5 Best WordPress Caching Plugins to Speed Up Your Website (2024)

Are you looking for the best WordPress caching plugin for your website?

Caching essentially stores a copy of your WordPress site on your server. When users open your website again, the server can simply pull up the copy so that visitors won’t have to reload your site from scratch again.

Since there are so many different WordPress cache plugins, it can feel overwhelming to pick the right option.

To help you pick the best plugin, we tested some of the best options on the market. While testing, we focused on a bunch of factors like ease of use, caching options, and price.

In this guide, we will show you the best WordPress caching plugins to improve your site speed.

Best WordPress Caching Plugins

In a hurry? No worries! Take a look at our top picks so you can quickly choose the right WordPress cache plugin for your site.

RankingPluginBest ForPrice
#1WP RocketOverall performance$59/yearRead more
#2WP Super CacheBeginnersFreeRead more
#3W3 Total CacheMultiple caching optionsFree + paidRead more
#4SucuriFirewall + caching$9.99/monthRead more
#5Cache EnablerSimple cachingFreeRead more

Why Use a WordPress Caching Plugin?

Using a WordPress caching plugin is one of the easiest ways to increase your website speed. When installed, the caching plugin will store parts of your site (like static HTML files, CSS files, JavaScript files, and so on) on your server.

Every time someone visits your site, they are served the cached version of the site instead of having to wait for your server to load the web pages from the beginning.

By storing cached pages of your site, a caching plugin drastically reduces the amount of processing required to serve those pages. Some cache content at the server level and others leverage browser caching. This leads to:

  • A faster website and better WordPress SEO. Search engines give a significant SEO advantage to fast web pages, which helps you rank higher in search results.
  • More power to handle larger amounts of traffic without slowing down your site performance or affecting your uptime. This is important if you run an eCommerce website.

Plus, caching can create a better user experience. Users who visit your site will experience faster page loading times, making it less likely for them to bounce from your site.

The probability of bounce increases 32% as page load time goes from 1 second to 3 seconds.

Think with Google

How We Tested and Reviewed WordPress Caching Plugins

  • We used them on our websites: Throughout the years, we have used different WordPress cache plugins on our websites to improve our site performance.
  • We tested the most popular plugins: We tested some of the most popular caching plugins on the market to see if they are worth the hype. We analyzed those plugins based on the following factors: ease of use, features, types of caching, and pricing.
  • We categorized them based on your needs: Not every website will benefit from the same caching plugin. That’s why we analyzed all the features to help you decide which tool fits your needs.

Why Trust WPBeginner

At WPBeginner, we are a dedicated team of people with over 16 years of experience in WordPress, design, and online marketing. Our WordPress experts extensively review each plugin or tool that is featured here and thoroughly test them on real websites. To learn more, you can see our complete editorial process.

1. WP Rocket

WP Rocket homepage

After trying out different plugins from this list, we found WP Rocket to be the overall best WordPress caching plugin. It is the easiest and most beginner-friendly option, which is a big help if you are new to this topic.

With WP Rocket, WordPress users can instantly cache their website with just one click. Once the plugin is activated, its crawler automatically fetches the WordPress pages to build up the cache.

The plugin then automatically turns on the recommended WordPress caching settings. These include page caching, cache preloading, Gzip compression, browser caching, and mobile device caching.

WP Rocket also offers optional features to configure to improve your website performance further. These include lazy loading images, CDN (content delivery network) support, minification, and more.

Pros of WP Rocket:

  • User-friendly plugin interface for beginners.
  • Essential caching functions are available out of the box, from page caching and browser caching to mobile device caching.
  • Additional optimization features to speed up your website loading time, like options to minify CSS files and enable a CDN integration.
  • Advanced features like database optimization, multisite support, and cache exclusions based on URLs or cookies.
  • Supports caching for dynamic content, including WooCommerce cart items.

Cons of WP Rocket:

  • Unfortunately, there is no free version, but WP Rocket does offer a 14-day money-back guarantee.

Pricing: Starting from $59 per year for one website, product updates, and support.

Why we chose WP Rocket: We have reviewed WP Rocket before at WPBeginner, and we strongly recommend it as the best WordPress caching plugin on the market. While there is no free version, its prices are quite affordable compared to other paid options.

You can also check out our step-by-step guide on how to install and set up WP Rocket in WordPress.

2. WP Super Cache

WP Super Cache plugin banner

WP Super Cache is a popular, free caching plugin created by Automattic, the company that runs WordPress.com.

This WordPress caching plugin has 2 caching settings: Expert and Simple. The first one is a much faster option than the other because it doesn’t execute any PHP scripts, but it does require you to edit your .htaccess file.

The second is a happy medium between fast site loading speed and ease of use. We recommend choosing this method instead if you are not confident editing your own .htaccess file.

Other than that, WP Super Cache includes other speed optimization features like cache preloading. This setting will generate cached files of your pages, posts, categories, and tags that are ready to load as soon as someone accesses the content for the first time.

Pros of WP Super Cache:

  • Completely free of charge.
  • Advanced caching settings are available, such as expert caching that can handle high traffic and custom caching options to control how the plugin works.
  • Cache garbage collection to delete old cache pages and keep your website updated.
  • Basic CDN support that will rewrite your website content URLs so that they are loaded with CDN.

Cons of WP Super Cache:

  • While the interface is pretty user-friendly, it uses technical terms designed for advanced users that may confuse beginners.

Pricing: Free plugin.

Why we chose WP Super Cache: If you are looking for a free caching plugin to speed up your website loading time, then WP Super Cache is a great choice.

For beginners, we recommend taking the time to explore the plugin and understand some of the more technical terms so that you can make the most of it. See our article on how to install and set up WP Super Cache for detailed instructions.

3. W3 Total Cache

W3 Total Cache's homepage

If you want to use a WordPress caching plugin with tons of optimization features, then check out W3 Total Cache.

Firstly, W3 Total Cache offers various types of caching besides page caching and browser caching. It also has object caching and database caching, both of which can speed up the execution of dynamic parts of your site (the ones that change frequently), not just the static ones.

Secondly, it has a Google PageSpeed Insights integration. During our testing, we liked that this feature lets you test your website speed without leaving your WordPress admin area, so it’s very user-friendly.

Other than that, you can find other speed enhancement features like CSS and JS file minification, lazy loading, and an image converter from other formats to WebP for better performance.

Pros of W3 Total Cache:

  • Multiple caching options are available for free: page caching, browser caching, opcode caching, database query caching, and object caching.
  • Google PageSpeed Insights integration to test website speed.
  • Image optimization features like lazy loading and WebP conversion.
  • Pro features in the premium version, like CDN support for the entire website and fragment caching for plugins and themes using the WordPress Transient API.

Cons of W3 Total Cache:

  • The feature set is comprehensive but can seem intimidating for beginners.
  • Unlike other plugins on the list, the preloading feature is not available out of the box.

Pricing: Free plugin available. The premium version’s plans start from $99 per year for one website license.

Why we chose W3 Total Cache: The free version of W3 Total Cache offers many caching options that you may not find in other plugins on the list, especially not in the free versions.

That said, the sheer range of features can feel overwhelming for beginners. For detailed setup instructions, see our article on how to install and set up the W3 Total Cache plugin.

4. Sucuri

Sucuri's CDN landing page

Sucuri is technically a WordPress firewall plugin, but it has built-in caching options to speed up your website in just a few clicks. We used to use Sucuri on WPBeginner, so we are very familiar with this plugin.

If you run an online store or a membership site, Sucuri recommends using Site Caching, which will keep your cache for up to 180 minutes. Meanwhile, blogs or news portals can use Minimal Caching, which will only cache your pages for up to 8 minutes before they are refreshed.

If you make significant changes to your site, then you can clear your old cache in one click. Sucuri also lets you clear the cache for a file or folder instead of the whole site. This allows you to optimize specific parts of your site without affecting its entirety.

Additionally, Sucuri supports Brotli, a data compression algorithm by Google that is faster than Gzip compression. It’s effective for compressing large files and reducing bandwidth usage. This means people with slow internet can visit your website quicker.

Pros of Sucuri:

  • Easy-to-use caching features that can be enabled in a few clicks.
  • User-friendly cache-clearing functions for the entire website and specific files or folders.
  • Support for compression algorithms, like the more popular Gzip, and a newer option like Brotli.
  • Reliable CDN service with worldwide network coverage, a great feature for websites with a global audience.
  • Top-notch security features like a web application firewall, malware removal, and DDoS protection.

Cons of Sucuri:

  • If you are just looking for a plugin with caching functionality, then Sucuri may seem like overkill.

Pricing: Comes in two types of subscription plans: Website Security Platform and Firewall with CDN. The first starts from $199.99 per year and includes the complete Sucuri security kit. The second starts from $9.99 per month and only comes with a firewall and CDN.

Why we chose Sucuri: If you are looking for a security plugin that doubles as an optimization plugin, then Sucuri is the perfect solution. Besides offering user-friendly caching features, you can get great protection without installing other plugins.

5. Cache Enabler by KeyCDN

The Cache Enabler plugin banner

Cache Enabler is a free WordPress caching plugin by KeyCDN, one of the most popular WordPress CDN services.

When we first activated the plugin, the plugin page looked rather simple. In reality, it’s quite powerful on its own. You can customize how long cached files last to suit your website needs instead of choosing a time period that’s been set for you.

There are also many cache-clearing settings that you can enable. For example, you can automatically clear the cache when a post type has been published, updated, or trashed so that your blog content stays up-to-date.

Pros of Cache Enabler:

  • Simple-to-use plugin page interface that’s easy to understand for beginners.
  • Gzip and Brotli compression support to reduce your file sizes.
  • Custom post types support, which is great for portfolios, online stores, membership sites, and so on.
  • A real-time display of your website’s cache size in the WordPress dashboard helps you keep track of how much space your cache is taking on your server.

Cons of Cache Enabler:

  • Compared to other caching plugins on the list, the features of Cache Enabler can seem pretty limited.

Pricing: Free plugin. However, if you choose to get KeyCDN as well, then the prices start from $0.04 per GB per month for the first 10 TB (for North America/Europe region). The cost varies by region, but you can use its pricing calculator to get estimates.

Why we chose Cache Enabler: As a free caching plugin, Cache Enabler is great at being easy to use yet packed with the most essential caching features. It can be a good option if you just need a simple caching solution.

Bonus Tip: Use Built-in Caching Features From Hosting Providers

These days, many WordPress hosting companies offer their own built-in caching solutions.

The benefit of using these built-in caching settings is that you won’t have to find or install a plugin yourself. Plus, the caching functionality is readily optimized for your hosting, so you may experience fewer errors.

The downside is that the feature set widely varies. Some may only include basic page caching, while others may have more advanced options. Depending on your website, you may not be able to rely solely on these built-in options.

That being said, we still think these hosting caching settings are worth talking about because they are very easy to enable. Let’s look at the caching features offered by some of the most popular web hosting providers on the market.

Bluehost

Bluehost is one of the biggest hosting companies in the world and an officially recommended WordPress hosting provider. Their hosting plans include built-in caching that you can enable from your hosting dashboard.

Bluehost's caching options

You can select one of these caching levels:

  • Assets Only – For eCommerce and sites that update frequently or display real-time information, you can use this level to cache your site’s static assets for 5 minutes.
  • Assets & Web Pages – If you have a WordPress blog, an educational site, or a website that updates at least once a week, consider using this level to cache static assets for 6 hours and other web pages for 5 minutes.
  • Assets & Web Pages – Extended – For portfolios or websites that update every month or less frequently, you can choose this option to cache static assets for 1 week and web pages for 5 minutes.

If you compare Bluehost’s caching options to the other plugins on the list, they may seem basic. But they also offer a Cloudflare CDN integration to boost your website performance further.

SiteGround

We use SiteGround to power WPBeginner and have seen many performance improvements since we switched. If you are curious, then you can check out our article on why we switched to SiteGround for more information.

By default, SiteGround offers 3 caching solutions: Nginx Direct Delivery for static content, Dynamic Cache, and Memcached (optional).

The last two are caching modules that not many WordPress hosting offers by default, which is what makes SiteGround so powerful. In fact, they can improve your website speed anywhere from 50% to 500%.

SiteGround's caching settings

For WordPress sites, SiteGround recommends installing their Speed Optimizer plugin to speed up your website by 20%. The plugin can also compress image sizes by up to 85% without losing quality.

Overall, if you use SiteGround, you really won’t need any caching plugins like WP Rocket or others.

Hostinger

Hostinger is one of the fastest-growing WordPress hosting providers in recent years. They are powered by the LiteSpeed Web Server, so their caching settings also come from LiteSpeed.

From the get-go, Hostinger offers two types of caching modules: the LiteSpeed Cache plugin and the Object Cache.

Hostinger's caching settings

The LiteSpeed Cache plugin is included in all plans and offers page caching, cache preloading, and image compression for your website. By default, Hostinger will update your cache every 30 minutes.

Meanwhile, the Object Cache will cache your database queries and is only available for Business plan users or above. It has been said to improve website speed by up to 3 times.

WP Engine

WP Engine is a managed WordPress hosting company, which means they will take care of most of your back-end maintenance tasks as much as possible. As a result, you won’t have to handle them as much.

Since WP Engine is a more premium hosting service, it comes with tons of caching features by default. These include page caching, CDN caching, object caching, and local browser caching.

You can also set exclusion rules for dynamic content, like shopping cart, checkout, or login pages. If you need to clear your cache, then you can just log in to your user portal and click a few buttons.

What Is the Best Cache Plugin for WordPress?

After comparing the different options on the list, we found that the best WordPress caching plugin is hands down WP Rocket. It has a great balance between being beginner-friendly and powerful to elevate your website performance.

If you are looking for a free caching plugin, then we recommend W3 Total Cache. It has plenty of caching features out of the box, from basic to advanced.

We also recommend checking out the caching modules that hosting providers like Bluehost have to offer. These may already be good enough to speed up your website, and they are already customized to suit your hosting needs.

Best WordPress Caching Plugins: FAQs Answered

Now that we’ve covered the list of best WordPress caching plugins, let’s answer some frequently asked questions.

Do I need a caching plugin?

Yes, we strongly recommend installing a WordPress caching plugin, as it can significantly improve your WordPress site’s speed.

Caching can reduce server load, improve the user experience by reducing load times, and potentially boost your site’s SEO rankings due to improved speed.

However, if your hosting provider offers built-in caching solutions like SiteGround, then you might not need to install a separate caching plugin.

Should I use multiple cache plugins in WordPress?

Using multiple caching plugins simultaneously can lead to conflicts and potential issues with your site. We generally recommend using only one caching plugin to avoid these problems.

However, if you need to use multiple caching tools for specific purposes, make sure they can complement each other and do not result in the same action being performed twice.

Which is better: WP Super Cache or W3 Total Cache?

Both WP Super Cache and W3 Total Cache are highly-rated WordPress caching plugins. However, the choice between the two depends on your specific needs and preferences.

WP Super Cache is a free plugin with some basic and advanced caching features. But some settings require some technical knowledge, so we don’t recommend it if you are a complete beginner.

W3 Total Cache is a freemium plugin with a comprehensive set of caching settings. The abundance of features may intimidate beginners, but the ease of use is generally much better than WP Super Cache.

Check Out More Guides to Speed Up WordPress

We hope this article helped you find the WordPress caching plugin to speed up your website. You may also want to see our list of the best WordPress plugins for business websites, and the best WordPress SEO plugins to help you boost your rankings.

If you liked this article, then please subscribe to our YouTube Channel for WordPress video tutorials. You can also find us on Twitter and Facebook.

Disclaimer: We also looked at other WordPress cache plugins and solutions for this article, including WP Fastest Cache, Hummingbird, and WP-Optimize. However, we picked only the very best WordPress caching plugins to help you avoid choice paralysis.

The post 5 Best WordPress Caching Plugins to Speed Up Your Website (2024) first appeared on WPBeginner.

How to Install and Setup W3 Total Cache for Beginners

Do you want to install and set up W3 Total Cache on your WordPress website?

W3 Total Cache is a popular WordPress caching plugin that helps you to improve your website speed and performance.

In this beginner’s guide, we’ll show you how to easily install and set up W3 Total Cache on your WordPress website.

W3 Total Cache installation and setup guide for WordPress beginners

Editor’s Note: We don’t use W3 Total Cache on our website anymore and have switched to WP Rocket which is a premium caching plugin. W3 Total Cache is still a fine solution that works well.

What is W3 Total Cache?

W3 Total Cache is one of the best WordPress caching plugins that allows you to easily improve WordPress performance and speed.

By default, WordPress uses PHP to dynamically generate each page on your website when it is requested by a user.

PHP is a server-side programming language. This means each user request increases the load on your server. This affects your website’s performance, user experience, and SEO.

WordPress caching plugins help you reduce this by skipping PHP and serving a cached copy of your webpage.

How caching works

It also allows you to easily connect your website to a CDN (content delivery network) to further improve your website performance.

Installing W3 Total Cache in WordPress

Before you install the W3 Total Cache plugin in WordPress, you’ll need to make sure that you deactivate any other caching plugin on your website. This would help you save server resources and prevent any plugin conflicts.

After that, you can go ahead and install and activate the W3 Total Cache plugin. For more details, see our step-by-step guide on how to install a WordPress plugin.

Upon activation, W3 Total Cache will add a new menu item labeled ‘Performance’ to your WordPress admin sidebar. Clicking on it will launch the plugin’s setup wizard.

W3 Total Cache set up

Simply click on the Next button to continue.

First, you will be asked to turn on Page Cache. Click on the Test Page Cache button to continue.

Configure page cache

W3 Total Cache will show you different storage engine options. You need to choose one that saves you the most time. Usually, it will be the ‘Disk: Enhanced’ option for most shared hosting platforms.

Click on the Next button to continue.

Now, you will be given the option to Test Database Cache. We recommend choosing None. For most small to medium sized websites your MySQL server will be able to fetch data more quickly than the Database cache.

Database cache

Click on the Next button to move on to the next step.

This will bring you to the Object Cache section. Object Caching allows W3 Total Cache to store database queries for dynamic pages and reuse them to improve performance.

Object cache in W3 Total Cache

If the test result shows barely a few milliseconds difference then you can choose None.

Click on the next button to continue.

After that, click on the Test Browser Cache button and then select the ‘Enabled’ option under the test results.

Browser cache

This option requests user’s browsers to store a copy of the web page for a limited time. Loading a page from browser cache is much faster than loading it from your web server’s cache.

Click on the next button to move on to the next step.

Lastly, the setup wizard will ask you to enable lazy loading for images.

Now, WordPress comes with built-in lazy loading for images. However, some older browsers may not have support for that feature.

W3 Total Cache uses JavaScript to add lazy loading for images, which can be even faster and more efficient.

Enable Lazy Loading

After that, click on the Next button to finish the setup wizard and view W3 Total Cache dashboard.

Advanced Caching Options in W3 Total Cache

The basic settings would work for most websites. However, there are many advanced options that you can configure to further improve performance.

Let’s take a look at the most important ones.

Minifying JavaScript and CSS in W3 Total Cache

The term ‘minify’ is used to describe a method that makes your website file sizes smaller. It does this by removing white spaces, lines, and unnecessary characters from the source code.

Note: Minifiying JS and CSS files can potentially break your website. If you turn it on and your website doesn’t look right, then simply disable these options.

W3 Total Cache allows you to easily minify JavaScript, CSS, and HTML source code as well. However, we recommend only minifying JavaScript and CSS files.

Simply head over to Performance » Minify page and scroll down to the JS section.

Enable JS minify in W3 Total Cache

Check the box next to ‘JS minify settings’ to enable it.

Now, scroll down to the CSS section and enable CSS minify settings the same way.

Enable CSS minify

Don’t forget to click on the Save All Settings button to store your settings.

For alternate methods, see our guide on how to minify JavaScript and CSS files in WordPress.

Enable CDN Support in W3 Total Cache

CDNs or content delivery networks help you further improve your website performance by serving static files like images, CSS, JavaScript from a global network of servers.

This reduces the load on your WordPress hosting server and improves page load speed.

W3 Total Cache comes with built-in support for various CDN platforms.

We recommend using Bunny.net which is the best CDN solution on the market. This is what we use for our OptinMonster website.

First, you need to signup for a Bunny.net account. After signup, you need to create a Pull Zone for your website.

Bunny CDN dashboard

A pull zone adds a hostname to Bunny.net CDN. This hostname is then used to serve static files for your website.

Add a name for your pull zone and then provide your website’s domain name.

Create pullzone

After adding the pullzone, you need to visit the Performance » General Settings page and scroll down to the CDN section.

Enable CDN

Check the Enable box next to the CDN option and choose Generic Mirror next to the CDN Type option.

Don’t forget to click on the Save All Changes button to store your settings.

Next, you need to visit the Performance » CDN page and scroll down to the Configuration: Objects section.

Add CDN hostname

From here, you need to add the hostname you created earlier for your pullzone and click on the test mirror button.

W3 Total Cache will check the availability of your hostname, and will show the Test Passed message when it’s successful.

You can now click on the Save All Changes button to store your settings.

W3 Total Cache will now start serving your static resources from CDN server.

W3 Total Cache also works well with Cloudflare free CDN. Alternately, you can also use it with Sucuri which is the best website firewall service with built-in CDN service.

Troubleshooting W3 Total Cache Issues

Once you have configured W3 Total Cache properly, it should work seamlessly in the background to improve WordPress speed and boost performance.

Occasionally, you may come across issues where you don’t see changes you made to your website right away, or a plugin may not be working properly.

Most common reason for those issues is that you are probably seeing an old cached version of your website.

This can be easily fixed by clearing cache in WordPress.

Simply click on the Performance menu at the top and then select Purge All Caches option. W3 Total Cache will clear all cached content on your website.

Clear all cache in W3 Total Cache

If you are still seeing the old version of your website, then try clearing your browser cache too.

We hope this article helped you install and setup W3 Total Cache in WordPress. You may also want to see our complete WordPress security guide for beginners to strengthen your website security, or check out our comparison of the best GoDaddy alternatives that are cheaper and more reliable.

If you liked this article, then please subscribe to our YouTube Channel for WordPress video tutorials. You can also find us on Twitter and Facebook.

The post How to Install and Setup W3 Total Cache for Beginners first appeared on WPBeginner.

How to Properly Install and Setup WP Rocket in WordPress

Do you want to properly install and setup WP Rocket plugin in WordPress?

WP Rocket is the best WordPress caching plugin in the market because it offers the most comprehensive set of tools to help speed up your website.

However, many beginners are not familiar with the techy lingo and may find it difficult to decide which plugin options they should turn on.

In this tutorial, we will show you how to easily install and setup WP Rocket plugin in WordPress. We will walk you through complete WP Rocket plugin settings, so you can get maximum performance benefits.

How to easily install and setup WP Rocket plugin in WordPress

Why Use WP Rocket?

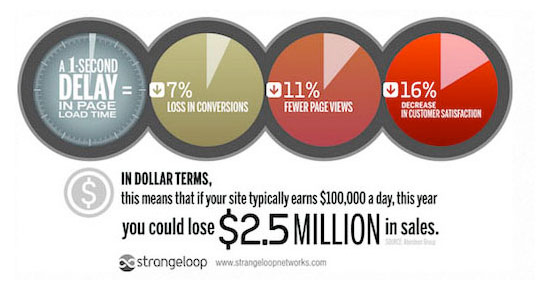
No one likes slow websites. In fact, a performance study found that a single second delay in page load time costs 7% less conversions, 11% fewer page views, and 16% decrease in customer satisfaction.

Strangeloop Study

And it’s not just users, search engines like Google also don’t like slow websites. They give a priority to faster websites in search rankings.

This is where WP Rocket comes in.

It is the best WordPress caching plugin on the market and allows you to quickly improve your WordPress website’s speed and performance.

Here is how it works.

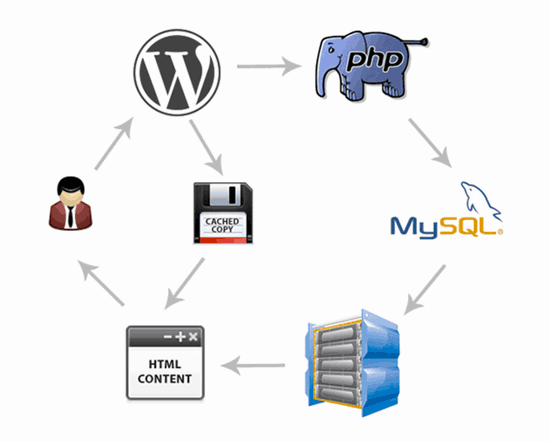
WordPress is a dynamic content management system. Every time a user visits your website, WordPress fetches the content from your database, generate a page on the fly, and send it back to the user.
WordPress caching

This process takes up WordPress hosting server resources. If a lot of people visit your website at once, then this would slow down your website.

WP Rocket makes WordPress bypass all this.

It crawls and saves a static copy of your pages in the cache and allows WordPress to show the cached page to the user instead of generating a page on the fly.

This frees up server resources on your website and improves overall page load time throughout your website.

We use WP Rocket on many of our own websites including WPForms, OptinMonster, etc.

That being said, let’s take a look at how to easily install and set up WP Rocket on your WordPress website.

Step 1. Installing WP Rocket Plugin in WordPress

The first thing you need to do is install and activate the WP Rocket plugin. For more details, see our step by step guide on how to install a WordPress plugin.

WP Rocket is a premium plugin, but the best part is that all features are included in their lowest plan.

Once installed and activated, the WP Rocket plugin works out of the box, and it will turn on caching with optimal settings for your website.

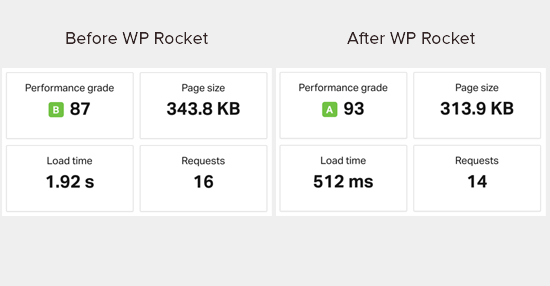
We ran speed tests on our demo site before and after installing WP Rocket. The performance improvement was incredible with just out of the box settings.

Speed test results before and after installing WP Rocket

The performance improvement is instantly noticeable because WP Rocket doesn’t wait for user requests to start caching pages. It proactively crawls your website and preloads pages in the cache.

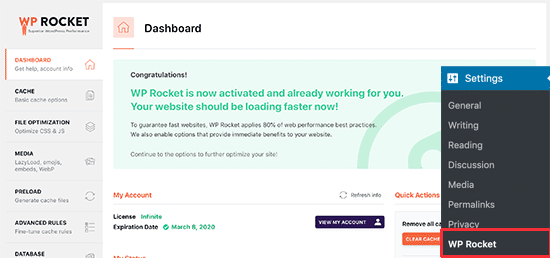
You can see caching status by visiting WP Rocket dashboard located under Settings » WP Rocket page.

WP Rocket dashboard

Now that you have installed WP Rocket, let’s take a look at other WP Rocket options and how to set them up to further improve your website speed.

Step 2. Set up Caching Options in WP Rocket

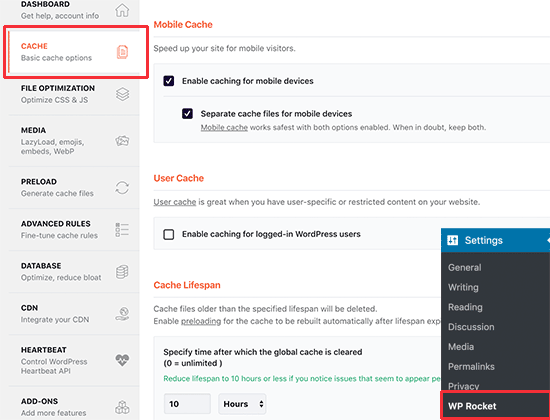
Fist, you need to visit Settings » WP Rocket page and click on the ‘Cache’ tab.

Setting up cache in WP Rocket

WP Rocket has already enabled page caching by default, but you can tweak the settings to further improve your website speed.

1. Mobile Caching

You’ll notice that mobile caching is turned on by default here. However, we recommend you to check the ‘Separate cache files for mobile devices’ option as well.

This option allows WP Rocket to create separate cache files for mobile users. Checking this option ensures that mobile users get the full cached mobile experience.

2. User Cache

If you run a website where users need to login to your website to access certain features, then you need to check this option.

For example, if you run a WooCommerce store or a membership website, then this option will improve user experience for all logged in users.

3. Cache Lifespan

Cache lifespan is the time you want to store the cached files on your website. The default limit is set to 10 hours which would work for most websites.

However, you can set it to a lower value if you run a very busy site. You can also set it to a higher value if you don’t update your website frequently.

After the lifespan time has passed, WP Rocket will delete the cached files. It will also immediately start preloading the cache with updated content.

Don’t forget to click on the Save Changes button to store your settings.

Step 3. Minifying Files using WP Rocket

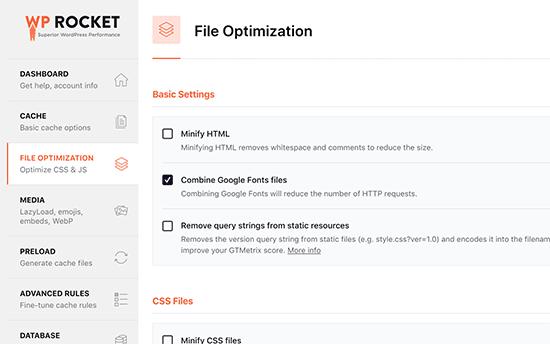
WP Rocket enables you to minify static files such as JavaScript and CSS stylesheets. You can simply switch to the File Optimization tab and check the boxes for the file types that you want to be minified.

Minifying files in WP Rocket

Minifying static content makes those file sizes smaller. In most cases, this difference is too small to make any noticeable impact on your website’s performance.
However if you run a large traffic site, then this can definitely have a big impact in reducing your overall bandwidth usage and saving on hosting costs.

The one caveat is that minifying files can also have unexpected consequences like files not loading or not working as intended.

If you turn this setting on, then please make sure to thoroughly review your website pages to make sure everything is working as intended.

Step 4. Lazy Load Media to Improve Page Load Speed

Images are often the second heaviest item on a page after video. Images take more time to load than text and increase the overall page download size.

Most popular websites now use a technique called lazy loading to delay image downloads.

Instead of loading all your images at once, lazy loading downloads only the images that will be visible on the user’s screen. This not only makes your pages load fast, but it also feels faster to the user.

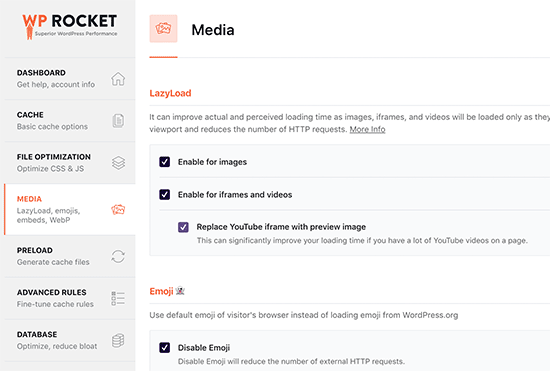
WP Rocket comes with a built-in lazy loading feature. You can enable lady loading for images by simply switching to the Media tab on the plugin’s settings page. You can also enable lazy loading for embeds like YouTube videos and iframes.

Lazy load images and embeds in WordPress

Note: While lazy loading images will help improve perceived website speed, you should always save and optimize images for web to get maximum results. Here’s how to easily optimize images for web performance (step by step).

Step 5. Fine Tune Preloading in WP Rocket

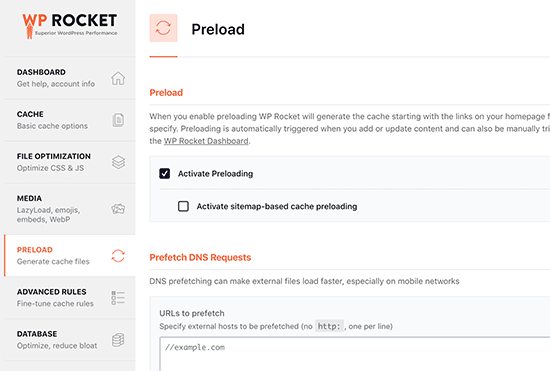
Next, you can review the preloading settings in WP Rocket by switching to the ‘Preloading’ tab. By default, the plugin starts crawling your homepage and follow links to preload cache.

Preload cache settings

Alternately, you can tell the plugin to use your XML sitemap to build cache.

You can turn off the preloading feature as well, but we do not recommend that.

Turning off preloading will tell WordPress to only cache pages when they are requested by a user. This means the first user to load that specific page will always see a slow website.

Editors note: Please keep preloading on to get maximum performance results.

Step 6. Set up Advanced Caching Rules

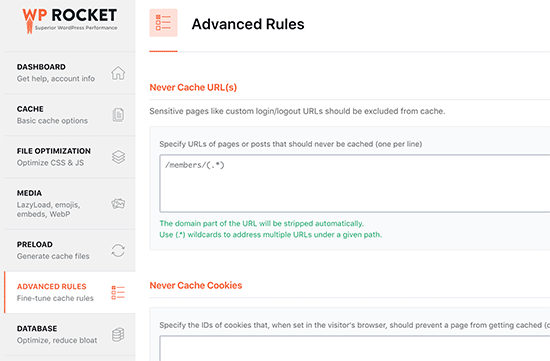
WP Rocket gives you full control over caching. You can switch to the Advanced Rules tab on the settings page to exclude pages that you don’t want to be cached.

Advanced caching rules

You can also exclude cookies, user agents (browsers and device types), and automatically rebuild cache when you update specific pages or posts.

The default settings would work for most websites. If you are unsure about these options, then you need to leave them blank.

This settings area is for developers and power users who need custom settings because they likely have a complex website setup.

Also See: 19 types of websites you can build with WordPress.

Step 7. Performing Database Clean up using WP Rocket

WP Rocket also makes it easy to clean up the WordPress database. It has very little to no effect on your website performance, but you can still review these options if you want to.

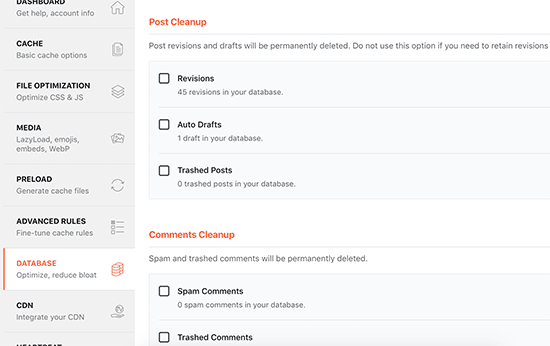
You need to switch to the Database tab on the plugin settings page. From here you can delete post revisions, drafts, spam, and trash comments.

Database clean up

We don’t recommend deleting post revisions because they can be really useful in undoing changes to your WordPress posts and pages in the future. You also don’t need to delete spam and trashed comments as WordPress automatically clean them up after 30 days.

Step 8. Configure Your CDN to Work with WP Rocket

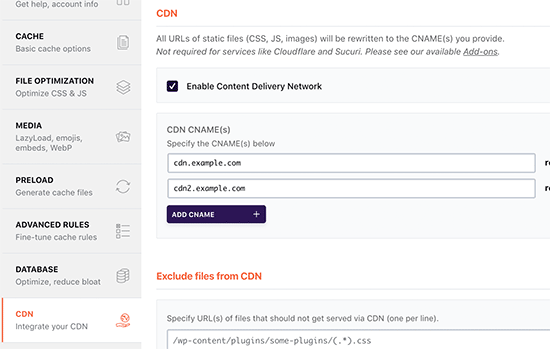
Next, you need to switch to the CDN tab. If you are using a CDN service for your WordPress site, then you can set it up to work with WP Rocket.

Set up CDN service

CDN or content delivery network enables you to serve static files from a network of servers spread across the globe.

This speeds up your website because it allows users browser to download files from the server closest to their location. It also reduces your hosting server load and makes your website more responsive.

For more information, see our guide on why you need a CDN service for your WordPress site.

We use MaxCDN by StackPath on our websites. It is one of the best CDN service for WordPress beginners.

Alternately, you can sign up for Sucuri, which is the best WordPress firewall and security plugin. Sucuri’s cloud-based firewall gives you a powerful CDN service to serve your static files.

If you are looking for a free alternative, then Cloudflare would work as well. However, Cloudflare’s free CDN offers limited protection against DDoS attacks, and the free plan is quite limited in terms of features.

WP Rocket has separate addons to easily set up Sucuri and Cloudflare on your website (more on this later).

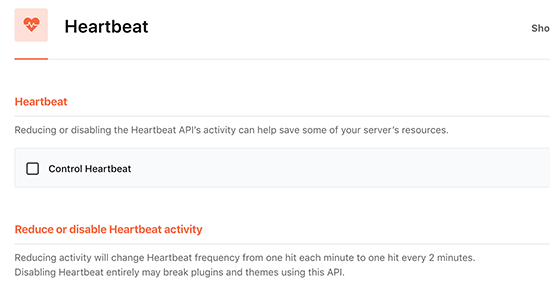
Step 9. Reducing Heartbeat API Activity in WordPress with WP Rocket

Heartbeat API allows WordPress to send a periodic request to the hosting server in the background. This allows your website to perform scheduled tasks.

For example, when writing blog posts the editor uses heartbeat API to check connectivity and post changes.

Controling heartbeat API in WordPress using WP Rocket

You can click on the Heartbeat API tab to control this feature and reduce the heartbeat API frequency.

We don’t recommend deactivating the Heart Beat API because it offers some very useful features. However you can reduce its frequency to improve performance specially for larger sites.

Step 10. WP Rocket Addons

WP Rocket also comes with some ready to deploy features available as Addons. Let’s take a look at currently available addons on this list.

1. Google Analytics Addon

The Google Analytics add-on for WP Rocket allows you to host Google Analytics code on your own server. This does not have any significant performance improvement but some users want it to get a 100% page speed score.

This feature is compatible with popular Google Analytics plugins like MonsterInsights and ExactMetrics.

2. Facebook Pixel

If you are using the Facebook pixel for user tracking, then this addon will host the pixels locally on your server. Again, this will improve your pagespeed score but may not have any actual impact on website speed.

3. Varnish Addon

If your WordPress hosting company uses Varnish cache, then you need to enable this addon. This will ensure that the Varnish cache is cleared when WP Rocket clears its cache.

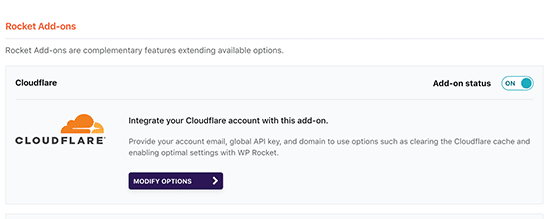
4. Cloudflare

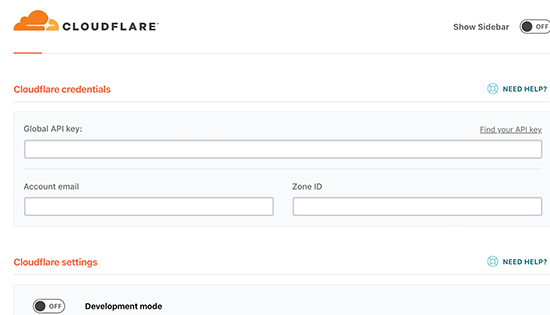
If you are using Cloudflare CDN, then you need this addon to make it work alongside WP Rocket. Simply enable the addon and click on the ‘Modify options’ button.

Enabling Cloudflare addon

After that, you need to enter your account credentials to connect WP Rocket with your Cloudflare account.

Cloudflare settings

5. Sucuri

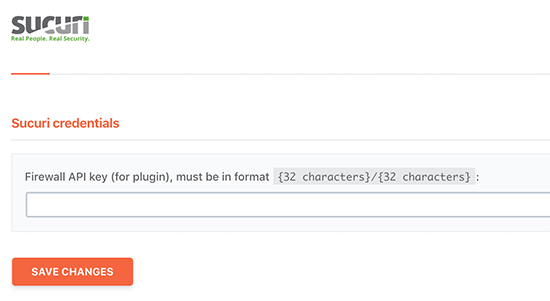
If you are using Sucuri, then you need to enable this addon and click on the ‘Modify options’ button. After that, enter your Sucuri account’s API key to connect your account.

Sucuri WP Rocket addon

Step 11. Managing Your WP Rocket Cache

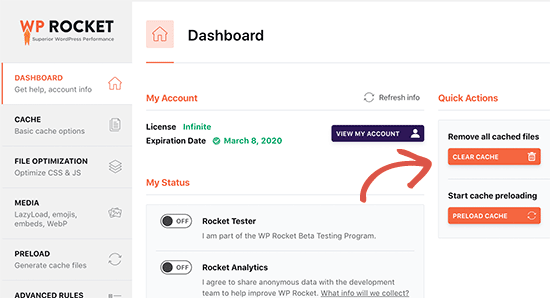
WP Rocket also makes it easy for admins to manage and clear WordPress cache. Simply go to the plugins settings page, and you’ll find the options to clear WP Rocket cache on the Dashboard tab.

Clear WP Rocket Cache

You can also start a preloading sequence to rebuild the cache on demand.

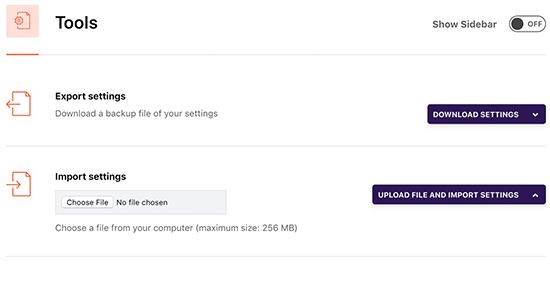
The plugin also makes it easier to import and export plugin settings. You can switch to the tools to easily export and import plugin settings. This is helpful when moving WordPress from local server to a live website and/or when moving WordPress to a new domain.

Import export settings

Below that, you’ll find the option to Rollback plugin to an earlier version. This comes in handy if a WP Rocket update didn’t work as expected.

If you want to have the same rollback feature for all your plugins, then see our guide on how to rollback plugins to older version in WordPress.

WP Rocket FAQ – Frequently Asked Questions

As WP Rocket has grown in popularity, we have answered many questions related to the WP Rocket WordPress caching plugin. Here are some of the top WP Rocket questions:

1. Is WP Rocket free? Is there a free version of WP Rocket available?

No, WP Rocket is a premium WordPress caching plugin. There is no free version or free trial available. They do offer a 14 day money back guarantee.

You may find a nulled version of WP Rocket for free, but we strongly recommend against using those because sometimes hackers use nulled version as a bait to hack your website.

See 9 reasons why you should always avoid nulled version of WordPress themes and plugins.

2. Is WP Rocket worth the price?

Yes it is worth every penny. We are paying customers of WP Rocket and use it successfully on many of our websites including WPForms, OptinMonster, and others.

We also have plans to switch to WP Rocket on WPBeginner in the near future as well. We are closely working with their team to get one particular setting included for it to work on our complex multi-server enterprise hosting setup.

Curious to see what WPBeginner hosting setup looks like? Check out the detailed case study here.

3. Do I need to use WP Rocket with managed WordPress hosting platforms?

The short answer is yes. You can and should use WP Rocket in combination with built-in caching offered by your managed hosting company to unlock additional performance improvements.

A lot of managed WordPress hosting companies like WP Engine, SiteGround, Bluehost, etc have their own caching plugins built in.

WP Rocket plays nicely along those built-in caching options provided by your managed hosting provider while helping you get additional performance benefits with features like CDN, minifying files, lazy loading, smart cache preloading, and more.

4. How to check if WP Rocket is working and caching pages?

To check if WP Rocket is working properly, you need to log out of your site or open it in an incognito window.

Next, you need to open the browser’s source view of the page, and scroll to the bottom. At the very end, you should see a text like: “This website is like a rocket …”

If that text is there, then you know WP Rocket is working properly and caching pages.

5. What makes WP Rocket better than other caching plugins?

In our opinion, WP Rocket is better than other WordPress caching plugins like W3 Total Cache, WP Super Cache, etc because it offers the most comprehensive set of features, and it is regularly updated to keep up with modern browser standards.

This is the #1 reason why we have started switching all of our sites to use WP Rocket, and soon WPBeginner will be using WP Rocket as well.

We hope this guide helped you learn how to install and set up WP Rocket plugin in WordPress. You may also want to see our ultimate guide on how to speed up WordPress, and our list of the must have WordPress plugins.

If you liked this article, then please subscribe to our YouTube Channel for WordPress video tutorials. You can also find us on Twitter and Facebook.

The post How to Properly Install and Setup WP Rocket in WordPress appeared first on WPBeginner.