7 Best WordPress Backup Plugins Compared (Pros and Cons)

Are you looking for the best WordPress backup plugin for your website?

Creating regular WordPress backups is the best thing you can do for your website security. Backups give you peace of mind and can save you in catastrophic situations, like when your site gets hacked or you accidentally lock yourself out.

There are several free and paid WordPress backup plugins, most of which are fairly easy to use.

In this article, we will share some of the best WordPress backup plugins for small businesses.

Best WordPress Backup Plugins

Important: While many WordPress hosting providers offer limited backup services, we always recommend that our users not rely solely on them. At the end of the day, it is your responsibility to keep regular backups of your website.

If you are not already backing up your WordPress website, then you should pick one of these best WordPress backup plugins and start using it right away.

1. Duplicator Pro

Duplicator

Duplicator Pro is a powerful and user-friendly WordPress backup plugin used by over 1.5 million website owners. It makes it easy to back up, migrate, and clone your WordPress site, even for beginners.

You can create manual or scheduled WordPress backups and safely store them on popular cloud services like Dropbox, Google Drive, FTP, OneDrive, and Amazon S3.

You can also view all of your backups right from your WordPress dashboard, which makes backup management simple.

When you need to restore a backup, the Duplicator Recovery Wizard will walk you through restoring your backup files, step by step.

Duplicator comes with all of the backup features you need, including complete WordPress files & database backups, recovery points, archive encryption for enhanced security, and more.

It also offers advanced site migration features such as an easy migration wizard, a streamlined installer, server-to-server imports, multisite network migrations, customizable pre-configured sites, large site support, and more.

At WPBeginner, we have used Duplicator for various website migrations, and it’s super reliable, especially for complex migrations.

Pricing: Starts at $49.50 per year for unlimited backups for up to 2 sites. There’s also a free version of Duplicator that you can use to get started.

Review: Duplicator Pro is a top-rated WordPress backup and migration plugin. It has over 1.5 million active installs and an average 4.9 out of 5 star rating. The free version has everything you need to get started. But we recommend upgrading to the premium version to access features like cloud storage, scheduled backups, and more.

2. UpdraftPlus

UpdraftPlus best WordPress backup plugin

UpdraftPlus is the most popular free WordPress backup plugin available on the internet. It is used by more than 3 million websites.

UpdraftPlus allows you to create a complete backup of your WordPress site and store it on the cloud or download it to your computer.

The plugin supports scheduled backups as well as on-demand backups. You also have the option to choose which files you want to backup.

It can automatically upload your backups to Dropbox, Google Drive, S3, Rackspace, FTP, SFTP, email, and several other cloud storage services (see our step-by-step guide on how to backup & restore your WordPress site with UpdraftPlus).

Besides backing up each WordPress website, UpdraftPlus also allows you to easily restore backups directly from your WordPress admin panel.

UpdraftPlus also has a premium version with add-ons to migrate or clone websites, database search and replace, multisite support, and several other features. The premium version also gets you access to priority support.

Pricing: Free (UpdraftPremium Personal costs $70 per year).

Review: UpdratPlus is one of the most loved WordPress backup plugins on the market. It has over 3 million active installs and an average 4.8 out of 5 star rating. While the free version has a lot of features, we recommend upgrading to UpdraftPlus premium to unlock all its powerful backup features.

3. Jetpack VaultPress Backup

Jetpack Backups

Jetpack VaultPress Backup is a popular WordPress backup plugin by Automattic, the company created by WordPress co-founder Matt Mullenweg.

This plugin was originally launched under the name VaultPress, which is what we use on WPBeginner, but now it’s been redesigned and rebranded as Jetpack Backups. We have started to switch several of our websites to the new Jetpack backup platform because it’s more up-to-date.

The Jetpack backup plugin offers automated daily and real-time cloud backup solutions without slowing down your site. You can easily set up Jetpack backups and restore from backups within a few clicks.

The higher plans of Jetpack also offer security scans and several other powerful features.

There are a few downsides to using Jetpack backups for beginners.

First, a recurring expense can add up with multiple WordPress sites because you pay per site.

Second, the purchase flow is quite complicated, and they force you to install the Jetpack plugin to purchase a subscription. The good news is that you can manually disable all the unnecessary features of Jetpack except for backups, so they don’t slow down your site.

Lastly, backups are stored for only 30 days on the lower plans. If you want an unlimited backup archive, you will have to pay $4.95 per month per website, which is significantly more expensive for beginners when compared to other solutions listed here.

WPBeginner website still uses VaultPress (an older version of Jetpack) because we got grandfathered in at their older pricing, which was much more favorable.

However, even at the higher price, Jetpack backup is completely worth it due to the stellar reputation of Automattic. This is why we pay for higher priced real-time backup plans for our new sites like All in One SEO because it’s an eCommerce store, and we want maximum protection.

Pricing: From $14.95 per month for a daily backup plan or $59.40 if you pay for a full year in advance.

Review: Jetpack VaultPress Backup is a premium backup service with a premium price point. If you are already using JetPack for other features like JetPack CDN for photos, social media promotion, and Elastic search, then it’s good value to purchase their Complete plan bundle. If you are just after real-time cloud backups for WordPress, then you can also look at BlogVault in our list because they offer more affordable pricing for beginners.

4. BackupBuddy

BackupBuddy WordPress Backup Plugin

BackupBuddy is one of the most popular premium WordPress backup plugins used by over half a million WordPress sites. It allows you to easily schedule daily, weekly, and monthly backups.

With BackupBuddy, you can automatically store your backups in cloud storage services like Dropbox, Amazon S3, Rackspace Cloud, FTP, and Stash (their cloud service) and even email it to yourself.

If you use their Stash service, you can also do real-time backups.

The biggest advantage of using BackupBuddy is that it is not a subscription-based service, so there is no monthly fee. You can use the plugin on the number of websites mentioned in your plan.

You also get access to premium support forums, regular updates, and 1GB of BackupBuddy Stash storage to store your backups. In addition, their iThemes Sync feature lets you manage up to 10 WordPress sites from a single dashboard.

You can even use BackupBuddy to duplicate, migrate and restore websites.

Pricing: $99 for Basic Plan (1 Site License).

Review: BackupBuddy is a cost-effective premium WordPress backup solution for you. It has a full set of features you will need to back up, restore, and move a WordPress site. In a nutshell, it’s a powerful UpdraftPlus and VaultPress alternative that you can use.

5. BlogVault

BlogVault Best Backup Service for WordPress

BlogVault is another popular WordPress backup service for WordPress. It’s a Software as a Service (SaaS) solution rather than just a WordPress plugin. It creates offsite backups independently on BlogVault servers, so there will be zero load on your server.

BlogVault creates an automatic backup of your website daily and also allows you to manually create unlimited on-demand backups. It features smart incremental backups that sync only incremental changes for minimal server load. This ensures optimal performance for your WordPress site.

Besides backups, it helps you to recover your website easily. You can store 90 days backup archive on lower plans and a 365-day backup archive on the higher plan, so you can recover your site from any mishap.

It also has a built-in staging site feature to let you test your website easily. Plus, they provide an easy option to migrate your website to another host.

BlogVault features are very promising for small businesses, and their real-time backup plan is affordable compared to Jetpack backups (half the price). However, if you compare it to self-hosted plugins like Updraft or BackupBuddy, the cost per site is more expensive.

Pricing: $89 per year for Personal Plan 1 Site License for daily backups. $299 per year for high frequency daily backups.

Review: BlogVault is an easy-to-use WordPress backup solution. It creates offsite backups, so your website server will not be overloaded with your backups. The pricing seems very affordable for small businesses that want real-time backups but don’t want to pay the premium pricing of Jetpack backups.

6. BoldGrid Backup

BoldGrid Backup WordPress plugin

BoldGrid Backup offers Total Upkeep, an automated WordPress backup solution by BoldGrid.

It allows you to easily create your website backups, restore your site after it crashes, and even use it to move your site when switching hosts. You can set up automated backups or manually create backups with one click.

Total Upkeep comes with an automated fault protection feature that automatically creates a backup of your site before it updates. If an update fails, it automatically rolls back your WordPress site to the last backup. It’s a great feature that protects you against update errors.

With BoldGrid’s Total Upkeep, you can store backup archives on your dashboard and in remote storage locations like Amazon S3, FTP, or SFTP.

Pricing: $2.50 per month billed annually (Includes all of BoldGrid Premium tools & Services).

Review: BoldGrid Total Upkeep Backup is a simple WordPress backup plugin you can use to create your website backups. If you want to take advantage of their bundle plan, including other powerful tools, then you will need to purchase the BoldGrid Premium Connect Key. This plan also includes the WordPress website builder, costing $60 per year.

7. BackWPup

BackWPup free WordPress backup plugin

BackWPup is a free plugin that allows you to create complete WordPress backups for free and store them on the cloud (Dropbox, Amazon S3, Rackspace, etc.), FTP, email, or on your computer.

It is extremely easy to use and allows you to schedule automatic backups according to your site’s update frequency.

Restoring a WordPress site from a backup is also very simple. The BackWPup Pro version comes with priority support, the ability to store backups on Google Drive, and other cool features.

Pricing: Free (Premium plan is also available).

Review: Used by over 700,000 websites, BackWPup is a great alternative to other backup plugins in the list. The premium version of the plugin adds more powerful features, including easy and quick website restoration from the backend with a standalone app.

Which Is the Best WordPress Backup Plugin?

Each WordPress backup plugin in our list has pros and cons, but all plugins offer complete WordPress file backup and full database backup features.

We use Jetpack Backups for two main reasons. It is extremely easy to use, and it offers real-time incremental backups.

This means that instead of backing up all of your files every day or every hour, it only creates a backup of what has been updated literally within minutes of the update. This is ideal for a large website like ours because it allows us to use our server resources efficiently.

However, if you run a small to medium size website and hate paying high monthly fees, we recommend the popular Duplicator plugin. It has powerful features like backup encryption, scheduled backups, and many cloud storage options.

Whichever WordPress backup plugin you choose, please do NOT store your backups on the same server as your website.

By doing that, you are putting all of your eggs in one basket. If your server’s hardware fails or you get hacked, you don’t have a backup. This defeats the purpose of setting up regular backups.

We recommend storing your backups on a third-party storage service like Dropbox, Amazon S3, Google Drive, etc.

We hope this article has helped you pick the best WordPress backup plugin for your site. You may also want to see our step-by-step WordPress security guide for beginners and our comparison of the best email marketing services for small businesses.

If you liked this article, then please subscribe to our YouTube Channel for WordPress video tutorials. You can also find us on Twitter and Facebook.

The post 7 Best WordPress Backup Plugins Compared (Pros and Cons) first appeared on WPBeginner.

How to Move WordPress From Local Server to Live Site (2 Methods)

One way to speed up your website development is to build your website locally on your own computer using a software like WAMP (for Windows) or MAMP (for Mac).

Once you’re finished perfecting your website, the next step is to move it from your computer to a live site and share your creation with the world. In this article, we will show you how to easily move WordPress from local server to a live site.

Move WordPress From Local Server to Live Site

We will cover two different methods to move WordPress from local server to your live website (step by step).

The first method uses a WordPress migration plugin and is recommended for beginners. In the second method, we will show you how to manually move WordPress from local server to a live site.

You can choose the method that best suits you:

Before You Begin

In order for you to migrate WordPress from localhost to live server, you need to have a few things in place.

First, we’re assuming that you have a WordPress site running on local server (also called localhost) on your computer, and you have full access to it.

Next, you’ll need to have a domain name and web hosting. We have a list of the best WordPress hosting companies that you can choose from.

To speed it up, you can use Bluehost. They’re an official WordPress recommended hosting provider, and they are offering our users an exclusive 60% off discount + a free domain.

If you need help setting up your website, follow our step by step guide on how to make a website.

Finally, you will need to have a FTP program and know how to use FTP, so you can upload your content to the live site.

Ready? Let’s begin migrating your WordPress site.

Method 1. Transfer WordPress from Local Server to Live Site Using a Migration Plugin

This method is easier and recommended for beginners. We’ll be using a WordPress migration plugin to move WordPress from localhost to a live site.

Step 1. Install and Setup Duplicator Plugin

First, thing you need to do is install and activate the Duplicator plugin on your local site. For more details, see our step by step guide on how to install a WordPress plugin.

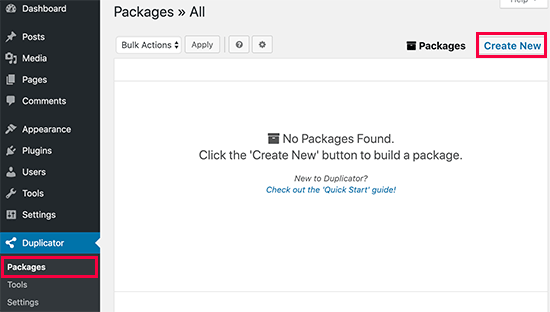
Upon activation, you need to go to Duplicator » Packages page and click on the ‘Create New’ button.

Creating a new Duplicator package

After that, click on the next button to continue.

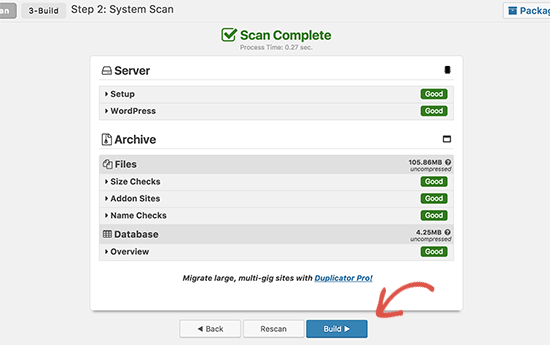
Duplicator will now run some tests to see if everything is in order. If all items are marked ‘Good’ then click on the ‘Build’ button.

Build package

This process may take a few minutes depending on the size of your website. You need to leave this tab open until the process is complete.

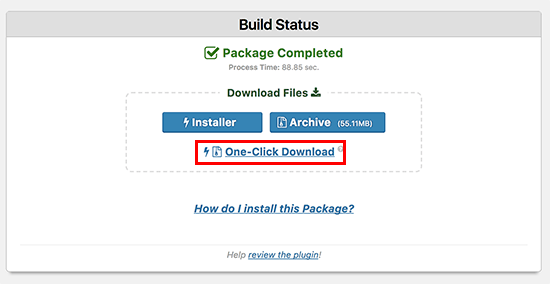
Once finished, you’ll see download options for Installer and the Archive package. You need to click on the ‘One click download’ link to download both files to your computer.

Download package

So what are these files?

Well, the archive file is a copy of your complete WordPress website. It includes all WordPress core files as well as your images, uploads, themes, plugins, and a backup of your WordPress database.

The installer file is a script that will automate the migration by unpacking the archive file.

Step 2. Create a Database for Your Live Site

Before you can run the installer or upload the WordPress website from localhost to your hosting server, you will need to create a MySQL database for your live website.

If you have already created a MySQL database, then you can skip this step.

To create a database you need to visit your hosting account’s cPanel dashboard. Scroll down to the Databases section and then click on the MySQL Databases icon.

Database icon in cPanel

On the next screen, you’ll see a field to create a new database. Simply provide a name for your database and click on the ‘Create Database’ button.

Create new database

cPanel will now create a new database for you. After that, you need to scroll down to the MySQL Users section.

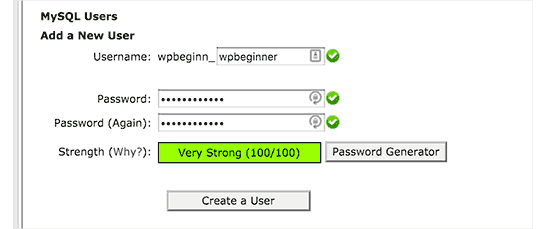
Next, provide a username and password for your new user and click on the ‘Create a user’ button.

Add a MySQL user

The new user you just created, still does not have permission to work on the database. Let’s change that.

Scroll down to the ‘Add User to Database’ section. Simply select the database user you created from the dropdown menu next to the ‘User’ field, then select the database, and click on the add button.

Save user to the database

Your database is now ready to be used with your WordPress site. Make sure to note down the database name, username, and password. You’ll need this information in the next step.

Step 3. Upload Files from Local Server to Live Site

Now you need to upload the archive and installer files from your local site to your hosting account.

First, connect to your live site using an FTP client. Once connected, make sure that the root directory of your website is completely empty.

Normally, root directory is the /home/public_html/ folder.

Some WordPress hosting companies automatically install WordPress when you sign up. If you have WordPress files there, then you need to delete them.

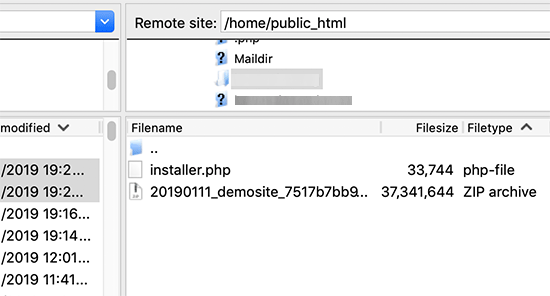
After that, you can upload the archive and installer files from Duplicator to your empty root directory.

Migration files in the root directory

Step 4. Runing The Migration Script

After you have uploaded the migration files, you need to visit the following URL in your browser:

http://example.com/installer.php

Don’t forget to replace example.com with your own domain name.

This will launch the Duplicator migration wizard.

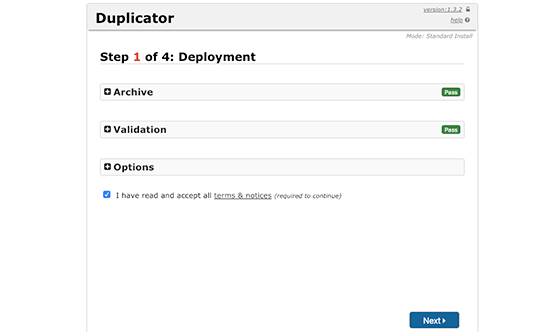
Duplicator intialized

The installer will automatically scan for the archive file and run a validation test. You need to check the terms & conditions checkbox and continue by clicking on the Next button.

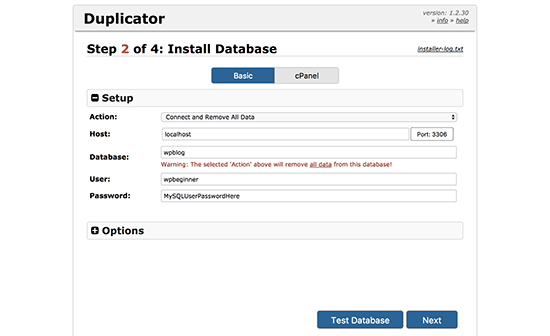
On the next screen, it will ask you to enter your WordPress database information.

Your host will likely be localhost. After that, you will enter the details of the database you created in the earlier step.

Connect your database

Click on the next button to continue.

Duplicator will now import your WordPress database backup from the archive into your new database.

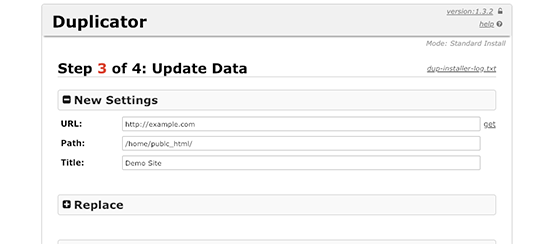
Next, it will ask you to update site URL or Path. You shouldn’t have to change anything since it automatically detects the URL of your live website, and its path.

Update site URL

Click on the next button to continue.

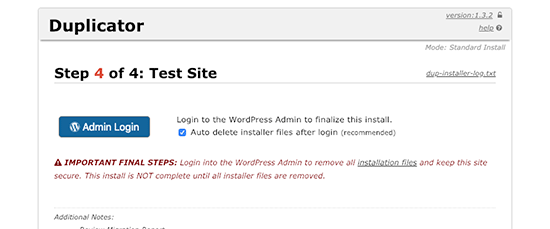
Duplicator will now finish the migration and will show you a success screen. You can now click on the ‘Admin Login’ button to enter the WordPress admin area of your live site.

Successfully moved

Once you login to your live site, Duplicator will automatically clean up the installation files.

That’s all, you have successfully moved WordPress from local server to your live site.

Method 2. Manually Transfer WordPress from Local Server to Live Site

In this method, we will show you how to manually move WordPress from local server to your live site. It will come in handy if the first method doesn’t work or you prefer to do it manually.

Step 1: Export Local WordPress Database

The first thing you need to do is export your local WordPress database. We’ll be using phpMyAdmin to do that. If you are unfamiliar with it, then you might want to take a look at our guide to WordPress database management using phpMyAdmin.

Simply go to http://localhost/phpmyadmin/ and click on your WordPress database. Next, click on the Export button from the top menu bar.

Export from localhost

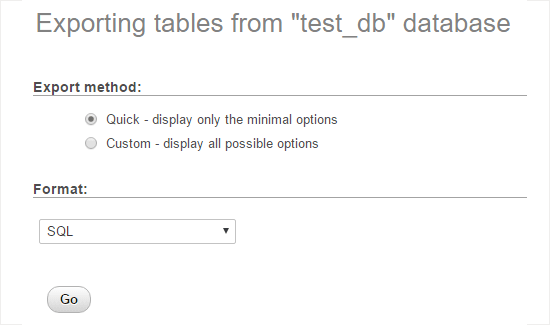
In the Export Method option, you can choose “Quick” or “Custom”. Custom will provide you with more options to export your database.

We recommend choosing Quick, and then click the Go button to download your database.

Export WordPress database using phpMyAdmin

Step 2: Upload WordPress Files to Live Site

Now we’ll need to move all your website files to the live site.

To get started, go ahead and open your FTP client and connect to your web hosting account.

Once you’re connected to your live site, make sure you upload the files in the right directory. For example, if you want the site to be hosted on yoursite.com, then you would want to upload all the files in your public_html directory.

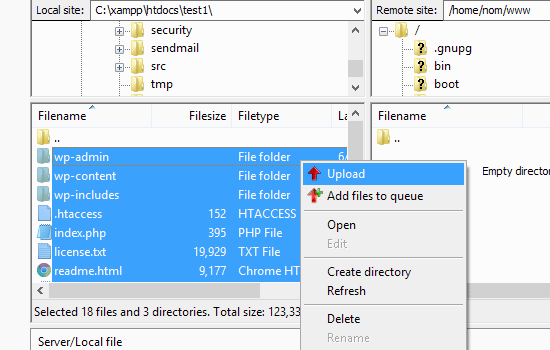
Now select your local WordPress files and upload them to your live server.

Uploading WordPress from localhost to live site

Step 3: Create MySQL Database on Live Site

While your FTP client is uploading your WordPress files, you can start importing your database to the live server. Most WordPress hosting providers offer cPanel to manage your hosting account, so we’ll show you how to create a database using cPanel.

First, you need to log in to your cPanel dashboard and click on the MySQL Databases icon which can be found in the databases section.

Database section in cpanel

On the next screen, create a database by entering a name for your database and clicking the Create Database button.

New database

After creating your database, scroll down to the MySQL Users section and create or add an existing user to the database.

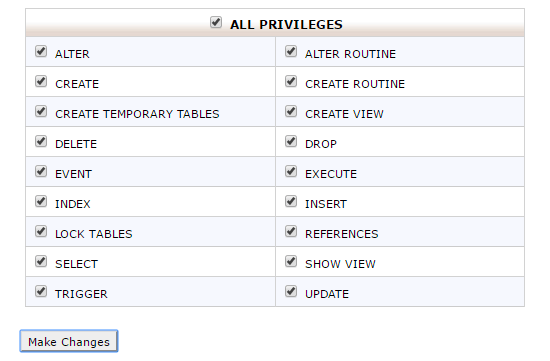
After adding the user, cPanel will take you to set MySQL privileges for that user. Simply grant all privileges to the user by making sure every box is checked, and then click the Make Changes button.

grant all privileges to database user

Step 4: Import WordPress Database on Live Site

The next step in the process is to import your WordPress database.

Go to your cPanel dashboard, scroll down to the databases section and click on phpMyAdmin.

This will take you to phpMyAdmin where you want to click on the database you created in Step 3. PhpMyAdmin will show your new database with no tables.

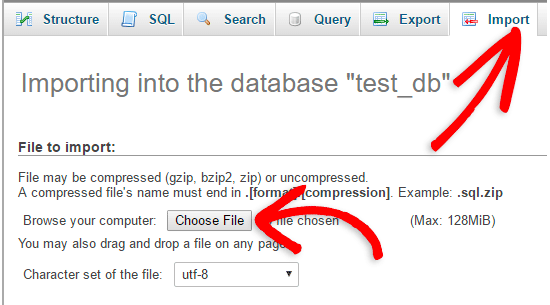
Click on the Import tab in the top menu. On the import page, click on Choose File button and then select the database file you saved in Step 1.

Lastly, press the Go button at the bottom of the page. PhpMyadmin will now import your WordPress database.

Import database via phpMyAdmin

Step 5: Change the Site URL

Now you need to change the site URL in your database, so that it will connect with your live WordPress site.

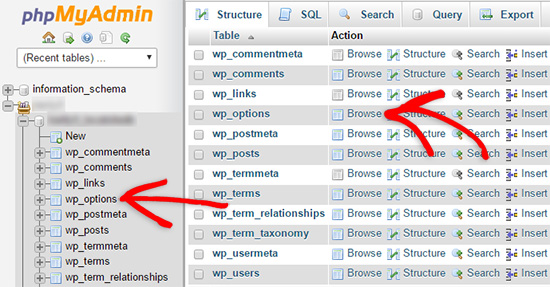
In phpMyAdmin, look for the wp_options table in your database that we just imported in step 4. If you changed your database prefix, then instead of wp_options it might be {prefix}_options.

Click on the Browse button next to wp_options or the link that you see in the sidebar to open the page with a list of fields within the wp_options table. See screenshot below:

Browse the wp options table

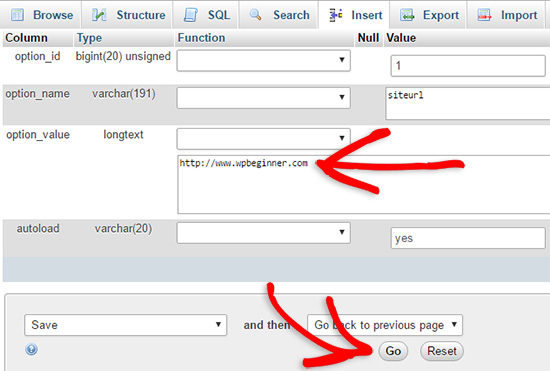
Under the field options_name, you need to look for siteurl. Click the Edit Field icon which can be found at the far left at the beginning of the row.

Edit siteurl in phpMyAdmin

When you click the edit field, an edit field window will appear. In the input box for option_value, you will see the URL of your local install probably something like: http://localhost/test. Carefully insert your new site url in this field, for example: https://www.wpbeginner.com

Save the field by clicking the Go button.

edit the siteurl field

Next, you need to replicate this step for the option name: home. The wp_options page can be a few pages long, so simply find the home tab.

Usually it is on the second page which you can navigate to by clicking on the pagination arrows in phpMyAdmin.

Update the home url to be the same as your siteurl.

Step 6: Setup Your Live Site

Now that we have imported the database and all of our content should be uploaded, it’s time to configure WordPress.

At this time, your site should be showing an Error Establishing Database Connection error.

To fix this, connect to your website using an FTP client and edit wp-config.php file.

You will need to provide the database name, user and password you created earlier in Step 3.

Next, save the wp-config.php file and upload it back to your server.

You can now visit your website, and it should be live now.

Next, you need to login to your WordPress admin panel and go to Settings » General. Without changing anything, scroll to the bottom and click the Save Changes button.

This will ensure that the site URL is corrected anywhere else that it needs to be.

After that go to Settings » Permalink and click Save Changes to ensure that all post links are working fine.

Step 7: Fix Images and Broken Links by Updating Paths

Whenever you are moving a WordPress site from one domain to another, or from local server to a live site, you’ll face broken links and missing images.

You can either use the SQL query or use the Velvet Blues WordPress plugin.

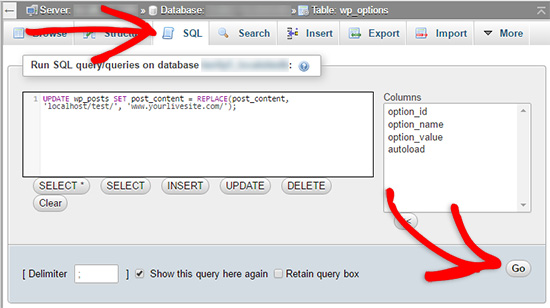
For those who want to do it via SQL, here is a simple SQL query that should solve this problem:

UPDATE wp_posts SET post_content = REPLACE(post_content, 'localhost/test/', 'www.yourlivesite.com/');

Simply go to phpMyAdmin, click on your database and then click on SQL from top menu. Write this query, but don’t forget to change it with your own local site and live site URLs.

Fixing WordPress images and broken URLs after moving to live site

That’s all, you have successfully migrated WordPress from localserver to a live site!

Hopefully now your live website is up and running smoothly. Be sure to check out your website to make sure that everything is working as expected. If you notice any errors, you can check out our guide to common WordPress errors for help troubleshooting.

If you liked this article, then please subscribe to our YouTube Channel for WordPress video tutorials. You can also find us on Twitter and Facebook.

The post How to Move WordPress From Local Server to Live Site (2 Methods) appeared first on WPBeginner.