Why should I care?
We use these data structures every day in programming.
Even if you're already familiar with them, it's helpful to recap them occasionally.

Tips, Expertise, Articles and Advice from the Pro's for Your Website or Blog to Succeed

We use these data structures every day in programming.
Even if you're already familiar with them, it's helpful to recap them occasionally.
Hasura is one of my favorite ways to create a managed GraphQL API for my applications. I find it easy and straightforward as well as suitable for a wide range of use cases. However, since working with Hasura, I’ve seen the same question come up again and again: how should we make an array? Given the fact that array and map are not provided in the type dropdown for rows, what’s the best way to accomplish this?
Truthfully, the concept of an array can be captured by Hasura a few different ways, and what follows is a breakdown of methods to approach this. My personal preference is the last option we’re going to cover, JSONB, but we’ll walk through other options in case you’d like to take another path, as every option has slightly different benefits.
Hasura doesn’t offer “array” as a type, but we can create an array of strings by selecting “Text” and adding square brackets at the end, like this:
What we get is text[], and we’ll be prompted to create arrays in one of two ways:
["one", "two"]
// or
{"one", "two"}![insertion of row with type {"foo", "bar"} or ["foo", "bar"]](https://i0.wp.com/css-tricks.com/wp-content/uploads/2020/12/CleanShot-2020-12-12-at-20.00.50@2x.png?resize=1034%2C118&ssl=1)
We can also create a relationship with another table that’s a series of text elements. To do so, create a row that has the type of text.
We’ll also create a new table via the “Add Table” button in the sidebar, and we’ll create a very simple row, with a unique key for the type we need — text, integer, or whatever is necessary for the data.
Now, click the “Relationships” tab. In the table, select the “Array Relationship” option, give it a name, and reference the original table that was created.
The id of the first table should have a relationship with the id of the second table we just created.

Once it’s saved, you should see the array relationship reflected in the table in the same relationships tab, with an arrow denoting the direction of the relationship.
users.gameId → favoriteGames.idNow we can look up the array in the “GraphiQL” tab:

What follows is one of my favorite ways to create an array in Hasura. I like it because it can be really performant. We can use the “JSONB” type and create an array by selecting JSONB from the dropdown. Then we will be prompted in a similar fashion as the text[] option:

When it’s filled out, it will look like this:

From there, not only can we add the arrays to your query as above, but we can also search by tag through multiple indexes, and their GraphiQL tab makes it easy to explore. Check out when I filter the tags by what contains “animation”:
query MyQuery {
  codesamples(where: {tags: {_contains: "animation"}}) {
    userId
    name
    id
  }
}
However, a lookup like this is not necessarily performant out of the box, especially when there are large amounts of data. Luckily, we can define what fields we would like to index. From the “Data” tab at the top, select the “SQL” group in the side panel, and in that area we can define what fields we would like to index in order to maintain a performant lookup. In this example, we’ll create an index on the “tags” field:
create index codesample_gin on codesamples using gin(tags)This will run the query, and index this lookup, making it more performant in the future.
Hasura has a wonderful developer experience to set up quick and easy-to-use GraphQL APIs. For those who are interested in setting up arrays with Hasura, I hope this article is helpful.
Thanks to Adron Hall from Hasura who proofed this post.
The post Creating Arrays in Hasura appeared first on CSS-Tricks.
You can support CSS-Tricks by being an MVP Supporter.
There are loads of ways to loop in JavaScript! How do you know which one to choose, and when? It can be a minefield for those new to the language. In this article, we are going to cover 7 of...
The post JavaScript Loops 101 appeared first on Treehouse Blog.
Sets are a new object type included in ES6 that allow the creation of collections of unique values. The values in a set can be either simple primitives, such as strings and integers or more complex object types like object literals or arrays. Think of sets as an array with no repeated elements.
There are many instances where we have an array containing many elements that we want to convert to a unique array. While it can be done by brute force on the array, checking elements, using loops, distinct callback method, etc., the best method is using set().
Shepherds are good at tending to their sheep, bringing order and structure to their herds. Even if there are hundreds of those wooly animals, a shepherd still herds them back to the farm at the end of the day.
When dealing with data, programmers often don't know if it is correctly filtered or sorted. This is especially painful when iterating over an array then displaying the data on a site without knowing the locations of each element receiving it. The Grid Shepherd is a technique that helps position and sort items where you want them to be, using CSS Grid instead of JavaScript.
That’s what we’re going to look at in this post. The Grid Shepherd technique can bring order and structure to the data we work with while giving us greater visibility to where and how it’s being used than we would be able to otherwise.
Let’s dig in.
We’re going to start by iterating over an unordered array of farm animals. Imagine that cows and sheep are happily grazing the fields. They can be grouped together programmatically with the Array.prototype.sort method and listed on a page:
let animals = [
  { name: 'Edna', animal: 'cow'   },
  { name: 'Liam', animal: 'sheep' },
  { name: 'Fink', animal: 'sheep' },
  { name: 'Olga', animal: 'cow'   },
]
let sortedAnimals = animals.sort((a, b) => {
  if (a.animal < b.animal) return -1
  if (a.animal > b.animal) return 1
  return 0
})
console.log(sortedAnimals)
/* Returns:
  [ { name: 'Elga', animal: 'cow'   },
    { name: 'Olga', animal: 'cow'   },
    { name: 'Liam', animal: 'sheep' },
    { name: 'Fink', animal: 'sheep' } ]
*/The Grid Shepherd method makes sorting data possible without the use of JavaScript. Instead, we rely on CSS Grid to do the lifting for us.
The structure is exactly the same as the JavaScript array of objects above, only represented in DOM nodes instead.
<main>
  <div class="cow">Edna</div>
  <div class="sheep">Liam</div>
  <div class="sheep">Jenn</div>
  <div class="cow">Fink</div>
</main>
See the Pen
1. Start by David Bernegger (@Achilles_2)
on CodePen.
To herd the animals, we have to fence them into a common area, which is what we’re using the <main> element to do. By setting that fence with display: grid, we’re creating a grid formatting context where we can define the column (or row) each animal should occupy.
.sheep { grid-column: 1; }
.cow { grid-column: 2; }
And with grid-auto-flow: dense, each animal orders itself into the first available spot of each defined area. This can also be used with as many different sort options as you want — simply define another column and the data will be shepherded magically into it.
main
  display: grid;
  grid-auto-flow: dense;
}

.sheep { grid-column: 1; }
.cow { grid-column: 2; }
See the Pen
2. Final by David Bernegger (@Achilles_2)
on CodePen.
We can take our herding example further with CSS Counters. That way, we can count how many animals we have in each column and — applying Heydon Pickering's quantity queries from Lea Verou's Talk in 2011 — conditionally style the them depending on how many there are.
Quantity queries rely on some sort of selector for counting the classes — which would be great with the :nth-child(An+B [of S]?) pseudo-class notation, but it’s currently only available in Safari). That means we have to use the :nth-of-type() selector as a workaround.
We need some new element types for this to work. This could be realized through Web Components or renaming any HTML element to a custom name. This works even if these elements are not in the HTML spec, as browsers use HTMLUnknownElement for undefined tags which results in them behaving much like a div. The document looks now like this:
<fence>
  <sheep>Lisa</sheep>
  <sheep>Bonnie</sheep>
  <cow>Olaf</cow>
  <sheep>Jenn</sheep>
</fence>
Now we can access our custom element types. Let’s apply a red background when the number of sheep or the cows is equal to or less than 10.
sheep:nth-last-of-type(n+10),
sheep:nth-last-of-type(n+10) ~ sheep,
cow:nth-last-of-type(n+10),
cow:nth-last-of-type(n+10) ~ cow, {
  background-color: red;
}
Additionally the the counters can be simply realized by using counter-reset: countsheep countcow; on the parent element and using the before selector to target each element and count up.
sheep::before {
  counter-increment: countsheep;
  content: counter(countsheep);
}
Here, we’re going to reach for Vue to dynamically add and remove animals using Vue transitions with two different sort options. Watch as the animals naturally occupy the correct columns, even as more are added and some are removed:
See the Pen
3. Final with Vue Transitions by David Bernegger (@Achilles_2)
on CodePen.
Grid Shepherd can also be used with any non-ordered data to:
grid-auto-flow: dense does not change the DOM structure of the grid — it merely reorders the contained elements visually. A side effect can be seen in the last example when ordering alphabetically as the counter numbers get mixed up. Changing the DOM structure not only affects people who use screen readers, but also effects tab traversal.
Also note that a flat document structure might not be good for screen readers. Instead, I would treat these presentational grids as graphs and provide the information with a longer textual alternative.
It’s pretty neat to see how a powerful CSS layout tool like grid can be leveraged for use cases that fall outside of traditional layouts needs and into things where we may have reached for other languages in the past. In this case, we can see how the layout benefits of CSS Grid and the dynamic data-handling capabilities of JavaScript overlap and how that gives us more choices — and power — to bend rendered data to our will.
The post Using the Grid Shepherd Technique to Order Data with CSS appeared first on CSS-Tricks.
In the first part of this series, you saw some of the most used array functions that the PHP language makes available.
Fortunately, after years and years of evolution and the publication of new versions of the language this list of array functions is still long, it almost seems that it never ends.
Map, reduce, and filter are three very useful array methods in JavaScript that give developers a ton of power in a short amount of space. Let’s jump right into how you can leverage (and remember how to use!) these super handy methods.
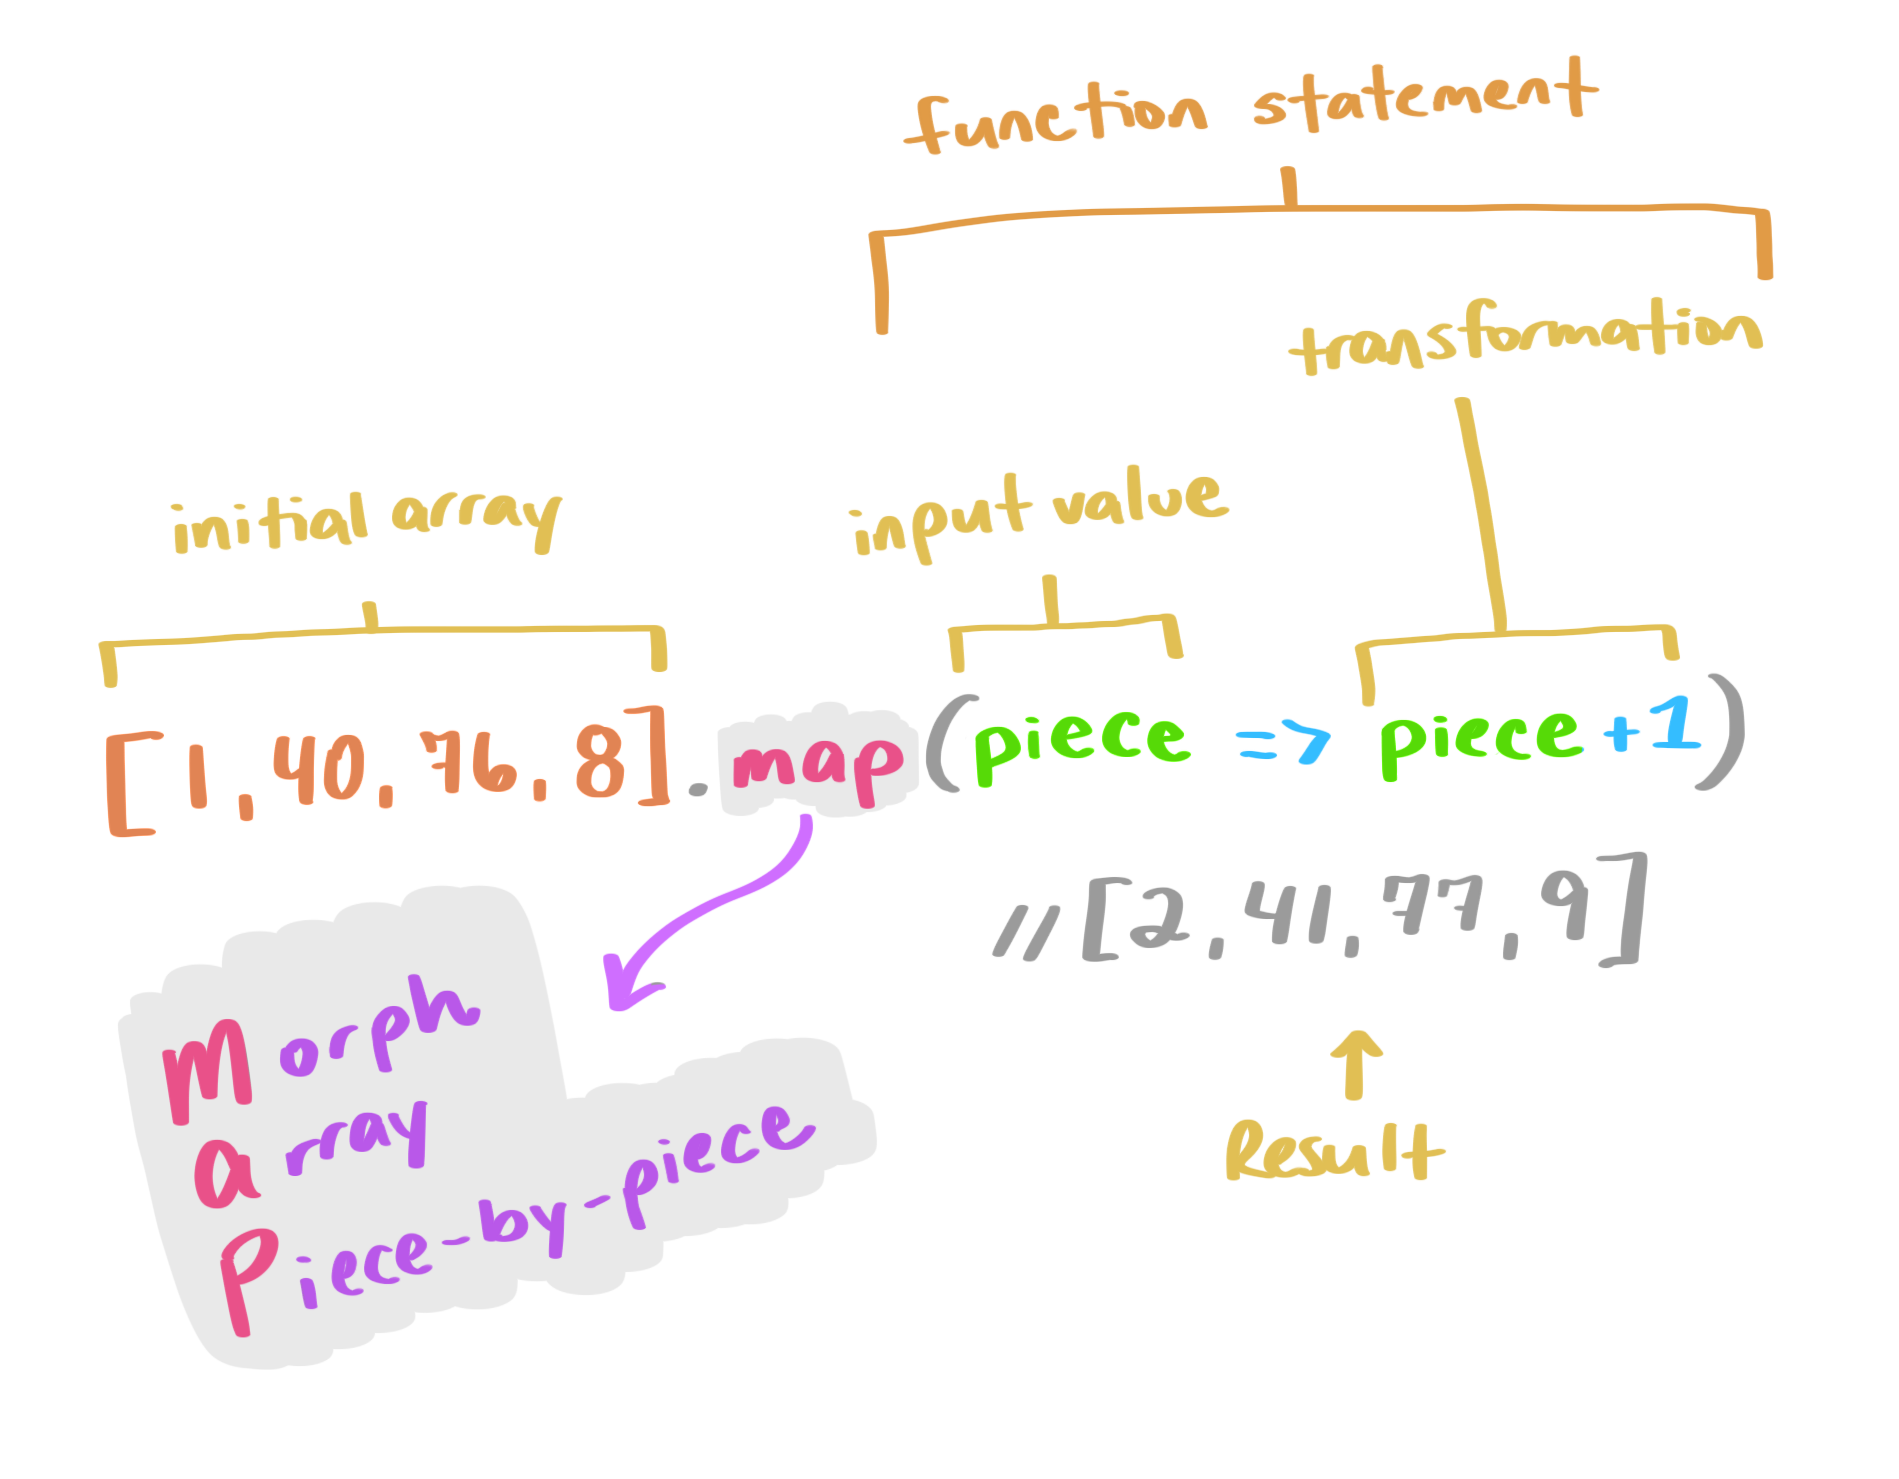
Array.map() updates each individual value in a given array based on a provided transformation and returns a new array of the same size. It accepts a callback function as an argument, which it uses to apply the transform.
let newArray = oldArray.map((value, index, array) => {
  ...
});
A mnemonic to remember this is MAP: Morph Array Piece-by-Piece.
Instead of a for-each loop to go through and apply this transformation to each value, you can use a map. This works when you want to preserve each value, but update it. We’re not potentially eliminating any values (like we would with a filter), or calculating a new output (like we would use reduce for). A map lets you morph an array piece-by-piece. Let’s take a look at an example:
[1, 4, 6, 14, 32, 78].map(val => val * 10)
// the result is: [10, 40, 60, 140, 320, 780]
In the above example, we take an initial array ([1, 4, 6, 14, 32, 78]) and map each value in it to be that value times ten (val * 10). The result is a new array with each value of the original array transformed by the equation: [10, 40, 60, 140, 320, 780].
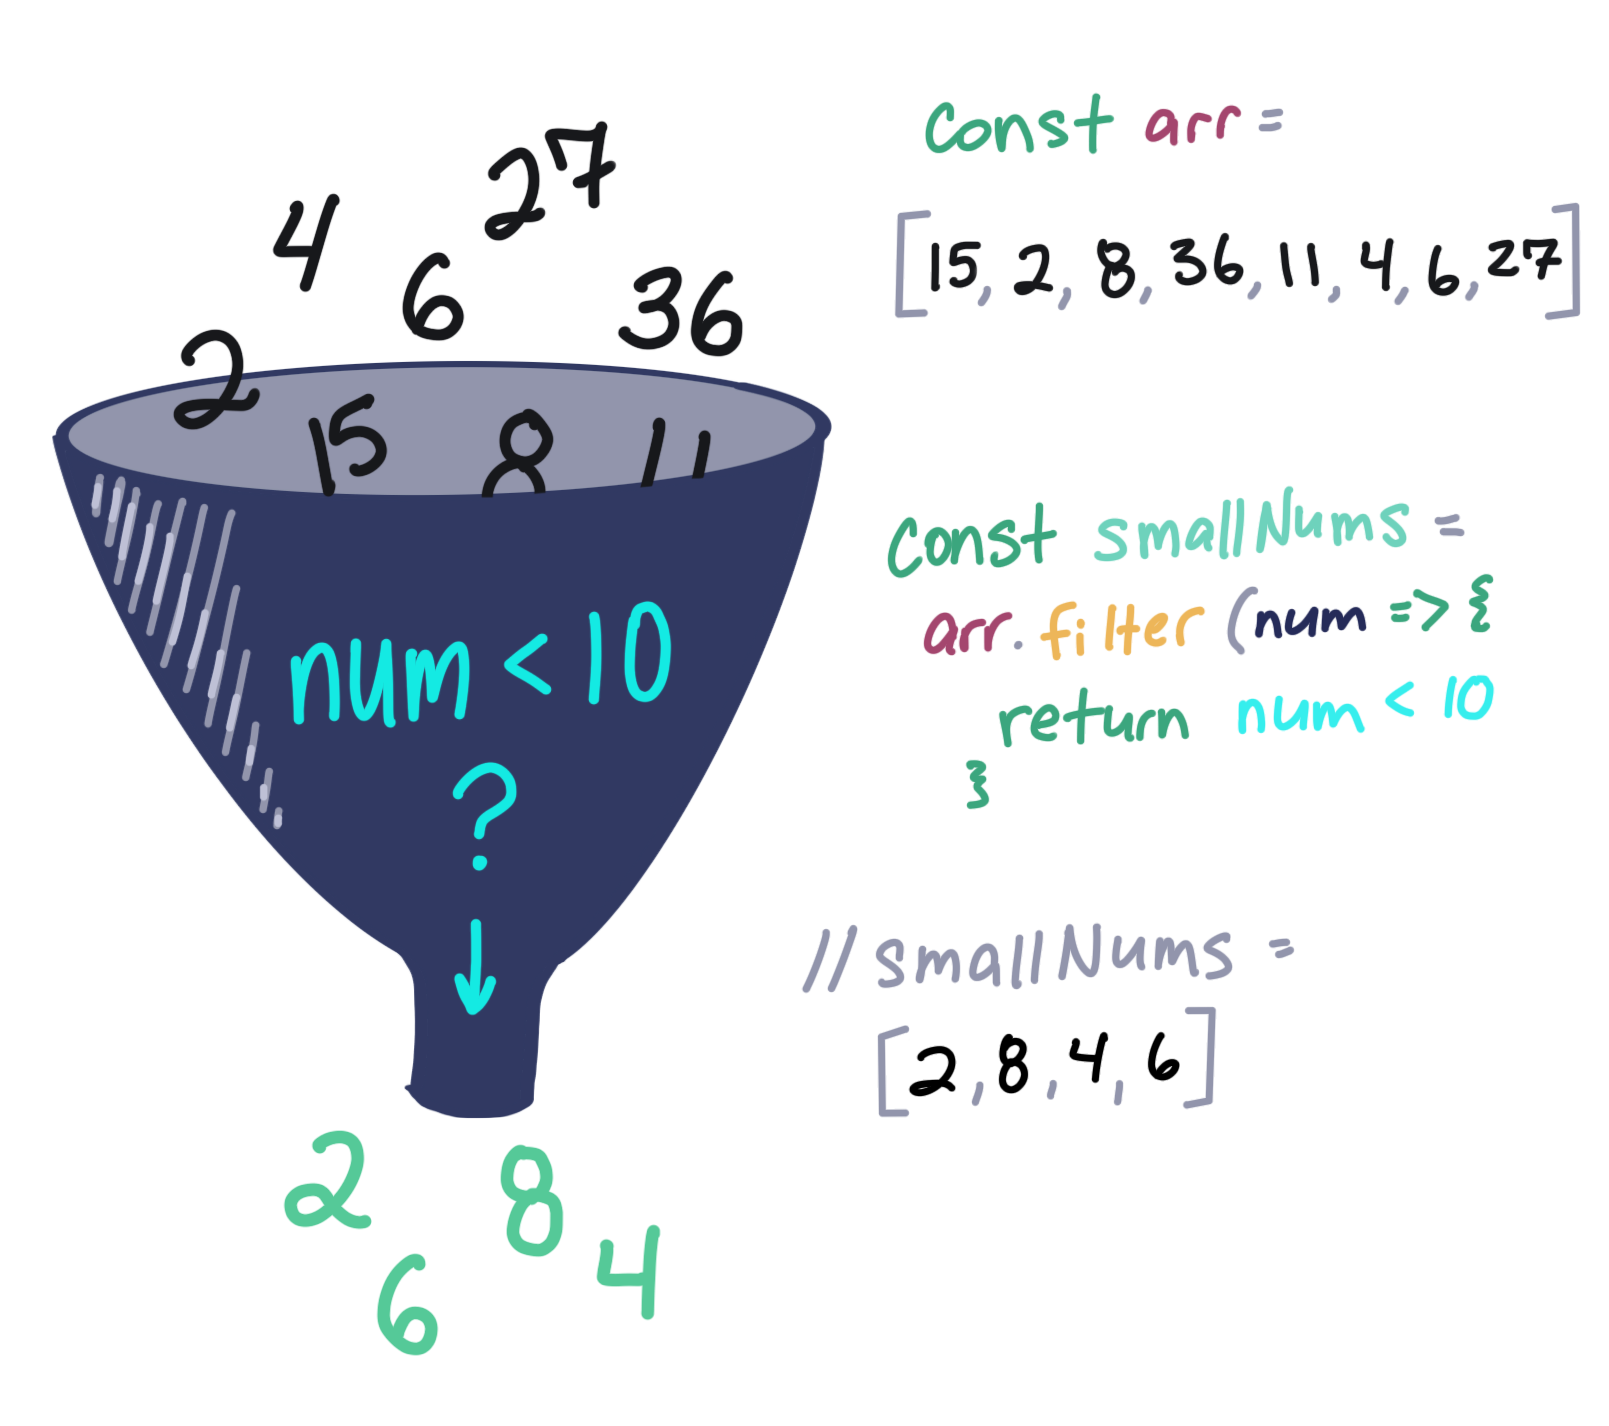
Array.filter() is a very handy shortcut when we have an array of values and want to filter those values into another array, where each value in the new array is a value that passes a specific test.
This works like a search filter. We’re filtering out values that pass the parameters we provide.
For example, if we have an array of numeric values, and want to filter them to just the values that are larger than 10, we could write:
[1, 4, 6, 14, 32, 78].filter(val => val > 10)
// the result is: [14, 32, 78]
If we were to use a map method on this array, such as in the example above, we would return an array of the same length as the original with val > 10 being the “transform," or a test in this case. We transform each of the original values to their answer if they are greater than 10. It would look like this:
[1, 4, 6, 14, 32, 78].map(val => val > 10)
// the result is: [false, false, false, true, true, true]
A filter, however, returns only the true values. So the result is smaller than the original array or the same size if all values pass a specific test.
Think about filter like a strainer-type-of-filter. Some of the mix will pass through into the result, but some will be left behind and discarded.
Say we have a (very small) class of four dogs in obedience school. All of the dogs had challenges throughout obedience school and took a graded final exam. We’ll represent the doggies as an array of objects, i.e.:
const students = [
  {
    name: "Boops",
    finalGrade: 80
  },
  {
    name: "Kitten",
    finalGrade: 45
  },
  {
    name: "Taco",
    finalGrade: 100
  },
  {
    name: "Lucy",
    finalGrade: 60
  }
]
If the dogs get a score higher than 70 on their final test, they get a fancy certificate; and if they don’t, they’ll need to take the course again. In order to know how many certificates to print, we need to write a method that will return the dogs with passing grades. Instead of writing out a loop to test each object in the array, we can shorten our code with filter!
const passingDogs = students.filter((student) => {
  return student.finalGrade >= 70
})

/*
passingDogs = [
  {
    name: "Boops",
    finalGrade: 80
  },
  {
    name: "Taco",
    finalGrade: 100
  }
]
*/
As you can see, Boops and Taco are good dogs (actually, all dogs are good dogs), so Boops and Taco are getting certificates of achievement for passing the course! We can write this in a single line of code with our lovely implicit returns and then remove the parenthesis from our arrow function since we have single argument:
const passingDogs = students.filter(student => student.finalGrade >= 70)

/*
passingDogs = [
  {
    name: "Boops",
    finalGrade: 80
  },
  {
    name: "Taco",
    finalGrade: 100
  }
]
*/The reduce() method takes the input values of an array and returns a single value. This one is really interesting. Reduce accepts a callback function which consists of an accumulator (a value that accumulates each piece of the array, growing like a snowball), the value itself, and the index. It also takes a starting value as a second argument:
let finalVal = oldArray.reduce((accumulator, currentValue, currentIndex, array) => {
  ...
}), initalValue;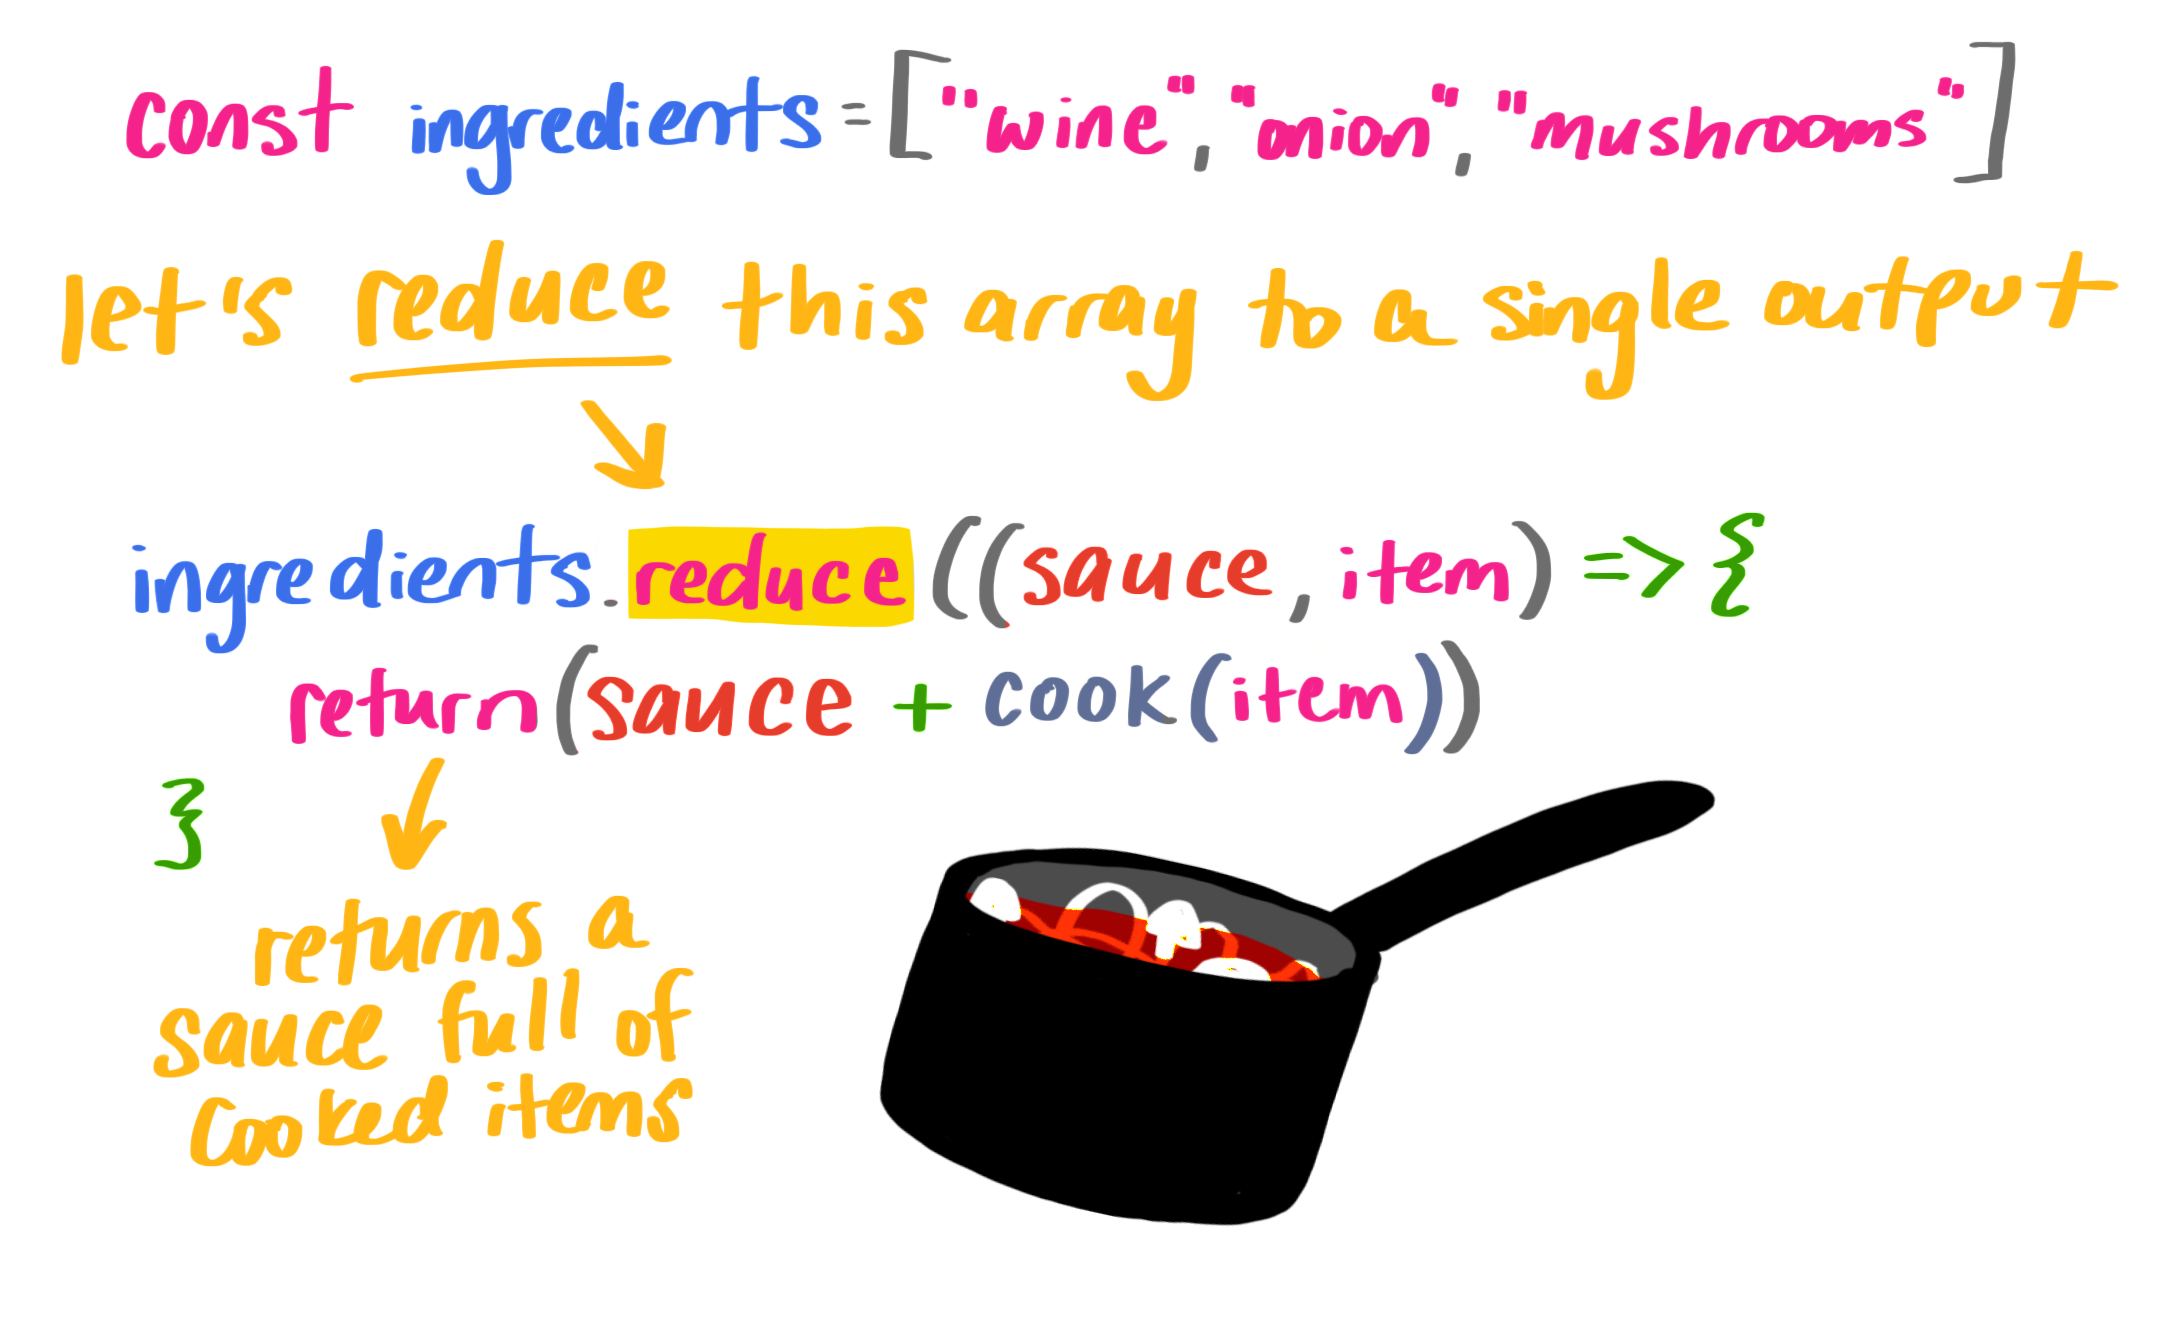
Let’s set up a cook function and a list of ingredients:
// our list of ingredients in an array
const ingredients = ['wine', 'tomato', 'onion', 'mushroom']

// a cooking function
const cook = (ingredient) => {
    return `cooked ${ingredient}`
}
If we want to reduce the items into a sauce (pun absolutely intended), we’ll reduce them with reduce()!
const wineReduction = ingredients.reduce((sauce, item) => {
  return sauce += cook(item) + ', '
  }, '')

// wineReduction = "cooked wine, cooked tomato, cooked onion, cooked mushroom, "
That initial value ('' in our case) is important because if we don’t have it, we don’t cook the first item. It makes our output a little wonky, so it’s definitely something to watch out for. Here’s what I mean:
const wineReduction = ingredients.reduce((sauce, item) => {
  return sauce += cook(item) + ', '
  })

// wineReduction = "winecooked tomato, cooked onion, cooked mushroom, "
Finally, to make sure we don’t have any excess spaces at the end of our new string, we can pass in the index and the array to apply our transformation:
const wineReduction = ingredients.reduce((sauce, item, index, array) => {
  sauce += cook(item)
  if (index < array.length - 1) {
        sauce += ', '
        }
        return sauce
  }, '')

// wineReduction = "cooked wine, cooked tomato, cooked onion, cooked mushroom"
Now we can write this even more concisely (in a single line!) using ternary operators, string templates, and implicit returns:
const wineReduction = ingredients.reduce((sauce, item, index, array) => {
  return (index < array.length - 1) ? sauce += `${cook(item)}, ` : sauce += `${cook(item)}`
}, '')

// wineReduction = "cooked wine, cooked tomato, cooked onion, cooked mushroom"
A little way to remember this is to recall how you make sauce: you reduce a few ingredients down to a single item.
I wanted to end this blog post with a song, so I wrote a little diddy about array methods that might just help you to remember them:
The post An Illustrated (and Musical) Guide to Map, Reduce, and Filter Array Methods appeared first on CSS-Tricks.
This little site by Remy Sharp's makes it clear whether or not a JavaScript method changes the original array (aka mutates) or not.
I was actually bitten by this the other day. I needed the last element from an array, so I remembered .pop() and used it.
const arr = ["doe", "ray", "mee"];
const last = arr.pop();
// mee, but array is now ["doe", "ray"]
This certainly worked great right away, but I didn't realize the original array had changed and it caused a problem. Instead, I had to find the non-mutating alternative:
const arr = ["doe", "ray", "mee"];
const last = arr.slice(-1);
// ["mee"], arr is unchanged
Related: Array Explorer
Direct Link to Article — Permalink
The post Does it mutate? appeared first on CSS-Tricks.