Here, I am going to discuss how to generate Barcodes or QR codes in Xamarin for Android. In order to do this, we need to get some information from the user, such as what message they want to convert, the code format they want to use, and their desired bitmap size. There is no default library for this, so we need to install a plugin.
Just write a few lines of code to generate 1D and 2D code. Barcodes have different formats, but I will demonstrate only a few code formats — Code 39, Code 128, AZTEC, and QR Code. Below is our final output for the project, so you can visualize our end-result throughout the tutorial.
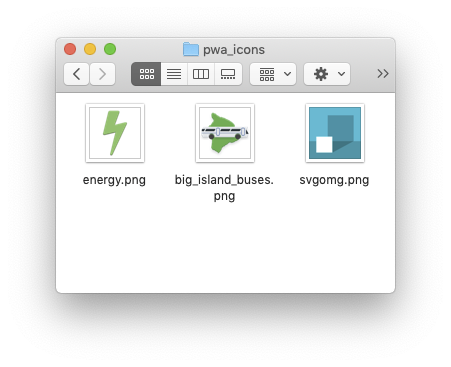
You’ve created a Progressive Web App (PWA), designed an icon to represent it, and now you’re installing it to your Android home screen.
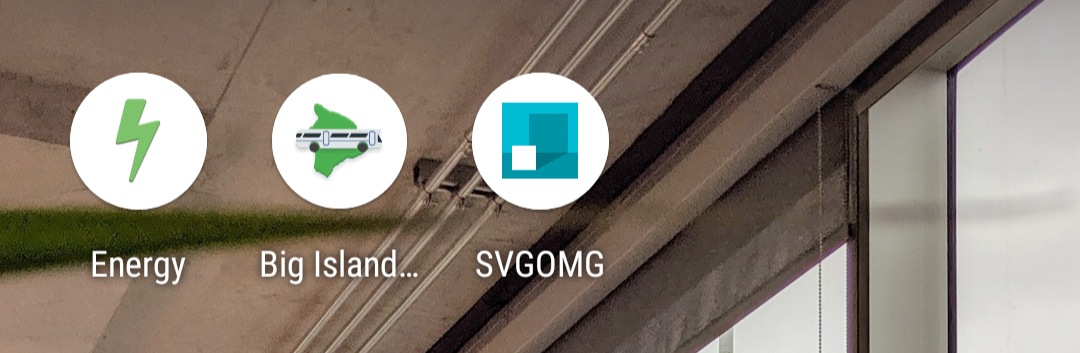
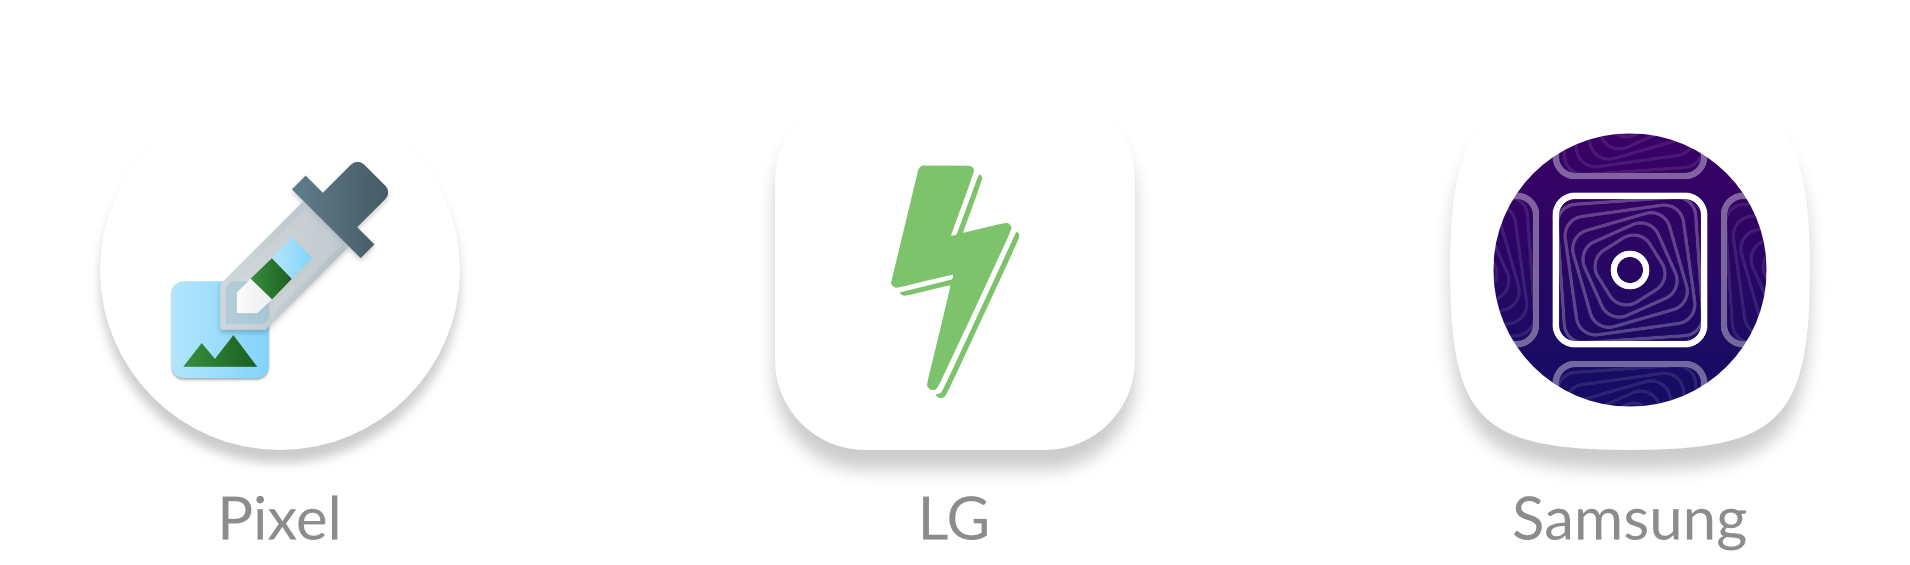
But, if you have a recent Android phone, your icons will show up like this:
What happened? Well, Android Oreo introduced adaptive icons, a new icon format that enforces the same shape for all icons on the home screen. Icons that don’t follow the new format are given a white background.
However, there is a new web feature called maskable icons that is coming soon to Firefox Preview and other web browsers. This new icon format will let your PWAs have their own adaptive icons on Android.
I work at Mozilla and have implemented support for maskable icons in Firefox Preview. I’ll show you how to add them to your own PWAs for Android.
What are maskable and adaptive icons?
Until a few years ago, Android app icons were freeform and could be any shape. This meant that web apps could also reuse the same transparent icon when pinned to the home screen.
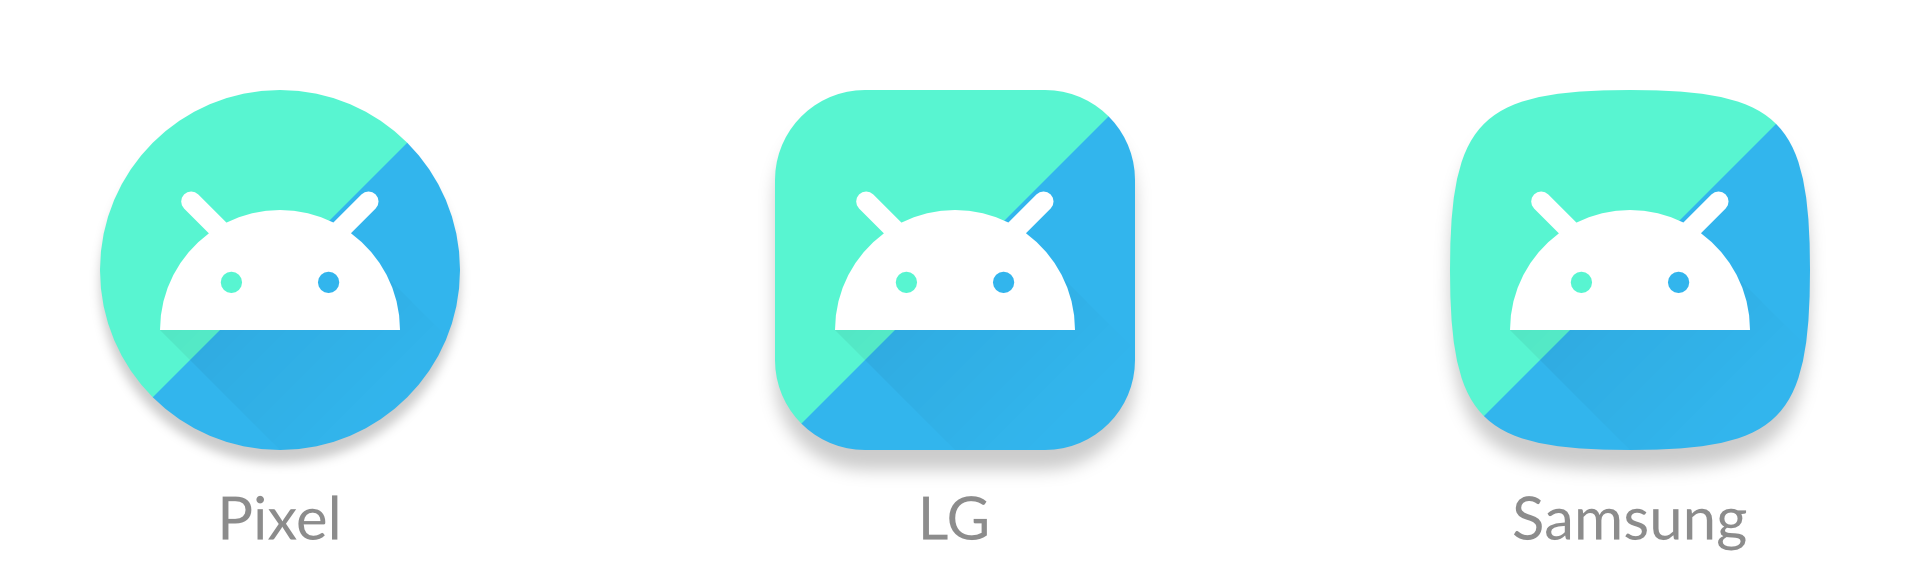
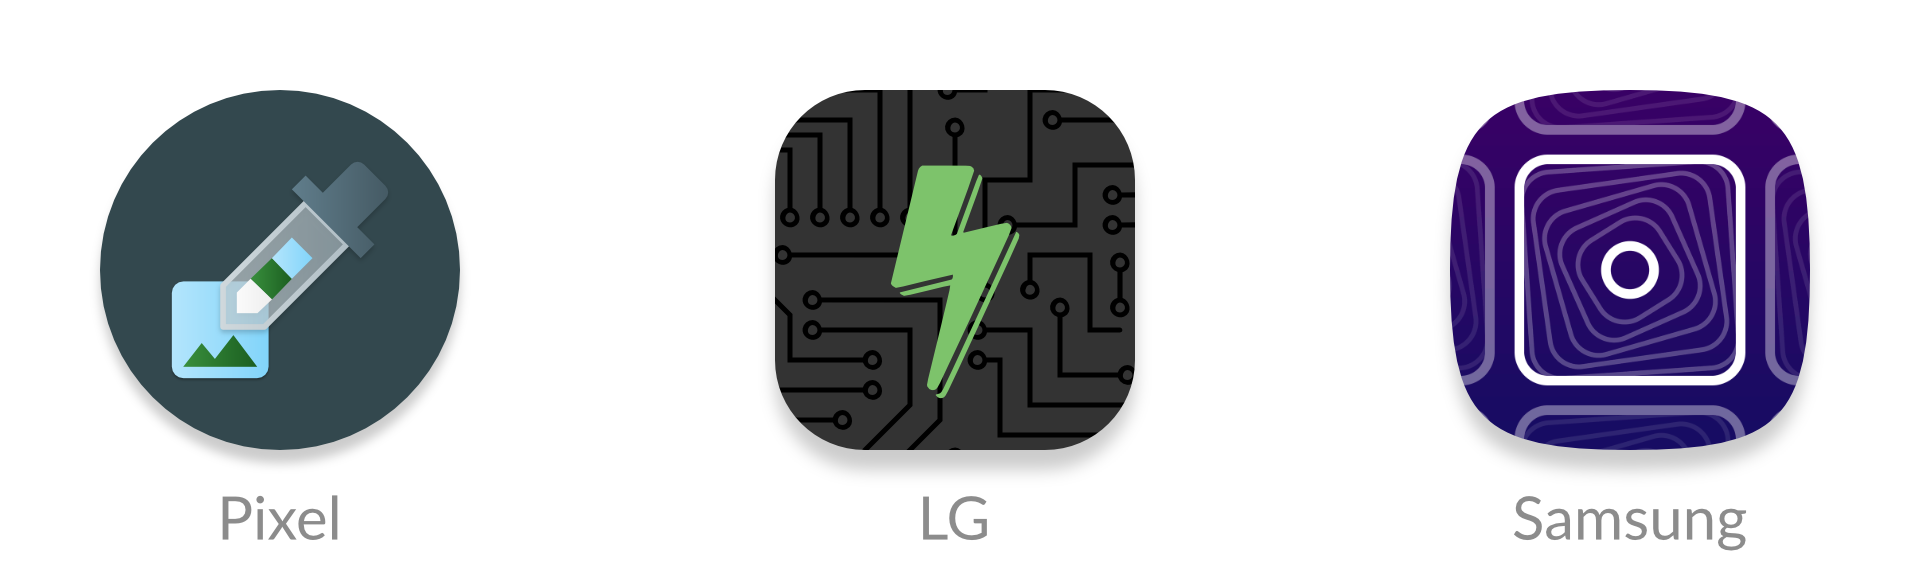
However, manufacturers, like Samsung, wanted to make all icons on a device the same shape to keep things consistent. Some manufacturers even wanted different shapes. To deal with the variety of requirements from manufacturers and devices, Android introduced “adaptive icons.” You supply an image with extra space around the edges, and Android will crop it to the correct shape.
But web apps are designed to work on any platform, so they don’t have APIs to create these special Android icons. Instead, icons would get squished into white boxes like this:
Lo and behold, last September a brand new API descended upon us and was added to the W3C spec. Maskable icons allow web developers to specify a full-bleed icon that will be cropped. It’s platform agnostic, so Windows could use them for tiles or iOS could use them for icons.
How to create maskable icons
Since the maskable icon format is designed work with any platform, the size and ratios are different from the size and ratios of Android’s adaptive icons. This means you can’t reuse the same asset.
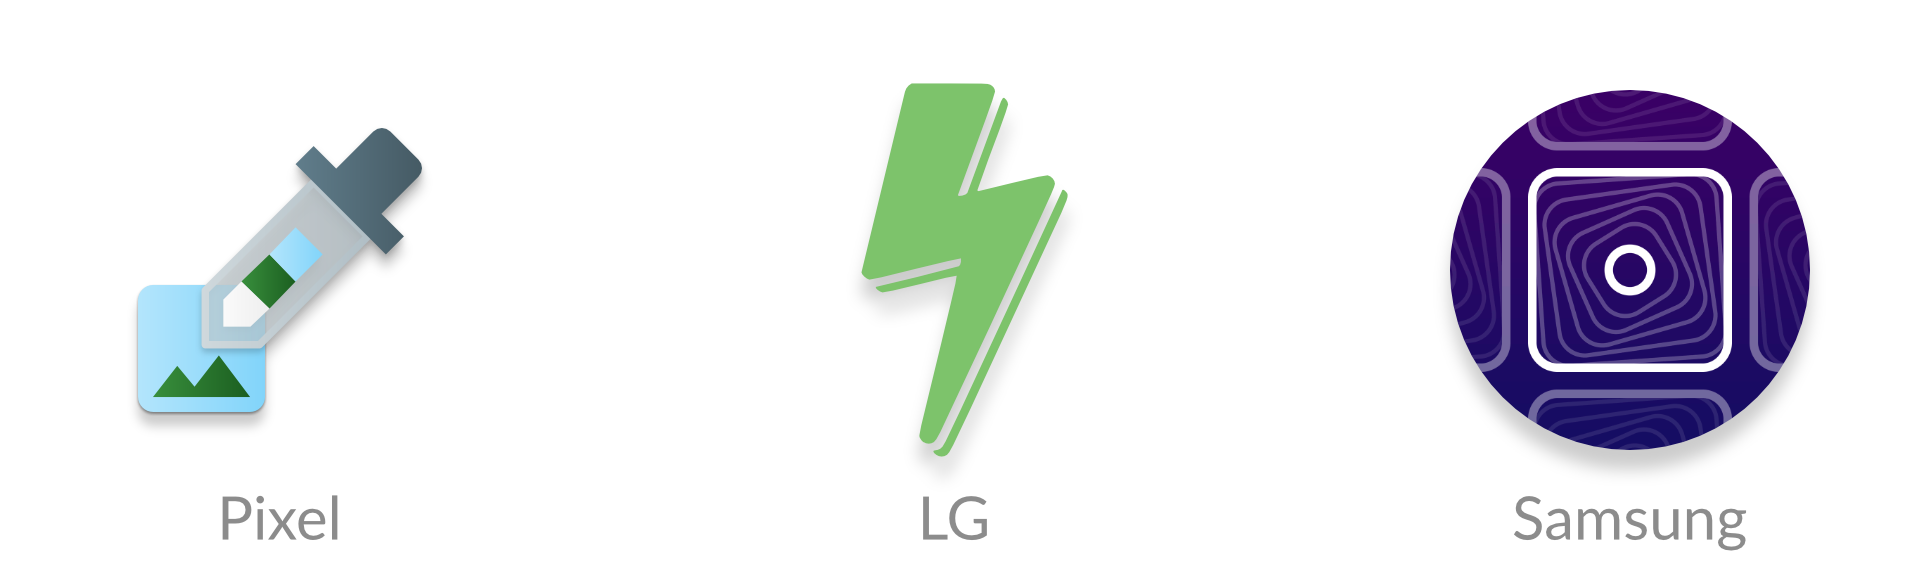
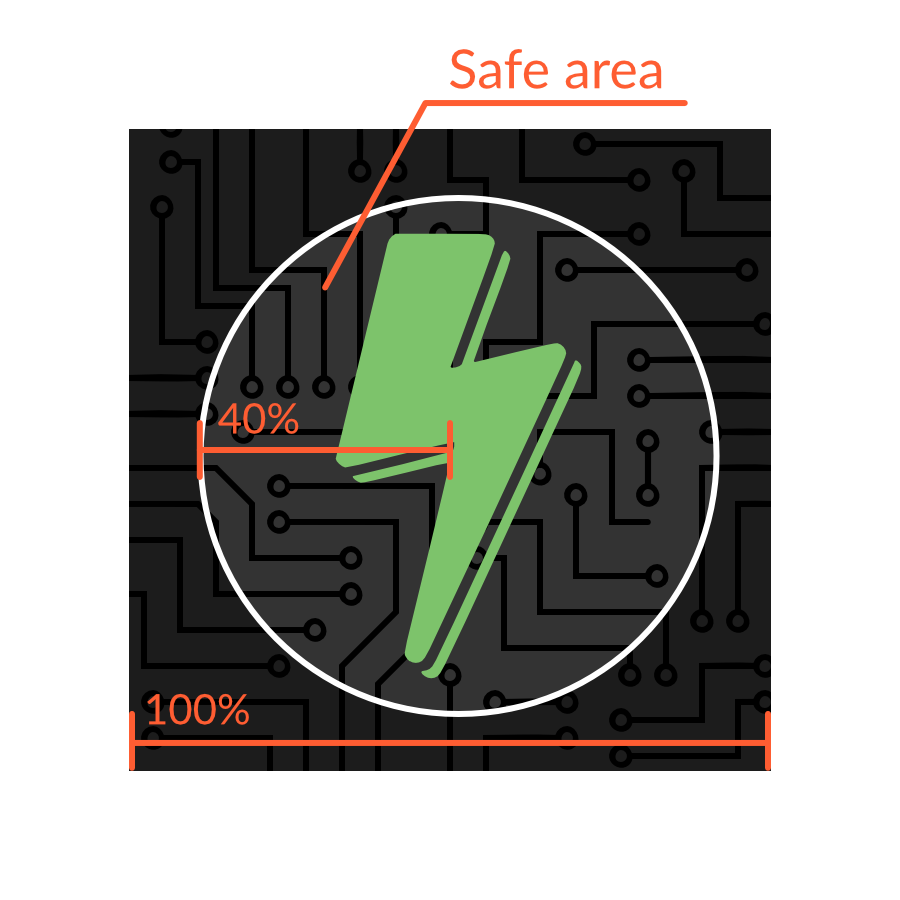
Maskable icons can be any size, and you can continue to use the same sizes that you’d use for normal transparent icons. But when designing the icon, ensure that important information is within a “safe zone” circle with a radius equal to 40% of the image’s size.
The safe zone
All pixels within this zone are guaranteed to be visible. Pixels outside the zone may be cropped off depending on the icon shape and the platform.
Warning: If you already have an Android app, avoid copying and pasting the icon from your Android app to your web app. The ratios are different, so your icons would look too small.
Adding the icon to your Web App Manifest
Once the icons are created, you can add an entry to your Web App Manifest similar to other icon assets. The Web App Manifest provides information about your web app in a JSON file, and includes an "icons" array.
Maskable icons use a special new key, "purpose", to indicate that they are meant to be used with icon masks. Icons with transparent backgrounds have a default "purpose" of "any", and icons can be used for multiple purposes by separating each option with a space.
"purpose": "maskable any"
Preview your icons
Do you want to see what your own maskable icons will look like? I’ve created a tool, Maskable.app, to help you evaluate how the icon appears in different shapes.
The app lets you preview your icon in various shapes that can be found on Android devices. I hope this tool helps you create unique icons for your Progressive Web Apps.
Once you’re satisfied with the results, you can start testing your app with Mozilla’s Reference Browser. This special browser is a testing ground for features before they reach Firefox Preview, and you can use it to check out how your PWA looks. Chrome is working on maskable icon support too.
Tools like PWACompat also have support for maskable icons. You can automatically generate icons for iOS and other devices based on your new maskable icons!
Time to build your own icons
If you want to more control over how your PWA icons are displayed on Android, maskable icons is the way to go. With maskable icons you can customize how your icon is displayed from edge-to-edge. Hopefully this article can get you started on creating your first maskable icon.
When it comes to mobile testing, two questions come in mind: "What are devices it supports and how do we test on all these devices?" It’s quite challenging to manually test on all devices and it’s not cost-effective either. Automating test cases saves of lots of time. Another challenge is running automation on actual devices.
There are multiple solutions that run automation on cloud, such as AWS Device Farm, Firebase Lab, Xamarin Test Cloud, Kobiton, Perfecto, Sauce Labs, and Experitest.
If you need to implement QR-scanning into your Xamarin (Forms) app, chances are high you will be using the ZXing.Net.Mobile library (as it is the most complete solution out there). In one of my recent projects, I wanted to do exactly that. I have used the library already before and thought it might be an easy plan.
Distorted Reality…
Reality hit me hard when I realized that the preview is totally distorted:
Did you know that nearly half of all global website traffic originates from mobile devices? People are not just browsing the web on mobile, they are also creating content using mobile apps from platforms like WordPress, Facebook, and other media sites.
Over the years, the WordPress mobile apps have seen significant improvements to help you easily publish content and manage your website using a mobile device. WordPress app is already available for both Android and iOS devices.
In this article, we will show you how to use the WordPress app on your iPhone, iPad, Android, and other mobile devices.
Why Use WordPress App on iPhone or iPad?
The WordPress app allows you to create content and manage your website from anywhere in the world specially when you’re traveling.
You can capture and upload photos, record and upload a video, write quick blog posts while riding the train or bus, walking around, or hanging out with friends. You can take your WordPress site with you in your pocket.
By default, the WordPress admin area is fully responsive and works well on mobile browsers.
However, this user interface is not optimal for mobile usage.
On the other, the WordPress app is designed to be touch-friendly, mobile optimized, and easy to use. It has an intuitive user interface which makes using the WordPress app a pleasure.
Writing without a physical keyboard had been an issue for many bloggers. The app combines your device’s native touch keyboard with WordPress formatting buttons, making it simple and easy to write posts on touch devices.
What Do You Need to Use the WordPress Mobile App?
Unlike other mobile apps, you actually need to have a WordPress website or a WordPress blog before you can start using the WordPress app.
The WordPress app works for both the popular free self-hosted WordPress.org platform as well as the WordPress.com blog hosting service.
Upon activation, you’ll need to click on the setup button to continue.
Next, you will be asked to sign in with a WordPress.com account. If you already have one, then you can go ahead and sign in. Otherwise, you can continue to signup for a free account.
During this process your self-hosted WordPress.org website will be connected to JetPack servers via your free WordPress.com account.
Once that’s done, you are now ready to start using the WordPress app on your mobile device(s).
Setting up the WordPress App on Your Mobile Device
First, you need to install the WordPress app on your device. It is available for Android, iOS (iPhones and iPads), Windows, MacOS, and Linux.
Next, you need to open the app and sign in to your WordPress.com account.
After that, the app will connect and fetch your website information.
You can now click on the continue button to move forward and view the app dashboard. This is where you will manage your WordPress site using the mobile app.
Editing Blog Posts with WordPress App
The WordPress app comes with an intuitive user interface to make it easy for you to create / edit blog posts and pages on your website.
You can view all your posts by clicking on the Blog Posts menu from the app dashboard. This will show you a list of your recent blog posts.
You can edit any blog post or tap the add new button to create a new blog post.
This will launch the WordPress app’s content editor. From here, you can write a new post using your phone’s native keyboard which will have a formatting toolbar at the bottom.
You can click on the ‘Add’ button to add images to your blog post. The app will allow you to upload images from your device, using your phone’s camera, or from the WordPress media library.
The app also allows you to change other post options. To access those options, tap on the three-dot menu on the top right corner of the edit screen and then select ‘Post settings’.
This will bring up the post settings menu. From here, you can add category and tags, featured image, change post status, and other options.
The WordPress app comes with built-in autosave feature which saves your posts locally on your device. Once you are done editing the blog post, simply click on the publish or update button at the top right corner.
The app will now upload the post to your website. You can visit your website in a browser to see it in action.
Switching to The New Block Editor in WordPress App
The app also includes the new WordPress block editor, but it is not turned on by default. In order to use the new editor with the app, you need to tap on your profile icon at the bottom and then select App Settings.
This will bring up the app settings menu where you can turn on the block editor.
You can now create WordPress posts in the app using the same block editor that you use on Desktop. However, the number of blocks available on the app is very limited at the moment.
Upload and Manage Media Files Using WordPress App
The WordPress app allows you to easily manage and upload photos / videos from your phone.
You can upload media while writing posts, or you can directly launch the Media library from the app dashboard.
This will launch the WordPress media library, and you’ll be able to see all media files in your library. You can edit media files, delete them, and even upload new photos and videos from your phone using the Add button.
Managing Comments on The Go Using The WordPress App
Comments help boost user engagement and build a community around your WordPress blog. The WordPress app makes it easy to moderate comments on the go.
You can view all comments on your site by visiting the Comments tab from the app dashboard. You’ll see comments awaiting moderation and approved comments.
You can click on any comment to view more options. This will allow you to edit the comment, approve or disapprove it, mark it as spam, or add a reply.
Performing Admin Tasks via WordPress App
The WordPress app comes with limited options to manage administrative tasks on your WordPress site via the app. Let’s take a look at these options and what you can do with them.
First, the WordPress app allows you to modify some of the site settings from the ‘Settings’ tab.
These settings are similar to the settings you see in your WordPress admin area. You can change site title, tagline, default category, timezone, and other options.
However, you will not see settings pages created by your WordPress plugins.
Speaking of plugins, the WordPress app does allow you to manage and even install plugins from the WordPress.org plugin directory.
However, you cannot use any of the plugins inside the app or access their settings. This feature is mainly useful when you need to activate or deactivate a plugin while away from your computer.
Same goes for WordPress themes. The app allows you to switch between installed themes on your WordPress site, but you cannot install new themes from the app or customize them.
Is it Possible to Run WordPress Entirely from The App?
No. Currently, it is not possible to efficiently run a WordPress site using only the WordPress app.
For example, you cannot manage plugins using the app. Plugins are an essential part of a WordPress website and you need them to extend your website’s functionality.
You also cannot access custom post types, SEO options, use cover images, use blocks created by plugins, and more.
Why and When to Use The WordPress App?
While the WordPress app is not enough to efficiently run the entire website, it does an excellent job of providing you an easy to use interface to write content, upload photos, and manage comments while away from your computer.
It can also be used when traveling to places with low connectivity. You can use some of the app features offline which allows you to save content as local drafts.
It can be used as a companion app to create content on the go and manage routine tasks like moderating comments.
Congratulations! You’ve decided you want to learn to code. Whether it’s because you’re interested in tech, or you want a high-paying career — you’re in the right place. How do you learn to code? It’s a...
Sometimes, it feels like people who can code seem like they have superpowers. But what is code, anyway? Code is all around us. Code is used in things like computers, phones, self-driving cars, and all other...
While mobile application developers are fed up with cookie cutter apps, Google is here with a new mobile application SDK to help app developers develop speedy and attractive mobile apps. Also, just like Android, Flutter is an open source SDK.
Why Is Flutter Different?
We have known many cross-platform development systems; why is Flutter different?
Did you know? 1.3 million new developer jobs will be created in the next 10 years. No matter your background or previous experience, there’s never been a better time to start your journey toward one of...
The latest versions of the mobile OS from Apple and Google will encrypt user data in a way that excludes access to these data from the companies themselves — developers of operating systems. Let's try to figure out what this means.
Encrypting Files "Out of the Box"
Law enforcement agencies are not very happy with this news. The rules of the games are changing. Now, even the presence of an order does not guarantee that they will be able to access the data that the user stores on his smartphone check all smartphones price here. Therefore, officials try to frighten the public and make them believe that the encryption of user data is bad and dangerous. To do this, they use their favorite slogans about pedophiles and terrorists.
2025 is the year where AR is estimated to be crucial in the business world. In this era of modern technology’s development, businesses must focus on implementing AR technology itself, as it is expected to expand up to $150 billion by 2020, according to Digi-Capital fundamental.
Augmented reality is the next big technology that delivers 3D high definition audio and video experience to its users. This technology uses markers and sensors to overlay digital environment in the real world that enable users with more intensely and vividly experiences.
PWA (Progressive Web Apps) have been with us for some time now. Yet, each time I try explaining it to clients, the same question pops up: "Will my users be able to install the app using app stores?" The answer has traditionally been no, but this changed with Chrome 72 which shipped a new feature called TWA (Trusted Web Activities).
Trusted Web Activities are a new way to integrate your web-app content such as your PWA with yourAndroid app using a protocol based on Custom Tabs.
In this article, I will use Netguru’s existing PWA (Wordguru) and explain step-by-step what needs to be done to make the application available and ready to be installed straight from the Google Play app store.
Some of the things we cover here may sound silly to any Android Developers out there, but this article is written from the perspective of a front-end developer, particularly one who has never used Android Studio or created an Android Application. Also, please do note that a lot of what we're covering here is still extremely experimental since it's limited to Chrome 72.
Step 1: Set up a Trusted Web Activity
Setting up a TWA doesn’t require you to write any Java code, but you will need to have Android Studio. If you’ve developed iOS or Mac software before, this is a lot like Xcode in that it provides a nice development environment designed to streamline Android development. So, grab that and meet me back here.
Create a new TWA project in Android Studio
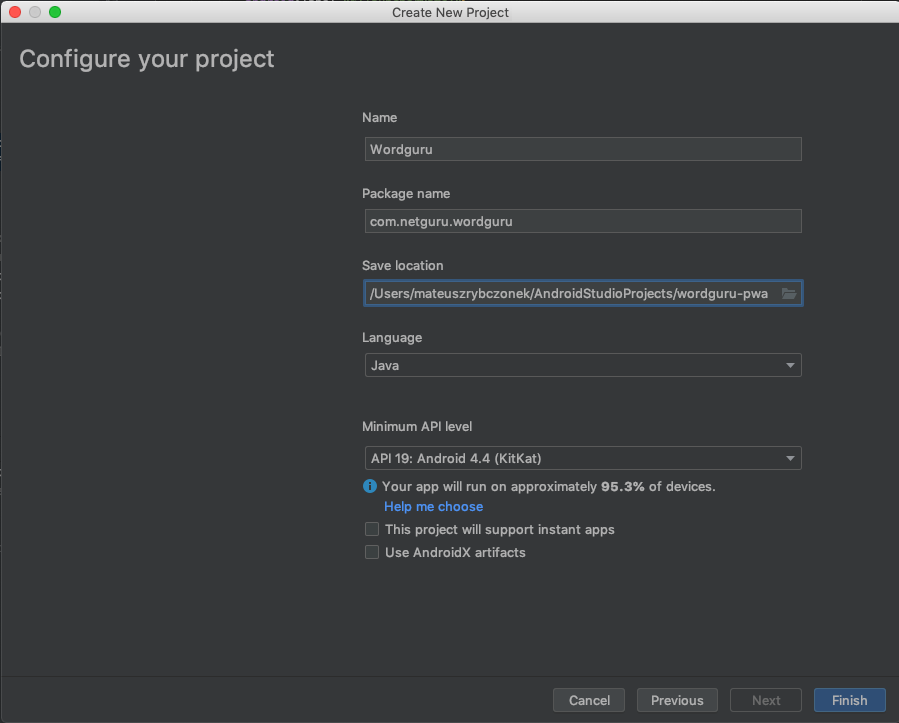
Did you get Android Studio? Well, I can’t actually hear or see you, so I’ll assume you did. Go ahead and crack it open, then click on "Start a new Android Studio project." From there, let’s choose the "Add No Activity" option, which allows us to configure the project.
The configuration is fairly straightforward, but it’s always good to know what is what:
Name The name of the application (but I bet you knew that).
Package name: An identifier for Android applications on the Play Store. It must be unique, so I suggest using the URL of the PWA in reverse order (e.g. com.netguru.wordguru).
Save location: Where the project will exist locally.
Language: This allows us to select a specific code language, but there’s no need for that since our app is already, you know, written. We can leave this at Java, which is the default selection.
Minimum API level: This is the version of the Android API we’re working with and is required by the support library (which we’ll cover next). Let’s use API 19.
There are few checkboxes below these options. Those are irrelevant for us here, so leave them all unchecked, then move on to Finish.
Add TWA Support Library
A support library is required for TWAs. The good news is that we only need to modify two files to fill that requirement and the both live in the same project directory: Gradle Scripts. Both are named build.gradle, but we can distinguish which is which by looking at the description in the parenthesis.
There’s a Git package manager called JitPack that’s made specifically for Android apps. It’s pretty robust, but the bottom line is that it makes publishing our web app a breeze. It is a paid service, but I’d say it’s worth the cost if this is your first time getting something into the Google Play store.
Editor Note: This isn’t a sponsored plug for JitPack. It’s worth calling out because this post is assuming little-to-no familiarity with Android Apps or submitting apps to Google Play and it has less friction for managing an Android App repo that connects directly to the store. That said, it’s totally not a requirement.
Once you’re in JitPack, let’s connect our project to it. Open up that build.gradle (Project: Wordguru) file we just looked at and tell it to look at JitPack for the app repository:
There are also variables called manifestPlaceholders that we’ll cover in the next section. For now, let’s add the following to define where the app is hosted, the default URL and the app name:
Every Android app has an Android App Manifest (AndroidManifest.xml) which provides essential details about the app, like the operating system it’s tied to, package information, device compatibility, and many other things that help Google Play display the app’s requirements.
The thing we’re really concerned with here is Activity (<activity>). This is what implements the user interface and is required for the "Activities" in "Trusted Web Activities."
Funny enough, we selected the "Add No Activity" option when setting up our project in Android Studio and that’s because our manifest is empty and contains only the application tag.
Let’s start by opening up the manfifest file. We’ll replace the existing package name with our own application ID and the label with the value from the manifestPlaceholders variables we defined in the previous section.
Then, we’re going to actually add the TWA activity by adding an <activity> tag inside the <application> tag.
And that, my friends, is Step 1. Let’s move on to Step 2.
Step 2: Verify the relationship between the website and the app
TWAs require a connection between the Android application and the PWA. To do that, we use Digital Asset Links.
The connection must be set on both ends, where TWA is the application and PWA is the website.
To establish that connection we need to modify our manifestPlaceholders again. This time, we need to add an extra element called assetStatements that keeps the information about our PWA.
Now, we need to add a new meta-data tag to our application tag. This will inform the Android application that we want to establish the connection with the application specified in the manifestPlaceholders.
That’s it! we just established the application to website relationship. Now let’s jump into the conversion of website to application.
To establish the connection in the opposite direction, we need to create a .json file that will be available in the app’s /.well-known/assetlinks.json path. The file can be created using a generator that’s built into Android Studio. See, I told you Android Studio helps streamline Android development!
We need three values to generate the file:
Hosting site domain: This is our PWA URL (e.g. https://wordguru.netguru.com/).
App package name: This is our TWA package name (e.g. com.netguru.wordguru).
App package fingerprint (SHA256): This is a unique cryptographic hash that is generated based on Google Play Store keystore.
We already have first and second value. We can get the last one using Android Studio.
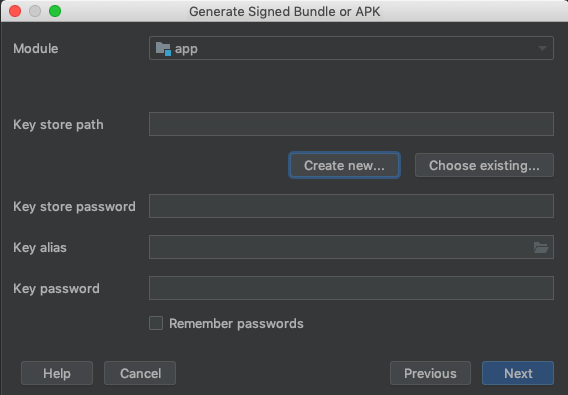
First we need to generate signed APK. In the Android Studio go to: Build → Generate Signed Bundle or APK → APK.
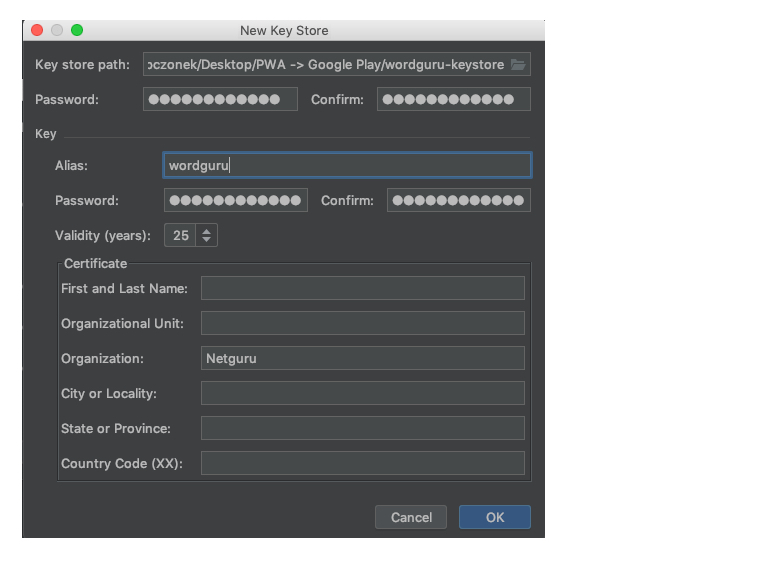
Next, use the existing keystore, if you already have one. If you need one, go to "Create new…" first.
Then let’s fill out the form. Be sure to remember the credentials as those are what the application will be signed with and they confirm your ownership of the application.
This will create a keystore file that is required to generate the app package fingerprint (SHA256). This file is extremely important as it is works as a proof that you are the owner of the application. If this file is lost, you will not be able to do any further updates to your application in the store.
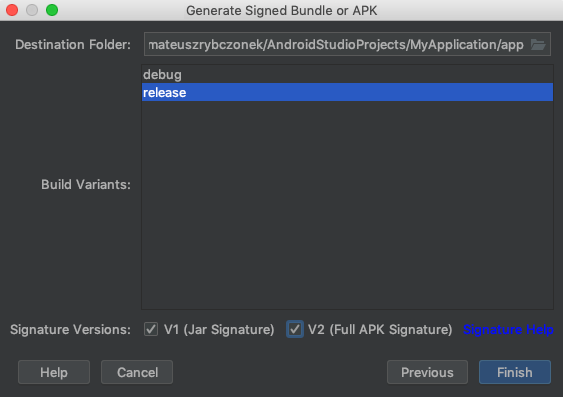
Next up, let’s select type of bundle. In this case, we’re choosing "release" because it gives us a production bundle. We also need to check the signature versions.
This will generate our APK that will be used later to create a release in Google Play store. After creating our keystore, we can use it to generate required app package fingerprint (the SHA256).
Let’s head back to Android Studio, and go to Tools → App Links Assistant. This will open a sidebar that shows the steps that are required to create a relationship between the application and website. We want to go to Step 3, "Declare Website Association" and fill in required data: Site domain and Application ID. Then, select the keystore file generated in the previous step.
After filling the form press "Generate Digital Asset Links file" which will generate our assetlinks.json file. If we open that up, it should look something like this:
This is the file we need to make available in our app’s /.well-known/assetlinks.json path. I will not describe how to make it available on that path as it is too project-specific and outside the scope of this article.
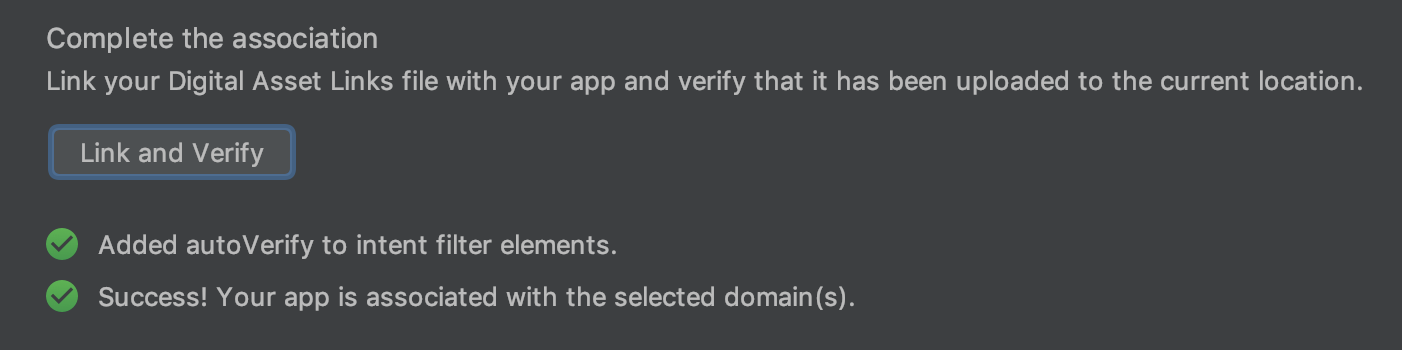
We can test the relationship by clicking on the "Link and Verify" button. If all goes well, we get a confirmation with "Success!"
Yay! We’ve established a two-way relationship between our Android application and our PWA. It’s all downhill from here, so let’s drive it home.
Step 3: Get required assets
Google Play requires a few assets to make sure the app is presented nicely in the store. Specifically, here’s what we need:
App Icons: We need a variety of sizes, including 48x48, 72x72, 96x96, 144x144, 192x192… or we can use an adaptive icon.
High-res Icon: This is a 512x512 PNG image that is used throughout the store.
Feature Graphic: This is a 1024x500 JPG or 24-bit PNG (no alpha) banner that Google Play uses on the app details view.
Screenshots: Google Play will use these to show off different views of the app that users can check out prior to downloading it.
Let’s go to the last step and finally push our app to the store.
Using the APK that we generated earlier (which is located in the AndroidStudioProjects directory), we need to go to the Google Play console to publish our application. I will not describe the process of publishing an application in the store as the wizard makes it pretty straightforward and we are provided step-by-step guidance throughout the process.
It may take few hours for the application to be reviewed and approved, but when it is, it will finally appear in the store.
If you can’t find the APK, you can create a new one by going to Build → Generate signed bundle / APK → Build APK, passing our existing keystore file and filling the alias and password that we used when we generated the keystore. After the APK is generated, a notice should appear and you can get to the file by clicking on the "Locate" link.
Congrats, your app is in Google Play!
That’s it! We just pushed our PWA to the Google Play store. The process is not as intuitive as we would like it to be, but still, with a bit of effort it is definitely doable, and believe me, it gives that great filling at the end when you see your app displayed in the wild.
It is worth pointing out that this feature is still very much early phase and I would consider it experimental for some time. I would not recommend going with a production release of your application for now because this only works with Chrome 72 and above — any version before that will be able to install the app, but the app itself will crash instantly which is not the best user experience.
Also, the official release of custom-tabs-client does not support TWA yet. If you were wondering why we used raw GitHub link instead of the official library release, well, that’s why.
In this Refcard, you will learn everything you need to know about getting started with this open-source tool, from installing the Appium server to running your first tests. Download this Refcard now to see why Appium is "Mobile App Automation Made Awesome."
Chrome on Android’s Data Saver feature helps by automatically optimizing web pages to make them load faster. When users are facing network or data constraints, Data Saver may reduce data use by up to 90% and load pages two times faster, and by making pages load faster, a larger fraction of pages actually finish loading on slow networks. Now, we are securely extending performance improvements beyond HTTP pages to HTTPS pages and providing direct feedback to the developers who want it.
To show users when a page has been optimized, Chrome now shows in the URL bar that a Lite version of the page is being displayed.
All of this is pretty neat but I think the name Lite Pages is a little confusing as it’s in no way related to AMP and Tim Kadlec makes that clear in his notes about the new feature:
Lite pages are also in no way related to AMP. AMP is a framework you have to build your site in to reap any benefit from. Lite pages are optimizations and interventions that get applied to your current site. Google’s servers are still involved, by as a proxy service forwarding the initial request along. Your URL’s aren’t tampered with in any way.
A quick glance at this seems great! We don’t have to give up ownership of our URLs, like with AMP, and we don’t have to develop with a proprietary technology — we can let Chrome be Chrome and do any performance things that it wants to do without turning anything on or off or adding JavaScript.
But wait! What kind of optimizations does a Lite Page make and how do they affect our sites? So far, it can disable scripts, replace images with placeholders and stop the loading of certain resources, although this is all subject to change in the future, I guess.
The optimizations only take effect when the loading experience for users is particularly bad, as the announcement blog post states:
...they are applied when the network’s effective connection type is “2G” or “slow-2G,” or when Chrome estimates the page load will take more than 5 seconds to reach first contentful paint given current network conditions and device capabilities.
It’s probably important to remember that the reason why Google is doing this isn’t to break our designs or mess with our websites — they’re doing this because there are serious performance concerns with the web, and those concerns aren't limited to developing nations.
About a month or so ago, I wrote a tutorial on getting started with HERE using Java and the Android SDK. Even though documentation for the job already existed, I wanted to put my own spin on the process to try to make it a little easier.
While Java is great, it is becoming a relic of time and is slowly being replaced with Kotlin, which is considered to be the new hotness. Kotlin can compile to bytecode for the JVM, and in these circumstances, we can reproduce all of our Java applications with Kotlin, an entirely different but increasingly popular language.
In this tutorial, we’ll learn more about Fragments — what are they, how to use them, and how to create them.
What Are Fragments?
A Fragment represents a portion of the user interface. You can combine multiple fragments in a single activity to build a multi-pane UI and reuse a fragment in multiple activities.
Which programming language comes to mind when you hear Android app development? Most probably, you will immediately think of Java. This is because of the vast number of Android apps that are developed in Java.
Developers around the world are still wondering if Kotlin has any future or not. But with the introduction of Kotlin in Google I/O two years back, Kotlin has made its own place in the Android application development market.
The Google Form Notifications add-on sends the form data in an email message each time a respondent submits your Google Form. The add-on can also send automated emails to form respondents as soon as they complete your Google Form.
The email notifications add-on for Google Forms can also send push notifications to your mobile phones and tablets as well. That means when respondents complete and submit your online Google Form, you’ll instantly get a real-time notification (sample) on your iPhone or Android phone.
The rich push notifications on your mobile can include answers from the Google Form as well as a link to the submitted form so you can view the form answers on your mobile device directly.
A fast response time is a key to success, especially in areas like customer service and closing sales leads, and mobile notifications will ensure that your important form entries are never lost in the daily deluge of emails.
Setup Mobile Notifications for Google Forms
It takes a few easy steps (videotutorial) to get up and running.
Install the IFTTT mobile app on your Android or iPhone. It will work on the iPad and Android tablets as well.
Next, we need to create a connection between our Google Form and the IFTTT app so that mobile notifications are triggered on the mobile phone immediately after the form is submitted.
1. Configure IFTTT
Open ifttt.com on your desktop and create a new applet. Choose the MakerWebhooks service for if-this condition and select the “Receive a web request” trigger. Set the Event name as the name of your Google Form.
For if-this-then-that action, choose Notifications as the service and choose either “Send a notification from IFTTT app” or “Send a rich notification”. Choose the latter if you want to include the form response URL in the notification that can directly view on the mobile phone.
On the next screen, put {{Value 1}} in the Title field, {{Value 2}} for Message and {{Value 3}} for Link URL. Click the “Create Action” button and then press “Finish” (this is important) to make your IFTTT applet live.
2. Configure Google Forms
Open any Google Form, go to the Add-ons menu, choose Email Notifications and then select Mobile Notifications. Enter the Event name, the IFTTT key, and the notification text. You can put any {{form field name}} in the text and these will be replaced with actual values filled by the user.
That’s it. Click the Test button to test the connection between the form and your mobile phone. If it works, click Save to enable mobile notifications.
If you have multiple Google Forms, you need to create separate IFTTT applets for each form and the event name should be unique for each applet.
Internally, when someone submits your form, the Google Addon triggers and sends a web request to the IFTTT service which in turn pushes the notification to your mobile device.
Troubleshooting Mobile Notifications
Ensure that your mobile is connected to the Internet.
The event name in the applet should match the event name in the form configuration.
You are logged into the IFTTT app on your mobile phone.
Check the activity log to ensure that notifications are getting sent.


