Image Alt Text vs Image Title in WordPress – What’s the Difference?

A lot of content on the web includes images. However, not many website owners optimize their images for speed or better search rankings.

Even though WordPress comes with the option to add alt text and an image title, often beginners do not understand the difference and how to use them.

In this article, we will share the difference between image alt text vs image title in WordPress, so you can improve your image SEO.

Image Alt Text vs Image Title in WordPress - What's the Difference?

Here’s what we’ll cover in this tutorial:

What’s the Difference Between Alt Text and Image Title?

‘Alt text’ is short for ‘alternate text’ and is an attribute that is added to an HTML image tag. The text describes the image, so visitors who can’t see the image and search engine bots will understand what the image is about.

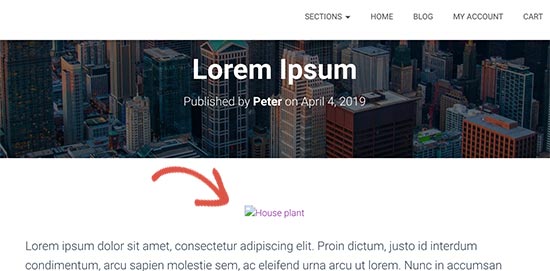
If an image on your WordPress website can’t be found or displayed for some reason, then the alt text will be shown instead, as you can see in the following screenshot.

Alt text displayed next to a broken image icon

Alt text is different from the image’s title. The title will be displayed in a small popup box when you bring your mouse cursor over the image.

An image with the title text

Alt text and image titles are also used to improve the accessibility of your website for those with poor vision and who use screen reader devices to read your site’s content.

When the screen reader comes to an image, it will read the alt text. Depending on the user’s settings, it may also read the title text.

For both accessibility and search engine optimization (SEO), alt text is more important than title text. This is why we strongly recommend including alt text for all your images.

How to Add Alt Text to an Image in WordPress

WordPress allows you to easily add alt text to your images. You can do this from the block editor, the classic editor, or the WordPress Media Library.

Adding Alt Text in the Block Editor

Simply create a new post or page or edit an existing one, and add an Image block.

Add an Image Block

If you’re not sure how to add a block or you need some extra help with the block editor, then just check out our tutorial on how to use the WordPress block editor.

Now you need to upload your image or drag and drop it into the Image block. You can then set the alt text on the right-hand side of the page.

Adding alt text to an image in the WordPress block editor

Adding Alt Text in the Classic Editor

If you’re still using the classic WordPress editor, then you can add image alt text when adding the image.

First, click on ‘Add Media’ above the posting box.

Click 'Add Media' in the classic editor to add an image to your post

After that, you should either upload the image from your computer or click the ‘Media Library’ tab to view images you’ve already uploaded.

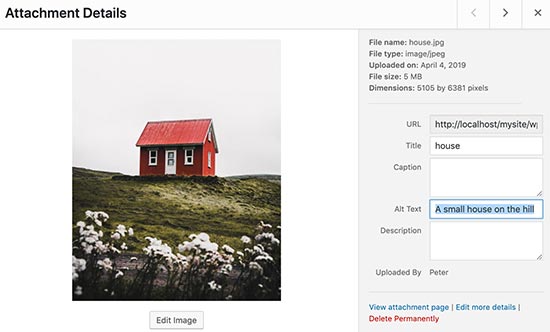
Next, click on the image you want in order to select it, and then type the alt text you want into the ‘Attachment Details’ of your image.

Adding alt text to an image in the classic editor

Adding Alt Text in the Media Library

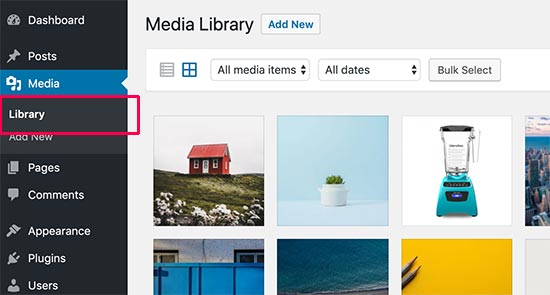
You can also add alt text to an image by going to Media » Library and clicking on the image to edit it.

Viewing or editing the alt text for your image in the WordPress media library

Remember, this won’t change the alt text for any instances of that image that you’ve already inserted into posts or pages. However, if you add the image to a post or page after adding alt text here, then the alt text will be included with it.

How to Add Image Titles in WordPress

It’s important to understand that there are two types of titles that you can add to your images.

First, there is the default image title WordPress uses internally to identify media files in the Media Library and attachments pages. Second, there is the HTML image title attribute added to images in your posts and pages.

Let’s take a look at how to add both types of titles.

Adding the WordPress Image Title in the Media Library

You can add WordPress media titles to your images using the Media Library. When you edit an image in the Media Library, you will see a ‘Title’ field.

Adding an Image Title in the WordPress Media Library

This title is used by WordPress to identify the image. When you click the ‘View attachment page’ link at the bottom of the screen, you’ll see the title is used as the title on that page.

Viewing the image's attachment page, with the image title shown

The WordPress media title isn’t necessary for image SEO or for users with screen readers. While it may be helpful in some cases, it’s not as useful as the image’s HTML title attribute. So how do you create that?

Pro Tip: Would you like to automatically use the WordPress media title as the image’s title attribute in your posts and pages? Take a look at the section below where we show you how to do this using All in One SEO Pro.

Adding an HTML Image Title Attribute in the Block Editor

It’s easy to add a title attribute in the block editor. Simply click the image and then click the down arrow next to ‘Advanced’ to show the advanced image options.

Adding the Title Attribute in the Block Editor

Now you can simply type the title in the ‘Title Attribute’ field.

Adding an HTML Image Title Attribute in the Classic Editor

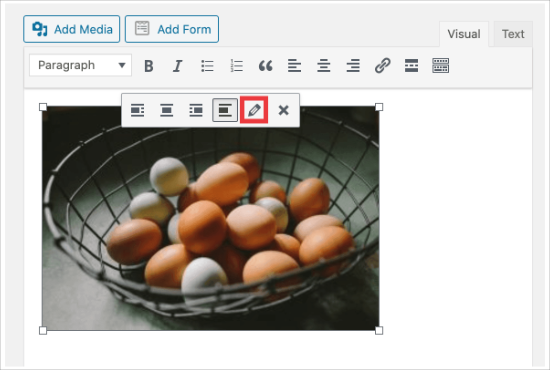
Adding a title attribute using the old classic editor is similar. You can add the title attribute by clicking on an image and then clicking the pencil icon.

Editing an image in the WordPress classic editor

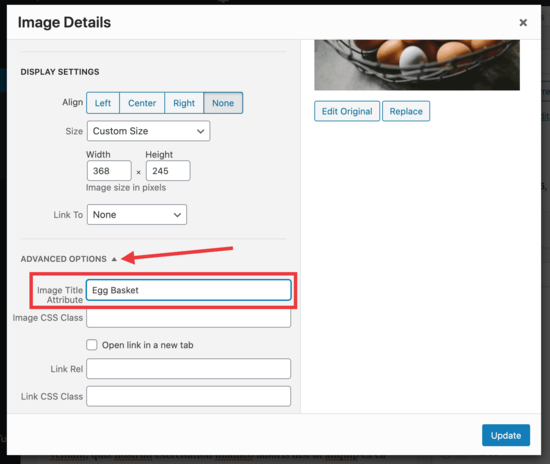
You’ll then see the ‘Image Details’ screen. To set the image title attribute, you need to click the little down arrow next to ‘Advanced Options’ at the bottom.

Click the downward arrow to view the Advanced details for your image

You can then set the image’s title attribute. Make sure you click the ‘Update’ button at the bottom of the screen when you’re done.

How to Automatically Set Alt Text and Image Titles Using AIOSEO

All in One SEO (AIOSEO) is the best WordPress SEO plugin on the market. It will add a proper image sitemap and other SEO features to improve your SEO ranking. It also lets you automatically set your alt text and image titles, and more.

The first thing you need to do is install and activate the All in One SEO plugin. For more details, see our step-by-step guide on how to install a WordPress plugin. To use the Image SEO feature, you will need the Plus plan or above.

Upon activation, the plugin will launch the setup wizard automatically. You can learn how to configure the plugin in our guide on how to set up All in One SEO correctly.

Now you need to navigate to All in One SEO » Search Appearance and then click on the ‘Image SEO’ tab. After that, you’ll have to click the ‘Activate Image SEO’ button to enable the premium image SEO features.

Activating the Image SEO Module in AIOSEO

Setting Image Titles Using All in One SEO

Make sure that you are looking at the ‘Title’ tab of the Image SEO page. Here you can choose tags that will set the format used to automatically generate title attributes for your images.

For example, if you include the ‘+ Image Title’ tag, then each image in your posts and pages will automatically use the WordPress media title in the HTML title attribute.

Customizing the Image Title in AIOSEO

You can also add other tags, such as your website title, to your image title attribute. All in One SEO can even strip punctuation from the title and change its capitalization.

Setting Alt Text Using All in One SEO

Next, you need to click the ‘Alt Tag’ tab on the AIOSEO’s Image SEO page. Here you can automatically format the alt text of your images.

By default, AIOSEO will simply use the image’s alt text. If you like, you can also add your website’s title and other information to the alt text of each image on your website.

Customizing the Alt Tag in AIOSEO

Why Use Alt Text and Image Titles in WordPress?

We strongly recommend using alt text for all images. Here on WPBeginner, we also add a title to all images. However, this is less important than the alt text.

Alt text is important because Google focuses on it as a ranking factor for images. It is also used by screen readers to help visitors with impaired vision to fully engage with your content.

You should never just stuff keywords into alt and title tags. It’s important that you make them descriptive and helpful so that they’re useful for visitors who need them. You can use your keywords where relevant, but don’t overdo it.

For example, if you’re writing an article about the best WordPress hosting, then your target keyword could be “best WordPress hosting”.

You might also have a screenshot in your article showing users how to set up an account with a popular web host like Bluehost. Let’s take a look at some good and bad examples of alt text for that image:

  • “Account setup” is not very descriptive and also doesn’t include anything related to your keyword.
  • “Best WordPress hosting, WordPress hosting, best web hosting for WordPress” doesn’t describe the image and is stuffed with keywords.
  • “Setting up a WordPress hosting account” is much better as it’s descriptive and uses part of the keyword in a natural and appropriate way.

We hope this article helped you understand the difference between image alt text and image title in WordPress. You may also want to learn how to optimize images for the web, and check out our list of the best WordPress SEO plugins and tools.

If you liked this article, then please subscribe to our YouTube Channel for WordPress video tutorials. You can also find us on Twitter and Facebook.

The post Image Alt Text vs Image Title in WordPress – What’s the Difference? first appeared on WPBeginner.

Just How Long Should Alt Text Be?

I teach a class over at the local college here in Long Beach and a majority of the content is hosted on the Canvas LMS so students can access it online. And, naturally, I want the content to be as accessible as possible, so thank goodness Canvas has a11y tooling built right into it.

But it ain’t all that rosy. It makes assumptions like all other a11y tooling and adheres to guidelines that were programmed into it. It’s not like the WCAG is baked right in and updated when it updates.

The reason this is even on my mind is that Jeremy yesterday described his love for writing image descriptions:

I enjoy writing alt text. I recently described how I updated my posting interface here on my own site to put a textarea for alt text front and centre for my notes with photos. Since then I’ve been enjoying the creative challenge of writing useful—but also evocative—alt text.

I buy into that! Writing alt text is a challenge that requires a delicate dance between the technical and the creative. It’s both an opportunity to make content more accessible and enhance the user experience.

One of those programmed guidelines in the Canvas tool is a cap of 120 characters on alt text. Why 120? I dunno, I couldn’t find any supporting guideline or rule for that exact number. One answer is that screen readers stop announcing text after 125 characters, but that’s apparently untrue, at least today. The general advice for how long alt text should be comes in varying degrees:

  • Jake Archibald talks of length in terms of emotion. Detail is great, but too much detail might distort the focal point, which makes total sense.
  • Dave sees them as short, succinct paragraphs.
  • Carrie Fisher suggests a 150-character limit not because screen readers will truncate them but more as a mental note that maybe things are getting too descriptive.
  • Daniel Göransson says in this 2017 guide that it comes down to context and knowing when certain details of an image are worth additional explanation. But he generally errs on the side of conciseness.

So, how long should alt text be? The general consensus here is that there is no hard limit, but more of a contextual awareness of what purpose the image serves and adapting to it accordingly.

Which gets me back to Jeremy’s article. He was writing alt text for a group of speaker headshots and realized the text was all starting to sound the same. He paused, thought about the experience, compared it to the experience of a sighted user, and created parity between them:

The more speakers were added to the line-up, the more I felt like I was repeating myself with the alt text. […] The experience of a sighted person looking at a page full of speakers is that after a while the images kind of blend together. So if the alt text also starts to sound a bit repetitive after a while, maybe that’s not such a bad thing. A screen reader user would be getting an equivalent experience.

I dig that. So if you’re looking for a hard and fast rule on character counts, sorry to disappoint. Like so many other things, context is king and that’s the sort of thing that can’t be codified, or even automated for that matter.

And while we’re on the topic, just noticed that Twitter has UI to display alt text:

Now if only there was more contrast between that text and the background… a11y is hard.

Just How Long Should Alt Text Be? originally published on CSS-Tricks. You should get the newsletter.

Your Image Is Probably Not Decorative

Eric doesn’t mince words, especially in the title, but also in the conclusion:

In modern web design and development, displaying an image is a highly intentional act. Alternate descriptions allow us to explain the content of the image, and in doing so, communicate why it is worth including.

Just because an image displays something fanciful doesn’t mean it isn’t worth describing. Announcing its presence ensures that anyone, regardless of ability or circumstance, can fully understand your digital experience.

I like the bit where, even when a CSS background-image is used, you can still use a “spacer GIF” to add alt text. And speaking of alt descriptions, did you know even Open Graph images can have them?

Direct Link to ArticlePermalink


The post Your Image Is Probably Not Decorative appeared first on CSS-Tricks. You can support CSS-Tricks by being an MVP Supporter.

How to Easily Add Title Attribute to Images in WordPress

Do you want to add the title attribute to images in WordPress? The title attribute makes images on your WordPress site more accessible and SEO friendly.

Similar to the alternate text, the title tag allows you to provide additional information about your image. This helps screen readers and search engines understand the context of the image inside your article.

In this article, we’ll show you how to easily add title attributes to images in WordPress.

Adding the title attribute to images in WordPress

What is the Title Attribute in Images?

The title attribute in images allows you to add a text description of your image. This makes it easy for screen readers and search engine bots to understand the image and it’s context.

We will show you some code examples to explain how the title attribute is used in HTML. But don’t worry, you wouldn’t need to add any HTML code to your website.

Normally, you can display images with the HTML tag like this:

<img src="/path/to/image/fruits.jpg" width="100" height="100" />

However, web crawlers, bots, and screen reading devices cannot actually see your images. To help those devices, you can use the alternate text and title text attribute in your images.

So, to help search engines and bots learn what your images are, you can add an alternate text attribute to your image tag.

The alternate tag attribute describes what your image is, and it is more important than title attribute. Here’s what it looks like:

<img src="/path/to/image/fruits.jpg" width="100" height="100" alt="A fruit basket" />

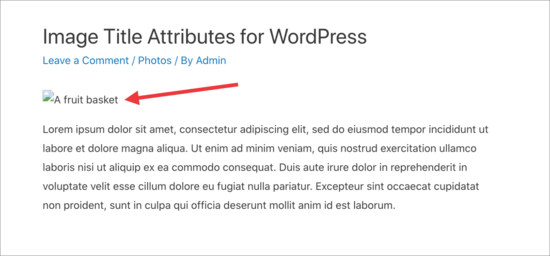
The alternate tag is also displayed when an image link is broken, not found, or when a browser is unable to load images. You’ll see the little image icon with the alternate tag next to it.

Broken image path

To make it easier for users with screen readers and accessibility needs, you can also add a title attribute to the image, like this:

<img src="/path/to/image/fruits.jpg" width="100" height="100" alt="A fruit basket" title="Fruit Basket" />

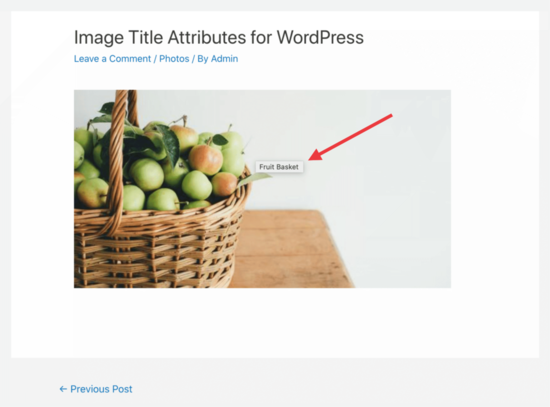
This title attribute appears in a popup when you hover your mouse over the image. Those who use screen reader software can configure their software to read this title.

Image title attribute

Using both the alternate text and the title attribute helps your image SEO, so you can bring more traffic to your site from search engines.

Adding Title Attribute to Images in WordPress

WordPress allows you to easily add alt text and title attributes within the content editor. First, go to Posts » Add New and create a post.

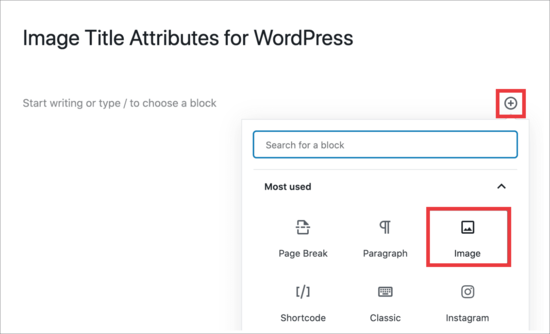
Click on the ‘+’ icon, and select the ‘image’ block to insert an image into your post or page.

Add image block

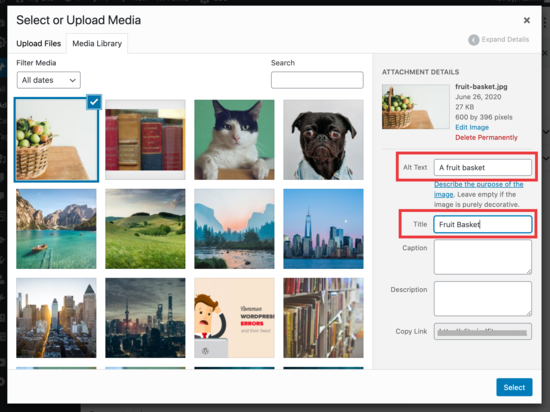
You’ll be prompted to upload or select an image from your media library. When you select your image, you’ll have the option to give it a title and enter your alt text.

Add alt and title to image

Important: This title is not the title attribute used in HTML. This one is used by WordPress internally to show your images in Media Library.

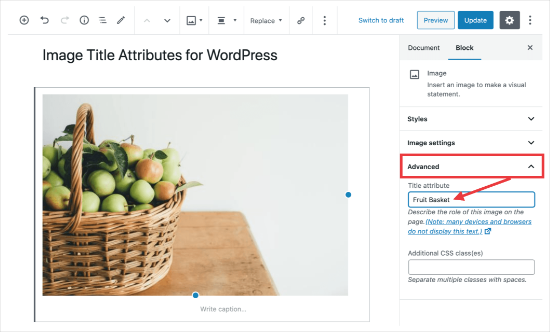
To add the actual title attribute, you will need to click on your image to view image settings in the right column.

Now click to expand the ‘Advanced’ tab and input the text you want to use for the title attribute. We wrote ‘Fruit Basket’ because that’s telling the internet what the image is.

Add title attribute

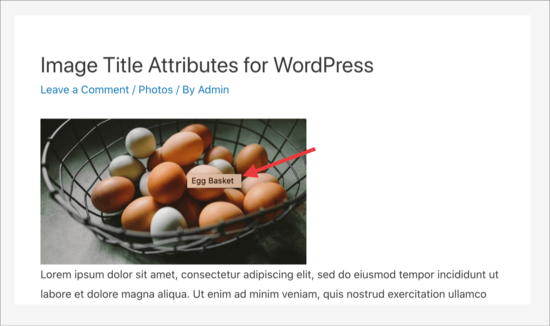
Now, when you view your site and hover your mouse over the image, you’ll see the popup that reads ‘Fruit Basket.’

Image title attribute

Add Title Attribute to Images in WordPress Classic Editor

If you are still using the older classic editor in WordPress, then you can still add title attribute by following similar steps.

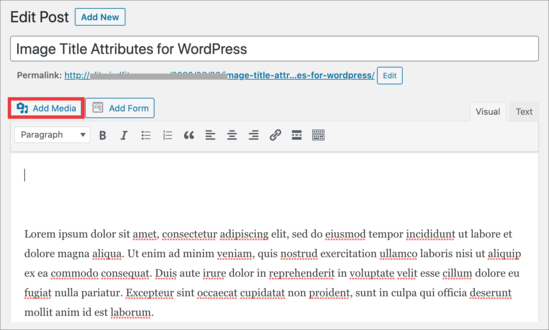
In the classic editor, you’ll click the ‘Add Media’ button and then select your image.

Add image classic editor

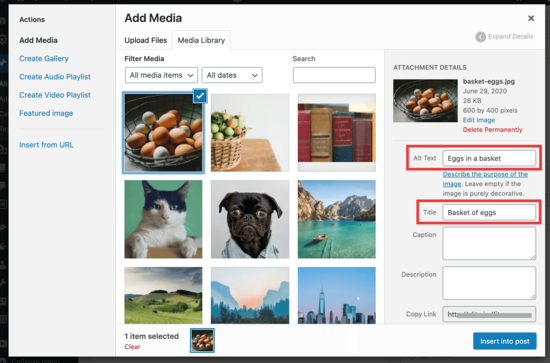
Now, select the image you want to add to your post or page and fill out the Alt Text field and Title field.

Please keep in mind that this title is used by WordPress internally and is not the image title attribute.

Select image classic editor

Click the ‘Insert into post’ button at the bottom of your screen and then you’ll see your image in your classic post editor.

Edit image in post

From there, click to select your image and then click on the little pencil icon. This will bring up the ‘Image Details’ popup. From here, you need to click the Advanced Options dropdown to enter your Image Title Attribute.

Image title attribute field

Don’t forget to click on the ‘Update’ button at the bottom, then save your post and check it in your browser. you’ll see the popup showing your image title attribute when you hover your mouse over the image.

Image title attribute popup

We hope this article helped you easily add the title attribute to images in WordPress. You may also want to take a look at how to fix most common image issues in WordPress, and how to save images optimized for web speed.

If you liked this article, then please subscribe to our YouTube Channel for WordPress video tutorials. You can also find us on Twitter and Facebook.

The post How to Easily Add Title Attribute to Images in WordPress appeared first on WPBeginner.
Weekly Platform News: CSS column-span Property, ADA applies to Websites, Auto-generated Image Descriptions

In this week's roundup: multi-column layouts gain wide support, the ADA means more A11y for retailers, and Google is doing something about all the empty image alt attributes in the wild.

The CSS column-span property will soon be widely supported

The CSS column-span property, which has been supported in Chrome and Safari since 2010 (and IE since 2012), is finally coming to Firefox in version 71 (in December).

This feature enables elements that span across all columns in a multiple-column layout. In the following demo, the headings span across both columns.

article {
  column-count: 2;
}

h2 {
  column-span: all;
}

See the Pen
Demo of CSS column-span: all
by Šime Vidas (@simevidas)
on CodePen.

(via Ting-Yu Lin)

The Americans with Disabilities Act applies to websites

In the United States, the Americans with Disabilities Act (ADA) applies to websites, which means that people can sue retailers if their websites are not accessible.

Domino’s Pizza’s appeal was recently turned down by the Supreme Court, so the lawsuit against them for failing to make their website accessible to screen reader users will now resume in district court.

Guillermo Robles, who is blind, filed suit in Los Angeles three years ago and complained he had been unable to order a pizza online because the Domino’s website lacked the software that would allow him to communicate. He cited the ADA, which guarantees to people with a disability “full and equal enjoyment of the goods and services ... of any place of public accommodations.”

(via David G. Savage)

Google announces automatically generated image descriptions for Chrome

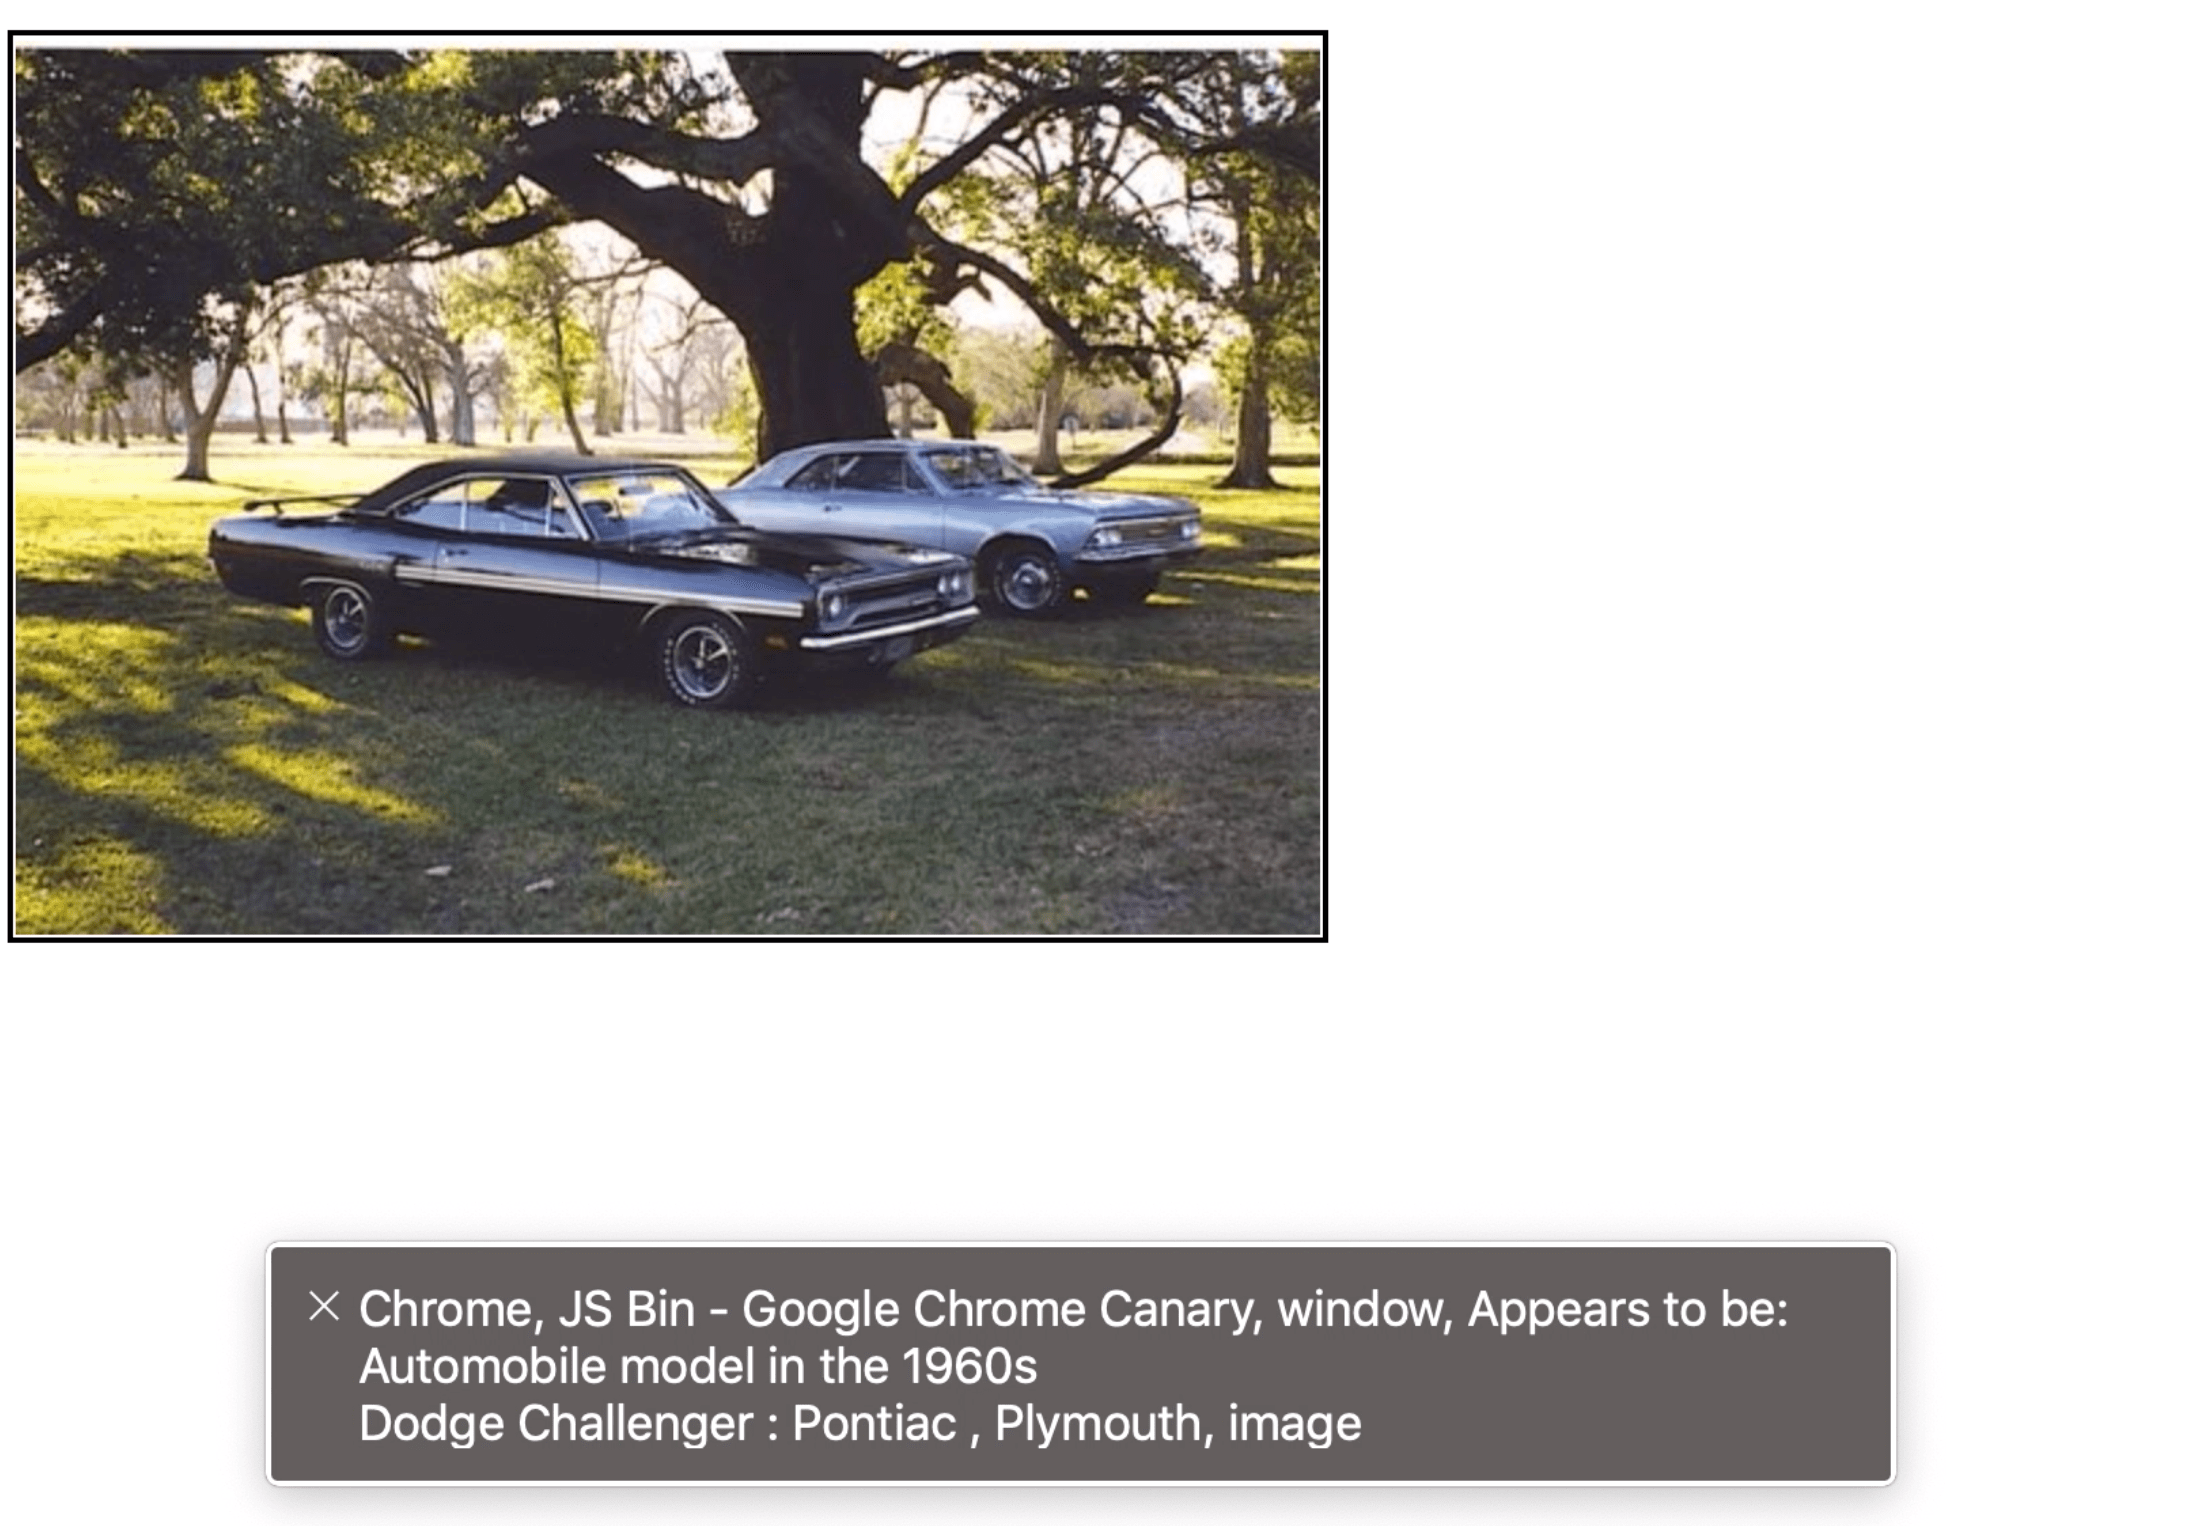
When used with the VoiceOver screen reader, Chrome can now automatically generate image descriptions for images that do not have proper alt text (<img alt> attribute). Google has already created more than 10 million image descriptions, but they are not meant to replace alt text written by humans.

Image descriptions automatically generated by a computer aren’t as good as those written by a human who can include additional context, but they can be accurate and helpful.

This new accessibility feature, called “Accessibility Image Descriptions,” may not be enabled by default in your version of Chrome, but you can enable it manually on the chrome://flags page.

(via Dominic Mazzoni)

More news...

Read even more news in my weekly Sunday issue that can be delivered to you via email every Monday morning.

More News →

The post Weekly Platform News: CSS column-span Property, ADA applies to Websites, Auto-generated Image Descriptions appeared first on CSS-Tricks.

Weekly Platform News: Improving UX on Slow Connections, a Tip for Writing Alt Text and a Polyfill for the HTML loading attribute

In this week's roundup, how to determine a slow connection, what we should put into alt text for images, and a new polyfill for the HTML loading attribute, plus more.

Detecting users on slow connections

Algolia is using the Network Information API (see the API’s Chrome status page) to detect users on slow connections — about 9% of their users — and make the following adjustments to ensure a good user experience:

  • increase the request timeout when the user performs a search query (a static timeout can cause a false positive for users on slow connections)
  • show a notification to the user while they’re waiting for search results (e.g., "You are on a slow connection. This might take a while.")
  • request fewer search results to decrease the total response size
  • debounce queries (e.g., don’t send queries at every keystroke)
navigator.connection.addEventListener("change", () => {
  // effective round-trip time estimate in ms
  let rtt = navigator.connection.rtt;

  // effective connection type
  let effectiveType = navigator.connection.effectiveType;

  if (rtt > 500 || effectiveType.includes("2g")) {
    // slow connection
  }
});

(via Jonas Badalic)

Alt text should communicate the main point

The key is to describe what you want your audience to get out of the image rather than a simple description of what the image is.

<!-- BEFORE -->
<img alt="Graph showing the use of the phrase "Who you
          gonna call?" in popular media over time.">

<!-- AFTER -->
<img alt="Graph illustrating an 800% increase in the use
          of the phrase "Who you gonna call?" in popular
          media after the release of Ghostbusters on
          June 7th, 1984.">

(via Caitlin Cashin)

In other news...

  • There is a new polyfill for the HTML loading attribute that is used by wrapping the images and iframes that you want to lazy-load in <noscript> elements (via Maximilian Franzke).
  • WeChat, the Chinese multi-purpose app with over one billion monthly active users, hosts over one million "mini programs" that are built in a very similar fashion to web apps (essentially CSS and JavaScript) (via Thomas Steiner).
  • Microsoft has made 24 new (online) voices from 21 different languages available to the Speech Synthesis API in the preview version of Edge ("these voices are the most natural-sounding voices available today") (via Scott Low)

Read more news in my new, weekly Sunday issue. Visit webplatform.news for more information.

The post Weekly Platform News: Improving UX on Slow Connections, a Tip for Writing Alt Text and a Polyfill for the HTML loading attribute appeared first on CSS-Tricks.

Beginner’s Guide to Image SEO – Optimize Images for Search Engines

Are you looking to improve image SEO on your website? When optimized properly, image search can bring many new visitors to your website.

To benefit from image SEO, you need to help search engines find your images and index them for the right keywords.

In this beginner’s guide, we will show you how to optimize image SEO by following top best practices.

Image SEO guide for beginners

Here is a brief overview of what you’ll learn in this article.

Optimizing Your Images for SEO and Speed

Speed plays an important role in SEO and user experience. Search engines consistently rank fast websites higher. This is also true for the image search.

Images increase your overall page load time. They take longer to download than text, which means your page loads slower if there are several large image files to download.

You need to make sure that images on your site are optimized for web. This can be a little tricky to get used to since many beginners are not experts in graphics and image editing.

We have a handy guide on how to properly optimize images before uploading them to your website.

The best way to optimize images is by editing them on your computer using a photo editing software like Adobe Photoshop. This allows you to choose the right file format to create a small file size.

You can also use an image compression plugin for WordPress. These image optimizer plugins allow you to automatically reduce file size while uploading an image to WordPress.

What is Alt Text?

Alt text or alternative text is an HTML attribute added to the img tag which is used to display images on a web page. It looks like this in plain HTML code:

<img src="/fruitbasket.jpeg" alt="A fruit basket" />

It allows website owners to describe the image in plain text. The main purpose of the alternate text is to improve accessibility by enabling screen readers to read out the alt text for visually impaired users.

Alt text is also crucial for image SEO. It helps search engines understand the context of the image.

Modern search engines can recognize an image and it’s content by using artificial intelligence. However, they still rely on website owners to describe the image in their own words.

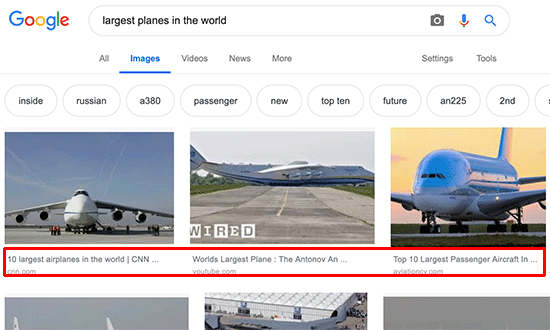
Alt text also accompanies images in Google image search, which helps users understand the image and improves your chances of getting more visitors.

Alt text used in search results

Usually, alt text is not visible on your website. However if an image is broken or cannot be found, then your users will be able to see the alternate text with a broken image icon next to it.

Alternate text displayed next to a broken image

What is the Difference Between Alt Text vs Title

Alt text is used for accessibility and image SEO, while title field is used internally by WordPress for media search.

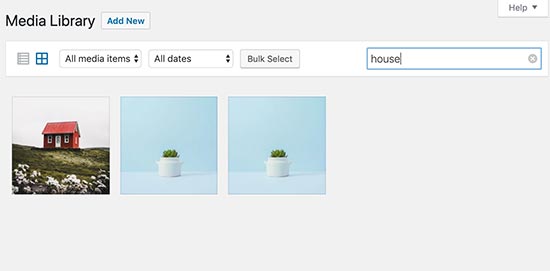
Search image by title

WordPress inserts the alt tag in the actual code used to display the image. The title tag is stored in the database to find and display images.

In the past, WordPress inserted the title tag in the HTML code as well. However, it was not an ideal situation from the accessibility point of view, which is why they removed it.

What is the Difference Between Alt Text vs Caption

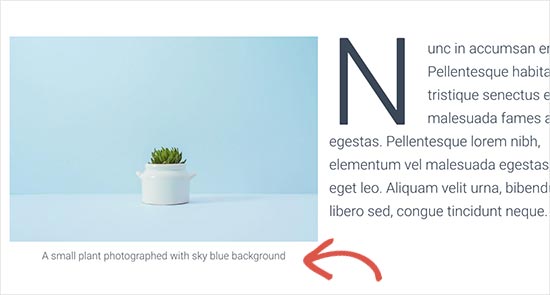
The alt text is used to describe the image for search engines and screen readers. On the other hand, the caption is used to describe the image for all users.

Alt text is not visible on your website while captions are visible below your images.

Example of a caption displayed below an image

The alt text is crucial for better image SEO on your website. The caption is optional and can be used only when you need to provide additional information about the image to website visitors.

How to Add Alt Text, Title, and Caption to Images in WordPress

Alt text, title, and caption make up the image metadata that you can add to images when uploading them into WordPress.

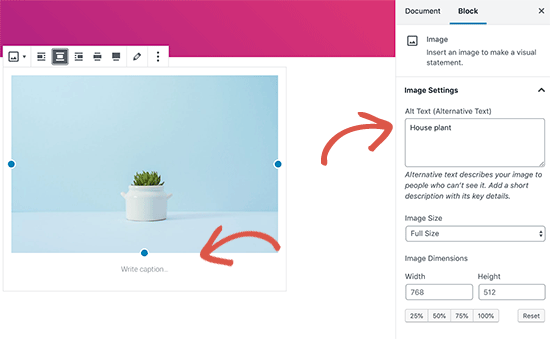
When you add an image using the default image block, WordPress allows you to add caption and alt text for the image.

Adding alt text and caption to an image in WordPress

It automatically generates a title for the image from the file name. You can change the title by clicking on the edit button in the image block’s toolbar.

Editing an image in default WordPress editor

This will bring up the media uploader popup where you can enter your own custom title for the image.

Changing image title in WordPress

You can also edit the alt tag and title for the images that you have already uploaded to WordPress. To do that, you need to visit Media » Library page and locate the image you want to edit.

WordPress media library

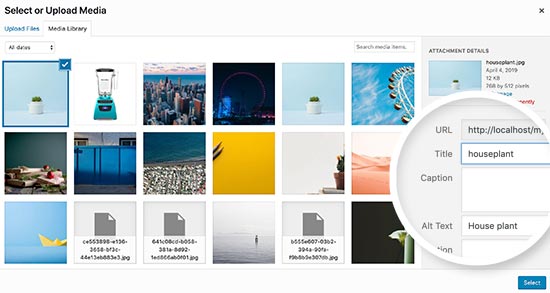
Simply clicking on an image will bring up the attachment details popup where you can enter title, alt text, and caption.

Add alt tag and title via media library

Note: Changing an image’s alt tag or caption via Media Library will not change it in the posts and pages where the image is already used.

When to Use Captions for Images in WordPress

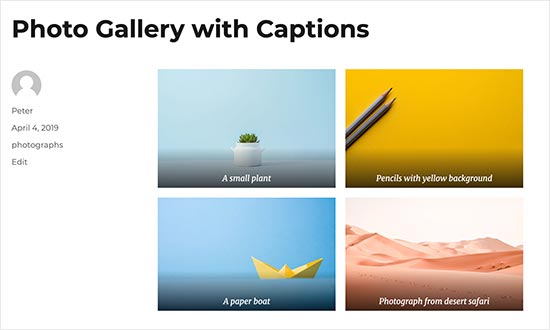
Captions allow you to provide additional details for an image to all your users. They are visible on the screen for all users including search engines and screen readers.

An image gallery with captions for each image

As you may have noticed that most websites don’t normally use captions with images in their blog posts or pages. That’s because captions are often not needed to explain an image.

Captions are more suitable in the following scenarios:

  • Family or event photos
  • Photos that need additional explanation describing the background story
  • Product image galleries

In most cases, you would be able to explain the image in the article content itself.

Disable Attachment Pages in WordPress

WordPress creates a page for all images you upload to your posts and pages. It is called the attachment page. This page just shows a larger version of the actual image and nothing else.

This can have a negative SEO impact on your search rankings. Search engines consider pages with little to no text as low quality or ‘thin content’.

This is why we recommend users to disable the attachment pages on your website.

The easiest way to do this is by installing and activating the Yoast SEO plugin. For more details, see our step by step guide on how to install a WordPress plugin.

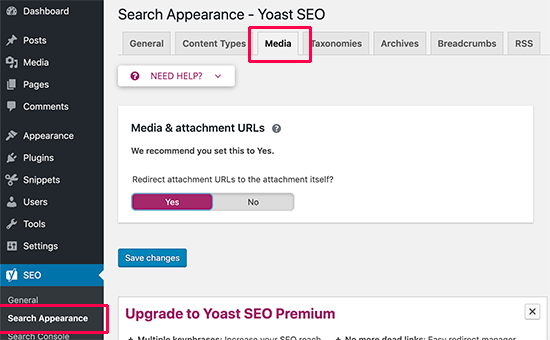
Upon activation, it automatically turns off attachment URLs. You can also manually turn off attachment pages in WordPress by visiting SEO » Search Appearance page and clicking on the Media tab.

Disable attachment URLs in WordPress

From here, make sure that the ‘Media & attachment URLs’ option is set to ‘Yes’.

If you are not using Yoast SEO plugin, then you can install the Attachment Pages Redirect plugin. This plugin simply redirects people visiting the attachment page to the post where the image is displayed.

You can also do this manually, by adding the following code to your theme’s functions.php file or a site-specific plugin.

function wpb_redirect_attachment_to_post() { 
if ( is_attachment() ) { 
global $post;
if( empty( $post ) ) $post = get_queried_object();	
if ($post->post_parent)	{
	$link = get_permalink( $post->post_parent );
	wp_redirect( $link, '301' );
	exit(); 
	}
else	{
	// What to do if parent post is not available
	wp_redirect( home_url(), '301' );
	exit(); 
	}
}
}
add_action( 'template_redirect', 'wpb_redirect_attachment_to_post' );

Additional Tips to Improve Image SEO

Adding alt tag is not the only thing you can do to improve image SEO. Following are a few additional tips that you should keep in mind when adding images to your blog posts.

1. Write descriptive alt text

Many beginners often just use one or two words as alt text for the image. This makes the image too generic and harder to rank.

For example, instead of just ‘kittens’ use ‘Kittens playing with a yellow rubber duck’.

2. Use descriptive file names for your images

Instead of saving your images as DSC00434.jpeg, you need to name them properly. Think of the keywords that users will type in the search to find that particular image.

Be more specific and descriptive in your image file names. For example, red-wooden-house.jpeg is better than just house.jpeg.

3. Provide context to your images

Search engines are getting smarter every day. They can recognize and categorize images quite well. However, they need you to provide context to the image.

Your images need to be relevant to the overall topic of the post or page. It is also helpful to place the image near the most relevant text in your article.

4. Follow the SEO best practices

You also need to follow the overall SEO guidelines for your website. This improves your overall search rankings including image search.

5. Use original photographs and images

There are many free stock photography websites that you can use to find free images for your blog posts. However, the problem with stock photos is that they are used by thousands of websites.

Try to use original photographs or create quality images that are unique to your blog.

We know that most bloggers are not photographers or graphic designers. Luckily, there are some great online tools that you can use to create graphics for your websites.

We hope this article helped you learn about Image SEO for your website. You may also want to see our guide on how to fix common image issues in WordPress.

If you liked this article, then please subscribe to our YouTube Channel for WordPress video tutorials. You can also find us on Twitter and Facebook.

The post Beginner’s Guide to Image SEO – Optimize Images for Search Engines appeared first on WPBeginner.
How do you figure?

Scott O'Hara digs into the <figure> and <figcaption> elements. Gotta love a good ol' HTML deep dive.

I use these on just about every blog post here on CSS-Tricks, and as I've suspected, I've basically been doing it wrong forever. My original thinking was that a figcaption was just as good as the alt attribute. I generally use it to describe the image.

<figure>
  <img src="starry-night.jpg" alt="">
  <figcaption>The Starry Night, a famous painting by Vincent van Gogh</figcaption>
</figure>

I intentionally left off the alt text, because the figcaption is saying what I would want to say in the alt text and I thought duplicating it would be annoying (to a screen reader user) and unnecessary. Scott says that's bad as the empty alt text makes the image entirely undiscoverable by some screen readers and the figure is describing nothing as a result.

The correct answer, I think, is to do more work:

<figure>
  <img src="starry-night.jpg" alt="An abstract painting with a weird squiggly tree thing in front of a swirling starry nighttime sky.">
  <figcaption>The Starry Night, a famous painting by Vincent van Gogh</figcaption>
</figure>

It's a good goal, and I should do better about this. It's just laziness that gets in the way, and laziness that makes me wish there was a pattern that allowed me to write a description once that worked for both. Maybe something like Nino Ross Rodriguez just shared today where artificial intelligence can take some of the lift. But that's kinda not the point here. The point is that you can't write it once because <figcaption> and alt do different things.

Direct Link to ArticlePermalink

The post How do you figure? appeared first on CSS-Tricks.

Using Artificial Intelligence to Generate Alt Text on Images

Web developers and content editors alike often forget or ignore one of the most important parts of making a website accessible and SEO performant: image alt​ text. You know, that seemingly small image attribute that describes an image:

​​​<img src="/cute/sloth/image.jpg" alt="A brown baby sloth staring straight into the camera with a tongue sticking out." >

A brown baby sloth staring straight into the camera with a tongue sticking out.
📷 Credit: Huffington Post

If you regularly publish content on the web, then you know it can be tedious trying to come up with descriptive text. Sure, 5-10 images is doable. But what if we are talking about hundreds or thousands of images? Do you have the resources for that?

Let’s look at some possibilities for automatically generating alt text for images with the use of computer vision and image recognition services from the likes Google, IBM, and Microsoft. They have the resources!

Reminder: What is alt text good for?

Often overlooked during web development and content entry, the alt​ attribute is a small bit of HTML code that describes an image that appears on a page. It’s so inconspicuous that it may not appear to have any impact on the average user, but it has very important uses indeed:

  • ​​Web Accessibility for Screen Readers: Imagine a page with lots of images and not a single one contains alt​ text. A user surfing in using a screen reader would only hear the word “image” blurted out and that’s not very helpful. Great, there’s an image, but what is it? Including alt​ enables screen readers to help the visually impaired “see” what’s there and have a better understanding of the content of the page. They say a picture is worth a thousand words — that’s a thousand words of context a user could be missing.
  • Display text if an image does not load: The World Wide Web seems infallible and, like New York City, that it never sleeps, but flaky and faulty connections are a real thing and, if that happens, well, images tend not to load properly and “break.” Alt text is a safeguard in that it displays on the page in place of where the “broken” image is, providing users with content as a fallback.
  • ​​SEO performance: Alt text on images contributes to SEO performance as well. Though it doesn’t exactly help a site or page skyrocket to the top of the search results, it is one factor to keep in mind for SEO performance.

Knowing how important these things are, hopefully you’ll be able to include proper alt​ text during development and content entry. But are your archives in good shape? Trying to come up with a detailed description for a large backlog of images can be a daunting task, especially if you’re working on tight deadlines or have to squeeze it in between other projects.

What if there was a way to apply alt​ text as an image is uploaded? And! What if there was a way to check the page for missing alt​ tags and automagically fill them in for us?

There are available solutions!

Computer vision (or image recognition) has actually been offered for quite some time now. Companies like Google, IBM and Microsoft have their own APIs publicly available so that developers can tap into those capabilities and use them to identify images as well as the content in them.

There are developers who have already utilized these services and created their own plugins to generate alt​ text. Take Sarah Drasner’s generator, for example, which demonstrates how Azure’s Computer Vision API can be used to create alt​ text for any image via upload or URL. Pretty awesome!

​​See the Pen
​​Dynamically Generated Alt Text with Azure's Computer Vision API
by Sarah Drasner (@sdras)
​​on CodePen.
​​

There’s also Automatic Alternative Text by Jacob Peattie, which is a WordPress plugin that uses the same Computer Vision API. It’s basically an addition to the workflow that allows the user to upload an image and generated alt​ text automatically.

​​Tools like these generally help speed-up the process of content management, editing and maintenance. Even the effort of thinking of a descriptive text has been minimized and passed to the machine!

Getting Your Hands Dirty With AI

I have managed to have played around with a few AI services and am confident in saying that Microsoft Azure’s Computer Vision produces the best results. The services offered by Google and IBM certainly have their perks and can still identify images and proper results, but Microsoft’s is so good and so accurate that it’s not worth settling for something else, at least in my opinion.

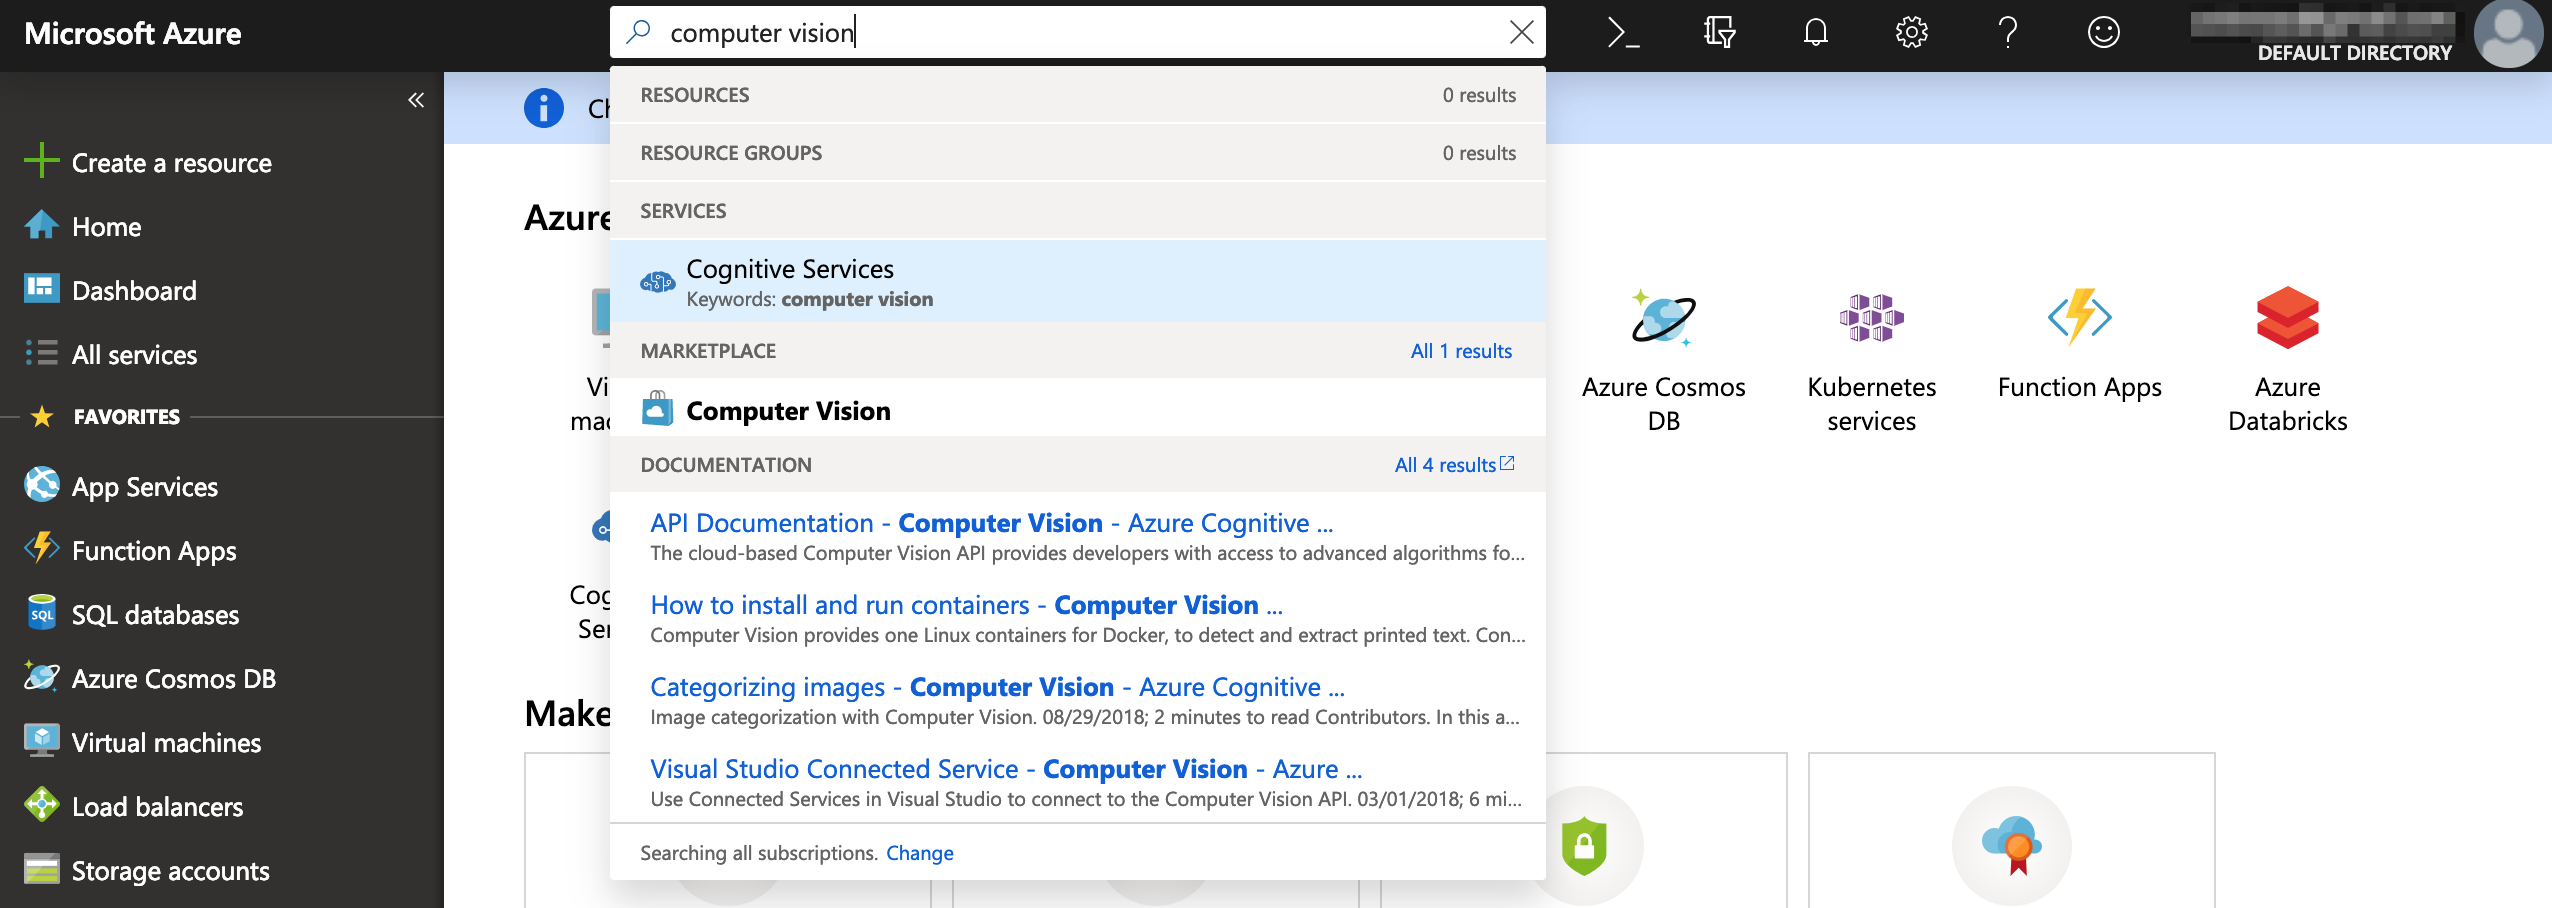
Creating your own image recognition plugin is pretty straightforward. First, head down to Microsoft Azure Computer Vision. You’ll need to login or create an account in order to grab an API key for the plugin.

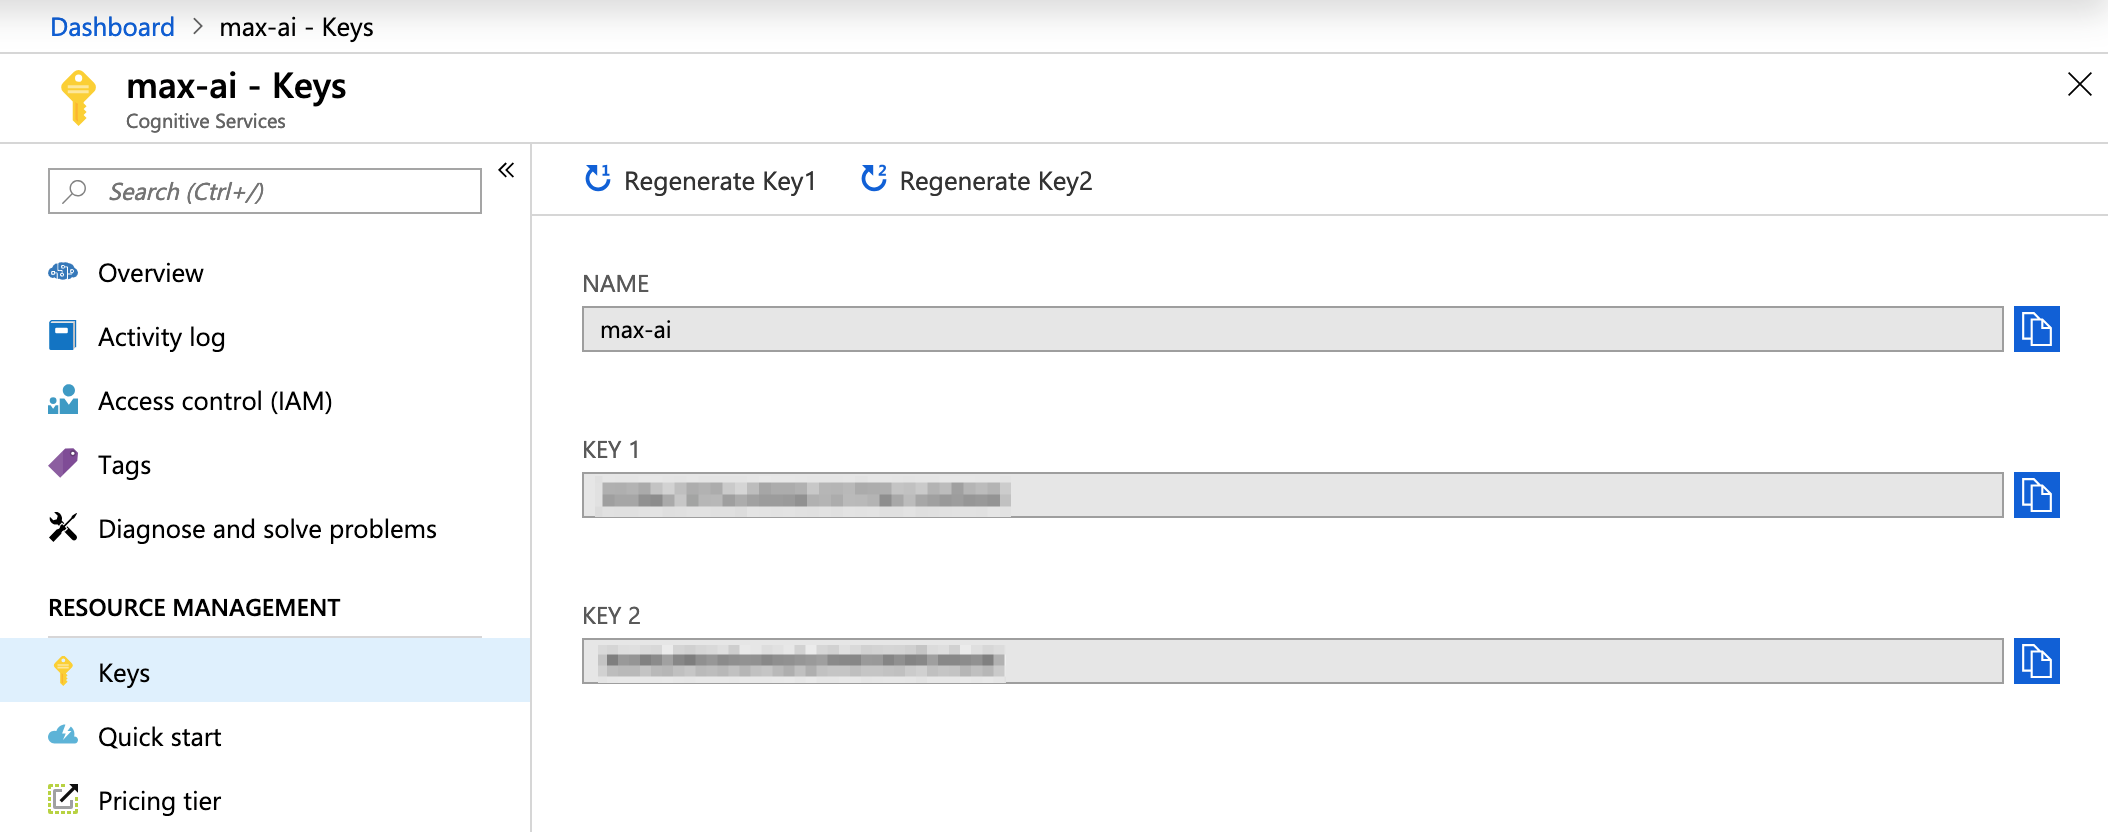
Once you’re on the dashboard, search and select Computer Vision and fill in the necessary details.

Starting out

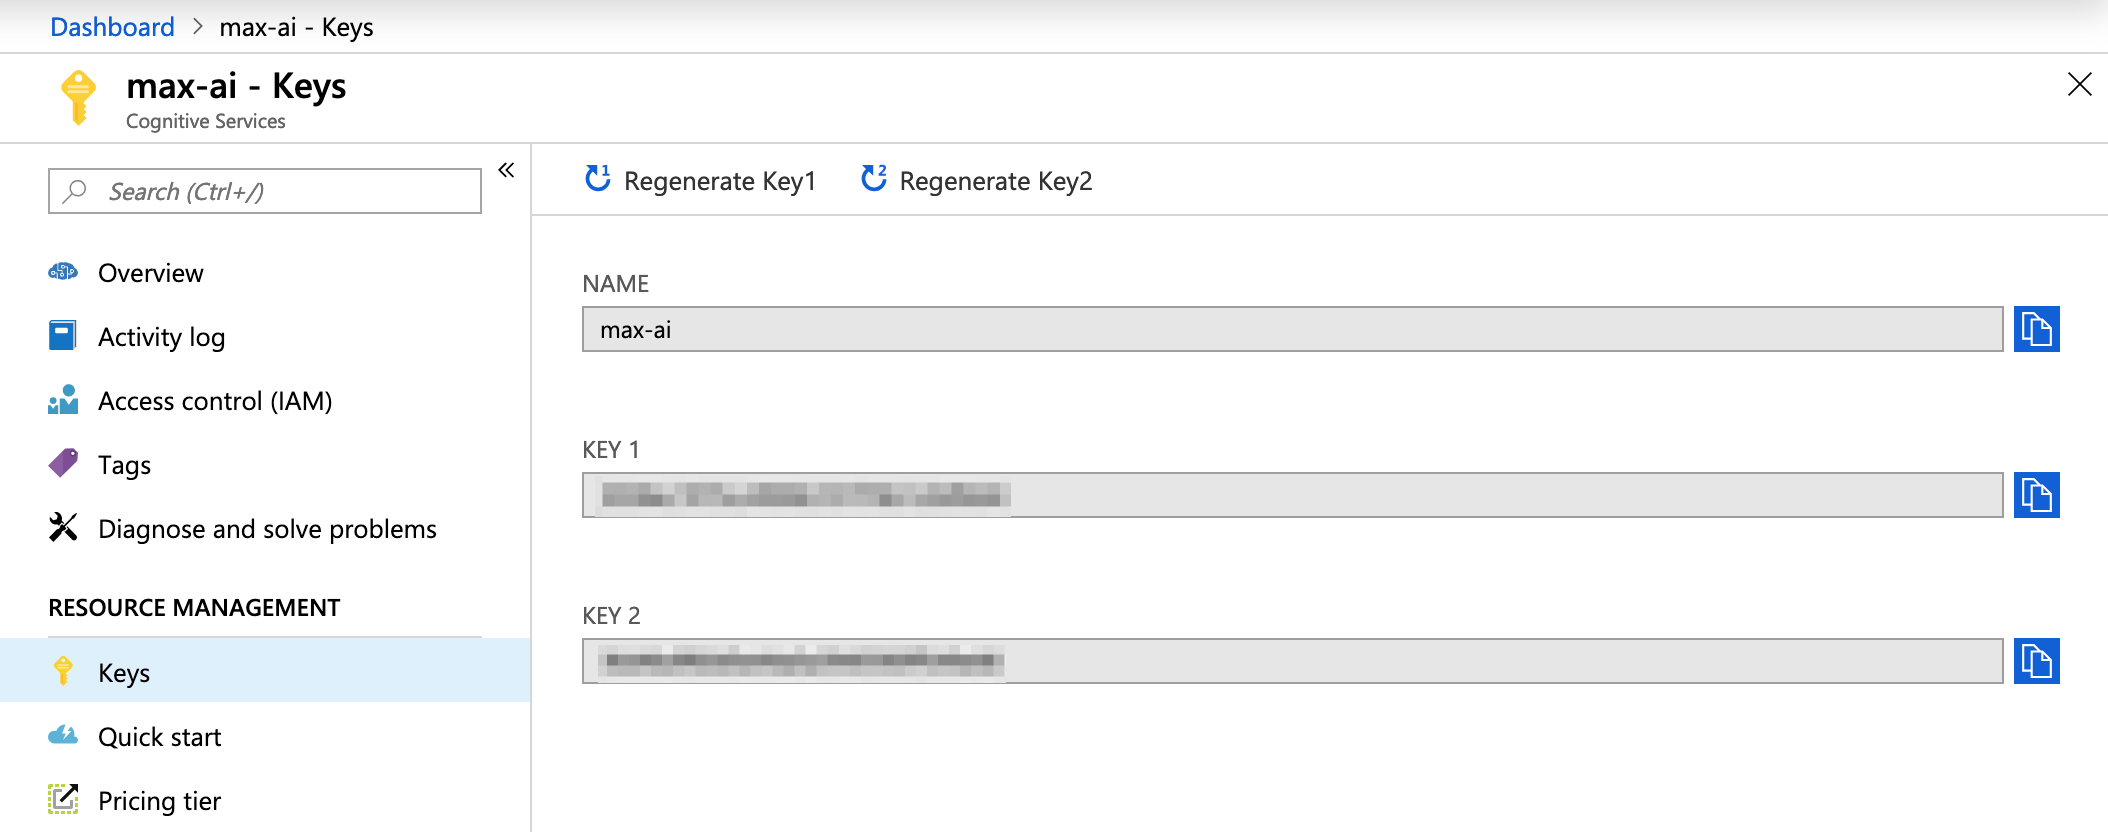
Wait for the platform to finish spinning up an instance of your computer vision. The API keys for development will be available once it’s done.

​​Keys: Also known as the Subscription Key in the official documentation

Let the interesting and tricky parts begin! I will be using vanilla JavaScript for the sake of demonstration. For other languages, you can check out the documentation. Below is a straight-up copy and paste of the code and you can use to replace the placeholders.

​​var request = new XMLHttpRequest();
request.open('POST', 'https://[LOCATION]/vision/v1.0/describe?maxCandidates=1&language=en', true);
request.setRequestHeader('Content-Type', 'application/json');
request.setRequestHeader('Ocp-Apim-Subscription-Key', '[SUBSCRIPTION_KEY]');
request.send(JSON.stringify({ "url": "[IMAGE_URL]" }));
request.onload = function () {
    var resp = request.responseText;
    if (request.status >= 200 && request.status < 400) {
        // Success!
        console.log('Success!');
    } else {
        // We reached our target server, but it returned an error
        console.error('Error!');
    }

    console.log(JSON.parse(resp));
};

request.onerror = function (e) {
    console.log(e);
};

Alright, let’s run through some key terminology of the AI service.

  • Location: This is the subscription location of the service that was selected prior to getting the subscription keys. If you can’t remember the location for some reason, you can go to the Overview screen and find it under Endpoint.
  • ​​

Overview > Endpoint : To get the location value
  • ​​Subscription Key: This is the key that unlocks the service for our plugin use and can be obtained under Keys. There’s two of them, but it doesn’t really matter which one is used.
  • ​​Image URL: This is the path for the image that’s getting the alt​ text. Take note that the images that are sent to the API must meet specific requirements:
    • File type must be JPEG, PNG, GIF, BMP
    • ​File size must be less than 4MB
    • ​​Dimensions should be greater than 50px by 50px

Easy peasy

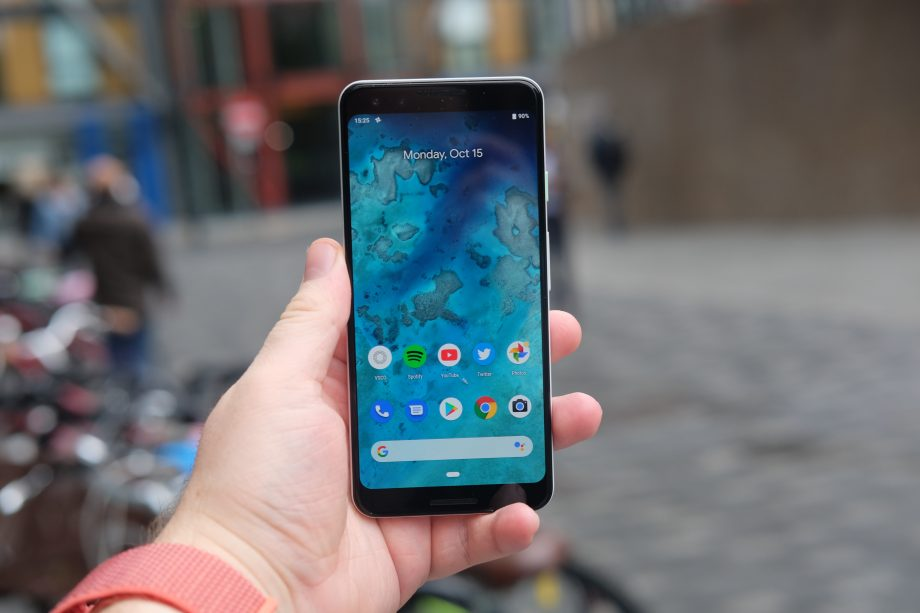
​​Thanks to big companies opening their services and API to developers, it’s now relatively easy for anyone to utilize computer vision. As a simple demonstration, I uploaded the image below to Microsoft Azure’s Computer Vision API.

Possible alt​ text: a hand holding a cellphone

​​The service returned the following details:

​​{
    "description": {
        "tags": [
            "person",
            "holding",
            "cellphone",
            "phone",
            "hand",
            "screen",
            "looking",
            "camera",
            "small",
            "held",
            "someone",
            "man",
            "using",
            "orange",
            "display",
            "blue"
        ],
        "captions": [
            {
                "text": "a hand holding a cellphone",
                "confidence": 0.9583763512737793
            }
        ]
    },
    "requestId": "31084ce4-94fe-4776-bb31-448d9b83c730",
    "metadata": {
        "width": 920,
        "height": 613,
        "format": "Jpeg"
    }
}

​​From there, you could pick out the alt​ text that could be potentially used for an image. How you build upon this capability is your business:

  • ​​You could create a CMS plugin and add it to the content workflow, where the alt​ text is generated when an image is uploaded and saved in the CMS.
  • ​​You could write a JavaScript plugin that adds alt​ text on-the-fly, after an image has been loaded with notably missing alt​ text.
  • ​​You could author a browser extension that adds alt​ text to images on any website when it finds images with it missing.
  • ​​You could write code that scours your existing database or repo of content for any missing alt​ text and updates them or opens pull requests for suggested changes.

​​Take note that these services are not 100% accurate. They do sometimes return a low confidence rating and a description that is not at all aligned with the subject matter. But, these platforms are constantly learning and improving. After all, Rome wasn’t built in a day.

The post Using Artificial Intelligence to Generate Alt Text on Images appeared first on CSS-Tricks.