15 Most Annoying Things about WordPress and How to Fix Them

Did you come across annoying things in WordPress and now looking for ways to fix them?

Like most things in life, WordPress also has its fair share of annoying things. Dealing with these annoyances is very easy with the right system and processes.

In this article, we will show you the 15 most annoying things about WordPress and how to fix them.

Most annoying things about WordPress and how to fix them

What is WordPress?

WordPress is an open-source website builder and content management system (CMS). It was created by Matt Mullenweg and Mike Little in 2003.

Over 43% of the websites on the internet are powered by WordPress. You can create all kinds of websites using WordPress. For instance, you can create a blog, start an online store, build a membership community, sell online courses, make a small business site, and more.

Do note that there is a difference between WordPress.org and WordPress.com. The latter is a website and blog hosting platform, while WordPress.org is an open-source software used by millions of people (including WPBeginner).

To get started with a WordPress website, you’ll need a domain name and website hosting. A domain name is like the address to your house, while web hosting is where your website lives, like a building.

For more details, please see our guide on how to make a WordPress website.

With all its popularity, WordPress isn’t perfect. There are a few quirks and shortcomings that can be frustrating for users.

That said, let’s look at some of the most annoying things about WordPress and how you can easily fix them. You can click the links below to jump ahead to any section:

1. Setting Up WordPress Backup

WordPress does not come with a built-in backup system. You are supposed to create your own backups instead of relying on your WordPress hosting company.

Having a regular backup saves you the frustration when something bad happens to your website. You can easily restore your website from a backup in case something fails or there is a security breach.

There are several ways to backup a WordPress site. The easiest way is by using a plugin. There are plenty of free and paid backup solutions available for WordPress. See our comparison of the 7 best WordPress backup plugins.

For instance, you can use Duplicator to create a complete backup of your site’s important files, databases, folders, and more. The plugin is very easy to use and also lets you schedule regular website backups.

Create new duplicator package

Besides that, you can also your web hosting provider’s cPanel or manually backup databases and other content on your website.

If you’re unsure what to backup, then please see our guide on which files you should backup.

2. Deleting the Uncategorized Category

WordPress comes with two built-in taxonomies, they are called categories and tags. By default, each new post you create is filed into a built-in category titled Uncategorized.

If you forget to assign the post to a category, then it will be filed under Uncategorized. This looks unprofessional, but you can easily fix it.

First, WordPress lets you rename the categories on your website. Simply head to Post Categories from the WordPress dashboard and then click the ‘Edit’ link under the Uncategorized category.

Click the Edit Link Under the Uncategorized Category

From here, you can rename the category to anything you want.

If you have other categories created on your website, then WordPress lets you change the default settings and use another category instead.

Simply navigate to Settings » Writing from the WordPress admin panel and click the ‘Default Post Category’ dropdown menu. Next, you can change it from Uncategorized to any other category.

Choosing the Default Category in Writing Settings

To learn more, please see our guide on how to change the default Uncategorized category in WordPress.

3. Changing Your Username

During WordPress installation or at the time of user creation, you can choose a username for the account.

However, the problem is that there’s no easy way to change the username once it’s created. This can be extremely annoying.

You Cannot Change Your Username from Your WordPress User Profile

One of the ways to fix this is by deleting the user and creating a new user with the updated username. Another way to resolve this is by using a WordPress plugin or manually updating the username from the WordPress database.

You can see our guide guide on how to change your WordPress username for more details.

4. Adding More Formatting Options to the Content Editor

Before the introduction of Gutenberg or block editor, WordPress had limited formatting options. You’d have to play around with HTML and CSS to edit the appearance of your blog posts and pages.

However, the WordPress content editor now offers a lot of customization options. You can format your content more easily and don’t have to rely on coding.

While new features are introduced with every new version of WordPress, many users may feel frustrated if they don’t find a formatting option.

For instance, you might want to use a specific font for your content but can’t find it in WordPress. To fix this, you can use different plugins to add custom fonts.

You can see our guide on 16 tips to master the WordPress content editor to learn more.

5. Getting White Screen of Death

Another annoying thing you might face in WordPress is the white screen of death. The worst part about the error is that there is no message, and you’re locked out of WordPress.

Most of the time, the error occurs because a script on your site exhausted the memory limit. When the unresponsive script gets killed by the WordPress hosting server or times out, you’ll see this error.

WordPress showing white screen instead of website

There are different ways to fix the white screen of death error. For instance, you can check whether the issue is occurring on other websites of yours. You can also try to increase the memory limit, disable all the plugins, clear the cache, and more.

For a step-by-step approach to fixing this issue, follow our guide on how to fix the WordPress white screen of death.

6. Getting Locked Out of WordPress

Sometimes you may end up locking yourself out of the WordPress admin area. Either you forgot your password and were unable to recover it, or something broke when you were adding code or a plugin.

Or there was an error establishing a connection between the database, there was an internal server error, or your site was hacked.

To help you resolve this issue, we have created a handy guide on what to do when you are locked out of the WordPress admin area. It will help you learn how to fix this in different scenarios.

7. Deactivating All WordPress Plugins without Admin Access

When troubleshooting some problems on your WordPress site, you will be advised to deactivate all WordPress plugins. You can just go to the plugins page and deactivate all plugins.

Deactivate all plugins

However, what if you don’t have access to the WordPress admin area?

You can deactivate plugins by using an FTP client. Simply access the /wp-content/ folder to view all the plugins and then deactivate them.

If you have access to the web hosting service’s cPanel, then you can also deactivate plugins from the phpMyAdmin settings.

See our guide on how to deactivate all WordPress plugins when not able to access wp-admin.

8. Fixing Common WordPress Errors

WordPress comes with a slight learning curve, and you get to learn things as you go along. Some things are easier to learn than others. The most frustrating and annoying thing for beginners is the number of common WordPress errors they may come across.

For instance, you might see a syntax error, your posts might be returning a 404 error, there can be an issue when uploading images, and more.

That’s why we have compiled a list of common WordPress errors and how to fix them.

9. Setting up Automatic Updates for WordPress Plugins

All good WordPress plugins are regularly updated. If you are using the best WordPress plugins on your website, then chances are that you will be installing updates quite often.

Installing updates takes only a few seconds, but it can be distracting to log in and find new updates.

To resolve this, you can simply head to Plugins » Installed Plugins from your WordPress dashboard and click the ‘Enable auto-updates’ for critical plugins.

Enable automatic updates for WordPress plugins

See our guide on how to automatically install updates for WordPress plugins.

10. Creating Better Image Galleries

While you can create galleries in the default WordPress installation, it’s not as useful because it lacks features like Albums, tagging, light boxes, and more.

Thankfully there are plugins like Envira Gallery, which allow you to create beautiful image galleries in WordPress without compromising speed. You can add Albums, watermarks, sell your photos, and more.

Many WordPress landing pages and theme builders like SeedProd also offer options to add image galleries to your website.

Advanced settings for SeedProd product image gallery

11. WordPress Plugins Can Conflict with Each Other

WordPress plugins are great for adding additional functionality and features to your website.

However, some plugins can conflict with one another, causing serious problems. For instance, they might not work properly like they’re intended to work or would end up breaking your site.

Having too many plugins can also lead to conflicts. You should deactivate and delete plugins that are not in use. This will help solve conflicts, strengthen WordPress security, and boost page load time.

12. Customizing WordPress Excerpts

By default, WordPress displays full posts on the homepage, archives, and category pages.

This not only creates duplicate content on your site, but it also makes navigation more frustrating and discourages users from viewing the full post and leaving comments.

By displaying excerpts on these pages, you can increase your pageviews and user engagement. It shows a short summary and tells users what the content is about.

Add an excerpt in WordPress

To learn more, please see our guide on how to customize WordPress excerpts without any coding.

13. Showing Excerpts in RSS Feeds

WordPress also shows your full articles in the RSS Feed. This means users reading your posts in a feed reader will have no reason to visit your website.

You can easily change this from the WordPress admin area. Go to Settings » Reading page and scroll down to For each article in a feed, include’ option and select Excerpt.

Display excerpt for each post

Next, click on the save changes button to store your settings.

14. Dealing with Comment Spam

Spam comments are one of the most annoying things on the internet. WordPress comes with built-in comment moderation to deal with spam comments. However, comment spam can quickly grow, and before you know it, you will be spending more time moderating comments.

The first thing you need to do is start using Akismet. It will catch most spam comments and keep them away from your moderation queue.

You may also want to check out these 12+ vital tips and tools to combat comment spam in WordPress.

WordPress comes with a built-in search feature, but it’s not very good. If a search is important for your website, then you will need to replace the default search with something better.

To improve WordPress search, you can use plugins like SearchWP. It helps you customize the search algorithm and include tables, custom fields, documents, taxonomies, and more in the search process.

Configure SearchWP engine settings

You can follow our guide on how to improve WordPress search for more details.

We hope this article helped you fix some of the most annoying things about WordPress. You may also want to see our guide on proven ways to make money online and the best email marketing software.

If you liked this article, then please subscribe to our YouTube Channel for WordPress video tutorials. You can also find us on Twitter and Facebook.

The post 15 Most Annoying Things about WordPress and How to Fix Them first appeared on WPBeginner.

Beginner’s Guide on How to Moderate Comments in WordPress

Are you wondering how to moderate comments on your WordPress site?

WordPress’s built-in comment system allows your readers to engage with your content and interact with you directly. That said, some comments may contain elements that hurt your brand and your website.

In this beginner’s guide, we will show you how to moderate comments in WordPress using the default WordPress features and some plugins.

Beginner's Guide on How to Moderate comments in WordPress

What Is Comment Moderation in WordPress?

In WordPress, comment moderation is a feature that lets users control and filter the comments submitted on their websites.

With comment moderation, you can approve, edit, remove, or mark comments as spam before they appear publicly on your site.

While comments can build your website engagement, they can also pose a significant risk to your WordPress security.

Harmful comments usually come from spambots. These bots can fill the comment section with irrelevant or repetitive messages. As a result, it may be hard for real visitors to find and interact with each other.

Additionally, spam comments may have malicious links that redirect users to phishing websites or spread viruses by encouraging users to download dangerous files onto their devices.

Without comment moderation, your website can provide a poor user experience for your readers. It can also negatively impact your WordPress SEO.

If your site is filled with spammy comments, it can affect your site’s credibility and trustworthiness, leading to lower search engine rankings.

Whenever you build a new WordPress site, the default WordPress comment system will be active. Your blog post will have a comment form displayed at the bottom. Note that it may look different or not appear depending on the WordPress theme you are using.

WordPress comment form example

Generally, anyone with a valid name and email can leave a comment without verifying their identity. However, it doesn’t mean the comment will get approved automatically.

Instead, they will see a preview of it and a message that the comment awaits moderation. This means the website owner will decide whether to approve or delete the comment.

What a comment awaiting moderation looks like on a WordPress website

This basic setting is good enough to filter genuine comments from harmful ones. But there’s actually a lot more that you can do to keep your WordPress blog safe.

With that in mind, let’s take a look at how you can moderate comments on your WordPress website. You can use these quick links to jump between the different sections:

Basics of Moderating WordPress Comments

You can see all comments on your WordPress website by clicking on the ‘Comments’ menu in the WordPress dashboard.

Opening the Comments menu on the WordPress admin panel

To learn more about the Comments page, you can check out our glossary entry on WordPress comments.

In this guide, we will talk more about what you should do when you receive a comment and what factors to look for when moderating it.

First, let’s cover some basics. When moderating comments, you should look for the following signs:

  • A bunch of links, keywords, and strange characters – This is the most obvious type of spam comment. Be careful of clicking any links here, as they could contain inappropriate content in the comment or even viruses.
  • Suspicious or generic names – If you see a comment left by a user named ‘Best Mortgage Rates’ or ‘Cheap Printer Ink,’ then it may be a marketer trying to spam your site for a backlink.
  • Generic messages – Often, spammers rely on generic comments to bypass your spam filter. Examples include Thank You, Really Nice Article, or a generic statement with your post title. It might also be something like, “I agree, beginner’s guide to comment moderation is essential.”
  • Offensive language It’s important for WordPress bloggers to create a respectful space for their audience. Otherwise, you may risk making certain readers uncomfortable.

Now, let’s look at the different comment action links, which will appear when you hover your cursor over a comment. There is Approve, Reply, Quick Edit, Edit, History, Spam, and Trash.

The WordPress comment action links

To accept a comment, you can click on the ‘Approve’ button. This will make the comment publicly visible on your website.

If you want to let users know that their comment is live, read our guide on how to notify users when their comment is approved in WordPress.

To mark a comment as spam, you can click the ‘Spam’ button. It will move the comment to the Spam tab on the Comments page.

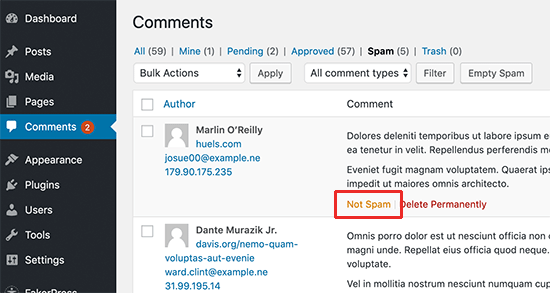
If a user complains that their comments are not appearing on your website, then this is the first place you should look. You can go to the ‘Spam’ tab and click the ‘Not Spam’ button below the comment.

Marking a comment as Not Spam on WordPress

You can also click on the ‘Empty Spam’ button to delete all spam comments at once. Even if you don’t, WordPress will automatically delete spam comments after 15 days.

If you find a comment in the All tab that is not necessarily spam but may be harmful to you and your readers, you can click the ‘Trash’ button. This will add the comment to the Trash tab.

Comments in the Trash will stay there for the next 30 days. After this time, WordPress will automatically delete them forever.

If you accidentally deleted a comment, then simply visit the ‘Trash’ tab and click on the ‘Restore’ link below the comment.

Restoring a WordPress comment from Trash

If you want to delete or mark multiple comments as spam, then you can use the ‘Bulk actions’ dropdown menu at the top of the comment list.

Note that doing this may cause your website to slow down while it processes all the comments.

Marking multiple comments as spam using the Bulk action option in WordPress

For more information, you can check out our guide on how to batch-delete spam comments in WordPress.

You can respond to a comment by clicking on the ‘Reply’ link. Once you’ve inserted your response, just click ‘Approve and Reply.’

Note that replying to a comment automatically approves it as well.

Approving and replying to a WordPress comment

The Quick Edit and Edit buttons work similarly. You can use either setting if you want to make the comment’s language clearer for visitors.

The difference is that, with Edit, you will be redirected to the Edit Comment page. With Quick Edit, you can modify the comment right on the Comments page like this:

Selecting the Quick Edit option on a WordPress comment

If you click the ‘History’ button, then you will see all the actions that have been done to the comment.

This feature can be helpful if you work with a team. It can help you track changes and understand how other people moderate comments on your site.

Reviewing the history of a WordPress comment

How to Configure the WordPress Comment Settings

We’ve covered the basics of moderating WordPress comments. We will now discuss the built-in WordPress comment settings, which will help you filter and control what kind of comments will appear on your website.

The comments settings page is located at Settings » Discussion. There are different sections on the discussion settings page, and we will walk you through each option on the page.

Changing the WordPress comment settings

Default post settings

The Default post settings offer three options to manage interactions and comments on your WordPress site:

The WordPress default post settings

The first option allows your blog to notify other blogs when you link to them in an article. The second option accepts notifications when they link to your articles.

These notifications are called pingbacks and trackbacks, and we recommend you uncheck both of these options. The first option can slow down your entire site, and the second option could bring you a lot of spam comments.

The third option on the article settings screen is ‘Allow people to post comments on new posts.’ It enables comments for all new articles you write on your WordPress blog.

Alternatively, you can turn comments on and off for individual articles, which we will show you later.

Other comment settings

WordPress' Other comment settings

In this section, you will notice the first option is ‘Comment author must fill out name and email.’ This option makes it mandatory for comment authors to provide a name and email address with their comments.

You need to check this option unless you want to allow anonymous commenting on your website.

There is also an option to require users to register on your site before leaving a comment. However, in our opinion, it’s not necessary for most sites as it may discourage new users from interacting with your post.

You will also see the option for closing comments on older articles. Some website owners use this to prevent spam, but it’s completely a personal preference.

Next is the ‘Show comments cookies opt-in checkbox, allowing comment author cookies to be set.’ Checking this box will let your website save the commenter’s name, email, and website details for when they want to comment on your post in the future.

Sometimes, WordPress comments can become a long thread that is difficult to keep track of. In this case, we recommend ticking the ‘Enable threaded (nested) comments’ option so that replies to specific comments appear directly beneath the original comment.

Having too many nested comments can negatively affect your page’s readability. The default setting of 5 levels is good enough for most WordPress websites.

If one of your articles becomes popular and gets too many comments, then the comment section will become too long. Users will have to scroll a lot to read the latest comments on the article.

To address this problem, you can check the option to break comments into pages. You can also use the dropdown menu to select whether to show the last or first comment page by default.

The last option is to display your most recent or oldest comments first. If you want to learn more about this, then you can read our guide on how to rearrange comments in WordPress.

‘Email me whenever’ and ‘Before a comment appears’

The WordPress comment 'Email me whenever' and 'Before a comment appears' settings

The next section allows you to receive email notifications whenever a user leaves a new comment on your site or a comment is held for moderation.

As you get more comments, these emails may become annoying, so we recommend turning the comment notifications off.

In the ‘Before a comment appears’ section, the first option is to approve each comment manually. Make sure this box is checked so that no comment can appear on your site without your approval.

Below this, you will see the ‘Comment author must have a previously approved comment’ option.

If this option is checked, then comments from authors with a previously approved comment will appear without explicit approval. Simply uncheck this option to make sure that all comments are manually approved.

Comment Moderation

WordPress Comment Moderation settings

As we’ve discussed before, a common trait among automated spam comments is that they contain a lot of links.

If you have already set your comments to be manually approved, then all your comments will go to the moderation queue regardless of how many links they have. If not, then you can specify to hold a comment in the queue if it contains a certain number of links.

You will also see a larger text area where you can enter words, IP addresses, email addresses, URLs, or browser information that you want to watch out for.

Any comment matching the things you enter here will be sent to the moderation queue.

Again, if you decide to have all comments manually approved, then you don’t need to do anything, as they are all going to the moderation queue anyway.

Disallowed Comment Keys

WordPress Disallowed Comment Keys settings

This setting used to be called the Comment Blocklist in WordPress 5.4. Here, you can set specific words that will automatically move the comment to Trash if used in a comment’s content, author name, URL, email, IP address, or browser information.

Make sure to use this feature carefully because real comments may get removed by mistake.

Avatars

WordPress Avatars settings

The last section on the Comments Settings screen is Avatars. These are the images that appear next to the comment author’s name on your website.

WordPress uses Gravatar, which is a free service that allows users to use the same avatar on all the blogs they visit. For more details, please see our guide on what Gravatar is.

We recommend checking the ‘Show Avatars’ box to make it easy to identify the different commenters on your post. You can also select the maximum rating of Gravatar that can be displayed on your blog.

WordPress uses Mystery Person as the default Gravatar when a comment author doesn’t have an image associated with their email address. You can change this by selecting a default avatar from the list or even adding your own custom default gravatar in WordPress.

That’s it! You have configured your comment settings. Don’t forget to click on the ‘Save Changes’ button to store your settings.

Clicking the 'Save Changes' button on the WordPress Discussion settings page

How to Moderate Comments Using Thrive Comments Plugin (Recommended)

The default WordPress comment system is good, but it can be pretty basic. For access to more comment management and engagement settings, you can install a WordPress comment plugin.

These plugins can not only improve comment moderation but also significantly boost your comment engagement. As a result, your visitors can enjoy a more engaging and safe commenting experience.

Thrive Comments is one of the best plugins to keep comments in check for a great user experience while encouraging user interaction.

For example, with the Comment Conversion feature, you can direct commenters to a custom thank-you page, social sharing buttons, or a related post so that they can discover more of your content.

The Thrive Comments WordPress plugin

To use Thrive Comments, you can purchase it as an individual plugin or get the complete Thrive Themes Suite. This comes with all Thrive products, including Thrive Ovation, which can turn your comments into testimonials for your web pages in one click.

Once you have completed your payment, you will get a plugin zip package to install on your WordPress site. For more information, read our step-by-step guide on how to install a WordPress plugin.

Once installed, you will now see a ‘Thrive Comments Moderation’ menu under the Comments tab on the admin panel. Here’s what the page looks like:

Opening the Thrive Comments Moderation page on WordPress

The interface looks similar to the built-in Comments section. However, there are several differences.

This interface now includes the ‘Unreplied’ and ‘Pending my reply’ tabs.

The first tab collects all comments that have not been replied to. Meanwhile, the second tab has all the comments that have been assigned to you by the website admin so that you can respond to them.

The Thrive Comments Moderation tabs and search menu

Additionally, you can filter comments by page by entering the page name in the ‘View comments on’ field.

If you want to look for specific comments, then you can type in a term from the comment into the ‘Search in comments’ field.

You also get more comment action links. Besides approving, removing, editing, and marking comments as spam, you can click the ‘Delegate’ button to assign a comment to another user.

This feature is handy if you run a WordPress blog with multiple writers.

Clicking the 'Delegate' button on a comment using the Thrive Comments plugin

If you click the ‘More’ button, then you will see the ‘Feature’ option. Selecting it will pin a comment to the top of the comment list on a blog post.

This way, important or noteworthy comments stay visible and easily accessible to all readers. All pinned comments can be found in the ‘Featured’ tab.

Clicking the 'Feature' option in the Thrive Comments plugin

For more details, you can see our guide on how to feature or bury comments in WordPress.

If you want to look at your entire comment activity, then just click the ‘Reports’ button at the top of the page.

You will be redirected to the Comments graph, which is a handy tool for evaluating your user engagement.

Clicking the Reports button on the Thrive Comments Moderation page

Here, you can see a timeline overview of all the comments you’ve received, approved, replied to, featured, marked as spam, and removed.

This is what the graph looks like on our testing site:

Thrive Comments graph report

You can also filter the comment activity using the options at the top. With ‘Show report,’ you can check out different types of reports. Or fill out the blog post title in the ‘View comments on’ field to see a comment graph from a specific post.

With the ‘Date interval’ option, you can change the time period of the graph. On the other hand, the ‘Graph interval’ setting lets you see the graph from a Daily, Weekly, or Monthly perspective.

The different filtering options in the Thrive Comments Reports page

How to Allow Specific Users to Moderate Comments in WordPress

Let’s say you work with a team to run your WordPress website, and you get a lot of comments every day. In this situation, you may want to grant comment moderation access to certain user roles only.

Doing this will let you assign comment moderation responsibilities to relevant team members best suited for the task, like a community manager.

This method not only helps you manage comments better but also keeps your WordPress site secure by allowing only the right users to access comments.

You can allow specific users to moderate WordPress comments in two ways: with the Thrive Comments plugin and the Comment Moderation Role plugin. Let’s take a look at each method.

Thrive Comments

To access the Thrive Comments’ moderation settings, go to Thrive Dashboard » Thrive Comments on your WordPress dashboard. Then, simply navigate to the ‘Comment Moderation’ tab.

Selecting user roles to moderate comments using the Thrive Comments Comment Moderation settings

At the top, you can check off which user roles can moderate comments.

Feel free to also turn on/off the ‘Exclude comments from moderators in the moderation dashboard’ setting as well.

Enabling it will make comments from moderators invisible on the Thrive Comments dashboard. This can help maintain a clear overview of user comments.

The rest of the settings in this tab are the same as the ones you will find on the Settings » Discussion page. If you make changes to these settings in this menu, then they will also be reflected in the default WordPress comment settings.

Comment Moderation Role

WordPress doesn’t offer a default user role that’s dedicated to moderating comments. For this, you can use the Comment Moderation Role plugin.

The plugin is created by our team at WPBeginner, and it allows you to give certain users the role of ‘WPB Comment Moderator.’ Then the assigned user will only see the comment moderation screen in WordPress.

You can assign the WPB Comment Moderator role to existing and new users. For more details, please see our guide on how to allow blog users to moderate comments in WordPress.

If you use Thrive Comments, then you will also see the WPB Comment Moderator role in the Comment Moderation tab, like so:

The WPB Comment Moderator role in Thrive Comments

How to Disable Comments for Specific Posts in WordPress

If you want to close comments on certain posts, then WordPress lets you disable them.

On your WordPress dashboard, simply go to Posts » All Posts. Then, click the ‘Quick Edit’ button for any blog post.

Clicking the 'Quick Edit' button on a WordPress post

After that, just uncheck the ‘Allow Comments’ option.

Then, click ‘Update.’ The comment section will no longer be visible on the blog post.

Disabling comments using the WordPress Quick Edit function

It’s also possible to disable comments on multiple posts simultaneously. All you need to do is check the blog posts and select ‘Edit’ in the ‘Bulk action’ dropdown menu.

Then, go ahead and click ‘Apply.’

Bulk selecting WordPress posts to be edited

From here, you can change the Comments option to ‘Do not allow.’

After that, simply click the ‘Update’ button.

Disabling comments in bulk using the WordPress post Edit function

Finally, you can close the comment section while editing a blog post in the WordPress Block Editor. Simply go to the ‘Discussion’ box from the ‘Post’ settings menu on the right panel.

If you have done that, you can uncheck the ‘Allow comments’ box.

Disabling the comment section on an individual WordPress post

If you want to remove the comment section for good, then just see our guide on how to completely disable comments in WordPress.

How to Filter Spam Comments With Akismet

To filter spam comments on your WordPress website, you can use Akismet. It’s a spam-filtering WordPress plugin developed by Automattic. This anti-spam plugin usually comes installed with your WordPress installation.

For more details, you can check out our guide on what Akismet is and why you should use it.

Once you mark a comment as spam, Akismet will learn to catch similar comments in the future.

If, for some reason, you have hundreds of spam comments in the ‘Pending’ tab, then simply click on the ‘Check for Spam’ button.

This will trigger a spam check on existing comments on your website, and Akismet will move the spam comments from Pending to Spam.

Clicking the 'Check for Spam' button on the WordPress Comments page

One way to combat spam comments further is by removing the URL field in the comment form. To do that, you can read our guide on how to remove the website URL field from the WordPress comment form.

We hope this article helped you learn how to moderate comments in WordPress. You may also want to check out our guide on how to make blog post comments searchable and our expert pick of the best WordPress plugins to grow your website.

If you liked this article, then please subscribe to our YouTube Channel for WordPress video tutorials. You can also find us on Twitter and Facebook.

The post Beginner’s Guide on How to Moderate Comments in WordPress first appeared on WPBeginner.

Why Is WordPress So Hard (And How to Make It Easier)

If you’re comparing different website builders, then you may have come across the sentiment that WordPress is hard to use.

WordPress is the world’s most popular website builder powering over 43% of all websites on the internet. However, some people complain that WordPress is more difficult to use than solutions like Squarespace and Wix.

In this article, we’ll address the myth of why WordPress is so hard, and share the tricks, tools, and techniques you can use to harness the full power of WordPress without any difficulties.

Why is WordPress so hard?

Why is WordPress So Hard?

Over 43% of all websites on the internet are built on WordPress. This might make you wonder:

Why are so many people using a difficult platform?

Unlike website builders such as Squarespace, WordPress is completely open source, customizable, and flexible. You can use WordPress in any way you want, which might sound confusing for new users.

This is particularly true if you’ve previously used a website builder like Wix.com. These platforms typically have limited features and control exactly how you use their tools. This might make it seem like that they’re easy to use, but they are also very restrictive.

With the right techniques, tools, and information, WordPress is just as easy as any website builder, but without any of the restrictions.

By choosing WordPress, you’ll get the freedom to use any web host and domain provider, so you can update, customize, and extend your WordPress website in exactly the way you want. 

In the official WordPress repository alone, you’ll find over 60,000 free plugins that can add all sorts of features to your website. Think of plugins like apps in your iPhone except they’re for your websites.

When it comes to designing your site, you can use any free or premium theme, or even use drag & drop page builders to create a completely unique design. 

There are no provider terms and conditions to follow, and you own all the content on your site. 

With that in mind, let’s take a look at why nearly half of all website owners in the world ignore the myth that WordPress is hard to use and choose WordPress as their platform.

WordPress Isn’t Hard (But Here’s How to Make it Even Easier)

At WPBeginner we don’t believe that WordPress is hard. However, if you don’t have the right tools, tricks, and know-how, then WordPress can feel more complex than it actually is.

With that in mind, let’s see how you can make WordPress easier. You can use the links below to jump to any section of the post.

Choose the Right Web Hosting Provider

By choosing the best WordPress hosting, you can set your site up for success. The right host will provide exactly the features you need to build and run a successful WordPress website, even if you have no previous experience.

Some hosts even perform crucial WordPress maintenance tasks such as creating backups, adding security plugins, and installing updates. This will make WordPress feel effortless.

For example, Bluehost is a well-known WordPress hosting provider that automatically installs and set up WordPress for you when you sign up.

The Bluehost web hosting provider

From time to time, you may encounter problems or have questions.

A good host will offer support over email, phone, live chat, and other channels so you’ll have no problems getting your site back on track.

As the world’s most popular CMS, there are lots of companies that offer WordPress hosting. For that reason, we’ve done the research and created a list of the best web hosting companies to help you find the provider that’s right for you.

Here are the top WordPress hosting companies that we recommend:

  1. Bluehost – great for beginners – includes free domain.
  2. Hostinger – growing fast in popularity due to affordable prices, fast speed, includes free domain.
  3. SiteGround – premium WordPress hosting provider, uses Google cloud. Slightly higher prices.
  4. WP Engine – enterprise managed WordPress hosting provider, great for large sites.

Install Must-Have WordPress Plugins

The best part about WordPress is that you can easily add any feature to your site using plugins, without hiring a developer.

There are eCommerce plugins to help you create an online store, plugins that turn WordPress into a membership site so you can sell courses, add smart lead generation forms to grow your business, improve your SEO rankings, and much more.

In fact, there are over 60,000 free plugins in the official WordPress repository alone, so you’ll have no problems finding a plugin that meets your exact needs.

The official WordPress plugin repository

To help you get started, here’s our expert list of the must-have plugins for your WordPress website.

Our top 5 free WordPress plugins that we always recommend include:

  1. WPForms – best drag & drop online form builder for WordPress.
  2. AIOSEO – best WordPress SEO plugin to boost your SEO rankings.
  3. MonsterInsights – easily see your website analytics to make data-driven decisions.
  4. Duplicator – easily create regular backups for your website.
  5. SeedProd – drag & drop page builder to create custom website designs without any code.

Find the Perfect WordPress Theme

WordPress themes control how your site looks and acts. There are themes designed for specific markets like WooCommerce themes and membership site themes, but also multi-purpose themes that you can customize to fit almost any type of site.

Just like plugins, there are countless free themes to choose from. In fact, there are over 10,500 free themes in the official WordPress repository alone.

The WordPress theme repository

You’ll find even more on top WordPress theme providers websites.

This includes Elegant Themes, Astra, StudioPress, and more.

An example of a premium WordPress theme marketplace

It’s important to choose a theme that looks good, has the features you need, and is also high quality. To help you make the right decision, see our guide on how to select the perfect WordPress theme.

If you’re looking for theme recommendations, then check out our expert pick of the most popular and best WordPress themes.

Use a WordPress Page Builder

When building your site, you’ll create posts and pages using the WordPress block editor.

The WordPress block editor

If you’re using a block-enabled theme such as Divi or Astra, then you can also add content using the full-site editor.

This editor allows you to completely change the theme layout and add new sections to your website without writing any code.

The WordPress full site editor (FSE)

This is a great start, but it can be very basic and has a limited number of features.

We still recommend using a page builder plugin such as SeedProd. SeedProd allows you to create completely custom page designs and comes with ready-made blocks that you can drag and drop anywhere on your site.

This includes advanced blocks like countdown timers, contact forms, Google Maps, payment fields, and much more.

Why is WordPress so hard? SeedProd can make it easier

After adding a block to your site, you can customize it using the settings in the left-hand SeedProd menu.

This makes it easy to create custom home pages, landing pages, and more.

Why is WordPress so bad? Page builders can make it easier

For more on this topic, please see our guide on WordPress Block Editor vs Page Builders, as well as our expert tips to master the WordPress content (block) editor.

Use a WordPress SEO Plugin

Most visitors will find your site through search engines like Google. To help search engines show your content to the right people, you’ll need to work on your WordPress SEO.

SEO is a huge topic that often includes technical tasks such as adding rich snippets schema markup to your site.

Thankfully, there’s a WordPress plugin for everything and SEO is no exception. There are lots of different WordPress SEO plugins and tools you can use for individual tasks, but we recommend AIOSEO as it’s the complete SEO toolkit for WordPress.

The AIOSEO SEO WordPress plugin

AIOSEO comes with powerful features including breadcrumb navigation, advanced eCommerce SEO support for WooCommerce, local SEO, an internal link assistant, and much more. This means you don’t have to set up and learn multiple SEO plugins.

AIOSEO also scans your pages and posts as you’re writing them and creates a checklist of ways to improve its SEO.

Why is WordPress so hard? AIOSEO can make it easier

For step-by-step instructions, please see our ultimate guide on how to set up All in One SEO for WordPress correctly.

Use Tools to Improve Site Speed and Performance

To provide a good experience, your website needs to load quickly.

WordPress is already optimized for speed and performance, but there are lots of tricks and tools that can make it run even faster. With that in mind, we’ve created the ultimate guide to boost WordPress speed and performance that has everything you need to know.

Set up an Automated Security Plugin

WordPress is secure software, but hackers are always coming up with new ways to break into sites and steal data. To help new WordPress users keep their sites safe, we’ve created an ultimate WordPress security guide.

We also recommend using Sucuri, which is the best WordPress security plugin.

The Sucuri WordPress security plugin

Sucuri tracks everything that happens on your site, including failed login attempts and any changes to the WordPress files.

It also scans for malware and monitors whether your site appears on any blocklists, as this may mean there’s a problem with your site’s security.

Why is WordPress so bad? Sucuri is one way to make it easier

If it finds an issue, then Sucuri will notify you automatically. In this way, you can protect your site without having to perform any manual checks, or learn complicated security tools.

To learn how we use Sucuri on our own websites, see our complete Sucuri review.

Set up Google Analytics

As a website owner, your goal is to get people to your site and keep them engaged. That’s where Google Analytics comes in.

Analytics allow you to make decisions based on real data. For example, you can track website visitors and see the content that gets the most engagement. You can then create more of this popular content.

An example of Google Analytics data

You can also see how long visitors stay on your site and the bounce rate, which is the percentage of users who exit your site on the first visit. You can use this information to increase pageviews and reduce bounce rate in WordPress.

Google Analytics is an important tool, but it can be complicated to set up. For that reason, we recommend using MonsterInsights.

The MonsterInsights Google Analytics plugin

MonsterInsights is the best analytics solution for WordPress users.

It allows you to easily install Google Analytics on your website and then shows helpful reports directly in the WordPress dashboard.

Why is WordPress so complicated? MonsterInsights can make it easier

To learn more, please see our guide on how to install Google Analytics in WordPress.

Use Comment Filtering and Moderation

All website owners worry about comment spam.

Spambots and malicious third parties can easily flood a site’s comment section with links to malware and low-quality pages. This can hurt your website’s reputation and may even affect its SEO.

You can moderate comments in WordPress directly from the dashboard, including manually approving and blocking comments, or even deleting them completely.

Moderating comments manually can make WordPress more hard

However, moderating every single comment can be time-consuming, especially as your site grows and attracts more visitors.

Thankfully, there are lots of tools to combat comment spam in WordPress. This includes Akismet, which automatically filters all comments through a global spam database.

Moderating comments automatically using Akismet

To learn more, please see our guide to Akismet and why you should start using it right away.

Never Edit Your Theme Files Directly

WordPress is open-source software so anyone can see and edit its code, or even add their own PHP, JavaScript, CSS, and HTML. It may sound complicated, but there are lots of reasons to add custom code to WordPress.

For example, you might use a code snippet to completely disable comments, or remove the WordPress version number. Typically, it doesn’t make sense to install a plugin for these small tasks, so WordPress gives you the option to use code instead.

Many WordPress tutorials will provide a snippet and then ask you to edit your theme’s functions.php file.

The problem is that even a typo or small mistake in the code can cause errors or even break your site completely. You also won’t be able to update your WordPress theme without losing the customization.

This leads many people to think that WordPress is hard, when really the problem lies with their custom code.

That’s why we recommend using WPCode.

The WPCode code snippets plugin for WordPress

WPCode is the best code snippets plugin for WordPress and allows you to add custom PHP, JavaScript, CSS, and HTML without editing any theme files.

WPCode also has a built-in library of snippets that you can add to a site with just a few clicks. Even if you’re a beginner with no coding experience, WPCode makes it easy to add custom code in WordPress in a safe way.

Why is WordPress so complicated? WPCode can make it easier

Keep Your WordPress Site Up-To-Date

It’s important to keep your themes, plugins, and core WordPress software up-to-date. Hackers try to exploit known errors and vulnerabilities in outdated software, so if you fall behind then your site could become an easy target.

Some updates even add features that make WordPress easier to use. For this reason, it’s important to update WordPress core, update your WordPress plugins, and install the latest version of your theme.

Some web hosts will install these updates for you automatically, especially if you’re using a managed hosting provider.

Another option is to enable automatic updates for WordPress and enable automatic updates for plugins and themes. With that done, you’ll always have access to the latest WordPress features and fixes.

Why is WordPress so complicated? Automatic updates can make it easier

Automate Your WordPress Backups

WordPress is secure and reliable software, but it’s still a good idea to create regular backups.

Accidents and mistakes happen, such as deleting important content or editing the wrong page. Malicious third parties may also try to break into your site and delete your content.

By creating regular backups, you can always recover a working and error-free version of your website. Even if the worst happens and you lose all your data, you can simply restore your WordPress website from its latest backup.

They may be important, but many website owners overlook backups until it’s too late.

The good news is there are many free and paid WordPress backup plugins that can do the hard work for you. We recommend using a premium plugin like Duplicator Pro as it can create backups automatically.

For added security, Duplicator Pro will save your backups to popular online storage solutions like Dropbox, OneDrive, or Amazon S3. This means you can log into these services from any location, and get access to a working copy of your website.

Learn WordPress

The right plugins, themes, and techniques will help you run a successful WordPress website with ease. In some cases, you can even completely automate important tasks such as making a WordPress database backup or performing a security audit.

For this reason, many website owners don’t take the time to learn more about WordPress. We think this is a big mistake.

By continuing to learn you can often make WordPress even easier to use. With that in mind, here are just some of the free resources you’ll find on WPBeginner:

  • WPBeginner Blog. This is where we publish our WordPress tutorials, how-tos, and step-by-step guides. We have a huge library of free content, and we’re publishing new information all the time.
  • WPBeginner Dictionary. Complicated terms and technical jargon can make WordPress seem a lot harder than it is. For that reason, we’ve created a directory that covers all the WordPress lingo.
  • WPBeginner Videos. Our step-by-step WordPress 101 video tutorials have everything you need to get started with WordPress.
  • WPBeginner on YouTube. Enjoyed our WordPress 101 series and want to learn more? You’ll find over 900 more videos on our YouTube channel covering everything from SEO, to common WordPress errors and how to fix them, how to embed dynamic social media feeds on your site, and much more.
  • WPBeginner Engage Group. The largest and fastest-growing WordPress group for non-techies and beginners on Facebook. Here, you can connect with over 91,000 WordPress users, ask questions, and get support from the community.

Consider Hiring a WordPress Maintenance Service

The tips and tricks in this guide will make WordPress feel effortless, even if you’ve never created a website before.

However, if you’re looking for the ultimate hassle-free experience then you can always hire a maintenance service to take care of WordPress for you. This includes creating backups, installing updates, performing SEO audits, upgrading your site’s security, finding and fixing broken links, and more.

These services are perfect for first-time WordPress users or anyone who finds that day-to-day website maintenance takes too much time. If you want to hire a WordPress expert, then see our pick of the best WordPress website maintenance services.

We hope this article helped you see why WordPress is not hard, and there’s a good reason that nearly half of all websites on the internet use WordPress. You may also want to see our guide on how much it really costs to build a WordPress website or see the most important reasons to use WordPress.

If you liked this article, then please subscribe to our YouTube Channel for WordPress video tutorials. You can also find us on Twitter and Facebook.

The post Why Is WordPress So Hard (And How to Make It Easier) first appeared on WPBeginner.

Akismet 5.0 Adds New Spam Detection Feature That Analyzes How Comments Are Posted

For years, the vast majority of Akismet releases have been centered around bug fixes and improving compatibility with various plugins. Version 5.0 was released today, following 4.2.5 earlier this month, with a new feature that should improve Askismet’s ability to detect spam comments.

Akismet engineer Christopher Finke explained how the plugin will now analyze how a comment is posted, in addition to analyzing what is posted:

A typical human commenter on the Web takes about 40 seconds to read a blog post and another 40 seconds to write and submit a comment. Their typing speed varies significantly throughout the creation of their comment, and they regularly use their mouse to click around the page. An automated spambot (even one programmed to act like a person) doesn’t act so human-like: its typing speed and mouseclick speed are superhumanly consistent. It doesn’t spend time “reading” blog posts. Its mouse usage is sparse.

This new feature can detect spam that is posted in a machine-like fashion, even if the spambot is attempting to post a comment with content identical to one that has already been approved.

“The Akismet plugin will begin observing these behaviors so that they can be used as part of the spam-checking process,” Finke said. “None of this data is personally identifiable, and it won’t be used for any purpose other than identifying spam.”

Akismet is bundled with WordPress and is active on more than 5 million sites. More than 62% of users are running on 4.2.x and ~38% are on version 4.1 or older. WordPress users who are having a lot of spam breaking through Akismet’s protection will want to upgrade to take advantage of the new spambot detection features in version 5.0.

12 Vital Tips and Tools to Combat Comment Spam in WordPress

Are you getting tired of dealing with comment spam on your WordPress blog? Well, you are not alone.

Spam comments are a huge problem especially if you are not prepared to deal with them properly.

In this article, we’ll share the best WordPress comment spam plugins and helpful tips to combat spam comments in WordPress. These tips will save you a lot of time and will significantly eliminate comment spam from your website.

Combat WordPress comment spam with these tips and tools

Why You Need to Deal with Comment Spam in WordPress?

Internet is full of spam bots that automatically spread links for nefarious websites in the form of comment spam. The purpose of these spam comments is to get ranked in search engines and also to get accidental clicks from unsuspecting visitors.

But not all comment spam is submitted by bots. There are actual human submitted spam comments as well. These off-topic and poorly written comments are harder to catch and often contain links to third-party websites.

If you are not monitoring your website and these comments get published, then both your actual users and search engines will be able to see them.

This affects your website’s reputation. Users would consider your website to be a low quality or spam website.

Search engines can also mark your website as unsafe if they found links to websites that distribute malware and viruses.

That being said, let’s see how you can combat comment spam effectively, so that you spend less time worrying about spam and more time on growing your online business.

1. Turn on Comment Moderation in WordPress

Let’s first make sure that no comment on your website is published without your approval. This step will ensure that comments don’t bypass any filters, and it will also give you full control on which comments appear on your website.

This solution is highly recommended for business websites such as law firms, accounting, etc.

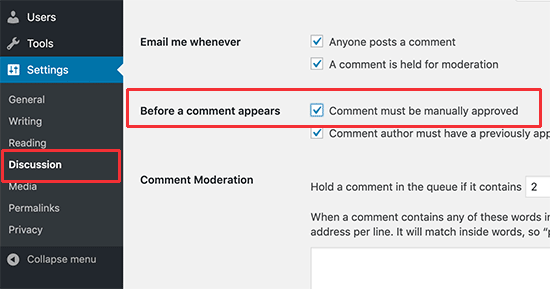
Head over to the Settings » Discussion page inside WordPress admin area. Next, scroll down to the ‘Before a comment appears’ section and check the box next to ‘Comment must be manually approved’ option.

Enable comment moderation in WordPress

Don’t forget to click on the ‘Save changes’ button to store your settings.

All your WordPress comments will now be held for moderation and you will have to manually approve each comment before it appears on your website.

Now you may be wondering how would I go through all the comments? Well in the next few tips, we will show you how to eliminate spam comments so that you only have to go through genuine comments.

2. Activate Akismet Anti-spam Protection

Akismet anti-spam protection

Akismet is an anti-spam plugin that comes pre-installed with WordPress. It filters all WordPress comments on your website through their anti-spam database and catches the most common types of spam comments.

Akismet is available as a free plugin, but you’ll need to signup for their API key. You can get it free for a personal blog or a small website.

To set it up, see our guide on how to set up Akismet for beginners with step by step instructions.

3. Using Sucuri to Combat Spam Comments

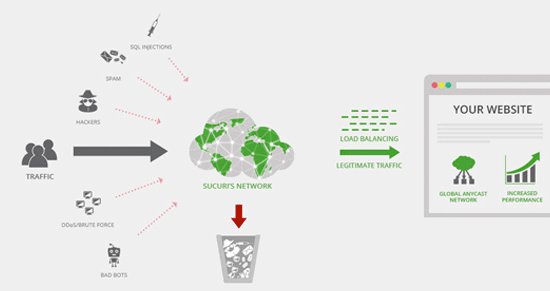
Sucuri website firewall

While Akismet is able to catch a lot of spam comments, it cannot stop spammers from accessing your website. Too many requests from spammers to submit comments can slow down your website and affect performance.

This is where Sucuri comes in. It is the best WordPress firewall plugin that allows you to block suspicious requests before they even reach your website.

They can prevent automated bots and scripts from submitting comments. This reduces the load on your servers and the number of spam comments you receive.

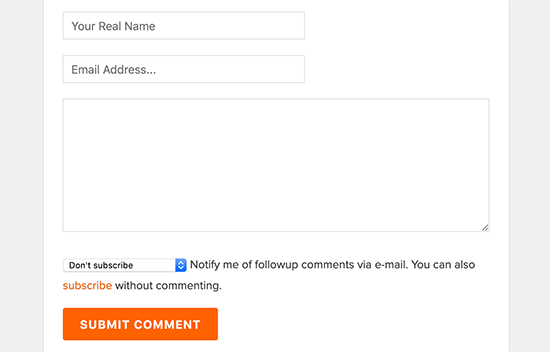
4. Using Honeypot to Catch Spam Bots

Honeypot anti spam technique

Honeypot technology is an effective method to trick spambots into identifying themselves. Once they are identified their comments can be blocked.

First, you need to install and activate the Antispam Bee plugin. Upon activation simply go to Settings » Antispam Bee page and check the option to mark as spam for all honeypot caught comments.

Don’t forget to click on the save changes button to store your settings.

The plugin will now use the honeypot technique to catch the bad spam bots. It also has other antispam filter such as validate the IP address from your WordPress comment blacklist, look at bbcode, look in local spam database, and more.

5. Add Google reCAPTCHA Verification

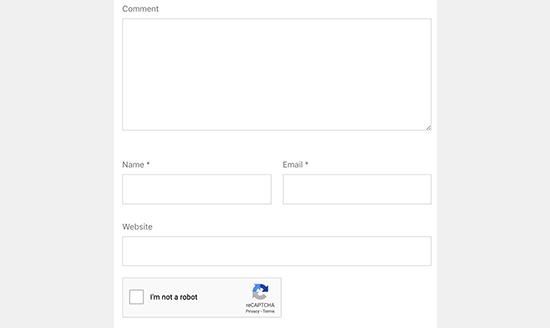
Using reCAPTCHA in WP Comments plugin, you can enable Google reCAPTCHA challenge on your comment forms.

WordPress comment form with reCAPTCHA enabled

ReCAPTCHA is an advanced form of CAPTCHA, which is a technology used to differentiate between robots and human users. CAPTCHA is an acronym for “Completely Automated Public Turing test to tell Computers and Humans Apart”.

Google makes it easy for users to verify their identity by simply clicking on the checkbox button.

For spambots, this technology is quite hard to bypass because when Google detects a spam bot, it gives them a much harder challenge.

See our guide on how to how to add reCAPTCHA to WordPress comments.

Note: while most WordPress comment captcha plugins are annoying, this is the best form of CAPTCHA you can use.

6. Removing Website URL Field from Comment Form

Remove website field from the comment form

The URL field in the comment form attracts not only spammers (both automated and human), but it also invites people who have absolutely no interest in the discussion at all.

These comments usually contain a line or two of irrelevant nonsense, and the comment author name will contain a keyword or a combination of a real name with keywords like Sally from Dunder Mifflin, or John @SEOconsultants, etc.

Simply add the following code to your WordPress theme’s functions.php file or a site-specific plugin.


function wpb_disable_comment_url($fields) { 
unset($fields['url']);
return $fields;
}
add_filter('comment_form_default_fields','wpb_disable_comment_url');

This code simply filters the WordPress comment form fields and removes the website field from the form.

Note: you will need to login to your WordPress hosting via FTP to upload the code above.

7. Disable Comments on Media Attachments

WordPress automatically creates image attachment pages where users can see an image and even leave a comment on it.

If you are linking your images to the attachment page, then after a while you will have a lot of attachment pages with comments enabled on them.

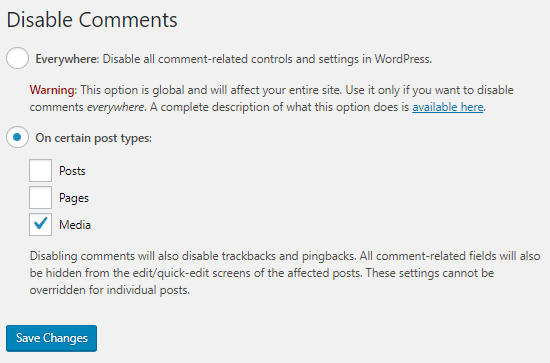
If images are a central part of your content, then that’s fine. But if you don’t want users to comment on images, then you should turn off comments on media attachments.

The easiest way to do this is by installing the Disable Comments plugin. Upon activation, go to Settings » Disable Comments page and check the box next to ‘Media’ option.

Disable comments for attachments

Click on the save changes button to store your settings. The plugin will now disable comments on your WordPress media files and attachments.

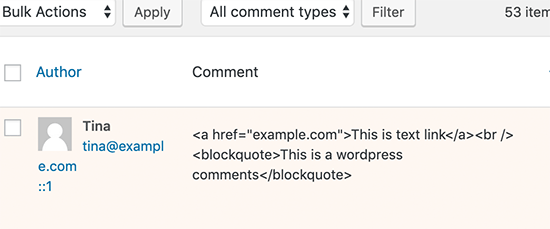
8. Disable HTML in Comments

Disable HTML in WordPress comments

Another handy tip to discourage links in comments is disabling HTML in comments. HTML can be used to hide spam links in WordPress comments.

Simply add the following code to your theme’s functions.php file or a site-specific plugin.

    function wpb_comment_post( $incoming_comment ) {
    $incoming_comment['comment_content'] = htmlspecialchars($incoming_comment['comment_content']);
    $incoming_comment['comment_content'] = str_replace( "'", ''', $incoming_comment['comment_content'] );
	return( $incoming_comment );
    }
    function wpb_comment_display( $comment_to_display ) {
     $comment_to_display = str_replace( ''', "'", $comment_to_display );
     return $comment_to_display;
}
add_filter( 'preprocess_comment', 'wpb_comment_post', '', 1);
add_filter( 'comment_text', 'wpb_comment_display', '', 1);
add_filter( 'comment_text_rss', 'wpb_comment_display', '', 1);
add_filter( 'comment_excerpt', 'wpb_comment_display', '', 1);
remove_filter( 'comment_text', 'make_clickable', 9 );

This code changes HTML code into HTML entities which are displayed as the code and are not parsed by the browser.

9. Minimum and Maximum Comment Length

Another way to combat comment spam is by using Yoast Comment Hacks plugin to set a minimum and maximum comment length.

Recently we ran into a comment spam problem where a spammer was leaving hundreds of comments per hour with a single word: hello.

Akismet and Sucuri were not able to block this because the comment looked natural. Antispam bee honeypot slowed the spammer down, but it too wasn’t able to entirely block the attack.

We simply enabled the Yoast Comment Hacks plugin and set the minimum comment length. This forces the user to leave a more meaningful comment instead of just a one word message.

10. Disable Trackbacks in WordPress

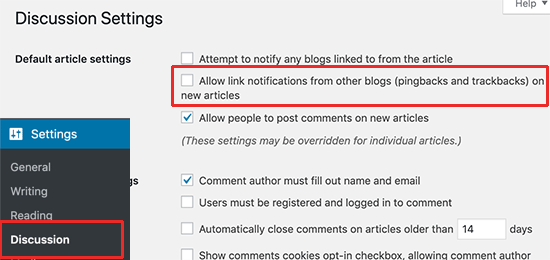
A big portion of comment SPAM is trackbacks. For most blogs, it is not necessary to have trackbacks enabled. You can choose to disable trackbacks on your entire blog or in an individual post. This is an easy way to significantly reduce comment SPAM.

Disable trackbacks in WordPress

You can find the above option by visiting Settings » Discussion. This will turn off trackbacks for your entire site.

11. Turn off Comments on Old Posts

WordPress allows you to turn off comments on old posts. This particularly helpful for websites publishing content that is more timely like news or events websites.

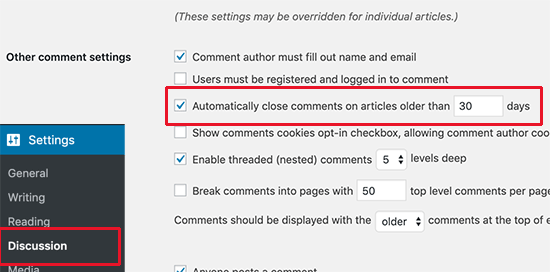
Simply go to Settings » Discussion, under ‘Other comment settings’ you will see the option ‘Automatically close comments on articles older than’. Check the box next to this option and enter the number of days you want comments to be displayed on a post.

Close comments on older articles

WordPress will now automatically close comments on posts older than the number of days you defined for this option. If you need, you can override comment deadline in WordPress for individual posts where you would like comments to remain open.

12. Switch Off Comments

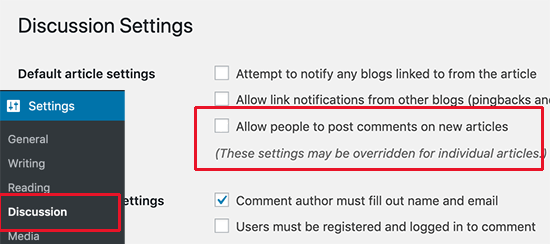
In case you feel that you don’t need comments on your WordPress site, or comment moderation goes out of your hands, remember that you can always switch off comments in WordPress. All you have to do is go to Settings » Discussion and uncheck the box next to ‘Allow people to post comments on new articles’.

Turn off comments

You can also make comments for registered users only by checking the box in your Settings ~ Discussion page. For more details, see our guide on how to completely disable comments in WordPress.

Frequently Asked Questions by Users

Why are they spamming me?

Spammers want to get better search rankings or lure unsuspecting visitors to dubious and malicious sites. They think that by spamming they can get more links, and it will somehow positively affect their search rankings.

In most cases, it is not a personal attack against you rather it’s a systematic process that targets many blogs.

What happens to comments that are marked as “Spam”?

The comments that you mark as spam, are not displayed on your website. You can delete Spammed comments in batch and/or recover good comments from the SPAM list.

Spam comments

Why is every comment going into the moderation queue?

You enabled the comment moderation as the first tip in this article. This gives you absolute control on any comment that gets published on your website.

We hope this article helped you find useful tips and tools to combat comment spam in WordPress. You may also want to see our guide on how to grow your website traffic and convert users into subscribers by creating an email newsletter.

If you liked this article, then please subscribe to our YouTube Channel for WordPress video tutorials. You can also find us on Twitter and Facebook.

The post 12 Vital Tips and Tools to Combat Comment Spam in WordPress appeared first on WPBeginner.