Useful Accessibility And Usability Examples To Help Improve Your Designs

This article is a sponsored by Extensis

This article is ideal for your lunch break. It highlights five quite straightforward (dare I even say simple) graphic communication problems. I then expand on them, showing the problem, remedy, and what can be learned. It will give you an insight into accessibility, also the easily looked-over area of access structures, and usability showing that they are a major factor in so many things, like design, communication, technology, objects, and systems. But we are not done there — I will also help you think about some new ways to make your designs much better and help you consider some aspects that you have never even considered before on your current projects, right now, today.

Adding A Basic Scroll Bar To A User Interface Menu Makes Items Easier To Find And Use

If we look at the menu by clicking on the Fonts drop-down menu in Microsoft Word Mac version 16 or any version of Microsoft Word, we can see that everything looks normal:

There is a list of fonts installed on the computer in alphabetical order. However, when we go to perform a task using the menu, like going to the font Verdana at the end of the list, we have to move our mouse all the way down to the bottom of the menu list, then hover over the down arrow, then wait 3 or 4 seconds, or more, until it gets to the bottom of the menu, near V, before we can select Verdana. Yes, we could also type the font name at the top, but maybe you are not sure what font you want to use or what it is called.

Problem

It takes many seconds to get to a font that is below B or at the end of the list; the current solution does not allow quick access. Furthermore, if you make a mistake, or your mouse goes off the menu, or if you are not able to control the mouse cursor that well, it will cause the menu to close, and then you have to start this interaction all over again, because if the mouse goes off or clicks out of the menu, it closes it. These issues are certainly not ideal for most of us who are busy and who want to get things done quickly and efficiently, like designers.

The problem of not having a scroll bar is often experienced in website vertical or side-navigation menus (sidenavs). The side-navigation menus might not even need to have a scroll bar, as the content inside the menu is not larger than the vertical screen height. However, if the website or smartphone browser is made a lot shorter vertically in height, there is often no scroll bar shown. So, you cannot scroll to the end of the side navigation’s content within the menu, and you might not even know to try to scroll more vertically, as no scroll bar is shown. Not ideal or great, hey?

Solution

One of the things that would be really easy to do, and is found a lot in software user interfaces and websites, is to add a simple scroll bar to the right of the font menu. How difficult is that to do? Not very. This would allow users to scroll more quickly to the font they want, reducing the time to find and select a font in the menu by at least half (50%). Why do they not do this? I am not really sure.

What Can We Learn?

If the software developers and user interface designers used a scroll bar to the right of the font menu, it would allow users to find any font much quicker, increase workflow productivity, reduce stress, confusion, and enable a much quicker and better interaction. Audit, test users, and find out what people want to do, or else you cannot be sure you have effectively designed the thing. Maybe you are not even aware of the ways users want to use your design, communication, object, or system. That is why it is so important to understand the following:

  • What people will want to do with your thing;
  • Different people will want to use your design, information, and communication in different ways;
  • Different people will want to achieve different things.
Better Font Software = Faster, Easier, And Better Results

As another example, if we compare font organizing software like Font Book on a Mac or the Fonts option in Control Panel on Windows. Yes, we have these two types of software, but do you actually use them to install fonts, or do you install them manually by copying the font files into the Fonts folders? Do you use them to view, compare, and get information about fonts? Can you use this software to manage, organize, and share fonts for your design team? Probably not, as they lack the features.

Well, the creative folks at Extensis have created just what you need: Connect Fonts. It is clearly better than Font Book on a Mac or the Fonts option in Control Panel on Windows for a number of reasons:

  • It has a better display of a font’s glyphs;
  • It shows the name of the glyph, Unicode value, and Glyph ID;
  • It has a better grid display, QuickType, Waterfall, ABC 123, and punctuation (many of these options are not available in Font Book);
  • Connect Fonts is a more advanced and technology-advanced software than Font Book on a Mac, or the Fonts option in Control Panel on Windows.

Here are additional features not offered by Font Book on a Mac or the Fonts option in Control Panel on Windows:

  • Use a font vault that is a single, secure, managed repository for all your fonts;
  • Sort options for all fonts (Name, Postscript Name, Type, Foundry, Class, Family, Version, Font Sense, Classification, Activation, Favourites, Date Added, Location);
  • Add Google Fonts;
  • Manage Adobe Creative Cloud fonts;
  • Zoom in and out;
  • All glyph panels and search;
  • Glyph information (Name, Unicode, Glyph ID, Keystrokes);
  • View categories of glyphs (Entire Font (123 Glyphs), Alphabetic Presentation Forms, Basic Latin, Combining Diacritical Marks, Currency Symbols, Cyrillic, General Punctuation, Geometric Shapes, Greek and Coptic, Latin Extended Additional, Latin Extended-A, Latin Extended-B, Latin-1 Supplement, Letterlike Symbols, Mathematical Operators, Number Forms, Spacing Modifier Letters, Superscripts and Subscripts);
  • Desktop and online in browser versions, both connected;
  • Cloud libraries and synchronize fonts;
  • Setup team libraries across desktop and online versions;
  • Share any digital files and documents;
  • Font analytics and reports;
  • Full admin account settings;
  • Very useful for large organizations to control fonts available for use and to manage permissions and rights;
  • Add tags.

Also:

  • Works with Adobe Creative Cloud, Sketch, Affinity Designer/Photo/Publisher;
  • View and preview fonts (Tile, QuickType, Waterfall and customized Waterfall, ABC 123, and punctuation).
Use ‘Access Structures’ To Excel Your Communication Success

An annual review gives interested people information about the business, charity, or organization, promotes what they do, and showcases what they have done in the last year to shareholders and other interested people. We designed an annual review (a printed publication showcasing a charity’s achievements, news, and financial activities for the year) more than ten years ago.

Problem

One of the standout issues that we soon realized from reading, laying out, and designing the annual review, was that there were many mentions of different towns within a country, mentioned throughout the text in the annual review, that the charity supports and works with. However, there was no easy or obvious way to know where they were or how to envisage where they were.

Solution

What was missing that the client had not done or envisaged in the past? A map on the inside back flap of the publication showing where the different towns were within the main country. It is not rocket science — maybe even just good old common sense.

What Can We Learn?

Can you see what we are doing? We tried to envisage and dig out what people will want to do with the thing and see if there is anything we can do to make the communication better, more accessible, and usable, and to better describe and help people to use the annual review. The annual review could have been an electronic PDF or HTML — the same problems exist whatever media. But would you have envisaged or thought about adding a map that the client never even thought about or even asked for? Sometimes, designers have to go the extra mile and push the boat out for their clients in need.

This issue of making information easier to understand and consciously helping people to understand and use it by adding clever features, in this case, a map, has to do with the area of accessibility. It could easily be considered usability because it makes the information and publication more usable; however, it is more about the area of accessibility. Being even more precise and specific, it has to do with things called access structures, as highlighted in 1979 by information designer and educator Robert Waller who runs the Simplification Centre and who has been the Professor of Information Design between 2007–2011 at the well-known Department of Typography & Graphic Communication at the University of Reading in the United Kingdom, just outside London. In the JS Party (Episode #36) podcast Suz Hinton, Safia Abdalla and Kevin Ball have also highlighted that there is more to accessibility than a disability people may have, and what devices they may use to help them.

Access structures are not commonly talked about in the now huge and popular world of accessibility. Yes, we talk of people, their physical issues (vision impairment, aging, dyslexia, physical disabilities, and so on), or what supportive devices they may use to make things easier (magnifying glass, screenreader, vision impairment stick, and so on), or even what legal issues and implications there might be because of bad accessibility. But we rarely talk about adding elements like access structures to help people with their content comprehension, processing and reading style strategies, such as:

  • Browse;
  • Skim/preview;
  • Search/scan;
  • Intense study;
  • Review.

And to just expand a bit more (if I may?), maybe you have used the audio hosting website SoundCloud. Among many of its great features, it has a search option just the same as any other search option, a horizontal box, then a search button (so nothing unusual or out of the ordinary here yet). It allows users to search through the whole website and content rather than having to go through and read millions of web pages (well, you knew that anyway). Expanding a bit more, when you search, it of course, returns the search results in a vertical list, just like a search on Google, Microsoft, and Twitter. However, on the left of the search results webpage are some really interesting and very useful search refinement options, as follows:

  • Everything
    The user’s search term searches through everything and the below.
  • SoundCloud Go+ tracks
    If selected, will only search through this offline and ad-free listening service from Soundcloud. There are then two further sub-search filter options:
    • Added any time,
    • Any length.
  • Tracks
    Apply user’s search to just audio content. There are then two further sub-search filter options:
    • Added any time,
    • Any length,
    • To listen to.
  • People
    Apply user’s search to just people, for example, user/profile account names. There are then nine further sub-search filter options that somehow seem to know the countries associated with your search:
    • Location. (9 country names associated with your search.)
  • Albums
    Apply user’s search to albums, for example, collected tracks within a grouped album option. They are then filtered by tag options:
    • Electronic,
    • Techno,
    • Hip-Hop & Rap,
    • Drum & Bass,
    • House,
    • Ambient,
    • Electronica,
    • Dance & EDM,
    • Deep House.
  • Playlists
    Apply user’s search to user-curated playlists collection, once again with the previous filter by tag options:
    • Same as previous.

So, you might think, well, this is all fairly standard and default stuff. However, not only is a user able to search for something; they are then given many very handy and useful sub-access structures that are very helpful in allowing them to further refine and edit their search term. I cannot stress how useful and important this is. This is basically the definition and whole bowls of what design, accessibility, usability, information, and communication are together.

Think about it. What would you do, and what would the result be if you could only perform a search, i.e. just search for something and then had no further refinement options? Users would not able to further refine what they are trying to do and achieve.

Providing An Electronic Business Card Increases The Chance Of Being Contacted And Getting New Business

I run a graphic communication design and text editing business in the United Kingdom called User Design, Illustration, and Typesetting, working for book publishers and also other types of organizations. We also do information design, user testing, website design, and research. We contact quite a lot of art, design, and production managers at U.K. book publishers, and one of the things we realized about seven years ago, is that they get a lot of emails every day from people offering the same services and making the same inquiry as us.

Problem

We realized that we need to increase the chance and any chance of our business’s details being used and spread, at and within their organization, and by whatever communication method they use, typically a computer, from staff-to-staff or colleague-to-colleague, to ultimately increase the chance of them contacting us (this is the goal anyway while the reality is another matter, but keep reading).

Solution

What we did, and it is really simple and easy to do (but we hardly ever see anyone do it), we made a link available to a digital business card in PDF, PNG, RTF, and vCard formats, on our homepage and contact us webpages. Do you provide a business card on your website, portfolio, or client’s website? Probably not. It is these types of things we need to try and realize and find out as designers because it improves the chances of communication success, and the ultimate end objective that was to get people to make an inquiry and contact us (an action).

What Can We Learn?

By making our main contact details more easily available and reusable, and in different electronic formats, it makes it quicker and easier to share and exchange our details, and also in different types of software (remember, not all of us like to use the same software program or system) thus leading to more chance of people in organizations contacting us (well, I have already said that three times). Would you have thought of this? How can you apply this to the project you are currently working on? Furthermore, the next important question is how can you measure if it is working and having an impact, or indeed if it is not? It is very important in design and communication to actually know the following:

  • What is working and what is not;
  • What areas could be optimized and what areas could be better;
  • Or what areas are not working well and are underperforming.

Basing design success measurements on what people think or feel is highly subjective, and soooooooooo last century.

The Fastest Internet Speed In 2022 Is Still 4 kbps

Current times in 2022 are challenging throughout the world (there is no denying that). Over the last few years, we have noticed the truly awful impact, performance, and results of websites for users, because of lazy loading images, infinite scroll, and content shifting on page load to save on internet data bandwidth usage — both on the user’s end and server-side (that delivers the website).

Problem

In essence, lazy loading means that an image or content will not be loaded until it becomes available or requested by the user in the visible screen area. Because of this lazy (late) loading, users frequently have to wait a few seconds for content to load, even with today’s amazing technology.

Infinite scroll is essentially the same principle as lazy load images, but the non-visible vertical webpage content not in the screen’s visible screen area, is not loaded until you scroll down. Lazy load can also be used with painful pagination features (like go to page 1, 2, 3, 4, 5, 6, 7, 8, 9, 10 as seen on large e-commerce websites and as Vitaly Friedman has outlined in his article, “Perfect Infinite Scroll UX”).

Content shifting on page load basically refers to a mixture of lazy loading content (text, images, and webpage layout) being delayed and loaded late, causing the content, when it does load, to load late, shifting the vertical and horizontal height of the web page’s content, cause elements and call-to-action buttons to shift and move around, as also highlighted by Michael Scharnagl on Smashing Magazine. This issue is especially problematic if you are trying to work quickly on a slowish or sluggish machine or device. However, not even a fast machine seems to make a difference regarding this issue.

All of these three issues create really bad user interactions, especially with longer-length web pages, although they are promoted and regarded as good webpage performance techniques.

Solution

Give people the content when it should be there and when they need it, as fast as you can. I understand that for very long webpages, some off-visible screen lazy loading and infinite scroll could be beneficial to save on unnecessary loading of content. But for everything else, just give it to users as fast as possible experience. We have incredible technology these days, and let’s not over-design and overthink.

What Can We Learn?

It could be said that when using lazy loading or infinite scroll in 2022, we are still dialing up with 4 kbps modems just like we did back in the year 2000. The amount of times and the delivery of information and images is the same: very, very slow. Nothing has changed. We are still looking at blank or block-colored images waiting for them to load... while 20 years of the internet have passed. The average speed of a computer and mobile internet in 2022 is 30.78 mbps, and we are still getting the same performance as in the year 2000 — as if on 4kbps modems. User experience is what matters, not technical wizardry.

Total Overload Of User’s First Website Interaction

Problem

Another example of bad usability is webpages that have very demanding first-visit user requirements. I am sure you all experience and struggle with the following on a daily basis (maybe you are even doing it now, arghhhh go away cookie policy box? Yes, no?):

  1. Cookie policy “accept/deny warning box” pops up when you 1st visit a webpage that distracts and blocks natural use.
  2. Email newsletter box pops up asking if you want to subscribe. That is another thing you have to do, even before you have started to use and read the webpage!
  3. A “do you want to receive update/news notifications” box appears.
  4. “Do you want to allow or block access to your physical location” box appears.
  5. Another box appears asking if you want to save 50% if you order in the next three days.
  6. A chat box appears asking if you want to chat with someone [well, maybe, but not at the moment].
  7. Then, finally, a “do you want to save your password” box appears.

Solution

Do not overcomplicate the 1st interaction with your thing. It is a bit like comparing it to bumping into someone when you are in a hurry and have to go, and all they keep doing is talking to you and telling you their life story. If people find their 1st interaction with you displeasing, they will turn away. If you have to provide options like cookie warning boxes, email newsletter subscribe boxes, and other notifications, leave them optional or in a place that everyone knows they can visit, like a universal options link or button in the top right of a webpage, where they can customize and setup these things, as they like.

What Can We Learn?

All of this creates a hard-to-use and over-demanding graphic communication. That distracts, over-complicates, and creates extra barriers to information that are very costly for your business or organization because it increases the chance of your users leaving and rejecting your item. Say goodbye to your users and customers in less than 3 seconds. It gives your brand a bad feeling and experience, and maybe they decide not to order something through your website. These are the everyday realities of bad usability because of your over-demanding and difficult-to-use design, information, and communication. It is not difficult:

  • Think about how people will want to use your design.
  • Make it as easy and least demanding as possible.
  • Test with them in real time.
Clothing Measurement Sizes On Fashion E-commerce

The next example has to do with measurements such as millimeters (mm), centimeters (cm), and inches (in). It doesn’t bring that much confusion with it, but surprisingly, it can still cause quite a lot of confusion and problems worldwide.

Problem

Measurements such as millimeters (mm), centimeters (cm) and inches (in) may not seem that interesting, but if you were to try to order a polo t-shirt online, you’ll notice that it may take you longer to do than expected. By measuring the width between your armpits across your breast area to get your bust (chest) circumference, and you may have measured 60 cm on the front, i.e. you have to multiply this number by 2 for the whole circumference of 60 cm (front) × 2 (front and back) to get a result of 120 cm.

Let’s say you finally find a polo t-shirt that you really like on a French clothing e-commerce website. You choose the color of the polo t-shirt you like and search for your size (we know that it is 120 cm, this sounds like we’re back in a Maths class, bear with me), but the only available sizes from that French clothing company are the following:

  • 2 – XS
  • 3 – S
  • 4 – M
  • 5 – L
  • 6 – XL
  • 7 – XXL
  • 8 – 3XL
  • 9 – 4XL
  • 10 – 5XL
  • 11 – 6XL

The above measurements are a bit helpful but certainly not accurate. They are not accurate because there is still no measurement information in millimeters, centimeters, or inches. However, the information above is a link titled Size guide. Okay, let's give that a go and see what it does. A slide-in panel appears, and there is a drop-down list with the following information:

  • 2 – XS = (bust circumference: 87 cm/34 in, pant waist circumference: 73 cm/28 inch).
  • 3 – S = (bust circumference: 90–93 cm/35–37 in, pant waist circumference: 77–81 cm/30–31 in).
  • 4 – M = (bust circumference: 97–101 cm/38–40 in, pant waist circumference: 85–89 cm/33–35 in).
  • 5 – L = (bust circumference: 105–109 cm/41–43 in, pant waist circumference: 93–97 cm/36–38 in).
  • 6 – XL = (bust circumference: 113–117 cm/44–46 in, pant waist circumference: 101–106 cm/39–42 in).
  • 7 – XXL = (bust circumference: 121–125 cm/48–49 in, pant waist circumference: 111–116 cm/44–46 in).
  • 8 – 3XL = (bust circumference: 129 cm/51 in, pant waist circumference: 121 cm/48 in).
  • 9 – 4XL = (bust circumference: 134 cm/53 in, pant waist circumference: 126 cm/50 in).
  • 10 – 5XL = that now, strangely, in the Size guide slide-in panel seems to say 1XG = (bust circumference: 139 cm/55 in, pant waist circumference: 131 cm/52 in).
  • 11 – 6XL = that now, strangely, in the Size guide slide-in panel seems to say 2XG = (bust circumference: 144 cm/57 in, pant waist circumference: 136 cm/54 in).

Are you starting to get a headache? I told you, keep reading and we will find the remedy!

Our bust (chest) circumference, as we know, is 120 cm, so it seems by the information in the above Size guide panel, that this size (entry):

  • 7 – XXL = (bust circumference: 121–125 cm / 48–49 in, pant waist circumference: 111–116 cm/44–46 in).

It is going to be a really good and safe size (because it is slightly larger than 120 cm by 1–4 cm). So it seems that there is no problem here, and in fact, the website has given good and flexible information because measurement sizes have been provided in three different measurements: cm, mm and in.

Another related question is whether all clothing websites display their polo t-shirts measurement like the French clothing company above. Well, no. Here is an example from a British clothing company, and we are going to use our pre-measured bust (chest) circumference, which we know is 120 cm once again, to order a different polo t-shirt from the British clothing company. So I have selected a polo t-shirt from the British clothing company’s e-commerce website, and the sizes that it gives are:

  • 36
  • 38
  • 40
  • 42
  • 44
  • 46

If we look at the drop-down list information from the French clothing company, we really cannot see anything that says 36, 38, 40, 42, 44, 46. However, once again, there is a View guide link on this British clothing website, so we click that, and see what happens (as it might be able to give us some more information).

Two options are available:

  • Top half (bust, chest),
  • Bottom half (waist).

We want the Top half (bust, chest) option because we measured the distance from armpit-to-armpit, then multiplied by 2 to give our total circumference in cm, as previously. The tables say:

Top half (bust, chest)

36 38 40 42 44 46
Chest (inches) 36 38 40 42 44 46
Chest (cm) 92 97 102 107 112 117
XS S M L XL XXL XXXL
Chest (inches) 32–34 35–37 38–40 41–43 44–46 47–49 50–52
Chest (cm) 81–86 89–94 97–102 104–109 112–117 119–124 127–132

We have to remember that the only available sizes in this polo t-shirt are 36, 38, 40, 42, 44, and 46. So it would seem 46 is the largest size they offer, and the circumference in cm of 46 (inches circumference) is 117 cm circumference. As you can see, 117 cm is not large enough. There is not enough flex (leeway) in this size because we know that our already measured armpit-to-armpit circumference in cm is 120 cm.

Solution

The French clothing company provided a good range of measurements in 2 measurements, inches and cm. The British clothing company, however, provided two tables, and it would be more advisable to actually not offer users the second table because it is basically a whole range table for all their clothing and is not valid for the polo t-shirt we selected, where only 36, 38, 40, 42, 44, 46 were available (yes, it is confusing). If we really want to clarify even more, the initial sizes of 36, 38, 40, 42, 44, and 46 would maybe be better written like this:

  • 36 in (92 cm), 38 in (97 cm), 40 in (102 cm), 42 in (107 cm), 44 in (112 cm), 46 in (117 cm).

Then there is much less misunderstanding, and users can relate the values better to their information and size.

What Can We Learn?

Yes, we can learn a lot. The interesting points to note are that the French clothing company’s website offered fairly useful and practical information. The British clothing company initially gave us six measurements in inches (36, 38, 40, 42, 44, 46) that made no sense to us, but when we went to the View guide link, we were able to decode the two tables, although it really was not made blatant (obvious enough) that this range only goes up to 46 inches bust (chest) circumference. And in fact, there were two tables provided, and it could have been very easy to read the second table (one below) and see that there is a size of XXL (119–124). Since the table has been provided, it will be available in XXL (119–124), but, of course, it is not for the polo t-shirt we selected.

Only give information relevant to the product and task, and remove any information that is not applicable or useful, especially when dealing with measurements. Furthermore, and you are going to like this if you are a designer or working in sales, if we consider the further-down-the-line consequences, you could very easily, as people do:

  • Make an order thinking the size will be alright when really it is not (we have all done this, hey).
  • Type in all your details.
  • Pay for it.
  • Wait for it to be delivered (maybe missing a day of work, or picking it up from somewhere else, as no one was in where you live).
  • Try it on, and it does not fit.
  • Get packaging to return it to them undamaged.
  • Complete another refund/return form.
  • Do more paperwork.
  • Send it back to them (maybe missing a day of work, so someone can pick it up from where you live or travel to a post/courier office).
  • Check your bank account over the next 30 days to see if you have been refunded.
  • Oh, I forgot, what about writing the postal address that the return needs to go to? Do you write it on the front in a pen, print out an A4 page, then sellotape it on, or do you do something else?

As you can see, user errors and mistakes are very time-consuming for the users themselves, and even more costly for the supplier of the product who has to process the return, i.e. giving them masses of more work to do. Good design makes a lot of sense for all involved.

Concluding Observations, What Did We Learn From All Of The Examples?

The results of getting good at the accessibility and usability issues previously mentioned are:

  • Be a better designer;
  • Designs will work better for people;
  • Enable people to achieve what they want to with your design and information;
  • Designs will increase business success;
  • Designs will reduce task interaction time and will allow users to achieve what they want to do faster;
  • Reduce stress, confusion, and unnecessary work;
  • Increase customer loyalty and quality perception of the brand.

What We Have Explored And Learned In This Article

  • Microsoft Word Font Menu
    Rather than accepting a design and what is there, we understood and found out how people will want to use the thing. We then looked at a very simple solution to make this as quick and efficient as possible. It leads to increased workflow speed, productivity, better actions, and a reduction in time, stress, and confusion.
  • Font Software
    We saw default operating software that lacked needed features.
  • Map In An Annual Review
    We found out, explored, and understood how people are going to use the thing, interface, content, or system. We then provided a very simple map that improves access to the content to allow easier and more chance of comprehending the information, and to increase the chance of people doing what we intend and enabling it to happen more easily.
  • Electronic Business Card On Websites
    We were able to increase the chances of people doing something (in our case, to contact us) by thinking about how we could make that easier to do by providing different electronic files to help people do this.
  • Modern (considered) good practice web performance techniques
    Current-day website design performance methods, like lazy load and infinite scroll, are rendering websites to load at 4kbps speeds that we had around the year 2000, that is 22 years ago. This makes websites difficult to use and interferes with the user’s original intention and goal.
  • Total Overload Of User’s First Interaction
    We saw many websites requiring a user’s first interaction to deal with, sometimes, 13 option settings and sorting, before they even get a chance to engage and complete their original task. Showing a high amount of information overload and digital information pollution.
  • Seemingly Straightforward And Assumed Easily Usable Information
    When it comes to information, even seemingly very mundane and standard information (if it is not designed, communicated, and provided to users in a logical and easy way) creates masses of problems and work for all involved (as was the case in the online polo t-shirt ordering examples).
Ways To Come Up With New Accessibility And Usability Ideas, For Your Current Project Right Now!
How can you simplify (I mean really reduce) the work, energy, and tasks for users to complete and get something done?
  • Reduce complexity and demands (for instance, by not bombarding them with options, notifications, and things to sort out, even before they have started their originally intended task).
  • Reduce steps, stages, and clicks.
  • Strengthen and reduce the complexity and unnecessary difficulty in design, communication, user interfaces, and systems.
  • Ask for feedback and try to get good-quality questionnaires.
  • Conduct real-time diagnostic user testing.
How would you make your design and information more obvious and easier to access, find, process and scan through for users?
  • Search options on a website (enabling people to search through all of your content)?
  • Sitemap or index (allow people to quickly find what they are looking for)?
  • Navigation menu for a website or contents page for a publication (allows people to get an overview of all of the website or system content).
  • Add a map, graph, or data visualization (to help people envisage and see the content in better and different ways)?
  • Make the content available as audio (either online or able to transfer to a portable physical device)?
  • Could you use heading hierarchy levels like heading 1, heading 2, or heading 3, bullet lists, boxes, or icons to split up, better chunk, and highlight information?
  • Do you provide your communication in a range of different medias like online, print, audio, video, braille, large print, and easy read (that will increase the chances of it being used and being used in different people’s most ideal format?).
  • What about a conclusion, summary, or recap after a lot of information to help reprocess and reinforce the main points from lengthy content?
  • What kind of navigational elements could you use or introduce to help users move and navigate around your system: running heads, breadcrumb navigation, go to the top link, scroll spy elements, where you are a feature, progress indicator, grid or list of thumbnails to give a whole overview?
  • How can you help and make users discover and enjoy more of your hopefully useful content and information?
How can you understand, envisage and get to know more about people and their requirements?
  • Find out, think, explore, ask and watch people using the thing.
  • Ask users and find out what they want to do with your thing.
  • How can you make it easier for them to do what they want and achieve what they want as quickly as possible?
  • Do user testing and set people tasks to do and see where they struggle and if they can do it within a reasonable amount of time.
  • Learn about different people’s needs, like people who are aging, dyslexic, with vision, physical or hearing issues.
  • Find out about different categories of people by reading about user personas.
  • Better sectioning or navigation features.
How can you provide the information people may want in different formats to allow better and easier use of your information?
  • Maybe: HTML, SMS, RTF, PDF, VCARD, TXT, XML?
  • How can you allow people to customize your website, interface, or system:
    • If people use your website or system a lot, maybe they would like to customize the colors, typeface, or layout to avoid boredom.
    • How could you deliver age-specific or more fitting and relevant content (text and images) to this category of users, or other age categories of users?
    • How could you allow people to customize your website so they can use it how they wish and use it in their most ideal presentation?

Thank you for reading. I hope you enjoyed the issues raised in this article and how tools like Extensis can help — some show the latetst strategies and methods (sadly, not that advanced) that we have been using here for the past twenty years. Accessibility and usability are really not that difficult — they just need to be done better.

Measuring The Performance Of Typefaces For Users (Part 1)

Our focus is on typefaces for reading large amounts of text and information in the most efficient, legible, pleasurable, comprehensible, and effective way possible. For instance, typefaces used for a novel, an academic paper in a journal, or a lengthy online article like this one that uses the Elena typeface, that you are reading now on this webpage. The questions that we will explore are:

  • How well do typefaces for extended reading actually work?
  • How well does a typeface work and perform against another similar typeface?
  • How would we test to see if there is any difference between a good sans serif and a serif typeface with users?
  • What would the world’s most ideal, best practice and design research-driven highly legible serif, sans serif, and slab serif possibly be like? What characteristics and themes would be most advisable, and do we need a central public list of aspects and features?
  • There is both the aesthetic and functional aspect to a typeface, but what is the functional aspect, and how can it be investigated and measured?
  • How good is a new typeface, and how good is it compared to a similar typeface designed in previous years?

Should typefaces be measured? There is no simple answer. The short answer: yes. The long answer: it is a difficult and imprecise task. We will discuss the pros and the cons, and I will show you what things are involved and how we could go about doing it.

A Very Short Introduction To Typefaces

For 100s of years, we have enjoyed using typefaces. These compiled systems for letters and symbols, which are representations of sounds and information, get a lot of use and are a large part of graphic communication.

The first movable type machine, and therefore the first printing press, was created by a man named Bi Sheng, who lived in Yingshan, China, from what we believe to be 970–1051 AD — over four full centuries before Johannes Gutenberg was even born. The moveable type, sculptured in a lead-based alloy — which is essentially metal blocks of letters and symbols that can be moved, arranged, and used for mass printing — was Johannes Gutenberg’s contribution. Fast forward to the early 1960s, phototypesetting systems appeared. These devices consisted of glass disks (one per typeface) that spun in front of a light source, which exposed characters onto light-sensitive paper. Later on, in the 1980s, type started to be used in a digital context in computers. And today, we still have type in a digital context, but it travels through cables, wirelessly on smartphones, and in virtual reality glasses in 3D.

There are many different classifications of typefaces. To name a few: sans serif, serif, slab serif, script, handwritten, display, ornamental, stencil, and monospace. In a way, technology also created new typeface classifications. Today, we even have mixed typefaces with elements of serif and sans serif, such as the Luc(as) de Groot’s typeface TheMix. This diversity adds to the difficulty and complexity of defining and testing typefaces.

Reasons To Measure The Performance Of Typefaces?

Because technology has made it possible to design typefaces easier than ever before, we seem to be reinventing “different types of wheels” that already get the job done. However, rather than reinventing these typefaces, maybe we can get some objective measures, learn from what works and what does not work, and then design objectively better wheels (typefaces).

If your aim is to produce a new typeface based on historical exemplars, tradition, or design, then fine, this is what you will be aiming for. Alternatively, if you want to do something new and expressive, or that has never been done before, then fine, of course. However, some contexts, situations, and users need and demand highly functional typefaces.

As I briefly mentioned, measuring a typeface’s effectiveness is difficult. Since many new typefaces are not supplied with any objective concrete testing data, how do we determine how well they work and where they succeed or fail?

Should We Measure The Typeface Alone, And/Or The Context And Environment That The Typeface Is Used In?

When considering the questions above, we can see that this is a large and complex issue. There are many different types of information, situations in which information is used, types of environments, and there are many different categories of people. Here are some extreme examples:

  • A person who is elderly trying to read road signs, driving home at night;
  • An accountant doing a large amount of numerical calculations for a million-pound/dollar company, needing to turn around the work in 30 minutes;
  • A young person learning to read for the first time, sitting in the back of a car full of people on bumpy roads;
  • A person with dyslexia trying to read and complete their evening class assignment.
Measuring Typefaces And The Resulting Performance Data

One of the reasons why measuring a typeface’s effectiveness is difficult is that we cannot accurately measure what goes on in people’s minds. Many factors are invisible, as Paul Luna — a professor at the University of Reading’s Department of Typography & Graphic Communication — mentions in this video Paul Luna on the typographer’s task. In addition, Robert Waller, information designer at the Simplification Centre states:

“Legibility research has a long history (going back to the 1870s). A wide range of issues has been studied, including type size, line spacing, line length, typestyle, serifs, and more. However, as Buckingham in New data on the typography of textbooks pointed out relatively early on, these factors interact in complex ways, apparently unrecognizable by many researchers. Indeed, in recent times a consensus has grown that the interaction of variables in type design is so complex that few generalizable findings can be found (see a longer review in Robert Waller’s “Typography and discourse”).”

Robert Waller in Comparing Typefaces For Airport Signs

Furthermore, Ralf Hermann, director of Typography.Guru in his article says:

“Doing scientific studies to test which typefaces work best in this regard, is almost impossible to do. For a proper test setup you would need to modify one parameter while keeping every other parameter unchanged. But setting a letter or word in different typefaces can not be considered as “changing one parameter”, because a typeface consists of dozens of relevant parameters like x-height, weight, contrast, width — just to name a few. So scientific tests for typeface legibility are often full of flaws. Very often the typefaces are set at the same point size, but as every graphic designer should know, the point size does not reflect the actual size of the letters in print or on-screen. So if you come across a scientific legibility study that compares typefaces set at the same point size, don’t even bother to read on!”

Ralf Hermann at What Makes Letters Legible?

The observations expressed in these quotes demonstrate that testing typefaces involves many complex factors. Because of this complexity, it has to be carefully controlled and modified, but it may not even be worth the effort.

Consistency And Variables

When testing typefaces or a selection of typefaces against another, we need to keep the typographic design parameters and variables the same, so we do not introduce or change the previously tested type settings. One example is the difference between the typefaces’ x-height’s (the height of a lowercase x) of any two typefaces we are testing. It is unlikely that they will be the same, as x-heights differ greatly. Thus, one of the two typeface x-height’s will seem to be larger in size, although it may be the same point size in the software. I will show you more about typographic variables under the section “Specific Typographic Design Variables Affecting Performance” in the second part of this article.

Robert Waller mentions in “The Clear Print standard: arguments for a flexible approach” that “although both point size and x-height are specified, it is the point size (pt) that is most commonly quoted — and point size is a notoriously imprecise measure.” It is, however, more effective and accurate to set an x-height measurement and set the typefaces being compared to that same x-height measurement. The x-height using point sizes actually results in different sizes — and does not look inconsistent between different typefaces.

Notice on the 1st line that we can see that both typefaces are set to 26 pt in Adobe InDesign. However, if you look at the tops of the “erdana” you can see that they go slightly above the line, so the Verdana typeface is, in essence, larger than the Info Display typeface, even when they are both typeset at 26 points. On the 2nd line, both typefaces have been typeset to a consistent and accurate measurement of an x-height of 5.5 mm. Notice that while the x-height is the same for both typefaces on the 2nd line, it gives a different point size for each typeface. This is why point size is not an accurate way to measure typeface size and for testing and comparing two or more typefaces.

Additionally, how you use and typeset the typeface in the actual typographic design and layout (line length, typeface size, color, spacing, leading, and so on) is probably more important than the actual typeface used. Thus, you could use one of the world’s most legible typefaces, but if you typeset it with a leading of -7 points and a line length of 100 characters, it would be rendered nearly useless.

As you can see, we can’t use a singular factor to measure typefaces. Instead, we need to address multiple factors within the design system. They all have to work well together to bring an ideal and effective final presentation.

Do We Need To Decide On A Base Default Typeface To Standardized Test Typefaces Against?

I would like to make things more complicated. (Remember when I told you this article had some difficult and complex issues?) So as an example, let’s say that we want to test a serif typeface against another serif and then again a sans serif against another sans serif. One would think that one of the two serifs or one of the sans serifs would perform better than the other, right? Well maybe, but not quite. Now, let’s say that we have the previous person testing two serif typefaces and two sans serif typefaces. What would happen if someone else did the same test but then tested their serif and sans serif against a different serif and sans serif typefaces that the 1st person used. Well, the result is simply that two people tested a serif and a sans serif typeface against different serif and sans serif typefaces, and they are not cross comparable.

So, the question is: should we, as a community, decide on base typefaces to test against? So, for a serif, it is quite popular and common in academic journals to test against Times New Roman. So, for sans serif, Arial is again another popular base typeface typically used to test another sans serif against. Then for monospace, Courier?

Last but not least, we have 2 people previously testing typefaces, but what typographic design and typesetting settings and variables did they use? Once again, even more inconsistency is introduced because they would most definitely test their typefaces with different typographic designs and typesetting settings. Do we need to set a base/default typographic design and typesetting, so everyone tests and measures against the same thing?

The Difference Between Near-identical Typefaces: Two Brief Discussions

There are many typefaces, and many of them are very similar or are nearly identical to previous or contemporary versions available. Here are some examples:

  • Neue Haas Grotesk (1956), Helvetica (1957), Arial (1982), Bau (2002), Akkurat (2004), Aktiv Grotesk (2010), Acumin (2015), Real (2015);
  • Frutiger (1976), Myriad (1992), Monotype SST (2017), Squad (2018), Silta (2018);
  • Collis (1993), Novel (2008), Elena (2010), Permian (2011), Lava (2013).

Note: For more information, see my article “No more new similar typefaces for extended reading, please!

If we look at a typeface like Garamond, we can see that there are many versions of Garamond — all with slightly different interpretations of what the ultimate or most accurate version of Garamond is. Furthermore, they are all designed for slightly different uses, contexts, and technological choices:

Typeface designers and foundries supplying these versions of Garamond say theirs is the best, but which one is right? They were all designed for slightly different contexts and technological times. It would be interesting to find out what the performance differences are between these very similar typefaces.

Furthermore, if we compare a typeface like Minion Pro (which is quite robust and sturdy) against a typeface like Monotype Baskerville, we can observe that Minion Pro has more consistent stroke widths and slightly less personality than Monotype Baskerville. In contrast, Monotype Baskerville has more variance in stroke width, with more of a posh and sophisticated personality than Minion Pro. Therefore, how would these differences affect their performance? Perhaps there is no one right answer to these questions.

I certainly feel, in 2022, that we, as designers, researchers, and academics, have certainly built up some fairly sensible and reasonable conclusions based on previous research and previous arguments over the last years. Nevertheless, the questions seem to remain around — what are the characteristics that make typefaces work a little bit better, and what would be “more advisable?”

Kai Bernau’s Neutral Typeface

Neutral, a typeface designed by Kai Bernau, is an interesting example of how an ideal utopian legible typeface might look and be like. We can see in the image below that Bernau has analyzed the fine and very subtle characteristics that are common in neutral typefaces, such Univers, Helvetica, TheSans, and so on.

The term “neutral” basically refers to a typeface design that does not say much or does not say anything and that has a very “no style/anonymous” feel and voice — like the color grey. Think of it like speaking to someone with little personality or who has a not-obvious personality. In his design, Bernau is attempting to find out what an almost merged letter skeleton of all these neutral typefaces would look like when comparing all these typefaces.

Kai Bernau’s Neutral typeface began as a graduation project at KABK (the Academy of Art, The Hague), taking inspiration from typefaces that seem ageless, remain fresh and relevant even decades after they were designed. His project was constructed based on a set of parameters derived by measuring and averaging a number of popular 20th-century sans serif fonts (like Helvetica, Univers, Frutiger, Meta, and TheSans), trying to design the ultimate “neutral” font. It is a very interesting idea that builds on previous best practices to find an optimal solution. This is much more like the conceptual typeface design that we need to see in the future. For more, see the “An Idea of a typeface” article by Kai Bernau.

Can A Utopian Highly Legible Typeface Exist?

Bernau’s typeface aims for neutrality and utopian legibility. However, if I asked the question: what would the world’s most legible sans serif, serif, or slab serif typeface look like? How much better than a typically good highly legible sans serif, serif, or slab serif typeface would it be? Furthermore, is it even worth the effort?

Whatever your thoughts are, it is the designer’s job to design things that work and read well. Adding to this conversation, Sofie Beier (a legibility expert) says:

“In the history of design, there are many examples of designers proposing an &lsduo;ideal typeface&rsduo;. The fact is that there is no optimal typeface style. A thorough literature review shows that typeface legibility varies significantly depending on the reading situation.”

Sofie Beier in Bringing Together Science And Typography

Perhaps, we should consider developing a central list of the elements, research, data, sources, and aspects to create legible and usable typefaces, so we can easily choose? This may lead to better typeface design decisions, choices, and better typefaces in the future.

Changing The Change: From What To What?

Another reason why we need to measure typefaces and know how well they work is highlighted by David Sless, information design pioneer and director of the Communication Research Institute in Australia, in his article “Changing the change: from what to what?”:

“Change is good. Design is all about change; bringing something into the world that didn’t exist before; changing from an undesirable to a desirable state of affairs; improvement; progress! And now we are even changing the change! […]

Benchmarking is that part of the design process where you ask how an existing system is performing against agreed performance requirements set at the scoping stage of the design process. Putting the matter simply, if you change something and then claim that the change is an improvement, you need to have some before and after measurements. […]

Much design work… is redesign rather than design from scratch. An important part of redesign is to ask: where are we right now? What is the current performance of this design? What is happening in the world now which we don’t want to happen, or we’d like to change? Where do we want to go? What do we want to achieve here? […]

So I’m all in favour of change, even changing the change. But we need to know what we are changing from. […]

Unless we look carefully at what we are doing now before making a change, we might throw out some good bits.”

David Sless

This is one of the reasons we need to measure typefaces and know how well they perform. That way, when we design new ones in the future, we can learn from past data and then use that knowledge in future typefaces, rather than relying on a bit of research and personal self-expression.

Redesigning typefaces makes us end up in the same place (whether good or bad), and we are not necessarily making and designing better typefaces. Although typeface design provides us with both the aesthetic appeal to meet the functional needs, it is the functional need and its functional aspect that is frequently missing.

With the thoughts mentioned above, I would like to raise another debate, because I know that typographic discussions and debates are usually beneficial and productive for all involved.

Are Typefaces Tools, Software, Objects, Products Or What?

This is a question that is not easily answered. It depends on what position you decide to take. Kris Sowersby, director of Klim Type Foundry argues that typefaces are not tools in his article “A typeface is not a tool”:

“In theory, designers could perform all of their typesetting jobs with the same one or two typefaces. But they don’t. I can almost guarantee this comes down to aesthetics. They choose a typeface for its emotive, visceral and visual qualities — how it looks and feels. Designers don’t use typefaces like a builder uses a hammer.

The function of a typeface is to communicate visually and culturally.”

— Kris Sowersby

Though Sowersby points out a functional aspect, he makes no mention that typefaces are used to achieve certain and precise responses and effects from users’ behaviors and emotional responses. For example, I might choose typefaces specifically because of their legibility — when a typeface is considered legible and easy-to-read by people with less-than-good eyesight. And so a well-designed typeface (or tool) is crucial.

Another reason I may choose a typeface is to bring a certain “more ideal” and to bring a “more specific” response and behavior from people. So, I may also choose a typeface as a tool for better communication with specific audiences. This is similar to why we choose a hammer over another, even though they all do the same job. There are 100s of different types of hammers, but builders do seem to have an “emotional favorite.”

In addition, typefaces can be more or less legible on different screens and monitor resolutions because they can be rendered with varying degrees of quality and sharpness.

Let us move on to a more precise and probably more important aspect, and that is testing data value.

The Two Types Of Testing Data: “Subjective” And “Objective”

When testing, there are two types of testing data: subjective (meaning mainly coming from a personal view and opinion) and objective (coming from a result from reality or the ability to do or not do something). They are valuable in their own ways. However, an objective measurement may be more desirable. It is important to know the difference between the two. Below is a brief description of both as it applies to our topic:

  • A subjective measure:
    A user says: “I can read this typeface better.” This may be the case and what the person feels. However, if the measurement, in this case, is “better,” then the questions are: how much better, what kind of a measure and how accurate a measure is “better,” and how much better (than what) is it? However, what one person likes may not be what another one likes. Is it better because I said so? They may not be able to describe or know why they like it, but they just say: “I like it.” Because this measure is based on what the person feels, it is not accurately measurable.

  • An objective measure:
    A user identified a letter correctly and within a certain timeframe. The data is either correct or incorrect, they could or could not do it, and they did or did not do it in a measurable recorded time span.

Kevin Larson, principal researcher on Microsoft’s Advanced Reading Technologies team, explains:

“While I generally agree with you on the importance of objective data, and most of my work has collected reading speed measures of one kind or another, I think there can be interesting subjective data.”

Kevin Larson

David Sless also states in his article “Choosing the right method for testing:”

“The first is that inexperienced, untrained, or misguided information designers ask the wrong questions: what do people think of my designs? Which of my designs do they prefer? What must my artifact look like? What information must my artifact contain? The second reason is that asking the wrong questions about the design, leads inevitably to certain ways of asking questions — methods of testing which give inadequate answers.”

David Sless

David Sless continues the discussion by adding [slightly reworded and edited by me]:

“Attitude and opinion surveys, preference tests, expert opinion, and content-based design, are based on the wrong questions and are highly subjective because they come from people’s views, knowledge build-ups and preferences… The right, or much better, more easily measurable and more accurate question, is based on user performance, setting them tasks to do, then using diagnostic testing to see if they can or cannot do the tasks, and making any notes, possibly recording how long it took them to do it. A far more useful question to ask before you design a new information artifact or redesign an existing one is: what do I want people to be able to do with this artifact?”

In summary, the most important question is: what do we want the users to do? Based on the previous examples and discussions in this article, we can see that not all data or information gained is necessarily useful or accurate.

What Do We Want People To Do With Highly Legible Typefaces?

Consulting Sless’ article “Changing the change: from what to what?” again:

“A far more useful question to ask before you design a new information artifact or redesign an existing one is: what do I want people to be able to do with this artifact?”

David Sless

Let’s try to outline what we want people to do with highly legible typefaces for extended reading, like reading large amounts of information, effectively and precisely:

  • We want them to be able to recognize what each letter, word, and symbol is;
  • We want the typeface to reflect and fit the content and message for the typeface to enhance and support it;
  • We want them to understand, absorb and comprehend as much of the information as possible;
  • We want to encourage, sustain and enable high motivation levels when looking at and reading the text;
  • We want them to maybe form a bond with the text and typography, feeling that the information is high quality, respectful and worthy;
  • We want to tire them as little as possible;
  • We want to provide typography in the most efficient way, such as leading, tracking, kerning, typeface size, color, line length, hyphenation, capitalization, and word spacing;
  • We want different categories of people — like people with vision impairments, people with low vision or very bad eyesight, people with dyslexia or aphasia, or who have specific letter requirements, like children learning to read — to at least have letters and symbols designed to support or fit their needs as best as possible. We want to allow accessibility via OpenType or stylistic options with the typeface, so they are available to use if needed. These points could be extended to language support as well.
More Coming Up In Part 2

Let us dive into more of these amazing complex issues (as I said they would be) in the second part of this article — available next Friday, June 10th. We will look deeply at how we can test typefaces and how to get the best out of it. Stay tuned!

Further Reading on Smashing Magazine

Micro-Typography: How To Space And Kern Punctuation Marks And Other Symbols

Micro-Typography: How To Space And Kern Punctuation Marks And Other Symbols

Micro-Typography: How To Space And Kern Punctuation Marks And Other Symbols

Thomas Bohm

This article is for anyone who works with typography, in any medium, and it is especially for those designers who are keen to give users the best reading experience possible.

Jeffrey Zeldman once said:

“90% of design is typography. And the other 90% is whitespace.”

You might be knowledgeable about typefaces; you might regularly modify the leading, tracking, and kerning of your fonts; you might optimize the file sizes of your web fonts — but is that all that can be done? For hundreds of years, typographers and typeface designers have been using white space in typography. In this article, I will discuss the spacing and kerning of punctuation and other marks, looking at what people say about the effects of these adjustments. I will show you different ways to go about doing this work, the pitfalls of this work, and how we might do it more accurately, quickly, and consistently.

This article will show you how to analyse typography in more detail, and how to better judge spacing and micro-typographic details, especially in typefaces designed for extended reading. You will learn a lot about how typefaces are built and programmed.

Typographers have a long history of not accepting what they are initially given, in order to achieve optimum performance for readers. There are also accessibility benefits from properly spacing punctuation marks and other symbols for different types of people (such as aging readers and children around six years old). This article will advance your typographic skills, help you produce a better reading experience, improve your typesetting skills, and enable you to deliver effortless reading of a large volume of text on web pages or in framework/API documentation.

What Spacing Are We Referring To?

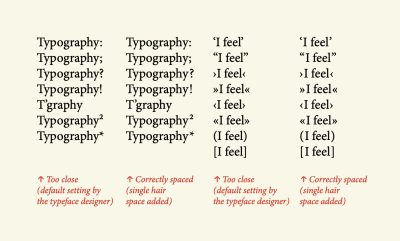
Below is a simple example of what spacing looks like applied and not applied:

The word ‘Typography’ repeated in 4 columns, with various punctuation marks and symbols showing the effect of spaced and not spaced marks.
Figure 1: This example is from Jost Hochuli’s book Detail in Typography. Set in Minion Pro Regular (version 2.068). No tracking applied; justification: desired, 100%. (Large preview)

You might not be able to see much difference, but there is. Welcome to micro-typography. This article is somewhat of a how-to about the issues and problems. We’ll need to explore the issues both in print (how it has been done in the past) and on the web (how it can be done in the present). The past informs the present.

There are also other benefits to spacing punctuation and other marks (though currently untested, with little evidence available). Have you considered people with vision impairments; the extra space given to punctuation marks and other symbols could be beneficial and add clarity, because the marks would not so squished against the next character. What about children around 6 years old, who are learning to read. Does the extra white space, and thus extra time and emphasis, lead to more awareness of these marks?

Why Space Punctuation Marks And Other Symbols?

You may remember letterpress typesetting or have done it yourself. There, a vast range of space characters are used, as Marcin Wichary points out. The subject of spacing punctuation and other marks in typography and typesetting has held my attention for some time. In high-end typographic design books and manuals by experts (for example, Detail in Typography by Jost Hochuli), it is widely regarded that spacing punctuation marks and miscellaneous symbols should be done and is good to do. This is somewhat debatable, though. Some people say that it is a waste of time and that 99% of users will not notice any difference. On the other hand, many expert typographers and typeface designers say it is a good thing to do, and I feel the extra time and emphasis given to marks, leads lead to better typographic communication.

Bruce Mau says this in his book, Life Style:

“Typographic design is the controlled release of information events in time. It operates on two temporal registers. The smallest is the shifting present tense of the reader. The largest is the sweep of historical time. Typography allows us to experience past and present simultaneously.

Every typographic decision — font, size, position, orientation, weight, colour, style — affects the reader’s speed of access, the rate at which the message is engaged by the nervous system.”

Bruce Mau says that people who design the reading experience are shapers of space and time. Furthermore, Peter Glaab says:

If the importance of a correctly punctuated sentence had seemed negligible to you, this will perk up your ears. Three arguments speak clearly for that:
  1. The text reads better.
  2. The text looks better.
  3. Correct orthography (the conventional spelling system of a language) enhances the value of a text.

Another analogy is timing and space in music. How could we say that empty and quiet spaces in music, or the contrast between loud (positive) and quiet (negative) sounds, do not matter? We cannot. These aspects are integral to it. White space is essential to so much design. Think about what information would look like without it? Erik Spiekermann once said:

You don’t actually design the black, you design the white: the space inside it and the space around it.

The control of white space in typography, and much of graphic communication, is design. It is as important as the black (positive) values. The spacing of punctuation marks and other symbols works more in an unconscious manner, rather than being directly perceivable, but it does have an effect.

What White Spaces In Typography Can We Use?

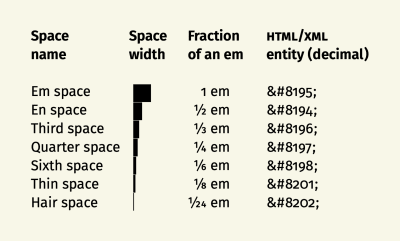
Shows the visual size and HTML/XML entity codes for: em, en, third, quarter, sixth, thin, and hair spaces.
Figure 2: A graphic representation of spaces available to use, from Yves Peters’ Adventures in Space: Spaces. A kerning value of any size can also be used (more on that later). (Large preview)

How do we know what width of space to add? Personal expertise plays a lot into it. I couldn’t imagine the need to use a space larger than a ¼ em (a quarter space). In his book, “The Elements Of Typographic Style,” Robert Bringhurst says:

“Kern consistently and modestly or not at all.”

Roland Stieger notes:

“We do not always use the same spaces, because every typeface has a different kerning. GREP (standing for: globally search a regular expression and print) we use only for bigger amounts of texts. In short texts, we often do it by hand (manually). With some fonts I find a hair space is fine, sometimes I find a thin space better. It really depends on the typeface.”

What Punctuation Marks And Other Symbols Should We Add Spacing To?

Typographers usually add space to the left side of the following marks:

: ; ” ’ ! ? / ) ] } * ¿ » ‹ @ ® ™ ℓ ° ¡ ' " † + = ÷ - – —

And they usually add space to the right of these:

“ ‘ / ( [ { > ≥ < ≤ £ $ ¢ € › « √ μ # @ + = ÷ - – —

Upon further inspection of figure 2, we see that many more characters and symbols might need extra spacing, on the left or right side.

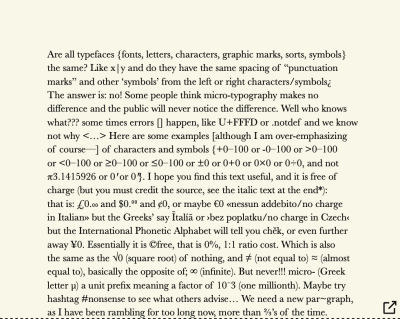
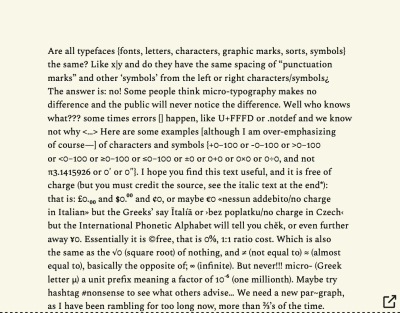
Cropped paragraph block typeset in Baskerville font, showing half of the full figure, of gobbledygook text. Shows lots of different typographic, mathematical, and miscellaneous symbols. And the whole paragraph block typeset in Baskerville font, of gobbledygook text. Shows lots of different typographic, mathematical, and miscellaneous symbols.
Figure 3 cropped (click/tap figure to see in full): My spacing and kerning test with gobbledygook text, with no additional spacing applied. Typeface size is 12 points, with 16-point leading. Default setting (tracking: 0; manual kerning: none applied; justification: desired, 100%). Baskerville Regular (version 13.0d1e10, which comes with macOS Catalina 10.15.2) old-style figures are not available in this version. (Large preview)
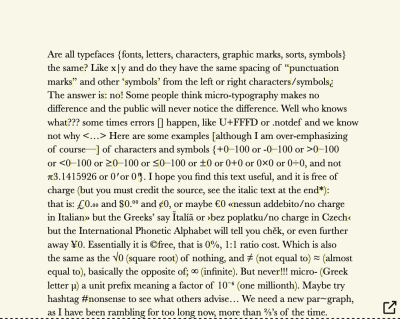
Cropped paragraph block typeset in Baskerville font, showing half of the full figure, of gobbledygook text. Shows lots of different typographic, mathematical and miscellaneous symbols. Yellow has been used to highlight where the white spaces have been inserted. And whole paragraph block typeset in Baskerville font, showing half of the full figure, of gobbledygook text. Shows lots of different typographic, mathematical, and miscellaneous symbols. Yellow has been used to highlight where the white spaces have been inserted.
Figure 4 cropped (click/tap figure to see in full): This uses the same typesetting as figure 3, but I have used a hair space (marked in light yellow) in InDesign to add better and wider spacing to select punctuation marks and many other symbols. (A hair space is 1/24th of an em, and an em is basically a square the size of the body text — 12 points, in this case.) Notice how these marks have more space on the left and right side. You might not have consciously noticed it at first. (Large preview)


Figure 5: A real-time example of micro-typography. This interactive version of figure 4 allows you to change the spaces and see in real time what has been adjusted. (View in a new window)

Cropped paragraph block typeset in Baskerville font, showing half of the full figure, of gobbledygook text. Shows lots of different typographic, mathematical and miscellaneous symbols. Yellow has been used to highlight where the white spaces have been inserted, and a darker yellow has been used to highlight kerning issues in the typeface as well. And whole paragraph block typeset in Baskerville font, showing half of the full figure, of gobbledygook text. Shows lots of different typographic, mathematical and miscellaneous symbols. Yellow has been used to highlight where the white spaces have been inserted, and a darker yellow has been used to highlight kerning issues in the typeface as well.
Figure 6 cropped (click/tap figure to see in full): This text block is the same as in figure 4. However, as you can see in both instances (figures 3 and 4), the typeface has kerning issues, which still need fixing. I have highlighted the kerning and baseline-shifting issues that need fixing in dark yellow. (Large preview)

So, in figures 3 to 6, we have seen what the spacing of punctuation and other symbols looks like. It is clear to me that this extra spacing makes for better and smoother typographic communication. We also see that not enough has been done by the typeface designer to apply white space and kerning, because many punctuation marks and other symbols are almost flush with the left or right character.

Examples Of Default Punctuation And Symbol Spacing In Different Typefaces

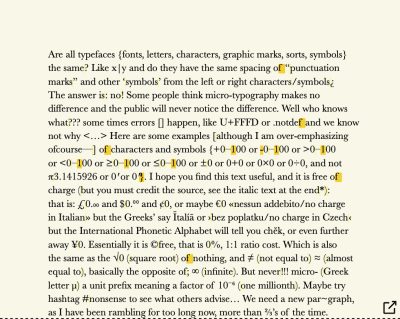
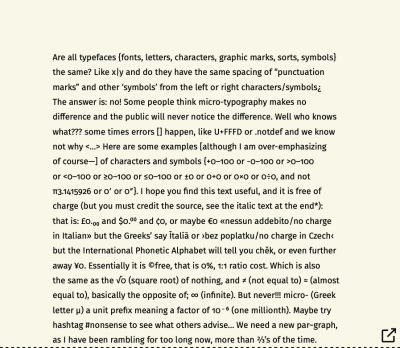
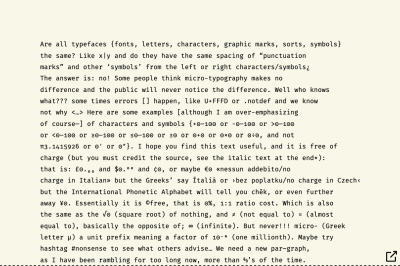
Are all typefaces the same, and do they have the same spacing of punctuation marks and other symbols from the left and right? The answer is no. Below are some examples of typefaces with their default settings (no tracking or kerning applied within the figures). Notice the white space around marks and non-alphabetic characters.

Cropped paragraph block typeset in Fira Sans Regular font, showing half of the full figure, of gobbledygook text. And whole paragraph block typeset in Fira Sans Regular font, showing whole of the full figure, of gobbledygook text.
Figure 7 cropped (click/tap figure to see in full): Fira Sans Regular (version 4.301); typeface size: 9.2 points; leading: 16 points. Default settings (tracking: 0; manual kerning: none applied; justification: desired, 100%). Generally, the letters by default are quite widely spaced (horizontally) within the typeface. Notice the better spacing and kerning built into this typeface by default than the Baskerville in figures 3, 4, and 6. Many fewer kerning and spacing issues are present in this typeface, and many of the default kerning settings do not need to be fixed. Good examples of default kerning are: ʺ} and +0–100 and 1:1 and //. (Large preview)
Cropped paragraph block typeset in Spectral Regular font, showing half of the full figure, of gobbledygook text. And whole paragraph block typeset in Spectral Regular font, showing half of the full figure, of gobbledygook text.
Figure 8 cropped (click/tap figure to see in full): Spectral Regular (version 1.002); typeface size: 11 points; leading 16 points. Default settings (tracking: 0; manual kerning: none applied; justification: desired, 100%). Notice the wide kerning/spacing of characters, such as: , , , , : and ;. (Large preview)
Cropped paragraph block typeset in Fira Mono Regular font, showing half of the full figure, of gobbledygook text. And whole paragraph block typeset in Fira Mono Regular font, showing half of the full figure, of gobbledygook text.
Figure 9 cropped (click/tap figure to see in full): Fira Mono Regular (version 3.206); typeface size: 9.2 points; leading: 16 points. I have included a monospace typeface to show that in monospace typefaces, all glyphs have the same width, and all characters or symbols align vertically. This leads to some interesting spacing characteristics and problems. (Large preview)

In figure 7, we can see that the default tracking (the spacing of letters across lines) for Fira Sans Regular is a little tight. In figure 8, we can see that Spectral Regular, a serif typeface for extended reading, has quite a lot of tracking across lines by default. If we look at a typeface like FF Unit, it also has quite a lot of tracking across lines by default. Much less spacing of punctuation marks and other symbols is needed, because the tracking is already generous. If we go to an extreme, like in figure 9, which uses Fira Mono Regular, you can see that, because all characters take up the same width, they all align vertically, creating a lot of white space on the left and right sides; thus, the spacing of punctuation marks and other symbols is not relevant.

So, we can now start to see that properly spacing punctuation and other marks is a good thing to do, that there is some benefit, and we can see roughly what marks and symbols to add space to. But what are the issues faced by real-world practical designers whose clients do not have an unlimited budget?

The Current State Of Problems

Currently, addressing the issue is an ordeal and time-consuming. The problems can be summarized as follows:

  • Spacing punctuation marks and other symbols takes too much time, via any method.
  • Find-and-replace or GREP can produce a massive number of errors and is a solution just waiting to go wrong.
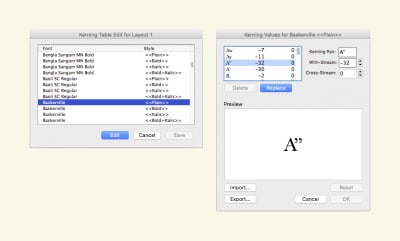
  • Modifying the typeface’s built-in kerning values is not easy to do or a best practice.
  • White space and kerning on web pages require (as of 2020) a lot of work to do and lacks technical support.
  • White space and kerning in ebooks end up having to be deleted and stripped out before the books are exported, or else they produce problems and empty (tofu) boxes □.
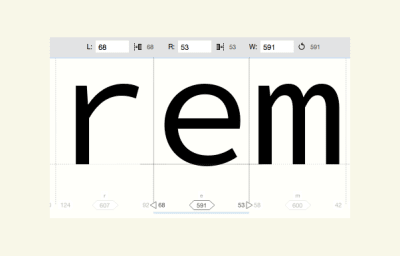
  • Modifying a typeface’s built-in sidebearing values is not easy to do or a best practice.

The Issues In More Detail

Spacing Punctuation Marks And Other Symbols Takes Too Much Time

For a 30-page A5 book, you can pretty much do what you like. Spacing and kerning can be done manually, with little time added to the total typesetting cost. What about a 100-page academic book? Manually adding spaces in Adobe InDesign or Quark would be too time-consuming. What about a website? If done in Adobe Dreamweaver, you could open up all individual pages and then add spacing characters, such as hair spaces and thin spaces (see figure 2). Some people and organisations are willing to pay extra for this typographic quality, but they are rare. Nicky Barneby, in TypoGraphic 59, outlines Penguin’s composition rules, set by Jan Tschichold in 1946. What we as typographers need is some way to add spacing to an agreed-upon list of characters and symbols, and that would take no more than 15 minutes to implement for a lengthy book or website. This would be the ideal solution, and this is my goal.

Find-And-Replace And GREP Is Just Waiting To Go Wrong

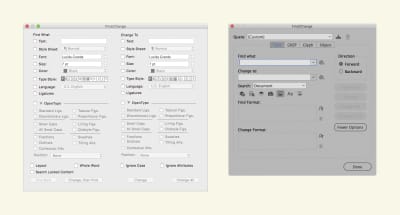
It is possible to add white space and to adjust kerning values using the find-and-replace option in software (Adobe InDesign, Quark, Microsoft Word, Adobe Dreamweaver).

You could manually find-and-replace, and find-and-replace, and so on. This would allow you to see what changes are occurring. But doing this for an entire book or website and for all character and symbol combinations would take days and would add massively to the overall time and cost of typesetting.

Alternatively, you could use GREP (globally search a regular expression and print), as Ralf Herrmann demonstrates for Adobe InDesign. However, there are issues with this. I am not prepared to do a mass find-and-replace without seeing what the find-and-replace is actually doing to the text. I suspect there are people who are comfortable clicking the “Change all” button, but I am not one of them. The risk only increases when you are working on typography for a client, when mistakes and leaving it up to software could be disastrous.

Also, GREP is too technical for people who do not know how to code or who don’t know what code expressions are needed. And we would be heavily relying on the software knowing what we want (never a good idea). A lot can go wrong with changes that you do not see being done. Bram de Does (who some say has designed the world’s two most beautiful typefaces) puts it thus:

“I like to do manual things as much as possible.”
A software dialog box on the left from Quark showing its Find/Change window. On the right is Adobe InDesign’s software dialog Find/Change window.
Figure 10: The find-and-change window in Quark (left) and in Adobe InDesign (right). (Large preview)

Another issue is that, if we use a single hair space throughout a book or website, what happens if we want to increase it to thin spaces? Well, we could do a find-and-replace for all hair spaces, and change them all to thin spaces in one click. That might work, but it might not. What happens if somewhere we have used two hair spaces side by side? When we do a find-and-replace, those two hair spaces would become two thin spaces. Two thin spaces are much wider than two hair spaces. Things get messy and complex quickly. Find-and-replace is a solution just waiting to go wrong.

Modifying A Typeface’s Built-in Kerning Values?

Kerning basically refers to the changing of space between two letters or symbols. Letterspacing (also known as tracking) refers to the addition or reduction of space across letters and symbols, across a line or lines of text. Every typeface has built within it (and specified by the typeface designer) a table of letter combinations and kerning values. Robert Bringhurst, in his book The Elements of Typographic Style, suggests another solution:

“One way to refine the typography of a text is to work your way through it line by line, putting space in here, removing it there, and repositioning errant characters one by one. But if these refinements are made to the font itself, you will never need to make them again. They are done for good.”

What he is suggesting is that we edit the kerning values or sidebearings (more on those in a minute) within the typeface itself, opening the font in typeface design software, and making the changes for good. I would not recommend this, for two reasons:

  1. The importing options alone in typeface software are beyond an academic exercise and will result in problems if not done properly by an expert. Typefaces produced before around 2004 were simpler to import and much less complex than typefaces available today. Much less could go wrong, technically and technologically, with typefaces built around 2004. When we add variable-font settings and issues with importing and modifying typefaces, errors are guaranteed to happen.
  2. Many typeface licences would class adjustments to the built-in kerning values and sidebearings in the typeface file itself as modifications, which would not be allowed in the end-user licence agreement (EULA). Doing it to open-source typefaces might be slightly more allowable, as Richard Hendel suggests, although still not guaranteed.

Furthermore, in Adobe InDesign, for example, if we take a character combination of A”, the A and closing quotation mark have a kerning value of -32. So, let’s say that we were going to add space to our selected list of marks using a +30 unit. For A”, which has a kerning value of -32, we could make that -2. This is easy to numerically work out and to space in increments or decrements of 30 units. However, what happens if the value was originally -26. We can work out the math, but how quickly? And it could increase complexity.

Quark’s Kerning Table Editing Feature

For many years, surprisingly, Quark has had a kerning table editing option, something that Adobe InDesign does not offer. It allows you to select a typeface and single weight, and then input a kerning pair to modify and customise on top of, overriding the built-in kerning table. In the “Kerning Pair” box, you input two characters to kern. In the “With-Stream” box, you can increase or decrease the horizontal amount in increments of 10 units. And in the “Cross-Stream” box, you can increase or decrease the vertical amount (similar to a baseline shift) in increments of 10 units. The modified kerning pair and value are then applied throughout the Quark document. Quark’s kerning table editing is a very interesting feature and can save a lot of time. Your customisations can also be saved and exported. Great! Now we’re talking. This option is getting us closer to our ideal scenario.

A screengrab of the ‘Kerning table edit’ window in Quark, it shows the kerning value numbers for many different pairs of letter combinations.
Figure 11: A screenshot of Quark’s kerning table editing option. (Large preview)

White Space And Kerning On Web Pages Currently Requires A Lot Of Work And Lacks Technical Support

We could add spacing to punctuation marks and other symbols in two ways:

  1. We could use a range of white space characters, specifying the HTML or XML entity in the markup, as shown in figure 2 and as Yves Peters describes excellently.
  2. We could create two CSS classes, one for adding a unit of space to the left side, and one to the right side. Then, we would use a span tag to apply it to a letter or symbol.

Both options above are possible, but when you have to do this for hundreds of web pages, it becomes daunting and unmanageable.

If we want to kern on the web officially, we are somewhat limited in options. There are basically two CSS options out of the box: font-kerning: normal, which says to use the typeface’s built-in kerning, and font-kerning: none, which says not to use the typeface’s built-in kerning. The Mozilla Developer Network documentation has an example. Hardly useful.

However, let’s go back to our example of the letter combination A”, which have a kerning value of -32. If we were to use a hair space throughout, at least there would be little math to do, because all of the white characters (essentially a glyph) have a fixed value. So, one of the upsides of white spaces is that they have a consistent width value.

White Space And Kerning In eBooks Produce Empty Boxes

Adding white space to text and entities such as non-breaking spaces and non-breaking hyphens can create problems when the document is exported to an ebook format. It can create empty (tofu) □ characters. These spaces are probably best removed (stripped out) before you export to an ebook or HTML. Moreover, kerning in ebooks can only be specified from the typeface’s built-in values and cannot be modified or overridden. Once again, all of this decreases our options.

Modifying A Typeface’s Built-in Sidebearing Values?

Sidebearings refer to the horizontal fixed space on either side of an individual character or symbol. Whereas kerning modifies the space between two letters and many different letter and symbol combinations, sidebearings are like fixed concrete blocks on the left and ride sides and the width. And when the value is set, it affects all instances of the letter or symbol where it is used, along with the kerning values applied on top of it. The spaces on either side are referred to as left sidebearing (LSB) and right sidebearing (RSB). These spaces ensure that characters sit beside one another with an even appearance. Essentially, it is the space to the left and right side of a character, before kerning is applied.

If you look back at figure 9 in this article, I used Fira Mono Regular for the text. If you scan down the text block, you’ll notice that all letters align vertically. The reason is that, essentially, all monospace typefaces have the same left and right sidebearings, or width bearing. (That is why it is called a monospace typeface — “mono”, as in singular). However, non-monospace typefaces have different left and right sidebearings; they span a character or symbol’s entire width. Good sidebearings can make the task of kerning a typeface easier. In Robert Bringhurst’s quote previously mentioned above, he basically says: If you fix it once, then it never needs fixing again. Perhaps, instead of adjusting the kerning, what we need to do sometimes is modify the sidebearing. Below is a screenshot from a panel in FontLab VI’s software Manual Metrics Editing.

A software screengrab of FontLab VI’s Manual Metrics Editing panel. Shows the lowercase letter e with a black line to the left and right. And 3 changeable values below.
Figure 12: FontLab VI’s Manual Metrics Editing panel. (Large preview)

This screenshot tells us a few things:

  1. The e (highlighted in the software) has a width bearing of 591 units, which is shown by the black thin vertical line to the left and right of the e.
  2. The left sidebearing of the e has 68 units.
  3. The right sidebearing of the e has 53 units.

So, if we were to think about the spacing and kerning issues mentioned earlier, let’s consider the colon. We always want a bit more space on the left of the colon, so that it is a bit set away from any character to its left. In theory, we could edit the left sidebearing and say that we want a bit more space on the left:

68 units + 20 units = 88 units

Note: This might equate to the space provided by a hair space, for example.

Then, every time the character gets used, in combination with other characters, it will always have a bit more space on the left. Is that it? Are we done?. Not quite.

Consider this text: 1:1. What happens, now that we have increased the default left sidebearing, it could look like 1 :1. What we might need to do is add a kerning pair value for a 1: combination (although I am not an expert, and my knowledge is slightly lacking in this area).

This article has gotten quite technical, and I have probably confused and bored you by now. But hold on: there are potentially easier and clearer options.

Possibly Better Solutions

White Space Edit For Print And Web

To clarify: Adding white space is basically adding a white space character (entity).

What would a white space edit look like? Quark has a kerning table editing option; why doesn’t InDesign have one. What would it look like in CSS or via the syntax for OpenType features in CSS? What do we ideally need?

  1. The typographer would need to be able to define an agreed-upon preset list of punctuation marks and symbols to add space to.
  2. Having defined the preset list of punctuation marks and symbols to add space to, the user would then need to be able to specify which punctuation marks and symbols they want to add space to on the right side or left side.
  3. The user would then need to be able to specify problematic letter and symbol combinations; for example, to exclude adding space to text such as a URL: https://www. We might reasonably add space to the left and right of a forward slash sign (/), but with a combination like https://, we would get a customized double space to the right of the first / and to the left of the second /, making it look like this: https:/ /.
  4. When the user has done this, they would then need to be able to add a space that is user-definable, or a space value from, say, four options. For print: 25, 50, 75, 100 (measured 1/1000 em in InDesign, relative to the typeface’s size). And for web: 1px, 2px, 3px, 4px.
  5. The user would need to be able to apply this spacing to the style sheet in InDesign or Quark, and also in CSS. I am sure experts can think of better coding than what is below, but here is my amateurish attempt:
    .class {
        font-feature-settings-space-characters-symbols-left-side: value,value,value,value; /* Characters and symbols could be copied into the horizontal list, or Unicode HTML entity values used as well */
        font-feature-settings-space-characters-symbols-right-side: value,value,value,value; /* Characters and symbols could be copied into the horizontal list, or Unicode HTML entity values used as well */
    font-feature-settings-space-characters-symbols-amount: value; /* Any range of measuring units could be used: px, em, rem */
    font-feature-settings-space-characters-symbols-problem-exclude-combinations: value,value,value,value; /* Letter and symbol combinations to not apply the above spacing to */
    }
    

    Or leave it to typeface designer to allow four options built into their typeface, via OpenType Feature File Specification rules:
    font-feature-settings-space-characters-symbols-amount-space: value; /* The user is allowed to define 1 of a range of 4 values: quarter 1/4, half 1/2, two-thirds 2/3, full 4/4 */
    

    Note: I tried to pick up on the syntax for OpenType features in CSS.

  6. In Adobe InDesign and a website’s CSS, a user needs some method to edit white space, overriding the built-in values in print and web fonts, applying it to a paragraph or character style sheet or as a selector in a CSS class.

Kerning Table Editing For Print And Web

To clarify: Kerning is the customization of space in between two letters or symbols. Kerning values are stored in a font file in a kerning table. Kerning values override the three sidebearing values (left sidebearing, width bearing, and right sidebearing). Kerning can also be customised on top of the built-in kerning table through software like Adobe InDesign and Quark. Letterspacing (also known as tracking) is a consistent positive (+) or negative (-) space value applied across a whole line of text.

What would a kerning table edit in Adobe InDesign look like? Quark has one. What would it look like in CSS or in the syntax for OpenType features in CSS? What do we ideally need? Well, in InDesign, it could look something like figure 11, pushed a bit further. Kerning typically relates to the space between two characters. For the spacing of punctuation and other marks, we are interested in spacing, but how would we kern all instances of a character and a colon (:), like the following: a:, b:, c:? We would be doing it for a long time, because there are potentially thousands of combinations that use a colon. However, if we could specify one character in the kerning pair dialog box (as shown in figure 11), then maybe we could specify a character and just say we want +25 units on the left side. For a kerning table edit on the web, we could do something like what’s shown below (but, again, we really need some way to read a font’s built-in kerning values, because we have no idea what they are to begin with):

fontname kerningtable { /* Accesses the kerning table within the web font file. */
    font-feature-settings-kerning-table-edit: character character, -value or +value;
/* The user selects two characters to kern, and then specifies a negative or positive value in a measurement unit (px, em, etc.). */
    font-feature-settings-kerning-table-edit-direction: horizontal or vertical;
/* The user can specify whether they want the kerning to be horizontal or vertical. */
}

Sidebearing Edit For Print And Web

To clarify: Sidebearings differ from kerning because they act like bottom-level (non-overridable) concrete blocks, forming the width of all the individual letters and symbols. A sidebearing value affects all instances of the letter or symbol where it is used, and the kerning values are applied on top of it. So, a lowercase i has a narrower width sidebearing than a lowercase m, which is twice as wide as an i (for non-monospace typefaces in general).

What would a sidebearing edit in Adobe InDesign look like? What would it look like in CSS or via the syntax for OpenType features in CSS? What do we ideally need? Well, it would look much like the example given under the heading above for “White space edit for print and web”. We would need some way to read the built-in sidebearing. So, in figure 12, the left sidebearing is 68, the right sidebearing is 53, and the width is 591. In CSS, we would somehow need to obtain the three built-in values for any character or symbol, either from an official public source or from the font maker. Then, maybe we could override those values using CSS:

fontname character { /* Accesses the sidebearing values within the web font file. */
    font-feature-settings-sidebearing-for-what-character: character; /* The user can paste in the character or specify a decimal or HEX entity. */
    font-feature-settings-left-sidebearing: value; /* Value in px? */
    font-feature-settings-right-sidebearing: value; /* Value in px? */
    font-feature-settings-width-sidebearing: value; /* Value in px? */
    font-feature-settings-sidebearing-problem-exclude-combinations: value; /* Letter and symbol combinations to not apply the above spacing to */
}

Observations

If you have read this far and have not given up or gotten bored, then you are clearly a committed typographer.

Let’s conclude:

  • Adding space characters (which are essentially character entities) of any kind, like hair spaces or thin spaces, in any software (Adobe InDesign, Quark, HTML) just leads to problems and results in a load of work.
  • We need to be able to modify spacing via the actual kerning value, rather than via a white space character or entity.
  • Typographers need to be able to override the built-in kerning table values in typefaces, then be able to apply custom kerning values via access to a kerning table editing feature.
  • Users need to be able to apply spacing to punctuation marks and other select symbols, and apply custom kerning globally to a typeface (either a desktop or web font), via a paragraph or character style sheet in Adobe InDesign and CSS. We need to be able to do all of this in a print document or website in less than 15 minutes, and it needs to be easy enough for people with basic software knowledge to do.

What Might The Solution Look Like?

Should the OpenType Feature File Specification rules allow for the spacing of punctuation marks and other symbols, so that typeface designers can allow it via some kind of OpenType pre-built option within their typefaces before releasing them for sale? Should Adobe have some kind of built-in kerning table editing, like Quark has had for many years? Should CSS allow access to a typeface’s built-in kerning table, for custom values to override the designer’s values? Should typeface designers space punctuation marks and other symbols better and more generously? Have they been lacking attention in this area?

A software screengrab of Adobe InDesign’s OpenType window, with 3 new options: 1st: an option to paste in characters to add space on the left side, 2nd: an option to paste in characters to add space on the right side, then an amount option.
Figure 13: Modified screenshot from Adobe InDesign’s OpenType options panel. Can we not add some option in the OpenType panel to add spacing to a selection of characters and symbols on the left or right side, as illustrated? (Large preview)
A software screengrab of Adobe InDesign’s Character window, with a new option below ‘optics’ and ‘metrics’ window which says ‘metrics (globally)’.
Figure 14: A modified screenshot from an Adobe InDesign panel, showing a potential new feature. When you modify a metric kerning value, there would be an option to apply it globally for an individual typeface’s style and weight. (Large preview)

Afterword

I hope you have found this article insightful and useful. I have not presented a perfect solution, but rather have covered potentially viable solutions, which I am happy to be developed and explored further. I am no expert in internal typeface kerning, technology, or new CSS properties. But I am sure we can do something about these hard-to-manage spacing problems that humans have been dealing with for so many hundreds of years across changing technological media. If you have any ideas, contact me by visiting the website linked in my “About the Author” page shown at the top of this article.

Thanks to Rachel Andrew (for advice and editing), Erik Spiekermann (for email support and further contacts), and Jost Hochuli and Roland Stieger (for support and feedback).

“I would love all those features, but I only know 1 or 2 other graphic designers who would use them. They don’t even use any of the OpenType features or Stylistic sets. I used the kerning table edit in Quark all the time, when setting different languages. Partly because I didn’t like some of the built-in kernings, partly because there were some missing, especially those after and before spaces. But most designers don’t even change the default word spaces in InDesign, let alone bother about more details. Sad, but ask other typeface designers and the few good typesetters out there: standards are low.”

Erik Spiekermann (March 2020)

Further Reading

Smashing Editorial (ra, yk, il, al)