Fixing Imports with Skypack

You’ve probably heard us mention Skypack once, twice or even thrice, and for good reason! It’s a wonderful service to get packages from npm on the web as ES modules.

For example, import React from "react"; is invalid JavaScript without some kind of bundler, but you can get it working in your Pens by changing to import React from "https://cdn.skypack.dev/react", a valid ES module served by Skypack.

But who wants to remember to type that out? Certainly not me! The good news is we offer some helpers to get imports working in your Pens.

Automatically Fixing Imports

Whenever you type out an import statement that isn’t a valid ES Module import, we offer to replace those with Skypack imports. This comes in really handy if you copy and paste some code from a tutorial, and gets those imports working without the hassle of installing packages and running a bundler!

Try it Yourself!

This helpful feature works in both the Pen and Project editor. We automatically add <script type="module"> in Pens to get ES Modules working, but don’t forget to add that yourself in Projects!

If you think your import shouldn’t be messed with, click “Ignore” and we won’t prompt you about imports anymore while you edit that Pen or Project.

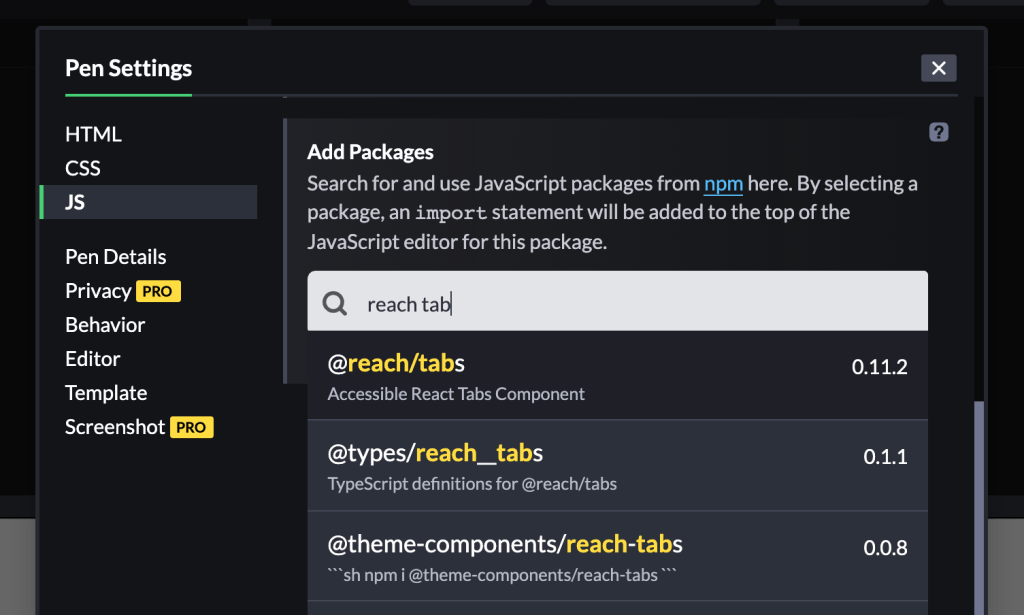
Searching and Adding Packages

You can also use the Add Package feature under JavaScript settings to automatically add a valid import statement to your code!

These helpful features should make working with modern JavaScript on CodePen even better. Learn more about all Skypack can do, and give it a try in the Pen Editor and Project Editor!

The post Fixing Imports with Skypack appeared first on CodePen Blog.

Collections: Reordered!

Collections are the perfect way to group and share Pens. We’ve just given them a big round of improvements including reordering, sorting, and commenting!

Reordering

Many of you (including some of our own Team CodePen members) have been asking for the ability to reorder Collections. A simple request on the surface, but it required a lot of reworking and rethinking all the way from the database to the UI.

Now that we’ve done the heavy lifting, reordering is as simple as dragging & dropping or typing in an exact position!

Got a step-by-step process you want to share in a specific order? Want to feature some great examples of your new library? Order them however you like!

Fresher Look

Collections got a fresh coat of paint! The layout has been streamlined to keep the content front & center.

Sorting

By default Collections are sorted by the given order but you can also sort by the most recent additions, newest Pens and more!

Changing these controls also updates the URL so you can easily share a specific view.

Details & Comments

See more details down below and add comments, just like a Pen! Perhaps suggest some new Pens to add or get some more details on a technique.

Learn More

We have much more in the Collections Documentation, and you can hear us dive into the new Collection features and the behind-the-scenes work on CodePen Radio #281: Collection Reordering.

The post Collections: Reordered! appeared first on CodePen Blog.

Lazy Loaded Prefill Embeds

CodePen’s Prefill Embeds are the perfect way to enhance documentation with live examples. With them, you keep all the code in your repo or blog post so you can easily update demos and track changes. To get started you can set everything up in a real Pen then copy out a Prefill Embed from the Embed Builder, or use the syntax to build your own!

Turning code samples into an interactive demo is cool enough, but you may not want that to happen right away. Let’s explore a way to turn code blocks into a CodePen Embed on click!

Here’s a sample copied directly from the Embed Builder.

<div class="codepen" data-height="265" data-theme-id="light" data-default-tab="html,result" data-user="codepen" data-slug-hash="fd63b769e68be117bc6dbc2d259d002c" data-prefill='{"tags":[],"scripts":[],"stylesheets":[]}'>
  <pre data-lang="html">&lt;h1>Hello from HTML&lt;/h1></pre>
  <pre data-lang="css">html {
  background: black;
  color: white;
  text-align: center;
}

h1::after {
  content: " / CSS!";
}
</pre>
  <pre data-lang="js">document.querySelector("h1").innerHTML += " / JavaScript";
</pre></div>
<script async src="https://static.codepen.io/assets/embed/ei.js"></script>

Adding Click to Run

The CodePen Embed script (ei.js) automatically turns elements with the codepen class into Embeds on page load. If we take off that codepen class so we can do a trick like this to make a Click to Run button:

<div data-height="265" data-theme-id="light" data-default-tab="html,result" data-user="codepen" data-slug-hash="fd63b769e68be117bc6dbc2d259d002c" data-prefill='{"tags":[],"scripts":[],"stylesheets":[]}'>
  ...
</div>
<script async src="https://static.codepen.io/assets/embed/ei.js"></script>
<script>
// Loop over all elements with the `data-prefill` attribute
Array.from(document.querySelectorAll('[data-prefill]'), ( el ) => {
  // Create a Click to Run button
  const button = document.createElement("button");
  button.innerHTML = "Click to Run";
  button.setAttribute("class", "prefill-click-to-run");
  el.appendChild(button);

  // On click, the element will become the embed!
  button.addEventListener("click", () => {
    el.classList.add("codepen"); // Add the codepen class back.
    window.__CPEmbed(); // Trigger the CodePen embed script to run again.
  });
});
</script>

Add a few styles and you can get some nice code blocks that turn into a Embed on click:

Syntax Highlighting, Lazy Loading, and More!

We can improve the setup even more with syntax highlighting through Prism.js, hidden code blocks, and a lazy load of the CodePen Embed script to keep your pages as light as possible!

All of these techniques put together gives you a lightweight, performant way to make on-demand Prefill Embeds for your docs or blog posts! Give it a whirl and share with us how you’re using Embeds.

The post Lazy Loaded Prefill Embeds appeared first on CodePen Blog.

Edit & Optimize Image Assets

CodePen’s Asset Hosting is the easiest way to upload and use images in your code, and it’s available right inside the Pen Editor! Let us handle the storage and CDN delivery¹ and you let your creativity fly. We’ve just released another major upgrade to this feature!

Now your image assets are even better with dynamic editing and optimization! Resize, rotate, and adjust the quality in the new image editor without changing the original image. Here’s a video demonstrating:

Take advantage of the increased assets storage to upload full size, high-quality images then use the image editor to make a smaller, optimized version to fit exactly where you need. You can even match a new aspect ratio with Fit modes like Cover or Pad. Save your edits as a new image, or make changes on-the-fly with the fancy URL parameters!

For example, the URL to an asset might be:

https://assets.codepen.io/3/image.png?width=310&height=436&format=auto

The base URL is:

https://assets.codepen.io/3/image.png

That will serve your image perfectly as it always has, but then see the URL parameters too:

?width=310&height=436&format=auto

Those will serve a manipulated version of the image based on those values, and still be fast, cached, global CDN served, and all that.

widthwidth of image. Positive integer. Cannot increase size of original.
heightheight of image. Positive integer. Cannot increase size of original.
formatauto will attempt to serve the image as WebP if the requesting browser supports it.
fitscale-down is the default.
cover will make sure the image covers the dimensions without squishing (it may crop your image!)
pad will make sure the image covers the dimensions without squishing (it may leave white edges!)
quality0 - 100. If the image is GIF, JPG, or WebP (No PNG), this will do lossy compression reducing the file size.
rotate90, 180, or 270

Here’s a workflow showing just how useful this on-the-fly editing can be!

This can be super useful for the responsive images syntax in HTML (recall our responsive art direction challenge), or anywhere changing an image via the URL would be handy. For example:

<img 
  src="https://assets.codepen.io/3/wall-e.jpg?width=300&format=auto" 
  srcset="
    https://assets.codepen.io/3/wall-e.jpg?width=1200&format=auto 600w,
    https://assets.codepen.io/3/wall-e.jpg?width=2400&format=auto 1200w
  "
  alt="Wall-E Toy looking up and to the left"
>

WebP can also dramatically decrease the file size while staying high quality, but manually converting to and working with WebP files can be a pain. Let us handle it for you! Drop in your JPG, GIF and PNG images and we can automatically serve a WebP image to supporting browsers with format=auto.

You can get up to 20 GB of Asset Hosting on our PRO Plans, so sign up for PRO to get started. That extra storage might be helpful, as you might notice another feature in there: “Save As New Image” which allows you to store your manipulated image as a new copy of the image if you’d like to.


¹ We’ll even smooth out issues with CORS headers so you can drop those images in 2D canvas or WebGL without problem!

The post Edit & Optimize Image Assets appeared first on CodePen Blog.

New Build Process for Exported Pens!

Exporting Pens is a great way to make an offline backup or to port your code to another project, but what if you wanted to keep working on that preprocessor code locally?

Now you can, with the latest PRO feature: Export with Build Process!

Open any Pen and click Export in the footer to try the new Build Process option. You'll receive a .zip file with your original code, a backup of the in-browser preview, and a build script customized for the preprocessors used!

No internet? No problem! You can work offline after you run npm install. There's even an auto-refreshing preview server for a local CodePen-like experience.

Check out the documentation

Want to learn more? You can read the documentation.

Also, each exported Pen has a DOCUMENTATION.markdown file in folder that unzips that explains how to use it.

A video tour

Listen to us talk about it

Over on CodePen Radio:

The post New Build Process for Exported Pens! appeared first on CodePen Blog.