Level Up Your CSS Skills With The :has() Selector

Using :has() gives us the ability to “look ahead” with CSS and style a parent or ancestor element. Then, we can broaden the selector to target one or more siblings or children. By considering element states or positions, we can style nearly any combination of elements as unique singles or ranges.

Note: At present, support for :has() is rising, with it being available as of Safari 15.4 and Chrome/Edge 105. It is also behind a flag in Firefox as of version 103. Until full support is available, check out this tip for supporting :has today from Bramus Van Damme.

How :has() Works With Combinators And Pseudo-Classes

To best understand how the advanced selectors we’ll be creating work, we’ll quickly review the most relevant combinators and pseudo-classes.

A “combinator” is a special character that denotes the type of relationship between selector parts. Here are the core combinators to know:

  • space character: the descendent combinator matches a direct or nested child;
  • >: the direct child combinator matches only top-level, un-nested children;
  • +: the adjacent sibling combinator matches only the very next sibling;
  • ~: the general sibling combinator matches one or more siblings following the base selector.

The first stage of creating complex selectors is to append a pseudo-class to one or more parts. A “pseudo-class” defines a special state of an element, like :hover, and has the format of a single colon followed by the name. The :has() pseudo-class is considered functional since it accepts a parameter. Specifically, it accepts a list of selectors, whether they be simple like img or complex with combinators like img + p.

However, :has() is one of four functional pseudo-classes, with the others being :is(), :where(), and :not(). Each of them accepts a selector list with a few other unique features.

If you’ve already used :is() and :where(), it’s likely been to manage specificity. Using :is() means the selector in the list with the highest specificity gives the entire selector its weight. While using :where() lends the entire selector list zero-specificity, making it easily overruled by later rules in the cascade.

Additionally, :is() and :where() have the extra special ability to be forgiving selectors. This means you may include (purposely or not) selectors the browser doesn’t understand, and it will still process the parts it does understand. Without this forgiving behavior, the browser would discard the entire rule.

The other benefit of both :is() and :where() is to create succinct, complex selectors. This is especially handy when using combinators and affecting multiple siblings or descendants, for example, article :is(h1, h2, h3).

Our last pseudo-class, :not(), has been available in CSS for the longest. However, alongside Selectors Level 4 when :is() and :where() were released, :not() was enhanced. This happened when it was allowed to accept a list of selectors instead of a single selector. It also has the same specificity behavior noted for :is().

Finally, we need to know about an underused, incredibly powerful feature of :is(), :where(), and :not() that we’ll be using to make our advanced :has() selectors. Using the * character within these selectors — which normally in CSS is the “universal selector” — actually refers to the selector target. This allows checking the preceding siblings or ancestors of the selector target. So, in img:not(h1 + *), we’re selecting images that do not directly follow an h1. And in p:is(h2 + *), we’re selecting paragraphs only if they directly follow h2. We’ll be using this behavior for our first demo next.

Polyfill For :only-of-selector

While :only-of-type is a valid pseudo-class, it only works to select within elements of the same element type. Given .highlight:only-of-type, no matches would be made in the following HTML because the class has no effect on reducing the scope.

<p>Not highlighted</p>
<p class="highlight">.highlight</p>
<p>Not highlighted</p>

If there was only one paragraph with the highlight class within a parent, it might falsely appear to be working. But in that case, it’s because the root element type the class is attached to is a paragraph, so it matches as true since there are no sibling paragraphs.

By combining :has() and :not(), we can effectively create an :only-of-selector that will match a singleton within a range of siblings based on a class or other valid selector.

We ultimately want our selector to match when there are no matching siblings that exist before or after the target.

A strength of :has() is testing for what follows an element. Since we want to test any number of siblings that follow, we’ll use the general sibling combinator ~ to create the first condition.

.highlight:not(:has(~ .highlight)

So far, this gives us the match of “highlights that do not have sibling highlights following it.”

Now we need to check prior siblings, and we’ll use the ability of :not() on its own to add that condition.

.highlight:not(:has(~ .highlight)):not(.highlight ~  *)

The second :not() condition is an AND clause to our selector that says “AND not itself a sibling of a previous highlight.”

With that, we have polyfilled the non-existent :only-of-selector pseudo-class!

To resolve this, we need to add a complex AND condition using :not() to exclude items that are not between [data-range="end"] and [data-range="start"], in that order.

On its own, this part of the selector reads as: “do not select items that follow [data-range="end"] which also have a later sibling of [data-range="start"].”

/* Note: this needs appended on the previous selector, not used alone */
:not([data-range="end"] ~ :has(~ [data-range="start"]))

In total, this makes for an admittedly long but very powerful selector that wasn’t possible before :has() without also using JavaScript due to the previous lack of the “look ahead” and “look behind” abilities in CSS.

/* Select all between a range */
[data-range="start"] ~ :has(~ [data-range="end"]):not([data-range]):not([data-range="end"] ~ :has(~ [data-range="start"]))
Keep in mind that just like other selectors, you can use :has() when you construct a selector within JavaScript. The ability to select previous siblings, ancestors and the other features we’ve learned will also make your JS selectors more efficiently powerful!

See the Pen Multi-range element selectors with :has() [forked] by Stephanie Eckles.

Linear Range Selection Based On State

Let’s pull together some of the qualities of :has() selectors and combinators we’ve learned to make a star rating component.

The underlying “star” will be a radio input, which will give us access to a :checked state to assist in developing the selectors.

<div class="star-rating">
  <fieldset>
    <legend>Rate this demo</legend>
    <div class="stars">
      <label class="star">
        <input type="radio" name="rating" value="1">
        <span>1</span>
      </label>
      <!-- ...4 more stars -->
    </div>
  </fieldset>
</div>

As shown in the following video preview, when a user hovers over the outlined stars, then the range from the start (left-most) to the hovered star should fill in with color. On selection, when the star radio is checked, the star and labeling number scale up in size and keep the fill color. If the user hovers over stars after the checked star, the range should fill in the stars up to the hover. If the user hovers stars before the checked star, the range should fill in only up to the hovered star, and stars between the hover and previously checked star should have the fill color lightened.

That’s a lot of ranges to keep track of, but with :has(), we can break them into segmented selectors real quick!

The following selector series applies to all states where we want a star or range of stars to fill in for or up to the :checked star. The rule updates a set of custom properties that will affect the star shape, created through a combo of the ::before and ::after pseudo-elements on the label.star.

Altogether, this rule selects the range of stars between the first star and the star being hovered, or the first star and the star with a checked radio.

.star:hover,
/* Previous siblings of hovered star */
.star:has(~ .star:hover),
/* Star has a checked radio */
.star:has(:checked),
/* Previous siblings of a checked star */
.star:has(~ .star :checked) {
  --star-rating-bg: dodgerblue;
}

Next, we want to lighten the fill color of stars in the range between the star being hovered and a later checked star, and checked stars that follow the hovered star.

/* Siblings between a hovered star and a checked star */
.star:hover ~ .star:has(~ .star :checked),
/* Checked star following a hovered star */
.star:hover ~ .star:has(:checked) {
  --star-rating-bg: lightblue;
}

As far as state selectors go for our star rating component, that’s all there is to it!

The CodePen demo has a few extra tricks on how the component is created using CSS grid, custom properties, and clip-path. For accessibility, it also ensures color isn’t the only indicator by scaling up the checked star. And it handles for high contrast themes (aka “forced colors”) by supplying values from the system colors palette to ensure the :checked star fill is visible. Additionally, the transitions are shortened when a user prefers reduced motion.

See the Pen Star Rating Component with :has() [forked] by Stephanie Eckles.

Stateful Multi-Range Selection Groups

Whereas the star rating component showed a dynamic style change based on state, the availability of stateful elements also makes it easier to use :has() for creating visual boundaries.

Our earlier multi-range selectors relied on manually adding “hooks” into the markup to correctly style ranges without leaking into the in-between areas. But if we have a field set containing checkboxes, we can once again use the :checked state to clearly identify boundaries around checked and unchecked items.

In this preview video, as checkboxes are selected, they receive a border and green background to create the visual boundary. Thanks to :has(), that boundary grows to appear to wrap groups of checked items so that the visual box seems as though it's around the whole group. The first item (or a singleton) gets round top corners, and the last item (or a singleton) gets round bottom corners as well as a slight shadow.

We need to create rules to handle the top, middle, and bottom appearance based on where the item falls within the set. Single items should receive all three styles.

Our HTML is set up to wrap each checkbox input with its label, so all of our selectors will begin by matching against label:has(:checked) to see if the label contains a checked input.

To determine either the first or single item in the set, we need to add the condition that it is not following a previous item with a checked input. This rule will style the top appearance.

/* First checked item in a range
 OR top of a single checked item */
label:has(:checked):not(label:has(:checked) + label)

To determine either the last or single item in the set, we flip the previous condition to check that it is not followed by a checked input. This rule will style the bottom appearance.

/* Last checked item in a range
 OR bottom of a single checked item */
label:has(:checked):not(label:has(+ label :checked))

For the middle appearance, we’ll create a rule that actually captures the group from start to finish since all of the items in the rule should receive a background color and side borders.

We could simply use label:has(:checked) for this selector given the context. However, we’re learning how to select and style ranges, so to complete our exercise, we’ll write the expanded selectors.

The logic represented in the first selector is “select labels with checked inputs that are followed by sibling labels containing checked inputs,” which captures all but the last item in the range. For that, we repeat the selector we just created for styling the last checked item in the range.

/* Range of checked items */
label:has(:checked):has(~ label :checked),
label:has(:checked):not(label:has(+ label :checked))

This CodePen demo also shows off accent-color for changing the checked input color and uses custom properties for managing the border radius. It also uses logical properties.

See the Pen Stateful multi-range selection groups with :has() [forked] by Stephanie Eckles.

More Resources On Writing :has() Selectors

You can explore all of the demonstrations we reviewed in my CodePen collection.

Other folks have started experimenting with what’s possible using :has(), and I encourage you to check out these resources for even more ideas. As with all recently released features, the field of opportunity is wide-open, and we all benefit when we share our learnings!

CSS Scroll Snap Slide Deck That Supports Live Coding

Virtual conferences have changed the game in terms of how a presenter is able to deliver content to an audience. At a live event it’s likely you just have your laptop, but at home, you may have multiple monitors so that you can move around windows and make off-screen changes when delivering live coding demos. However, as some events go back to in-person, you may be in a similar boat as me wondering how to bring an equivalent experience to a live venue.

With a bit of creativity using native web functionality and modern CSS, like CSS scroll snap, we’ll be building a no-JavaScript slide deck that allows live editing of CSS demos. The final deck will be responsive and shareable, thanks to living inside of a CodePen.

To make this slide deck, we’ll learn about:

  • CSS scroll snap, counters, and grid layout
  • The contenteditable attribute
  • Using custom properties and HSL for theming
  • Gradient text
  • Styling the <style> element

Slide templates

When making a slide deck of a bunch of different slides, it’s likely that you’ll need different types of slides. So we’ll create these three essential templates:

  • Text: open for any text you need to include
  • Title: emphasizing a headline to break up sections of content
  • Demo: split layout with a code block and the preview
Screenshot of the text slide containing a heading, byline, and Twitter handle. The text is dark blue and the background has a light blue. There is the number one in white inside a bright blue circle located in the bottom-left corner of the slide indicating the page title.
Text presentation slide
A slide with the text Topic 1 in dark blue and a soft linear gradient that goes from a super light blue to a brighter blue, going from left to right.
Title presentation slide

Slide deck screenshot showing the split view with live code on the left and the output on the right. The page number of the slide is shown in the bottom-left corner and includes the word CSS after the page number.
Demo presentation slide

HTML templates

Let’s start creating our HTML. We’ll use an ordered list with the ID of slides and go ahead and populate a text and title slide.

Each slide is one of the list elements with the class of slide, as well as a modifier class to indicate the template type. For these text-based slides, we’ve nested a <div> with the class of content and then added a bit of boilerplate text.

<ol id="slides">
  <li class="slide slide--text">
    <div class="content">
      <h1>Presentation Title</h1>
      <p>Presented by Your Name</p>
      <p><a target="_blank" href="<https://twitter.com/5t3ph>">@5t3ph</a></p>
    </div>
  </li>
  <li class="slide slide--title">
    <div class="content">
      <h2>Topic 1</h2>
    </div>
  </li>
</ol>

We’re using target="_blank" on the link due to CodePen using iframes for the preview, so it’s necessary to “escape” the iframe and load the link.

Base styles

Next, we’ll begin to add some styles. If you are using CodePen, these styles assume you’re not loading one of the resets. Our reset wipes out margin and ensures the <body> element takes up the total available height, which is all we really need here. And, we’ll make a basic font stack update.

* {
  margin: 0;
  box-sizing: border-box;
}

body {
  min-height: 100vh;
  font-family: system-ui, sans-serif;
  font-size: 1.5rem;
}

Next, we’ll define that all our major layout elements will use a CSS grid, remove list styling from #slides, and make each slide take up the size of the viewport. Finally, we’ll use the place-content shorthand to center the slide--text and slide--title slide content.

body,
#slides,
.slide {
  display: grid;
}

#slides {
  list-style: none;
  padding: 0;
  margin: 0;
}

.slide {
  width: 100vw;
  height: 100vh;
}

.slide--text,
.slide--title {
  place-content: center;
}

Then, we’ll add some lightweight text styles. Since this is intended to be a presentation with one big point being made at a time, as opposed to an article-like format, we’ll bump the base font-size to 2rem. Be sure to adjust this value as you test out your final slides in full screen. You may decide it feels too small for your content versus your presentation viewport size.

h1, h2 {
  line-height: 1.1;
}

a {
  color: inherit;
}

.content {
  padding: 2rem;
  font-size: 2rem;
  line-height: 1.5;
}

.content * + * {
  margin-top: 0.5em;
}

.slide--text .content {
  max-width: 40ch;
}

At this point, we have some large text centered within a container the size of the viewport. Let’s add a touch of color by creating a simple theme system.

We’ll be using the hsl color space for the theme while setting a custom property of --theme-hue and --theme-saturation. The hue value of 230 corresponds to a blue. For ease of use, we’ll then combine those into the --theme-hs value to drop into instances of hsl.

:root {
  --theme-hue: 230;
  --theme-saturation: 85%;
  --theme-hs: var(--theme-hue), var(--theme-saturation);
}

We can adjust the lightness values for backgrounds and text. The slides will feel cohesive since they will be tints of that base hue.

Back in our main <body> style, we can apply this idea to create a very light version of the color for a background, and a dark version for the text.

body {
  /* ... existing styles */
  background-color: hsl(var(--theme-hs), 95%);
  color: hsl(var(--theme-hs), 25%);
}
Screenshot of a CSS scroll snap slide  with the presentation title, a byline, and a Twitter handle. The text is dark blue and the background is a light blue.

Let’s also give .slide--title a little bit of extra pizazz by adding a subtle gradient background.

.slide--title {
  background-image: 
    linear-gradient(125deg, 
      hsl(var(--theme-hs), 95%), 
      hsl(var(--theme-hs), 75%)
    );
}
A slide with the text Topic 1 in dark blue and a soft linear gradient that goes from a super light blue to a brighter blue, going from left to right.

Demo slide template

Our demo slide breaks the mold so far and requires two main elements:

  • a .style container around an inline <style> element with actual written styles that you intend to both be visible on screen and apply to the demo
  • a .demo container to hold the demo preview with whatever markup is appropriate for that

If you’re using CodePen to create this deck, you’ll want to update the “Behavior” setting to turn off “Format on Save.” This is because we don’t want extra tabs/spaces prior to the styles block. Exactly why will become clear in a moment.

Screenshot of a CodePen's HTMLand CSS code panels. The settings menu for the HTML panel is open and highlighting the first item, which is Format HTML.

Here’s our demo slide content:

<li class="slide slide--demo">
  <div class="style">
  <style contenteditable="true"> 
.modern-container {
  --container-width: 40ch;

  width: min(
    var(--container-width), 100% - 3rem
  );
  margin-inline: auto;
}
  </style>
  </div>
  <div class="demo">
    <div class="modern-container">
      <div class="box">container</div>
    </div>
  </div>
</li>

Note that extra contenteditable="true" attribute on the <style> block . This is a native HTML feature that allows you to mark any element as editable. It is not a replacement for form inputs and textareas and typically requires JavaScript for more full-featured functionality. But for our purposes, it’s the magic that enables “live” coding. Ultimately, we’ll be able to make changes to the content in here and the style changes will apply immediately. Pretty fancy, hold tight.

However, if you view this so far, you won’t see the style block displayed. You will see the outcome of the .modern-container demo styles are being applied, though.

Another relevant note here is that HTML5 included validating a <style> block anywhere; not just in the <head>.

What we’re going to do next will feel strange, but we can actually use display properties on <style> to make it visible. We’ve placed it within another container to use a little extra positioning for it and make it a resizable area. Then, we’ve set the <style> element itself to display: block and applied properties to give it a code editor look and feel.

.style {
  display: grid;
  align-items: center;
  background-color: hsl(var(--theme-hs), 5%);
  padding-inline: max(5vw, 2rem) 3rem;
  font-size: 1.35rem;
  overflow-y: hidden;
  resize: horizontal;
}

style {
  display: block;
  outline: none;
  font-family: Consolas, Monaco, "Andale Mono", "Ubuntu Mono", monospace;
  color: hsl(var(--theme-hs), 85%);
  background: none;
  white-space: pre;
  line-height: 1.65;
  tab-size: 2;
  hyphens: none;
}

Then, we need to create the .slide--demo rule and use CSS grid to display the styles and demo, side-by-side. As a reminder, we’ve already set up the base .slide class to use grid, so now we’ll create a rule for grid-template-columns just for this template.

.slide--demo {
  grid-template-columns: fit-content(85ch) 1fr;
}

If you’re unfamiliar with the grid function fit-content(), it allows an element to use its intrinsic width up until the maximum value defined in the function. So, this rule says the style block can grow to a maximum of 85ch wide. When your <style> content is narrow, the column will only be as wide as it needs to be. This is really nice visually as it won’t create extra horizontal space while still ultimately capping the allowed width.

To round out this template, we’ll add some padding for the .demo. You may have also noticed that extra class within the demo of .box. This is a convention I like to use for demos to provide a visual of element boundaries when the size and position of something are important.

.demo {
  padding: 2rem;
}

.box {
  background-color: hsl(var(--theme-hs), 85%);
  border: 2px dashed;
  border-radius: .5em;
  padding: 1rem;
  font-size: 1.35rem;
  text-align: center;
}

Here’s the result of our code template:

Screenshot of a slide that's split in half vertically, the left side with a almost black dark blue background and code that is a lighter blue in a mono font. The right side has a light blue background and an element at the top that says container, with a dashed border and slightly darker blue background.

Live-editing functionality

Interacting with the displayed styles will actually update the preview! Additionally, since we created the .style container as a resizable area, you can grab the resize handle in the lower right to grow and shrink the preview area as needed.

The one caveat for our live-editing ability is that browsers treat it differently.

  • Firefox: This provides the best result as it allows both changing the loaded styles and full functionality of adding new properties and even new rules.
  • Chromium and Safari: These allow changing values in loaded styles, but not adding new properties or new rules.

As a presenter, you’ll likely want to use Firefox. As for viewers utilizing the presentation link, they’ll still be able to get the intention of your slides and shouldn’t have issues with the display (unless their browser doesn’t support your demoed code). But outside of Firefox, they may be unable to manipulate the demos as fully as you may show in your presentation.

You may want to “Fork” your finished presentation pen and actually remove the editable behavior on <style> blocks and instead display final versions of your demos styles, as applicable.

Reminder: styles you include in demos can potentially affect slide layout and other demos! You may want to scope demo styles under a slide-specific class to prevent unintended style changes across your deck.

Code highlighting

While we won’t be able to achieve full syntax highlighting without JavaScript, we can create a method to highlight certain parts of the code block for emphasis.

To do this, we’ll pair up linear-gradient with the -webkit properties that enable using an element’s background as the text effect. Then, using custom properties, we can define how many “lines” of the style block to highlight.

First, we’ll place the required -webkit properties directly on the <style> element. This will cause the visible text to disappear, but we’ll make it visible in a moment by adding a background. Although these are -webkit prefixed, they are supported cross-browser.

style {
  /* ...existing styles */
  -webkit-text-fill-color: transparent;
  -webkit-background-clip: text;
}

The highlighting effect will work by creating a linear-gradient with two colors where the lighter color shows through as the text color for the lines to highlight. As a default, we’ll bookend the highlight with a darker color such that it appears that the first property is highlighted.

Here’s a preview of the initial effect:

An up-close screenshot of the live code panel of the slide, with the second line of code a lighter blue than the rest, indicating that it is emphasized.

To create this effect, we need to work out how to calculate the height of the highlight color. In our <style> element’s rules, we’ve already set the line-height to 1.65, which corresponds to a total computed line height of 1.65em. So, you may think that we multiply that by the number of lines and call it a day.

However, due to the visible style block being rendered using white-space: pre to preserve line breaks, there’s technically a sneaky invisible line before the first line of text. This is created from formatting the <style> tag on an actual line prior to the first line of CSS code. This is also why I noted that preventing auto-formatting in CodePen is important — otherwise, you would also have extra left padding.

With these caveats in mind, we’ll set up three custom properties to help compute the values we need and add them to the beginning of our .style ruleset. The final --lines height value first takes into account that invisible line and the selector.

style {
  --line-height: 1.65em;
  --highlight-start: calc(2 * var(--line-height));
  --lines: calc(var(--highlight-start) + var(--num-lines, 1) * var(--line-height));
}

Now we can apply the values to create the linear-gradient. To create the sharp transitions we need for this effect, we ensure the gradient stops from one color to the next match.

style {
  background-image: linear-gradient(
    hsl(var(--theme-hs), 75%) 0 var(--highlight-start),
    hsl(var(--theme-hs), 90%) var(--highlight-start) var(--lines),
    hsl(var(--theme-hs), 75%) var(--lines) 100%
  );
}

To help visualize what’s happening, I’ve commented out the -webkit lines to reveal the gradient being created.

A close-up screenshot of the live code example, but with a bright blue background to reveal the near-white gradient that highlights the second line of code.

Within our --lines calculation, we also included a --num-lines property. This will let you adjust the number of lines to highlight per demo via an inline style. This example adjusts the highlight to three lines:

<style contenteditable="true" style="--num-lines: 3">

We can also pass a recalculated --highlight-start to change the initial line highlighted:

<style contenteditable="true" style="--num-lines: 3; --highlight-start: calc(4 * var(--line-height))">

Let’s look at the outcome of the previous adjustment:

Showing the live code example with lines 3 through 6 highlighted in a lighter blue than the rest of the code.

Now, if you add or remove lines during your presentation, the highlighting will not adjust. But it’s still nice as a tool to help direct your viewers’ attention.

There are two utility classes we’ll add for highlighting the rule only or removing highlighting altogether. To use, apply directly to the <style> element for the demo.

.highlight--rule-only {
  --highlight-start: calc(1 * var(--line-height))
}

.highlight--none {
  background-image: none;
  background-color: currentColor;
}

Slide motion with CSS scroll snap

Alright, we have some nice-looking initial slides. But it’s not quite feeling like a slide deck yet. We’ll resolve that in two parts:

  1. Reflow the slides horizontally
  2. Use CSS scroll snap to enforce scrolling one slide at a time

Our initial styles already defined the #slides ordered list as a grid container. To accomplish a horizontal layout, we need to add one extra property since the .slides have already included dimensions to fill the viewport.

#slides {
  /* ...existing styles */
  grid-auto-flow: column;
}

For CSS scroll snap to work, we need to define which axis allows overflow, so for horizontal scrolling, that’s x:

#slides {
  overflow-x: auto;
}

The final property we need for scroll snapping for the #slides container is to define scroll-snap-type. This is a shorthand where we select the x axis, and the mandatory behavior, which means initiating scrolling should always trigger snapping to the next element.

#slides {
  scroll-snap-type: x mandatory;
}

If you try it at this point, you won’t experience the scroll snapping behavior yet because we have two properties to add to the child .slide elements. Use of scroll-snap-align tells the browser where to “snap” to, and setting scroll-snap-stopto always prevents scrolling past one of the child elements.

.slide {
  /* ...existing styles */
  scroll-snap-align: center;
  scroll-snap-stop: always;
}

The scroll snapping behavior should work either by scrolling across your slide or using left and right arrow keys.

There are more properties that can be set for CSS scroll snap, you can review the MDN docs to learn what all is available. CSS scroll snap also has a bit different behavior cross-browser, and across input types, like touch versus mouse, or touchpad versus mouse wheel, or via scrollbar arrows. For our presentation, if you find that scrolling isn’t very smooth or “snapping” then try using arrow keys instead.

Currently, there isn’t a way to customize the CSS scroll snap sliding animation easing or speed. Perhaps that is important to you for your presentation, and you don’t need the other features we’ve developed for modifying the code samples. In that case, you may want to choose a “real” presentation application.

CSS scroll snap is very cool but also has some caveats to be aware of if you’re thinking of using it beyond our slide deck context. Check out another scroll snapping demo and more information on SmolCSS.dev.

Slide numbers

An optional feature is adding visible slide numbers. Using a CSS counter, we can get the current slide number and display it however we’d like as the value of a pseudo-element. And using data attributes, we can even append the current topic.

The first step is giving our counter a name, which is done via the counter-reset property. This is placed on the element that contains items to be counted, so we’ll add it to #slides.

#slides {
  counter-reset: slides;
}

Then, on the elements to be counted (.slide), we add the counter-increment property and callback to the name of the counter we defined.

.slide {
  counter-increment: slides;
}

To access the current count, we’ll set up a pseudo element. Within the content property, the counter() function is available. This function accepts the name of our counter and returns the current number.

.slide::before {
  content: counter(slides);
}

The number is now appearing but not where we want it. Because our slide content is variable, we’ll use classic absolute positioning to place the slide number in the bottom-left corner. And we’ll add some visual styles to make it enclosed in a nice little circle.

.slide::before {
  content: counter(slides);
  position: absolute;
  left: 1rem;
  bottom: 1rem;
  width: 1.65em;
  height: 1.65em;
  display: grid;
  place-content: center;
  border-radius: 50%;
  font-size: 1.25rem;
  color: hsl(var(--theme-hs), 95%);
  background-color: hsl(var(--theme-hs), 55%);
}
Screenshot of the text slide containing a heading, byline, and Twitter handle. The text is dark blue and the background has a light blue. There is the number one in white inside a bright blue circle located in the bottom-left corner of the slide indicating the page title.

We can enhance our slide numbers by grabbing the value of a data attribute to also append a short topic title. This means first adding an attribute to each <li> element where we want this to happen. We’ll add data-topic to the <li> for the title and code demo slides. The value can be whatever you want, but shorter strings will display best.

<li class="slide slide--title" data-topic="CSS">

We’ll use the attribute as a selector to change the pseudo element. We can get the value by using the attr() function, which we’ll concatenate with the slide number and add a colon for a separator. Since the element was previously a circle, there are a few other properties to update.

[data-topic]::before {
  content: counter(slides) ": " attr(data-topic);
  padding: 0.25em 0.4em;
  width: auto;
  border-radius: 0.5rem;
}

With that added, here’s the code demo slide showing the added topic of “CSS”:

Slide deck screenshot showing the split view with live code on the left and the output on the right. The page number of the slide is shown in the bottom-left corner and includes the word CSS after the page number.

Small viewport styles

Our slides are already somewhat responsive, but eventually, there will be problems with horizontal scrolling on smaller viewports. My suggestion is to remove the CSS scroll snap and let the slides flow vertically.

To accomplish this will just be a handful of updates, including adding a border to help separate slide content.

First, we’ll move the CSS scroll snap related properties for #slides into a media query to only apply above 120ch.

@media screen and (min-width: 120ch) {
  #slides {
    grid-auto-flow: column;
    overflow-x: auto; 
    scroll-snap-type: x mandatory;
  }
}

Next, we’ll move the CSS scroll snap and dimension properties for .slide into this media query as well.

@media screen and (min-width: 120ch) {
  .slide {
    width: 100vw;
    height: 100vh;
    scroll-snap-align: center;
    scroll-snap-stop: always;
  }
}

To stack the demo content, we’ll move our entire rule for .slide--demo into this media query:

@media screen and (min-width: 120ch) {
  .slide--demo {
    grid-template-columns: fit-content(85ch) 1fr;
  }
}

Now everything is stacked, but we want to bring back a minimum height for each slide and then add the border I mentioned earlier:

@media (max-width: 120ch) {
  .slide {
    min-height: 80vh;
  }

  .slide + .slide {
    border-top: 1px dashed;
  }
}

Your content also might be at risk of overflow on smaller viewports, so we’ll do a couple of adjustments for .content to try to prevent that We’ll add a default width that will be used on small viewports, and move our previous max-width constraint into the media query. Also shown is a quick method updating our <h1> to use fluid type.

h1 {
  font-size: clamp(2rem, 8vw + 1rem, 3.25rem);
}

.content {
  /* remove max-width rule from here */
  width: calc(100vw - 2rem);
}

@media screen and (min-width: 120ch) {
  .content {
    width: unset;
    max-width: 45ch;
  }
}

Additionally, I found it helps to reposition the slide counter. For that, we’ll adjust the initial styles to place it in the top-left, then move it back to the bottom in our media query.

.slide {
  /* adjust default here, removing the old "bottom" value */
  top: 0.25rem;
  left: 0.25rem;
}

@media (min-width: 120ch) {
  .slide::before {
    top: auto;
    bottom: 1rem;
    left: 1rem;
  }
}

Final slide deck

The embed will likely be showing the stacked small viewport version, so be sure to open the full version in CodePen, or jump to the live view. As a reminder, the editing ability works best in Firefox.

If you’re interested in seeing a fully finished deck in action, I used this technique to present my modern CSS toolkit.


CSS Scroll Snap Slide Deck That Supports Live Coding originally published on CSS-Tricks. You should get the newsletter and become a supporter.

An Introduction To CSS Cascade Layers

CSS recently turned 25 years old, and over that time, many techniques and tools have been created to help developers work with the cascade. Within the last year, a new spec to orchestrate the “C” in CSS was drafted and is now an official candidate recommendation: cascade layers.

Cascade layers allow controlling the specificity and order of rule sets across stylesheets.

We all have run into CSS collisions and sudden regressions in our codebases when new styles are written or 3rd-party styles are added. This is because of the interdependence of styles due to source order, specificity, and inheritance. Some ways to control the cascade have included methodologies like ITCSS and BEM and other newer native features like CSS custom properties and :where/:is. Cascade layers will be the ultimate native solution for resolving conflicts between multiple sources of styles.

You can experiment with cascade layers in the following browsers where they are enabled by default with no flag needed:

  • Chrome Canary/Chromium 99+,
  • Firefox Nightly 97+,
  • Safari Technical Preview 137+.
What Are Cascade Layers Solving?

Miriam Suzanne, the spec author for cascade layers, noted in her original explainer (some information is now outdated) that “Cascade Layers would allow authors to define their own layering scheme and avoid specificity or source-order conflicts across concerns.” We’ll learn more about those key concepts of specificity and source order (aka “order of appearance”) to understand better when to use layers.

A foundational principle of the cascade that will help understand the purpose of cascade layers is that of origins. When the browser composites styles, there are three primary origins:

  • Author origin
    The stylesheets you add to your website.
  • User origin
    Styles that browsers may allow providing as preferences such as default font, font size, and colors.
  • User-Agent origin
    The default styles applied by the browser.

Additionally, both transitions and animations are considered origins due to the “virtual“ rules they create while running.

These origins are the highest priority when the browser determines which rule in the cascade “wins“ for a given element. Each origin also considers whether a definition is flagged with !important, which reverses the order of origins, resulting in !important in lower origins taking priority. So, use of !important updates the origin order to:

  1. important User-Agent origin,
  2. important User origin,
  3. important Author origin,
  4. normal Author origin,
  5. normal User origin,
  6. normal User-Agent origin.

The cascade sorting order determines the styles that the browser will apply. When a higher level fails to resolve the styles to use, the next level is evaluated until a winning declaration is found.

The sort order by priority is as follows:

  1. origins and importance;
  2. context (inside a shadow DOM, for example);
  3. element-attached styles (within the style attribute);
  4. specificity;
  5. order of appearance — aka “last one wins“.

Once cascade layers are supported, they will slot into the sorting order between element-attached styles and specificity.

OK, so what does all that really mean for how cascade layers will impact styles? Let’s consider for a moment some of the many ways you might author your styles:

  • all in a single stylesheet;
  • aided by a framework;
  • using a preprocessor like Sass;
  • with a methodology like BEM;
  • via CSS-in-JS.

Regardless of how you write CSS, you still are only working within the author origin. And within that origin, to work out the “right” styles to apply to an element, you are dealing with the last two sorting layers: specificity and order of appearance.

Frameworks, methodologies, and JS-related solutions directly result from trying to allow authors to exert some control over the cascade. For example, BEM (Block, Element, Modifier) encourages classes for every level within your components to provide some encapsulation. When BEM naming is adhered to, the resulting styles mostly bypass the order of appearance level (unless purposely using a modifier) while enabling control over specificity.

Without those tools and techniques as guardrails, it is notoriously easy to get in a battle against specificity and order of appearance. Even with using these approaches, rogue third-party styles or simply lack of discipline can result in increased usage of stronger selectors and rules littered with !important in an attempt to regain control. For some folks, this leads to significant frustration when writing CSS.

Cascade layers aim to place control of specificity and order back in the hands of authors. Use of @layer grants explicit power to orchestrate exactly how styles from varying sources are evaluated and prioritized.

The Cascade, Specificity, And Order Of Appearance

Let’s do a quick refresher on the basics of specificity and how order of appearance comes into play. These concepts are critical to understanding how layers work, and how powerful they will be for authors.

Here is a paragraph with the class of royal.

<p class="royal">Lorem, ipsum dolor.</p>

What color do you think the paragraph will be given the following rules?

p {
  color: green;
}

.royal {
  color: royalblue;
}

:first-child {
  color: red;
}

The element tag has the lowest specificity, so it is not considered since the paragraph has a class with a matching rule. However, the class of royal and the pseudo-class have the same specificity, so the browser moves to order of appearance to determine which to apply. Since the :first-child rule is defined last, the paragraph will be red.

Now, if you always wanted the royal class to apply, some options would be to:

  • add an !important onto the color definition;
  • move the .royal rule after the :first-child rule;
  • increase the specificity of the rule, such as updating it to p.royal for the added power of the element selector.

But there are consequences for each of these.

  • !important is likely to result in issues for modifying the element with other styles later.
  • Moving the rule might not be a permanent fix as you might continue to have conflicts with rules of the same specificity.
  • Increasing specificity may also reduce reusability; as in our example, p.royal removes the ability to use the royal class for other elements.

Let’s move on to learning how cascade layers work, and how they alleviate these points of conflict.

Defining Cascade Layers

As noted in the intro, cascade layers involve the new at-rule of @layer. There are multiple ways to define layers.

The first key concept of using @layer is that the order of layers matters because layers change the game regarding specificity. And by “order,” we’re talking about that idea we reviewed on “order of appearance.” A powerful feature of layers is that their order can be defined early and then styles added to later, which we’ll look at shortly.

One way to define a layer is to use the @layer rule and a name to create a block for the layer styles. Here, we’re making a layer called base:

@layer base {
  body { ... }
}

You can also add the layer() function to an @import but keep in mind that the use of @import has a performance cost. However, this feature can be very useful for defining a framework or third-party script as a layer.

@import url(bootstrap.css) layer(bootstrap);

We can also use an @layer statement to define layers, formatted either as multi or single line. This feature becomes incredibly important for allowing authors to define their layer order in one location at the top of their styles. They can then add styles later via the block or import methods by referencing the same layer name.

In this example, we’re essentially giving the Bootstrap framework styles the lowest priority as a layer, followed by our own base styles, and finally allowing for an application layer.

@layer bootstrap, base, application;

@import url(bootstrap.css) layer(bootstrap);

@layer base {
  body {... }
}

Note: The spec is particular about the order of including @import. Once you add a @layer after an @import, any use of @import after that layer will be invalid and not loaded. So, if you had multiple @import to add, you’ll need to group them prior to creating more layers.

Nesting Cascade Layers

You can also nest @layer rules. Then, to add onto nested rules later, you reference the parent and nested rules together using dot notation.

@layer framework {
  @layer reset, base, components;
}

@layer framework.reset { ... }

Alternatively, you can define nested layers up-front using dot notation:

@layer framework.reset, framework.base, framework.components;

If you re-use a name within a nested layer, it will not reference the outer layer but rather start a new layer with that name. So, in this example, we would be creating the framework.base layer, not appending styles to the outer base layer.

@layer base;

@layer framework {
  @layer base { ... }
}

Unnamed Layers

Finally, naming is optional. You can define unnamed (anonymous) layers. The downside is you cannot add to them later, and wherever they are added determines their priority against the order of other layers.

@layer { /* rules */ }
@import url(framework.css) layer;

You may choose to use anonymous layers to re-enforce that layers be defined in one location for your application. Or, you may use them as “private” layers if you intentionally do not want later authors to be able to manipulate them.

Specificity Of Cascade Layers And Layer Rules

Earlier I mentioned cascade layers were a gamechanger for specificity. While the rules we briefly reviewed about specificity will still apply within and outside layers, including layers introduces a new paradigm.

The first part of specificity for layers is the order. Therefore, layers defined later will have their rules take priority over layers defined earlier.

Let’s consider the following layer stack:

@layer reset, base, theme, components, utilities;

Selectors defined in theme will take priority over reset and base, and the utilities layer styles will be prioritized over all of the previous layers.

Now, the outcome of that priority might surprise you. Recall that layers are intended to place control of the cascade back with authors. And a critical component of that control is being able to manage specificity. To fulfill that intention, the resulting behavior is that a more simple selector in a later layer can override what historically would have been a stronger selector in an earlier layer.

In the following example, the simple h2 element selector would make all of the h2s blue due to the theme layer order of appearance being after the base layer.

@layer base {
  article h2 {
    color: purple;
  }
}

@layer theme {
  h2 {
    color: blue;
  }
}

However, within an individual layer, the classic specificity rules apply.

Note: If you nest layers, this specificity behavior still exists. So, if the previous layers were nested in a framework layer, the h2 in framework.theme would still override the h2 in framework.base.

Hopefully, the reason these are called “layers” is becoming clear!

A metaphor the CSSWG group used in planning layers was comparing them to PhotoShop layers, where the top layer overrides lower layers, but is also “see through” for parts where it doesn’t apply.

Specificity Of Unlayered Styles

Given layers are not presently fully supported, not to mention the shift they’ll be bringing, the CSS working group wanted to ensure an upgrade path. And as part of that discussion, they determined that the styles you’re currently used to writing — aka “unlayered styles” — would always take the highest priority. In other words, styles outside of layers will ultimately “win” over styles within layers.

If a paragraph has a class of blue and that class is defined in the utilities layer, it will be overridden by the p selector that lives outside of a layer. So here, the paragraph (and all others in the application) would end up red.

@layer utilities {
  .blue {
    color: blue;
  }
}

/* wins */
p {
  color: red;
}

Unlayered styles have priority even if they are ordered before any layers are defined. Meaning we could have placed the p rule before the utilities layer, and the paragraph would still become red.

Unlayered Styles Within Nested Layers

If you write styles inside a layer and then add nested layers, the rules outside of nested layers act like unlayered styles in terms of the cascade specificity. In this layer block, the paragraph will remain green.

@layer typography {
  p {
    color: green;
  }

  @layer content;
}

@layer typography.content {
  p {
    color: blue;
  }
}

So, if your nested layers have the potential to override each other, you may want to insure all styles with the parent layer are themselves within layers.

Use Of !important In Layers

As with the unlayered cascade sorting order, marking a property definition as !important raises its priority. In cascade layers, adding in !important reverses the sorting order such that competing !important styles in a layer defined earlier win over !important styles in later layers. This was designed to match the !important behavior we reviewed for origins. Additionally, the use of !important within a layer will also win over an unlayered style.

Here are three rules where color on .lead has been marked !important. Two rules are within layers and one in the unlayered style. Due to the sort order reversal caused by !important, the element .lead is applied to will be green where cascade layers are supported.


/* wins */
@layer theme {
  .lead {
    color: green !important;
  }
}

@layer utilities {
  .lead {
    color: red !important;
  }
}

.lead {
  color: orange !important;
}

Consequently, to override a style marked !important within a layer, you must define a layer before that layer and continue marking the rule !important. Or, remove the use of !important and refactor.

This CodePen includes the styles we’ve reviewed so far to demonstrate the rules around specificity within and outside of layers and the impact of !important.

See the Pen @layer specificity and !important by Stephanie Eckles.

At time of writing, browser devtools for the current implementations of layers did not indicate that a style was coming from a layer. However, tooling is on the way, so stay tuned!

Combining Cascade Layers And Preprocessor Includes

CSS preprocessors like Sass and LESS allow you to combine styles from multiple stylesheets.

For example, in Sass, you might build up your primary stylesheet by including other files via the @use directive, like so:

@use "reset";
@use "theme";

Once layers are well supported, you may decide to wrap each include within a layer, depending on how granular you prefer to architect your styles. You could do that individually in each include before using it, or you can use the built-in Sass mixin for load-css to populate a layer with styles from an include:

@use 'sass:meta';

@layer theme {
  @include meta.load-css('theme');
}

If you were offering styles within a framework or design system where downstream authors could modify which layers were included, you could create an overrideable $layers list. Then, loop through list values to output the corresponding layer styles. This demo code assumes you have named your includes the same as your expected layers.

@use "sass:meta";
@use "sass:list";

$layers: "reset", "theme" !default;

// Outputs the list of layers
@layer #{$layers};

// Outputs each layer's styles via their include
@each $layer in $layers {
  @layer #{$layer} {
    @include meta.load-css($layer);
  }
}
Use Cases For Cascade Layers

We’ve hit pretty hard on the rules of layers regarding specificity and order of appearance. So, let’s consider some use cases of when those usually clash that layers will likely help resolve.

As you explore these scenarios, keep in mind that the browser will still download a complete stylesheet to process the rules. So, while layers can manage competing definitions, beware of creating file size bloat.

Resets Or Baseline Styles

When styles are authored with the intent of being re-used, there is usually a reset and/or set of baseline styles. These may be to smooth over browser inconsistencies for common elements or provide sensible defaults for the expected application. Styles in these categories usually are intended to have the lowest priority, which makes them good candidates to list as your first layer.

Additionally, having these styles in layers means that authors can later amend or add to styles within these layers. This idea is beneficial in the other scenarios we’ll review since it keeps the same specificity as originally intended.

Maybe your reset layer sets the font-family to sans-serif and then is distributed within a WordPress theme. You could tap into that layer within output from a settings panel to update the font-family to a user-defined value and ensure the low specificity is kept vs. adding a standard inline style.

Framework And Library Overrides

A primary reason folks use frameworks and libraries is for the preset styles. Generally, the framework and library authors will likely have tried to keep specificity low and offer customization methods. But there are always unique situations that you as the implementor will encounter where you may still need to override some styles.

Using layers, you can first place the framework entirely within its own layer to demote it to the lowest specificity against your custom layers. We briefly looked at this idea when learning the @layer syntax with Bootstrap as the example.

It’s certainly possible that as layers gain support, frameworks and libraries will offer a version that uses layers, thus giving you an entry point to more easily add your customizations. For example, if Bootstrap wrapped each component in a layer, you could override its styles by calling that same layer name and providing your styles.

Keeping with our Bootstrap example, they offer Sass and customization via Sass variables. But, Sass variables are applied at compilation time. So, there would still be value in having the library-supplied layers available if you needed to add a user stylesheet post-compilation.

Subsequently, without attaching user styles to those library layers, you may run into the issue of order of appearance. For example, if you intend to override base component styles while still allowing utility styles to modify variations successfully. Due to the specificity between layered and unlayered styles, you would run the risk of utility styles’ specificity no longer being high enough if you added the base customizations as “normal” styles.

Dark Mode And Other Theming

One aspect of cascade layers we haven’t covered is that they can be created or added to within other at-rules such as @media.

The use of layers means these rules do not need to be ordered next to the original theme rules, which provides more flexibility in architecting your styles. Updating the values using layers within a media query results in the styles keeping their original specificity defined by layer order. So, you can more safely modify styles to create a new theme even if the styles live in different layers.

You may consider using nested @layer to set the order of a series of potential themes. Then, you can set the layer styles within the associated media query (if there is one).

Here we’ve defined a series of possible themes associated with media queries and a final layer open for a user theme. This demonstrates defining the dark theme styles to update the related custom properties within the prefers-color-scheme media query.

@layer theme {
  @layer light, dark, prefers-contrast, forced-colors, user;

  @layer light {
    body {
      --background: #f9f9f9;
      --color: #222;

      background-color: var(--background);
      color: var(--color);
    }
  }
}

@media (prefers-color-scheme: dark) {
  @layer theme.dark {
    body {
      --background: #222;
      --color: #fff;
    }
  }
}

Given this type of setup, wherever it might make sense to add in the optional user theme stylesheet, you would be confident it would be able to override any previously set theme layers.

Components

When we first started describing layers, if you are used to a component architecture, you may have thought about creating a layer per component. While you certainly could, keep in mind all we’ve learned about how layers handle specificity.

You likely want component styles to be able to override more general styles, and you have two options of how to include them as layers. If you contain all your component styles within a single layer, then within that layer, they follow the “normal” rules of specificity. However, if you break them into separate layers, you’re affording the later layers higher priority to override previous layers.

As you consider these options, know that layers are not intended to solve scoping or encapsulation of styles. For that, keep an eye on another spec also being authored by Miriam Suzanne for actual native CSS scoping.

Element States

An excellent use case for a layer is to contain element states, such as :disabled or :focus.

In the past, I've written a more complex selector to add styles for buttons where I excluded the disabled state:

.button:not(:disabled) { ... }

That rule increases specificity in a way that has to be matched or exceeded by downstream authors who wanted to change properties defined in that rule. Instead, layers will allow defining specific component styles that simpler state selectors can also override.

Here’s an example of how I might update my button styles in the future for both :focus-visible and :disabled states. These state rules will technically apply to any interactive element, including links, buttons, and form elements.

@layer components, states;

@layer components {
  .button {
    --focus-color: rebeccapurple;

    background-color: rebeccapurple;
    color: #fff;
  }
}

@layer states {
  :disabled {
    background-color: #ddd;
    color: #999;
  }

  :focus-visible {
    outline: 2px solid var(--focus-color, currentColor);
    outline-offset: 2px;
  }
}

This technique is demonstrated in this CodePen:

See the Pen @layer for element state by Stephanie Eckles.

Do We Really Need Cascade Layers?

If you are writing small, contained projects that are not shared with a team or not meant for re-use, you may not see much value in cascade layers. Most certainly, they won’t be needed on every project.

However, the ability to define layer order and then append to layers later in your stylesheets is incredibly powerful. The level of confidence this allows in ensuring the intended specificity of styles stays intact is worth a lot.

Consider developing styles for a theme, or design system, or with a preprocessor or JS framework or library. These are scenarios where you are likely to have rules spread across several stylesheets and includes for the sake of overall organization. Injecting layers into these scenarios would allow adding and amending styles without extra architecture to maintain the original order of appearance and specificity.

Can We Start Using Cascade Layers?

With new CSS features, we can often begin using them as a progressive enhancement. For example, with properties like aspect-ratio or selectors like :is(), we can use @supports to include new features while supporting fallbacks. Or, sometimes features can be added, and graceful degradation is acceptable without a comparable fallback.

However, cascade layers are such an all-encompassing change that it will be difficult to start moving to use them until a polyfill is available. Unfortunately, @supports doesn’t currently work with at-rules, and even if it did, it would not be entirely sufficient for cascade layers since unlayered styles always win over layered ones.

You can certainly start experimenting with cascade layers to learn more about using them! Then, when a polyfill is ready, you’ll be better prepared to assess if they are a feature you’d like to incorporate into your projects. Also keep in mind that that more browsers have moved to be “evergreen” so after while you may feel browsers have an acceptable level of support for your audiences.

Alternative Solutions For Managing Specificity

While sufficient support for cascade layers without a polyfill may be a few years away, there are still modern CSS options to aid in managing specificity today.

Two complementary pseudo-classes already have excellent support in evergreen browsers: :is() and :where(). Both pseudo-classes allow listing multiple selectors within the parenthesis. The difference is in how they treat the specificity of those selectors.

  • :is() takes on the specificity of strongest selector listed, for example, with :is(.class, #id), the entire rule would have the specificity of the id.
  • :where() is always zero-specificity for the listed selectors.

Particularly for :where(), the benefit of zero-specificity can be used for setting up resets and baseline styles that are intended to be overridden. Sometimes those initial styles have bumped up specificity by including attributes or states.

For example, I enjoy attaching list-style removal if my list element has added role="list" (to ensure assistive tech still announces it as a list). But, adding that attribute selector bumps specificity, and I have to include it again if I want to change padding and margin. So, instead, I can use :where() to write the selector with zero-specificity. This creates a default with no issue in overriding it later in component styles with a simpler selector.

:where(ul, ol):where([role="list"]) { ... }

Recently, Mads Stoumann covered using :is() and :where() as a cascade-control method in more depth on CSS-Tricks.

Spec Status

Cascade layers are part of the spec for “CSS Cascading and Inheritance Level 5,” which reached candidate recommendation on January 13, 2022. There are no remaining major issues yet to resolve, but you can find the previously resolved issues on GitHub.

Give cascade layers a try! If you find an issue, you can file it for the working group to consider on GitHub.

Additional Resources

A Guide To CSS Debugging

We’ve all been there, at the end of completing CSS for a layout and — what’s that? Ah! An extra scrollbar! Or maybe an element is an unexpected color. And on some browsers, that new feature just doesn’t seem to be working.

Debugging — regardless of the language — is never a favorite task. CSS, like other languages, becomes easier to debug when you take time to learn a bit about its quirks. It also helps to become familiar with tools to help you both debug and prevent creating bugs in the first place.

Common Causes Of CSS Bugs

The first step in debugging is taking a step back and identifying the primary cause of the issue. In my experience, CSS layout issues often fall out of one of the following categories:

  1. Overflow of content from its parent resulting in extra or unexpected scrollbars and content being pushed out of the regular viewport area.
  2. Inheriting browser inconsistencies leading to mixed results across browsers and devices.
  3. Unexpected inheritance from the cascade where multiple styles override one another, which may cause alignment and spacing issues, among other things.
  4. CSS resiliency failures from DOM changes, including when child elements have gained wrapping divs or additional elements are unexpectedly added.

We’ll review debugging for each category by learning common culprits for these issues and see how to use dev tools and other methods to pinpoint the offending styles. Of course, we’ll discuss possible resolutions to these bugs as well.

General Debugging Tips

When something has gone wrong in your CSS, you can begin by using your favorite browser’s built-in DevTools to:

  • toggle off rules one at a time
  • toggle all rules off and bring them back one at a time
  • remove or relocate elements

Due to the global nature of CSS, the problematic style for an element may be located in its parent, grandparent, or even further back up the tree. DevTools will display the rules most applicable to the element based on specificity at the top of the pane and then provide a stack trace of the cascade and inherited styles.

You can also try to isolate the specific layout issue by either placing only that part into a local file or using an online editor like CodePen or CodeSandbox. Be aware that using those editors may insert extra opinions that your local environment doesn’t have. For example, CodePen defaults to using the Normalize reset, which may introduce new problems if you’re not already using it. Toggle off any settings that don’t work for your project. Then, you can use DevTools to copy in the relevant HTML.

After that, another handy feature is to open the context menu ("right click" or equivalent) for your element and then select "Copy > Copy styles" from the menu. Repeat for each nested element as needed.

If the problem no longer exists after isolating it, it’s likely that an ancestor element is leading to the difficulties. You may choose to isolate starting from higher up the DOM tree, or you’ll likely need to inspect inheritance more closely. We’ll talk about inheritance a bit more later on.

If you can resolve the problem in your isolated component, you can bring the updated styles back into your main project stylesheet.

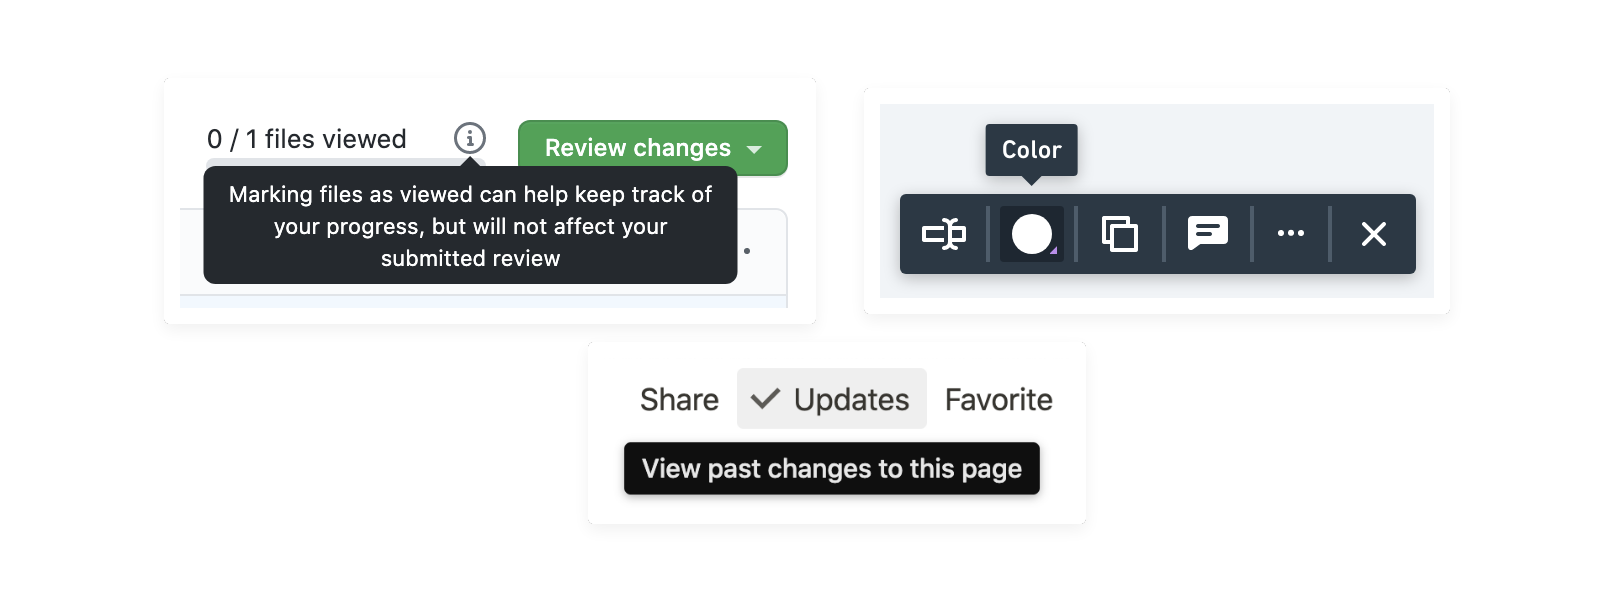
Chrome, Edge, Firefox, and Safari also have a way to track the changes you’ve made and save them to make it easier for you to copy over any updates.

  • Chrome/Edge
    Use the "kebab" more menu to select "More Tools > Changes" to open that panel. Additionally, you can persist your changes by using the local overrides feature.
  • Firefox
    The "Changes" panel should be already available by default and next to the "Computed" tab.
  • Safari
    Also offers the "Changes" panel by default, located in the same tab bar as the "Styles".

Recommended Reading: Examine And Edit CSS,” Firefox Developer Tools, MDN Web Docs

More ideas, tips, and tools will be discussed next.

Debugging Overflow

Overflow is usually one of the most apparent issues and can be pretty frustrating. It’s not always evident at a glance which element is causing overflow, and it can be tedious to try to comb through elements using dev tools inspectors.

“CSS is designed to not lose content, to not cause harm. In order to not cause harm, we show what overflows by default.”

— Miriam Suzanne, Why Is CSS So Weird? (video)

Thinking about it another way, the infamous meme of "CSS is Awesome" is, in fact, correct and intentional behavior if the base box was purposely set smaller than the size needed to accommodate that text. (If you’re interested, the original creator, Steven Frank, stopped by CSS Tricks to explain the origin).

A tried and true method to begin figuring out which element is responsible for overflow is to add the following CSS:

* {
  outline: 1px solid red;
}

Why outline instead of border? Because it will not add to the element’s computed DOM size. Adding borders will change element appearances if they’re already using a border and may falsely cause additional overflow issues.

The intent of using outline is to reveal element boundaries and visualize how elements are nested. For example, if overflow is causing unexpected scrollbars, an outline can help point out which element is pushing out of the viewport.

In addition to this manual method, Firefox reveals scrolling elements and specify which elements have children causing overflow, as seen in this screenshot.

Common Causes Of Overflow

Typically when we’re concerned about overflow problems, it’s from a mismatch of width allowances between a parent element and its children.

One of the first things to check is if an element has set an absolute width without a responsive method to allow it to fully resize downwards. For example, a 600px box will trigger overflow on viewports narrower than 600px. Instead, you may be able to adjust to add in a max-width: 100% so that the element will also responsively resize:

.wide-element {
  width: 600px;
  max-width: 100%;
}

An example of when this would not be a complete solution is when the element triggering overflow also has margins that increase its computed size within its parent. In the following example, the paragraph is still forced outside the main element due to its horizontal margin.

Fortunately, we can account for that margin by using the CSS math function calc to subtract the total area used by the horizontal margins:

p:first-of-type {
  width: 800px;
  max-width: calc(100% - 6rem);
  margin: 3rem;
}

Now, all that said, it’s not often we should be supplying absolute widths for elements. More often, it would be best to define only max-width if you need to control an element’s size. Again, this reduces bugs related to responsively sizing it. In fact, we can completely resolve the issues for our example by removing both the width and max-width values, which allows the paragraph’s default behavior to let it appropriately adjust within the available space of the main parent.

However, there are situations when the solutions we looked at make sense, such as applying max-width: 100% to create responsive images. And for some flexbox-based layout methods, you’ll also see width or flex-basis used with calc for the reason of accounting for margin.

Another common trigger for overflow has to do with one of the recognized mistakes in the design of CSS by the CSS Working Group. Number 6, in fact, which is that box-sizing should have defaulted to border-box instead of content-box.

All browsers currently ship with the legacy decision to set the element box model to use content-box, which means that an element’s border and padding are added to the computation of the element’s size. So, if you set absolute dimensions for width and/or height, you need to account for the extra space for any added border and padding.

To simplify this behavior, a best practice is to ensure your styles include resetting all elements to use border-box. This reduces the chance of overflow in many instances and makes the CSS layout more predictable due to removing complications from including borders and padding in the final element dimensions.

*,
*::before,
*::after {
  box-sizing: border-box;
}

Other causes of overflow fit a little better into the categories of bugs we’ll review next.

Debugging Browser Inconsistencies

While we’re living in a golden age of near-parity between browsers for critical features, there are still some legacy choices that can interfere. Every browser ships with a default stylesheet called user-agent (UA) styles.

Here’s an example of how those styles appear in the primary browsers:

These happen to be highlighting one of those defaults that can be another common trigger for overflow. The body element has margin attached in every browser, with the top ones as commented:

body {
  /* Chromium and Firefox */
  margin: 8px;
  /* Safari/webkit */
  margin-top: 8px;
}

You may be familiar with the concept of a CSS reset. These have evolved over the years as both CSS and browser support have improved but resetting the body back to margin: 0 is usually a feature.

If you use CodePen, the default reset is Normalize.css, authored by Nicolas Gallagher and initially released in 2012. It can be found in many, many projects and is quite an opinionated reset. However, it’s worth noting that it has not been updated since November 2018.

Note: Another timely note here is that Internet Explorer will reach end of life officially on June 15, 2022%20mode.)). This means that many features are needed not only in resets but within our stylesheets, in general, will no longer be required!

CSS has been improving rapidly in the last couple of years, and of course, browsers are continually modernizing. An alternative reset that fits better with more modern projects is Andy Bell’s Modern CSS Reset. This reset is enough to smooth out the handful of things common to most projects that are still inconsistent cross-browser, while not being overly opinionated. It also considers a few basic accessibility features. Andy explains each rule of the reset, and I’ve found it to be a solid starting point.

Let’s look at a few modern browser inconsistencies that can cause layout bugs.

Overflow from Viewport Units and Scrollbars

Without removing the margin on the body, our simple example from the overflow section triggers overflow. That’s because we used 100vw as one of the possible values for the width of the main element. Since it’s not subtracting the margin, it experiences overflow due to 100vw being 16px wider than the available space between the body’s margins.

Depending on the browser and operating system, you may also experience browser scrollbar widths upsetting the 100vw calculation as well. Currently, the fix is to update to 100% if you can. Soon we’ll also have the scrollbar-gutter property to help us account for scrollbar widths. This property is being extended in CSS Overflow Module Level 4 and has gained support in Chromium browsers from version 94. Bramus has an excellent breakdown of scrollbar-gutter of how it will work and what it will help solve. The summary of the solution is to make sure you leave room for scrollbars while achieving an even gap appearance on both sides of the content by adding: overflow: auto; scrollbar-gutter: stable both-edges;.

Note :If you aren’t sure your content requires scrollbars but know that it may need them sometimes, be sure to use the auto value for overflow. This tells the browser only to add them when the element needs them to accommodate the content. That said, users can customize their preferences to always show scrollbars, which is why the scrollbar-gutter property will be extra valuable!

It can also be problematic to set min-height: 100vh on the body without removing the margin first. There are other issues with 100vh specifically, and those have to do with how different devices and browser combinations have implemented the calculation for 100vh.

While 100vh appears to work on most desktop contexts, you may have experienced the frustration of having what seems like unexpected behavior, particularly when tested on iOS in WebKit browsers. Within a fixed layout set to 100vh, the bottom part of the website content is stuck behind the browser chrome, making it inaccessible when scrolling is prevented. For example, in a fixed height mobile menu or a single page app or game trying to fill no more than the available viewport height.

Matt Smith went seeking a solution and discovered in some scenarios the 100vh issue can be resolved by using the following combination:

html {
  height: -webkit-fill-available;
}

body {
  min-height: 100vh;
  /* mobile viewport bug fix */
  min-height: -webkit-fill-available;
}

This solution is imperfect, and I suggest testing on an actual device to ensure it works for your layout.

Jen Simmons also shared a technique (timestamp: 13m) that is available in Safari 15 to adjust this behavior with the help of CSS environment variables. The safe-area-inset-bottom will be 0 when not applicable and dynamically adjust when it does apply. This environment variable can be used for padding, margin, and within calc as shown:

body {
  min-height: calc(100vh — env(safe-area-inset-bottom));
}

The CSS Working Group has an improved solution in draft to address this category of issues, which will be a set of new units for "Large, Small, and Dynamic Viewport Sizes." These are intended to better correspond with the dynamic behavior of the changing browser chrome as is the cause of the WebKit troubles.

Here’s a summary of the current draft (note that these may still have some changes before they are stable in browsers):

  • Small viewport-percentage units (svh, svb, svw, svi)
    Equivalent to the remaining viewport space when all dynamic UI elements are expanded (ex. URL bar and virtual keyboard), and will not change its value even as the browser chrome changes.
  • Large viewport-percentage units (lvh, lvb, lvw, lvi)
    The size opposite of small, calculated to assume all dynamic UI elements are retracted.
  • Dynamic viewport-percentage units (dvh, dvb, dvw, dvi)
    The unstable value of the visible viewport space that changes along with dynamic browser chrome changes.

Typography Element Properties

UA styles also include default styles for common typography elements such as headings, paragraphs, and lists. Typically, CSS resets or frameworks will have already addressed these things. And, while you may not consider differences in these properties to be "bugs," it’s helpful to understand that they are not the same defaults cross-browser since these styles are some of the most impactful.

The main note here is that if you notice an inconsistency, you may want to select your preferred value (such as a particular font-size for an h1) and add it to your stylesheet.

Differences In Browser Feature Support

Browser differences in feature support wins as the most frustrating category, stretching from modern browsers back to the beginning of CSS. Quite simply, not all browsers support all CSS properties equally.

As mentioned earlier, we are in a time of near feature parity but also in a time of rapid development and growth of the CSS language. So the issues we have due to feature support are shrinking, but at the same time, we’re in a holding pattern as we wait for the new things to reach general availability.

Fortunately, we have several tools available to help research feature support during development and to help address inconsistencies.

The one you may already know about is caniuse, which lists support tables for both CSS and JavaScript features. The caveat to be aware of here is that the browser usage data is based on Statcounter, a sampling of 2 million websites. The percentages, therefore, may not match your audience and should only be one data point in trying to determine whether it’s "safe" to use a particular feature for your project.

Another helpful tool is the VSCode extension webhint, which is also powering part of the Issues panel in Edge. Webhint alerts you about features that may have lower browser support to help you be aware during development. You can configure what browsers are considered by including a browserslist in your package.

Knowing about feature support during development helps you make an informed solution. But sometimes, it’s not about whether a feature is strictly supported but whether or not the property has undergone syntax changes. For example, sometimes properties are released with "vendor prefixes." You’ve likely seen these — ones that begin with -webkit or -moz.

Usually, the stable version of the property does not continue to have a prefix, but it’s best to include the prefixed version for the broadest support. Fortunately, you can automate this step instead of doing it manually with the popular autoprefixer package. In addition, there is support for including it in many build processes, such as postCSS (the method I use). Like webhint, it looks at your browserlist to determine what level of support to provide prefixed properties.

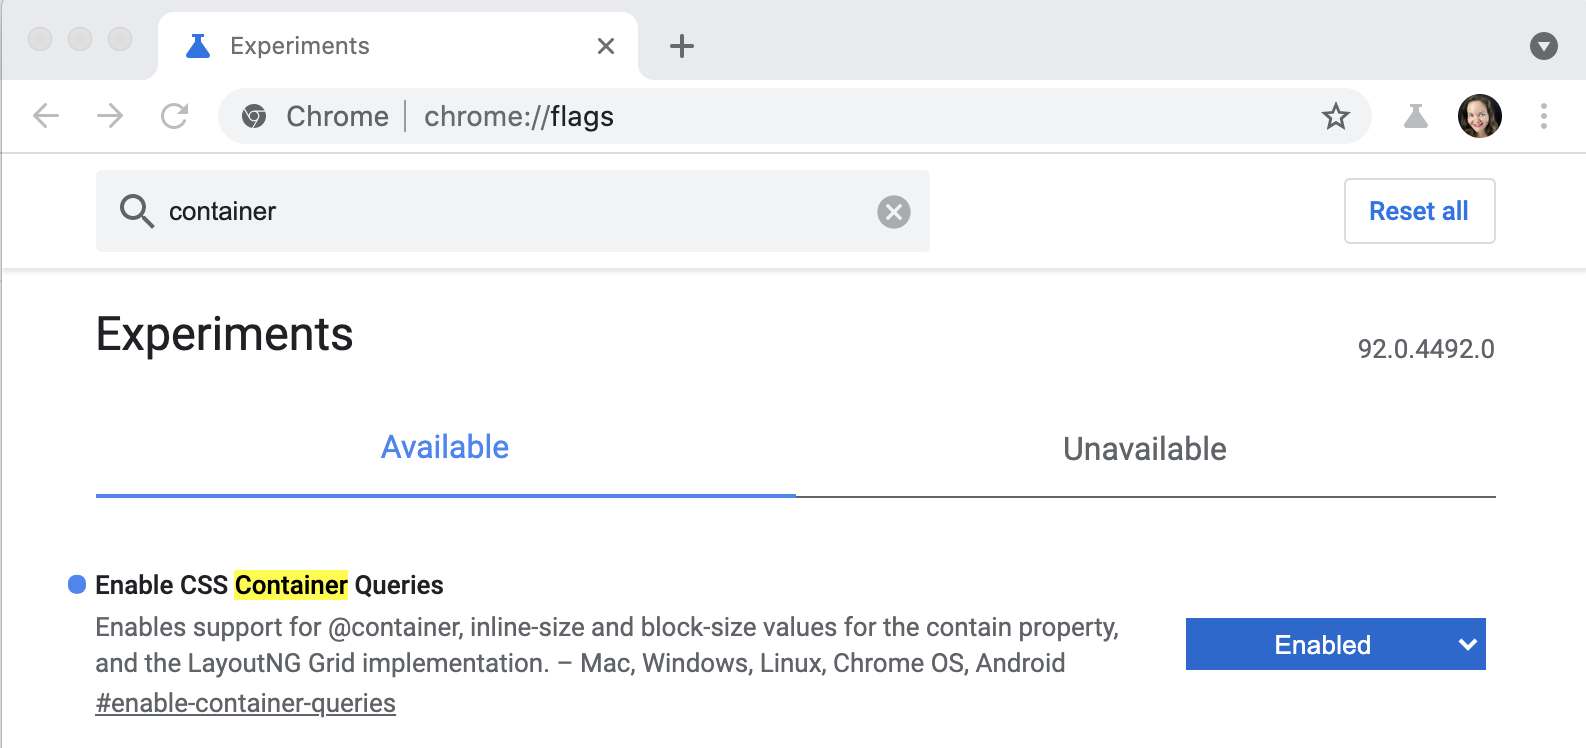
Beyond these tools, each browser’s dev tools have a method of signifying when that browser doesn’t support a property. Chromium, Safari, and Firefox show a yellow warning triangle alongside some other styling and a hover-triggered property to denote an unsupported property.

Reviewing how to handle a lack of support for a feature is a bit beyond the scope of this article. And, providing fallbacks if needed or setting up solutions as progressive enhancements is going to be unique. That’s why setting yourself up with tools to help check support during development is so important. Then, you can create a solution that fits the level of support you need instead of having a complete solution that you then have to debug and define a fallback for once you get bug reports.

Unexpected Cascading Layout Inheritance

Ok, so you feel you’re using well-supported CSS features. And you’ve just added a new section to your site, and you feel pretty confident about the CSS. But when you go to look at it in the browser, things seem incorrect.

Particularly when using a framework or design system and then also writing custom CSS, we can encounter bugs related to the cascade and inheritance. Something that works in isolation may not work when placed within a screen layout.

Fortunately, all browser dev tools allow tracing the cascade. By reviewing the Styles panel, we can see what rules are overriding our styles. Or, we can locate a parent that is adding a layout method we weren’t expecting for our child component.

This simple example shows that the rule for main * is "winning" the cascade for applying color to the paragraph. Dev tools manipulate the order in the Styles panel to show the most applicable styles on top. Then, we can see that the color property for just p is crossed-out as an extra indicator that that rule definition is not applied.

Let’s take a quick step back to CSS basics on the cascade. For this example, some of you may have realized that main * has equal specificity to p. But the other very critical part of the cascade is the order of rules, and here is the order from the stylesheet for the example:

body {
  color: #222;
}

p {
  color: #444;
}

main * {
  color: hsl(260, 85%, 25%);
}

If we want to make sure the rule for just p "wins," then we either need to make sure it follows the main rule or increase its specificity.

This basic feature of CSS is extremely powerful but can be perceived as a "bug" if you aren’t as familiar with how it works. And it can certainly be frustrating if you are tasked with deploying a new feature on a legacy codebase or required to use a framework where it’s more challenging to get around inherited specificity.

Solving issues due to the cascade often doesn’t have an easy answer. It’s worth the time to step back from the immediate problem and examine the layers of styles coming together to identify the best place to make a change. Recognize that an !important could cause you further issues related to specificity down the line, so try out reordering properties if possible first. Or, you may want to switch to setting up "components," which provide a layer of scoping for styles and encourage being more intentional about inheritance.

Speaking of layers — speeding through the spec process is another new feature that was designed specifically to assist in orchestrating the cascade and alleviating clashes. At present, the Cascade Layers spec (@layer) has gained experimental support in all the top browsers. For more info on this upcoming feature, check out the excellent overview on CSS layers by Bramus.

Note: Please make sure to check the resources at the end of this article for a few links related to checking CSS specificity.

CSS Resiliency Failures From DOM Changes

Sometimes, a carefully crafted CSS solution stops working. In my experience, that often happens due to the underlying DOM changing. When we add CSS based on the current DOM, our solution isn’t resilient to change.

For example, if we create a grid layout rule for a list defined as .grid li, and then the DOM structure changes to be a set of article elements, the CSS will break.

Or, if we set up a series of icons that fit perfectly within the original space, but then the client needs to add an icon, and it causes overflow.

These examples really show why CSS is a valuable skill. If you can write scalable, DOM-independent CSS, your solutions will scale, and you will reduce the likelihood of this category of bugs.

Similar to creating an API in another programming language, it’s a worthwhile endeavor to consider how your CSS rules will be used beyond the current problem you’re solving.

Debugging this category usually means tracing back to the original rules to see if they can be extended to work for the updated context. Again, you can use dev tools to find the applied rules and even follow the reference link to go to the source.

Note: For more tips on how to handle this category with specific things to consider, review my article on future-proofing CSS styles.

Layout Swaps To Help Avoid CSS Bugs

Let’s look at a few specific examples that may cause layout bugs and how to address them.

Layout Spacing

Once flexbox was introduced, many grid layout solutions were released that all had some math to compute the width of the flex children. In addition, that width had to be aware of the addition of margin to add space between the children.

Good News: The gap property for flexbox is now supported in all evergreen browsers!

CSS grid also supports the gap property. The advantage of gap over margin is that it will always only apply between elements, regardless of orientation. So, no more funky business of trying to attach margin to the "correct" side or having to use negative margin on the parent to counteract nested margin.

Unlike margin, the use of gap is less likely to cause overflow since it never applies to the outer edge of the elements. However, you may still experience overflow if the children cannot resize to a narrower width.

Handling Element Widths

If either your flex or grid children are causing overflow, here are two methods you may try as upgrades.

For flex, ensure you use flex-basis instead of width and that the flex-shrink value is set to 1. These properties will ensure that the element is allowed to be reduced in size.

For grid, a method I often use to achieve auto-wrapping behavior for grid children is the following:

grid-template-columns: repeat(auto-fit, minmax(30ch, 1fr));

But, this prevents elements shrinking below that minimum width of 30ch. So, instead, we can update to this solution that keeps our minimum on larger viewports/within larger parents while still allowing child elements to shrink within narrower spaces:

grid-template-columns: repeat(auto-fit, minmax(min(100%, 30ch), 1fr));

I often find CSS functions very handy in these sorts of scenarios. If you’re unfamiliar, you may enjoy my article on practical uses of CSS functions.

Outside of a grid or flex context, we can achieve a similar behavior for elements to prevent setting an absolute width. We discussed in the overflow section how absolutes could often cause problems. But, there are, of course, times when we do want to provide some width parameters. Once again, my preferred method for setting a flexible width uses the CSS function of min(). In this example, it is a bit of a shorthand for setting both width and max-width at once. The min() function will use the smaller computed value, which dynamically changes as the element’s context changes:

width: min(100vw - 2rem, 80ch);

The min() function accepts more than two values, so you could even add a percentage value here as well. Then, your container would be responsive not just to the viewport but when nested in other containers as well, reducing overflow bugs even further—and achieving our mission of creating scalable, DOM-independent styles!

Review the use of min() as a container style as well as to make grid children more flexible in this CodePen: min() and CSS Grid for responsive containers (codepen.io)

Cumulative Layout Shift

A more recent hot topic in site performance and related metrics is Cumulative Layout Shift (CLS). This is the Google Lighthouse score for how much elements shift or jump during page load. Some offenders are pretty obvious, such as ads and popup banners. Those things use motion and are typically late or purposely delayed in loading.

Now, before you go attacking the problem, make sure there is one. Chrome and Edge include the "Lighthouse" panel in dev tools which you can use to run a report for both desktop and mobile versions of your site. If CLS is not a problem, that score will be less than 0.1 and be displayed with a green indicator.

Two other things that may affect your site are images and custom fonts.

Fairly recently, all browsers have begun to reserve space for images if they include width and height attributes. Those attributes provide the two necessary pieces of information for the browser to calculate the image’s aspect ratio and hold that space within the page layout.

However, due to responsive design, many of us are used to stripping those attributes assuming that CSS will take over. As Jen Simmons explains, it’s time to add those back in. In addition, you may need to tweak your responsive image CSS slightly to include the following somewhat more specific rule, which will allow the image to respond to narrower contexts without losing its aspect ratio:

img[width] {
  height: auto;
}

As for custom fonts, the issue can come in here when the custom font and the designated system fallback font have a significant mismatch. In years past, we’d call it FLOUT (flash of unstyled text). This "flash" is from the delay in time between the initial page load and the custom font loading.

In the example video from my own site that has this problem, I’ve used the Network Conditions panel in Edge to load the site with "Network throttling" set to "Slow 3G."

In my case, the actual CLS score doesn’t indicate the problem is severe enough to stress about resolving. However, if the font loading delay causes lots of elements to shift, that’s when it is worth looking into ways to alleviate the shifting problem.

Sometimes you can select a fallback system font that better matches the custom font so that the relative size is a closer match. Or, you can reduce the effect by setting a minimum size on the parent elements or adjusting other layout attributes so that it doesn’t cause a significant shift when the font loads.

Simon Hearne did a deep dive into what causes layout shifts due to fonts as well if you’d like to learn more about the problem, especially if you’re working on a more text-heavy site where the impact on CLS is more significant. They conclude that the ultimate solution to strictly address the layout shift is to use font-display: optional but concede that this is not optimal from a design perspective. Simon provides more solutions to help you select the right path for your site, including a handy CodePen to help you test fallbacks. Google also provides a resource describing preloading fonts.

Resources For Debugging CSS

We covered some frequent causes of CSS bugs and how to address them. Here are more resources that can help you with debugging CSS:

Additionally, outside of the popular browser’s dev tools, you may find these two alternates helpful due to their extra tools and features:

  • Polypane (paid) is a browser that shows you multiple views of your site to test responsive design but also has additional features that can help you catch bugs early.
  • VisBug is a Chromium extension that gives you extra info about elements, which can also help pinpoint issues.

When CSS Isn’t Enough: JavaScript Requirements For Accessible Components

As the author of ModernCSS.dev, I’m a big proponent of CSS solutions. And, I love seeing the clever ways people use CSS for really out-of-the-box designs and interactivity! However, I’ve noticed a trend toward promoting “CSS-only” components using methods like the “checkbox hack”. Unfortunately, hacks like these leave a significant amount of users unable to use your interface.

This articles covers several common components and why CSS isn’t sufficient for covering accessibility by detailing the JavaScript requirements. These requirements are based on the Web Content Accessibility Guidelines (WCAG) and additional research from accessibility experts. I won’t prescribe JavaScript solutions or demo CSS, but rather examine what needs to be accounted for when creating each component. A JavaScript framework can certainly be used but is not necessary in order to add the events and features discussed.

The requirements listed are by and large not optional — they are necessary to help ensure the accessibility of your components.

If you’re using a framework or component library, you can use this article to help evaluate if the provided components meet accessibility requirements. It’s important to know that many of the items noted are not going to be fully covered by automated accessibility testing tools like aXe, and therefore need some manual testing. Or, you can use a testing framework like Cypress to create tests for the required functionality.

Keep in mind that this article is focused on informing you of JavaScript considerations for each interface component. This is not a comprehensive resource for all the implementation details for creating fully accessible components, such as necessary aria or even markup. Resources are included for each type to assist you in learning more about the wider considerations for each component.

Determining If CSS-Only Is An Appropriate Solution

Here are a few questions to ask before you proceed with a CSS-only solution. We’ll cover some of the terms presented here in more context alongside their related components.

  • Is this for your own enjoyment?
    Then absolutely go all in on CSS, push the boundaries, and learn what the language can do! 🎉
  • Does the feature include showing and hiding of content?
    Then you need JS to at minimum toggle aria and to enable closing on Esc. For certain types of components that also change state, you may also need to communicate changes by triggering updates within an ARIA live region.
  • Is the natural focus order the most ideal?
    If the natural order looses the relationship between a trigger and the element it triggered, or a keyboard user can’t even access the content via natural tab order, then you need JS to assist in focus management.
  • Does the stylized control offer the correct information about the functionality?
    Users of assistive technology like screen readers receive information based on semantics and ARIA that helps them determine what a control does. And, users of speech recognition need to be able to identify the component’s label or type to work out the phrase to use to operate the controls. For example, if your component is styled like tabs but uses radio buttons to “work” like tabs, a screen reader may hear “radio button” and a speech user may try to use the word “tab” to operate them. In these cases, you’ll need JS to enable using the appropriate controls and semantics to achieve the desired functionality.
  • Does the effect rely on hover and/or focus?
    Then you may need JS to assist in an alternative solution for providing equal access or persistent access to the content especially for touch screen users and those using desktop zoom of 200%+ or magnification software.

Quick tip: Another reference when you’re creating any kind of customized control is the Custom Control Accessible Development Checklist from the W3 “Using ARIA” guide. This mentions several points above, with a few additional design and semantic considerations.

Tooltips

Narrowing the definition of a tooltip is a bit tricky, but for this section we’re talking about small text labels that appear on mouse hover near a triggering element. They overlay other content, do not require interaction, and disappear when a user removes hover or focus.

The CSS-only solution here may seem completely fine, and can be accomplished with something like:

<button class="tooltip-trigger">I have a tooltip</button>
<span class="tooltip">Tooltip</span>

.tooltip {
display: none;
}

.tooltip-trigger:hover + .tooltip,
.tooltip-trigger:focus + .tooltip {
display: block;
}

However, this ignores quite a list of accessibility concerns and excludes many users from accessing the tooltip content.

A large group of excluded users are those using touch screens where :hover will possibly not be triggered since on touch screens, a :hover event triggers in sync with a :focus event. This means that any related action connected to the triggering element — such as a button or link — will fire alongside the tooltip being revealed. This means the user may miss the tooltip, or not have time to read its contents.

In the case that the tooltip is attached to an interactive element with no events, the tooltip may show but not be dismissible until another element gains focus, and in the meantime may block content and prevent a user from doing a task.

Additionally, users who need to use zoom or magnification software to navigate also experience quite a barrier to using tooltips. Since tooltips are revealed on hover, if these users need to change their field of view by panning the screen to read the tooltip it may cause it to disappear. Tooltips also remove control from the user as there is often nothing to tell the user a tooltip will appear ahead of time. The overlay of content may prevent them from doing a task. In some circumstances such as a tooltip tied to a form field, mobile or other on-screen keyboards can obscure the tooltip content. And, if they are not appropriately connected to the triggering element, some assistive technology users may not even know a tooltip has appeared.

Guidance for the behavior of tooltips comes from WCAG Success Criterion 1.4.13 — Content on Hover or Focus. This criterion is intended to help low vision users and those using zoom and magnification software. The guiding principles for tooltip (and other content appearing on hover and focus) include:

  • Dismissible
    The tooltip can be dismissed without moving hover or focus
  • Hoverable
    The revealed tooltip content can be hovered without it disappearing
  • Persistent
    The additional content does not disappear based on a timeout, but waits for a user to remove hover or focus or otherwise dismiss it

To fully meet these guidelines requires some JavaScript assistance, particularly to allow for dismissing the content.

  • Users of assistive technology will assume that dismissal behavior is tied to the Esc key, which requires a JavaScript listener.
  • According to Sarah Higley’s research described in the next section, adding a visible “close” button within the tooltip would also require JavaScript to handle its close event.
  • It’s possible that JavaScript may need to augment your styling solution to ensure a user can hover over the tooltip content without it dismissing during the user moving their mouse.

Alternatives To Tooltips

Tooltips should be a last resort. Sarah Higley — an accessibility expert who has a particular passion for dissuading the use of tooltips — offers this simple test:

“Why am I adding this text to the UI? Where else could it go?”

— Sarah Higley from the presentation “Tooltips: Investigation Into Four Parts

Based on research Sarah was involved with for her role at Microsoft, an alternative solution is a dedicated “toggletip”. Essentially, this means providing an additional element to allow a user to intentionally trigger the showing and hiding of extra content. Unlike tooltips, toggletips can retain semantics of elements within the revealed content. They also give the user back the control of toggling them, and retain discoverability and operability by more users and in particular touch screen users.

If you’ve remembered the title attribute exists, just know that it suffers all the same issues we noted from our CSS-only solution. In other words — don’t use title under the assumption it’s an acceptable tooltip solution.

For more information, check out Sarah’s presentation on YouTube as well as her extensive article on tooltips. To learn more about tooltips versus toggletips and a bit more info on why not to use title, review Heydon Pickering’s article from Inclusive Components: Tooltips and Toggletips.

Modals

Modals — aka lightboxes or dialogs — are in-page windows that appear after a triggering action. They overlay other page content, may contain structured information including additional actions, and often have a semi-transparent backdrop to help distinguish the modal window from the rest of the page.

I have seen a few variations of a CSS-only modal (and am guilty of making one for an older version of my portfolio). They may use the “checkbox hack”, make use of the behavior of :target, or try to fashion it off of :focus (which is probably really an overlarge tooltip in disguise).

As for the HTML dialog element, be aware that it is not considered to be comprehensively accessible. So, while I absolutely encourage folks to use native HTML before custom solutions, unfortunately this one breaks that idea. You can learn more about why the HTML dialog isn’t accessible.

Unlike tooltips, modals are intended to allow structured content. This means potentially a heading, some paragraph content, and interactive elements like links, buttons or even forms. In order for the most users to access that content, they must be able to use keyboard events, particularly tabbing. For longer modal content, arrow keys should also retain the ability to scroll. And like tooltips, they should be dismissible with the Esc key — and there’s no way to enable that with CSS-only.

JavaScript is required for focus management within modals. Modals should trap focus, which means once focus is within the modal, a user should not be able to tab out of it into the page content behind it. But first, focus has to get inside of the modal, which also requires JavaScript for a fully accessible modal solution.

Here’s the sequence of modal related events that must be managed with JavaScript:

  1. Event listener on a button opens the modal
  2. Focus is placed within the modal; which element varies based on modal content (see decision tree)
  3. Focus is trapped within the modal until it is dismissed
  4. Preferably, a user is able to close a modal with the Esc key in addition to a dedicated close button or a destructive button action such as “Cancel” if acknowledgement of modal content is required
    1. If Esc is allowed, clicks on the modal backdrop should also dismiss the modal
  5. Upon dismissal, if no navigation occurred, focus is placed back on the triggering button element

Modal Focus Decision Tree

Based on the WAI-ARIA Authoring Practices Modal Dialog Example, here is a simplified decision tree for where to place focus once a modal is opened. Context will always dictate the choice here, and ideally focus is managed further than simply “the first focusable element”. In fact, sometimes non-focusable elements need to be selected.

  • Primary subject of the modal is a form.
    Focus first form field.
  • Modal content is significant in length and pushes modal actions out of view.
    Focus a heading if present, or first paragraph.
  • Purpose of the modal is procedural (example: confirmation of action) with multiple available actions.
    Focus on the “least destructive” action based on the context (example: “OK”).
  • Purpose of the modal is procedural with one action.
    Focus on the first focusable element

Quick tip: In the case of needing to focus a non-focusable element, such as a heading or paragraph, add tabindex="-1" which allows the element to become programmatically focusable with JS but does not add it to the DOM tab order.

Refer to the WAI-ARIA modal demo for more information on other requirements for setting up ARIA and additional details on how to select which element to add focus to. The demo also includes JavaScript to exemplify how to do focus management.

For a ready-to-go solution, Kitty Giraudel has created a11y-dialog which includes the feature requirements we discussed. Adrian Roselli also has researched managing focus of modal dialogs and created a demo and compiled information on how different browser and screen reader combinations will communicate the focused element.

Tabs

Tabbed interfaces involve a series of triggers that display corresponding content panels one at a time. The CSS “hacks” you may find for these involve using stylized radio buttons, or :target, which both allow only revealing a single panel at a time.

Here are the tab features that require JavaScript:

  1. Toggling the aria-selected attribute to true for the current tab and false for unselected tabs
  2. Creating a roving tabindex to distinguish tab selection from focus
  3. Move focus between tabs by responding to arrow key events (and optionally Home and End)

Optionally, you can make tab selection follow focus — meaning when a tab is focused its also then selected and shows its associated tab panel. The WAI-ARIA Authoring Practices offers this guide to making a choice for whether selection should follow focus.

Whether or not you choose to have selection follow focus, you will also use JavaScript to listen for arrow key events to move focus between tab elements. This is an alternative pattern to allow navigation of tab options since the use of a roving tabindex (described next) alters the natural keyboard tab focus order.

About Roving tabindex

The concept of a roving tabindex is that the value of the tabindex value is programmatically controlled to manage the focus order of elements. In regards to tabs, this means that only the selected tab is part of the focus order by way of setting tabindex="0", and unselected tabs are set to tabindex="-1" which removes them from the natural keyboard focus order.

The reason for this is so that when a tab is selected, the next tab will land a user’s focus within the associated tab panel. You may choose to make the element that is the tab panel focusable by assigning it tabindex="0", or that may not be necessary if there’s a guarantee of a focusable element within the tab panel. If you tab panel content will be more variable or complex, you may consider managing focus according to the decision tree we reviewed for modals.

Example Tab Patterns

Here are some reference patterns for creating tabs:

Carousels

Also called slideshows or sliders, carousels involve a series of rotating content panels (aka “slides”) that include control mechanisms. You will find these in many configurations with a wide range of content. They are somewhat notoriously considered a bad design pattern.

The tricky part about CSS-only carousels is that they may not offer controls, or they may use unexpected controls to manipulate the carousel movement. For example, you can again use the “checkbox hack” to cause the carousel to transition, but checkboxes impart the wrong type of information about the interaction to users of assistive tech. Additionally, if you style the checkbox labels to visually appear as forward and backward arrows, you are likely to give users of speech recognition software the wrong impression of what they should say to control the carousel.

More recently, native CSS support for scroll snap has landed. At first, this seems like the perfect CSS-only solution. But, even automated accessibility checking will flag these as un-navigable by keyboard users in case there is there no way to navigate them via interactive elements. There are other accessibility and user experience concerns with the default behavior of this feature, some of which I’ve included in my scroll snap demo on SmolCSS.

Despite the wide range in how carousels look, there are some common traits. One option is to create a carousel using tab markup since effectively it’s the same underlying interface with an altered visual presentation. Compared to tabs, carousels may offer extra controls for previous and next, and also pause if the carousel is auto-playing.

The following are JavaScript considerations depending on your carousel features:

  • Using Paginated Controls
    Upon selection of a numbered item, programmatically focus the associated carousel slide. This will involve setting up slide containers using roving tabindex so that you can focus the current slide, but prevent access to off-screen slides.
  • Using Auto-Play
    Include a pause control, and also enable pausing when the slide is hovered or an interactive element within it is focused. Additionally, you can check for prefers-reduced-motion within JavaScript to load the slideshow in a paused state to respect user preferences.
  • Using Previous/Next Controls
    Include a visually hidden element marked as aria-live="polite" and upon these controls being activated, populate the live region with an indication of the current position, such as “Slide 2 of 4”.

Resources For Building Accessible Carousels

Dropdown Menus

This refers to a component where a button toggles open a list of links, typically used for navigation menus. CSS implementations that stop at showing the menu on :hover or :focus only miss some important details.

I’ll admit, I even thought that by using the newer :focus-within property we could safely implement a CSS-only solution. You’ll see that my article on CSS dropdown menus was amended to include notes and resources on the necessary JavaScript (I kept the title so that others seeking that solution will hopefully complete the JS implementation, too). Specifically, relying on only CSS means violating WCAG Success Criterion 1.4.13: Content on Hover or Focus which we learned about with tooltips.

We need to add in JavaScript for some techniques that should sound familiar at this point:

  • Toggling aria-expanded on the menu button between true and false by listening to click events
  • Closing an open menu upon use of the Esc key, and returning focus to the menu toggle button
  • Preferably, closing open menus when focus is moved outside of the menu
  • Optional: Implement arrow keys as well as Home and End keys for keyboard navigation between menu toggle buttons and links within the dropdowns

Quick tip: Ensure the correct implementation of the dropdown menu by associating the menu display to the selector of .dropdown-toggle[aria-expanded=`"true"] + .dropdownrather than basing the menu display on the presence of an additional JS-added class likeactive`. This removes some complexity from your JS solution, too!

This is also referred to as a “disclosure pattern” and you can find more details in the WAI-ARIA Authoring Practices’s Example Disclosure Navigation Menu.

Additional resources on creating accessible components

A Primer On CSS Container Queries

At present, container queries can be used in Chrome Canary by visiting chrome://flags and searching for and enabling them. A restart will be required.

Note: Please keep in mind that the spec is in progress, and could change at any time. You can review the draft document which will update as the spec is formed.

What Problem Are CSS Container Queries Solving?

Nearly 11 years ago, Ethan Marcotte introduced us to the concept of responsive design. Central to that idea was the availability of CSS media queries which allowed setting various rules depending on the size of the viewport. The iPhone had been introduced three years prior, and we were all trying to figure out how to work within this new world of contending with both mobile screen sizes and desktop screen sizes (which were much smaller on average than today).

Before and even after responsive design was introduced, many companies dealt with the problem of changing layout based on screen size by delivering completely different sites, often under the subdomain of m. Responsive design and media queries opened up many more layout solutions, and many years of creating best practices around responding to viewport sizes. Additionally, frameworks like Bootstrap rose in popularity largely due to providing developers responsive grid systems.

In more recent years, design systems and component libraries have gained popularity. There is also a desire to build once, deploy anywhere. Meaning a component developed in isolation is intended to work in any number of contexts to make building complex interfaces more efficient and consistent.

At some point, those components come together to make a web page or application interface. Currently, with only media queries, there is often an extra layer involved to orchestrate mutations of components across viewport changes. As mentioned previously, a common solution is to use responsive breakpoint utility classes to impose a grid system, such as frameworks like Bootstrap provide. But those utility classes are a patch solution for the limitations of media queries, and often result in difficulties for nested grid layouts. In those situations, you may have to add many breakpoint utility classes and still not arrive at the most ideal presentation.

Or, developers may be using certain CSS grid and flex behaviors to approximate container responsiveness. But flex and CSS grid solutions are restricted to only loosely defining layout adjustments from horizontal to vertical arrangements, and don’t address the need to modify other properties.

Container queries move us beyond considering only the viewport, and allow any component or element to respond to a defined container’s width. So while you may still use a responsive grid for overall page layout, a component within that grid can define its own changes in behavior by querying its container. Then, it can adjust its styles depending on whether it’s displayed in a narrow or wide container.

We also kept main as a container. This means we can add styles for the .article class, but they will be in response to the width of main, not themselves. I am anticipating this ability to have rules within container queries responding to multiple layers of containers cause the most confusion for initial implementation and later evaluation and sharing of stylesheets.

In the near future, updates to browser's DevTools will certainly help in making DOM changes that alter these types of relationships between elements and the containers they may query. Perhaps an emerging best practice will be to only query one level up within a given @container block, and to enforce children carrying their container with them to reduce the potential of negative impact here. The trade-off is the possibility of more DOM elements as we saw with our article example, and consequently dirtying semantics.

In this example, we saw what happened with both nested containers and also the effects of introducing flex or grid layout into a container. What is currently unsettled in the spec is what happens when a container query is defined but there are no actual container ancestors for those queried elements. It may be decided to consider containment to be false and drop the rules, or they may fallback to the viewport. You can track the open issue for fallback containment and even add your opinion to this discussion!

Container Element Selector Rules

Earlier I mentioned that a container cannot itself be styled within a container query (unless it’s a nested container and responding to its ancestor container’s query). However, a container can be used as part of the CSS selector for its children.

Why is this important? It allows retaining access to CSS pseudo-classes and selectors that may need to originate on the container, such as :nth-child.

Given our article example, if we wanted to add a border to every odd article, we can write the following:

@container (min-width: 60ch) {
  .container:nth-child(odd) > article {
    border: 1px solid grey;
  }
} 

If you need to do this, you may want to use less generic container class names to be able to identify in a more readable way which containers are being queried for the rule.

Case Study: Upgrading Smashing Magazine’s Article Teasers

If you visit an author’s profile here on Smashing (such as mine) and resize your browser, you’ll notice the arrangement of the article teaser elements change depending on the viewport width.

On the smallest viewports, the avatar and author’s name are stacked above the headline, and the reading time and comment stats are slotted between the headline and article teaser content. On slightly larger viewports, the avatar floats left of all the content, causing the headline to also sit closer to the author’s name. Finally, on the largest viewports, the article is allowed to span nearly the full page width and the reading time and comment stats change their position to float to the right of the article content and below the headline.

By combining container queries with an upgrade to using CSS grid template areas, we can update this component to be responsive to containers instead of the viewport. We’ll start with the narrow view, which also means that browsers that do not support container queries will use that layout.

Now for this demo, I’ve brought the minimum necessary existing styles from Smashing, and only made one modification to the existing DOM which was to move the headline into the header component (and make it an h2).

Here’s a reduced snippet of the article DOM structure to show the elements we’re concerned about re-arranging (original class names retained):

<article class="article--post">
  <header>
    <div class="article--post__image"></div>
    <span class="article--post__author-name"></span>
    <h2 class="article--post__title"></h2>
  </header>
  <footer class="article--post__stats"></footer>
  <div class="article--post__content"></div>
</article>

We’ll assume these are direct children of main and define main as our container:

main {
  contain: layout inline-size style;
}

In the smallest container, we have the three sections stacked: header, stats, and content. Essentially, they are appearing in the default block layout in DOM order. But we’ll go ahead and assign a grid template and each of the relevant elements because the template is key to our adjustments within the container queries.

.article--post {
  display: grid;
  grid-template-areas: 
    "header" 
    "stats" 
    "content";
  gap: 0.5rem;
}

.article--post header {
  grid-area: header;
}

.article--post__stats {
  grid-area: stats;
}

.article--post__content {
  grid-area: content;
}

Grid is ideal for this job because being able to define named template areas makes it much easier to apply changes to the arrangement. Plus, its actual layout algorithm is more ideal than flexbox for how we want to manage to resize the areas, which may become more clear as we add in the container query updates.

Before we continue, we also need to create a grid template for the header to be able to move around the avatar, author’s name, and headline.

We’ll add onto the rule for .article`--post header`:

.article--post header {
  display: grid;
  grid-template-areas:
    "avatar name"
    "headline headline";
  grid-auto-columns: auto 1fr;
  align-items: center;
  column-gap: 1rem;
  row-gap: 0.5rem;
}

If you’re less familiar with grid-template-areas, what we’re doing here is ensuring that the top row has one column for the avatar and one for the name. Then, on the second row, we’re planning to have the headline span both of those columns, which we define by using the same name twice.

Importantly, we also define the grid-auto-columns to override the default behavior where each column takes up 1fr or an equal part of the shared space. This is because we want the first column to only be as wide as the avatar, and allow the name to occupy the remaining space.

Now we need to be sure to explicitly place the related elements into those areas:

.article--post__image {
  grid-area: avatar;
}

.article--post__author-name {
  grid-area: name;
}

.article--post__title {
  grid-area: headline;
  font-size: 1.5rem;
}

We’re also defining a font-size for the title, which we’ll increase as the container width increases.

Finally, we will use flex to arrange the stats list horizontally, which will be the arrangement until the largest container size:

.article--post__stats ul {
  display: flex;
  gap: 1rem;
  margin: 0;
}

Note: Safari recently completed support of gap for flexbox, meaning it’s supported for all modern browsers now! 🎉

We can now move to our first of two container queries to create the midsize view. Let’s take advantage of being able to create font-relative queries, and base it on the container exceeding 60ch. In my opinion, making content things relative to line length is a practical way to manage changes across container widths. However, you could certainly use pixels, rems, ems, and possibly more options in the future.

For this middle size, we need to adjust both the header and overall article grid templates:

@container (min-width: 60ch) {
  .article--post header {
    grid-template-areas:
      "avatar name"
      "avatar headline";
    align-items: start;
  }

  .article--post {
    grid-template-areas: "header header" ". stats" ". content";
    grid-auto-columns: 5rem 1fr;
    column-gap: 1rem;
  }

  .article--post__title {
    font-size: 1.75rem;
  }
}

At this width, we want the avatar to appear pulled into its own column to the left of the rest of the content. To achieve this, within the header the grid template assigns it to the first column of both rows, and then shifts the name to row one, column two, and the headline to row two, column two. The avatar also needs to be aligned to the top now, so adjust that with align-items: start.

Next, we updated the article grid template so that the header takes up both columns in the top row. Following that, we use the . character to assign an unnamed grid area for the first column of the second and third row, preparing for the visual of the avatar appearing in its own column. Then, we adjust the auto columns to make make the first column equivalent to the avatar width to complete the effect.

For the largest container size, we need to move the stats list to appear on the right of the article content, but below the headline. We’ll again use ch units for our “breakpoint”, this time picking 100ch.

@container (min-width: 100ch) {
  .article--post {
    grid-template-areas: "header header header" ". content stats";
    grid-auto-columns: 5rem fit-content(70ch) auto;
  }

  .article--post__stats ul {
    flex-direction: column;
  }

  .article--post__title {
    max-width: 80ch;
    font-size: 2rem;
  }

  .article--post__content {
    padding-right: 2em;
  }
}

To meet all of our requirements, we now need to take care of three columns, which makes the first row a triple repeat of header. Then, the second row starts with an unnamed column shared with content and then stats.

Looking at the real version of this page, we see that the article doesn’t span 100% of the width of Smashing’s layout. To retain this cap, within the grid-auto-columns we’re using the fit-content function, which can be read as: “grow up until intrinsic max-width of the content, but no greater than the provided value”. So, we’re saying the column can grow but not exceed 70ch. This does not prevent it from shrinking, so the column remains responsive to its available space as well.

Following the content column, we define auto for the stats column width. This means it will be allowed to take the inline space it needs to fit its content.

Now, you may be thinking that we’ve kind of just done media queries but in a slightly different way. Which — if we pause a moment — is kind of great! It should help container queries feel familiar and make them easier to adjust to and include in your workflow. For our demo, it also currently feels that way because our single article is currently responding to one parent element which itself is only responding to the changing viewport.

What we’re really done is set the foundation for this article to be dropped in on an article page, or on the home page where the articles are arranged in columns (for the sake of this demo, we’ll ignore the other changes that happen on the home page). As we learned in the intro example, if we want elements to respond to the width of CSS grid tracks or flex items, we need to have them carry their container with them. So let’s add an explicit container element around each article instead of relying on main.

<div class="article--post-container">
    <article class="article--post"></article>
</div>

Then, we’ll assign .article`--post-container` as a container:

.article--post-container {
  contain: layout inline-size;
}

Now, if we create a flex-based grid layout as we did in the intro example, we’ll place one article by itself above that grid, and two within the flex grid. This results in the following adjustments as the containers change size:

The video helps demonstrate the changes that are now able to happen completely independently of viewport-based media queries! This is what makes container queries exciting, and why they’ve been sought after by CSS developers for so long.

Here is the full CodePen of this demo including the flex grid:

See the Pen Container Queries Case Study: Smashing Magazine Article Excerpts by Stephanie Eckles.

Opportunities and Cautions for Using Container Queries

You can start preparing to use container queries today by including them as a progressive enhancement. By defining styles that work well without container queries, you can layer up enhancements that do use them. Then, unsupporting browsers will still receive a workable — if less than ideal — version.

As we look towards the future of being able to use container queries anywhere, here are some possible opportunities where they will be beneficial, as well as some cautions. All of them share one trait: they are scenarios when it’s likely to be considered desirable that layout and style changes will be independent from the viewport.

Responsive Typography

You may be familiar with the concept of responsive or fluid typography. Solutions for making typography update across viewport and element widths have seen many advancements, from JavaScript assisting, to CSS solutions using clamp() and viewport units.

If the spec receives a container unit (which we’ll talk about shortly), we may be able to achieve intrinsic typography. But even with the current spec, we can define responsive typography by changing the font-size value across various sizes of contained elements. In fact, we just did this in the example of the Smashing Magazine articles.

While this is exciting from a design and layout point of view, it comes with the same caution as existing fluid typography solutions. For accessibility, a user should be able to zoom the layout and increase font-size to 200% of its original size. If you create a solution that drastically shrinks font size in smaller containers — which may be the computed size upon zoom — a user may never be able to achieve increasing the base font-size by 200%. I’m sure we will see more guidelines and solutions around this as we all get more familiar with container queries!

Changing Display Values

With container queries, we’ll be able to completely change display properties, such as from grid to flex. Or change their related properties, like update grid templates. This makes way for smoothly repositioning child elements based on the current space allowed to the container.

This is the category you’ll find many of the current demos fall into, as it seems to be one of the things that makes the possibility of container queries so exciting. Whereas responsive grid systems are based on media queries tied to viewport width, you may find yourself adding layers of utility classes to get the result you’re really after. But with container queries, you can exactly specify not only a grid system, but completely change it as the element or component grows and shrinks.

Possible scenarios include:

  • changing a newsletter subscription form from horizontal to stacked layout;
  • creating alternating grid template sections;
  • changing image aspect ratios and their position versus related content;
  • dynamic contact cards that reposition avatars and contact details and can be dropped in a sidebar just as easily as a page-width section

Here it should be noted that just as in our pre-container query world, for accessibility it's advised to ensure a logical order especially for the sake of tabbing interactive elements like links, buttons, and form elements.

Showing, Hiding And Rearranging

For more complex components, container queries can step in and manage variations. Consider a navigation menu that includes a series of links, and when the container is reduced, some of those links should hide and a dropdown should appear.

Container queries can be used to watch sections of the navigation bar and change those individual parts independently. Contrast this to trying to handle this with media queries, where you might opt to design and develop against breakpoints with the result of a compromised, less ideal final solution.

Develop Once, Deploy Anywhere

Okay, this might be a bit aspirational. But for design systems, component libraries, and framework developers, container queries will greatly improve the ability to deliver self-defensive solutions. Components' ability to manage themselves within any given space will reduce complications introduced when it comes time to actually add them into a layout.

At first thought, this seems like the dream, especially if you’ve been involved with design system development as I have. However, the pros and cons may be equal for some components, and you may not always want the dynamic layout or repositioning behavior. I anticipate this will be another area best practices will form to perhaps have components opt-in to using container query behavior per instance, such as through a modifier class.

For example, consider a card component that assumes that font-size should change. But, in a particular instance, the actual character counts were much longer or much shorter and those rules were suboptimal. An opt-in would likely be easier than trying to override every single container query that was attached.

What Might Change in the Spec

Currently, even the syntax is subject to change before the spec is fully finalized. In fact, it’s been released as an experiment so that as a community we can provide feedback. Miriam Suzanne has created a GitHub project to track issues, and you may react to those and add comments.

I already mentioned two key issues yet to be resolved:

  • #6178: How does @container resolve when no ancestor containers have been defined?
  • #5989: What container features can be queried?

Of high importance and impact is:

  • Should there be a new syntax for establishing queryable containers? (#6174) The initial issue from Miriam proposes two options of either a new set of dedicated contain values or an entirely new property perhaps called containment. If any of these changes come through in the prototype phase, the values demonstrated at the start of this article may no longer work. So once again, note that it’s great to experiment, but be aware that things will continue changing!

Also of interest is the possibility of new container units, tracked in:

  • ["container width" and "container height" units (#5888)
    This could open up a native CSS solution for intrinsic typography among other things, something like: font-size: clamp(1.5rem, 1rem + 4cw, 3rem) (where cw is a placeholder for a currently undefined unit that might represent container width).

Additional Demos And Resources

A Guide To Newly Supported, Modern CSS Pseudo-Class Selectors

Pseudo-class selectors are the ones that begin with the colon character “:” and match based on a state of the current element. The state may be relative to the document tree, or in response to a change of state such as :hover or :checked.

:any-link

Although defined in Selectors Level 4, this pseudo-class has had cross-browser support for quite some time. The any-link pseudo-class will match an anchor hyperlink as long as it has a href. It will match in a way equivalent to matching both :link and :visited at once. Essentially, this may reduce your styles by one selector if you are adding basic properties such as color that you’d like to apply to all links regardless of their visited status.

:any-link {
  color: blue;
  text-underline-offset: 0.05em;
}

An important note about specificity is that :any-link will win against a as a selector even if a is placed lower in the cascade since it has the specificity of a class. In the following example, the links will be purple:

:any-link {
  color: purple;
}

a {
  color: red;
}

So if you introduce :any-link, be aware that you will need to include it on instances of a as a selector if they will be in direct competition for specificity.

:focus-visible

I’d bet that one of the most common accessibility violations across the web is removing outline on interactive elements like links, buttons, and form inputs for their :focus state. One of the main purposes of that outline is to serve as a visual indicator for users who primarily use keyboards to navigate. A visible focus state is critical as a way-finding tool as those users tab across an interface and to help reinforce what is an interactive element. Specifically, the visible focus is covered in the WCAG Success Criterion 2.4.11: Focus Appearance (Minimum).

The :focus-visible pseudo-class is intended to only show a focus ring when the user agent determines via heuristics that it should be visible. Put another way: browsers will determine when to apply :focus-visible based on things like input method, type of element, and context of the interaction. For testing purposes via a desktop computer with keyboard and mouse input, you should see :focus-visible styles attached when you tab into an interactive element but not when you click it, with the exception of text inputs and textareas which should show :focus-visible for all focus input types.

Note: For more details, review the working draft of the :focus-visible spec.

The latest versions of Firefox and Chromium browsers seem to now be handling :focus-visible on form inputs according to the spec which says that the UA should remove :focus styles when :focus-visible matches. Safari is not yet supporting :focus-visible so we need to ensure a :focus style is included as a fallback to avoid removing the outline for accessibility.

Given a button and text input with the following set of styles, let’s see what happens:

input:focus,
button:focus {
  outline: 2px solid blue;
  outline-offset: 0.25em;
}

input:focus-visible {
  outline: 2px solid transparent;
  border-color: blue;
}

button:focus:not(:focus-visible) {
  outline: none;
}

button:focus-visible {
  outline: 2px solid transparent;
  box-shadow: 0 0 0 2px #fff, 0 0 0 4px blue;
}

Chromium and Firefox

  • input
    Correctly remove :focus styles when elements are focused via mouse input in favor of :focus-visible resulting in changing the border-color and hiding the outline on keyboard input
  • button
    Does not only use :focus-visible without the extra rule for button:focus:not(:focus-visible) that removes the outline on :focus, but will allow visibility of the box-shadow only on keyboard input

Safari

  • input
    Continues using only the :focus styles
  • button
    This seems to now be partially respecting the intent of :focus-visible on the button by hiding the :focus styles on click, but still showing the :focus styles on keyboard interaction

So for now, the recommendation would be to continue including :focus styles and then progressively enhance up to using :focus-visible which the demo code allows. Here’s a CodePen for you to continue testing with:

See the Pen Testing application of :focus-visible by Stephanie Eckles.

:focus-within

The :focus-within pseudo-class has support among all modern browsers, and acts almost like a parent selector but only for a very specific condition. When attached to a containing element and a child element matches for :focus, styles can be added to the containing element and/or any other elements within the container.

A practical enhancement to use this behavior for is styling a form label when the associated input has focus. For this to work, we wrap the label and input in a container, and then attach :focus-within to that container as well as selecting the label:

.form-group:focus-within label {
  color: blue;
}

This results in the label turning blue when the input has focus.

This CodePen demo also includes adding an outline directly to the .form-group container:

See the Pen Testing application of :focus-within by Stephanie Eckles.

:is()

Also known as the “matches any” pseudo-class, :is() can take a list of selectors to try to match against. For example, instead of listing heading styles individually, you can group them under the selector of :is(h1, h2, h3).

A couple of unique behaviors about the :is() selector list:

  • If a listed selector is invalid, the rule will continue to match the valid selectors. Given :is(-ua-invalid, article, p) the rule will match article and p.
  • The computed specificity will equal that of the passed selector with the highest specificity. For example, :is(#id, p) will have the specificity of the #id — 1.0.0 — whereas :is(p, a) will have a specificity of 0.0.1.

The first behavior of ignoring invalid selectors is a key benefit. When using other selectors in a group where one selector is invalid, the browser will throw out the whole rule. This comes into play for a few instances where vendor prefixes are still necessary, and grouping prefixed and non-prefixed selectors causes the rule to fail among all browsers. With :is() you can safely group those styles and they will apply when they match and be ignored when they don’t.

To me, grouping heading styles as previously mentioned is already a big win with this selector. It’s also the type of rule that I would feel comfortable using without a fallback when applying non-critical styles, such as:

:is(h1, h2, h3) {
  line-height: 1.2;
}

:is(h2, h3):not(:first-child) {
  margin-top: 2em;
}

In this example (which comes from the document styles in my project SmolCSS), having the greater line-height inherited from base styles or lacking the margin-top is not really a problem for non-supporting browsers. It’s simply less than ideal. What you wouldn’t want to use :is() for quite yet would be critical layout styles such as Grid or Flex that significantly control your interface.

Additionally, when chained to another selector, you can test whether the base selector matches a descendent selector within :is(). For example, the following rule selects only paragraphs that are direct descendants of articles. The universal selector is being used as a reference to the p base selector.

p:is(article > *)

For the best current support, if you’d like to start using it you’ll also want to double-up on styles by including duplicate rules using :-webkit-any() and :matches(). Remember to make these individual rules, or even the supporting browser will throw it out! In other words, include all of the following:

:matches(h1, h2, h3) { }

:-webkit-any(h1, h2, h3) { }

:is(h1, h2, h3) { }

Worth mentioning at this point is that along with the newer selectors themselves is an updated variation of @supports which is @supports selector. This is also available as @supports not selector.

Note: At present (of the modern browsers), only Safari does not support this at-rule.

You could check for :is() support with something like the following, but you’d actually be losing out on supporting Safari since Safari supports :is() but doesn’t support @supports selector.

@supports selector(:is(h1)) {
  :is(h1, h2, h3) {
    line-height: 1.1;
  }
}

:where()

The pseudo-class :where() is almost identical to :is() except for one critical difference: it will always have zero-specificity. This has incredible implications for folks who are building frameworks, themes, and design systems. Using :where(), an author can set defaults and downstream developers can include overrides or extensions without specificity clashing.

Consider the following set of img styles. Using :where(), even with a higher specificity selector, the specificity remains zero. In the following example, which color border do you think the image will have?

:where(article img:not(:first-child)) {
    border: 5px solid red;
}

:where(article) img {
  border: 5px solid green;
}

img {
  border: 5px solid orange;
}

The first rule has zero specificity since its wholly contained within :where(). So directly against the second rule, the second rule wins. Introducing the img element-only selector as the last rule, it’s going to win due to the cascade. This is because it will compute to the same specificity as the :where(article) img rule since the :where() portion does not increase specificity.

Using :where() alongside fallbacks is a little more difficult due to the zero-specificity feature since that feature is likely why you would want to use it over :is(). And if you add fallback rules, those are likely to beat :where() due to its very nature. And, it has better overall support than the @supports selector so trying to use that to craft a fallback isn’t likely to provide much (if any) of a gain. Basically, be aware of the inability to correctly create fallbacks for :where() and carefully check your own data to determine if it’s safe to begin using for your unique audience.

You can further test :where() with the following CodePen that uses the img selectors from above:

See the Pen Testing :where() specificity by Stephanie Eckles.

Enhanced :not()

The base :not() selector has been supported since Internet Explorer 9. But Selectors Level 4 enhances :not() by allowing it to take a selector list, just like :is() and :where().

The following rules provide the same result in supporting browsers:

article :not(h2):not(h3):not(h4) {
  margin-bottom: 1.5em;
}

article :not(h2, h3, h4) {
  margin-bottom: 1.5em;
}

The ability of :not() to accept a selector list has great modern browser support.

As we saw with :is(), enhanced :not() can also contain a reference to the base selector as a descendent using *. This CodePen demonstrates this ability by selecting links that are not descendants of nav.

See the Pen Testing :not() with a descendent selector by Stephanie Eckles.

Bonus: The previous demo also includes an example of chaining :not() and :is() to select images that are not adjacent siblings of either h2 or h3 elements.

Proposed but “at risk” — :has()

The final pseudo-class that is a very exciting proposal but has no current browser implementing it even in an experimental way is :has(). In fact, it is listed in the Selector Level 4 Editor’s Draft as “at-risk” which means that it is recognized to have difficulties in completing its implementation and so it may be dropped from the recommendation.

If implemented, :has() would essentially be the “parent selector” that many CSS folks have longed to have available. It would work with logic similar to a combination of both :focus-within and :is() with descendent selectors, where you are looking for the presence of descendants but the applied styling would be to the parent element.

Given the following rule, if navigation contained a button, then the navigation would have decreased top and bottom padding:

nav {
  padding: 0.75rem 0.25rem;

nav:has(button) {
  padding-top: 0.25rem;
  padding-bottom: 0.25rem;
}

Again, this is not currently implemented in any browser even experimentally — but it is fun to think about! Robin Rendle provided additional insights into this future selector over on CSS-Tricks.

Honorable Mention from Level 3: :empty

A useful pseudo-class you may have missed from Selectors Level 3 is :empty which matches an element when it has no child elements, including text nodes.

The rule p:empty will match <p></p> but not <p>Hello</p>.

One way you can use :empty is to hide elements that are perhaps placeholders for dynamic content that is populated with JavaScript. Perhaps you have a div that will receive search results, and when it’s populated it will have a border and some padding. But with no results yet, you don’t want it to take up space on the page. Using :empty you can hide it with:

.search-results:empty {
  display: none;
}

You may be thinking about adding a message in the empty state and be tempted to add it with a pseudo-element and content. The pitfall here is that messages may not be available to users of assistive technology which are inconsistent on whether they can access content. In other words, to make sure a “no results” type of message is accessible, you would want to add that as a real element like a paragraph (an aria-label would no longer be accessible for a hidden div).

Resources for Learning About Selectors

CSS has many more selectors inclusive of pseudo-classes. Here are a few more places to learn more about what’s available:

A Deep Dive Into Eleventy Static Site Generator

But first — let’s quickly review what is meant by a “static site” and then what a generator provides. A static site is composed of static content — as in, the HTML, CSS, assets, and all content are already compiled together before pushing to a website host. This is different from a dynamic site that compiles those things from querying a database at run time (like WordPress) or that pulls content from APIs client-side (like JavaScript frameworks without server-side rendering).

A static site generator is an environment and build processor to compile your content into static HTML. They usually offer helpers to provide flexibility in writing your content (like supporting Markdown) and include methods for templating. So instead of writing HTML pages one by one and having to copy and paste the repeated parts, a generator will support breaking those things into components via a certain templating language. Then the generator’s build process will bring everything together and output the final HTML that can be uploaded to a web host to be served as your website. Depending on the web host you use, this build process can even be done by the host.

There are many static site generators available. You may have heard of or even used ones like Jekyll, Hugo, Gatsby, Next and Nuxt. A comprehensive list is provided by Jamstack.org.

What Makes Eleventy Different From Other Static Site Generators?

Eleventy is exceptionally fast both during builds and in the browser. This is largely thanks to not requiring the loading of a client-side JavaScript bundle in order to serve content (compared to something like Gatsby). Server-side rendering isn’t even a concern here, since the filesystem page creation defaults to static HTML.

What really makes Eleventy unique is the ability to select from and intermix up to ten different templating languages:

Intermixing languages can happen in the same file, or between layouts. For example, I often write my main content with Markdown that feeds into a Nunjucks layout. In some projects, I’ve found it useful to be able to loop over some data using Nunjucks while in the Markdown file. This ability to combine languages is very powerful, and allows you to design a write-and-build workflow that works best for you and your project.

Eleventy includes a --serve flag that uses BrowserSync to enable serving the site locally and with hot-reload upon file changes. This is a great convenience, and is good to keep in mind if you’re not looking for a static site generator but perhaps an upgrade from build tools like Gulp.

As part of being zero-config, all your site files could live in the root of your project. To alter the input and output directories, you can create an Eleventy config, which is expected to be a root file called .eleventy.js. Here’s a quick snippet showing how to make this modification:

module.exports = function (eleventyConfig) {
  return {
    dir: {
      // default: [site root]
      input: "src",
      // default: _site
      output: "public",
    },
  };
};

As noted earlier, the default behavior is filesystem page creation which is generally of great benefit especially for rapidly getting started. This is easily overrideable by assigning a custom permalink and that can be done per file, for an entire directory, or dynamically for a set of data. Permalinks also offer another superpower which we’ll explore in a bit!

Uniquely, during the build, you can prepare content, data, and transforms on that content and data by using JavaScript and leveraging filters and shortcodes (we’ll talk about those later). Again, this all happens without adding a JavaScript bundle client-side, while still enabling the use of JavaScript as a templating language.

Important Note: You can successfully use Eleventy with no or low JavaScript knowledge.

Unlike other SSGs like Gatsby, or environments like WordPress, most Eleventy sites do not require any plugins. There are some plugins available, but they are not necessary for essential functionality.

When building with Eleventy, you can add on features as you need them. In fact, you could just use HTML and never work with any of the other templating languages. Eleventy is only as complex as your project requires!

Understanding Essential Eleventy Concepts

Let’s go over a few bits of terminology and concepts that will help you be successful in creating your Eleventy projects.

Layouts And Templates

You may think of these terms as interchangeable, but in Eleventy’s context, they do have contextual meanings:

  • Template is the generic term for all content files.
  • Layouts are special templates that wrap other content.

For example, template refers to all your Markdown files, whereas a layout might be a Nunjucks file that contains the HTML5 boilerplate and a slot for the template content. We’ll learn how to make this work in the section on getting started.

Filters And Shortcodes

These are additional ways to modify content output, and create reusable template parts. They are available for use with Nunjucks, Liquid, Handlebars, and JavaScript templating. Filters and shortcodes are defined within .eleventy.js.

Beyond variables and operators available in your templating language of choice, Eleventy has unified the concept of filters across the previously listed languages. Filters transform content in some way specific to the content type. For example, you may create a filter intended for strings to uppercase them. Or you might have a filter intended to be used on arrays to alter what is returned, like picking a random item. Some filters are provided by Eleventy, a few of which we’ll use in the getting started tutorial.

Shortcodes allow creating reusable template parts and are able to accept arguments. They can be either standalone or paired, meaning they wrap content with a start and end tag.

One of my favorite shortcodes is to render the current year — meaning no more out of date copyright years in your footer! Here’s how to create a year shortcode:

eleventyConfig.addShortcode("year", () => ${new Date().getFullYear()});

To use it in a Nunjucks or Liquid template looks like this: {% year %}.

You can review the Eleventy docs for examples of paired shortcodes.

Collections

Collections are groups of related content, and are typically created within frontmatter by defining tags. Tag syntax options include single strings, single-line arrays — ["tagA", "tagB"] — for multiples, or YAML-style lists to assign multiple tags. For example, I can create a “pages” collection by adding the following frontmatter to all content I want to be included in that collection:

---
tags: pages
---

Once you have defined a collection, you can access it via your templating language of choice within the global collections object. To access our “pages” collection would look like collections.pages. This returns an array of that collection’s data, and so you can perform array operations like looping over it such as to produce a list of links or article teaser cards. You can even suppress normal file output and use only collections to manage data display, which is useful for managing single-page site content.

Custom Data

So far we’ve talked about creating content as files, but Eleventy also makes it very easy to maintain different data sources. This is called “custom data” and lives as JavaScript module exports or JSON files in the _data directory.

Custom data can be used to:

  • Define a basic JSON array.
  • Return the results of a fetch operation.
  • Retrieve and re-format content from a headless CMS.

Eleventy makes all data from within _data available under a variable matching the filename. For example, if I create posts.json then I can access that in my templates as posts. Using Nunjucks, here’s an example of looping over the posts data:

{% for post in posts %}
  {{ post.title }}
{% endfor %}

Pagination And Creating Pages From Data

In Eleventy terms, pagination refers to iterating over a data set and defining a template for the output of that data “chunk”. This is done with a dedicated file that defines the pagination within frontmatter. The file also includes setting up your intended output for the data, meaning it becomes its own template as well. We can define a layout to send the content to and also add tags to create a collection for ease of reference and flexibility for the output.

Note: If you use custom data to retrieve content from a CMS, then pagination is the Eleventy method you’re looking for to turn that data into pages dynamically.

Here’s an example of referencing our posts custom data which we’ll assume we’re retrieving via a fetch from a headless CMS. Importantly, the size is set to 1, which means each “pagination chunk” should produce one single page of output. We then use the alias to create a reference to the current item in the pagination loop, and then use that reference in the permalink definition and the template body.

The file that defines the pagination can live wherever you’d like within your input directory. My organizational preference is to create a generate directory, and then name it the same as the collection it will be creating. Consider the following to be src/generate/posts.njk:

---
pagination:
  data: posts
  size: 1
  alias: post
  addAllPagesToCollections: true
permalink: "/{{ post.title | slug }}/"
tags: posts
layout: post
templateEngineOverride: njk, md
---
{{ post.body | safe }}

In this case, the permalink is assigning the page to be output directly off of the site root. You could change this to add a prefix such as /posts/{{ post.title | slug }}, for example.

Additionally, if you want all of the generated pages to be available in the collection created by the tags, you must set addAllPagesToCollections to true to include more than the first item.

Lastly, if your content is coming in as Markdown instead of pre-compiled HTML, you’ll need to use the templateEngineOverride. In the example snippet, I’ve set it to njk, md which means the template content will need to be processed both as Nunjucks in order to convert the variable, and then Markdown to compile the contents returned in the variable.

If you’re wondering what safe means, we’re going to learn that next!

How To Get Started With Eleventy

Alright, so you’re ready to get going with your first Eleventy project! This brief tutorial will help you get a starting structure in place to continue building from. We’ll use the concepts we’ve already learned about and add a few new ideas, too.

The first important note here is that Eleventy is a scoped package, so here’s the install command:

npm install @11ty/eleventy

Next, a handy convenience I like to do is add the following scripts into my package.json:

"scripts": {
  "start": "eleventy --serve",
  "build": "eleventy"
}

As mentioned previously, the --serve flag will enable a local server via BrowserSync.

My preference is to update the input/output directories as we already looked at, so now it’s time to create some content within src or the input directory of your choosing.

In order to prepare our project to be more flexible and scalable from the start, I would suggest creating at least one layout that contains the HTML5 boilerplate. Layouts need to be defined within a directly called _includes, which is one of a handful of expected directories.

A convention that you’ll often find among starters is to call this layout base. I have a preference for making it a Nunjucks file.

Here’s a sample base.njk:

<!DOCTYPE html>
<html lang="en">
<head>
  <meta charset="UTF-8">
  <meta name="viewport" content="width=device-width, initial-scale=1.0">
  <title>{{ title }}</title>
</head>
<body>
  <header>
    <h1>{{ title }}</h1>
  </header>
  <main>
    {{ content | safe }}
  </main>
</body>
</html>

The double curly braces are Nunjucks syntax for variables. Here, we’ve prepared for an incoming title variable that will shortly be supplied via front matter. The content variable is provided by Eleventy and marks the slot where all incoming non-front matter content should go. Importantly, this is used in conjunction with the provided safe filter which prevents compiled HTML from being escaped versus rendered.

Now it’s time to create our site index, which we’ll add as index.md:

---
title: Hello Smashing Readers!
layout: base.njk
---

Thanks for reading — hope you’re excited to try Eleventy!

Notice that in the front matter we added our title, and also defined the layout.

At this point, we can run our project with the script we added: npm start. This will trigger BrowserSync to setup localhost:8080 (if it’s available) but you will need to manually open it in the browser. Check out this quick tip if you’d like it to open the browser automatically.

The last critical step is to add a stylesheet. Currently, CSS isn’t recognized as an automatically included filetype so we’ll have one extra config step after we create our stylesheet.

You can add a CSS file wherever you’d like in your input directory, such as css/style.css. Then, open .eleventy.js (or create it in the project root if you didn’t do the input/output customization) and add the following :

module.exports = function (eleventyConfig) {
  eleventyConfig.addPassthroughCopy("./src/css/");
  eleventyConfig.addWatchTarget("./src/css/");

  // - input/output customization if using -
};

First, we add the css directory as a “passthrough copy” which means Eleventy should include it in the push to the output directory. Then we also add it as a “watch target” so that as we make changes to our styles while running our start command, Eleventy will trigger a rebuild to update our local site.

Lastly, we need to remember to add the link to our stylesheet within our base layout:

<link rel="stylesheet" href="{{ '/css/style.css' | url }}" />

When we define the stylesheet’s location, we pass it through Eleventy’s url filter which will adjust the relative file path as needed upon build.

Next, let’s create a “pages” post type to explore using collections and layouts a bit more. To do this, add the directory of pages and create one or two Markdown files, including a title front-matter key but not a layout.

We’re going to use a slightly different method to define the layout this time — a data directory file. This file is generally formatted as JSON and enables us to add data that should be applied to all files within a directory, which prevents having to duplicate it across files. The file needs to be named the same as the directory it will be used for, so create the file pages.json and add the following content:

{
  "layout": "page.njk",
  "tags": "pages"
}

We’ve also gone ahead and defined tags in order to create the “pages” collection. But the layout we defined doesn’t actually exist yet, so create _includes/page.njk and add the following:

---
layout: base.njk
---

<article>
  {{ content | safe }}
</article>

Here we’re using the Eleventy concept of layout chaining to be able to re-use our base template but also add a unique element for our page layout, which is the <article>. This means that all of the content of our pages will use both the page layout and base layouts.

Layout chaining reduces duplication by allowing re-use of boilerplates and base site layout structures.

Now that we’ve created content for the pages content type and defined it as the “pages” collection via the tags, let’s see how we can access that collection. Here, we’ll use Nunjucks to loop over the collection and output a list of links to each page. This loop will be added within our index.md file.

{% for post in collections.post -%}
- [{{ post.data.title }}]({{ post.url }})
{% endfor %}

We’ve done something unique though which is that the inside of the loop actually switches back to Markdown to render the links. This is not a required way to handle this scenario, but it can be very handy! Sometimes, depending on complexity, this may not work. The real reason is that the Markdown renderer defaults to Liquid templating language, so if you’re using Nunjucks features beyond basic loops, you will have to let Eleventy know how to process the file.

In the earlier section on pagination, we actually already looked at the solution for this. And that is to make use of the templateEngineOverride to indicate that the file should be processed as both Nunjucks and Markdown. The following full solution should be placed in the template’s front matter: templateEngineOverride: njk, md.

At this point, you’ve created a basic multi-page site! If you have need of using external data, jump back up to the section on pagination.

Other Ways To Start An Eleventy Project

Whereas some other static site generators and environments like WordPress have the concept of “themes”, Eleventy uses the term “starter”. There is a growing collection to choose from, and many can be found in the listing within the Eleventy docs.

My preference is to use Sass with my Eleventy projects, and I have a Sass starter available if you’d like to see how to add that into your build process. Others may choose to add in Gulp if they are used to that build pipeline for assets and processing.

I’ve also created a minimal starter that includes the features discussed in this article and shares similarities with the tutorial result. It also has a small example of fetching external data, and shows how to add in a partial to display site navigation based on a collection.

Expanding On The Basics

Once you’ve experimented with creating your first site with some basic content and maybe some custom data, it’s helpful to know additional ways to work with that content. Here is a brief overview of some other concepts to be aware of.

Altering File Output Type With Permalinks

I mentioned earlier that permalinks have a superpower. And that is that you can use them to output non-HTML file types.

Two useful examples are creating an RSS feed and a sitemap, both of which happen to typically be XML files. What’s really powerful is that you can continue to use the templating language of your choice to help generate those files, so you can loop over page data with Nunjucks to keep your RSS feed fresh, for example.

Customizing Collections

Sometimes using tags to create collections may not be sufficient. Or, you may want to create filtered variations of an existing collection. We can alter or create collections by using a series of provided functions. These will live in the .eleventy.js config file.

In this example, we’re using the addCollection function to filter items in an existing collection. The new collection will be based on the existence of customKey within front matter. This key is returned off of the data object which is attached to all generated Eleventy content.

eleventyConfig.addCollection("specialCollection", function (collection) {
  return collection.getAll().filter((post) => post.data.customKey);
});

You can review other ways to create, modify, and use collections in the Eleventy docs.

Working With The Data Cascade

Eleventy has a more full concept of how data is compiled for a template called the data cascade which we only just began exploring in this guide. You will get the most out of Eleventy if you review how that works, starting in the docs. Ben Myers also has an excellent guide to understanding the data cascade.

Recommended Eleventy Plugins

In the intro, I briefly mentioned there were plugins available, but that they aren’t always needed. However, there are a few I tend to use on most projects, which include:

  • @11ty/eleventy-plugin-rss If you would like to have an RSS feed, this official plugin provides some filters to help you to generate the feed. The linked repo includes a sample feed, which you may also find in use within some starters.
  • @11ty/eleventy-plugin-syntaxhighlight Instead of loading Prism as a script for code highlighting, this plugin allows that processing to be applied as part of the Eleventy build process. This means code blocks are transformed to include the classes for applying a Prism theme ahead of time, so you will only need to add a Prism CSS theme of your choice.
  • @11tyrocks/eleventy-plugin-social-images A feature I sought out early in my Eleventy exploration was the ability to generate social media share images. This led me to create a plugin that uses Puppeteer behind the scenes to take the snapshot. The plugin comes with prebuilt templates as well as config options to define your own template file.

I would also recommend becoming familiar with the rest of the official Eleventy plugins as they address other common needs including navigation and image handling.

Deciding If Eleventy Is Right For Your Project

Eleventy, like most static sites, is best for content that doesn’t typically need to be served dynamically or on-demand. This is not to say all of the site has to be static, or that there are not ways to make content dynamic. You may still load JavaScript to enable dynamic content like fetching from APIs or creating interactive widgets. You can also use services like IFTTT or Zapier to facilitate rebuilding your site if your host supports build webhooks and you have parts that you want to refresh on a schedule.

Thanks to custom data and pagination, we saw it was easy to include external data as from a headless CMS or any other API. So although it will be served statically, you still have a lot of flexibility in where you pull content and how you manage it.

My favorite thing about Eleventy is that it doesn’t impose many opinions on how I should structure my site, beyond the few expected directories we talked about for _includes and _data (and you can update the naming convention of those, too). This can also be helpful if you are looking to migrate a site and being able to potentially move some existing file structure as well. However, if you prefer a more opinionated architecture, you might seek a different option.

I also enjoy how I can mold Eleventy to fit my mental model for a given project by leveraging multiple templating languages as well as filters, shortcodes, and layouts. Starters also help give a boost so that you can focus on what’s really important: your content. And the high performance of purely static output is also a great benefit.

If you do need a bit more in your build process, you can add other familiar tools like Webpack, Gulp, or Parcel. You may be able to find a starter that already includes those things. Keep in mind you can also leverage Node scripts which are already inherent to the Eleventy build process.

Eleventy is very capable of handling large amounts of page generation. It has been used for some large and complex sites such as Google’s web.dev and Netlify’s marketing site. I’ve also used Eleventy for some unconventional purposes, like email and web component generators, along with some others which are described in this overview.

Additional Resources

I hope this guide has both peaked your interest and prepared you to begin using Eleventy! It included a lot of points that I found a bit tricky to uncover when I was creating my first project with it. Since I first found Eleventy in April 2020, I’ve built over 20 Eleventy projects counting starters, plugins, side projects, and course materials. Many of those can be found on my site 11ty.Rocks which also has tutorials and tips. Eleventy is something I really enjoy discussing, so feel free to reach out on Twitter!

The following are more resources for helping you on your journey to learn and get the most out of Eleventy:

Finally, I want to note that the Eleventy community is small but active! If you ever have difficulty finding some information, you can tweet your question to the official @eleven_ty account. Eleventy’s creator, Zach Leatherman, is quick to answer or RT questions to help get you back on your way!

Create Responsive Image Effects With CSS Gradients And `aspect-ratio`

To prepare for our future image effects, we’re going to set up a card component that has a large image at the top followed by a headline and description. The common problem with this setup is that we may not always have perfect control over what the image is, and more importantly to our layout, what its dimensions are. And while this can be resolved by cropping ahead of time, we can still encounter issues due to responsively sized containers. A consequence is uneven positions of the card content which really stands out when you present a row of cards.

Another previous solution besides cropping may have been to swap from an inline img to a blank div that only existed to present the image via background-image. I’ve implemented this solution many times myself in the past. One advantage this has is using an older trick for aspect ratio which uses a zero-height element and sets a padding-bottom value. Setting a padding value as a percent results in a final computed value that is relative to the element’s width. You may have also used this idea to maintain a 16:9 ratio for video embeds, in which case the padding value is found with the formula: 9/16 = 0.5625 * 100% = 56.26%. But we’re going to explore two modern CSS properties that don’t involve extra math, give us more flexibility, and also allow keeping the semantics provided by using a real img instead of an empty div.

First, let’s define the HTML semantics, including use of an unordered list as the cards’ container:

<ul class="card-wrapper">
  <li class="card">
    <img src="" alt="">
    <h3>A Super Wonderful Headline</h3>
    <p>Lorem ipsum sit dolor amit</p>
  </li>
  <!-- additional cards -->
</ul>

Next, we’ll create a minimal set of baseline styles for the .card component. We’ll set some basic visual styles for the card itself, a quick update to the expected h3 headline, then essential styles to begin to style the card image.

.card {
  background-color: #fff;
  border-radius: 0.5rem;
  box-shadow: 0.05rem 0.1rem 0.3rem -0.03rem rgba(0, 0, 0, 0.45);
  padding-bottom: 1rem;
}

.card > :last-child {
  margin-bottom: 0;
}

.card h3 {
  margin-top: 1rem;
  font-size: 1.25rem;
}

img {
  border-radius: 0.5rem 0.5rem 0 0;
  width: 100%;
}

img ~ * {
  margin-left: 1rem;
  margin-right: 1rem;
}

The last rule uses the general sibling combinator to add a horizontal margin to any element that follows the img since we want the image itself to be flush with the sides of the card.

And our progress so far leads us to the following card appearance:

Finally, we’ll create the .card-wrapper styles for a quick responsive layout using CSS grid. This will also remove the default list styles.

.card-wrapper {
  list-style: none;
  padding: 0;
  margin: 0;
  display: grid;
  grid-template-columns: repeat(auto-fit, minmax(30ch, 1fr));
  grid-gap: 1.5rem;
}

Note: If this grid technique is unfamiliar to you, review the explanation in my tutorial about modern solutions for the 12-column grid.

With this applied and with all cards containing an image with a valid source path, our .card-wrapper styles give us the following layout:

As demonstrated in the preview image, these baseline styles aren’t enough to properly contain the images given their varying natural dimensions. We’re in need of a method to constrain these images uniformly and consistently.

Enable Uniform Image Sizes with object-fit

As noted earlier, you may previously have made an update in this scenario to change the images to be added via background-image instead and used background-size: cover to handle nicely resizing the image. Or you may have tried to enforce cropping ahead of time (still a worthy goal since any image size reduction will improve performance!).

Now, we have the property object-fit available which enables an img tag to act as the container for the image. And, it comes with a cover value as well that results in a similar effect as the background image solution, but with the bonus of retaining the semantics of an inline image. Let’s apply it and see how it works.

We do need to pair it with a height dimension for extra guidance on how we want the image container to behave (recall we had already added width: 100%). And we’re going to use the max() function to select either 10rem or 30vh depending on which is larger in a given context, which prevents the image height from shrinking too much on smaller viewports or when the user has set a large zoom.

img {
  /* ...existing styles */
  object-fit: cover;
  height: max(10rem, 30vh);
}

Bonus Accessibility Tip: You should always test your layouts with 200% and 400% zoom on desktop. While there isn’t currently a zoom media query, functions like max() can help resolve layout issues. Another context this technique is useful is spacing between elements.

With this update, we’ve definitely improved things, and the visual result is as if we’d use the older background image technique:

Responsively Consistent Image Sizing With aspect-ratio

When using object-fit by itself, one downside is that we still need to set some dimension hints.

An upcoming property (currently available in Chromium browsers) called aspect-ratio will enhance our ability to consistently size images.

Using this property, we can define a ratio to resize the image instead of setting explicit dimensions. We’ll continue to use it in combination with object-fit to ensure these dimensions only affect the image as a container, otherwise, the image could appear distorted.

Here is our full updated image rule:

img {
  border-radius: 0.5rem 0.5rem 0 0;
  width: 100%;
  object-fit: cover;
  aspect-ratio: 4/3;
}

We’re going to start with an image ratio of 4/3 for our card context, but you could choose any ratio. For example, 1/1 for a square, or 16/9 for standard video embeds.

Here are the updated cards, although it will probably be difficult to notice the visual difference in this particular instance since the aspect ratio happens to closely match the appearance we achieved by setting the height for object-fit alone.

Setting an aspect-ratio results in the ratio being maintained as the elements grow or shrink, whereas when only setting object-fit and height the image ratio will constantly be in flux as the container dimensions change.

Adding Responsive Effects With CSS Gradients And Functions

OK, now that we know how to setup consistently sized images, let’s have some fun with them by adding a gradient effect!

Our goal with this effect is to make it appear as though the image is fading into the card content. You may be tempted to wrap the image in its own container to add the gradient, but thanks to the work we’ve already done on the image sizing, we can work out how to safely do it on the main .card.

The first step is to define a gradient. We’re going to use a CSS custom property to add in the gradient colors to enable easily swapping the gradient effect, starting with a blue to pink. The last color in the gradient will always be white to maintain the transition into the card content background and create the “feathered” edge.

.card {
  --card-gradient: #5E9AD9, #E271AD;

  background-image: linear-gradient(
    var(--card-gradient),
    white max(9.5rem, 27vh)
  );
  /* ...existing styles */
}

But wait — is that a CSS max() function? In a gradient? Yes, it’s possible, and it’s the magic that makes this gradient effective responsively!

However, if I were to add a screenshot, we wouldn’t actually see the gradient having any effect on the image yet. For that, we need to bring in the mix-blend-mode property, and in this scenario we’ll use the overlay value:

img {
  /* ...existing styles */
  mix-blend-mode: overlay;
}

The mix-blend-mode property is similar to applying the layer blending styles available in photo manipulation software like Photoshop. And the overlay value will have the effect of allowing the medium tones in the image to blend with the gradient behind it, leading to the following result:

Now, at this point, we are relying on the aspect-ratio value alone to resize the image. And if we resize the container and cause the card layout to reflow, the changing image height causes inconsistencies in where the gradient fades to white.

So we’ll add a max-height property as well that also uses the max() function and contains values slightly greater than the ones in the gradient. The resulting behavior is that the gradient will (almost always) correctly line up with the bottom of the image.

img {
  /* ...existing styles */
  max-height: max(10rem, 30vh);
}

It’s important to note that adding a max-height alters the aspect-ratio behavior. Instead of always using the exact ratio, it will be used only when there’s enough allotted space given the new extra constraint of the max-height.

However, aspect-ratio will still continue to ensure the images resize consistently as was the benefit over only object-fit. Try commenting out aspect-ratio in the final CodePen demo to see the difference it’s making across container sizes.

Since our original goal was to enable consistently responsive image dimensions, we’ve still hit the mark. For your own use case, you may need to fiddle with the ratio and height values to achieve your desired effect.

Alternate: mix-blend-mode And Adding A Filter

Using overlay as the mix-blend-mode value was the best choice for the fade-to-white effect we were looking for, but let’s try an alternate option for a more dramatic effect.

We’re going to update our solution to add a CSS custom property for the mix-blend-mode value and also update the color values for the gradient:

.card {
  --card-gradient: tomato, orange;
  --card-blend-mode: multiply;
}

img {
  /* ...existing styles */
  mix-blend-mode: var(--card-blend-mode);
}

The multiply value has a darkening effect on mid-tones, but keeps white and black as is, resulting in the following appearance:

While we’ve lost the fade and now have a hard edge on the bottom of the image, the white part of our gradient is still important to ensure that the gradient ends prior to the card content.

One additional modification we can add is the use of filter and, in particular, use the grayscale() function to remove the image colors and therefore have the gradient be the only source of image coloring.

img {
  /* ...existing styles */
  filter: grayscale(100);
}

Using the value of grayscale(100) results in complete removal of the image’s natural colors and transforming it into black and white. Here’s the update for comparison with the previous screenshot of its effect when using our orange gradient with multiply:

Use aspect-ratio As A Progressive Enhancement

As previously mentioned, currently aspect-ratio is only supported in the latest version of Chromium browsers (Chrome and Edge). However, all browsers support object-fit and that along with our height constraints results in a less-ideal but still acceptable result, seen here for Safari:

Without aspect-ratio functioning, the result here is that ultimately the image height is capped but the natural dimensions of each image still lead to some variance between card image heights. You may want to instead change to adding a max-height or make use of the max() function again to help make a max-height more responsive across varying card sizes.

Extending The Gradient Effects

Since we defined the gradient color stops as a CSS custom property, we have ready access to change them under different contexts. For example, we might change the gradient to more strongly feature one of the colors if the card is hovered or has one of its children in focus.

First, we’ll update each card h3 to contain a link, such as:

<h3><a href="">A Super Wonderful Headline</a></h3>

Then, we can use one of our newest available selectors — :focus-within — to alter the card gradient when the link is in focus. For extra coverage of possible interactions, we’ll couple this with :hover. And, we’ll reuse our max() idea to assign a single color to take over coverage of the image portion of the card. The downside to this particular effect is that gradient stops and color changes aren’t reliably animateable — but they will be soon thanks to CSS Houdini.

To update the color and add the new color stop, we just need to re-assign the value of --card-gradient within this new rule:

.card:focus-within,
.card:hover {
  --card-gradient: #24a9d5 max(8.5rem, 20vh);
}

Our max() values are less than the original in use for white to maintain the feathered edge. If we used the same values, it would meet the white and create a clearly straightedge separation.

In creating this demo, I originally tried an effect that used transform with scale for a zoom-in effect. But I discovered that due to mix-blend-mode being applied, the browser would not consistently repaint the image which caused an unpleasant flickering. There will always be trade-offs in requesting the browser perform CSS-only effects and animations, and while it’s very cool what we can do, it’s always best to check the performance impact of your effects.

Have Fun Experimenting!

Modern CSS has given us some awesome tools for updating our web design toolkits, with aspect-ratio being the latest addition. So go forth, and experiment with object-fit, aspect-ratio, and adding functions like max() into your gradients for some fun responsive effects! Just be sure to double-check things cross-browser (for now!) and across varying viewports and container sizes.

Here is the CodePen including the features and effects we reviewed today:

See the Pen Responsive Image Effects with CSS Gradients and aspect-ratio by Stephanie Eckles.

Looking for more? Make sure you check out our CSS Guide here on Smashing →

A Community-Driven Site with Eleventy: Building the Site

In the last article, we learned what goes into planning for a community-driven site. We saw just how many considerations are needed to start accepting user submissions, using what I learned from my experience building Style Stage as an example.

Now that we’ve covered planning, let’s get to some code! Together, we’re going to develop an Eleventy setup that you can use as a starting point for your own community (or personal) site.

Article Series:

  1. Preparing for Contributions
  2. Building the Site (You are here!)

This article will cover:

  • How to initialize Eleventy and create useful develop and build scripts
  • Recommended setup customizations
  • How to define custom data and combine multiple data sources
  • Creating layouts with Nunjucks and Eleventy layout chaining
  • Deploying to Netlify

The vision

Let’s assume we want to let folks submit their dogs and cats and pit them against one another in cuteness contests.

Screenshot of the site, showing a Meow vs. Bow Wow heading above a Weekly Battle subheading, followed by a photo of a tabby cat named Fluffy and one of a happy dog named Lexi.
Live demo

We’re not going to get into user voting in this article. That would be so cool (and totally possible with serverless functions) but our focus is on the pet submissions themselves. In other words, users can submit profile details for their cats and dogs. We’ll use those submissions to create a weekly battle that puts a random cat up against a random dog on the home page to duke it out over which is the most purrrfect (or woof-tastic, if you prefer).

Let’s spin up Eleventy

We’ll start by initializing a new project by running npm init on any directory you’d like, then installing Eleventy into it with:

npm install @11ty/eleventy

While it’s totally optional, I like to open up the package-json file that’s added to the directory and replace the scripts section with this:

"scripts": {
  "develop": "eleventy --serve",
  "build": "eleventy"
},

This allows us to start developing Eleventy in a development environment (npm run develop) that includes Browsersync hot-reloading for local development. It also adds a command that compiles and builds our work (npm run build) for deployment on a production server.

If you’re thinking, “npm what?” what we’re doing is calling on Node (which is something Eleventy requires). The commands noted here are intended to be run in your preferred terminal, which may be an additional program or built-in to your code editor, like it is in VS Code.

We’ll need one more npm package, fast-glob, that will come in handy a little later for combining data. We may as well install it now:

npm install --save-dev fast-glob.

Let’s configure our directory

Eleventy allows customizing the input directory (where we work) and output directory (where our built work goes) to provide a little extra organization.

To configure this, we’ll create the eleventy.js file at the root of the project directory. Then we’ll tell Eleventy where we want our input and output directories to go. In this case, we’re going to use a src directory for the input and a public directory for the output.

module.exports = function (eleventyConfig) {
  return 
    dir: {
      input: "src",
      output: "public"
    },
  };
};

Next, we’ll create a directory called pets where we’ll store the pets data we get from user submissions. We can even break that directory down a little further to reduce merge conflicts and clearly distinguish cat data from dog data with cat and dog subdirectories:

pets/
  cats/
  dogs/

What’s the data going to look like? Users will send in a JSON file that follows this schema, where each property is a data point about the pet:

{
  "name": "",
  "petColor": "",
  "favoriteFood": "",
  "favoriteToy": "",
  "photoURL": "",
  "ownerName": "",
  "ownerTwitter": ""
}

To make the submission process crystal clear for users, we can create a CONTRIBUTING.md file at the root of the project and write out the guidelines for submissions. GitHub takes the content in this file and uses displays it in the repo. This way, we can provide guidance on this schema such as a note that favoriteFood, favoriteToy, and ownerTwitte are optional fields.

A README.md file would be just as fine if you’d prefer to go that route. It’s just nice that there’s a standard file that’s meant specifically for contributions.

Notice photoURL is one of those properties. We could’ve made this a file but, for the sake of security and hosting costs, we’re going to ask for a URL instead. You may decide that you are willing to take on actual files, and that’s totally cool.

Let’s work with data

Next, we need to create a combined array of data out of the individual cat files and dog files. This will allow us to loop over them to create site pages and pick random cat and dog submissions for the weekly battles.

Eleventy allows node module.exports within the _data directory. That means we can create a function that finds all cat files and another that finds all dog files and then creates arrays out of each set. It’s like taking each cat file and merging them together to create one data set in a single JavaScript file, then doing the same with dogs.

The filename used in _data becomes the variable that holds that dataset, so we’ll add files for cats and dogs in there:

_data/
  cats.js
  dogs.js

The functions in each file will be nearly identical — we’re merely swapping instances of “cat” for “dog” between the two. Here’s the function for cats: 

const fastglob = require("fast-glob");
const fs = require("fs");


module.exports = async () => {
  // Create a "glob" of all cat json files
  const catFiles = await fastglob("./src/pets/cats/*.json", {
    caseSensitiveMatch: false,
  });


  // Loop through those files and add their content to our `cats` Set
  let cats = new Set();
  for (let cat of catFiles) {
    const catData = JSON.parse(fs.readFileSync(cat));
    cats.add(catData);
  }


  // Return the cats Set of objects within an array
  return [...cats];
};

Does this look scary? Never fear! I do not routinely write node either, and it’s not a required step for less complex Eleventy sites. If we had instead chosen to have contributors add to an ever growing single JSON file with _data, then this combination step wouldn’t be necessary in the first place. Again, the main reason for this step is to reduce merge conflicts by allowing for individual contributor files. It’s also the reason we added fast-glob to the mix.

Let’s output the data

This is a good time to start plugging data into the templates for our UI. In fact, go ahead and drop a few JSON files into the pets/cats and pets/dogs directories that include data for the properties so we have something to work with right out of the gate and test things.

We can go ahead and add our first Eleventy page by adding a index.njk file in the src directory. This will become the home page, and is a Nunjucks template file format.

Nunjucks is one option of many for creating templates with Eleventy. See the docs for a full list of templating options.

Let’s start by looping over our data and outputting an unordered list both for cats and dogs:

<ul>
  <!-- Loop through cat data -->
  {% for cat in cats %}
  <li>
    <a href="/cats/{{ cat.name | slug }}/">{{ cat.name }}</a>
  </li>
  {% endfor %}
</ul>


<ul>
  <!-- Loop through dog data -->
  {% for dog in dogs %}
  <li>
    <a href="/dogs/{{ dog.name | slug }}/">{{ dog.name }}</a>
  </li>
  {% endfor %}
</ul>

As a reminder, the reference to cats and dogs matches the filename in _data. Within the loop we can access the JSON keys using dot notation, as seen for cat.name, which is output as a Nunjucks template variable using double curly braces (e.g. {{ cat.name }}).

Let’s create pet profile pages

Besides lists of cats and dogs on the home page (index.njk), we also want to create individual profile pages for each pet. The loop indicated a hint at the structure we’ll use for those, which will be [pet type]/[name-slug].

The recommended way to create pages from data is via the Eleventy concept of pagination which allows chunking out data.

We’re going to create the files responsible for the pagination at the root of the src directory, but you could nest them in a custom directory, as long as it lives within src and can still be discovered by Eleventy.

src/
  cats.njk
  dogs.njk

Then we’ll add our pagination information as front matter, shown for cats:

---
pagination:
  data: cats
  alias: cat
  size: 1
permalink: "/cats/{{ cat.name | slug }}/"
---

The data value is the filename from _data. The alias value is optional, but is used to reference one item from the paginated array. size: 1 indicates that we’re creating one page per item of data.

Finally, in order to successfully create the page output, we need to also indicate the desired permalink structure. That’s where the alias value above comes into play, which accesses the name key from the dataset. Then we are using a built-in filter called slug that transforms a string value into a URL-friendly string (lowercasing and converting spaces to dashes, etc).

Let’s review what we have so far

Now is the time to fire up Eleventy with npm run develop. That will start the local server and show you a URL in the terminal you can use to view the project. It will show build errors in the terminal if there are any.

As long as all was successful, Eleventy will create a public directory, which should contain:

public/
  cats/
    cat1-name/index.html
    cat2-name/index.html
  dogs/
    dog1-name/index.html
    dog2-name/index.html
  index.html

And in the browser, the index page should display one linked list of cat names and another one of linked dog names.

Let’s add data to pet profile pages

Each of the generated pages for cats and dogs is currently blank. We have data we can use to fill them in, so let’s put it to work.

Eleventy expects an _includes directory that contains layout files (“templates”) or template partials that are included in layouts.

We’ll create two layouts:

src/
  _includes/
    base.njk
    pets.njk

The contents of base.njk will be an HTML boilerplate. The <body> element in it will include a special template tag, {{ content | safe }}, where content passed into the template will render, with safe meaning it can render any HTML that is passed in versus encoding it.

Then, we can assign the homepage, index.md, to use the base.njk layout by adding the following as front matter. This should be the first thing in index.md, including the dashes:

---
layout: base.njk
---

If you check the compiled HTML in the public directory, you’ll see the output of the cat and dog loops we created are now within the <body> of the base.njk layout.

Next, we’ll add the same front matter to pets.njk to define that it will also use the base.njk layout to leverage the Eleventy concept of layout chaining. This way, the content we place in pets.njk will be wrapped by the HTML boilerplate in base.njk so we don’t have to write out that HTML each and every time.

In order to use the single pets.njk template to render both cat and dog profile data, we’ll use one of the newest Eleventy features called computed data. This will allow us to assign values from the cats and dogs data to the same template variables, as opposed to using if statements or two separate templates (one for cats and one for dogs). The benefit is, once again, to avoid redundancy.

Here’s the update needed in cats.njk, with the same update needed in dogs.njk (substituting cat with dog):

eleventyComputed:
  title: "{{ cat.name }}"
  petColor: "{{ cat.petColor }}"
  favoriteFood: "{{ cat.favoriteFood }}"
  favoriteToy: "{{ cat.favoriteToy }}"
  photoURL: "{{ cat.photoURL }}"
  ownerName: "{{ cat.ownerName }}"
  ownerTwitter: "{{ cat.ownerTwitter }}"

Notice that eleventyComputed defines this front matter array key and then uses the alias for accessing values in the cats dataset. Now, for example, we can just use {{ title }} to access a cat’s name and a dog’s name since the template variable is now the same.

We can start by dropping the following code into pets.njk to successfully load cat or dog profile data, depending on the page being viewed:

<img src="{{ photoURL }}" />
<ul>
  <li><strong>Name</strong>: {{ title }}</li>
  <li><strong>Color</strong>: {{ petColor }}</li>
  <li><strong>Favorite Food</strong>: {{ favoriteFood if favoriteFood else 'N/A' }}</li>
  <li><strong>Favorite Toy</strong>: {{ favoriteToy if favoriteToy else 'N/A' }}</li>
{% if ownerTwitter %}
  <li><strong>Owner</strong>: <a href="{{ ownerTwitter }}">{{ ownerName }}</a></li>
{% else %}
  <li><strong>Owner</strong>: {{ ownerName }}</li>
{% endif %}
</ul>

The last thing we need to tie this all together is to add layout: pets.njk to the front matter in both cats.njk and dogs.njk.

With Eleventy running, you can now visit an individual pet page and see their profile:

Screenshot of a cat profile page that starts with the cat's name for the heading, followed by the cat's photo, and a list of the cat's details.
Fancy Feast for a fancy cat. 😻

We’re not going into styling in this article, but you can head over to the sample project repo to see how CSS is included.

Let’s deploy this to production!

The site is now in a functional state and can be deployed to a hosting environment! 

As recommended earlier, Netlify is an ideal choice, particularly for a community-driven site, since it can trigger a deployment each time a submission is merged and provide a preview of the submission before sending it for review.

If you choose Netlify, you will want to push your site to a GitHub repo which you can select during the process of adding a site to your Netlify account. We’ll tell Netlify to serve from the public directory and run npm run build when new changes are merged into the main branch.

The sample site includes a netlify.toml file which has the build details and is automatically detected by Netlify in the repo, removing the need to define the details in the new site flow.

Once the initial site is added, visit Settings → Build → Deploy in Netlify. Under Deploy contexts, select “Edit” and update the selection for “Deploy Previews” to “Any pull request against your production branch / branch deploy branches.” Now, for any pull request, a preview URL will be generated with the link being made available directly in the pull request review screen.

Let’s start accepting submissions!

Before we pass Go and collect $100, it’s a good idea to revisit the first post and make sure we’re prepared to start taking user submissions. For example, we ought to add community health files to the project if they haven’t already been added. Perhaps the most important thing is to make sure a branch protection rule is in place for the main branch. This means that your approval is required prior to a pull request being merged.

Contributors will need to have a GitHub account. While this may seem like a barrier, it removes some of the anonymity. Depending on the sensitivity of the content, or the target audience, this can actually help vet (get it?) contributors.

Here’s the submission process:

  1. Fork the website repository.
  2. Clone the fork to a local machine or use the GitHub web interface for the remaining steps.
  3. Create a unique .json file within src/pets/cats or src/pets/dogs that contains required data.
  4. Commit the changes if they’re made on a clone, or save the file if it was edited in the web interface.
  5. Open a pull request back to the main repository.
  6. (Optional) Review the Netlify deploy preview to verify information appears as expected.
  7. Merge the changes.
  8. Netlify deploys the new pet to the live site.

A FAQ section is a great place to inform contributors how to create pull request. You can check out an example on Style Stage.

Let’s wrap this up…

What we have is fully functional site that accepts user contributions as submissions to the project repo. It even auto-deploys those contributions for us when they’re merged!

There are many more things we can do with a community-driven site built with Eleventy. For example:

  • Markdown files can be used for the content of an email newsletter sent with Buttondown. Eleventy allows mixing Markdown with Nunjucks or Liquid. So, for example, you can add a Nunjucks for loop to output the latest five pets as links that output in Markdown syntax and get picked up by Buttondown.
  • Auto-generated social media preview images can be made for social network link previews.
  • A commenting system can be added to the mix.
  • Netlify CMS Open Authoring can be used to let folks make submissions with an interface. Check out Chris’ great rundown of how it works.

My Meow vs. BowWow example is available for you to fork on GitHub. You can also view the live preview and, yes, you really can submit your pet to this silly site. 🙂

Best of luck creating a healthy and thriving community!

Article Series:

  1. Preparing for Contributions
  2. Building the Site (You are here!)

The post A Community-Driven Site with Eleventy: Building the Site appeared first on CSS-Tricks.

You can support CSS-Tricks by being an MVP Supporter.

A Community-Driven Site with Eleventy: Preparing for Contributions

I’ve recently found myself reaching for Eleventy (aka 11ty) above all other tools when I want to develop a website. It’s hard to beat a static site generator that provides advanced templating opportunities while otherwise getting out of your way and allowing you to just create.

One of those sites is Style Stage, a modern CSS showcase styled by community contributions. Eleventy was perfect for this community-driven project in several ways:

  • Its exceptionally fast builds locally and on a production host
  • It’s un-opinionated about how to construct templates
  • Its ability to create any file type with complete control over how and where files are rendered
  • Its ability to intermix templating languages, such as HTML, Markdown, and Nunjucks
  • It’s highly performant because it compiles to static HTML with no required dependencies for production

The number one reason Eleventy is a great choice for creating a community-driven site is the ability to dynamically create site pages from data sources. We’ll review how to use this feature and more when we create our sample community site.

Article Series:

  1. Preparing for Contributions (You are here!)
  2. Building the Site (Coming tomorrow!)

What goes into creating a community-driven site?

In the not-so-distant past, creating a community-driven site could potentially be a painful process involving CMS nightmares trying to create contributor workflows. Armed with Eleventy and a few other modern tools, this is now nearly fully automatable with a minimum of oversight.

Before we get to inviting contributors, we’ve got some work to do ourselves.

1. Determine what content contributors will have access to modify

This will guide a lot of the other decisions. In the case of using Eleventy for Style Stage, I created a JSON file that contributors can use to create pull requests to modify and provide their own relevant metadata that’s used to create their pages.

An early version of the JSON file which initially had an “Example” for contributors to reference. This screenshot also shows the first two contributors details.

Perhaps you also want to allow access to include additional assets, or maybe it makes sense to have multiple data files for the ease of categorizing and querying data. Or maybe contributors are able to add Markdown files within a particular directory.

Consider the scope of what contributors can modify or submit, and weigh that against an estimate of your availability to review submissions. This will help enable a successful, manageable community.

GitHub actions can make it possible to label or close a pull request with invalid files if you need advanced automated screening of incoming content.

2. Create contributor guidelines

Spending time upfront to think through your guidelines can help with your overall plan. You may identify additional needed features, or items that can be automated.

Once your guidelines are prepared, it’s best to include them in a special file in your GitHub repository called CONTRIBUTING.md. The all-caps filename is the expected format. Having this file creates an automatic extra link for contributors when they are creating their pull request or issues in a prompt that ask them to be sure they’ve reviewed the guidelines:

Screenshot courtesy of the GitHub documentation.

How to handle content licensing and author attribution are things that fall into this category. For example, Style Stage releases contributed stylesheets under the CC BY-NC-SA license but authors retain copyright over original graphics. As part of the build process, the license and author attribution are appended to the styles, and the authors attribution metadata is updated within the style page template.

You’ll also want to consider policies around acceptable content and what would cause submissions to be rejected. Style Stage states that:

Submissions will be rejected for using obscene, excessively violent, or otherwise distasteful imagery, violating the above guidelines, or other reasons at the discretion of the maintainer.

3. Prepare workflow and automations

While Eleventy takes care of the site build, the other key players enabling Style Stage contributions are Netlify and GitHub.

Contributors submit a pull request to the Style Stage repo on GitHub and, when they do, Netlify creates a deploy preview. This allows contributors to verify that their submission works as expected, and saves me time as the maintainer by not having to pull down submissions to ensure they meet the guidelines.

The status of the Netlify deploy updates in real-time on the pull request review page. Once the last item (“/deploy-preview”) displays “Deploy preview ready!” clicking “Details” will launch the live link to the preview.

All discussion takes place through GitHub. This has the added advantage of public accountability which helps dissuade bad actors.

If the contributor needs to make a change, they can update their pull request or request a re-deploy of the branch preview if it’s a remote asset that has changed. This re-deploy is a very small manual step, and it may not be needed for every PR — or even at all, depending on how you accept contributions.

The last step is the final approval of the PR and merging into the main branch. Once the pull request is merged, Netlify immediately deploys the changes to production.

Eleventy is, of course, a static site generator, and several hosts offer webhooks to trigger a build. Netlify’s build plugins are a good example of that. But if you need to refresh data more often than each time a PR is merged, one option is to use IFTTT or Zapier to set up daily deploys, or deploys based on a variety of other triggers.

Example of completed setup of a daily deploy via webhook from IFTTT

It’s worth noting that what we’re talking about here does limit your contributor audience to having a GitHub account. However, GitHub contributions can be done entirely via the web interface, so it’s very possible to provide guidance so that other users — even those who don’t code — can still participate.

4. Choose a method for contributor and community updates

The first consideration here is to decide how critical it is for contributors to know about updates to your site by evaluating the likely impact of the change.

In the case of Style Stage, the core will be unchanging, but there is some planned optional functionality. I went with a weekly(-ish) newsletter. That way, it is something folks can opt into and there is value for contributors and users alike.

Matthew Ström’s “Using Netlify Forms and Netlify Functions to Build an Email Sign-Up Widget” is a great place to learn how to add subscribers to your newsletter with a static form in Eleventy. It also covers a function for sending the subscriber’s email to Buttondown, a lightweight email service. For an example of how to manage your Buttondown email template and content in Eleventy, review the Style Stage setup which shows how to exclude the newsletter from the published site build.

If you’re only expecting low priority updates, then GitHub’s repo notifications might be sufficient for communication. Creating releases is another way to go. Or, hey, it’s even possible to to incorporate notifications on the site itself.

5. Find and engage with potential contributors

Style Stage was an idea that I vetted by tossing out a poll on Twitter. I then put out a “call for contributors” and engaged with responders as well as those who retweeted me. A short timeline also helped find motivated contributors who helped Style Stage avoid launching without any submissions. Many of those contributors became evangelists that introduced Style Stage to even more people. I also promoted a launch livestream which doubled as promotional material.

This is what it means to “engage” with contributors. Creating avenues for engagement and staying engaged with them helps turn casual contributors into “fans” who encourage others to participate.

Remember that the site content is a great place to encourage participation! Style Stage dedicates its entire page to encouraging submissions. If that’s not possible for you, then you might consider using prompts for contributions where it makes sense.

6. Finalize repo settings and include community health files

Finally, ensure that your repository is published publicly and that it includes applicable “community health” files. These are meant to be documents that help establish guidelines, set good expectations with community members, define a code of conduct, and other information that contribute to the overall “health” of the community. There are a bunch of examples, suggestions and tips on how to do this in the GitHub docs.

While there are a half dozen files noted in the documentation, in my experience so far, the three files you’ll need at minimum are:

  • a README.md file at the root of the project that includes the project’s name and a good description of what it is. GitHub will display the contents below the list of files in the repo.
  • a CONTRIBUTING.md file that describes the submission process for contributions. Be explicit as far as what steps are involved and what constitutes a “good” submission.
  • a pull request template. I wouldn’t exactly say this is a mandatory thing, but it’s worth adding to this list because it further solidifies the expectations for submitting contributions. Many templates will even include a checklist that details requirements for approval.

Oh, and having a branch protection rule on the main branch is another good idea. You can do this by going to SettingsBranches from the repo and selecting the “Add rule” option. “Require pull request reviews before merging” and “Require review from Code Owners” are the two key settings to enable. You can check the GitHub docs to learn more about this protection.

Coming up next…

What we covered here is a starting point for creating a community-driven site with Eleventy. The point is that there are several things that need to be considered before we jump straight into code. Communities need care and that requires a few steps that help establish an engaged and healthy community.

You’re probably getting anxious to start coding a community site with Eleventy! Well, that’s coming up in the next installment of this two-parter.  Together, we’ll develop an Eleventy starter from scratch that you can extend for your own community (or personal) site.

Article Series:

  1. Preparing for Contributions (You are here!)
  2. Building the Site (Coming tomorrow!)


The post A Community-Driven Site with Eleventy: Preparing for Contributions appeared first on CSS-Tricks.

You can support CSS-Tricks by being an MVP Supporter.

A Handy Sass-Powered Tool for Making Balanced Color Palettes

For those who may not come from a design background, selecting a color palette is often based on personal preferences. Choosing colors might be done with an online color tool, sampling from an image, "borrowing" from favorite brands, or just sort of randomly picking from a color wheel until a palette "just feels right."

Our goal is to better understand what makes a palette "feel right" by exploring key color attributes with Sass color functions. By the end, you will become more familiar with:

  • The value of graphing a palette’s luminance, lightness, and saturation to assist in building balanced palettes
  • The importance of building accessible contrast checking into your tools
  • Advanced Sass functions to extend for your own explorations, including a CodePen you can manipulate and fork

What you’ll ultimately find, however, is that color on the web is a battle of hardware versus human perception.

What makes color graphing useful

You may be familiar with ways of declaring colors in stylesheets, such as RGB and RGBA values, HSL and HSLA values, and HEX codes.

rbg(102,51,153)
rbga(102,51,153, 0.6)
hsl(270, 50%, 40%)
hsla(270, 50%, 40%, 0.6)
#663399

Those values give devices instructions on how to render color. Deeper attributes of a color can be exposed programmatically and leveraged to understand how a color relates to a broader palette.

The value of graphing color attributes is that we get a more complete picture of the relationship between colors. This reveals why a collection of colors may or may not feel right together. Graphing multiple color attributes helps hint at what adjustments can be made to create a more harmonious palette. We’ll look into examples of how to determine what to change in a later section.

Two useful measurements we can readily obtain using built-in Sass color functions are lightness and saturation.

  • Lightness refers to the mix of white or black with the color.
  • Saturation refers to the intensity of a color, with 100% saturation resulting in the purest color (no grey present).
$color: rebeccapurple;

@debug lightness($color);
// 40%

@debug saturation($color);
// 50%;

However, luminance may arguably be the most useful color attribute. Luminance, as represented in our tool, is calculated using the WCAG formula which assumes an sRGB color space. Luminance is used in the contrast calculations, and as a grander concept, also aims to get closer to quantifying the human perception of relative brightness to assess color relationships. This means that a tighter luminance value range among a palette is likely to be perceived as more balanced to the human eye. But machines are fallible, and there are exceptions to this rule that you may encounter as you manipulate palette values. For more extensive information on luminance, and a unique color space called CIELAB that aims to even more accurately represent the human perception of color uniformity, see the links at the end of this article.

Additionally, color contrast is exceptionally important for accessibility, particularly in terms of legibility and distinguishing UI elements, which can be calculated programmatically. That’s important in that it means tooling can test for passing values. It also means algorithms can, for example, return an appropriate text color when passed in the background color. So our tool will incorporate contrast checking as an additional way to gauge how to adjust your palette.

The functions demonstrated in this project can be extracted for helping plan a contrast-safe design system palette, or baked into a Sass framework that allows defining a custom theme.

Sass as a palette building tool

Sass provides several traditional programming features that make it perfect for our needs, such as creating and iterating through arrays and manipulating values with custom functions. When coupled with an online IDE, like CodePen, that has real-time processing, we can essentially create a web app to solve specific problems such as building a color palette.

Here is a preview of the tool we’re going to be using:

See the Pen
Sass Color Palette Grapher
by Stephanie Eckles (@5t3ph)
on CodePen.

Features of the Sass palette builder

  • It outputs an aspect ratio-controlled responsive graph for accurate plot point placement and value comparing.
  • It leverages the result of Sass color functions and math calculations to correctly plot points on a 0–100% scale.
  • It generates a gradient to provide a more traditional "swatch" view.
  • It uses built-in Sass functions to extract saturation and lightness values.
  • It creates luminance and contrast functions (forked from Material Web Components in addition to linking in required precomputed linear color channel values).
  • It returns appropriate text color for a given background, with a settings variable to change the ratio used.
  • It provides functions to uniformly scale saturation and lightness across a given palette.

Using the palette builder

To begin, you may wish to swap from among the provided example palettes to get a feel for how the graph values change for different types of color ranges. Simply copy a palette variable name and swap it for $default as the value of the $palette variable which can be found under the comment SWAP THE PALETTE VARIABLE.

Next, try switching the $contrastThreshold variable value between the predefined ratios, especially if you are less familiar with ensuring contrast passes WCAG guidelines.

Then try to adjust the $palette-scale-lightness or $palette-scale-saturation values. Those feed into the palette function and uniformly scale those measurements across the palette (up to the individual color's limit).

Finally, have a go at adding your own palette, or swap out some colors within the examples. The tool is a great way to explore Sass color functions to adjust particular attributes of a color, some of which are demonstrated in the $default palette.

Interpreting the graphs and creating balanced, accessible palettes

The graphing tool defaults to displaying luminance due to it being the most reliable indicator of a balanced palette, as we discussed earlier. Depending on your needs, saturation and lightness can be useful metrics on their own, but mostly they are signalers that can help point to what needs adjusting to bring a palette's luminance more in alignment. An exception may be creating a lightness scale based on each value in your established palette. You can swap to the $stripeBlue example for that.

The $default palette is actually in need of adjustment to get closer to balanced luminance:

The $default palette’s luminance graph

A palette that shows well-balanced luminance is the sample from Stripe ($stripe):

The $stripe palette luminance graph

Here's where the tool invites a mind shift. Instead of manipulating a color wheel, it leverages Sass functions to programmatically adjust color attributes.

Check the saturation graph to see if you have room to play with the intensity of the color. My recommended adjustment is to wrap your color value with the scale-color function and pass an adjusted $saturation value, e.g. example: scale-color(#41b880, $saturation: 60%). The advantage of scale-color is that it fluidly adjusts the value based on the given percent.

Lightness can help explain why two colors feel different by assigning a value to their brightness measured against mixing them with white or black. In the $default palette, the change-color function is used for purple to align it's relative $lightness value with the computed lightness() of the value used for the red.

The scale-color function also allows bundling both an adjusted $saturation and $lightness value, which is often the most useful. Note that provided percents can be negative.

By making use of Sass functions and checking the saturation and lightness graphs, the $defaultBalancedLuminance achieves balanced luminance. This palette also uses the map-get function to copy values from the $default palette and apply further adjustments instead of overwriting them, which is handy for testing multiple variations such as perhaps a hue shift across a palette.

The $defaultBalancedLuminance luminance graph

Take a minute to explore other available color functions.

http://jackiebalzer.com/color offers an excellent web app to review effects of Sass and Compass color functions.

Contrast comes into play when considering how the palette colors will actually be used in a UI. The tool defaults to the AA contrast most appropriate for all text: 4.5. If you are building for a light UI, then consider that any color used on text should achieve appropriate contrast with white when adjusting against luminance, indicated by the center color of the plot point.

Tip: The graph is set up with a transparent background, so you can add a background rule on body if you are developing for a darker UI.

Further reading

Color is an expansive topic and this article only hits the aspects related to Sass functions. But to truly understand how to create harmonious color systems, I recommend the following resources:

  • Color Spaces - is a super impressive deep-dive with interactive models of various color spaces and how they are computed.
  • Understanding Colors and Luminance - A beginner-friendly overview from MDN on color and luminance and their relationship to accessibility.
  • Perpetually Uniform Color Spaces - More information on perceptually uniform color systems, with an intro the tool HSLuv that converts values from the more familiar HSL color space to the luminance-tuned CIELUV color space.
  • Accessible Color Systems - A case study from Stripe about their experience building an accessible color system by creating custom tooling (which inspired this exploration and article).
  • A Nerd's Guide to Color on the Web - This is a fantastic exploration of the mechanics of color on the web, available right here on CSS-Tricks.
  • Tanaguru Contrast Finder - An incredible tool to help if you are struggling to adjust colors to achieve accessible contrast.
  • ColorBox - A web app from Lyft that further explores color scales through graphing.
  • Designing Systematic Colors - Describes Mineral UI's exceptional effort to create color ramps to support consistent theming via a luminance-honed palette.
  • How we designed the new color palettes in Tableau 10 - Tableau exposed features of their custom tool that helped them create a refreshed palette based on CIELAB, including an approachable overview of that color space.

The post A Handy Sass-Powered Tool for Making Balanced Color Palettes appeared first on CSS-Tricks.