Django Highlights: Models, Admin, And Harnessing The Relational Database (Part 3)

Django Highlights: Models, Admin, And Harnessing The Relational Database (Part 3)

Django Highlights: Models, Admin, And Harnessing The Relational Database (Part 3)

Philip Kiely

Before we get started, I want to note that Django’s built-in administrative capabilities, even after customization, are not meant for end-users. The admin panel exists as a developer, operator, and administrator tool for creating and maintaining software. It is not intended to be used to give end-users moderation capabilities or any other administrator abilities over the platform you develop.

This article is based on a hypothesis in two parts:

  1. The Django admin panel is so intuitive that you basically already know how to use it.
  2. The Django admin panel is so powerful that we can use it as a tool for learning about representing data in a relational database using a Django model.

I offer these ideas with the caveat that we will still need to write some configuration code to activate the admin panel’s more powerful abilities, and we will still need to use Django’s models-based ORM (object-relational mapping) to specify the representation of data in our system.

Recommended Reading

“Django Highlights” is a series introducing important concepts of web development in Django. You might want to read up on providing secure user authentication flows and follow alongside a demonstration on using Django templating to write complex pages.

Setting Up

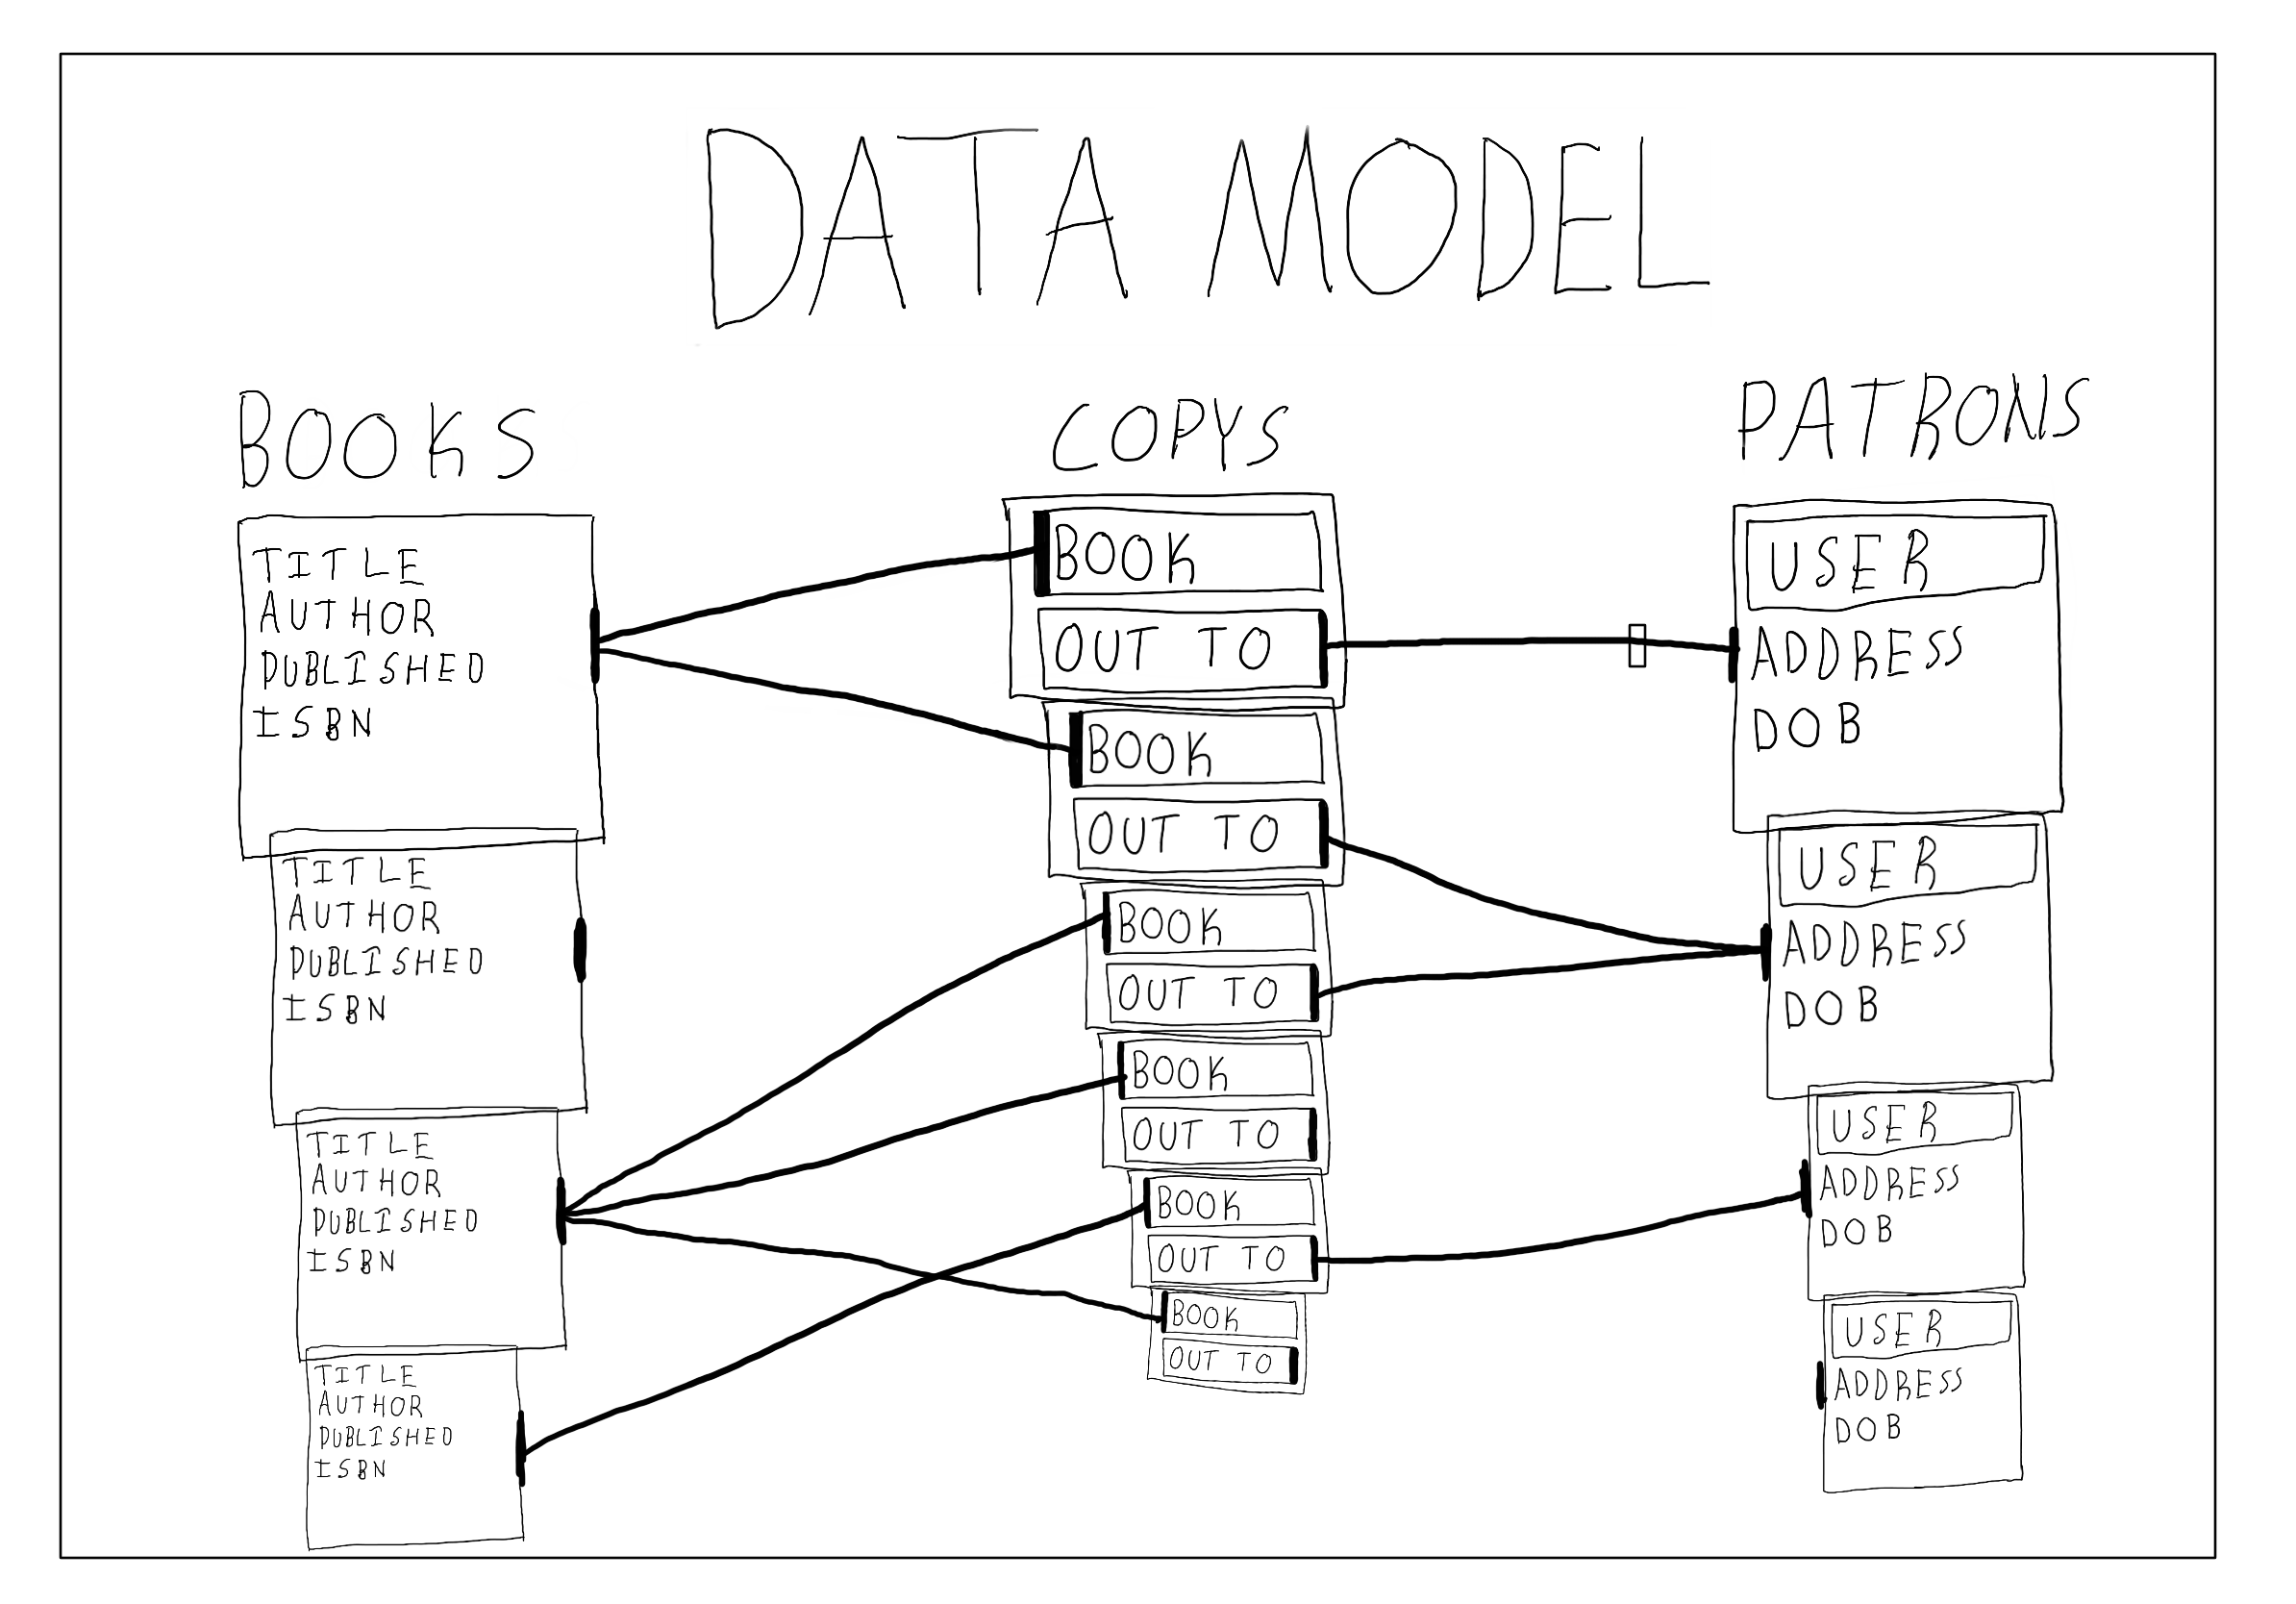
We’re going to be working with a sample project in this article. The project models some data that a library would store about its books and patrons. The example should be fairly applicable to many types of systems that manage users and/or inventory. Here’s a sneak peek of what the data looks like:

Data Model. (Large preview)

Please complete the following steps to get the example code running on your local machine.

1. Installing Packages

With Python 3.6 or higher installed, create a directory and virtual environment. Then, install the following packages:

pip install django django-grappelli

Django is the web framework that we’re working with in this article. (django-grappelli is an admin panel theme that we’ll briefly cover.)

2. Getting The Project

With the previous packages installed, download the example code from GitHub. Run:

git clone https://github.com/philipkiely/library_records.git
cd library_records/library

3. Creating a Superuser

Using the following commands, set up your database and create a superuser. The command-line interface will walk you through the process of creating a superuser. Your superuser account will be how you access the admin panel in a moment, so be sure to remember the password you set. Use:

python manage.py migrate
python manage.py createsuperuser

4. Loading the Data

For our exploration, I created a dataset called a fixture that you can load into the database (more on how to create a fixture at the end of the article). Use the fixture to populate your database before exploring it in the admin panel. Run:

python manage.py loaddata ../fixture.json

5. Running The Example Project

Finally, you’re ready to run the example code. To run the server, use the following command:

python manage.py runserver

Open your browser to http://127.0.0.1:8000 to view the project. Note that you are automatically redirected to the admin panel at /admin/. I accomplished that with the following configuration in library/urls.py:

from django.contrib import admin
from django.urls import path
from records import views

urlpatterns = [
    path('admin/', admin.site.urls),
    path('', views.index),
]

combined with the following simple redirect in records/views.py:

from django.http import HttpResponseRedirect

def index(request):
    return HttpResponseRedirect('/admin/')

Using The Admin Panel

We’ve made it! When you load your page, you should see something like the following:

Django Admin Panel Main Page. (Large preview)

This view is accomplished with the following boilerplate code in records/admin.py:

from django.contrib import admin
from .models import Book, Patron, Copy

admin.site.register(Book)
admin.site.register(Copy)
admin.site.register(Patron)

This view should give you an initial understanding of the data that the system stores. I’ll remove some of the mystery: Groups and Users are defined by Django and store information and permissions for accounts on the system. You can read more about the User model in an earlier article in this series. Books, Copys, and Patrons are tables in the database that we created when running migrations and populated by loading the fixture. Note that Django naively pluralizes model names by appending an “s,” even in cases like “copys” where it is incorrect spelling.

Data Model. (Large preview)

In our project, a Book is a record with a title, author, publication date, and ISBN (International Standard Book Number). The library maintains a Copy of each Book, or possibly multiple. Each Copy can be checked out by a Patron, or could currently be checked in. A Patron is an extension of the User that records their address and date of birth.

Create, Read, Update, Destroy

One standard capability of the admin panel is adding instances of each model. Click on “books” to get to the model’s page, and click the “Add Book” button in the upper-right corner. Doing so will pull up a form, which you can fill out and save to create a book.

Create a Book (Large preview)

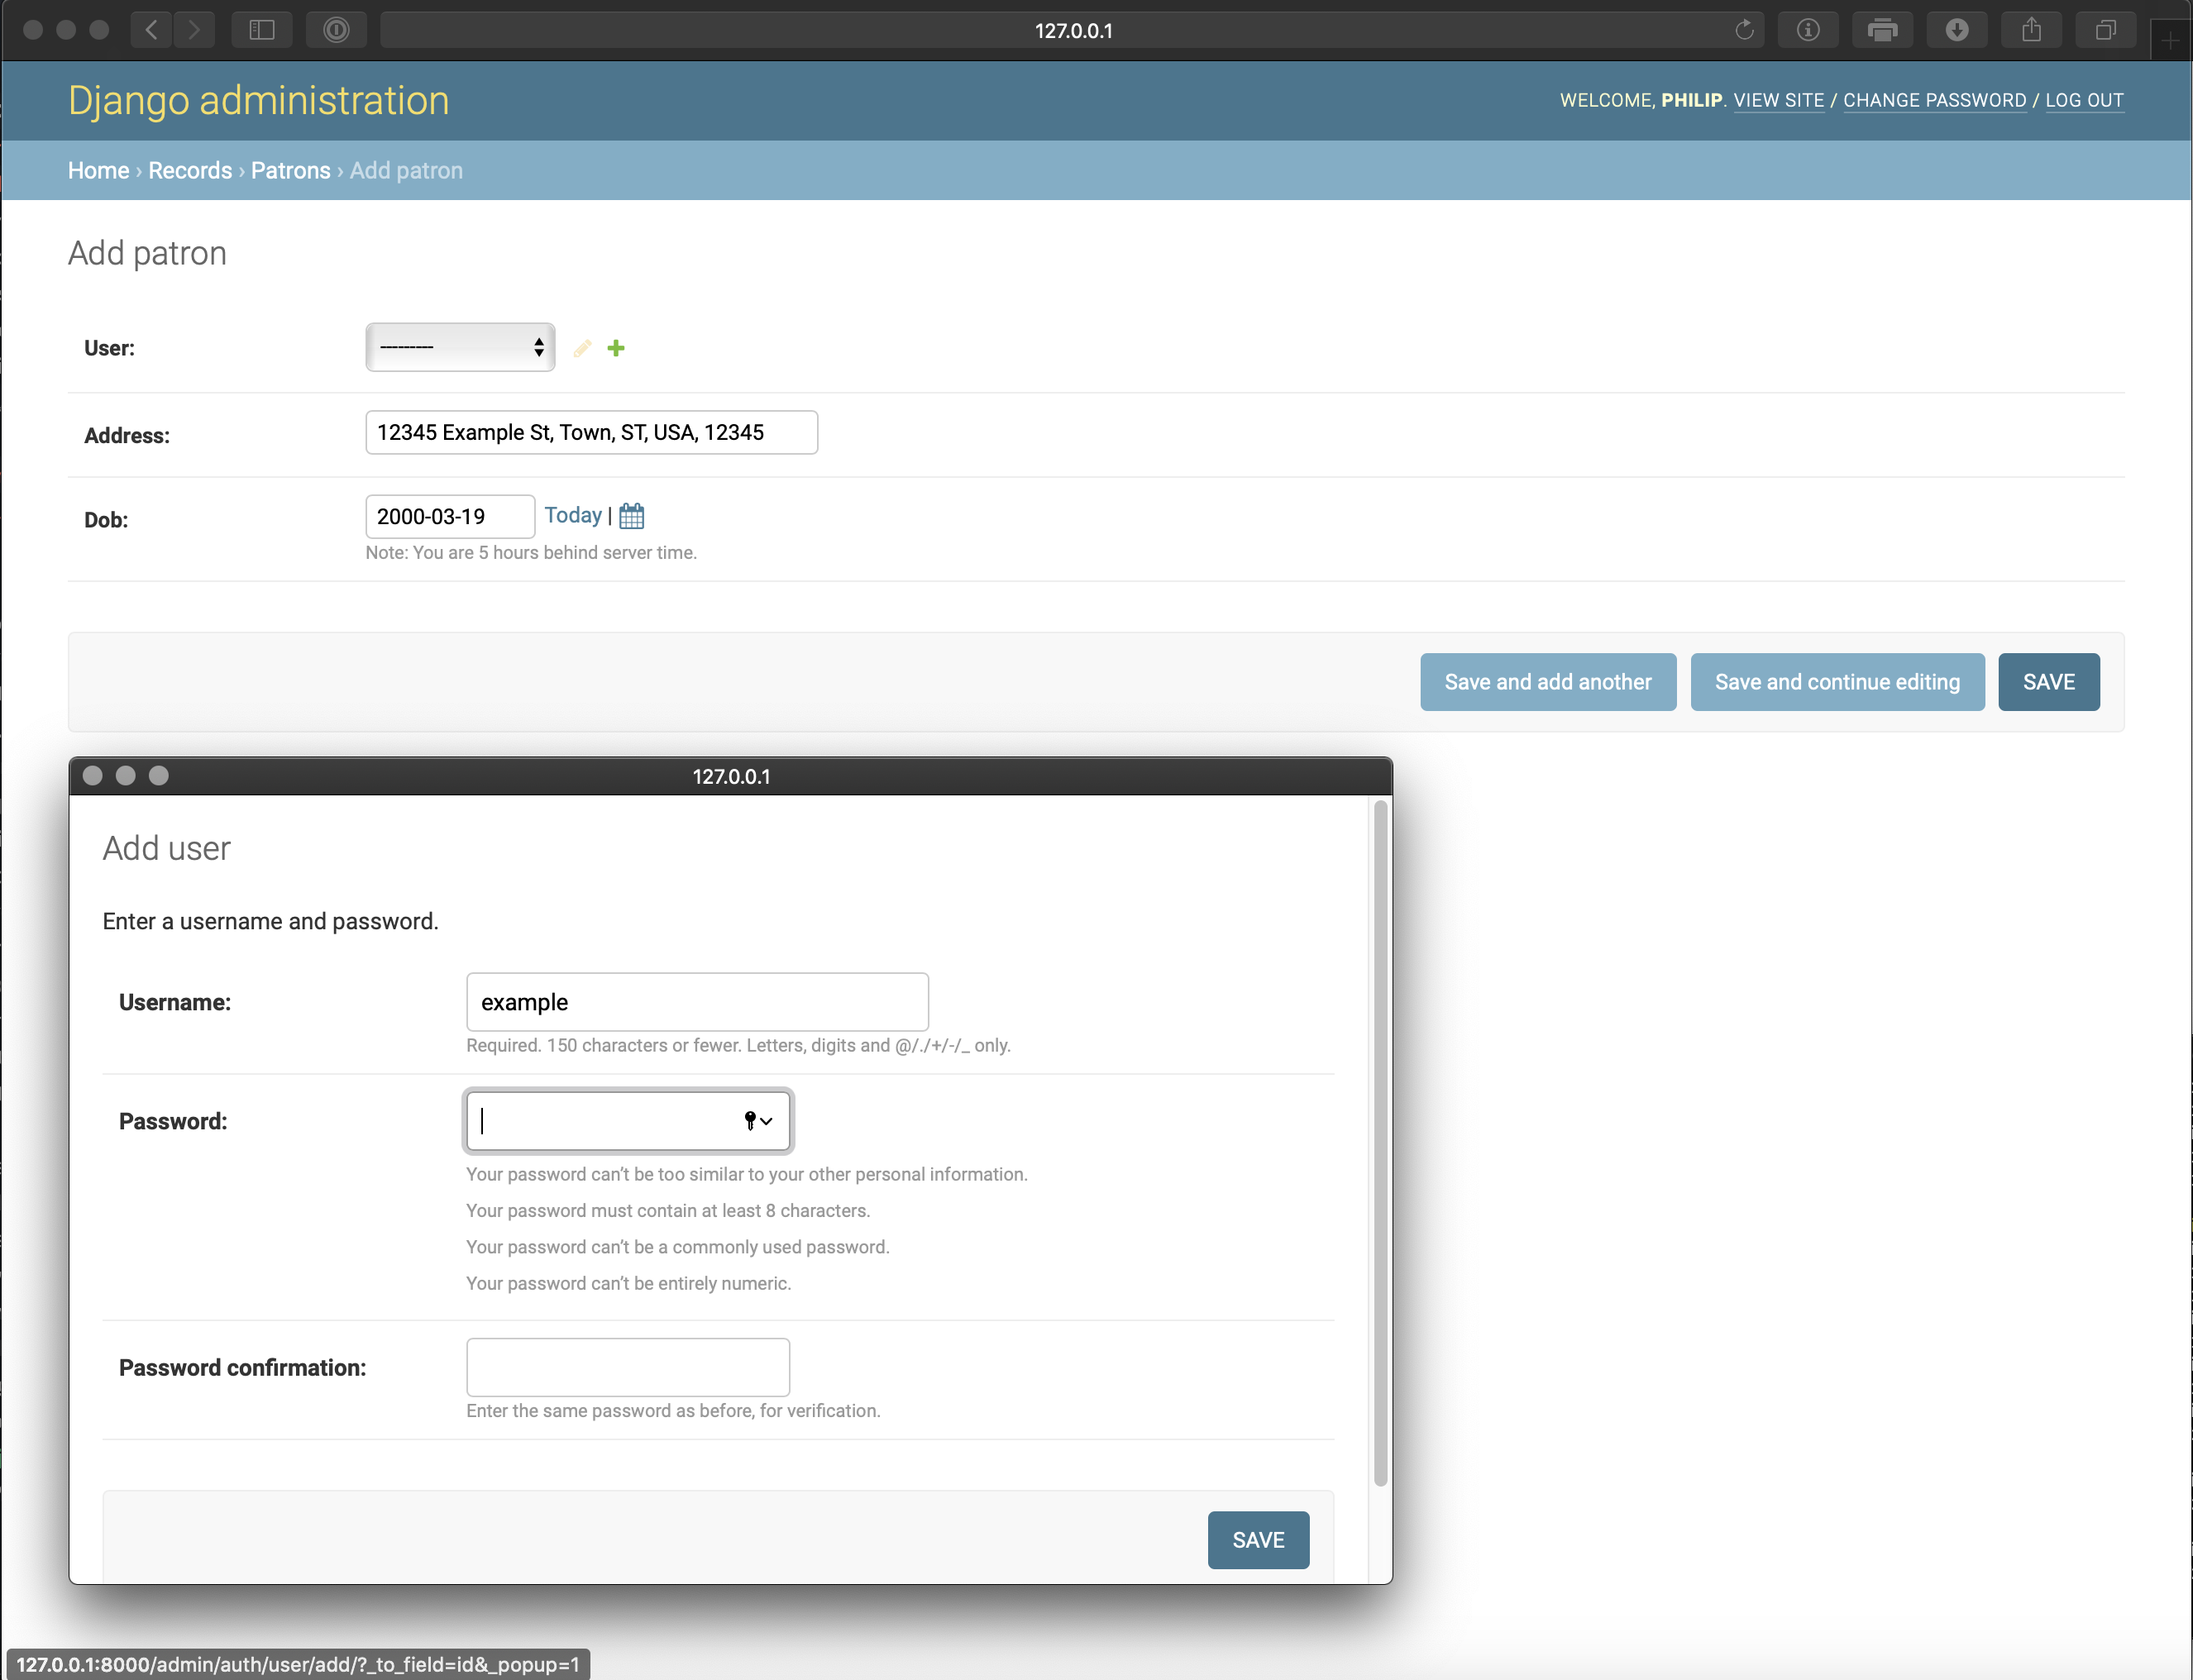
Creating a Patron reveals another built-in capability of the admin’s create form: you can create the connected model directly from the same form. The screenshot below shows the pop-up that is triggered by the green plus sign to the right of the User drop-down. Thus, you can create both models on the same admin page.

Create a Patron. (Large preview)

You can create a COPY via the same mechanism.

For each record, you can click the row to edit it using the same form. You can also delete records using an admin action.

Admin Actions

While the built-in capabilities of the admin panel are widely useful, you can create your own tools using admin actions. We’ll create two: one for creating copies of books and one for checking in books that have been returned to the library.

To create a Copy of a Book, go to the URL /admin/records/book/ and use the “Action” dropdown menu to select “Add a copy of book(s)” and then use the checkboxes on the left-hand column of the table to select which book or books to add a copy of to the inventory.

Create Copy Action. (Large preview)

Creating this relies on a model method we’ll cover later. We can call it as an admin action by creating a ModelAdmin class for the Profile model as follows in records/admin.py:

from django.contrib import admin
from .models import Book, Patron, Copy

class BookAdmin(admin.ModelAdmin):
    list_display = ("title", "author", "published")
    actions = ["make_copys"]

    def make_copys(self, request, queryset):
        for q in queryset:
            q.make_copy()
        self.message_user(request, "copy(s) created")
    make_copys.short_description = "Add a copy of book(s)"

admin.site.register(Book, BookAdmin)

The list_display property denotes which fields are used to represent the model in the model’s overview page. The actions property lists admin actions. Our admin action is defined as a function within BookAdmin and takes three arguments: the admin object itself, the request (the actual HTTP request sent by the client), and the queryset (the list of objects whose boxes were checked). We perform the same action on each item in the queryset, then notify the user that the actions have been completed. Every admin action requires a short description so that it can be properly identified in the drop-down menu. Finally, we now add BookAdmin when registering the model.

Writing admin actions for setting properties in bulk is pretty repetitive. Here’s the code for checking in a Copy, note its near equivalence to the previous action.

from django.contrib import admin
from .models import Book, Patron, Copy

class CopyAdmin(admin.ModelAdmin):
    actions = ["check_in_copys"]

    def check_in_copys(self, request, queryset):
        for q in queryset:
            q.check_in()
        self.message_user(request, "copy(s) checked in")
    check_in_copys.short_description = "Check in copy(s)"

admin.site.register(Copy, CopyAdmin)

Admin Theme

By default, Django provides fairly simple styles for the admin panel. You can create your own theme or use a third-party theme to give the admin panel a new look. One popular open-source theme is grappelli, which we installed earlier in the article. You can check out the documentation for its full capabilities.

Installing the theme is pretty straightforward, it only requires two lines. First, add grappelli to INSTALLED_APPS as follows in library/settings.py:

INSTALLED_APPS = [
    'grappelli',
    'django.contrib.admin',
    'django.contrib.auth',
    'django.contrib.contenttypes',
    'django.contrib.sessions',
    'django.contrib.messages',
    'django.contrib.staticfiles',
    'records',
]

Then, adjust library/urls.py:

from django.contrib import admin
from django.urls import path, include
from records import views

urlpatterns = [
    path('grappelli/', include('grappelli.urls')),
    path('admin/', admin.site.urls),
    path('', views.index),
]

With those changes in place, the admin panel should look like the following:

Admin Panel with Theme. (Large preview)

There are a number of other themes out there, and again you can develop your own. I’ll be sticking with the default look for the rest of this article.

Understanding Models

Now that you’re comfortable with the admin panel and using it to navigate the data, let’s take a look at the models that define our database structure. Each model represents one table in a relational database.

A relational database stores data in one or more tables. Each of these tables has a specified column structure, including a primary key (a unique identifier for each element) and one or more columns of values, which are of various types like strings, integers, and dates. Each object stored in the database is represented as a single row. The “relational” part of the name comes from what is arguably the technology’s most important feature: creating relationships between tables. An object (row) can have a one-to-one, one-to-many (foreign key), or many-to-many mapping to rows in other tables. We’ll discuss this further in the examples.

Django, by default, uses SQLite3 for development. SQLite3 is a simple relational database engine and your database is automatically created as db.sqlite3 the first time you run python manage.py migrate. We’ll continue with SQLite3 for this article, but it is not suitable for production use, primarily because overwrites are possible with concurrent users. In production, or when writing a system that you one day intend to deploy, use PostgreSQL or MySQL.

Django uses models to interface with the database. Using part of Django’s ORM, the records/models.py file includes multiple models, which allows for specifying fields, properties, and methods for each object. When creating models, we strive for a “Fat Model” architecture, within reason. That means that as much of the data validation, parsing, processing, business logic, exception handling, edge case resolution, and similar tasks as possible should be handled in the specification of the model itself. Under the hood, Django models are very complex, featureful objects with widely useful default behavior. This makes the “Fat Model” architecture easy to achieve even without writing a substantial amount of code.

Let’s walk through the three models in our sample application. We can’t cover everything, as this is supposed to be an introductory article, not the Django framework’s complete documentation, but I’ll highlight the most important choices I made in constructing these simple models.

The Book class is the most straightforward of the models. Here it is from records/models.py:

from django.db import models

class Book(models.Model):
    title = models.CharField(max_length=300)
    author = models.CharField(max_length=150)
    published = models.DateField()
    isbn = models.IntegerField(unique=True)

    def __str__(self):
        return self.title + " by " + self.author

    def make_copy(self):
        Copy.objects.create(book=self)

All CharField fields require a specified max_length attribute. The conventional length is 150 characters, which I doubled for title in case of very long titles. Of course, there still is an arbitrary limit, which could be exceeded. For unbounded text length, use a TextField. The published field is a DateField. The time the book was published doesn’t matter, but if it did I would use a DateTimeField. Finally, the ISBN is an integer (ISBNs are 10 or 13 digits and thus all fit within the integer’s max value) and we use unique=True as no two books can have the same ISBN, which is then enforced at the database level.

All objects have a method __str__(self) that defines their string representation. We override the default implementation provided by the models.Model class and instead represent books as “title by author” in all places where the model would be represented as a string. Recall that previously we used list_display in Book’s admin object to determine what fields would be shown in the admin panel’s list. If that list_display is not present, the admin list instead shows the string representation of the model, as it does for both Patron and Copy.

Finally, we have a method on Book that we called in its admin action that we wrote earlier. This function creates a Copy that is related to a given instance of a Book in the database.

Moving on to Patron, this model introduces the concept of a one-to-one relationship, in this case with the built-in User model. Check it out from records/models.py:

from django.db import models
from django.contrib.auth.models import User

class Patron(models.Model):
    user = models.OneToOneField(User, on_delete=models.CASCADE)
    address = models.CharField(max_length=150)
    dob = models.DateField()

    def __str__(self):
        return self.user.username

The user field is not exactly a bijective function. There CAN be a User instance without an associated Patron instance. However, a User CAN NOT be associated with more than one Patron instance, and a Patron cannot exist without exactly one relation to a user. This is enforced at the database level, and is guaranteed by the on_delete=models.CASCADE specification: if a User instance is deleted, an associated Profile will be deleted.

The other fields and __str__(self) function we’ve seen before. It’s worth noting that you can reach through a one-to-one relation to get attributes, in this case user.username, in a model’s functions.

To expand on the usefulness of database relations, let’s turn our attention to Copy from records/models.py:

from django.db import models

class Copy(models.Model):
    book = models.ForeignKey(Book, on_delete=models.CASCADE)
    out_to = models.ForeignKey(Patron, blank=True, null=True, on_delete=models.SET_NULL)

    def __str__(self):
        has_copy = "checked in"
        if self.out_to:
            has_copy = self.out_to.user.username
        return self.book.title + " -> " + has_copy
    
    def check_out(self, p):
        self.out_to = p
        self.save()
    
    def check_in(self):
        self.out_to = None
        self.save()

Again, we’ve seen most of this before, so let’s focus on the new stuff: models.ForeignKey. A Copy must be of a single Book, but the library may have multiple Copys of each Book. A Book can exist in the database without the library having a Copy in its catalog, but a Copy cannot exist without an underlying Book.

This complex relationship is expressed with the following line:

book = models.ForeignKey(Book, on_delete=models.CASCADE)

The deletion behavior is the same as Patron’s in reference to User.

The relationship between a Copy and a Patron is slightly different. A Copy may be checked out to up to one Patrons, but each Patron can check out as many Copys as the library lets them. However, this is not a permanent relationship, the Copy is sometimes not checked out. Patrons and Copys exist independently from one another in the database; deleting an instance of one should not delete any instance of the other.

This relationship is still a use case for the foreign key, but with different arguments:

out_to = models.ForeignKey(Patron, blank=True, null=True, on_delete=models.SET_NULL)

Here, having blank=True allows for forms to accept None as the value for the relation and null=True allows for the column for the Patron relation in Copy’s table in the database accept null as a value. The delete behavior, which would be triggered on a Copy if a Patron instance was deleted while they had that Copy checked out, is to sever the relation while leaving the Copy intact by setting the Patron field to null.

The same field type, models.ForeignKey, can express very different relationships between objects. The one relation that I could not cleanly fit in the example is a many-to-many field, which is like a one-to-one field, except that, as suggested by its name, each instance can be related to many other instances and every other and each of those can be related back to many others, like how a book could have multiple authors, each of whom have written multiple books.

Migrations

You might be wondering how the database knows what is expressed in the model. In my experience, migrations are one of those things that are pretty straightforward until they aren’t, and then they eat your face. Here’s how to keep your mug intact, for beginners: learn about migrations and how to interact with them, but try to avoid making manual edits to the migration files. If you already know what you’re doing, skip this section and keep up what works for you.

Either way, check out the official documentation for a complete treatment of the subject.

Migrations translate changes in a model to changes in database schema. You don’t have to write them yourself, Django creates them with the python manage.py makemigrations command. You should run this command when you create a new model or edit the fields of an existing model, but there is no need to do so when creating or editing model methods. It’s important to note that migrations exist as a chain, each one references the previous one so that it can make error-free edits to the database schema. Thus, if you’re collaborating on a project, it’s important to keep a single consistent migration history in version control. When there are unapplied migrations, run python manage.py migrate to apply them before running the server.

The example project is distributed with a single migration, records/migrations/0001_initial.py. Again, this is automatically generated code that you shouldn’t have to edit, so I won’t copy it in here, but if you want to get a sense of what’s going on behind the scenes go ahead and take a look at it.

Fixtures

Unlike migrations, fixtures are not a common aspect of Django development. I use them to distribute sample data with articles, and have never used them otherwise. However, because we used one earlier, I feel compelled to introduce the topic.

For once, the official documentation is a little slim on the topic. Overall, what you should know is that fixtures are a way of importing and exporting data from your database in a variety of formats, including JSON, which is what I use. This feature mostly exists to help with things like automated testing, and is not a backup system or way to edit data in a live database. Furthermore, fixtures are not updated with migrations, and if you try to apply a fixture to a database with an incompatible schema it will fail.

To generate a fixture for the entire database, run:

python manage.py dumpdata --format json > fixture.json

To load a fixture, run:

python manage.py loaddata fixture.json

Conclusion

Writing models in Django is a huge topic, and using the admin panel is another. In 3,000 words, I’ve only managed to introduce each. Hopefully, using the admin panel has given you a better interface to explore how models work and relate to each other, leaving you with the confidence to experiment and develop your own relational representations of data.

If you’re looking for an easy place to start, try adding a Librarian model that inherits from User like Profile does. For more of a challenge, try implementing a checkout history for each Copy and/or Patron (there are several ways of accomplishing this one).

Django Highlights is a series introducing important concepts of web development in Django. Each article is written as a stand-alone guide to a facet of Django development intended to help front-end developers and designers reach a deeper understanding of “the other half” of the codebase. These articles are mostly constructed to help you gain an understanding of theory and convention, but contain some code samples which are written in Django 3.0.

Further Reading

You may be interested in the following articles and documentation.

Smashing Editorial (dm, yk, il)

Django Highlights: Templating Saves Lines (Part 2)

Django Highlights: Templating Saves Lines (Part 2)

Django Highlights: Templating Saves Lines (Part 2)

Philip Kiely

Some no-frills approaches to building websites require a developer to write every line of HTML by hand. On the other extreme, commercial no-code site builders create all of the HTML for the user automatically, often at the expense of readability in the resultant code. Templating is around the middle of that spectrum, but closer to hand-written HTML than, say, generating page structure in a single-page application using React or a similar library. This sweet spot on the continuum provides many of the benefits of from-scratch manual HTML (semantic/readable code, full control over page structure, fast page loads) and adds separation of concerns and concision, all at the expense of spending some time writing modified HTML by hand. This article demonstrates using Django templating to write complex pages.

HTML Spectrum. (Large preview)

Today’s topic applies beyond the Django framework. Flask (another web framework) and Pelican (a static site generator) are just two of many other Python projects that use the same approach to templating. Jinja2 is the templating engine that all three frameworks use, although you can use a different one by altering the project settings (strictly speaking, Jinja2 is a superset of Django templating). It is a freestanding library that you can incorporate into your own projects even without a framework, so the techniques from this article are broadly useful.

Server-Side Rendering

A template is just an HTML file where the HTML has been extended with additional symbols. Remember what HTML stands for: HyperText Markup Language. Jinja2, our templating language, simply adds to the language with additional meaningful markup symbols. These additional structures are interpreted when the server renders the template to serve a plain HTML page to the user (that is to say, the additional symbols from the templating language don’t make it into the final output).

Server-side rendering is the process of constructing a webpage in response to a request. Django uses server-side rendering to serve HTML pages to the client. At the end of its execution, a view function combines the HTTP request, one or more templates, and optionally data accessed during the function’s execution to construct a single HTML page that it sends as a response to the client. Data goes from the database, through the view, and into the template to make its way to the user. Don’t worry if this abstract explanation doesn’t fully make sense, we’ll turn to a concrete example for the rest of this article.

Setting Up

For our example, we’ll take a fairly complex webpage, Start Bootstrap’s admin template, and rewrite the HTML as a Jinja2 template. Note that the MIT-licensed library uses a different templating system (based on JavaScript and Pug) to generate the page you see, but their approach differs substantially from Jinja2-style templating, so this example is more of a reverse-engineering than a translation of their excellent open-source project. To see the webpage we’ll be constructing, you can take a look at Start Bootstrap’s live preview.

I have prepared a sample application for this article. To get the Django project running on your own computer, start your Python 3 virtual environment and then run the following commands:

pip install django
git clone https://github.com/philipkiely/sm_dh_2_dashboard.git
cd sm_dh_2_dashboard
python manage.py migrate
python manage.py createsuperuser
python manage.py loaddata employee_fixture.json
python manage.py runserver

Then, open your web browser and navigate to http://127.0.0.1:8000. You should see the same page as the preview, matching the image below.

Dashboard Main Page. (Large preview)

Because this tutorial is focused on frontend, the underlying Django app is very simple. This may seem like a lot of configuration for presenting a single webpage, and to be fair it is. However, this much set-up could also support a much more robust application.

Now, we’re ready to walk through the process of turning this 668 line HTML file into a properly architected Django site.

Templating And Inheritance

The first step in refactoring hundreds of lines of HTML into clean code is splitting out elements into their own templates, which Django will compose into a single webpage during the render step.

Take a look in pages/templates. You should see five files:

  • base.html, the base template that every webpage will extend. It contains the <head> with the title, CSS imports, etc.
  • navbar.html, the HTML for the top navigation bar, a component to be included where necessary.
  • footer.html, the code for the page footer, another component to be included where needed.
  • sidebar.html, the HTMl for the sidebar, a third component to be included when required.
  • index.html, the code unique to the main page. This template extends the base template and includes the three components.

Django assembles these five files like Voltron to render the index page. The keywords that allow this are {% block %}, {% include %}, and {% extend %}. In base.html:

{% block content %}
{% endblock %}

These two lines leave space for other templates that extend base.html to insert their own HTML. Note that content is a variable name, you can have multiple blocks with different names in a template, giving flexibility to child templates. We see how to extend this in index.html:

{% extends "base.html" %}
{% block content %}
<!-- HTML Goes Here -->
{% endblock %}

Using the extends keyword with the base template name gives the index page its structure, saving us from copying in the heading (note that the file name is a relative path in double-quoted string form). The index page includes all three components that are common to most pages on the site. We bring in those components with include tags as below:

{% extends "base.html" %}
{% block content %}
{% include "navbar.html" %}
{% include "sidebar.html" %}
<!--Index-Specific HTML-->
{% include "footer.html" %}
<!--More Index-Specific HTML-->
{% endblock %}

Overall, this structure provides three key benefits over writing pages individually:

  • DRY (Don’t Repeat Yourself) Code
    By factoring out common code into specific files, we can change the code in only one place and reflect those changes across all pages.
  • Increased Readability
    Rather than scrolling through one giant file, you can isolate the specific component you’re interested in.
  • Separation of Concerns
    The code for, say, the sidebar now has to be in one place, there can’t be any rogue script tags floating at the bottom of the code or other intermingling between what should be separate components. Factoring out individual pieces forces this good coding practice.

While we could save even more lines of code by putting the specific components in the base.html template, keeping them separate provides two advantages. The first is that we are able to embed them exactly where they belong in a single block (this is relevant only to the footer.html which goes inside the main div of the content block). The other advantage is that if we were to create a page, say a 404 error page, and we did not want the sidebar or footer, we could leave those out.

These capabilities are par for the course for templating. Now, we turn to powerful tags that we can use in our index.html to provide dynamic features and save hundreds of lines of code.

Two Fundamental Tags

This is very far from an exhaustive list of available tags. The Django documentation on templating provides such an enumeration. For now, we’re focusing on the use cases for two of the most common elements of the templating language. In my own work, I basically only use the for and if tag on a regular basis, although the dozen or more other tags provided to have their own use cases, which I encourage you to review in the template reference.

Before we get to the tags, I want to make a note on syntax. The tag {% foo %} means that “foo” is a function or other capability of the templating system itself, while the tag {{ bar }} means that “bar” is a variable passed into the specific template.

For Loops

In the remaining index.html, the largest section of code by several hundred lines is the table. Instead of this hardcoded table, we can generate the table dynamically from the database. Recall python manage.py loaddata employee_fixture.json from the setup step. That command used a JSON file, called a Django Fixture, to load all 57 employee records into the application’s database. We use the view in views.py to pass this data to the template:

from django.shortcuts import render
from .models import Employee

def index(request):
    return render(request, "index.html", {"employees": Employee.objects.all()})

The third positional argument to render is a dictionary of data that is made available to the template. We use this data and the for tag to construct the table. Even in the original template that I adapted this webpage from, the table of employees was hard-coded. Our new approach cuts hundreds of lines of repetitive hard-coded table rows. index.html now contains:

{% for employee in employees %}
  <trv
    <td>{{ employee.name }}</td>
    <td>{{ employee.position }}</td>
    <td>{{ employee.office }}</td>
    <td>{{ employee.age }}</td>
    vtd>{{ employee.start_date }}</td>
    <td>${{ employee.salary }}</td>
  </tr>
{% endfor %}

The bigger advantage is that this greatly simplifies the process of updating the table. Rather than having a developer manually edit the HTML to reflect a salary increase or new hire, then push that change into production, any administrator can use the admin panel to make real-time updates (http://127.0.0.1/admin, use the credentials you created with python manage.py createsuperuser to access). This is a benefit of using Django with this rendering engine instead of using it on its own in a static site generator or other templating approach.

If Else

The if tag is an incredibly powerful tag that allows you to evaluate expressions within the template and adjust the HTML accordingly. Lines like {% if 1 == 2 %} are perfectly valid, if a little useless, as they evaluate to the same result every time. Where the if tag shines is when interacting with data passed into the template by the view. Consider the following example from sidebar.html:

<div class="sb-sidenav-footer">
  <div class="small">
    Logged in as:
  </div>
  {% if user.is_authenticated %}
    {{ user.username }}
  {% else %}
    Start Bootstrap
  {% endif %}
</div>

Note that the entire user object is passed into the template by default, without us specifying anything in the view to make that happen. This allows us to access the user’s authentication status (or lack thereof), username, and other features, including following foreign key relationships to access data stored in a user profile or other connected model, all from the HTML file.

You might be concerned that this level of access could pose security risks. However, remember that these templates are for a server-side rendering framework. After constructing the page, the tags have consumed themselves and are replaced with pure HTML. Thus, if an if statement introduces data to a page under some conditions, but the data is not used in a given instance, then that data will not be sent to the client at all, as the if statement is evaluated server-side. This means that a properly constructed template is a very secure method of adding sensitive data to pages without that data leaving the server unless necessary. That said, the use of Django templating does not remove the need to communicate sensitive information in a secure, encrypted manner, it simply means that security checks like user.is_authenticated can safely happen in the HTML as it is processed server-side.

This feature has a number of other use cases. For example, in a general product homepage, you might want to hide the “sign up” and “sign in” buttons and replace them with a “sign out” button for logged-in users. Another common use is to show and hide success or error messages for operations like form submission. Note that generally you would not hide the entire page if the user is not logged in. A better way to change the entire webpage based on the user’s authentication status is to handle it in the appropriate function in views.py.

Filtering

Part of the view’s job is to format data appropriately for the page. To accomplish this, we have a powerful extension to tags: filters. There are many filters available in Django to perform actions like justifying text, formatting dates, and adding numbers. Basically, you can think of a filter as a function that is applied to the variable in a tag. For example, we want our salary numbers to read “$1,200,000” instead of “1200000.” We’ll use a filter to get the job done in index.html:

<td>${{ employee.salary|intcomma }}</td>

The pipe character | is the filter that applies the intcomma command to the employee.salary variable. The “$” character does not come from the template, for an element like that which appears every time, it’s easier to just stick it outside the tag.

Note that intcomma requires us to include {% load humanize %} at the top of our index.html and 'django.contrib.humanize', in our INSTALLED_APPS in settings.py. This is done for you in the provided sample application.

Conclusion

Server-side rendering with the Jinja2 engine provides key tools for creating clean, adaptable, responsive front-end code. Separating pages into files allows for DRY components with flexible composition. Tags provide fundamental capabilities for displaying data passed from the database by view functions. Done right, this approach can increase the speed, SEO capabilities, security, and usability of the site, and is a core aspect of programming in Django and similar frameworks.

If you haven’t done so already, check out the sample application and try adding your own tags and filters using the complete list.

Django Highlights is a series introducing important concepts of web development in Django. Each article is written as a stand-alone guide to a facet of Django development intended to help front-end developers and designers reach a deeper understanding of “the other half” of the code base. These articles are mostly constructed to help you gain an understanding of theory and convention, but contain some code samples, which are written in Django 3.0.

Smashing Editorial (dm, yk, il)

Django Highlights: User Models And Authentication (Part 1)

Django Highlights: User Models And Authentication (Part 1)

Django Highlights: User Models And Authentication (Part 1)

Philip Kiely

There are two types of websites: static and dynamic. Django is a framework for developing dynamic websites. While a static website is one that solely presents information, there is no interaction (beyond simple page requests) that gets registered to a server. In a static website, the server sends HTML, CSS, and JavaScript to a client and that’s it. More capabilities require a dynamic website, where the server stores information and responds to user interaction beyond just serving pages. One major reason to develop a dynamic site is to authenticate users and restrict content.

Writing, deploying, and administering a static website is about an order of magnitude easier, cheaper, and more secure than a dynamic site. Thus, you should only create a dynamic website if the dynamic paradigm’s additional capabilities are necessary for your project. Django simplifies and streamlines the process of creating a dynamic site with its built-in components. As one of the primary components of a dynamic web application, the “user account” object, like the wheel, is tempting to re-invent, but the standard shape is appropriate for most uses. Django provides a powerful out-of-the-box user model, and in this article, we’ll walk through the best way to provide secure, intuitive user authentication flows.

Getting Set Up

If you’d like to create your own Django application to experiment with the concepts in this article, you can create a directory (and preferably a virtual environment) and then run the following commands:

pip install django
django-admin startproject PROJECTNAME
cd PROJECTNAME
python manage.py startapp APPNAME
python manage.py migrate
python manage.py runserver

If you’re looking for a walkthrough of creating your first Django project, Django’s own website provides a great one. In this article, we’re not using an example project, but the concepts discussed will apply to almost every Django application.

Standard User Model

Fundamentally, the concept of a user account exists for two reasons: access control and personalized application state. Access control is the idea that resources on a system are only available to some users. Personalized state is heavily dependent on the purpose of the application but may include settings, data, or any other records specific to an individual user. The Django stock User model provides sensible approaches to both use cases.

Initially, there are two types of users in a Django application: superuser accounts and regular users. Superusers have every attribute and privilege of regular accounts, but also have access to the Django admin panel, a powerful application that we’ll explore in detail in a future article. Essentially, superusers can create, edit, or delete any data in the application, including other user accounts.

Fundamentally, the concept of a user account exists for two reasons: access control and personalized application state.

To create a superuser on your own Django application, run:

python manage.py createsuperuser

The other benefit of a user account is storing personalized data to the database. By default, Django only requires a username and password but provides optional fields for users to enter their first name, last name, and email address. You can read a complete model reference on the Django website. We’ll discuss extending this model below.

Security And Reliability

Django includes substantial password management middleware with the user model. User passwords are required to be at least 8 characters, not entirely numbers, not match too closely to the username, and not be on a list of the 20,000 most common passwords. The Django stock forms validate these requirements. When a password is sent to the server, it is encrypted before it is stored, by default using the PBKDF2 algorithm with a SHA256 hash. Overall, the default password system provides robust security without any effort from the developer. Unless you have specific expertise and a compelling reason to change the way passwords are handled in your application, don’t modify this behavior.

One other convenient built-in is the requirement that usernames are unique. If you think about it, if there were two users with the username “djangofan1” and the server received a login request for that username it would not know which user was trying to access the application. Unfortunately for them, the second user to try to register with “djangofan1” will have to pick a different name, perhaps “djangofan2”. This uniqueness constraint is enforced at the database level but is again verified by the forms that Django provides.

Finally, a note on deleting users. While deleting users is a possibility, most complex applications will have a number of resources tied to each user account. If you want to effectively delete a user without removing those attached objects, set the user’s is_active field to false instead. Then, those other resources remain associated with the account rather than being deleted themselves, and the user account is able to be re-activated at any time by a superuser. Note that this does not free up the username, but setting the account as inactive in conjunction with changing the username to a random, unique value could achieve the same effect. Finally, if your site policies or applicable local law require that user accounts be fully deletable, the is_active approach will not be sufficient.

Unless you have specific expertise and a compelling reason to change the way passwords are handled in your application, don’t modify this behavior.

Standard Use

When you want to register a new user account, the view for doing so will probably look something like the following in views.py:

from django.shortcuts import render, redirect
from django.contrib.auth import authenticate, login
from django.contrib.auth.forms import UserCreationForm

def signup(request):
    if request.user.is_authenticated:
        return redirect('/')
    if request.method == 'POST':
        form = UserCreationForm(request.POST)
        if form.is_valid():
            form.save()
            username = form.cleaned_data.get('username')
            password = form.cleaned_data.get('password1')
            user = authenticate(username=username, password=password)
            login(request, user)
            return redirect('/')
        else:
            return render(request, 'signup.html', {'form': form})
    else:
        form = UserCreationForm()
        return render(request, 'signup.html', {'form': form})

Let’s break that down:

  • If the user is already signed in, we’ll redirect them away from the signup page.
  • If the request method is POST, that means that the form for creating a user has already been filled out and it’s time to create a user.
    • First, construct the form object on the backend with the user-provided data.
    • If the form is valid, create the user and log them in, then send them to the main page.
    • Otherwise, dump them back on the user creation page with information about what data was invalid (for example, they requested a username already in use).
  • Otherwise, the user is accessing the page for the first time and should be met with the form for creating a new account.

Now examining account signin:

from django.shortcuts import render, redirect
from django.contrib.auth import authenticate, login
from django.contrib.auth.forms import AuthenticationForm

def signin(request):
    if request.user.is_authenticated:
        return render(request, 'homepage.html')
    if request.method == 'POST':
        username = request.POST['username']
        password = request.POST['password']
        user = authenticate(request, username=username, password=password)
        if user is not None:
            login(request, user)
            return redirect('/')
        else:
            form = AuthenticationForm(request.POST)
            return render(request, 'signin.html', {'form': form})
    else:
        form = AuthenticationForm()
        return render(request, 'signin.html', {'form': form})

Another breakdown:

  • If the user is already signed in, we’ll redirect them away from the sign-in page.
  • If the request method is POST, that means that the form for signing in has been filled and it’s time to authenticate the user to an account.
    • First, authenticate the user with the user-provided data
    • If the username and password correspond to an account, log the user in
    • Otherwise, bring them back to the sign-in page with their form information pre-filled
  • Otherwise, the user is accessing the page for the first time and should be met with the form for logging in.

Finally, your users may eventually want to sign out. The basic code for this request is simple:

from django.shortcuts import render, redirect
from django.contrib.auth import logout

def signout(request):
    logout(request)
    return redirect('/')

Once the user has been logged in to their account, and until they log out on that device, they are having a “session.” During this time, subsequent requests from their browser will be able to access account-only pages. A user can have multiple sessions active at the same time. By default, sessions do not time out.

While a user has an active session on their device, they will register as True for the request.user.is_authenticated check. Another way to restrict pages to logged-in users only is the @login_required decorator above a function. There are multiple other ways of achieving the same, detailed here.

If this level of configuration is more than you want to perform, there is an even more out-of-the-box approach to user management. These stock authentication views provide standard routes, views, and forms for user management and can be modified by assigning them to custom URLs, passing custom templates, or even subclassing the views for more control.

Extending The User Model

Generally, you need to expand the user model to provide finer-grained access controls or store more user data per account. We’ll explore several common cases below.

Dropping Fields From The User Model

Contrary to this section’s header, I do not actually recommend making changes directly to the user model or associated database schema! The generic user model is established in your database by default during the setup of a new Django project. So much is tied to the default user model that changing it could have unexpected effects in your application (especially if you’re using third-party libraries), accordingly, adding or removing fields is not recommended and is not made easy by the framework.

By default, the only two fields that are required for a user are username and password. If you don’t want to use any of the other fields, simply ignore their existence, as a user can be created without a first name, last name, or email address. There is a collection of default fields like last_login and date_joined that can also be ignored if you don’t want them. If you had an actual technical constraint that required dropping optional fields from the user model, you would already know about it and wouldn’t need this article.

A common reason you might want to drop a field in the user model is to drop the username in favor of the email as a unique identifier. In that case, when creating the user from form data or authenticating a request, simply enter the email address as the username in addition to its use in the email field. The username field will still enforce the uniqueness constraint when usernames are formatted as email addresses. Strings are strings, they will be treated the same.

So much is tied to the default user model that changing it could have unexpected effects in your application, especially if you’re using third-party libraries.

Adding Fields With A Profile

Similarly, if you want to store extra information about your users, you should not attempt to modify the default user model. Even for a single field, define your own object with a one-to-one relationship with the existing users. This extra model is often called the Profile. Say you wanted to store a middle name and date of birth (dob) for each user. The Profile would be defined as follows in models.py:

from django.db import models
from django.contrib.auth.models import User

class Profile(models.Model):
    user = models.OneToOneField(User, on_delete=models.CASCADE)
    middle_name = models.CharField(max_length=30, blank=True)
    dob = models.DateField(null=True, blank=True)

Custom Access Control

Your application may have required a distinction between different types of users for accessing information and functions. Django provides a system for creating custom fine-grained access control: permissions and groups.

Permissions are objects that determine access to resources. A user can have one or more permissions. For example, they might have read access to a table of products and write access to a table of customers. The exact implementation of permission varies substantially by application but Django’s approach makes it intuitive to define permissions for data and assign those permissions to users.

Applications for enterprise and other large organizations often implement role-based access control. Essentially, a user can have various roles, each of which has certain permissions. Django’s tool for implementing this pattern is the Group. A group can have any number of permissions, which can each be assigned to any number of groups. A user then gains permissions not directly but by their membership to groups, making the application easier to administer.

Overview: Integrating A Payment Provider

The precise process of integrating a payment processor varies substantially by application and provider. However, I’ll cover the process in general terms.

One of the key advantages of outsourcing payments is that the provider is responsible for storing and validating highly regulated data such as credit card information. The service then shares some unique user token with your application along with data about their payment history. Like adding the profile, you can create a model associated with the core User and store the data in that model. As with passwords, it’s important to follow the given integration with the provider to avoid storing sensitive information improperly.

Overview: Social Sign-In

The other broad, complex field I want to briefly touch upon is social sign-in. Large platforms like Facebook and Google, as well as smaller sites like GitHub, provide APIs for using their services to authenticate users. Similar to a payment provider, this creates a record in your database linking an account to an account in their database.

You might want to include social auth in your site to make it easier for users to sign up without creating a new set of login credentials. If your application solely targets customers who already use a specific site that provides a social auth option, it might help you attract users from that market by lowering the barrier of entry. Furthermore, if your application intends to access the user’s data from a third-party service, linking the accounts during authentication simplifies the process of granting permissions.

However, there are downsides to using social auth. API changes or outages from the third party provider could interrupt your application’s uptime or development activities. In general, external dependencies add complexity to the application. Finally, it’s worth considering the data collection and use policies of third parties that you are integrating with and make sure that they align with your and your users’ expectations.

If you do decide that social authentication is right for your application, fortunately, there’s a library for that. Python Social Auth for Django is a package for enabling the capabilities of Python’s social auth ecosystem in Django projects.

Wrapping Up

As universal as the user account is, its widespread use can lead to resolving the same problems needlessly. Hopefully, this article has shown you the range of powerful features available in Django and given you an understanding of the basic responsibilities of an application when creating user accounts.

Django Highlights is a series introducing important concepts of web development in Django. Each article is written as a stand-alone guide to a facet of Django development intended to help front-end developers and designers reach a deeper understanding of “the other half” of the codebase. These articles are mostly constructed to help you gain an understanding of theory and convention but contain some code samples, which are written in Django 3.0. Several concepts that we touched on in this article, including templates, admin users, models, and forms, will be explored individually in detail in future articles in this series.

Smashing Editorial (dm, il)

Adapting Agile For Part-Time Teams

Adapting Agile For Part-Time Teams

Adapting Agile For Part-Time Teams

Philip Kiely
<p>The formal notion of the Agile software development method is about as old as I am (the Agile Manifesto was published in February 2001). I point this out not to <a href="https://xkcd.com/1686/">make you feel old</a>, but instead to demonstrate that Agile has had a long time to infiltrate software development. While the methodology advocates for &ldquo;co-located, dedicated teams,&rdquo; in its ubiquity Agile is frequently applied to teams partially or fully composed of part-time workers. While there are lessons to be taken from the practice, Agile must be adapted to support, rather than hinder, part-time teams.</p> <p>In this article, we’ll consider applying Agile to a team of 5-10 people each working 20 hours per week on a project. We’ll further consider the frequent intersection of remote work with part-time teams and discuss situations where contributors work as few as 5 hours per week on a project. We’ll also hear from professors Armando Fox at the University of California, Berkeley and Barbara Johnson at Grinnell College with their thoughts on part-time Agile teams.</p> <h3 id="why-does-part-time-work-happen">Why Does Part-Time Work Happen?</h3> <p>While the &ldquo;5 developers for 20 hours&rdquo; example may seem contrived, many situations lead to the scenario. You may have:</p> <ul> <li>Developers assigned to multiple clients, projects, or teams within a single company,</li> <li>A team with contractors or co-op interns,</li> <li>Volunteers working on an open-source or community project, or</li> <li>An after-hours team working on a startup or product.</li> </ul> <p>While we will examine the many challenges involved in managing teams under these constraints, usually the alternative to working part-time with someone isn’t their full-time efforts, the alternative is not being able to work with them at all. While part-time workers and teams often require extensive compromises, with clear and effective management they can still be a huge net positive to a team and business.</p> <div data-component="FeaturePanel" data-audience="non-subscriber" data-remove="true" class="feature-panel-container hidden"></div> <h3 id="tenets-of-agile">Tenets Of Agile</h3> <p>Given its prevalence in the software development industry, everyone understands Agile slightly differently. To get through adapting the framework together, we need a shared vocabulary to define &ldquo;regular&rdquo; Agile, you know, the kind that advocates for &ldquo;dedicated, co-located teams.&rdquo; Agile implements practices, rituals, and roles to promote effective work.</p> <p>Agile, as implemented, involves certain practices:</p> <ul> <li>&ldquo;Sprints&rdquo; are discrete units of time, often 2 weeks, that determine the cycle of work for Agile teams.</li> <li>&ldquo;Stories&rdquo; or &ldquo;user stories&rdquo; are well-scoped units of work that a single team member can complete in some fraction of the sprint.</li> <li>Often, teams organize their stories on &ldquo;kanban boards&rdquo; or similar methods of tracking story state: to do, in progress, in review, and done in a given sprint.</li> </ul> <p>Agile revolves around four rituals:</p> <ol> <li><strong>Sprint Planning</strong><br /> This is a meeting that opens each sprint with writing, estimating, prioritizing, and assigning stories that the team intends to complete for the sprint.</li> <li><strong>Daily Stand-Up</strong><br /> A chance for teams to meet every day to discuss the previous day’s progress, discuss the day’s work, and raise any roadblocks. Ideally, the meeting is very short (5-15 minutes) and is near the start of the workday to minimize the interruption of dedicated work time.</li> <li><strong>Sprint Review</strong><br /> This is part of a meeting which ends each sprint with a review of work accomplished, new backlog items, missed estimates, and other quantifiers of team progress.</li> <li><strong>Sprint Retrospective</strong><br /> A discrete meeting or block of time for discussing what went well and what to improve about how the team operates in qualitative terms.</li> </ol> <p>Agile teams usually have distinct, cross-functional roles. Common roles include:</p> <ul> <li>The &ldquo;project manager/team lead&rdquo; manages the team, assigns work, reports to management, assists team members, and performs other managerial duties.</li> <li>The &ldquo;scrum master&rdquo; is responsible for leading Agile rituals.</li> <li>A &ldquo;product owner/product manager&rdquo; represents the client or end-user to the team. They have an active hand in writing stories, reviewing product functionality, and communicating progress to clients and expectations to the team.</li> <li>An &ldquo;individual contributor&rdquo; is any member of the team whose main responsibility is building the product. Developers, designers, QA specialists and writers are all examples of individual contributors.</li> </ul> <p>While these definitions are important for our shared understanding, the major theme of this article is that achieving your team’s goals is more important than implementing &ldquo;proper&rdquo; Agile. If this doesn’t exactly match your setup, common elements should help apply upcoming recommendations to your experience.</p> <figure class=" "> <a href="https://cloud.netlifyusercontent.com/assets/344dbf88-fdf9-42bb-adb4-46f01eedd629/e0200d18-740a-45d3-ab60-096581b5d70b/board-irfan-simsar-unsplash.jpg"> <img srcset="https://res.cloudinary.com/indysigner/image/fetch/f_auto,q_auto/w_400/https://cloud.netlifyusercontent.com/assets/344dbf88-fdf9-42bb-adb4-46f01eedd629/e0200d18-740a-45d3-ab60-096581b5d70b/board-irfan-simsar-unsplash.jpg 400w, https://res.cloudinary.com/indysigner/image/fetch/f_auto,q_auto/w_800/https://cloud.netlifyusercontent.com/assets/344dbf88-fdf9-42bb-adb4-46f01eedd629/e0200d18-740a-45d3-ab60-096581b5d70b/board-irfan-simsar-unsplash.jpg 800w, https://res.cloudinary.com/indysigner/image/fetch/f_auto,q_auto/w_1200/https://cloud.netlifyusercontent.com/assets/344dbf88-fdf9-42bb-adb4-46f01eedd629/e0200d18-740a-45d3-ab60-096581b5d70b/board-irfan-simsar-unsplash.jpg 1200w, https://res.cloudinary.com/indysigner/image/fetch/f_auto,q_auto/w_1600/https://cloud.netlifyusercontent.com/assets/344dbf88-fdf9-42bb-adb4-46f01eedd629/e0200d18-740a-45d3-ab60-096581b5d70b/board-irfan-simsar-unsplash.jpg 1600w, https://res.cloudinary.com/indysigner/image/fetch/f_auto,q_auto/w_2000/https://cloud.netlifyusercontent.com/assets/344dbf88-fdf9-42bb-adb4-46f01eedd629/e0200d18-740a-45d3-ab60-096581b5d70b/board-irfan-simsar-unsplash.jpg 2000w" src="https://res.cloudinary.com/indysigner/image/fetch/f_auto,q_auto/w_400/https://cloud.netlifyusercontent.com/assets/344dbf88-fdf9-42bb-adb4-46f01eedd629/e0200d18-740a-45d3-ab60-096581b5d70b/board-irfan-simsar-unsplash.jpg" sizes="70vw" alt="&#39;Scrum Board&#39; by İrfan Simsar on Unsplash" /> </a> <figcaption class="op-vertical-bottom"> (Image credit: ‘İrfan Simsar’ on <a href='https://unsplash.com/'>Unsplash</a>) (<a href='https://cloud.netlifyusercontent.com/assets/344dbf88-fdf9-42bb-adb4-46f01eedd629/e0200d18-740a-45d3-ab60-096581b5d70b/board-irfan-simsar-unsplash.jpg'>Large preview</a>) </figcaption> </figure> <h3 id="constraints-of-part-time-work">Constraints Of Part-Time Work</h3> <p>Immediately, we see how the constraints of part-time work cut into standard Agile. First off, in a given two-week sprint, each employee may spend 2 hours in sprint planning, 10 times 15 minutes in stand-up, 1 hour in sprint review, and 30 minutes in sprint retrospective, for a total of 6 hours in Agile meetings. For a full-time employee, that’s only 7.5% of their 80-hour fortnight, for a half-time employee it doubles to 15%. Add in other meetings and account for context switching and suddenly your individual contributors have very little time left each week to individually contribute.</p> <p>Thus, part-time work exacerbates the need for good capacity estimation and up-front planning while reducing the time available for it. Fortunately, Agile’s notion of story points applies well. Story points estimate effort rather than time and thus stay constantly effective between full-time and part-time workers, though of course part-time workers will take longer to achieve the same amount of story points, which you can account for by measuring the team’s velocity.</p> <p>Even if your development team is part-time, your clients may not be. Customer support, emergency bug fixes, outage repairs, and even regular communication can be more difficult with part-time work adding additional overhead.</p> <figure class=" "> <a href="https://cloud.netlifyusercontent.com/assets/344dbf88-fdf9-42bb-adb4-46f01eedd629/107f0a17-6c3c-4678-ae1c-d67d231d80c4/watch-brad-neathery-unsplash.jpg"> <img srcset="https://res.cloudinary.com/indysigner/image/fetch/f_auto,q_auto/w_400/https://cloud.netlifyusercontent.com/assets/344dbf88-fdf9-42bb-adb4-46f01eedd629/107f0a17-6c3c-4678-ae1c-d67d231d80c4/watch-brad-neathery-unsplash.jpg 400w, https://res.cloudinary.com/indysigner/image/fetch/f_auto,q_auto/w_800/https://cloud.netlifyusercontent.com/assets/344dbf88-fdf9-42bb-adb4-46f01eedd629/107f0a17-6c3c-4678-ae1c-d67d231d80c4/watch-brad-neathery-unsplash.jpg 800w, https://res.cloudinary.com/indysigner/image/fetch/f_auto,q_auto/w_1200/https://cloud.netlifyusercontent.com/assets/344dbf88-fdf9-42bb-adb4-46f01eedd629/107f0a17-6c3c-4678-ae1c-d67d231d80c4/watch-brad-neathery-unsplash.jpg 1200w, https://res.cloudinary.com/indysigner/image/fetch/f_auto,q_auto/w_1600/https://cloud.netlifyusercontent.com/assets/344dbf88-fdf9-42bb-adb4-46f01eedd629/107f0a17-6c3c-4678-ae1c-d67d231d80c4/watch-brad-neathery-unsplash.jpg 1600w, https://res.cloudinary.com/indysigner/image/fetch/f_auto,q_auto/w_2000/https://cloud.netlifyusercontent.com/assets/344dbf88-fdf9-42bb-adb4-46f01eedd629/107f0a17-6c3c-4678-ae1c-d67d231d80c4/watch-brad-neathery-unsplash.jpg 2000w" src="https://res.cloudinary.com/indysigner/image/fetch/f_auto,q_auto/w_400/https://cloud.netlifyusercontent.com/assets/344dbf88-fdf9-42bb-adb4-46f01eedd629/107f0a17-6c3c-4678-ae1c-d67d231d80c4/watch-brad-neathery-unsplash.jpg" sizes="100vw" alt="&#39;Man in a watch typing&#39; by Brad Neathery on Unsplash" /> </a> <figcaption class="op-vertical-bottom"> (Image credit: ‘Brad Neathery’ on <a href='https://unsplash.com/'>Unsplash</a>) (<a href='https://cloud.netlifyusercontent.com/assets/344dbf88-fdf9-42bb-adb4-46f01eedd629/107f0a17-6c3c-4678-ae1c-d67d231d80c4/watch-brad-neathery-unsplash.jpg'>Large preview</a>) </figcaption> </figure> <div class="sponsors__lead-place"></div> <h3 id="frequently-intersecting-constraints">Frequently Intersecting Constraints</h3> <p>While not all part-time teams will experience these additional challenges, in my experience part-time work often overlaps with remote work, different time zones and availabilities, and classification of workers as temporary, contractors, or interns instead of employees. This is not an article about any of these things, but they bear mentioning.</p> <p>Part-time work adds significant overhead to the already difficult task of finding a regular time when everyone is available to meet. If some team members work in the mornings and others in the evenings or are located across the world from each other, scheduling quickly becomes impossible. GitLab has published <a href="https://about.gitlab.com/handbook/communication/">extensive documentation on remote communication</a> that might be helpful.</p> <p>Working with contractors, student interns, temporary hires, or other non-permanent teams or team members brings its own advantages and challenges. That said, however, someone got to the table, the Agile framework treats them as an equal member of the team and stakeholder in the project.</p> <figure class=" "> <a href="https://cloud.netlifyusercontent.com/assets/344dbf88-fdf9-42bb-adb4-46f01eedd629/7abbdc79-3c84-487b-a3b9-c9b9d099b3d6/meeting-you-x-ventures-unsplash.jpg"> <img srcset="https://res.cloudinary.com/indysigner/image/fetch/f_auto,q_auto/w_400/https://cloud.netlifyusercontent.com/assets/344dbf88-fdf9-42bb-adb4-46f01eedd629/7abbdc79-3c84-487b-a3b9-c9b9d099b3d6/meeting-you-x-ventures-unsplash.jpg 400w, https://res.cloudinary.com/indysigner/image/fetch/f_auto,q_auto/w_800/https://cloud.netlifyusercontent.com/assets/344dbf88-fdf9-42bb-adb4-46f01eedd629/7abbdc79-3c84-487b-a3b9-c9b9d099b3d6/meeting-you-x-ventures-unsplash.jpg 800w, https://res.cloudinary.com/indysigner/image/fetch/f_auto,q_auto/w_1200/https://cloud.netlifyusercontent.com/assets/344dbf88-fdf9-42bb-adb4-46f01eedd629/7abbdc79-3c84-487b-a3b9-c9b9d099b3d6/meeting-you-x-ventures-unsplash.jpg 1200w, https://res.cloudinary.com/indysigner/image/fetch/f_auto,q_auto/w_1600/https://cloud.netlifyusercontent.com/assets/344dbf88-fdf9-42bb-adb4-46f01eedd629/7abbdc79-3c84-487b-a3b9-c9b9d099b3d6/meeting-you-x-ventures-unsplash.jpg 1600w, https://res.cloudinary.com/indysigner/image/fetch/f_auto,q_auto/w_2000/https://cloud.netlifyusercontent.com/assets/344dbf88-fdf9-42bb-adb4-46f01eedd629/7abbdc79-3c84-487b-a3b9-c9b9d099b3d6/meeting-you-x-ventures-unsplash.jpg 2000w" src="https://res.cloudinary.com/indysigner/image/fetch/f_auto,q_auto/w_400/https://cloud.netlifyusercontent.com/assets/344dbf88-fdf9-42bb-adb4-46f01eedd629/7abbdc79-3c84-487b-a3b9-c9b9d099b3d6/meeting-you-x-ventures-unsplash.jpg" sizes="100vw" alt="&#39;Untitled&#39; (Meeting) by You X Ventures on Unsplash." /> </a> <figcaption class="op-vertical-bottom"> (Image credit: ‘You X Ventures’ on <a href='https://unsplash.com/'>Unsplash</a>) (<a href='https://cloud.netlifyusercontent.com/assets/344dbf88-fdf9-42bb-adb4-46f01eedd629/7abbdc79-3c84-487b-a3b9-c9b9d099b3d6/meeting-you-x-ventures-unsplash.jpg'>Large preview</a>) </figcaption> </figure> <h3 id="redefining-rituals-for-part-time-teams">Redefining Rituals For Part-Time Teams</h3> <p>Now that we’ve framed the challenges that part-time work creates, let’s focus on solutions. While I’ve seen a number of successful modifications to Agile rituals for part-time teams, I reached out to Professor Armando Fox, co-author of <em>Engineering Software as a Service: An Agile Approach Using Cloud Computing</em> with David Patterson. In an email interview, he emphasized two key goals of agile rituals to retain:</p> <blockquote>“The reason Agile is a good fit [for part-time teams] is the idea of using user stories as the unit of work. The key to doing this successfully is up-front planning and continuous check-ins.”<br /><br />&mdash; Armando Fox</blockquote> <p>Sprint planning condenses up-front planning to a single high-value meeting. For part-time teams, the product owner, scrum master, and team lead (who may be only one or two people, more on that later) should do as much pre-meeting work as possible to define well-scoped tickets for the individual contributors to estimate and take. Fox said &ldquo;if stories are tightly-circumscribed, branches are short-lived, stories require modest amounts of code that can be delivered with good test coverage, and code quality is maintained through continuous code review (pull requests) as well as the use of code quality measurement tools, the team can successfully divide-and-conquer even if they’re not always working at the same time.&rdquo; That’s definitely a lot of &ldquo;if&rdquo; statements, working in this manner will take dedicated effort from the entire team, but should result in a quality product.</p> <p>The other half of the equation is continuous check-ins. Agile’s daily stand-ups work great for co-located full-time teams, if everyone’s in the office by 9 or 10 AM the meeting happens more or less naturally. It’s tempting to replace this with an asynchronous check, like status-report emails, but Fox advocates that teams stick to the ritual. &ldquo;The team needs to check-in frequently &mdash; we recommend daily 5-minute stand-ups &mdash; so that any red flags can be spotted early. Even part-time teams can find 5 minutes a day that the whole team is available. Email isn’t good for this; an interactive meeting, where people can also mention blocking items and others can immediately speak up with suggestions, is the best format,&rdquo; he wrote.</p> <p>For a part-time team, it may also be tempting to do away with regular meetings entirely and rely solely on the start and end of sprint check-ins. Fox warns that &ldquo;every team [that he has] coached at Berkeley has said that they quickly realized that once-a-week team meetings were nowhere near enough to keep everyone on the same page.&rdquo;</p> <p>Sprint reviews and retrospectives are important components of Agile. If teams do not regularly evaluate their working practices and performance, bad interactions will continue unchecked and discontent will grow. However, the velocity measurement and end-of-sprint re-assignment tasks can be handled by the scrum master outside of meeting times, and the team leader can use one-on-one meetings and their perception of team mood in stand-ups and sprint planning to reduce the need for sprint review and retrospective.</p> <p>If you absolutely need to cut back on the number and duration of Agile meetings, cut review and retrospective first. That said, it is important to celebrate the team’s progress each sprint and give people space to air grievances. A decent compromise can be to extend the last stand-up of each sprint to accomplish this communication within the team.</p> <div class="sponsors__lead-place"></div> <h3 id="defining-roles-on-a-part-time-agile-team">Defining Roles On A Part-Time Agile Team</h3> <p>This section depends entirely on the composition of the team. However, there are a few useful heuristics for assigning roles. Responsibilities assigned should minimize communication overhead (which scales worse-than-linearly with team size), fit individual contributors&rsquo; abilities, and account for team members&rsquo; schedules and availability.</p> <p>For this section, I turned to Professor Barbara Johnson, who teaches a team software development course that I am currently enrolled in at Grinnell College. She wrote:</p> <blockquote>“I have sometimes seen teams come to rely upon what might be called a 'chief organizer' who combines the roles of not only a scrum master (who organizes the team) but also the product owner (who coordinates and documents the client’s needs and feedback). This lessens the cognitive overhead of the rest of the team, who then can focus more on moving the project’s code and testing suite forward with each iteration.”</blockquote> <p>This matches my experience with part-time teams.</p> <p>If possible, condense the managerial positions (team lead, product manager, scrum master) into a single role and assign that role to the &ldquo;fullest-time&rdquo; team member. If you have a team of 10 where only 1 person is full-time or otherwise has greater availability, that person should have as many organizational and communication responsibilities as feasible. Part-time teams require just as much communication as full-time teams and an even greater logistical effort, so concentrating that work in one person massively reduces communication overhead.</p> <p>However, frequently this isn’t possible, either because no one has extra availability or because those people are better suited to individual contributor roles. In that case, I still advocate for condensing managerial responsibilities as much as possible but breaking the product owner back out into its own role. In this case, it’s important to be realistic when estimating how much further work these people will be able to do on user stories considering their other work for the team and client.</p> <p>Most of the members of the part-time team will be individual contributors. There are two competing philosophies for individual contributors: generalist teams and teams of specialists. Imagine that your team is developing a web application. A generalist team would be composed of entirely full-stack developers. These developers would never be blocked on others&rsquo; work as, in theory, they are equally comfortable on anything from design to deployment. Alternately, if a designer, front-end engineer, back-end engineer, and site reliability engineer comprise a team, they will be fast and effective at their own work because they only spend their time on the thing that they’re best at.</p> <p>As a team organizer, you may find yourself with a team of generalists, a team of specialists, or a mix. Putting together a part-time team of solid performers is hard enough without restricting yourself to one type of individual contributor, so, fortunately, both types bring something useful to the table. If you can recognize which of your individual contributors are generalists and which are specialists, you can assign tasks more effectively to maximize the impact of their limited work time.</p> <p>Finally, on teams where people are working ten or fewer hours per week, it is tempting to throw out roles entirely and just say &ldquo;do what you can.&rdquo; Per our theme, these super-part-time teams need even more structured communication but have even less time for it. If everyone has such limited, scattered availability that you cannot justify assigning roles at all, it’s probably worth re-examining the structure, goals, and feasibility of the project.</p> <figure class=" "> <a href="https://cloud.netlifyusercontent.com/assets/344dbf88-fdf9-42bb-adb4-46f01eedd629/6f510c00-a18e-41c2-87fc-899948283ffe/man-saulo-mohana-unsplash.jpg"> <img srcset="https://res.cloudinary.com/indysigner/image/fetch/f_auto,q_auto/w_400/https://cloud.netlifyusercontent.com/assets/344dbf88-fdf9-42bb-adb4-46f01eedd629/6f510c00-a18e-41c2-87fc-899948283ffe/man-saulo-mohana-unsplash.jpg 400w, https://res.cloudinary.com/indysigner/image/fetch/f_auto,q_auto/w_800/https://cloud.netlifyusercontent.com/assets/344dbf88-fdf9-42bb-adb4-46f01eedd629/6f510c00-a18e-41c2-87fc-899948283ffe/man-saulo-mohana-unsplash.jpg 800w, https://res.cloudinary.com/indysigner/image/fetch/f_auto,q_auto/w_1200/https://cloud.netlifyusercontent.com/assets/344dbf88-fdf9-42bb-adb4-46f01eedd629/6f510c00-a18e-41c2-87fc-899948283ffe/man-saulo-mohana-unsplash.jpg 1200w, https://res.cloudinary.com/indysigner/image/fetch/f_auto,q_auto/w_1600/https://cloud.netlifyusercontent.com/assets/344dbf88-fdf9-42bb-adb4-46f01eedd629/6f510c00-a18e-41c2-87fc-899948283ffe/man-saulo-mohana-unsplash.jpg 1600w, https://res.cloudinary.com/indysigner/image/fetch/f_auto,q_auto/w_2000/https://cloud.netlifyusercontent.com/assets/344dbf88-fdf9-42bb-adb4-46f01eedd629/6f510c00-a18e-41c2-87fc-899948283ffe/man-saulo-mohana-unsplash.jpg 2000w" src="https://res.cloudinary.com/indysigner/image/fetch/f_auto,q_auto/w_400/https://cloud.netlifyusercontent.com/assets/344dbf88-fdf9-42bb-adb4-46f01eedd629/6f510c00-a18e-41c2-87fc-899948283ffe/man-saulo-mohana-unsplash.jpg" sizes="100vw" alt="&#39;At the bustling Times Square&#39; by Saulo Mohana on Unsplash" /> </a> <figcaption class="op-vertical-bottom"> (Image credit: ‘Saulo Mohana’ on <a href='https://unsplash.com/'>Unsplash</a>) (<a href='https://cloud.netlifyusercontent.com/assets/344dbf88-fdf9-42bb-adb4-46f01eedd629/6f510c00-a18e-41c2-87fc-899948283ffe/man-saulo-mohana-unsplash.jpg'>Large preview</a>) </figcaption> </figure> <h3 id="client-communication">Client Communication</h3> <p>Software development is slow, complex work, and part-time teams only magnify that truth. Agile includes the client in the process by writing user stories, rapid prototyping, a quick release schedule, and consistent communication.</p> <p>As a part-time team, communicate reasonable expectations to the client. For a half-time team, remember that development time is cut by more than half, build an extra buffer into doubled estimates. As development time is limited, it is critical to solicit complete, accurate specifications when meeting with the client or end-users to avoid wasting your efforts.</p> <p>Don’t let part-time work make you fall behind on client communication. Even if there is very little progress to report, soliciting regular feedback and posting updates at a reasonable cadence should increase the client’s patience with the slow development pace.</p> <h3 id="conclusion-goals-methods">Conclusion: Goals &gt; Methods</h3> <p>You can get a lot done in a part-time schedule. Outside of coding, 10-20 hours per week is enough time to train for a first marathon. With a strong team and good working practices, it is enough time to bring a great product to the market. Using Agile to encourage up-front planning and continuous check-ins with user stories, regular stand-ups, and well-defined roles will allow even part-time teams to overcome communication barriers and work effectively towards a shared goal.</p> <h4><span class="rh">Further Reading</span> on SmashingMag:</h4> <ul> <li><a title="Read 'Bringing A Healthy Code Review Mindset To Your Team'" href="https://www.smashingmagazine.com/2019/06/bringing-healthy-code-review-mindset/" rel="bookmark">Bringing A Healthy Code Review Mindset To Your Team</a></li> <li><a title="Read 'Building Diverse Design Teams To Drive Innovation'" href="https://www.smashingmagazine.com/2018/05/building-diverse-design-teams-innovation/" rel="bookmark">Building Diverse Design Teams To Drive Innovation</a></li> <li><a title="Read 'The Case For Brand Systems: Aligning Teams Around A Common Story'" href="https://www.smashingmagazine.com/2019/06/case-brand-systems-align-teams/" rel="bookmark">The Case For Brand Systems: Aligning Teams Around A Common Story</a></li> <li><a title="Read 'Creating Authentic Human Connections Within A Remote Team'" href="https://www.smashingmagazine.com/2019/08/creating-authentic-human-connections-remote-team/" rel="bookmark">Creating Authentic Human Connections Within A Remote Team</a></li> </ul> <div class="signature"> <img src="https://www.smashingmagazine.com/images/logo/logo--red.png" alt="Smashing Editorial"> <span>(dm, yk, il)</span> </div>

Text-To-Speech And Back Again With AWS (Part 2)

Text-To-Speech And Back Again With AWS (Part 2)

Text-To-Speech And Back Again With AWS (Part 2)

Philip Kiely

This is the second half of a series on transforming content between text and speech on AWS. In part one, we used Amazon Polly to narrate blog posts and embedded the content in a website using an audio tag. In this article, we will use speech-to-text to draft transcripts of podcasts and interviews for publication. Finally, we will evaluate the overall accuracy of these format-transformation technologies by running a few samples through round-trip transcriptions.

Speech-To-Text Project

In 2012, Patrick McKenzie (a.k.a. patio11, of Kalzumeus and Stripe) and Ramit Sethi (of I Will Teach You To Be Rich) sat down and recorded two hour-long podcasts. As I am a fan of both of their work, I probably would have listened to the podcasts, but I definitely wouldn’t have listened to them several times each. The transcripts, on the other hand, I can reread and reference at my leisure. I also freely recommend the series when talking to people about freelancing, knowing that I am giving them a resource that takes a quarter the time to read that it takes to listen to. Even though the content of the podcasts and transcripts are exactly the same, the combination is 10× as useful as the podcast alone.

In the first transcript, McKenzie says that he paid 75 dollars and waited a couple of days to have the podcast transcribed by a professional service. His other option was to transcribe it himself. When I worked for my college’s newspaper, I frequently transcribed interviews. Over time, I got more practiced at the skill and improved from taking four minutes of transcribing per minute of audio to three minutes per minute. While I imagine that a professional with specialized equipment and a faster typing speed could drop below two minutes per minute, as an amateur transcriber McKenzie likely saved himself five or six hours of work by paying for the service.

Seven years later, it seems like he should have another option: an automated transcription with Amazon Web Services. As we’ll see, the transcription would require significantly more editing before it would be publication-ready, but automated transcription has two killer features compared to hiring a professional: he would have gotten the transcription back in real time for about a dollar. In this article, I’ll explain how you can use Speech-to-Text on AWS to easily make your content multi-format and ideas for using Amazon Transcribe in more complex applications.

Amazon provides a console to experiment with Transcribe. To access the console, log on to your AWS account and search “Transcribe” in the services search field. The console exposes the full power of Transcribe, and if you’re only planning on transcribing a few pieces of content per week then using the console is a solid long-term option. The transcription console gives you two options: streaming audio and uploading a file.

Amazon Transcribe Console Real-Time Transcription Tab
You can launch live transcriptions in the real-time transcription tab. (Large preview)

The “real-time transcription” tab offers the ability to speak into the microphone and have a transcription generated in real time. Speaking deliberately, and with my computer’s onboard microphone, I was able to transcribe the sentence “Smashing Magazine publishes technical content for developers worldwide” on the first try. However, when I tried to transcribe the previous paragraph at a more conversational speed and articulation, there were numerous errors.

“Amazon provides a consul to experiment with transcribe access. The console log onto a ws account and search transcribed in the services search field, The consul exposes the full power of transcribed. And if you only planning on transcribing a few pieces of content a week than using the consul is a solid long term option. The transcription Council gives you two options streaming audio and uploaded a file.”

In addition to simply missing some words, Transcribe has issues with homophones and punctuation. In the first sentence, it transcribed “console” as “consul.” This homophone error can only be corrected by evaluating each transcribed word in the context of the sentence and adjusting according to the algorithm’s best guess. The first sentence also runs into the second, which throws off the grammatical structure and meaning of the entire rest of the paragraph. Beyond contextual clues, Amazon Transcribe seems to use pauses to determine punctuation. That said, I am using a built-in microphone, transcribing in real time, and to be honest I don’t have the clearest speaking voice. Let’s see if we can find improvements by mitigating each of these factors.

I used a Blue Yeti, a midrange all-purpose recording microphone, to stream audio into the console. As you can see in the image below, improved audio quality did not significantly improve transcription quality. I hypothesize that while a poor quality audio input would further degrade the text’s accuracy, improvement past the threshold of a built-in microphone or cheap webcam does not provide the quality transcription that we are looking for.

Results of using a good microphone
Improving microphone quality does not materially improve transcription quality. (Large preview)

Using the same microphone, I recorded the same paragraph as an .mp3 file and uploaded it for transcription. To do the same, navigate to the “Transcription Jobs” panel and click the orange button with the text “Create Job.” This will bring you to a form where you can configure the transcription job.

Transcription job form top half
A transcription job requires a title, language, input source, and file format. (Large preview)

The job name is arbitrary, just choose something that will be meaningful to you when you review the completed jobs. You can select from about a dozen languages, with English and Spanish available in regional variants. The transcription service draws its input from S3, so you’ll need to upload your audio file to the storage service before you can run the job. You can upload the file in one of four supported formats: .mp3, .mp4, .wav, and .flac.

Transcription job form bottom half
A transcription job offers data location and audio identification options. (Large preview)

If you want to keep the output data in a permanent location, change “Data location” to “Customer specified” and enter the name of an S3 bucket that you can write to. Finally, you can choose between two identification options. Channel identification tags input with the channel that it came from in the audio file, while “Speaker identification” attempts to recognize distinct voices in the audio. If you are transcribing a multi-person podcast or interview, Speaker identification is a useful feature, but it is not applicable to this simple test.

Inspecting the output, unfortunately, reveals that the transcription is no more accurate than the real-time console transcription. However, running a transcription job does provide more data. In addition to the transcription text, the job outputs JSON with each word, its confidence score, and alternate words considered, if any. If you want to write your own natural language processing code to try to improve the readability of the output, this data will give you what you need to get started.

Finally, I had a friend who hosts a local radio show narrate the same paragraph for live transcription. Despite his steady pace and clear enunciation, the resulting text was no more accurate than any of my live transcription attempts. While a professional narrator may be able to achieve even more specific pronunciation, the technology is really only useful if it is widely usable.

Unfortunately, it seems that the transcription quality is too low to fully automate our proposed use case. Depending on your typing speed, running audio through Amazon Transcribe and then editing by hand may be faster than simple manual transcription, but it is not a turnkey solution for speech-to-text that compares to what exists for text-to-speech. For specific domains, you can define Custom Vocabularies to improve transcription accuracy, but out of the box, the service is insufficiently advanced.

As with most of its services, AWS offers an API for using Transcribe. Unless you have a large number of files to transcribe or you need to transcribe audio in response to events, I would recommend using the console and save yourself the time of setting up programmatic access.

To use Transcribe from the AWS CLI, you’ll need a JSON file and a terminal command.

aws transcribe start-transcription-job \
     --region YOUR_REGION_HERE \
     --cli-input-json YOUR_FILE_PATH.json

At YOUR_FILE_PATH.json, you’ll need a .json file with four pieces of information. As above, you can set any meaningful string as the TranscriptionJobName and any supported language as the LanguageCode. The CLI supports the same four media file formats and still reads the media file from S3.

{
    "TranscriptionJobName": "request ID", 
    "LanguageCode": "en-US", 
    "MediaFormat": "mp3", 
    "Media": {
        "MediaFileUri": "https://YOUR_S3_BUCKET/YOUR_MEDIA_FILE.mp3"
    }
}

This kind of access is also available through a Python SDK. Amazon recommends Transcribe for voice analytics, search and compliance, advertising, and closed-captioning media. In each of these cases, the transcribed text is an input to another system like Amazon Comprehend rather than the final output. Thus, as a developer, it is important to design your system and limit its use cases to tolerate the range of errors that Transcribe will feed into your application.

Note: For more on using Amazon Transcribe and other services programmatically, check out Amazon’s getting started guide.

Round Trip Accuracy

While the live performance of Amazon Transcribe was somewhat disappointing, we can investigate the theoretical maximum accuracy of the system by transcribing something that was read by Amazon Polly. The two services should be using compatible pronunciation libraries and speech cadences, so text input into Amazon Polly should survive the round trip more or less intact. Of course, we will stick with the same test paragraph.

Lo and behold, this is the only strategy that has made the transcription noticeably better:

“Amazon provides a console to experiment with transcribe. To access the console, log onto your AWS account and search transcribing the service’s search field. The console exposes the full power of transcribe, and if you’re only planning on transcribing a few pieces of content per week than using the console is a solid long term option. The Transcription council gives you two options. Streaming audio and uploading a file.”

Stubborn errors persist (“council” versus “console” comes in at 70% confidence) but overall the text is a few edits away from useable. However, most of us don’t speak like synthesized robots, so this quality is unavailable to us at the time of writing.

Conclusion

While the quality of output speech and text are noticeably lesser than that of a person, these services cost so little that they are a strong alternative for many applications. Text-to-speech, at 4 dollars per million characters (16 dollars per million for the superior neural voices), can narrate articles in seconds for pennies. Speech-to-text, at .04 cents per second, can transcribe podcasts in minutes for about a dollar. Of course, prices may change over time, but historically as technologies like these improve, they tend to become less expensive and more effective.

Because of the low cost, you can experiment with these technologies for things like improving your personal productivity. When biking or driving to work, it is impossible to type notes or an outline a project, however, speaking and automatically transcribing a stream-of-consciousness narration would get a lot of planning done. Journalists frequently transcribe long interviews, a process which AWS can automate by tagging the voices of people speaking in a recording. On the other side of the writing process, having a steady, robotic voice read your work back to you can help you identify errors and awkward phrasing.

These technologies already have a number of use cases, but that will only expand over time as the technologies improve. While text-to-speech is reaching near-perfect accuracy in pronunciation, especially when assisted by pronunciation alphabets and tags, the synthesized voice still doesn’t sound fully natural. Speech-to-text systems are pretty good at transcribing clear speech but still struggle with punctuation, homophones, and even moderately quick speech. Once the technologies overcome these challenges, I anticipate that most applications will have a use for at least one of them.

Smashing Editorial (dm, yk, il)

Text To Speech With AWS

Text To Speech With AWS

Text To Speech With AWS

Philip Kiely

This two-part series presents three projects that teach you how to use AWS (Amazon Web Services) to transform text between its written and spoken states. The first project will use text to speech to turn a blog post or other written content into a spoken .mp3 file to give more options to blind and dyslexic users of your site.

In the next article, we will embark on the return journey, from speech to text, and consider the accuracy of these transcriptions by sending various samples through a round-trip translation. To follow these tutorials, you will need an AWS account with billing enabled, though the tutorials will stay well within the constraints of free-tier resources. Examples will focus on using the AWS console, but I will also demonstrate the AWS CLI (Command Line Interface), which requires basic command line knowledge.

Introduction And Motivation

Most of the internet is text-based. Text is lightweight (1 byte per letter), widely supported, easy to interpret, and has a precedent as old as the internet as the default medium of online communication. Sending written text predates the internet: telegraphs carried text over wires hundreds of years ago and physical mail has transmitted writing for centuries. Voice transmission over radio and telephone also predates the internet, but did not translate to the same foundational medium that text did online. This is in almost all cases a good thing, again, text is lightweight and easy to interpret compared to audio. However, transforming between voice and text can add powerful functionality to and improve the accessibility of a wide variety of applications.

It has always been possible to transform between audio and text, you can read a written speech or transcribe an oral sermon. Indeed, if we think back to the telegram, trained operators transcoded Morse Code messages to words. In each example, it has always been very labor intensive to move from speech to writing or back, even with specialized training and equipment. With a variety of cloud services, we can automate these processes to allow transitioning between mediums in seconds without any human effort, which expands the possible use cases.

The most obvious benefit of implementing appropriate text to speech and speech to text options is accessibility. A visually impaired or dyslexic user would benefit from a narrated version of an article, while a deaf person could become a member of your podcasting audience by reading a transcript of the show.

Text to Speech Project

Say you wanted to add narrated versions of every post to your blog. You could purchase a microphone and invest hours into recording and editing spoken renditions of each post. This would result in a superior listener experience, but if you want most of the benefit for only a couple of minutes and a few pennies per post, consider using AWS instead. If you are the sort of person who regularly updates and revises older or evergreen content, this method also helps you keep the spoken version up to date with minimal effort.

We will begin with text to speech using Amazon Polly. For simple exploration, AWS provides a graphical user interface through its online console. After logging in to your AWS account, use the “Services” menu to find “Amazon Polly” or go to https://us-east-1.console.aws.amazon.com/polly/home/SynthesizeSpeech.

Using the Polly Console

Amazon Polly Console
Amazon Polly provides a console to perform text-to-speech operations. (Large preview)

You can use the Amazon Polly console to read 3,000 characters (about 500 words) and get an audio stream or immediate download. If you need up to 100,000 characters (about 16,600 words) read, your only option is to have AWS store the result in S3 after it has finished processing, which can take a couple of minutes. At the time of writing, Amazon Polly does not support inputs of over 100,000 billable characters, if you want to convert a longer text like a book you will most likely have to do so in chunks and concatenate the audio files yourself.

A “billable character” is one that the service actually pronounces. Specifically, that means that SSML tags are not billable characters, which we will cover later. For your first year of using Amazon Polly, you get 5 million billable characters per month for free, which is more than enough to run the examples from this article and do your own experimentation. Beyond that, Amazon Polly costs four dollars per million billable characters at the time of writing, meaning that converting a standard-length novel would cost about two dollars.

The console also allows you to change the language, region, and voice of the reader. Though this article only covers English, at the time of writing AWS supports 21 languages and 29 distinct language-region pairs. While most regions only have one or two voices, popular ones like United States English have several options to chose between.

Amazon Polly narrated text is very obviously read by a robot, but the resulting audio is quite listenable.

I often prefer to use the UK English voice “Brian.” To my American ears, the British accent covers some of the inflections in robotic speech and makes for a smoother listening experience. To be clear, Amazon Polly narrated text is very obviously read by a robot, but the resulting audio is quite listenable.

It is significantly better than the built-in reader that the MacOS say terminal command uses, and is comparable to the speech quality of voice assistants like Siri and Alexa.

Writing SSML

If you want full control over the resultant speech, you can take the time to tag your input with SSML. SSML (Speech Synthesis Markup Language) is a standardized language for representing verbal cues in text. Like HTML, XML, and other markup languages, it uses opening and closing tags. Amazon Polly supports SSML input, and tags do not count as “billable characters.” Alexa skills also use SSML for pre-programmed responses, so it is a worthwhile language to know.

The foundational tag, <speak>, wraps everything that you want read. Like HTML, use <p> to divide paragraphs, which results in a significant pause in the narration. Smaller pauses come from punctuation, and you always have the option to insert pauses of up to ten seconds with <break>.

SSML provides <say-as>, a very flexible tag that supports everything from pronouncing phone numbers to censoring expletives using the interpret-as argument. Consider the options from this tag with the following sample.

<speak>
Call 5551230987 by 11'00" PM to get tips on writing clean JavaScript.<break time="1s"/>
Call <say-as interpret-as="telephone">5551230987</say-as> by 11'00" PM to get tips on writing clean <say-as interpret-as="expletive">JavaScript</say-as>
</speak>

Further flexibility comes from the <prosody> tag, which provides you with control over the rate, pitch, and volume of speech. Unfortunately, at the time of writing Polly does not support the <voice> tag, which Alexa skills can use to speak in multiple standard voices, but does support the <lang> tag that allows voices in one language to correctly pronounce words from other languages. In this example, <lang> corrects the pronunciation of “tag” from American to German.

<speak>
    Guten tag, where is the airport?<break time="1s"/>
    <lang xml:lang="de-DE">Guten tag</lang>, where is the airport>
</speak>

Finally, if you want to customize pronunciation within a language, Amazon Polly supports the <phoneme> tag.

My last name, Kiely, is spelled differently than it is pronounced. Using the x-sampa alphabet, I am able to specify the correct pronunciation.

<speak>
    Philip Kiely<break time="1s"/>
    Philip <phoneme alphabet="x-sampa" ph="ˈkaI.li">Kiely</phoneme>
</speak>

This is not an exhaustive list of the customization options available with SSML. For a complete reference, visit the documentation.

Writing Lexicons

If you want to specify a consistent custom pronunciation or expand an abbreviation without tagging each instance with a phoneme tag, or you are using plain text instead of SSML, Amazon Polly supports lexicons of custom pronunciations. You can apply up to five lexicons of up to 4,000 characters each per language to a narration, though larger lexicons increase the processing time.

As with before, I want to make sure that Amazon Polly says my name correctly, but this time I want to do so without using SSML. I wrote the following lexicon:

<?xml version="1.0" encoding="UTF-8"?>
<lexicon version="1.0"
      xmlns="http://www.w3.org/2005/01/pronunciation-lexicon"
      xmlns:xsi="http://www.w3.org/2001/XMLSchema-instance"
      xsi:schemaLocation="http://www.w3.org/2005/01/pronunciation-lexicon
        http://www.w3.org/TR/2007/CR-pronunciation-lexicon-20071212/pls.xsd"
      alphabet="x-sampa"
      xml:lang="en-US">
  <lexeme><grapheme>Kiely</grapheme><alias>ˈkaIli</alias></lexeme>
</lexicon>

The <?xml?> header and <lexicon> tag will stay mostly constant between lexicons, though the <lexicon> tag supports two important arguments. The first, alphabet, lets you choose between x-sampa and ipa, two standard pronunciation alphabets. I prefer x-sampa because it uses standard ASCII characters, so I am unlikely to encounter encoding issues. The xml:lang argument lets you specify language and region. A lexicon is only usable by a voice from that language and region.

The lexicon itself is a sequence of <lexeme> tags. Each one contains a <grapheme> tag, which contains the original text, and the <alias> tag, which describes what you want said instead. Aliases go beyond pronunciation, you can use them for expanding abbreviations (“Jr” becomes “Junior”) or replacing words (“Bruce Wayne” becomes “Batman”). A lexicon can have as many lexeme tags as it can fit in the 4,000 character limit.

Amazon Polly Console with lexicon loaded
The included lexicon will modify the pronunciation of the input text. (Large preview)

The screenshot shows the plain text that would be mispronounced and the applied lexicon. Use the “Customize Pronunciation” menu to select up to five uploaded lexicons, uploaded from the left navbar tab “Lexicons.” Listening to the speech verifies that my name is said correctly.

Now that we have full control over the resultant speech, let’s consider how to save the output for use in our application.

Saving and loading from S3

If you want to re-use spoken text in your application, you’ll want to choose the “Synthesize to S3” option in the Amazon Polly console. In this example, I am using the voice “Brian” to perform a surprisingly capable reading of Shakespeare’s sonnet XXIX. We begin by copying in the poem as plain text and selecting “Synthesize to S3,” which launches the following modal.

S3 Synthesize Modal
The 'Synthesize to S3' button gives you options for where to save the resultant file. (Large preview)

S3 buckets have globally unique names, and you can enter any S3 bucket that you own or have the appropriate permissions to. Make sure the bucket allows for making its contents public, as that will be required in a future step. You should also set a “S3 key prefix,” which is a string that will help you identify the output in the bucket. After clicking Synthesize and giving it a moment to process, we navigate to the S3 bucket that we synthesized the speech into.

S3 Bucket main page
A S3 bucket stores your project's files. (Large preview)

The arrow points to the entry in the bucket that we just created. Selecting that item will bring us to the following page.

S3 Bucket file view
For each file, you can make it public using this button. (Large preview)

Follow the arrow to select the “Make Public” option, which will make the file accessible to anyone with a link. Scroll down and copy the link and use it in your application. For example, you can download the poem here. For many applications, you may wish to pass the url to an html <audio> tag to allow for web playback.

We have covered every necessary component for transforming text to speech on AWS. Next, we turn our attention to a more advanced interface that can provide automation potential and save time.

Using the AWS CLI

Back to our hypothetical blog post. The simplest workflow would be to take the final written version of each article, copy it into the console, click the “Synthesize to S3 button,” and embed a download link to the resultant .mp3 file in the blog. Honestly, this is a pretty decent workflow; it is exactly what I do for my personal website. However, AWS offers another option: the AWS CLI.

Make sure that you have installed and configured the AWS CLI appropriately. Begin by entering aws polly help to make sure that Polly is available and to read a list of supported commands. For troubleshooting, see the documentation.

To perform a conversion from the command line, I first copied the poem from earlier into a .txt file. I then ran the following command in terminal (MacOS/Linux):

aws polly synthesize-speech \
    --output-format mp3 \
    --voice-id Joanna \
    --text "`cat sonnetxxix.txt`" \
    poem.mp3

In a few seconds, the resulting .mp3 file was downloaded to my machine, ready for inclusion in my CMS or other application. Note the special characters around the --text argument, this passes the contents of the file rather than just the file name.

Finally, for more advanced applications, Amazon Polly has an SDK for 9 languages/platforms. The SDK would be overkill for these examples, but is exactly what you want for automating Amazon Polly calls, especially in response to user actions.

Conclusion

Text to speech can help you create more versatile, accessible content. Beginning in the Amazon Polly console, we can transform up to 100,000 billable characters in plain text or SSML, make the resulting .mp3 file public, and use that file in an application. We can use the AWS CLI for automation and more convenient access.

Stay tuned for the second installment of the series, we will convert media in the other direction, from speech to text, and consider the benefits and challenges of doing so. Part two will build on the technologies that we have used so far and introduce Amazon Transcribe.

Further Reference

Smashing Editorial (yk,ra)