Using Trello as a Super Simple CMS

Sometimes our sites need a little sprinkling of content management. Not always. Not a lot. But a bit. The CMS market is thriving with affordable, approachable products, so we’re not short of options. Thankfully, it is a very different world to the one that used to force companies to splash out a ga-jillionty-one dollars (not an exact cost: I rounded to the nearest bazillion) for an all-singing, all-dancing, all-integrating, all-personalizing, big-enterprise-certified™ CMS platform.

Sometimes, though, it’s nice to use a really simple tool that anyone updating content on the site is already familiar with, rather than getting to grips with a new CMS. 

I like Trello a lot for managing ideas and tasks. And it has an API. Why not use it as a content source for a web site? I mean, hey, if we can do it with Google Sheets, then what’s to stop us from trying other things?

Hello, Trello

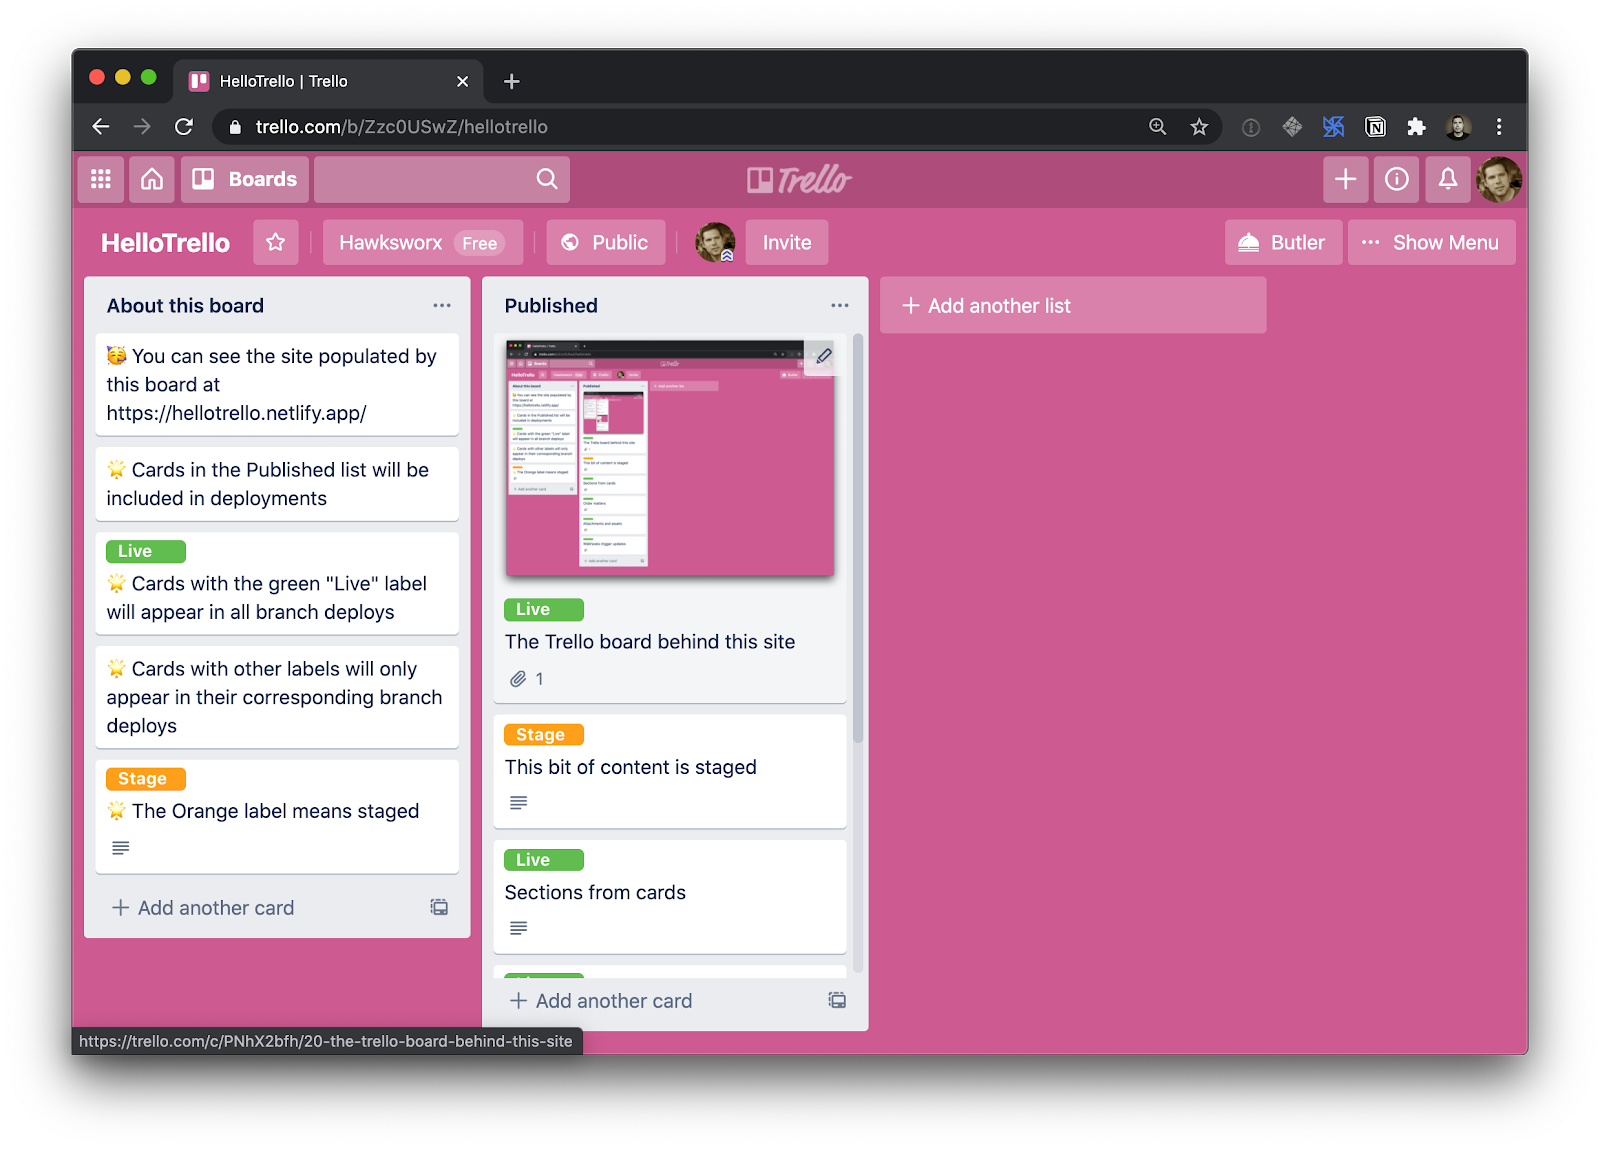
Here’s a simple site to explore. It gets its content from this Trello board and that content is displayed in sections. Each section is populated by the title and description fields of a card in our Trello board.

Two webpages side-by-side. The left is a Trello board with a bright pink background. The right is a screenshot of the build website using Trello data.

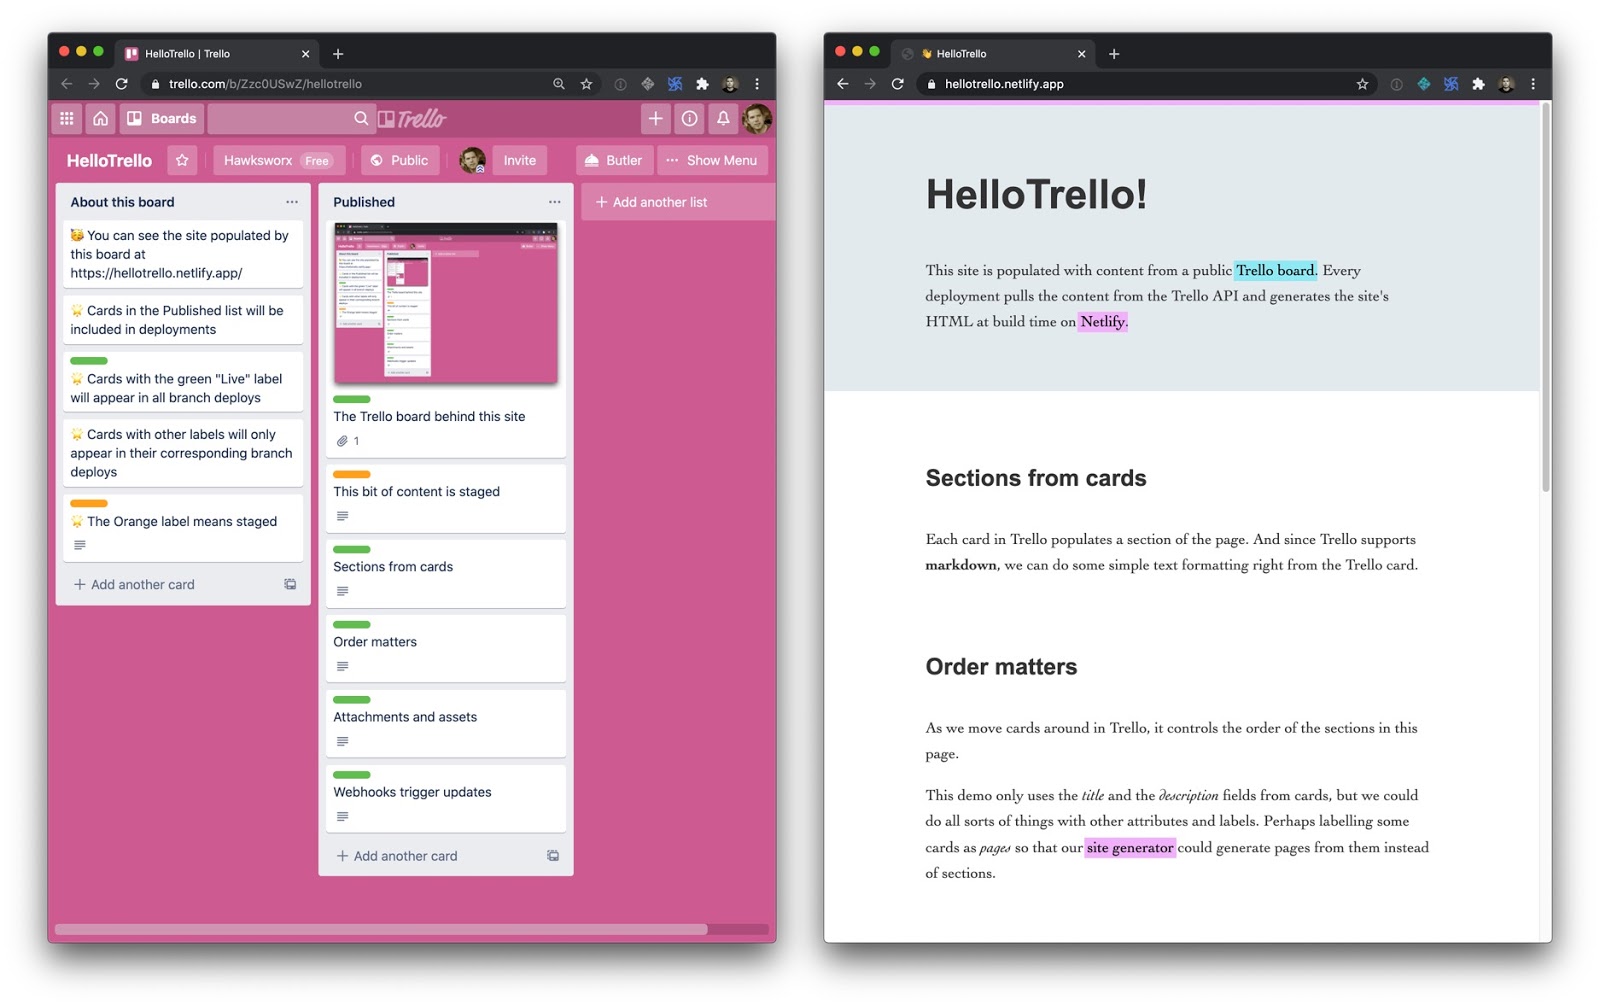
Trello uses Markdown, which comes in handy here. Anyone editing content in a Trello card is able to apply basic text formatting and have the same Markdown flow into the site and transformed into HTML by a build process.

Building blocks

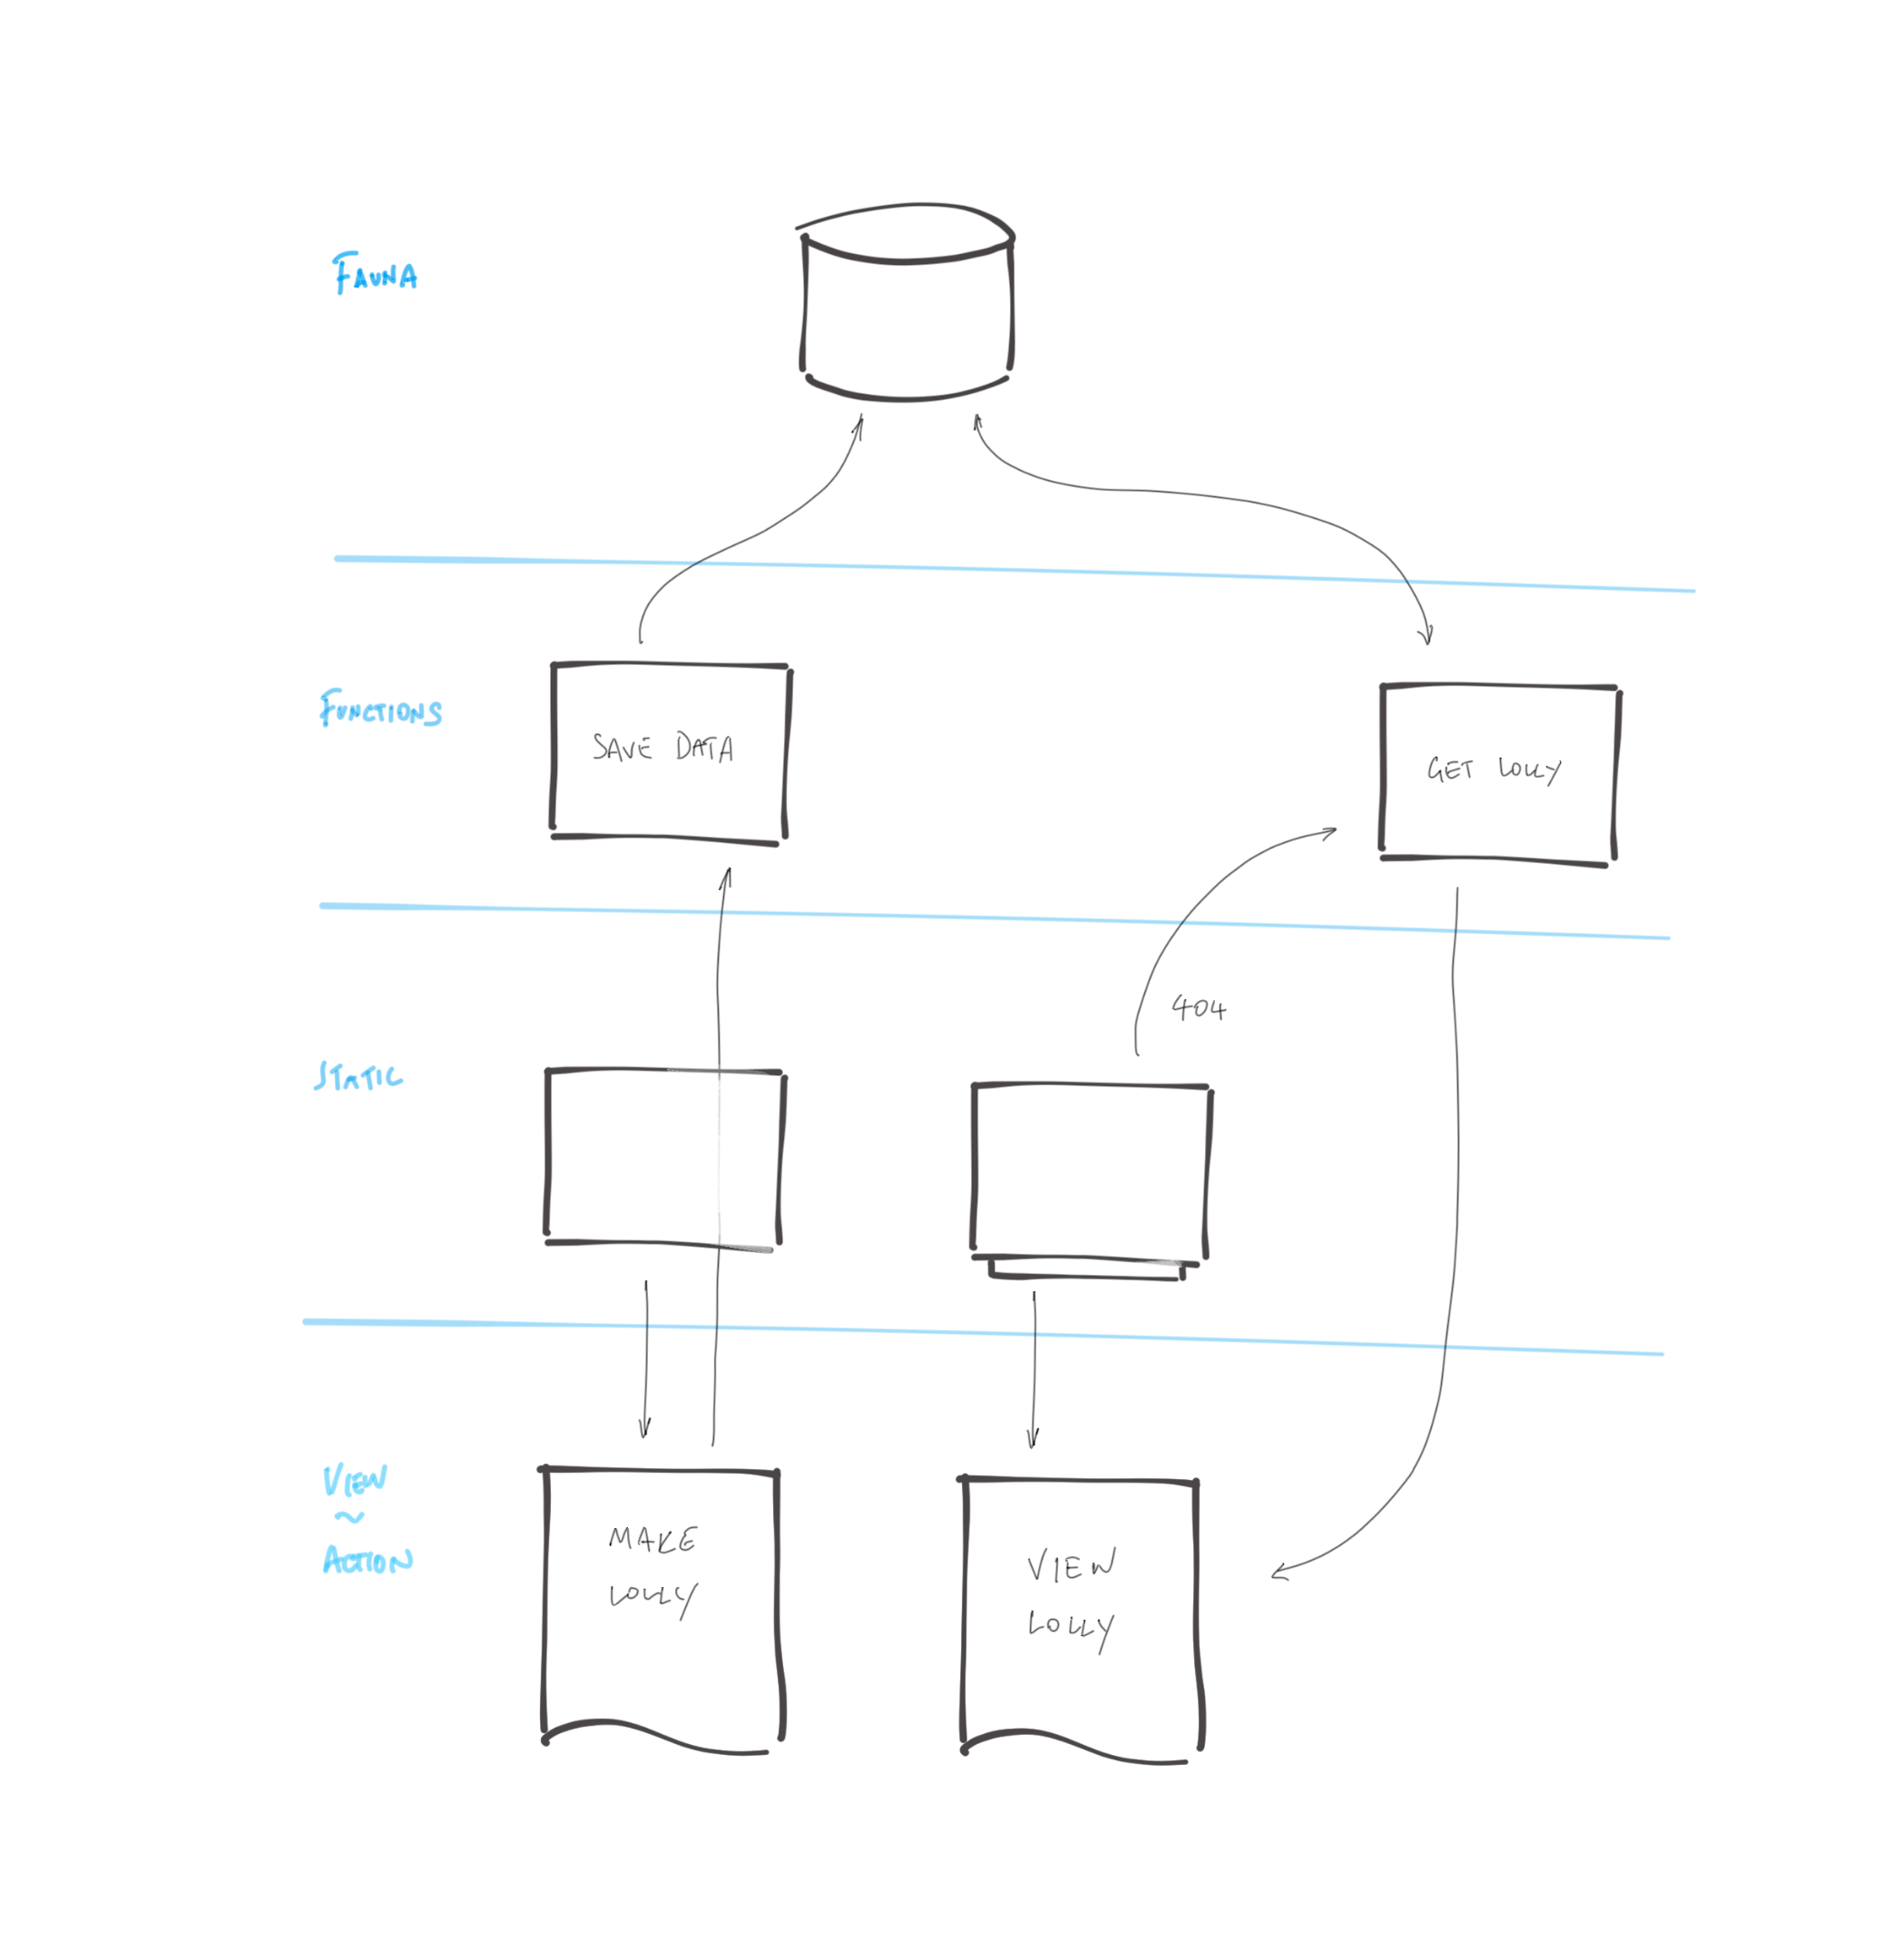
I’m a big fan of this model of running a build which pulls content from various feeds and sources, and then mashes them together with a template to generate the HTML of a website. It decouples the presentation from the management of the content (which is where the term “decoupled” comes from in popular modern CMS products). And it means that we are free to craft the website just the way we want with all of the wizzy tricks and techniques we’ve learned here on CSS-Tricks.

Diagram showing the flow of data, going from Trello as JSON to Build where the data and the template are coupled, then finally, to the front end.

Since we pull in the content at build time, we don’t need to worry about the usage quotas or the performance of our data sources if our sites get popular and bring in loads of traffic. And why wouldn’t they? Look how pretty we made them!

I wanna play!

Fine. You can grab a copy of this site’s code and tinker around to your heart’s content. This version includes information on how to create your own Trello board and use it as the source for content for the build.

If you want to walk through how this works first rather than diving right into it yourself, read on.

Discovering the API

Trello has a well-documented API and set of developer resources. There is also a handy Node module to simplify the task of authenticating and interacting with the API. But you can also explore the API by tinkering with the URLs when you are exploring your Trello boards. 

For example, the URL for the Trello board above is:

https://trello.com/b/Zzc0USwZ/hellotrello

If we add .json to that URL, Trello shows us the content represented as JSON. Take a look.

We can use this technique to inspect the underlying data throughout Trello. Here is the URL for one card in particular:

https://trello.com/c/YVxlSEzy/4-sections-from-cards

If we use this little trick and add .json to the URL we’ll see the data which describes that card

We’ll find interesting things — unique IDs for the board, the list, and the card. We can see the card’s content, and lots of metadata.

I love doing this! Look at all the lovely data! How shall we use it?

Deciding how to use a board

For this example, let’s assume that we have a site with just one page of manageable content. A list or column in our board would be ideal for controlling the sections on that page. An editor could give them titles and content, and drag them around into the order they want.

We’ll need the ID of the list so that we can access it via the API. Luckily, we’ve already seen how to discover that — take a look at the data for any of the cards in the list in question. Each one has an idBoard property. Bingo!

Generating the site

The plan is to fetch the data from Trello and apply it to some templates to populate our site. Most static site generators (SSG) would do the job. That’s what they are good at. I’ll use Eleventy because I think it has the simplest concepts to understand. Plus, it is very efficient at getting data and generating clean HTML with Nunjucks (a popular templating language).

We’ll want to be able to use an expression lin our template that outputs a section element for each item found in a JavaScript object called trello:

<!-- index.njk -->
{% for card in trello %}
<section>
  <h2>{{ card.name }}</h2>
  <div>
    {% markdown %}
      {{- card.desc | safe }}
    {% endmarkdown %}
  </div>
</section>
{% endfor %}

Fetching the data for the build

A popular technique with Jamstack sites like this is to run a build with Gulp, Grunt or [insert latest new build script hotness here] which goes and fetches data from various APIs and feeds, stashes the data in a suitable format for the SSG, and then runs the SSG to generate the HTML. This works rather nicely.

Eleventy simplifies things here by supporting the execution of JavaScript in its data files. In other words, rather than only leveraging data stored as JSON or YAML, it can use whatever gets returned by JavaScript, opening the door to making requests directly to APIs when the Eleventy build runs. We won’t need a separate build step to go off to fetch data first. Eleventy will do it for us.

Let’s use that to get the data for our trello object in the templates.

We could use the Trello Node client to query the API, but as it turns out all the data we want is right there in the JSON for the board. Everything! In one request! We can just fetch it in one go!

// trello.js
module.exports = () => {
  const TRELLO_JSON_URL='https://trello.com/b/Zzc0USwZ/hellotrello.json';

  // Use node-fetch to get the JSON data about this board
  const fetch = require('node-fetch');
  return fetch(TRELLO_JSON_URL)
    .then(res => res.json())
    .then(json => console.log(json));
};

However, we don’t want to show all the data from that board. It includes cards on other lists, cards which have been closed and deleted, and so on. But we can filter the cards to only include the ones of interest thanks to JavaScript’s filter method.

// trello.js
module.exports = () => {
   const TRELLO_JSON_URL='https://trello.com/b/Zzc0USwZ/hellotrello.json'
   const TRELLO_LIST_ID='5e98325d6d6bd120f2b7395f',
 
   // Use node-fetch to get the JSON data about this board
   const fetch = require('node-fetch');
   return fetch(TRELLO_JSON_URL)
   .then(res => res.json())
   .then(json => {
 
     // Just focus on the cards which are in the list we want
     // and do not have a closed status
     let contentCards = json.cards.filter(card => {
       return card.idList == TRELLO_LIST_ID && !card.closed;
     });
 
     return contentCards;
 });
};

That’ll do it! With this saved in a file called trello.js in Eleventy’s data directory, we’ll have this data ready to use in our templates in an object called trello

Done-zo! 🎉

But we can do better. Let’s also handle attached images, and also add a way to have content staged for review before it goes live.

Image attachments

It’s possible to attach files to cards in Trello. When you attach an image, it shows up right there in the card with the source URL of the asset described in the data. We can make use of that!

If a card has an image attachment, we’ll want to get its source URL, and add it as an image tag to what our template inserts into the page at build time. That means adding the Markdown for an image to the Markdown in the description property of our JSON (card.desc). 

Then we can let Eleventy turn that into HTML for us along with everything else. This code looks for cards in our JSON and massages the data into the shape that we’ll need.

// trello.js

// If a card has an attachment, add it as an image 
// in the description markdown
contentCards.forEach(card => {
  if(card.attachments.length) {
    card.desc = card.desc + `\n![${card.name}](${card.attachments[0].url} '${card.name}')`;
  }
});

Now we can move images around in our content too. Handy!

Staging content

Let’s add one more flourish to how we can use Trello to manage our site’s content.

There are a few ways that we might want to preview content before launching it to the world. Our Trello board could have one list for staging and one list for production content. But that would make it hard to visualize how new content lives alongside that which is already published.

A better idea would be to use Trello’s labels to signify which cards are published live, and which should only be included on a staged version of the site. This will give us a nice workflow. We can add more content by adding a new card in the right place. Label it with “stage” and filter it out from the cards appearing on our production branch. 

Screenshot of the Trello board with a bright pink background. It has cards in a column called Published.
Label hints in Trello showing what content is staged and what is live

A little more filtering of our JavaScript object is called for:

// trello.js

// only include cards labelled with "live" or with
// the name of the branch we are in
contentCards = contentCards.filter(card => {
  return card.labels.filter(label => (
    label.name.toLowerCase() == 'live' ||
    label.name.toLowerCase() == BRANCH
   )).length;
 });

We want the content labelled ‘live’ to show up on every version of the build, staging or not. In addition we’ll look to include cards which have a label matching a variable called “BRANCH”. 

How come? What’s that?

This is where we get crafty! I’ve chosen to host this site on Netlify (disclaimer: I work there). This means that I can run the build from Netlify’s CI/CD environment. This redeploys the site whenever I push changes to its git repository, and also gives access to a couple of other things which are really handy for this site. 

One is Branch deploys. If you want a new environment for a site, you can create one by making a new branch in the Git repository. The build will run in that context, and your site will be published on a subdomain which includes the branch name. Like this.

Take a look and you’ll see all the cards from our list, including the one which has the orange “stage” label. We included it in this build because its label matched the branch name for the build context. BRANCH was an environment variable which contained whichever branch the build ran in.

label.name.toLowerCase() == BRANCH

In theory, we could make as many branches and labels as we like, and have all sorts of staging and testing environments. Ready to promote something from “stage” to “live”? Swap the labels and you’re good to go!

But how does it update though?

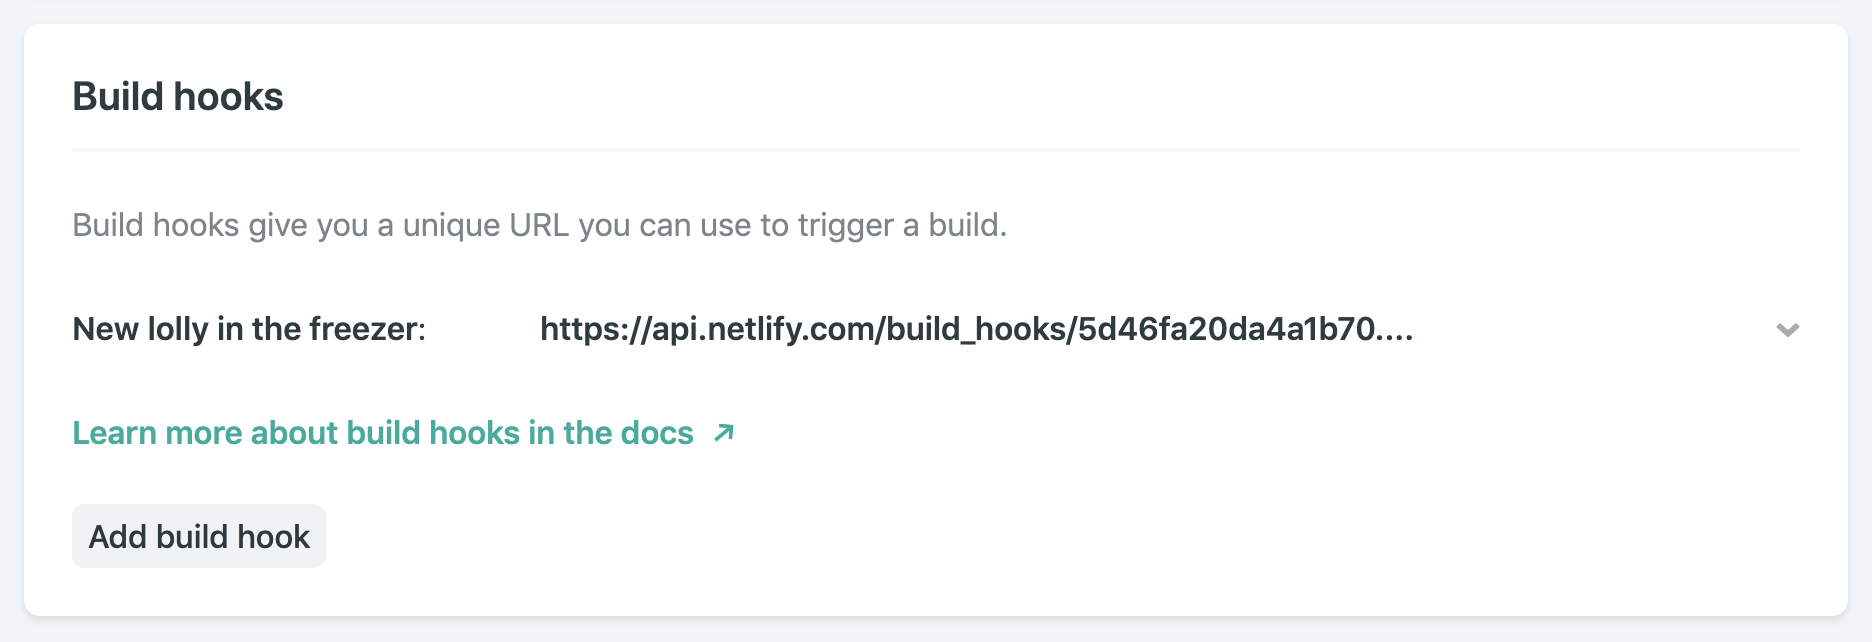
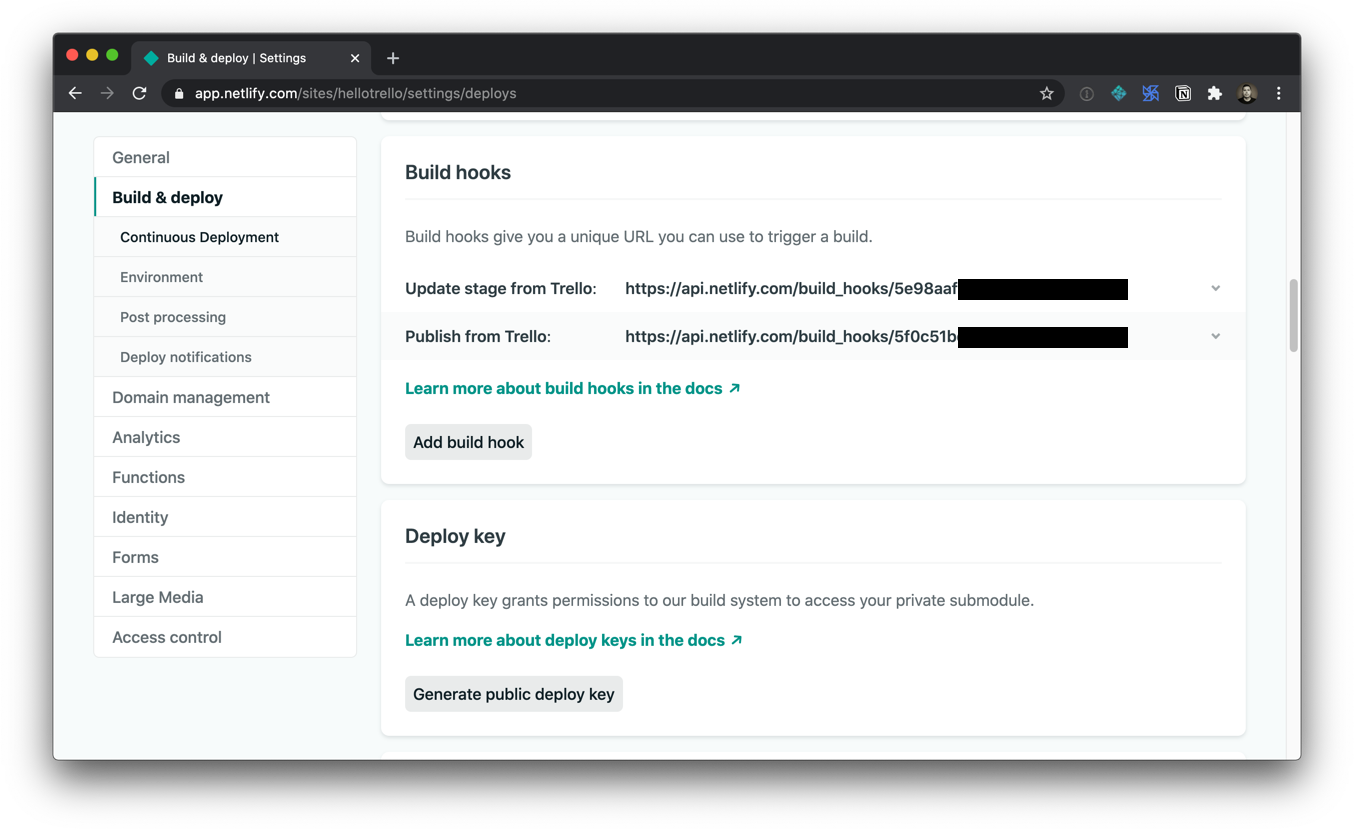
The second perk we get from running the site build in a CI/CD such as Netlify’s is that we can trigger a build to run whenever we like. Netlify lets us create build hooks. These are webhooks which initiate a new deployment when you send an HTTP POST to them.

If Trello supports webhooks too, then we could stitch these services together and refresh the site automatically whenever the Trello board changes. And guess what… they do! Hoorah!

To create a Netlify build hook, you’ll need to visit your site’s admin panel. (You can bootstrap this demo site into a new Netlify site in a couple of clicks if you want to try it out.)

Screenshot of the netlify build hooks screen with options to add a build hook and generate a public deploy key.
Creating a Netlify Build hook

Now, armed with a new build hook URL, we’ll need to register a new Trello webhook which calls it when content changes. The method for creating webhooks in Trello is via Trello’s API

The repo for this site includes a little utility to call the Trello API and create the webhook for you. But you’ll need to have a Trello developer token and key. Thankfully, it is easy to create those for free by visiting the Trello Developer portal and following the instructions under “Authorizing a client.”

Got ‘em? Great! If you save them in a .env file in your project, you can run this command to set up the Trello webhook:

npm run hook --url https://api.netlify.com/build_hooks/XXXXX

And with that, we’ve created a nice little flow for managing content on a simple site. We can craft our frontend just the way we want it, and have updates to the content happen on a Trello board which automatically updates the site whenever changes are made.

Could I really use this though?

This is a simplistic example. That’s by design. I really wanted to demonstrate the concepts of decoupling, and of using the API of an external service to drive the content for a site.

This won’t replace a full-featured decoupled CMS for more involved projects. But the principles are totally applicable to more complex sites.

This model, however, could be a great match for the types of websites we see for businesses such as independent shops, bars and restaurants. Imagine a Trello board that has one list for managing a restaurant’s home page, and one for managing their menu items. Very approachable for the restaurant staff to manage, and far nicer than uploading a new PDF of the menu whenever it changes.

Ready to explore an example and experiment with your own board and content? Try this:


The post Using Trello as a Super Simple CMS appeared first on CSS-Tricks.

You can support CSS-Tricks by being an MVP Supporter.

Emcee Tips for a Conference or Meetup

There are some great resources out there to help conference speakers give better talks, but fewer for people who are preparing to take on the role of emcee at meetup or conference.

I've been fortunate enough to emcee conferences more than 20 times now, most recently JAMstack_conf which I help organize. I also enjoy hosting smaller, less formal meetups which benefit just as much from having somebody to keep things rolling nicely along.

Since emcee-ing is a rather visible role, I often get asked, "Got any tips for emcee-ing?" I do. At the same time, note that there is no substitute for finding the approach that fits you and lets you be yourself. But I've found what works for me, and what I enjoy in an emcee when I'm attending or speaking at a conference.

Here's my advice:

Biggest tip: Enjoy yourself.

I find that trying to relax (yeah, easy to say) and remembering that the audience want you to succeed really helps. When you remember that you're not hosting the Oscars (if you are reading this in preparation for hosting the Oscars, please contact me directly. DMs are open), and that people are very happy with you being human and personable, it gives you license to relax and talk to the room as if everyone is your friend. That’s liberating and helps you to be more natural.

The crowd's view of the stage at Vue.js London. Image copyright www.edtelling.com.

To err is human

While we all want things to run as smoothly as possible, mistakes happen. Don’t panic or let them throw you off too much. I find that owning mistakes and communicating them honestly to the audience can be a feature rather than a bug. It also helps them trust you and be on your side. (I believe that there is only one “side” at a conference anyway. And this can help to establish that.)

Many of the moments I consider highlights have come from some silly mistake I’ve made on stage, like giving the wrong information and being corrected by the audience. It’s fine. We’re in it together. Have a little fun with it.

Technical difficulties

It’s really common for there to be technical difficulties during a conference. They often only take a few moments to resolve, but they can occasionally drag on and become a little uncomfortable.

As a speaker it is horrible to think that you are on your own to fix things while a room full of people impatiently watches on. As an emcee, you can help enormously by being ready to jump in if it looks like things might need some time and concentration from the speaker, or if a helpful member of the audio-visual team is sprinting to the stage.

I like to step back on the stage to provide a little buffer. No need to panic. Often just a little company on stage and some headspace is all that is required. My trick is to keep a little pocket-sized notebook on me all day. I keep a few notes ready, things like news and announcements for the audience. Where will the refreshments be later? Who are the sponsors and where can you find them? What are the details for the social later on? Those kinds of things. You may need them at the start of the next break anyway, but you can buy a little time for the speakers and save time for later by being ready to share that at this "handy opportunity."

“Me again! We’ll get this fixed in a second. While we have a mo...”

Even when there isn’t a problem, the speaker might still take a little time to plug in their laptop, be certain that they can see their speaker notes, and so on. If the conference does need each speaker to plug in as they come to the stage, I like to invite them up while I introduce them, and then check that they are ready when it looks like they have stopped tinkering with their setup. This doesn’t need to be a secret from the audience. “It looks like Jina is ready to go. Are you all set? Excellent! OK, a big round of applause please, for...”

Longer pauses. Oh this is getting awwwwwkward!

Every once in a while, there is a larger technical issue. The audio-visual team is on it, but you’ve used up all your padding material, pulled a couple of jokes from your back pocket, and now you and the speaker are stranded on stage with nothing to say and that horrible feeling of not knowing where to put your hands so that you look natural. Not to worry. Be honest.

Eventually the audience will start to feel awkward too, so cut this off at the pass. If things look like they really do need a few minutes, tell the audience. A bright and breezy update buys you some time and some good will.

"It looks like we still need a couple more minutes to figure this out, so we’ll step off stage for a moment and then come on again to enjoy a second, bonus round of applause. Don’t go anywhere, we’ll be right back!"

This sort of thing can take the pressure off everyone. Including the audience. And you can milk that second round of applause for the speaker as they return.

Just be honest. Everyone is on your side, remember.

Practice all the names

A mistake that makes me uncomfortable is botching somebody's name when I introduce them. That is a bit of a fear I still have and I've done it many times despite my best efforts. I like to watch YouTube videos of all the speakers that I don't already know to get a sense of what they've spoken about in the past, and also as a chance to listen to how they introduce themselves. I practice them out loud and write them down phonetically if they are tricky.

If you find a name particularly difficult, you can even use the voice recorder on your phone to capture how they pronounce it on YouTube, or your own best try, and then have it ready as a last-minute primer just before you need it.

Know more than the speaker's bio

Speakers often get introduced by someone reading out their bio. I don't think this gives the impression that you have enthusiasm for, or awareness of them. Both of which are, I think, valuable for creating trust with the audience and comfort for the speaker. I like to look them up and make some notes based on previous talks, the links on their own sites, or whatever else I can scrounge. I like to have an intro that goes beyond the bio that the attendees all have and will recognize as being read verbatim when they hear it.

Introducing Divya Sasidharan onstage at Vue.js London. Image copyright www.edtelling.com.

Jake has a good thought related to this:

... it shouldn't matter if the speaker has published 18 books, or if they're just an intern starting out their career, their talk content is what matters.

Yes! Listing their full resume isn't the point at all. I personally just like to convey that I know who this is, and that I'm not encountering them for the first time as I read the schedule — and that I’m looking forward to hearing what they have to say, irrespective of how extensive their previous experience or fame may be.

It's also worth double-checking that the job title and company details you have for somebody are still correct. It's nice to make sure that you didn't miss a recent role change.

Another good nugget from Jake is to avoid surprising the speaker. I've wandered into this territory before where I've enthused about a speaker in their introduction and mentioned a bunch of things that they were planning to say for themselves in their intro. As he says:

Make the speaker aware of the kind of intro they'll get, so they can adjust their own intro accordingly.

That's good. Communicating with the speaker ahead of time so that you can tune your own intro is likely to be easier than them adjusting their own content, what with slides and timings, etc.

"No surprises" is probably a good motto for this.

Avoid "in jokes"

When you emcee, you might sometimes be introducing somebody you know. Perhaps it's a friend, a colleague, or somebody you shared a nice chat and giggle with at the reception or dinner the night before. While I think it's fine to reference a history or relationship in an intro for context, It's safer to focus on things that everyone can relate to and not just those who already know you or the speaker.

Private jokes don't mean anything to the vast majority of the audience, and can even alienate you a little by creating a bit of a clique as Jan thoughtfully mentioned on Twitter.

Don't assume or rely on "fame"

"This next speaker needs no introduction" is rarely true. Even if it's likely that a lot of people in the room might already know who a given speaker is, there will be some who don't.

As Luke observed:

Don't assume the audience knows who the speaker is.

Each speaker deserves a nice introduction. And there will always be some in the audience thinking "who dis?" Even a little background can be a helpful foundation and give the speaker a nice springboard to get started.

Announce and thank people with vigor

I've been introduced quite a few times in ways where I've been unsure whether the intro is over or not! I like to be sure that the final thing I say is the name of the speaker. (Not their talk title, although I'll likely mention that and possibly the themes in my introduction.)

An onstage introduction at Vue.js London. Image copyright www.edtelling.com.

Ending the intro with the speaker's name seems painfully obvious, but I do this even if I've used their name earlier in the intro. It makes the handoff emphatic and acts as an obvious cue for audience applause. Using an intonation which suggests "it's time to clap right now!" is also helpful. Again, it seems obvious but giving the audience clear cues is important.

Let the speakers give the talks

You might sometimes be opinionated about the topic of the next talk. Maybe you’ve given talks on the same subject yourself. Great, that will come in handy if you need to ask informed questions after the talk. But don’t fall into the temptation to show this off during your intro. The speakers are “the show” — not the emcee. And the person you are introducing is the one invited to share their expertise.

I sometimes show I value the upcoming topic, but I advise against flexing your knowledge muscles during an intro. You might cannibalize the content, or even contradict it. And you’ll never communicate it in an intro as well as the speaker can during the actual talk. You might come off as being cocky.

Don’t step on the speaker's toes. Let them present the content. This is why everyone is here.

Prep speakers for questions and answers

If there is Q&A that you’ll need to lead or curate, it’s important to know that in advance. It is one of the first things I’ll ask the organizer in the run up to a conference. I like to ask the speakers at the speaker dinner the night before the event or when they are getting mic'd up (but earlier really is better, especially when they have time to think while being relaxed) if there is anything they'd like me to ask or avoid saying altogether. There are often things people can't include due to time and this can be a chance to squeeze that in and also serve as a nice soft ball question to get things started and let them settle in.

Some speakers might not want to take questions. I like to make sure about that first, and steer the event organizers away from it if somebody prefers not to have it.

Housekeeping is a good boilerplate

At the opening of the day, I usually jump quickly into the various housekeeping stuff of toilets, exits, code of conduct, etc. soon after saying my initial hello and maintain an enthusiastic posture about the day. It doesn't require much imagination and can help you settle in.

Don't forget to introduce yourself too!

Ask the organizers what they need

Along the way, there might be a need to mention sponsors, inform people of food, or even other things. I like to check in with the organizers at every break to see if there is anything they need me to announce. Maybe there can be a private Slack channel or Whatsapp group so you can stay in contact with them. That way you can find out if they need to adjust timings or any other odds and ends as you go.

Most of all though, and to repeat my first point a little, allow yourself to enjoy the experience. It's so much fun when the speakers and audience are enjoying themselves.

Make sure you ride that wave and have fun too!

My checklist

I have this little checklist as a starting point for the events I'll be emcee-ing. It changes a bit depending on what the conference needs.

Prep speaker intro notes
Prep speaker name pronunciation notes
Confirm format for Q&A with organizers
Prep seed questions for each talk
Share event notes Google Doc with organizers
Access/create emcee slack channel or WhatsApp group
Confirm or create event intro/outro slides if appropriate
Get housekeeping notes from organizers
Get familiar with code of conduct and contact info to share
Confirm event hashtags to share
Get sponsor call-out requirements from organizers
Meet AV team and discuss transition format
Brief speakers on transition format and get ok for questions
Get water / pen / notepad / mic
Breath. Smile. Have fun.


What have I missed? Got any good tips? I'd love to hear them. Feel free to leave thoughts and suggestions in the comments.

The post Emcee Tips for a Conference or Meetup appeared first on CSS-Tricks.

Static First: Pre-Generated JAMstack Sites with Serverless Rendering as a Fallback

You might be seeing the term JAMstack popping up more and more frequently. I’ve been a fan of it as an approach for some time.

One of the principles of JAMstack is that of pre-rendering. In other words, it generates your site into a collection of static assets in advance, so that it can be served to your visitors with maximum speed and minimum overhead from a CDN or other optimized static hosting environment.

But if we are going to pre-generate our sites ahead of time, how do we make them feel dynamic? How do we build sites that need to change often? How do we work with things like user generated content?

As it happens, this can be a great use case for serverless functions. JAMstack and serverless are the best of friends. They complement each other wonderfully.

In this article, we’ll look at a pattern of using serverless functions as a fallback for pre-generated pages in a site that is comprised almost entirely of user generated content. We’ll use a technique of optimistic URL routing where the 404 page is a serverless function to add serverless rendering on the fly.

Buzzwordy? Perhaps. Effective? Most certainly!

You can go and have a play with the demo site to help you imagine this use case. But only if you promise to come back.

https://vlolly.net

Is that you? You came back? Great. Let’s dig in.

The idea behind this little example site is that it lets you create a nice, happy message and virtual pick-me-up to send to a friend. You can write a message, customize a lollipop (or a popsicle, for my American friends) and get a URL to share with your intended recipient. And just like that, you’ve brightened up their day. What’s not to love?

Traditionally, we’d build this site using some server-side scripting to handle the form submissions, add new lollies (our user generated content) to a database and generate a unique URL. Then we’d use some more server-side logic to parse requests for these pages, query the database to get the data needed to populate a page view, render it with a suitable template, and return it to the user.

That all seems logical.

But how much will it cost to scale?

Technical architects and tech leads often get this question when scoping a project. They need to plan, pay for, and provision enough horsepower in case of success.

This virtual lollipop site is no mere trinket. This thing is going to make me a gazillionaire due to all the positive messages we all want to send each other! Traffic levels are going to spike as the word gets out. I had better have a good strategy of ensuring that the servers can handle the hefty load. I might add some caching layers, some load balancers, and I’ll design my database and database servers to be able to share the load without groaning from the demand to make and serve all these lollies.

Except... I don’t know how to do that stuff.

And I don’t know how much it would cost to add that infrastructure and keep it all humming. It’s complicated.

This is why I love to simplify my hosting by pre-rendering as much as I can.

Serving static pages is significantly simpler and cheaper than serving pages dynamically from a web server which needs to perform some logic to generate views on demand for every visitor.

Since we are working with lots of user generated content, it still makes sense to use a database, but I’m not going to manage that myself. Instead, I’ll choose one of the many database options available as a service. And I’ll talk to it via its APIs.

I might choose Firebase, or MongoDB, or any number of others. Chris compiled a few of these on an excellent site about serverless resources which is well worth exploring.

In this case, I selected Fauna to use as my data store. Fauna has a nice API for stashing and querying data. It is a no-SQL flavored data store and gives me just what I need.

https://fauna.com

Critically, Fauna have made an entire business out of providing database services. They have the deep domain knowledge that I’ll never have. By using a database-as-a-service provider, I just inherited an expert data service team for my project, complete with high availability infrastructure, capacity and compliance peace of mind, skilled support engineers, and rich documentation.

Such are the advantages of using a third-party service like this rather than rolling your own.

Architecture TL;DR

I often find myself doodling the logical flow of things when I’m working on a proof of concept. Here’s my doodle for this site:

And a little explanation:

  1. A user creates a new lollipop by completing a regular old HTML form.
  2. The new content is saved in a database, and its submission triggers a new site generation and deployment.
  3. Once the site deployment is complete, the new lollipop will be available on a unique URL. It will be a static page served very rapidly from the CDN with no dependency on a database query or a server.
  4. Until the site generation is complete, any new lollipops will not be available as static pages. Unsuccessful requests for lollipop pages fall back to a page which dynamically generates the lollipop page by querying the database API on the fly.

This kind of approach, which first assumes static/pre-generated assets, only then falling back to a dynamic render when a static view is not available was usefully described by Markus Schork of Unilever as "Static First" which I rather like.

In a little more detail

You could just dive into the code for this site, which is open source and available for you to explore, or we could talk some more.

You want to dig in a little further, and explore the implementation of this example? OK, I’ll explain in some more details:

  • Getting data from the database to generate each page
  • Posting data to a database API with a serverless function
  • Triggering a full site re-generation
  • Rendering on demand when pages are yet to be generated

Generating pages from a database

In a moment, we’ll talk about how we post data into the database, but first, let’s assume that there are some entries in the database already. We are going to want to generate a site which includes a page for each and every one of those.

Static site generators are great at this. They chomp through data, apply it to templates, and output HTML files ready to be served. We could use any generator for this example. I chose Eleventy due to it’s relative simplicity and the speed of its site generation.

To feed Eleventy some data, we have a number of options. One is to give it some JavaScript which returns structured data. This is perfect for querying a database API.

Our Eleventy data file will look something like this:

// Set up a connection with the Fauna database.
// Use an environment variable to authenticate
// and get access to the database.
const faunadb = require('faunadb');
const q = faunadb.query;
const client = new faunadb.Client({
  secret: process.env.FAUNADB_SERVER_SECRET
});

module.exports = () => {
  return new Promise((resolve, reject) => {
    // get the most recent 100,000 entries (for the sake of our example)
    client.query(
      q.Paginate(q.Match(q.Ref("indexes/all_lollies")),{size:100000})
    ).then((response) => {
      // get all data for each entry
      const lollies = response.data;
      const getAllDataQuery = lollies.map((ref) => {
        return q.Get(ref);
      });
      return client.query(getAllDataQuery).then((ret) => {
        // send the data back to Eleventy for use in the site build
        resolve(ret);
      });
    }).catch((error) => {
      console.log("error", error);
      reject(error);
    });
  })
}

I named this file lollies.js which will make all the data it returns available to Eleventy in a collection called lollies.

We can now use that data in our templates. If you’d like to see the code which takes that and generates a page for each item, you can see it in the code repository.

Submitting and storing data without a server

When we create a new lolly page we need to capture user content in the database so that it can be used to populate a page at a given URL in the future. For this, we are using a traditional HTML form which posts data to a suitable form handler.

The form looks something like this (or see the full code in the repo):

<form name="new-lolly" action="/new" method="POST">

  <!-- Default "flavors": 3 bands of colors with color pickers -->
  <input type="color" id="flavourTop" name="flavourTop" value="#d52358" />
  <input type="color" id="flavourMiddle" name="flavourMiddle" value="#e95946" />
  <input type="color" id="flavourBottom" name="flavourBottom" value="#deaa43" />

  <!-- Message fields -->
  <label for="recipientName">To</label>
  <input type="text" id="recipientName" name="recipientName" />

  <label for="message">Say something nice</label>
  <textarea name="message" id="message" cols="30" rows="10"></textarea>

  <label for="sendersName">From</label>
  <input type="text" id="sendersName" name="sendersName" />

  <!-- A descriptive submit button -->
  <input type="submit" value="Freeze this lolly and get a link">

</form>

We have no web servers in our hosting scenario, so we will need to devise somewhere to handle the HTTP posts being submitted from this form. This is a perfect use case for a serverless function. I’m using Netlify Functions for this. You could use AWS Lambda, Google Cloud, or Azure Functions if you prefer, but I like the simplicity of the workflow with Netlify Functions, and the fact that this will keep my serverless API and my UI all together in one code repository.

It is good practice to avoid leaking back-end implementation details into your front-end. A clear separation helps to keep things more portable and tidy. Take a look at the action attribute of the form element above. It posts data to a path on my site called /new which doesn’t really hint at what service this will be talking to.

We can use redirects to route that to any service we like. I’ll send it to a serverless function which I’ll be provisioning as part of this project, but it could easily be customized to send the data elsewhere if we wished. Netlify gives us a simple and highly optimized redirects engine which directs our traffic out at the CDN level, so users are very quickly routed to the correct place.

The redirect rule below (which lives in my project’s netlify.toml file) will proxy requests to /new through to a serverless function hosted by Netlify Functions called newLolly.js.

# resolve the "new" URL to a function
[[redirects]]
  from = "/new"
  to = "/.netlify/functions/newLolly"
  status = 200

Let’s look at that serverless function which:

  • stores the new data in the database,
  • creates a new URL for the new page and
  • redirects the user to the newly created page so that they can see the result.

First, we’ll require the various utilities we’ll need to parse the form data, connect to the Fauna database and create readably short unique IDs for new lollies.

const faunadb = require('faunadb');          // For accessing FaunaDB
const shortid = require('shortid');          // Generate short unique URLs
const querystring = require('querystring');  // Help us parse the form data

// First we set up a new connection with our database.
// An environment variable helps us connect securely
// to the correct database.
const q = faunadb.query
const client = new faunadb.Client({
  secret: process.env.FAUNADB_SERVER_SECRET
})

Now we’ll add some code to the handle requests to the serverless function. The handler function will parse the request to get the data we need from the form submission, then generate a unique ID for the new lolly, and then create it as a new record in the database.

// Handle requests to our serverless function
exports.handler = (event, context, callback) => {

  // get the form data
  const data = querystring.parse(event.body);
  // add a unique path id. And make a note of it - we'll send the user to it later
  const uniquePath = shortid.generate();
  data.lollyPath = uniquePath;

  // assemble the data ready to send to our database
  const lolly = {
    data: data
  };

  // Create the lolly entry in the fauna db
  client.query(q.Create(q.Ref('classes/lollies'), lolly))
    .then((response) => {
      // Success! Redirect the user to the unique URL for this new lolly page
      return callback(null, {
        statusCode: 302,
        headers: {
          Location: `/lolly/${uniquePath}`,
        }
      });
    }).catch((error) => {
      console.log('error', error);
      // Error! Return the error with statusCode 400
      return callback(null, {
        statusCode: 400,
        body: JSON.stringify(error)
      });
    });

}

Let's check our progress. We have a way to create new lolly pages in the database. And we’ve got an automated build which generates a page for every one of our lollies.

To ensure that there is a complete set of pre-generated pages for every lolly, we should trigger a rebuild whenever a new one is successfully added to the database. That is delightfully simple to do. Our build is already automated thanks to our static site generator. We just need a way to trigger it. With Netlify, we can define as many build hooks as we like. They are webhooks which will rebuild and deploy our site of they receive an HTTP POST request. Here’s the one I created in the site’s admin console in Netlify:

Netlify build hook

To regenerate the site, including a page for each lolly recorded in the database, we can make an HTTP POST request to this build hook as soon as we have saved our new data to the database.

This is the code to do that:

const axios = require('axios'); // Simplify making HTTP POST requests

// Trigger a new build to freeze this lolly forever
axios.post('https://api.netlify.com/build_hooks/5d46fa20da4a1b70XXXXXXXXX')
.then(function (response) {
  // Report back in the serverless function's logs
  console.log(response);
})
.catch(function (error) {
  // Describe any errors in the serverless function's logs
  console.log(error);
});

You can see it in context, added to the success handler for the database insertion in the full code.

This is all great if we are happy to wait for the build and deployment to complete before we share the URL of our new lolly with its intended recipient. But we are not a patient lot, and when we get that nice new URL for the lolly we just created, we’ll want to share it right away.

Sadly, if we hit that URL before the site has finished regenerating to include the new page, we’ll get a 404. But happily, we can use that 404 to our advantage.

Optimistic URL routing and serverless fallbacks

With custom 404 routing, we can choose to send every failed request for a lolly page to a page which will can look for the lolly data directly in the database. We could do that in with client-side JavaScript if we wanted, but even better would be to generate a ready-to-view page dynamically from a serverless function.

Here’s how:

Firstly, we need to tell all those hopeful requests for a lolly page that come back empty to go instead to our serverless function. We do that with another rule in our Netlify redirects configuration:

# unfound lollies should proxy to the API directly
[[redirects]]
  from = "/lolly/*"
  to = "/.netlify/functions/showLolly?id=:splat"
  status = 302

This rule will only be applied if the request for a lolly page did not find a static page ready to be served. It creates a temporary redirect (HTTP 302) to our serverless function, which looks something like this:

const faunadb = require('faunadb');                  // For accessing FaunaDB
const pageTemplate = require('./lollyTemplate.js');  // A JS template litereal 

// setup and auth the Fauna DB client
const q = faunadb.query;
const client = new faunadb.Client({
  secret: process.env.FAUNADB_SERVER_SECRET
});

exports.handler = (event, context, callback) => {

  // get the lolly ID from the request
  const path = event.queryStringParameters.id.replace("/", "");

  // find the lolly data in the DB
  client.query(
    q.Get(q.Match(q.Index("lolly_by_path"), path))
  ).then((response) => {
    // if found return a view
    return callback(null, {
      statusCode: 200,
      body: pageTemplate(response.data)
    });

  }).catch((error) => {
    // not found or an error, send the sad user to the generic error page
    console.log('Error:', error);
    return callback(null, {
      body: JSON.stringify(error),
      statusCode: 301,
      headers: {
        Location: `/melted/index.html`,
      }
    });
  });
}

If a request for any other page (not within the /lolly/ path of the site) should 404, we won’t send that request to our serverless function to check for a lolly. We can just send the user directly to a 404 page. Our netlify.toml config lets us define as many level of 404 routing as we’d like, by adding fallback rules further down in the file. The first successful match in the file will be honored.

# unfound lollies should proxy to the API directly
[[redirects]]
  from = "/lolly/*"
  to = "/.netlify/functions/showLolly?id=:splat"
  status = 302

# Real 404s can just go directly here:
[[redirects]]
  from = "/*"
  to = "/melted/index.html"
  status = 404

And we’re done! We’ve now got a site which is static first, and which will try to render content on the fly with a serverless function if a URL has not yet been generated as a static file.

Pretty snappy!

Supporting larger scale

Our technique of triggering a build to regenerate the lollipop pages every single time a new entry is created might not be optimal forever. While it’s true that the automation of the build means it is trivial to redeploy the site, we might want to start throttling and optimizing things when we start to get very popular. (Which can only be a matter of time, right?)

That’s fine. Here are a couple of things to consider when we have very many pages to create, and more frequent additions to the database:

  • Instead of triggering a rebuild for each new entry, we could rebuild the site as a scheduled job. Perhaps this could happen once an hour or once a day.
  • If building once per day, we might decide to only generate the pages for new lollies submitted in the last day, and cache the pages generated each day for future use. This kind of logic in the build would help us support massive numbers of lolly pages without the build getting prohibitively long. But I’ll not go into intra-build caching here. If you are curious, you could ask about it over in the Netlify Community forum.

By combining both static, pre-generated assets, with serverless fallbacks which give dynamic rendering, we can satisfy a surprisingly broad set of use cases — all while avoiding the need to provision and maintain lots of dynamic infrastructure.

What other use cases might you be able to satisfy with this "static first” approach?

The post Static First: Pre-Generated JAMstack Sites with Serverless Rendering as a Fallback appeared first on CSS-Tricks.

Tips for rolling your own lazy loading

You may have heard (or even issued the call) that “we can just use lazy loading!” when looking for a way to slim down a particularly heavy web page.

Lazy loading is a popular technique for gradually requesting images as they come into view, rather than all at once after the HTML of the page has been parsed. It can reduce the initial page weight, and help us hit our performance budgets by requesting images when they're needed.

It can be effective. But it also comes with some baggage of its own. We’ll get to that! In fact, Rahul Nanwani did an extensive write-up that hits several lazy-loading methods and illustrates just how complex some are.

In this post, we’ll look at an implementation that's already been covered in brief detail in this post by Preerhi. We're going to expand on that so you can add your own implementation of lazy loading to your site site as I’ve done on this little demo site.

We’ll cover these topics along the way:

Continue reading "Tips for rolling your own lazy loading"