How to Create a “Skip to Content” Link

Skip links are little internal navigation links that help users move around a page. It’s possible you’ve never actually seen one before because they’re often hidden from view and used as an accessibility enhancement that lets keyboard users and screen readers jump from the top of the page to the content without have to go through other elements on the page first.

In fact, you can find one right here on CSS-Tricks if you crack DevTools open.

In my opinion, the best way to implement a skip link is to hide it and then bring it into view when it is focused. So, let’s say we have a link in the HTML:

<a class="skip-to-content-link" href="#main">
  Skip to content
</a>

…we can give it an absolute position and translate it off the screen:

.skip-to-content-link {
  left: 50%;
  position: absolute;
  transform: translateY(-100%);
}

Then we can bring it back into view when it’s in focus and style it up a bit in the process:

.skip-to-content-link {
  background: #e77e23;
  height: 30px;
  left: 50%;
  padding: 8px;
  position: absolute;
  transform: translateY(-100%);
  transition: transform 0.3s;
}

.skip-to-content-link:focus {
  transform: translateY(0%);
}

This will hide our link until it is focused and then put it into view when it becomes focused.

Now, allow me to elaborate, starting with this quote from Miles Davis:

Time isn’t the main thing. It’s the only thing.

As I sit down to write this article in a rainy Ireland, I think of the challenge that many users face as they use the web that I take for granted. We put so much thought into creating a great user experience without thinking of all our users and how to meet their needs. Admittedly, a skip link was something I had never heard of until completing a course on Frontend Masters by Marcy Sutton. Since learning the power and simplicity of using a skip link, I decided to make it my mission to spread more awareness — and what platform better than CSS-Tricks!

A solution is an answer to a problem, so what’s the solution for helping keyboard users and screen readers find the content of a page quickly? In short, the solution is time. Giving users the ability to navigate to parts of our website that they are most interested in gives them the power to save valuable time.

Take the Sky News website as an example. It offers a “Skip to content” button that allows users to skip all the navigation items and jump straight to the main content.

You can see this button by navigating to the top of the page using your keyboard.  This is similar to the implementation shown above. The link is always in the document but only becomes visible when it’s in focus.

This is the type of skip link we are going to create together in this post.

Our sample website

I built a sample website that we will use to demonstrate a skip link.

The website has a number of navigation links but, in the interest of time, there are only two pages: the home page and the blog page. This is all we need to see how things work.

Identifying the problem

Here’s the navigation we’re working with:

In total, we have eight navigation items that a keyboard user and screen reader must tab through before reaching the main content below the navigation.

That’s the problem. The navigation may be irrelevant for the user. Perhaps the user was given a direct link to an article and they simply want to get to the content.

This is a perfect use case for a skip link.

Creating the link

There are a couple of approaches to creating a Skip to content link.  What I like to do is similar to the Sky News example, which is hiding the link until it is focused.  That means we can drop the link at or near the top of the page, like inside the <header> element.

<header>
  <a class="skip-link" href='#main'>Skip to content</a>
  <!-- Navigation-->
</header>

This link has a .skip-link class so we can style it. Thehref attribute points to #main, which is the ID we will add to the <main> element that comes further down the page. That’s what the link will jump to when clicked.

<header>
  <a class="skip-link" href='#main'>Skip to content</a>
  <!-- Navigation-->
</header>


<!-- Maybe some other stuff... -->


<main id="main">
  <!-- Content -->
</main>

Here’s what we have if we simply drop the link into the header with no styling.

This does not look great, but the functionality is there. Try navigating to the link with your keyboard and pressing Enter when it’s in focus.

Now it’s time to make it look pretty. We must first fix the positioning and only show our skip link when it is in focus.

.skip-link {
  background: #319795;
  color: #fff;
  font-weight: 700;
  left: 50%;
  padding: 4px;
  position: absolute;
  transform: translateY(-100%);
}

.skip-link:focus {
  transform: translateY(0%);
}

The magic here is in the transform property, which is hiding and showing our skip link depending on whether it is focused or not. Let’s make it look a little nicer with a quick transition on the transform property.

.skip-link {
  /* Same as  before */
  transition: transform 0.3s;
}

It will now transition into view which makes that bit better.

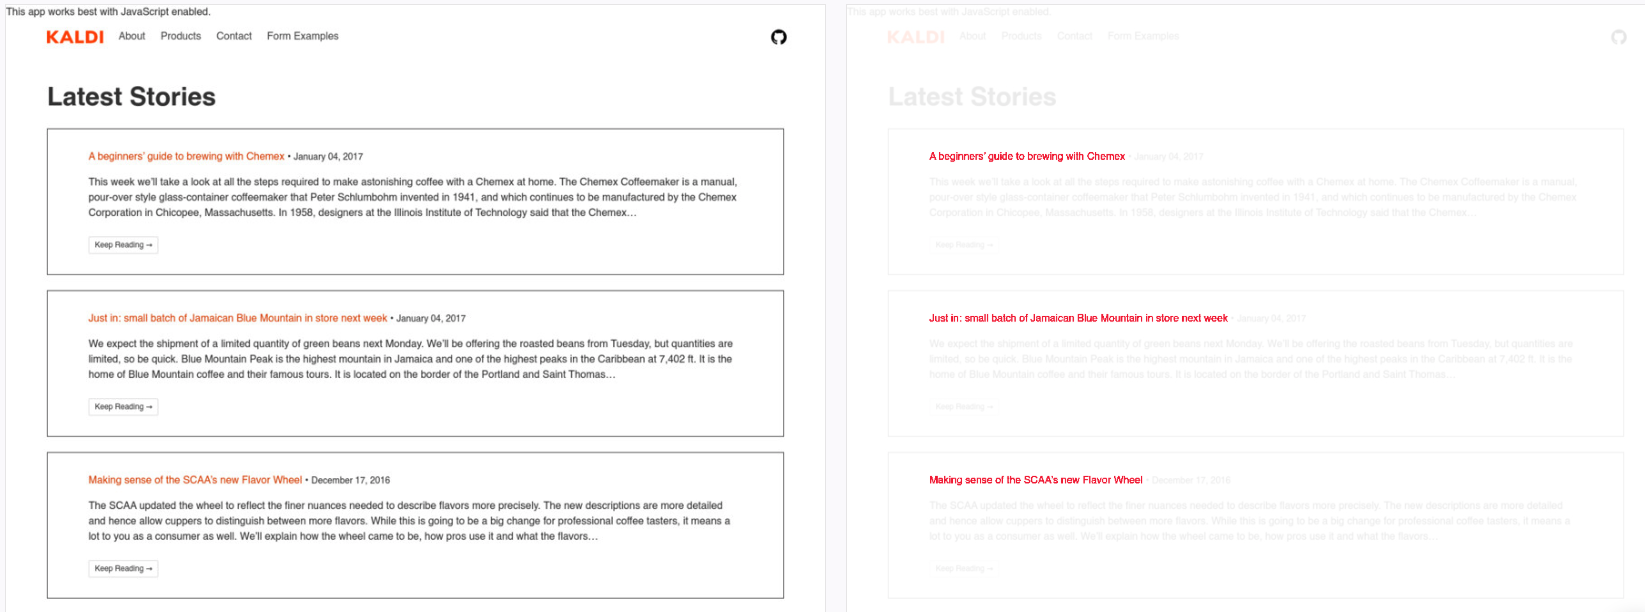
You should now (hopefully) have what I have below:

As you can see, the skip link bypasses the navigation and jumps straight down to the <main> element when clicked.

It’s OK to use more than one link!

Right now, the link only serves one purpose and that is skip to the content of our website. But we don’t have to stop there.

We can go even further and create a skip link that has more options, such as a way to jump to the footer of the site. As you might imagine, this is quite similar to what we’ve already done.

Let’s make the blog page of the example site a little more usable by using multiple skip links. It’s common for blogs to use AJAX that loads in more posts when reaching the bottom of the page. This can make it very difficult to get to the footer of the website. That’s the problem we want to solve in this case.

So let’s add a second link that bypasses all that auto-loading business and jumps the user straight to a #footer element on the page.

<div class="skip-link" >
  Skip to <a href='#main'>content</a> or <a href='#footer'>footer</a>
</div>

We also need to amend our CSS a little and use the :focus-within pseudo selector.

.skip-link {
  transform: translateY(-100%);
}

.skip-link:focus-within {
  transform: translateY(0%);
}

This is saying if anything within our .skip-link element has focus, then we show it. Sadly, neither Internet Explorer nor Opera Mini support focus-within, but its coverage is pretty darn good and there is a polyfill available.

This browser support data is from Caniuse, which has more detail. A number indicates that browser supports the feature at that version and up.

Desktop

ChromeFirefoxIEEdgeSafari
6052No7910.1

Mobile / Tablet

Android ChromeAndroid FirefoxAndroidiOS Safari
8068No10.3

Last thing we need to do is make sure there's an ID on our footer element so the link has something to jump to.

<footer id="footer">

Here's what this gives us:

If we wanted to go one step further (and I’d encourage it), we could style each link a little differently so users can distinguish between the two. Both links in this example are plain white which works great for a single button that does a single thing, but it’d be clearer that we’re dealing with two links if they were presented differently.

Jumping to conclusions

Are you using skip links on your site? Or, if not, does this convince you to use one? I hope it’s clear that skip links are a great value add when it comes to the accessibility of a site. While it’s not a silver bullet that solves every accessibility need, it does solve some use cases that make for a much more polished user experience.

Here are some prominent sites that are using this or a similar technique:

The post How to Create a “Skip to Content” Link appeared first on CSS-Tricks.

Testing for Visual Regressions with Percy

While this post is not sponsored (it is based on Paul’s own personal experience), we have worked with Percy before on a sponsored video, that also goes through the process of setting up Percy on a site. It’s fascinating, powerful, useful stuff and I highly recommend checking it out.


Let me set the stage:

  1. You've pushed some code and all the meticulously unit tests you wrote pass. Fantastic! Let’s get this branch into QA.
  2. You receive a Slack message from your QA team asking why a button is now floating off the screen?
  3. "But... I didn't touch any code in that part of the application," you think to yourself.
  4. Then you remember you did change some CSS.
  5. Panic! What else has changed in the UI? Does this affect iPad? Will Firefox behave differently than Chrome? What about mobile?

This is a very common scenario many of us face when building large-scale applications that deal with different screen sizes and browsers. It’s a Herculean task to test UI for each and every change to code.

What now, throw in the towel and move to the mountains? Thankfully, no. We have Percy to help save the day! And it’s really the best friend we have for testing unexpected outcomes that impact design and layout. Percy has become an indispensable part of my development stack and I convinced CSS-Tricks to let me share some things about it that have made my code stronger and helped prevent errors from shipping.

Plus, it integrates well with other tooling and is a relative breeze to set up. So hang with me a bit as we walk through what Percy is and how to leverage it for your projects.

So, what exactly is Percy?

According to Percy’s site, it’s an “all in one visual review platform."

I’ve found that holds true. What it boils down to is that Percy provides a way to test visual regressions. That’s pretty awesome if you think about it. Many changes to a codebase — especially working with CSS — can introduce breaking changes to a site’s design. If you’ve ever inherited a large legacy stylesheet, modified a class, and hit Save, then you probably have a great idea of how nerve-wracking that can feel. Percy’s goal is to provide confidence in those types of situations where it’s difficult to know all of the UI that depends on the same line of code.

Excited? Let's get started.

Setting up an example site

Let’s set up a little site that Percy can hook into and test some UI we’re going to make together. These days, this couldn't be easier, thanks to Gatsby and Netlify. It is way beyond the scope of this article to do a deep dive into these technologies, but rest assured, they are wonderful as well and can get us online without a bunch of server setup.

Head over over to Netlify templates and click the "Deploy to Netlify" button, which will set up a git repo on your GitHub account and also deploy the app using Netlify.

After completing the setup steps, we should get something like this (after the site is deployed):

Magically, our site is now live! We will use this to get to grips with Percy.

Using CircleCI for automated testing

Percy works best in a continuous integration (CI) environment that will trigger testing based on an action. We will use CircleCI to make it happen by integrating with the example site’s GitHub repo and running the builds, allowing us to test every commit.

The first thing we need to do is clone down our new repo on GitHub, I clone mine as follows:

git clone https://github.com/PaulRyanStitcherAds/gatsby-starter-netlify-cms.git

With our repo now cloned, we can head over to CircleCI and sign up with a GitHub account.

We now need to add our project, so click "Add Projects" in the side navigation and you should see a screen like the following screenshot. Find the project we just cloned and click “Set Up Project."

In the Set Up Project area, we want to select Linux as our operating system and Ruby as our language (pery-cli is in Ruby). Here are the rest of the steps for this part:

CircleCI tells us that we need a .circleci directory and that we need a config.yml file in it. Create the following structure within your project.

CircleCI offers a configuration snippet to copy and paste for our configuration, but it is far too verbose for us; we only need a simple config.yml file.

Go ahead and use the following snippet. You’ll see that we install the percy-cli gem along with Percy in our tests:

version: 2
jobs:
  build:
    docker:
      - image: circleci/ruby:2.4.1-node-browsers
    working_directory: ~/repo
    steps:
      - checkout
      - run:
          name: install dependencies
          command: |
            npm install
            gem install percy-cli
      
      - run: 
          name: run our tests
          command: |
            npm run build
            percy snapshot public

This config is all we need.

At first, It took me a while to figure out why my build was failing and turned out I was trying to install percy-cli as an npm module. Yikes!

We now have the CircleCI configuration set up so finally we can start using Percy!

As a sanity check, comment out the run our tests step above and push your code to the master branch.

Now click the "Start building" button which will use the configuration you just pushed to create a build. Here's what you should see in the workflows section:

From here on out, CircleCI will create a build for us whenever we do a push.

Hooking Percy up to CircleCI

A Percy account is needed to use the service. Head over to Percy’s site and sign up with your GitHub account.

Once signed up, you can create a new organization (if you don't already have one) and call it whatever you want.

Next thing to do is add a project to the organization. It’s probably a good idea to call the project something matching the name of the repo so that it’s recognizable later.

Now we need to add a Percy token to CircleCI. Percy tokens are located under "Project Settings."

My access token is blocked out.

Alright, let’s add the token in CircleCI in Environment Variables under “Build Settings." You can find Build Settings by clicking the gear icon beside your project in the workflows section.

Again, my token is blocked out.

It’s time to run Percy! If you commented out the run our tests line in the config file earlier, then remove the comment because that command will run Percy. Push to master again and then head over to the Percy app — we will see Percy has started its own build for creating snapshots. If all goes well, this is what we should get:

If you click on this build, then you can see all the screens Percy has snapped of the application.

You might be wondering what the deal is with that empty left column. That's where the original screen normally is, but since this is the first test, Percy informs us that there are no previous snapshots to compare.

The final thing we need to do to wrap up this connection is link our repo to Percy. So, in Percy, click “Project Settings" then click on the “install an integration" link.

Select the organization and hit install for all repositories:

Finally! We can link to our repository.

Unlocking the true power of Percy

Since we now have everything set up, we can see how Percy can be used in a code review workflow! The first thing we will do is create a branch from master. I’m calling my branch "changing-color."

Go to the /src/components/all.sass file, change Line 5 to use the color pink, then push the change to the repo. This is what we’re going to evaluate in our visual test.

Create a pull request for the change in GitHub.

CircleCI is carrying out checks for us but the one we are focused on is the Percy step. It may need a minute or two for Percy to pop up:

Percy is letting us know that we need to review changes we made, which in this case, is the change from red to pink. We can see the impact of that change:

Although the changes on the right are red, that is highlighting the areas that have been changed to pink. In other words, red is indicating the change rather than the actual appearance.

We can give this a quick glance and then click the “Approve" button which will give us a green tick on GitHub indicating we’re free to merge the pull request.

This is the true power of Percy: allowing us to see the impact of a small change and giving us the option to approve the changes.

Fantastic! We have now taking a tour on how to set Percy up in our projects along with how to integrate CircleCI. I really hope this will save you many headaches in the future when managing your UI.

The post Testing for Visual Regressions with Percy appeared first on CSS-Tricks.