Modern apps place high demands on front-end developers. Web apps require complex functionality, and the lion’s share of that work is falling to front-end devs:
building modern, accessible user interfaces
creating interactive elements and complex animations
managing complex application state
meta-programming: build scripts, transpilers, bundlers, linters, etc.
reading from REST, GraphQL, and other APIs
middle-tier programming: proxies, redirects, routing, middleware, auth, etc.
This list is daunting on its own, but it gets really rough if your tech stack doesn’t optimize for simplicity. A complex infrastructure introduces hidden responsibilities that introduce risk, slowdowns, and frustration.
Depending on the infrastructure we choose, we may also inadvertently add server configuration, release management, and other DevOps duties to a front-end developer’s plate.
The sneaky middle tier — where front-end tasks can balloon in complexity
Let’s look at a task I’ve seen assigned to multiple front-end teams: create a simple REST API to combine data from a few services into a single request for the frontend. If you just yelled at your computer, “But that’s not a frontend task!” — I agree! But who am I to let facts hinder the backlog?
An API that’s only needed by the frontend falls into middle-tier programming. For example, if the front end combines the data from several backend services and derives a few additional fields, a common approach is to add a proxy API so the frontend isn’t making multiple API calls and doing a bunch of business logic on the client side.
There’s not a clear line to which back-end team should own an API like this. Getting it onto another team’s backlog — and getting updates made in the future — can be a bureaucratic nightmare, so the front-end team ends up with the responsibility.
This is a story that ends differently depending on the architectural choices we make. Let’s look at two common approaches to handling this task:
Build an Express app on Node to create the REST API
Use serverless functions to create the REST API
Express + Node comes with a surprising amount of hidden complexity and overhead. Serverless lets front-end developers deploy and scale the API quickly so they can get back to their other front-end tasks.
Solution 1: Build and deploy the API using Node and Express (and Docker and Kubernetes)
Earlier in my career, the standard operating procedure was to use Node and Express to stand up a REST API. On the surface, this seems relatively straightforward. We can create the whole REST API in a file called server.js:
const express = require('express');

const PORT = 8080;
const HOST = '0.0.0.0';

const app = express();

app.use(express.static('site'));

// simple REST API to load movies by slug
const movies = require('./data.json');

app.get('/api/movies/:slug', (req, res) => {
  const { slug } = req.params;
  const movie = movies.find((m) => m.slug === slug);

  res.json(movie);
});

app.listen(PORT, HOST, () => {
  console.log(`app running on http://${HOST}:${PORT}`);
});
This code isn’t too far removed from front-end JavaScript. There’s a decent amount of boilerplate in here that will trip up a front-end dev if they’ve never seen it before, but it’s manageable.
If we run node server.js, we can visit http://localhost:8080/api/movies/some-movie and see a JSON object with details for the movie with the slug some-movie (assuming you’ve defined that in data.json).
Deployment introduces a ton of extra overhead
Building the API is only the beginning, however. We need to get this API deployed in a way that can handle a decent amount of traffic without falling down. Suddenly, things get a lot more complicated.
We need several more tools:
somewhere to deploy this (e.g. DigitalOcean, Google Cloud Platform, AWS)
a container to keep local dev and production consistent (i.e. Docker)
a way to make sure the deployment stays live and can handle traffic spikes (i.e. Kubernetes)
At this point, we’re way outside front-end territory. I’ve done this kind of work before, but my solution was to copy-paste from a tutorial or Stack Overflow answer.
The Docker config is somewhat comprehensible, but I have no idea if it’s secure or optimized:
FROM node:14
WORKDIR /usr/src/app
COPY package*.json ./
RUN npm install
COPY . .
EXPOSE 8080
CMD [ "node", "server.js" ]
Next, we need to figure out how to deploy the Docker container into Kubernetes. Why? I’m not really sure, but that’s what the back end teams at the company use, so we should follow best practices.
Our initial task of “stand up a quick Node API” has ballooned into a suite of tasks that don’t line up with our core skill set. The first time I got handed a task like this, I lost several days getting things configured and waiting on feedback from the backend teams to make sure I wasn’t causing more problems than I was solving.
Some companies have a DevOps team to check this work and make sure it doesn’t do anything terrible. Others end up trusting the hivemind of Stack Overflow and hoping for the best.
With this approach, things start out manageable with some Node code, but quickly spiral out into multiple layers of config spanning areas of expertise that are well beyond what we should expect a frontend developer to know.
Solution 2: Build the same REST API using serverless functions
If we choose serverless functions, the story can be dramatically different. Serverless is a great companion to Jamstack web apps that provides front-end developers with the ability to handle middle tier programming without the unnecessary complexity of figuring out how to deploy and scale a server.
There are multiple frameworks and platforms that make deploying serverless functions painless. My preferred solution is to use Netlify since it enables automated continuous delivery of both the front end and serverless functions. For this example, we’ll use Netlify Functions to manage our serverless API.
Using Functions as a Service (a fancy way of describing platforms that handle the infrastructure and scaling for serverless functions) means that we can focus only on the business logic and know that our middle tier service can handle huge amounts of traffic without falling down. We don’t need to deal with Docker containers or Kubernetes or even the boilerplate of a Node server — it Just Works™ so we can ship a solution and move on to our next task.
First, we can define our REST API in a serverless function at netlify/functions/movie-by-slug.js:
To add the proper routing, we can create a netlify.toml at the root of the project:
[[redirects]]
  from = "/api/movies/*"
  to = "/.netlify/functions/movie-by-slug"
  status = 200
This is significantly less configuration than we’d need for the Node/Express approach. What I prefer about this approach is that the config here is stripped down to only what we care about: the specific paths our API should handle. The rest — build commands, ports, and so on — is handled for us with good defaults.
If we have the Netlify CLI installed, we can run this locally right away with the command ntl dev, which knows to look for serverless functions in the netlify/functions directory.
Visiting http://localhost:888/api/movies/booper will show a JSON object containing details about the “booper” movie.
So far, this doesn’t feel too different from the Node and Express setup. However, when we go to deploy, the difference is huge. Here’s what it takes to deploy this site to production:
Commit the serverless function and netlify.toml to repo and push it up on GitHub, Bitbucket, or GitLab
Use the Netlify CLI to create a new site connected to your git repo: ntl init
That’s it! The API is now deployed and capable of scaling on demand to millions of hits. Changes will be automatically deployed whenever they’re pushed to the main repo branch.
Using serverless functions allows front-end developers to complete middle-tier programming tasks without taking on the additional boilerplate and DevOps overhead that creates risk and decreases productivity.
If our goal is to empower frontend teams to quickly and confidently ship software, choosing serverless functions bakes productivity into the infrastructure. Since adopting this approach as my default Jamstack starter, I’ve been able to ship faster than ever, whether I’m working alone, with other front-end devs, or cross-functionally with teams across a company.
Creating video is time consuming. A well-made 5-minute video can take hours to plan, record, and edit — and that’s before we start talking about making that video consistent with all the other videos on your site.
When we took on the Jamstack Explorers project (a video-driven educational resource for web developers), we wanted to find the right balance of quality and shipping: what could we automate in our video production process to reduce the time and number of steps required to create video content without sacrificing quality?
With the help of Cloudinary, we were able to deliver a consistent branding approach in all our video content without adding a bunch of extra editing tasks for folks creating videos. And, as a bonus, if we update our branding in the future, we can update all the video branding across the whole site at once — no video editing required!
What does “video branding” mean?
To make every video on the Explorers site feel like it all fits together, we include a few common pieces in each video:
A title scene
A short intro bumper (video clip) that shows the Jamstack Explorers branding
A short outro bumper that either counts down to the next video or shows a “mission accomplished” if this is the last video in the mission
Skip to the end: here’s how a branded video looks
To show the impact of adding the branding, here’s one of the videos from Jamstack Explorers without any branding:
This video (and this Vue mission from Ben Hong) is legitimately outstanding! However, it starts and ends a little abruptly, and we don’t have a sense of where this video lives.
We worked with Adam Hald to create branded video assets that help give each video a sense of place. Check out the same video with all the Explorers branding applied:
We get the same great content, but now we’ve added a little extra va-va-voom that makes this feel like it’s part of a larger story.
In this article, we’ll walk through how we automatically customize every video using Cloudinary.
How does Cloudinary make this possible?
Cloudinary is a cloud-based asset delivery network that gives us a powerful, URL-based API to manipulate and transform media. It supports all sorts of asset types, but where it really shines is with images and video.
To use Cloudinary, you create a free account, then upload your asset. This asset then becomes available at a Cloudinary URL:
https://res.cloudinary.com/netlify/image/upload/v1605632851/explorers/avatar.jpg
                           ^^^^^^^             ^^^^^^^^^^ ^^^^^^^^^^^^^^^^^^^
                              |                      |                |
                              V                      V                V
                      cloud (account) name    version (optional)  file name
This URL points to the original image and can be used in <img /> tags and other markup.
The original image size is 97.6kB.
Dynamically adjust file format and quality to reduce file sizes
If we’re using this image on a website and want to improve our site performance, we may decide to reduce the size of this image by using next-generation formats like WebP, AVIF, and so on. These new formats are much smaller, but aren’t supported by all browsers, which would usually mean using a tool to generate multiple versions of this image in different formats, then using a <picture> element or other specialized markup to provide modern options with the JPG fallback for older browsers.
With Cloudinary, all we have to do is add a transformation to the URL:
https://res.cloudinary.com/netlify/image/upload/q_auto,f_auto/v1605632851/explorers/avatar.jpg
                                                ^^^^^^^^^^^^
                                                      |
                                                      V
                                    automatic quality & format transformations
What we see in the browser is visually identical:
The transformed image is 15.4kB.
By setting the file format and quality settings to automatic (f_auto,q_auto), Cloudinary is able to detect which formats are supported by the client and serves the most efficient format at a reasonable quality level. In Chrome, for example, this image transforms from a 97.6kB JPG to a 15.4kB WebP, and all we had to do was add a couple of things to the URL!
We can transform our images in lots of different ways!
We can go further with other transformations, including resizing (w_150 for “resize to 150px wide”) and color effects (e_grayscale for “apply the grayscale effect”):
There’s a Node SDK to make this a little more human-readable
For more advanced transformations like what we’re going to get into, writing the URLs by hand can get a little hard to read. We ended up using the Cloudinary Node SDK to give us the ability to add comments and explain what each transformation was doing, and that’s been extremely helpful as we maintain and evolve the platform.
To install it, get your Cloudinary API key and secret from your console, then install the SDK using npm:
# create a new directory
mkdir cloudinary-video

# move into the new directory
cd cloudinary-video/

# initialize a new Node project
npm init -y

# install the Cloudinary Node SDK
npm install cloudinary
Next, create a new file called index.js and initialize the SDK with your cloud_name and API credentials:
const cloudinary = require('cloudinary').v2;

// TODO replace these values with your own Cloudinary credentials
cloudinary.config({
  cloud_name: 'your_cloud_name',
  api_key: 'your_api_key',
  api_secret: 'your_api_secret',
});
Don’t commit your API credentials to GitHub or share them anywhere. Use environment variables to keep them safe! If you’re unfamiliar with environment variables, Colby Fayock has written a great introduction to using environment variables.
Next, we can create the same transformation as before using slightly more human-readable configuration settings:
cloudinary.uploader
  // the first argument should be the public ID (including folders!) of the
  // image we want to transform
  .explicit('explorers/avatar', {
    // these two properties match the beginning of the URL:
    // https://res.cloudinary.com/netlify/image/upload/...
    //                                    ^^^^^^^^^^^^
    resource_type: 'image',
    type: 'upload',

    // "eager" means we want to run these transformations ahead of time to avoid
    // a slow first load time
    eager: [
      {
        fetch_format: 'auto',
        quality: 'auto',
        width: 150,
        effect: 'grayscale',
      },
    ],

    // allow this transformed image to be cached to avoid re-running the same
    // transformations over and over again
    overwrite: false,
  })
  .then((result) => {
    console.log(result);
  });
Let’s run this code by typing node index.js in our terminal. The output will look something like this:
Under the eager property, our transformations are shown along with the full URL to view the transformed image.
While the Node SDK is probably overkill for a straightforward transformation like this one, it becomes really handy when we start looking at the complex transformations required to add video branding.
Transforming videos with Cloudinary
To transform our videos in Jamstack Explorers, we follow the same approach: each video is uploaded to Cloudinary, and then we modify the URLs to resize, adjust quality, and insert the title card and bumpers.
There are a few major categories of transformation that we’ll be tackling to add the branding:
Overlays
Transitions
Text overlays
Splicing
Let’s look at each of these categories and see if we can’t reimplement the Jamstack Explorers branding on Ben’s video! Let’s get set up by setting up index.js to transform our base video:
cloudinary.uploader
  .explicit('explorers/bumper', {
    // these two properties match the beginning of the URL:
    // https://res.cloudinary.com/netlify/image/upload/...
    //                                    ^^^^^^^^^^^^
    resource_type: 'video',
   type: 'upload',

    // "eager" means we want to run these transformations ahead of time to avoid
    // a slow first load time
    eager: [
      {
        fetch_format: 'auto',
        quality: 'auto',
        height: 360,
        width: 640,
        crop: 'fill', // avoid letterboxing if videos are different sizes
      },
    ],

    // allow this transformed image to be cached to avoid re-running the same
    // transformations over and over again
    overwrite: false,
  })
  .then((result) => {
    console.log(result);
  });
You may have noticed that we’re using a video called “bumper” instead of Ben’s original video. This is due to the way Cloudinary orders videos as we add them together. We’ll add Ben’s video in the next section!
Combine two videos with a custom transition using Cloudinary
To add our bumpers, we need to add a second transformation “layer” to the eager array that adds a second video as an overlay.
To do this, we use the overlay transformation and set it to video:publicID, where publicID is the Cloudinary public ID of the asset with any slashes (/) transformed to colons (:).
We also need to tell Cloudinary how to transition between the two videos, which we do using a special kind of video called a luma matte that lets us mask one video with the black area of the video, and a second video with the white area. This results in a stylized cross-fade.
Here’s what the luma matte looks like on its own:
The video and the transition both have their own transformations, which means that we need to treat them as different “layers” in the Cloudinary transform. This means splitting them into separate objects, then adding additional objects to “apply” each layer, which allows us to call that section done and continue adding more transformations to the main video.
To tell Cloudinary this this is a luma matte and not another video, we set the effect type to transition.
Make the following changes in index.js to put all of this in place:
const videoBaseTransformations = {
  fetch_format: 'auto',
  quality: 'auto',
  height: 360,
  width: 600,
  crop: 'fill',
}

cloudinary.uploader
  .explicit('explorers/bumper', {
    // these two properties match the beginning of the URL:
    // <https://res.cloudinary.com/netlify/image/upload/>...
    //
    resource_type: 'video',
    type: 'upload',

    // "eager" means we want to run these transformations ahead of time to avoid
    // a slow first load time
    eager: [
      videoBaseTransformations,
      {
        overlay: 'video:explorers:LCA-07-lifecycle-hooks',
        ...videoBaseTransformations,
      },
      {
        overlay: 'video:explorers:transition',
        effect: 'transition',
      },
      { flags: 'layer_apply' }, // <= apply the transformation
      { flags: 'layer_apply' }, // <= apply the actual video
    ],

    // allow this transformed image to be cached to avoid re-running the same
    // transformations over and over again
    overwrite: false,
  })
  .then((result) => {
    console.log(result);
  });
We need the same format, quality, and sizing transformations on all videos, so we pulled those out into a variable called videoBaseTransformations, then added a second object to contain the overlay.
If we run this with node index.js, the video we get back looks like this:
Not bad! This already looks like it’s part of the Jamstack Explorers site, and that transition adds a nice flow from the common bumper into the custom video.
Adding the outro bumper works exactly the same: we need to add another overlay for the ending bumper and a transition. We won’t show this code in the tutorial, but you can see it in the source code if you’re interested.
Add a title card to a video using text overlays
To add a title card, there are two distinct steps:
Extract a short video clip to serve as the title card background
Add a text overlay with the video’s title
The next two sections walk through each step individually so we can see the distinction between the two.
Extract a short video clip to use as the title card background
When Adam Hald created the Explorers video assets, he included a beautiful intro video that opens on a starry sky that’s perfect for a title card. Using Cloudinary, we can grab a few seconds of that starry sky and splice it into every video as a title card!
In index.js, add the following transformation blocks:
cloudinary.uploader
  .explicit('explorers/bumper', {
    // these two properties match the beginning of the URL:
    // https://res.cloudinary.com/netlify/image/upload/...
    //
    resource_type: 'video',
    type: 'upload',

    // "eager" means we want to run these transformations ahead of time to avoid
    // a slow first load time
    eager: [
      videoBaseTransformations,
      {
        overlay: 'video:explorers:LCA-07-lifecycle-hooks',
        ...videoBaseTransformations,
      },
      {
        overlay: 'video:explorers:transition',
        effect: 'transition',
      },
      { flags: 'layer_apply' }, // <= apply the transformation
      { flags: 'layer_apply' }, // <= apply the actual video

      // add the outro bumper and a transition
      {
        overlay: 'video:explorers:countdown',
        ...videoBaseTransformations,
      },
      {
        overlay: 'video:explorers:transition',
        effect: 'transition',
      },
      { flags: 'layer_apply' },
      { flags: 'layer_apply' },

      // splice a title card at the beginning of the video
      {
        overlay: 'video:explorers:intro',
        flags: 'splice', // splice this into the video
        ...videoBaseTransformations,
      },
      {
        audio_codec: 'none', // remove the audio
        end_offset: 3, // shorten to 3 seconds
        effect: 'accelerate:-25', // slow down 25% (to ~4 seconds)
      },
      {
        flags: 'layer_apply',
        start_offset: 0, // put this at the beginning of the video
      },
    ],

    // allow this transformed image to be cached to avoid re-running the same
    // transformations over and over again
    overwrite: false,
  })
  .then((result) => {
    console.log(result);
  });
Using the splice flag, we tell Cloudinary to add this video directly without a transition.
In the next set of transformations, we add three transformations we haven’t seen before:
We set audio_codec to none to remove sound from this segment of video.
We set end_offset to 3, which means we’ll get only the first 3 seconds of the video.
We add the accelerate effect with a value of -25, which slows the video down by 25%.
Running node index.js will now give us a video that starts with just under 4 seconds of silent, starry skies:
Add text overlays to videos using Cloudinary
Our last step is to add a text overlay to show the video title!
Text overlays use the same overlay property as other overlays, but we pass an object with settings for the font. Cloudinary supports a wide variety of fonts — I haven’t been able to find a definitive list, but it seems to be a large number of Google Fonts — and if you’ve purchased a license to use a custom font, you can upload a custom font to Cloudinary for use in text overlays as well.
cloudinary.uploader
  .explicit('explorers/bumper', {
    // these two properties match the beginning of the URL:
    // <https://res.cloudinary.com/netlify/image/upload/>...
    //
    resource_type: 'video',
    type: 'upload',

    // "eager" means we want to run these transformations ahead of time to avoid
    // a slow first load time
    eager: [
      videoBaseTransformations,
      {
        overlay: 'video:explorers:LCA-07-lifecycle-hooks',
        ...videoBaseTransformations,
      },
      {
        overlay: 'video:explorers:transition',
        effect: 'transition',
      },
      { flags: 'layer_apply' }, // <= apply the transformation
      { flags: 'layer_apply' }, // <= apply the actual video

      // add the outro bumper and a transition
      {
        overlay: 'video:explorers:countdown',
        ...videoBaseTransformations,
      },
      {
        overlay: 'video:explorers:transition',
          effect: 'transition',
        },
        { flags: 'layer_apply' },
        { flags: 'layer_apply' },

        // splice a title card at the beginning of the video
        {
          overlay: 'video:explorers:intro',
          flags: 'splice', // splice this into the video
          ...videoBaseTransformations,
        },
        {
          audio_codec: 'none', // remove the audio
          end_offset: 3, // shorten to 3 seconds
          effect: 'accelerate:-25', // slow down 25% (to ~4 seconds)
        },
        {
        overlay: {
          font_family: 'roboto', // lots of Google Fonts are supported
          font_size: 40,
          text_align: 'center',
          text: 'Lifecycle Hooks', // this can be any text you want
        },
        width: 500,
        crop: 'fit',
        color: 'white',
      },
      { flags: 'layer_apply' },
      {
        flags: 'layer_apply',
        start_offset: 0, // put this at the beginning of the video
      },
    ],

    // allow this transformed image to be cached to avoid re-running the same
    // transformations over and over again
    overwrite: false,
  })
  .then((result) => {
    console.log(result);
  });
In addition to setting the font size and alignment, we also apply a width of 500px (which will be centered by default) to keep our title text from smashing into the side of the title card, and set the crop value to fit, which will wrap longer titles. Setting the color to white makes our text visible against the dark, starry background.
Run node index.js to generate the URL and we’ll see our fully branded video, including a title card and bumpers!
Build your video branding once; use it everywhere
Creating bumpers, transitions, and title cards is a lot of work. Creating high-quality video content is also a lot of work. If we had to manually edit every Jamstack Explorers video to insert these title cards and bumpers, it’s extremely unlikely that we would have actually done it.
We knew that the only realistic way for us to keep the videos consistently branded was to reduce the friction of adding the branding, and Cloudinary let us automate it entirely. This means that we can stay consistent without any manual steps!
As an added bonus, it also means that if we update our title cards or bumpers in the future, we can update all the branding for all the videos by changing the code in one place. This is a huge relief for us, because we know that Explorers is going to continue to grow and evolve over time.
What to do next
Now that you know how to use Cloudinary to add custom branding, here are some additional resources to help you keep learning.
What else can you automate using Cloudinary? How much time could you save by automating the repetitive parts of your video editing workflow? I am exactly the kind of nerd who loves to talk about this stuff, so send me your ideas on Twitter!
Recently, my team took on a project to build an online, video-based learning platform. The project, called Jamstack Explorers, is a Jamstack app powered by Sanity and Next.js. We knew that the success of this project relied on making the editing experience easy for collaborators from different companies and roles, as well as retaining the flexibility to add custom components as needed.
To accomplish this, we decided to author content using MDX, which is Markdown with the option to include custom components. For our audience, Markdown is a standard approach to writing content: it’s how we format GitHub comments, Notion docs, Slack messages (kinda), and many other tools. The custom MDX components are optional and their usage is similar to shortcodes in WordPress and templating languages.
To make it possible to collaborate with contributors from anywhere, we decided to use Sanity as our content management system (CMS).
But how could we write MDX in Sanity? In this tutorial, we’ll break down how we set up MDX support in Sanity, and how to load and render that MDX in Next.js — powered website using a reduced example.
TL;DR
If you want to jump straight to the results, here are some helpful links:
Our first step is to get our content management workflow set up. In this section, we’ll walk through setting up a new Sanity instance, adding support for writing MDX, and creating a public, read-only API that we can use to load our content into a website for display.
Create A New Sanity Instance
If you don’t already have a Sanity instance set up, let’s start with that. If you do already have a Sanity instance, skip ahead to the next section.
Our first step is to install the Sanity CLI globally, which allows us to install, configure, and run Sanity locally.
# install the Sanity CLI
npm i -g @sanity/cli
In your project folder, create a new directory called sanity, move into it, and run Sanity’s init command to create a new project.
# create a new directory to contain Sanity files
mkdir sanity
cd sanity/
sanity init
The init command will ask a series of questions. You can choose whatever makes sense for your project, but in this example we’ll use the following options:
Choose a project name: Sanity Next MDX Example.
Choose the default dataset configuration ("production").
Use the default project output path (the current directory).
Choose "clean project" from the template options.
Install The Markdown Plugin For Sanity
By default, Sanity doesn’t have Markdown support. Fortunately, there’s a ready-made Sanity plugin for Markdown support that we can install and configure with a single command:
# add the Markdown plugin
sanity install markdown
This command will install the plugin and add the appropriate configuration to your Sanity instance to make it available for use.
Define A Custom Schema With A Markdown Input
In Sanity, we control every content type and input using schemas. This is one of my favorite features about Sanity, because it means that I have fine-grained control over what each content type stores, how that content is processed, and even how the content preview is built.
For this example, we’re going to create a simple page structure with a title, a slug to be used in the page URL, and a content area that expects Markdown.
Create this schema by adding a new file at sanity/schemas/page.js and adding the following code:
We start by giving the whole content type a name and title. The type of document tells Sanity that this should be displayed at the top level of the Sanity Studio as a content type someone can create.
Each field also needs a name, title, and type. We can optionally provide validation rules and other options, such as giving the slug a max length and allowing it to be generated from the title value.
Add A Custom Schema To Sanity’s Configuration
After our schema is defined, we need to tell Sanity to use it. We do this by importing the schema into sanity/schemas/schema.js, then adding it to the types array passed to createSchema.
  // First, we must import the schema creator
  import createSchema from 'part:@sanity/base/schema-creator';

  // Then import schema types from any plugins that might expose them
  import schemaTypes from 'all:part:@sanity/base/schema-type';

+ // Import custom schema types here
+ import page from './page';

  // Then we give our schema to the builder and provide the result to Sanity
  export default createSchema({
    // We name our schema
    name: 'default',
    // Then proceed to concatenate our document type
    // to the ones provided by any plugins that are installed
    types: schemaTypes.concat([
-     / Your types here! /
+     page,
    ]),
  });
This puts our page schema into Sanity’s startup configuration, which means we’ll be able to create pages once we start Sanity up!
Run Sanity Studio Locally
Now that we have a schema defined and configured, we can start Sanity locally.
sanity start
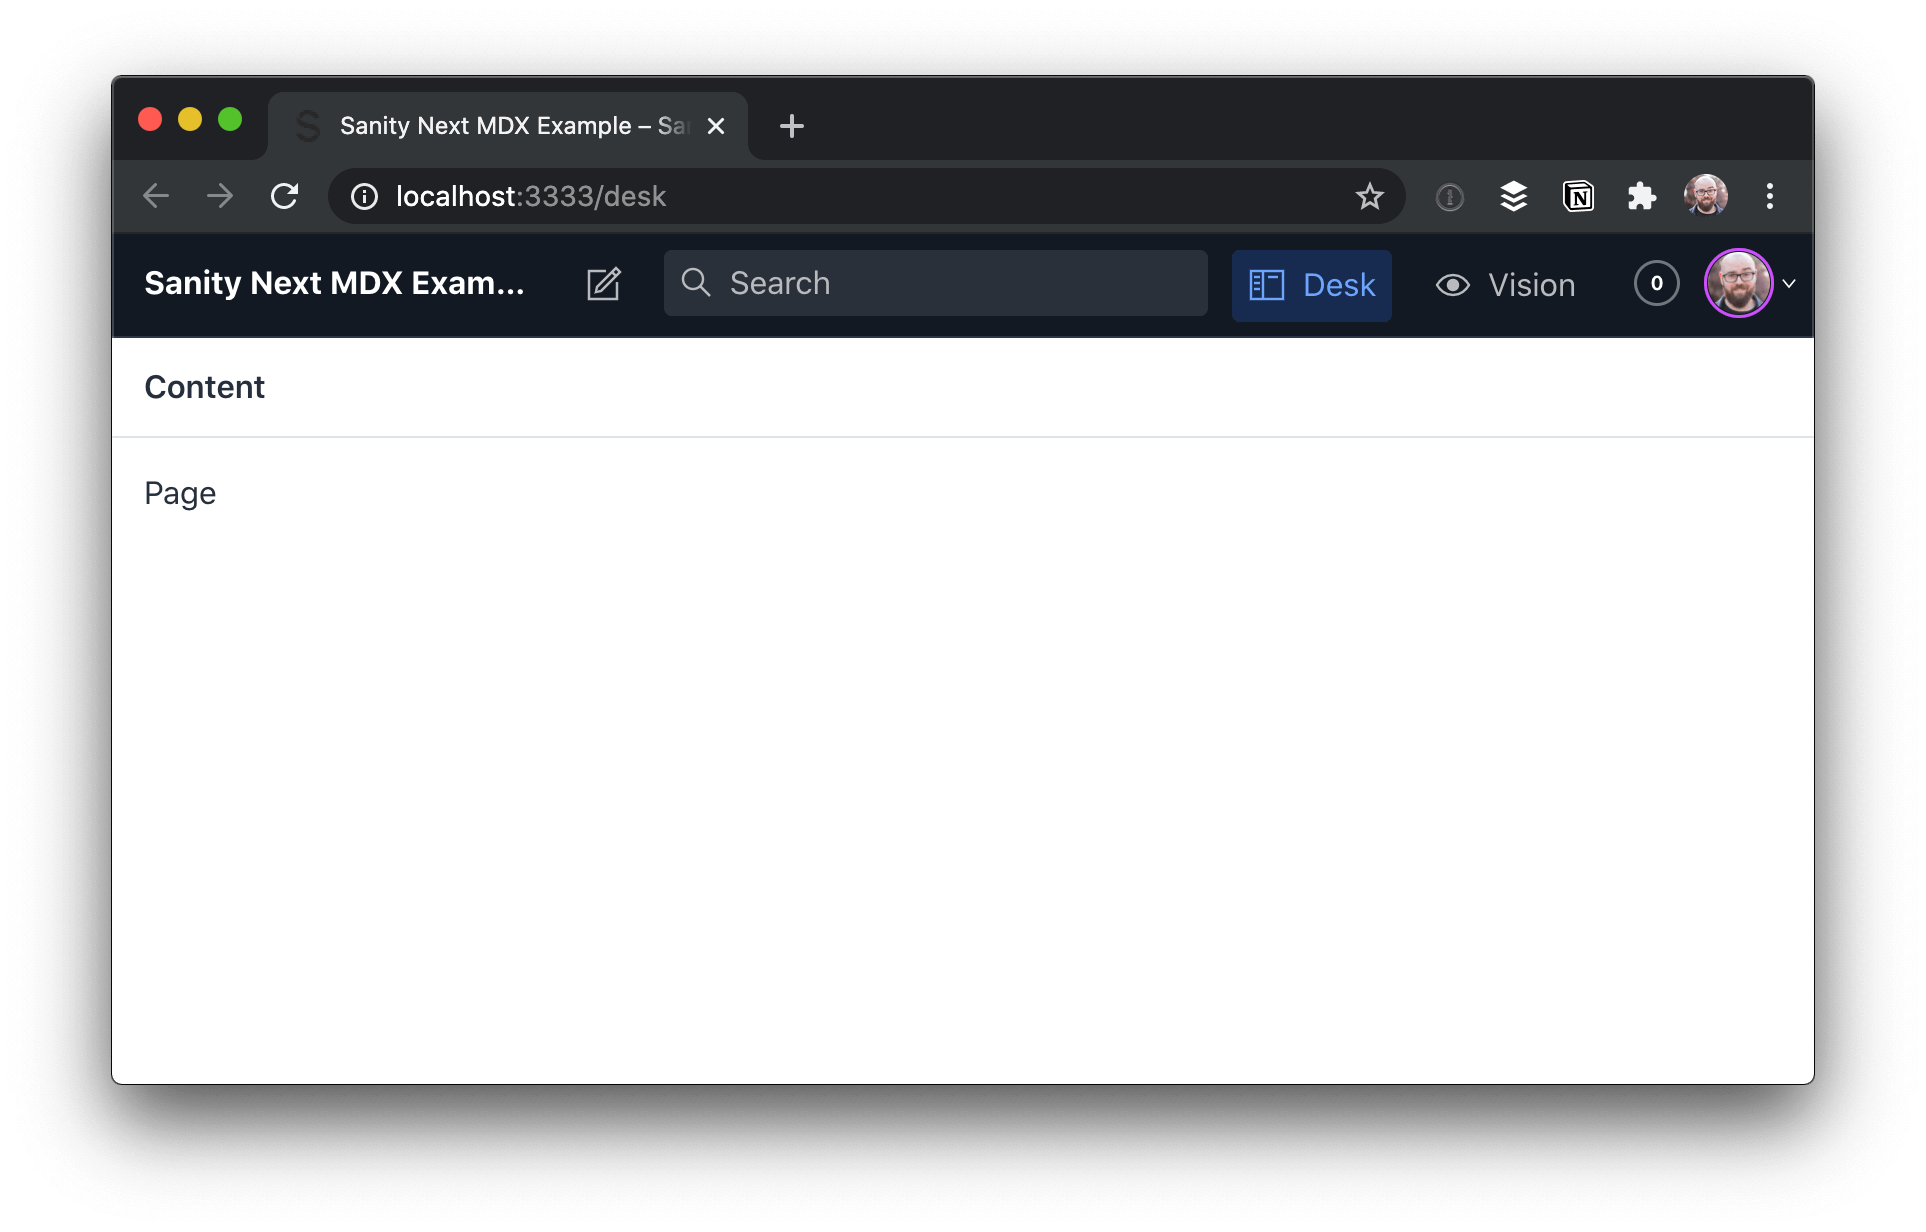
Once it’s running, we can open Sanity Studio at http://localhost:3333 on our local machine.
When we visit that URL, we’ll need to log in the first time. Use your preferred account (e.g. GitHub) to authenticate. Once you get logged in, you’ll see the Studio dashboard, which looks pretty barebones.
To add a new page, click "Page", then the pencil icon at the top-left.
Add a title and slug, then write some Markdown with MDX in the content area:
This is written in Markdown.

But what’s this?

<Callout>

Oh dang! Is this a React component in the middle of our content? 😱

</Callout>

Holy buckets! That’s amazing!
Heads up! The empty line between the MDX component and the Markdown it contains is required. Otherwise the Markdown won’t be parsed. This will be fixed in MDX v2.
Once you have the content in place, click "Publish" to make it available.
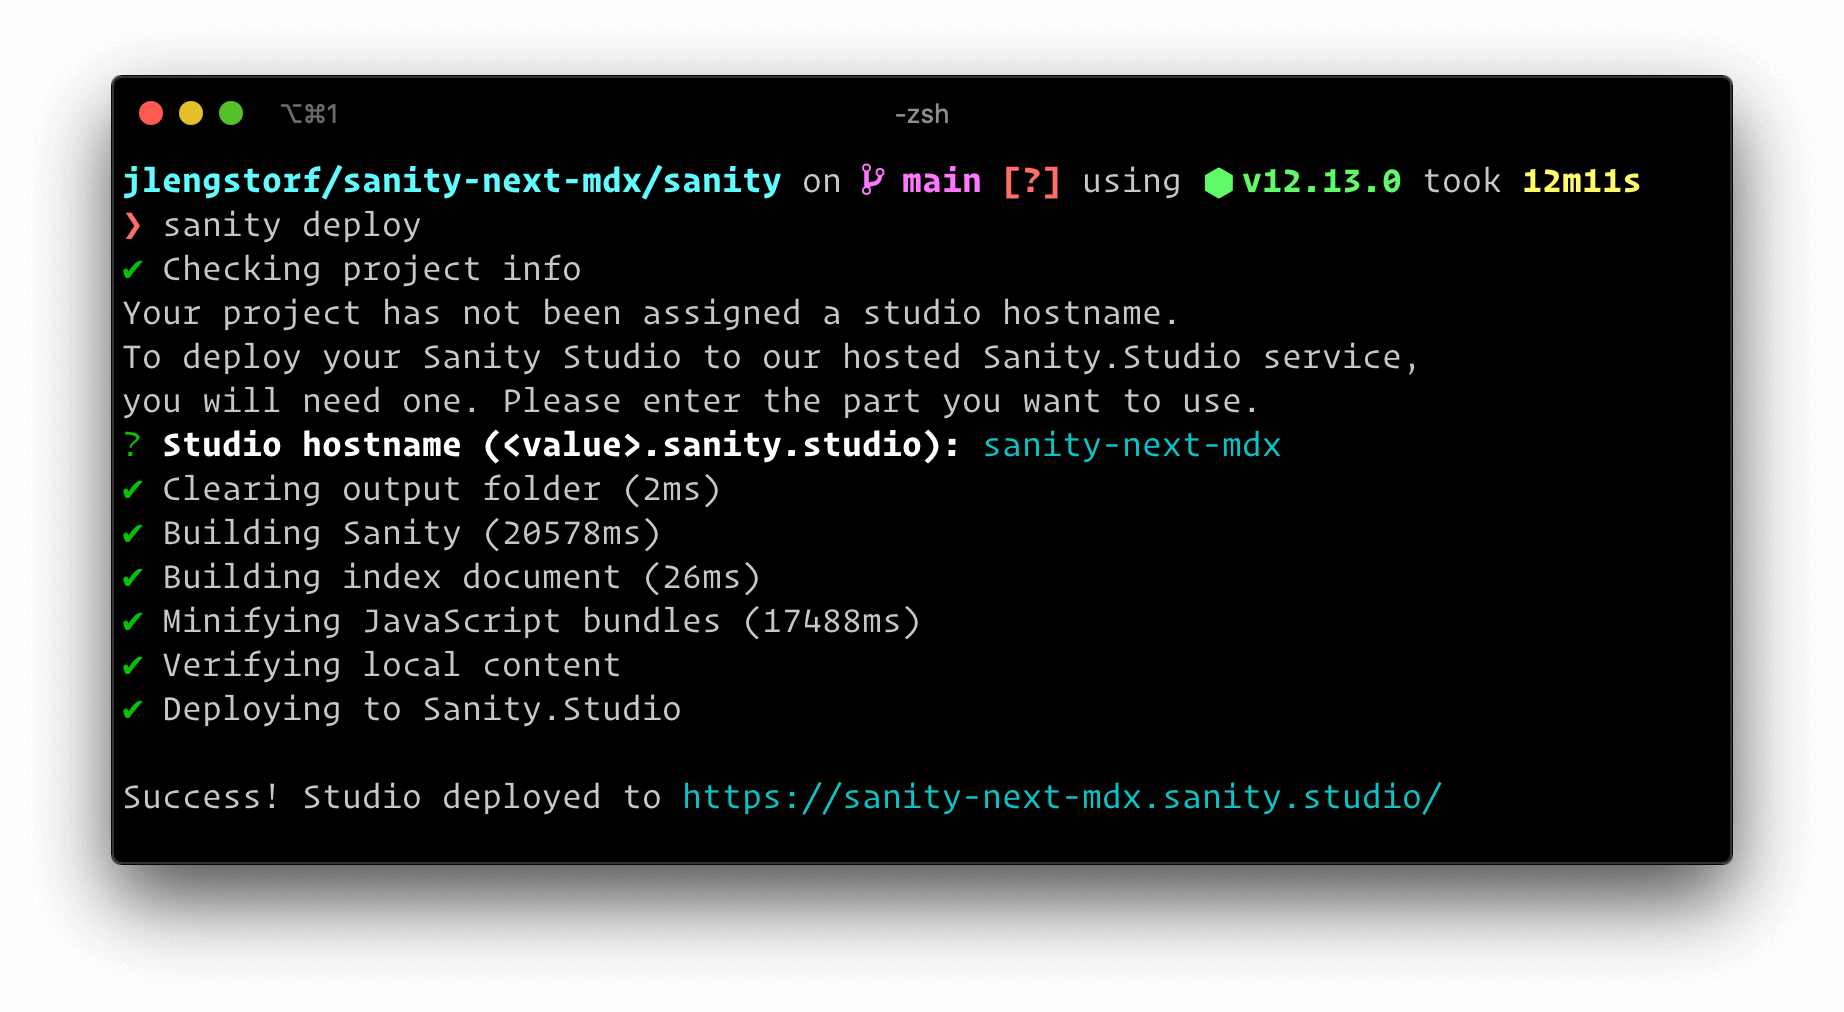
Deploy The Sanity Studio To A Production URL
In order to make edits to the site’s data without having to run the code locally, we need to deploy the Sanity Studio. The Sanity CLI makes this possible with a single command:
sanity deploy
Choose a hostname for the site, which will be used in the URL. After that, it will be deployed and reachable at your own custom link.
This provides a production URL for content editors to log in and make changes to the site content.
Make Sanity Content Available Via GraphQL
Sanity ships with support for GraphQL, which we’ll use to load our page data into our site’s front-end. To enable this, we need to deploy a GraphQL API, which is another one-liner:
sanity graphql deploy
We can choose to enable a GraphQL Playground, which gives us a browser-based data explorer. This is extremely handy for testing queries.
Store the GraphQL URL — you’ll need it to load the data into Next.js!
The GraphQL API is read-only for published content by default, so we don’t need to worry about keeping this secret — everything that this API returns is published, which means it’s what we want people to see.
Test Sanity GraphQL Queries In The Browser
By opening the URL of our GraphQL API, we’re able to test out GraphQL queries to make sure we’re getting the data we expect. These queries are copy-pasteable into our code.
To load our page data, we can build the following query using the "schema" tab at the right-hand side as a reference.
query AllPages {
  allPage {
    title
    slug {
      current
    }
    content
  }
}
This query loads all the pages published in Sanity, returning the title, current slug, and content for each. If we run this in the playground by pressing the play button, we can see our page returned.
Now that we’ve got page data with MDX in it coming back from Sanity, we’re ready to build a site using it!
In the next section, we’ll create an Next.js site that loads data from Sanity and renders our MDX content properly.
Display MDX In Next.js From Sanity
In an empty directory, start by initializing a new package.json, then install Next, React, and a package called next-mdx-remote.
# create a new package.json with the default options
npm init -y

# install the packages we need for this project
npm i next react react-dom next-mdx-remote
Inside package.json, add a script to run next dev:
In our page content, we used the <Callout> component to wrap some of our Markdown. MDX works by combining React components with Markdown, which means our first step is to define the React component our MDX expects.
Create a Callout component at src/components/callout.js:
This component adds a blue box around content that we want to call out for extra attention.
Send GraphQL Queries Using The Fetch API
It may not be obvious, but you don’t need a special library to send GraphQL queries! It’s possible to send a query to a GraphQL API using the browser’s built-in Fetch API.
Since we’ll be sending a few GraphQL queries in our site, let’s add a utility function that handles this so we don’t have to duplicate this code in a bunch of places.
Add a utility function to fetch Sanity data using the Fetch API at src/utils/sanity.js:
The first argument is the Sanity GraphQL URL that Sanity returned when we deployed the GraphQL API.
GraphQL queries are always sent using the POST method and the application/json content type header.
The body of a GraphQL request is a stringified JSON object with two properties: query, which contains the query we want to execute as a string; and variables, which is an object containing any query variables we want to pass into the GraphQL query.
The response will be JSON, so we need to handle that in the .then for the query result, and then we can destructure the result to get to the data inside. In a production app, we’d want to check for errors in the result as well and display those errors in a helpful way, but this is a post about MDX, not GraphQL, so #yolo.
Heads up! The Fetch API is great for simple use cases, but as your app becomes more complex you’ll probably want to look into the benefits of using a GraphQL-specific tool like Apollo or urql.
Create A Listing Of All Pages From Sanity In Next.js
To start, let’s make a list of all the pages published in Sanity, as well as a link to their slug (which won’t work just yet).
Create a new file at src/pages/index.js and put the following code inside:
import Link from 'next/link';
import { getSanityContent } from '../utils/sanity';

export default function Index({ pages }) {
  return (
    <div>
      <h1>This Site Loads MDX From Sanity.io</h1>
      <p>View any of these pages to see it in action:</p>
      <ul>
        {pages.map(({ title, slug }) => (
          <li key={slug}>
            <Link href={`/${slug}`}>
              <a>{title}</a>
            </Link>
          </li>
        ))}
      </ul>
    </div>
  );
}

export async function getStaticProps() {
  const data = await getSanityContent({
    query: `
      query AllPages {
        allPage {
          title
          slug {
            current
          }
        }
      }
    `,
  });

  const pages = data.allPage.map((page) => ({
    title: page.title,
    slug: page.slug.current,
  }));

  return {
    props: { pages },
  };
}
In getStaticProps we call the getSanityContent utility with a query that loads the title and slug of all pages in Sanity. We then map over the page data to create a simplified object with a title and slug property for each page and return that array as a pages prop.
The Index component to display this page receives that page’s prop, so we map over that to output an unordered list of links to the pages.
Start the site with npm run dev and open http://localhost:3000 to see the work in progress.
If we click a page link right now, we’ll get a 404 error. In the next section we’ll fix that!
Generate Pages Programatically In Next.js From CMS Data
Next.js supports dynamic routes, so let’s set up a new file to catch all pages except our home page at src/pages/[page].js.
In this file, we need to tell Next what the slugs are that it needs to generate using the getStaticPaths function.
To load the static content for these pages, we need to use getStaticProps, which will receive the current page slug in params.page.
To help visualize what’s happening, we’ll pass the slug through to our page and log the props out on screen for now.
If the server is already running this will reload automatically. If not, run npm run dev and click one of the page links on http://localhost:3000 to see the dynamic route in action.
Load Page Data From Sanity For The Current Page Slug In Next.js
Now that we have the page slug, we can send a request to Sanity to load the content for that page.
Using the getSanityContent utility function, send a query that loads the current page using its slug, then pull out just the page’s data and return that in the props.
After reloading the page, we can see that the MDX content is loaded, but it hasn’t been processed yet.
Render MDX From A CMS In Next.js With Next-mdx-remote
To render the MDX, we need to perform two steps:
For the build-time processing of MDX, we need to render the MDX to a string. This will turn the Markdown into HTML and ensure that the React components are executable. This is done by passing the content as a string into renderToString along with an object containing the React components we want to be available in MDX content.
For the client-side rendering of MDX, we hydrate the MDX by passing in the rendered string and the React components. This makes the components available to the browser and unlocks interactivity and React features.
While this might feel like doing the work twice, these are two distinct processes that allow us to both create fully rendered HTML markup that works without JavaScript enabled and the dynamic, client-side functionality that JavaScript provides.
Make the following changes to src/pages/[page].js to render and hydrate MDX:
After saving these changes, reload the browser and we can see the page content being rendered properly, custom React components and all!
Use MDX With Sanity And Next.js For Flexible Content Workflows
Now that this code is set up, content editors can quickly write content using MDX to enable the speed of Markdown with the flexibility of custom React components, all from Sanity! The site is set up to generate all the pages published in Sanity, so unless we want to add new custom components we don’t need to touch the Next.js code at all to publish new pages.
What I love about this workflow is that it lets me keep my favorite parts of several tools: I really like writing content in Markdown, but my content also needs more flexibility than the standard Markdown syntax provides; I like building websites with React, but I don’t like managing content in Git.
Beyond this, I also have access to the huge amount of customization made available in both the Sanity and React ecosystems, which feels like having my cake and eating it, too.
If you’re looking for a new content management workflow, I hope you enjoy this one as much as I do!
What’s Next?
Now that you’ve got a Next site using MDX from Sanity, you may want to go further with these tutorials and resources:
One of the more powerful concepts I've stumbled across recently is the idea of abstract syntax trees, or ASTs. If you've ever studied alchemy, you may recall that the whole motivation for alchemists was to discover some way to transform not-gold into gold through scientific or arcane methods.
ASTs are kind of like that. Using ASTs, we can transform Markdown into HTML, JSX into JavaScript, and so much more.
Why are ASTs useful?
Early in my career, I tried to change files using a find-and-replace method. This ended up being fairly complicated, so I tried using regular expressions. I ended up abandoning the idea because it was so brittle; the app broke all the time because someone would enter text in a way I hadn’t anticipated and it would break my regular expressions causing the whole app to fall down.
The reason this was so hard is that HTML is flexible. That makes it extremely hard to parse using regular expressions. String-based replacement like this is prone to breaking because it might miss a match, match too much, or do something weird that results in invalid markup that leaves the page looking janky.
ASTs, on the other hand, turn HTML into something far more structured, which makes it much simpler to dive into a text node and do replacements on only that text, or to mess with elements without needing to deal with the text at all.
This makes AST transformation safer and less error-prone than a purely string-based solution.
What are ASTs used for?
To start, let's take a look at a minimal document using a couple lines of Markdown. This will be saved as a file called home.md, which we'll save in the content folder of our website.
# Hello World!
 An adorable corgi!
Some more text goes here.
Assuming we know Markdown, we can infer that when this Markdown is parsed, it'll end up being an <h1> that says, "Hello World!" and a <p> that says, "This is some Markdown."
But how does it get transformed from Markdown to HTML?
First, we need to install the dependencies required to parse the Markdown into an AST and convert it to HTML. To do that, we need to make sure we've initialized the folder as a package. Run the following command in your terminal:
# make sure you’re in your root folder (where `content` is)
# initialize this folder as an npm package
npm init

# install the dependencies
npm install unified remark-parse remark-html
If we assume our Markdown is stored in home.md, we can get the AST with the following code:
This code takes advantage of Node’s built-in fs module, which allows us to access and manipulate the filesystem. For more information on how this works, check out the official docs.
If we save this as src/index.js and use Node to execute this script from the command line, we’ll see the following in our terminal:
$ node src/index.js
<h1>Hello World!</h1>
<p><img src="<https://images.dog.ceo/breeds/corgi-cardigan/n02113186_1030.jpg>" alt="cardigan corgi"> An adorable corgi!</p>
<p>Some more text goes here.</p>
We tell unified to use remark-parse to turn the Markdown file into an AST, then to use remark-html to turn the Markdown AST into a HTML — or, more specifically, it turns it into something called a VFile. Using the toString() method turns that AST into an actual string of HTML we can display in the browser!
Thanks to the hard work of the open-source community, remark does all the hard work of turning Markdown into HTML for us. (See the diff)
Next, let's look at how this actually works.
What does an AST look like?
To see the actual AST, let’s write a tiny plugin to log it:
Note that the position values have been truncated to save space. They contain information about where the node is in the document. For the purposes of this tutorial, we won’t be using this information. (See the diff)
This is a little overwhelming to look at, but if we zoom in we can see that each part of the Markdown becomes a type of node with a text node inside it.
The type tells us what kind of node we're dealing with.
Each node type has additional properties that describe the node. The depth property on the heading tells us what level heading it is — a depth of 1 means it’s an <h1> tag, 2 means <h2>, and so on.
The children array tells us what's inside this node. In both the heading and the paragraph, there’s only text, but we could also see inline elements here, like <strong>.
This is the power of ASTs: We've now described the Markdown document as an object that a computer can understand. If we want to print this back to Markdown, a Markdown compiler would know that a "heading" node with a depth of 1 starts with #, and a child text node with the value "Hello" means the final line should be # Hello.
How AST transformations work
Transforming an AST is usually done using the visitor pattern. It‘s not important to know the ins and outs of how this works to be productive, but if you’re curious, JavaScript Design Patterns for Humans by Soham Kamani has a great example to help explain how it works. The important thing to know is that the majority of resources on AST work will talk about "visiting nodes," which roughly translates to "find part of the AST so we can do stuff with it." The way this works practice is that we write a function that will be applied to AST nodes matching our criteria.
A few important notes about how it works:
ASTs can be huge, so for performance reasons we will mutate nodes directly. This runs counter to how I would usually approach things — as a general rule I don't like to mutate global state — but it makes sense in this context.
Visitors work recursively. That means that if we process a node and create a new node of the same type, the visitor will run on the newly created node as well unless we explicitly tell the visitor not to.
We're not going to go too deep in this tutorial, but these two ideas will help us understand what's going on as we start to mess with the code.
How do I modify the HTML output of the AST?
What if we want to change the output of our Markdown, though? Let's say our goal is to wrap image tags with a figure element and supply a caption, like this:
To accomplish this, we'll need transform the HTML AST — not the Markdown AST — because Markdown doesn't have a way of creating figure or figcaption elements. Fortunately, because unified is interoperable with multiple parsers, we can do that without writing a bunch of custom code.
Convert a Markdown AST to an HTML AST
To convert the Markdown AST to an HTML AST, add remark-rehype and switch to rehype-stringify for turning the AST back to HTML.
npm install remark-rehype rehype-stringify
Make the following changes in src/index.js to switch over to rehype:
This is the AST for the HTML representation of the image, so we can start changing it over to use the figure element. (See the diff)
Write a plugin for unified
To wrap our img element with a figure element, we need to write a plugin. In unified, plugins are added with the use() method, which accepts the plugin as a first argument and any options as a second argument:
.use(plugin, options)
The plugin code is a function (called an “attacher” in unified jargon) that receives option. These options are used to create a new function (called a “transformer”) that receives the AST and does work to, er, transform it. For more details on plugins, check out the plugin overview in the unified docs.
The function it returns will receive the entire AST as its argument, and it doesn't return anything. (Remember, ASTs are mutated globally.) Create a new file called img-to-figure.js in the same folder as index.js, then put the following inside:
module.exports = options => tree => {
  console.log(tree);
};
Next, we need to add a visitor. This will let us actually get at the code. Unified takes advantage of a number of utility packages, all prefixed with unist-util-*, that allow us to do common things with our AST without writing custom code.
We can use unist-util-visit to modify nodes. This gives us a visit helper that takes three arguments:
The entire AST we're working with
A predicate function to identify which nodes we want to visit
A function to make any changes to the AST we want to make
To install, run the following in your command line:
npm install unist-util-visit
Let's implement a visitor in our plugin by adding the following code:
const visit = require('unist-util-visit');

  module.exports = options => tree => {
    visit(
      tree,
      // only visit p tags that contain an img element
      node =>
        node.tagName === 'p' && node.children.some(n => n.tagName === 'img'),
      node => {
        console.log(node);
      }
    );
};
When we run this, we can see there's only one paragraph node logged:
Now that we have the image attributes, we can start to change the AST. Remember, because ASTs can be really large, we mutate them in place to avoid creating lots of copies and potentially slowing our script down.
We start by changing the node’s tagName to be a figure instead of a paragraph. The rest of the details can stay the same for now.
Make the following changes in src/img-to-figure.js:
const visit = require('unist-util-visit');

module.exports = options => tree => {
  visit(
    tree,
    // only visit p tags that contain an img element
    node =>
    node.tagName === 'p' && node.children.some(n => n.tagName === 'img'),
    node => {
      node.tagName = 'figure';
    }
  );
};
If we run our script again and look at the output, we can see that we’re getting closer!
<h1>Hello World!</h1>
<figure><img src="<https://images.dog.ceo/breeds/corgi-cardigan/n02113186_1030.jpg>" alt="cardigan corgi">An adorable corgi!</figure>
<p>Some more text goes here.</p>
To avoid needing to write custom syntax, we're going to use any text passed inline with an image as the image caption.
We can make an assumption that usually images don't have inline text in Markdown, but it’s worth noting that this could 100% cause unintended captions to appear for people writing Markdown. We're going to take that risk in this tutorial. If you're planning to put this into production, make sure to weigh the trade-offs and choose what's best for your situation.
To use the text, we're going to look for a text node inside our parent node. If we find one, we want to grab its value as our caption. If no caption is found, we don’t want to transform this node at all, so we can return early.
Make the following changes to src/img-to-figure.js to grab the caption:
const visit = require('unist-util-visit');

module.exports = options => tree => {
  visit(
    tree,
    // only visit p tags that contain an img element
    node =>
    node.tagName === 'p' && node.children.some(n => n.tagName === 'img'),
    node => {
      // find the text node
      const textNode = node.children.find(n => n.type === 'text');

      // if there’s no caption, we don’t need to transform the node
      if (!textNode) return;

      const caption = textNode.value.trim();

      console.log({ caption });
      node.tagName = 'figure';
    }
  );
};
Now that we have our caption text, we can add a figcaption to display it. We could do this by creating a new node and deleting the old text node, but since we’re mutating in place it’s a little less complicated to just change the text node into an element.
Elements don’t have text, though, so we need to add a new text node as a child of the figcaption element to display the caption text.
Make the following changes to src/img-to-figure.js to add the caption to the markup:
const visit = require('unist-util-visit');

module.exports = options => tree => {
  visit(
    tree,
    // only visit p tags that contain an img element
    node =>
      node.tagName === 'p' && node.children.some(n => n.tagName === 'img'),
    node => {
      // find the text node
      const textNode = node.children.find(n => n.type === 'text');

      // if there’s no caption, we don’t need to transform the node
      if (!textNode) return;

      const caption = textNode.value.trim();
      // change the text node to a figcaption element containing a text node
      textNode.type = 'element';
      textNode.tagName = 'figcaption';
      textNode.children = [
        {
          type: 'text',
          value: caption
        }
      ];

      node.tagName = 'figure';
    }
  );
};
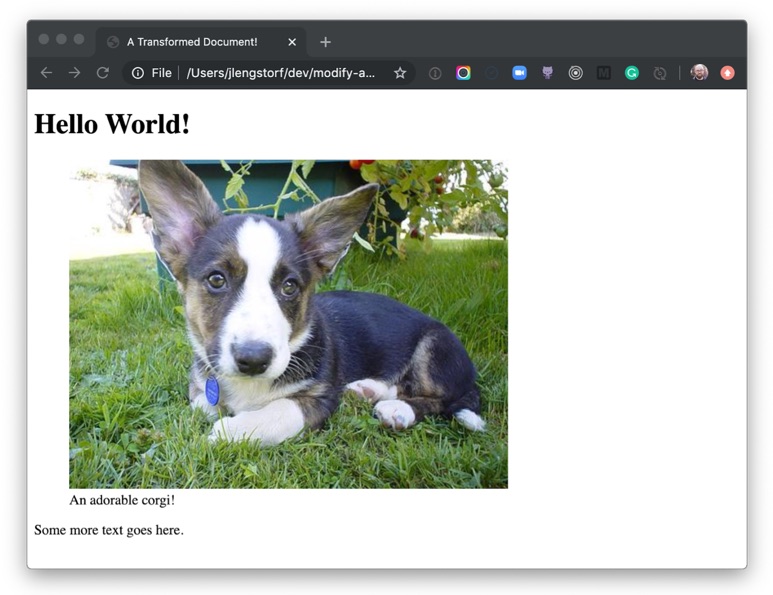
If we run the script again with node src/index.js, we see the transformed image wrapped in a figure element and described with a figcaption!
<h1>Hello World!</h1>
<figure><img src="<https://images.dog.ceo/breeds/corgi-cardigan/n02113186_1030.jpg>" alt="cardigan corgi"><figcaption>An adorable corgi!</figcaption></figure>

<p>Some more text goes here.</p>
Now that we've made a bunch of transformations, we want to save those adjustments to an actual file so we can share them.
Since the Markdown doesn't include a full HTML document, we’re going to add one more rehype plugin called rehype-document to add the full document structure and a title tag.
Run the script again and we'll be able to see a new folder in root called public, and inside that we’ll see home.html. Inside, our transformed document is saved!
If we open public/home.html in a browser, we can see our transformed Markdown rendered as a figure with a caption.
Holy buckets! Look at that adorable corgi! And we know it’s adorable because the caption tells us so.
What to do next
Transforming files using ASTs is extremely powerful — with it, we’re able to create pretty much anything we can imagine in a safe way. No regexes or string parsing required!
From here, you can dig deeper into the ecosystem of plugins for remark and rehype to see more of what’s possible and get more ideas for what you can do with AST transformation, from building your own Markdown-powered static site generator; to automating performance improvements by modifying code in-place; to whatever you can imagine!
Adding Dynamic And Async Functionality To JAMstack Sites
Adding Dynamic And Async Functionality To JAMstack Sites
Jason Lengstorf
It’s increasingly common to see websites built using the JAMstack — that is, websites that can be served as static HTML files built from JavaScript, Markup, and APIs. Companies love the JAMstack because it reduces infrastructure costs, speeds up delivery, and lowers the barriers for performance and security improvements because shipping static assets removes the need for scaling servers or keeping databases highly available (which also means there are no servers or databases that can be hacked). Developers like the JAMstack because it cuts down on the complexity of getting a website live on the internet: there are no servers to manage or deploy; we can write front-end code and it just goes live, like magic.
(“Magic” in this case is automated static deployments, which are available for free from a number of companies, including Netlify, where I work.)
But if you spend a lot of time talking to developers about the JAMstack, the question of whether or not the JAMstack can handle Serious Web Applications™ will come up. After all, JAMstack sites are static sites, right? And aren’t static sites super limited in what they can do?
This is a really common misconception, and in this article we’re going to dive into where the misconception comes from, look at the capabilities of the JAMstack, and walk through several examples of using the JAMstack to build Serious Web Applications™.
JAMstack Fundamentals
Phil Hawksworth explains what JAMStack actually means and when it makes sense to use it in your projects, as well as how it affects tooling and front-end architecture. Read article →
What Makes A JAMstack Site “Static”?
Web browsers today load HTML, CSS, and JavaScript files, just like they did back in the 90s.
A JAMstack site, at its core, is a folder full of HTML, CSS, and JavaScript files.
These are “static assets”, meaning we don’t need an intermediate step to generate them (for example, PHP projects like WordPress need a server to generate the HTML on every request).
That’s the true power of the JAMstack: it doesn’t require any specialized infrastructure to work. You can run a JAMstack site on your local computer, by putting it on your preferred content delivery network (CDN), hosting it with services like GitHub Pages — you can even drag-and-drop the folder into your favorite FTP client to upload it to shared hosting.
Static Assets Don’t Necessarily Mean Static Experiences
Because JAMstack sites are made of static files, it’s easy to assume that the experience on those sites is, y’know, static. But that’s not the case!
JavaScript is capable of doing a whole lot of dynamic stuff. After all, modern JavaScript frameworks are static files after we get through the build step — and there are hundreds of examples of incredibly dynamic website experiences powered by them.
There is a common misconception that “static” means inflexible or fixed. But all that “static” really means in the context of “static sites” is that browsers don’t need any help delivering their content — they’re able to use them natively without a server handling a processing step first.
If someone asks about building a new app, it’s common to see suggestions for JAMstack approaches such as Gatsby, Eleventy, Nuxt, and other similar tools. It’s equally common to see objections arise: “static site generators can’t do _______”, where _______ is something dynamic.
But — as we touched on in the previous section — JAMstack sites can handle dynamic content and interactions!
Here’s an incomplete list of things that I’ve repeatedly heard people claim the JAMstack can’t handle that it definitely can:
Load data asynchronously
Handle processing files, such as manipulating images
Read from and write to a database
Handle user authentication and protect content behind a login
In the following sections, we’ll look at how to implement each of these workflows on a JAMstack site.
If you can’t wait to see the dynamic JAMstack in action, you can check out the demos first, then come back and learn how they work.
A note about the demos:
These demos are written without any frameworks. They are only HTML, CSS, and standard JavaScript. They were built with modern browsers (e.g. Chrome, Firefox, Safari, Edge) in mind and take advantage of newer features like JavaScript modules, HTML templates, and the Fetch API. No polyfills were added, so if you’re using an unsupported browser, the demos will probably fail.
Load Data From A Third-Party API Asynchronously
“What if I need to get new data after my static files are built?”
In the JAMstack, we can take advantage of numerous asynchronous request libraries, including the built-in Fetch API, to load data using JavaScript at any point.
Demo: Search A Third-Party API From A JAMstack Site
A common scenario that requires asynchronous loading is when the content we need depends on user input. For example, if we build a search page for the Rick & Morty API, we don’t know what content to display until someone has entered a search term.
To handle that, we need to:
Create a form where people can type in their search term,
Listen for a form submission,
Get the search term from the form submission,
Send an asynchronous request to the Rick & Morty API using the search term,
Display the request results on the page.
First, we need to create a form and an empty element that will contain our search results, which looks like this:
Next, we need to write a function that handles form submissions. This function will:
Prevent the default form submission behavior
Get the search term from the form input
Use the Fetch API to send a request to the Rick & Morty API using the search term
Call a helper function that displays the search results on the page
We also need to add an event listener on the form for the submit event that calls our handler function.
Here’s what that code looks like altogether:
<script type="module">
 import showResults from './show-results.js';

 const form = document.querySelector('form');

 const handleSubmit = async event => {
   event.preventDefault();

   // get the search term from the form input
   const name = form.elements['name'].value;

   // send a request to the Rick & Morty API based on the user input
   const characters = await fetch(
     `https://rickandmortyapi.com/api/character/?name=${name}`,
   )
     .then(response => response.json())
     .catch(error => console.error(error));

   // add the search results to the DOM
   showResults(characters.results);
 };

 form.addEventListener('submit', handleSubmit);
</script>
Note: to stay focused on dynamic JAMstack behaviors, we will not be discussing how utility functions like showResults are written. The code is thoroughly commented, though, so check out the source to learn how it works!
With this code in place, we can load our site in a browser and we’ll see the empty form with no results showing:
Handle Expensive Computing Tasks Off the User’s Device
In many apps, we need to do things that are pretty resource-intensive, such as processing an image. While some of these kinds of operations are possible using client-side JavaScript only, it’s not necessarily a great idea to make your users’ devices do all that work. If they’re on a low-powered device or trying to stretch out their last 5% of battery life, making their device do a bunch of work is probably going to be a frustrating experience for them.
So does that mean that JAMstack apps are out of luck? Not at all!
The “A” in JAMstack stands for APIs. This means we can send off that work to an API and avoid spinning our users’ computer fans up to the “hover” setting.
“But wait,” you might say. “If our app needs to do custom work, and that work requires an API, doesn’t that just mean we’re building a server?”
Thanks to the power of serverless functions, we don’t have to!
Serverless functions (also called “lambda functions”) are a sort of API without any server boilerplate required. We get to write a plain old JavaScript function, and all of the work of deploying, scaling, routing, and so on is offloaded to our serverless provider of choice.
Serverless functions are the peanut butter to our JAMstack: they unlock a whole world of high-powered, dynamic functionality without ever asking us to deal with server code or devops.
Demo: Convert An Image To Grayscale
Let’s assume we have an app that needs to:
Download an image from a URL
Convert that image to grayscale
Upload the converted image to a GitHub repo
As far as I know, there’s no way to do image conversions like that entirely in the browser — and even if there was, it’s a fairly resource-intensive thing to do, so we probably don’t want to put that load on our users’ devices.
Instead, we can submit the URL to be converted to a serverless function, which will do the heavy lifting for us and send back a URL to a converted image.
For our serverless function, we’ll be using Netlify Functions. In our site’s code, we add a folder at the root level called “functions” and create a new file called “convert-image.js” inside. Then we write what’s called a handler, which is what receives and — as you may have guessed — handles requests to our serverless function.
To convert an image, it looks like this:
exports.handler = async event => {
 // only try to handle POST requests
 if (event.httpMethod !== 'POST') {
   return { statusCode: 404, body: '404 Not Found' };
 }

 try {
   // get the image URL from the POST submission
   const { imageURL } = JSON.parse(event.body);

   // use a temporary directory to avoid intermediate file cruft
   // see https://www.npmjs.com/package/tmp
   const tmpDir = tmp.dirSync();

   const convertedPath = await convertToGrayscale(imageURL, tmpDir);

   // upload the processed image to GitHub
   const response = await uploadToGitHub(convertedPath, tmpDir.name);

   return {
     statusCode: 200,
     body: JSON.stringify({
       url: response.data.content.download_url,
     }),
   };
 } catch (error) {
   return {
     statusCode: 500,
     body: JSON.stringify(error.message),
   };
 }
};
This function does the following:
Checks to make sure the request was sent using the HTTP POST method
Grabs the image URL from the POST body
Creates a temporary directory for storing files that will be cleaned up once the function is done executing
Calls a helper function that converts the image to grayscale
Calls a helper function that uploads the converted image to GitHub
Returns a response object with an HTTP 200 status code and the newly uploaded image’s URL
Note: We won’t go over how the helper functions for image conversion or uploading to GitHub work, but the source code is well commented so you can see how it works.
Next, we need to add a form that will be used to submit URLs for processing and a place to show the before and after:
<form
 id="image-form"
 action="/.netlify/functions/convert-image"
 method="POST"
>
 <label for="imageURL">URL of an image to convert</label>
 <input type="url" name="imageURL" required />
 <button type="submit">Convert</button>
</form>

<div id="converted"></div>
Finally, we need to add an event listener to the form so we can send off the URLs to our serverless function for processing:
<script type="module">
 import showResults from './show-results.js';

 const form = document.querySelector('form');
 form.addEventListener('submit', event => {
   event.preventDefault();

   // get the image URL from the form
   const imageURL = form.elements['imageURL'].value;

   // send the image off for processing
   const promise = fetch('/.netlify/functions/convert-image', {
     method: 'POST',
     headers: { 'Content-Type': 'application/json' },
     body: JSON.stringify({ imageURL }),
   })
     .then(result => result.json())
     .catch(error => console.error(error));

   // do the work to show the result on the page
   showResults(imageURL, promise);
 });
</script>
After deploying the site (along with its new “functions” folder) to Netlify and/or starting up Netlify Dev in our CLI, we can see the form in our browser:
An empty form that accepts an image URL (Large preview)
If we add an image URL to the form and click “convert”, we’ll see “processing…” for a moment while the conversion is happening, then we’ll see the original image and its newly created grayscale counterpart:
The image is converted from full color to grayscale. (Large preview)
Oh dang! Our JAMstack site just handled some pretty serious business and we didn’t have to think about servers once or drain our users’ batteries!
Use A Database To Store And Retrieve Entries
In many apps, we’re inevitably going to need the ability to save user input. And that means we need a database.
You may be thinking, “So that’s it, right? The jig is up? Surely a JAMstack site — which you’ve told us is just a collection of files in a folder — can’t be connected to a database!”
Au contraire.
As we saw in the previous section, serverless functions give us the ability to do all sorts of powerful things without needing to create our own servers.
Similarly, we can use database-as-a-service (DBaaS) tools, such as Fauna and Amplify DataStore, to read and write to a database without having to set one up or host it ourselves.
DBaaS tools massively simplify the process of setting up databases for websites: creating a new database is as straightforward as defining the types of data we want to store. The tools automatically generate all of the code to manage create, read, update, and delete (CRUD) operations and make it available for us to use via API, so we don’t have to actually manage a database; we just get to use it.
Demo: Create a Petition Page
If we want to create a small app to collect digital signatures for a petition, we need to set up a database to store those signatures and allow the page to read them out for display.
For this demo we’ll use Fauna as our DBaaS provider. We won’t go deep into how Fauna works, but in the interest of demonstrating the small amount of effort required to set up a database, let’s list each step and click to get a ready-to-use database:
Give the database a name (e.g. “dynamic-jamstack-demos”)
Click “create”
Click “security” in the left-hand menu on the next page
Click “new key”
Change the role dropdown to “Server”
Add a name for the key (e.g. “Dynamic JAMstack Demos”)
Store the key somewhere secure for use with the app
Click “save”
Click “GraphQL” in the left-hand menu
Click “import schema”
Upload a file called db-schema.gql that contains the following code:
type Signature {
 name: String!
}

type Query {
 signatures: [Signature!]!
}
Once we upload the schema, our database is ready to use. (Seriously.)
Thirteen steps is a lot, but with those thirteen steps, we just got a database, a GraphQL API, automatic management of capacity, scaling, deployment, security, and more — all handled by database experts. For free. What a time to be alive!
To try it out, the “GraphQL” option in the left-hand menu gives us a GraphQL explorer with documentation on the available queries and mutations that allow us to perform CRUD operations.
Note: We won’t go into details about GraphQL queries and mutations in this post, but Eve Porcello wrote an excellent intro to sending GraphQL queries and mutations if you want a primer on how it works.
With the database ready to go, we can create a serverless function that stores new signatures in the database:
const qs = require('querystring');
const graphql = require('./util/graphql');

exports.handler = async event => {
 try {
   // get the signature from the POST data
   const { signature } = qs.parse(event.body);

   const ADD_SIGNATURE = `
     mutation($signature: String!) {
       createSignature(data: { name: $signature }) {
         _id
       }
     }
   `;

   // store the signature in the database
   await graphql(ADD_SIGNATURE, { signature });

   // send people back to the petition page
   return {
     statusCode: 302,
     headers: {
       Location: '/03-store-data/',
     },
     // body is unused in 3xx codes, but required in all function responses
     body: 'redirecting...',
   };
 } catch (error) {
   return {
     statusCode: 500,
     body: JSON.stringify(error.message),
   };
 }
};
This function does the following:
Grabs the signature value from the form POST data
Calls a helper function that stores the signature in the database
Defines a GraphQL mutation to write to the database
Sends off the mutation using a GraphQL helper function
Redirects back to the page that submitted the data
Next, we need a serverless function to read out all of the signatures from the database so we can show how many people support our petition:
An important note about sensitive keys and JAMstack apps:
One thing to note about this app is that we’re using serverless functions to make these calls because we need to pass a private server key to Fauna that proves we have read and write access to this database. We cannot put this key into client-side code, because that would mean anyone could find it in the source code and use it to perform CRUD operations against our database. Serverless functions are critical for keeping private keys private in JAMstack apps.
Once we have our serverless functions set up, we can add a form that submits to the function for adding a signature, an element to show existing signatures, and a little bit of JS to call the function to get signatures and put them into our display element:
If we load this in the browser, we’ll see our petition form with signatures below it:
An empty form that accepts a digital signature (Large preview)
Then, if we add our signature…
The petition form with a name filled in (Large preview)
…and submit it, we’ll see our name appended to the bottom of the list:
The petition form clears and the new signature is added to the bottom of the list. (Large preview)
Hot diggity dog! We just wrote a full-on database-powered JAMstack app with about 75 lines of code and 7 lines of database schema!
Protect Content With User Authentication
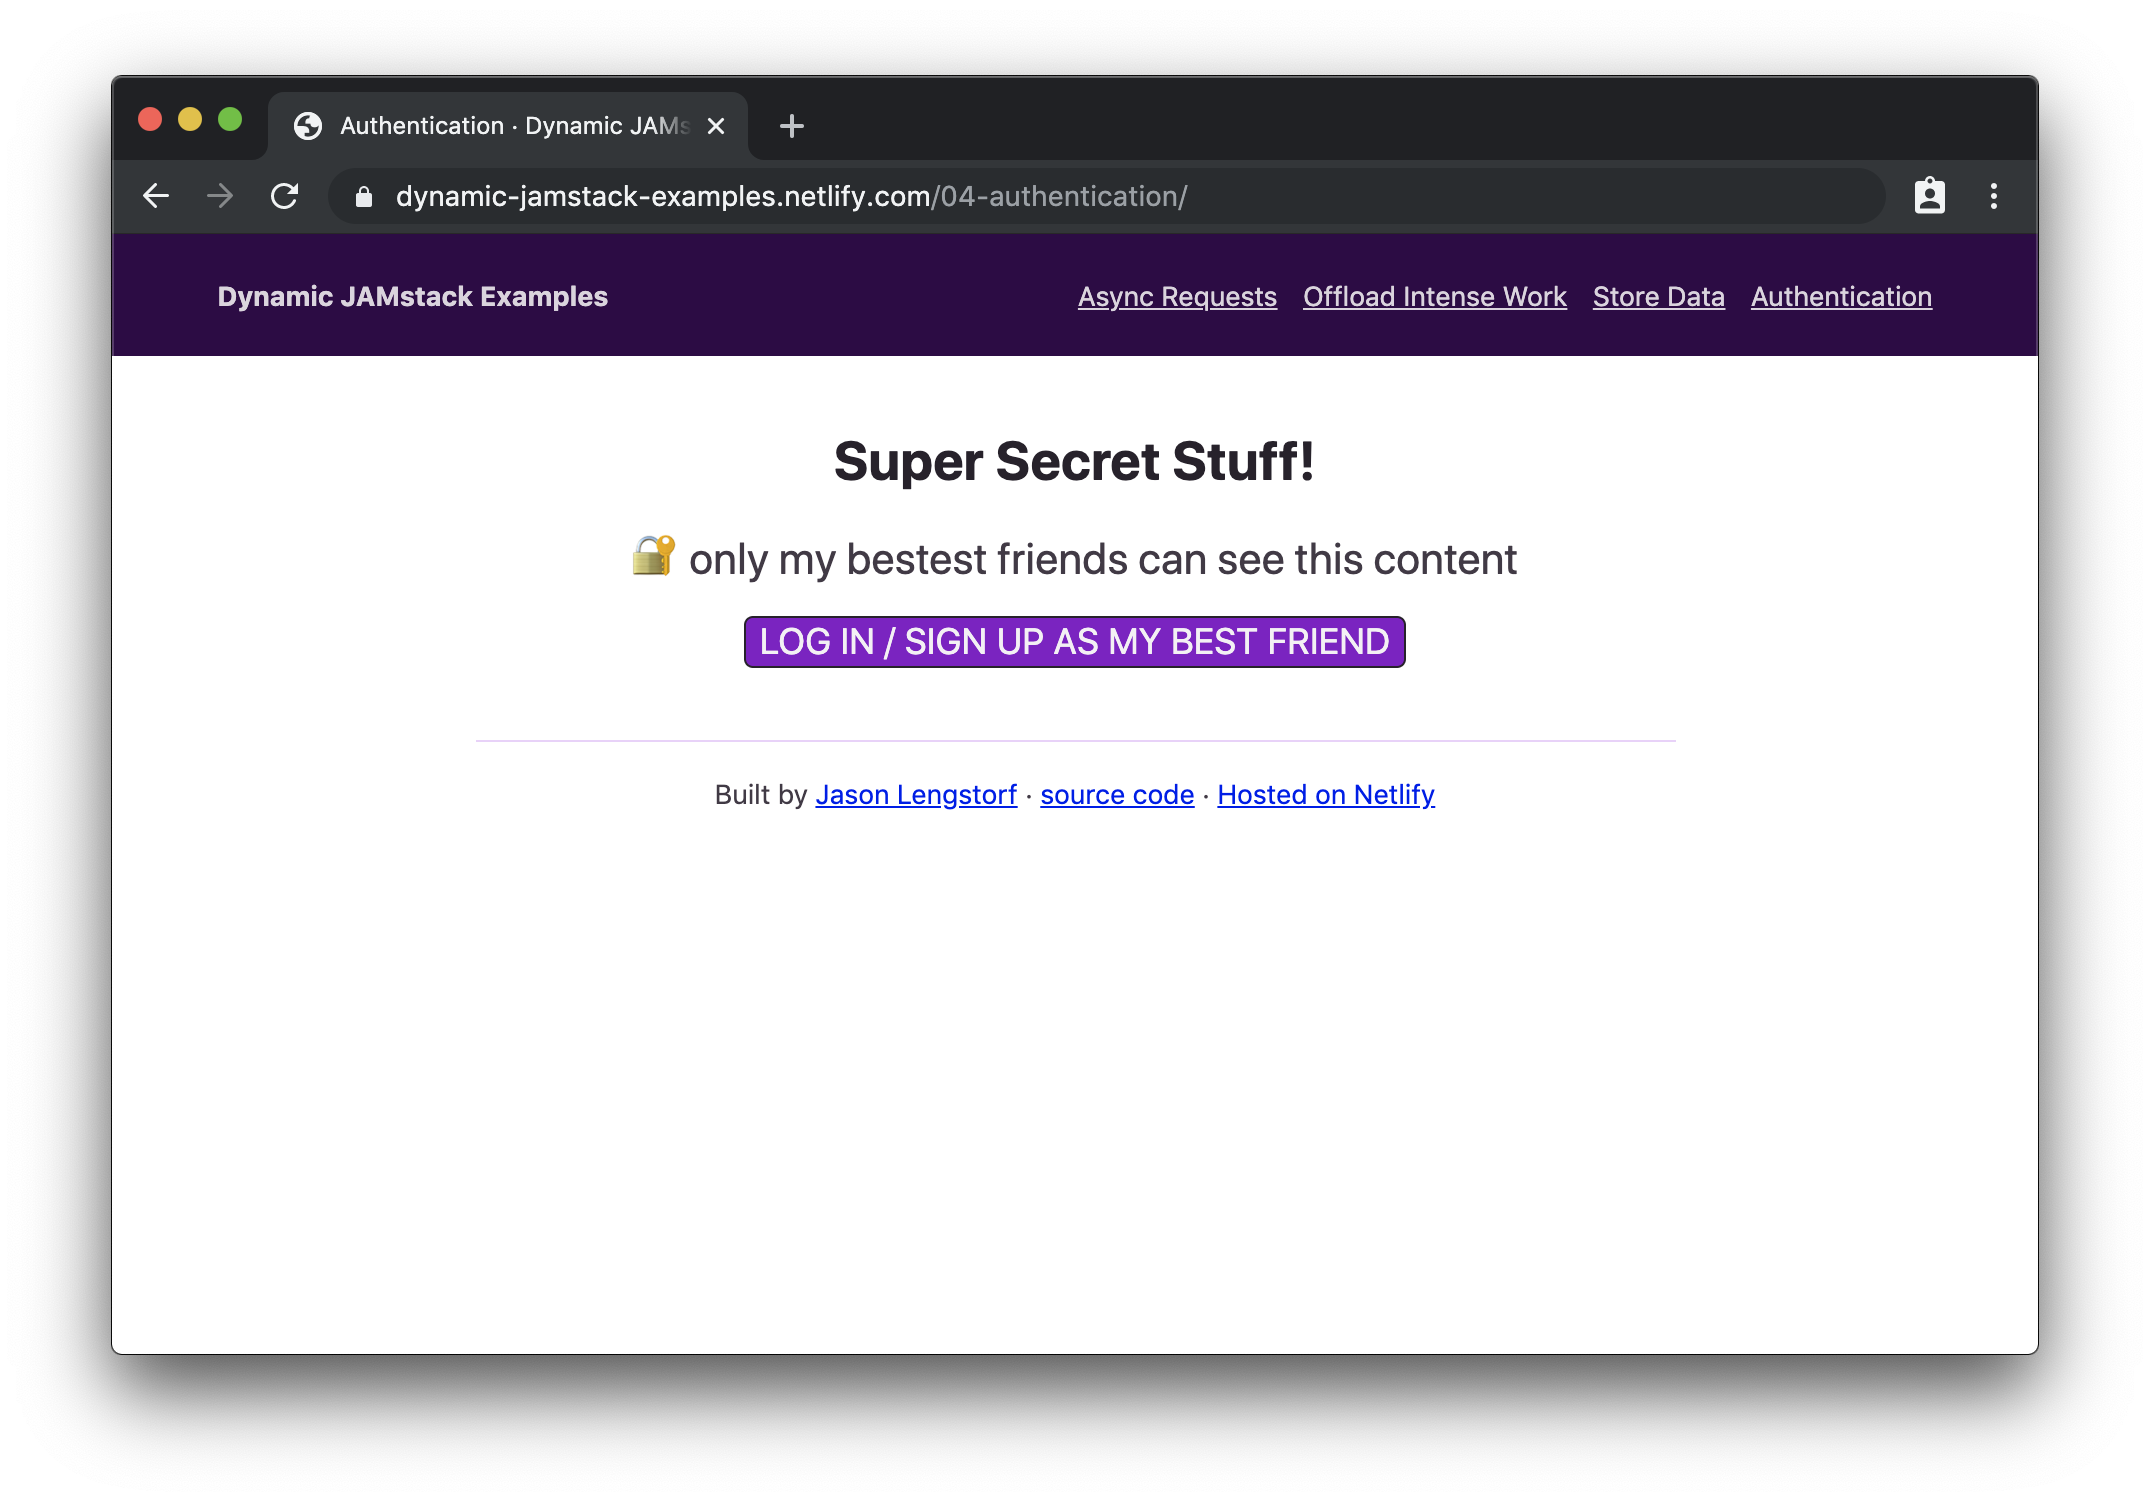
“Okay, you’re for sure stuck this time,” you may be thinking. “There is no way a JAMstack site can handle user authentication. How the heck would that work, even?!”
I’ll tell you how it works, my friend: with our trusty serverless functions and OAuth.
OAuth is a widely-adopted standard for allowing people to give apps limited access to their account info rather than sharing their passwords. If you’ve ever logged into a service using another service (for example, “sign in with your Google account”), you’ve used OAuth before.
Note:We won’t go deep into how OAuth works, but Aaron Parecki wrote a solid overview of OAuth that covers the details and workflow.
In JAMstack apps, we can take advantage of OAuth, and the JSON Web Tokens (JWTs) that it provides us with for identifying users, to protect content and only allow logged-in users to view it.
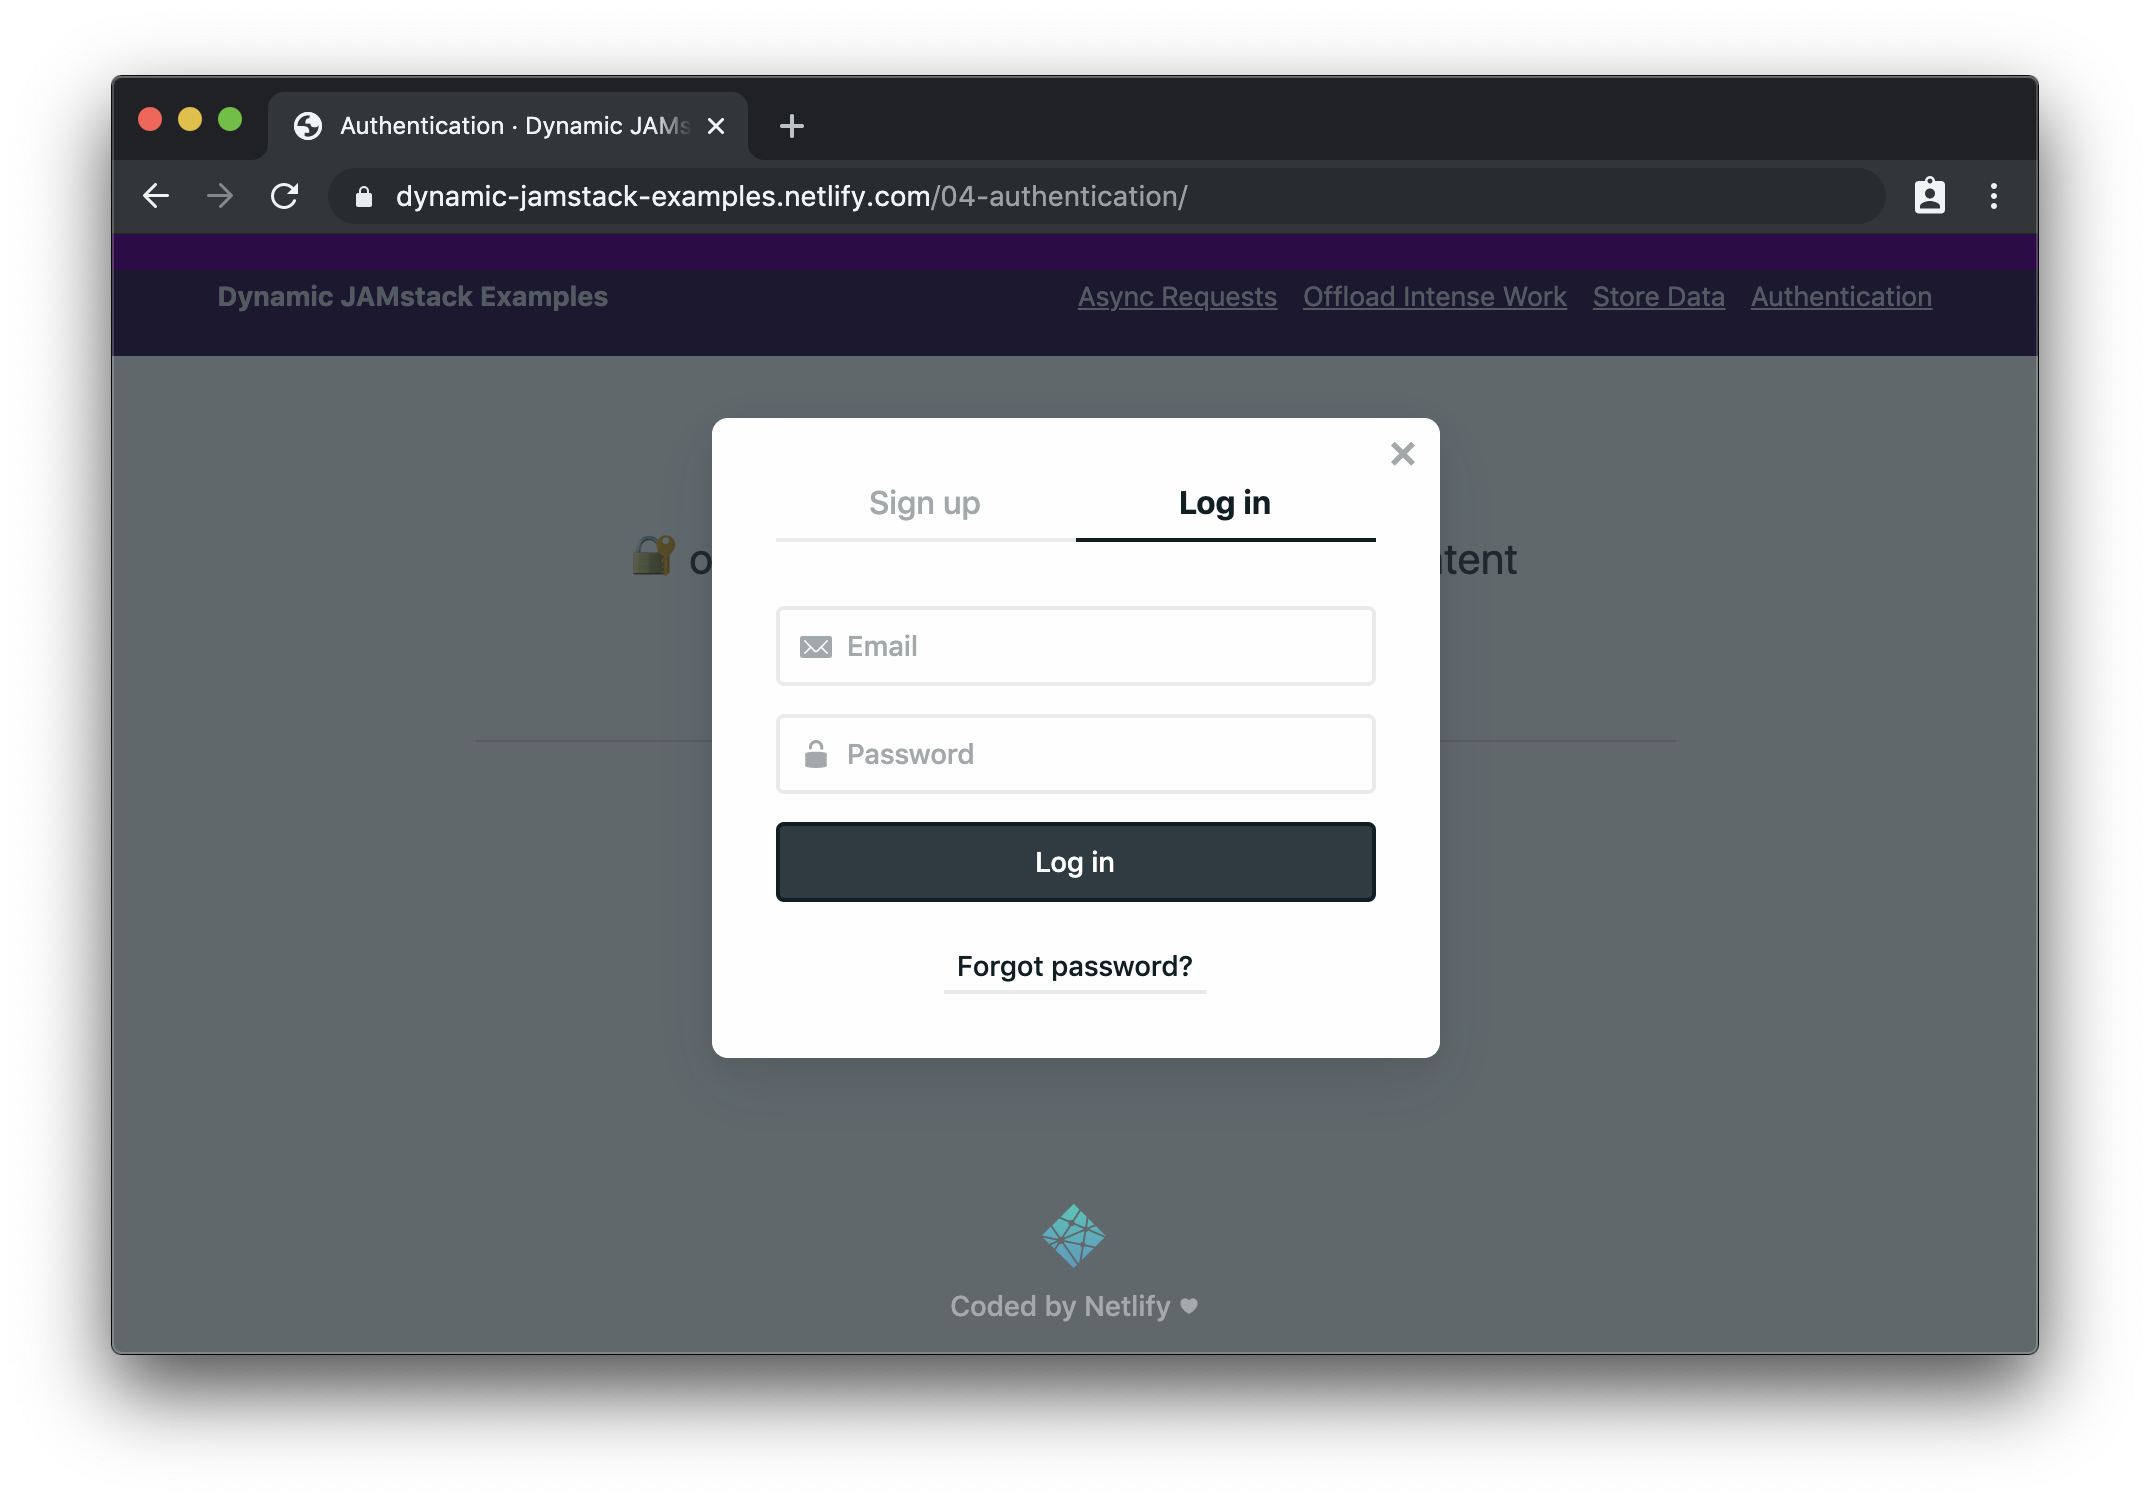
Demo: Require Login to View Protected Content
If we need to build a site that only shows content to logged-in users, we need a few things:
An identity provider that manages users and the sign-in flow
UI elements to manage logging in and logging out
A serverless function that checks for a logged-in user using JWTs and returns protected content if one is provided
For this example, we’ll use Netlify Identity, which gives us a really pleasant developer experience for adding authentication and provides a drop-in widget for managing login and logout actions.
Choose the site that needs auth from your sites list
Click “identity” in the top nav
Click the “Enable Identity” button
We can add Netlify Identity to our site by adding markup that shows logged out content and adds an element to show protected content after logging in:
<div class="content logged-out">
  <h1>Super Secret Stuff!</h1>
  <p>🔐 only my bestest friends can see this content</p>
  <button class="login">log in / sign up to be my best friend</button>
</div>
<div class="content logged-in">
  <div class="secret-stuff"></div>
  <button class="logout">log out</button>
</div>
This markup relies on CSS to show content based on whether the user is logged in or not. However, we can’t rely on that to actually protect the content — anyone could view the source code and steal our secrets!
Instead, we created an empty div that will contain our protected content, but we’ll need to make a request to a serverless function to actually get that content. We’ll dig into how that works shortly.
Next, we need to add code to make our login button work, load the protected content, and show it on screen:
Loads the Netlify Identity widget, which is a helper library that creates a login modal, handles the OAuth workflow with Netlify Identity, and gives our app access to the logged-in user’s info
Adds an event listener to the login button that triggers the Netlify Identity login modal to open
Adds an event listener to the logout button that calls the Netlify Identity logout method
Adds an event handler for logging out to remove the authenticated class on logout, which hides the logged-in content and shows the logged-out content
Adds an event handler for logging in that:
Adds the authenticated class to show the logged-in content and hide the logged-out content
Grabs the logged-in user’s JWT
Calls a serverless function to load protected content, sending the JWT in the Authorization header
Puts the secret content in the secret-stuff div so logged-in users can see it
Right now the serverless function we’re calling in that code doesn’t exist. Let’s create it with the following code:
Checks for a user in the serverless function’s context argument
Throws an error if no user is found
Returns secret content after ensuring that a logged-in user requested it
Netlify Functions will detect Netlify Identity JWTs in Authorization headers and automatically put that information into context — this means we can check for a valid JWTs without needing to write code to validate JWTs!
When we load this page in our browser, we’ll see the logged out page first:
When logged out, we can only see information about logging in. (Large preview)
If we click the button to log in, we’ll see the Netlify Identity widget:
The Netlify Identity Widget provides the whole login/sign up experience. (Large preview)
After logging in (or signing up), we can see the protected content:
After logging in, we can see protected content. (Large preview)
Wowee! We just added user login and protected content to a JAMstack app!
What To Do Next
The JAMstack is much more than “just static sites” — we can respond to user interactions, store data, handle user authentication, and just about anything else we want to do on a modern website. And all without the need to provision, configure, or deploy a server!
What do you want to build with the JAMstack? Is there anything you’re still not convinced the JAMstack can handle? I’d love to hear about it — hit me up on Twitter or in the comments!