Writing A Multiplayer Text Adventure Engine In Node.js: Adding Chat Into Our Game (Part 4)

Writing A Multiplayer Text Adventure Engine In Node.js: Adding Chat Into Our Game (Part 4)

Writing A Multiplayer Text Adventure Engine In Node.js: Adding Chat Into Our Game (Part 4)

Fernando Doglio

Any platform that allows for collaborative play between people will be required to have one very particular characteristic: the ability for players to (somehow) talk to each other. That is exactly why our text-adventure engine built in Node.js would not be complete without a way for the party members to be able to communicate with each other. And because this is indeed a text adventure, that form of communication will be presented in the form of a chat window.

So in this article, I’m going to explain how I added chat support for the text client as well as how I designed a quick chat server using Node.js.

Previous Parts Of This Series

  • Part 1: The Introduction
  • Part 2: Game Engine Server Design
  • Part 3: Creating The Terminal Client

Back To The Original Plan

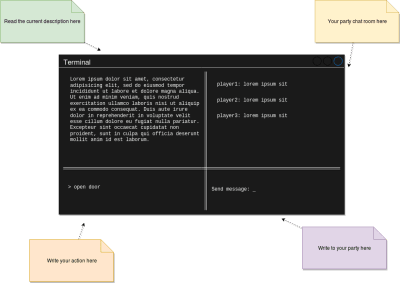
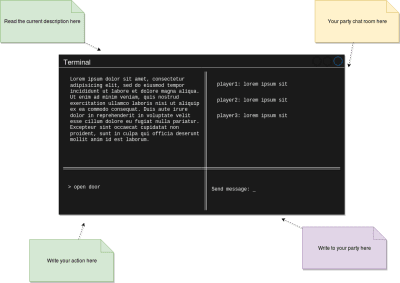
Lack of design skills aside, this has been the original wireframe/mock-up for the text-based client we built in the previous part of the series:
(Large preview)

The right side of that image is meant for inter-player communications, and it’s been planned as a chat since the beginning. Then, during the development of this particular module (the text client), I managed to simplify it into the following:

(Large preview)

Yes, we already covered this image in the previous installment but our focus was the left half. Today, however, our focus will be on the right half of what you’re seeing there. In other words:

  • Adding the ability to reactively pull data from a third-party service and update a content window.
  • Adding support to the command interface for chat commands. Essentially changing the way commands work out of the box and adding support for things, such as “sending a message to the rest of the team”.
  • Create a basic chat server on the back-end that can facilitate team communication.

Let me start with the last one before moving on to how to modify our existing code.

Creating The Chat Server

Before even looking at any code, one of the first things one should do is to quickly define the scope of any new project. Particularly with this one, we need to make sure we don’t spend a lot of time working on features we might not need for our particular use case.

You see, all we need is for the party members to be able to send messages with each others, but when one thinks of a “chat server”, other features often come in mind (such as chat rooms, private messages, emojis and so on).

So in order to keep our work manageable and get something out that works, here is what the chat server module will actually do:

  • Allow for a single room per party. Meaning, the actual room for a party will be auto-created when the game itself is created and the first player starts playing. All subsequent party members will join the same room, automatically and without a choice.
  • There will not be support for private messages. There is no need to be secretive in your party. At least not in this first version. Users will only be able to send messages through the chat, nothing else.
  • And to make sure everyone is aware, the only notification sent to the entire party, will be when new players join the game. That’s all.

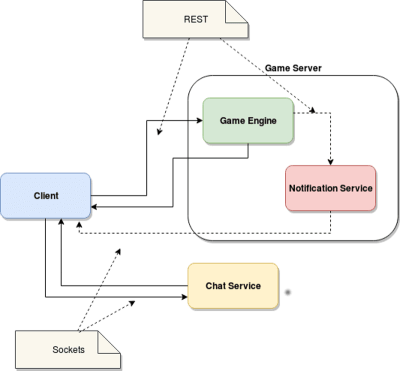
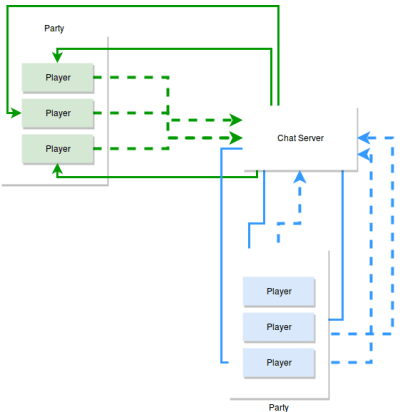
The following diagram shows the communication between servers and clients. As I mentioned, the mechanics are quite simple, so the most important bit to highlight here is the fact that we’re keeping conversations contained within the same party members:
(Large preview)

The Tools For The Job

Given the above restrictions and the fact that all we need is a direct connection between the clients and the chat server, we’ll solve this problem with an old fashion socket. Or in other words, the main tool we’ll be using is socket.io (note that there are 3rd party services providing managed chat servers, for instance, but for the purposes of this, going there would the equivalent of killing a mosquito with a shotgun).

With socket.io we can establish a bidirectional, real-time, event-based communication between the server and the clients. Unlike what we did with the game engine, where we published a REST API, the socket connection provides a faster way of communication.

Which is exactly what we need, a quick way to connect clients and server, exchanging messages and sending broadcasts between them.

Designing A Chat Server

Although socket.io is quite magical when it comes to socket management, it’s not a full chat server, we still need to define some logic to use it.

For our particularly small list of features, the design of our server’s internal logic should look something like this:

  • The server will need to support at least two different event types:
    1. New message
      This one is obvious, we need to know when a new message from a client is received, so we’ll need support for this type of event.
    2. New user joined
      We’ll need this one just to make sure we can notify the entire party when a new user joins the chat room.
  • Internally, we’ll handle chat rooms, even though that concept will not be something public to clients. Instead, all they will send is the game ID (the ID players use to join the game). With this ID we’ll use socket.io’s rooms feature which handles individual rooms for us.
  • Because of how socket.io works, it keeps an in-memory session open that is automatically assigned to the socket created for each client. In other words, we have a variable automatically assigned to each individual client where we can store information, such as player names, and room assigned. We’ll be using this socket-session to handle some internal client-room associations.
A Note About In-Memory Sessions

In-memory storage is not always the best solution. For this particular example, I’m going with it because it simplifies the job. That being said, a good and easy improvement you could implement if you wanted to take this into a production-ready product would be to substitute it with a Redis instance. That way you keep the in-memory performance but add an extra layer of reliability in case something goes wrong and your process dies.

With all of that being said, let me show you the actual implementation.

The Implementation

Although the full project can be seen on GitHub, the most relevant code lies in the main file (index.js):

// Setup basic express server
let express = require('express');
let config = require("config")
let app = express();
let server = require('http').createServer(app);
let io = require('socket.io')(server);
let port = process.env.PORT || config.get('app.port');

server.listen(port, () => {
  console.log('Server listening at port %d', port);
});

let numUsers = 0;


io.on('connection', (socket) => {
  let addedUser = false;

  // when the client emits 'new message', this listens and executes
  socket.on(config.get('chat.events.NEWMSG'), (data, done) => {
    let room = socket.roomname
    if(!socket.roomname) {
        socket.emit(config.get('chat.events.NEWMSG'), "You're not part of a room yet")
        return done()
    }

    // we tell the client to execute 'new message'
    socket.to(socket.roomname).emit(config.get('chat.events.NEWMSG'), {
      room: room,
      username: socket.username,
      message: data
    });
    done()
  });

  socket.on(config.get('chat.events.JOINROOM'), (data, done) => {
      console.log("Requesting to join a room: ", data)

      socket.roomname = data.roomname
      socket.username = data.username
      socket.join(data.roomname, _ => {
          socket.to(data.roomname).emit(config.get('chat.events.NEWMSG'), {
            username: 'Game server',
            message: socket.username + ' has joined the party!'
          })
          done(null, {joined: true})
      })
  })

  // when the user disconnects.. perform this
  socket.on('disconnect', () => {
    if (addedUser) {
      --numUsers;

      // echo globally that this client has left
      socket.to(socket.roomname).emit('user left', {
        username: socket.username,
        numUsers: numUsers
      });
    }
  });
});

That is all there is for this particular server. Simple right? A couple of notes:

  1. I’m using the config module to handle all my constants. I personally love this module, it simplifies my life every time I need to keep “magic numbers” out of my code. So everything from the list of accepted messages to the port the server will listen to are stored and accessed through it.
  2. There are two main events to pay attention to, just like I said before.
    • When a new message is received, which can be seen when we listen for config.get('chat.events.NEWMSG'). This code also makes sure you don’t accidentally try to send a message before joining a room. This shouldn’t happen if you implement the chat client correctly, but just in case these type of checks are always helpful when others are writing the clients for your services.
    • When a new user joins a room. You can see that event on the config.get('chat.events.JOINROOM') listener. In that case, all we do is add the user to the room (again, this is handled by socket.io, so all it takes is a single line of code) and then we broadcast to the room a message notifying who just joined. The key here is that by using the socket instance of the player joining, the broadcast will be sent to everyone in the room except the player. Again, behavior provided by socket.io, so we don’t have to add this in.

That is all there is to the server code, let’s now review how I integrated the client-side code into the text-client project.

Updating The Client Code

In order to integrate both, chat commands and game commands, the input box at the bottom of the screen will have to parse the player’s input and decide on what they’re trying to do.

The rule is simple: If the player is trying to send a message to the party, they’ll start the command with the word “chat”, otherwise, they won’t.

What Happens When Sending A Chat Message?

The following list of actions takes place when the user hits the ENTER key:

  1. Once a chat command is found, the code will trigger a new branch, where a chat client library will be used and a new message will be sent (emitted through the active socket connection) to the server.
  2. The server will emit the same message to all other players in the room.
  3. A callback (setup during boot-time) listening for new events from the server will be triggered. Depending on the event type (either a player sent a message, or a player just joined), we’ll display a message on the chat box (i.e the text box on the right).

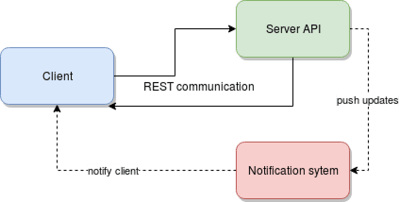
The following diagram presents a graphic representation of the above steps; ideally, it should help visualize which components are involved in this process:

(Large preview)

Reviewing The Code Changes

For a full list of changes and the entire code working, you should check the full repository on Github. Here, I’m quickly going to glance over some of the most relevant bits of code.

For example, setting up the main screen is where we now trigger the connection with the chat server and where we configure the callback for updating the chat box (red box on the top from the diagram above).

setUpChatBox: function() {
        let handler = require(this.elements["chatbox"].meta.handlerPath)
        handler.handle(this.UI.gamestate, (err, evt) => {
            if(err) {
                this.UI.setUpAlert(err)    
                return this.UI.renderScreen()
            }

            if(evt.event == config.get('chatserver.commands.JOINROOM')) {
                this.elements["chatbox"].obj.insertBottom(["::You've joined the party chat room::"])
                this.elements["chatbox"].obj.scroll((config.get("screens.main-ui.elements.gamebox.autoscrollspeed") ) + 1)
            }
            if(evt.event == config.get('chatserver.commands.SENDMSG')) {
                this.elements["chatbox"].obj.insertBottom([evt.msg.username + ' said :> ' + evt.msg.message])
                this.elements["chatbox"].obj.scroll((config.get("screens.main-ui.elements.gamebox.autoscrollspeed") ) + 1)
            }
            this.UI.renderScreen()
        })

    },

This method gets called from the init method, just like everything else. The main function for this code is to use the assigned handler (the chatbox handler) and call it’s handle method, which will connect to the chat server, and afterwards, setup the callback (which is also defined here) to be triggered when something happens (one of the two events we support).

The interesting logic from the above snippet is inside the callback, because it’s the logic used to update the chat box.

For completeness sake, the code that connects to the server and configures the callback shown above is the following:

const io = require('socket.io-client'),
    config = require("config"),
    logger = require("../utils/logger")


// Use https or wss in production.
let url = config.get("chatserver.url") 
let socket = io(url)


module.exports = {

    connect2Room: function(gamestate, done) {
        socket.on(config.get('chatserver.commands.SENDMSG'), msg => {
            done(null, {
                event: config.get('chatserver.commands.SENDMSG'),
                msg: msg
            })     
        })
        socket.emit(config.get("chatserver.commands.JOINROOM") , {
            roomname: gamestate.gameID,
            username: gamestate.playername
        }, _ => {
            logger.info("Room joined!")
            gamestate.inroom = true
            done(null, {
                event: config.get('chatserver.commands.JOINROOM')
            })
        })
        
    },

   handleCommand: function(command, gamestate, done) {
        logger.info("Sending command to chatserver!")
        
        let message = command.split(" ").splice(1).join(" ")

        logger.info("Message to send: ", message)

        if(!gamestate.inroom) { //first time sending the message, so join the room first
            logger.info("Joining a room")
            let gameId = gamestate.game
            
    socket.emit(config.get("chatserver.commands.JOINROOM") , {
                roomname: gamestate.gameID,
                username: gamestate.playername
            }, _ => {
                logger.info("Room joined!")
                gamestate.inroom = true
                updateGameState = true

                logger.info("Updating game state ...")
                socket.emit(config.get("chatserver.commands.SENDMSG"), message, done)
            })
        } else {
            logger.info("Sending message to chat server: ", message  )
            socket.emit(config.get("chatserver.commands.SENDMSG"), message, done)
        }
            
    }
}

The connect2room method is the one called during setup of the main screen as I mentioned, you can see how we set up the handler for new messages and emit the event related to joining a room (which then triggers the same event being broadcasted to other players on the server-side).

The other method, handleCommand is the one that takes care of sending the chat message to the server (and it does so with a simple socket.emit). This one is executed when the commandHandler realizes a chat message is being sent. Here is the code for that logic:

module.exports = {
    handle: function(gamestate, text, done) {
        let command = text.trim()
        if(command.indexOf("chat") === 0) { //chat command
            chatServerClient.handleCommand(command, gamestate, done)
        } else {
            sendGameCommand(gamestate, text, done)
        }     
    }
}

That is the new code for the commandHandler, the sendGameCommand function is where the old code now is encapsulated (nothing changed there).

And that is it for the integration, again, fully working code can be downloaded and tested from the full repository.

Final Thoughts

This marks the end of the road for this project. If you stuck to it until the end, thanks for reading! The code is ready to be tested and played with, and if you happen to do so, please reach out and let me know what you thought about it.

Hopefully with this project, many old-time fans of the genre can get back to it and experience it in a way they never did.

Have fun playing (and coding)!

Further Reading on SmashingMag:

Smashing Editorial (dm, yk, il)

Writing A Multiplayer Text Adventure Engine In Node.js: Game Engine Server Design (Part 2)

Writing A Multiplayer Text Adventure Engine In Node.js: Game Engine Server Design (Part 2)

Writing A Multiplayer Text Adventure Engine In Node.js: Game Engine Server Design (Part 2)

Fernando Doglio

After some careful consideration and actual implementation of the module, some of the definitions I made during the design phase had to be changed. This should be a familiar scene for anyone who has ever worked with an eager client who dreams about an ideal product but needs to be restraint by the development team.

Once features have been implemented and tested, your team will start noticing that some characteristics might differ from the original plan, and that’s alright. Simply notify, adjust, and go on. So, without further ado, allow me to first explain what has changed from the original plan.

Battle Mechanics

This is probably the biggest change from the original plan. I know I said I was going to go with a D&D-esque implementation in which each PC and NPC involved would get an initiative value and after that, we would run a turn-based combat. It was a nice idea, but implementing it on a REST-based service is a bit complicated since you can’t initiate the communication from the server side, nor maintain status between calls.

So instead, I will take advantage of the simplified mechanics of REST and use that to simplify our battle mechanics. The implemented version will be player-based instead of party-based, and will allow players to attack NPCs (Non-Player Characters). If their attack succeeds, the NPCs will be killed or else they will attack back by either damaging or killing the player.

Whether an attack succeeds or fails will be determined by the type of weapon used and the weaknesses an NPC might have. So basically, if the monster you’re trying to kill is weak against your weapon, it dies. Otherwise, it’ll be unaffected and — most likely — very angry.

Triggers

If you paid close attention to the JSON game definition from my previous article, you might’ve noticed the trigger’s definition found on scene items. A particular one involved updating the game status (statusUpdate). During implementation, I realized having it working as a toggle provided limited freedom. You see, in the way it was implemented (from an idiomatic point of view), you were able to set a status but unsetting it wasn’t an option. So instead, I’ve replaced this trigger effect with two new ones: addStatus and removeStatus. These will allow you to define exactly when these effects can take place — if at all. I feel this is a lot easier to understand and reason about.

This means that the triggers now look like this:

"triggers": [
{
    "action": "pickup",
"effect":{
    "addStatus": "has light",
"target": "game"
    }
},
{
    "action": "drop",
    "effect": {
    "removeStatus": "has light",
    "target": "game"
    }
}
]

When picking up the item, we’re setting up a status, and when dropping it, we’re removing it. This way, having multiple game-level status indicators is completely possible and easy to manage.

The Implementation

With those updates out of the way, we can start covering the actual implementation. From an architectural point of view, nothing changed; we’re still building a REST API that will contain the main game engine’s logic.

The Tech Stack

For this particular project, the modules I’m going to be using are the following:

Module Description
Express.js Obviously, I’ll be using Express to be the base for the entire engine.
Winston Everything in regards to logging will be handled by Winston.
Config Every constant and environment-dependant variable will be handled by the config.js module, which greatly simplifies the task of accessing them.
Mongoose This will be our ORM. I will model all resources using Mongoose Models and use that to interact directly with the database.
uuid We’ll need to generate some unique IDs — this module will help us with that task.

As for other technologies used aside from Node.js, we have MongoDB and Redis. I like to use Mongo due to the lack of schema required. That simple fact allows me to think about my code and the data formats, without having to worry about updating the structure of my tables, schema migrations or conflicting data types.

Regarding Redis, I tend to use it as a support system as much as I can in my projects and this case is no different. I will be using Redis for everything that can be considered volatile information, such as party member numbers, command requests, and other types of data that are small enough and volatile enough to not merit permanent storage.

I’m also going to be using Redis’ key expiration feature to auto manage some aspects of the flow (more on this shortly).

API Definition

Before moving into client-server interaction and data-flow definitions I want to go over the endpoints defined for this API. They aren’t that many, mostly we need to comply with the main features described in Part 1:

Feature Description
Join a game A player will be able to join a game by specifying the game’s ID.
Create a new game A player can also create a new game instance. The engine should return an ID, so that others can use it to join.
Return scene This feature should return the current scene where the party is located. Basically, it’ll return the description, with all of the associated information (possible actions, objects in it, etc.).
Interact with scene This is going to be one of the most complex ones, because it will take a command from the client and perform that action — things like move, push, take, look, read, to name just a few.
Check inventory Although this is a way to interact with the game, it does not directly relate to the scene. So, checking the inventory for each player will be considered a different action.
Register client application The above actions require a valid client to execute them. This endpoint will verify the client application and return a Client ID that will be used for authentication purposes on subsequent requests.

The above list translates into the following list of endpoints:

Verb Endpoint Description
POST /clients Client applications will require to get a Client ID key using this endpoint.
POST /games New game instances are created using this endpoint by the client applications.
POST /games/:id Once the game is created, this endpoint will enable party members to join it and start playing.
GET /games/:id/:playername This endpoint will return the current game state for a particular player.
POST /games/:id/:playername/commands Finally, with this endpoint, the client application will be able to submit commands (in other words, this endpoint will be used to play).

Let me go into a bit more detail about some of the concepts I described in the previous list.

Client Apps

The client applications will need to register into the system to start using it. All endpoints (except for the first one on the list) are secured and will require a valid application key to be sent with the request. In order to obtain that key, client apps need to simply request one. Once provided, they will last for as long as they are used, or will expire after a month of not being used. This behavior is controlled by storing the key in Redis and setting a one-month long TTL to it.

Game Instance

Creating a new game basically means creating a new instance of a particular game. This new instance will contain a copy of all of the scenes and their content. Any modifications done to the game will only affect the party. This way, many groups can play the same game on their own individual way.

Player’s Game State

This is similar to the previous one, but unique to each player. While the game instance holds the game state for the entire party, the player’s game state holds the current status for one particular player. Mainly, this holds inventory, position, current scene and HP (health points).

Player Commands

Once everything is set up and the client application has registered and joined a game, it can start sending commands. The implemented commands in this version of the engine include: move, look, pickup and attack.

  • The move command will allow you to traverse the map. You’ll be able to specify the direction you want to move towards and the engine will let you know the result. If you take a quick glimpse at Part 1, you can see the approach I took to handle maps. (In short, the map is represented as a graph, where each node represents a room or scene and is only connected to other nodes that represent adjacent rooms.)

    The distance between nodes is also present in the representation and coupled with the standard speed a player has; going from room to room might not be as simple as stating your command, but you’ll also have to traverse the distance. In practice, this means that going from one room to the other might require several move commands). The other interesting aspect of this command comes from the fact that this engine is meant to support multiplayer parties, and the party can’t be split (at least not at this time).

    Therefore, the solution for this is similar to a voting system: every party member will send a move command request whenever they want. Once more than half of them have done so, the most requested direction will be used.
  • look is quite different from move. It allows the player to specify a direction, an item or NPC they want to inspect. The key logic behind this command, comes into consideration when you think about status-dependant descriptions.

    For example, let’s say that you enter a new room, but it’s completely dark (you don’t see anything), and you move forward while ignoring it. A few rooms later, you pick up a lit torch from a wall. So now you can go back and re-inspect that dark room. Since you’ve picked up the torch, you now can see inside of it, and be able to interact with any of the items and NPCs you find in there.

    This is achieved by maintaining a game wide and player specific set of status attributes and allowing the game creator to specify several descriptions for our status-dependant elements in the JSON file. Every description is then equipped with a default text and a set of conditional ones, depending on the current status. The latter are optional; the only one that is mandatory is the default value.

    Additionally, this command has a short-hand version for look at room: look around; that is because players will be trying to inspect a room very often, so providing a short-hand (or alias) command that is easier to type makes a lot of sense.
  • The pickup command plays a very important role for the gameplay. This command takes care of adding items into the players inventory or their hands (if they’re free). In order to understand where each item is meant to be stored, their definition has a “destination” property that specifies if it is meant for the inventory or the player’s hands. Anything that is successfully picked up from the scene is then removed from it, updating the game instance’s version of the game.
  • The use command will allow you to affect the environment using items in your inventory. For instance, picking up a key in a room will allow you to use it to open a locked door in another room.
  • There is a special command, one that is not gameplay-related, but instead a helper command meant to obtain particular information, such as the current game ID or the player’s name. This command is called get, and the players can use it to query the game engine. For example: get gameid.
  • Finally, the last command implemented for this version of the engine is the attack command. I already covered this one; basically, you’ll have to specify your target and the weapon you’re attacking it with. That way the system will be able to check the target’s weaknesses and determine the output of your attack.

Client-Engine Interaction

In order to understand how to use the above-listed endpoints, let me show you how any would-be-client can interact with our new API.

Step Description
Register client First things first, the client application needs to request an API key to be able to access all other endpoints. In order to get that key, it needs to register on our platform. The only parameter to provide is the name of the app, that’s all.
Create a game After the API key is obtained, the first thing to do (assuming this is a brand new interaction) is to create a brand new game instance. Think about it this way: the JSON file I created in my last post contains the game’s definition, but we need to create an instance of it just for you and your party (think classes and objects, same deal). You can do with that instance whatever you want, and it will not affect other parties.
Join the game After creating the game, you’ll get a game ID back from the engine. You can then use that game ID to join the instance using your unique username. Unless you join the game, you can’t play, because joining the game will also create a game state instance for you alone. This will be where your inventory, your position and your basic stats are saved in relation to the game you’re playing. You could potentially be playing several games at the same time, and in each one have independent states.
Send commands In other words: play the game. The final step is to start sending commands. The amount of commands available was already covered, and it can be easily extended (more on this in a bit). Everytime you send a command, the game will return the new game state for your client to update your view accordingly.

Let’s Get Our Hands Dirty

I’ve gone over as much design as I can, in the hopes that that information will help you understand the following part, so let’s get into the nuts and bolts of the game engine.

Note: I will not be showing you the full code in this article since it’s quite big and not all of it is interesting. Instead, I’ll show the more relevant parts and link to the full repository in case you want more details.

The Main File

First things first: this is an Express project and it’s based boilerplate code was generated using Express’ own generator, so the app.js file should be familiar to you. I just want to go over two tweaks I like to do on that code to simplify my work.

First, I add the following snippet to automate the inclusion of new route files:

const requireDir = require("require-dir")
const routes = requireDir("./routes")

//...

Object.keys(routes).forEach( (file) => {
    let cnt = routes[file]
    app.use('/' + file, cnt)    
})

It’s quite simple really, but it removes the need to manually require each route files you create in the future. By the way, require-dir is a simple module that takes care of auto-requiring every file inside a folder. That’s it.

The other change I like to do is to tweak my error handler just a little bit. I should really start using something more robust, but for the needs at hand, I feel like this gets the work done:

// error handler
app.use(function(err, req, res, next) {
  // render the error page
  if(typeof err === "string") {
    err = {
      status: 500,
      message: err
    }
  }
  res.status(err.status || 500);
  let errorObj = {
    error: true,
    msg: err.message,
    errCode: err.status || 500
  }
  if(err.trace) {
    errorObj.trace = err.trace
  }

  res.json(errorObj);
});

The above code takes care of the different types of error messages we might have to deal with — either full objects, actual error objects thrown by Javascript or simple error messages without any other context. This code will take it all and format it into a standard format.

Handling Commands

This is another one of those aspects of the engine that had to be easy to extend. In a project like this one, it makes total sense to assume new commands will pop up in the future. If there is something you want to avoid, then that would probably be avoid making changes on the base code when trying to add something new three or four months in the future.

No amount of code comments will make the task of modifying code you haven’t touched (or even thought about) in several months easy, so the priority is to avoid as many changes as possible. Lucky for us, there are a few patterns we can implement to solve this. In particular, I used a mixture of the Command and the Factory patterns.

I basically encapsulated the behavior of each command inside a single class which inherits from a BaseCommand class that contains the generic code to all commands. At the same time, I added a CommandParser module that grabs the string sent by the client and returns the actual command to execute.

The parser is very simple since all implemented commands now have the actual command as to their first word (i.e. “move north”, “pick up knife”, and so on) it’s a simple matter of splitting the string and getting the first part:

const requireDir = require("require-dir")
const validCommands = requireDir('./commands')

class CommandParser {


    constructor(command) {
        this.command = command
    }


    normalizeAction(strAct) {
        strAct = strAct.toLowerCase().split(" ")[0]
        return strAct
    }


    verifyCommand() {
        if(!this.command) return false
        if(!this.command.action) return false
        if(!this.command.context) return false

        let action = this.normalizeAction(this.command.action)

        if(validCommands[action]) {
            return validCommands[action]
        }
        return false
    }

    parse() {
        let validCommand = this.verifyCommand()
        if(validCommand) {
            let cmdObj = new validCommand(this.command)
            return cmdObj
        } else {
            return false
        }
    }
}

Note: I’m using the require-dir module once again to simplify the inclusion of any existing and new command classes. I simply add it to the folder and the entire system is able to pick it up and use it.

With that being said, there are many ways this can be improved; for instance, by being able to add synonym support for our commands would be a great feature (so saying “move north”, “go north” or even “walk north” would mean the same). That is something that we could centralize in this class and affect all commands at the same time.

I won’t go into details on any of the commands because, again, that’s too much code to show here, but you can see in the following route code how I managed to generalize that handling of the existing (and any future) commands:

/**
Interaction with a particular scene
*/
router.post('/:id/:playername/:scene', function(req, res, next) {

    let command = req.body
    command.context = {
        gameId: req.params.id,
        playername: req.params.playername,
    }

    let parser = new CommandParser(command)

    let commandObj = parser.parse() //return the command instance
    if(!commandObj) return next({ //error handling
        status: 400,
          errorCode: config.get("errorCodes.invalidCommand"),
        message: "Unknown command"
    })

    commandObj.run((err, result) => { //execute the command
        if(err) return next(err)

        res.json(result)
    })

})

All commands only require the run method — anything else is extra and meant for internal use.

I encourage you to go and review the entire source code (even download it and play with it if you like!). In the next part of this series, I’ll show you the actual client implemention and interaction of this API.

Closing Thoughts

I may not have covered a lot of my code here, but I still hope that the article was helpful to show you how I tackle projects — even after the initial design phase. I feel like a lot of people try to start coding as their first response to a new idea and that sometimes can end up discouraging to a developer since there is no real plan set nor any goals to achieve — other than having the final product ready (and that is too big of a milestone to tackle from day 1). So again, my hope with these articles is to share a different way to go about working solo (or as part of a small group) on big projects.

I hope you’ve enjoyed the read! Please feel free to leave a comment below with any type of suggestions or recommendations, I’d love to read what you think and if you’re eager to start testing the API with your own client-side code.

See you on the next one!

Smashing Editorial (dm, yk, il)

7 Steps to Becoming an Effective Leader

Leading others is not an easy task, in fact it’s quite hard if you care enough to try to do it the right way. Effective leaders aren’t born, they’re made, no matter what anyone else tells you. There are things you can (and should) learn that’ll help you get there… all it takes is for you to want to do it.

This is specially relevant for newly minted leaders, because it’s hard to find companies that present the new role with an associated training program. These people are left alone to figure out how to lead others, and that is a process that not everyone undergoes in the same way or time.

Writing A Multiplayer Text Adventure Engine In Node.js

Writing A Multiplayer Text Adventure Engine In Node.js

Writing A Multiplayer Text Adventure Engine In Node.js

Fernando Doglio

Text adventures were one of the first forms of digital role-playing games out there, back when games had no graphics and all you had was your own imagination and the description you read on the black screen of your CRT monitor.

If we want to get nostalgic, maybe the name Colossal Cave Adventure (or just Adventure, as it was originally named) rings a bell. That was the very first text adventure game ever made.

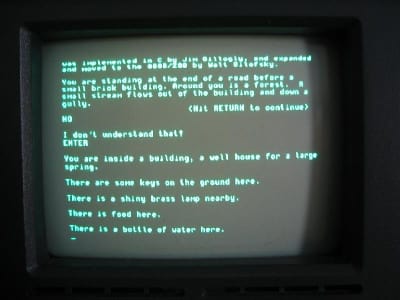
A picture of an actual text adventure from back in the day
A picture of an actual text adventure from back in the day. (Large preview)

The image above is how you’d actually see the game, a far cry from our current top AAA adventure games. That being said, they were fun to play and would steal hundreds of hours of your time, as you sat in front of that text, alone, trying to figure out how to beat it.

Understandably so, text adventures have been replaced over the years by games that present better visuals (although, one could argue that a lot of them have sacrificed story for graphics) and, especially in the past few years, the increasing ability to collaborate with other friends and play together. This particular feature is one that the original text adventures lacked, and one that I want to bring back in this article.

Our Goal

The whole point of this endeavour, as you have probably guessed by now from the title of this article, is to create a text adventure engine that allows you to share the adventure with friends, enabling you to collaborate with them similarly to how you would during a Dungeons & Dragons game (in which, just like with the good ol’ text adventures, there are no graphics to look at).

In creating the engine, the chat server and the client is quite a lot of work. In this article, I’ll be showing you the design phase, explaining things like the architecture behind the engine, how the client will interact with the servers, and what the rules of this game will be.

Just to give you some visual aid of what this is going to look like, here is my goal:

General wireframe for the final UI of the game client
General wireframe for the final UI of the game client (Large preview)

That is our goal. Once we get there, you’ll have screenshots instead of quick and dirty mockups. So, let’s get down with the process. The first thing we’ll cover is the design of the whole thing. Then, we’ll cover the most relevant tools I’ll be using to code this. Finally, I’ll show you some of the most relevant bits of code (with a link to the full repository, of course).

Hopefully, by the end, you’ll find yourself creating new text adventures to try them out with friends!

Design Phase

For the design phase, I’m going to cover our overall blueprint. I’ll try my best not to bore you to death, but at the same time, I think it’s important to show some of the behind-the-scenes stuff that needs to happen before laying down your first line of code.

The four components I want to cover here with a decent amount of detail are:

  • The engine
    This is going to be the main game server. The game rules will be implemented here, and it’ll provide a technologically agnostic interface for any type of client to consume. We’ll implement a terminal client, but you could do the same with a web browser client or any other type you’d like.
  • The chat server
    Because it’s complex enough to have its own article, this service is also going to have its own module. The chat server will take care of letting players communicate with each other during the game.
  • The client
    As stated earlier, this will be a terminal client, one that, ideally, will look similar to the mockup from earlier. It will make use of the services provided by both the engine and the chat server.
  • Games (JSON files)
    Finally, I’ll go over the definition of the actual games. The whole point of this is to create an engine that can run any game, as long as your game file complies with the engine’s requirements. So, even though this will not require coding, I’ll explain how I’ll structure the adventure files in order to write our own adventures in the future.

The Engine

The game engine, or game server, will be a REST API and will provide all of the required functionality.

I went for a REST API simply because — for this type of game — the delay added by HTTP and its asynchronous nature will not cause any trouble. We will, however, have to go a different route for the chat server. But before we start defining endpoints for our API, we need to define what the engine will be capable of. So, let’s get to it.

Feature Description
Join a game A player will be able to join a game by specifying the game’s ID.
Create a new game A player can also create a new game instance. The engine should return an ID, so that others can use it to join.
Return scene This feature should return the current scene where the party is located. Basically, it’ll return the description, with all of the associated information (possible actions, objects in it, etc.).
Interact with scene This is going to be one of the most complex ones, because it will take a command from the client and perform that action — things like move, push, take, look, read, to name just a few.
Check inventory Although this is a way to interact with the game, it does not directly relate to the scene. So, checking the inventory for each player will be considered a different action.
A Word About Movement

We need a way to measure distances in the game because moving through the adventure is one of the core actions a player can take. We will be using this number as a measure of time, just to simplify the gameplay. Measuring time with an actual clock might not be the best, considering these type of games have turn-based actions, such as combat. Instead, we’ll use distance to measure time (meaning that a distance of 8 will require more time to traverse than one of 2, thus allowing us to do things like add effects to players that last for a set amount of “distance points”).

Another important aspect to consider about movement is that we’re not playing alone. For simplicity’s sake, the engine will not let players split the party (although that could be an interesting improvement for the future). The initial version of this module will only let everyone move wherever the majority of the party decides. So, moving will have to be done by consensus, meaning that every move action will wait for the majority of the party to request it before taking place.

Combat

Combat is another very important aspect of these types of games, and one that we’ll have to consider adding to our engine; otherwise, we’ll end up missing on some of the fun.

This is not something that needs to be reinvented, to be honest. Turn-based party combat has been around for decades, so we’ll just implement a version of that mechanic. We’ll be mixing it up with the Dungeons & Dragons concept of “initiative”, rolling a random number in order to keep the combat a bit more dynamic.

In other words, the order in which everyone involved in a fight gets to pick their action will be randomized, and that includes the enemies.

Finally (although I’ll go over this in more detail below), you’ll have items that you can pick up with a set “damage” number. These are the items you’ll be able to use during combat; anything that doesn’t have that property will cause 0 damage to your enemies. We’ll probably add a message when you try to use those objects to fight, so that you know that what you’re trying to do makes no sense.

Client-Server Interaction

Let’s see now how a given client would interact with our server using the previously defined functionality (not thinking about endpoints yet, but we’ll get there in a sec):

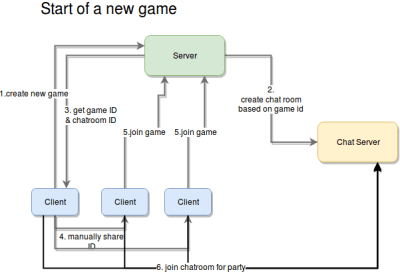
(Large preview)

The initial interaction between the client and the server (from the point of view of the server) is the start of a new game, and the steps for it are as follows:

  1. Create a new game.
    The client requests the creation of a new game from the server.
  2. Create chat room.
    Although the name doesn’t specify it, the server is not just creating a chatroom in the chat server, but also setting up everything it needs in order to allow a set of players to play through an adventure.
  3. Return game’s meta data.
    Once the game has been created by the server and the chat room is in place for the players, the client will need that information for subsequent requests. This will mostly be a set of IDs the clients can use to identify themselves and the current game they want to join (more on that in a second).
  4. Manually share game ID.
    This step will have to be done by the players themselves. We could come up with some sort of sharing mechanism, but I will leave that on the wish list for future improvements.
  5. Join the game.
    This one is pretty straightforward. Ince everyone has the game ID, they’ll join the adventure using their client applications.
  6. Join their chat room.
    Finally, the players’ client apps will use the game’s metadata to join their adventure’s chat room. This is the last step required pre-game. Once this is all done, then the players are ready to start adventuring!
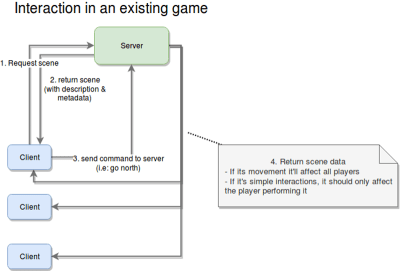
Action order for an existing game
Action order for an existing game (Large preview)

Once the prerequisites have all been met, players can start playing the adventure, sharing their thoughts through the party chat, and advancing the story. The diagram above shows the four steps required for that.

The following steps will run as part of the game loop, meaning that they will be repeated constantly until the game ends.

  1. Request scene.
    The client app will request the metadata for the current scene. This is the first step in every iteration of the loop.
  2. Return the meta data.
    The server will, in turn, send back the metadata for the current scene. This information will include things like a general description, the objects found inside it, and how they relate to each other.
  3. Send command.
    This is where the fun begins. This is the main input from the player. It’ll contain the action they want to perform and, optionally, the target of that action (for example, blow candle, grab rock, and so on).
  4. Return the reaction to the command sent.
    This could simply be step two, but for clarity, I added it as an extra step. The main difference is that step two could be considered the beginning of this loop, whereas this one takes into account that you’re already playing, and, thus, the server needs to understand who this action is going to affect (either a single player or all players).

As an extra step, although not really part of the flow, the server will notify clients about status updates that are relevant to them.

The reason for this extra recurring step is because of the updates a player can receive from the actions of other players. Recall the requirement for moving from one place to another; as I said before, once the majority of the players have chosen a direction, then all players will move (no input from all players is required).

The interesting bit here is that HTTP (we’ve already mentioned that the server is going to be a REST API) does not allow for this type of behavior. So, our options are:

  1. perform polling every X amount of seconds from the client,
  2. use some sort of notification system that works in parallel with the client-server connection.

In my experience, I tend to prefer option 2. In fact, I would (and will for this article) use Redis for this kind of behavior.

The following diagram demonstrates the dependencies between services.

Interactions between an client app and the game engine
Interactions between an client app and the game engine (Large preview)

The Chat Server

I will leave the details of the design of this module for the development phase (which is not a part of this article). That being said, there are things we can decide.

One thing we can define is the set of the restrictions for the server, which will simplify our work down the line. And if we play our cards right, we might end up with a service that provides a robust interface, thus allowing us to, eventually, extend or even change the implementation to provide fewer restrictions without affecting the game at all.

  • There will be only one room per party.
    We will not let subgroups be created. This goes hand in hand with not letting the party split. Maybe once we implement that enhancement, allowing for subgroup and custom chat room creation would be a good idea.
  • There will be no private messages.
    This is purely for simplification purposes, but having a group chat is already good enough; we don’t need private messages right now. Remember that whenever you’re working on your minimum viable product, try to avoid going down the rabbit hole of unnecessary features; it’s a dangerous path and one that is hard to get out of.
  • We will not persist messages.
    In other words, if you leave the party, you’ll lose the messages. This will hugely simplify our task, because we won’t have to deal with any type of data storage, nor will we have to waste time deciding on the best data structure to store and recover old messages. It’ll all live in memory, and it will stay there for as long as the chat room is active. Once it’s closed, we’ll simply say goodbye to them!
  • Communication will be done over sockets.
    Sadly, our client will have to handle a double communication channel: a RESTful one for the game engine and a socket for the chat server. This might increase the complexity of the client a bit, but at the same time, it will use the best methods of communication for every module. (There is no real point in forcing REST on our chat server or forcing sockets on our game server. That approach would increase the complexity of the server-side code, which is the one also handling the business logic, so let’s focus on that side for now.)

That’s it for the chat server. After all, it will not be complex, at least not initially. There is more to do when it’s time to start coding it, but for this article, it is more than enough information.

The Client

This is the final module that requires coding, and it is going to be our dumbest one of the lot. As a rule of thumb, I prefer to have my clients dumb and my servers smart. That way, creating new clients for the server becomes much easier.

Just so we’re on the same page, here is the high-level architecture that we should end up with.

Final high level architecture of the entire development
Final high level architecture of the entire development (Large preview)

Our simple ClI client will not implement anything very complex. In fact, the most complicated bit we’ll have to tackle is the actual UI, because it’s a text-based interface.

That being said, the functionality that the client application will have to implement is as follows:

  1. Create a new game.
    Because I want to keep things as simple as possible, this will only be done through the CLI interface. The actual UI will only be used after joining a game, which brings us to the next point.
  2. Join an existing game.
    Given the game’s code returned from the previous point, players can use it to join in. Again, this is something you should be able to do without a UI, so this functionality will be part of the process required to start using the text UI.
  3. Parse game definition files.
    We’ll discuss these in a bit, but the client should be able to understand these files in order to know what to show and know how to use that data.
  4. Interact with the adventure.
    Basically, this gives the player the ability to interact with the environment described at any given time.
  5. Maintain an inventory for each player.
    Each instance of the client will contain an in-memory list of items. This list is going to be backed up.
  6. Support chat.
    The client app needs to also connect to the chat server and log the user into the party’s chat room.

More on the client’s internal structure and design later. In the meantime, let’s finish the design stage with the last bit of preparation: the game files.

The Game: JSON Files

This is where it gets interesting because up to now, I’ve covered basic microservices definitions. Some of them might speak REST, and others might work with sockets, but in essence, they’re all the same: You define them, you code them, and they provide a service.

For this particular component, I’m not planning on coding anything, yet we need to design it. Basically, we’re implementing a sort of protocol for defining our game, the scenes inside it and everything inside them.

If you think about it, a text adventure is, at its core, basically a set of rooms connected to each other, and inside them are “things” you can interact with, all tied together with a, hopefully, decent story. Now, our engine will not take care of that last part; that part will be up to you. But for the rest, there is hope.

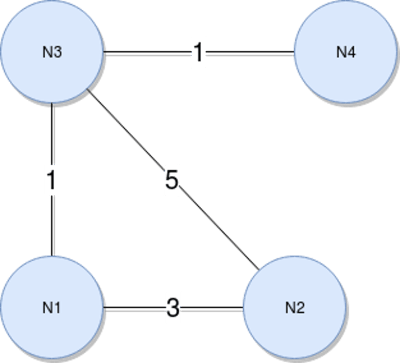
Now, going back to the set of interconnected rooms, that to me sounds like a graph, and if we also add the concept of distance or movement speed that I mentioned earlier, we have a weighted graph. And that is just a set of nodes that have a weight (or just a number — don’t worry about what it’s called) that represents that path between them. Here is a visual (I love learning by seeing, so just look at the image, OK?):

A weighted graph example
A weighted graph example (Large preview)

That’s a weighted graph — that’s it. And I’m sure you’ve already figured it out, but for the sake of completeness, let me show you how you would go about it once our engine is ready.

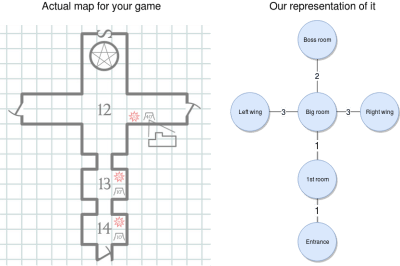
Once you start setting up the adventure, you’ll create your map (like you see on the left of the image below). And then you’ll translate that into a weighted graph, as you can see on the right of the image. Our engine will be able to pick it up and let you walk through it in the right order.

Example graph for a given dungeon
Example graph for a given dungeon (Large preview)

With the weighted graph above, we can make sure players can’t go from the entrance all the way to the left wing. They would have to go through the nodes in between those two, and doing so will consume time, which we can measure using the weight from the connections.

Now, onto the “fun” part. Let’s see how the graph would look like in JSON format. Bear with me here; this JSON will contain a lot of information, but I’ll go through as much of it as I can:

{
    "graph": [
            { "id": "entrance", "name": "Entrance", "north": { "node": "1stroom", "distance": 1 } },
     { "id": "1st room", "name": "1st Room", "south": {"node": "entrance", "distance": 1} , "north": { "node": "bigroom", "distance": 1} } ,
     { "id": "bigroom",
       "name": "Big room",
       "south": { "node": "1stroom", "distance": 1},
       "north": { "node": "bossroom", "distance": 2},
       "east":  { "node": "rightwing", "distance": 3} ,
       "west":  { "node": "leftwing", "distance": 3}
     },
     { "id": "bossroom", "name": "Boss room", "south": {"node": "bigroom", "distance": 2} }
     { "id": "leftwing", "name": "Left Wing", "east": {"node": "bigroom", "distance": 3} }
     { "id": "rightwing", "name": "Right Wing", "west": { "node": "bigroom", "distance": 3 } }
    ],
    "game": {
     "win-condition": {
       "source": "finalboss",
       "condition": {
         "type": "comparison",
         "left": "hp",
         "right": "0",
         "symbol": "<="
       }
     },
     "lose-condition": {
       "source": "player",
       "condition": {
         "type": "comparison",
         "left": "hp",
         "right": "0",
         "symbol": "<="
       }
     }
    },
    "rooms": {
     "entrance": {
       "description": {
         "default": "You're at the entrance of the dungeon. There are two lit torches on each wall (one on your right and one on your left). You see only one path: ahead."
       },
       "items": [
         {
           "id": "littorch1",
           "name": "Lit torch on the right",  
           "triggers": [
             {
               "action": "grab", //grab Lit torch on the right
               "effect":{
                 "statusUpdate": "has light",
                 "target": "game",
               }
             }
           ] ,
           "destination": "hand"
         },
         {
           "id": "littorch2",
           "name": "Lit torch on the left",  
           "triggers": [
             {
               "action": "grab", //grab Lit torch on the left
               "effect":{
                 "statusUpdate": "has light",
                 "target": "game",
               }
             }
           ] ,
           "destination": "hand"
         
         }
       ]
     },
     "1stroom": {
       "description": {
         "default": "You're in a very dark room. There are no windows and no source of light, other than the one at the entrance. You get the feeling you're not alone here.",
         "conditionals": {
           "has light": "The room you find yourself in appears to be empty, aside from a single chair in the right corner. There appears to be only one way out: deeper into the dungeon."
         }
       },
       "items": [
         {
           "id": "chair",
           "name": "Wooden chair",
           "details": "It's a wooden chair, nothing fancy about it. It appears to have been sitting here, untouched, for a while now.",
           "subitems": [
             {    "id": "woodenleg",  
               "name": "Wooden leg",
               "triggeractions": [
                 { "action": "break", "target": "chair"},  //break 
                 { "action": "throw", "target": "chair"} //throw 
               ],
               "destination": "inventory",
               "damage": 2
             }
           ]
         }
       ]
     },
     "bigroom": {
       "description": {
         "default": "You've reached the big room. On every wall are torches lighting every corner. The walls are painted white, and the ceiling is tall and filled with painted white stars on a black background. There is a gateway on either side and a big, wooden double door in front of you."
       },
       "exits": {
         "north": { "id": "bossdoor",  "name": "Big double door", "status": "locked", "details": "A aig, wooden double door. It seems like something big usually comes through here."}
       },
       "items": []
     },
     "leftwing": {
       "description": {
         "default": "Another dark room. It doesn't look like it's that big, but you can't really tell what's inside. You do, however, smell rotten meat somewhere inside.",
         "conditionals": {
           "has light":  "You appear to have found the kitchen. There are tables full of meat everywhere, and a big knife sticking out of what appears to be the head of a cow."
         }
       },
       "items": [
         { "id": "bigknife", "name": "Big knife", "destination": "inventory", "damage": 10}
       ]
     },
     "rightwing": {
       "description": {
         "default": "This appear to be some sort of office. There is a wooden desk in the middle, torches lighting every wall, and a single key resting on top of the desk."
       },
       "items": [
         {     "id": "key",
           "name": "Golden key",
           "details": "A small golden key. What use could you have for it?",
           "destination": "inventory",
           "triggers": [{
             "action": "use", //use  on north exit (contextual)
             "target": {
               "room": "bigroom",
               "exit": "north"
             },
             "effect": {
               "statusUpdate": "unlocked",
               "target": {
                 "room": "bigroom",
                 "exit": "north"
               }
             }
           }
         ]
         }
       ]
     },
     "bossroom": {
       "description": {
         "default": "You appear to have reached the end of the dungeon. There are no exits other than the one you just came in through. The only other thing that bothers you is the hulking giant looking like it's going to kill you, standing about 10 feet from you."
       },
       "npcs": [
         {
           "id": "finalboss",
           "name": "Hulking Ogre",
           "details": "A huge, green, muscular giant with a single eye in the middle of his forehead. It doesn't just look bad, it also smells like hell.",
           "stats":  {
             "hp": 10,
             "damage": 3
           }
         }
       ]
     }
    }
}

I know it looks like a lot, but if you boil it down to a simple description of the game, you have a dungeon comprising six rooms, each one interconnected with others, as shown in the diagram above.

Your task is to move through it and explore it. You’ll find there are two different places where you can find a weapon (either in the kitchen or in the dark room, by breaking the chair). You will also be confronted with a locked door; so, once you find the key (located inside the office-like room), you’ll be able to open it and fight the boss with whatever weapon you’ve collected.

You will either win by killing it or lose by getting killed by it.

Let’s now get into a more detailed overview of the entire JSON structure and its three sections.

Graph

This one will contain the relationship between the nodes. Basically, this section directly translates into the graph we looked at before.

The structure for this section is pretty straightforward. It’s a list of nodes, where every node comprises the following attributes:

  • an ID that uniquely identifies the node among all others in the game;
  • a name, which is basically a human-readable version of the ID;
  • a set of links to the other nodes. This is evidenced by the existence of four possible keys: north”, south, east, and west. We could eventually add further directions by adding combinations of these four. Every link contains the ID of the related node and the distance (or weight) of that relation.
Game

This section will contain the general settings and conditions. In particular, in the example above, this section contains the win and lose conditions. In other words, with those two conditions, we’ll let the engine know when the game can end.

To keep things simple, I’ve added just two conditions:

  • you either win by killing the boss,
  • or lose by getting killed.
Rooms

Here is where most of the 163 lines come from, and it is the most complex of the sections. This is where we’ll describe all of the rooms in our adventure and everything inside them.

There will be a key for every room, using the ID we defined before. And every room will have a description, a list of items, a list of exits (or doors) and a list of non-playable characters (NPCs). Out of those properties, the only one that should be mandatory is the description, because that one is required for the engine to let you know what you’re seeing. The rest of them will only be there if there is something to show.

Let’s look into what these properties can do for our game.

The Description

This item is not as simple as one might think, because your view of a room can change depending on different circumstances. If, for example, you look at the description of the first room, you’ll notice that, by default, you can’t see anything, unless of course, you have a lit torch with you.

So, picking up items and using them might trigger global conditions that will affect other parts of the game.

The Items

These represent all the things” you can find inside a room. Every item shares the same ID and name that the nodes in the graph section had.

They will also have a “destination” property, which indicates where that item should be stored, once picked up. This is relevant because you will be able to have only one item in your hands, whereas you’ll be able to have as many as you’d like in your inventory.

Finally, some of these items might trigger other actions or status updates, depending on what the player decides to do with them. One example of this are the lit torches from the entrance. If you grab one of them, you’ll trigger a status update in the game, which in turn will make the game show you a different description of the next room.

Items can also have “subitems”, which come into play once the original item gets destroyed (through the “break” action, for example). An item can be broken down into several ones, and that is defined in the “subitems” element.

Essentially, this element is just an array of new items, one that also contains the set of actions that can trigger their creation. This basically opens up the possibility to create different subitems based on the actions you perform on the original item.

Finally, some items will have a “damage” property. So, if you use an item to hit an NPC, that value will be used to subtract life from them.

The Exits

This is simply a set of properties indicating the direction of the exit and the properties of it (a description, in case you want to inspect it, its name and, in some cases, its status).

Exits are a separate entity from items because the engine will need to understand if you can actually traverse them based on their status. Exits that are locked will not let you go through them unless you work out how to change their status to unlocked.

The NPCs

Finally, NPCs will be part of another list. They are basically items with statistics that the engine will use to understand how each one should behave. The ones we’ve defined in our example are “hp”, which stands for health points, and “damage”, which, just like the weapons, is the number that each hit will subtract from the player’s health.

That is it for the dungeon I created. It is a lot, yes, and in the future I might consider creating a level editor of sorts, to simplify the creation of the JSON files. But for now, that won’t be necessary.

In case you haven’t realized it yet, the main benefit of having our game defined in a file like this is that we’ll be able to switch JSON files like you did cartridges back in the Super Nintendo era. Just load up a new file and start a new adventure. Easy!

Closing Thoughts

Thanks for reading thus far. I hope you’ve enjoyed the design process I go through to bring an idea to life. Remember, though, that I’m making this up as I go, so we might realize later that something we defined today isn’t going to work, in which case we’ll have to backtrack and fix it.

I’m sure there are a ton of ways to improve the ideas presented here and to make one hell of an engine. But that would require a lot more words than I can put into an article without making it boring for everyone, so we’ll leave it at that for now.

Smashing Editorial (rb, ra, al, il)