Frankenstein Migration: Framework-Agnostic Approach (Part 2)
Denys MishunovIn this article, we’ll be putting all the theory to the test by performing step-by-step migration of an application, following the recommendations from the previous part. To make things straightforward, reduce uncertainties, unknowns, and unnecessary guessing, for the practical example of migration, I decided to demonstrate the practice on a simple to-do application.

In general, I assume that you have a good understanding of how a generic to-do application works. This type of application suits our needs very well: it’s predictable, yet has a minimum viable number of required components to demonstrate different aspects of Frankenstein Migration. However, no matter the size and complexity of your real application, the approach is well-scalable and is supposed to be suitable for projects of any size.

For this article, as a starting point, I picked a jQuery application from the TodoMVC project — an example that may already be familiar to a lot of you. jQuery is legacy enough, might reflect a real situation with your projects, and most importantly, requires significant maintenance and hacks for powering a modern dynamic application. (This should be enough to consider migration to something more flexible.)
What is this “more flexible” that we are going to migrate to then? To show a highly-practical case useful in real life, I had to choose among the two most popular frameworks these days: React and Vue. However, whichever I would pick, we would miss some aspects of the other direction.
So in this part, we’ll be running through both of the following:
- A migration of a jQuery application to React, and
- A migration of a jQuery application to Vue.

Code Repositories
All the code mentioned here is publicly available, and you can get to it whenever you want. There are two repositories available for you to play with:
- Frankenstein TodoMVC
This repository contains TodoMVC applications in different frameworks/libraries. For example, you can find branches likevue,angularjs,reactandjqueryin this repository. - Frankenstein Demo
It contains several branches, each of which represents a particular migration direction between applications, available in the first repository. There are branches likemigration/jquery-to-reactandmigration/jquery-to-vue, in particular, that we’ll be covering later on.
Both repositories are work-in-progress and new branches with new applications and migration directions should be added to them regularly. (You’re free to contribute as well!) Commits history in migration branches is well structured and might serve as additional documentation with even more details than I could cover in this article.
Now, let’s get our hands dirty! We have a long way ahead, so don’t expect it to be a smooth ride. It’s up to you to decide how you want to follow along with this article, but you could do the following:
- Clone the
jquerybranch from the Frankenstein TodoMVC repository and strictly follow all of the instructions below. - Alternatively, you can open a branch dedicated to either migration to React or migration to Vue from the Frankenstein Demo repository and follow along with commits history.
- Alternatively, you can relax and keep reading because I am going to highlight the most critical code right here, and it’s much more important to understand the mechanics of the process rather than the actual code.
I’d like to mention one more time that we’ll strictly be following the steps presented in the theoretical first part of the article.
Let’s dive right in!
- Identify Microservices
- Allow Host-to-Alien Access
- Write An Alien Microservice/Component
- Write Web Component Wrapper Around Alien Service
- Replace Host Service With Web Component
- Rinse & Repeat For All Of Your Components
- Switch To Alien
1. Identify Microservices
As Part 1 suggests, in this step, we have to structure our application into small, independent services dedicated to one particular job. The attentive reader might notice that our to-do application is already small and independent and can represent one single microservice on its own. This is how I would treat it myself if this application would live in some broader context. Remember, however, that the process of identifying microservices is entirely subjective and there is no one correct answer.
So, in order to see the process of Frankenstein Migration in more detail, we can go a step further and split this to-do application into two independent microservices:
- An input field for adding a new item.
This service can also contain the application’s header, based purely on positioning proximity of these elements. - A list of already added items.
This service is more advanced, and together with the list itself, it also contains actions like filtering, list item’s actions, and so on.

Tip: To check whether the picked services are genuinely independent, remove HTML markup, representing each of these services. Make sure that the remaining functions still work. In our case, it should be possible to add new entries into localStorage (that this application is using as storage) from the input field without the list, while the list still renders the entries from localStorage even if the input field is missing. If your application throws errors when you remove markup for potential microservice, take a look at the “Refactor If Needed” section in Part 1 for an example of how to deal with such cases.
Of course, we could go on and split the second service and the listing of the items even further into independent microservices for each particular item. However, it might be too granular for this example. So, for now, we conclude that our application is going to have two services; they are independent, and each of them works towards its own particular task. Hence, we have split our application into microservices.
2. Allow Host-to-Alien Access
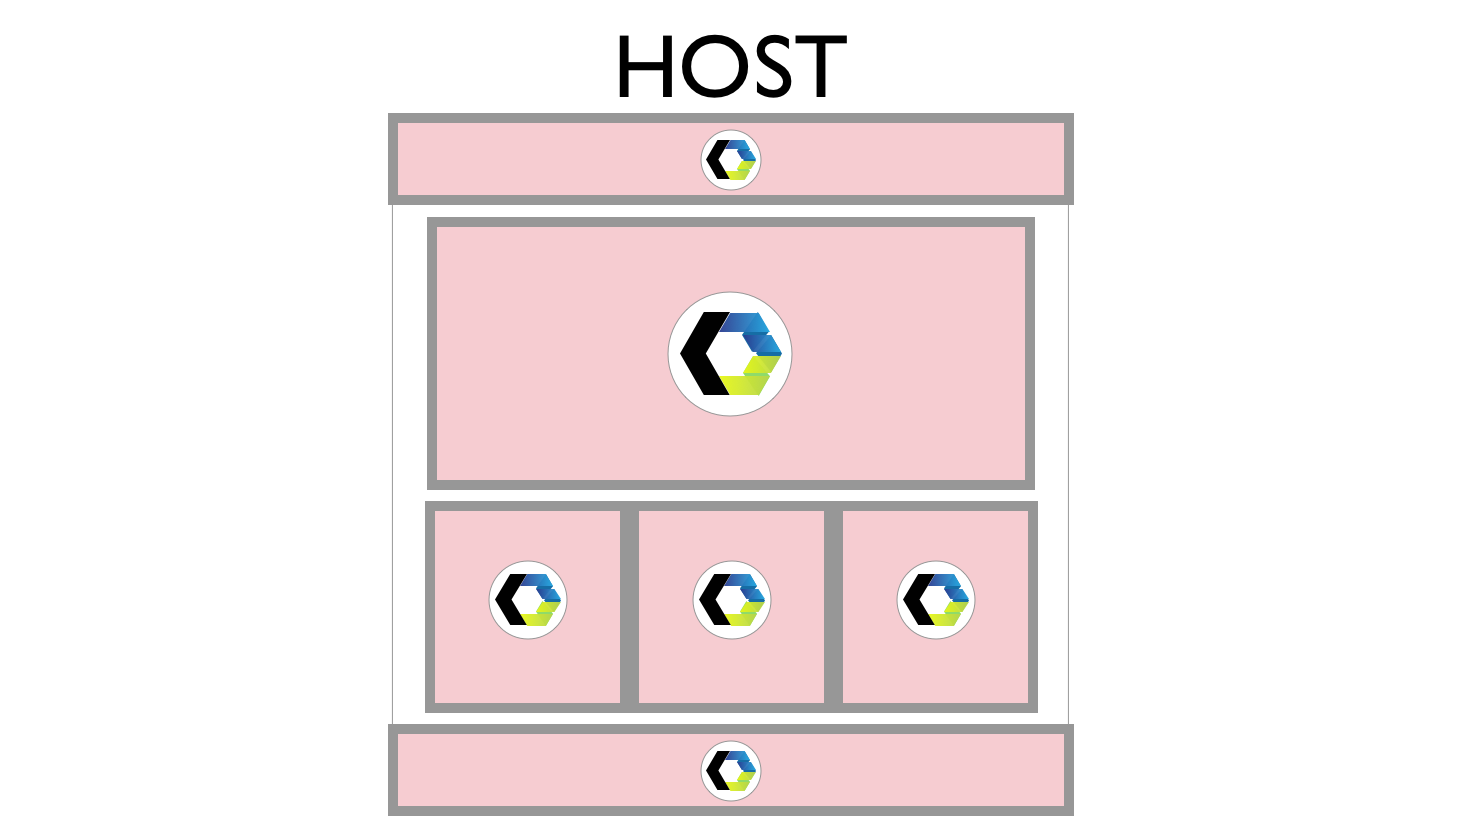
Let me briefly remind you of what these are.
- Host
This is what our current application is called. It is written with the framework from which we’re about to move away from. In this particular case, our jQuery application. - Alien
Simply put, this one’s a gradual re-write of Host on the new framework that we are about to move to. Again, in this particular case, it’s a React or Vue application.
The rule of thumb when splitting Host and Alien is that you should be able to develop and deploy any of them without breaking the other one — at any point in time.
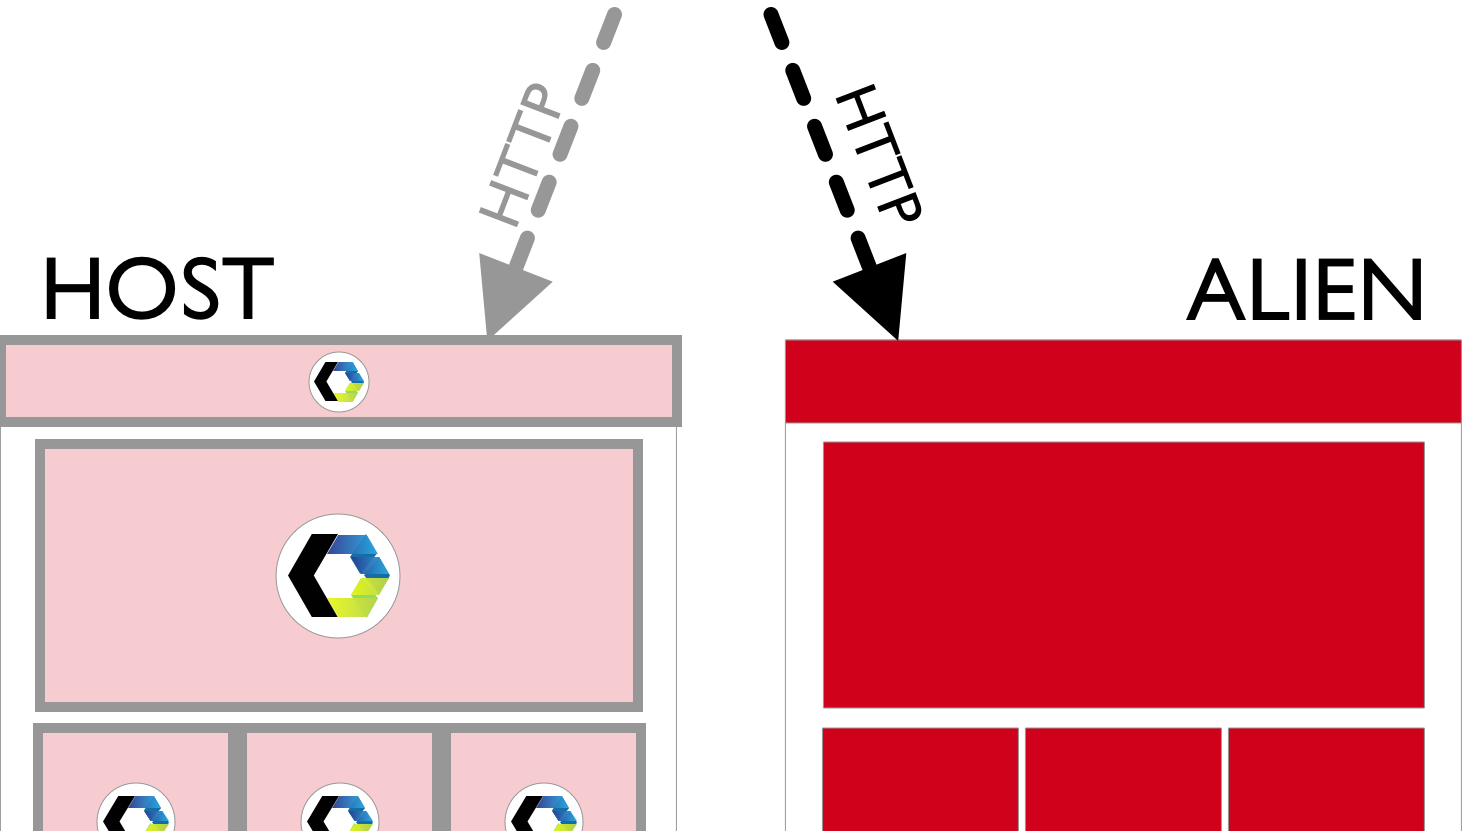
Keeping Host and Alien independent from each other is crucial for Frankenstein Migration. However, this makes arranging communication between the two a bit challenging. How do we allow Host access Alien without smashing the two together?
Adding Alien As A Submodule Of Your Host
Even though there are several ways to achieve the setup we need, the simplest form of organizing your project to meet this criterion is probably git submodules. This is what we’re going to use in this article. I’ll leave it up to you to read carefully about how submodules in git work in order to understand limitations and gotchas of this structure.
The general principles of our project’s architecture with git submodules should look like this:
- Both Host and Alien are independent and are kept in separate
gitrepositories; - Host references Alien as a submodule. At this stage, Host picks a particular state (commit) of Alien and adds it as, what looks like, a subfolder in Host’s folder structure.
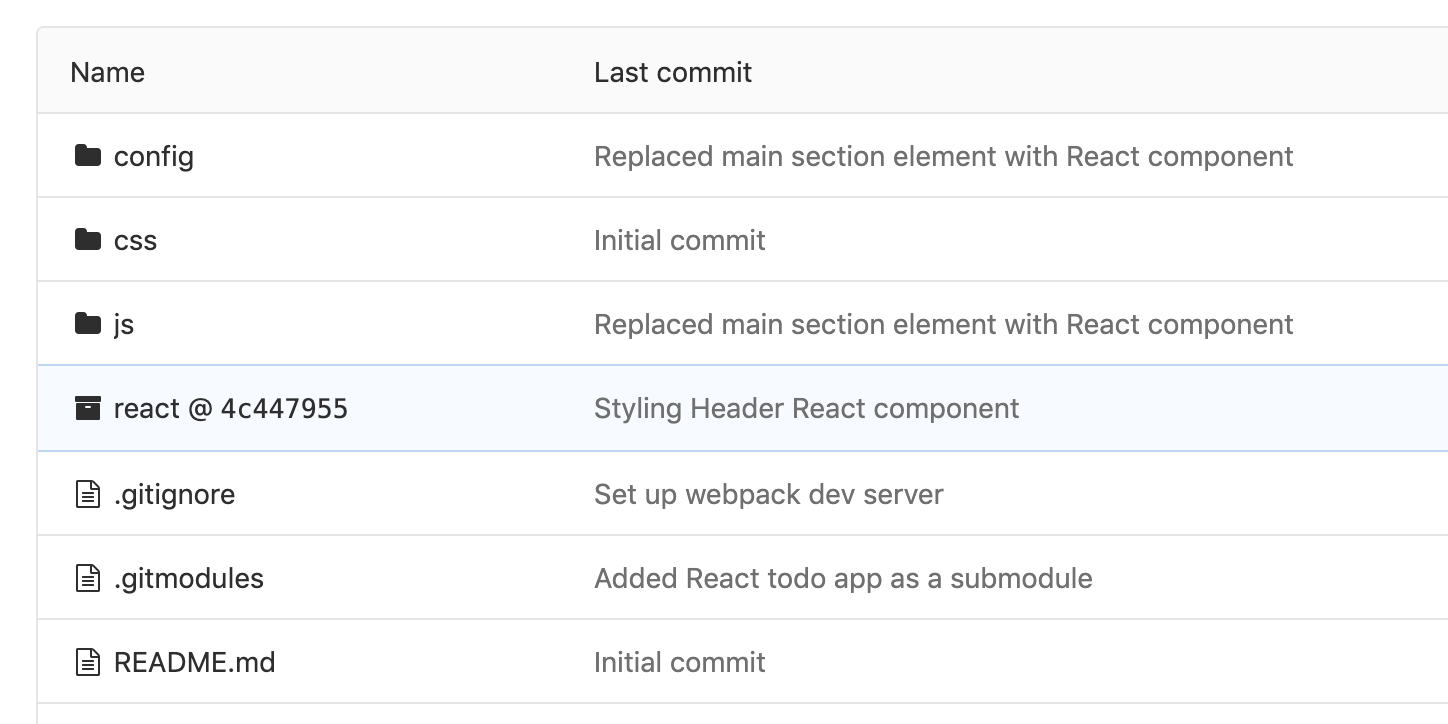
The process of adding a submodule is the same for any application. Teaching git submodules is beyond the scope of this article and is not directly related to Frankenstein Migration itself. So let’s just take a brief look at the possible examples.
In the snippets below, we use the React direction as an example. For any other migration direction, replace react with the name of a branch from Frankenstein TodoMVC or adjust to custom values where needed.
If you follow along using the original jQuery TodoMVC application:
$ git submodule add -b react git@gitlab.com:mishunov/frankenstein-todomvc.git react
$ git submodule update --remote
$ cd react
$ npm i
If you follow along with migration/jquery-to-react (or any other migration direction) branch from the Frankenstein Demo repository, the Alien application should already be in there as a git submodule, and you should see a respective folder. However, the folder is empty by default, and you need to update and initialize the registered submodules.
From the root of your project (your Host):
$ git submodule update --init
$ cd react
$ npm i
Note that in both cases we install dependencies for the Alien application, but those become sandboxed to the subfolder and won’t pollute our Host.
After adding the Alien application as a submodule of your Host, you get independent (in terms of microservices) Alien and Host applications. However, Host considers Alien a subfolder in this case, and obviously, that allows Host to access Alien without a problem.
3. Write An Alien Microservice/Component
At this step, we have to decide what microservice to migrate first and write/use it on the Alien’s side. Let’s follow the same order of services we identified in Step 1 and start with the first one: input field for adding a new item. However, before we begin, let’s agree that beyond this point, we are going to use a more favorable term component instead of microservice or service as we are moving towards the premises of frontend frameworks and the term component follows the definitions of pretty much any modern framework.
Branches of Frankenstein TodoMVC repository contain a resulting component that represents the first service “Input field for adding a new item” as a Header component:
Writing components in the framework of your choice is beyond the scope of this article and is not part of Frankenstein Migration. However, there are a couple of things to keep in mind while writing an Alien component.
Independence
First of all, the components in Alien should follow the same principle of independence, previously set up on the Host’s side: components should not depend on other components in any way.
Interoperability
Thanks to the independence of the services, most probably, components in your Host communicate in some well-established way be it a state management system, communication through some shared storage or, directly via a system of DOM events. “Interoperability” of Alien components means that they should be able to connect to the same source of communication, established by Host, to dispatch information about its state changes and listen to changes in other components. In practice, this means that if components in your Host communicate via DOM events, building your Alien component exclusively with state management in mind won’t work flawlessly for this type of migration, unfortunately.
As an example, take a look at the js/storage.js file that is the primary communication channel for our jQuery components:
...

fetch: function() {
  return JSON.parse(localStorage.getItem(STORAGE_KEY) || "[]");
},
save: function(todos) {
  localStorage.setItem(STORAGE_KEY, JSON.stringify(todos));
  var event = new CustomEvent("store-update", { detail: { todos } });
  document.dispatchEvent(event);
},

...
Here, we use localStorage (as this example is not security-critical) to store our to-do items, and once the changes to the storage get recorded, we dispatch a custom DOM event on the document element that any component can listen to.
At the same time, on the Alien’s side (let’s say React) we can set up as complex state management communication as we want. However, it’s probably smart to keep it for the future: to successfully integrate our Alien React component into Host, we have to connect to the same communication channel used by Host. In this case, it’s localStorage. To make things simple, we just copied over Host’s storage file into Alien and hooked up our components to it:
import todoStorage from "../storage";

class Header extends Component {
  constructor(props) {
    this.state = {
      todos: todoStorage.fetch()
    };
  }
  componentDidMount() {
    document.addEventListener("store-update", this.updateTodos);
  }
  componentWillUnmount() {
    document.removeEventListener("store-update", this.updateTodos);
  }
  componentDidUpdate(prevProps, prevState) {
    if (prevState.todos !== this.state.todos) {
      todoStorage.save(this.state.todos);
    }
  }
  ...
}
Now, our Alien components can talk the same language with Host components and vice versa.
4. Write Web Component Wrapper Around Alien Service
Even though we’re now only on the fourth step, we have achieved quite a lot:
- We’ve split our Host application into independent services which are ready to be replaced by Alien services;
- We’ve set up Host and Alien to be completely independent of each other, yet very well connected via
git submodules; - We’ve written our first Alien component using the new framework.
Now it’s time to set up a bridge between Host and Alien so that the new Alien component could function in the Host.
Reminder from Part 1: Make sure that your Host has a package bundler available. In this article, we rely on Webpack, but it doesn’t mean that the technique won’t work with Rollup or any other bundler of your choice. However, I leave the mapping from Webpack to your experiments.
Naming Convention
As mentioned in the previous article, we are going to use Web Components to integrate Alien into Host. On the Host’s side, we create a new file: js/frankenstein-wrappers/Header-wrapper.js. (It’s going to be our first Frankenstein wrapper.) Keep in mind that it’s a good idea to name your wrappers the same as your components in Alien application, e.g. just by adding a “-wrapper” suffix. You”ll see later on why this is a good idea, but for now, let’s agree that this means that if the Alien component is called Header.js (in React) or Header.vue (in Vue), the corresponding wrapper on the Host’s side should be called Header-wrapper.js.
In our first wrapper, we begin with the fundamental boilerplate for registering a custom element:
class FrankensteinWrapper extends HTMLElement {}
customElements.define("frankenstein-header-wrapper", FrankensteinWrapper);
Next, we have to initialize Shadow DOM for this element.
Please refer to Part 1 to get reasoning on why we use Shadow DOM.
class FrankensteinWrapper extends HTMLElement {
  connectedCallback() {
    this.attachShadow({ mode: "open" });
  }
}
With this, we have all the essential bits of the Web Component set up, and it’s time to add our Alien component into the mix. First of all, at the beginning of our Frankenstein wrapper, we should import all the bits responsible for the Alien component’s rendering.
import React from "../../react/node_modules/react";
import ReactDOM from "../../react/node_modules/react-dom";
import HeaderApp from "../../react/src/components/Header";
...
Here we have to pause for a second. Note that we do not import Alien’s dependencies from Host’s node_modules. Everything comes from the Alien itself that sits in react/ subfolder. That is why Step 2 is so important, and it is crucial to make sure the Host has full access to assets of Alien.
Now, we can render our Alien component within Web Component’s Shadow DOM:
...
connectedCallback() {
  ...
  ReactDOM.render(<HeaderApp />, this.shadowRoot);
}
...
Note: In this case, React doesn’t need anything else. However, to render the Vue component, you need to add a wrapping node to contain your Vue component like the following:
...
connectedCallback() {
  const mountPoint = document.createElement("div");
  this.attachShadow({ mode: "open" }).appendChild(mountPoint);
  new Vue({
    render: h => h(VueHeader)
  }).$mount(mountPoint);
}
...
The reason for this is the difference in how React and Vue render components: React appends component to referenced DOM node, while Vue replaces referenced DOM node with the component. Hence, if we do .$mount(this.shadowRoot) for Vue, it essentially replaces the Shadow DOM.
That’s all we have to do to our wrapper for now. The current result for Frankenstein wrapper in both jQuery-to-React and jQuery-to-Vue migration directions can be found over here:
To sum up the mechanics of the Frankenstein wrapper:
- Create a custom element,
- Initiate Shadow DOM,
- Import everything needed for rendering an Alien component,
- Render the Alien component within the custom element’s Shadow DOM.
However, this doesn’t render our Alien in Host automatically. We have to replace the existing Host markup with our new Frankenstein wrapper.
Fasten your seatbelts, it may not be as straightforward as one would expect!
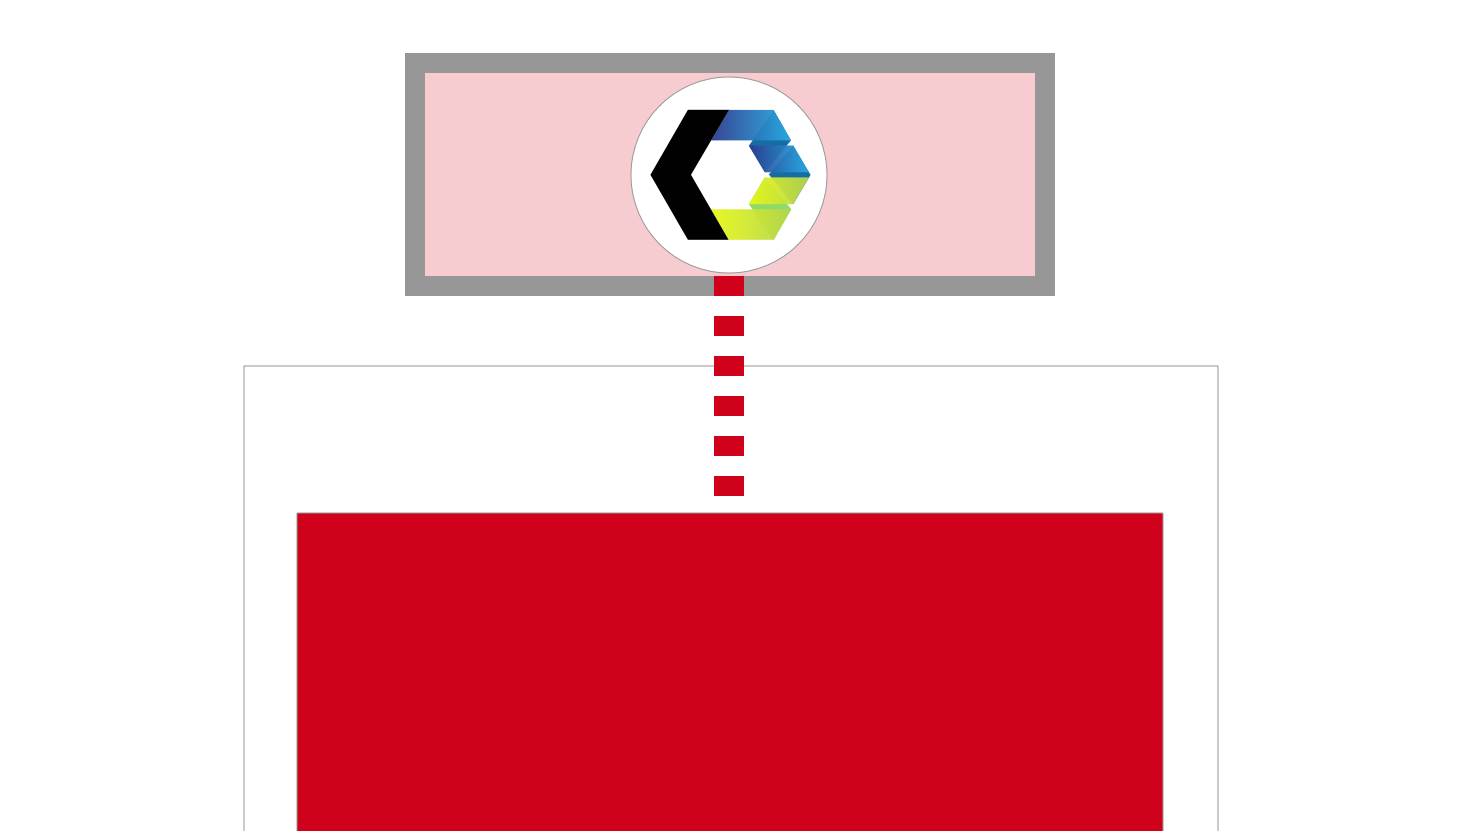
5. Replace Host Service With Web Component
Let’s go on and add our new Header-wrapper.js file to index.html and replace the existing header markup with the newly-created <frankenstein-header-wrapper> custom element.
...
<!-- <header class="header">-->
<!--   <h1>todos</h1>-->
<!--   <input class="new-todo" placeholder="What needs to be done?" autofocus>-->
<!-- </header>-->

<frankenstein-header-wrapper></frankenstein-header-wrapper>
...
<script type="module"
        src="js/frankenstein-wrappers/Header-wrapper.js"></script>
Unfortunately, this won’t work as simple as that. If you open a browser and check the console, there is the Uncaught SyntaxError waiting for you. Depending on the browser and its support for ES6 modules, it will either be related to ES6 imports or to the way the Alien component gets rendered. Either way, we have to do something about it, but the problem and solution should be familiar and clear to most of the readers.
5.1. Update Webpack and Babel where needed
We should involve some Webpack and Babel magic before integrating our Frankenstein wrapper. Wrangling these tools is beyond the scope of the article, but you can take a look at the corresponding commits in the Frankenstein Demo repository:
Essentially, we set up the processing of the files as well as a new entry point frankenstein in Webpack’s configuration to contain everything related to Frankenstein wrappers in one place.
Once Webpack in Host knows how to process the Alien component and Web Components, we’re ready to replace Host’s markup with the new Frankenstein wrapper.
5.2. Actual Component’s Replacement
The component’s replacement should be straightforward now. In index.html of your Host, do the following:
- Replace
<header class="header">DOM element with<frankenstein-header-wrapper>; - Add a new script
frankenstein.js. This is the new entry point in Webpack that contains everything related to Frankenstein wrappers.
...
<!-- We replace <header class="header"> -->
<frankenstein-header-wrapper></frankenstein-header-wrapper>
...
<script src="./frankenstein.js"></script>
That’s it! Restart your server if needed and witness the magic of the Alien component integrated into Host.
However, something still seemd to be is missing. The Alien component in the Host context doesn’t look the same way as it does in the context of the standalone Alien application. It’s simply unstyled.

Why is it so? Shouldn’t the component’s styles be integrated with the Alien component into Host automatically? I wish they would, but as in too many situations, it depends. We’re getting to the challenging part of Frankenstein Migration.
5.3. General Information On The Styling Of The Alien Component
First of all, the irony is that there is no bug in the way things work. Everything is as it’s designed to work. To explain this, let’s briefly mention different ways of styling components.
Global Styles
We all are familiar with these: global styles can be (and usually are) distributed without any particular component and get applied to the whole page. Global styles affect all DOM nodes with matching selectors.
A few examples of global styles are <style> and <link rel="stylesheet"> tags found into your index.html. Alternatively, a global stylesheet can be imported into some root JS module so that all components could get access to it as well.
The problem of styling applications in this way is obvious: maintaining monolithic stylesheets for large applications becomes very hard. Also, as we saw in the previous article, global styles can easily break components that are rendered straight in the main DOM tree like it is in React or Vue.
Bundled Styles
These styles usually are tightly coupled with a component itself and are rarely distributed without the component. The styles typically reside in the same file with the component. Good examples of this type of styling are styled-components in React or CSS Modules and Scoped CSS in single file components in Vue. However, no matter the variety of tools for writing bundled styles, the underlying principle in most of them is the same: the tools provide a scoping mechanism to lock down styles defined in a component so that the styles don’t break other components or global styles.
Why Could Scoped Styles Be Fragile?
In Part 1, when justifying the use of Shadow DOM in Frankenstein Migration, we briefly covered the topic of scoping vs. encapsulation) and how encapsulation of Shadow DOM is different from scoping styling tools. However, we did not explain why scoping tools provide such fragile styling for our components, and now, when we faced the unstyled Alien component, it becomes essential for understanding.
All scoping tools for modern frameworks work similarly:
- You write styles for your component in some way without thinking much about scope or encapsulation;
- You run your components with imported/embedded stylesheets through some bundling system, like Webpack or Rollup;
- The bundler generates unique CSS classes or other attributes, creating and injecting individual selectors for both your HTML and corresponding stylesheets;
- The bundler makes a
<style>entry in the<head>of your document and puts your components’ styles with unique mingled selectors in there.
That’s pretty much it. It does work and works fine in many cases. Except for when it does not: when styles for all components live in the global styling scope, it becomes easy to break those, for example, using higher specificity. This explains the potential fragility of scoping tools, but why is our Alien component completely unstyled?
Let’s take a look at the current Host using DevTools. When inspecting the newly-added Frankenstein wrapper with the Alien React component, for example, we can see something like this:

So, Webpack does generate unique CSS classes for our component. Great! Where are the styles then? Well, the styles are precisely where they are designed to be — in the document’s <head>.
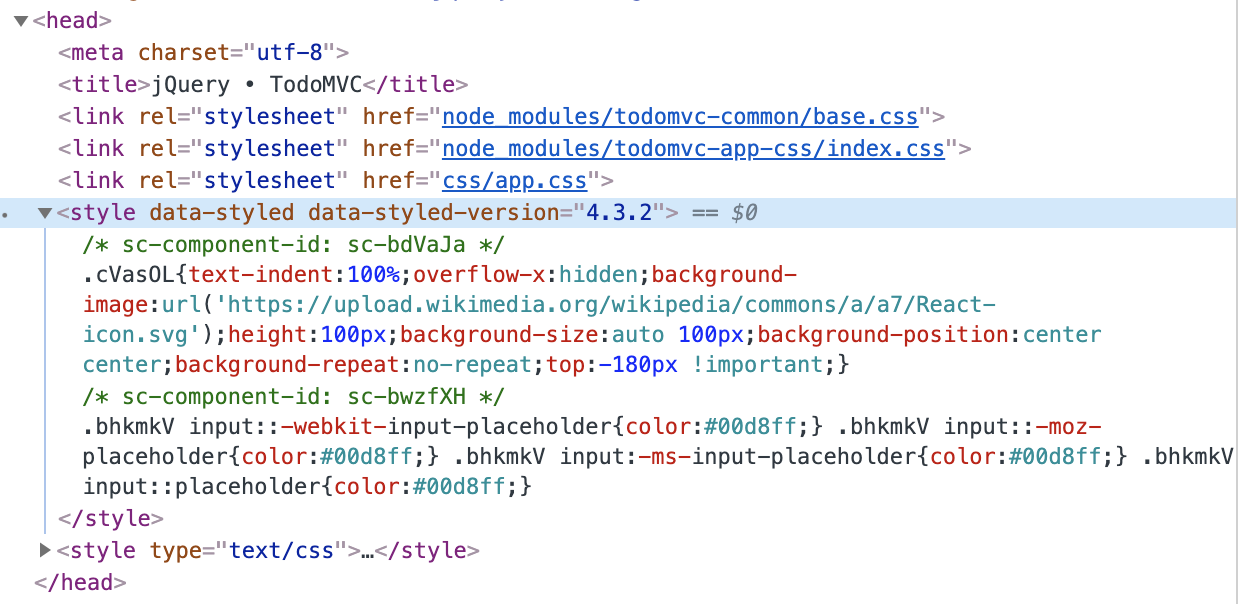
<head>. (Large preview)
So everything works as it should, and this is the main problem. Since our Alien component resides in Shadow DOM, and as explained in Part #1, Shadow DOM provides full encapsulation of components from the rest of the page and global styles, including those newly-generated stylesheets for the component that cannot cross the shadow border and get to the Alien component. Hence, the Alien component is left unstyled. However, now, the tactics of solving the problem should be clear: we should somehow place the component’s styles in the same Shadow DOM where our component resides (instead of the document’s <head>).
5.4. Fixing Styles For The Alien Component
Up until now, the process of migrating to any framework was the same. However, things start diverging here: every framework has its recommendations on how to style components, and hence, the ways of tackling the problem differ. Here, we discuss most common cases but, if the framework you work with uses some unique way of styling components, you need to keep in mind the basic tactics such as putting the component’s styles into Shadow DOM instead of <head>.
In this chapter, we are covering fixes for:
- Bundled styles with CSS Modules in Vue (tactics for Scoped CSS are the same);
- Bundled styles with styled-components in React;
- Generic CSS Modules and global styles. I combine these because CSS Modules, in general, are very similar to the global stylesheets and can be imported by any component making the styles disconnected from any particular component.
Constraints first: anything we do to fix styling should not break the Alien component itself. Otherwise, we lose the independence of our Alien and Host systems. So, to address the styling issue, we are going to rely on either bundler’s configuration or the Frankenstein wrapper.
Bundled Styles In Vue And Shadow DOM
If you’re writing a Vue application, then you’re most probably using single file components. If you’re also using Webpack, you should be familiar with two loaders vue-loader and vue-style-loader. The former allows you to write those single file components while the latter dynamically injects the component’s CSS into a document as a <style> tag. By default, vue-style-loader injects the component’s styles into the document’s <head>. However, both packages accept the shadowMode option in configuration which allows us to easily change the default behavior and inject styles (as the option’s name implies) into Shadow DOM. Let’s see it in action.
Webpack Configuration
At a bare minimum, the Webpack configuration file should contain the following:
const VueLoaderPlugin = require('vue-loader/lib/plugin');
...
module: {
  rules: [
    {
      test: /\.vue$/,
      loader: 'vue-loader',
      options: {
        shadowMode: true
      }
    },
    {
      test: /\.css$/,
      include: path.resolve(__dirname, '../vue'),
      use: [
        {
          loader:'vue-style-loader',
          options: {
            shadowMode: true
          }
        },
        'css-loader'
      ]
    }
  ],
  plugins: [
    new VueLoaderPlugin()
  ]
}
In a real application, your test: /\.css$/ block will be more sophisticated (probably involving the oneOf rule) to account for both Host and Alien configurations. However, in this case, our jQuery is styled with simple <link rel="stylesheet"> in index.html, so we don’t build styles for Host via Webpack, and it’s safe to cater for Alien only.
Wrapper Configuration
In addition to Webpack configuration, we also need to update our Frankenstein wrapper, pointing Vue to the correct Shadow DOM. In our Header-wrapper.js, rendering of the Vue component should include the shadowRoot property leading to shadowRoot of our Frankenstein wrapper:
...
new Vue({
  shadowRoot: this.shadowRoot,
  render: h => h(VueHeader)
}).$mount(mountPoint);
...
After you update the files and restart your server, you should be getting something like this in your DevTools:

Finally, styles for the Vue component are within our Shadow DOM. At the same time, your application should look like this:

We start getting something resembling our Vue application: styles bundled with the component, are injected into the wrapper’s Shadow DOM, but the component still looks not as it is supposed to. The reason is that in the original Vue application, the component is styled not only with the bundled styles but also partially with global styles. However, before fixing the global styles, we have to get our React integration to the same state as the Vue one.
Bundled Styles In React And Shadow DOM
Because there are many ways one can style a React component, the particular solution to fix an Alien component in Frankenstein Migration depends on the way we style the component in the first place. Let’s briefly cover the most commonly used alternatives.
styled-components
styled-components is one of the most popular ways of styling React components. For the Header React component, styled-components is precisely the way we style it. Since this is a classic CSS-in-JS approach, there is no file with a dedicated extension that we could hook our bundler onto as we do for .css or .js files, for example. Luckily, styled-components allow the injection of component’s styles into a custom node (Shadow DOM in our case) instead of the document’s headwith the help of the StyleSheetManager helping component. It is a pre-defined component, installed with the styled-components package that accepts target property, defining “an alternate DOM node to inject styles info”. Exactly what we need! Moreover, we do not even need to change our Webpack configuration: everything is up to our Frankenstein wrapper.
We should update our Header-wrapper.js that contains the React Alien component with the following lines:
...
import { StyleSheetManager } from "../../react/node_modules/styled-components";
...
const target = this.shadowRoot;
ReactDOM.render(
  <StyleSheetManager target={target}>
    <HeaderApp />
  </StyleSheetManager>,
  appWrapper
);
...
Here, we import the StyleSheetManager component (from Alien, and not from Host) and wrap our React component with it. At the same time, we send the target property pointing to our shadowRoot. That’s it. If you restart the server, you have to see something like this in your DevTools:

Now, our component’s styles are in Shadow DOM instead of <head>. This way, the rendering of our app now resembles what we have seen with the Vue app previously.

Same story: styled-components are responsible just for the bundled part of the React component’s styles, and the global styles manage the remaining bits. We get back to global styles in a bit after we review one more type of styling components.
CSS Modules
If you take a closer look at the Vue component that we have fixed earlier, you might notice that CSS Modules is precisely the way we style that component. However, even if we style it with Scoped CSS (another recommended way of styling Vue components) the way we fix our unstyled component doesn’t change: it is still up to vue-loader and vue-style-loader to handle it through shadowMode: true option.
When it comes to CSS Modules in React (or any other system using CSS Modules without any dedicated tools), things get a bit more complicated and less flexible, unfortunately.
Let’s take a look at the same React component which we’ve just integrated, but this time styled with CSS Modules instead of styled-components. The main thing to note in this component is a separate import for stylesheet:
import styles from './Header.module.css'
The .module.css extension is a standard way to tell React applications built with the create-react-app utility that the imported stylesheet is a CSS Module. The stylesheet itself is very basic and does precisely the same our styled-components do.
Integrating CSS modules into a Frankenstein wrapper consists of two parts:
- Enabling CSS Modules in bundler,
- Pushing resulting stylesheet into Shadow DOM.
I believe the first point is trivial: all you need to do is set { modules: true } for css-loader in your Webpack configuration. Since, in this particular case, we have a dedicated extension for our CSS Modules (.module.css), we can have a dedicated configuration block for it under the general .css configuration:
{
  test: /\.css$/,
  oneOf: [
    {
      test: /\.module\.css$/,
      use: [
        ...
        {
          loader: 'css-loader',
          options: {
            modules: true,
          }
        }
      ]
    }
  ]
}
Note: A modules option for css-loader is all we have to know about CSS Modules no matter whether it’s React or any other system. When it comes to pushing resulting stylesheet into Shadow DOM, however, CSS Modules are no different from any other global stylesheet.
By now, we went through the ways of integrating bundled styles into Shadow DOM for the following conventional scenarios:
- Vue components, styled with CSS Modules. Dealing with Scoped CSS in Vue components won’t be any different;
- React components, styled with styled-components;
- Components styled with raw CSS Modules (without dedicated tools like those in Vue). For these, we have enabled support for CSS modules in Webpack configuration.
However, our components still don’t look as they are supposed to because their styles partially come from global styles. Those global styles do not come to our Frankenstein wrappers automatically. Moreover, you might get into a situation in which your Alien components are styled exclusively with global styles without any bundled styles whatsoever. So let’s finally fix this side of the story.
Global Styles And Shadow DOM
Having your components styled with global styles is neither wrong nor bad per se: every project has its requirements and limitations. However, the best you can do for your components if they rely on some global styles is to pull those styles into the component itself. This way, you have proper easy-to-maintain self-contained components with bundled styles.
Nevertheless, it’s not always possible or reasonable to do so: several components might share some styling, or your whole styling architecture could be built using global stylesheets that are split into the modular structure, and so on.
So having an opportunity to pull in global styles into our Frankenstein wrappers wherever it’s required is essential for the success of this type of migration. Before we get to an example, keep in mind that this part is the same for pretty much any framework of your choice — be it React, Vue or anything else using global stylesheets!
Let’s get back to our Header component from the Vue application. Take a look at this import:
import "todomvc-app-css/index.css";
This import is where we pull in the global stylesheet. In this case, we do it from the component itself. It’s only one way of using global stylesheet to style your component, but it’s not necessarily like this in your application.
Some parent module might add a global stylesheet like in our React application where we import index.css only in index.js, and then our components expect it to be available in the global scope. Your component’s styling might even rely on a stylesheet, added with <style> or <link> to your index.html. It doesn’t matter. What matters, however, is that you should expect to either import global stylesheets in your Alien component (if it doesn’t harm the Alien application) or explicitly in the Frankenstein wrapper. Otherwise, the wrapper would not know that the Alien component needs any stylesheet other than the ones already bundled with it.
Caution. If there are many global stylesheets to be shared between Alien components and you have a lot of such components, this might harm the performance of your Host application under the migration period.
Here is how import of a global stylesheet, required for the Header component, is done in Frankenstein wrapper for React component:
// we import directly from react/, not from Host
import '../../react/node_modules/todomvc-app-css/index.css'
Nevertheless, by importing a stylesheet this way, we still bring the styles to the global scope of our Host, while what we need is to pull in the styles into our Shadow DOM. How do we do this?
Webpack configuration for global stylesheets & Shadow DOM
First of all, you might want to add an explicit test to make sure that we process only the stylesheets coming from our Alien. In case of our React migration, it will look similar to this:
test: /\.css$/,
oneOf: [
  // this matches stylesheets coming from /react/ subfolder
  {
    test: /\/react\//,
    use: []
  },
  ...
]
In case of Vue application, obviously, you change test: /\/react\// with something like test: /\/vue\//. Apart from that, the configuration will be the same for any framework. Next, let’s specify the required loaders for this block.
...
use: [
  {
    loader: 'style-loader',
    options: {
      ...
    }
  },
  'css-loader'
]
Two things to note. First, you have to specify modules: true in css-loader’s configuration if you’re processing CSS Modules of your Alien application.
Second, we should convert styles into <style> tag before injecting those into Shadow DOM. In the case of Webpack, for that, we use style-loader. The default behavior for this loader is to insert styles into the document’s head. Typically. And this is precisely what we don’t want: our goal is to get stylesheets into Shadow DOM. However, in the same way we used target property for styled-components in React or shadowMode option for Vue components that allowed us to specify custom insertion point for our <style> tags, regular style-loader provides us with nearly same functionality for any stylesheet: the insert configuration option is exactly what helps us achieve our primary goal. Great news! Let’s add it to our configuration.
...
{
  loader: 'style-loader',
  options: {
    insert: 'frankenstein-header-wrapper'
  }
}
However, not everything is so smooth here with a couple of things to keep in mind.
Global stylesheets and insert option of style-loader
If you check documentation for this option, you notice, that this option takes one selector per configuration. This means that if you have several Alien components requiring global styles pulled into a Frankenstein wrapper, you have to specify style-loader for each of the Frankenstein wrappers. In practice, this means that you, probably, have to rely on oneOf rule in your configuration block to serve to all wrappers.
{
  test: /\/react\//,
  oneOf: [
    {
      test: /1-TEST-FOR-ALIEN-FILE-PATH$/,
      use: [
        {
          loader: 'style-loader',
          options: {
            insert: '1-frankenstein-wrapper'
          }
        },
        `css-loader`
      ]
    },
    {
      test: /2-TEST-FOR-ALIEN-FILE-PATH$/,
      use: [
        {
          loader: 'style-loader',
          options: {
            insert: '2-frankenstein-wrapper'
          }
        },
        `css-loader`
      ]
    },
    // etc.
  ],
}
Not very flexible, I agree. Nevertheless, it’s not a big deal as long as you don’t have hundreds of components to migrate. Otherwise, it might make your Webpack configuration hard to maintain. The real problem, however, is that we can not write a CSS selector for Shadow DOM.
Trying to solve this, we might note that the insert option can also take a function instead of a plain selector to specify more advanced logic for insertion. With this, we can use this option to insert stylesheets straight into Shadow DOM! In simplified form it might look similar to this:
insert: function(element) {
  var parent = document.querySelector('frankenstein-header-wrapper').shadowRoot;
  parent.insertBefore(element, parent.firstChild);
}
Tempting, isn’t it? However, this won’t work for our scenario or will work far from optimal. Our <frankenstein-header-wrapper> is indeed available from index.html (because we added it in Step 5.2). But when Webpack processes all dependencies (incl. the stylesheets) for either an Alien component or a Frankenstein wrapper, Shadow DOM is not yet initialized in the Frankenstein wrapper: imports are processed before that. Hence, pointing insert straight to shadowRoot will result in an error.
There is only one case when we can guarantee that Shadow DOM is initialized before Webpack processes our stylesheet dependency. If Alien component does not import a stylesheet itself and it becomes up to Frankenstein wrapper to import it, we might employ dynamic import and import the required stylesheet after we set up Shadow DOM:
this.attachShadow({ mode: "open" });
import('../vue/node_modules/todomvc-app-css/index.css');
This will work: such import, combined with the insert configuration above, will indeed find correct Shadow DOM and insert <style> tag into it. Nevertheless, getting and processing stylesheet will take time, which means your users on a slow connection or slow devices might face a moment of the unstyled component before your stylesheet gets on its place within wrapper’s Shadow DOM.

So all in all, even though insert accepts function, unfortunately, it’s not enough for us, and we have to fall back to plain CSS selectors like frankenstein-header-wrapper. This doesn’t place stylesheets into Shadow DOM automatically, however, and the stylesheets reside in <frankenstein-header-wrapper> outside of Shadow DOM.

style-loader puts imported stylesheet into the Frankenstein wrapper, but outside of Shadow DOM. (Large preview)
We need one more piece of the puzzle.
Wrapper configuration for global stylesheets & Shadow DOM
Luckily, the fix is quite straightforward on the wrapper’s side: when Shadow DOM gets initialized, we need to check for any pending stylesheets in the current wrapper and pull them into Shadow DOM.
The current state of the global stylesheet’s import is as follows:
- We import a stylesheet that has to be added into Shadow DOM. The stylesheet can be imported in either the Alien component itself or, explicitly in the Frankenstein wrapper. In the case of migration to React, for example, the import is initialized from the wrapper. However, in migration to Vue, the similar component itself imports the required stylesheet, and we don’t have to import anything in the wrapper.
- As pointed out above, when Webpack processes
.cssimports for the Alien component, thanks to theinsertoption ofstyle-loader, the stylesheets get injected into a Frankenstein wrapper, but outside of Shadow DOM.
Simplified initialization of Shadow DOM in Frankenstein wrapper, should currently (before we pull in any stylesheets) look similar to this:
this.attachShadow({ mode: "open" });
ReactDOM.render(); // or `new Vue()`
Now, to avoid flickering of the unstyled component, what we need to do now is pull in all the required stylesheets after initialization of the Shadow DOM, but before the Alien component’s rendering.
this.attachShadow({ mode: "open" });

Array.prototype.slice
  .call(this.querySelectorAll("style"))
  .forEach(style => {
    this.shadowRoot.prepend(style);
  });

ReactDOM.render(); // or new Vue({})
It was a long explanation with a lot of details, but mainly, all it takes to pull in global stylesheets into Shadow DOM:
- In Webpack configuration add
style-loaderwithinsertoption pointing to required Frankenstein wrapper. - In the wrapper itself, pull in “pending” stylesheets after initialization of Shadow DOM, but before the Alien component’s rendering.
After implementing these changes, your component should have everything it needs. The only thing you might want (this is not a requirement) to add is some custom CSS to fine-tune an Alien component in Host’s environment. You might even style your Alien component completely different when used in Host. It goes beyond the main point of the article, but you look at the final code for the wrapper, where you can find examples of how to override simple styles on the wrapper level.
You can also take a look at the Webpack configuration at this step of migration:
- Migration to React with styled-components
- Migration to React with CSS Modules
- Migration to Vue
And finally, our components look exactly as we intended them to look like.

5.5. Summary of fixing styles for the Alien component
This is a great moment to sum up what we have learned in this chapter so far. It might look like we had to do enormous work to fix styling of the Alien component; however, it all boils down to:
- Fixing bundled styles implemented with styled-components in React or CSS modules and Scoped CSS in Vue is as simple as a couple of lines in Frankenstein wrapper or Webpack configuration.
- Fixing styles, implemented with CSS Modules, starts with just one line in
css-loaderconfiguration. After that, CSS Modules are treated as a global stylesheet. - Fixing global stylesheets requires configuring
style-loaderpackage withinsertoption in Webpack, and updating Frankenstein wrapper to pull in the stylesheets into Shadow DOM at the right moment of the wrapper’s lifecycle.
After all, we have got properly styled Alien component migrated into the Host. There is just one thing that might or might not bother you depending on what framework you migrate to, however.
Good news first: If you’re migrating to Vue, the demo should be working just fine, and you should be able to add new to-do items from migrated Vue component. However, if you’re migrating to React, and try to add a new to-do item, you won’t succeed. Adding new items simply doesn’t work, and no entries are added to the list. But why? What’s the problem? No prejudice, but React has its own opinions on some things.
5.6. React And JS Events In Shadow DOM
No matter what React documentation tells you, React is not very friendly to Web Components. The simplicity of the example in the documentation doesn’t stand any criticism, and anything more complicated than rendering a link in Web Component requires some research and investigation.
As you have seen while fixing the styling for our Alien component, contrary to Vue where things fit Web Components nearly out of the box, React is not that Web Components-ready. For now, we have an understanding of how to make React components at least look good within Web Components, but there is also functionality and JavaScript events to fix.
Long story short: Shadow DOM encapsulates events and retargets them, while React does not support this behavior of Shadow DOM natively and hence does not catch events coming from within Shadow DOM. There are deeper reasons for this behavior, and there is even an open issue in React’s bug tracker if you want to dive into more details and discussions.
Luckily, smart people prepared a solution for us. @josephnvu provided the basis for the solution, and Lukas Bombach converted it into react-shadow-dom-retarget-events npm module. So you can install the package, follow instructions on the packages’ page, update your wrapper’s code and your Alien component will magically start working:
import retargetEvents from 'react-shadow-dom-retarget-events';
...
ReactDOM.render(
  ...
);
retargetEvents(this.shadowRoot);
If you want to have it more performant, you can make a local copy of the package (MIT license allows that) and limit the number of events to listen to as it is done in Frankenstein Demo repository. For this example, I know what events I need to retarget and specify only those.
With this, we are finally (I know it was a long process) done with proper migration of the first styled and fully-functional Alien component. Get yourself a good drink. You deserve it!
6. Rinse & Repeat For All Of Your Components
After we migrated the first component, we should repeat the process for all of our components. In the case of Frankenstein Demo, there is only one left, however: the one, responsible for rendering the listing of to-do items.
New Wrappers For New Components
Let’s start with adding a new wrapper. Following the naming convention, discussed above (since our React component is called MainSection.js), the corresponding wrapper in migration to React should be called MainSection-wrapper.js. At the same time, a similar component in Vue is called Listing.vue, hence the corresponding wrapper in the migration to Vue should be called Listing-wrapper.js. However, no matter the naming convention, the wrapper itself is going to be nearly identical to the one we already have:
There is just one interesting thing we introduce in this second component in React application. Sometimes, for that or another reason, you might want to use some jQuery plugin in your components. In case of our React component, we introduced two things:
- Tooltip plugin from Bootstrap that uses jQuery,
- A toggle for CSS classes like
.addClass()and.removeClass().
Note: This use of jQuery for adding/removing classes is purely illustrative. Please don’t use jQuery for this scenario in real projects — rely on plain JavaScript instead.
Of course, it might look weird to introduce jQuery in an Alien component when we migrate away from jQuery, but your Host might be different from the Host in this example — you might migrate away from AngularJS or anything else. Also, jQuery functionality in a component and global jQuery are not necessarily the same thing.
However, the problem is that even if you confirm that component works just fine in the context of your Alien application, when you put it into Shadow DOM, your jQuery plugins and other code that rely on jQuery just won’t work.
jQuery In Shadow DOM
Let’s take a look at a general initialization of a random jQuery plugin:
$('.my-selector').fancyPlugin();
This way, all elements with .my-selector are going to be processed by fancyPlugin. This form of initialization assumes that .my-selector is present in global DOM. However, once such an element is put into Shadow DOM, just like with styles, shadow boundaries prevent jQuery from sneaking into it. As a result, jQuery can not find elements within Shadow DOM.
The solution is to provide an optional second parameter to the selector that defines the root element for jQuery to search from. And this is, where we can supply our shadowRoot.
$('.my-selector', this.shadowRoot).fancyPlugin();
This way, jQuery selectors and, as a result, the plugins will work just fine.
Keep in mind though that the Alien components are intended to be used both: in Alien without shadow DOM, and in Host within Shadow DOM. Hence we need a more unified solution that would not assume the presence of Shadow DOM by default.
Analyzing MainSection component in our React application, we find that it sets documentRoot property.
...
this.documentRoot = this.props.root? this.props.root: document;
...
So, we check for passed root property, and if it exists, this is what we use as documentRoot. Otherwise, we fall back to document.
Here is the initialize of the tooltip plugin that uses this property:
$('[data-toggle="tooltip"]', this.documentRoot).tooltip({
  container: this.props.root || 'body'
});
As a bonus, we use the same root property to define a container for injecting the tooltip in this case.
Now, when the Alien component is ready to accept the root property, we update rendering of the component in corresponding Frankenstein wrapper:
// `appWrapper` is the root element within wrapper’s Shadow DOM.
ReactDOM.render(<MainApp root={ appWrapper } />, appWrapper);
And that’s it! The component works as fine in Shadow DOM as it does in the global DOM.
Webpack configuration for multi-wrappers scenario
The exciting part is happening in Webpack’s configuration when using several wrappers. Nothing changes for the bundled styles like those CSS Modules in Vue components, or styled-components in React. However, global styles should get a little twist now.
Remember, we said that style-loader (responsible for injecting global stylesheets into correct Shadow DOM) is inflexible as it takes just one selector at a time for its insert option. This means that we should split the .css rule in Webpack to have one sub-rule per wrapper using oneOf rule or similar, if you’re on a bundler other than Webpack.
It’s always easier to explain by using an example, so let’s talk about the one from migration to Vue this time (the one in migration to React, however, is nearly identical):
...
oneOf: [
  {
    issuer: /Header/,
    use: [
      {
        loader: 'style-loader',
        options: {
          insert: 'frankenstein-header-wrapper'
        }
      },
      ...
    ]
  },
  {
    issuer: /Listing/,
    use: [
      {
        loader: 'style-loader',
        options: {
          insert: 'frankenstein-listing-wrapper'
        }
      },
      ...
    ]
  },
]
...
I have excluded css-loader as its configuration is the same in all cases. Let’s talk about style-loader instead. In this configuration, we insert <style> tag into either *-header-* or *-listing-*, depending on the name of the file requesting that stylesheet (issuer rule in Webpack). But we have to remember that the global stylesheet required for rendering an Alien component might be imported in two places:
- The Alien component itself,
- A Frankenstein wrapper.
And here, we should appreciate the naming convention for wrappers, described above, when the name of an Alien component and a corresponding wrapper match. If, for example, we have a stylesheet, imported in a Vue component called Header.vue, it gets to correct *-header-* wrapper. At the same time, if we, instead, import the stylesheet in the wrapper, such stylesheet follows precisely the same rule if the wrapper is called Header-wrapper.js without any changes in the configuration. Same thing for the Listing.vue component and its corresponding wrapper Listing-wrapper.js. Using this naming convention, we reduce the configuration in our bundler.
After all of your components migrated, it’s time for the final step of the migration.
7. Switch To Alien
At some point, you find out that the components you identified at the very first step of the migration, are all replaced with Frankenstein wrappers. No jQuery application is left really and what you have is, essentially, the Alien application that is glued together using the means of Host.
For example, the content part of index.html in the jQuery application — after migration of both microservices — looks something like this now:
<section class="todoapp">
  <frankenstein-header-wrapper></frankenstein-header-wrapper>
  <frankenstein-listing-wrapper></frankenstein-listing-wrapper>
</section>
At this moment, there is no point in keeping our jQuery application around: instead, we should switch to Vue application and forget about all of our wrappers, Shadow DOM and fancy Webpack configurations. To do this, we have an elegant solution.
Let’s talk about HTTP requests. I will mention Apache configuration here, but this is just an implementation detail: doing the switch in Nginx or anything else should be as trivial as in Apache.
Imagine that you have your site served from the /var/www/html folder on your server. In this case, your httpd.conf or httpd-vhost.conf should have an entry that points to that folder like:
DocumentRoot "/var/www/html"
To switch your application after the Frankenstein migration from jQuery to React, all you need to do is update the DocumentRoot entry to something like:
DocumentRoot "/var/www/html/react/build"
Build your Alien application, restart your server, and your application is served directly from the Alien’s folder: the React application served from the react/ folder. However, the same is true for Vue, of course, or any other framework you have migrated too. This is why it is so vital to keep Host and Alien completely independent and functional at any point in time because your Alien becomes your Host at this step.
Now you can safely remove everything around your Alien’s folder, including all the Shadow DOM, Frankenstein wrappers and any other migration-related artifact. It was a rough path at moments, but you have migrated your site. Congratulations!
Conclusion
We definitely went through somewhat rough terrain in this article. However, after we started with a jQuery application, we have managed to migrate it to both Vue and React. We have discovered some unexpected and not-so-trivial issues along the way: we had to fix styling, we had to fix JavaScript functionality, introduce some bundler configurations, and so much more. However, it gave us a better overview of what to expect in real projects. In the end, we have got a contemporary application without any remaining bits from the jQuery application even though we had all the rights to be skeptical about the end result while the migration was in progress.

Frankenstein Migration is neither a silver bullet nor should it be a scary process. It’s just the defined algorithm, applicable to a lot of projects, that helps to transform projects into something new and robust in a predictable manner.