Build Customizer Settings Faster by Using the Kirki Framework in Your Project

Kirki is a free open-source (MIT-licensed) framework built for developers who are looking to add Customizer Controls to their themes or plugins.

Aristeides Stathopoulos, Kirki’s lead developer has been working on the framework since 2014. Thanks to the continuous updates and improvements, Kirki has built a community on Github which includes over 1000 stars and 300 forks.

Before Kirki I never touched the customizer. Kirki helped me to understand the customizer and do a lot in less time!

LebCit – WordPress Theme Developer

WordPress Core Customizer Controls

WordPress Core includes a handful of basic Customizer Controls by default. For example: text, textarea, checkbox, radio, select, dropdown-pages, email, URL, number, hidden, and date controls.

Kirki supports the Core Controls too, plus around twenty more. Generally speaking, the Kirki controls cover the more advanced use-cases. For example:

  • Typography
  • Color Palettes
  • TinyMCE Editor
  • Sortable Fields

Kirki also offers functionality not available in Core WordPress, such as the auto-generation of your CSS output and postMessage scripts. These features, which we’ll look at later in this article, can easily cut your development time in half.

Kirki is Slow

One criticism commonly held against Kirki is that it’s slow. In fact, this criticism is used against most frameworks (including WordPress). It makes sense, right? You are loading a lot of code you might never use.

In this case, the reality is that the opposite is true. Most of the time control panels built using Kirki will actually be faster than the same panels built with Core Controls.

This is because Kirki adds an optimization layer that isn’t built into WordPress.

When the Customizer is initialized WordPress instantly tries to load all the controls, even if they are within a section or panel and the user can’t interact with them yet. In comparison, Kirki postpones the loading until just before the user will be interacting with the control.

To see the effect of this in practice, let’s try adding 50 color controls using each method.

Core Method:

for ($i = 0; $i < 50; $i++){
	$wp_customize->add_setting( 'color_setting_hex_' . $i , array(
		'default' => '#0088CC'
	) );

	// add color picker control
	$wp_customize->add_control( new WP_Customize_Color_Control( $wp_customize, 'color_setting_hex_' . $i, array(
		'label' => 'Color Control',
		'section' => 'title_tagline',
		'settings' => 'color_setting_hex_' . $i,
	) ) );
}

With Kirki:

for ($i = 0; $i < 50; $i++) {
     Kirki::add_field( 'config_id', array(
         'type'        => 'color',
         'settings'    => 'color_setting_hex_' . $i,
         'label'       => __( 'Color Control', 'kirki' ),
         'section'     => 'title_tagline',
         'default'     => '#0088CC',
     ) );
 }

The results:

As you can see, the initial load speed is considerably faster when using Kirki. The code required to create the controls is more concise too.

Integrating Kirki Into Your Project

There are multiple ways to integrate the Kirki Framework into your project, the official documentation does a good job of explaining the different methods.

I recommend developers guide the user to install the plugin version of Kirki, rather than including the framework directly within your project’s code. This can be done using TGMPA or the script provided.

The reasoning behind taking the plugin route is that Kirki is frequently updated and improved. By installing the plugin version, your users will have instant access to bug fixes and security updates.

In contrast, when you include the framework as part of your project, users will only receive updates when you update your theme or plugin, which might be less frequently than is required.

Whichever method you use, be sure to check Kirki is initialized before you add your settings:

// Early exit if Kirki doesn’t exist.
if ( ! class_exists( 'Kirki' ) ) {
    return;
}

Fields

In the Core Method example, we first created a setting and then created a control for it. In most cases, the two are directly linked. Kirki simplifies the process and allows us to create a ‘Field’ instead. When a field is created, it builds the setting and control in the background for us.

Fields support all the control arguments you would expect (label, description, section, default), as well as some Kirki-specific arguments.

The ‘type’ argument allows you to choose one of Kirki’s 30 control types: https://kirki.org/docs/controls/

Sections

Customizer Sections allow you to group Controls together. WordPress has six built-in sections that you can add your controls too:

  • title_tagline – Site Identity
  • colors – Colors
  • header_image – Header Image
  • background_image – Background Image
  • static_front_page – Homepage Settings
  • custom_css – Additional CSS


Sections in Kirki work exactly the same as in Core, the Kirki::add_section() method is simply a wrapper for $wp_customize->add_section() and accepts the same parameters and arguments.

Kirki::add_section( 'section_id', array(
     'title'          => esc_html__( 'My Section', 'kirki' ),
     'description'    => esc_html__( 'My section description.', 'kirki' ),
 ) );

Panels

Panels allow you to create another level of hierarchy by grouping Sections together. WordPress Core has one built-in panel, which is ‘Menus’.

Again, the Kirki implementation is simply a wrapper for the Core functionality.

Kirki::add_panel( 'panel_id', array(
     'priority'    => 10,
     'title'       => esc_html__( 'My Panel', 'kirki' ),
     'description' => esc_html__( 'My panel description', 'kirki' ),
 ) );

‘transport’ => ‘auto’

Traditionally when creating Customizer Controls you have two options for the transport argument:

  • Refresh – Each time the user makes a change the preview pane is refreshed to show the changes. This can take a couple of seconds.
  • postMessage – Each time the user makes a change the preview pane is updated using Javascript which doesn’t require a refresh and is near-instant.

postMessage is undoubtedly the superior method for updating the previewer and should be used where possible. However, there is one downside, using postMessage means you need to create write custom JS code for each of your controls. A simple implementation looks something like this:

// Update the site title in real time...
wp.customize( 'blogname', function( value ) {
    value.bind( function( newval ) {
        $( '#site-title a' ).html( newval );
    } );
} );

When you have a lot of settings, this can quickly become repetitive.

This is where Kirki shines, it adds a third option: ‘transport’ => ‘auto’.

‘transport’ => ‘auto’ works together with another argument Kirki adds named ‘output’. When both values are defined, Kirki will auto-generate the postMessage scripts for you. Which means you get all the benefits of using postMessage without having to write any of the Javascript code.

A field using transport => ‘auto’ looks like this:

Kirki::add_field( ‘config_id’, array(
     'type'        => 'color',
     'settings'    => 'color_setting_hex',
     'label'       => __( 'Color Control', 'kirki' ),
     'section'     => ‘colors’,
     'default'     => '#0088CC',
     'transport'   => 'auto',
     'output' => array(
         array(
             'element'  => 'body',
             'property' => 'background-color',
         ),
     ),
 ) );

This time-saving feature of Kirki means that most of the time you will no longer need to write or enqueue your own postMessage scripts.

Frontend CSS Output

Another part of creating Customizer settings is generating the CSS output on the frontend. A simple example might look like this:

/**
 * Output the Customizer CSS to wp_head
 */
function wptavern_customizer_css() {
	$bg_color = get_theme_mod( 'color_setting_hex' );
	?>
	<style>
		body {
			background-color: <?php echo sanitize_hex_color( $bg_color ); ?>;
		}
	</style>
	<?php
}
add_action( 'wp_head', wptavern_customizer_css );

Like the postMessage example, writing this code can quickly become repetitive if you have a lot of settings.

Fortunately, ‘transport’ => ‘auto’ takes care of the frontend output for you too. Even in our simplified example, ‘transport’ => ‘auto’ has reduced the code we need to write by ~50%.

Conclusion

In this article, we’ve looked at just the basics of the Kirki Framework and two of its arguments, already we can see how it allows us to create Customizer Controls faster and without compromising on performance.

When you dive into Kirki you will quickly discover the wealth of functionality it adds on top of the Customize API. It’s no surprise that it’s in use on over 300,000 websites and a core part of some of the biggest WordPress themes on the market.

Optimizing Google Fonts Performance

Optimizing Google Fonts Performance

Optimizing Google Fonts Performance

Danny Cooper

It’s fair to say Google Fonts are popular. As of writing, they have been viewed over 29 trillion times across the web and it’s easy to understand why — the collection gives you access to over 900 beautiful fonts you can use on your website for free. Without Google Fonts you would be limited to the handful of “system fonts” installed on your user’s device.

System fonts or ‘Web Safe Fonts’ are the fonts most commonly pre-installed across operating systems. For example, Arial and Georgia are packaged with Windows, macOS and Linux distributions.

Like all good things, Google Fonts do come with a cost. Each font carries a weight that the web browser needs to download before they can be displayed. With the correct setup, the additional load time isn’t noticeable. However, get it wrong and your users could be waiting up to a few seconds before any text is displayed.

Google Fonts Are Already Optimized

The Google Fonts API does more than just provide the font files to the browser, it also performs a smart check to see how it can deliver the files in the most optimized format.

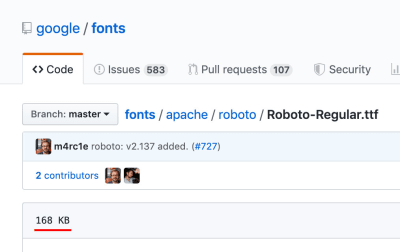
Let’s look at Roboto, GitHub tells us that the regular variant weighs 168kb.

Roboto Regular has a file size of 168kb
168kb for a single font variant. (Large preview)

However, if I request the same font variant from the API, I’m provided with this file. Which is only 11kb. How can that be?

When the browser makes a request to the API, Google first checks which file types the browser supports. I’m using the latest version of Chrome, which like most browsers supports WOFF2, so the font is served to me in that highly compressed format.

If I change my user-agent to Internet Explorer 11, I’m served the font in the WOFF format instead.

Finally, if I change my user agent to IE8 then I get the font in the EOT (Embedded OpenType) format.

Google Fonts maintains 30+ optimized variants for each font and automatically detects and delivers the optimal variant for each platform and browser.

— Ilya Grigorik, Web Font Optimization

This is a great feature of Google Fonts, by checking the user-agent they are able to serve the most performant formats to browsers that support those, while still displaying the fonts consistently on older browsers.

Browser Caching

Another built-in optimization of Google Fonts is browser caching.

Due to the ubiquitous nature of Google Fonts, the browser doesn’t always need to download the full font files. SmashingMagazine, for example, uses a font called ‘Mija’, if this is the first time your browser has seen that font, it will need to download it completely before the text is displayed, but the next time you visit a website using that font, the browser will use the cached version.

As the Google Fonts API becomes more widely used, it is likely visitors to your site or page will already have any Google fonts used in your design in their browser cache.

— FAQ, Google Fonts

The Google Fonts browser cache is set to expire after one year unless the cache is cleared sooner.

Note: Mija isn’t a Google Font, but the principles of caching aren’t vendor-specific.

Further Optimization Is Possible

While Google invests great effort in optimizing the delivery of the font files, there are still optimizations you can make in your implementation to reduce the impact on page load times.

1. Limit Font Families

The easiest optimization is to simply use fewer font families. Each font can add up to 400kb to your page weight, multiply that by a few different font families and suddenly your fonts weigh more than your entire page.

I recommend using no more than two fonts, one for headings and another for content is usually sufficient. With the right use of font-size, weight, and color you can achieve a great look with even one font.

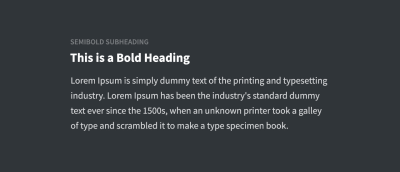
Example showing three weights of a single font family (Source Sans Pro)
Three weights of a single font family (Source Sans Pro). (Large preview)

2. Exclude Variants

Due to the high-quality standard of Google Fonts, many of the font families contain the full spectrum of available font-weights:

  • Thin (100)
  • Thin Italic (100i)
  • Light (300)
  • Light Italic (300i)
  • Regular (400)
  • Regular Italic (400i)
  • Medium (600)
  • Medium Italic (600i)
  • Bold (700)
  • Bold Italic (700i)
  • Black (800)
  • Black Italic (800i)

That’s great for advanced use-cases which might require all 12 variants, but for a regular website, it means downloading all 12 variants when you might only need 3 or 4.

For example, the Roboto font family weighs ~144kb. If however you only use the Regular, Regular Italic and Bold variants, that number comes down to ~36kb. A 75% saving!

The default code for implementing Google Fonts looks like this:

<link href="https://fonts.googleapis.com/css?family=Roboto" rel="stylesheet">

If you do that, it will load only the ‘regular 400’ variant. Which means all light, bold and italic text will not be displayed correctly.

To instead load all the font variants, we need to specify the weights in the URL like this:

<link href="https://fonts.googleapis.com/css?family=Roboto:100,100i,300,300i,400,400i,500,500i,700,700i,900,900i" rel="stylesheet">

It’s rare that a website will use all variants of a font from Thin (100) to Black (900), the optimal strategy is to specify just the weights you plan to use:

<link href="https://fonts.googleapis.com/css?family=Roboto:400,400i,600" rel="stylesheet">

This is especially important when using multiple font families. For example, if you are using Lato for headings, it makes sense to only request the bold variant (and possibly bold italic):

<link href="https://fonts.googleapis.com/css?family=Lato:700,700i" rel="stylesheet">

3. Combine Requests

The code snippet we worked with above makes a call to Google’s servers (fonts.googleapis.com), that’s called an HTTP request. Generally speaking, the more HTTP requests your web page needs to make, the longer it will take to load.

If you wanted to load two fonts, you might do something like this:

<link href="https://fonts.googleapis.com/css?family=Open+Sans:400,400i,600" rel="stylesheet">
<link href="https://fonts.googleapis.com/css?family=Roboto" rel="stylesheet">

That would work, but it would result in the browser making two requests. We can optimize that by combining them into a single request like this:

<link href="https://fonts.googleapis.com/css?family=Roboto|Open+Sans:400,400i,600" rel="stylesheet">

There is no limit to how many fonts and variants a single request can hold.

4. Resource Hints

Resource hints are a feature supported by modern browsers which can boost website performance. We are going to take a look at two types of resource hint: ‘DNS Prefetching’ and ‘Preconnect’.

Note: If a browser doesn’t support a modern feature, it will simply ignore it. So your web page will still load normally.

DNS Prefetching

DNS prefetching allows the browser to start the connection to Google’s Fonts API (fonts.googleapis.com) as soon as the page begins to load. This means that by the time the browser is ready to make a request, some of the work is already done.

To implement DNS prefetching for Google Fonts, you simply add this one-liner to your web pages <head>:

<link rel="dns-prefetch" href="//fonts.googleapis.com">
Preconnect

If you look at the Google Fonts embed code it appears to be a single HTTP request:

<link href="https://fonts.googleapis.com/css?family=Roboto:400,400i,700" rel="stylesheet">

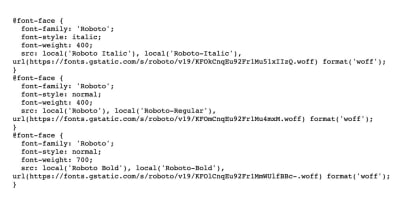
However, if we visit that URL we can see there are three more requests to a different URL, https://fonts.gstatic.com. One additional request for each font variant.

Source code of a Google Fonts Request
(View source) (Large preview)

The problem with these additional requests is that the browser won’t begin the processes to make them until the first request to https://fonts.googleapis.com/css is complete. This is where Preconnect comes in.

Preconnect could be described as an enhanced version of prefetch. It is set on the specific URL the browser is going to load. Instead of just performing a DNS lookup, it also completes the TLS negotiation and TCP handshake too.

Just like DNS Prefetching, it can be implemented with one line of code:

<link rel="preconnect" href="https://fonts.gstatic.com/" crossorigin>

Just adding this line of code can reduce your page load time by 100ms. This is made possible by starting the connection alongside the initial request, rather than waiting for it to complete first.

5. Host Fonts Locally

Google Fonts are licensed under a ‘Libre’ or ‘free software’ license, which gives you the freedom to use, change and distribute the fonts without requesting permission. That means you don’t need to use Google’s hosting if you don’t want to — you can self-host the fonts!

All of the fonts files are available on Github. A zip file containing all of the fonts is also available (387MB).

Lastly, there is a helper service that enables you to choose which fonts you want to use, then it provides the files and CSS needed to do so.

There is a downside to hosting fonts locally. When you download the fonts, you are saving them as they are at that moment. If they are improved or updated, you won’t receive those changes. In comparison, when requesting fonts from the Google Fonts API, you are always served the most up-to-date version.

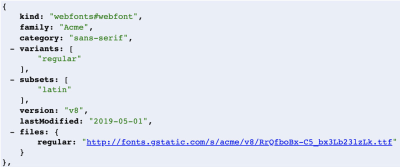
Google Fonts API Request showing a last modified date
Google Fonts API Request. (Large preview)

Note the lastModified parameter in the API. The fonts are regularly modified and improved.

6. Font Display

We know that it takes time for the browser to download Google Fonts, but what happens to the text before they are ready? For a long time, the browser would show blank space where the text should be, also known as the "FOIT” (Flash of Invisible Text).

Recommended Reading: FOUT, FOIT, FOFT” by Chris Coyier

Showing nothing at all can be a jarring experience to the end user, a better experience would be to initially show a system font as a fallback and then “swap” the fonts once they are ready. This is possible using the CSS font-display property.

By adding font-display: swap; to the @font-face declaration, we tell the browser to show the fallback font until the Google Font is available.

    @font-face {
    font-family: 'Roboto';
    src: local('Roboto Thin Italic'),
  url(https://fonts.gstatic.com/s/roboto/v19/KFOiCnqEu92Fr1Mu51QrEz0dL-vwnYh2eg.woff2)
  format('woff2');
    font-display: swap;
  }

In 2019 Google, announced they would add support for font-display: swap. You can begin implementing this right away by adding an extra parameter to the fonts URL:

https://fonts.googleapis.com/css?family=Roboto&display=swap

7. Use the Text Parameter

A little known feature of the Google Fonts API is the text parameter. This rarely-used parameter allows you to only load the characters you need.

For example, if you have a text-logo that needs to be a unique font, you could use the text parameter to only load the characters used in the logo.

It works like this:

https://fonts.googleapis.com/css?family=Roboto&text=CompanyName

Obviously, this technique is very specific and only has a few realistic applications. However, if you can use it, it can cut down the font weight by up to 90%.

Note: When using the text parameter, only the “normal” font-weight is loaded by default. To use another weight you must explicitly specify it in the URL.

https://fonts.googleapis.com/css?family=Roboto:700&text=CompanyName

Wrapping Up

With an estimated 53% of the top 1 million websites using Google Fonts, implementing these optimizations can have a huge impact.

How many of the above have you tried? Let me know in the comments section.

Smashing Editorial (dm, yk, il)

The Most Common WordPress Theme Development Mistakes (and How to Fix Them)

Submitting a theme to the WordPress.org theme directory is a great way to share your work and contribute to the WordPress community. Currently, there are over 7000 themes in the directory, the most popular of which exceeds 300,000 active installations. (Not including Twenty____ Themes which are packaged with WordPress and have install counts in the millions.)

Before submitting your theme to the directory, it’s important to understand the review process first because if your theme doesn’t meet those requirements it can be rejected on the spot.

Themes that have 3 or more distinct issues may be closed as not-approved. However, theme authors may resubmit the theme once they’ve corrected the issues.

https://make.wordpress.org/themes/handbook/review/required/

Reviewers are on your side and want to see your theme go live, once it meets the standards required. If your theme has only minor issues preventing it being included in the directory, your reviewer will work with you to fix those.

Unfortunately, if your theme has too many issues it will be closed as not-approved. If you decide to fix the issues you can upload the theme again – but it will join the back of the queue.

From my experience reviewing over 100 themes I’ve been able to identify the most common issues that prevent themes being approved. By sharing these with you in this article I’m hoping I can help you avoid getting stuck in the queue or rejected.

Uploading Your Theme

When you upload a theme, it joins the queue to be reviewed. On average it will take two months for your theme to reach the front of the queue and receive its first review. All reviewers are volunteers with limited time available to complete reviews. A variety of factors can affect the wait time. When more people volunteer to review themes, the queue moves quickly. Conversely, when themes with a lot of issues are submitted it slows down the queue.

By submitting a theme that meets all the requirements it makes the review process a lot smoother and ultimately your theme will be live sooner. In this guide, we are going to explore the most common issues that will keep your theme held up in the queue and prevent it from being approved.

Note: Theme authors that have a track record of submitting issue-free themes can apply to become ‘Trusted Authors‘.

Naming Issues

When you upload a theme, the first check that is performed is to see if the name is already taken. Frequently you will be told the name you’ve chosen is already taken, even if you can’t see a theme with that name in the directory.

How could that be? The reason is that the test isn’t checking against just the directory, it’s checking against the entire WordPress ecosystem. If a theme has been released anywhere (Github, ThemeForest, etc.) and has over 50 active installations, that name will be unavailable to use.

Note: if you’ve released your theme elsewhere and accumulated 50+ installations, you can still use that name in the directory.

Unescaped Output

Theme reviewers take security very seriously, there’s even a dedicated resource. An entire article could be written on writing secure themes, but in this section we are going to explore one aspect: escaping output.

Unescaped output places users of your theme at risk. Here’s an example of an unescaped value ($title):

$title = get_option( 'my_custom_title' );
echo '<h2>' . $title . '</h2>';

The problem with the above is that while we know what type of value $title should be, a string, we have not checked if that is the case.

If a hacker has managed to change the value of ‘my_custom_title’ in the database, your theme will output that value. This presents a huge risk as they could replace the intended output with inline Javascript:

    alert('This is dangerous'); 

The solution is to escape all output to ensure it only includes the type of data we are expecting.

Our example could be fixed like this:

$title = get_option( 'my_custom_title' );
echo '<h2>' . esc_html( $title ) . '</h2>';

The downside to using esc_html is that it strips all HTML tags. If $title included bold or italics, for example:

$title = 'This article is <strong>very</strong> useful';
echo esc_html( $title );

The word ‘very’ would not be bold on the frontend; instead it would output the code <strong>very</strong>.

This illustrates why it’s important to use the correct escaping functions for the context. If we were expecting some HTML in the output, we’d be better using wp_kses_post() or wp_kses() and setting the $allowed_html parameter.

Functions that output also need to be escaped:

<a href="<?php echo esc_url( get_permalink() ); ?>">

The exception is WordPress core functions that include ‘the_’ in their name, these are usually escaped already.

function the_permalink( $post = 0 ) {
    /**
     * Filters the display of the permalink for the current post.
     *
     * @since 1.5.0
     * @since 4.4.0 Added the `$post` parameter.
     *
     * @param string      $permalink The permalink for the current post.
     * @param int|WP_Post $post      Post ID, WP_Post object, or 0. Default 0.
     */
    echo esc_url( apply_filters( 'the_permalink', get_permalink( $post ), $post ) );
}

Untranslatable Text

To be accepted into the directory all themes must be 100% ‘translation-ready’. That means each text string your theme outputs must be translatable.

WordPress already has the systems and functionality to handle the translation process, you just need to make sure your strings use the correct functions.

While simple to implement, this is often overlooked as it goes against the flow of how people write HTML.

Normally, you might do something like this:

<h1>404 - Not Found</h1>

To make it translatable, you need to add in some PHP:

// __ functions are the basis of localization.
<h1><?php echo __( '404', 'text-domain' ); ?>

// _e functions echo the value.
<h1><?php _e( '404', 'text-domain' ); ?>

// Escape and echo the string.
<h1><?php esc_html_e( '404', 'text-domain' ); ?>

// localization and variables.
<h1><?php _n( 'One post', '%s posts', $count, 'text-domain' ); ?>

Strings output by functions must also be translation ready:

// not translation-ready :-(
<?php next_posts_link( 'Older Entries' ); ?>

// translation-ready :-)
<?php next_posts_link( esc_html__( 'Older Entries', ‘text-domain’ ) ); ?>

Tip: A lot of code examples in codex.wordpress.org don’t use the translation functions, so be careful when copy and pasting those.

Incorrectly Enqueuing Resources

The .css and .js files your theme uses must be enqueued using the correct functions: wp_enqueue_style() for CSS and wp_enqueue_script() for Javascript.

A common error is to hardcode scripts and styles directly into the <head> or before </body>. There are two problems to this approach:

1. Impossible to remove

If a plugin needs to remove a resource you have loaded, it’s not possible. If you had used the proper enqueue functions it could be done like so:

/**
 * Dequeue the theme javascript.
 *
 * Hooked to the wp_enqueue_scripts action, with a late priority (100),
 * so that it is after the script was enqueued.
 */
function wptavern_dequeue_script() {
   wp_dequeue_script( 'theme-scripts' );
}
add_action( 'wp_enqueue_scripts', 'wptavern_dequeue_script', 100 );

2. Duplicate Loading

If you enqueue a resource, jQuery for example, and a plugin also enqueues it, WordPress is smart enough to only load it once.

/**
 * Enqueue jQuery
 *
 * jQuery will only be loaded once, despite the two enqueues.
 * jQuery is packaged with WordPress so we don't need to specify a src. 
 */
function wptavern_enqueue_script() {
   wp_enqueue_script( 'jquery' );
   wp_enqueue_script( 'jquery' );
}
add_action( 'wp_enqueue_scripts', 'wptavern_enqueue_script' );

If instead you had hardcoded jQuery into your <head> then there would be no way for WordPress to know, and it would be loaded twice.

Plugin-Territory Functionality

The scope of a theme should only handle the design and aesthetic of a website, all other functionality should be handled by WordPress itself or plugins.

In an attempt to add more value to their themes, theme authors often try to incorporate extra functionality, for example, SEO controls or custom post types.

The problem with bundling functionality into a theme is that the data is not portable. Take SEO controls as an example, if the user changes the theme, they lose all the work they did to optimize their pages. In contrast by using an SEO plugin, the data and functionality is independent of the theme and will be retained when changing the theme.

Some examples of plugin-territory functionality:

  • Analytics/Tracking
  • SEO controls
  • Contact Forms
  • Shortcodes
  • Gutenberg Blocks

Tip: If your code writes to the database, it is highly likely to be plugin territory. The exception would be design-related settings (sidebar position, colors, etc.).

Not Prefixing

Prefixing is a way of ensuring that your code doesn’t clash with code from plugins. Namespacing in PHP is a better way to achieve the same effect. However, some users are still using old versions of PHP (5.2) which don’t support that feature.

Justin Tadlock shared a list of common things that should be prefixed:

  • PHP function names.
  • PHP class names.
  • PHP global variables.
  • Action/Filter hooks.
  • Script handles.
  • Style handles.
  • Image size names.

Source: https://themereview.co/prefix-all-the-things/

// function example.
my_prefix_example();

// class example.
class My_Prefix_Example { … }

// action and filter example.
do_action( 'my_prefix_action' );
apply_filters( 'my_prefix_filter', $values );

// enqueue examples.
wp_enqueue_script( 'my_prefix_script', get_template_directory_uri() . '/js/custom-script.js' );
wp_enqueue_style( 'my_prefix_style', get_template_directory_uri() . '/css/styles.css' );

// image size example.
add_image_size( 'my_prefix_image_size', 220, 180 ); // 220 pixels wide by 180 pixels tall.

Exception: When enqueuing third-party resources, don’t add a prefix:

 // enqueuing a third-party script (chosen.js).
 wp_enqueue_script( 'chosen', get_template_directory_uri() . '/js/chosen.js' );

Licensing Issues

Your theme and all of its files must be 100% GPL-compatible. This includes images, libraries, scripts, and fonts.

All third-party resources must list their source and license information.

This requirement can be particularly tricky as not all licenses are GPL-friendly. The Unsplash license only has one restriction:

“This license does not include the right to compile photos from Unsplash to replicate a similar or competing service.”

That one restriction, however, is enough to make it non-GPL-compatible, and as such, you won’t see Unsplash images included in wordpress.org themes.

A list of GPL-compatible licenses is available here – https://www.gnu.org/licenses/license-list.html#GPLCompatibleLicenses

Recently, stocksnap.io has been the most common source of images in the directory as all the images they list are licensed as CC0 (GPL-compatible).

Screenshot Mistakes

The requirements state that your screenshot should be an unedited representation of your theme that doesn’t look like an advertisement. That means no photoshop work, overlays, borders or fancy effects.

Images must also follow the same licensing requirements we explored above.

Bonus: Use a Coding Standard

Code that seems easy to read and understand for you, can be the complete opposite for a reviewer who only has 10-15 minutes to check your code.

While there is no requirement on coding standards, following one does make your code easier to read, understand and maintain. I personally use and recommend the ‘WordPress Coding Standards‘, though there are others.

Using PHP_CodeSniffer and the WordPress ruleset in your code editor can make adhering to a standard a lot easier – https://github.com/WordPress-Coding-Standards/WordPress-Coding-Standards

Conclusion

The Theme Requirements are created with the end user in mind. Avoid making the common mistakes I’ve listed above and your theme will be approved in no time. If you would like to experience the review process from the other side, you can even become a reviewer.