Response time is a big deal when it comes to web applications. Users demand instantaneous responses, no matter what your app may be doing. Whether it’s only displaying a person’s name or crunching numbers, web app users demand that your app responds to their command every single time. Sometimes that can be hard to achieve given the single-threaded nature of JavaScript. But in this article, we’ll learn how we can leverage the Web Worker API to deliver a better experience.
In writing this article, I made the following assumptions:
To be able to follow along, you should have at least some familiarity with JavaScript and the document API;
You should also have a working knowledge of React so that you can successfully start a new React project using Create React App.
If you need more insights into this topic, I’ve included a number of links in the “Further Resources” section to help you get up to speed.
First, let’s get started with Web Workers.
What Is A Web Worker?
To understand Web Workers and the problem they’re meant to solve, it is necessary to get a grasp of how JavaScript code is executed at runtime. During runtime, JavaScript code is executed sequentially and in a turn-by-turn manner. Once a piece of code ends, then the next one in line starts running, and so on. In technical terms, we say that JavaScript is single-threaded. This behavior implies that once some piece of code starts running, every code that comes after must wait for that code to finish execution. Thus, every line of code “blocks” the execution of everything else that comes after it. It is therefore desirable that every piece of code finish as quickly as possible. If some piece of code takes too long to finish our program would appear to have stopped working. On the browser, this manifests as a frozen, unresponsive page. In some extreme cases, the tab will freeze altogether.
Imagine driving on a single-lane. If any of the drivers ahead of you happen to stop moving for any reason, then, you have a traffic jam. With a program like Java, traffic could continue on other lanes. Thus Java is said to be multi-threaded. Web Workers are an attempt to bring multi-threaded behavior to JavaScript.
The screenshot below shows that the Web Worker API is supported by many browsers, so you should feel confident in using it.
Web Workers run in background threads without interfering with the UI, and they communicate with the code that created them by way of event handlers.
An excellent definition of a Web Worker comes from MDN:
“A worker is an object created using a constructor (e.g. Worker() that runs a named JavaScript file — this file contains the code that will run in the worker thread; workers run in another global context that is different from the current window. Thus, using the window shortcut to get the current global scope (instead of self within a Worker will return an error.”
A worker is created using the Worker constructor.
const worker = new Worker('worker-file.js')
It is possible to run most code inside a web worker, with some exceptions. For example, you can’t manipulate the DOM from inside a worker. There is no access to the document API.
Workers and the thread that spawns them send messages to each other using the postMessage() method. Similarly, they respond to messages using the onmessage event handler. It’s important to get this difference. Sending messages is achieved using a method; receiving a message back requires an event handler. The message being received is contained in the data attribute of the event. We will see an example of this in the next section. But let me quickly mention that the sort of worker we’ve been discussing is called a “dedicated worker”. This means that the worker is only accessible to the script that called it. It is also possible to have a worker that is accessible from multiple scripts. These are called shared workers and are created using the SharedWorker constructor, as shown below.
const sWorker = new SharedWorker('shared-worker-file.js')
To learn more about Workers, please see this MDN article. The purpose of this article is to get you started with using Web workers. Let’s get to it by computing the nth Fibonacci number.
Computing The Nth Fibonacci Number
Note:For this and the next two sections, I’m using Live Server on VSCode to run the app. You can certainly use something else.
This is the section you’ve been waiting for. We’ll finally write some code to see Web Workers in action. Well, not so fast. We wouldn’t appreciate the job a Web Worker does unless we run into the sort of problems it solves. In this section, we’re going to see an example problem, and in the following section, we’ll see how a web worker helps us do better.
Imagine you were building a web app that allowed users to calculate the nth Fibonacci number. In case you’re new to the term ‘Fibonacci number’, you can read more about it here, but in summary, Fibonacci numbers are a sequence of numbers such that each number is the sum of the two preceding numbers.
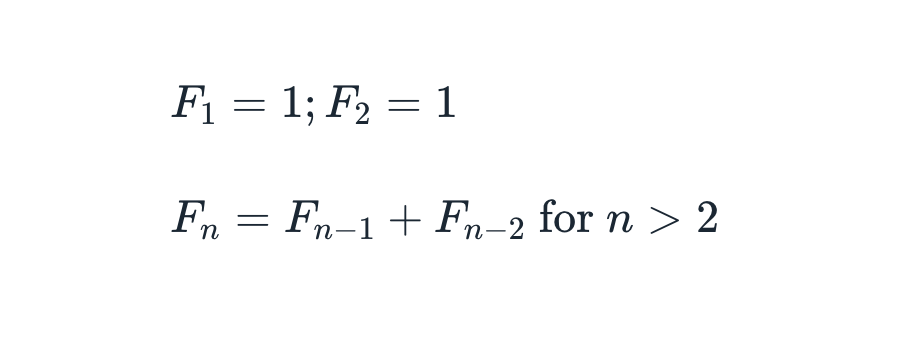
Mathematically, it is expressed as:
Thus the first few numbers of the sequence are:
1, 1, 2, 3, 5, 8, 13, 21, 34, 55, 89 ...
In some sources, the sequence starts at F0 = 0, in which case the formula below holds for n > 1:
In this article we’ll start at F1 = 1. One thing we can see right away from the formula is that the numbers follow a recursive pattern. The task at hand now is to write a recursive function to compute the nth Fibonacci number (FN).
After a few tries, I believe you can easily come up with the function below.
const fib = n => {
  if (n < 2) {
    return n // or 1
  } else {
    return fib(n - 1) + fib(n - 2)
  }
}
The function is simple. If n is less than 2, return n (or 1), otherwise, return the sum of the n-1 and n-2 FNs. With arrow functions and ternary operator, we can come up with a one-liner.
const fib = n => (n < 2 ? n : fib(n-1) + fib(n-2))
This function has a time complexity of 0(2n). This simply means that as the value of n increases, the time required to compute the sum increases exponentially. This makes for a really long-running task that could potentially interfere with our UI, for large values of n. Let’s see this in action.
Note: This is by no means the best way to solve this particular problem. My choice of using this method is for the purpose of this article.
To start, create a new folder and name it whatever you like. Now inside that folder create a src/ folder. Also, create an index.html file in the root folder. Inside the src/ folder, create a file named index.js.
Open up index.html and add the following HTML code.
This part is very simple. First, we have a heading. Then we have a container with an input and a button. A user would enter a number then click on “Calculate”. We also have a container to hold the result of the calculation. Lastly, we include the src/index.js file in a script tag.
You may delete the stylesheet link. But if you’re short on time, I have defined some CSS which you can use. Just create the styles.css file at the root folder and add the styles below:
Now open up src/index.js let’s slowly develop it. Add the code below.
const fib = (n) => (n < 2 ? n : fib(n - 1) + fib(n - 2));
const ordinal_suffix = (num) => {
// 1st, 2nd, 3rd, 4th, etc.
const j = num % 10;
const k = num % 100;
switch (true) {
case j === 1 && k !== 11:
return num + "st";
case j === 2 && k !== 12:
return num + "nd";
case j === 3 && k !== 13:
return num + "rd";
default:
return num + "th";
}
};
const textCont = (n, fibNum, time) => {
const nth = ordinal_suffix(n);
return <p id='timer'>Time: <span class='bold'>${time} ms</span></p>
<p><span class="bold" id='nth'>${nth}</span> fibonnaci number: <span class="bold" id='sum'>${fibNum}</span></p>;
};
Here we have three functions. The first one is the function we saw earlier for calculating the nth FN. The second function is just a utility function to attach an appropriate suffix to an integer number. The third function takes some arguments and outputs a markup which we will later insert in the DOM. The first argument is the number whose FN is being computed. The second argument is the computed FN. The last argument is the time it takes to perform the computation.
Still in src/index.js, add the below code just under the previous one.
const errPar = document.getElementById("error");
const btn = document.getElementById("submit-btn");
const input = document.getElementById("number-input");
const resultsContainer = document.getElementById("results-container");

btn.addEventListener("click", (e) => {
  errPar.textContent = '';
  const num = window.Number(input.value);

  if (num < 2) {
    errPar.textContent = "Please enter a number greater than 2";
    return;
  }

  const startTime = new Date().getTime();
  const sum = fib(num);
  const time = new Date().getTime() - startTime;

  const resultDiv = document.createElement("div");
  resultDiv.innerHTML = textCont(num, sum, time);
  resultDiv.className = "result-div";
  resultsContainer.appendChild(resultDiv);
});
First, we use the document API to get hold of DOM nodes in our HTML file. We get a reference to the paragraph where we’ll display error messages; the input; the calculate button and the container where we’ll show our results.
Next, we attach a “click” event handler to the button. When the button gets clicked, we take whatever is inside the input element and convert it to a number, if we get anything less than 2, we display an error message and return. If we get a number greater than 2, we continue. First, we record the current time. After that, we calculate the FN. When that finishes, we get a time difference that represents how long the computation took. In the remaining part of the code, we create a new div. We then set its inner HTML to be the output of the textCont() function we defined earlier. Finally, we add a class to it (for styling) and append it to the results container. The effect of this is that each computation will appear in a separate div below the previous one.
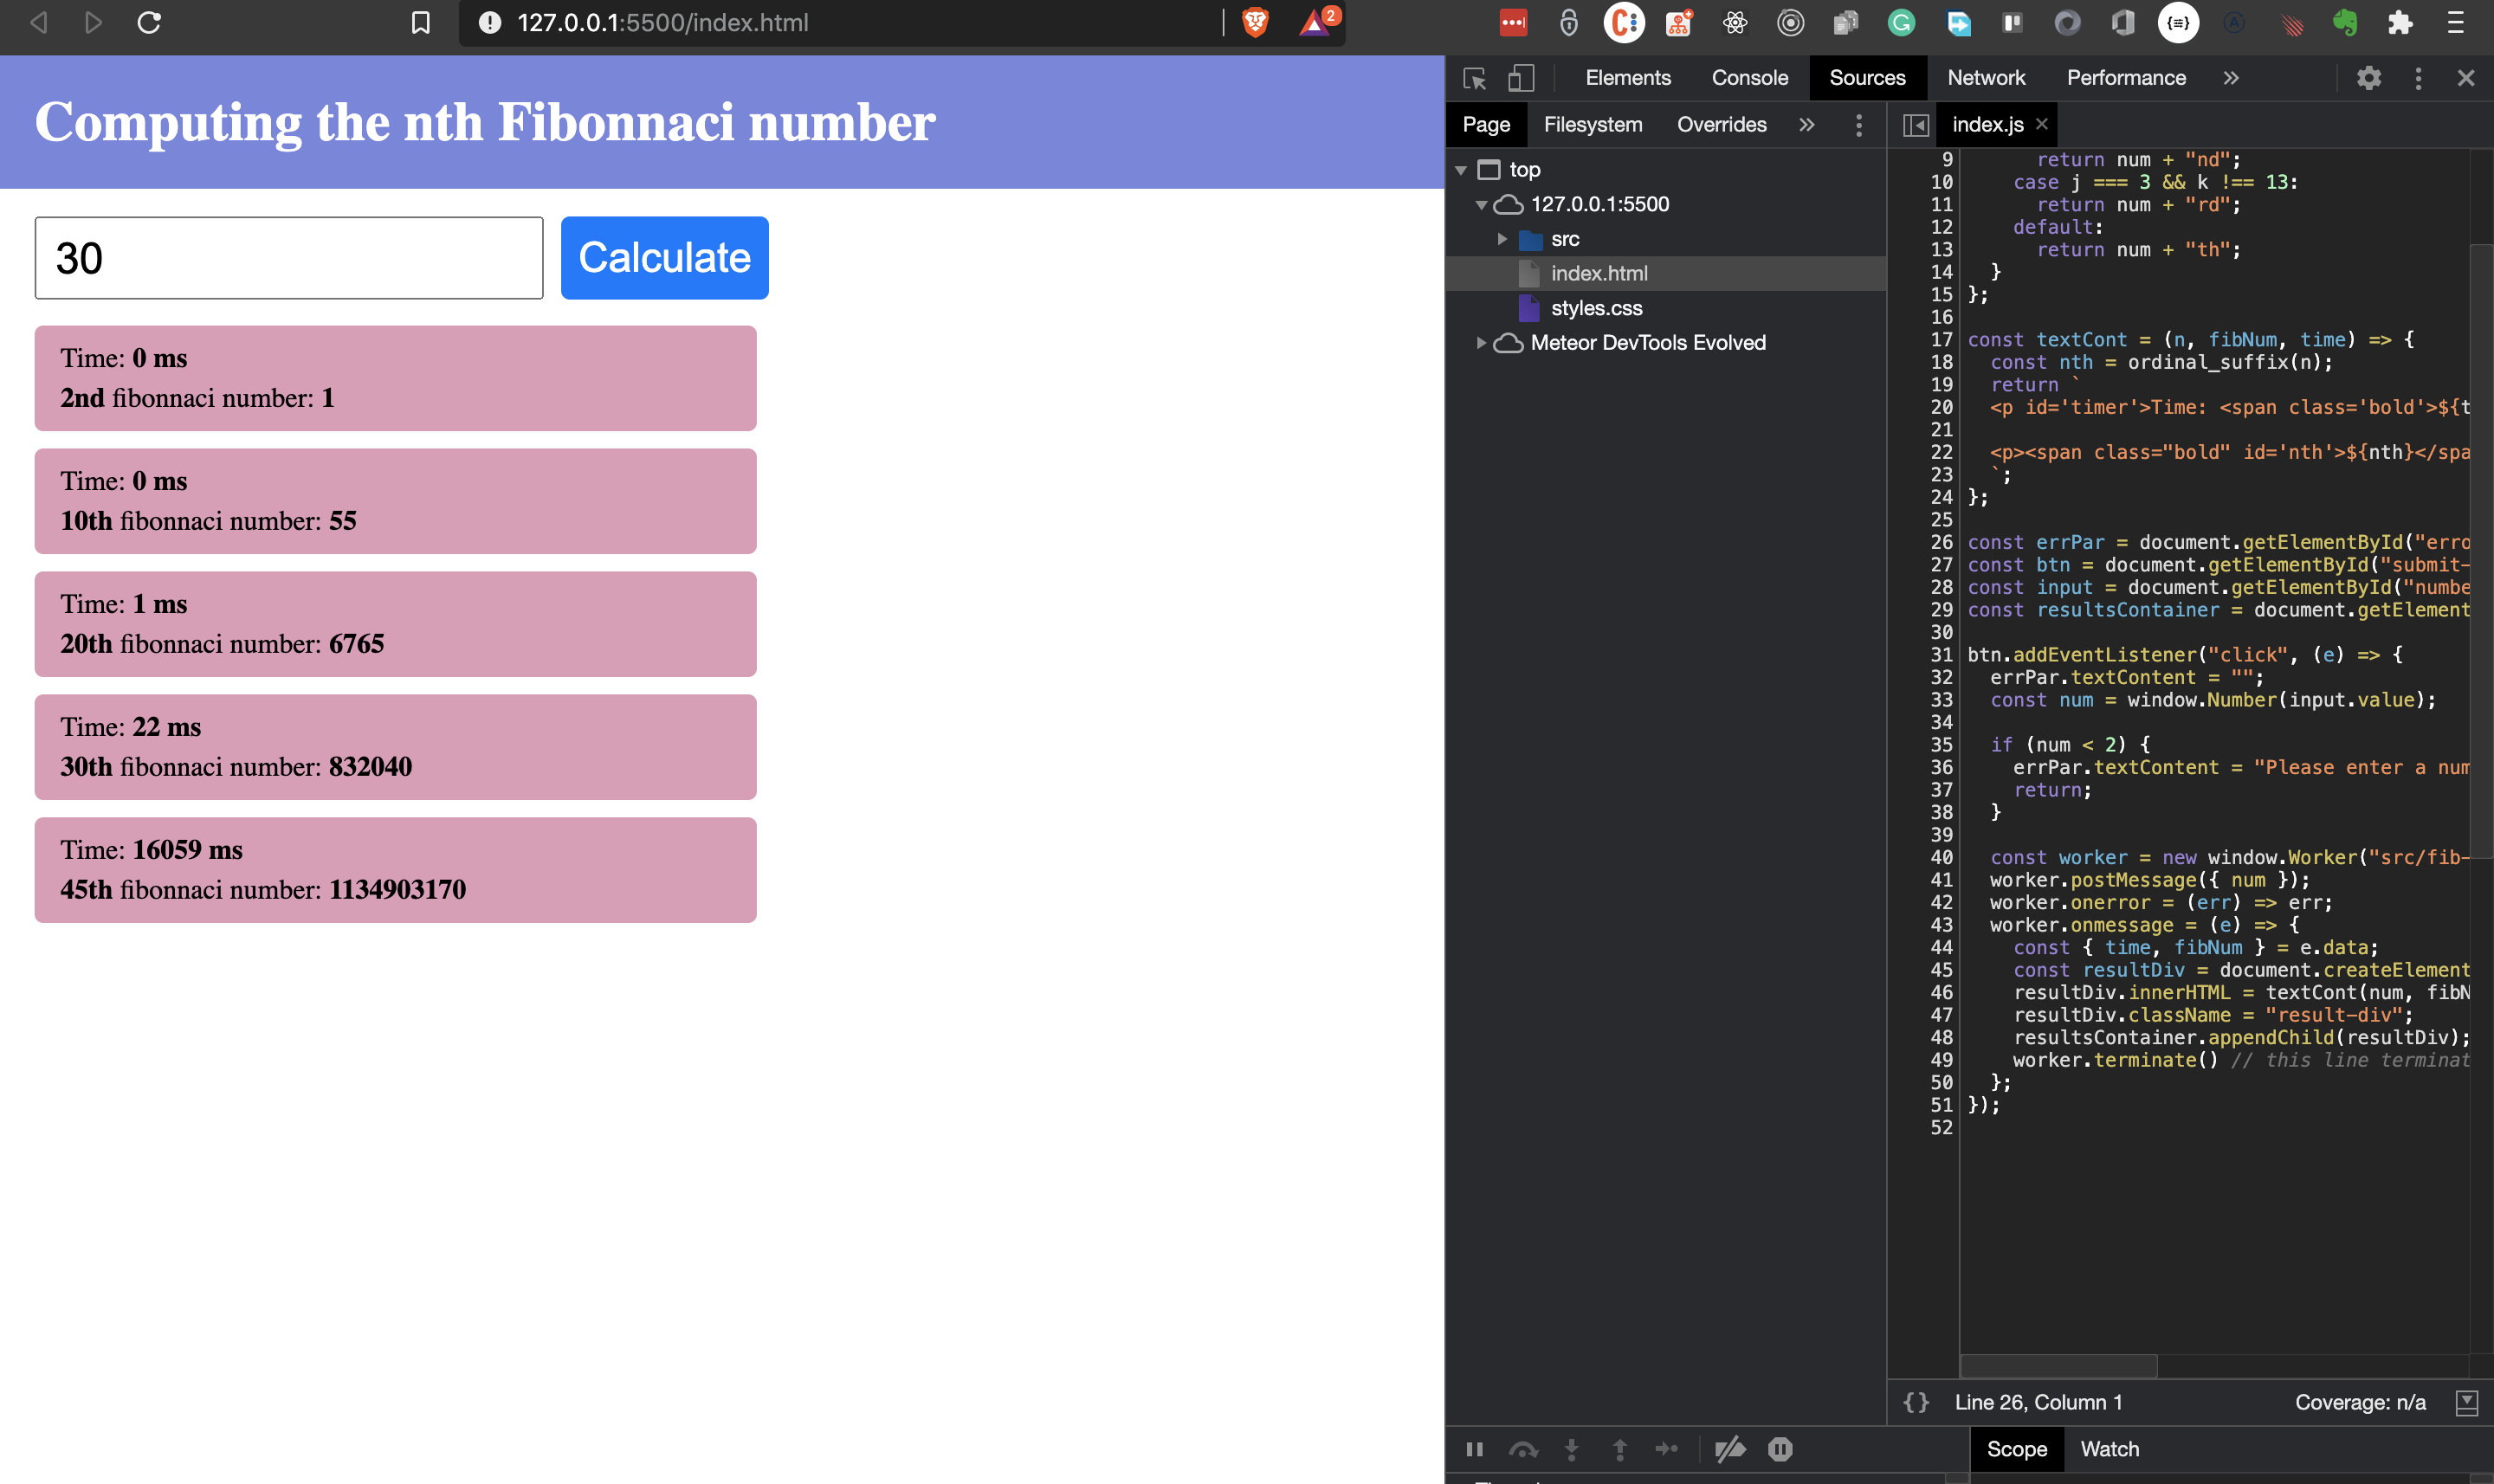
We can see that as the number increases, the computation time also increases (exponentially). For instance, from 30 to 35, we had the computation time jump from 13ms to 130ms. We can still consider those operations to be “fast”. At 40 we see a computation time of over 1 second. On my machine, this is where I start noticing the page become unresponsive. At this point, I can no longer interact with the page while the computation is on-going. I can’t focus on the input or do anything else.
Recall when we talked about JavaScript being single-threaded? Well, that thread has been “blocked” by this long-running computation, so everything else must “wait” for it to finish. It may start at a lower or higher value on your machine, but you’re bound to reach that point. Notice that it took almost 10s to compute that of 44. If there were other things to do on your web app, well, the user has to wait for Fib(44) to finish before they can continue. But if you deployed a web worker to handle that calculation, your users could carry on with something else while that runs.
Let’s now see how web workers help us overcome this problem.
An Example Web Worker In Action
In this section, we’ll delegate the job of computing the nth FN to a web worker. This will help free up the main thread and keep our UI responsive while the computation is on-going.
Getting started with web workers is surprisingly simple. Let’s see how. Create a new file src/fib-worker.js. and enter the following code.
Notice that we have moved the function that calculates the nth Fibonacci number, fib inside this file. This file will be run by our web worker.
Recall in the section What is a web worker, we mentioned that web workers and their parent communicate using the onmessage event handler and postMessage() method. Here we’re using the onmessage event handler to listen to messages from the parent script. Once we get a message, we destructure the number from the data attribute of the event. Next, we get the current time and start the computation. Once the result is ready, we use the postMessage() method to post the results back to the parent script.
Open up src/index.js let’s make some changes.
...

const worker = new window.Worker("src/fib-worker.js");

btn.addEventListener("click", (e) => {
  errPar.textContent = "";
  const num = window.Number(input.value);
  if (num < 2) {
    errPar.textContent = "Please enter a number greater than 2";
    return;
  }

  worker.postMessage({ num });
  worker.onerror = (err) => err;
  worker.onmessage = (e) => {
    const { time, fibNum } = e.data;
    const resultDiv = document.createElement("div");
    resultDiv.innerHTML = textCont(num, fibNum, time);
    resultDiv.className = "result-div";
    resultsContainer.appendChild(resultDiv);
  };
});
The first thing to do is to create the web worker using the Worker constructor. Then inside our button’s event listener, we send a number to the worker using worker.postMessage({ num }). After that, we set a function to listen for errors in the worker. Here we simply return the error. You can certainly do more if you want, like showing it in DOM. Next, we listen for messages from the worker. Once we get a message, we destructure time and fibNum, and continue the process of showing them in the DOM.
Note that inside the web worker, the onmessage event is available in the worker’s scope, so we could have written it as self.onmessage and self.postMessage(). But in the parent script, we have to attach these to the worker itself.
In the screenshot below you would see the web worker file in the sources tab of Chrome Dev Tools. What you should notice is that the UI stays responsive no matter what number you enter. This behavior is the magic of web workers.
We’ve made a lot of progress with our web app. But there’s something else we can do to make it better. Our current implementation uses a single worker to handle every computation. If a new message comes while one is running, the old one gets replaced. To get around this, we can create a new worker for each call to calculate the FN. Let’s see how to do that in the next section.
Working With Multiple Web Workers
Currently, we’re handling every request with a single worker. Thus an incoming request will replace a previous one that is yet to finish. What we want now is to make a small change to spawn a new web worker for every request. We will kill this worker once it’s done.
Open up src/index.js and move the line that creates the web worker inside the button’s click event handler. Now the event handler should look like below.
btn.addEventListener("click", (e) => {
  errPar.textContent = "";
  const num = window.Number(input.value);

  if (num < 2) {
    errPar.textContent = "Please enter a number greater than 2";
    return;
  }

  const worker = new window.Worker("src/fib-worker.js"); // this line has moved inside the event handler
  worker.postMessage({ num });
  worker.onerror = (err) => err;
  worker.onmessage = (e) => {
    const { time, fibNum } = e.data;
    const resultDiv = document.createElement("div");
    resultDiv.innerHTML = textCont(num, fibNum, time);
    resultDiv.className = "result-div";
    resultsContainer.appendChild(resultDiv);
    worker.terminate() // this line terminates the worker
  };
});
We made two changes.
We moved this line const worker = new window.Worker("src/fib-worker.js") inside the button’s click event handler.
We added this line worker.terminate() to discard the worker once we’re done with it.
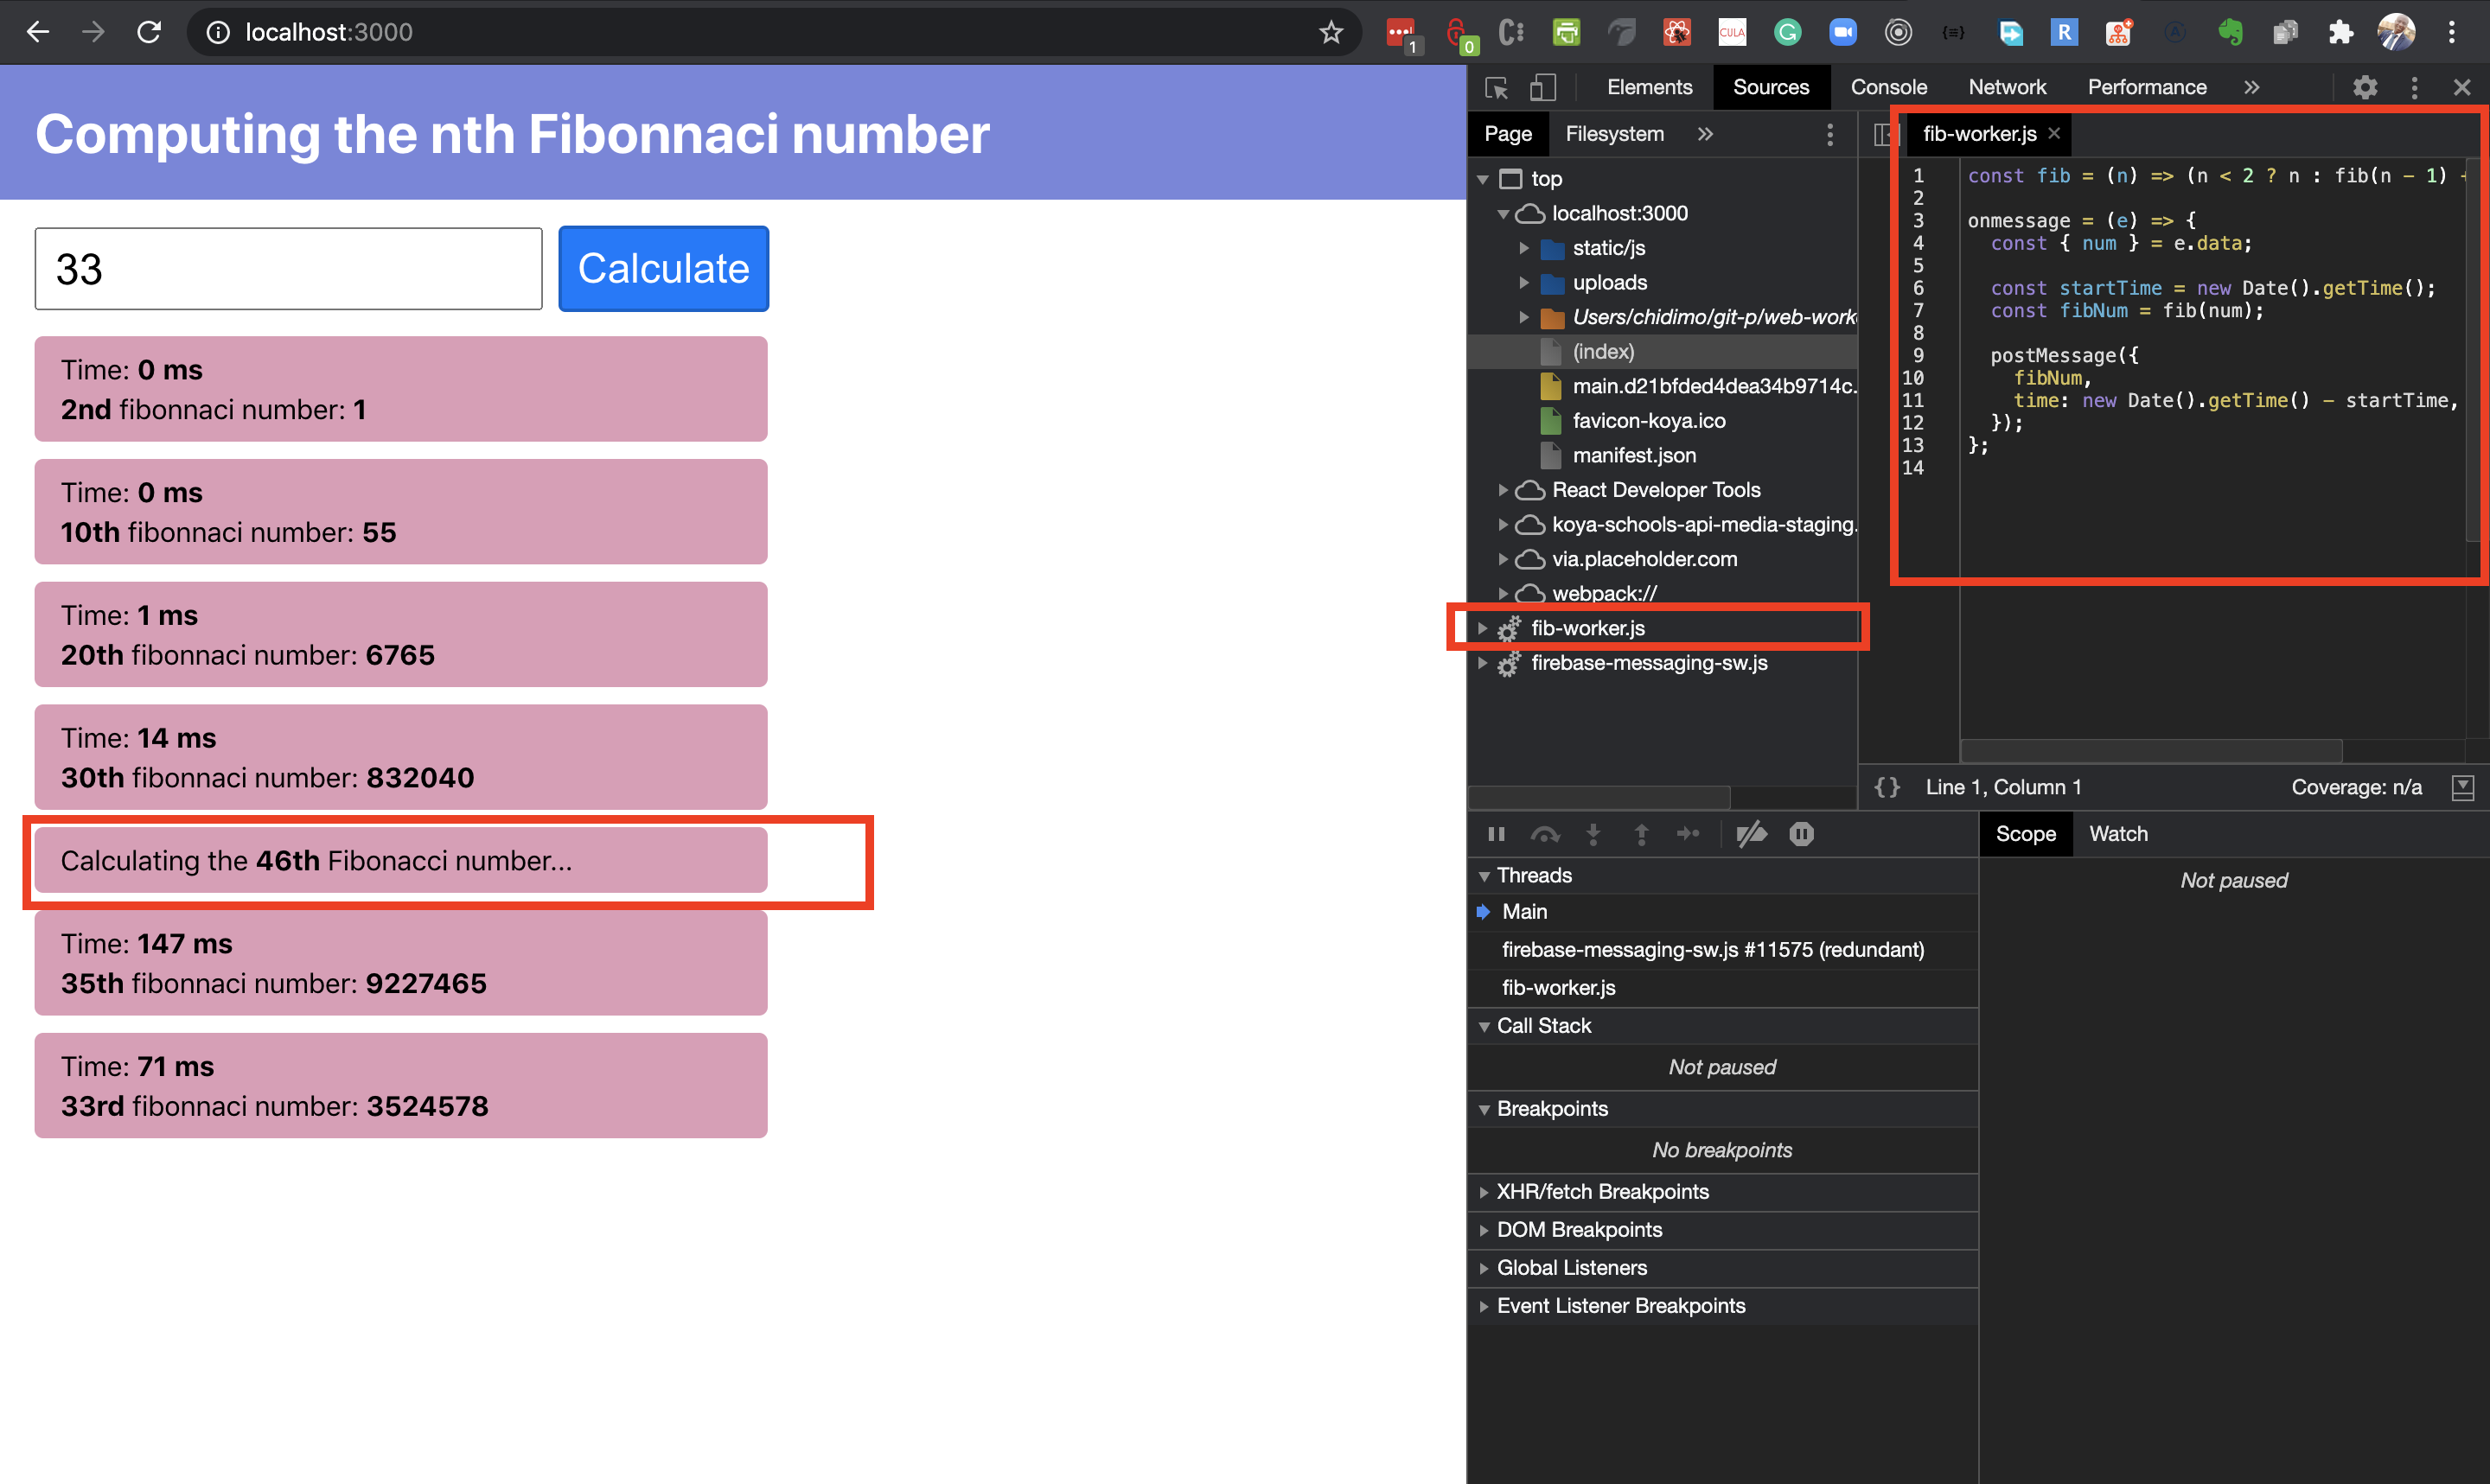
So for every click of the button, we create a new worker to handle the calculation. Thus we can keep changing the input, and each result will hit the screen once the computation finishes. In the screenshot below you can see that the values for 20 and 30 appear before that of 45. But I started 45 first. Once the function returns for 20 and 30, their results were posted, and the worker terminated. When everything finishes, we shouldn’t have any workers on the sources tab.
We could end this article right here, but if this were a react app, how would we bring web workers into it. That is the focus of the next section.
Web Workers In React
To get started, create a new react app using CRA. Copy the fib-worker.js file into the public/ folder of your react app. Putting the file here stems from the fact that React apps are single-page apps. That’s about the only thing that is specific to using the worker in a react application. Everything that follows from here is pure React.
In src/ folder create a file helpers.js and export the ordinal_suffix() function from it.
// src/helpers.js

export const ordinal_suffix = (num) => {
  // 1st, 2nd, 3rd, 4th, etc.
  const j = num % 10;
  const k = num % 100;
  switch (true) {
    case j === 1 && k !== 11:
      return num + "st";
    case j === 2 && k !== 12:
      return num + "nd";
    case j === 3 && k !== 13:
      return num + "rd";
    default:
      return num + "th";
  }
};
Our app will require us to maintain some state, so create another file, src/reducer.js and paste in the state reducer.
Let’s go over each action type one after the other.
SET_ERROR: sets an error state when triggered.
SET_NUMBER: sets the value in our input box to state.
SET_FIBO: adds a new entry to the array of computed FNs.
UPDATE_FIBO: here we look for a particular entry and replaces it with a new object which has the computed FN and the time taken to compute it.
We shall use this reducer shortly. Before that, let’s create the component that will display the computed FNs. Create a new file src/Results.js and paste in the below code.
With this change, we start the process of converting our previous index.html file to jsx. This file has one responsibility: take an array of objects representing computed FNs and display them. The only difference from what we had before is the introduction of a loading state. So now when the computation is running, we show the loading state to let the user know that something is happening.
Let’s put in the final pieces by updating the code inside src/App.js. The code is rather long, so we’ll do it in two steps. Let’s add the first block of code.
import React from "react";
import "./App.css";
import { ordinal_suffix } from "./helpers";
import { reducer } from './reducer'
import { Results } from "./Results";
function App() {
  const [info, dispatch] = React.useReducer(reducer, {
    err: "",
    num: "",
    computedFibs: [],
  });
  const runWorker = (num, id) => {
    dispatch({ type: "SET_ERROR", err: "" });
    const worker = new window.Worker('./fib-worker.js')
    worker.postMessage({ num });
    worker.onerror = (err) => err;
    worker.onmessage = (e) => {
      const { time, fibNum } = e.data;
      dispatch({
        type: "UPDATE_FIBO",
        id,
        time,
        fibNum,
      });
      worker.terminate();
    };
  };
  return (
    <div>
      <div className="heading-container">
        <h1>Computing the nth Fibonnaci number</h1>
      </div>
      <div className="body-container">
        <p id="error" className="error">
          {info.err}
        </p>

        // ... next block of code goes here ... //

        <Results results={info.computedFibs} />
      </div>
    </div>
  );
}
export default App;
As usual, we bring in our imports. Then we instantiate a state and updater function with the useReducer hook. We then define a function, runWorker(), that takes a number and an ID and sets about calling a web worker to compute the FN for that number.
Note that to create the worker, we pass a relative path to the worker constructor. At runtime, our React code gets attached to the public/index.html file, thus it can find the fib-worker.js file in the same directory. When the computation completes (triggered by worker.onmessage), the UPDATE_FIBO action gets dispatched, and the worker terminated afterward. What we have now is not much different from what we had previously.
In the return block of this component, we render the same HTML we had before. We also pass the computed numbers array to the <Results /> component for rendering.
Let’s add the final block of code inside the return statement.
        <div className="input-div">
          <input
            type="number"
            value={info.num}
            className="number-input"
            placeholder="Enter a number"
            onChange={(e) =>
              dispatch({
                type: "SET_NUMBER",
                num: window.Number(e.target.value),
              })
            }
          />
          <button
            id="submit-btn"
            className="btn-submit"
            onClick={() => {
              if (info.num < 2) {
                dispatch({
                  type: "SET_ERROR",
                  err: "Please enter a number greater than 2",
                });
                return;
              }
              const id = info.computedFibs.length;
              dispatch({
                type: "SET_FIBO",
                id,
                loading: true,
                nth: ordinal_suffix(info.num),
              });
              runWorker(info.num, id);
            }}
          >
            Calculate
          </button>
        </div>
We set an onChange handler on the input to update the info.num state variable. On the button, we define an onClick event handler. When the button gets clicked, we check if the number is greater than 2. Notice that before calling runWorker(), we first dispatch an action to add an entry to the array of computed FNs. It is this entry that will be updated once the worker finishes its job. In this way, every entry maintains its position in the list, unlike what we had before.
Finally, copy the content of styles.css from before and replace the content of App.css.
We now have everything in place. Now start up your react server and play around with some numbers. Take note of the loading state, which is a UX improvement. Also, note that the UI stays responsive even when you enter a number as high as 1000 and click “Calculate”.
Note the loading state and the active worker. Once the 46th value is computed the worker is killed and the loading state is replaced by the final result.
Phew! It has been a long ride, so let’s wrap it up. I encourage you to take a look at the MDN entry for web workers (see resources list below) to learn other ways of using web workers.
In this article, we learned about what web workers are and the sort of problems they’re meant to solve. We also saw how to implement them using plain JavaScript. Finally, we saw how to implement web workers in a React application.
I encourage you to take advantage of this great API to deliver a better experience for your users.
How To Test Your React Apps With The React Testing Library
How To Test Your React Apps With The React Testing Library
Chidi Orji
Today, we’ll briefly discuss why it’s important to write automated tests for any software project, and shed light on some of the common types of automated testing. We’ll build a to-do list app by following the Test-Driven Development (TDD) approach. I’ll show you how to write both unit and functional tests, and in the process, explain what code mocks are by mocking a few libraries. I’ll be using a combination of RTL and Jest — both of which come pre-installed in any new project created with Create-React-App (CRA).
To follow along, you need to know how to set up and navigate a new React project and how to work with the yarn package manager (or npm). Familiarities with Axios and React-Router are also required.
Best Practices With React
React is a fantastic JavaScript library for building rich user interfaces. It provides a great component abstraction for organizing your interfaces into well-functioning code, and there’s just about anything you can use it for. Read more articles on React →
Why You Should Test Your Code
Before shipping your software to end-users, you first have to confirm that it is working as expected. In other words, the app should satisfy its project specifications.
Just as it is important to test our project as a whole before shipping it to end-users, it’s also essential to keep testing our code during the lifetime of a project. This is necessary for a number of reasons. We may make updates to our application or refactor some parts of our code. A third-party library may undergo a breaking change. Even the browser that is running our web application may undergo breaking changes. In some cases, something stops working for no apparent reason — things could go wrong unexpectedly. Thus, it is necessary to test our code regularly for the lifetime of a project.
Broadly speaking, there are manual and automated software tests. In a manual test, a real user performs some action on our application to verify that they work correctly. This kind of test is less reliable when repeated several times because it’s easy for the tester to miss some details between test runs.
In an automated test, however, a test script is executed by a machine. With a test script, we can be sure that whatever details we set in the script will remain unchanged on every test run.
This kind of test gives us the benefits of being predictable and fast, such that we can quickly find and fix bugs in our code.
Having seen the necessity of testing our code, the next logical question is, what sort of automated tests should we write for our code? Let’s quickly go over a few of them.
Types Of Automated Testing
There are many different types of automated software testing. Some of the most common ones are unit tests, integration tests, functional tests, end-to-end tests, acceptance tests, performance tests, and smoke tests.
Unit test
In this kind of test, the goal is to verify that each unit of our application, considered in isolation, is working correctly. An example would be testing that a particular function returns an expected value, give some known inputs. We’ll see several examples in this article.
Smoke test
This kind of test is done to check that the system is up and running. For example, in a React app, we could just render our main app component and call it a day. If it renders correctly we can be fairly certain that our app would render on the browser.
Integration test
This sort of test is carried out to verify that two or more modules can work well together. For example, you might run a test to verify that your server and database are actually communicating correctly.
Functional test
A functional test exists to verify that the system meets its functional specification. We’ll see an example later.
End-to-end test
This kind of test involves testing the application the same way it would be used in the real world. You can use a tool like cypress for E2E tests.
Acceptance test
This is usually done by the business owner to verify that the system meets specifications.
Performance test
This sort of testing is carried out to see how the system performs under significant load. In frontend development, this is usually about how fast the app loads on the browser.
When it comes to testing React applications, there are a few testing options available, of which the most common ones I know of are Enzyme and React Testing Library (RTL).
RTL is a subset of the @testing-library family of packages. Its philosophy is very simple. Your users don’t care whether you use redux or context for state management. They care less about the simplicity of hooks nor the distinction between class and functional components. They just want your app to work in a certain way. It is, therefore, no surprise that the testing library’s primary guiding principle is
“The more your tests resemble the way your software is used, the more confidence they can give you.”
So, whatever you do, have the end-user in mind and test your app just as they would use it.
Choosing RTL gives you a number of advantages. First, it’s much easier to get started with it. Every new React project bootstrapped with CRA comes with RTL and Jest configured. The React docs also recommend it as the testing library of choice. Lastly, the guiding principle makes a lot of sense — functionality over implementation details.
With that out of the way, let’s get started with building a to-do list app, following the TDD approach.
Project Setup
Open a terminal and copy and run the below command.
# start new react project and start the server
npx create-react-app start-rtl && cd start-rtl && yarn start
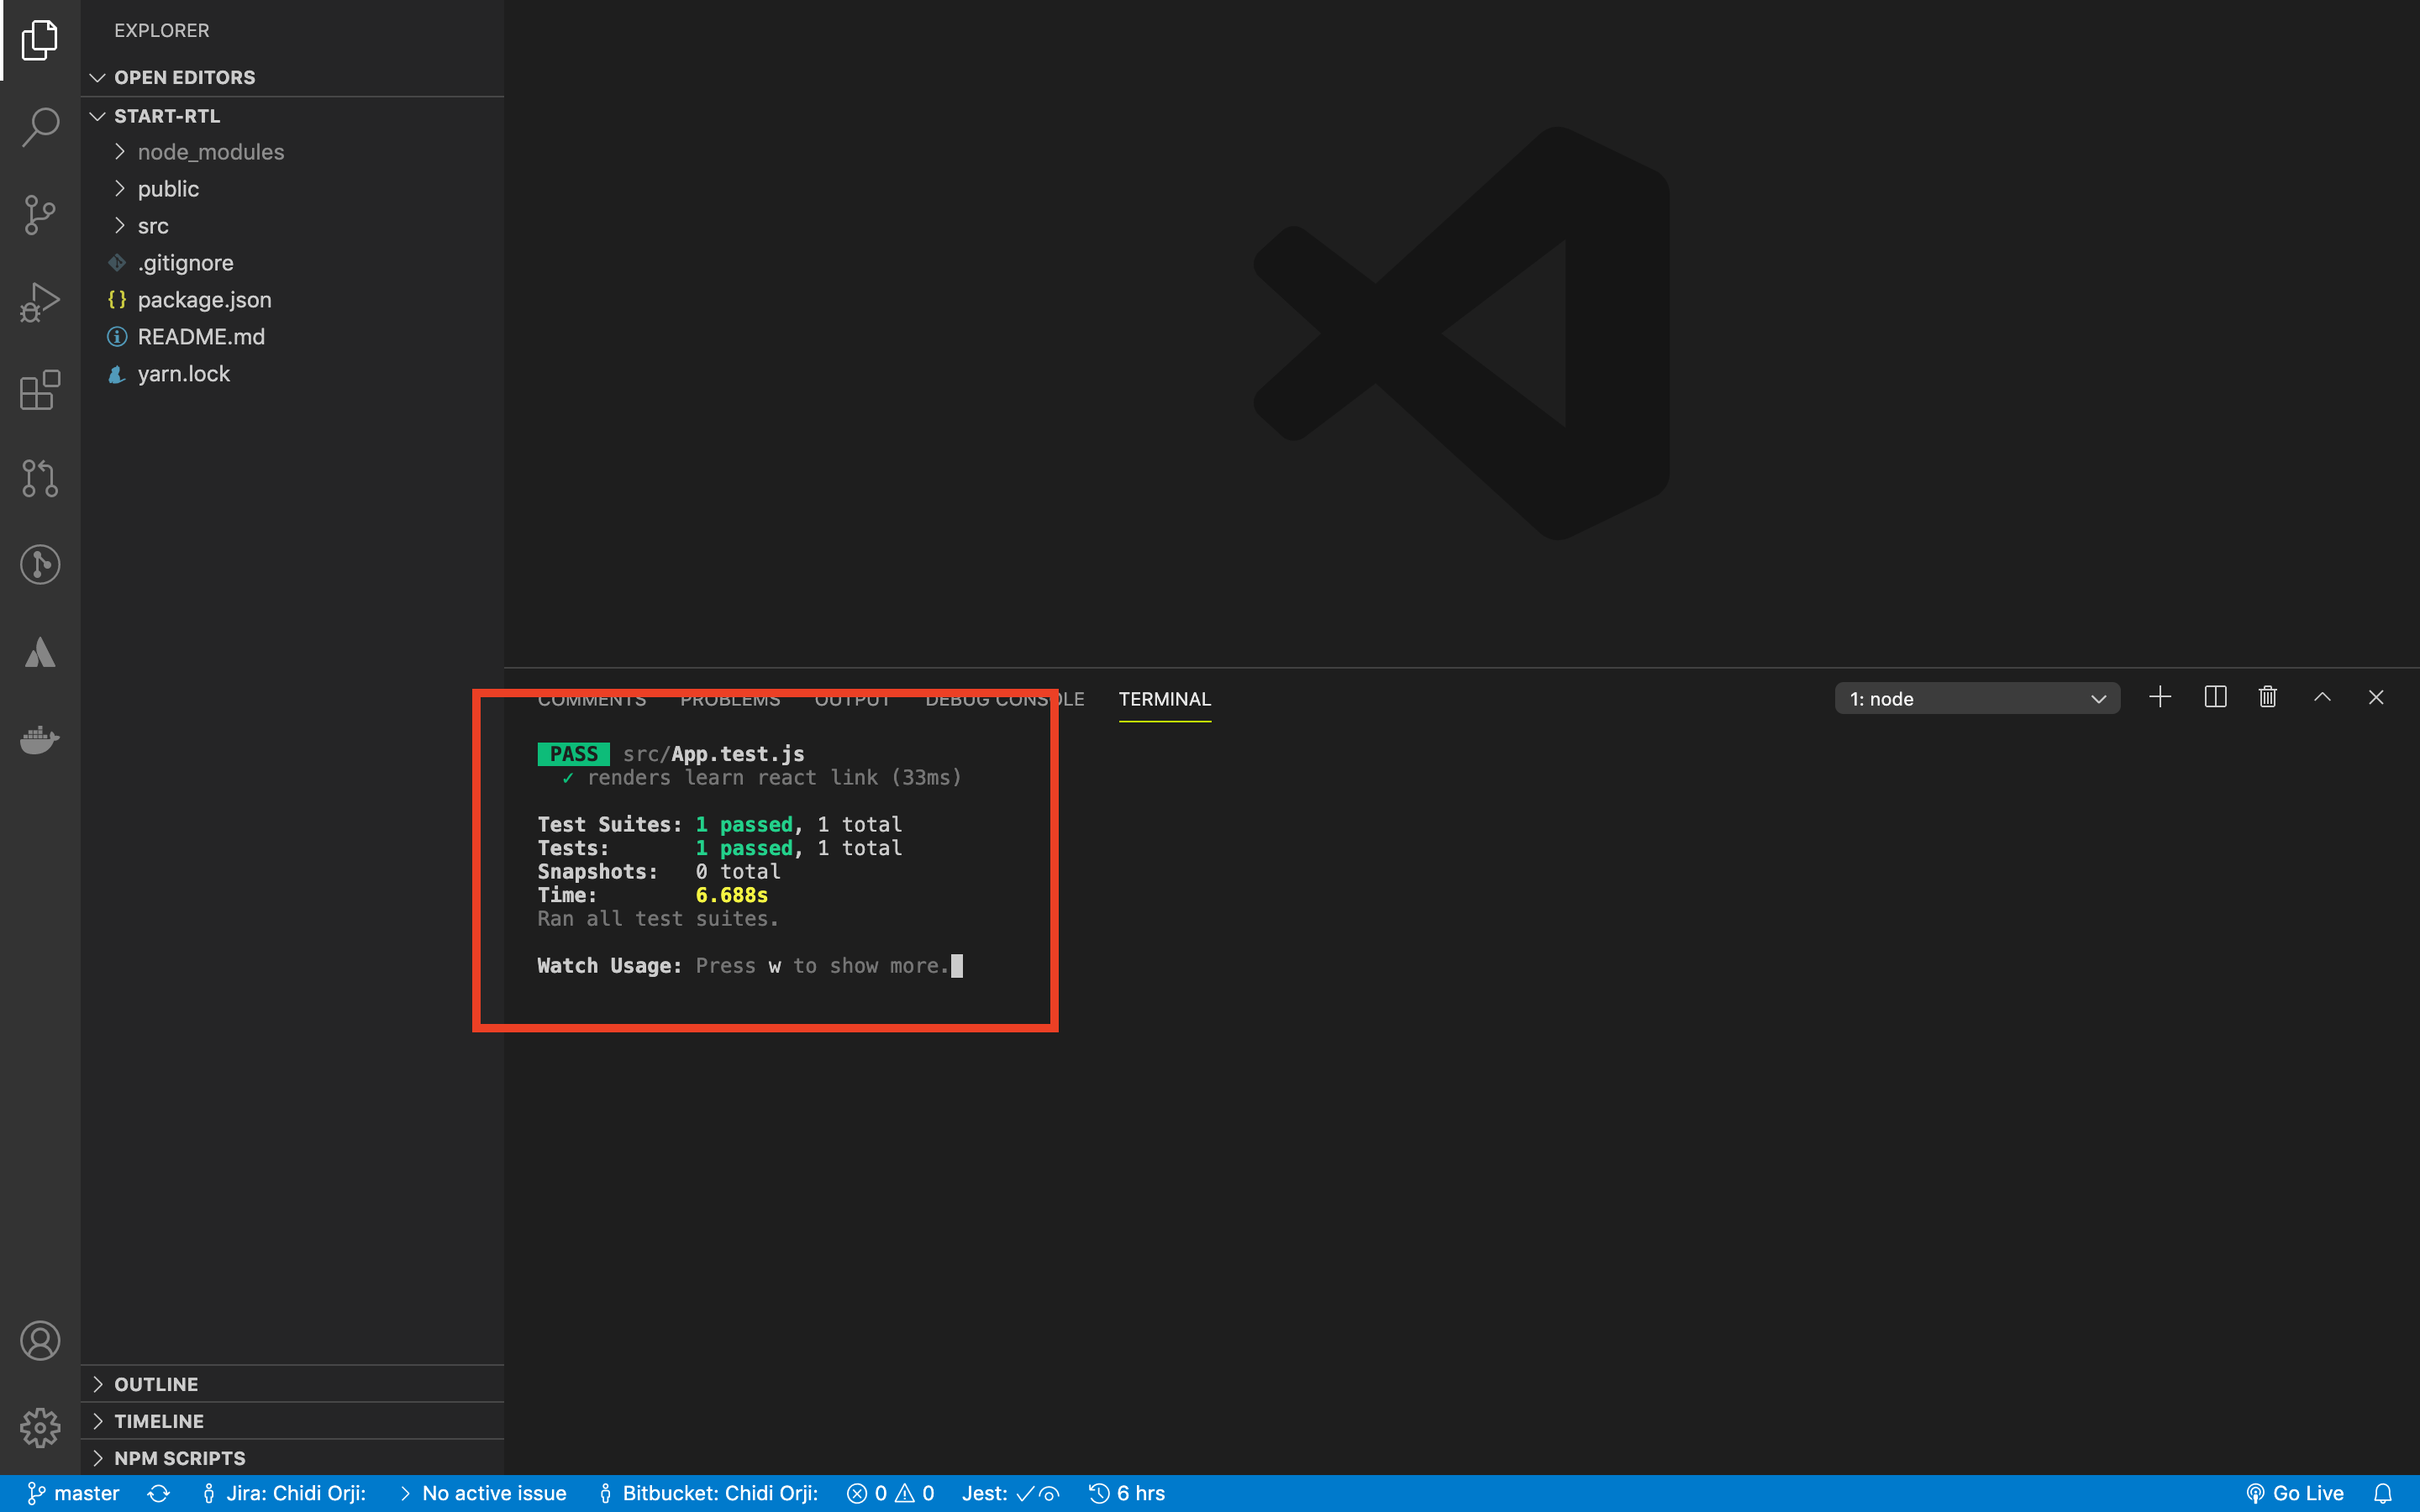
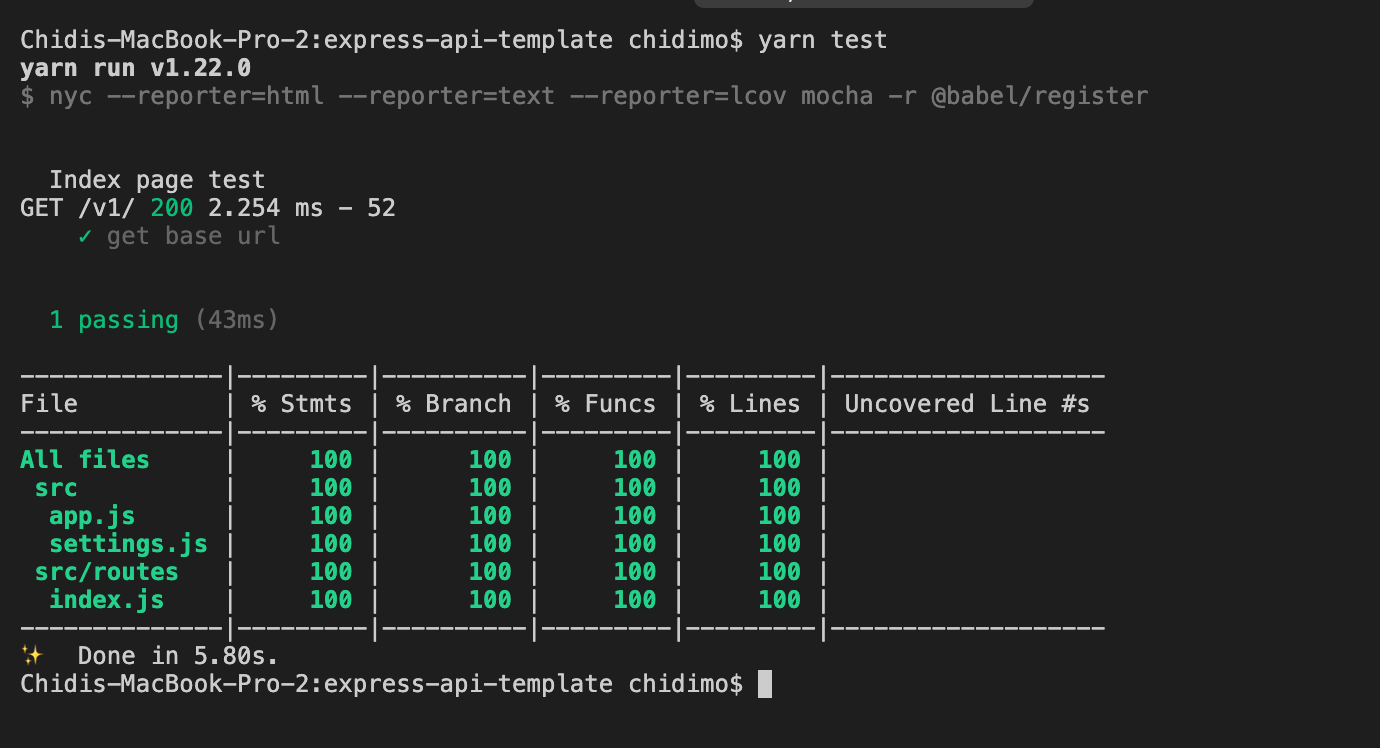
This should create a new React project and start the server on http://localhost:3000. With the project running, open a separate terminal, run yarn test and then press a. This runs all tests in the project in watch mode. Running the test in watch mode means that the test will automatically re-run when it detects a change in either the test file or the file that is being tested. On the test terminal, you should see something like the picture below:
You should see a lot of greens, which indicates that the test we’re running passed in flying colors.
As I mentioned earlier, CRA sets up RTL and Jest for every new React project. It also includes a sample test. This sample test is what we just executed.
When you run the yarn test command, react-scripts calls upon Jest to execute the test. Jest is a JavaScript testing framework that’s used in running tests. You won’t find it listed in package.json but you can do a search inside yarn.lock to find it. You can also see it in node_modules/.
Jest is incredible in the range of functionality that it provides. It provides tools for assertions, mocking, spying, etc. I strongly encourage you to take at least a quick tour of the documentation. There’s a lot to learn there that I cannot scratch in this short piece. We’ll be using Jest a lot in the coming sections.
Open package.json let’s see what we have there. The section of interest is dependencies.
The render method of RTL renders the <App /> component and returns an object which is de-structured for the getByText query. This query finds elements in the DOM by their display text. Queries are the tools for finding elements in the DOM. The complete list of queries can be found here. All of the queries from the testing library are exported by RTL, in addition to the render, cleanup, and act methods. You can read more about these in the API section.
The text is matched with the regular expression /learn react/i. The i flag makes the regular expression case-insensitive. We expect to find the text Learn React in the document.
All of this mimics the behavior a user would experience in the browser when interacting with our app.
Let’s start making the changes required by our app. Open App.js and replace the content with the below code.
import React from "react";
import "./App.css";
function App() {
  return (
    <div className="App">
      <header className="App-header">
        <h2>Getting started with React testing library</h2>
      </header>
    </div>
  );
}
export default App;
If you still have the test running, you should see the test fail. Perhaps you can guess why that is the case, but we’ll return to it a bit later. Right now I want to refactor the test block.
Replace the test block in src/App.test.js with the code below:
# use describe, it pattern
describe("<App />", () => {
  it("Renders <App /> component correctly", () => {
    const { getByText } = render(<App />);
    expect(getByText(/Getting started with React testing library/i)).toBeInTheDocument();
  });
});
This refactor makes no material difference to how our test will run. I prefer the describe and it pattern as it allows me structure my test file into logical blocks of related tests. The test should re-run and this time it will pass. In case you haven’t guessed it, the fix for the failing test was to replace the learn react text with Getting started with React testing library.
In case you don’t have time to write your own styles you can just copy the one below into App.css.
You should already see the page title move up after adding this CSS.
I consider this a good point for me to commit my changes and push to Github. The corresponding branch is 01-setup.
Let’s continue with our project setup. We know we’re going to need some navigation in our app so we need React-Router. We’ll also be making API calls with Axios. Let’s install both.
# install react-router-dom and axios
yarn add react-router-dom axios
Most React apps you’ll build will have to maintain state. There’s a lot of libraries available for managing state. But for this tutorial, I’ll be using React’s context API and the useContext hook. So let’s set up our app’s context.
Create a new file src/AppContext.js and enter the below content.
Here we create a new context with React.createContext({}), for which the initial value is an empty object. We then define an AppProvider component that accepts children component. It then wraps those children in AppContext.Provider, thus making the { appData, appDispatch } object available to all children anywhere in the render tree.
Our reducer function defines two action types.
LOAD_TODOLIST which is used to update the todoList array.
LOAD_SINGLE_TODO which is used to update activeToDoItem.
appData and appDispatch are both returned from the useReducer hook. appData gives us access to the values in the state while appDispatch gives us a function which we can use to update the app’s state.
Now open index.js, import the AppProvider component and wrap the <App /> component with <AppProvider />. Your final code should look like what I have below.
Wrapping <App /> inside <AppProvider /> makes AppContext available to every child component in our app.
Remember that with RTL, the aim is to test our app the same way a real user would interact with it. This implies that we also want our tests to interact with our app state. For that reason, we also need to make our <AppProvider /> available to our components during tests. Let’s see how to make that happen.
The render method provided by RTL is sufficient for simple components that don’t need to maintain state or use navigation. But most apps require at least one of both. For this reason, it provides a wrapper option. With this wrapper, we can wrap the UI rendered by the test renderer with any component we like, thus creating a custom render. Let’s create one for our tests.
Create a new file src/custom-render.js and paste the following code.
import React from "react";
import { render } from "@testing-library/react";
import { MemoryRouter } from "react-router-dom";

import { AppProvider } from "./AppContext";

const Wrapper = ({ children }) => {
  return (
    <AppProvider>
      <MemoryRouter>{children}</MemoryRouter>
    </AppProvider>
  );
};

const customRender = (ui, options) =>
  render(ui, { wrapper: Wrapper, ...options });

// re-export everything
export * from "@testing-library/react";

// override render method
export { customRender as render };
Here we define a <Wrapper /> component that accepts some children component. It then wraps those children inside <AppProvider /> and <MemoryRouter />. MemoryRouter is
A <Router> that keeps the history of your “URL” in memory (does not read or write to the address bar). Useful in tests and non-browser environments like React Native.
We then create our render function, providing it the Wrapper we just defined through its wrapper option. The effect of this is that any component we pass to the render function is rendered inside <Wrapper />, thus having access to navigation and our app’s state.
The next step is to export everything from @testing-library/react. Lastly, we export our custom render function as render, thus overriding the default render.
Note that even if you were using Redux for state management the same pattern still applies.
Let’s now make sure our new render function works. Import it into src/App.test.js and use it to render the <App /> component.
Open App.test.js and replace the import line. This
import { render } from '@testing-library/react';
should become
import { render } from './custom-render';
Does the test still pass? Good job.
There’s one small change I want to make before wrapping up this section. It gets tiring very quickly to have to write const { getByText } and other queries every time. So, I’m going to be using the screen object from the DOM testing library henceforth.
Import the screen object from our custom render file and replace the describe block with the code below.
We’re now accessing the getByText query from the screen object. Does your test still pass? I’m sure it does. Let’s continue.
If your tests don’t pass you may want to compare your code with mine. The corresponding branch at this point is 02-setup-store-and-render.
Testing And Building The To-Do List Index Page
In this section, we’ll pull to-do items from http://jsonplaceholder.typicode.com/. Our component specification is very simple. When a user visits our app homepage,
show a loading indicator that says Fetching todos while waiting for the response from the API;
display the title of 15 to-do items on the screen once the API call returns (the API call returns 200). Also, each item title should be a link that will lead to the to-do details page.
Following a test-driven approach, we’ll write our test before implementing the component logic. Before doing that we’ll need to have the component in question. So go ahead and create a file src/TodoList.js and enter the following content:
Since we know the component specification we can test it in isolation before incorporating it into our main app. I believe it’s up to the developer at this point to decide how they want to handle this. One reason you might want to test a component in isolation is so that you don’t accidentally break any existing test and then having to fight fires in two locations. With that out of the way let’s now write the test.
Create a new file src/TodoList.test.js and enter the below code:
import React from "react";
import axios from "axios";
import { render, screen, waitForElementToBeRemoved } from "./custom-render";
import { TodoList } from "./TodoList";
import { todos } from "./makeTodos";

describe("<App />", () => {
  it("Renders <TodoList /> component", async () => {
    render(<TodoList />);
    await waitForElementToBeRemoved(() => screen.getByText(/Fetching todos/i));

    expect(axios.get).toHaveBeenCalledTimes(1);
    todos.slice(0, 15).forEach((td) => {
      expect(screen.getByText(td.title)).toBeInTheDocument();
    });
  });
});
Inside our test block, we render the <TodoList /> component and use the waitForElementToBeRemoved function to wait for the Fetching todos text to disappear from the screen. Once this happens we know that our API call has returned. We also check that an Axios get call was fired once. Finally, we check that each to-do title is displayed on the screen. Note that the it block receives an async function. This is necessary for us to be able to use await inside the function.
Each to-do item returned by the API has the following structure.
The only condition is that each id should be unique.
Create a new file src/makeTodos.js and enter the below content. This is the source of todos we’ll use in our tests.
const makeTodos = (n) => {
  // returns n number of todo items
  // default is 15
  const num = n || 15;
  const todos = [];
  for (let i = 0; i < num; i++) {
    todos.push({
      id: i,
      userId: i,
      title: `Todo item ${i}`,
      completed: [true, false][Math.floor(Math.random() * 2)],
    });
  }
  return todos;
};

export const todos = makeTodos(200);
This function simply generates a list of n to-do items. The completed line is set by randomly choosing between true and false.
Unit tests are supposed to be fast. They should run within a few seconds. Fail fast! This is one of the reasons why letting our tests make actual API calls is impractical. To avoid this we mock such unpredictable API calls. Mocking simply means replacing a function with a fake version, thus allowing us to customize the behavior. In our case, we want to mock the get method of Axios to return whatever we want it to. Jest already provides mocking functionality out of the box.
Let’s now mock Axios so it returns this list of to-dos when we make the API call in our test. Create a file src/__mocks__/axios.js and enter the below content:
import { todos } from "../makeTodos";

export default {
  get: jest.fn().mockImplementation((url) => {
    switch (url) {
      case "https://jsonplaceholder.typicode.com/todos":
        return Promise.resolve({ data: todos });
      default:
        throw new Error(`UNMATCHED URL: ${url}`);
    }
  }),
};
When the test starts, Jest automatically finds this mocks folder and instead of using the actual Axios from node_modules/ in our tests, it uses this one. At this point, we’re only mocking the get method using Jest’s mockImplementation method. Similarly, we can mock other Axios methods like post, patch, interceptors, defaults etc. Right now they’re all undefined and any attempt to access, axios.post for example, would result in an error.
Note that we can customize what to return based on the URL the Axios call receives. Also, Axios calls return a promise which resolves to the actual data we want, so we return a promise with the data we want.
At this point, we have one passing test and one failing test. Let’s implement the component logic.
Open src/TodoList.js let’s build out the implementation piece by piece. Start by replacing the code inside with this one below.
import React from "react";
import axios from "axios";
import { Link } from "react-router-dom";
import "./App.css";
import { AppContext } from "./AppContext";

export const TodoList = () => {
  const [loading, setLoading] = React.useState(true);
  const { appData, appDispatch } = React.useContext(AppContext);

  React.useEffect(() => {
    axios.get("https://jsonplaceholder.typicode.com/todos").then((resp) => {
      const { data } = resp;
      appDispatch({ type: "LOAD_TODOLIST", todoList: data });
      setLoading(false);
    });
  }, [appDispatch, setLoading]);

  return (
    <div>
      // next code block goes here
    </div>
  );
};
We import AppContext and de-structure appData and appDispatch from the return value of React.useContext. We then make the API call inside a useEffect block. Once the API call returns, we set the to-do list in state by firing the LOAD_TODOLIST action. Finally, we set the loading state to false to reveal our to-dos.
We slice appData.todoList to get the first 15 items. We then map over those and render each one in a <Link /> tag so we can click on it and see the details. Note the data-testid attribute on each Link. This should be a unique ID that will aid us in finding individual DOM elements. In a case where we have similar text on the screen, we should never have the same ID for any two elements. We’ll see how to use this a bit later.
My tests now pass. Does yours pass? Great.
Let’s now incorporate this component into our render tree. Open up App.js let’s do that.
First things. Add some imports.
import { BrowserRouter, Route } from "react-router-dom";
import { TodoList } from "./TodoList";
We need BrowserRouter for navigation and Route for rendering each component in each navigation location.
Now add the below code after the <header /> element.
This is simply telling the browser to render the <TodoList /> component when we’re on the root location, /. Once this is done, our tests still pass but you should see some error messages on your console telling you about some act something. You should also see that the <TodoList /> component seems to be the culprit here.
Since we’re sure that our TodoList component by itself is okay, we have to look at the App component, inside of which is rendered the <TodoList /> component.
This warning may seem complex at first but it is telling us that something is happening in our component that we’re not accounting for in our test. The fix is to wait for the loading indicator to be removed from the screen before we proceed.
Open up App.test.js and update the code to look like so:
import React from "react";
import { render, screen, waitForElementToBeRemoved } from "./custom-render";
import App from "./App";
describe("<App />", () => {
  it("Renders <App /> component correctly", async () => {
    render(<App />);
    expect(
      screen.getByText(/Getting started with React testing library/i)
    ).toBeInTheDocument();
    await waitForElementToBeRemoved(() => screen.getByText(/Fetching todos/i));
  });
});
We’ve made two changes. First, we changed the function in the it block to an async function. This is a necessary step to allow us to use await in the function body. Secondly, we wait for the Fetching todos text to be removed from the screen. And voila!. The warning is gone. Phew! I strongly advise that you bookmark this post by Kent Dodds for more on this act warning. You’re gonna need it.
Now open the page in your browser and you should see the list of to-dos. You can click on an item if you like, but it won’t show you anything because our router doesn’t yet recognize that URL.
For comparison, the branch of my repo at this point is 03-todolist.
Let’s now add the to-do details page.
Testing And Building The Single To-Do Page
To display a single to-do item we’ll follow a similar approach. The component specification is simple. When a user navigates to a to-do page:
The only thing new to us in this file is the const { id } = useParams() line. This is a hook from react-router-dom that lets us read URL parameters. This id is going to be used in fetching a to-do item from the API.
This situation is a bit different because we’re going to be reading the id from the location URL. We know that when a user clicks a to-do link, the id will show up in the URL which we can then grab using the useParams() hook. But here we’re testing the component in isolation which means that there’s nothing to click, even if we wanted to. To get around this we’ll have to mock react-router-dom, but only some parts of it. Yes. It’s possible to mock only what we need to. Let’s see how it’s done.
Create a new mock file src/__mocks__ /react-router-dom.js. Now paste in the following code:
By now you should have noticed that when mocking a module we have to use the exact module name as the mock file name.
Here, we use the module.exports syntax because react-router-dom has mostly named exports. (I haven’t come across any default export since I’ve been working with it. If there are any, kindly share with me in the comments). This is unlike Axios where everything is bundled as methods in one default export.
We first spread the actual react-router-dom, then replace the useParams hook with a Jest function. Since this function is a Jest function, we can modify it anytime we want. Keep in mind that we’re only mocking the part we need to because if we mock everything, we’ll lose the implementation of MemoryHistory which is used in our render function.
Let’s start testing!
Now create src/TodoItem.test.js and enter the below content:
import React from "react";
import axios from "axios";
import { render, screen, waitForElementToBeRemoved } from "./custom-render";
import { useParams, MemoryRouter } from "react-router-dom";
import { TodoItem } from "./TodoItem";

describe("<TodoItem />", () => {
  it("can tell mocked from unmocked functions", () => {
    expect(jest.isMockFunction(useParams)).toBe(true);
    expect(jest.isMockFunction(MemoryRouter)).toBe(false);
  });
});
Just like before, we have all our imports. The describe block then follows. Our first case is only there as a demonstration that we’re only mocking what we need to. Jest’s isMockFunction can tell whether a function is mocked or not. Both expectations pass, confirming the fact that we have a mock where we want it.
Add the below test case for when a to-do item has been completed.
  it("Renders <TodoItem /> correctly for a completed item", async () => {
    useParams.mockReturnValue({ id: 1 });
    render(<TodoItem />);

    await waitForElementToBeRemoved(() =>
      screen.getByText(/Fetching todo item 1/i)
    );

    expect(axios.get).toHaveBeenCalledTimes(1);
    expect(screen.getByText(/todo item 1/)).toBeInTheDocument();
    expect(screen.getByText(/Added by: 1/)).toBeInTheDocument();
    expect(
      screen.getByText(/This item has been completed/)
    ).toBeInTheDocument();
  });
The very first thing we do is to mock the return value of useParams. We want it to return an object with an id property, having a value of 1. When this is parsed in the component, we end up with the following URL https://jsonplaceholder.typicode.com/todos/1. Keep in mind that we have to add a case for this URL in our Axios mock or it will throw an error. We will do that in just a moment.
We now know for sure that calling useParams() will return the object { id: 1 } which makes this test case predictable.
As with previous tests, we wait for the loading indicator, Fetching todo item 1 to be removed from the screen before making our expectations. We expect to see the to-do title, the id of the user who added it, and a message indicating the status.
Open src/__mocks__/axios.js and add the following case to the switch block.
When this URL is matched, a promise with a completed to-do is returned. Of course, this test case fails since we’re yet to implement the component logic. Go ahead and add a test case for when the to-do item has not been completed.
  it("Renders <TodoItem /> correctly for an uncompleted item", async () => {
    useParams.mockReturnValue({ id: 2 });
    render(<TodoItem />);
    await waitForElementToBeRemoved(() =>
      screen.getByText(/Fetching todo item 2/i)
    );
    expect(axios.get).toHaveBeenCalledTimes(2);
    expect(screen.getByText(/todo item 2/)).toBeInTheDocument();
    expect(screen.getByText(/Added by: 2/)).toBeInTheDocument();
    expect(
      screen.getByText(/This item is yet to be completed/)
    ).toBeInTheDocument();
  });
This is the same as the previous case. The only difference is the ID of the to-do, the userId, and the completion status. When we enter the component, we’ll need to make an API call to the URL https://jsonplaceholder.typicode.com/todos/2. Go ahead and add a matching case statement to the switch block of our Axios mock.
As with the <TodoList /> component, we import AppContext. We read activeTodoItem from it, then we read the to-do title, userId, and completion status. After that we make the API call inside a useEffect block. When the API call returns we set the to-do in state by firing the LOAD_SINGLE_TODO action. Finally, we set our loading state to false to reveal the to-do details.
Let’s add the final piece of code inside the return div:
{loading ? (
  <p>Fetching todo item {id}</p>
) : (
  <div>
    <h2 className="todo-title">{title}</h2>
    <h4>Added by: {userId}</h4>
    {completed ? (
      <p className="completed">This item has been completed</p>
    ) : (
      <p className="not-completed">This item is yet to be completed</p>
    )}
  </div>
)}
Once this is done all tests should now pass. Yay! We have another winner.
Our component tests now pass. But we still haven’t added it to our main app. Let’s do that.
Open src/App.js and add the import line:
import { TodoItem } from './TodoItem'
Add the TodoItem route above the TodoList route. Be sure to preserve the order shown below.
# preserve this order
<Route path="/item/:id" component={TodoItem} />
<Route exact path="/" component={TodoList} />
Open your project in your browser and click on a to-do. Does it take you to the to-do page? Of course, it does. Good job.
In case you’re having any problem, you can check out my code at this point from the 04-test-todo branch.
Phew! This has been a marathon. But bear with me. There’s one last point I’d like us to touch. Let’s quickly have a test case for when a user visits our app, and then proceed to click on a to-do link. This is a functional test to mimic how our app should work. In practice, this is all the testing we need to be done for this app. It ticks every box in our app specification.
Open App.test.js and add a new test case. The code is a bit long so we’ll add it in two steps.
import userEvent from "@testing-library/user-event";
import { todos } from "./makeTodos";

jest.mock("react-router-dom", () => ({
  ...jest.requireActual("react-router-dom"),
}));

describe("<App />"
  ...
  // previous test case
  ...

  it("Renders todos, and I can click to view a todo item", async () => {
    render(<App />);
    await waitForElementToBeRemoved(() => screen.getByText(/Fetching todos/i));
    todos.slice(0, 15).forEach((td) => {
      expect(screen.getByText(td.title)).toBeInTheDocument();
    });
    // click on a todo item and test the result
    const { id, title, completed, userId } = todos[0];
    axios.get.mockImplementationOnce(() =>
      Promise.resolve({
        data: { id, title, userId, completed },
      })
    );
    userEvent.click(screen.getByTestId(String(id)));
    await waitForElementToBeRemoved(() =>
      screen.getByText(`Fetching todo item ${String(id)}`)
    );

    // next code block goes here
  });
});
We have two imports of which userEvent is new. According to the docs,
“user-event is a companion library for the React Testing Library that provides a more advanced simulation of browser interactions than the built-in fireEvent method.”
Yes. There is a fireEvent method for simulating user events. But userEvent is what you want to be using henceforth.
Before we start the testing process, we need to restore the original useParams hooks. This is necessary since we want to test actual behavior, so we should mock as little as possible. Jest provides us with requireActual method which returns the original react-router-dom module.
Note that we must do this before we enter the describe block, otherwise, Jest would ignore it. It states in the documentation that requireActual:
“...returns the actual module instead of a mock, bypassing all checks on whether the module should receive a mock implementation or not.”
Once this is done, Jest bypasses every other check and ignores the mocked version of the react-router-dom.
As usual, we render the <App /> component and wait for the Fetching todos loading indicator to disappear from the screen. We then check for the presence of the first 15 to-do items on the page.
Once we’re satisfied with that, we grab the first item in our to-do list. To prevent any chance of a URL collision with our global Axios mock, we override the global mock with Jest’s mockImplementationOnce. This mocked value is valid for one call to the Axios get method. We then grab a link by its data-testid attribute and fire a user click event on that link. Then we wait for the loading indicator for the single to-do page to disappear from the screen.
Now finish the test by adding the below expectations in the position indicated.
expect(screen.getByText(title)).toBeInTheDocument();
expect(screen.getByText(`Added by: ${userId}`)).toBeInTheDocument();
switch (completed) {
  case true:
    expect(
      screen.getByText(/This item has been completed/)
    ).toBeInTheDocument();
    break;
  case false:
    expect(
      screen.getByText(/This item is yet to be completed/)
    ).toBeInTheDocument();
    break;
  default:
    throw new Error("No match");
    }
We expect to see the to-do title and the user who added it. Finally, since we can’t be sure about the to-do status, we create a switch block to handle both cases. If a match is not found we throw an error.
You should have 6 passing tests and a functional app at this point. In case you’re having trouble, the corresponding branch in my repo is 05-test-user-action.
Conclusion
Phew! That was some marathon. If you made it to this point, congratulations. You now have almost all you need to write tests for your React apps. I strongly advise that you read CRA’s testing docs and RTL’s documentation. Overall both are relatively short and direct.
I strongly encourage you to start writing tests for your React apps, no matter how small. Even if it’s just smoke tests to make sure your components render. You can incrementally add more test cases over time.
Notifications have become a stable part of the web nowadays. It’s not uncommon to come across sites asking for permission to send notifications to your browser. Most modern web browsers implement the push API and are able to handle push notifications. A quick check on caniuse shows that the API enjoys wide support among modern chrome-based browsers and Firefox browser.
There are various services for implementing notifications on the web. Notable ones are Pusher and Firebase. In this article, we’ll implement push notifications with the Firebase Cloud Messaging (FCM) service, which is “a cross-platform messaging solution that lets you reliably send messages at no cost”.
I assume that the reader has some familiarity with writing a back-end application in Express.js and/or some familiarity with React. If you’re comfortable with either of these technologies, then, you could work with either the frontend or backend. We will implement the backend first, then move on to the frontend. In that way, you can use whichever section appeals more to you.
So let’s get started.
Types Of Firebase Messages
The Firebase documentation specifies that an FCM implementation requires two components.
A trusted environment such as Cloud Functions for Firebase or an app server on which to build, target, and send messages.
An iOS, Android, or web (JavaScript) client app that receives messages via the corresponding platform-specific transport service.
We will take care of item 1 in our express back-end app, and item 2 in our react front-end app.
The docs also state that FCM lets us send two types of messages.
Notification messages (sometimes thought of as “display messages”) are handled by the FCM SDK automatically.
Data messages are handled by the client app.
Notification messages are automatically handled by the browser on the web. They can also take an optional data payload, which must be handled by the client app. In this tutorial, we’ll be sending and receiving data messages, which must be handled by the client app. This affords us more freedom in deciding how to handle the received message.
Setting Up A Firebase Project
The very first thing we need to do is to set up a Firebase project. FCM is a service and as such, we’ll be needing some API keys. This step requires that you have a Google account. Create one if you don’t already have one. You can click here to get started.
After setting up your Google account, head on to the Firebase console.
Click on add project. Enter a name for your project and click on continue. On the next screen, you may choose to turn off analytics. You can always turn it on later from the Analytics menu of your project page. Click continue and wait a few minutes for the project to be created. It’s usually under a minute. Then click on continue to open your project page.
Once we’ve successfully set up a project, the next step is to get the necessary keys to work with our project. When working with Firebase, we need to complete a configuration step for the frontend and backend separately. Let’s see how we can obtain the credentials needed to work with both.
Frontend
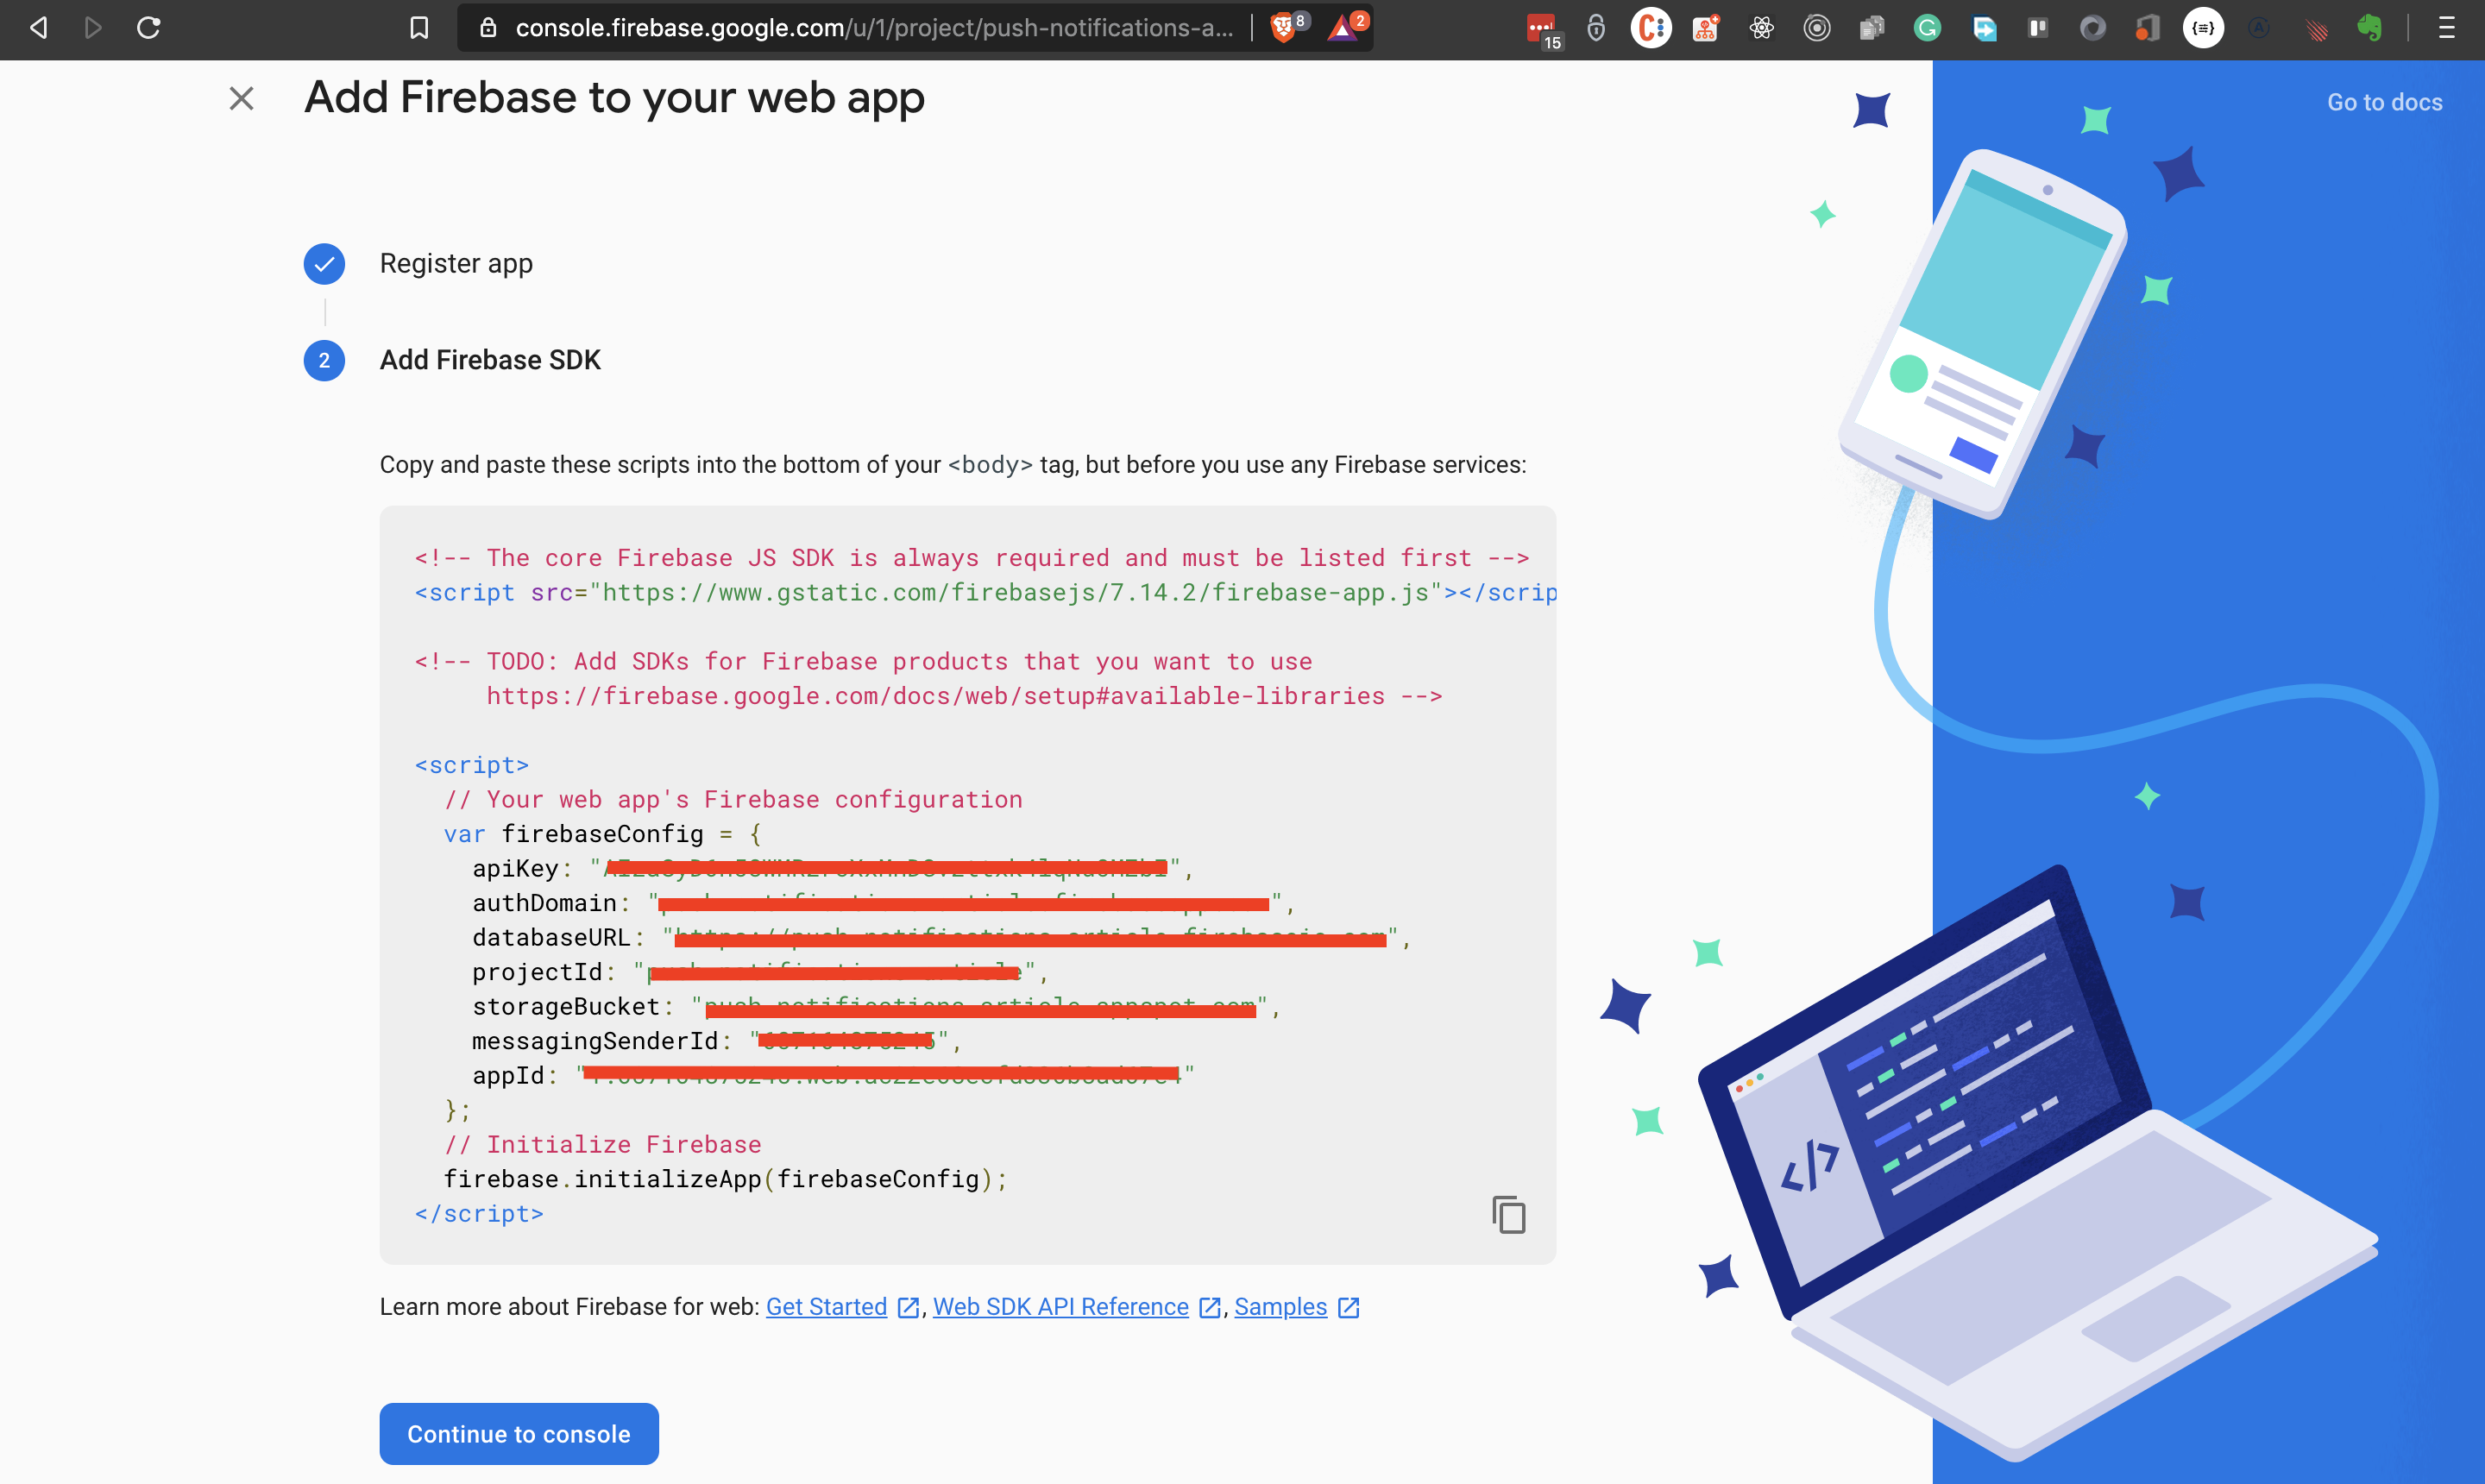
On the project page, click on the icon to add Firebase to your web app.
Give your app a nickname. No need to set up Firebase hosting. Click on Register app and give it a few seconds to complete the setup. On the next screen, copy out the app credentials and store them somewhere. You could just leave this window open and come back to it later.
We’ll be needing the configuration object later. Click on continue to console to return to your console.
Backend
We need a service account credential to connect with our Firebase project from the backend. On your project page, click on the gear icon next to Project Overview to create a service account for use with our Express backend. Refer to the below screenshot. Follow steps 1 to 4 to download a JSON file with your account credentials. Be sure to keep your service account file in a safe place.
Steps for creating a service account credential. (Large preview)
I’ll advise you not to download it until you’re ready to use it. Just remember to come back to these sections if you need a refresher.
So now we’ve successfully set up a Firebase project and added a web app to it. We’ve also seen how to get the credentials we need to work with both the frontend and backend. Let’s now work on sending push notifications from our express backend.
Getting Started
To make it easier to work through this tutorial, I’ve set up a project on Github with both a server and a client. Usually, you’ll have a separate repo for your backend and frontend respectively. But I’ve put them together here to make it easier to work through this tutorial.
Create a fork of the repo, clone it to your computer, and let’s get our front-end and back-end servers started.
Fork the repo and check out the 01-get-started branch.
Open the project in your code editor of choice and observe the contents.
In the project root, we have two folders, client/ and server/. There’s also a .editorconfig file, a .gitignore, and a README.md.
The client folder contains a React app. This is where we will listen for notifications.
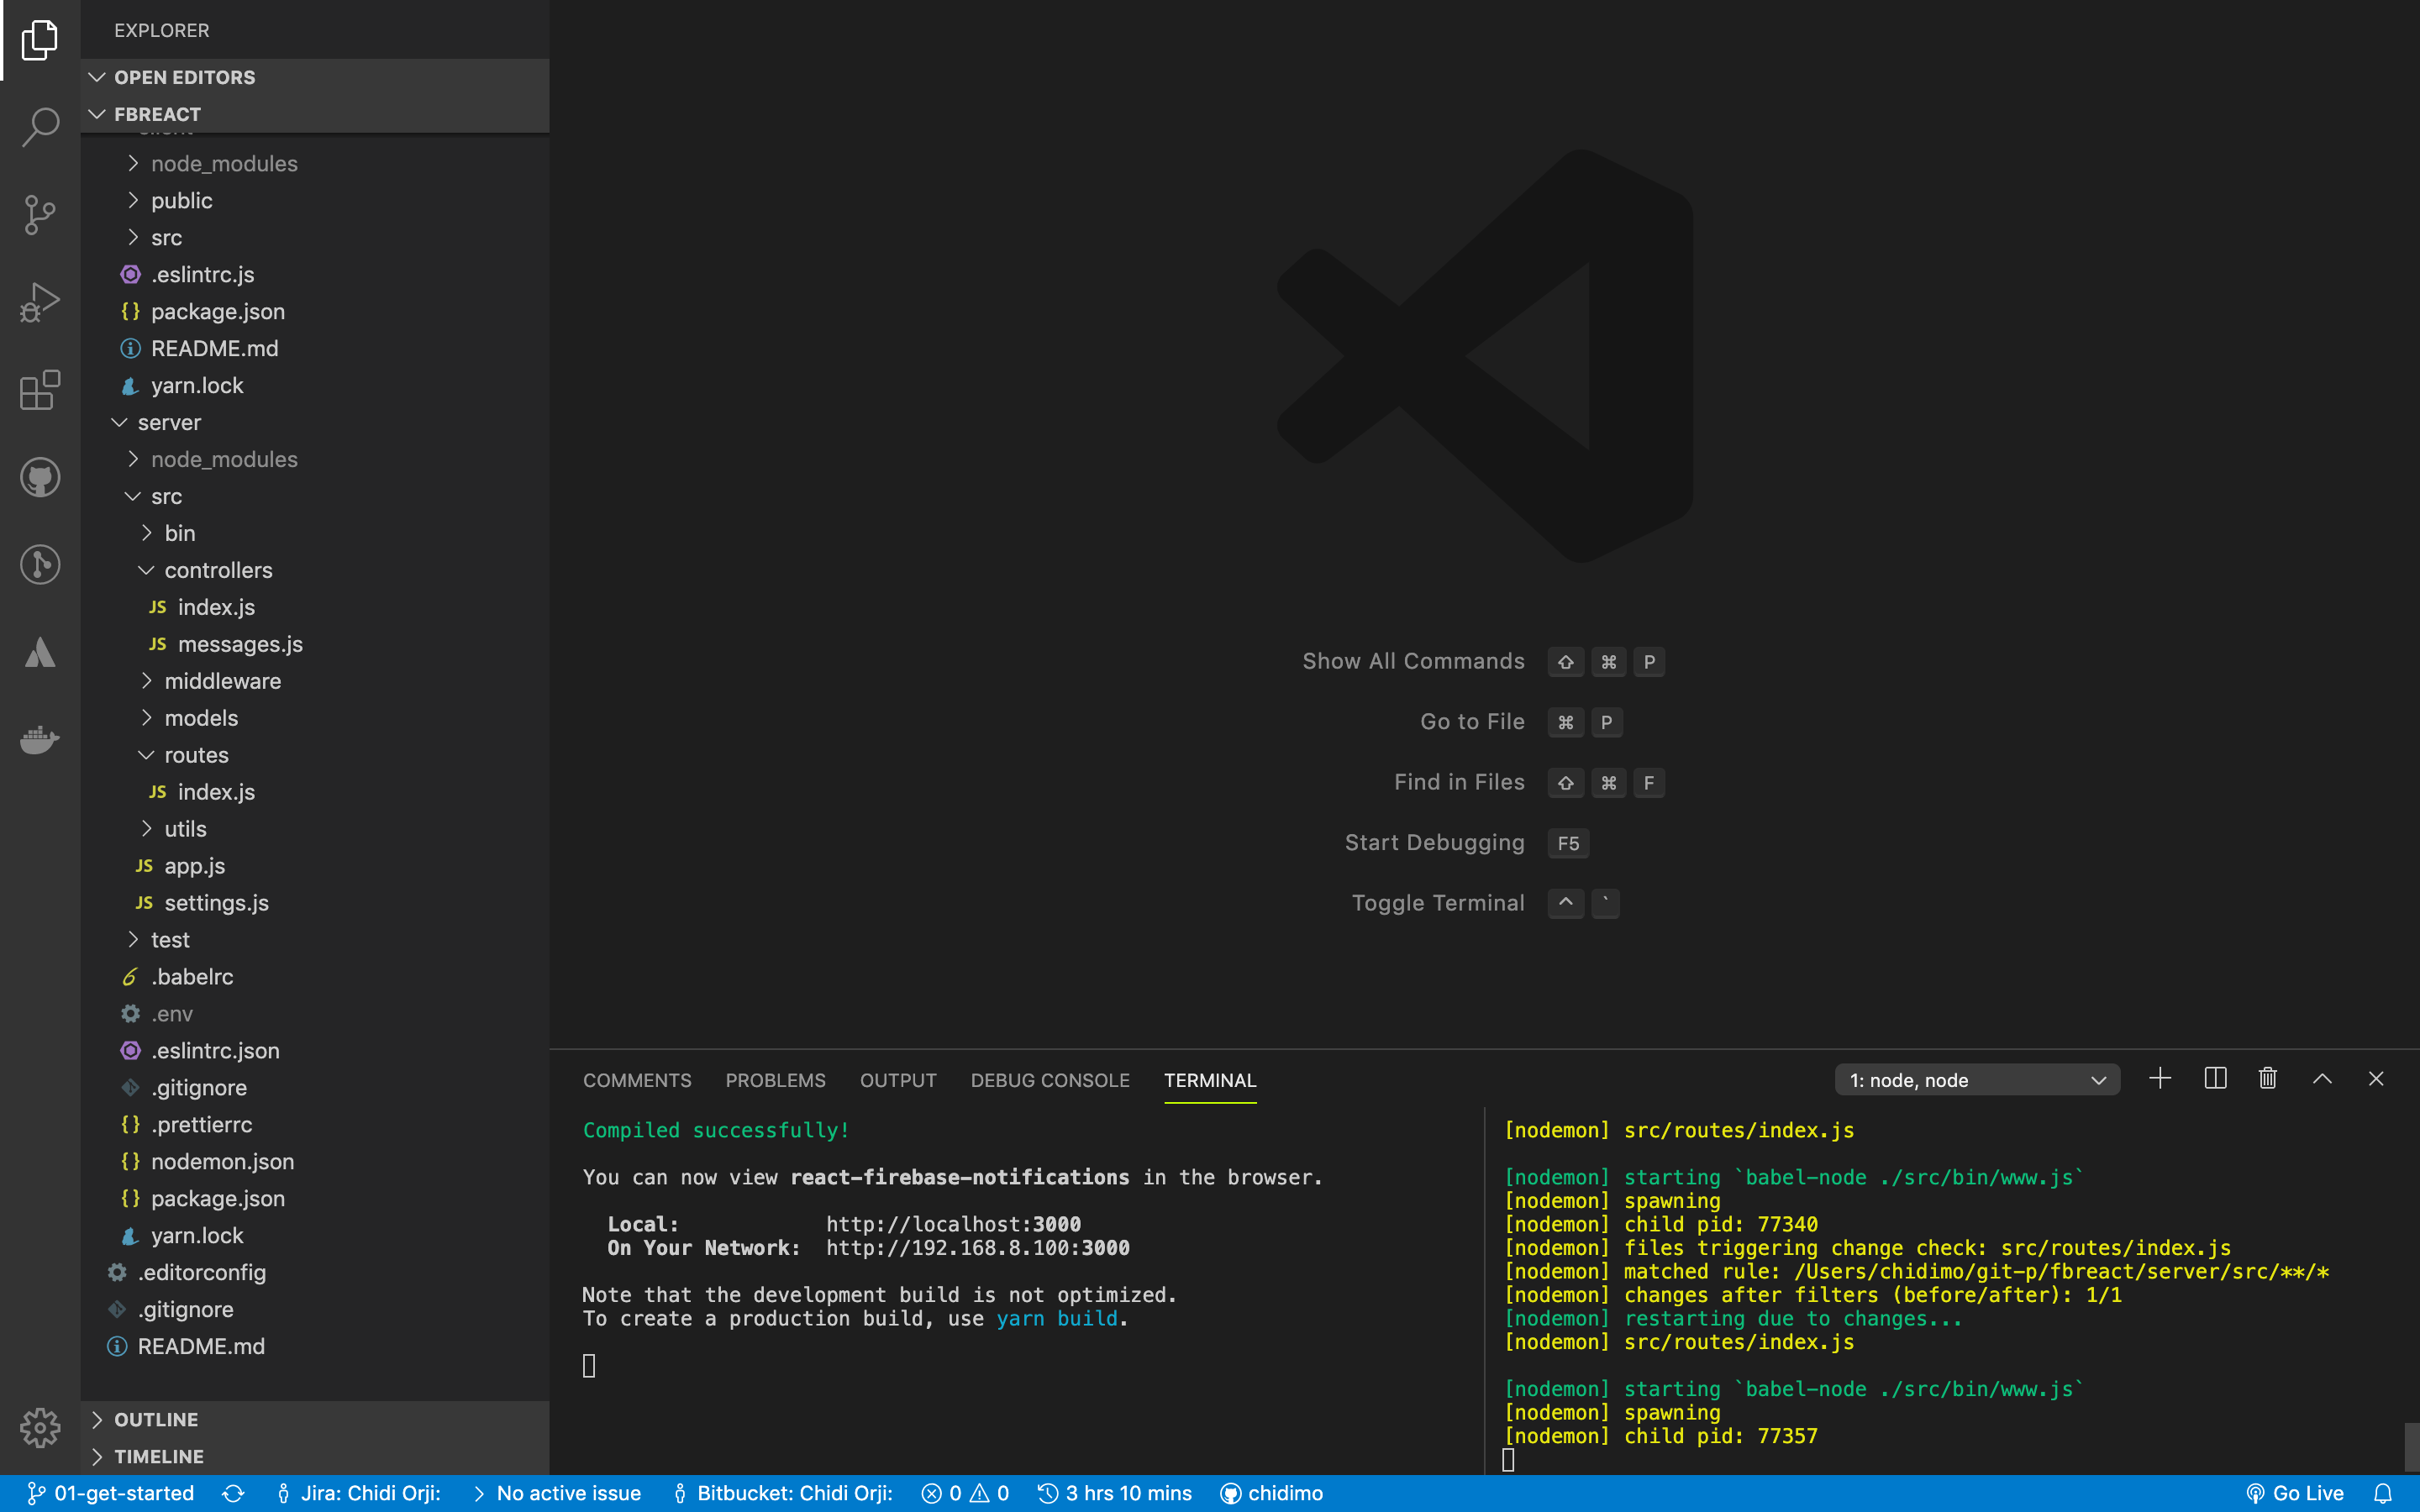
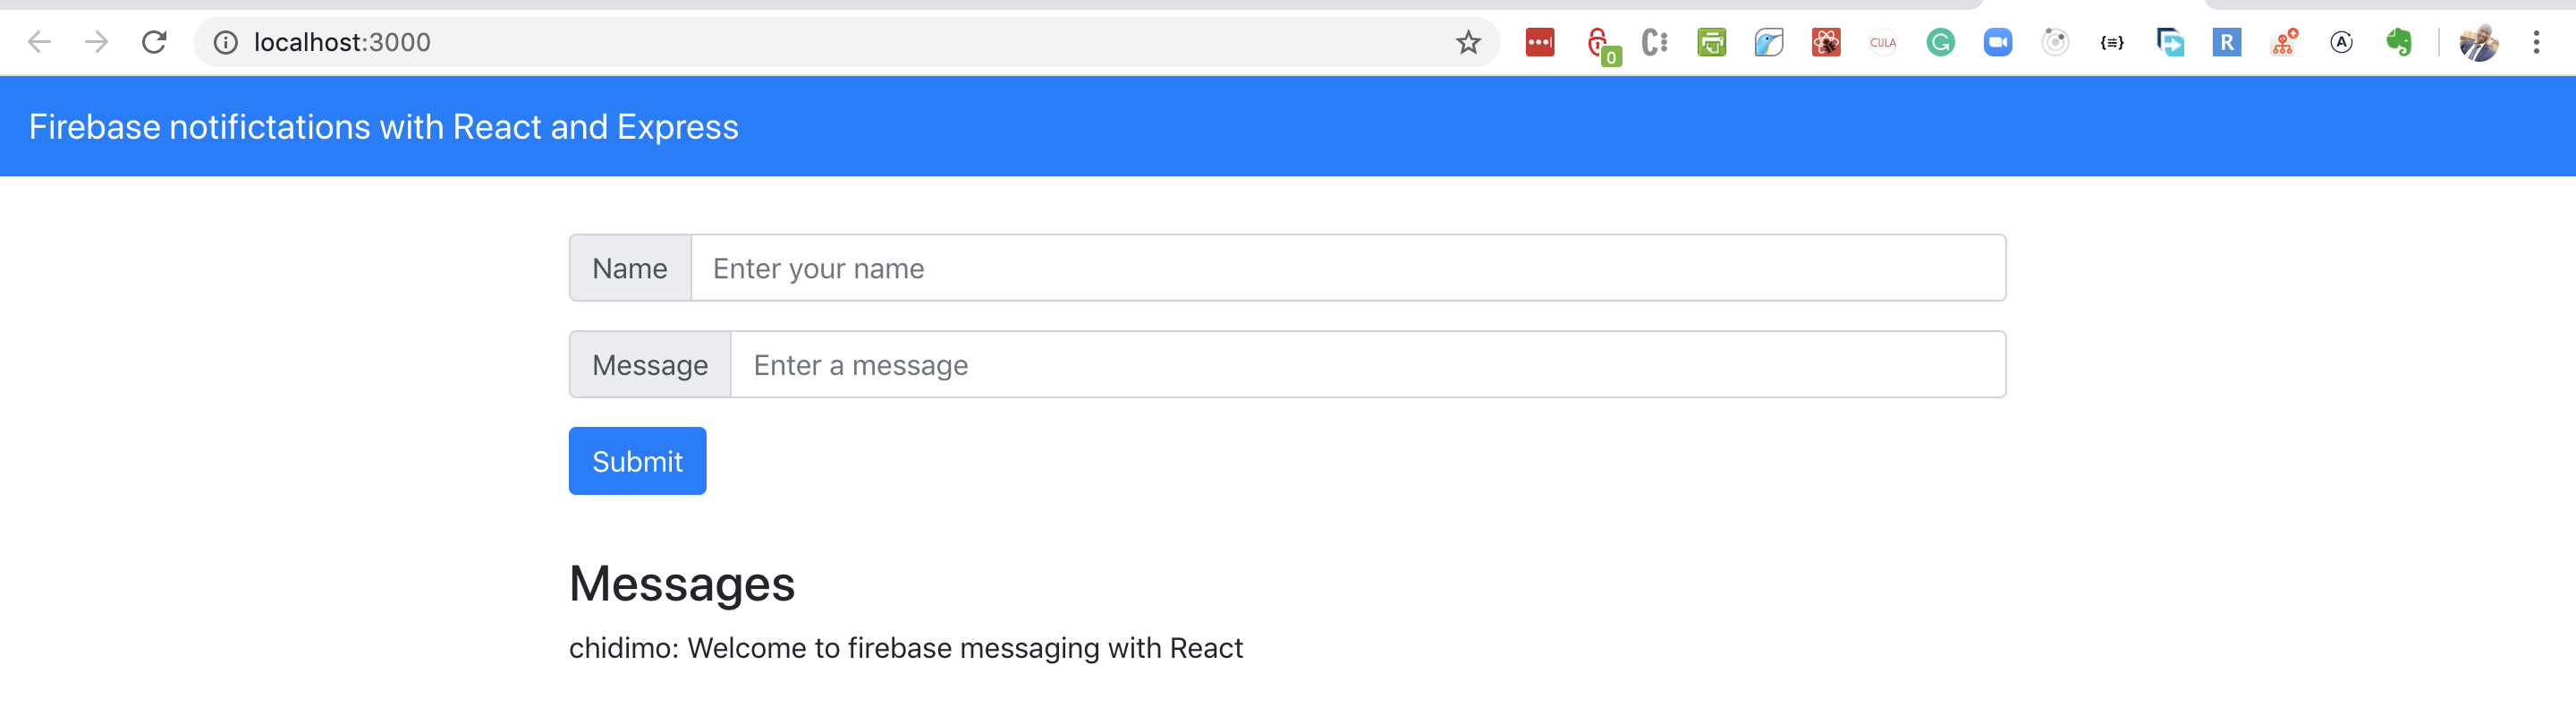
Open a terminal and navigate to the client/ folder. Run the yarn install command to install the project dependencies. Then run yarn start to start the project. Visit http://localhost:3000 to see the live app.
Create a .env file inside the server/ folder and add the CONNECTION_STRING environment variable. This variable is a database connection URL pointing to a PostgreSQL database. If you need help with this, check out the Connecting The PostgreSQL Database And Writing A Model section of my linked article. You should also provide the PORT environment variable since React already runs on port 3000. I set PORT=3001 in my .env file.
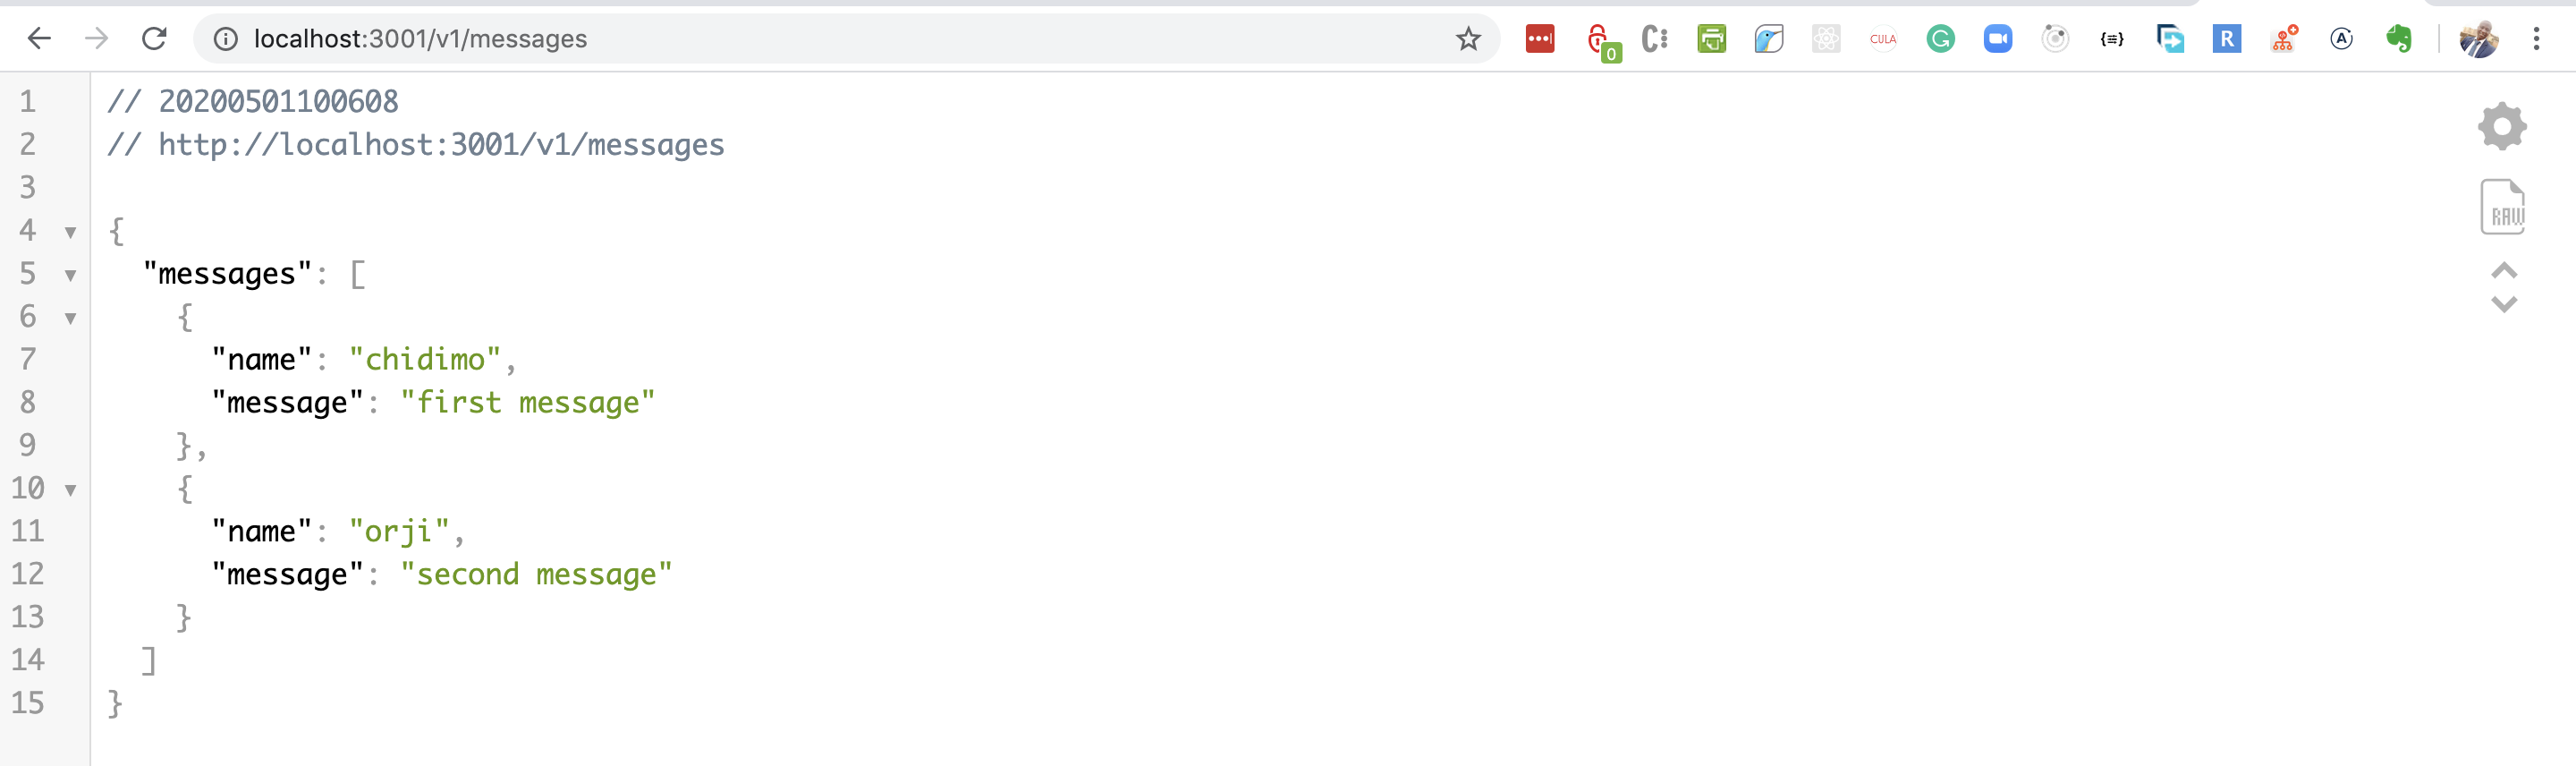
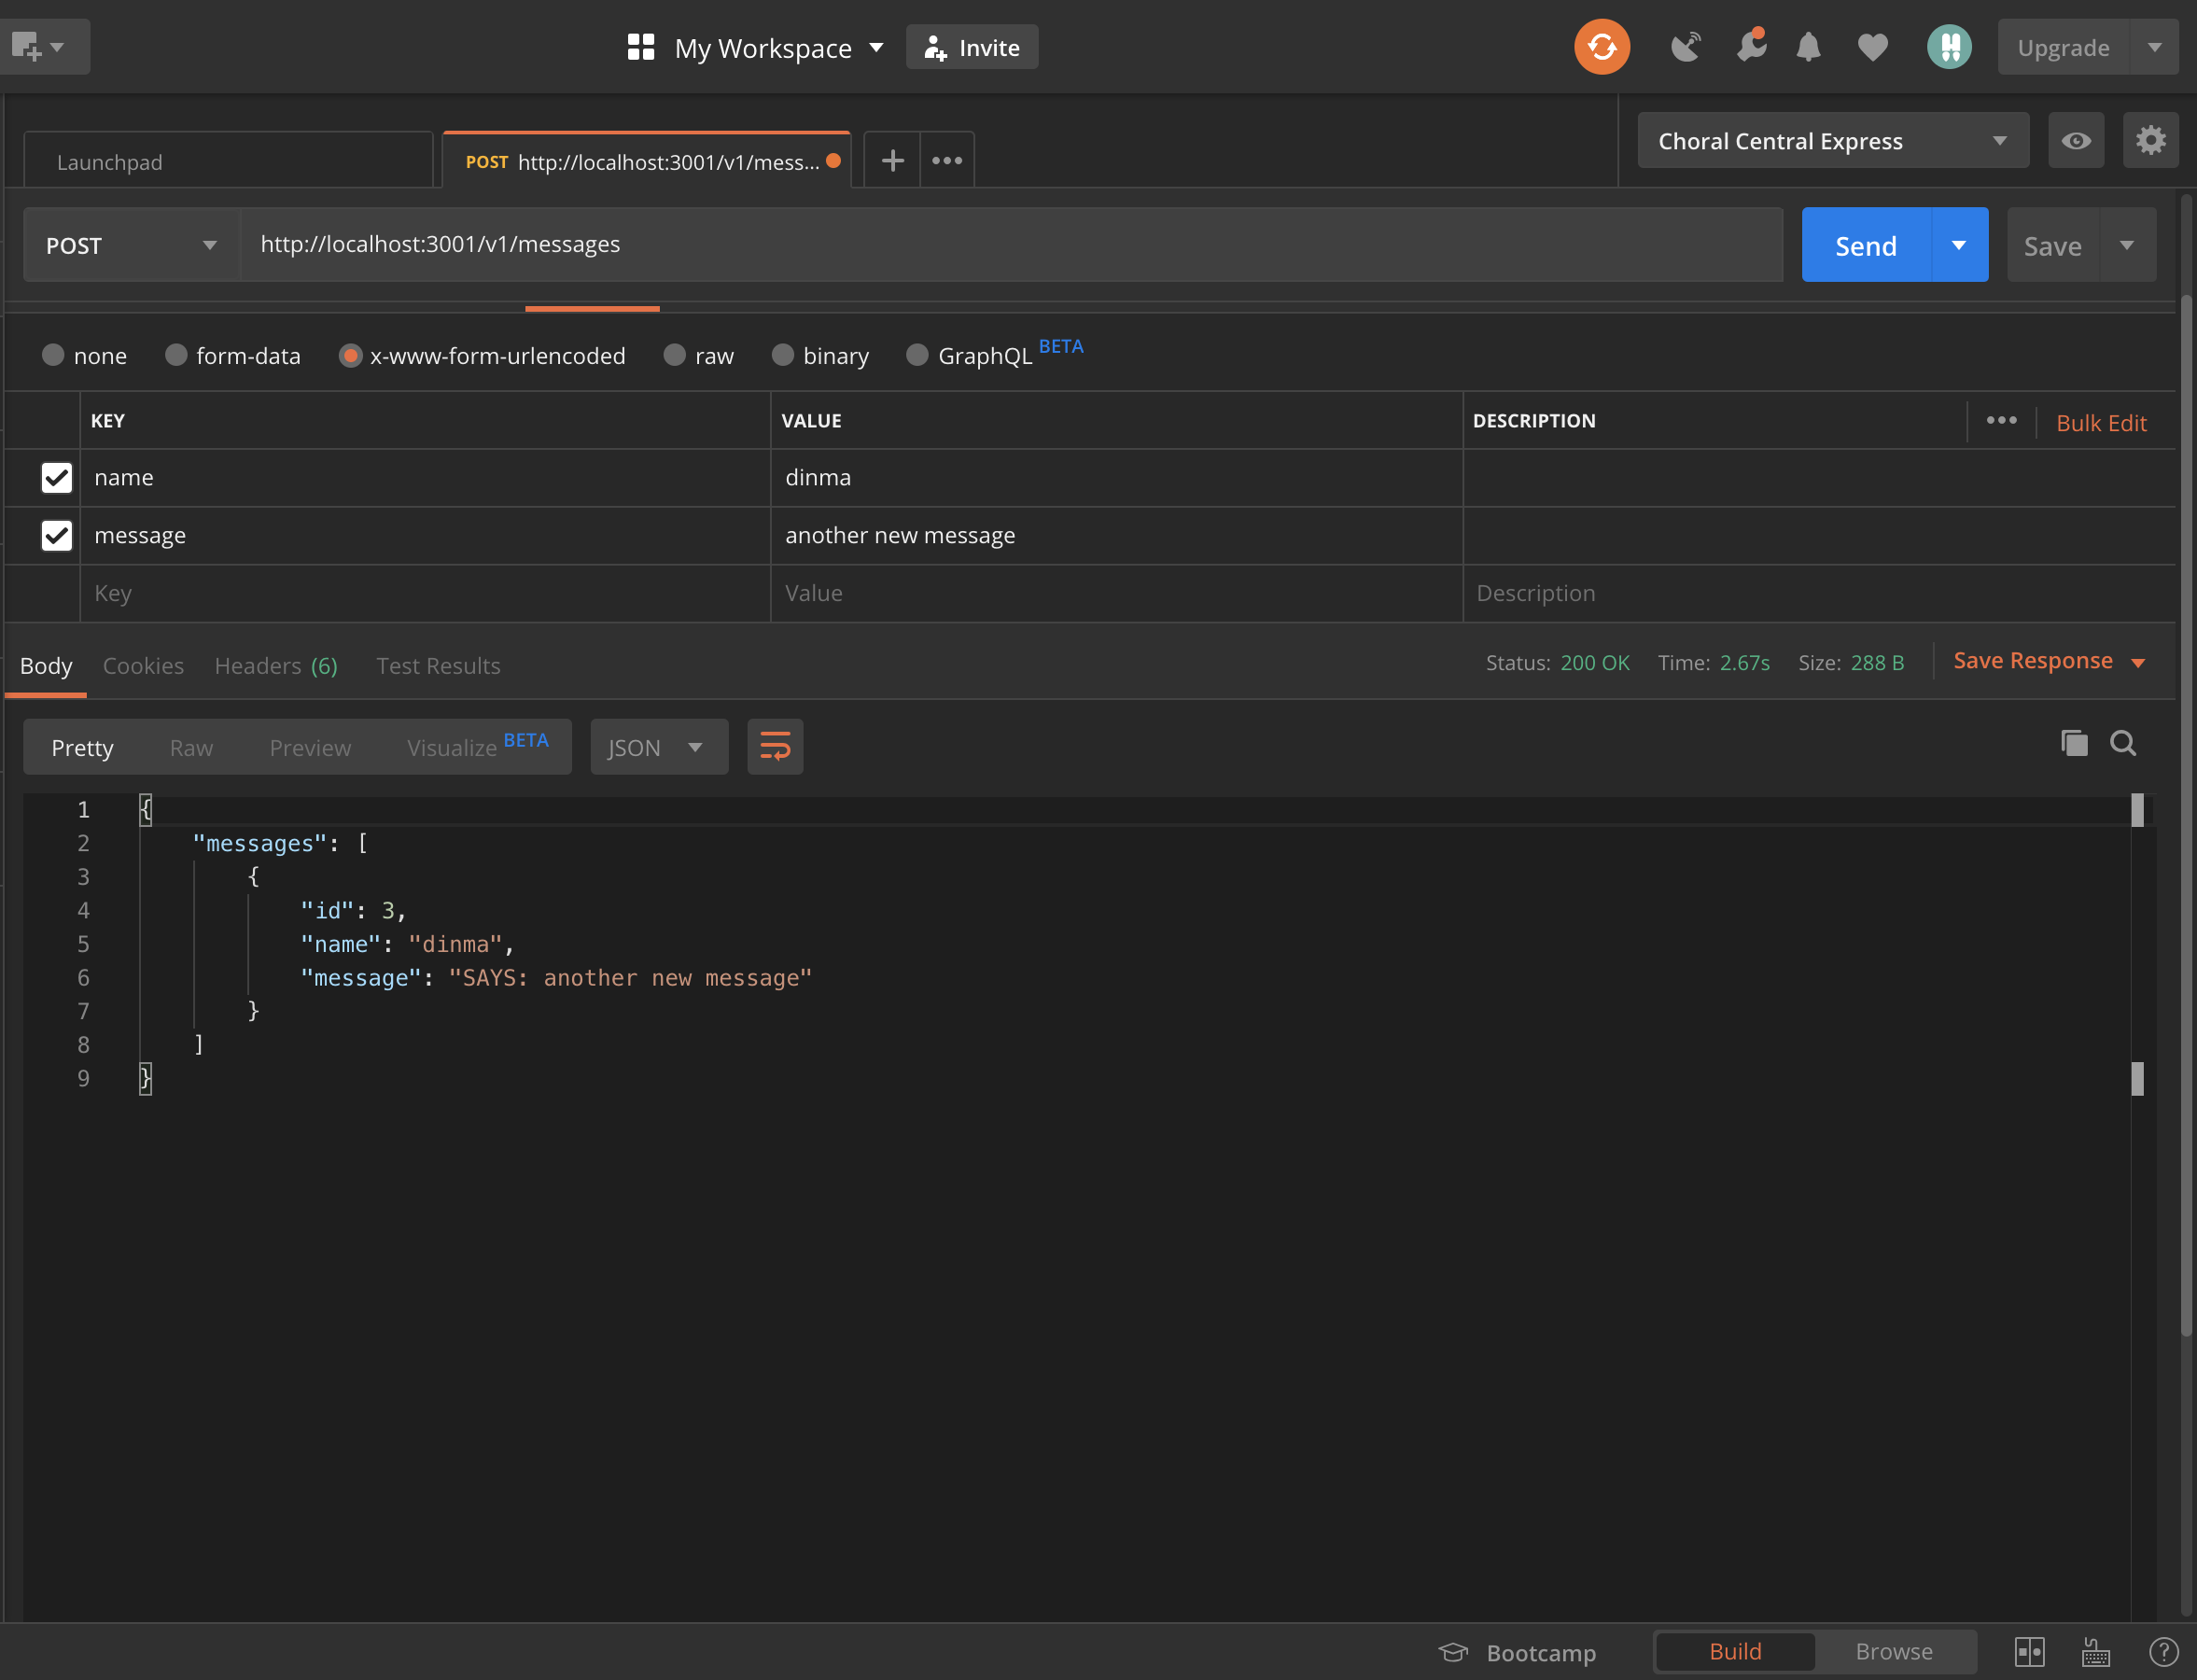
Open a separate terminal and navigate to the server/ folder. Run the yarn install command to install the project dependencies. Run yarn runQuery to create the project database. Run yarn startdev to start the project. Visit http://localhost:3001/v1/messages and you should see some messages in a JSON format.
Now that we have our front-end and back-end apps running, let’s implement notifications in the backend.
Setting Up Firebase Admin Messaging On The Backend
Sending out push notifications with FCM on the backend requires either the Firebase admin SDK or the FCM server protocols. We’ll be making use of the admin SDK in this tutorial. There’s also the notifications composer, which is good for “testing and sending marketing and engagement messages with powerful built-in targeting and analytics”.
In your terminal, navigate to the server/ folder and install the Admin SDK.
The value of this variable is the path to your downloaded service account credentials. At this point, you probably want to go back to the section where we created the service account for our project. You should copy the admin initialization code from there and also download your service account key file. Place this file in your server/ folder and add it to your .gitignore.
Remember, in an actual project, you should store this file in a very secure location on your server. Don’t let it get into the wrong hands.
Open server/src/settings.js and export the application credentials file path.
# export the service account key file path
export const googleApplicationCredentials = process.env.GOOGLE_APPLICATION_CREDENTIALS;
Create a file server/src/firebaseInit.js and add the below code.
We import the admin module from firebase-admin. We then initialize the admin app with our service account file. Finally, we create and export the messaging feature.
Note that I could have passed the path to my service account key file directly, but it is the less secure option. Always use environment variables when dealing with sensitive information.
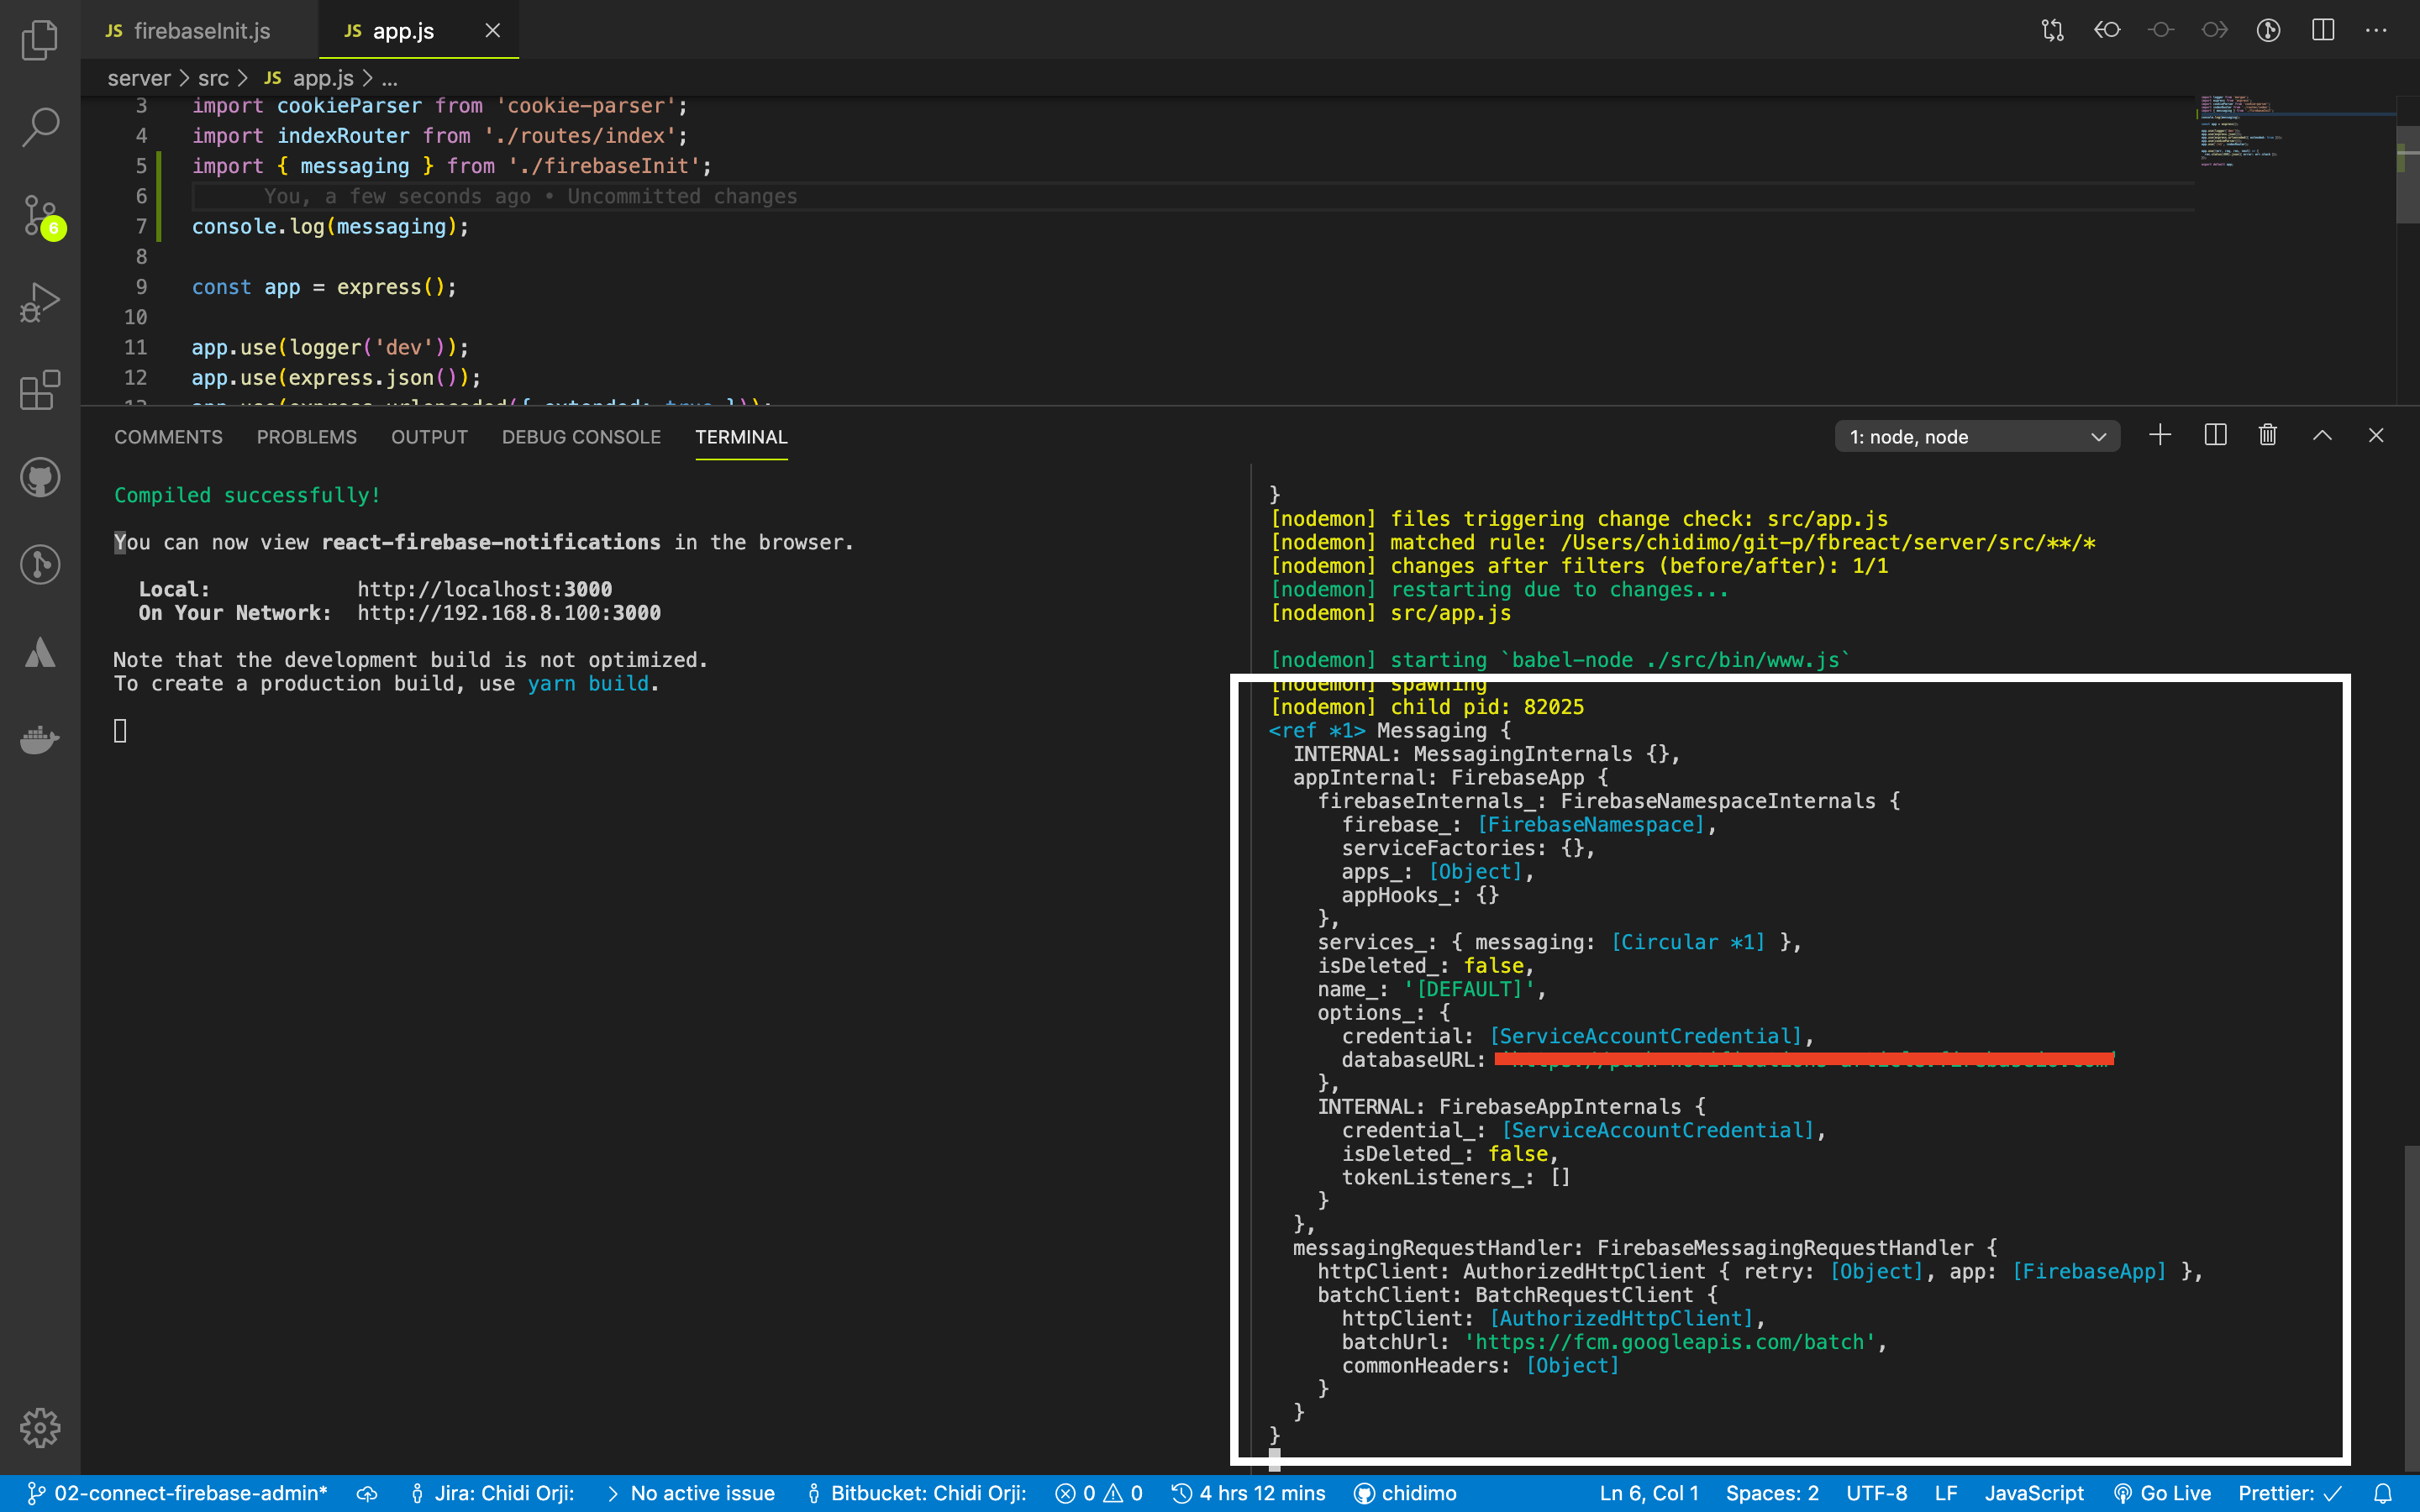
To check that you completed the initialization successfully, open up server/src/app.js and include the following lines.
import { messaging } from './firebaseInit'
console.log(messaging)
We import the messaging instance and log it in the console. You should see something like the picture below. You should remove these once you verify that your admin is set up correctly.
If you run into any problems, you can check out the 02-connect-firebase-admin branch of my repo for comparison.
Now that we’ve successfully setup admin messaging, let’s now write the code to send the notifications.
Sending Push Notifications From The Backend
FCM data message configuration is very simple. All you have to do is supply one or more target(s) and a JSON of the message you wish to send to the client(s). There are no required keys in the JSON. You alone decide what key-value pairs you want to include in the data. The data messages form works across all platforms, so our notification could also be processed by mobile devices.
There are additional configurations for other platforms. For example, there’s an android settings that only work with android devices and apns settings that work on only iOS devices. You can find the configuration guide here.
Create a file server/src/notify.js and enter the below code.
import { messaging } from './firebaseInit';

export const sendNotificationToClient = (tokens, data) => {
  // Send a message to the devices corresponding to the provided
  // registration tokens.
  messaging
    .sendMulticast({ tokens, data })
    .then(response => {
      // Response is an object of the form { responses: [] }
      const successes = response.responses.filter(r => r.success === true)
        .length;
      const failures = response.responses.filter(r => r.success === false)
        .length;
      console.log(
        'Notifications sent:',
        `${successes} successful, ${failures} failed`
      );
    })
    .catch(error => {
      console.log('Error sending message:', error);
    });
};
We created a function that accepts an array of token strings and a data object. Each token string represents a device that has accepted to receive notifications from our back-end application. The notification will be sent to each client in the tokens array. We’ll see how to generate the token in the front-end section of the tutorial.
The messaging instance’s sendMulticast method returns a promise. On success, we get an array from which we count the number of successes as well as failed notifications. You could certainly handle this response anyhow you want.
Let’s use this function to send out a notification each time a new message is added to the database.
Open server/src/controllers/message.js and update the addMessage function.
This function handles a post request to the /messages endpoint. Once a message is successfully created, a notification is sent out by the sendNotificationToClient function followed by the response to the client. The only missing piece in this code is the tokens to send the notifications to.
When we connect the client app, we’ll copy the generated token and paste it in this file. In a production app, you’ll store the tokens somewhere in your database.
With this last piece of code, we’ve completed the back-end implementation. Let’s now switch over to the frontend.
This is a regular react component styled with react-bootstrap. There’s a toast component right at the top of our app, which we shall use to display notifications. Note that we also set the baseURL for the axios library. Everything of note happens inside the <Messaging /> component. Let’s now take a look at its content.
Open up client/src/Messaging.js and inspect the content.
We have two state variables, messages and requesting. messages represent the list of messages from our database and requesting is for toggling our loader state. We have a React.useEffect block where we make our API call to the /messages endpoint and set the returned data in our messages state.
In the return statement, we map over the messages and display the name and message fields. On the same page, we include a form for creating new messages.
We’re using the Formik library to manage our form. We pass the <Formik /> component an initialvalues props, an onSubmit prop and the form component we want to render. In return, we get back some handy functions such as handleChange which we can use to manipulate our form inputs, and handleSubmit which we use to submit the form. isSubmitting is a boolean that we use to toggle the submit button state.
I encourage you to give formik a try. It really simplifies working with forms. We will replace the code in the onSubmit method later.
Let’s now implement the method that will request a browser’s permission and assign it a token.
To start using Firebase in the frontend, we have to install the Firebase JavaScript client library. Note that this is a different package from the firebase-admin SDK.
“The full Firebase JavaScript client includes support for Firebase Authentication, the Firebase Realtime Database, Firebase Storage, and Firebase Cloud Messaging.”
So here, we import only the messaging feature. At this point, you could refer to the section on creating a Firebase project to get the config object. We then initialize Firebase and export the messaging feature. Let’s add in the final block of code.
The requestFirebaseNotificationPermission function requests the browser’s permission to send notifications and resolves with a token if the request is granted. This is the token that FCM uses to send a notification to the browser. It is what triggers the prompt you see on browsers asking for permission to send a notification.
The onMessageListener function is only invoked when the browser is in the foreground. Later, we will write a separate function to handle the notification when the browser is in the background.
Open up client/src/App.js and import the requestFirebaseNotificationPermission function.
import { requestFirebaseNotificationPermission } from './firebaseInit'
Then inside the App function, add the below code before the return statement.
Once the app loads this function runs and requests the browser’s permission to show notifications. If the permission is granted, we log the token. In a production app, you should save the token somewhere that your backend can access. But for this tutorial, we’re just going to copy and paste the token into the back-end app.
Now run your app and you should see the notification request message. Click allow and wait for the token to be logged to the console. Since you’ve granted the browser permission, if we refresh the page you won’t see the banner anymore, but the token will still be logged to the console.
You should know that Firefox browser (v75) doesn’t ask for notification permission by default. The permission request has to be triggered by a user-generated action like a click.
This is a good point for me to commit my changes. The corresponding branch is 04-request-permission.
Let’s now complete the code for saving a message to our database.
Open up client/src/Messaging.js and replace the onSubmit function of our form with the below code.
onSubmit={(values, actions) => {
  axios
    .post("/messages", values)
    .then((resp) => {
      setMessages(resp.data.messages.concat(messages));
      actions.setSubmitting(false);
      toast.success("Submitted succesfully");
    })
    .catch((err) => {
      console.log(err);
      toast.error("There was an error saving the message");
    });
}}
We make a post request to the /messages endpoint to create a new message. If the request succeeds we take the returned data and put it at the top of the messages list. We also display a success toast.
Let’s try it out to see if it works. Start the front-end and back-end servers. Before trying out the post request, open server/src/controllers/messages.js and comment out the line where we’re sending the notification.
# this line will throw an error if tokens is an empty array comment it out temporarily
// sendNotificationToClient(tokens, notificationData);
Try adding some messages to the database. Works? That’s great. Now uncomment that line before continuing.
Copy the notification token from the developer console and paste it into the tokens array. The token is a very long string, as shown below.
Open client/src/Messaging.js, import the onMessageListener and invoke it just under the useEffect block. Any position within the function is fine as long it’s before the return statement.
The listener returns a promise which resolves to the notification payload on success. We then display the title and body in a toast. Note that we could have taken any other action once we receive this notification but I’m keeping things simple here. With both servers running, try it out and see if it’s working.
Works? That’s great.
In case you run into problems, you could always compare with my repo. The corresponding branch at this point is 05-listen-to-notification.
There’s just one bit we need to take care of. Right now we can only see notifications when the browser is in the foreground. The point about notifications is that it should pop up whether the browser is in the foreground or not.
If we were to be sending a display message i.e. we included a notification object in our notification payload, the browser will take care of that on its own. But since we’re sending a data message, we have to tell the browser how to behave in response to a notification when our browser is in the background.
To handle the background notification we need to register a service worker with our front-end client.
Create a file client/public/firebase-messaging-sw.js and enter the following content:
At the top of the file, we’re importing the firebase-app and the firebase-messaging libraries since we only need the messaging feature. Don’t worry if the import syntax is new. It’s a syntax for importing external scripts into service worker files. Make sure that the version being imported is the same as the one in your package.json. I’ve run into issues that I solved by harmonizing the versions.
As usual, we initialize Firebase, then we invoke the setBackgroundMessageHandler, passing it a callback, which receives the notification message payload. The remaining part of the code specifies how the browser should display the notification. Notice that we can also include an icon to display as well.
We can also control what happens when we click on the notification with the notificationclick event handler.
Create a file client/src/serviceWorker.js and enter the below content.
This function registers our service worker files. Note that we have replaced the more detailed version generated by React. We first check if the serviceWorker is present in the navigator object. This is simple browser support. If the browser supports service workers, we register the service worker file we created earlier.
Now open client/src/index.js, import this function, and invoke it.
# other imports

import { registerServiceWorker } from './serviceWorker'

ReactDOM.render(
  ...
);

registerServiceWorker()
If all goes well, you should see the service worker’s scope logged to your console.
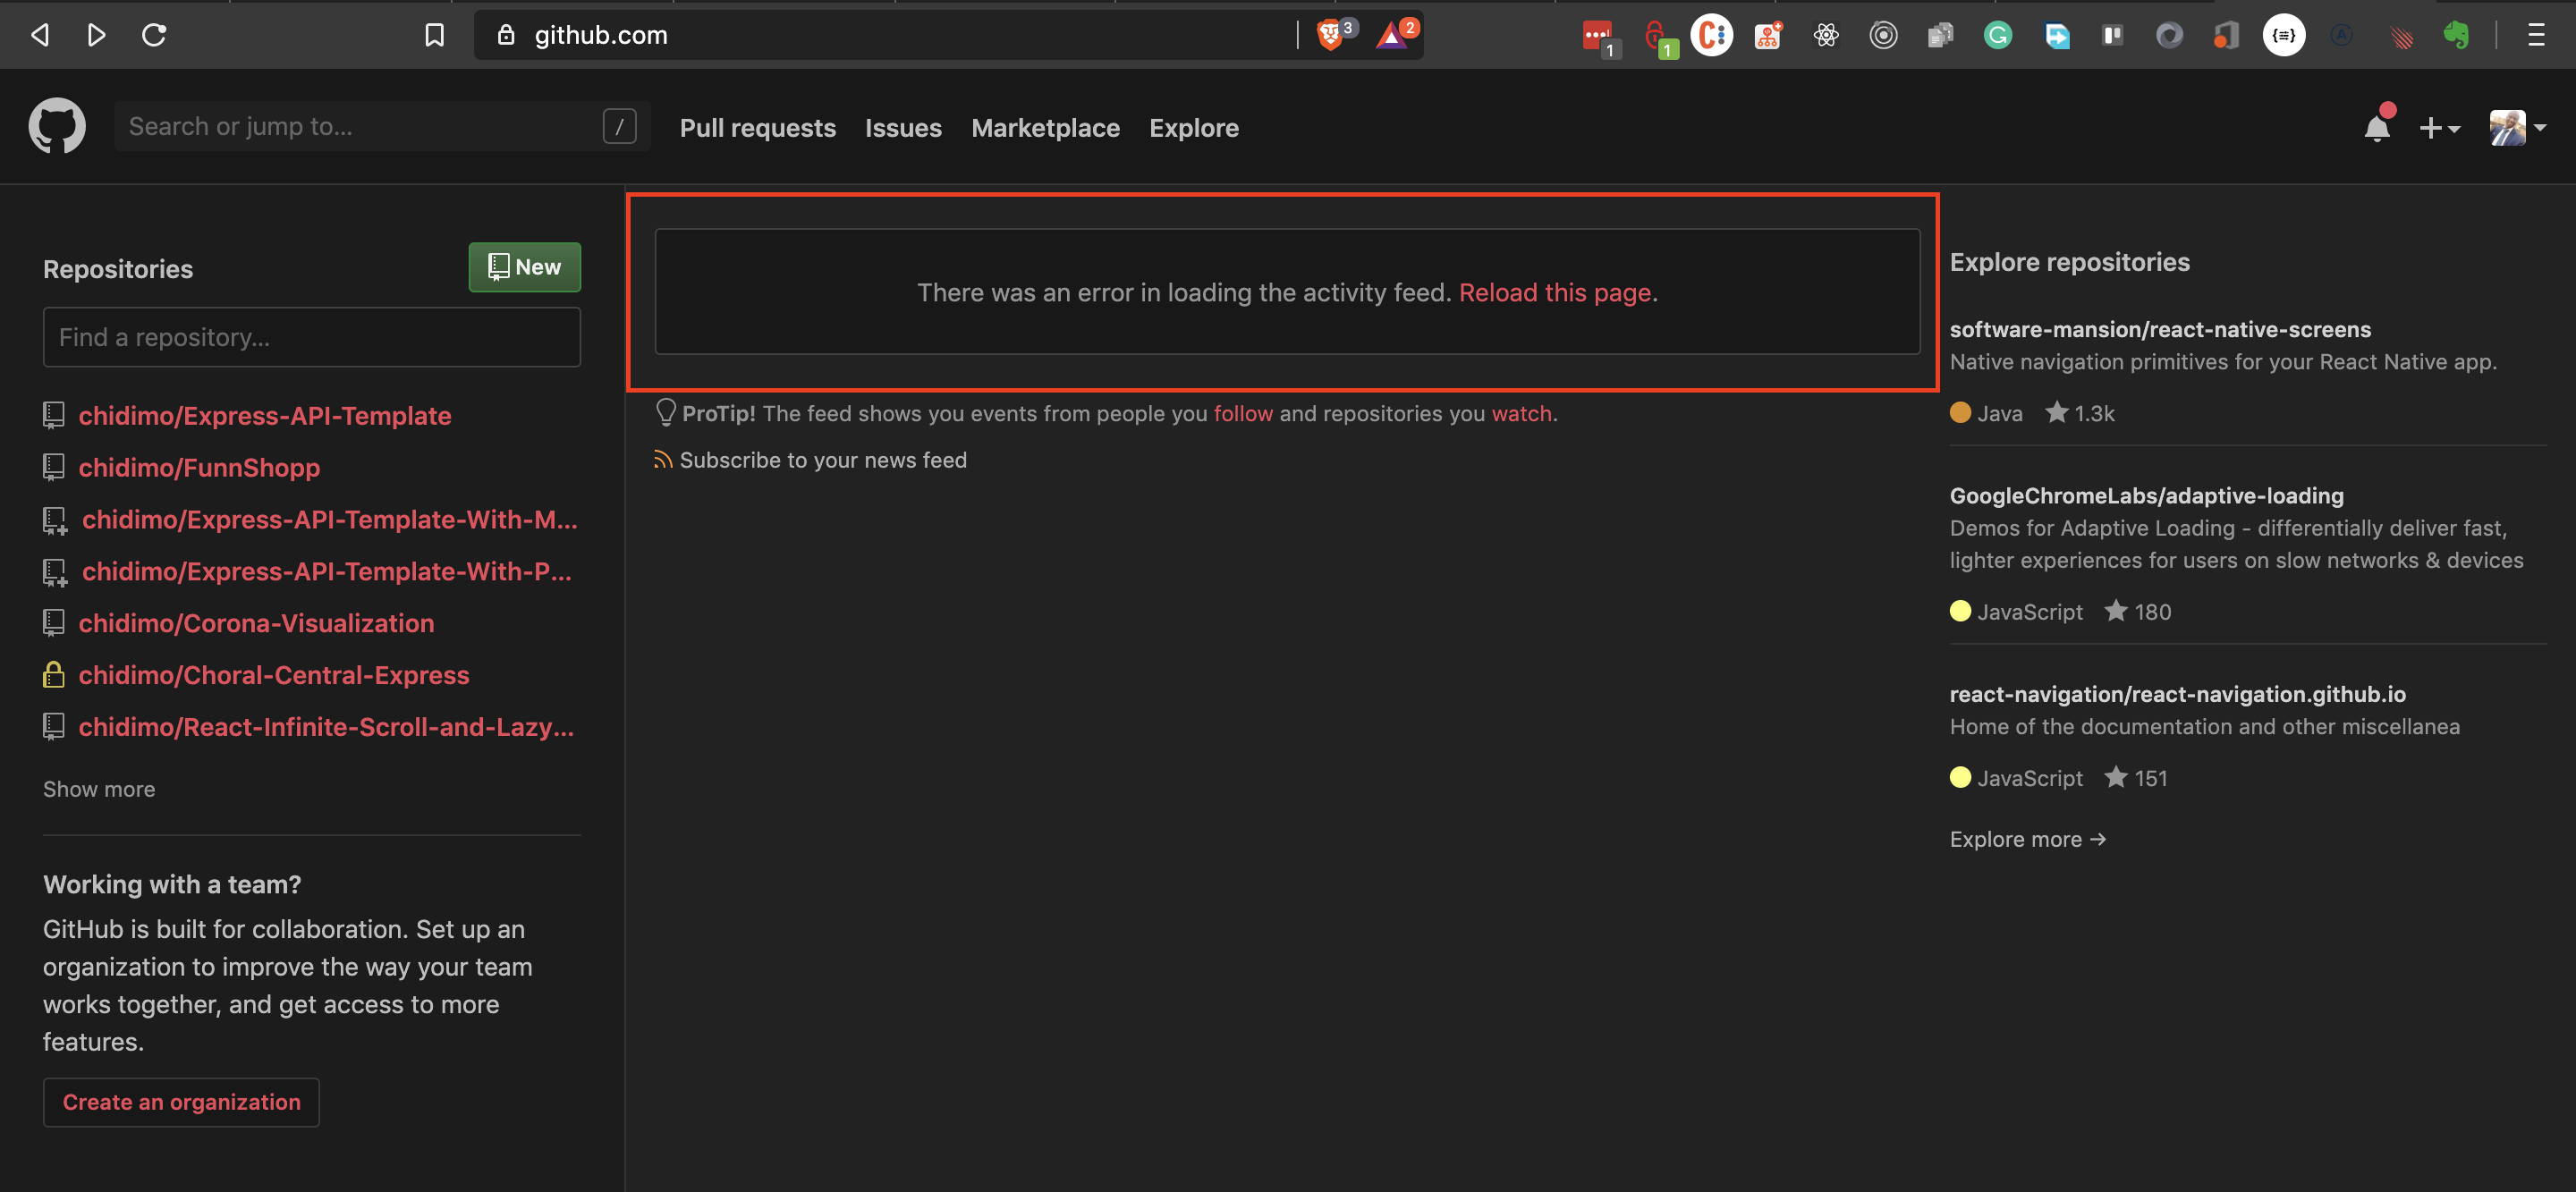
Open http://localhost:3000/messaging in a second browser and create a message. You should see the notification from the other browser come into view.
Background and foreground notifications. (Large preview)
In this article, we learned about the different types of notification messages we can send with the Firebase Cloud Messaging (FCM). API. We then implemented the “data message” type on the backend. Finally, we generated a token on the client app which we used to receive notification messages triggered by the back-end app. Finally, we learned how to listen for and display the notification messages when the browser is in either the background or foreground.
I encourage you to take a look at the FCM docs to learn more.
As a React developer, you should be already familiar with the principle that state should not be mutated directly. You might be wondering what that means (most of us had that confusion when we started out).
This tutorial will do justice to that: you will understand what immutable state is and the need for it. You’ll also learn how to use Immer to work with immutable state and the benefits of using it.
You can find the code in this article in this Github repo.
Immutability In JavaScript And Why It Matters
Immer.js is a tiny JavaScript library was written by Michel Weststrate whose stated mission is to allow you “to work with immutable state in a more convenient way.”
But before diving into Immer, let’s quickly have a refresher about immutability in JavaScript and why it matters in a React application.
The latest ECMAScript (aka JavaScript) standard defines nine built-in data types. Of these nine types, there are six that are referred to as primitive values/types. These six primitives are undefined, number, string, boolean, bigint, and symbol. A simple check with JavaScript’s typeof operator will reveal the types of these data types.
A primitive is a value that is not an object and has no methods. Most important to our present discussion is the fact that a primitive’s value cannot be changed once it is created. Thus, primitives are said to be immutable.
The remaining three types are null, object, and function. We can also check their types using the typeof operator.
These types are mutable. This means that their values can be changed at any time after they are created.
You might be wondering why I have the array [0, 1] up there. Well, in JavaScriptland, an array is simply a special type of object. In case you’re also wondering about null and how it is different from undefined. undefined simply means that we haven’t set a value for a variable while null is a special case for objects. If you know something should be an object but the object is not there, you simply return null.
To illustrate with a simple example, try running the code below in your browser console.
String.prototype.match should return an array, which is an object type. When it can’t find such an object, it returns null. Returning undefined wouldn’t make sense here either.
Enough with that. Let’s return to discussing immutability.
According to the MDN docs:
“All types except objects define immutable values (that is, values which can’t be changed).”
This statement includes functions because they are a special type of JavaScript object. See function definition here.
Let’s take a quick look at what mutable and immutable data types mean in practice. Try running the below code in your browser console.
let a = 5;
let b = a
console.log(`a: ${a}; b: ${b}`) // a: 5; b: 5
b = 7
console.log(`a: ${a}; b: ${b}`) // a: 5; b: 7
Our results show that even though b is “derived” from a, changing the value of b doesn’t affect the value of a. This arises from the fact that when the JavaScript engine executes the statement b = a, it creates a new, separate memory location, puts 5 in there, and points b at that location.
What about objects? Consider the below code.
let c = { name: 'some name'}
let d = c;
console.log(`c: ${JSON.stringify(c)}; d: ${JSON.stringify(d)}`) // {"name":"some name"}; d: {"name":"some name"}
d.name = 'new name'
console.log(`c: ${JSON.stringify(c)}; d: ${JSON.stringify(d)}`) // {"name":"new name"}; d: {"name":"new name"}
We can see that changing the name property via variable d also changes it in c. This arises from the fact that when the JavaScript engine executes the statement, c = { name: 'some name'}, the JavaScript engine creates a space in memory, puts the object inside, and points c at it. Then, when it executes the statement d = c, the JavaScript engine just points d to the same location. It doesn’t create a new memory location. Thus any changes to the items in d is implicitly an operation on the items in c. Without much effort, we can see why this is trouble in the making.
Imagine you were developing a React application and somewhere you want to show the user’s name as some name by reading from variable c. But somewhere else you had introduced a bug in your code by manipulating the object d. This would result in the user’s name appearing as new name. If c and d were primitives we wouldn’t have that problem. But primitives are too simple for the kinds of state a typical React application has to maintain.
This is about the major reasons why it is important to maintain an immutable state in your application. I encourage you to check out a few other considerations by reading this short section from the Immutable.js README: the case for immutability.
Having understood why we need immutability in a React application, let’s now take a look at how Immer tackles the problem with its produce function.
Immer’s produce Function
Immer’s core API is very small, and the main function you’ll be working with is the produce function. produce simply takes an initial state and a callback that defines how the state should be mutated. The callback itself receives a draft (identical, but still a copy) copy of the state to which it makes all the intended update. Finally, it produces a new, immutable state with all the changes applied.
The general pattern for this sort of state update is:
// produce signature
produce(state, callback) => nextState
In the above code, we simply pass the starting state and a callback that specifies how we want the mutations to happen. It’s as simple as that. We don’t need to touch any other part of the state. It leaves initState untouched and structurally shares those parts of the state that we didn’t touch between the starting and the new states. One such part in our state is the pets array. The produced nextState is an immutable state tree that has the changes we’ve made as well as the parts we didn’t modify.
Armed with this simple, but useful knowledge, let’s take a look at how produce can help us simplify our React reducers.
We can see that this is unnecessarily verbose and prone to mistakes for this relatively simple state object. We also have to touch every part of the state, which is unnecessary. Let’s see how we can simplify this with Immer.
And with a few lines of code, we have greatly simplified our reducer. Also, if we fall into the default case, Immer just returns the draft state without us needing to do anything. Notice how there is less boilerplate code and the elimination of state spreading. With Immer, we only concern ourselves with the part of the state that we want to update. If we can’t find such an item, as in the `UPDATE_INSTALLED` action, we simply move on without touching anything else.
The `produce` function also lends itself to currying. Passing a callback as the first argument to `produce` is intended to be used for currying. The signature of the curried `produce` is
//curried produce signature
produce(callback) => (state) => nextState
Let’s see how we can update our earlier state with a curried produce. Our curried produce would look like this:
The curried produce function accepts a function as its first argument and returns a curried produce that only now requires a state from which to produce the next state. The first argument of the function is the draft state (which will be derived from the state to be passed when calling this curried produce). Then follows every number of arguments we wish to pass to the function.
All we need to do now to use this function is to pass in the state from which we want to produce the next state and the action object like so.
// add a new package to the starting state
const nextState = curriedProduce(initState, {
  type: 'ADD_PACKAGE',
  package: newPackage,
});

// update an item in the recently produced state
const nextState2 = curriedProduce(nextState, {
  type: 'SET_INSTALLED',
  name: 'immer',
  installed: true,
});
Note that in a React application when using the useReducer hook, we don’t need to pass the state explicitly as I’ve done above because it takes care of that.
You might be wondering, would Immer be getting a hook, like everything in React these days? Well, you’re in company with good news. Immer has two hooks for working with state: the useImmer and the useImmerReducer hooks. Let’s see how they work.
Using The useImmer And useImmerReducer Hooks
The best description of the useImmer hook comes from the use-immer README itself.
useImmer(initialState) is very similar to useState. The function returns a tuple, the first value of the tuple is the current state, the second is the updater function, which accepts an immer producer function, in which the draft can be mutated freely, until the producer ends and the changes will be made immutable and become the next state.
To make use of these hooks, you have to install them separately, in addition to the main Immer libarary.
And it’s as simple as that. You could say it’s React’s useState but with a bit of steroid. To use the update function is very simple. It receives the draft state and you can modify it as much as you want like below.
// make changes to data
updateData(draft => {
  // modify the draft as much as you want.
})
The creator of Immer has provided a codesandbox example which you can play around with to see how it works.
useImmerReducer is similarly simple to use if you’ve used React’s useReducer hook. It has a similar signature. Let’s see what that looks like in code terms.
We can see that the reducer receives a draft state which we can modify as much as we want. There’s also a codesandbox example here for you to experiment with.
And that is how simple it is to use Immer hooks. But in case you’re still wondering why you should use Immer in your project, here’s a summary of some of the most important reasons I’ve found for using Immer.
Why You Should Use Immer
If you’ve written state management logic for any length of time you’ll quickly appreciate the simplicity Immer offers. But that is not the only benefit Immer offers.
When you use Immer, you end up writing less boilerplate code as we have seen with relatively simple reducers. This also makes deep updates relatively easy.
With libraries such as Immutable.js, you have to learn a new API to reap the benefits of immutability. But with Immer you achieve the same thing with normal JavaScript Objects, Arrays, Sets, and Maps. There’s nothing new to learn.
Immer also provides structural sharing by default. This simply means that when you make changes to a state object, Immer automatically shares the unchanged parts of the state between the new state and the previous state.
With Immer, you also get automatic object freezing which means that you cannot make changes to the produced state. For instance, when I started using Immer, I tried to apply the sort method on an array of objects returned by Immer’s produce function. It threw an error telling me I can’t make any changes to the array. I had to apply the array slice method before applying sort. Once again, the produced nextState is an immutable state tree.
Immer is also strongly typed and very small at just 3KB when gzipped.
Conclusion
When it comes to managing state updates, using Immer is a no-brainer for me. It’s a very lightweight library that lets you keep using all the things you’ve learned about JavaScript without trying to learn something entirely new. I encourage you to install it in your project and start using it right away. You can add use it in existing projects and incrementally update your reducers.
I’d also encourage you to read the Immer introductory blog post by Michael Weststrate. The part I find especially interesting is the “How does Immer work?” section which explains how Immer leverages language features such as proxies and concepts such as copy-on-write.
I’d also encourage you to take a look at this blog post: Immutability in JavaScript: A Contratian View where the author, Steven de Salas, presents his thoughts about the merits of pursuing immutability.
I hope that with the things you’ve learned in this post you can start using Immer right away.
React Error Handling And Reporting With Error Boundary And Sentry
React Error Handling And Reporting With Error Boundary And Sentry
Chidi Orji
In this article, we’ll look at error boundaries in React. We’ll learn what they are and how to use them to deliver a better user experience, even when something breaks in our app. We’ll also learn how to integrate with Sentry for realtime error monitoring.
This tutorial is aimed at React developers of every level who wants to start using error boundaries in their react apps.
The only prerequisite is that you have some familiarity with React class components.
I will be using Yarn as my package manager for this project. You’ll find installation instructions for your specific operating system over here.
What Is An Error Boundary And Why Do We Need It?
A picture, they say, is worth a thousand words. For that reason, I’d like to talk about error boundaries using — you guessed it — pictures.
The illustration below shows the component tree of a simple React app. It has a header, a sidebar on the left, and the main component, all of which is wrapped by a root <App /> component.
In an ideal world, we would expect to see the app rendered this way every single time. But, unfortunately, we live in a non-ideal world. Problems, (bugs), can surface in the frontend, backend, developer’s end, and a thousand other ends. The problem could happen in either of our three components above. When this happens, our beautifully crafted app comes crashing down like a house of cards.
React encourages thinking in terms of components. Composing multiple smaller components is better than having a single giant component. Working this way helps us think about our app in simple units. But aside from that won’t it be nice if we could contain any errors that might happen in any of the components? Why should a failure in a single component bring down the whole house?
In the early days of React, this was very much the case. And worse, sometimes you couldn’t even figure out what the problem was. The React repository on Github has some of such notable errors here, here, and here.
React 16 came to the rescue with the concept of an “error boundary”. The idea is simple. Erect a fence around a component to keep any fire in that component from getting out.
The illustration below shows a component tree with an <ErrorBoundary /> component wrapping the <Main /> component. Note that we could certainly wrap the other components in an error boundary if we wanted. We could even wrap the <App /> component in an error boundary.
As we discussed earlier, this red line keeps any errors that occur in the <Main /> component from spilling out and crashing both the <Header /> and <LeftSideBar /> components. This is why we need an error boundary.
Now that we have a conceptual understanding of an error boundary, let’s now get into the technical aspects.
What Makes A Component An Error Boundary?
As we can see from our component tree, the error boundary itself is a React component. According to the docs,
A class component becomes an error boundary if it defines either (or both) of the lifecycle methods static getDerivedStateFromError() or componentDidCatch().
There are two things to note here. Firstly, only a class component can be used as an error boundary. Even if you’re writing all your components as function, you still have to make use of a class component if you want to have an error boundary. Secondly, it must define either (or both) of static getDerivedStateFromError() or componentDidCatch(). Which one(s) you define depends on what you want to accomplish with your error boundary.
Functions Of An Error Boundary
An error boundary isn’t some dumb wall whose sole purpose in life is to keep a fire in. Error boundaries do actual work. For starters, they catch javascript errors. They can also log those errors, and display a fallback UI. Let’s go over each of \these functions one after the other.
Catch JavaScript Errors
When an error is thrown inside a component, the error boundary is the first line of defense. In our last illustration, if an error occurs while rendering the <Main /> component, the error boundary catches this error and prevents it from spreading outwards.
Logs Those Errors
This is entirely optional. You could catch the error without logging it. It is up to you. You can do whatever you want with the errors thrown. Log them, save them, send them somewhere, show them to your users (you really don’t want to do this). It’s up to you.
But to get access to the errors you have to define the componentDidCatch() lifecycle method.
Render A Fallback UI
This, like logging the errors, is entirely optional. But imagine you had some important guests, and the power supply was to go out. I’m sure you don’t want your guests groping in the dark, so you invent a technology to light up the candles instantaneously. Magical, hmm. Well, your users are important guests, and you want to afford them the best experience in all situations.
You can render a fallback UI with static getDerivedStateFromError() after an error has been thrown.
It is important to note that error boundaries do not catch errors for the following situations:
Errors inside event handlers.
Errors in asynchronous code (e.g. setTimeout or requestAnimationFrame callbacks).
Errors that happen when you’re doing some server-side rendering.
Errors are thrown in the error boundary itself (rather than its children). You could have another error boundary catch this error, though.
Working With Error Boundaries
Let’s now dive into our code editor. To follow along, you need to clone the repo.
After cloning the repo, check out the 01-initial-setup branch. Once that is done, run the following commands to start the app.
# install project dependencies
yarn install

# start the server
yarn start
When started, the app renders to what we have in the picture below.
The app currently has a header and two columns. Clicking on Get images in the left column makes an API call to the URL https://picsum.photos/v2/list?page=0&limit=2 and displays two pictures. On the right column, we have some description texts and two buttons.
When we click the Replace string with object button, we’ll replace the text {"function":"I live to crash"}, which has been stringified, with the plain JavaScript object. This will trigger an error as React does not render plain JavaScript objects. This will cause the whole page to crash and go blank. We’ll have to refresh the page to get back our view.
Try it for yourself.
Now refresh the page and click the Invoke event handler button. You’ll see an error screen popup, with a little X at the top right corner. Clicking on it removes the error screen and shows you the rendered page, without any need to refresh. In this case, React still knows what to display even though an error is thrown in the event handler. In a production environment, this error screen won’t show up at all and the page will remain intact. You can only see that something has gone wrong if you look in the developer console.
Note: To run the app in production mode requires that you install serve globally. After installing the server, build the app, and start it with the below command.
# build the app for production
yarn build

# serve the app from the build folder
serve -s build
Having seen how React handles two types of errors, (rendering error, and event handler error), let’s now write an error boundary component.
Create a new ErrorBoundary.js file inside the /src folder and let’s build the error boundary component piece by piece.
We define both of the two lifecycle methods that make a component an error boundary. Whenever an error occurs inside the error boundary’s child component, both of our lifecycle methods are activated.
static getDerivedStateFromError() receives the error and updates the state variables, error and hasError.
componentDidCatch() receives the error, which represents the error that was thrown and errorInfo which is an object with a componentStack key containing information about which component threw the error. Here we logged the error and also update the state with the errorInfo. It’s totally up to you what you want to do with these two.
Then in the render method, we return this.props.children, which represents whatever component that this error boundary encloses.
Let’s add the final piece of code. Copy the following code and paste it inside the render() method.
const { hasError, errorInfo } = this.state;
if (hasError) {
  return (
    <div className="card my-5">
      <div className="card-header">
        <p>
          There was an error in loading this page.{' '}
          <span
            style={{ cursor: 'pointer', color: '#0077FF' }}
            onClick={() => {
              window.location.reload();
            }}
          >
            Reload this page
          </span>{' '}
        </p>
      </div>
      <div className="card-body">
        <details className="error-details">
          <summary>Click for error details</summary>
          {errorInfo && errorInfo.componentStack.toString()}
        </details>
      </div>
    </div>
  );
}
In the render() method, we check if hasError is true. If it is, then we render the <div className="card my-5"></div> div, which is our fallback UI. Here, we’re showing information about the error and an option to reload the page. However, in a production environment, it is not advised to show the error to the user. Some other message would be fine.
Let’s now make use of our ErrorBoundary component. Open up App.js, import ErrorBoundary and render ColumnRight inside it.
# import the error boundary
import ErrorBoundary from './ErrorBoundary';

# wrap the right column with the error boundary
<ErrorBoundary>
  <ColumnRight />
</ErrorBoundary>
Now click on Replace string with object. This time, the right column crashes and the fallback UI is displayed. We’re showing a detailed report about where the error happened. We also see the error log in the developer console.
We can see that everything else remains in place. Click on Get images to confirm that it still works as expected.
At this point, I want to mention that with error boundaries, you can go as granular as you want. This means that you can use as many as necessary. You could even have multiple error boundaries in a single component.
With our current use of Error Boundary, clicking Replace string with object crashes the whole right column. Let’s see how we can improve on this.
Open up src/columns/ColumnRight.js, import ErrorBoundary and render the second <p> block inside it. This is the paragraph that crashes the <ColumnRight /> component.
# import the component
import ErrorBoundary from '../ErrorBoundary';

# render the erring paragraph inside it.
<ErrorBoundary>
  <p>
  Clicking this button will replace the stringified object,{' '}
    <code>{text}</code>, with the original object. This will result in a
  rendering error.
  </p>
</ErrorBoundary>
This time, we still have most of the page intact. Only the second paragraph is replaced with our fallback UI.
Click around to make sure everything else is working.
If you’d like to check out my code at this point you should check out the 02-create-eb branch.
In case you’re wondering if this whole error boundary thing is cool, let me show you what I captured on Github a few days ago. Look at the red outline.
I’m not certain about what is happening here, but it sure looks like an error boundary.
Error boundaries are cool, but we don’t want errors in the first place. So, we need to monitor errors as they occur so we can get a better idea of how to fix them. In this section, we’ll learn how Sentry can help us in that regard.
Integrating With Sentry
As I opened the Sentry homepage while writing this line, I was greeted by this message.
Software errors are inevitable. Chaos is not. Sentry provides self-hosted and cloud-based error monitoring that helps all software teams discover, triage, and prioritize errors in real-time.
Sentry is a commercial error reporting service. There are many other companies that provide similar services. My choice of Sentry for this article is because it has a free developer plan that lets me log up to 5,000 events per month across all my projects (pricing docs). An event is a crash report (also known as an exception or error). For this tutorial, we will be making use of the free developer plan.
You can integrate Sentry with a lot of web frameworks. Let’s go over the steps to integrate it into our React project.
Visit the Sentry website and create an account or login if you already have one.
Click on Projects in the left navigation. Then, click on Create Project to start a new project.
Under Choose a platform, select React.
Under Set your default alert settings check Alert me on every new issue.
Give your project a name and click Create project. This will create the project and redirect you to the configuration page.
Let’s install the Sentry browser SDK.
# install Sentry
yarn add @sentry/browser
On the configuration page, copy the browser SDK initialization code and paste it into your index.js file.
import * as Sentry from '@Sentry/browser';

# Initialize with Data Source Name (dsn)
Sentry.init({ dsn: 'dsn-string' });
And that is enough for Sentry to start sending error alerts. It says in the docs,
Note: On its own, @Sentry/browser will report any uncaught exceptions triggered from your application.
Click on Got it! Take me to the issue stream to proceed to the issues dashboard. Now return to your app in the browser and click on the red buttons to throw some error. You should get email alerts for each error (Sometimes the emails are delayed). Refresh your issues dashboard to see the errors.
The Sentry dashboard provides a lot of information about the error it receives. You can see information such as a graph of the frequency of occurrence of each error event type. You can also assign each error to a team member. There’s a ton of information. Do take some time to explore them to see what is useful to you.
You can click on each issue to see more detailed information about the error event.
Now let’s use Sentry to report errors that are caught by our error boundary. Open ErrorBoundary.js and update the following pieces of code.
# import Sentry
import * as Sentry from '@sentry/browser'

# add eventId to state
state = {
  error: '',
  eventId: '', // add this to state
  errorInfo: '',
  hasError: false,
};

# update componentDidCatch
componentDidCatch(error, errorInfo) {
  // eslint-disable-next-line no-console
  console.log({ error, errorInfo });
  Sentry.withScope((scope) => {
    scope.setExtras(errorInfo);
    const eventId = Sentry.captureException(error);
    this.setState({ eventId, errorInfo });
  });
}
With this setup, Sentry sends all errors captured by our error boundary to our issue dashboard using the Sentry.captureException method.
Sentry also gives us a tool to collect user feedback. Let’s add the feedback button as part of our fallback UI inside our error boundary.
Open ErrorBoundary.js and add the feedback button just after the div with a className of card-body. You could place this button anywhere you like.
Now, whenever our fallback UI is rendered, the Report feedback button is displayed. Clicking on this button opens a dialog that the user can fill to provide us with feedback.
Go ahead and trigger an error, then, fill and submit the feedback form. Now go to your Sentry dashboard and click on User Feedback in the left navigation. You should see your reported feedback.
Currently, we get alerts for every error, even those that happen during development. This tends to clog our issue stream. Let’s only report errors that happen in production.
On the left navigation click on Settings. Underneath the ORGANIZATION menu, click on Projects. In that list, click on your error boundary project. From Project Settings on the lefthand side, click on Inbound Filters. Look for Filter out events coming from localhost and enable it. This is just one of the numerous configurations that are available in Sentry. I encourage you to have a look around to see what might be useful for your project.
If you’d like to take a look at my code, the corresponding branch in my repo is 03-integrate-sentry.
Conclusion
If you haven’t been using error boundaries in your React app, you should immediately add one at the top level of your app. Also, I encourage you to integrate an error reporting service into your project. We’ve seen how easy it is to get started with Sentry for free.
How To Set Up An Express API Backend Project With PostgreSQL
How To Set Up An Express API Backend Project With PostgreSQL
Chidi Orji
We will take a Test-Driven Development (TDD) approach and the set up Continuous Integration (CI) job to automatically run our tests on Travis CI and AppVeyor, complete with code quality and coverage reporting. We will learn about controllers, models (with PostgreSQL), error handling, and asynchronous Express middleware. Finally, we’ll complete the CI/CD pipeline by configuring automatic deploy on Heroku.
It sounds like a lot, but this tutorial is aimed at beginners who are ready to try their hands on a back-end project with some level of complexity, and who may still be confused as to how all the pieces fit together in a real project.
It is robust without being overwhelming and is broken down into sections that you can complete in a reasonable length of time.
Getting Started
The first step is to create a new directory for the project and start a new node project. Node is required to continue with this tutorial. If you don’t have it installed, head over to the official website, download, and install it before continuing.
I will be using yarn as my package manager for this project. There are installation instructions for your specific operating system here. Feel free to use npm if you like.
Open your terminal, create a new directory, and start a Node.js project.
# create a new directory
mkdir express-api-template

# change to the newly-created directory
cd express-api-template

# initialize a new Node.js project
npm init
Answer the questions that follow to generate a package.json file. This file holds information about your project. Example of such information includes what dependencies it uses, the command to start the project, and so on.
You may now open the project folder in your editor of choice. I use visual studio code. It’s a free IDE with tons of plugins to make your life easier, and it’s available for all major platforms. You can download it from the official website.
Create the following files in the project folder:
README.md
.editorconfig
Here’s a description of what .editorconfig does from the EditorConfig website. (You probably don’t need it if you’re working solo, but it does no harm, so I’ll leave it here.)
“EditorConfig helps maintain consistent coding styles for multiple developers working on the same project across various editors and IDEs.”
The [*] means that we want to apply the rules that come under it to every file in the project. We want an indent size of two spaces and UTF-8 character set. We also want to trim trailing white space and insert a final empty line in our file.
Open README.md and add the project name as a first-level element.
# Express API template
Let’s add version control right away.
# initialize the project folder as a git repository
git init
Create a .gitignore file and enter the following lines:
I consider this to be a good point to commit my changes and push them to GitHub.
Starting A New Express Project
Express is a Node.js framework for building web applications. According to the official website, it is a
Fast, unopinionated, minimalist web framework for Node.js.
There are other great web application frameworks for Node.js, but Express is very popular, with over 47k GitHub stars at the time of this writing.
In this article, we will not be having a lot of discussions about all the parts that make up Express. For that discussion, I recommend you check out Jamie’s series. The first part is here, and the second part is here.
Install Express and start a new Express project. It’s possible to manually set up an Express server from scratch but to make our life easier we’ll use the express-generator to set up the app skeleton.
# install the express generator globally
yarn global add express-generator

# install express
yarn add express

# generate the express project in the current folder
express -f
The -f flag forces Express to create the project in the current directory.
We’ll now perform some house-cleaning operations.
Delete the file index/users.js.
Delete the folders public/ and views/.
Rename the file bin/www to bin/www.js.
Uninstall jade with the command yarn remove jade.
Create a new folder named src/ and move the following inside it:
1. app.js file
2. bin/ folder
3. routes/ folder inside.
Open up package.json and update the start script to look like below.
"start": "node ./src/bin/www"
At this point, your project folder structure looks like below. You can see how VS Code highlights the file changes that have taken place.
The code generated by express-generator is in ES5, but in this article, we will be writing all our code in ES6 syntax. So, let’s convert our existing code to ES6.
Replace the content of routes/index.js with the below code:
import express from 'express';

const indexRouter = express.Router();

indexRouter.get('/', (req, res) =>
  res.status(200).json({ message: 'Welcome to Express API template' })
);

export default indexRouter;
It is the same code as we saw above, but with the import statement and an arrow function in the / route handler.
Replace the content of src/app.js with the below code:
import logger from 'morgan';
import express from 'express';
import cookieParser from 'cookie-parser';
import indexRouter from './routes/index';
const app = express();
app.use(logger('dev'));
app.use(express.json());
app.use(express.urlencoded({ extended: true }));
app.use(cookieParser());
app.use('/v1', indexRouter);

export default app;
Let’s now take a look at the content of src/bin/www.js. We will build it incrementally. Delete the content of src/bin/www.js and paste in the below code block.
#!/usr/bin/env node
/**
 * Module dependencies.
 */
import debug from 'debug';
import http from 'http';
import app from '../app';
/**
 * Normalize a port into a number, string, or false.
 */
const normalizePort = val => {
  const port = parseInt(val, 10);
  if (Number.isNaN(port)) {
    // named pipe
    return val;
  }
  if (port >= 0) {
    // port number
    return port;
  }
  return false;
};

/**
 * Get port from environment and store in Express.
 */
const port = normalizePort(process.env.PORT || '3000');
app.set('port', port);

/**
 * Create HTTP server.
 */
const server = http.createServer(app);

// next code block goes here
This code checks if a custom port is specified in the environment variables. If none is set the default port value of 3000 is set on the app instance, after being normalized to either a string or a number by normalizePort. The server is then created from the http module, with app as the callback function.
The #!/usr/bin/env node line is optional since we would specify node when we want to execute this file. But make sure it is on line 1 of src/bin/www.js file or remove it completely.
Let’s take a look at the error handling function. Copy and paste this code block after the line where the server is created.
/**
 * Event listener for HTTP server "error" event.
 */
const onError = error => {
  if (error.syscall !== 'listen') {
    throw error;
  }
  const bind = typeof port === 'string' ? `Pipe ${port}` : `Port ${port}`;
  // handle specific listen errors with friendly messages
  switch (error.code) {
    case 'EACCES':
      alert(`${bind} requires elevated privileges`);
      process.exit(1);
      break;
    case 'EADDRINUSE':
      alert(`${bind} is already in use`);
      process.exit(1);
      break;
    default:
      throw error;
  }
};

/**
 * Event listener for HTTP server "listening" event.
 */
const onListening = () => {
  const addr = server.address();
  const bind = typeof addr === 'string' ? `pipe ${addr}` : `port ${addr.port}`;
  debug(`Listening on ${bind}`);
};
/**
 * Listen on provided port, on all network interfaces.
 */
server.listen(port);
server.on('error', onError);
server.on('listening', onListening);
The onError function listens for errors in the http server and displays appropriate error messages. The onListening function simply outputs the port the server is listening on to the console. Finally, the server listens for incoming requests at the specified address and port.
At this point, all our existing code is in ES6 syntax. Stop your server (use Ctrl + C) and run yarn start. You’ll get an error SyntaxError: Invalid or unexpected token. This happens because Node (at the time of writing) doesn’t support some of the syntax we’ve used in our code.
We’ll now fix that in the following section.
Configuring Development Dependencies: babel, nodemon, eslint, And prettier
It’s time to set up most of the scripts we’re going to need at this phase of the project.
Install the required libraries with the below commands. You can just copy everything and paste it in your terminal. The comment lines will be skipped.
This installs all the listed babel scripts as development dependencies. Check your package.json file and you should see a devDependencies section. All the installed scripts will be listed there.
The babel scripts we’re using are explained below:
@babel/cli
A required install for using babel. It allows the use of Babel from the terminal and is available as ./node_modules/.bin/babel.
@babel/core
Core Babel functionality. This is a required installation.
@babel/node
This works exactly like the Node.js CLI, with the added benefit of compiling with babel presets and plugins. This is required for use with nodemon.
@babel/plugin-transform-runtime
This helps to avoid duplication in the compiled output.
@babel/preset-env
A collection of plugins that are responsible for carrying out code transformations.
@babel/register
This compiles files on the fly and is specified as a requirement during tests.
@babel/runtime
This works in conjunction with @babel/plugin-transform-runtime.
Create a file named .babelrc at the root of your project and add the following code:
The watch key tells nodemon which files and folders to watch for changes. So, whenever any of these files changes, nodemon restarts the server. The ignore key tells it the files not to watch for changes.
Now update the scripts section of your package.json file to look like the following:
# build the content of the src folder
"prestart": "babel ./src --out-dir build"

# start server from the build folder
"start": "node ./build/bin/www"

# start server in development mode
"startdev": "nodemon --exec babel-node ./src/bin/www"
prestart scripts builds the content of the src/ folder and puts it in the build/ folder. When you issue the yarn start command, this script runs first before the start script.
start script now serves the content of the build/ folder instead of the src/ folder we were serving previously. This is the script you’ll use when serving the file in production. In fact, services like Heroku automatically run this script when you deploy.
yarn startdev is used to start the server during development. From now on we will be using this script as we develop the app. Notice that we’re now using babel-node to run the app instead of regular node. The --exec flag forces babel-node to serve the src/ folder. For the start script, we use node since the files in the build/ folder have been compiled to ES5.
Run yarn startdev and visit http://localhost:3000/v1. Your server should be up and running again.
The final step in this section is to configure ESLint and prettier. ESLint helps with enforcing syntax rules while prettier helps for formatting our code properly for readability.
Add both of them with the command below. You should run this on a separate terminal while observing the terminal where our server is running. You should see the server restarting. This is because we’re monitoring package.json file for changes.
This file mostly defines some rules against which eslint will check our code. You can see that we’re extending the style rules used by Airbnb.
In the "rules" section, we define whether eslint should show a warning or an error when it encounters certain violations. For instance, it shows a warning message on our terminal for any indentation that does not use 2 spaces. A value of [0] turns off a rule, which means that we won’t get a warning or an error if we violate that rule.
Create a file named .prettierrc and add the code below:
We’re setting a tab width of 2 and enforcing the use of single quotes throughout our application. Do check the prettier guide for more styling options.
Now add the following scripts to your package.json:
# add these one after the other

"lint": "./node_modules/.bin/eslint ./src"

"pretty": "prettier --write '**/*.{js,json}' '!node_modules/**'"

"postpretty": "yarn lint --fix"
Run yarn lint. You should see a number of errors and warnings in the console.
The pretty command prettifies our code. The postpretty command is run immediately after. It runs the lint command with the --fix flag appended. This flag tells ESLint to automatically fix common linting issues. In this way, I mostly run the yarn pretty command without bothering about the lint command.
Run yarn pretty. You should see that we have only two warnings about the presence of alert in the bin/www.js file.
Here’s what our project structure looks like at this point.
Settings And Environment Variables In Our .env File
In nearly every project, you’ll need somewhere to store settings that will be used throughout your app e.g. an AWS secret key. We store such settings as environment variables. This keeps them away from prying eyes, and we can use them within our application as needed.
I like having a settings.js file with which I read all my environment variables. Then, I can refer to the settings file from anywhere within my app. You’re at liberty to name this file whatever you want, but there’s some kind of consensus about naming such files settings.js or config.js.
For our environment variables, we’ll keep them in a .env file and read them into our settings file from there.
Create the .env file at the root of your project and enter the below line:
TEST_ENV_VARIABLE="Environment variable is coming across"
To be able to read environment variables into our project, there’s a nice library, dotenv that reads our .env file and gives us access to the environment variables defined inside. Let’s install it.
# install dotenv
yarn add dotenv
Add the .env file to the list of files being watched by nodemon.
Now, create the settings.js file inside the src/ folder and add the below code:
import dotenv from 'dotenv';
dotenv.config();
export const testEnvironmentVariable = process.env.TEST_ENV_VARIABLE;
We import the dotenv package and call its config method. We then export the testEnvironmentVariable which we set in our .env file.
Open src/routes/index.js and replace the code with the one below.
The only change we’ve made here is that we import testEnvironmentVariable from our settings file and use is as the return message for a request from the / route.
It’s time to incorporate testing into our app. One of the things that give the developer confidence in their code is tests. I’m sure you’ve seen countless articles on the web preaching Test-Driven Development (TDD). It cannot be emphasized enough that your code needs some measure of testing. TDD is very easy to follow when you’re working with Express.js.
In our tests, we will make calls to our API endpoints and check to see if what is returned is what we expect.
Each of these libraries has its own role to play in our tests.
mocha
test runner
chai
used to make assertions
nyc
collect test coverage report
sinon-chai
extends chai’s assertions
supertest
used to make HTTP calls to our API endpoints
coveralls
for uploading test coverage to coveralls.io
Create a new test/ folder at the root of your project. Create two files inside this folder:
test/setup.js
test/index.test.js
Mocha will find the test/ folder automatically.
Open up test/setup.js and paste the below code. This is just a helper file that helps us organize all the imports we need in our test files.
import supertest from 'supertest';
import chai from 'chai';
import sinonChai from 'sinon-chai';
import app from '../src/app';

chai.use(sinonChai);
export const { expect } = chai;
export const server = supertest.agent(app);
export const BASE_URL = '/v1';
This is like a settings file, but for our tests. This way we don’t have to initialize everything inside each of our test files. So we import the necessary packages and export what we initialized — which we can then import in the files that need them.
Open up index.test.js and paste the following test code.
import { expect, server, BASE_URL } from './setup';

describe('Index page test', () => {
  it('gets base url', done => {
    server
      .get(`${BASE_URL}/`)
      .expect(200)
      .end((err, res) => {
        expect(res.status).to.equal(200);
        expect(res.body.message).to.equal(
          'Environment variable is coming across.'
        );
        done();
      });
  });
});
Here we make a request to get the base endpoint, which is / and assert that the res.body object has a message key with a value of Environment variable is coming across.
If you’re not familiar with the describe, it pattern, I encourage you to take a quick look at Mocha’s “Getting Started” doc.
Add the test command to the scripts section of package.json.
This script executes our test with nyc and generates three kinds of coverage report: an HTML report, outputted to the coverage/ folder; a text report outputted to the terminal and an lcov report outputted to the .nyc_output/ folder.
Now run yarn test. You should see a text report in your terminal just like the one in the below photo.
Look inside .gitignore and you’ll see that we’re already ignoring both. I encourage you to open up coverage/index.html in a browser and view the test report for each file.
This is a good point to commit your changes.
The corresponding branch in my repo is 04-first-test.
Continuous Integration(CD) And Badges: Travis, Coveralls, Code Climate, AppVeyor
It’s now time to configure continuous integration and deployment (CI/CD) tools. We will configure common services such as travis-ci, coveralls, AppVeyor, and codeclimate and add badges to our README file.
Let’s get started.
Travis CI
Travis CI is a tool that runs our tests automatically each time we push a commit to GitHub (and recently, Bitbucket) and each time we create a pull request. This is mostly useful when making pull requests by showing us if the our new code has broken any of our tests.
Visit travis-ci.com or travis-ci.org and create an account if you don’t have one. You have to sign up with your GitHub account.
Hover over the dropdown arrow next to your profile picture and click on settings.
Under Repositories tab click Manage repositories on Github to be redirected to Github.
On the GitHub page, scroll down to Repository access and click the checkbox next to Only select repositories.
Click the Select repositories dropdown and find the express-api-template repo. Click it to add it to the list of repositories you want to add to travis-ci.
Click Approve and install and wait to be redirected back to travis-ci.
At the top of the repo page, close to the repo name, click on the build unknown icon. From the Status Image modal, select markdown from the format dropdown.
Copy the resulting code and paste it in your README.md file.
On the project page, click on More options > Settings. Under Environment Variables section, add the TEST_ENV_VARIABLE env variable. When entering its value, be sure to have it within double quotes like this "Environment variable is coming across."
Create .travis.yml file at the root of your project and paste in the below code (We’ll set the value of CC_TEST_REPORTER_ID in the Code Climate section).
First, we tell Travis to run our test with Node.js, then set the CC_TEST_REPORTER_ID global environment variable (we’ll get to this in the Code Climate section). In the matrix section, we tell Travis to run our tests with Node.js v12. We also want to cache the node_modules/ directory so it doesn’t have to be regenerated every time.
We install our dependencies using the yarn command which is a shorthand for yarn install. The before_script and after_script commands are used to upload coverage results to codeclimate. We’ll configure codeclimate shortly. After yarn test runs successfully, we want to also run yarn coverage which will upload our coverage report to coveralls.io.
Coveralls
Coveralls uploads test coverage data for easy visualization. We can view the test coverage on our local machine from the coverage folder, but Coveralls makes it available outside our local machine.
Visit coveralls.io and either sign in or sign up with your Github account.
Hover over the left-hand side of the screen to reveal the navigation menu. Click on ADD REPOS.
Search for the express-api-template repo and turn on coverage using the toggle button on the left-hand side. If you can’t find it, click on SYNC REPOS on the upper right-hand corner and try again. Note that your repo has to be public, unless you have a PRO account.
Click details to go to the repo details page.
Create the .coveralls.yml file at the root of your project and enter the below code. To get the repo_token, click on the repo details. You will find it easily on that page. You could just do a browser search for repo_token.
This command uploads the coverage report in the .nyc_output folder to coveralls.io. Turn on your Internet connection and run:
yarn coverage
This should upload the existing coverage report to coveralls. Refresh the repo page on coveralls to see the full report.
On the details page, scroll down to find the BADGE YOUR REPO section. Click on the EMBED dropdown and copy the markdown code and paste it into your README file.
Code Climate
Code Climate is a tool that helps us measure code quality. It shows us maintenance metrics by checking our code against some defined patterns. It detects things such as unnecessary repetition and deeply nested for loops. It also collects test coverage data just like coveralls.io.
Visit codeclimate.com and click on ‘Sign up with GitHub’. Log in if you already have an account.
Once in your dashboard, click on Add a repository.
Find the express-api-template repo from the list and click on Add Repo.
Wait for the build to complete and redirect to the repo dashboard.
Under Codebase Summary, click on Test Coverage. Under the Test coverage menu, copy the TEST REPORTER ID and paste it in your .travis.yml as the value of CC_TEST_REPORTER_ID.
Still on the same page, on the left-hand navigation, under EXTRAS, click on Badges. Copy the maintainability and test coverage badges in markdown format and paste them into your README.md file.
It’s important to note that there are two ways of configuring maintainability checks. There are the default settings that are applied to every repo, but if you like, you could provide a .codeclimate.yml file at the root of your project. I’ll be using the default settings, which you can find under the Maintainability tab of the repo settings page. I encourage you to take a look at least. If you still want to configure your own settings, this guide will give you all the information you need.
AppVeyor
AppVeyor and Travis CI are both automated test runners. The main difference is that travis-ci runs tests in a Linux environment while AppVeyor runs tests in a Windows environment. This section is included to show how to get started with AppVeyor.
From the repo list, find the express-api-template repo. Hover over it and click ADD.
Click on the Settings tab. Click on Environment on the left navigation. Add TEST_ENV_VARIABLE and its value. Click ‘Save’ at the bottom of the page.
Create the appveyor.yml file at the root of your project and paste in the below code.
environment:
  matrix:
  - nodejs_version: "12"
install:
  - yarn
test_script:
  - yarn test
build: off
This code instructs AppVeyor to run our tests using Node.js v12. We then install our project dependencies with the yarn command. test_script specifies the command to run our test. The last line tells AppVeyor not to create a build folder.
Click on the Settings tab. On the left-hand navigation, click on badges. Copy the markdown code and paste it in your README.md file.
Commit your code and push to GitHub. If you have done everything as instructed all tests should pass and you should see your shiny new badges as shown below. Check again that you have set the environment variables on Travis and AppVeyor.
Currently, we’re handling the GET request to the root URL, /v1, inside the src/routes/index.js. This works as expected and there is nothing wrong with it. However, as your application grows, you want to keep things tidy. You want concerns to be separated — you want a clear separation between the code that handles the request and the code that generates the response that will be sent back to the client. To achieve this, we write controllers. Controllers are simply functions that handle requests coming through a particular URL.
To get started, create a controllers/ folder inside the src/ folder. Inside controllers create two files: index.js and home.js. We would export our functions from within index.js. You could name home.js anything you want, but typically you want to name controllers after what they control. For example, you might have a file usersController.js to hold every function related to users in your app.
Open src/controllers/home.js and enter the code below:
You will notice that we only moved the function that handles the request for the / route.
Open src/controllers/index.js and enter the below code.
// export everything from home.js
export * from './home';
We export everything from the home.js file. This allows us shorten our import statements to import { indexPage } from '../controllers';
Open src/routes/index.js and replace the code there with the one below:
import express from 'express';
import { indexPage } from '../controllers';
const indexRouter = express.Router();

indexRouter.get('/', indexPage);

export default indexRouter;
The only change here is that we’ve provided a function to handle the request to the / route.
You just successfully wrote your first controller. From here it’s a matter of adding more files and functions as needed.
Go ahead and play with the app by adding a few more routes and controllers. You could add a route and a controller for the about page. Remember to update your test, though.
Run yarn test to confirm that we’ve not broken anything. Does your test pass? That’s cool.
Connecting The PostgreSQL Database And Writing A Model
Our controller currently returns hard-coded text messages. In a real-world app, we often need to store and retrieve information from a database. In this section, we will connect our app to a PostgreSQL database.
We’re going to implement the storage and retrieval of simple text messages using a database. We have two options for setting a database: we could provision one from a cloud server, or we could set up our own locally.
I would recommend you provision a database from a cloud server. ElephantSQL has a free plan that gives 20MB of free storage which is sufficient for this tutorial. Visit the site and click on Get a managed database today. Create an account (if you don’t have one) and follow the instructions to create a free plan. Take note of the URL on the database details page. We’ll be needing it soon.
ElephantSQL turtle plan details page (Large preview)
If you would rather set up a database locally, you should visit the PostgreSQL and PgAdmin sites for further instructions.
Once we have a database set up, we need to find a way to allow our Express app to communicate with our database. Node.js by default doesn’t support reading and writing to PostgreSQL database, so we’ll be using an excellent library, appropriately named, node-postgres.
node-postgres executes SQL queries in node and returns the result as an object, from which we can grab items from the rows key.
Open your .env file and add the CONNECTION_STRING variable. This is the connection string we’ll be using to establish a connection to our database. The general form of the connection string is shown below.
If you’re using elephantSQL you should copy the URL from the database details page.
Inside your /src folder, create a new folder called models/. Inside this folder, create two files:
pool.js
model.js
Open pools.js and paste the following code:
import { Pool } from 'pg';
import dotenv from 'dotenv';
import { connectionString } from '../settings';
dotenv.config();

export const pool = new Pool({ connectionString });
First, we import the Pool and dotenv from the pg and dotenv packages, and then import the settings we created for our postgres database before initializing dotenv. We establish a connection to our database with the Pool object. In node-postgres, every query is executed by a client. A Pool is a collection of clients for communicating with the database.
To create the connection, the pool constructor takes a config object. You can read more about all the possible configurations here. It also accepts a single connection string, which I will use here.
Open model.js and paste the following code:
import { pool } from './pool';

class Model {
  constructor(table) {
    this.pool = pool;
    this.table = table;
    this.pool.on('error', (err, client) => `Error, ${err}, on idle client${client}`);
  }

  async select(columns, clause) {
    let query = `SELECT ${columns} FROM ${this.table}`;
    if (clause) query += clause;
    return this.pool.query(query);
  }
}

export default Model;
We create a model class whose constructor accepts the database table we wish to operate on. We’ll be using a single pool for all our models.
We then create a select method which we will use to retrieve items from our database. This method accepts the columns we want to retrieve and a clause, such as a WHERE clause. It returns the result of the query, which is a Promise. Remember we said earlier that every query is executed by a client, but here we execute the query with pool. This is because, when we use pool.query, node-postgres executes the query using the first available idle client.
The query you write is entirely up to you, provided it is a valid SQL statement that can be executed by a Postgres engine.
The next step is to actually create an API endpoint to utilize our newly connected database. Before we do that, I’d like us to create some utility functions. The goal is for us to have a way to perform common database operations from the command line.
Create a folder, utils/ inside the src/ folder. Create three files inside this folder:
queries.js
queryFunctions.js
runQuery.js
We’re going to create functions to create a table in our database, insert seed data in the table, and to delete the table.
Open up queries.js and paste the following code:
export const createMessageTable = `
DROP TABLE IF EXISTS messages;
CREATE TABLE IF NOT EXISTS messages (
  id SERIAL PRIMARY KEY,
  name VARCHAR DEFAULT '',
  message VARCHAR NOT NULL
  )
  `;

export const insertMessages = `
INSERT INTO messages(name, message)
VALUES ('chidimo', 'first message'),
      ('orji', 'second message')
`;

export const dropMessagesTable = 'DROP TABLE messages';
In this file, we define three SQL query strings. The first query deletes and recreates the messages table. The second query inserts two rows into the messages table. Feel free to add more items here. The last query drops/deletes the messages table.
Open queryFunctions.js and paste the following code:
Here, we create functions to execute the queries we defined earlier. Note that the executeQueryArray function executes an array of queries and waits for each one to complete inside the loop. (Don’t do such a thing in production code though). Then, we only resolve the promise once we have executed the last query in the list. The reason for using an array is that the number of such queries will grow as the number of tables in our database grows.
This is where we execute the functions to create the table and insert the messages in the table. Let’s add a command in the scripts section of our package.json to execute this file.
"runQuery": "babel-node ./src/utils/runQuery"
Now run:
yarn runQuery
If you inspect your database, you will see that the messages table has been created and that the messages were inserted into the table.
If you’re using ElephantSQL, on the database details page, click on BROWSER from the left navigation menu. Select the messages table and click Execute. You should see the messages from the queries.js file.
Let’s create a controller and route to display the messages from our database.
Create a new controller file src/controllers/messages.js and paste the following code:
import Model from '../models/model';

const messagesModel = new Model('messages');
export const messagesPage = async (req, res) => {
  try {
    const data = await messagesModel.select('name, message');
    res.status(200).json({ messages: data.rows });
  } catch (err) {
    res.status(200).json({ messages: err.stack });
  }
};
We import our Model class and create a new instance of that model. This represents the messages table in our database. We then use the select method of the model to query our database. The data (name and message) we get is sent as JSON in the response.
We define the messagesPage controller as an async function. Since node-postgres queries return a promise, we await the result of that query. If we encounter an error during the query we catch it and display the stack to the user. You should decide how choose to handle the error.
Add the get messages endpoint to src/routes/index.js and update the import line.
# update the import line
import { indexPage, messagesPage } from '../controllers';

# add the get messages endpoint
indexRouter.get('/messages', messagesPage)
Now, let’s update our test file. When doing TDD, you usually write your tests before implementing the code that makes the test pass. I’m taking the opposite approach here because we’re still working on setting up the database.
Create a new file, hooks.js in the test/ folder and enter the below code:
When our test starts, Mocha finds this file and executes it before running any test file. It executes the before hook to create the database and insert some items into it. The test files then run after that. Once the test is finished, Mocha runs the after hook in which we drop the database. This ensures that each time we run our tests, we do so with clean and new records in our database.
Create a new test file test/messages.test.js and add the below code:
Note: I hope everything works fine on your end, but in case you should be having trouble for some reason, you can always check my code in the repo!
Now, let’s see how we can add a message to our database. For this step, we’ll need a way to send POST requests to our URL. I’ll be using Postman to send POST requests.
Let’s go the TDD route and update our test to reflect what we expect to achieve.
Open test/message.test.js and add the below test case:
This test makes a POST request to the /v1/messages endpoint and we expect an array to be returned. We also check for the id, name, and message properties on the array.
Run your tests to see that this case fails. Let’s now fix it.
To send post requests, we use the post method of the server. We also send the name and message we want to insert. We expect the response to be an array, with a property id and the other info that makes up the query. The id is proof that a record has been inserted into the database.
Open src/models/model.js and add the insert method:
We destructure the request body to get the name and message. Then we use the values to form an SQL query string which we then execute with the insertWithReturn method of our model.
Add the below POST endpoint to /src/routes/index.js and update your import line.
import { indexPage, messagesPage, addMessage } from '../controllers';

indexRouter.post('/messages', addMessage);
Run your tests to see if they pass.
Open Postman and send a POST request to the messages endpoint. If you’ve just run your test, remember to run yarn query to recreate the messages table.
yarn query
POST request to messages endpoint. (Large preview)
GET request showing newly added message. (Large preview)
Commit your changes and push to GitHub. Your tests should pass on both Travis and AppVeyor. Your test coverage will drop by a few points, but that’s okay.
The corresponding branch on my repo is 08-post-to-db.
Middleware
Our discussion of Express won’t be complete without talking about middleware. The Express documentation describes a middlewares as:
“[...] functions that have access to the request object (req), the response object (res), and the next middleware function in the application’s request-response cycle. The next middleware function is commonly denoted by a variable named next.”
We’re going to write a simple middleware that modifies the request body. Our middleware will append the word SAYS: to the incoming message before it is saved in the database.
Before we start, let’s modify our test to reflect what we want to achieve.
Open up test/messages.test.js and modify the last expect line in the posts message test case:
it('posts messages', done => {
   ...
  expect(m).to.have.property('message', `SAYS: ${data.message}`); # update this line
    ...
});
We’re asserting that the SAYS: string has been appended to the message. Run your tests to make sure this test case fails.
Now, let’s write the code to make the test pass.
Create a new middleware/ folder inside src/ folder. Create two files inside this folder:
Here, we append the string SAYS: to the message in the request body. After doing that, we must call the next() function to pass execution to the next function in the request-response chain. Every middleware has to call the next function to pass execution to the next middleware in the request-response cycle.
Enter the below code in index.js:
# export everything from the middleware file

export * from './middleware';
This exports the middleware we have in the /middleware.js file. For now, we only have the modifyMessage middleware.
Open src/routes/index.js and add the middleware to the post message request-response chain.
import { modifyMessage } from '../middleware';

indexRouter.post('/messages', modifyMessage, addMessage);
We can see that the modifyMessage function comes before the addMessage function. We invoke the addMessage function by calling next in the modifyMessage middleware. As an experiment, comment out the next() line in the modifyMessage middle and watch the request hang.
Open Postman and create a new message. You should see the appended string.
The corresponding branch in my repo is 09-middleware.
Error Handling And Asynchronous Middleware
Errors are inevitable in any application. The task before the developer is how to deal with errors as gracefully as possible.
In Express:
“Error Handling refers to how Express catches and processes errors that occur both synchronously and asynchronously.
If we were only writing synchronous functions, we might not have to worry so much about error handling as Express already does an excellent job of handling those. According to the docs:
“Errors that occur in synchronous code inside route handlers and middleware require no extra work.”
But once we start writing asynchronous router handlers and middleware, then we have to do some error handling.
Our modifyMessage middleware is a synchronous function. If an error occurs in that function, Express will handle it just fine. Let’s see how we deal with errors in asynchronous middleware.
Let’s say, before creating a message, we want to get a picture from the Lorem Picsum API using this URL https://picsum.photos/id/0/info. This is an asynchronous operation that could either succeed or fail, and that presents a case for us to deal with.
Start by installing Axios.
# install axios
yarn add axios
Open src/middleware/middleware.js and add the below function:
In this async function, we await a call to an API (we don’t actually need the returned data) and afterward call the next function in the request chain. If the request fails, we catch the error and pass it on to next. Once Express sees this error, it skips all other middleware in the chain. If we didn’t call next(err), the request will hang. If we only called next() without err, the request will proceed as if nothing happened and the error will not be caught.
Import this function and add it to the middleware chain of the post messages route:
This is our error handler. According to the Express error handling doc:
“[...] error-handling functions have four arguments instead of three: (err, req, res, next).”
Note that this error handler must come last, after every app.use() call. Once we encounter an error, we return the stack trace with a status code of 400. You could do whatever you like with the error. You might want to log it or send it somewhere.
To start the app, it needs to be compiled down to ES5 using babel in the prestart step because babel only exists in our development dependencies. We have to set NPM_CONFIG_PRODUCTION to false in order to be able to install those as well.
To confirm everything is set correctly, run the command below. You could also visit the settings tab on the app page and click on Reveal Config Vars.
# check configuration variables
heroku config
Now run git push heroku.
To open the app, run:
# open /v1 route
heroku open /v1

# open /v1/messages route
heroku open /v1/messages
If like me, you’re using the same PostgresSQL database for both development and production, you may find that each time you run your tests, the database is deleted. To recreate it, you could run either one of the following commands:
# run script locally
yarn runQuery

# run script with heroku
heroku run yarn runQuery
Continuous Deployment (CD) With Travis
Let’s now add Continuous Deployment (CD) to complete the CI/CD flow. We will be deploying from Travis after every successful test run.
The first step is to install Travis CI. (You can find the installation instructions over here.) After successfully installing the Travis CI, login by running the below command. (Note that this should be done in your project repository.)
# login to travis
travis login --pro

# use this if you’re using two factor authentication
travis login --pro --github-token enter-github-token-here
If your project is hosted on travis-ci.org, remove the --pro flag. To get a GitHub token, visit the developer settings page of your account and generate one. This only applies if your account is secured with 2FA.
Open your .travis.yml and add a deploy section:
deploy:
  provider: heroku
  app:
    master: app-name
Here, we specify that we want to deploy to Heroku. The app sub-section specifies that we want to deploy the master branch of our repo to the app-name app on Heroku. It’s possible to deploy different branches to different apps. You can read more about the available options here.
Run the below command to encrypt your Heroku API key and add it to the deploy section:
# encrypt heroku API key and add to .travis.yml
travis encrypt $(heroku auth:token) --add deploy.api_key --pro
This will add the below sub-section to the deploy section.
Now commit your changes and push to GitHub while monitoring your logs. You will see the build triggered as soon as the Travis test is done. In this way, if we have a failing test, the changes would never be deployed. Likewise, if the build failed, the whole test run would fail. This completes the CI/CD flow.
If you’ve made it this far, I say, “Thumbs up!” In this tutorial, we successfully set up a new Express project. We went ahead to configure development dependencies as well as Continuous Integration (CI). We then wrote asynchronous functions to handle requests to our API endpoints — completed with tests. We then looked briefly at error handling. Finally, we deployed our project to Heroku and configured Continuous Deployment.
You now have a template for your next back-end project. We’ve only done enough to get you started, but you should keep learning to keep going. Be sure to check out the Express.js docs as well. If you would rather use MongoDB instead of PostgreSQL, I have a template here that does exactly that. You can check it out for the setup. It has only a few points of difference.
Implementing Infinite Scroll And Image Lazy Loading In React
Implementing Infinite Scroll And Image Lazy Loading In React
Chidi Orji
If you have been looking for an alternative to pagination, infinite scroll is a good consideration. In this article, we’re going to explore some use cases for the Intersection Observer API in the context of a React functional component. The reader should possess a working knowledge of React functional components. Some familiarity with React hooks will be beneficial but not required, as we will be taking a look at a few.
Our goal is that at the end of this article, we will have implemented infinite scroll and image lazy loading using a native HTML API. We would also have learned a few more things about React Hooks. With that you can be able to implement infinite scroll and image lazy loading in your React application where necessary.
Let’s get started.
Creating Maps With React And Leaflet
Grasping information from a CSV or a JSON file isn’t only complicated, but is also tedious. Representing the same data in the form of visual aid is simpler. Shajia Abidi explains how powerful of a tool Leaflet is, and how a lot of different kinds of maps can be created. Read article →
The Intersection Observer API
According to the MDN docs, “the Intersection Observer API provides a way to asynchronously observe changes in the intersection of a target element with an ancestor element or with a top-level document’s viewport”.
This API allows us to implement cool features such as infinite scroll and image lazy loading. The intersection observer is created by calling its constructor and passing it a callback and an options object. The callback is invoked whenever one element, called the target, intersects either the device viewport or a specified element, called the root. We can specify a custom root in the options argument or use the default value.
let observer = new IntersectionObserver(callback, options);
The API is straightforward to use. A typical example looks like this:
var intObserver = new IntersectionObserver(entries => {
    entries.forEach(entry => {
      console.log(entry)
      console.log(entry.isIntersecting) // returns true if the target intersects the root element
    })
  },
  {
    // default options
  }
);
let target = document.querySelector('#targetId');
intObserver.observe(target); // start observation
entries is a list of IntersectionObserverEntry objects. The IntersectionObserverEntry object describes an intersection change for one observed target element. Note that the callback should not handle any time-consuming task as it runs on the main thread.
The Intersection Observer API currently enjoys broad browser support, as shown on caniuse.
You can read more about the API in the links provided in the resources section.
Let us now look at how to make use of this API in a real React app. The final version of our app will be a page of pictures that scrolls infinitely and will have each image loaded lazily.
Making API Calls With The useEffect Hook
To get started, clone the starter project from this URL. It has minimal setup and a few styles defined. I’ve also added a link to Bootstrap’s CSS in the public/index.html file as I’ll be using its classes for styling.
Feel free to create a new project if you like. Make sure you have yarn package manager installed if you want to follow with the repo. You can find the installation instructions for your specific operating system here.
For this tutorial, we’re going to be grabbing pictures from a public API and displaying them on the page. We will be using the Lorem Picsum APIs.
For this tutorial, we’ll be using the endpoint, https://picsum.photos/v2/list?page=0&limit=10, which returns an array of picture objects. To get the next ten pictures, we change the value of page to 1, then 2, and so on.
We will now build the App component piece by piece.
Open up src/App.js and enter the following code.
import React, { useEffect, useReducer } from 'react';

import './index.css';

function App() {
  const imgReducer = (state, action) => {
    switch (action.type) {
      case 'STACK_IMAGES':
        return { ...state, images: state.images.concat(action.images) }
      case 'FETCHING_IMAGES':
        return { ...state, fetching: action.fetching }
      default:
        return state;
    }
  }
  const [imgData, imgDispatch] = useReducer(imgReducer,{ images:[], fetching: true})
  // next code block goes here
}
Firstly, we define a reducer function, imgReducer. This reducer handles two actions.
The STACK_IMAGES action concatenates the images array.
FETCHING_IMAGES action toggles the value of the fetching variable between true and false.
The next step is to wire up this reducer to a useReducer hook. Once that is done, we get back two things:
imgData, which contains two variables: images is the array of picture objects. fetching is a boolean which tells us if the API call is in progress or not.
imgDispatch, which is a function for updating the reducer object.
Inside the useEffect hook, we make a call to the API endpoint with fetch API. We then update the images array with the result of the API call by dispatching the STACK_IMAGES action. We also dispatch the FETCHING_IMAGES action once the API call completes.
The next block of code defines the return value of the function. Enter the following code after the useEffect hook.
Let’s now extend this by displaying more pictures as the page scrolls.
Implementing Infinite Scroll
We aim to present more pictures as the page scrolls. From the URL of the API endpoint, https://picsum.photos/v2/list?page=0&limit=10, we know that to get a new set of photos, we only need to increment the value of page. We also need to do this when we have run out of pictures to show. For our purpose here, we’ll know we have run out of images when we hit the bottom of the page. It’s time to see how the Intersection Observer API helps us achieve that.
Open up src/App.js and create a new reducer, pageReducer, below imgReducer.
We define a variable bottomBoundaryRef and set its value to useRef(null). useRef lets variables preserve their values across component renders, i.e. the current value of the variable persists when the containing component re-renders. The only way to change its value is by re-assigning the .current property on that variable.
In our case, bottomBoundaryRef.current starts with a value of null. As the page rendering cycle proceeds, we set its current property to be the node <div id='page-bottom-boundary'>.
We use the assignment statement ref={bottomBoundaryRef} to tell React to set bottomBoundaryRef.current to be the div where this assignment is declared.
We shall see where this assignment is done in a minute.
Next, we define a scrollObserver function, in which to set the observer. This function accepts a DOM node to observe. The main point to note here is that whenever we hit the intersection under observation, we dispatch the ADVANCE_PAGE action. The effect is to increment the value of pager.page by 1. Once this happens, the useEffect hook that has it as a dependency is re-run. This re-run, in turn, invokes the fetch call with the new page number.
The event procession looks like this.
Hit intersection under observation → call ADVANCE_PAGE action → increment value of pager.page by 1 → useEffect hook for fetch call runs → fetch call is run → returned images are concatenated to the images array.
We invoke scrollObserver in a useEffect hook so that the function will run only when any of the hook’s dependencies change. If we didn’t call the function inside a useEffect hook, the function would run on every page render.
Recall that bottomBoundaryRef.current refers to <div id="page-bottom-boundary" style="border: 1px solid red;"></div>. We check that its value is not null before passing it to scrollObserver. Otherwise, the IntersectionObserver constructor would return an error.
Because we used scrollObserver in a useEffect hook, we have to wrap it in a useCallback hook to prevent un-ending component re-renders. You can learn more about useCallback in the React docs.
Enter the below code after the <div id='images'> div.
When the API call starts, we set fetching to true, and the text Getting images becomes visible. As soon as it finishes, we set fetching to false, and the text gets hidden. We could also trigger the API call before hitting the boundary exactly by setting a different threshold in the constructor options object. The red line at the end lets us see exactly when we hit the page boundary.
If you inspect the network tab as you scroll down, you’ll see that as soon as you hit the red line (the bottom boundary), the API call happens, and all the images start loading even when you haven’t gotten to viewing them. There are a variety of reasons why this might not be desirable behavior. We may want to save network calls until the user wants to see an image. In such a case, we could opt for loading the images lazily, i.e., we won’t load an image until it scrolls into view.
Open up src/App.js. Just below the infinite scrolling functions, enter the following code.
// App.js

// lazy loads images with intersection observer
// only swap out the image source if the new url exists
const imagesRef = useRef(null);
const imgObserver = useCallback(node => {
  const intObs = new IntersectionObserver(entries => {
    entries.forEach(en => {
      if (en.intersectionRatio > 0) {
        const currentImg = en.target;
        const newImgSrc = currentImg.dataset.src;
        // only swap out the image source if the new url exists
        if (!newImgSrc) {
          console.error('Image source is invalid');
        } else {
          currentImg.src = newImgSrc;
        }
        intObs.unobserve(node); // detach the observer when done
      }
    });
  })
  intObs.observe(node);
}, []);
useEffect(() => {
  imagesRef.current = document.querySelectorAll('.card-img-top');
  if (imagesRef.current) {
    imagesRef.current.forEach(img => imgObserver(img));
  }
}, [imgObserver, imagesRef, imgData.images]);
As with scrollObserver, we define a function, imgObserver, which accepts a node to observe. When the page hits an intersection, as determined by en.intersectionRatio > 0, we swap the image source on the element. Notice that we first check if the new image source exists before doing the swap. As with the scrollObserver function, we wrap imgObserver in a useCallback hook to prevent un-ending component re-render.
Also note that we stop observing an img element once we’re done with the substitution. We do this with the unobserve method.
In the following useEffect hook, we grab all the images with a class of .card-img-top on the page with document.querySelectorAll. Then we iterate over each image and set an observer on it.
Note that we added imgData.images as a dependency of the useEffect hook. When this changes it triggers the useEffect hook and in turn imgObserver get called with each <img className='card-img-top'> element.
Update the <img className='card-img-top'/> element as shown below.
We set a default source for every <img className='card-img-top'/> element and store the image we want to show on the data-src property. The default image usually has a small size so that we’re downloading as little as possible. When the <img/> element comes into view, the value on the data-src property replaces the default image.
In the picture below, we see the default lighthouse image still showing in some of the spaces.
Let’s now see how we can abstract all these functions so that they’re re-usable.
Abstracting Fetch, Infinite Scroll And Lazy Loading Into Custom Hooks
We have successfully implemented fetch, infinite scroll, and image lazy loading. We might have another component in our application that needs similar functionality. In that case, we could abstract and reuse these functions. All we have to do is move them inside a separate file and import them where we need them. We want to turn them into Custom Hooks.
The React documentation defines a Custom Hook as a JavaScript function whose name starts with "use" and that may call other hooks. In our case, we want to create three hooks, useFetch, useInfiniteScroll, useLazyLoading.
Create a file inside the src/ folder. Name it customHooks.js and paste the code below inside.
// customHooks.js

import { useEffect, useCallback, useRef } from 'react';
// make API calls and pass the returned data via dispatch
export const useFetch = (data, dispatch) => {
  useEffect(() => {
    dispatch({ type: 'FETCHING_IMAGES', fetching: true });
    fetch(`https://picsum.photos/v2/list?page=${data.page}&limit=10`)
      .then(data => data.json())
      .then(images => {
        dispatch({ type: 'STACK_IMAGES', images });
        dispatch({ type: 'FETCHING_IMAGES', fetching: false });
      })
      .catch(e => {
        dispatch({ type: 'FETCHING_IMAGES', fetching: false });
        return e;
      })
  }, [dispatch, data.page])
}

// next code block here
The useFetch hook accepts a dispatch function and a data object. The dispatch function passes the data from the API call to the App component, while the data object lets us update the API endpoint URL.
// infinite scrolling with intersection observer
export const useInfiniteScroll = (scrollRef, dispatch) => {
  const scrollObserver = useCallback(
    node => {
      new IntersectionObserver(entries => {
        entries.forEach(en => {
          if (en.intersectionRatio > 0) {
            dispatch({ type: 'ADVANCE_PAGE' });
          }
        });
      }).observe(node);
    },
    [dispatch]
  );
  useEffect(() => {
    if (scrollRef.current) {
      scrollObserver(scrollRef.current);
    }
  }, [scrollObserver, scrollRef]);
}

// next code block here
The useInfiniteScroll hook accepts a scrollRef and a dispatch function. The scrollRef helps us set up the observer, as already discussed in the section where we implemented it. The dispatch function gives a way to trigger an action that updates the page number in the API endpoint URL.
// lazy load images with intersection observer
export const useLazyLoading = (imgSelector, items) => {
  const imgObserver = useCallback(node => {
  const intObs = new IntersectionObserver(entries => {
    entries.forEach(en => {
      if (en.intersectionRatio > 0) {
        const currentImg = en.target;
        const newImgSrc = currentImg.dataset.src;
        // only swap out the image source if the new url exists
        if (!newImgSrc) {
          console.error('Image source is invalid');
        } else {
          currentImg.src = newImgSrc;
        }
        intObs.unobserve(node); // detach the observer when done
      }
    });
  })
  intObs.observe(node);
  }, []);
  const imagesRef = useRef(null);
  useEffect(() => {
    imagesRef.current = document.querySelectorAll(imgSelector);
    if (imagesRef.current) {
      imagesRef.current.forEach(img => imgObserver(img));
    }
  }, [imgObserver, imagesRef, imgSelector, items])
}
The useLazyLoading hook receives a selector and an array. The selector is used to find the images. Any change in the array triggers the useEffect hook that sets up the observer on each image.
We can see that it is the same functions we have in src/App.js that we have extracted to a new file. The good thing now is that we can pass arguments dynamically. Let’s now use these custom hooks in the App component.
Open src/App.js. Import the custom hooks and delete the functions we defined for fetching data, infinite scroll, and image lazy loading. Leave the reducers and the sections where we make use of useReducer. Paste in the below code.
We have already talked about bottomBoundaryRef in the section on infinite scroll. We pass the pager object and the imgDispatch function to useFetch. useLazyLoading accepts the class name .card-img-top. Note the . included in the class name. By doing this, we don’t need to specify it document.querySelectorAll. useInfiniteScroll accepts both a ref and the dispatch function for incrementing the value of page.
HTML is getting better at providing nice APIs for implementing cool features. In this post, we’ve seen how easy it is to use the intersection observer in a React functional component. In the process, we learned how to use some of React’s hooks and how to write our own hooks.
The drag-and-drop API is one of the coolest features of HTML. It helps us implement drag-and-drop features in web browsers.
In the current context, we will be dragging files from outside the browser. On dropping the file(s), we put them on a list and display their names. With the files in hand, we could then perform some other operation on the file(s), e.g. upload them to a cloud server.
In this tutorial, we’ll be focusing on how to implement the action of dragging and dropping in a React application. If what you need is a plain JavaScript implementation, perhaps you’d first like to read “How To Make A Drag-And-Drop File Uploader With Vanilla JavaScript,” an excellent tutorial written by Joseph Zimmerman not too long ago.
The dragenter, dragleave, dragover, And drop Events
There are eight different drag-and-drop events. Each one fires at a different stage of the drag-and-drop operation. In this tutorial, we’ll focus on the four that are fired when an item is dropped into a drop zone: dragenter, dragleave, dragover and drop.
The dragenter event fires when a dragged item enters a valid drop target.
The dragleave event fires when a dragged item leaves a valid drop target.
The dragover event fires when a dragged item is being dragged over a valid drop target. (It fires every few hundred milliseconds.)
The drop event fires when an item drops on a valid drop target, i.e dragged over and released.
We can turn any HTML element into a valid drop target by defining the ondragover and ondrop event handler attributes.
You can learn all about the eight events from the MDN web docs.
Drag-And-Drop Events In React
To get started, clone the tutorial repo from this URL:
https://github.com/chidimo/react-dnd.git
Check out the 01-start branch. Make sure you have yarn installed as well. You can get it from yarnpkg.com.
But if you prefer, create a new React project and replace the content of App.js with the code below:
If you cloned the repo, issue the following commands (in order) to start the app:
yarn # install dependencies
yarn start # start the app
The next step is to create a drag-and-drop component. Create a file DragAndDrop.js inside the src/ folder. Enter the following function inside the file:
In the return div, we have defined our focus HTML event handler attributes. You can see that the only difference from pure HTML is the camel-casing.
The div is now a valid drop target since we have defined the onDragOver and onDrop event handler attributes.
We also defined functions to handle those events. Each of these handler function receives the event object as its argument.
For each of the event handlers, we call preventDefault() to stop the browser from executing its default behavior. The default browser behavior is to open the dropped file. We also call stopPropagation() to make sure that the event is not propagated from child to parent elements.
Import the DragAndDrop component into the App component and render it below the heading.
Now view the component in the browser and you should see something like the image below.
div to be converted into a drop zone (Large preview)
If you’re following with the repo, the corresponding branch is 02-start-dragndrop
Managing State With The useReducer Hook
Our next step will be to write the logic for each of our event handlers. Before we do that, we have to consider how we intend to keep track of dropped files. This is where we begin to think about state management.
We will be keeping track of the following states during the drag-and-drop operation:
dropDepth
This will be an integer. We’ll use it to keep track of how many levels deep we are in the drop zone. Later on, I will explain this with an illustration. (Credits to Egor Egorov for shining a light on this one for me!)
inDropZone
This will be a boolean. We will use this to keep track of whether we’re inside the drop zone or not.
FileList
This will be a list. We’ll use it to keep track of files that have been dropped into the drop zone.
To handle states, React provides the useState and useReducer hooks. We’ll opt for the useReducer hook given that we will be dealing with situations where a state depends on the previous state.
The useReducer hook accepts a reducer of type (state, action) => newState, and returns the current state paired with a dispatch method.
You can read more aboutuseReducerin the Reactdocs.
Inside the App component (before the return statement), add the following code:
The useReducer hook accepts two arguments: a reducer and an initial state. It returns the current state and a dispatch function with which to update the state. The state is updated by dispatching an action that contains a type and an optional payload. The update made to the component’s state is dependent on what is returned from the case statement as a result of the action type. (Note here that our initial state is an object.)
For each of the state variables, we defined a corresponding case statement to update it. The update is performed by invoking the dispatch function returned by useReducer.
Now pass data and dispatch as props to the DragAndDrop component you have in your App.js file:
<DragAndDrop data={data} dispatch={dispatch} />
At the top of the DragAndDrop component, we can access both values from props.
const { data, dispatch } = props;
If you’re following with the repo, the corresponding branch is 03-define-reducers.
Let’s finish up the logic of our event handlers. Note that the ellipsis represents the two lines:
In the illustration that follows, we have nested drop zones A and B. A is our zone of interest. This is where we want to listen for drag-and-drop events.
An illustration of the ondragenter and ondragleave events (Large preview)
When dragging into a drop zone, each time we hit a boundary, the ondragenter event is fired. This happens at boundaries A-in and B-in. Since we’re entering the zone, we increment dropDepth.
Likewise, when dragging out of a drop zone, each time we hit a boundary, the ondragleave event is fired. This happens at boundaries A-out and B-out. Since we’re leaving the zone, we decrement the value of dropDepth. Notice that we don’t set inDropZone to false at boundary B-out. That is why we have this line to check the dropDepth and return from the function dropDepth greater than 0.
if (data.dropDepth > 0) return
This is because even though the ondragleave event is fired, we’re still within zone A. It is only after we have hit A-out, and dropDepth is now 0 that we set inDropZone to false. At this point, we have left all drop zones.
Each time this event fires, we set inDropZone to true. This tells us that we’re inside the drop zone. We also set the dropEffect on the dataTransfer object to copy. On a Mac, this has the effect of showing a green plus sign as you drag an item around in the drop zone.
We can access the dropped files with e.dataTransfer.files. The value is an array-like object so we use the array spread syntax to convert it to a JavaScript array.
We now need to check if there is at least one file before attempting to add it to our array of files. We also make sure to not include files that are already on our fileList.
The dataTransfer object is cleared in preparation for the next drag-and-drop operation. We also reset the values of dropDepth and inDropZone.
Update the className of the div in the DragAndDrop component. This will conditionally change the className of the div depending on the value of data.inDropZone.
<div className={data.inDropZone ? 'drag-drop-zone inside-drag-area' : 'drag-drop-zone'}
      ...
    >
  <p>Drag files here to upload</p>
</div>
Render the list of files in App.js by mapping through data.fileList.
Now try dragging and dropping some files onto the drop zone. You’ll see that as we enter the drop zone, the background becomes less opaque because the inside-drag-area class is activated.
When you release the files inside the drop zone, you’ll see the file names listed under the drop zone:
Drop zone showing low opacity during dragover (Large preview)
A list of files dropped into the drop zone (Large preview)
The complete version of this tutorial is on the 04-finish-handlers branch.
Conclusion
We’ve seen how to handle file uploads in React using the HTML drag-and-drop API. We’ve also learned how to manage state with the useReducer hook. We could extend the file handleDrop function. For example, we could add another check to limit file sizes if we wanted. This can come before or after the check for existing files. We could also make the drop zone clickable without affecting the drag-and-drop functionality.