Building A Static-First MadLib Generator With Portable Text And Netlify On-Demand Builder Functions

Creating an interactive experience with fiction can be a chore with traditional content management tools. Writing the prose, creating the forms, combining them in the frontend — these are often the domain of three different people.

Let’s make it the domain of just one content creator in which the user will fill out a form before reading the story — creating odd and often funny stories. This type of experience was popularized as “Madlibs.”

How The Generator Will Work

An editor can create a series of madlibs that an end-user can fill out and save a copy with their unique answers. The editor will be working with the Sanity Studio inside a rich-text field that we’ll craft to provide additional information for our front-end to build out forms.

For the editor, it will feel like writing standard paragraph content. They’ll be able to write like they’re used to writing. They can then create specific blocks inside their content that will specify a part of speech and display text.

The front-end of the application can then use that data to both display the text and build a form. We’ll use 11ty to create the frontend with some small templates. The form that is built will display to the user before they see the text. They’ll know what type of speech and general context for the phrases and words they can enter.

After the form is submitted, they’ll be given their fully formed story (with hopefully hilarious results). This creation will only be set within their browser. If they wish to share it, they can then click the “Save” button. This will submit the entire text to a serverless function in Netlify to save it to the Sanity data store. Once that has been created, a link will appear for the user to view the permanent version of their madlib and share it with friends.

Since 11ty is a static site generator, we can’t count on a site rebuild to generate each user’s saved Madlib on the fly. We can use 11ty’s new Serverless mode to build them on request using Netlify’s On-Demand Builders to cache each Madlib.

The Tools

Sanity.io

Sanity.io is a unified content platform that believes that content is data and data can be used as content. Sanity pairs a real-time data store with three open-source tools: a powerful query language (GROQ), a CMS (Sanity Studio), and a rich-text data specification (Portable Text).

Portable Text

Portable Text is an open-source specification designed to treat rich text as data. We’ll be using Portable Text for the rich text that our editors will enter into a Sanity Studio. Data will decorate the rich text in a way that we can create a form on the fly based on the content.

11ty And 11ty Serverless

11ty is a static site generator built in Node. It allows developers to ingest data from multiple sources, write templates in multiple templating engines, and output simple, clean HTML.

In the upcoming 1.0 release, 11ty is introducing the concept of 11ty Serverless. This update allows sites to use the same templates and data to render pages via a serverless function or on-demand builder. 11ty Serverless begins to blur the line between “static site generator” and server-rendered page.

Netlify On-Demand Builders

Netlify has had serverless functions as part of its platform for years. For example, an “On-Demand Builder” is a serverless function dedicated to serving a cached file. Each builder works similarly to a standard serverless function on the first call. Netlify then caches that page on its edge CDN for each additional call.

Building The Editing Interface And Datastore

Before we can dive into serverless functions and the frontend, it would be helpful to have our data set up and ready to query.

To do this, we’ll set up a new project and install Sanity’s Studio (an open-source content platform for managing data in your Sanity Content Lake).

To create a new project, we can use Sanity’s CLI tools.

First, we need to create a new project directory to house both the front-end and the studio. I’ve called mine madlibs.

From inside this directory in the command line, run the following commands:

npm i -g @sanity/cli
sanity init

The sanity init command will run you through a series of questions. Name your project madlibs, create a new dataset called production, set the “output path” to studio, and for “project template,” select “Clean project with no predefined schemas.”

The CLI creates a new Sanity project and installs all the needed dependencies for a new studio. Inside the newly created studio directory, we have everything we need to make our editing experience.

Before we create the first interface, run sanity start in the studio directory to run the studio.

Creating The madlib Schema

A set of schema defines the studio’s editing interface. To create a new interface, we’ll create a new schema in the schema folder.

// madlibs/studio/schemas/madlib.js

export default {
  // Name in the data
  name: 'madlib',
  // Title visible to editors
  title: 'Madlib Template',
  // Type of schema (at this stage either document or object)
  type: 'document',
  // An array of fields
  fields: [
    {
      name: 'title',
      title: 'Title',
      type: 'string'
    },
    {
      title: 'Slug',
      name: 'slug',
      type: 'slug',
      options: {
        source: 'title',
        maxLength: 200, // // will be ignored if slugify is set
      }
    },
  ]
}

The schema file is a JavaScript file that exports an object. This object defines the data's name, title, type, and any fields the document will have.

In this case, we'll start with a title string and a slug that can be generated from the title field. Once the file and initial code are created, we need to add this schema to our schema.js file.

// /madlibs/studio/schema/schema.js

// First, we must import the schema creator
import createSchema from 'part:@sanity/base/schema-creator'

// Then import schema types from any plugins that might expose them
import schemaTypes from 'all:part:@sanity/base/schema-type'

// Imports our new schema
import madlib from './madlib'

// Then we give our schema to the builder and provide the result to Sanity
export default createSchema({
  // We name our schema
  name: 'default',
  // Then proceed to concatenate our document type
  // to the ones provided by any plugins that are installed
  types: schemaTypes.concat([
    // document
    // adds the schema to the list the studio will display
    madlib,
  ])
})

Next, we need to create a rich text editor for our madlib authors to write the templates. Sanity has a built-in way of handling rich text that can convert to the flexible Portable Text data structure.

To create the editor, we use an array field that contains a special schema type: block.

The block type will return all the default options for rich text. We can also extend this type to create specialty blocks for our editors.

export default {
  // Name in the data
  name: 'madlib',
  // Title visible to editors
  title: 'Madlib Template',
  // Type of schema (at this stage either document or object)
  type: 'document',
  // An array of fields
  fields: [
    {
      name: 'title',
      title: 'Title',
      type: 'string'
    },
    {
      title: 'Slug',
      name: 'slug',
      type: 'slug',
      options: {
        source: 'title',
        maxLength: 200, // // will be ignored if slugify is set
      }
    },
    {
      title: 'Madlib Text',
      name: 'text',
      type: 'array',
      of: [
        {
          type: 'block',
          name: 'block',
          of: [
            // A new type of field that we'll create next
            { type: 'madlibField' }
          ]
        },
      ]
    },
  ]
}

This code will set up the Portable Text editor. It builds various types of “blocks.” Blocks roughly equate to top-level data in the JSON data that Portable Text will return. By default, standard blocks take the shape of things like paragraphs, headers, lists, etc.

Custom blocks can be created for things like images, videos, and other data. For our madlib fields, we want to make “inline” blocks — blocks that flow within one of these larger blocks. To do that, the block type can accept its own of array. These fields can be any type, but we’ll make a custom type and add it to our schema in our case.

Creating A Custom Schema Type For The Madlib Field

To create a new custom type, we need to create a new file and import the schema into schema.js as we did for a new document type.

Instead of creating a schema with a type of document, we need to create one of type: object.

This custom type needs to have two fields: the display text and the grammar type. By structuring the data this way, we open up future possibilities for inspecting our content.

Alongside the data fields for this type, we can also specify a custom preview to show more than one field displayed in the rich text. To make this work, we define a React component that will accept the data from the fields and display the text the way we want it.

// /madlibs/studio/schemas/object/madLibField.js
import React from 'react'

// A React Component that takes hte value of data
// and returns a simple preview of the data that can be used
// in the rich text editor
function madlibPreview({ value }) {
  const { text, grammar } = value

  return (
    
      {text} ({grammar})
    
  );
}

export default {
  title: 'Madlib Field Details',
  name: 'madlibField',
  type: 'object',
  fields: [
    {
      name: 'displayText',
      title: 'Display Text',
      type: 'string'
    },
    {
      name: 'grammar',
      title: 'Grammar Type',
      type: 'string'
    }
  ],
  // Defines a preview for the data in the Rich Text editor
  preview: {
    select: {
      // Selects data to pass to our component
      text: 'displayText',
      grammar: 'grammar'
    },

    // Tells the field which preview to use
    component: madlibPreview,
  },
}

Once that’s created, we can add it to our schemas array and use it as a type in our Portable Text blocks.

// /madlibs/studio/schemas/schema.js
// First, we must import the schema creator
import createSchema from 'part:@sanity/base/schema-creator'

// Then import schema types from any plugins that might expose them
import schemaTypes from 'all:part:@sanity/base/schema-type'

import madlib from './madlib'
// Import the new object
import madlibField from './objects/madlibField'

// Then we give our schema to the builder and provide the result to Sanity
export default createSchema({
  // We name our schema
  name: 'default',
  // Then proceed to concatenate our document type
  // to the ones provided by any plugins that are installed
  types: schemaTypes.concat([
    // documents
    madlib,
    //objects
    madlibField
  ])
})

Creating The Schema For User-generated Madlibs

Since the user-generated madlibs will be submitted from our frontend, we don’t technically need a schema for them. However, if we create a schema, we get an easy way to see all the entries (and delete them if necessary).

We want the structure for these documents to be the same as our madlib templates. The main differences in this schema from our madlib schema are the name, title, and, optionally, making the fields read-only.

// /madlibs/studio/schema/userLib.js
export default {
  name: 'userLib',
  title: 'User Generated Madlibs',
  type: 'document',
  fields: [
    {
      name: 'title',
      title: 'Title',
      type: 'string',
      readOnly: true
    },
    {
      title: 'Slug',
      name: 'slug',
      type: 'slug',
      readOnly: true,
      options: {
        source: 'title',
        maxLength: 200, // // will be ignored if slugify is set
      },
    },
    {
      title: 'Madlib Text',
      name: 'text',
      type: 'array',
      readOnly: true,
      of: [
        {
          type: 'block',
          name: 'block',
          of: [
            { type: 'madlibField' }
          ]
        },
      ]
    },
  ]
}

With that, we can add it to our schema.js file, and our admin is complete. Before we move on, be sure to add at least one madlib template. I found the first paragraph of Moby Dick worked surprisingly well for some humorous results.

Building The Frontend With 11ty

To create the frontend, we’ll use 11ty. 11ty is a static site generator written in and extended by Node. It does the job of creating HTML from multiple sources of data well, and with some new features, we can extend that to server-rendered pages and build-rendered pages.

Setting Up 11ty

First, we’ll need to get things set up.

Inside the main madlibs directory, let’s create a new site directory. This directory will house our 11ty site.

Open a new terminal and change the directory into the site directory. From there, we need to install a few dependencies.

// Create a new package.json
npm init -y
// Install 11ty and Sanity utilities
npm install @11ty/eleventy@beta @sanity/block-content-to-html @sanity/client

Once these have been installed, we’ll add a couple of scripts to our package.json

// /madlibs/site/package.json

"scripts": {
 "start": "eleventy --serve",
 "build": "eleventy"
  },

Now that we have a build and start script, let’s add a base template for our pages to use and an index page.

By default, 11ty will look in an _includes directory for our templates, so create that directory and add a base.njk file to it.

<!DOCTYPE html>
<html lang="en">

<head>
  <meta charset="UTF-8">
  <meta name="viewport" content="width=device-width, initial-scale=1.0">
  <title>Madlibs</title>
  {# Basic reset #}
  <link rel="stylesheet" href="https://unpkg.com/some-nice-basic-css/global.css" />

</head>

<body>
  <nav class="container navigation">
    <a class="logo" href="/">Madlibs</a>
  </nav>

  <div class="stack container bordered">
    {# Inserts content from a page file and renders it as html #}
    {{ content | safe }}
  </div>

  {% block scripts %}
  {# Block to insert scripts from child templates #}
  {% endblock %}
</body>

</html>

Once we have a template, we can create a page. First, in the root of the site directory, add an index.html file. Next, we’ll use frontmatter to add a little data — a title and the layout file to use.

---
title: Madlibs 
layout: 'base.njk'
---
<p>Some madlibs to take your mind off things. They're stored in <a href="https://sanity.io">Sanity.io</a>, built with <a href="https://11ty.dev">11ty</a>, and do interesting things with Netlify serverless functions.</p>

Now you can start 11ty by running npm start in the site directory.

Creating Pages From Sanity Data Using 11ty Pagination

Now, we want to create pages dynamically from data from Sanity. To do this, we’ll create a JavaScript Data file and a Pagination template.

Before we dive into those files, we need to create a couple of utilities for working with the Sanity data.

Inside the site directory, let’s create a utils directory.

The first utility we need is an initialized Sanity JS client. First, create a file named sanityClient.js in the new utils directory.

// /madlibs/site/utils/sanityClient.js'
const sanityClient = require('@sanity/client')
module.exports = sanityClient({
  // The project ID
  projectId: '<YOUR-ID>',
  // The dataset we created
  dataset: 'production',
  // The API version we want to use
  // Best practice is to set this to today's date
  apiVersion: '2021-06-07',
  // Use the CDN instead of fetching directly from the data store
  useCdn: true
})

Since our rich text is stored as Portable Text JSON, we need a way to convert the data to HTML. We’ll create a utility to do this for us. First, create a file named portableTextUtils.js in the utils directory.

For Sanity and 11ty sites, we typically will want to convert the JSON to either Markdown or HTML. For this site, we’ll use HTML to have granular control over the output.

Earlier, we installed @sanity/block-content-to-html, which will help us serialize the data to HTML. The package will work on all basic types of Portable Text blocks and styles. However, we have a custom block type that needs a custom serializer.

// Initializes the package
const toHtml = require('@sanity/block-content-to-html')
const h = toHtml.h;

const serializers = {
  types: {
    madlibField: ({ node }) => {
      // Takes each node of type madlibField
      // and returns an HTML span with an id, class, and text
      return h('span', node.displayText, { id: node._key, className: 'empty' })
    }
  }
}

const prepText = (data) => {
  // Takes the data from a specific Sanity document
  // and creates a new htmlText property to contain the HTML
  // This lets us keep the Portable Text data intact and still display HTML
  return {
    ...data,
    htmlText: toHtml({
      blocks: data.text, // Portable Text data
      serializers: serializers // The serializer to use
    })
  }
}

// We only need to export prepText for our functions
module.exports = { prepText }

The serializers object in this code has a types object. In this object, we create a specialized serializer for any type. The key in the object should match the type given in our data. In our case, this is madlibField. Each type will have a function that returns an element written using hyperscript functions.

In this case, we create a span with children of the displayText from the current data. Later we’ll need unique IDs based on the data’s _key, and we’ll need a class to style these. We provide those in an object as the third argument for the h() function. We’ll use this same serializer setup for both our madlib templates and the user-generated madlibs.

Now that we have our utilities, it’s time to create a JavaScript data file. First, create a _data in the site directory. In this file, we can add global data to our 11ty site. Next, create a madlibs.js file. This file is where our JavaScript will run to pull each madlib template. The data will be available to any of our templates and pages under the madlibs key.

// Get our utilities
const client = require('../utils/sanityClient')
const {prepText} = require('../utils/portableTextUtils')
// The GROQ query used to find specific documents and 
// shape the output 
const query = *[_type == "madlib"]{
    title,
    "slug": slug.current,
    text,
    _id,
    "formFields": text[]{
        children[_type == "madlibField"]{
            displayText,
            grammar,
            _key
      }
      }.children[]
  }

module.exports = async function() {
    // Fetch data based on the query
    const madlibs = await client.fetch(query);

    // Prepare the Portable Text data
    const preppedMadlib = madlibs.map(prepText)
    // Return the full array
    return preppedMadlib
}

To fetch the data, we need to get the utilities we just created. The Sanity client has a fetch() method to pass a GROQ query. We’ll map over the array of documents the query returns to prepare their Portable Text and then return that to 11ty’s data cascade.

The GROQ query in this code example is doing most of the work for us. We start by requesting all documents with a _type of madlib from our Sanity content lake. Then we specify which data we want to return. The data starts simply: we need the title, slug, rich text, and id from the document, but we also want to reformat the data into a set of form fields, as well.

To do that, we create a new property on the data being returned: formFields. This looks at the text data (a Portable Text array) and loops over it with the [] operator. We can then build a new project on this data like we’re doing with the entire document with the {} operator.

Each text object has a children array. We can loop through that, and if the item matches the filter inside the [], we can run another projection on that. In this case, we’re filtering all children that have a _type == "madlibField". In other words, any inline block that has an item with the type we created. We need the displayText, grammar, and _key for each of these. This will return an array of text objects with the children matching our filter. We need to flatten this to be an array of children. To do this, we can add the .children[] after the projects. This will return a flat array with just the children elements we need.

This gives us all the documents in an array with just the data we need (including newly reformatted items).

To use them in our 11ty build, we need a template that will use Pagination.

In the root of the site, create a madlib.njk file. This file will generate each madlib page from the data.

---
layout: 'base.njk'
pagination:
  data: madlibs
  alias: madlib
  size: 1
permalink: "madlibs/{{ madlib.slug | slug }}/index.html"
---

In the front matter of this file, we specify some data 11ty can use to generate our pages:

  • layout
    The template to use to render the page.
  • pagination
    An object with pagination information.
  • pagination.data
    The data key for pagination to read.
  • pagination.alias
    A key to use in this file for ease.
  • pagination.size
    The number of madlibs per page (in this case, 1 per page to create individual pages).
  • permalink
    The URLs at which each of these should live (can be partially generated from data).

With that data in place, we can specify how to display each piece of data for an item in the array.

---
layout: 'base.njk'
pagination:
  data: madlibs
  alias: madlib
  size: 1
permalink: "madlibs/{{ madlib.slug | slug }}/index.html"
---

<h2>{{ madlib.title }}</h2>
<p><em>Instructions:</em> Fill out this form, submit it and get your story. It will hopfully make little-to-no sense. Afterward, you can save the madlib and send it to your friends.</p>
<div class="madlibtext">
<a href="#" class="saver">Save it</a>
{{ madlib.htmlText | safe }}
</div>
<h2>Form</h2>
<form class="madlibForm stack">
{% for input in madlib.formFields %}
    <label>
        {{ input.displayText }} ({{ input.grammar }})
        <input type="text" class="libInput" name={{input._key}}>
    </label>
{% endfor %}
<button>Done</button>
</form>

We can properly format the title and HTML text. We can then use the formFields array to create a form that users can enter their unique answers.

There’s some additional markup for use in our JavaScript — a form button and a link to save the finalized madlib. The link and madlib text will be hidden (no peeking for our users!).

For every madlib template, you created in your studio, 11ty will build a unique page. The final URLs should look like this

http://localhost:8080/madlibs/the-slug-in-the-studio/
Making The Madlibs Interactive

With our madlibs generated, we need to make them interactive. We’ll sprinkle a little JavaScript and CSS to make them interactive. Before we can use CSS and JS, we need to tell 11ty to copy the static files to our built site.

Copying Static Assets To The Final Build

In the root of the site directory, create the following files and directories:

  • assets/css/style.css — for any additional styling,
  • assets/js/madlib.js — for the interactions,
  • .eleventy.js — the 11ty configuration file.

When these files are created, we need to tell 11ty to copy the assets to the final build. Those instructions live in the .eleventy.js configuration file.

module.exports = function(eleventyConfig) {
 eleventyConfig.addPassthroughCopy("assets/");
}

This instructs 11ty to copy the entire assets directory to the final build.

The only necessary CSS to make the site work is a snippet to hide and show the madlib text. However, if you want the whole look and feel, you can find all the styles in this file.

.madlibtext {
 display: none
}
.madlibtext.show {
 display: block;
}

Filling In The Madlib With User Input And JavaScript

Any frontend framework will work with 11ty if you set up a build process. For this example, we’ll use plain JavaScript to keep things simple. The first task is to take the user data in the form and populate the generic madlib template that 11ty generated from our Sanity data.

// Attach the form handler
const form = document.querySelector('.madlibForm')
form.addEventListener('submit', completeLib);

function showText() {
  // Find the madlib text in the document
  const textDiv = document.querySelector('.madlibtext')
  // Toggle the class "show" to be present
  textDiv.classList.toggle('show')
}

// A function that takes the submit event
// From the event, it will get the contents of the inputs
// and write them to page and show the full text
function completeLib(event) {
  // Don't submit the form
  event.preventDefault();
  const { target } = event // The target is the form element

  // Get all inputs from the form in array format
  const inputs = Array.from(target.elements)

  inputs.forEach(input => {
    // The button is an input and we don't want that in the final data
    if (input.type != 'text') return
    // Find a span by the input's name
    // These will both be the _key value
    const replacedContent = document.getElementById(input.name)
    // Replace the content of the span with the input's value
    replacedContent.innerHTML = input.value
  })
  // Show the completed madlib
  showText();
}

This functionality comes in three parts: attaching an event listener, taking the form input, inserting it into the HTML, and then showing the text.

When the form is submitted, the code creates an array from the form’s inputs. Next, it finds elements on the page with ids that match the input’s name — both created from the _key values of each block. It then replaces the content of that element with the value from the data.

Once that’s done, we toggle the full madlib text to show on the page.

We need to add this script to the page. To do this, we create a new template for the madlibs to use. In the _includes directory, create a file named lib.njk. This template will extend the base template we created and insert the script at the bottom of the page’s body.

{% extends 'base.njk' %}

{% block scripts %}
<script>
  var pt = {{ madlib.text | dump | safe }}
  var data = {
      libId: {{ madlib._id }},
      libTitle: {{ madlib.title }}
  }
</script>
<script src="/assets/js/madlib.js"></script>
{% endblock %}

Then, our madlib.njk pagination template needs to use this new template for its layout.

---
layout: 'lib.njk'
pagination:
  data: madlibs
  alias: madlib
  size: 1
permalink: "madlibs/{{ madlib.slug | slug }}/index.html"
---

// page content

We now have a functioning madlib generator. To make this more robust, let’s allow users to save and share their completed madlibs.

Saving A User Madlib To Sanity With A Netlify Function

Now that we have a madlib displayed to the user, we need to create the link for saving send the information to Sanity.

To do that, we’ll add some more functionality to our front-end JavaScript. But, first, we need to add some more data pulled from Sanity into our JavaScript, so we’ll add a couple of new variables in the scripts block on the lib.njk template.

{% extends 'base.njk' %}

{% block scripts %}
<script>
  // Portable Text data
  var pt = {{ madlib.text | dump | safe }}
  var data = {
      libId: {{ madlib._id }},
      libTitle: {{ madlib.title }}
  }
</script>
<script src="/assets/js/madlib.js"></script>
{% endblock %}

We can write a script to send it and the user-generated answers to a serverless function to send to Sanity with that additional data.

// /madlibs/site/assets/js/madlib.js

// ... completeLib()

async function saveLib(event) {
  event.preventDefault();

  // Return an Map of ids and content to turn into an object
  const blocks = Array.from(document.querySelectorAll('.empty')).map(item => {
    return [item.id, { content: item.outerText }]
  })
  // Creates Object ready for storage from blocks map
  const userContentBlocks = Object.fromEntries(blocks);

  // Formats the data for posting
  const finalData = {
    userContentBlocks,
    pt, // From nunjucks on page
    ...data // From nunjucks on page
  }

  // Runs the post data function for createLib
  postData('/.netlify/functions/createLib', finalData)
    .then(data => {
      // When post is successful
      // Create a div for the final link
      const landingZone = document.createElement('div')
      // Give the link a class
      landingZone.className = "libUrl"
      // Add the div after the saving link
      saver.after(landingZone)
      // Add the new link inside the landing zone
      landingZone.innerHTML = <a href="/userlibs/${data._id}/" class="savedUrl">Your url is /userlibs/${data._id}/</a>

    }).catch(error => {
      // When errors happen, do something with them
      console.log(error)
    });
}

async function postData(url = '', data = {}) {
  // A wrapper function for standard JS fetch
  const response = await fetch(url, {
    method: 'POST',
    mode: 'cors',
    cache: 'no-cache',
    credentials: 'same-origin',
    headers: {
      'Content-Type': 'application/json'
    },
    body: JSON.stringify(data)
  });
  return response.json(); // parses JSON response into native JavaScript objects
}

We add a new event listener to the “Save” link in our HTML.

The saveLib function will take the data from the page and the user-generated data and combine them in an object to be handled by a new serverless function. The serverless function needs to take that data and create a new Sanity document. When creating the function, we want it to return the _id for the new document. We use that to create a unique link that we add to the page. This link will be where the newly generated page will be.

Setting Up Netlify Dev

To use Netlify Functions, we’ll need to get our project set up on Netlify. We want Netlify to build and serve from the site directory. To give Netlify this information, we need to create a netlify.toml file at the root of the entire project.

[build]
 command = "npm run build" # Command to run
 functions = "functions"            # Directory we store the functions
 publish = "_site"                        # Folder to publish (11ty automatically makes the _site folder
 base = "site"                                # Folder that is the root of the build

To develop these locally, it’s helpful to install Netlify’s CLI globally.
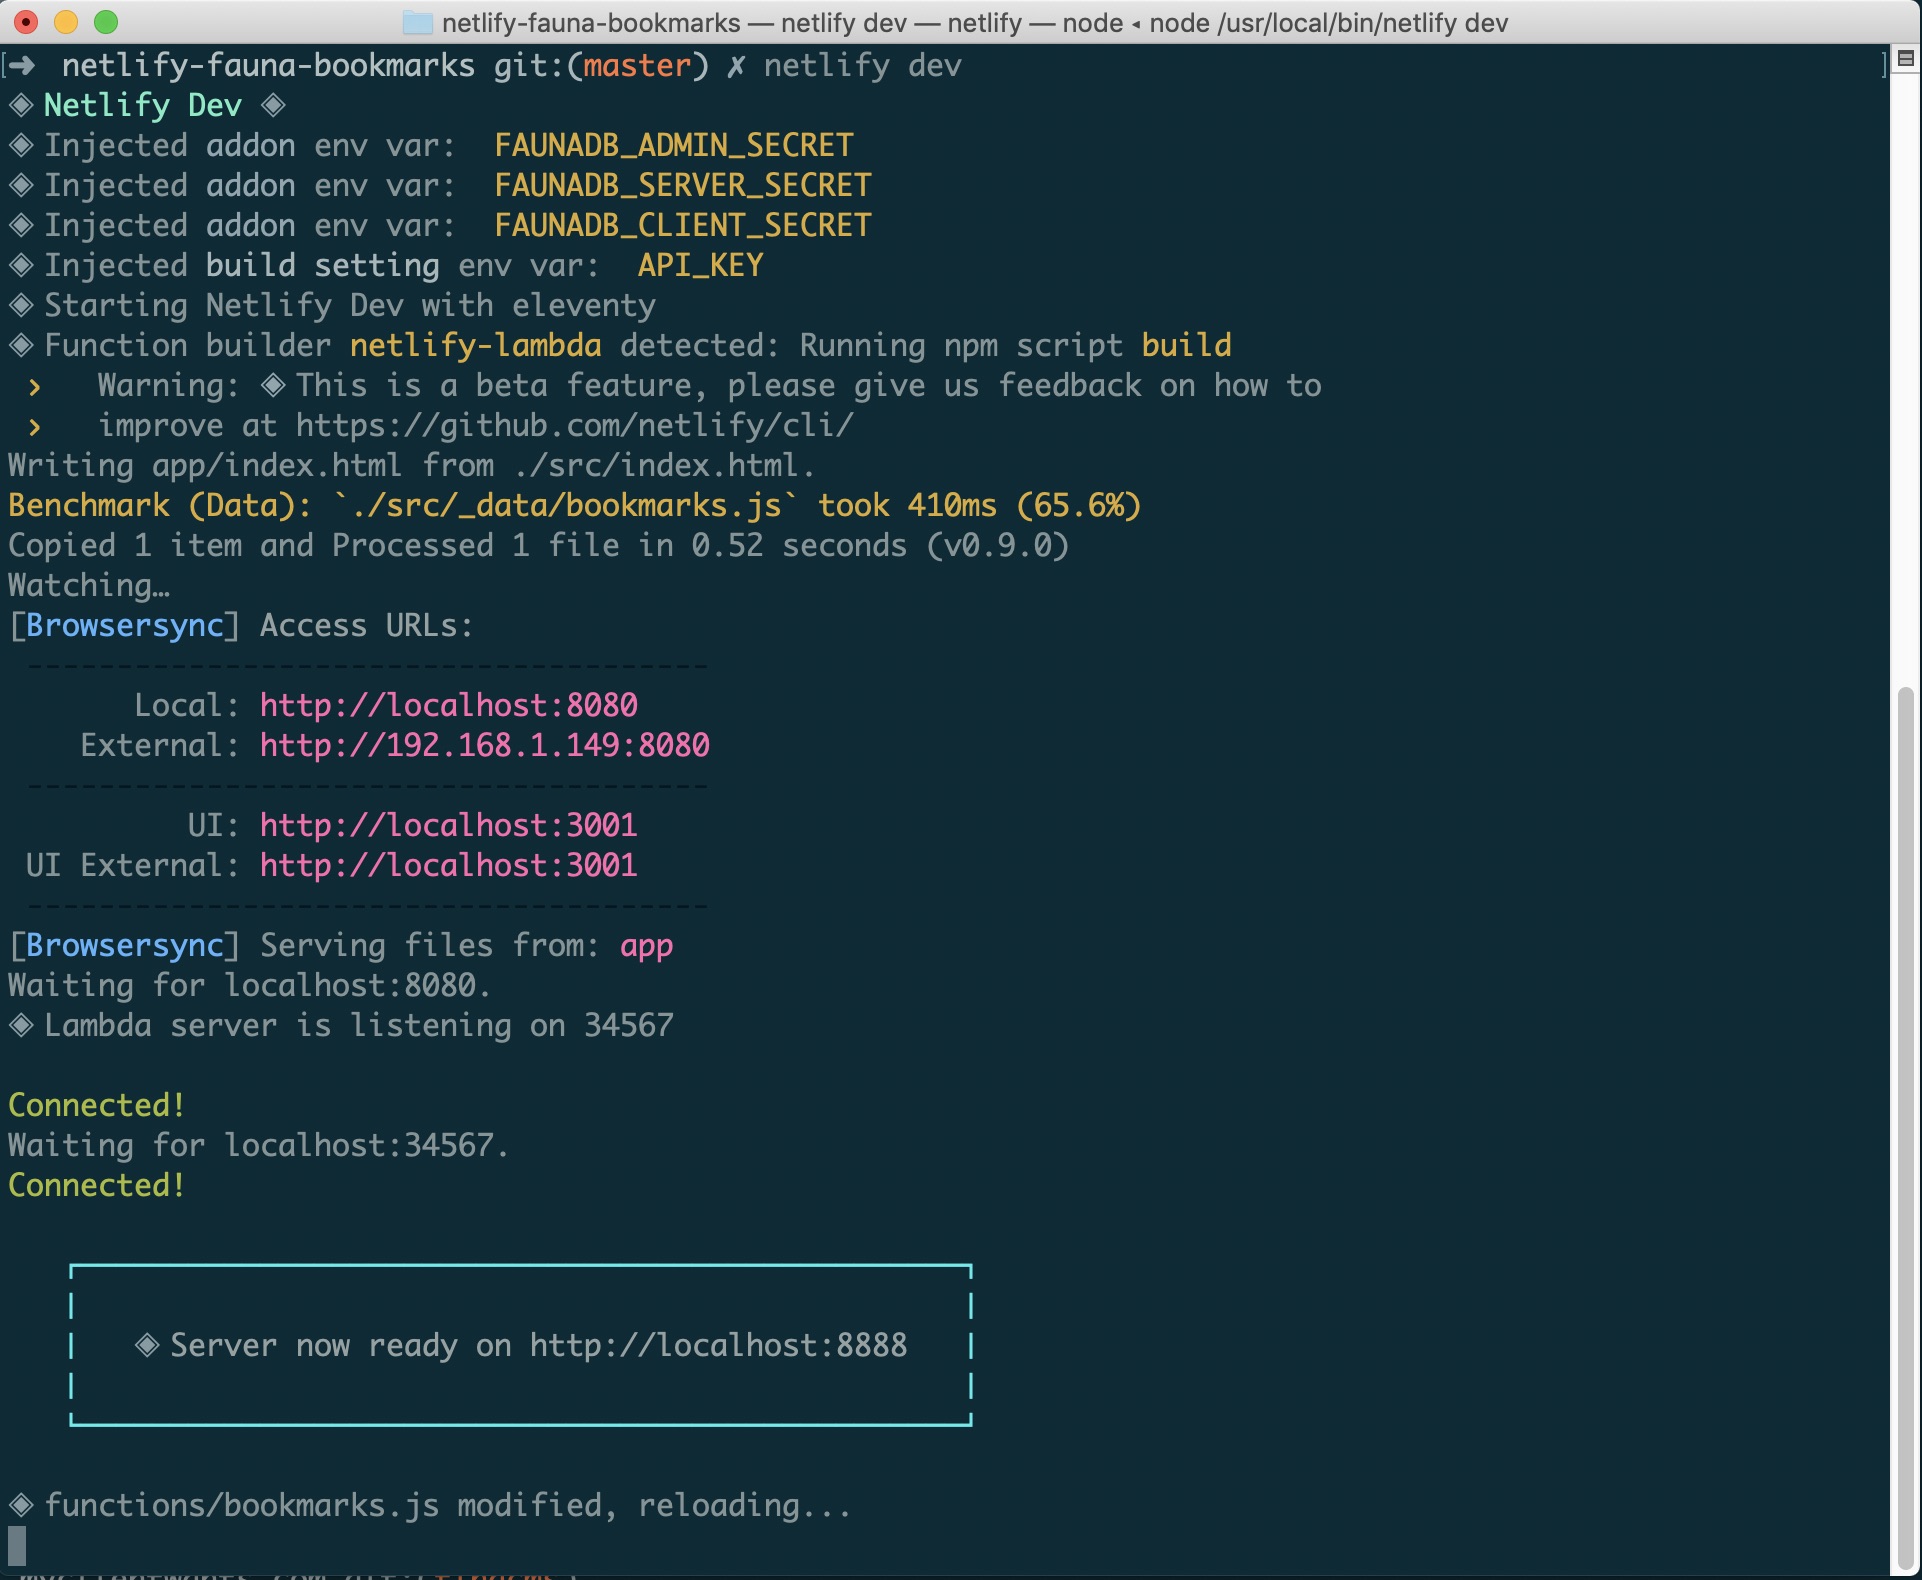
npm install -g netlify-cli

Once that’s installed, you can run netlify dev in your project. This will take the place of running your start NPM script.

The CLI will run you through connecting your repository to Netlify. Once it’s done, we’re ready to develop our first function.

Creating A Function To Save Madlibs To Sanity

Since our TOML file sets the functions directory to functions, we need to create the directory. Inside the directory, make a createLib.js file. This will be the serverless function for creating a madlib in the Sanity data store.

The standard Sanity client we’ve been using is read-only. To give it write permissions, we need to reconfigure it to use an API read+write token. To generate a token, log into the project dashboard and go to the project settings for your madlibs project. In the settings, find the Tokens area and generate a new token with “Editor” permissions. When the token is generated, save the string to Netlify’s environment variables dashboard with the name SANITY_TOKEN. Netlify Dev will automatically pull these environment variables into the project while running.

To reconfigure the client, we’ll require the file from our utilities, and then run the .config() method. This will let us set any configuration value for this specific use. We’ll set the token to the new environment variable and set useCdn to false.

// Sanity JS Client
// The build client is read-only
// To use to write, we need to add an API token with proper permissions
const client = require('../utils/sanityClient')
client.config({
    token: process.env.SANITY_TOKEN,
    useCdn: false
})

The basic structure for a Netlify function is to export a handler function that is passed an event and returns an object with a status code and string body.

// Grabs local env variables from .env file
// Not necessary if using Netlify Dev CLI
require('dotenv').config()

// Sanity JS Client
// The build client is read-only
// To use to write, we need to add an API token with proper permissions
const client = require('../utils/sanityClient')
client.config({
  token: process.env.SANITY_TOKEN,
  useCdn: false
})

// Small ID creation package
const { nanoid } = require('nanoid')

exports.handler = async (event) => {
  // Get data off the event body
  const {
    pt,
    userContentBlocks,
    id,
    libTitle
  } = JSON.parse(event.body)

  // Create new Portable Text JSON
  // from the old PT and the user submissions
  const newBlocks = findAndReplace(pt, userContentBlocks)

  // Create new Sanity document object
  // The doc's _id and slug are based on a unique ID from nanoid
  const docId = nanoid()
  const doc = {
    _type: "userLib",
    _id: docId,
    slug: { current: docId },
    madlib: id,
    title: ${libTitle} creation,
    text: newBlocks,
  }

  // Submit the new document object to Sanity
  // Return the response back to the browser
  return client.create(doc).then((res) => {
    // Log the success into our function log
    console.log(Userlib was created, document ID is ${res._id})
    // return with a 200 status and a stringified JSON object we get from the Sanity API
    return { statusCode: 200, body: JSON.stringify(doc) };
  }).catch(err => {
    // If there's an error, log it
    // and return a 500 error and a JSON string of the error
    console.log(err)
    return {
      statusCode: 500, body: JSON.stringify(err)
    }
  })
}

// Function for modifying the Portable Text JSON
// pt is the original portable Text
// mods is an object of modifications to make 
function findAndReplace(pt, mods) {
  // For each block object, check to see if a mod is needed and return an object
  const newPT = pt.map((block) => ({
    ...block, // Insert all current data
    children: block.children.map(span => {
      // For every item in children, see if there's a modification on the mods object
      // If there is, set modContent to the new content, if not, set it to the original text 
      const modContent = mods[span._key] ? mods[span._key].content : span.text
      // Return an object with all the original data, and a new property
      // displayText for use in the frontends
      return {
        ...span,
        displayText: modContent
      }
    })
  }))
  // Return the new Portable Text JSON
  return newPT
}

The body is the data we just submitted. For ease, we’ll destructure the data off the event.body object. Then, we need to compare the original Portable Text and the user content we submitted and create the new Portable Text JSON that we can submit to Sanity.

To do that, we run a find and replace function. This function maps over the original Portable Text and for every child in the blocks, replace its content with the corresponding data from the modfications object. If there isn’t a modification, it will store the original text.

With modified Portable Text in hand, we can create a new object to store as a document in the Sanity content lake. Each document needs a unique identifier (which we can use the nanoid NPM package to create. We’ll also let this newly created ID be the slug for consistency.

The rest of the data is mapped to the proper key in our userLib schema we created in the studio and submitted with the authenticated client’s .create() method. When success or failure returns from Sanity, we pass that along to the frontend for handling.

Now, we have data being saved to our Sanity project. Go ahead and fill out a madlib and submit. You can view the creation in the studio. Those links that we’re generating don’t work yet, though. This is where 11ty Serverless comes in.

Setting Up 11ty Serverless

You may have noticed when we installed 11ty that we used a specific version. This is the beta of the upcoming 1.0 release. 11ty Serverless is one of the big new features in that release.

Installing The Serverless Plugin

11ty Serverless is an included plugin that can be initialized to create all the boilerplate for running 11ty in a serverless function. To get up and running, we need to add the plugin to our .eleventy.js configuration file.

const { EleventyServerlessBundlerPlugin } = require("@11ty/eleventy");

module.exports = function (eleventyConfig) {
  eleventyConfig.addPassthroughCopy("assets/");

  eleventyConfig.addPlugin(EleventyServerlessBundlerPlugin, {
    name: "userlibs", // the name to use for the functions
    functionsDir: "./functions/", // The functions directory
    copy: ["utils/"], // Any files that need to be copied to make our scripts work
    excludeDependencies: ["./_data/madlibs.js"] // Exclude any files you don't want to run
  });
};

After creating this file, restart 11ty by rerunning netlify dev. On the next run, 11ty will create a new directory in our functions directory named userlibs (matching the name in the serverless configuration) to house everything it needs to have to run in a serverless function. The index.js file in this directory is created if it doesn’t exist, but any changes you make will persist.

We need to make one small change to the end of this file. By default, 11ty Serverless will initialize using standard serverless functions. This will run the function on every load of the route. That’s an expensive load for content that can’t be changed after it’s been generated. Instead, we can change it to use Netlify’s On-Demand Builders. This will build the page on the first request and cache the result for any later requests. This cache will persist until the next build of the site.

To update the function, open the index.js file and change the ending of the file.

// Comment this line out
exports.handler = handler

// Uncomment these lines
const { builder } = require("@netlify/functions");
exports.handler = builder(handler);

Since this file is using Netlify’s functions package, we also need to install that package.

npm install @netlify/functions

Creating A Data File For User-generated Madlibs

Now that we have an On-Demand Builder, we need to pull the data for user-generated madlibs. We can create a new JavaScript data file in the _data file named userlibs.js. Like our madlibs data file, the file name will be the key to get this data in our templates.

// /madlibs/site/_data/userlibs.js

const client = require('../utils/sanityClient')
const {prepText} = require('../utils/portableTextUtils')

const query = *[_type == "userLib"]{
    title,
    "slug": slug.current,
    text,
    _id
  }

module.exports = async function() {
    const madlibs = await client.fetch(query);
    // Protect against no madlibs returning
    if (madlibs.length == 0) return {"404": {}} 

    // Run through our portable text serializer
    const preppedMadlib = madlibs.map(prepText)

    // Convert the array of documents into an object
    // Each item in the Object will have a key of the item slug
    // 11ty's Pagination will create pages for each one
    const mapLibs = preppedMadlib.map(item => ([item.slug, item]))
    const objLibs = Object.fromEntries(mapLibs)
    return objLibs
}

This data file is similar to what we wrote earlier, but instead of returning the array, we need to return an object. The object’s keys are what the serverless bundle will use to pull the correct madlib on request. In our case, we’ll make the item’s slug the key since the serverless route will be looking for a slug.

Creating A Pagination Template That Uses Serverless Routes

Now that the plugin is ready, we can create a new pagination template to use the generated function.

In the root of our site, add a userlibs.njk template. This template will be like the madlibs.njk template, but it will use different data without any interactivity.

---
layout: 'base.njk'
pagination:
  data: userLibs
  alias: userlib
  size: 1
  serverless: eleventy.serverless.path.slug

permalink: 
  userlibs: "/userlibs/:slug/"
---

<h2>{{ userlib.title }}</h2>
<div>
  {{ userlib.htmlText | safe }}
</div>

In this template, we use base.njk to avoid including the JavaScript. We specify the new userlibs data for pagination.

To pull the correct data, we need to specify what the lookup key will be. On the pagination object, we do this with the serverless property. When using serverless routes, we get access to a new object: eleventy.serverless. On this object, there’s a path object that contains information on what URL the user requested. In this case, we’ll have a slug property on that object. That needs to correspond to a key on our pagination data.

To get the slug on our path, we need to add it to the permalink object. 11ty Serverless allows for more than one route for a template. The route’s key needs to match the name provided in the .eleventy.js configuration. In this case, it should be userlibs. We specify the static /userlibs/ start to the path and then add a dynamic element: :slug/. This slug will be what gets passed to eleventy.serverless.path.slug.

Now, the link that we created earlier by submitting a madlib to Sanity will work.

Next Steps

Now we have a madlib generator that saves to a data store. We build only the necessary pages to allow a user to create a new madlib. When they create one, we make those pages on-demand with 11ty and Netlify Functions. From here, we can extend this further.

  • Statically build the user-generated content as well as render them on request.
  • Create a counter for the total number of madlibs saved by each madlib template.
  • Create a list of words users use by parts of speech.

When you can statically build AND dynamically render, what sorts of applications does this open up?

How to Create a Commenting Engine with Next.js and Sanity

One of the arguments against the Jamstack approach for building websites is that developing features gets complex and often requires a number of other services. Take commenting, for example. To set up commenting for a Jamstack site, you often need a third-party solution such as Disqus, Facebook, or even just a separate database service. That third-party solution usually means your comments live disconnected from their content.

When we use third-party systems, we have to live with the trade-offs of using someone else’s code. We get a plug-and-play solution, but at what cost? Ads displayed to our users? Unnecessary JavaScript that we can’t optimize? The fact that the comments content is owned by someone else? These are definitely things worth considering.

Monolithic services, like WordPress, have solved this by having everything housed under the same application. What if we could house our comments in the same database and CMS as our content, query it in the same way we query our content, and display it with the same framework on the front end?

It would make this particular Jamstack application feel much more cohesive, both for our developers and our editors.

Let’s make our own commenting engine

In this article, we’ll use Next.js and Sanity.io to create a commenting engine that meets those needs. One unified platform for content, editors, commenters, and developers.

Why Next.js?

Next.js is a meta-framework for React, built by the team at Vercel. It has built-in functionality for serverless functions, static site generation, and server-side rendering.

For our work, we’ll mostly be using its built-in “API routes” for serverless functions and its static site generation capabilities. The API routes will simplify the project considerably, but if you’re deploying to something like Netlify, these can be converted to serverless functions or we can use Netlify’s next-on-netlify package.

It’s this intersection of static, server-rendered, and serverless functions that makes Next.js a great solution for a project like this.

Why Sanity?

Sanity.io is a flexible platform for structured content. At its core, it is a data store that encourages developers to think about content as structured data. It often comes paired with an open-source CMS solution called the Sanity Studio.

We’ll be using Sanity to keep the author’s content together with any user-generated content, like comments. In the end, Sanity is a content platform with a strong API and a configurable CMS that allows for the customization we need to tie these things together.

Setting up Sanity and Next.js

We’re not going to start from scratch on this project. We’ll begin by using the simple blog starter created by Vercel to get working with a Next.js and Sanity integration. Since the Vercel starter repository has the front end and Sanity Studio separate, I’ve created a simplified repository that includes both.

We’ll clone this repository, and use it to create our commenting base. Want to see the final code? This “Starter” will get you set up with the repository, Vercel project, and Sanity project all connected.

The starter repo comes in two parts: the front end powered by Next.js, and Sanity Studio. Before we go any further, we need to get these running locally.

To get started, we need to set up our content and our CMS for Next to consume the data. First, we need to install the dependencies required for running the Studio and connecting to the Sanity API.

# Install the Sanity CLI globally
npm install -g @sanity/cli
# Move into the Studio directory and install the Studio's dependencies
cd studio
npm install

Once these finish installing, from within the /studio directory, we can set up a new project with the CLI.

# If you're not logged into Sanity via the CLI already
sanity login
# Run init to set up a new project (or connect an existing project)
sanity init

The init command asks us a few questions to set everything up. Because the Studio code already has some configuration values, the CLI will ask us if we want to reconfigure it. We do.

From there, it will ask us which project to connect to, or if we want to configure a new project.

We’ll configure a new project with a descriptive project name. It will ask us to name the “dataset” we’re creating. This defaults to “production” which is perfectly fine, but can be overridden with whatever name makes sense for your project.

The CLI will modify the file ~/studio/sanity.json with the project’s ID and dataset name. These values will be important later, so keep this file handy.

For now, we’re ready to run the Studio locally.

# From within /studio
npm run start

After the Studio compiles, it can be opened in the browser at http://localhost:3333.

At this point, it makes sense to go into the admin and create some test content. To make the front end work properly, we’ll need at least one blog post and one author, but additional content is always nice to get a feel for things. Note that the content will be synced in real-time to the data store even when you’re working from the Studio on localhost. It will become instantly available to query. Don’t forget to push publish so that the content is publicly available.

Once we have some content, it’s time to get our Next.js project running.

Getting set up with Next.js

Most things needed for Next.js are already set up in the repository. The main thing we need to do is connect our Sanity project to Next.js. To do this, there’s an example set of environment variables set in /blog-frontent/.env.local.example. Remove .example from that file and then we’ll modify the environment variables with the proper values.

We need an API token from our Sanity project. To create this value, let’s head over to the Sanity dashboard. In the dashboard, locate the current project and navigate to the Settings → API area. From here, we can create new tokens to use in our project. In many projects, creating a read-only token is all we need. In our project, we’ll be posting data back to Sanity, so we’ll need to create a Read+Write token.

Showing a modal open in the Sanity dashboard with a Add New Token heading, a text field to set the token label with a value of Comment Engine, and three radio buttons that set if the token as read, write or deploy studio access where the write option is selected.
Adding a new read and write token in the Sanity dashboard

When clicking “Add New Token,” we receive a pop-up with the token value. Once it’s closed, we can’t retrieve the token again, so be sure to grab it!

This string goes in our .env.local file as the value for SANITY_API_TOKEN. Since we’re already logged into manage.sanity.io , we can also grab the project ID from the top of the project page and paste it as the value of NEXT_PUBLIC_SANITY_PROJECT_ID. The SANITY_PREVIEW_SECRET is important for when we want to run Next.js in “preview mode”, but for the purposes of this demo, we don’t need to fill that out.

We’re almost ready to run our Next front-end. While we still have our Sanity Dashboard open, we need to make one more change to our Settings → API view. We need to allow our Next.js localhost server to make requests.

In the CORS Origins, we’ll add a new origin and populate it with the current localhost port: http://localhost:3000. We don’t need to be able to send authenticated requests, so we can leave this off When this goes live, we’ll need to add an additional Origin with the production URL to allow the live site to make requests as well.

Our blog is now ready to run locally!

# From inside /blog-frontend
npm run dev

After running the command above, we now have a blog up and running on our computer with data pulling from the Sanity API. We can visit http://localhost:3000 to view the site.

Creating the schema for comments

To add comments to our database with a view in our Studio, we need to set up our schema for the data.

To add our schema, we’ll add a new file in our /studio/schemas directory named comment.js. This JavaScript file will export an object that will contain the definition of the overall data structure. This will tell the Studio how to display the data, as well as structuring the data that we will return to our frontend.

In the case of a comment, we’ll want what might be considered the “defaults” of the commenting world. We’ll have a field for a user’s name, their email, and a text area for a comment string. Along with those basics, we’ll also need a way of attaching the comment to a specific post. In Sanity’s API, the field type is a “reference” to another type of data.

If we wanted our site to get spammed, we could end there, but it would probably be a good idea to add an approval process. We can do that by adding a boolean field to our comment that will control whether or not to display a comment on our site.

export default {
  name: 'comment',
  type: 'document',
  title: 'Comment',
  fields: [
    {
      name: 'name',
      type: 'string',
    },
    {
      title: 'Approved',
      name: 'approved',
      type: 'boolean',
      description: "Comments won't show on the site without approval"
    },   
    {
      name: 'email',
      type: 'string',
    },
    {
      name: 'comment',
      type: 'text',
    },
    {
      name: 'post',
      type: 'reference',
      to: [
        {type: 'post'}
      ]
    }
  ],
}

After we add this document, we also need to add it to our /studio/schemas/schema.js file to register it as a new document type.

import createSchema from 'part:@sanity/base/schema-creator'
import schemaTypes from 'all:part:@sanity/base/schema-type'
import blockContent from './blockContent'
import category from './category'
import post from './post'
import author from './author'
import comment from './comment' // <- Import our new Schema
export default createSchema({
  name: 'default',
  types: schemaTypes.concat([
    post,
    author,
    category,
    comment, // <- Use our new Schema
    blockContent
  ])
})

Once these changes are made, when we look into our Studio again, we’ll see a comment section in our main content list. We can even go in and add our first comment for testing (since we haven’t built any UI for it in the front end yet).

An astute developer will notice that, after adding the comment, the preview our comments list view is not very helpful. Now that we have data, we can provide a custom preview for that list view.

Adding a CMS preview for comments in the list view

After the fields array, we can specify a preview object. The preview object will tell Sanity’s list views what data to display and in what configuration. We’ll add a property and a method to this object. The select property is an object that we can use to gather data from our schema. In this case, we’ll take the comment’s name, comment, and post.title values. We pass these new variables into our prepare() method and use that to return a title and subtitle for use in list views.

export default {
  // ... Fields information
  preview: {
      select: {
        name: 'name',
        comment: 'comment',
        post: 'post.title'
      },
      prepare({name, comment, post}) {
        return {
          title: `${name} on ${post}`,
          subtitle: comment
        }
      }
    }
  }

}

The title will display large and the subtitle will be smaller and more faded. In this preview, we’ll make the title a string that contains the comment author’s name and the comment’s post, with a subtitle of the comment body itself. You can configure the previews to match your needs.

The data now exists, and our CMS preview is ready, but it’s not yet pulling into our site. We need to modify our data fetch to pull our comments onto each post.

Displaying each post’s comments

In this repository, we have a file dedicated to functions we can use to interact with Sanity’s API. The /blog-frontend/lib/api.js file has specific exported functions for the use cases of various routes in our site. We need to update the getPostAndMorePosts function in this file, which pulls the data for each post. It returns the proper data for posts associated with the current page’s slug, as well as a selection of new posts to display alongside it.

In this function, there are two queries: one to grab the data for the current post and one for the additional posts. The request we need to modify is the first request.

Changing the returned data with a GROQ projection

The query is made in the open-source graph-based querying language GROQ, used by Sanity for pulling data out of the data store. The query comes in three parts:

  • The filter – what set of data to find and send back *[_type == "post" && slug.current == $slug]
  • An optional pipeline component — a modification to the data returned by the component to its left | order(_updatedAt desc)
  • An optional projection — the specific data elements to return for the query. In our case, everything between the brackets ({}).

In this example, we have a variable list of fields that most of our queries need, as well as the body data for the blog post. Directly following the body, we want to pull all the comments associated with this post.

In order to do this, we create a named property on the object returned called 'comments' and then run a new query to return the comments that contain the reference to the current post context.

The entire filter looks like this:

*[_type == "comment" && post._ref == ^._id && approved == true]

The filter matches all documents that meet the interior criteria of the square brackets ([]). In this case, we’ll find all documents of _type == "comment". We’ll then test if the current post’s _ref matches the comment’s _id. Finally, we check to see if the comment is approved == true.

Once we have that data, we select the data we want to return using an optional projection. Without the projection, we’d get all the data for each comment. Not important in this example, but a good habit to be in.

curClient.fetch(
    `*[_type == "post" && slug.current == $slug] | order(_updatedAt desc) {
        ${postFields}
        body,
        'comments': *[_type == "comment" && post._ref == ^._id && approved == true]{
            _id, 
            name, 
            email, 
            comment, 
            _createdAt
        }
    }`,
 { slug }
 )
 .then((res) => res?.[0]),

Sanity returns an array of data in the response. This can be helpful in many cases but, for us, we just need the first item in the array, so we’ll limit the response to just the zero position in the index.

Adding a Comment component to our post

Our individual posts are rendered using code found in the /blog-frontend/pages/posts/[slug].js file. The components in this file are already receiving the updated data in our API file. The main Post() function returns our layout. This is where we’ll add our new component.

Comments typically appear after the post’s content, so let’s add this immediately following the closing </article> tag.

// ... The rest of the component
</article>
// The comments list component with comments being passed in
<Comments comments={post?.comments} />

We now need to create our component file. The component files in this project live in the /blog-frontend/components directory. We’ll follow the standard pattern for the components. The main functionality of this component is to take the array passed to it and create an unordered list with proper markup.

Since we already have a <Date /> component, we can use that to format our date properly.

# /blog-frontend/components/comments.js

import Date from './date'

export default function Comments({ comments = [] }) {
  return (
    <>
     <h2 className="mt-10 mb-4 text-4xl lg:text-6xl leading-tight">Comments:</h2>
      <ul>
        {comments?.map(({ _id, _createdAt, name, email, comment }) => (
          <li key={_id} className="mb-5">
            <hr className="mb-5" />
            <h4 className="mb-2 leading-tight"><a href={`mailto:${email}`}>{name}</a> (<Date dateString={_createdAt}/>)</h4>
            <p>{comment}</p>
            <hr className="mt-5 mb-5" />
         </li>
        ))
      </ul>
    </>
  )
}

Back in our /blog-frontend/pages/posts/[slug].js file, we need to import this component at the top, and then we have a comment section displayed for posts that have comments.

import Comments from '../../components/comments'

We now have our manually-entered comment listed. That’s great, but not very interactive. Let’s add a form to the page to allow users to submit a comment to our dataset.

Adding a comment form to a blog post

For our comment form, why reinvent the wheel? We’re already in the React ecosystem with Next.js, so we might as well take advantage of it. We’ll use the react-hook-form package, but any form or form component will do.

First, we need to install our package.

npm install react-hook-form

While that installs, we can go ahead and set up our Form component. In the Post component, we can add a <Form /> component right after our new <Comments /> component.

// ... Rest of the component
<Comments comments={post.comments} />
<Form _id={post._id} />

Note that we’re passing the current post _id value into our new component. This is how we’ll tie our comment to our post.

As we did with our comment component, we need to create a file for this component at /blog-frontend/components/form.js.

export default function Form ({_id}) {

  // Sets up basic data state
  const [formData, setFormData] = useState() 
        
  // Sets up our form states 
  const [isSubmitting, setIsSubmitting] = useState(false)
  const [hasSubmitted, setHasSubmitted] = useState(false)
        
  // Prepares the functions from react-hook-form
  const { register, handleSubmit, watch, errors } = useForm()

  // Function for handling the form submission
  const onSubmit = async data => {
    // ... Submit handler
  }

  if (isSubmitting) {
    // Returns a "Submitting comment" state if being processed
    return <h3>Submitting comment…</h3>
  }
  if (hasSubmitted) {
    // Returns the data that the user submitted for them to preview after submission
    return (
      <>
        <h3>Thanks for your comment!</h3>
        <ul>
          <li>
            Name: {formData.name} <br />
            Email: {formData.email} <br />
            Comment: {formData.comment}
          </li>
        </ul>
      </>
    )
  }

  return (
    // Sets up the Form markup
  )
}

This code is primarily boilerplate for handling the various states of the form. The form itself will be the markup that we return.

// Sets up the Form markup
<form onSubmit={handleSubmit(onSubmit)} className="w-full max-w-lg" disabled>
  <input ref={register} type="hidden" name="_id" value={_id} />
									
  <label className="block mb-5">
    <span className="text-gray-700">Name</span>
    <input name="name" ref={register({required: true})} className="form-input mt-1 block w-full" placeholder="John Appleseed"/>
    </label>
																																																									
  <label className="block mb-5">
    <span className="text-gray-700">Email</span>
    <input name="email" type="email" ref={register({required: true})} className="form-input mt-1 block w-full" placeholder="your@email.com"/>
  </label>

  <label className="block mb-5">
    <span className="text-gray-700">Comment</span>
    <textarea ref={register({required: true})} name="comment" className="form-textarea mt-1 block w-full" rows="8" placeholder="Enter some long form content."></textarea>
  </label>
																																					
  {/* errors will return when field validation fails  */}
  {errors.exampleRequired && <span>This field is required</span>}
	
  <input type="submit" className="shadow bg-purple-500 hover:bg-purple-400 focus:shadow-outline focus:outline-none text-white font-bold py-2 px-4 rounded" />
</form>

In this markup, we’ve got a couple of special cases. First, our <form> element has an onSubmit attribute that accepts the handleSubmit() hook. That hook provided by our package takes the name of the function to handle the submission of our form.

The very first input in our comment form is a hidden field that contains the _id of our post. Any required form field will use the ref attribute to register with react-hook-form’s validation. When our form is submitted we need to do something with the data submitted. That’s what our onSubmit() function is for.

// Function for handling the form submission
const onSubmit = async data => {
  setIsSubmitting(true)
        
  setFormData(data)
        
  try {
    await fetch('/api/createComment', {
      method: 'POST',
     body: JSON.stringify(data),
     type: 'application/json'
    })  
    setIsSubmitting(false)
    setHasSubmitted(true)
  } catch (err) {
    setFormData(err)
  }
}

This function has two primary goals:

  1. Set state for the form through the process of submitting with the state we created earlier
  2. Submit the data to a serverless function via a fetch() request. Next.js comes with fetch() built in, so we don’t need to install an extra package.

We can take the data submitted from the form — the data argument for our form handler — and submit that to a serverless function that we need to create.

We could post this directly to the Sanity API, but that requires an API key with write access and you should protect that with environment variables outside of your front-end. A serverless function lets you run this logic without exposing the secret token to your visitors.

Submitting the comment to Sanity with a Next.js API route

In order to protect our credentials, we’ll write our form handler as a serverless function. In Next.js, we can use “API routes” to create serverless function. These live alongside our page routes in the /blog-frontent/pages directory in the api directory. We can create a new file here called createComment.js.

To write to the Sanity API, we first need to set up a client that has write permissions. Earlier in this demo, we set up a read+write token and put it in /blog-frontent/.env.local. This environment variable is already in use in a client object from /blog-frontend/lib/sanity.js. There’s a read+write client set up with the name previewClient that uses the token to fetch unpublished changes for preview mode.

At the top of our createClient file, we can import that object for use in our serverless function. A Next.js API route needs to export its handler as a default function with request and response arguments. Inside our function, we’ll destructure our form data from the request object’s body and use that to create a new document.

Sanity’s JavaScript client has a create() method which accepts a data object. The data object should have a _type that matches the type of document we wish to create along with any data we wish to store. In our example, we’ll pass it the name, email, and comment.

We need to do a little extra work to turn our post’s _id into a reference to the post in Sanity. We’ll define the post property as a reference and give the_id as the _ref property on this object. After we submit it to the API, we can return either a success status or an error status depending on our response from Sanity.

// This Next.js template already is configured to write with this Sanity Client
import {previewClient} from '../../lib/sanity'

export default async function createComment(req, res) {
  // Destructure the pieces of our request
  const { _id, name, email, comment} = JSON.parse(req.body)
  try {
    // Use our Client to create a new document in Sanity with an object  
    await previewClient.create({
      _type: 'comment',
      post: {
        _type: 'reference',
        _ref: _id,
      },
     name,
     email,
     comment
    })
  } catch (err) {
    console.error(err)
    return res.status(500).json({message: `Couldn't submit comment`, err})
  }
    
  return res.status(200).json({ message: 'Comment submitted' })
}

Once this serverless function is in place, we can navigate to our blog post and submit a comment via the form. Since we have an approval process in place, after we submit a comment, we can view it in the Sanity Studio and choose to approve it, deny it, or leave it as pending.

Take the commenting engine further

This gets us the basic functionality of a commenting system and it lives directly with our content. There is a lot of potential when you control both sides of this flow. Here are a few ideas for taking this commenting engine further.


The post How to Create a Commenting Engine with Next.js and Sanity appeared first on CSS-Tricks.

You can support CSS-Tricks by being an MVP Supporter.

Simplify Your Stack With A Custom-Made Static Site Generator

With the advent of the Jamstack movement, statically-served sites have become all the rage again. Most developers serving static HTML aren’t authoring native HTML. To have a solid developer experience, we often turn to tools called Static Site Generators (SSG).

These tools come with many features that make authoring large-scale static sites pleasant. Whether they provide simple hooks into third-party APIs like Gatsby’s data sources or provide in-depth configuration like 11ty's huge collection of template engines, there’s something for everyone in static site generation.

Because these tools are built for diverse use cases, they have to have a lot of features. Those features make them powerful. They also make them quite complex and opaque for new developers. In this article, we’ll take the SSG down to its basic components and create our very own.

What Is A Static Site Generator?

At its core, a static site generator is a program that performs a series of transformations on a group of files to convert them into static assets, such as HTML. What sort of files it can accept, how it transforms them, and what types of files come out differentiate SSGs.

Jekyll, an early and still popular SSG, uses Ruby to process Liquid templates and Markdown content files into HTML.

Gatsby uses React and JSX to transform components and content into HTML. It then goes a step further and creates a single-page application that can be served statically.

11ty renders HTML from templating engines such as Liquid, Handlebars, Nunjucks, or JavaScript template literals.

Each of these platforms has additional features to make our lives easier. They provide theming, build pipelines, plugin architecture, and more. With each additional feature comes more complexity, more magic, and more dependencies. They’re important features, to be sure, but not every project needs them.

Between these three different SSGs, we can see another common theme: data + templates = final site. This seems to be the core functionality of generator static sites. This is the functionality we’ll base our SSG around.

At its core, a static site generator is a program that performs a series of transformations on a group of files to convert them into static assets, such as HTML.

Our New Static Site Generator’s Technology Stack: Handlebars, Sanity.io And Netlify

To build our SSG, we’ll need a template engine, a data source, and a host that can run our SSG and build our site. Many generators use Markdown as a data source, but what if we took it a step further and natively connected our SSG to a CMS?

  • Data Source: Sanity.io
  • Data fetching and templating: Node and Handlebars
  • Host and Deployment: Netlify.

Prerequisites

  • NodeJS installed
  • Sanity.io account
  • Knowledge of Git
  • Basic knowledge of command line
  • Basic knowledge of deployment to services like Netlify.

Note: To follow along, you can find the code in this repository on GitHub.

Setting Up Our Document Structure In HTML

To start our document structure, we’re going to write plain HTML. No need to complicate matters yet.

In our project structure, we need to create a place for our source files to live. In this case, we’ll create a src directory and put our index.html inside.

In index.html, we’ll outline the content we want. This will be a relatively simple about page.

<!DOCTYPE html><html lang="en">
<head>
    <meta charset="UTF-8">
    <meta name="viewport" content="width=device-width, initial-scale=1.0">
    <title>Title of the page!</title>
</head>
<body>
    <h1>The personal homepage of Bryan Robinson</h1>

    <p>Some pagraph and rich text content next</p>

    <h2>Bryan is on the internet</h2>
    <ul>
        <li><a href="linkURL">List of links</a></li>
    </ul>
</body>
</html>

Let’s keep this simple. We’ll start with an h1 for our page. We’ll follow that with a few paragraphs of biographical information, and we’ll anchor the page with a list of links to see more.

Convert Our HTML Into A Template That Accepts Data

After we have our basic structure, we need to set up a process to combine this with some amount of data. To do this, we’ll use the Handlebars template engine.

At its core, Handlebars takes an HTML-like string, inserts data via rules defined in the document, and then outputs a compiled HTML string.

To use Handlebars, we’ll need to initialize a package.json and install the package.

Run npm init -y to create the structure of a package.json file with some default content. Once we have this, we can install Handlebars.

npm install handlebars

Our build script will be a Node script. This is the script we’ll use locally to build, but also what our deployment vendor and host will use to build our HTML for the live site.

To start our script, we’ll create an index.js file and require two packages at the top. The first is Handlebars and the second is a default module in Node for accessing the current file system.

const fs = require('fs');
const Handlebars = require('handlebars');

We’ll use the fs module to access our source file, as well as to write to a distribution file. To start our build, we'll create a main function for our file to run when called and a buildHTML function to combine our data and markup.

function buildHTML(filename, data) {
  const source = fs.readFileSync(filename,'utf8').toString();
  const template = Handlebars.compile(source);
  const output = template(data);

  return output
}

async function main(src, dist) {
  const html = buildHTML(src, { "variableData": "This is variable data"});

  fs.writeFile(destination, html, function (err) {
    if (err) return console.log(err);
      console.log('index.html created');
  });
}

main('./src/index.html', './dist/index.html');

The main() function accepts two arguments: the path to our HTML template and the path we want our built file to live. In our main function, we run buildHTML on the template source path with some amount of data.

The build function converts the source document into a string and passes that string to Handlebars. Handlebars compiles a template using that string. We then pass our data into the compiled template, and Handlebars renders a new HTML string replacing any variables or template logic with the data output.

We return that string into our main function and use the writeFile method provided by Node’s file-system module to write the new file in our specified location if the directory exists.

To prevent an error, add a dist directory into your project with a .gitkeep file in it. We don’t want to commit our built files (our build process will do this), but we’ll want to make sure to have this directory for our script.

Before we create a CMS to manage this page, let’s confirm it’s working. To test, we’ll modify our HTML document to use the data we just passed into it. We’ll use the Handlebars variable syntax to include the variableData content.

<h1>{{ variableData }}</h1>

Now that our HTML has a variable, we’re ready to run our node script.

node index.js

Once the script finishes, we should have a file at /dist/index.html. If we read open this in a browser, we’ll see our markup rendered, but also our “This is variable data” string, as well.

Connecting To A CMS

We have a way of putting data together with a template, now we need a source for our data. This method will work with any data source that has an API. For this demo, we’ll use Sanity.io.

Sanity is an API-first data source that treats content as structured data. They have an open-source content management system to make managing and adding data more convenient for both editors and developers. The CMS is what’s often referred to as a “Headless” CMS. Instead of a traditional management system where your data is tightly coupled to your presentation, a headless CMS creates a data layer that can be consumed by any frontend or service (and possibly many at the same time).

Sanity is a paid service, but they have a “Standard” plan that is free and has all the features we need for a site like this.

Setting Up Sanity

The quickest way to get up and running with a new Sanity project is to use the Sanity CLI. We’ll start by installing that globally.

npm install -g @sanity/cli

The CLI gives us access to a group of helpers for managing, deploying, and creating. To get things started, we’ll run sanity init. This will run us through a questionnaire to help bootstrap our Studio (what Sanity calls their open-source CMS).

Select a Project to Use:
   Create new project
   HTML CMS

Use the default dataset configuration?   
   Y // this creates a "Production" dataset

Project output path:
   studio // or whatever directory you'd like this to live in

Select project template
   Clean project with no predefined schemas

This step will create a new project and dataset in your Sanity account, create a local version of Studio, and tie the data and CMS together for you. By default, the studio directory will be created in the root of our project. In larger-scale projects, you may want to set this up as a separate repository. For this project, it’s fine to keep this tied together.

To run our Studio locally, we’ll change the directory into the studio directory and run sanity start. This will run Studio at localhost:3333. When you log in, you’ll be presented with a screen to let you know you have “Empty schema.” With that, it’s time to add our schema, which is how our data will be structured and edited.

Creating Sanity Schema

The way you create documents and fields within Sanity Studio is to create schemas within the schemas/schema.js file.

For our site, we’ll create a schema type called "About Details." Our schema will flow from our HTML. In general, we could make most of our webpage a single rich-text field, but it’s a best practice to structure our content in a de-coupled way. This provides greater flexibility in how we might want to use this data in the future.

For our webpage, we want a set of data that includes the following:

  • Title
  • Full Name
  • Biography (with rich text editing)
  • A list of websites with a name and URL.

To define this in our schema, we create an object for our document and define out its fields. An annotated list of our content with its field type:

  • Title — string
  • Full Name — string
  • Biography — array of "blocks"
  • Website list — array of objects with name and URL string fields.
types: schemaTypes.concat([
    / Your types here! /

    {
        title: "About Details",
        name: "about",
        type: "document",
        fields: [
            {
                name: 'title',
                type: 'string'
            },
            {
                name: 'fullName',
                title: 'Full Name',
                type: 'string'
            },
            {
                name: 'bio',
                title: 'Biography',
                name: 'content',
                type: 'array',
                of: [
                    {
                        type: 'block'
                    }
                ]
            },
            {
                name: 'externalLinks',
                title: 'Social media and external links',
                type: 'array',
                of: [
                    {
                        type: 'object',
                        fields: [
                            { name: 'text', title: 'Link text', type: 'string' },
                            { name: 'href', title: 'Link url', type: 'string' }
                        ]
                    }
                ]
            }
        ]
    }
])

Add this to your schema types, save and your Studio will recompile and present you with your first documents. From here, we’ll add our content into the CMS by creating a new document and filling out the information.

Structuring Your Content In A Reusable Way

At this point, you may be wondering why we have a "full name" and a "title." This is because we want our content to have the potential to be multipurpose. By including a name field instead of including the name just in the title, we give that data more use. We can then use information in this CMS to also power a resumé page or PDF. The biography field could be programmatically used in other systems or websites. This allows us to have a single source of truth for much of this content instead of being dictated by the direct use case of this particular site.

Pulling Our Data Into Our Project

Now that we’ve made our data available via an API, let's pull it into our project.

Install and configure the Sanity JavaScript client

First thing, we need access to the data in Node. We can use the Sanity JavaScript client to forge that connection.

npm install @sanity/client

This will fetch and install the JavaScript SDK. From here, we need to configure it to fetch data from the project we set up earlier. To do that, we’ll set up a utility script in /utils/SanityClient.js. We provide the SDK with our project ID and dataset name, and we’re ready to use it in our main script.

const sanityClient = require('@sanity/client');
const client = sanityClient({
    projectId: '4fs6x5jg',
    dataset: 'production',
    useCdn: true 
  })

module.exports = client;

Fetching Our Data With GROQ

Back in our index.js file, we’ll create a new function to fetch our data. To do this, we’ll use Sanity’s native query language, the open-source GROQ.

We’ll build the query in a variable and then use the client that we configured to fetch the data based on the query. In this case, we build an object with a property called about. In this object, we want to return the data for our specific document. To do that, we query based on the document _id which is generated automatically when we create our document.

To find the document’s _id, we navigate to the document in Studio and either copy it from the URL or move into “Inspect” mode to view all the data on the document. To enter Inspect, either click the “kabob” menu at the top-right or use the shortcut Ctrl + Alt + I. This view will list out all the data on this document, including our _id. Sanity will return an array of document objects, so for simplicity’s sake, we’ll return the 0th entry.

We then pass the query to the fetch method of our Sanity client and it will return a JSON object of all the data in our document. In this demo, returning all the data isn’t a big deal. For bigger implementations, GROQ allows for an optional "projection" to only return the explicit fields you want.

const client = require('./utils/SanityClient') // at the top of the file

// ...

async function getSanityData() {
    const query = {
        "about": *[_id == 'YOUR-ID-HERE'][0]
    }
    let data = await client.fetch(query);
}

Converting The Rich Text Field To HTML

Before we can return the data, we need to do a transformation on our rich text field. While many CMSs use rich text editors that return HTML directly, Sanity uses an open-source specification called Portable Text. Portable Text returns an array of objects (think of rich text as a list of paragraphs and other media blocks) with all the data about the rich text styling and properties like links, footnotes, and other annotations. This allows for your text to be moved and used in systems that don’t support HTML, like voice assistants and native apps.

For our use case, it means we need to transform the object into HTML. There are NPM modules that can be used to convert portable text into various uses. In our case we’ll use a package called block-content-to-html.

npm install @sanity/block-content-to-html

This package will render all the default markup from the rich text editor. Each type of style can be overridden to conform to whatever markup you need for your use case. In this case, we’ll let the package do the work for us.

const blocksToHtml = require('@sanity/block-content-to-html'); // Added to the top

async function getSanityData() {
    const query = {
        "about": *[_type == 'about'][0]
    }
    let data = await client.fetch(query);
    data.about.content = blocksToHtml({
        blocks: data.about.content
    })
    return await data
}

Using The Content From Sanity.io In Handlebars

Now that the data is in a shape we can use it, we’ll pass this to our buildHTML function as the data argument.

async function main(src, dist) {
    const data = await getSanityData();
    const html = buildHTML(src, data)

    fs.writeFile(dist, html, function (err) {
        if (err) return console.log(err);
        console.log('index.html created');
    });
}

Now, we can change our HTML to use the new data. We’ll use more variable calls in our template to pull most of our data.

To render our rich text content variable, we’ll need to add an extra layer of braces to our variable. This will tell Handlebars to render the HTML instead of displaying the HTML as a string.

For our externalLinks array, we’ll need to use Handlebars’ built-in looping functionality to display all the links we added to our Studio.

<!DOCTYPE html>
<html lang="en">
<head>
    <meta charset="UTF-8">
    <meta name="viewport" content="width=device-width, initial-scale=1.0">
    <title>{{ about.title }}</title>
</head>
<body>
    <h1>The personal homepage of {{ about.fullName }}</h1>

    {{{ about.content }}}

    <h2>Bryan is on the internet</h2>
    <ul>
        {{#each about.externalLinks }}
            <li><a href="{{ this.href }}">{{ this.text }}</a></li>
        {{/each}}
    </ul>
</body>
</html>

Setting Up Deployment

Let’s get this live. We need two components to make this work. First, we want a static host that will build our files for us. Next, we need to trigger a new build of our site when content is changed in our CMS.

Deploying To Netlify

For hosting, we’ll use Netlify. Netlify is a static site host. It serves static assets, but has additional features that will make our site work smoothly. They have a built-in deployment infrastructure that can run our node script, webhooks to trigger builds, and a globally distributed CDN to make sure our HTML page is served quickly.

Netlify can watch our repository on GitHub and create a build based on a command that we can add in their dashboard.

First, we’ll need to push this code to GitHub. Then, in Netlify’s Dashboard, we need to connect the new repository to a new site in Netlify.

Once that’s hooked up, we need to tell Netlify how to build our project. In the dashboard, we’ll head to Settings > Build & Deploy > Build Settings. In this area, we need to change our “Build command” to “node index.js” and our “Publish directory” to “./dist”.

When Netlify builds our site, it will run our command and then check the folder we list for content and publish the content inside.

Setting Up A Webhook

We also need to tell Netlify to publish a new version when someone updates content. To do that, we’ll set up a Webhook to notify Netlify that we need the site to rebuild. A Webhook is a URL that can be programmatically accessed by a different service (such as Sanity) to create an action in the origin service (in this case Netlify).

We can set up a specific “Build hook” in our Netlify dashboard at Settings > Build & Deploy > Build hooks. Add a hook, give it a name and save. This will provide a URL that can be used to remotely trigger a build in Netlify.

Next, we need to tell Sanity to make a request to this URL when you publish changes.

We can use the Sanity CLI to accomplish this. Inside of our /studio directory, we can run sanity hook create to connect. The command will ask for a name, a dataset, and a URL. The name can be whatever you’d like, the dataset should be production for our product, and the URL should be the URL that Netlify provided.

Now, whenever we publish content in Studio, our website will automatically be updated. No framework necessary.

Next Steps

This is a very small example of what you can do when you create your own tooling. While more full-featured SSGs may be what you need for most projects, creating your own mini-SSG can help you understand more about what’s happening in your generator of choice.

  • This site publishes only one page, but with a little extra in our build script, we could have it publish more pages. It could even publish a blog post.
  • The “Developer experience” is a little lacking in the repository. We could run our Node script on any file saves by implementing a package like Nodemon or add “hot reloading” with something like BrowserSync.
  • The data that lives in Sanity can power multiple sites and services. You could create a resumé site that uses this and publishes a PDF instead of a webpage.
  • You could add CSS and make this look like a real site.

From Static Sites To End User JAMstack Apps With FaunaDB

From Static Sites To End User JAMstack Apps With FaunaDB

From Static Sites To End User JAMstack Apps With FaunaDB

Bryan Robinson

The JAMstack has proven itself to be one of the top ways of producing content-driven sites, but it’s also a great place to house applications, as well. If you’ve been using the JAMstack for your performant websites, the demos in this article will help you extend those philosophies to applications as well.

When using the JAMstack to build applications, you need a data service that fits into the most important aspects of the JAMstack philosophy:

  • Global distribution
  • Zero operational needs
  • A developer-friendly API.

In the JAMstack ecosystem there are plenty of software-as-a-service companies that provide ways of getting and storing specific types of data. Whether you want to send emails, SMS or make phone calls (Twilio) or accept form submissions efficiently (Formspree, Formingo, Formstack, etc.), it seems there’s an API for almost everything.

These are great services that can do a lot of the low-level work of many applications, but once your data is more complex than a spreadsheet or needs to be updated and store in real-time, it might be time to look into a database.

The service API can still be in use, but a central database managing the state and operations of your app becomes much more important. Even if you need a database, you still want it to follow the core JAMstack philosophies we outlined above. That means, we don’t want to host our own database server. We need a Database-as-a-Service solution. Our database needs to be optimized for the JAMstack:

  • Optimized for API calls from a browser or build process.
  • Flexible to model your data in the specific ways your app needs.
  • Global distribution of our data like a CDN houses our sites.
  • Hands-free scaling with no need of a database administrator or developer intervention.

Whatever service you look into needs to follow these tenets of serverless data. In our demos, we’ll explore FaunaDB, a global serverless database, featuring native GraphQL to assure that we keep our apps in step with the philosophies of the JAMstack.

Let’s dive into the code!

A JAMstack Guestbook App With Gatsby And Fauna

I’m a big fan of reimagining the internet tools and concepts of the 1990s and early 2000s. We can take these concepts and make them feel fresh with the new set of tools and interactions.

guestbook-form-and-signature
A look at the app we’re creating. A signature form with a signature list below. The form will populate a FaunaDB database and that database will create the view list. (Large preview)

In this demo, we’ll create an application that was all the rage in that time period: the guestbook. A guestbook is nothing but app-generated content and interaction. A user can come to the site, see all the signatures of past “guests” and then leave their own.

To start, we’ll statically render our site and build our data from Fauna during our build step. This will provide the fast performance we expect from a JAMstack site. To do this, we’ll use GatsbyJS.

Initial setup

Our first step will be to install Gatsby globally on our computer. If you’ve never spent much time in the command line, Gatsby’s “part 0” tutorial will help you get up and running. If you already have Node and NPM installed, you’ll install the Gatsby CLI globally and create a new site with it using the following commands:

npm install -g gatsby-cli
gatsby new <directory-to-install-into> <starter>

Gatsby comes with a large repository of starters that can help bootstrap your project. For this demo, I chose a simple starter that came equipped with the Bulma CSS framework.

gatsby new guestbook-app https://github.com/amandeepmittal/gatsby-bulma-quickstart

This gives us a good starting point and structure. It also has the added benefit of coming with styles that are ready to go.

Let’s do a little cleanup for things we don’t need. We’ll start by simplifying our components.header.js

import React from 'react';

import './style.scss';

const Header = ({ siteTitle }) => (
  <section className="hero gradientBg ">
    <div className="hero-body">
      <div className="container container--small center">
        <div className="content">
          <h1 className="is-uppercase is-size-1 has-text-white">
            Sign our Virtual Guestbook
          </h1>
          <p className="subtitle has-text-white is-size-3">
            If you like all the things that we do, be sure to sign our virtual guestbook
          </p>
        </div>
      </div>
    </div>
  </section>
);

export default Header;

This will get rid of much of the branded content. Feel free to customize this section, but we won’t write any of our code here.

Next we’ll clean out the components/midsection.js file. This will be where our app’s code will render.

import React, { useState } from 'react';
import Signatures from './signatures';
import SignForm from './sign-form';


const Midsection = () => {

    const [sigData, setSigData] = useState(data.allSignatures.nodes);
    return (
        <section className="section">
            <div className="container container--small">
                <section className="section is-small">
                    <h2 className="title is-4">Sign here</h2>
                    <SignForm></SignForm>
                </section>

                <section className="section">
                    <h2 className="title is-5">View Signatures</h2>
                    <Signatures></Signatures>
                </section>
            </div>
        </section>
    )
}

export default Midsection;

In this code, we’ve mostly removed the “site” content and added in a couple new components. A <SignForm> that will contain our form for submitting a signature and a <Signatures> component to contain the list of signatures.

Now that we have a relatively blank slate, we can set up our FaunaDB database.

Setting Up A FaunaDB Collection

After logging into Fauna (or signing up for an account), you’ll be given the option to create a new Database. We’ll create a new database called guestbook.

signatures Collection
The initial state of our signatures Collection after we add our first Document. (Large preview)

Inside this database, we’ll create a “Collection” called signature. Collections in Fauna a group of Documents that are in turn JSON objects.

In this new Collection, we’ll create a new Document with the following JSON:

{
 name: "Bryan Robinson",
 message:
   "Lorem ipsum dolor amet sum Lorem ipsum dolor amet sum Lorem ipsum dolor amet sum Lorem ipsum dolor amet sum"
}

This will be the simple data schema for each of our signatures. For each of these Documents, Fauna will create additional data surrounding it.

{
 "ref": Ref(Collection("signatures"), "262884172900598291"),
 "ts": 1586964733980000,
 "data": {
   "name": "Bryan Robinson",
   "message": "Lorem ipsum dolor amet sum Lorem ipsum dolor amet sum Lorem ipsum dolor amet sum Lorem ipsum dolor amet sum "
 }
}

The ref is the unique identifier inside of Fauna and the ts is the time (as a Unix timestamp) the document was created/updated.

After creating our data, we want an easy way to grab all that data and use it in our site. In Fauna, the most efficient way to get data is via an Index. We’ll create an Index called allSignatures. This will grab and return all of our signature Documents in the Collection.

Now that we have an efficient way of accessing the data in Gatsby, we need Gatsby to know where to get it. Gatsby has a repository of plugins that can fetch data from a variety of sources, Fauna included.

Setting up the Fauna Gatsby Data Source Plugin

npm install gatsby-source-faunadb

After we install this plugin to our project, we need to configure it in our gatsby-config.js file. In the plugins array of our project, we’ll add a new item.

{
    resolve: `gatsby-source-faunadb`,
    options: {
    // The secret for the key you're using to connect to your Fauna database.
    // You can generate on of these in the "Security" tab of your Fauna Console.
        secret: process.env.YOUR_FAUNADB_SECRET,
    // The name of the index you want to query
    // You can create an index in the "Indexes" tab of your Fauna Console.
        index: `allSignatures`,
    // This is the name under which your data will appear in Gatsby GraphQL queries
    // The following will create queries called `allBird` and `bird`.
        type: "Signatures",
    // If you need to limit the number of documents returned, you can specify a 
    // Optional maximum number to read.
    // size: 100
    },
},

In this configuration, you provide it your Fauna secret Key, the Index name we created and the “type” we want to access in our Gatsby GraphQL query.

Where did that process.env.YOUR_FAUNADB_SECRET come from?

In your project, create a .env file — and include that file in your .gitignore! This file will give Gatsby’s Webpack configuration the secret value. This will keep your sensitive information safe and not stored in GitHub.

YOUR_FAUNADB_SECRET = "value from fauna"

We can then head over to the “Security” tab in our Database and create a new key. Since this is a protected secret, it’s safe to use a “Server” role. When you save the Key, it’ll provide your secret. Be sure to grab that now, as you can’t get it again (without recreating the Key).

Once the configuration is set up, we can write a GraphQL query in our components to grab the data at build time.

Getting the data and building the template

We’ll add this query to our Midsection component to make it accessible by both of our components.

const Midsection = () => {
 const data = useStaticQuery(
 graphql`
            query GetSignatures {
                allSignatures {
                  nodes {
                    name
                    message
                    _ts
                    _id
                  }
                }
            }`
        );
// ... rest of the component
}

This will access the Signatures type we created in the configuration. It will grab all the signatures and provide an array of nodes. Those nodes will contain the data we specify we need: name, message, ts, id.

We’ll set that data into our state — this will make updating it live easier later.

const [sigData, setSigData] = useState(data.allSignatures.nodes);

Now we can pass sigData as a prop into <Signatures> and setSigData into <SignForm>.

<SignForm setSigData={setSigData}></SignForm>


<Signatures sigData={sigData}></Signatures>

Let’s set up our Signatures component to use that data!

import React from 'react';
import Signature from './signature'   

const Signatures = (props) => {
    const SignatureMarkup = () => {
        return props.sigData.map((signature, index) => {
            return (
                <Signature key={index} signature={signature}></Signature>
            )
        }).reverse()
    }

    return (
        <SignatureMarkup></SignatureMarkup>
    )
}

export default Signatures

In this function, we’ll .map() over our signature data and create an Array of markup based on a new <Signature> component that we pass the data into.

The Signature component will handle formatting our data and returning an appropriate set of HTML.

import React from 'react';

const Signature = ({signature}) => {
    const dateObj = new Date(signature._ts / 1000);
    let dateString = `${dateObj.toLocaleString('default', {weekday: 'long'})}, ${dateObj.toLocaleString('default', { month: 'long' })} ${dateObj.getDate()} at ${dateObj.toLocaleTimeString('default', {hour: '2-digit',minute: '2-digit', hour12: false})}`

    return (
    <article className="signature box">      
        <h3 className="signature__headline">{signature.name} - {dateString}</h3>
        <p className="signature__message">
            {signature.message} 
        </p>
    </article>
)};

export default Signature;

At this point, if you start your Gatsby development server, you should have a list of signatures currently existing in your database. Run the following command to get up and running:

gatsby develop

Any signature stored in our database will build HTML in that component. But how can we get signatures INTO our database?

Let’s set up a signature form component to send data and update our Signatures list.

Let’s Make Our JAMstack Guestbook Interactive

First, we’ll set up the basic structure for our component. It will render a simple form onto the page with a text input, a textarea, and a button for submission.

import React from 'react';

import faunadb, { query as q } from "faunadb"

var client = new faunadb.Client({ secret: process.env.GATSBY_FAUNA_CLIENT_SECRET  })

export default class SignForm extends React.Component {
    constructor(props) {
        super(props)
        this.state = {
            sigName: "",
            sigMessage: ""
        }
    }

    handleSubmit = async event => {
        // Handle the submission
    }

    handleInputChange = event => {
        // When an input changes, update the state
    }

    render() {
        return (
            <form onSubmit={this.handleSubmit}>
                <div className="field">
                    <div className="control">
                 <label className="label">Label
                    <input 
                        className="input is-fullwidth"
                        name="sigName" 
                        type="text"
                        value={this.state.sigName}
                        onChange={this.handleInputChange}
                    />
                    </label>
                    </div>
                </div>
                <div className="field">
                    <label>
                        Your Message:
                        <textarea 
                            rows="5"
                            name="sigMessage" 
                            value={this.state.sigMessage}
                            onChange={this.handleInputChange} 
                            className="textarea" 
                            placeholder="Leave us a happy note"></textarea>

                    </label>
                </div>
                <div className="buttons">
                    <button className="button is-primary" type="submit">Sign the Guestbook</button>
                </div>
            </form>
        )
    }

}

To start, we’ll set up our state to include the name and the message. We’ll default them to blank strings and insert them into our <textarea> and <input>.

When a user changes the value of one of these fields, we’ll use the handleInputChange method. When a user submits the form, we’ll use the handleSubmit method.

Let’s break down both of those functions.

  handleInputChange = event => {
 const target = event.target
 const value = target.value
 const name = target.name
 this.setState({
            [name]: value,
        })
    }

The input change will accept the event. From that event, it will get the current target’s value and name. We can then modify the state of the properties on our state object — sigName, sigMessage or anything else.

Once the state has changed, we can use the state in our handleSubmit method.

  handleSubmit = async event => {
        event.preventDefault();
 const placeSig = await this.createSignature(this.state.sigName, this.state.sigMessage);
 this.addSignature(placeSig);
    }

This function will call a new createSignature() method. This will connect to Fauna to create a new Document from our state items.

The addSignature() method will update our Signatures list data with the response we get back from Fauna.

In order to write to our database, we’ll need to set up a new key in Fauna with minimal permissions. Our server key is allowed higher permissions because it’s only used during build and won’t be visible in our source.

This key needs to only allow for the ability to only create new items in our signatures collection.

Note: A user could still be malicious with this key, but they can only do as much damage as a bot submitting that form, so it’s a trade-off I’m willing to make for this app.

signatures-client-permissions
A look at the FaunaDB security panel. In this shot, we’re creating a 'client' role that allows only the 'Create' permission for those API Keys. (Large preview)

For this, we’ll create a new “Role” in the “Security” tab of our dashboard. We can add permissions around one or more of our Collections. In this demo, we only need signatures and we can select the “Create” functionality.

After that, we generate a new key that uses that role.

To use this key, we’ll instantiate a new version of the Fauna JavaScript SDK. This is a dependency of the Gatsby plugin we installed, so we already have access to it.

import faunadb, { query as q } from "faunadb"

var client = new faunadb.Client({ secret: process.env.GATSBY_FAUNA_CLIENT_SECRET })

By using an environment variable prefixed with GATSBY_, we gain access to it in our browser JavaScript (be sure to add it to your .env file).

By importing the query object from the SDK, we gain access to any of the methods available in Fauna’s first-party Fauna Query Language (FQL). In this case, we want to use the Create method to create a new document on our Collection.

createSignature = async (sigName, sigMessage) => {
 try {
 const queryResponse = await client.query(
                q.Create(
                    q.Collection('signatures'),
                    { 
                        data: { 
                            name: sigName,
                            message: sigMessage
                        } 
                    }
                )
            )
 const signatureInfo = { name: queryResponse.data.name, message: queryResponse.data.message, _ts: queryResponse.ts, _id: queryResponse.id}
 return signatureInfo
        } catch(err) {
            console.log(err);
        }
    }

We pass the Create function to the client.query() method. Create takes a Collection reference and an object of information to pass to a new Document. In this case, we use q.Collection and a string of our Collection name to get the reference to the Collection. The second argument is for our data. You can pass other items in the object, so we need to tell Fauna, we’re specifically sending it the data property on that object.

Next, we pass it the name and message we collected in our state. The response we get back from Fauna is the entire object of our Document. This includes our data in a data object, as well as a Fauna ID and timestamp. We reformat that data in a way that our Signatures list can use and return that back to our handleSubmit function.

Our submit handler will then pass that data into our setSigData prop which will notify our Signatures component to rerender with that new data. This gives our user immediate feedback that their submission has been accepted.

Rebuilding the site

This is all working in the browser, but the data hasn’t been updated in our static application yet.

From here, we need to tell our JAMstack host to rebuild our site. Many have the ability to specify a webhook to trigger a deployment. Since I’m hosting this demo on Netlify, I can create a new “Deploy webhook” in their admin and create a new triggerBuild function. This function will use the native JavaScript fetch() method and send a post request to that URL. Netlify will then rebuild the application and pull in the latest signatures.

  triggerBuild = async () => {
 const response = await fetch(process.env.GATSBY_BUILD_HOOK, { method: "POST", body: "{}" });
 return response;
    }

Both Gatsby Cloud and Netlify have implemented ways of handling “incremental” builds with Gatsby drastically speeding up build times. This sort of build can happen very quickly now and feel almost as fast as a traditional server-rendered site.

Every signature that gets added gets quick feedback to the user that it’s been submitted, is perpetually stored in a database, and served as HTML via a build process.

Still feels a little too much like a typical website? Let’s take all these concepts a step further.

Create A Mindful App With Auth0, Fauna Identity And Fauna User-Defined Functions (UDF)

Being mindful is an important skill to cultivate. Whether it’s thinking about your relationships, your career, your family, or just going for a walk in nature, it’s important to be mindful of the people and places around you.

Mindful Mission
A look at the final app screen showing a 'Mindful Mission,' 'Past Missions' and a 'Log Out' button. (Large preview)

This app intends to help you focus on one randomized idea every day and review the various ideas from recent days.

To do this, we need to introduce a key element to most apps: authentication. With authentication, comes extra security concerns. While this data won’t be particularly sensitive, you don’t want one user accessing the history of any other user.

Since we’ll be scoping data to a specific user, we also don’t want to store any secret keys on browser code, as that would open up other security flaws.

We could create an entire authentication flow using nothing but our wits and a user database with Fauna. That may seem daunting and moves us away from the features we want to write. The great thing is that there’s certainly an API for that in the JAMstack! In this demo, we’ll explore integrating Auth0 with Fauna. We can use the integration in many ways.

Setting Up Auth0 To Connect With Fauna

Many implementations of authentication with the JAMstack rely heavily on Serverless functions. That moves much of the security concerns from a security-focused company like Auth0 to the individual developer. That doesn’t feel quite right.

serverless function flow
A diagram outlining the convoluted method of using a serverless function to manage authentication and token generation. (Large preview)

The typical flow would be to send a login request to a serverless function. That function would request a user from Auth0. Auth0 would provide the user’s JSON Web Token (JWT) and the function would provide any additional information about the user our application needs. The function would then bundle everything up and send it to the browser.

There are a lot of places in that authentication flow where a developer could introduce a security hole.

Instead, let’s request that Auth0 bundle everything up for us inside the JWT it sends. Keeping security in the hands of the folks who know it best.

Auth0’s Rule flow
A diagram outlining the streamlined authentication and token generation flow when using Auth0’s Rule system. (Large preview)

We’ll do this by using Auth0’s Rules functionality to ask Fauna for a user token to encode into our JWT. This means that unlike our Guestbook, we won’t have any Fauna keys in our front-end code. Everything will be managed in memory from that JWT token.

Setting up Auth0 Application and Rule

First, we’ll need to set up the basics of our Auth0 Application.

Following the configuration steps in their basic walkthrough gets the important basic information filled in. Be sure to fill out the proper localhost port for your bundler of choice as one of your authorized domains.

After the basics of the application are set up, we’ll go into the “Rules” section of our account.

Click “Create Rule” and select “Empty Rule” (or start from one of their many templates that are helpful starting points).

Here’s our Rule code

async function (user, context, callback) {
  const FAUNADB_SECRET = 'Your Server secret';
  const faunadb = require('faunadb@2.11.1');
  const { query: q } = faunadb;
  const client = new faunadb.Client({ secret: FAUNADB_SECRET });
  try {
    const token = await client.query(
      q.Call('user_login_or_create', user.email, user) // Call UDF in fauna
    );
    let newClient = new faunadb.Client({ secret: token.secret });

    context.idToken['https://faunadb.com/id/secret'] = token.secret;
    callback(null, user, context);
  } catch(error) {
    console.log('->', error);
    callback(error, user, context);
  }
}

We give the rule a function that takes the user, context, and a callback from Auth0. We need to set up and grab a Server token to initialize our Fauna JavaScript SDK and initialize our client. Just like in our Guestbook, we’ll create a new Database and manage our Tokens in “Security”.

From there, we want to send a query to Fauna to create or log in our user. To keep our Rule code simple (and make it reusable), we’ll write our first Fauna “User-Defined Function” (UDF). A UDF is a function written in FQL that runs on Fauna’s infrastructure.

First, we’ll set up a Collection for our users. You don’t need to make a first Document here, as they’ll be created behind the scenes by our Auth0 rule whenever a new Auth0 user is created.

Next, we need an Index to search our users Collection based on the email address. This Index is simpler than our Guestbook, so we can add it to the Dashboard. Name the Index user_by_email, set the Collection to users, and the Terms to data.email. This will allow us to pass an email address to the Index and get a matching user Document back.

It’s time to create our UDF. In the Dashboard, navigate to “Functions” and create a new one named user_login_or_create.

Query(
  Lambda(
    ["userEmail", "userObj"], // Arguments
    Let(
      { user: Match(Index("user_by_email"), Var("userEmail")) }, // Set user variable 
      If(
        Exists(Var("user")), // Check if the User exists
        Create(Tokens(null), { instance: Select("ref", Get(Var("user"))) }), // Return a token for that item in the users collection (in other words, the user)
        Let( // Else statement: Set a variable
          {
            newUser: Create(Collection("users"), { data: Var("userObj") }), // Create a new user and get its reference
            token: Create(Tokens(null), { // Create a token for that user
              instance: Select("ref", Var("newUser"))
            })
          },
          Var("token") // return the token
        )
      )
    )
  )
)

Our UDF will accept a user email address and the rest of the user information. If a user exists in a users Collection, it will create a Token for the user and send that back. If a user doesn’t exist, it will create that user Document and then send a Token to our Auth0 Rule.

We can then store the Token as an idToken attached to the context in our JWT. The token needs a URL as a key. Since this is a Fauna token, we can use a Fauna URL. Whatever this is, you’ll use it to access this in your code.

This Token doesn’t have any permissions yet. We need to go into our Security rules and set up a new Role.

We’ll create an “AuthedUser” role. We don’t need to add any permissions yet, but as we create new UDFs and new Collections, we’ll update the permissions here. Instead of generating a new Key to use this Role, we want to add to this Role’s “Memberships”. On the Memberships screen, you can select a Collection to add as a member. The documents in this Collection (in our case, our Users), will have the permissions set on this role given via their Token.

Now, when a user logs in via Auth0, they’ll be returned a Token that matches their user Document and has its permissions.

From here, we come back to our application.

Implement logic for when the User is logged in

Auth0 has an excellent walkthrough for setting up a “vanilla” JavaScript single-page application. Most of this code is a refactor of that to fit the code splitting of this application.

default Auth0 Login/Signup screen
The default Auth0 Login/Signup screen. All the login flow can be contained in the Auth0 screens. (Large preview)

First, we’ll need the Auth0 SPA SDK.

npm install @auth0/auth0-spa-js
import createAuth0Client from '@auth0/auth0-spa-js';
import { changeToHome } from './layouts/home'; // Home Layout
import { changeToMission } from './layouts/myMind'; // Current Mindfulness Mission Layout

let auth0 = null;
var currentUser = null;
const configureClient = async () => {
    // Configures Auth0 SDK
    auth0 = await createAuth0Client({
      domain: "mindfulness.auth0.com",
      client_id: "32i3ylPhup47PYKUtZGRnLNsGVLks3M6"
    });
};

const checkUser = async () => {
    // return user info from any method
    const isAuthenticated = await auth0.isAuthenticated();
    if (isAuthenticated) {
        return await auth0.getUser();
    }
}

const loadAuth = async () => {
    // Loads and checks auth
    await configureClient();      
    
    const isAuthenticated = await auth0.isAuthenticated();
    if (isAuthenticated) {
        // show the gated content
        currentUser = await auth0.getUser();
        changeToMission(); // Show the "Today" screen
        return;
    } else {
        changeToHome(); // Show the logged out "homepage"
    }

    const query = window.location.search;
    if (query.includes("code=") && query.includes("state=")) {

        // Process the login state
        await auth0.handleRedirectCallback();
       
        currentUser = await auth0.getUser();
        changeToMission();

        // Use replaceState to redirect the user away and remove the querystring parameters
        window.history.replaceState({}, document.title, "/");
    }
}

const login = async () => {
    await auth0.loginWithRedirect({
        redirect_uri: window.location.origin
    });
}
const logout = async () => {
    auth0.logout({
        returnTo: window.location.origin
    });
    window.localStorage.removeItem('currentMindfulItem') 
    changeToHome(); // Change back to logged out state
}

export { auth0, loadAuth, currentUser, checkUser, login, logout }

First, we configure the SDK with our client_id from Auth0. This is safe information to store in our code.

Next, we set up a function that can be exported and used in multiple files to check if a user is logged in. The Auth0 library provides an isAuthenticated() method. If the user is authenticated, we can return the user data with auth0.getUser().

We set up a login() and logout() functions and a loadAuth() function to handle the return from Auth0 and change the state of our UI to the “Mission” screen with today’s Mindful idea.

Once this is all set up, we have our authentication and user login squared away.

We’ll create a new function for our Fauna functions to reference to get the proper token set up.

const AUTH_PROP_KEY = "https://faunad.com/id/secret";
var faunadb = require('faunadb'),
q = faunadb.query;

async function getUserClient(currentUser) {
    return new faunadb.Client({ secret: currentUser[AUTH_PROP_KEY]})
}

This returns a new connection to Fauna using our Token from Auth0. This token works the same as the Keys from previous examples.

Generate a random Mindful topic and store it in Fauna

To start, we need a Collection of items to store our list of Mindful objects. We’ll create a Collection called “mindful” things, and create a number of items with the following schema:

{
   "title": "Career",
   "description": "Think about the next steps you want to make in your career. What’s the next easily attainable move you can make?",
   "color": "#C6D4FF",
   "textColor": "black"
 }

From here, we’ll move to our JavaScript and create a function for adding and returning a random item from that Collection.

async function getRandomMindfulFromFauna(userObj) {
    const client = await getUserClient(userObj);

    try {
        let mindfulThings = await client.query(
            q.Paginate(
                q.Documents(q.Collection('mindful_things'))
            )
        )
        let randomMindful = mindfulThings.data[Math.floor(Math.random()*mindfulThings.data.length)];
        let creation = await client.query(q.Call('addUserMindful', randomMindful));
        
        return creation.data.mindful;

    } catch (error) {
        console.log(error)
    }   
}

To start, we’ll instantiate our client with our getUserClient() method.

From there, we’ll grab all the Documents from our mindful_things Collection. Paginate() by default grabs 64 items per page, which is more than enough for our data. We’ll grab a random item from the array that’s returned from Fauna. This will be what Fauna refers to as a “Ref”. A Ref is a full reference to a Document that the various FQL functions can use to locate a Document.

We’ll pass that Ref to a new UDF that will handle storing a new, timestamped object for that user stored in a new user_things Collection.

We’ll create the new Collection, but we’ll have our UDF provide the data for it when called.

We’ll create a new UDF in the Fauna dashboard with the name addUserMindful that will accept that random Ref.

As with our login UDF before, we’ll use the Lambda() FQL method which takes an array of arguments.

Without passing any user information to the function, FQL is able to obtain our User Ref just calling the Identity() function. All we have from our randomRef is the reference to our Document. We’ll run a Get() to get the full object. We’ll the Create() a new Document in the user_things Collection with our User Ref and our random information.

We then return the creation object back out of our Lambda. We then go back to our JavaScript and return the data object with the mindful key back to where this function gets called.

Render our Mindful Object on the page

When our user is authenticated, you may remember it called a changeToMission() method. This function switches the items on the page from the “Home” screen to markup that can be filled in by our data. After it’s added to the page, the renderToday() function gets called to add content by a few rules.

The first rule of Serverless Data Club is not to make HTTP requests unless you have to. In other words, cache when you can. Whether that’s creating a full PWA-scale application with Service Workers or just caching your database response with localStorage, cache data, and fetch only when necessary.

The first rule of our conditional is to check localStorage. If localStorage does contain a currentMindfulItem, then we need to check its date to see if it’s from today. If it is, we’ll render that and make no new requests.

The second rule of Serverless Data Club is to make as few requests as possible without the responses of those requests being too large. In that vein, our second conditional rule is to check the latest item from the current user and see if it is from today. If it is, we’ll store it in localStorage for later and then render the results.

Finally, if none of these are true, we’ll fire our getRandomMindfulFromFauna() function, format the result, store that in localStorage, and then render the result.

Get the latest item from a user

I glossed over it in the last section, but we also need some functionality to retrieve the latest mindful object from Fauna for our specific user. In our getLatestFromFauna() method, we’ll again instantiate our Fauna client and then call a new UDF.

Our new UDF is going to call a Fauna Index. An Index is an efficient way of doing a lookup on a Fauna database. In our case, we want to return all user_things by the user field. Then we can also sort the result by timestamp and reverse the default ordering of the data to show the latest first.

Simple Indexes can be created in the Index dashboard. Since we want to do the reverse sort, we’ll need to enter some custom FQL into the Fauna Shell (you can do this in the database dashboard Shell section).

CreateIndex({
  name: "getMindfulByUserReverse",
  serialized: true,
  source: Collection("user_things"),
  terms: [
    {
      field: ["data", "user"]
    }
  ],
  values: [
    {
      field: ["ts"],
      reverse: true
    },
    {
      field: ["ref"]
    }
  ]
})

This creates an Index named getMindfulByUserReverse, created from our user_thing Collection. The terms object is a list of fields to search by. In our case, this is just the user field on the data object. We then provide values to return. In our case, we need the Ref and the Timestamp and we’ll use the reverse property to reverse order our results by this field.

We’ll create a new UDF to use this Index.

Query(
  Lambda(
    [],
    If( // Check if there is at least 1 in the index
      GT(
        Count(
          Select(
            "data",
            Paginate(Match(Index("getMindfulByUserReverse"), Identity()))
          )
        ),
        0
      ),
      Let( // if more than 0
        {
          match: Paginate(
            Match(Index("getMindfulByUserReverse"), Identity()) // Search the index by our User
          ),
          latestObj: Take(1, Var("match")), // Grab the first item from our match
          latestRef: Select(
            ["data"],
            Get(Select(["data", 0, 1], Var("latestObj"))) // Get the data object from the item
          ),
          latestTime: Select(["data", 0, 0], Var("latestObj")), // Get the time
          merged: Merge( // merge those items into one object to return
            { latestTime: Var("latestTime") },
            { latestMindful: Var("latestRef") }
          )
        },
        Var("merged")
      ),
      Let({ error: { err: "No data" } }, Var("error")) // if there aren't any, return an error.
    )
  )
)

This time our Lambda() function doesn’t need any arguments since we’ll have our User based on the Token used.

First, we’ll check to see if there’s at least 1 item in our Index. If there is, we’ll grab the first item’s data and time and return that back as a merged object.

After we get the latest from Fauna in our JavaScript, we’ll format it to a structure our storeCurrent() and render() methods expect it and return that object.

Now, we have an application that creates, stores, and fetches data for a daily message to contemplate. A user can use this on their phone, on their tablet, on the computer, and have it all synced. We could turn this into a PWA or even a native app with a system like Ionic.

We’re still missing one feature. Viewing a certain number of past items. Since we’ve stored this in our database, we can retrieve them in whatever way we need to.

Pull the latest X Mindful Missions to get a picture of what you’ve thought about

We’ll create a new JavaScript method paired with a new UDF to tackle this.

getSomeFromFauna will take an integer count to ask Fauna for a certain number of items.

Our UDF will be very similar to the getLatestFromFauana UDF. Instead of returning the first item, we’ll Take() the number of items from our array that matches the integer that gets passed into our UDF. We’ll also begin with the same conditional, in case a user doesn’t have any items stored yet.

Query(
  Lambda(
    ["count"], // Number of items to return
    If( // Check if there are any objects
      GT( 
        Count(
          Select(
            "data",
            Paginate(Match(Index("getMindfulByUserReverse"), Identity(null)))
          )
        ),
        0
      ),
      Let(
        {
          match: Paginate(
            Match(Index("getMindfulByUserReverse"), Identity(null)) // Search the Index by our User
          ),
          latestObjs: Select("data", Take(Var("count"), Var("match"))), // Get the data that is returned
          mergedObjs: Map( // Loop over the objects
            Var("latestObjs"),
            Lambda(
              "latestArray",
              Let( // Build the data like we did in the LatestMindful function
                {
                  ref: Select(["data"], Get(Select([1], Var("latestArray")))),
                  latestTime: Select(0, Var("latestArray")),
                  merged: Merge(
                    { latestTime: Var("latestTime") },
                    Select("mindful", Var("ref"))
                  )
                },
                Var("merged") // Return this to our new array
              )
            )
          )
        },
        Var("mergedObjs") // return the full array
      ),
      { latestMindful: [{ title: "No additional data" }] } // if there are no items, send back a message to display
    )
  )
)

In this demo, we created a full-fledged app with serverless data. Because the data is served from a CDN, it can be as close to a user as possible. We used FaunaDB’s features, such as UDFs and Indexes, to optimize our database queries for speed and ease of use. We also made sure we only queried our database the bare minimum to reduce requests.

Where To Go With Serverless Data

The JAMstack isn’t just for sites. It can be used for robust applications as well. Whether that’s for a game, CRUD application or just to be mindful of your surroundings you can do a lot without sacrificing customization and without spinning up your own non-dist database system.

With performance on the mind of everyone creating on the JAMstack — whether for cost or for user experience — finding a good place to store and retrieve your data is a high priority. Find a spot that meets your needs, those of your users, and meets ideals of the JAMstack.

Smashing Editorial (ra, yk, il)

Create A Bookmarking Application With FaunaDB, Netlify And 11ty

Create A Bookmarking Application With FaunaDB, Netlify And 11ty

Create A Bookmarking Application With FaunaDB, Netlify And 11ty

Bryan Robinson

The JAMstack (JavaScript, APIs and Markup) revolution is in full swing. Static sites are secure, fast, reliable and fun to work on. At the heart of the JAMstack are static site generators (SSGs) that store your data as flat files: Markdown, YAML, JSON, HTML, and so on. Sometimes, managing data this way can be overly complicated. Sometimes, we still need a database.

With that in mind, Netlify — a static site host and FaunaDB — a serverless cloud database — collaborated to make combining both systems easier. 

Why A Bookmarking Site?

The JAMstack is great for many professional uses, but one of my favorite aspects of this set of technology is its low barrier to entry for personal tools and projects.

There are plenty of good products on the market for most applications I could come up with, but none would be exactly set up for me. None would give me full control over my content. None would come without a cost (monetary or informational).

With that in mind, we can create our own mini-services using JAMstack methods. In this case, we’ll be creating a site to store and publish any interesting articles I come across in my daily technology reading.

I spend a lot of time reading articles that have been shared on Twitter. When I like one, I hit the “heart” icon. Then, within a few days, it’s nearly impossible to find with the influx of new favorites. I want to build something as close to the ease of the “heart,” but that I own and control.

How are we going to do that? I’m glad you asked.

Interested in getting the code? You can grab it on Github or just deploy straight to Netlify from that repository! Take a look at the finished product here.

Our Technologies

Hosting And Serverless Functions: Netlify

For hosting and serverless functions, we’ll be utilizing Netlify. As an added bonus, with the new collaboration mentioned above, Netlify’s CLI — “Netlify Dev” — will automatically connect to FaunaDB and store our API keys as environment variables.

Database: FaunaDB

FaunaDB is a “serverless” NoSQL database. We’ll be using it to store our bookmarks data.

Static Site Generator: 11ty

I’m a big believer in HTML. Because of this, the tutorial won’t be using front-end JavaScript to render our bookmarks. Instead, we’ll utilize 11ty as a static site generator. 11ty has built-in data functionality that makes fetching data from an API as easy as writing a couple of short JavaScript functions.

iOS Shortcuts

We’ll need an easy way to post data to our database. In this case, we’ll use iOS’s Shortcuts app. This could be converted to an Android or desktop JavaScript bookmarklet, as well.

Setting Up FaunaDB Via Netlify Dev

Whether you have already signed up for FaunaDB or you need to create a new account, the easiest way to set up a link between FaunaDB and Netlify is via Netlify’s CLI: Netlify Dev. You can find full instructions from FaunaDB here or follow along below.

Netlify Dev running in the final project with our environment variable names showing
Netlify Dev running in the final project with our environment variable names showing (Large preview)

If you don’t already have this installed, you can run the following command in Terminal:

npm install netlify-cli -g

From within your project directory, run through the following commands:

netlify init // This will connect your project to a Netlify project

netlify addons:create fauna // This will install the FaunaDB "addon"

netlify addons:auth fauna // This command will run you through connecting your account or setting up an account

Once this is all connected, you can run netlify dev in your project. This will run any build scripts we set up, but also connect to the Netlify and FaunaDB services and grab any necessary environment variables. Handy!

Creating Our First Data

From here, we’ll log into FaunaDB and create our first data set. We’ll start by creating a new Database called “bookmarks.” Inside a Database, we have Collections, Documents and Indexes.

A screenshot of the FaunaDB console with data
A screenshot of the FaunaDB console with data (Large preview)

A Collection is a categorized group of data. Each piece of data takes the form of a Document. A Document is a “single, changeable record within a FaunaDB database,” according to Fauna’s documentation. You can think of Collections as a traditional database table and a Document as a row.

For our application, we need one Collection, which we’ll call “links.” Each document within the “links” Collection will be a simple JSON object with three properties. To start, we’ll add a new Document that we’ll use to build our first data fetch.

{
  "url": "https://css-irl.info/debugging-css-grid-part-2-what-the-fraction/",
  "pageTitle": "CSS { In Real Life } | Debugging CSS Grid – Part 2: What the Fr(action)?",
  "description": "CSS In Real Life is a blog covering CSS topics and useful snippets on the web’s most beautiful language. Published by Michelle Barker, front end developer at Ordoo and CSS superfan."
}

This creates the basis for the information we’ll need to pull from our bookmarks as well as provides us with our first set of data to pull into our template.

If you’re like me, you want to see the fruits of your labor right away. Let’s get something on the page!

Installing 11ty And Pulling Data Into A Template

Since we want the bookmarks to be rendered in HTML and not fetched by the browser, we’ll need something to do the rendering. There are many great ways of doing it, but for ease and power, I love using the 11ty static site generator.

Since 11ty is a JavaScript static site generator, we can install it via NPM.

npm install --save @11ty/eleventy

From that installation, we can run eleventy or eleventy --serve in our project to get up and running.

Netlify Dev will often detect 11ty as a requirement and run the command for us. To have this work - and make sure we’re ready to deploy, we can also create “serve” and “build” commands in our package.json.

"scripts": {
    "build": "npx eleventy",
    "serve": "npx eleventy --serve"
  }

11ty’s Data Files

Most static site generators have an idea of a “data file” built-in. Usually, these files will be JSON or YAML files that allow you to add extra information to your site.

In 11ty, you can use JSON data files or JavaScript data files. By utilizing a JavaScript file, we can actually make our API calls and return the data directly into a template.

By default, 11ty wants data files stored in a _data directory. You can then access the data by using the file name as a variable in your templates. In our case, we’ll create a file at _data/bookmarks.js and access that via the {{ bookmarks }} variable name.

If you want to dig deeper into data file configuration, you can read through examples in the 11ty documentation or check out this tutorial on using 11ty data files with the Meetup API.

The file will be a JavaScript module. So in order to have anything work, we need to export either our data or a function. In our case, we’ll export a function.

module.exports = async function() {  
    const data = mapBookmarks(await getBookmarks());  

    return data.reverse()  
}

Let’s break that down. We have two functions doing our main work here: mapBookmarks() and getBookmarks()

The getBookmarks() function will go fetch our data from our FaunaDB database and mapBookmarks() will take an array of bookmarks and restructure it to work better for our template.

Let’s dig deeper into getBookmarks().

getBookmarks()

First, we’ll need to install and initialize an instance of the FaunaDB JavaScript driver.

npm install --save faunadb

Now that we’ve installed it, let’s add it to the top of our data file. This code is straight from Fauna’s docs.

// Requires the Fauna module and sets up the query module, which we can use to create custom queries.
const faunadb = require('faunadb'),  
      q = faunadb.query;

// Once required, we need a new instance with our secret
var adminClient = new faunadb.Client({  
   secret: process.env.FAUNADB_SERVER_SECRET  
});

After that, we can create our function. We’ll start by building our first query using built-in methods on the driver. This first bit of code will return the database references we can use to get full data for all of our bookmarked links. We use the Paginate method, as a helper to manage cursor state should we decide to paginate the data before handing it to 11ty. In our case, we’ll just return all the references.

In this example, I’m assuming you installed and connected FaunaDB via the Netlify Dev CLI. Using this process, you get local environment variables of the FaunaDB secrets. If you didn’t install it this way or aren’t running netlify dev in your project, you’ll need a package like dotenv to create the environment variables. You’ll also need to add your environment variables to your Netlify site configuration to make deploys work later.

adminClient.query(q.Paginate(  
       q.Match( // Match the reference below
           q.Ref("indexes/all_links") // Reference to match, in this case, our all_links index  
       )  
   ))  
   .then( response => { ... })

This code will return an array of all of our links in reference form. We can now build a query list to send to our database.

adminClient.query(...)
    .then((response) => {  
        const linkRefs = response.data; // Get just the references for the links from the response 
        const getAllLinksDataQuery = linkRefs.map((ref) => {  
        return q.Get(ref) // Return a Get query based on the reference passed in  
   })  

return adminClient.query(getAllLinksDataQuery).then(ret => {  
    return ret // Return an array of all the links with full data  
       })  
   }).catch(...)

From here, we just need to clean up the data returned. That’s where mapBookmarks() comes in!

mapBookmarks()

In this function, we deal with two aspects of the data.

First, we get a free dateTime in FaunaDB. For any data created, there’s a timestamp (ts) property. It’s not formatted in a way that makes Liquid’s default date filter happy, so let’s fix that.

function mapBookmarks(data) {
    return data.map(bookmark => {
        const dateTime = new Date(bookmark.ts / 1000);
        ...
    })
}

With that out of the way, we can build a new object for our data. In this case, it will have a time property, and we’ll use the Spread operator to destructure our data object to make them all live at one level.

function mapBookmarks(data) {
    return data.map(bookmark => {
        const dateTime = new Date(bookmark.ts / 1000);

        return { time: dateTime, ...bookmark.data }
    })
}

Here’s our data before our function:

{ 
  ref: Ref(Collection("links"), "244778237839802888"),
  ts: 1569697568650000,
  
  data: { 
    url: 'https://sample.com',
    pageTitle: 'Sample title',
    description: 'An escaped description goes here' 
  } 
}

Here’s our data after our function:

{
    time: 1569697568650,
    url: 'https://sample.com',
    pageTitle: 'Sample title'
    description: 'An escaped description goes here'
}

Now, we’ve got well-formatted data that’s ready for our template!

Let’s write a simple template. We’ll loop through our bookmarks and validate that each has a pageTitle and a url so we don’t look silly.

<div class="bookmarks">  
   {% for link in bookmarks %}  
       {% if link.url and link.pageTitle %} // confirms there’s both title AND url for safety

        <div class="bookmark">  
            <h2><a href="{{ link.url }}">{{ link.pageTitle }}</a></h2>  
            <p>Saved on {{ link.time | date: "%b %d, %Y"  }}</p>
            {% if link.description != "" %}  
                <p>{{ link.description }}</p>  
            {% endif %}
        </div>  

       {% endif %}  
   {% endfor %}  
</div>

We’re now ingesting and displaying data from FaunaDB. Let’s take a moment and think about how nice it is that this renders out pure HTML and there’s no need to fetch data on the client side!

But that’s not really enough to make this a useful app for us. Let’s figure out a better way than adding a bookmark in the FaunaDB console.

Enter Netlify Functions

Netlify’s Functions add-on is one of the easier ways to deploy AWS lambda functions. Since there’s no configuration step, it’s perfect for DIY projects where you just want to write the code.

This function will live at a URL in your project that looks like this: https://myproject.com/.netlify/functions/bookmarks assuming the file we create in our functions folder is bookmarks.js.

Basic Flow

  1. Pass a URL as a query parameter to our function URL.
  2. Use the function to load the URL and scrape the page’s title and description if available.
  3. Format the details for FaunaDB.
  4. Push the details to our FaunaDB Collection.
  5. Rebuild the site.

Requirements

We’ve got a few packages we’ll need as we build this out. We’ll use the netlify-lambda CLI to build our functions locally. request-promise is the package we’ll use for making requests. Cheerio.js is the package we’ll use to scrape specific items from our requested page (think jQuery for Node). And finally, we’ll need FaunaDb (which should already be installed.

npm install --save netlify-lambda request-promise cheerio

Once that’s installed, let’s configure our project to build and serve the functions locally.

We’ll modify our “build” and “serve” scripts in our package.json to look like this:

"scripts": {
    "build": "npx netlify-lambda build lambda --config ./webpack.functions.js && npx eleventy",
    "serve": "npx netlify-lambda build lambda --config ./webpack.functions.js && npx eleventy --serve"
}

Warning: There’s an error with Fauna’s NodeJS driver when compiling with Webpack, which Netlify’s Functions use to build. To get around this, we need to define a configuration file for Webpack. You can save the following code to a newor existingwebpack.config.js.

const webpack = require('webpack');

module.exports = {
  plugins: [ new webpack.DefinePlugin({ "global.GENTLY": false }) ]
};

Once this file exists, when we use the netlify-lambda command, we’ll need to tell it to run from this configuration. This is why our “serve” and “build scripts use the --config value for that command.

Function Housekeeping

In order to keep our main Function file as clean as possible, we’ll create our functions in a separate bookmarks directory and import them into our main Function file.

import { getDetails, saveBookmark } from "./bookmarks/create";

getDetails(url)

The getDetails() function will take a URL, passed in from our exported handler. From there, we’ll reach out to the site at that URL and grab relevant parts of the page to store as data for our bookmark.

We start by requiring the NPM packages we need:

const rp = require('request-promise');  
const cheerio = require('cheerio');

Then, we’ll use the request-promise module to return an HTML string for the requested page and pass that into cheerio to give us a very jQuery-esque interface.

const getDetails = async function(url) {  
    const data = rp(url).then(function(htmlString) {  
        const $ = cheerio.load(htmlString);  
        ...  
}

From here, we need to get the page title and a meta description. To do that, we’ll use selectors like you would in jQuery. 

Note: In this code, we use 'head > title' as the selector to get the title of the page. If you don’t specify this, you may end up getting <title> tags inside of all SVGs on the page, which is less than ideal.

const getDetails = async function(url) {
  const data = rp(url).then(function(htmlString) {
    const $ = cheerio.load(htmlString);
    const title = $('head > title').text(); // Get the text inside the tag  
    const description = $('meta[name="description"]').attr('content'); // Get the text of the content attribute

// Return out the data in the structure we expect  
    return {
      pageTitle: title,
      description: description
    };
  });
  return data //return to our main function  
}

With data in hand, it’s time to send our bookmark off to our Collection in FaunaDB!

saveBookmark(details)

For our save function, we’ll want to pass the details we acquired from getDetails as well as the URL as a singular object. The Spread operator strikes again!

const savedResponse = await saveBookmark({url, ...details});

In our create.js file, we also need to require and setup our FaunaDB driver. This should look very familiar from our 11ty data file.

const faunadb = require('faunadb'),  
      q = faunadb.query;  

const adminClient = new faunadb.Client({  
   secret: process.env.FAUNADB_SERVER_SECRET  
});

Once we’ve got that out of the way, we can code.

First, we need to format our details into a data structure that Fauna is expecting for our query. Fauna expects an object with a data property containing the data we wish to store.

const saveBookmark = async function(details) {  
const data = {  
   data: details  
};

...

}

Then we’ll open a new query to add to our Collection. In this case, we’ll use our query helper and use the Create method. Create() takes two arguments. First is the Collection in which we want to store our data and the second is the data itself.

After we save, we return either success or failure to our handler.

const saveBookmark = async function(details) {  
const data = {  
   data: details  
};

return adminClient.query(q.Create(q.Collection("links"), data))  
   .then((response) => {  
        /* Success! return the response with statusCode 200 */  
        return {  
             statusCode: 200,  
             body: JSON.stringify(response)  
         }  
     }).catch((error) => {  
        /* Error! return the error with statusCode 400 */  
        return  {  
             statusCode: 400,  
             body: JSON.stringify(error)  
         }  
     })  
}

Let’s take a look at the full Function file.

import { getDetails, saveBookmark } from "./bookmarks/create";  
import { rebuildSite } from "./utilities/rebuild"; // For rebuilding the site (more on that in a minute)

exports.handler = async function(event, context) {  
    try {  
        const url = event.queryStringParameters.url; // Grab the URL  

        const details = await getDetails(url); // Get the details of the page  
        const savedResponse = await saveBookmark({url, ...details}); //Save the URL and the details to Fauna  

        if (savedResponse.statusCode === 200) { 
            // If successful, return success and trigger a Netlify build  
            await rebuildSite();  
            return { statusCode: 200, body: savedResponse.body }  
         } else {  
            return savedResponse //or else return the error  
         }  
     } catch (err) {  
        return { statusCode: 500, body: `Error: ${err}` };  
     }  
};

rebuildSite()

The discerning eye will notice that we have one more function imported into our handler: rebuildSite(). This function will use Netlify’s Deploy Hook functionality to rebuild our site from the new data every time we submit a new — successful — bookmark save.

In your site’s settings in Netlify, you can access your Build & Deploy settings and create a new “Build Hook.” Hooks have a name that appears in the Deploy section and an option for a non-master branch to deploy if you so wish. In our case, we’ll name it “new_link” and deploy our master branch.

A visual reference for the Netlify Admin’s build hook setup
A visual reference for the Netlify Admin’s build hook setup (Large preview)

From there, we just need to send a POST request to the URL provided.

We need a way of making requests and since we’ve already installed request-promise, we’ll continue to use that package by requiring it at the top of our file.

const rp = require('request-promise');  

const rebuildSite = async function() {  
    var options = {  
         method: 'POST',  
         uri: 'https://api.netlify.com/build_hooks/5d7fa6175504dfd43377688c',  
         body: {},  
         json: true  
    };  

    const returned = await rp(options).then(function(res) {  
         console.log('Successfully hit webhook', res);  
     }).catch(function(err) {  
         console.log('Error:', err);  
     });  

    return returned  
}
A demo of the Netlify Function setup and the iOS Shortcut setup combined

Setting Up An iOS Shortcut

So, we have a database, a way to display data and a function to add data, but we’re still not very user-friendly.

Netlify provides URLs for our Lambda functions, but they’re not fun to type into a mobile device. We’d also have to pass a URL as a query parameter into it. That’s a LOT of effort. How can we make this as little effort as possible?

A visual reference for the setup for our Shortcut functionality
A visual reference for the setup for our Shortcut functionality (Large preview)

Apple’s Shortcuts app allows the building of custom items to go into your share sheet. Inside these shortcuts, we can send various types of requests of data collected in the share process.

Here’s the step-by-step Shortcut:

  1. Accept any items and store that item in a “text” block.
  2. Pass that text into a “Scripting” block to URL encode (just in case).
  3. Pass that string into a URL block with our Netlify Function’s URL and a query parameter of url.
  4. From “Network” use a “Get contents” block to POST to JSON to our URL.
  5. Optional: From “Scripting” “Show” the contents of the last step (to confirm the data we’re sending).

To access this from the sharing menu, we open up the settings for this Shortcut and toggle on the “Show in Share Sheet” option.

As of iOS13, these share “Actions” are able to be favorited and moved to a high position in the dialog.

We now have a working “app” for sharing bookmarks across multiple platforms!

Go The Extra Mile!

If you’re inspired to try this yourself, there are a lot of other possibilities to add functionality. The joy of the DIY web is that you can make these sorts of applications work for you. Here are a few ideas:

  1. Use a faux “API key” for quick authentication, so other users don’t post to your site (mine uses an API key, so don’t try to post to it!).
  2. Add tag functionality to organize bookmarks.
  3. Add an RSS feed for your site so that others can subscribe.
  4. Send out a weekly roundup email programmatically for links that you’ve added.

Really, the sky is the limit, so start experimenting!

Smashing Editorial (dm, yk)