What is super() in JavaScript?

What's happening when you see some JavaScript that calls super()?.In a child class, you use super() to call its parent’s constructor and super.<methodName> to access its parent’s methods. This article will assume at least a little familiarity with the concepts of constructors and child and parent classes. If that's totally new, you may want to start with Mozilla's article on Object-oriented JavaScript for beginners.

Super isn't unique to Javascript — many programming languages, including Java and Python, have a super() keyword that provides a reference to a parent class. JavaScript, unlike Java and Python, is not built around a class inheritance model. Instead, it extends JavaScript’s prototypal inheritance model to provide behavior that’s consistent with class inheritance.

Let’s learn a bit more about it and look at some code samples.

First off, here’s a quote from Mozilla’s web docs for classes:

JavaScript classes, introduced in ECMAScript 2015, are primarily syntactical sugar over JavaScript's existing prototype-based inheritance. The class syntax does not introduce a new object-oriented inheritance model to JavaScript.

An example of a simple child and parent class will help illustrate what this quote really means:

See the Pen
ZEzggLK
by Bailey Jones (@bailey_jones)
on CodePen.

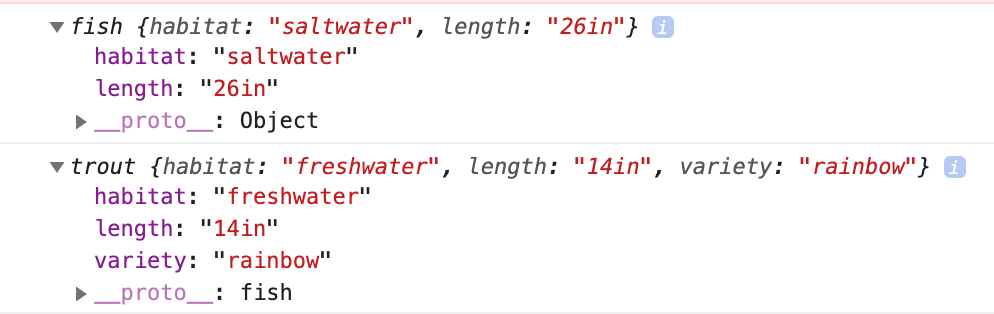
My example has two classes: fish and trout. All fish have information for habitat and length, so those properties belong to the fish class. Trout also has a property for variety, so it extends fish to build on top of the other two properties. Here are the constructors for fish and trout:

class fish {
  constructor(habitat, length) {
    this.habitat = habitat
    this.length = length
  }
}

class trout extends fish {
  constructor(habitat, length, variety) {
    super(habitat, length)
    this.variety = variety
  }
}

The fish class’s constructor defines habitat and length, and the trout’s constructor defines variety. I have to call super() in trout’s constructor, or I’ll get a reference error when I try to set this.variety. That's because on line one of the trout class, I told JavaScript that trout is a child of fish using the extends keyword. That means trout’s this context includes the properties and methods defined in the fish class, plus whatever properties and methods trout defines for itself. Calling super() essentially lets JavaScript know what a fish is so that it can create a this context for trout that includes everything from fish, plus everything we’re about to define for trout. The fish class doesn’t need super() because its “parent” is just the JavaScript Object. Fish is already at the top of the prototypal inheritance chain, so calling super() is not necessary — fish’s this context only needs to include Object, which JavaScript already knows about.

The prototypal inheritance model for fish and trout and the properties available on the this context for each of them. Starting from the top, the prototypal inheritance chain here goes Objectfishtrout.

I called super(habitat, length) in trout’s constructor (referencing the fish class), making all three properties immediately available on the this context for trout. There’s actually another way to get the same behavior out of trout’s constructor. I must call super() to avoid a reference error, but I don’t have to call it “correctly” with parameters that fish's constructor expects. That's because I don't have to use super() to assign values to the fields that fish creates — I just have to make sure that those fields exist on trout's this context. This is an important difference between JavaScript and a true class inheritance model, like Java, where the following code could be illegal depending on how I implemented the fish class:

class trout extends fish {
  constructor(habitat, length, variety) {
    super()
    this.habitat = habitat
    this.length = length
    this.variety = variety
  }
}

This alternate trout constructor makes it harder to tell which properties belong to fish and which belong to trout, but it gets the same result as the previous example. The only difference is that here, calling super() with no parameters creates the properties habitat and length on the current this context without assigning anything to them. If I called console.log(this) after line three, it would print {habitat: undefined, length: undefined}. Lines four and five assign values.

I can also use super() outside of trout’s constructor in order to reference methods on the parent class. Here I’ve defined a renderProperties method that will display all the class’s properties into the HTML element I pass to it. super() is useful here because I want my trout class to implement a similar method that does the same thing plus a little more — it assigns a class name to the element before updating its HTML. I can reuse the logic from the fish class by calling super.renderProperties() inside the relevant class function.

class fish {
  renderProperties(element) {
    element.innerHTML = JSON.stringify(this)
  }
}

class trout extends fish {
renderPropertiesWithSuper(element) {
  element.className="green" 
  super.renderProperties(element);
}

The name you choose is important. I’ve called my method in the trout class renderPropertiesWithSuper() because I still want to have the option of calling trout.renderProperties() as it’s defined on the fish class. If I’d just named the function in the trout class renderProperties, that would be perfectly valid; however, I’d no longer be able to access both functions directly from an instance of trout - calling trout.renderProperties would call the function defined on trout. This isn't necessarily a useful implementation - it's an arguably better pattern for a function that calls super like this to overwrite its parent function's name - but it does illustrate how flexible JavaScript allows your classes to be.

It is completely possible to implement this example without the use of the super() or extends keywords that were so helpful in the previous code sample, it's just much less convenient. That's what Mozilla meant by "syntactical sugar." In fact, if I plugged my previous code into a transpiler like Babel to make sure my classes worked with older versions of JavaScript, it would generate something closer to the following code. The code here is mostly the same, but you'll notice that without extends and super(), I have to define fish and trout as functions and access their prototypes directly. I also have to do some extra wiring on lines 15, 16, and 17 to establish trout as a child of fish and to make sure trout can be passed the correct this context in its constructor. If you're interested in a deep dive into what's going on here, Eric Green has an excellent post with lots of code samples on how to build classes with and without ES2015.

See the Pen
wvvdxdd
by Bailey Jones (@bailey_jones)
on CodePen.

Classes in JavaScript are a powerful way to share functionality. Class components in React, for example, rely on them. However, if you're used to Object Oriented programming in another language that uses a class inheritance model, JavaScript's behavior can occasionally be surprising. Learning the basics of prototypal inheritance can help clarify how to work with classes in JavaScript.

The post What is super() in JavaScript? appeared first on CSS-Tricks.

The Many Ways to Link Up Shapes and Images with HTML and CSS

Different website designs often call for a shape other than a square or rectangle to respond to a click event. Perhaps your site has some kind of tilted or curved banner where the click area would be awkwardly large as a straight rectangle. Or you have a large uniquely shaped logo where you only want that unique shape to be clickable. Or you have an interactive image that responds differently when different regions of it are clicked.

You can surround those assets with an un-styled <a> tag to get a clickable rectangle that's approximately the right size. However, you can also control the shape of that region with different techniques, making sure the target for your click area exactly matches what’s visible on the screen.

SVG shapes

If your click target is an image or a portion of an image, and you have the ability to choose SVG as its format, you already have a great deal of control over how that element will behave on your page. The simplest way to make a portion of an SVG clickable is to add an an SVG hyperlink element to the markup. This is as easy as wrapping the target with an <a> tag, just as you would a nested html element. Your <a> tag can surround a simple shape or more complex paths. It can surround a group of SVG elements or just one. In this example the link for the bullseye wraps a single circle element, but the more complex arrow shape is made up of two polygons and a path element.

See the Pen
target svg
by Bailey Jones (@bailey_jones)
on CodePen.

Note that I’ve used the deprecated xlink:href property in this demo to ensure that the link will work on Safari. The href alone would have worked in Internet Explorer, Chrome, and Firefox.

The only trick here is to make sure the <a> tag is inside the SVG markup and that the tag wraps the shape you want to be clickable. The viewbox for this SVG is still a rectangle, so wrapping the entire SVG element wouldn't have the same effect.

Image maps

Let’s say you don’t have control over the SVG markup, or that you need to add a clickable area to a raster image instead. It’s possible to apply a clickable target to a portion of an <img> tag using an image map.

Image maps are defined separately from the image source. The map will effectively overlay the entire image element, but it's up to you to define the clickable area. Unlike the hyperlink element in the SVG example, the coordinates in the image map don’t have anything to do with the definition of the source image. Image maps have been around since HTML 3, meaning they have excellent browser support. However, they can’t be styled with CSS alone to provide interactive cues, like we were able to do with SVG on hover — the cursor is the only visual indicator that the target area of the image can be clicked. There are, however, options for styling the areas with JavaScript.

W3 Schools has an excellent example of an image map using a picture of the solar system where the sun and planets are linked to close-up images of those targets — everywhere else in the image is un-clickable. That’s because the coordinates of the areas defined in their image map match the locations of the sun and planets in the base image.

Here’s another example from Derek Fogge that uses uses maps to create more interesting click targets. It does use jQuery to style the areas on click, but notice the way a map overlays the image and coordinates are used to create the targets.

See the Pen
responsive image map demo
by Derek Fogge (@PositionRelativ)
on CodePen.

You can implement image maps on even more complex shapes too. In fact, let’s go back to the same target shape from the SVG example but using a raster image instead. We still want to link up the arrow and the bullseye but this time do not have SVG elements to help us out. For the bullseye, we know the X and Y coordinates and its radius in the underlying image, so it’s fairly easy to define a circle for the region. The arrow shape is more complicated. I used https://www.image-map.net to plot out the shape and generate the area for the image map — it’s made up of one polygon and one circle for the rounded edge at the top.

See the Pen
target image map
by Bailey Jones (@bailey_jones)
on CodePen.

Clip-path

What if you want to use CSS to define the shape of a custom click region without resorting to JavaScript for the styling? The CSS clip-path property provides considerable flexibility for defining and styling target areas on any HTML element.

Here we have a click area in the shape of a five-pointed star. The star is technically a polygon, so we could use a star-shaped base image and an image map with corresponding coordinates like we did in the previous image map example. However, let’s put clip-path to use. The following example shows the same clip-path applied to both a JPG image and an absolutely positioned hyperlink element.

See the Pen
Clip-path
by Bailey Jones (@bailey_jones)
on CodePen.

Browser support for clip-path has gotten much better, but it can still be inconsistent for some values. Be sure to check support and vendor prefixes before relying on it.

We can also mix and match different approaches depending on what best suits the shape of a particular click target. Here, I’ve combined the "close" shape using Bennet Freely’s clippy with an SVG hyperlink element to build the start of a clickable tic-tac-toe game. SVG is useful here to make sure the "hole" in the middle of the "O" shape isn’t clickable. For the "X" though, which is a polygon, a single clip-path can style it.

See the Pen
tic tac toe
by Bailey Jones (@bailey_jones)
on CodePen.

Again, beware of browser support especially when mixing and matching techniques. The demo above will not be supported everywhere.

CSS shapes without transparent borders

The clip-path property allowed us to apply a predefined shape to an HTML element of our choice, including hyperlink elements. There are plenty of other options for creating elements HTML and CSS that aren’t squares and rectangles — you can see some of them in The Shapes of CSS. However, not all techniques will effect the shape of the click area as you might expect. Most of the examples in the Shapes of CSS rely on transparent borders, which the DOM will still recognize as part of your click target even if your users can’t see them. Other tricks like positioning, transform, and pseudo elements like ::before and ::after will keep your styled hyperlink aligned with its visible shape.

Here’s a CSS heart shape that does not rely on transparent borders. You can see how the the red heart shape is the only clickable area of the element.

See the Pen
Clickable heart
by Bailey Jones (@bailey_jones)
on CodePen.

Here’s another example that creates a CSS triangle shape using transparent borders. You can see how the click area winds up being outside the actual shape. Hover over the element and you’ll be able to see the true size of the click area.

See the Pen
clickable triangle
by Bailey Jones (@bailey_jones)
on CodePen.


Hopefully this gives you a good baseline understanding of the many ways to create clickable regions on images and shapes, relying on HTML and CSS alone. You may find that it’s necessary to reach for JavaScript in order to get a more advanced interactive experience. However, the combined powers of HTML, CSS, and SVG provide considerable options for controlling the precise shape of your click target.

The post The Many Ways to Link Up Shapes and Images with HTML and CSS appeared first on CSS-Tricks.