SolidStart: A Different Breed Of Meta-Framework

The current landscape of web tooling is increasingly more complex than ever before. We have libraries such as Solid, Vue, Svelte, Angular, React, and others that handle UI (User Interface) updates in an ergonomic fashion. The ever more important topic weighing on developers is the balance and trade-off of performance and usability best practices.

Developers are also blurring the lines between front-end and back-end code. The way we colocate logic and data is becoming more interesting as we integrate and mesh the way they work together to deliver a unified app experience.

With these shifts in ideology in mind, meta-frameworks have evolved around the core libraries in unique ways. To encapsulate the paradigms in which the UI is rendered and create seamless interoperability between our server code and our browser code, new practices are emerging.

While the initial idea of having a “meta” framework was to stitch together different sets of tools in order to build smooth experiences, it is tough to create integrations without making some level of opinionated decisions. So frameworks such as QwikCity, SvelteKit, Redwood, and Next.js went all the way into their own opinionated territory and provided a hard railway to ensure a defined set of conventions.

Meanwhile, others like Nuxt, Remix, and Analog stayed with a more shallow abstraction of their integrations, allowing a mix of their toolings and more easily using resources from the community (Vite is a good example of a tool that is shallowly used by all of them).

This not only produces a lower vendor lock-in to developers but also allows configuration to be re-used in some cases as such decisions are stripped out of opinions in favor of stronger abstractions. SolidStart takes a giant step beyond that into unbiased territory. Its own core is around 1500 lines of code, and the biggest pieces of functionality are provided with a meshing of well-integrated tools.

Modules Over Monoliths

The impetus behind decoupling the architecture completely is to give power to the consuming developer to pick the framework and build it according to their desire. A developer may want to use Solid and SSR, but let’s imagine legacy code has a tight dependency on TanStack Router, while SolidStart and most Solid projects have Solid-Router instead. With a decoupled architecture, it becomes possible to either create an incremental adoption or integration layer so that everything will work tailored to the team’s best benefit.

The decoupled architecture sustaining newer frameworks also empowers the developer for a better debugging experience within and beyond its community. If an issue is encountered on the server, you’re not restricted to the knowledge of a specific framework.

For example, since both are based on Nitro, the Analog and SolidStart communities can now share knowledge with each other. Beyond that, because all of them are based in Nitro and Vite, Nuxt, Analog, and SolidStart can deploy to the same platforms and share implementation details to make each ecosystem grow together. The community wins with this approach, and the library/framework developers win as well. This is a radically new pattern and approach to jointly sharing the weight of meta-framework maintenance (one of the most feared responsibilities of maintainers).

What Is SolidStart Exactly?

SolidStart is built from five fundamental pillars:

  1. Solid: the view library that provides rendering abstractions.
  2. Vite (within Vinxi): the bundler to optimize code for execution in different runtimes.
  3. Nitro (within Vinxi): the agnostic web server created by the Nuxt team and based on h3 with Rollup.
  4. Vinxi: the orchestrator, what determines where the runtimes and the code each one has.
  5. Seroval: the data serializer that will bridge data from server to browser and back.

1. Solid

Solid as a rendering library has become increasingly popular because of its incredible rendering performance and thin abstraction layer. It’s built on top of Signals, a renewing and modern implementation of the classical Observer Pattern, and provides a series of helpers to empower the developer to create extremely high-performance and easy-to-read code.

It uses JSX and has syntax that is very similar to React, but under the hood, it operates in a completely different manner. Bringing the developer closer to the DOM while still providing the needed ergonomics to be productive in the developer environment. At only 3Kb of bundle size, it’s often a choice even for mostly static sites. e.g., many people use Solid to bring interactivity to their content-based Astro websites when needed.

Solid also brings first-class primitives, built-in Control Flow components, high-quality state management, and full TypeScript support. Solid packs a punch in a small efficient package.

2. Vite

Arguably the best bundler in the JavaScript ecosystem, Vite has the right balance between declarative and customizable configuration. It’s fully based on TypeScript, which makes it easy to extend by the consuming library or framework, and has a large enough user base that guarantees its versatility. Vite works with and has become the de-facto tool for many frameworks, such as Astro, Vue, Preact, Elm, Lit, Svelte, Nuxt, Analog, Remix, and many others.

Aside from its popularity, it is particularly loved for its fast server start time, HMR support, optimized builds, ease of configuration, rich plug-in ecosystem, modern tooling, and high-quality overall developer experience.

3. Nitro

A framework in itself, Nitro is written in TypeScript and is completely agnostic and open for every meta-framework to use as a foundation. It provides a powerful set of tools and APIs to manage caching, routes, and tree-shaking. It is a fast base for any JavaScript-based project to build their server on. Nitro is highly scalable, integrating easily into DevOps and CI/CD pipelines, security-focused, robust, and boasts a rich set of adapters, making it deployable on most, if not all, major vendor platforms.

Think of Nitro as a bolt-on extension that makes Vite easier to build on and more pliable. It solves a majority of run-time level concerns that would need to be solved in Vite.

4. Vinxi

Vinxi is an SDK (Software Development Kit) that brings a powerful set of configuration-based tools to create full-stack applications. It composes Nitro under the hood to establish a web server and leverages Vite for the bundling components. It is inspired by the Bun App API and works via a very declarative interface to instantiate an app by setting routers for each runtime.

For example:

import { createApp } from "vinxi";
import solid from "vite-plugin-solid";

const resources = {
    name: "public",
    mode: "static",
    dir: "./public",
};

const spa = {
    name: "client",
    mode: "build",
    handler: "./app/client.tsx",
    target: "browser",
    plugins: () => [solid({ ssr: true })],
    base: "/_build"
}

const server = {
    name: "ssr",
    mode: "handler",
    handler: "./app/server.tsx",
    target: "server",
    plugins: () => [solid({ ssr: true })],
}

export default createApp({
    routers: [resources, spa, server],
});

As resource routes work as a bucket, by defining mode: "static" there’s no need to define a handler. Your router can also be statically built (mode: “build”) and targeted towards the browser runtime, or it can be on the server and handle each request via its entry-point handler: "./app/server.tsx".

Vinxi will leverage the right set of APIs from Nitro and Vite so your resources aren’t exposed to the wrong runtimes and so that deployment works smoothly for defined platform providers.

5. Seroval

Once routers are set, and the app can handle navigation (hard navigation via the “ssr” handler and soft navigation via the “client” handler), it’s time to stitch them together. This is the part where SolidStart’s core comes into place. It supplies APIs that deliver the ergonomics to fetch and mutate requests.

All these APIs are powered by yet another agnostic library called Seroval. In order to send data between server and client in a secure manner, it all needs to be serialized. Seroval defines itself in an over-simplistic way: “Stringify JS Values.” However, this definition doesn’t address the fact it does so in an extremely powerful and fast fashion.

Thanks to Seroval, SolidStart is able to safely and efficiently cross the serialization boundary. Resource serialization is arguably the most important feature of a full-stack framework — without it, the back-end and front-end bridge simply won’t work in a smooth way.

Besides resource serialization, SolidStart can also use server actions. Straight from the documentation, this is how server actions look for us (note the "use server" directive that allows Vinxi to put the code in the correct place.

import { action, redirect } from "@solidjs/router";

const isAdmin = action(async (formData: FormData) => {
  "use server";
  await new Promise((resolve, reject) => setTimeout(resolve, 1000));
  const username = formData.get("username");
  if (username === "admin") throw redirect("/admin");
  return new Error("Invalid username");
});

export function MyComponent() {
  return (
    <form action={isAdmin} method="post">
      <label for="username">Username:</label>
      <input type="text" name="username" />
      <input type="submit" value="submit" />
    </form>
  );
}
Everything Comes Together

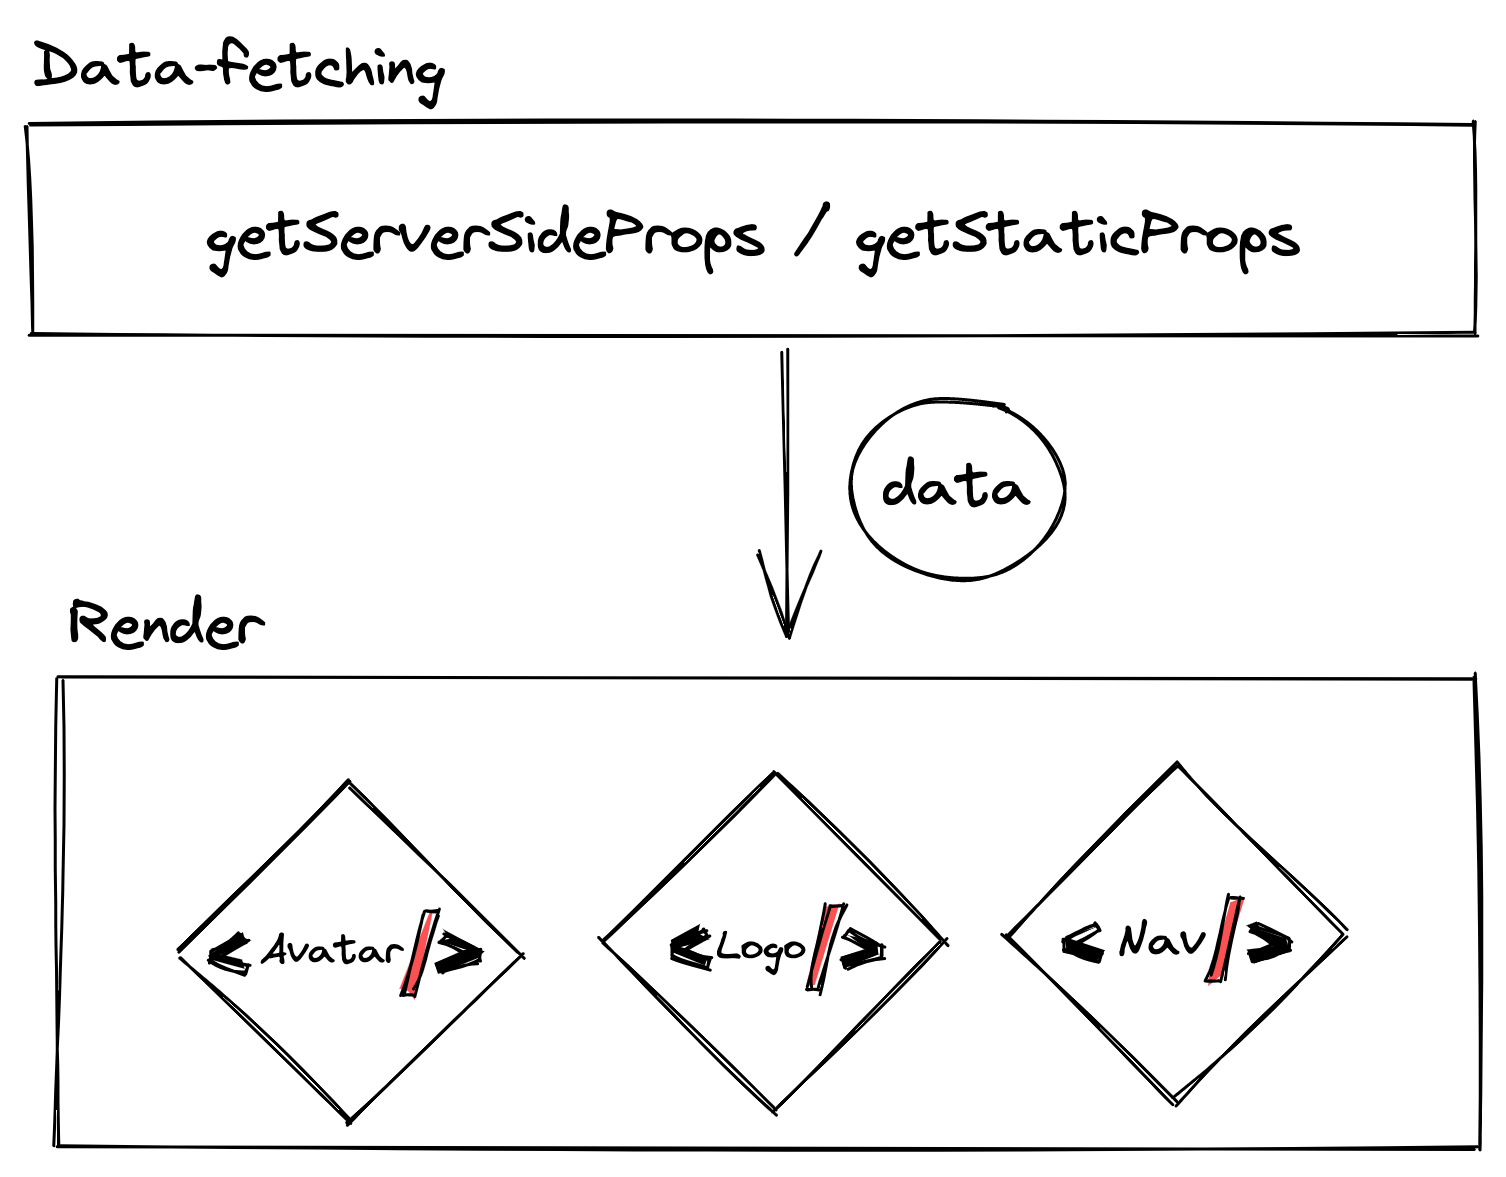
After this breakdown, things may still be a bit up in the air. So, let’s close the loop by assembling the parts:

Hopefully, this little exercise of pulling the framework apart and putting the pieces back together was interesting and insightful. Let me know in the comments below or on X if this has helped you better understand or even choose the tools for your next project.

Final Considerations

This article would not have been possible without the technical help from my awesome folks at Solid’s team: Dave Di Biase, Alexis Munsayac, Alex Lohr, Daniel Afonso, and Nikhil Saraf. Thank you for your reviews, insights, and overall making me sound cleverer!

Fine-Grained Access Handling And Data Management With Row-Level Security

Many apps have some kind of user-specific information or data that is supposed to be accessed by a certain group of users and not by others. With these sorts of requirements comes a demand for fine-grained access handling. Whether for security or privacy reasons, dealing with sensitive data is an important topic for any app. Big or small, nobody wants to be on the wrong side of a data leakage scandal. So let’s dive in on what it means to handle sensitive or confidential information in our apps.

Take It Seriously

Regardless if you’re requesting access on Twitter, a bank, or your local library, identifying yourself is a crucial first step. Any sort of gateway needs a reliable way to verify if an access request is legitimate.

“Identity theft is not a joke.”
Dwight Schrute

On the web, we encapsulate the process for identifying a user and granting them access as Auth, which stands for two related but distinct actions:

  • Authentication: the act of confirming a user’s identity.
  • Authorization: granting an authenticated user access to a resource.

It is possible to have authentication without authorization, but not the other way around. The strategy to implement authorization at a data management level can be loosely referred to as Row-Level Security (RLS), but RLS is actually a bit more than this. In this article, we will take a step deeper into managing sensitive user data and defining access roles to a user base.

Row-Level Security (RLS)

A ‘row’, in this case, refers to an entry in a database table. For example, in a posts table, a row would be a single article, check this json representation:

{
    "posts": [
        {
            "id": "article_23495044",
            "title": "User Data Management",
            "content": "<huge blob of text>",
            "publishedAt": "2023-03-28",
            "author": "author_2929292"
        },
        // ...
    ]
}

To understand RLS, each object inside posts is a ‘row’.

The above data is enough for creating a filter algorithm to effectively enforce row-level security. Nonetheless, it’s crucial for scalability and data handling that such relationship is defined on your data layer. This way, any service that connects to your database will have all the required information to implement its own access-control logic as required. So for the above example, the schema for the posts table would roughly look like the following:

{
    "posts": {
        "columns": [
            {
                "name": "id",
                "type": "string"
            },
            // ... other primitive types
            // establish relationship with "authors"
            {
                "name": "author",
                "type": "link",
                "link": "authors"
            }
        ]
    }
}

In the above example, we define the type of each value in our posts database and establish a relationship to the authors table. So each post will receive the id of one author. This is a one-to-many relationship: one author can have many posts.

Of course, there are patterns to define many-to-many relationships as well. Take, for example, a team’s backlog. You may want only members of a certain team to have access. In such case, you can create a list of users with access to a specific resource (and thus being very granular about it), or you can define a table for team, and thus connecting a team to multiple tasks, and a team to multiple users: this pattern is called a junction table and is great for defining scoped access within your data layer.

Now we understand what authorization is and looks like in a few cases. This should be enough to design a mental model for defining access to our data. We understand that in order to use the granular access to our data effectively, our app must be aware of which user is using that particular instance of the app (aka who’s behind the mouse).

Authentication

It is time to set up a reliable and cost-effective authentication. Cost-effective because it is counter-productive to re-authenticate the user on every request. And it increases the risk factor of attacks, so let’s keep auth requests to a minimum. The way our app stores the user credentials to re-use in a defined lifecycle is called a session.

There are multiple ways of authenticating users and handling sessions. I invite you to check Eric Burel’s article on “Authentication in Websites: A Banking Analogy”. It’s a great and thorough explanation of how authentication works.

From this moment on, let’s assume we did our due diligence: username and password are securely stored, an authentication provider is able to reliably verify our user’s identity and returns a session, which is an object carrying a userId matching our user’s row in the database.

Connecting The Dots

So now that we have established what it means and the requirements each moving piece brings in order to get it working, our goal is the following:

  1. Authentication
    The provider performs user authentication, the library creates a session, and the app receives that as a payload from the auth request.
  2. Resource request
    Authenticated User performs request with resourceId; the app takes userId from session.
  3. Granting access
    It filters all resources from the table to only the ones owned by userId and returns (if it exists) the one with resourceId.

With the above mental model defined, it is possible to any sort of implementation and properly design your queries. For example, on our first defined schema (posts and authors), we can use filters on our fetching service to only provide access to the results a user should have:

async function getPostsByAuthor(authorId: string) {
    return sdk.db.posts
        .filter({
            author: authorId
        })
        .getPaginated()
}

This contrived snippet is just to exemplify a bare-bones RLS implementation. Maybe as a food-for-thought so you can build upon it.

Conclusion

Hopefully, these concepts have offered extra clarity on defining access management to private and/or sensitive data. It’s important to note that there are security concerns before and around storing such kind of data which were beyond the scope of this article. As a general rule: store as little as you need and provide only the necessary amount of access to data. The least sensible data going over the wire or being stored by your app, the lesser the chance your app is a target or victim of attacks or leaks.

Let me know your questions or feedback in the comment section or on Twitter.

Understanding App Directory Architecture In Next.js

Since Next.js 13 release, there’s been some debate about how stable the shiny new features packed in the announcement are. On “What’s New in Next.js 13?” we have covered the release announced and established that though carrying some interesting experiments, Next.js 13 is definitely stable. And since then, most of us have seen a very clear landscape when it comes to the new <Link> and <Image> components, and even the (still beta) @next/font; these are all good to go, instant profit. Turbopack, as clearly stated in the announcement, is still alpha: aimed strictly for development builds and still heavily under development. Whether you can or can’t use it in your daily routine depends on your stack, as there are integrations and optimizations still somewhere on the way. This article’s scope is strictly about the main character of the announcement: the new App Directory architecture (AppDir, for short).

Because the App directory is the one that keeps bringing questions due to it being partnered with an important evolution in the React ecosystem — React Server Components — and with edge runtimes. It clearly is the shape of the future of our Next.js apps. It is experimental though, and its roadmap is not something we can consider will be done in the next few weeks. So, should you use it in production now? What advantages can you get out of it, and what are the pitfalls you may find yourself climbing out of? As always, the answer in software development is the same: it depends.

What Is The App Directory Anyway?

It is the new strategy for handling routes and rendering views in Next.js. It is made possible by a couple of different features tied together, and it is built to make the most out of React concurrent features (yes, we are talking about React Suspense). It brings, though, a big paradigm shift in how you think about components and pages in a Next.js app. This new way of building your app has a lot of very welcomed improvements to your architecture. Here’s a short, non-exhaustive list:

  • Partial Routing.
    • Route Groups.
    • Parallel Routes.
    • Intercepting Routes.
  • Server Components vs. Client Components.
  • Suspense Boundaries.
  • And much more, check the features overview in the new documentation.

A Quick Comparison

When it comes to the current routing and rendering architecture (in the Pages directory), developers were required to think of data fetching per route.

  • getServerSideProps: Server-Side Rendered;
  • getStaticProps: Server-Side Pre-Rendered and/or Incremental Static Regeneration;
  • getStaticPaths + getStaticProps: Server-Side Pre-Rendered or Static Site Generated.

Historically, it hadn’t yet been possible to choose the rendering strategy on a per-page basis. Most apps were either going full Server-Side Rendering or full Static Site Generation. Next.js created enough abstractions that made it a standard to think of routes individually within its architecture.

Once the app reaches the browser, hydration kicks in, and it’s possible to have routes collectively sharing data by wrapping our _app component in a React Context Provider. This gave us tools to hoist data to the top of our rendering tree and cascade it down toward the leaves of our app.

import { type AppProps } from 'next/app';

export default function MyApp({ Component, pageProps }: AppProps) {
  return (
        <SomeProvider>
            <Component {...pageProps} />
        </SomeProvider>
}

The ability to render and organize required data per route made this approach an almost good tool for when data absolutely needed to be available globally in the app. And while this strategy will allow data to spread throughout the app, wrapping everything in a Context Provider bundles hydration to the root of your app. It is not possible anymore to render any branches on that tree (any route within that Provider context) on the server.

Here, enters the Layout Pattern. By creating wrappers around pages, we could opt in or out of rendering strategies per route again instead of doing it once with an app-wide decision. Read more on how to manage states in the Pages Directory on the article “State Management in Next.js” and on the Next.js documentation.

The Layout Pattern proved to be a great solution. Being able to granularly define rendering strategies is a very welcomed feature. So the App directory comes in to put the layout pattern front and center. As a first-class citizen of Next.js architecture, it enables enormous improvements in terms of performance, security, and data handling.

With React concurrent features, it’s now possible to stream components to the browser and let each one handle its own data. So rendering strategy is even more granular now — instead of page-wide, it’s component-based. Layouts are nested by default, which makes it more clear to the developer what impacts each page based on the file-system architecture. And on top of all that, it is mandatory to explicitly turn a component client-side (via the “use client” directive) in order to use a Context.

Building Blocks Of The App Directory

This architecture is built around the Layout Per Page Architecture. Now, there is no _app, neither is there a _document component. They have both been replaced by the root layout.jsx component. As you would expect, that’s a special layout that will wrap up your entire application.

export function RootLayout({ children }: { children: React.ReactNode }) {
    return (
        <html lang="en">
            <body>
                {children}
            </body>
        </html>
}

The root layout is our way to manipulate the HTML returned by the server to the entire app at once. It is a server component, and it does not render again upon navigation. This means any data or state in a layout will persist throughout the lifecycle of the app.

While the root layout is a special component for our entire app, we can also have root components for other building blocks:

  • loading.jsx: to define the Suspense Boundary of an entire route;
  • error.jsx: to define the Error Boundary of our entire route;
  • template.jsx: similar to the layout, but re-renders on every navigation. Especially useful to handle state between routes, such as in or out transitions.

All of those components and conventions are nested by default. This means that /about will be nested within the wrappers of / automatically.

Finally, we are also required to have a page.jsx for every route as it will define the main component to render for that URL segment (as known as the place you put your components!). These are obviously not nested by default and will only show in our DOM when there’s an exact match to the URL segment they correspond to.

There is much more to the architecture (and even more coming!), but this should be enough to get your mental model right before considering migrating from the Pages directory to the App directory in production. Make sure to check on the official upgrade guide as well.

Server Components In A Nutshell

React Server Components allow the app to leverage infrastructure towards better performance and overall user experience. For example, the immediate improvement is on bundle size since RSC won’t carry over their dependencies to the final bundle. Because they’re rendered in the server, any kind of parsing, formatting, or component library will remain on the server code. Secondly, thanks to their asynchronous nature, Server Components are streamed to the client. This allows the rendered HTML to be progressively enhanced on the browser.

So, Server Components lead to a more predictable, cacheable, and constant size of your final bundle breaking the linear correlation between app size and bundle size. This immediately puts RSC as a best practice versus traditional React components (which are now referred to as client components to ease disambiguation).

On Server Components, fetching data is also quite flexible and, in my opinion, feels closer to vanilla JavaScript — which always smooths the learning curve. For example, understanding the JavaScript runtime makes it possible to define data-fetching as either parallel or sequential and thus have more fine-grained control on the resource loading waterfall.

  • Parallel Data Fetching, waiting for all:
import TodoList from './todo-list'

async function getUser(userId) {
  const res = await fetch(`https://<some-api>/user/${userId}`);
  return res.json()
}

async function getTodos(userId) {
  const res = await fetch(`https://<some-api>/todos/${userId}/list`);
  return res.json()
}

export default async function Page({ params: { userId } }) {
  // Initiate both requests in parallel.
  const userResponse = getUser(userId)
  const  = getTodos(username)

  // Wait for the promises to resolve.
  const [user, todos] = await Promise.all([userResponse, todosResponse])

  return (
    <>
      <h1>{user.name}</h1>
      <TodoList list={todos}></TodoList>
    </>
  )
}
  • Parallel, waiting for one request, streaming the other:
async function getUser(userId) {
  const res = await fetch(`https://<some-api>/user/${userId}`);
  return res.json()
}

async function getTodos(userId) {
  const res = await fetch(`https://<some-api>/todos/${userId}/list`);
  return res.json()
}

export default async function Page({ params: { userId } }) {
  // Initiate both requests in parallel.
  const userResponse = getUser(userId)
  const todosResponse = getTodos(userId)

  // Wait only for the user.
  const user = await userResponse

  return (
    <>
      <h1>{user.name}</h1>
            <Suspense fallback={<div>Fetching todos...</div>}>
          <TodoList listPromise={todosResponse}></TodoList>
            </Suspense>
    </>
  )
}

async function TodoList ({ listPromise }) {
  // Wait for the album's promise to resolve.
  const todos = await listPromise;

  return (
    <ul>
      {todos.map(({ id, name }) => (
        <li key={id}>{name}</li>
      ))}
    </ul>
  );
}

In this case, <TodoList> receives an in-flight Promise and needs to await it before rendering. The app will render the suspense fallback component until it’s all done.

  • Sequential Data Fetching fires one request at a time and awaits for each:
async function getUser(username) {
  const res = await fetch(`https://<some-api>/user/${userId}`);
  return res.json()
}

async function getTodos(username) {
  const res = await fetch(`https://<some-api>/todos/${userId}/list`);
  return res.json()
}

export default async function Page({ params: { userId } }) {
  const user = await getUser(userId)


  return (
    <>
      <h1>{user.name}</h1>
            <Suspense fallback={<div>Fetching todos...</div>}>
            <TodoList userId={userId} />
            </Suspense>
    </>
  )
}

async function TodoList ({ userId }) {
  const todos = await getTodos(userId);

  return (
    <ul>
      {todos.map(({ id, name }) => (
        <li key={id}>{name}</li>
      ))}
    </ul>
  );
}

Now, Page will fetch and wait on getUser, then it will start rendering. Once it reaches <TodoList>, it will fetch and wait on getTodos. This is still more granular than what we are used to it with the Pages directory.

Important things to note:

  • Requests fired within the same component scope will be fired in parallel (more about this at Extended Fetch API below).
  • Same requests fired within the same server runtime will be deduplicated (only one is actually happening, the one with the shortest cache expiration).
  • For requests that won’t use fetch (such as third-party libraries like SDKs, ORMs, or database clients), route caching will not be affected unless manually configured via segment cache configuration.
export const revalidate = 600; // revalidate every 10 minutes

export default function Contributors({
  params
}: {
  params: { projectId: string };
}) {
    const { projectId }  = params
    const { contributors } = await myORM.db.workspace.project({ id: projectId })

  return <ul>{*/ ... */}</ul>;
}

To point out how much more control this gives developers: when within the pages directory, rendering would be blocked until all data is available. When using getServerSideProps, the user would still see the loading spinner until data for the entire route is available. To mimic this behavior in the App directory, the fetch requests would need to happen in the layout.tsx for that route, so always avoid doing it. An “all or nothing” approach is rarely what you need, and it leads to worse perceived performance as opposed to this granular strategy.

Extended Fetch API

The syntax remains the same: fetch(route, options). But according to the Web Fetch Spec, the options.cache will determine how this API will interact with the browser cache. But in Next.js, it will interact with the framework server-side HTTP Cache.

When it comes to the extended Fetch API for Next.js and its cache policy, two values are important to understand:

  • force-cache: the default, looks for a fresh match and returns it.
  • no-store or no-cache: fetches from the remote server on every request.
  • next.revalidate: the same syntax as ISR, sets a hard threshold to consider the resource fresh.
fetch(`https://route`, { cache: 'force-cache', next: { revalidate: 60 } })

The caching strategy allows us to categorize our requests:

  • Static Data: persist longer. E.g., blog post.
  • Dynamic Data: changes often and/or is a result of user interaction. E.g., comments section, shopping cart.

By default, every data is considered static data. This is due to the fact force-cache is the default caching strategy. To opt out of it for fully dynamic data, it’s possible to define no-store or no-cache.

If a dynamic function is used (e.g., setting cookies or headers), the default will switch from force-cache to no-store!

Finally, to implement something more similar to Incremental Static Regeneration, you’ll need to use next.revalidate. With the benefit that instead of being defined for the entire route, it only defines the component it’s a part of.

Migrating From Pages To App

Porting logic from Pages directory to Apps directory may look like a lot of work, but Next.js has worked prepared to allow both architectures to coexist, and thus migration can be done incrementally. Additionally, there is a very good migration guide in the documentation; I recommend you to read it fully before jumping into a refactoring.

Guiding you through the migration path is beyond the scope of this article and would make it redundant to the docs. Alternatively, in order to add value on top of what the official documentation offers, I will try to provide insight into the friction points my experience suggests you will find.

The Case Of React Context

In order to provide all the benefits mentioned above in this article, RSC can’t be interactive, which means they don’t have hooks. Because of that, we have decided to push our client-side logic to the leaves of our rendering tree as late as possible; once you add interactiveness, children of that component will be client-side.

In a few cases pushing some components will not be possible (especially if some key functionality depends on React Context, for example). Because most libraries are prepared to defend their users against Prop Drilling, many create context providers to skip components from root to distant descendants. So ditching React Context entirely may cause some external libraries not to work well.

As a temporary solution, there is an escape hatch to it. A client-side wrapper for our providers:

// /providers.jsx
‘use client’

import { type ReactNode, createContext } from 'react';

const SomeContext = createContext();

export default function ThemeProvider({ children }: { children: ReactNode }) {
  return (
    <SomeContext.Provider value="data">
      {children}
    </SomeContext.Provider>
  );
}

And so the layout component will not complain about skipping a client component from rendering.

// app/.../layout.jsx
import { type ReactNode } from 'react';
import Providers from ‘./providers’;

export default function Layout({ children }: { children: ReactNode }) {
    return (
    <Providers>{children}</Providers>
  );
}

It is important to realize that once you do this, the entire branch will become client-side rendered. This approach will take everything within the <Providers> component to not be rendered on the server, so use it only as a last resort.

TypeScript And Async React Elements

When using async/await outside of Layouts and Pages, TypeScript will yield an error based on the response type it expects to match its JSX definitions. It is supported and will still work in runtime, but according to Next.js documentation, this needs to be fixed upstream in TypeScript.

For now, the solution is to add a comment in the above line {/* @ts-expect-error Server Component */}.

Client-side Fetch On The Works

Historically, Next.js has not had a built-in data mutation story. Requests being fired from the client side were at the developer’s own discretion to figure out. With React Server Components, this is bound for a chance; the React team is working on a use hook which will accept a Promise, then it will handle the promise and return the value directly.

In the future, this will supplant most bad cases of useEffect in the wild (more on that in the excellent talk “Goodbye UseEffect”) and possibly be the standard for handling asynchronicity (fetching included) in client-side React.

For the time being, it is still recommended to rely on libraries like React-Query and SWR for your client-side fetching needs. Be especially aware of the fetch behavior, though!

So, Is It Ready?

Experimenting is at the essence of moving forward, and we can’t make a nice omelet without breaking eggs. I hope this article has helped you answer this question for your own specific use case.

If on a greenfield project, I’d possibly take App directory for a spin and keep Page directory as a fallback or for the functionality that is critical for business. If refactoring, it would depend on how much client-side fetching I have. Few: do it; many: probably wait for the full story.

Let me know your thoughts on Twitter or in the comments below.

Further Reading On SmashingMag

Code Documentation, Streamlined

This article is a sponsored by Swimm

Everything surrounding software documentation is tough — from allocating time to do it to keeping it up to date. Documentation success is tricky to achieve, and often there isn’t enough time to measure impact. That’s because they don’t bring a tangible impact to the end-user experience. We are incapable of putting value on great documentation. Because of that, not rarely do the efforts to create and maintain delightful documentation overweight the time investment and proper planning.

Penny Or Dime

Software Developers are in the business of writing code and content (well, most of us 😉). We can easily justify our salaries when benchmarked versus the features we ship and the revenue coming in through them. So when it comes to writing and educating our peers about those features so they become more capable of interacting with their code, we often question the value of those minutes in opposition to shipping the next feature or fixing that nasty bug right there. There’s so much technical debt, so why are we writing about code that we need to refactor?

We save those minutes immediately — it’s an obvious choice. Right back to code. And we just saved ourselves a few pennies of time. Fast forward a bit; a colleague needs to jump into it and implement a change. You’re out (working on the next big thing, in a meeting, on vacation, or maybe you left the company!), and there are no docs. Those pennies start to accumulate interest now. Luckily, there are a few comments in the code. Good to know that src actually means source, and function sort(a, b) takes two integers. But the reasoning is not really there, so let’s keep digging. The pull request has no description, git blame doesn’t help because who wrote the code isn’t around. I guess it’s time to play detective and reverse engineer stuff. Those pennies are dimes now. Describing has a much smaller cognitive overload than investigating. So the cost to develop our app is rising with developer time, task by task.

Documentation is a hygiene task. We do it to keep things tidy, comfortable, and ergonomic. They are a direct catalyzer of Developer Experience, for better or for worse. And Developer Experience determines how much focus developers can put on the code that really matters instead of working their way out through the weeds.

Brushing Teeth

Hopefully, we all can agree that brushing our teeth is something important to be done every day. It is not the kind of habit that we can do it all on Friday and compensate for days skipped. And in this case, documentation is kind of similar. Of course, we can write it all by the end of the quarter, but it will be way harder and more time-consuming. For instance: do you remember what (or why!) you coded three months ago?

The cognitive overload of documenting things grows from the time you ship the code. Ideally, documentation is like writing tests (which we all do!), and every time we change something, we update the docs.

Remove Obstacles

Unfortunately, most of us fail to create the habit of writing documentation — this is because the workflow is often full of friction. We finish the code, close the file (or the IDE, or the project), and jump onto a Markdown editor (or Jira, or a Wiki, etc.), and now we need to find the right place to put the knowledge we have just created, submit it to review — others will tell us if we picked the best spot, if we wrote it clearly enough, etc. Meanwhile, the code can’t wait — our users are already getting that shiny new feature. (If that’s you, tough! Been there, done that. You have my sympathy.)

As the process proceeds, the decisions raise questions. And yes, practice makes perfect — but ideally, we wouldn’t need to spend such big amounts of time (and energy!) to effectuate due diligence. This friction is working against us in maintaining the habit, and the time we spent finding the spot to put the code has drained our motivation.

Connect the Moving Pieces

As usual, the developer's solution to a friction problem is automation. Elude the tedious and repetitive work by making them derivative. Swimm accomplishes that by making a few of those many decisions for you in what they call a "documentation ecosystem" — a very appropriate naming.

  1. Where to put the documentation? Right there, with the code.
  2. When to write the documentation? As you implement it. Or when you open the PR (at the latest!).

In summary, you write a method; you explain the method right then and there. The “magical” part comes when, because they’re collocated, it is possible to directly document the parameters and variables in the code to the text in the docs. That way, when the code changes, the documentation is aware it is now outdated and can flag your whole team about it.

All this neat automation requires a little setup and possibly a few changes to your coding interfaces and related processes.

Code to Docs

If you use either VS Code or one of JetBrains' IDEs, it is possible to have an extension/plugin integrated. Once writing the code, a “Swimm wave” will show up next to the code that’s already documented, so you can follow the link and edit the code in an enhanced Markdown editor. This editor has some interesting auto-completion inspected from your code (start typing a variable name, and you’ll see it autocomplete); use it as much as possible since this is the mechanism to link your code to your documentation.

Versioning To Docs

With GitHub, once documentation is coupled with the code, reviewing also happens in the same PR. The integration bot is capable of identifying Smart Tokens across the code changed and flags either adjustments already made (prompting to review right then and there) or untouched ones (also prompting to review). With individual comments that look more like PR prompts, your PR reviewers can approve each comment section one by one, depending on how comfortable they are with them.

Additionally, with automatic checks (Swimm’s patented Auto-sync), it is also possible to set automatic approvals and notification triggers, or mute them completely. So your team can avoid notification overload and tune how they are made aware of changes in a way it suits them best.

Take It From Here

I hope this glimpse at the problem of writing documentation has resonated with you in a way and that the ideas around here made sense. Please reach out in the comments below or reply to me at @AtilaFassina if there’s anything you’d like to add or just chat about great documentation. I love a good success story!

What’s New In Next.js 13?

October has come and gone, and with it, Next.js has released a new major version packed (pun intended) with tons of new features — some of which can be seamlessly adopted from your Next.js 12 app, while others not so much.

If you’re just jumping on the bandwagon, it may be confusing to distinguish the hype, the misinformation, and what’s stable for your production apps, but fear not! I’m here to give you a nice overview and get you up to speed.

What Misinformation?

As with all Next.js releases, there are a few APIs that are moved into the stable core and for recommended use, and there are others still in the experimental channel. “Experimental” APIs are still up for debate. The main functionality is there, but the question of how these APIs behave and how they can be used is still susceptible to change as there may be bugs or unexpected side effects.

In version 13, the experimental releases were big and took over the spotlight. This caused many people to consider the whole release unstable and experimental — but it’s not. Next.js 13 is actually quite stable and allows for a smooth upgrade from version 12 if you don’t intend to adopt any experimental API. Most changes can be incrementally adopted, which we’ll get into detail later in this post.

Releases Summary

Before we dig deeper into what each announcement entails, let’s check on a quick list and balance experiments and stable features.

Experimental

  • App Directory;
  • New Bundler (Turbopack);
  • Font Optimization.

Stable

  • “New” Image Component to replace legacy Image component as default;
  • ES Module Support for next.config.mjs;
  • “New” Link component.
The App Directory

This feature is actually a big architectural rewrite. It puts React Server Components front and center, leverages a whole new routing system and router hooks (under next/navigation instead of next/router), and flips the entire data-fetching story.

This is all meant to enable big performance improvements, like eagerly rendering each part of your view which doesn’t depend on data while suspending (you read that right!) the pieces which are fetching data and getting rendered on the server.

As a consequence, this also brings a huge mental model change to how you architect your Next.js app.

Let’s compare how things were versus how they will work in the App directory. When using the /pages directory (the architecture we have been using up to now), data is fetched from the page level and is cascaded down toward the leaf components.

In contrast, given that the app directory is powered by Server Components, each component is in charge of its own data, meaning you can now fetch-then-render every component you need and cache them individually, performing Incremental Static Regeneration (ISR) at a much more granular level.

Additionally, Next.js will carry on optimizations: Requests will be deduped (not allowing different components to fire the same request in parallel), thanks to a change in how the fetch runtime method works with the cache. By default, all requests will use strong cache heuristics (“force-cache”), which can be opted out via configuration.

You read it right. Next.js and React Server Components both interfere with the fetch standard in order to provide resource-fetching optimisations.

You Don’t Need To Go "All-In"

It is important to point out that the transition from the /pages architecture to /app can be done incrementally, and both solutions can coexist as long as routes don’t overlap. There’s currently no mention in Next.js’ roadmap about deprecating support for /pages.

Recommended Reading: ISR vs DPR: Big Words, Quick Explanation by Cassidy Williams

New Bundler And Benchmarks

Since its first release, Next.js has used webpack under the hood. This year, we have watched a new generation of bundlers, written in low-level languages, popping up, such as ESBuild (which powers Vite), Parcel 2 (Rust), and others. We have also watched Vercel setting the stage for a big change in Next.js. In version 12, they added SWC to their build and transpilation process as a step to replacing both Babel and Terser.

In version 13, they announced Turbopack, a new bundler written in Rust with very bold performance claims. Yes, there has been controversy on Twitter about which bundler is the fastest overall and how those benchmarks were measured. Still, it’s beyond debate how much Turbopack can actually help large projects written in Next.js with way better ergonomics than any other tool (for starters, with built-in configuration).

This feature is not only experimental but actually only works with next dev. You should not (and as of now can’t ) use it for a production build.
Font Optimization

The new @next/font module allows making performance optimization to your Web Fonts during build time. It will download the font assets during build-time and host them in your very own /public folder. This will save a round-trip to a further server, avoid an additional handshake, and ultimately deliver your font in the fastest way possible and cache it properly with the rest of your resources.

Remember that when using this package, the it's important to have a working internet connection when you run your development build the first time so it can cache it properly, otherwise it will fallback to system fonts if adjustFontFallback is not set.

Additionally, @next/font has a special module for Google Web Fonts, conveniently available as they are widely used:

import { Jost } from '@next/font/google';
// get an object with font styles:
const jost = Jost();
// define them in your component:
<html className={jost.className}>

The module will also work in case you use custom fonts:

import localFont from '@next/font/local';
const myFont = localFont({ src: './my-font.woff2' });
<html className={myFont.className}>

Even though this feature is still in Beta, it is considered stable enough for you to use in production.

New Image And Link Components

Arguably the most important components within the Next.js package have received a slight overhaul. Next Image has been living a double life since Next.js 12 in @next/image and @next/future/image. In Next.js 13, the default component is switched:

  • next/image moves to next/legacy/image;
  • next/future/image moves to next/image.

This change comes with a codemod, a command that attempts to automigrate the code in your app. This allows for a smooth migration when upgrading Next.js:

npx @next/codemod next-image-to-legacy-image ./pages

If you make this change and do not have visual regression tests set up, I'd recommend taking a good look at your pages in every major browser to see if everything looks correct.

For the new Link component, the change should also be smooth. The <a> element within <Link> is not necessary nor recommended anymore. The codemod will either remove it or add a legacyBehavior prop to your component.

npx @next/codemod new-link ./pages

In case the codemod fails, you will receive a linting warning on dev, so keep an eye on your terminal!

ES Modules and Automatic Module Transpilation

There two upgrades have passed under the radar for most, but I consider them especially useful for people working with Monorepos. Up until now, it was not very ergonomic to share configuration between configuration files and other files that may be used in runtime. That’s because next.config.js is written with CommonJS as the module system, which can't import from ESM files. Now, Next.js supports ESM simply by adding type: "module" to your package.json and renaming next.config.jsnext.config.mjs.

Note: The “m” stands for “module” and is part of the Node.js spec for ESM support.

For Monorepos using internal packages (JavaScript packages that are not published to NPM but instead are consumed from source by sibling apps within the monorepo), a special plugin was necessary to transpile those modules on build-time when consuming them. From Next.js 13 onwards, this can be arranged without a plugin by simply passing an (experimental) property to your next.config.mjs:

const nextConfig = {
  experimental: {
    transpilePackages: ['@my-org/internal-package'],
  },
};

You can see an example in the Apex-Monorepo template. With these settings, it is possible to develop both the dependency component and your app simultaneously without any publishing or workaround.

What’s Next?

If you’re still interested in playing around and talking more about these features, I’ll be running a Advanced Next.js Masterclass from Nov 30 – Dec 15, 2022 — I’d be super happy to welcome you there and answer all of your questions!

Until then, let me know in the comments below or tweet over to me at @AtilaFassina on how your migration has been and your thoughts on the experimental features.

Databases For Front-End Developers: The Concepts Under The Hood (Part 2)

In Part 1, The Rise Of Serverless Databases, of the “Databases For Front-End Developers” series, we talked about the hurdles and traps of scaling and maintaining your databases. We went from simpler and specialized alternatives like Content Management Systems and spreadsheets to self-hosted databases and, finally, to Serverless Databases.

Today, we go deeper into the rabbit hole. We will explore concepts to equip you to have your own opinions about which kinds of databases suit your specific needs. And this is important to stress up front: there is no right answer. Each database carries its own set of tradeoffs and advantages. If something looks like a “one-size-fits-all” solution, be careful: you might be missing something!

Anatomy Of A Database

Before we begin, it’s important to highlight that what we loosely refer to as “databases” are actually “Database Management Systems (DBMS).” A DBMS is a piece of software that enables the user to more ergonomically write, read, delete, or update information in a given set of data. For this series, we will focus mainly on Relational and Non-Relational DBMSs. There are many other types, all categorized by their data structures, but relational and non-relational are the most common for web development by any measure.

Both Relational (R) and Non-Relational (NR) DBMS have different terms for the parts that compose them. Such components are almost interchangeable in definition, and that’s why you can commonly hear a developer referring to a Document (NR term) as “Table,” which is its Relational equivalent structure. Don’t be afraid of confusing them; they appear often enough for this cognitive overload to disappear quickly with usage. Additionally, once you get more familiar with the differences of each data structure, you will realize they probably shouldn’t be used interchangeably because there are differences among them. But for now, and for the sake of simplicity, let’s focus on the similarities:

  • Schema
    It’s the description of the database (like a blueprint), describing the landscape of the database in a supported language. This is required by relational databases, and though not required by non-relational DBMS, many interfaces offer a possibility to define it too.
  • Tables (R/NR), Collections (NR)
    It’s the logical data structure, unsorted. A relatable example of this would be a spreadsheet table or a group (collection) of JSON objects.
  • Databases (R/NR)
    It’s the logical grouping of data. You group your tables in databases (user database, invoices databases) and your documents in indexes based on how you intend to query them.

Keys And Columns

To use a more familiar example, let’s take a JSON object as an example:

{
  "name": "Atila"
  "role": "DX Engineer at Xata"
}

Given that JSON, a column would be represented by the key-value pair (column name has value “Atila”), and the key follows the same meaning as the JSON spec, key name will access the value “Atila.”

A table has columns, and each column’s name determines the key with which you can access a value in a record.

In addition to the above definition, there are special kinds of keys. Such keys play a special role in the schema of your database and how you will interact with your data. Define these wisely: any minimal change to them can be considered a breaking change to your data layer.

  • Unique Keys (UK)
    The keys that are unique between records on a table. They also accept null.
  • Primary Keys (PK)
    It’s a special kind of Unique Key. There can only be one Primary Key per table, and it can never be null (Primary Keys are always considered required). Primary Keys are also indexed by default, helping with queries that want to filter on the value.
  • Foreign Keys (FK)
    When there is a relation between tables, the keys are represented as foreign keys at the extraneous table.

Example of Foreign Key: if each author in an authors table has posts (and posts is another table), post.title will be a FK at authors. And the junction between authors and posts is called a relation.

Mapping Your DBMS

Once you look at the different data structures and choose your DBMS, you are ready to draw the first connection from your data layer to your application layer. And suddenly, you noticed it isn’t quite straightforward to bring data from the database to your client-side (or even to your server-side API in some cases).

Here comes ORM (Object Relational Mapping) and ODM (Object Document Mapping) to assist your developer experience. Prisma is probably the most widely used ORM at the moment, while Mongoose has the largest ODM user base. It’s important to note they are not a requirement for connecting to databases. Still, if you keep an eye on how they build your queries (some specific cases can present performance issues on the account of the abstraction), they tend to make your life easier and fetching or writing data much more ergonomic.

When it comes to serverless databases, the need for them becomes a bit more questionable. And this is because many of these databases provide the users with an officially supported Software Development Kit (SDK). Your mileage will vary depending on the SDK, but they tend to have a big feature overlap with ORMs and ODMs, especially on databases that will keep the data layer behind an API (Xata, for example). This way, you won’t need to worry about translating your queries, and you can demand equivalent ergonomics between the SDK and an ORM.

Common Concepts

In this part of our series, we are learning what to look for when choosing the stack for our data layers. It is essential to understand common concepts around maintaining and choosing a DBMS (from here on out, we’re back into referring to them as “databases” to remain consistent with the rest of the world).

The next sections will not go so deep that you jump out and find a job as Database Administrator (DBA), but hopefully, it will offer you enough ammo to engage in conversation with experts and identify the best solution for your use cases. These concepts are common for every kind of data layer, from a spreadsheet to a self-hosted database and even to a serverless database. What will vary is how each solution will balance the variables intertwined in these paradigms.

As Thanos (from Marvel: Infinity Wars) would say: “perfectly balanced, like all things should be.”

The most important concepts, to begin with, are Consistency, Availability, and Partition Tolerance. They’re better understood if presented together because the balance between them will guide how predictable your data is in different contexts.

CAP Theorem

This theorem describes the relationship between 3 components in a distributed system: Consistency, Availability, and Partition tolerance (C.A.P). The overall conclusion is easy to summarize: any system is only able to contemplate 2 of these components at the same time. Though just a simple sentence, this idea requires a bit of unpacking.

Consistency (C)

Within the CAP Theorem constraints, “consistency” refers directly to the data. When different clients make the same request, they will get the same response. When a written request is accepted and confirmed, all users will have access to this updated information at the same time.

Availability (A)

Every request will receive a response with data. No errors. However, this comes with no promises on whether the data is up to date or not. Depending on whether this is paired with consistency (C) or partition tolerance (P), you will get different behavior.

Partition Tolerance (P)

A “partition” is when the connection between two nodes in a system is broken. The CAP Theorem essentially describes how a system will tolerate the partition: enforcing availability (AP system) or enforcing consistency (CP system). Regardless of how small a system is, partitions can always happen. Therefore there is no such thing as a CA system.

To provide a more graphical example of each system, we can consider:

  • AP System
    Another node has a copy of the data. The user will get information back but without promises of it being 100% correct (up-to-date). It’s commonly implemented with DynamoDB, Cassandra, and so on.
  • CP System
    To return an error and accept the transaction is impossible. It’s commonly implemented with traditional sharded DBs, Citus, for example.

Though popular and very often referred to, the CAP Theorem can be considered incomplete because it doesn’t consider situations beyond the network partition. Especially today, with high-availability content delivery networks (CDN), and extreme connectivity, it’s crucial to take into consideration latency and deeper aspects of consistency (linearizability and serializability).

Consistency Confusion

It’s funny how “consistency” is a term that switches meanings based on the context. So, in the CAP Theorem, as we just saw, it’s all about data and how reliably a user will get the same response to the same request regardless of which partition they reach. Once we take a step away from our own system, a new perspective makes us ask: “how consistently will we handle concurrent operations?”. And just like that, the CAP Theorem does not sufficiently describe the intricacies of operating at scale.

There is a third meaning of “consistency,” which we will save for later; it’s part of yet another acronym (ACID). If the last paragraph left you scratching your head, I can’t recommend enough “Inconsistent Thoughts on Database Consistency” by Alex DeBrie.

PACELC Theorem

The first three letters are the same as CAP, just reordered. The “consistency” in the PACELC Theorem goes deeper than in the CAP Theorem. It follows the Consistency Model, which determines the contract between a data store and a system. To make things less complicated, consider the PACELC an extension of the CAP Theorem.

Beyond asking the developer to strategize for the event of a network partition, the PACELC also considers what happens when the system has no partitions (healthy network).

ELC stands for Else: Latency or Consistency?

  • Latency: Can you accept an occasional stale response for the sake of performance?
  • Consistency:
    • Linearizability: Will you accept a higher latency to sync data in all nodes of a network before considering the transaction done?
    • Serializability: In the event of concurrent transactions on the same data, will you handle them in parallel or in a queue?

Because of this, I consider the PACELC carries a better mental model for this new era of Serverless Databases. When healthy, it’s not a scalar classification “AP” or “CP”; it accepts a spectrum because latency can be high or not, and consistency can have different levels as well.

Once we start talking about the types of databases and their data structures and which guarantees each can give, we will also talk about a bit of system architecture and how your architecture can reduce the tradeoffs when even by enforcing consistency, you can strive for a low latency scenario.

See You Next Time

With that, I believe we are ready to start narrowing down our discussions on the differences between each database type. Moreover, it’s possible to discuss and level expectations on each solution taken and analyze architectures individually. From now on, we will focus on Relational and Non-Relational databases.

In a few days, on our season finale, we will cover the differences between NoSQL and SQL: what guarantees to expect, what that means to your data, and how that affects development workflow. Then we will be ready to jump right into Serverless Databases and what to expect going forward. I can’t wait!

As usual, feel free to reach out to me with feedback, questions, and/or requests for the next part.

Databases For Front-End Developers: The Rise Of Serverless Databases (Part 1)

As front-end developers, we understand the foundational role data plays in our daily jobs. It may come from an external API, a CMS, or even a spreadsheet. But god forbid we need to talk about setting up databases.

Those days are over. With serverless databases becoming popular by the day, it has never been easier to create a full-stack architecture with both vertical and horizontal scaling, high availability, and bulletproof consistency.

To fully reap the benefits of such an architecture, it’s essential to understand what decisions are made for you. In the same way that the “learn JavaScript, not a framework” mantra became popular, we also ought to understand the concepts behind database architecture in order to use them reliably. So, welcome to the first part of our “Databases for Front-end Developers” series.

This series is not going to make you an expert on distributed systems or capable of jumping into a database admin role, but it will shed some light on the concepts, terms, and acronyms you will face when getting ready to choose your next stack. See it as a primer on (serverless) databases. Hopefully, it will give you a push into the rabbit hole and make you confident in joining conversations to evaluate tradeoffs for different solutions.

Spreadsheets And Content Management Systems

What?! Spreadsheets? Well, yes. The user interface (you and I, or U and I, or UI) is quite similar to that of a database. Spreadsheets give you a table in which to store data. In some cases, they will only allow you to define specific data types per column. The familiarities are there, but spreadsheets find an abrupt end once we pop the hood.

The availability is questionable: spreadsheets are not meant to serve content, only store content. For starters, they will not fuel an app as it scales, and they may not obey certain best practices when it comes to assuring data integrity. Up to very recently, they were the quickest way to get started with some data layer. But now, there is no point for an app not to use a real (serverless) database (more on this later).

A Content Management System (CMS) is another kind of database. “Content” is a special kind of data that the CMS specializes in. It will provide the user (developer) with enough abstractions to facilitate managing such data to a point where the underlying database is not a concern. It will handle the deliverability, availability, and integrity of your data. But the heavier the abstraction is, the higher the tradeoff. The data types are limited to what the CMS will give you, with most even imposing their own architecture for handling relations, queries, types, etc. Of course, there are still significant and viable use cases for CMSs, and they aren’t going anywhere. So, as long as you’re sure that’s your use case, you’ll be fine with one.

Growth Pains

If you choose the simpler, “abstractionful” route of a spreadsheet or a CMS as your source of truth and your data begins to diversify, obstacles will show up. The first issue with a spreadsheet is usually about the underlying API, it’s often not intended for most average-sized apps’ traffic, and then there are the first refactoring conversations.

With a CMS, APIs are usually not the problem, but managing the data can be. As an app grows and data diversifies, some of it ends up not being content anymore and may be more related to application logic.

When data is not content, managing it in a CMS is not ideal. It’s less flexible and often doesn’t fit the owner-team workflow. Now, while it is perfectly possible for other databases and CMSs to coexist, it’s up to the developers to understand the pros and cons of each solution and decide what is best for their app’s delivery and user experience.

Database Admin Is Hard

As front-end developers, the first time we talk about databases is usually a conversation about “relational vs. non-relational.” From then on, while trying to figure out the differences, we loosely hear a myriad of terms, such as ACID, BASE, and even CAP Theorem. This article will skip a thorough explanation of these differences. We will look better into them in the next part of this series. For now, it is sufficient to say “non-relational” databases impose eventual consistency on an app.

Eventual consistency can also be unwrapped into a longer discussion, but let’s take it as this:

Eventual consistency means that in certain special conditions, the data received is stale.

Like comments in a blog post, they won’t affect your app if a few seconds after a write you still don’t see the latest one. But password updates need to be strongly consistent always, not eventually consistent.

Of course, those are not the only differences. Query performance is different between each type of database. One can imagine being eventually consistent allows for quicker reads because there is less assurance involved.

More Growth Pains

Once the database is decided, the app can grow steadily and smoothly for a while. As an app gets big, data complexity grows, and as data complexity grows, the database becomes slower. At scale, how do we make a database faster?

  • Do you add more resources to a single server? (vertical scale)
  • How do you replicate data across a cluster of machines?
    • Do you split your database into smaller partitions (shards) instead? (horizontal scale, more about this in part 2)
  • Do you add a faster in-memory database in front of it for common queries? (key-value store)

Those are not easy questions to answer. It depends on the user base, the type of data, the amount, frequency, and origin of queries. Is your database read-heavy or write-heavy? And though there is a multitude of factors impacting this decision, there’s also a high cost attached to making the wrong choice.

Additionally, some use cases may even require searching through data easier from user-land. A search engine is not an easy problem to solve and often requires an additional type of database to properly index your data (if sharded, it’s even harder). Having all this around your user’s data also brings a whole set of tools around it just to make it maintainable.

Even more, keeping an eye on our databases (now “data infrastructure” if we’ve got a search engine in the mix) requires a high level of observability and OLAP (Online Analytical Processing). This introduces a whole new level of complexity!

As you may have noticed, very high stakes are associated with creating, maintaining, and growing a database. Decisions that can make or break an app, decisions that are costly to go back on, and that must be made relatively early.

Serverless Databases Are Fun

Because of all the complexity mentioned above, many investors and incubators have their eyes turned to startups creating serverless databases. They are a whole new category of databases. The concepts of traditional ones still apply, but differently.

Serverless Databases

To understand what a “serverless database” really is, we first need to deconstruct the term. It is a common joke that “serverless” is a misnomer. Still, the point of a serverless architecture is to abstract away from the consumer (developer) the complexity of handling site reliability and server maintenance provided by a serverless vendor, such as Netlify, Vercel, Amazon Web Services (AWS), and so many others. I tend to like Xata’s definition of “serverless database”.

A “serverless database” does for databases what serverless does for servers. The complexity is lifted away (to different degrees depending on the chosen platform). Some, like Supabase and Firebase, will offer a multitude of serverless related features to couple with your database; others, like AWS Aurora or PlanetScale, focus on making it easier to use and scale PostgreSQL and MySQL DBs. And finally, there are others that abstract the database entirely, like Xata. They provide you with an ORM-like SDK, keep the database behind an API, and are able to offer a complex set of database features, bending the current limitations of traditional relational and non-relational databases.

Once we get to the next part of this series, we will talk about different kinds of databases. Then you will be ready to pop the hood on any serverless database offering you want and understand the differences for yourself. Meanwhile, let’s keep it superficial.

Batteries Included

Don’t take the “serverless” prefix lightly; these databases are from a different breed. They are able to offer guarantees and performance that “traditional” databases require some effort to reach, sometimes not even so. This is because on serverless databases, the work has been done, just not by your team.

The same way “serverless” means you don’t need to handle your server, “serverless database” means you don’t need to handle your database. The platform will handle it for you.

Because of this, the decisions about scalability and deliverability are often made external to your team. What your team gets is the assurance that any request will receive a response in a timely manner and that data will respect the consistency guarantees. Again, different solutions have different tradeoffs. It’s important to check what each offering imposes before jumping in.

See You On The Next One

Hopefully, this has been enough to spark your curiosity. This is the first article of a 3-part series. In the next ones, we will cover more in-depth information about what databases actually are. Specifically, we’ll look into:

  • Schemas,
  • Theorems and models,
  • Types of databases,
  • whatever you suggest in the comments below!

All that necessary knowledge will enable you to choose the best solution for your app. Understanding the tradeoffs of different serverless solutions and surrounding yourself with the right kind of help is crucial to setting your app up for success. Reach out to me if you need anything meanwhile. Otherwise, see you in a few days!

Further Reading on Smashing Magazine

Remix Routes Demystified

Around six months ago, Remix became open source. It brings a lovely developer experience and approximates web development to the web platform in a refreshing way. It’s a known tale that naming is the hardest thing in programming, but the team nailed this one. Remix drinks from the community experience, puts the platform and browser behavior in a front seat; sprinkles the learning the authors got from React-Router, Unpkg, and from teaching React. Like a remixed record, its content mixes the old needs to novel solutions in order to deliver a flawless experience.

Writing a Remix app is fun, it gets developers scratching their heads about, “How did Forms actually work before?”, "Can Cache really do that?”, and (my personal favorite), “The docs just pointed me to Mozilla Dev Network!”

In this article, we will dig deeper and look beyond the hype, though. Let’s pick inside (one of) Remix’s secret sauces and see one of the features that powers most of its features and fuels many of its conventions: routes. Buckle up!

Anatomy Of A Remix Repository

If pasting npx create-remix@latest, following the prompt, and opening the scanning the bare bones project file-tree, a developer will be faced with a structure similar to the one bellow:

├───/.cache
├───/public
├───/app
│   ├───/routes
│   ├───entry.client.jsx
│   ├───entry.server.jsx
│   └───root.tsx
├───remix.config.js
└───package.json
  • .cache will show up, once there’s a build output;
  • public is for static assets;
  • app is where the fun will happen, think of it as a /src for now;
  • the files on the root are the configuration ones, for Remix, and for NPM.

Remix can be deployed to any JavaScript environment (even without Node.js). Depending on which platform you choose, the starter may output more files to make sure it all works as intended.

We have all seen similar repositories on other apps. But things already don’t feel the same with those entry.server.jsx and entry.client.jsx: every route has a client and a server runtime. Remix embraces the server-side from the very beginning, making it a truly isomorphic app.

While entry.client.jsx is pretty much a regular DOM renderer with Remix built-in sauce, entry.server.jsx already shows a powerful strategy of Remix routing. It is possible and clear to determine an app-wide configuration for headers, response, and metadata straight from there. The foundation for a multi-page app is set from the very beginning.

Routes Directory

Out of the 3 folders inside /app on the snippet above, routes is definitely the most important. Remix brings a few conventions (one can opt-out with some configuration tweaks) that power the Developer Experience within the framework. The first convention, which has somewhat raised to a standard among such frameworks, is File System based routing. Within the /routes directory, a regular file will create a new route from the root of your app. If one wants myapp.com and myapp.com/about, for example, the following structure can achieve it:

├───/apps
│   ├───/routes
│   │   ├───index.jsx
│   │   └───about.jsx

Inside those files, there are regular React components as the default export, while special Remix methods can be named exports to provide additional functionalities like data-fetching with the loader and action methods or route configuration like the headers and meta methods.

And here is where things start to get interesting: Remix doesn’t separate your data by runtime. There’s no “server data”, or “build-time data”. It has a loader for loading data, it has an action for mutations, headers and meta for extending/overriding response headers and metatags on a per-route basis.

Route Matching And Layouts

Composability is an order of business within the React ecosystem. A componentized program excels when we allow it to wrap one component on another, decorating them and empowering them with each other. With that in mind, the Layout Pattern has surfaced, it consists of creating a component to wrap a route (a.k.a another component) and decorate it in order to enforce UI consistency or make important data available.

Remix puts the Layout Pattern front and center it’s possible to determine a Layout to render all routes which match its name.

├───/apps
│   ├───/routes
│   │   ├───/posts    // actual posts inside
│   │   └───posts.jsx // this is the layout

The posts.jsx component uses a built-in Remix component (<Outlet />) which will work in a similar way that React developers are used to have {children} for. This component will use the content within a /posts/my-post.jsx and render it within the layout. For example:

import { Outlet } from 'remix'

export default PostsLayout = () => (
  <main>
     <Navigation />
     <article>
       <Outlet />
     </article>
     <Footer />
  </main>
)

But not always the UI will walk in sync with the URL structure. There is a chance that developers will need to create layouts without nesting routes. Take for example the /about page and the /, they are often completely different, and this convention ties down the URL structure with UI look and feel. Unless there is an escape hatch.

Skipping Inheritance

When nesting route components like above, they become child components of another component with the same name as their directory, like posts.jsx is the parent component to everything inside /posts through <Outlet />. But eventually, it may be necessary to skip such inheritance while still having the URL segment. For example:

├───/apps
│   ├───/routes
│   │   ├───/posts                       // post
│   │   ├───posts.different-layout.jsx   // post
│   │   └───posts.jsx                    // posts layout

In the example above, posts.different-layout.tsx will be served in /posts/different-layout, but it won’t be a child component of posts.jsx layout.

Dynamic Routes

Creating routes for a complex multi-page app is almost impossible without some Dynamic Routing shenanigans. Of course, Remix has its covered. It is possible to declare the parameters by prefixing them with a $ in the file name, for example:

├───/apps
│   ├───/routes
│   |   └───/users
│   │         └───$userId.jsx

Now, your page component for $userId.jsx can look something like:

import { useParams } from 'remix'

export default function PostRoute() {
  const { userId } = useParams()

  return (
    <ul>
      <li>user: {userId}</li>
    </ul>
  )
}

Also there’s an additional twist: we can combine this with the Dot Limiters mentioned a few sections prior, and we can easily have:

├───/apps
│   ├───/routes
│   |   └───/users
│   |         ├───$userId.edit.jsx
│   │         └───$userId.jsx

Now the following path segment will not only be matched, but also carry out the parameter: /users/{{user-id}}/edit. Needless to say, the same structure can be combined to also carry additional parameters, for example: $appRegion.$userId.jsx will carry out the 2 parameters to your functions and page component: const { appRegion, userId } = useParams().

Catch-all With Splats

Eventually, developers may find themselves in situations where the number of parameters, or keys for each, a route is receiving is unclear. For these edge-cases Remix offers a way of catching everything. Splats will match everything which was not matched before by any of its siblings. For example, take this route structure:

├───/apps
│   ├───/routes
│   │   ├───about.jsx
│   │   ├───index.jsx
│   │   └───$.jsx      // Splat Route
  • mydomain.com/about will render about.jsx;
  • mydomain.com will render index.jsx;
  • anything that’s not the root nor /about will render $.jsx.

And Remix will pass a params object to both of its data handling methods (loader and action), and it has a useParams hook (exactly the same from React-Router) to use such parameters straight on the client-side. So, our $.jsx could look something like:

import { useParams } from 'remix'
import type { LoaderFunction, ActionFunction } from 'remix'

export const loader: LoaderFunction = async ({
  params
}) => {
  return (params['*'] || '').split('/')
};

export const action: ActionFunction = async ({
  params
}) => {
  return (params['*'] || '').split('/')
};

export default function SplatRoute() {
  const params = useParams()
  console.log(return (params['*'] || '').split('/'))

  return (<div>Wow. Much dynamic!</div>)
}

Check the Load data and the Mutating data sections for an in-depth explanation of loader and action methods respectively.

The params[''] will be a string with the all params. For example: mydomain.com/this/is/my/route will yield “this/is/my/route”. So, in this case we can just use .split('/') to turn into an array like ['this', 'is', 'my', 'route'].

Load Data

Each route is able to specify a method that will provide and handle its data on the server right before rendering. This method is the loader function, it must return a serializable piece of data which can then be accessed on the main component via the special useLoaderData hook from Remix.

import type { LoaderFunction } from 'remix'
import type { ProjectProps } from '~/types'
import { useLoaderData } from 'remix'

export const loader: LoaderFunction = async () => {
  const repositoriesResp = await fetch(
    'https://api.github.com/users/atilafassina/repos'
  )
  return repositoriesResp.json()
}

export default function Projects() {
  const repositoryList: ProjectProps[] = useLoaderData()

  return (<div>{repositoryList.length}</div>
}

It’s important to point out, that the loader will always run on the server. Every logic there will not arrive in the client-side bundle, which means that any dependency used only there will not be sent to the user either. The loader function can run in 2 different scenarios:

  1. Hard navigation:
    When the user navigates via the browser window (arrives directly to that page).
  2. Client-side navigation:
    When the user was in another page in your Remix app and navigates via a <Link /> component to this route.

When hard navigation happens, the loader method runs, provides the renderer with data, and the route is Server-Side Rendered to finally be sent to the user. On the client-side navigation, Remix fires a fetch request by itself and uses the loader function as an API endpoint to fuel fresh data to this route.

Mutating Data

Remix carries multiple ways of firing a data mutation from the client-side: HTML form tag, and extremely configurable <Form /> component, and the useFetcher and useFetchers hooks. Each of them has its own intended use-cases, and they are there to power the whole concept of an Optimistic UI that made Remix famous. We will park those concepts for now and address them in a future article because all these methods unfailingly communicate with a single server-side method: the action function.

Action and Loader are fundamentally the same method, the only thing which differentiates them is the trigger. Actions will be triggered on any non-GET request and will run before the loader is called by the re-rendering of the route. So, post a user interaction, the following cascade will happen on Remix’s side:

  1. Client-side triggers Action function,
  2. Action function connects to the data source (database, API, …),
  3. Re-render is triggered, calls Loader function,
  4. Loader function fetches data and feeds Remix rendering,
  5. Response is sent back to the client.
Headers And Meta

As previously mentioned, there are other specific methods for each route that aren’t necessarily involved with fetching and handling data. They are responsible for your document headers and metatags.

Exporting meta function allows the developer to override the metatag values defined in the root.jsx and tailor it to that specific route. If a value isn’t changed, it will seamlessly inherit. The same logic will apply to the headers function, but with a twist.

Data usually is what determines how long a page can be cached, so, naturally, the document inherits the headers from its data. If headers function doesn’t explicitly declare otherwise, the loader function headers will dictate the headers of your whole document, not only data. And once declared, the headers function will receive both: the parent headers and the loader headers as parameters.

import type { HeadersFunction } from 'remix'

export const headers: HeadersFunction = ({ loaderHeaders, parentHeaders }) => ({
  ...parentHeaders,
  ...loaderHeaders,
  "x-magazine": "smashing",
  "Cache-Control": "max-age: 60, stale-while-revalidate=3600",
})
Resource Routes

These routes are essentially one which doesn’t exist naturally in the website’s navigation pattern. Usually, a resource route does not return a React component. Besides this, they behave exactly the same as others: for GET requests, the loader function will run, for any other request method, the action function will return the response.

Resource routes can be used in a number of use cases when you need to return a different file type: a pdf or csv document, a sitemap, or other. For example, here we are creating a PDF file and returning it as a resource to the user.

export const loader: LoaderFunction = async () => {
  const pdf = somethingToPdf()

  return new Response(pdf, {
    headers: {
      'Content-Disposition': 'attachment;',
      'Content-Type': 'application/pdf',
    },
  })
}

Remix makes it straightforward to adjust the response headers, so we can even use Content-Disposition to instruct the browser that this specific resource should be saved to the file system instead of displaying inline to the browser.

Remix Secret Sauce: Nested Routes

Here is where a multi-page app meets single-page apps. Since Remix’s routing is powered by React-Router, it brings its partial routing capabilities to the architecture. Each route is responsible for its own piece of logic and presentation, and this all can be declared used by the File-System heuristics again. Check this:

├───/apps
│   ├───/routes
│   │   ├───/dashboard
│   │   |    ├───profile.jsx
│   │   |    ├───settings.jsx
│   │   |    └───posts.jsx
│   │   └───dashboard.jsx      // Parent route

And just like we did implicitly on our Layout paradigm before, and how Remix handles the root//routes relationship, we will determine a parent route which will render all its children routes inside the <Outlet /> component. So, our dashboard.jsx looks something like this:

import { Outlet } from 'remix'

export default function Dashboard () {
  return (
   <div>
     some content that will show at every route
     <Outlet />
   </div>
  )
}

This way, Remix can infer which resources to pre-fetch before the user asks for the page. because it allows the framework to identify relationships between each route and more intelligently infer what will be needed. Fetching all of your page's data dependencies in parallel drastically boosts the performance of your app by eliminating those render and fetch waterfalls we dread so much seeing in (too) many web apps today.

So, thanks to Nested Routes, Remix is able to preload data for each URL segment, it knows what the app needs before it renders. On top of that, the only things that actually need re-rendering are the components inside the specific URL segment.

For example, take our above app , once users navigate to /dashboard/activity and then to /dashboard/friends the components it will render and data it will fetch are only the ones inside /friends route. The components and resources matching the /dashboard segment are already there.

So now Remix is preventing the browser from re-rendering the entire UI and only doing it for the sections that actually changed. It can also prefetch resources for the next page so once actual navigation occurs the transition is instant because data will be waiting at the browser cache. Remix is able to optimize it all out of the box with fine-grained precision, thanks to Nested Routes and powered by partial routing.

Wrapping Up

Routing is arguably the most important structure of a web app because it dictates the foundation where every component will relate to each other, and how the whole app will be able to scale going forward. Looking closely through Remix’s decisions for handling routes was a fun and refreshing ride, and this is only the scratch on the surface of what this framework has under its hood. If you want to dig deeper into more resources, be sure to check this amazing interactive guide for Remix routes by Dilum Sanjaya.

Though an extremely powerful feature and a backbone of Remix, we have just scratched the surface with routes and these examples. Remix shows its true potential on highly interactive apps, and it’s a very powerful set of features: data mutation with forms and special hooks, authentication and cookie management, and more.

How To Benchmark And Improve Web Vitals With Real User Metrics

How would you measure performance? Sometimes it’s the amount of time an application takes from initial request to fully rendered. Other times it’s about how fast a task is performed. It may also be how long it takes for the user to get feedback on an action. Rest assured, all these definitions (and others) would be correct, provided the right context.

Unfortunately, there is no silver bullet for measuring performance. Different products will have different benchmarks and two apps may perform differently against the same metrics, but still rank quite similarly to our subjective "good” and "bad” verdicts.

In an effort to streamline language and to promote collaboration and standardization, our industry has come up with widespread concepts. This way developers are capable of sharing solutions, defining priorities, and focusing on getting work done effectively.

Performance vs Perceived Performance

Take this snippet as an example:

const sum = new Array(1000)
  .fill(0)
  .map((el, idx) => el + idx)
  .reduce((sum, el) => sum + el, 0)
console.log(sum)

The purpose of this is unimportant, and it doesn’t really do anything except take a considerable amount of time to output a number to the console. Facing this code, one would (rightfully) say it does not perform well. It’s not fast code to run, and it could be optimized with different kinds of loops, or perform those tasks in a single loop.

Another important thing is that it has the potential to block the rendering of a web page. It freezes (or maybe even crashes) your browser tab. So in this case, the performance perceived by the user is hand in hand with the performance of the task itself.

However, we can execute this task in a web worker. By preventing render block, our task will not perform any faster— so one could say performance is still the same — but the user will still be able to interact with our app, and be provided with proper feedback. That impacts how fast our end-user will perceive our application. It is not faster, but it has better Perceived Performance.

Note: Feel free to explore my react-web-workers proof-of-concept on GitHub if you want to know more about Web-Workers and React.

Web Vitals

Web performance is a broad topic with thousands of metrics that you could potentially monitor and improve. Web Vitals are Google’s answer to standardizing web performance. This standardization empowers developers to focus on the metrics that have the greatest impact on the end-user experience.

  • First Contentful Paint (FCP)
    The time from when loading starts to when content is rendered on the screen.
  • Largest Contentful Paint (LCP)
    The render time of the largest image or text block is visible within the viewport. A good score is under 2.5s for 75% of page loads.
  • First Input Delay (FID)
    The time from when the user interacts with the page to the time the browser is able to process the request.
    A good score is under 100ms for 75% of page loads.
  • Cumulative Layout Shift (CLS)
    The total sum of all individual layout shifts for every unexpected shift that occurs in the page’s lifespan. A good score is 0.1 on 75% of page loads.
  • Time to Interactive (TTI)
    The time from when the page starts loading to when its main sub-resources have loaded.
  • Total Blocking Time (TBT)
    The time between First Contentful Paint and Time to Interactive where the main thread was blocked (no responsiveness to user input).
Which one of these is the most important?

Core Web Vitals are the subset of Web Vitals that Google has identified as having the greatest impact on the end-user experience. As of 2022, there are three Core Web Vitals — Largest Contentful Paint (speed), Cumulative Layout Shift (stability) and First Input Delay (interactivity).

Recommended Reading: The Developer’s Guide to Core Web Vitals

Chrome User Experience Report vs Real User Metrics

There are multiple ways of testing Web Vitals on your application. The easiest one is to open your Chrome Devtools, go to the Lighthouse tab, check your preferences, and generate a report. This is called a Chrome User Experience Report (CrUX), and it is based on a 28-day average of samples from Chrome users who meet certain requirements:

  • browsing history sync;
  • no Sync passphrase setup;
  • usage statistic reporting enabled.

But it’s quite hard to define how representative of your own users the Chrome UX Report is. The report serves as a ballpark range and can offer a good indicator of things to improve on an ad-hoc basis. This is why it’s a very good idea to use a Real User Monitoring (RUM) tool, like Raygun. This will report on people actually interacting with your app, across all browsers, within an allocated timeframe.

Monitoring real user metrics yourself is not a simple task though. There are a plethora of hurdles to be aware of. However, it doesn’t have to be complicated. It’s easy to get set up with getting RUM metrics with performance monitoring tools. One of the options worth considering is Raygun — it can be set up in a few quick steps and is GDPR-friendly. In addition, you also get plenty of error reporting features.

Application Monitoring

Developers often treat observability and performance monitoring as an after-thought. However, monitoring is a crucial aspect of the development lifecycle which helps software teams move faster, prioritize efforts, and avoid serious issues down the road.

Setting up monitoring can be straightforward, and building features that account for observability will help the team do basic maintenance and code hygiene to avoid those dreadful refactoring sprints. Application monitoring can help you sleep peacefully at night and guides your team towards crafting better user experiences.

Monitor Trends And Avoid Regressions

In the same way, we have tests running on our Continuous Integration pipeline (ideally) to avoid feature regressions and bugs, we ought to have a way to identify performance regressions for our users immediately after a new deployment. Raygun can help developers automate this work with their Deployment Tracking feature.

Adhering to the performance budget becomes more sustainable. With this information, your team can quickly spot performance regressions (or improvements) across all Web Vitals, identify problematic deployments, and zero in on impacted users.

Drill In And Take Action

When using RUM, it is possible to narrow down results on a per-user basis. For example, in Raygun, it is possible to click on a score or bar on the histogram to see a list of impacted users. This makes it possible to start drilling further into sessions on an individual basis, with instance-level information. This helps taking action directly targeted to the issue instead of simply trusting general best practices. And later on, to diagnose the repercussions of the change.

Wrapping Up

To summarize, Web Vitals are the new gold standard in performance due to their direct correlation with the user’s experience. Development teams who are actively monitoring and optimizing their Web Vitals based on real user insights will deliver faster and more resilient digital experiences.

We’ve only just scratched the surface of what monitoring can do and solutions to sustain performance maintenance while scaling your app. Let me know in the comments how you employ a Performance Budget, better observability, or other solutions to have a relaxed night of sleep!

Localizing Your Next.js App

Instructing Next.js your app intends to have routes for different locales (or countries, or both) could not be more smooth. On the root of your project, create a next.config.js if you have not had the need for one. You can copy from this snippet.

/** @type {import('next').NextConfig} */

module.exports = {
  reactStrictMode: true,
  i18n: {
    locales: ['en', 'gc'],
    defaultLocale: 'en',
  }
}

Note: The first line is letting the TS Server (if you are on a TypeScript project, or if you are using VSCode) which are the properties supported in the configuration object. It is not mandatory but definitely a nice feature.

You will note two property keys inside the i18n object:

  • locales
    A list of all locales supported by your app. It is an array of strings.
  • defaultLocale
    The locale of your main root. That is the default setting when either no preference is found or you forcing to the root.

Those property values will determine the routes, so do not go too fancy on them. Create valid ones using locale code and/or country codes and stick with lower-case because they will generate a url soon.

Now your app has multiple locales supported there is one last thing you must be aware of in Next.js. Every route now exists on every locale, and the framework is aware they are the same. If you want to navigate to a specific locale, we must provide a locale prop to our Link component, otherwise, it will fall back based on the browser’s Accept-Language header.

<Link href="/" locale="de"><a>Home page in German</a></Link>

Eventually, you will want to write an anchor which will just obey the selected locale for the user and send them to the appropriate route. That can easily be achieved with the useRouter custom hook from Next.js, it will return you an object and the selected locale will be a key in there.

import type { FC } from 'react'
import Link from 'next/link'
import { useRouter } from 'next/router'

const Anchor: FC<{ href: string }> = ({ href, children }) => {
  const { locale } = useRouter()

  return (
    <Link href={href} locale={locale}>
      <a>{children}</a>
    </Link>
  )
}

Your Next.js is now fully prepared for internationalization. It will:

  • Pick up the user’s preferred locale from the Accepted-Languages header in our request: courtesy of Next.js;
  • Send the user always to a route obeying the user’s preference: using our Anchor component created above;
  • Fall back to the default language when necessary.

The last thing we need to do is make sure we can handle translations. At the moment, routing is working perfectly, but there is no way to adjust the content of each page.

Creating A Dictionary

Regardless if you are using a Translation Management Service or getting your texts some other way, what we want in the end is a JSON object for our JavaScript to consume during runtime. Next.js offers three different runtimes:

  • client-side,
  • server-side,
  • compile-time.

But keep that at the back of your head for now. We’ll first need to structure our data.

Data for translation can vary in shape depending on the tooling around it, but ultimately it eventually boils down to locales, keys, and values. So that is what we are going to get started with. My locales will be en for English and pt for Portuguese.

module.exports = {
  en: {
    hello: 'hello world'
  },
  pt: {
    hello: 'oi mundo'
  }
}
Translation Custom Hook

With that at hand, we can now create our translation custom hook.

import { useRouter } from 'next/router'
import dictionary from './dictionary'

export const useTranslation = () => {
  const { locales = [], defaultLocale, ...nextRouter} = useRouter()
  const locale = locales.includes(nextRouter.locale || '')
    ? nextRouter.locale
    : defaultLocale

  return {
    translate: (term) => {
      const translation = dictionary[locale][term]

      return Boolean(translation) ? translation : term
    }
  }
}

Let’s breakdown what is happening upstairs:

  1. We use useRouter to get all available locales, the default one, and the current;
  2. Once we have that, we check if we have a valid locale with us, if we do not: fallback to the default locale;
  3. Now we return the translate method. It takes a term and fetches from the dictionary to that specified locale. If there is no value, it returns the translation term again.

Now our Next.js app is ready to translate at least the more common and rudimentary cases. Please note, this is not a dunk on translation libraries. There are tons of important features our custom hook over there is missing: interpolation, pluralization, genders, and so on.

Time To Scale

The lack of features to our custom hook is acceptable if we do not need them right now; it is always possible (and arguably better) to implement things when you actually need them. But there is one fundamental issue with our current strategy that is worrisome: it is not leveraging the isomorphic aspect of Next.js.

The worst part of scaling localized apps is not managing the translation actions themselves. That bit has been done quite a few times and is somewhat predictable. The problem is dealing with the bloat of shipping endless dictionaries down the wire to the browser — and they only multiply as your app requires more and more languages. That is data that very often becomes useless to the end-user, or it affects performance if we need to fetch new keys and values when they switch language. If there is one big truth about user experience, it’s this: your users will surprise you.

We cannot predict when or if users will switch languages or need that additional key. So, ideally, our apps will have all translations for a specific route at hand when such a route is loaded. For now, we need to split chunks of our dictionary based on what the page renders, and what permutations of state it can have. This rabbit hole goes deep.

Server-Side Pre-Rendering

Time to recap our new requirements for scalability:

  1. Ship as little as possible to the client-side;
  2. Avoid extra requests based on user interaction;
  3. Send the first render already translated down to the user.

Thanks to the getStaticProps method of Next.js pages, we can achieve that without needing to dive at all into compiler configuration. We will import our entire dictionary to this special Serverless Function, and we will send to our page a list of special objects carrying the translations of each key.

Setting Up SSR Translations

Back to our app, we will create a new method. Set a directory like /utils or /helpers and somewhere inside we will have the following:

export function ssrI18n(key, dictionary) {
  return Object.keys(dictionary)
    .reduce((keySet, locale) => {
      keySet[locale] = (dictionary[locale as keyof typeof dictionary][key])
      return keySet
    , {})
}

Breaking down what we are doing:

  1. Take the translation key or term and the dictionary;
  2. Turn the dictionary object into an array of its keys;
  3. Each key from the dictionary is a locale, so we create an object with the key name and each locale will be the value for that specific language.

An example output of that method will have the following shape:

{
  'hello': {
    'en': 'Hello World',
    'pt': 'Oi Mundo',
    'de': 'Hallo Welt'
  }
}

Now we can move to our Next.js page.

import { ssrI18n } from '../utils/ssrI18n'
import { DICTIONARY } from '../dictionary'
import { useRouter } from 'next/router'

const Home = ({ hello }) => {
  const router = useRouter()
  const i18nLocale = getLocale(router)

  return (
    <h1 className={styles.title}>
      {hello[i18nLocale]}
    </h1>
  )
}

export const getStaticProps = async () => ({
  props: {
    hello: ssrI18n('hello', DICTIONARY),
    // add another entry to each translation key
  }
})

And with that, we are done! Our pages are only receiving exactly the translations they will need in every language. No external requests if they switch languages midway, on the contrary: the experience will be super quick.

Skipping All Setup

All that is great, but we can still do better for ourselves. The developer could take some attention; there is a lot of bootstrapping in it, and we are still relying on not making any typos. If you ever worked on translated apps, you’ll know that there will be a mistyped key somewhere, somehow. So, we can bring the type-safety of TypeScript to our translation methods.

To skip this setup and get the TypeScript safety and autocompletion, we can use next-g11n. This is a tiny library that does exactly what we have done above, but adds types and a few extra bells and whistles.

Wrapping Up

I hope this article has given you a larger insight into what Next.js Internationalized Routing can do for your app to achieve Globalization, and what it means to provide a top-notch user experience in localized apps in today’s web. Let hear what you think in the comments below, or send a tweet my way.

State Management In Next.js

This article is intended to be used as a primer for managing complex states in a Next.js app. Unfortunately, the framework is way too versatile for us to cover all possible use cases in this article. But these strategies should fit the vast majority of apps around with little to no adjustments. If you believe there is a relevant pattern to be considered, I look forward to seeing you in the comments section!

React Core APIs For Data

There is only one way a React application carries data: passing it down from parent components to children components. Regardless of how an app manages its data, it must pass data from top to bottom.

As an application grows in complexity and ramifications of your rendering tree, multiple layers surface. Sometimes it is needed to pass down data far down multiple layers of parent components until it finally reaches the component which the data is intended for, this is called Prop Drilling.

As one could anticipate: Prop Drilling can become a cumbersome pattern and error-prone as apps grow. To circumvent this issue comes in the Context API. The Context API adds 3 elements to this equation:

  1. Context
    The data which is carried forward from Provider to Consumer.
  2. Context Provider
    The component from which the data originates.
  3. Context Consumer
    The component which will use the data received.

The Provider is invariably an ancestor of the consumer component, but it is likely not a direct ancestor. The API then skips all other links in the chain and hands the data (context) over directly to the consumer. This is the entirety of the Context API, passing data. It has as much to do with the data as the postal office has to do with your mail.

In a vanilla React app, data may be managed by 2 other APIs: useState and useReducer. It would be beyond the scope of this article to suggest when to use one or another, so let's keep it simple by saying:

  • useState
    Simple data structure and simple conditions.
  • useReducer
    Complex data structures and/or intertwined conditions.

The fact Prop Drilling and Data Management in React are wrongfully confused as one pattern is partially owned to an inherent flaw in the Legacy Content API. When a component re-render was blocked by shouldComponentUpdate it would prevent the context from continuing down to its target. This issue steered developers to resort to third-party libraries when all they needed was to avoid prop drilling.

To check a comparison on the most useful libraries, I can recommend you this post about React State Management.

Next.js is a React framework. So, any of the solutions described for React apps can be applied to a Next.js app. Some will require a bigger flex to get it set up, some will have the tradeoffs redistributed based on Next.js' own functionalities. But everything is 100% usable, you can pick your poison freely.

For the majority of common use-cases, the combination of Context and State/Reducer is enough. We will consider this for this article and not dive too much into the intricacies of complex states. We will however take into consideration that most Jamstack apps rely on external data, and that is also state.

Propagating Local State Through The App

A Next.js app has 2 crucial components for handling all pages and views in our application:

  • _document.{t,j}sx
    This component is used to define the static mark-up. This file is rendered on the server and is not re-rendered on the client. Use it for affecting the <html> and <body> tags and other metadata. If you don’t want to customize these things, it’s optional for you to include them in your application.
  • _app.{t,j}sx
    This one is used to define the logic that should spread throughout the app. Anything that should be present on every single view of the app belongs here. Use it for <Provider>s, global definitions, application settings, and so on.

To be more explicit, Context providers are applied here, for example:

// _app.jsx or _app.tsx

import { AppStateProvider } from './my-context'

export default function MyApp({ Component, pageProps }) {
  return (
    <AppStateProvider>
      <Component {...pageProps} />
    </AppStateProvider>
  )
}

Every time a new route is visited, our pages can tap into the AppStateContext and have their definitions passed down as props. When our app is simple enough it only needs one definition to be spread out like this, the previous pattern should be enough. For example:

export default function ConsumerPage() {
  const { state } = useAppStatecontext()
  return (
    <p>
      {state} is here! 🎉
    </p>
  )
}

You can check a real-world implementation of this ContextAPI pattern in our demo repository.

If you have multiple pieces of state defined in a single context, you may start running into performance issues. The reason for this is because when React sees a state update, it makes all of the necessary re-renders to the DOM. If that state is shared across many components (as it is when using the Context API), it could cause unnecessary re-renders, which we don’t want. Be discerning with the state variables you share across components!

Something you can do to stay organized with your state-sharing is by creating multiple pieces of Context (and thus different Context Providers) to hold different pieces of state. For example, you might share authentication in one Context, internationalization preferences in another, and website theme in another.

Next.js also provides a <Layout> pattern that you can use for something like this, to abstract all this logic out of the _app file, keeping it clean and readable.

// _app.jsx or _app.tsx
import { DefaultLayout } from './layout'

export default function MyApp({ Component, pageProps }) {
  const getLayout = Component.getLayout || (
    page => <DefaultLayout>{page}</DefaultLayout>
  )

  return getLayout(<Component {...pageProps} />)
}


// layout.jsx
import { AppState_1_Provider } from '../context/context-1'
import { AppState_2_Provider } from '../context/context-2'

export const DefaultLayout = ({ children }) => {
  return (
    <AppState_1_Provider>
      <AppState_2_Provider>
        <div className="container">
          {children}
        </div>
      </AppState_2_Provider>
    </AppState_1_Provider>
  )
}

With this pattern, you can create multiple Context Providers and keep them well defined in a Layout component for the whole app. In addition, the getLayout function will allow you to override the default Layout definitions on a per-page basis, so every page can have its own unique twist on what is provided.

Creating A Hierarchy Amongst Routes

Sometimes the Layout pattern may not be enough, though. As apps go further in complexity, a need may surface to establish a relationship provider/consumer relationship between routes. A route will wrap other routes and thus provide them with common definitions instead of making developers duplicate code. With this in mind, there is a Wrapper Proposal in Next.js discussions to provide a smooth developer experience for achieving this.

For the time being, there is not a low-config solution for this pattern within Next.js, but from the examples above, we can come up with a solution. Take this snippet directly from the docs:

import Layout from '../components/layout'
import NestedLayout from '../components/nested-layout'

export default function Page() {
  return {
    /** Your content */
  }
}

Page.getLayout = (page) => (
  <Layout>
    <NestedLayout>{page}</NestedLayout>
  </Layout>
)

Again the getLayout pattern! Now it is provided as a property of the Page object. It takes a page parameter just as a React component takes the children prop, and we can wrap as many layers as we want. Abstract this into a separate module, and you share this logic with certain routes:

// routes/user-management.jsx

export const MainUserManagement = (page) => (
  <UserInfoProvider>
    <UserNavigationLayout>
      {page}
    </UserNavigationlayout>
  </UserInfoProvider>
)


// user-dashboard.jsx
import { MainUserManagement } from '../routes/user-management'

export const UserDashboard = (props) => (<></>)

UserDashboard.getLayout = MainUserManagement
Growing Pains Strike Again: Provider Hell

Thanks to React's Context API we eluded Prop Drilling, which was the problem we set out to solve. Now we have readable code and we can pass props down to our components touching only required layers.

Eventually, our app grows, and the number of props that must be passed down increases at an increasingly fast pace. If we are careful enough to isolate eliminate unnecessary re-renders, it is likely that we gather an uncountable amount of <Providers> at the root of our layouts.

export const DefaultLayout = ({ children }) => {
  return (
    <AuthProvider>
      <UserProvider>
        <ThemeProvider>
          <SpecialProvider>
            <JustAnotherProvider>
              <VerySpecificProvider>
                {children}
              </VerySpecificProvider>
            </JustAnotherProvider>
          </SpecialProvider>
        </ThemeProvider>
      </UserProvider>
    </AuthProvider>
  )
}

This is what we call Provider Hell. And it can get worse: what if SpecialProvider is only aimed at a specific use-case? Do you add it at runtime? Adding both Provider and Consumer during runtime is not exactly straightforward.

With this dreadful issue in focus Jōtai has surfaced. It is a state management library with a very similar signature to useState. Under the hood, Jōtai also uses the Context API, but it abstracts the Provider Hell from our code and even offers a “Provider-less” mode in case the app only requires one store.

Thanks to the bottom-up approach, we can define Jōtai's atoms (the data layer of each component that connects to the store) in a component level and the library will take care of linking them to the provider. The <Provider> util in Jōtai carries a few extra functionalities on top of the default Context.Provider from React. It will always isolate the values from each atom, but it will take an initialValues property to declare an array of default values. So the above Provider Hell example would look like this:

import { Provider } from 'jotai'
import {
  AuthAtom,
  UserAtom,
  ThemeAtom,
  SpecialAtom,
  JustAnotherAtom,
  VerySpecificAtom
} from '@atoms'

const DEFAULT_VALUES = [
  [AuthAtom, 'value1'],
  [UserAtom, 'value2'],
  [ThemeAtom, 'value3'],
  [SpecialAtom, 'value4'],
  [JustAnotherAtom, 'value5'],
  [VerySpecificAtom, 'value6']
]

export const DefaultLayout = ({ children }) => {
  return (
    
      {children}
    
  )
}

Jōtai also offers other approaches to easily compose and derive state definitions from one another. It can definitely solve scalability issues in an incremental manner.

Fetching State

Up until now, we have created patterns and examples for managing the state internally within the app. But we should not be naïve, it is hardly ever the case an application does not need to fetch content or data from external APIs.

For client-side state, there are again two different workflows that need acknowledgement:

  1. fetching the data
  2. incorporating data into the app's state

When requesting data from the client-side, it is important to be mindful of a few things:

  1. the user's network connection: avoid re-fetching data that is already available
  2. what to do while waiting for the server response
  3. how to handle when data is not available (server error, or no data)
  4. how to recover if integration breaks (endpoint unavailable, resource changed, etc)

And now is when things start getting interesting. That first bullet, Item 1, is clearly related to the fetching state, while Item 2 slowly transitions towards the managing state. Items 3 and 4 are definitely on the managing state scope, but they are both dependent on the fetch action and the server integration. The line is definitely blurry. Dealing with all these moving pieces is complex, and these are patterns that do not change much from app to app. Whenever and however we fetch data, we must deal with those 4 scenarios.

Luckily, thanks to libraries such as React-Query and SWR every pattern shown for the local state is smoothly applied for external data. Libraries like these handle cache locally, so whenever the state is already available they can leverage settings definition to either renew data or use from the local cache. Moreover, they can even provide the user with stale data while they refresh content and prompt for an interface update whenever possible.

In addition to this, the React team has been transparent from a very early stage about upcoming APIs which aim to improve the user and developer experience on that front (check out the proposed Suspense documentation here). Thanks to this, library authors have prepared for when such APIs land, and developers can start working with similar syntax as of today.

So now, let's add external state to our MainUserManagement layout with SWR:

import { useSWR } from 'swr'
import { UserInfoProvider } from '../context/user-info'
import { ExtDataProvider } from '../context/external-data-provider'
import { UserNavigationLayout } from '../layouts/user-navigation'
import { ErrorReporter } from '../components/error-reporter'
import { Loading } from '../components/loading'

export const MainUserManagement = (page) => {
  const { data, error } = useSWR('/api/endpoint')

  if (error) => <ErrorReporter {...error} />
  if (!data) => <Loading />

  return (
    <UserInfoProvider>
      <ExtDataProvider>
        <UserNavigationLayout>
          {page}
        </UserNavigationlayout>
      </ExtDataProvider>
    </UserInfoProvider>
  )
}

As you can see above, the useSWR hook provides a lot of abstractions:

  • a default fetcher
  • zero-config caching layer
  • error handler
  • loading handler

With 2 conditions we can provide early returns within our component for when the request fails (error), or for while the round-trip to the server is not yet done (loading). For these reasons, the libraries side closely to State Management libraries. Although they are not exactly user management, they integrate well and provide us with enough tools to simplify managing these complex asynchronous states.

It is important to emphasize something at this point: a great advantage of having an isomorphic application is saving requests for the back-end side. Adding additional requests to your app once it is already on the client-side will affect the perceived performance. There’s a great article (and e-book!) on this topic here that goes much more in-depth.

This pattern is not intended in any way to replace getStaticProps or getServerSideProps on Next.js apps. It is yet another tool in the developer's belt to build with when presented with peculiar situations.

Final Considerations

While we wrap up with these patterns, it is important to stress out a few caveats which may creep out on you if you are not mindful as you implement them. First, let us recapitulate what we have covered in this article:

  • Context as a way of avoiding Prop Drilling;
  • React core APIs for managing state (useState and useReducer);
  • Passing client-side state throughout a Next.js application;
  • How to prevent certain routes from accessing state;
  • How to handle data-fetching on the client-side for Next.js apps.

There are three important tradeoffs that we need to be aware of when opting for these techniques:

  1. Using the server-side methods for generating content statically is often preferable to fetching the state from the client-side.
  2. The Context API can lead to multiple re-renders if you aren’t careful about where the state changes take place.

Making good consideration of those points will be important, in addition all good practices when dealing with state in a client-side React app remain useful on a Next.js app. The server layer may be able to offer a performance boost and this by itself may mitigate some computation issues. But it will also benefit from sticking to the common best practices when it comes to rendering performance on apps.

Try It Yourself

You can check the patterns described in this article live on nextjs-layout-state.netlify.app or check out the code on github.com/atilafassina/nextjs-layout-state. You can even just click this button to instantly clone it to your chosen Git provider and deploy it to Netlify:

In case you would like something less opinionated or are just thinking about getting started with Next.js, there is this awesome starter project to get you going all set up to easily deploy to Netlify. Again, Netlify makes it easy as pie to clone it to your own repository and deploy:

References

Breaking Down Bulky Builds With Netlify And Next.js

One of the biggest pains of working with statically generated websites is the incrementally slower builds as your app grows. This is an inevitable problem any stack faces at some point and it can strike from different points depending on what kind of product you are working with.

For example, if your app has multiple pages (views, routes) when generating the deployment artifact, each of those routes becomes a file. Then, once you’ve reached thousands, you start wondering when you can deploy without needing to plan ahead. This scenario is common on e-commerce platforms or blogs, which are already a big portion of the web but not all of it. Routes are not the only possible bottleneck, though.

A resource-heavy app will also eventually reach this turning point. Many static generators carry out asset optimization to ensure the best user experience. Without build optimizations (incremental builds, caching, we will get to those soon) this will eventually become unmanageable as well — think about going through all images in a website: resizing, deleting, and/or creating new files over and over again. And once all that is done: remember Jamstack serves our apps from the edges of the Content Delivery Network. So we still need to move things from the server they were compiled at to the edges of the network.

On top of all that, there is also another fact: data is often dynamic, meaning that when we build our app and deploy it, it may take a few seconds, a few minutes, or even an hour. Meanwhile, the world keeps spinning, and if we are fetching data from elsewhere, our app is bound to get outdated. Unacceptable! Build again to update!

Build Once, Update When Needed

Solving Bulky Builds has been top of mind for basically every Jamstack platform, framework, or service for a while. Many solutions revolve around incremental builds. In practice, this means that builds will be as bulky as the differences they carry against the current deployment.

Defining a diff algorithm is no easy task though. For the end-user to actually benefit from this improvement there are cache invalidation strategies that must be considered. Long story short: we do not want to invalidate cache for a page or an asset that has not changed.

Next.js came up with Incremental Static Regeneration (ISR). In essence, it is a way to declare for each route how often we want it to rebuild. Under the hood, it simplifies a lot of the work to the server-side. Because every route (dynamic or not) will rebuild itself given a specific time-frame, and it just fits perfectly in the Jamstack axiom of invalidating cache on every build. Think of it as the max-age header but for routes in your Next.js app.

To get your application started, ISR just a configuration property away. On your route component (inside the /pages directory) go to your getStaticProps method and add the revalidate key to the return object:

export async function getStaticProps() {
  const { limit, count, pokemons } = await fetchPokemonList()

  return {
    props: {
      limit,
      count,
      pokemons,
    },
    revalidate: 3600 // seconds
  }
}

The above snippet will make sure my page rebuilds every hour and fetch for more Pokémon to display.

We still get the bulk-builds every now and then (when issuing a new deployment). But this allows us to decouple content from code, by moving content to a Content Management System (CMS) we can update information in a few seconds, regardless of how big our application is. Goodbye to webhooks for updating typos!

On-Demand Builders

Netlify recently launched On-Demand Builders which is their approach to supporting ISR for Next.js, but also works across frameworks including Eleventy and Nuxt. In the previous session, we established that ISR was a great step toward shorter build-times and addressed a significant portion of the use-cases. Nevertheless, the caveats were there:

  1. Full builds upon continuous deployment.
    The incremental stage happens only after the deployment and for the data. It is not possible to ship code incrementally
  2. Incremental builds are a product of time.
    The cache is invalidated on a time basis. So unnecessary builds may occur, or needed updates may take longer depending on the revalidation period set in the code.

Netlify’s new deployment infrastructure allows developers to create logic to determine what pieces of their app will build on deployment and what pieces will be deferred (and how they will be deferred).

  • Critical
    No action is needed. Everything you deploy will be built upon push.
  • Deferred
    A specific piece of the app will not be built upon deploy, it will be deferred to be built on-demand whenever the first request occurs, then it will be cached as any other resource of its type.

Creating an On-Demand builder

First of all, add a netlify/functions package as a devDependency to your project:

yarn add -D @netlify/functions

Once that is done, it is just the same as creating a new Netlify Function. If you have not set a specific directory for them, head on to netlify/functions/ and create a file of any name to your builder.

import type { Handler } from '@netlify/functions'
import { builder } from '@netlify/functions'

const myHandler: Handler = async (event, context) => {
  return {
    statusCode: 200,
    body: JSON.stringify({ message: 'Built on-demand! 🎉' }),
  }
}
export const handler = builder(myHandler)

As you can see from the snippet above, the on-demand builder splits apart from a regular Netlify Function because it wraps its handler inside a builder() method. This method connects our function to the build tasks. And that is all you need to have a piece of your application deferred for building only when necessary. Small incremental builds from the get-go!

Next.js On Netlify

To build a Next.js app on Netlify there are 2 important plugins that one should add to have a better experience in general: Netlify Plugin Cache Next.js and Essential Next-on-Netlify. The former caches your NextJS more efficiently and you need to add it yourself, while the latter makes a few slight adjustments to how Next.js architecture is built so it better fits Netlify’s and is available by default to every new project that Netlify can identify is using Next.js.

On-Demand Builders With Next.js

Building performance, deploy performance, caching, developer experience. These are all very important topics, but it is a lot — and takes time to set up properly. Then we get to that old discussion about focusing on Developer Experience instead of User Experience. Which is the time things go to a hidden spot in a backlog to be forgotten. Not really.

Netlify has got your back. In just a few steps, we can leverage the full power of the Jamstack in our Next.js app. It's time to roll up our sleeves and put it all together now.

Defining Pre-Rendered Paths

If you have worked with static generation inside Next.js before, you have probably heard of getStaticPaths method. This method is intended for dynamic routes (page templates that will render a wide range of pages). Without dwelling too much on the intricacies of this method, it is important to note the return type is an object with 2 keys, like in our Proof-of-Concept this will be [Pokémon]dynamic route file:

export async function getStaticPaths() {
  return {
    paths: [],
    fallback: 'blocking',
  }
}
  • paths is an array carrying out all paths matching this route which will be pre-rendered
  • fallback has 3 possible values: blocking, true, or false

In our case, our getStaticPaths is determining:

  1. No paths will be pre-rendered;
  2. Whenever this route is called, we will not serve a fallback template, we will render the page on-demand and keep the user waiting, blocking the app from doing anything else.

When using On-Demand Builders, make sure your fallback strategy meets your app’s goals, the official Next.js docs: fallback docs are very useful.

Before On-Demand Builders, our getStaticPaths was slightly different:

export async function getStaticPaths() {
  const { pokemons } = await fetchPkmList()
  return {
    paths: pokemons.map(({ name }) => ({ params: { pokemon: name } })),
    fallback: false,
  }
}

We were gathering a list of all pokémon pages we intended to have, map all the pokemon objects to just a string with the pokémon name, and forwarding returning the { params } object carrying it to getStaticProps. Our fallback was set to false because if a route was not a match, we wanted Next.js to throw a 404: Not Found page.

You can check both versions deployed to Netlify:

The code is also open-sourced on Github and you can easily deploy it yourself to check the build times. And with this queue, we slide onto our next topic.

Build Times

As mentioned above, the previous demo is actually a Proof-of-Concept, nothing is really good or bad if we cannot measure. For our little study, I went over to the PokéAPI and decided to catch all pokémons.

For reproducibility purposes, I capped our request (to 1000). These are not really all within the API, but it enforces the number of pages will be the same for all builds regardless if things get updated at any point in time.

export const fetchPkmList = async () => {
  const resp = await fetch(`${API}pokemon?limit=${LIMIT}`)
  const {
    count,
    results,
  }: {
    count: number
    results: {
      name: string
      url: string
    }[]
  } = await resp.json()
  return {
    count,
    pokemons: results,
    limit: LIMIT,
  }
}

And then fired both versions in separated branches to Netlify, thanks to preview deploys they can coexist in basically the same environment. To really evaluate the difference between both methods the ODB approach was extreme, no pages were pre-rendered for that dynamic route. Though not recommended for real-world scenarios (you will want to pre-render your traffic-heavy routes), it marks clearly the range of build-time performance improvement we can achieve with this approach.

Strategy Number of Pages Number of Assets Build time Total deploy time
Fully Static Generated 1002 1005 2 minutes 32 seconds 4 minutes 15 seconds
On-Demand Builders 2 0 52 seconds 52 seconds

The pages in our little PokéDex app are pretty small, the image assets are very lean, but the gains on deploy time are very significant. If an app has a medium to a large amount of routes, it is definitely worth considering the ODB strategy.

It makes your deploys faster and thus more reliable. The performance hit only happens on the very first request, from the subsequent request and onward the rendered page will be cached right on the Edge making the performance exactly the same as the Fully Static Generated.

The Future: Distributed Persistent Rendering

On the very same day, On-Demand Builders were announced and put on early access, Netlify also published their Request for Comments on Distributed Persistent Rendering (DPR).

DPR is the next step for On-Demand Builders. It capitalizes on faster builds by making use of such asynchronous building steps and then caching the assets until they’re actually updated. No more full-builds for a 10k page's website. DPR empowers the developers to a full control around the build and deploy systems through solid caching and using On-Demand Builders.

Picture this scenario: an e-commerce website has 10k product pages, this means it would take something around 2 hours to build the entire application for deployment. We do not need to argue how painful this is.

With DPR, we can set the top 500 pages to build on every deploy. Our heaviest traffic pages are always ready for our users. But, we are a shop, i.e. every second counts. So for the other 9500 pages, we can set a post-build hook to trigger their builders — deploying the remaining of our pages asynchronously and immediately caching. No users were hurt, our website was updated with the fastest build possible, and everything else that did not exist in cache was then stored.

Conclusion

Although many of the discussion points in this article were conceptual and the implementation is to be defined, I am excited about the future of the Jamstack. The advances we are doing as a community revolve around the end-user experience.

What is your take on Distributed Persistent Rendering? Have you tried out On-Demand Builders in your application? Let me know more in the comments or call me out on Twitter. I am really curious!

References

Tree-Shaking: A Reference Guide

Before starting our journey to learn what tree-shaking is and how to set ourselves up for success with it, we need to understand what modules are in the JavaScript ecosystem.

Since its early days, JavaScript programs have grown in complexity and the number of tasks they perform. The need to compartmentalize such tasks into closed scopes of execution became apparent. These compartments of tasks, or values, are what we call modules. They’re main purpose is to prevent repetition and to leverage reusability. So, architectures were devised to allow such special kinds of scope, to expose their values and tasks, and to consume external values and tasks.

To dive deeper into what modules are and how they work, I recommend “ES Modules: A Cartoon Deep-Dive”. But to understand the nuances of tree-shaking and module consumption, the definition above should suffice.

What Does Tree-Shaking Actually Mean?

Simply put, tree-shaking means removing unreachable code (also known as dead code) from a bundle. As Webpack version 3’s documentation states:

“You can imagine your application as a tree. The source code and libraries you actually use represent the green, living leaves of the tree. Dead code represents the brown, dead leaves of the tree that are consumed by autumn. In order to get rid of the dead leaves, you have to shake the tree, causing them to fall.”

The term was first popularized in the front-end community by the Rollup team. But authors of all dynamic languages have been struggling with the problem since much earlier. The idea of a tree-shaking algorithm can be traced back to at least the early 1990s.

In JavaScript land, tree-shaking has been possible since the ECMAScript module (ESM) specification in ES2015, previously known as ES6. Since then, tree-shaking has been enabled by default in most bundlers because they reduce output size without changing the program’s behaviour.

The main reason for this is that ESMs are static by nature. Let‘s dissect what that means.

ES Modules vs. CommonJS

CommonJS predates the ESM specification by a few years. It came about to address the lack of support for reusable modules in the JavaScript ecosystem. CommonJS has a require() function that fetches an external module based on the path provided, and it adds it to the scope during runtime.

That require is a function like any other in a program makes it hard enough to evaluate its call outcome at compile-time. On top of that is the fact that adding require calls anywhere in the code is possible — wrapped in another function call, within if/else statements, in switch statements, etc.

With the learning and struggles that have resulted from wide adoption of the CommonJS architecture, the ESM specification has settled on this new architecture, in which modules are imported and exported by the respective keywords import and export. Therefore, no more functional calls. ESMs are also allowed only as top-level declarations — nesting them in any other structure is not possible, being as they are static: ESMs do not depend on runtime execution.

Scope and Side Effects

There is, however, another hurdle that tree-shaking must overcome to evade bloat: side effects. A function is considered to have side effects when it alters or relies on factors external to the scope of execution. A function with side effects is considered impure. A pure function will always yield the same result, regardless of context or the environment it’s been run in.

const pure = (a:number, b:number) => a + b
const impure = (c:number) => window.foo.number + c

Bundlers serve their purpose by evaluating the code provided as much as possible in order to determine whether a module is pure. But code evaluation during compiling time or bundling time can only go so far. Therefore, it’s assumed that packages with side effects cannot be properly eliminated, even when completely unreachable.

Because of this, bundlers now accept a key inside the module’s package.json file that allows the developer to declare whether a module has no side effects. This way, the developer can opt out of code evaluation and hint the bundler; the code within a particular package can be eliminated if there’s no reachable import or require statement linking to it. This not only makes for a leaner bundle, but also can speed up compiling times.


{
    "name": "my-package",
    "sideEffects": false
}

So, if you are a package developer, make conscientious use of sideEffects before publishing, and, of course, revise it upon every release to avoid any unexpected breaking changes.

In addition to the root sideEffects key, it is also possible to determine purity on a file-by-file basis, by annotating an inline comment, /*@__PURE__*/, to your method call.

const x = */@__PURE__*/eliminated_if_not_called()

I consider this inline annotation to be an escape hatch for the consumer developer, to be done in case a package has not declared sideEffects: false or in case the library does indeed present a side effect on a particular method.

Optimizing Webpack

From version 4 onward, Webpack has required progressively less configuration to get best practices working. The functionality for a couple of plugins has been incorporated into core. And because the development team takes bundle size very seriously, they have made tree-shaking easy.

If you’re not much of a tinkerer or if your application has no special cases, then tree-shaking your dependencies is a matter of just one line.

The webpack.config.js file has a root property named mode. Whenever this property’s value is production, it will tree-shake and fully optimize your modules. Besides eliminating dead code with the TerserPlugin, mode: 'production' will enable deterministic mangled names for modules and chunks, and it will activate the following plugins:

  • flag dependency usage,
  • flag included chunks,
  • module concatenation,
  • no emit on errors.

It’s not by accident that the trigger value is production. You will not want your dependencies to be fully optimized in a development environment because it will make issues much more difficult to debug. So I would suggest going about it with one of two approaches.

On the one hand, you could pass a mode flag to the Webpack command line interface:

# This will override the setting in your webpack.config.js
webpack --mode=production

Alternatively, you could use the process.env.NODE_ENV variable in webpack.config.js:

mode: process.env.NODE_ENV === 'production' ? 'production' : development

In this case, you must remember to pass --NODE_ENV=production in your deployment pipeline.

Both approaches are an abstraction on top of the much known definePlugin from Webpack version 3 and below. Which option you choose makes absolutely no difference.

Webpack Version 3 and Below

It’s worth mentioning that the scenarios and examples in this section might not apply to recent versions of Webpack and other bundlers. This section considers usage of UglifyJS version 2, instead of Terser. UglifyJS is the package that Terser was forked from, so code evaluation might differ between them.

Because Webpack version 3 and below don’t support the sideEffects property in package.json, all packages must be completely evaluated before the code gets eliminated. This alone makes the approach less effective, but several caveats must be considered as well.

As mentioned above, the compiler has no way of finding out by itself when a package is tampering with the global scope. But that’s not the only situation in which it skips tree-shaking. There are fuzzier scenarios.

Take this package example from Webpack’s documentation:

// transform.js
import * as mylib from 'mylib';

export const someVar = mylib.transform({
  // ...
});

export const someOtherVar = mylib.transform({
  // ...
});

And here is the entry point of a consumer bundle:

// index.js

import { someVar } from './transforms.js';

// Use `someVar`...

There’s no way to determine whether mylib.transform instigates side effects. Therefore, no code will be eliminated.

Here are other situations with a similar outcome:

  • invoking a function from a third-party module that the compiler cannot inspect,
  • re-exporting functions imported from third-party modules.

A tool that might help the compiler get tree-shaking to work is babel-plugin-transform-imports. It will split all member and named exports into default exports, allowing the modules to be evaluated individually.

// before transformation
import { Row, Grid as MyGrid } from 'react-bootstrap';
import { merge } from 'lodash';

// after transformation
import Row from 'react-bootstrap/lib/Row';
import MyGrid from 'react-bootstrap/lib/Grid';
import merge from 'lodash/merge';

It also has a configuration property that warns the developer to avoid troublesome import statements. If you’re on Webpack version 3 or above, and you have done your due diligence with basic configuration and added the recommended plugins, but your bundle still looks bloated, then I recommend giving this package a try.

Scope Hoisting and Compile Times

In the time of CommonJS, most bundlers would simply wrap each module within another function declaration and map them inside an object. That’s not any different than any map object out there:

(function (modulesMap, entry) {
  // provided CommonJS runtime
})({
  "index.js": function (require, module, exports) {
     let { foo } = require('./foo.js')
     foo.doStuff()
  },
  "foo.js": function(require, module, exports) {
     module.exports.foo = {
       doStuff: () => { console.log('I am foo') }
     }
  }
}, "index.js")

Apart from being hard to analyze statically, this is fundamentally incompatible with ESMs, because we’ve seen that we cannot wrap import and export statements. So, nowadays, bundlers hoist every module to the top level:

// moduleA.js
let $moduleA$export$doStuff = () => ({
  doStuff: () => {}
})

// index.js
$moduleA$export$doStuff()

This approach is fully compatible with ESMs; plus, it allows code evaluation to easily spot modules that aren’t being called and to drop them. The caveat of this approach is that, during compiling, it takes considerably more time because it touches every statement and stores the bundle in memory during the process. That’s a big reason why bundling performance has become an even greater concern to everyone and why compiled languages are being leveraged in tools for web development. For example, esbuild is a bundler written in Go, and SWC is a TypeScript compiler written in Rust that integrates with Spark, a bundler also written in Rust.

To better understand scope hoisting, I highly recommend Parcel version 2’s documentation.

Avoid Premature Transpiling

There’s one specific issue that is unfortunately rather common and can be devastating for tree-shaking. In short, it happens when you’re working with special loaders, integrating different compilers to your bundler. Common combinations are TypeScript, Babel, and Webpack — in all possible permutations.

Both Babel and TypeScript have their own compilers, and their respective loaders allow the developer to use them, for easy integration. And therein lies the hidden threat.

These compilers reach your code before code optimization. And whether by default or misconfiguration, these compilers often output CommonJS modules, instead of ESMs. As mentioned in a previous section, CommonJS modules are dynamic and, therefore, cannot be properly evaluated for dead-code elimination.

This scenario is becoming even more common nowadays, with the growth of “isomorphic” apps (i.e. apps that run the same code both server- and client-side). Because Node.js does not have standard support for ESMs yet, when compilers are targeted to the node environment, they output CommonJS.

So, be sure to check the code that your optimization algorithm is receiving.

Tree-Shaking Checklist

Now that you know the ins and outs of how bundling and tree-shaking work, let’s draw ourselves a checklist that you can print somewhere handy for when you revisit your current implementation and code base. Hopefully, this will save you time and allow you to optimize not only the perceived performance of your code, but maybe even your pipeline’s build times!

  1. Use ESMs, and not only in your own code base, but also favour packages that output ESM as their consumables.
  2. Make sure you know exactly which (if any) of your dependencies have not declared sideEffects or have them set as true.
  3. Make use of inline annotation to declare method calls that are pure when consuming packages with side effects.
  4. If you’re outputting CommonJS modules, make sure to optimize your bundle before transforming the import and export statements.

Package Authoring

Hopefully, by this point we all agree that ESMs are the way forward in the JavaScript ecosystem. As always in software development, though, transitions can be tricky. Luckily, package authors can adopt non-breaking measures to facilitate swift and seamless migration for their users.

With some small additions to package.json, your package will be able to tell bundlers the environments that the package supports and how they’re supported best. Here’s a checklist from Skypack:

  • Include an ESM export.
  • Add "type": "module".
  • Indicate an entry point through "module": "./path/entry.js" (a community convention).

And here’s an example that results when all best practices are followed and you wish to support both web and Node.js environments:

{
    // ...
    "main": "./index-cjs.js",
    "module": "./index-esm.js",
    "exports": {
        "require": "./index-cjs.js",
        "import": "./index-esm.js"
    }
    // ...
}

In addition to this, the Skypack team has introduced a package quality score as a benchmark to determine whether a given package is set up for longevity and best practices. The tool is open-sourced on GitHub and can be added as a devDependency to your package to perform the checks easily before each release.

Wrapping Up

I hope this article has been useful to you. If so, consider sharing it with your network. I look forward to interacting with you in the comments or on Twitter.

Useful Resources

Articles and Documentation

Projects and Tools

Jumping Into Webmentions With NextJS (or Not)

Webmention is a W3C recommendation last published on January 12, 2017. And what exactly is a Webmention? It’s described as…


[…] a simple way to notify any URL when you mention it on your site. From the receiver’s perspective, it’s a way to request notifications when other sites mention it.

In a nutshell, it’s a way of letting a website know it has been mentioned somewhere, by someone, in some way. The Webmention spec also describes it as a way for a website to let others know it cited them. What that basically bails down to is that your website is an active social media channel, channeling communication from other channels (e.g. Twitter, Instagram, Mastodon, Facebook, etc.).

How does a site implement Webmentions? In some cases, like WordPress, it’s as trivial as installing a couple of plugins. Other cases may not be quite so simple, but it’s still pretty straightforward. In fact, let’s do that now!

Here’s our plan

  1. Declare an endpoint to receive Webmentions
  2. Process social media interactions to Webmentions
  3. Get those mentions into a website/app
  4. Set the outbound Webmentions

Luckily for us, there are services in place that make things extremely simple. Well, except that third point, but hey, it’s not so bad and I’ll walk through how I did it on my own atila.io site.

My site is a server-side blog that’s pre-rendered and written with NextJS. I have opted to make Webmention requests client-side; therefore, it will work easily in any other React app and with very little refactoring in any other JavaScript application.

Step 1: Declare an endpoint to receive Webmentions

In order to have an endpoint we can use to accept Webmentions, we need to either write the script and add to our own server, or use a service such as Webmention.io (which is what I did).

Webmention.io is free and you only need to confirm ownership over the domain you register. Verification can happen a number of ways. I did it by adding a rel="me" attribute to a link in my website to my social media profiles. It only takes one such link, but I went ahead and did it for all of my accounts.

<a
  href="https://twitter.com/atilafassina"
  target="_blank"
  rel="me noopener noreferrer"
>
  @AtilaFassina
</a>

Verifying this way, we also need to make sure there’s a link pointing back to our website in that Twitter profile. Once we’ve done that, we can head back to Webmention.io and add the URL.

This gives us an endpoint for accepting Webmentions! All we need to do now is wire it up as <link> tags in the <head> of our webpages in order to collect those mentions.

<head>
  <link rel="webmention" href="https://webmention.io/{user}/webmention" />
  <link rel="pingback" href="https://webmention.io/{user}/xmlrpc" />
  <!-- ... -->
</head>

Remember to replace {user} with your Webmention.io username.

Step 2: Process social media interactions into Webmentions

We are ready for the Webmentions to start flowing! But wait, we have a slight problem: nobody actually uses them. I mean, I do, you do, Max Böck does, Swyx does, and… that’s about it. So, now we need to start converting all those juicy social media interactions into Webmentions.

And guess what? There’s an awesome free service for it. Fair warning though: you’d better start loving the IndieWeb because we’re about to get all up in it.

Bridgy connects all our syndicated content and converts them into proper Webmentions so we can consume it. With a SSO, we can get each of our profiles lined up, one by one.

Step 3: Get those mentions into a website/app

Now it’s our turn to do some heavy lifting. Sure, third-party services can handle all our data, but it’s still up to us to use it and display it.

We’re going to break this up into a few stages. First, we’ll get the number of Webmentions. From there, we’ll fetch the mentions themselves. Then we’ll hook that data up to NextJS (but you don’t have to), and display it.

Get the number of mentions

type TMentionsCountResponse = {
  count: number
  type: {
    like: number
    mention: number
    reply: number
    repost: number
  }
}

That is an example of an object we get back from the Webmention.io endpoint. I formatted the response a bit to better suit our needs. I’ll walk through how I did that in just a bit, but here’s the object we will get:

type TMentionsCount = {
  mentions: number
  likes: number
  total: number
}

The endpoint is located at:

https://webmention.io/api/count.json?target=${post_url}

The request will not fail without it, but the data won’t come either. Both Max Böck and Swyx combine likes with reposts and mentions with replies. In Twitter, they are analogous.

const getMentionsCount = async (postURL: string): TMentionsCount => {
  const resp = await fetch(
    `https://webmention.io/api/count.json?target=${postURL}/`
  )
  const { type, count } = await resp.json()


  return {
    likes: type.like + type.repost,
    mentions: type.mention + type.reply,
    total: count,
  }
}

Get the actual mentions

Before getting to the response, please note that the response is paginated, where the endpoint accepts three parameters in the query:

  • page: the page being requested
  • per-page: the number of mentions to display on the page
  • target: the URL where Webmentions are being fetched

Once we hit https://webmention.io/api/mentions and pass the these params, the successful response will be an object with a single key links which is an array of mentions matching the type below:

type TMention = {
  source: string
  verified: boolean
  verified_date: string // date string
  id: number
  private: boolean
  data: {
    author: {
      name: string
      url: string
      photo: string // url, hosted in webmention.io
    }
    url: string
    name: string
    content: string // encoded HTML
    published: string // date string
    published_ts: number // ms
  }
  activity: {
    type: 'link' | 'reply' | 'repost' | 'like'
    sentence: string // pure text, shortened
    sentence_html: string // encoded html
  }
  target: string
}

The above data is more than enough to show a comment-like section list on our site. Here’s how the fetch request looks in TypeScript:

const getMentions = async (
  page: string,
  postsPerPage: number,
  postURL: string
): { links: TWebMention[] } => {
  const resp = await fetch(
    `https://webmention.io/api/mentions?page=${page}&per-page=${postsPerPage}&target=${postURL}`
  )
  const list = await resp.json()
  return list.links
}

Hook it all up in NextJS

We’re going to work in NextJS for a moment. It’s all good if you aren’t using NextJS or even have a web app. We already have all the data, so those of you not working in NextJS can simply move ahead to Step 4. The rest of us will meet you there.

As of version 9.3.0, NextJS has three different methods for fetching data:

  1. getStaticProps: fetches data on build time
  2. getStaticPaths: specifies dynamic routes to pre-render based on the fetched data
  3. getServerSideProps: fetches data on each request

Now is the moment to decide at which point we will be making the first request for fetching mentions. We can pre-render the data on the server with the first batch of mentions, or we can make the entire thing client-side. I opted to go client-side.

If you’re going client-side as well, I recommend using SWR. It’s a custom hook built by the Vercel team that provides good caching, error and loading states — it and even supports React.Suspense.

Display the Webmention count

Many blogs show the number of comments on a post in two places: at the top of a blog post (like this one) and at the bottom, right above a list of comments. Let’s follow that same pattern for Webmentions.

First off, let’s create a component for the count:

const MentionsCounter = ({ postUrl }) => {
  const { t } = useTranslation()
  // Setting a default value for `data` because I don't want a loading state
  // otherwise you could set: if(!data) return <div>loading...</div>
  const { data = {}, error } = useSWR(postUrl, getMentionsCount)


  if (error) {
    return <ErrorMessage>{t('common:errorWebmentions')}</ErrorMessage>
  }


  // The default values cover the loading state
  const { likes = '-', mentions = '-' } = data


  return (
    <MentionCounter>
      <li>
        <Heart title="Likes" />
        <CounterData>{Number.isNaN(likes) ? 0 : likes}</CounterData>
      </li>
      <li>
        <Comment title="Mentions" />{' '}
        <CounterData>{Number.isNaN(mentions) ? 0 : mentions}</CounterData>
      </li>
    </MentionCounter>
  )
}

Thanks to SWR, even though we are using two instances of the WebmentionsCounter component, only one request is made and they both profit from the same cache.

Feel free to peek at my source code to see what’s happening:

Display the mentions

Now that we have placed the component, it’s time to get all that social juice flowing!

At of the time of this writing, useSWRpages is not documented. Add to that the fact that the webmention.io endpoint doesn’t offer collection information on a response (i.e. no offset or total number of pages), I couldn’t find a way to use SWR here.

So, my current implementation uses a state to keep the current page stored, another state to handle the mentions array, and useEffect to handle the request. The “Load More” button is disabled once the last request brings back an empty array.

const Webmentions = ({ postUrl }) => {
  const { t } = useTranslation()
  const [page, setPage] = useState(0)
  const [mentions, addMentions] = useState([])


  useEffect(() => {
    const fetchMentions = async () => {
      const olderMentions = await getMentions(page, 50, postUrl)
      addMentions((mentions) => [...mentions, ...olderMentions])
    }
    fetchMentions()
  }, [page])


  return (
    <>
      {mentions.map((mention, index) => (
        <Mention key={mention.data.author.name + index}>
          <AuthorAvatar src={mention.data.author.photo} lazy />
          <MentionContent>
            <MentionText
              data={mention.data}
              activity={mention.activity.type}
            />
          </MentionContent>
        </Mention>
      ))}
      </MentionList>
      {mentions.length > 0 && (
        <MoreButton
          type="button"
          onClick={() => {
          setPage(page + 1)
        }}
        >
        {t('common:more')}
      </MoreButton>
    )}
    </>
  )
}

The code is simplified to allow focus on the subject of this article. Again, feel free to peek at the full implementation:

Step 4: Handling outbound mentions

Thanks to Remy Sharp, handling outbound mentions from one website to others is quite easy and provides an option for each use case or preference possible.

The quickest and easiest way is to head over to Webmention.app, get an API token, and set up a web hook. Now, if you have RSS feed in place, the same thing is just as easy with an IFTT applet, or even a deploy hook.

If you prefer to avoid using yet another third-party service for this feature (which I totally get), Remy has open-sourced a CLI package called wm which can be ran as a postbuild script.

But that’s not enough to handle outbound mentions. In order for our mentions to include more than simply the originating URL, we need to add microformats to our information. Microformats are key because it’s a standardized way for sites to distribute content in a way that Webmention-enabled sites can consume.

At their most basic, microformats are a kind of class-based notations in markup that provide extra semantic meaning to each piece. In the case of a blog post, we will use two kinds of microformats:

  • h-entry: the post entry
  • h-card: the author of the post

Most of the required information for h-entry is usually in the header of the page, so the header component may end up looking something like this:

<header class="h-entry">
  <!-- the post date and time -->
  <time datetime="2020-04-22T00:00:00.000Z" class="dt-published">
    2020-04-22
  </time>
  <!-- the post title -->
  <h1 class="p-name">
    Webmentions with NextJS
  </h1>
</header>

And that’s it. If you’re writing in JSX, remember to replace class with className, that datetime is camelCase (dateTime), and that you can use the new Date('2020-04-22').toISOString() function.

It’s pretty similar for h-card. In most cases (like mine), author information is below the article. Here’s how my page’s footer looks:

<footer class="h-card">
  <!-- the author name -->
  <span class="p-author">Atila Fassina</span>
  <!-- the authot image-->
  <img
    alt="Author’s photograph: Atila Fassina"
    class="u-photo"
    src="/images/internal-avatar.jpg"
    lazy
  />
</footer>

Now, whenever we send an outbound mention from this blog post, it will display the full information to whomever is receiving it.

Wrapping up

I hope this post has helped you getting to know more about Webmentions (or even about IndieWeb as a whole), and perhaps even helped you add this feature to your own website or app. If it did, please consider sharing this post to your network. I will be super grateful! 😉

References

Further reading

The post Jumping Into Webmentions With NextJS (or Not) appeared first on CSS-Tricks.