A Thoughtful Way To Use React’s <code>useRef()</code> Hook

In React components, there are times when frequent changes have to be tracked without enforcing the re-rendering of the component. It can also be that there is a need to re-render the component efficiently. While useState and useReducer hooks are the React API to manage local state in a React component, they can also come at a cost of being called too often making the component to re-render for each call made to the update functions.

In this article, I’ll explain why useState is not efficient for tracking some states, illustrate how useState creates too much re-render of a component, how values that are stored in a variable are not persisted in a component, and last but not least, how useRef can be used keep track of variables without causing re-render of the component. And give a solution on how to enforce re-render without affecting the performance of a component.

After the evolution of functional components, functional components got the ability to have a local state that causes re-rendering of the component once there is an update to any of their local state.

function Card (props) {
  const [toggled, setToggled] = useState(false);

  const handleToggleBody  = () => {
    setToggled(!toggled)
  }

  return (<section className="card">
    <h3 className="card__title" onMouseMove={handleToggleBody}>
       {props.title}
    </h3>

    {toggled && <article className="card__body">
      {props.body}
    </article>}
  </section>)
}

// Consumed as:
<Card name="something" body="very very interesting" />

In the component above, a card is rendered using a section element having a child h3 with a card__title class which holds the title of the card, the body of the card is rendered in an article tag with the body of card__body. We rely on the title and body from the props to set the content of the title and body of the card, while the body is only toggled when the header is hovered over.

Scenario – mouseover event (Large preview)

Re-rendering A Component With useState

Initial rendering of a component is done when a component has its pristine, undiluted state values, just like the Card component, its initial render is when the mouseover event is yet to be triggered. Re-rendering of a component is done in a component when one of its local states or props have been updated, this causes the component to call its render method to display the latest elements based on the state update.

In the Card component, the mousemove event handler calls the handleToggleBody function to update the state negating the previous value of the toggled state.

We can see this scenario in the handleToggleBody function calling the setToggled state update function. This causes the function to be called every time the event is triggered.

Storing State Values In A Variable

A workaround for the repeated re-rendering is using a local variable within the component to hold the toggled state which can also be updated to prevent the frequent re-rendering — which is carried out only when there is an update to local states or props of a component.

function Card (props) {
  let toggled = false;

  const handleToggleBody  = () => {
    toggled = !toggled;
    console.log(toggled);
  }

  return (<section className="card">
    <section className="cardTitle" onMouseMove={handleToggleBody}>
       {title}
    </section>

    {toggled && <article className="cardBody">
      {body}
    </article>}
  </section>)
}

<Card name="something" body="very very interesting" />

This comes with an unexpected behavior where the value is updated but the component is not re-rendered because no internal state or props has changed to trigger a re-render of the component.

Using variable in place of state (Large preview)

Local Variables Are Not Persisted Across Rerender

Let's consider the steps from initial rendering to a re-rendering of a React component.

  • Initially, the component initializes all variables to the default values, also stores all the state and refs to a unique store as defined by the React algorithm.
  • When a new update is available for the component through an update to its props or state, React pulls the old value for states and refs from its store and re-initializes the state to the old value also applying an update to the states and refs that have an update.
  • It then runs the function for the component to render the component with the updated states and refs. This re-rendering will also re-initialize variables to hold their initial values as defined in the component since they are not tracked.
  • The component is then re-rendered.

Below is an example that can illustrate this:

function Card (props) {
  let toggled = false;

  const handleToggleBody = () => {
    toggled = true;
    console.log(toggled);
  };

  useEffect(() => {
    console.log(“Component rendered, the value of toggled is:“, toggled);
  }, [props.title]);

  return (
    <section className=“card”>
      <h3 className=“card__title” onMouseMove={handleToggleBody}>
        {props.title}
      </h3>

      {toggled && <article className=“card__body”>{props.body}</article>}
    </section>
  );
}

// Renders the application
function App () {

  const [cardDetails, setCardDetails] = useState({
    title: “Something”,
    body: “uniquely done”,
  });

  useEffect(() => {
    setTimeout(() => {
      setCardDetails({
        title: “We”,
        body: “have updated something nice”,
      });
    }, 5000); // Force an update after 5s
  }, []);

  return (
    <div>
      <Card title={cardDetails.title} body={cardDetails.body} />
    </div>
  );
}

In the above code, the Card component is being rendered as a child in the App component. The App component is relying on an internal state object named cardDetails to store the details of the card. Also, the component makes an update to the cardDetails state after 5seconds of initial rendering to force a re-rendering of the Card component list.

The Card has a slight behavior; instead of switching the toggled state, it is set to true when a mouse cursor is placed on the title of the card. Also, a useEffect hook is used to track the value of the toggled variable after re-rendering.

Using variable in place of state (second test) (Large preview)

The result after running this code and placing a mouse on the title updates the variable internally but does not cause a re-render, meanwhile, a re-render is triggered by the parent component which re-initializes the variable to the initial state of false as defined in the component. Interesting!

About useRef() Hook

Accessing DOM elements is core JavaScript in the browser, using vanilla JavaScript a div element with class "title" can be accessed using:

<div class="title">
  This is a title of a div
</div>
<script>
  const titleDiv = document.querySelector("div.title")
</script>

The reference to the element can be used to do interesting things such as changing the text content titleDiv.textContent = "this is a newer title" or changing the class name titleDiv.classList = "This is the class" and much more operations.

Overtime, DOM manipulation libraries like jQuery made this process seamless with a single function call using the $ sign. Getting the same element using jQuery is possible through const el = ("div.title"), also the text content can be updated through the jQuery's API: el.text("New text for the title div").

Refs In React Through The useRef Hook

ReactJS being a modern frontend library took it further by providing a Ref API to access its element, and even a step further through the useRef hook for a functional component.

import React, {useRef, useEffect} from "react";

export default function (props) {
  // Initialized a hook to hold the reference to the title div.
  const titleRef = useRef();

  useEffect(function () {
    setTimeout(() => {
      titleRef.current.textContent = "Updated Text"
    }, 2000); // Update the content of the element after 2seconds 
  }, []);

  return <div className="container">
    {/** The reference to the element happens here **/ }
    <div className="title" ref={titleRef}>Original title</div>
  </div>
}
Using Ref to store state (Large preview)

As seen above, after the 2 seconds of the component initial rendering, the text content for the div element with the className of title changes to "Updated text".

How Values Are Stored In useRef

A Ref variable in React is a mutable object, but the value is persisted by React across re-renders. A ref object has a single property named current making refs have a structure similar to { current: ReactElementReference }.

The decision by the React Team to make refs persistent and mutable should be seen as a wise one. For example, during the re-rendering of a component, the DOM element may get updated during the process, then it is necessary for the ref to the DOM element to be updated too, and if not updated, the reference should be maintained. This helps to avoid inconsistencies in the final rendering.

Explicitly Updating The Value Of A useRef Variable

The update to a useRef variable, the new value can be assigned to the .current of a ref variable. This should be done with caution when a ref variable is referencing a DOM element which can cause some unexpected behavior, aside from this, updating a ref variable is safe.

function User() {
  const name = useRef("Aleem");

  useEffect(() => {
    setTimeout(() => {
      name.current = "Isiaka";
      console.log(name);
    }, 5000);
  });

  return <div>{name.current}</div>;
}

Storing Values In useRef

A unique way to implement a useRef hook is to use it to store values instead of DOM references. These values can either be a state that does not need to change too often or a state that should change as frequently as possible but should not trigger full re-rendering of the component.

Bringing back the card example, instead of storing values as a state, or a variable, a ref is used instead.

function Card (props) {

  let toggled = useRef(false);

  const handleToggleBody  = () => {
    toggled.current = !toggled.current;
  }

  return (
    <section className=“card”>
      <h3 className=“card__title” onMouseMove={handleToggleBody}>
        {props.title}
      </h3>

      {toggled && <article className=“card__body”>{props.body}</article>}
    </section>
  );
  </section>)
}

This code gives the desired result internally but not visually. The value of the toggled state is persisted but no re-rendering is done when the update is done, this is because refs are expected to hold the same values throughout the lifecycle of a component, React does not expect them to change.

Shallow And Deep Rerender

In React, there are two rendering mechanisms, shallow and deep rendering. Shallow rendering affects just the component and not the children, while deep rendering affects the component itself and all of its children.

When an update is made to a ref, the shallow rendering mechanism is used to re-render the component.

function UserAvatar (props) {
  return <img src={props.src} />
}

function Username (props) {
  return <span>{props.name}</span>
}

function User () {
  const user = useRef({
    name: "Aleem Isiaka",
    avatarURL: "https://icotar.com/avatar/jake.png?bg=e91e63",
  })

  console.log("Original Name", user.current.name);
  console.log("Original Avatar URL", user.current.avatarURL);

  useEffect(() => {
    setTimeout(() => {
      user.current = {
        name: "Isiaka Aleem",
        avatarURL: "https://icotar.com/avatar/craig.png?s=50", // a new image
      };
    },5000)
  })

  // Both children won't be re-rendered due to shallow rendering mechanism
  // implemented for useRef
  return (<div>
    <Username name={user.name} />
      <UserAvatar src={user.avatarURL} />
  </div>);
}

In the above example, the user's details are stored in a ref which is updated after 5 seconds, the User component has two children, Username to display the user's name and UserAvatar to display the user's avatar image.

After the update has been made, the value of the useRef is updated but the children are not updating their UI since they are not re-rendered. This is shallow re-rendering, and it is what is implemented for useRef hook.

Shallow-rerender (Large preview)

Deep re-rendering is used when an update is carried out on a state using the useState hook or an update to the component's props.

function UserAvatar (props) {
  return <img src={props.src} />
}

function Username (props) {
  return <span>{props.name}</span>
}

function User () {
  const [user, setUser] = useState({
    name: "Aleem Isiaka",
    avatarURL: "https://icotar.com/avatar/jake.png?bg=e91e63",
  });

  useEffect(() => {
    setTimeout(() => {
      setUser({
        name: "Isiaka Aleem",
        avatarURL: "https://icotar.com/avatar/craig.png?s=50", // a new image
      });
    },5000);
  })

  // Both children are re-rendered due to deep rendering mechanism
  // implemented for useState hook
  return (<div>
    <Username name={user.name} />
      <UserAvatar src={user.avatarURL} />
  </div>);
}
Deep rerender (Large preview)

Contrary to the result experienced when useRef is used, the children, in this case, get the latest value and are re-rendered making their UIs have the desired effects.

Forcing A Deep Re-render For useRef Update

To achieve a deep re-render when an update is made to refs, the deep re-rendering mechanism of the useState hook can be partially implemented.

function UserAvatar (props) {
  return <img src={props.src} />
}

function Username (props) {
  return <span>{props.name}</span>
}

function User () {
  const user = useRef({
    name: "Aleem Isiaka",
    avatarURL: "https://icotar.com/avatar/jake.png?bg=e91e63",
  })

  const [, setForceUpdate] = useState(Date.now());

  useEffect(() => {
    setTimeout(() => {
      user.current = {
        name: "Isiaka Aleem",
        avatarURL: "https://icotar.com/avatar/craig.png?s=50", // a new image
      };

      setForceUpdate();
    },5000)
  })
  return (<div>
    <Username name={user.name} />
      <UserAvatar src={user.avatarURL} />
  </div>);
}
Deep + Shallow rerender (Large preview)

In the above improvement to the User component, a state is introduced but its value is ignored since it is not required, while the update function to enforce a rerender of the component is named setForceUpdate to maintain the naming convention for useState hook. The component behaves as expected and re-renders the children after the ref has been updated.

This can raise questions such as:

“Is this not an anti-pattern?”

or

“Is this not doing the same thing as the initial problem but differently?”

Sure, this is an anti-pattern, because we are taking advantage of the flexibility of useRef hook to store local states, and still calling useState hook to ensure the children get the latest value of the useRef variable current value both of which can be achieved with useState.

Yes, this is doing almost the same thing as the initial case but differently. The setForceUpdate function does a deep re-rendering but does not update any state that is acting on the component’s element, which keeps it consistent across re-render.

Conclusion

Frequently updating state in a React component using useState hook can cause undesired effects. We have also seen while variables can be a go-to option; they are not persisted across the re-render of a component like a state is persisted.

Refs in React are used to store a reference to a React element and their values are persisted across re-render. Refs are mutable objects, hence they can be updated explicitly and can hold values other than a reference to a React element.

Storing values in refs solve the problem of frequent re-rendering but brought a new challenge of the component not being updated after a ref’s value has changed which can be solved by introducing a setForceUpdate state update function.

Overall, the takeaways here are:

  • We can store values in refs and have them updated, which is more efficient than useState which can be expensive when the values are to be updated multiple times within a second.
  • We can force React to re-render a component, even when there is no need for the update by using a non-reference useState update function.
  • We can combine 1 and 2 to have a high-performance ever-changing component.

References

Handling Continuous Integration And Delivery With GitHub Actions

Before the invention of CI/CD (Continuous Integration and Continuous Deployment & Delivery), software was generally developed by writing the code using a computer whenever it was time to move the software to production. The RedHat website defines CI/CD to be “a method to frequently deliver apps to customers by introducing automation into the stages of app development. The main concepts attributed to CI/CD are continuous integration, continuous delivery, and continuous deployment.”

In other words, CI/CD is a process that replaces the traditional/manual ways of building and deploying software applications. The CI/CD process is automated and executed once a trigger is met. The trigger is mostly attached to a new git commit to ensure that the latest version of a repository’s code is built and deployed with minimal effort to the developer.

Handling Continuous Integration & Delivery With GitHub Actions

To further understand how continuous integration and delivery work, we will focus on deploying a URL shortener application API server on Heroku using Github Actions. The application is a NodeJS server and supports:

  • Shortening a URL by making a POST request to /shorten with a request body containing the code to identify the URL and a url as the URL to redirect to. If no code is sent, it simply generates a random code and returns it as part of the response.
  • Visiting a shortened link by making a GET request to /:code; the code is the unique code identifier used when shortening the URL.
  • Monitoring analysis by making a GET request to /analysis/:code; the :code is the unique code identifier used when shortening the URL.

We don’t necessarily have to create a new application since we can deploy a private repository that our Github account has access to, but we can also deploy a public repository. The workflow will check out the code from the application repository, add Heroku git remote URL, and finally deploy the application to Heroku.

About Github Actions

Github Actions is one of the services offered by Github Inc. According to the release note:

“GitHub Actions is an API for cause and effect on GitHub: orchestrate any workflow, based on any event, while GitHub manages the execution, provides rich feedback, and secures every step along the way. With GitHub Actions, workflows and steps are just code in a repository, so you can create, share, reuse, and fork your software development practices.”

Github Actions is one of the many options that could be used to implement continuous software deployment and delivery(CI/CD) by ensuring that a new version of a software is shipped to the production or testing area as soon as possible.

Components of Github Actions

Github Actions consists of six main components:

  1. Runners,
  2. Workflows,
  3. Events,
  4. Jobs,
  5. Steps,
  6. Actions.
1. Runners

These are hosted virtual operating systems that could run commands to carry out a build process. Github Actions Runners can be self-hosted or picked from one of the free runners made available by Github which are based on Microsoft Azure’s Standard_DS2_v2 virtual machines.

2. Workflows

These are laid out instructions that give the Github Action application on a runner. Workflow instructions are defined in a YAML file and live inside of the .github/workflows folder in a git repository. The name of a workflow file does not have a correlation with the intention of the file, as Github parses and runs every file inside of the .github/workflows folder.

3. Events

For a Workflow file to be processed and executed, an event is required. An event could be a new push or pr merge, Github actions can listen to a list of events triggered by a repository. As a basic example, we could have a workflow file that listens to the push event of a repository to process a new build of our application.

4. Jobs

Once an event is triggered, the series of steps carried out for that workflow is a step. A job could list a series of steps that run parallel to each other, also they could be configured to run in sequential order.

5. Steps

These are the single elements that make up a job. A step groups the actions that are carried out on a runner.

6. Actions

An action is an element of a step and is basically a command. It is an action that gets executed on the runner, and as such, is the heart of Github Actions. We can have our own custom action such as npm install or leverage on existing actions created by the community such as the checkout action.

Configuring A Workflow For A Node.js Application

In this section, we will deploy a NodeJS application to a remote server. For this case, we will use Heroku as our deployment server hence, we have to create an account and then an application.

Signing Up And Creating An Account On Heroku

Signup for a Heroku account from here and proceed to log in to your account. From the dashboard click on the new button and then create new app. Enter a unique name for the app, and click on the create button.

Log in to your Github account or create a new one if you don’t have one, then create a new Github repository for our app named aleem-urls and clone it locally using git clonegit@github.com:{your-username}/aleem-urls.git.

From the root of our application, create a folder named .github/workflows that will contain all the GitHub action workflows inside this folder create a file named action.yml, this file will hold the instructions for our deployment process to Heroku through our code on Github. We will run the below code in our terminal to achieve this process.

$ cd path/to/repo
$ mkdir .github/workflows
$ touch .github/workflows/action.yml

Next, we will make the .github/workflow/action.yml file have the below content:

name: "Clone URL Shortener Github Actions"

on:
  push:
jobs:
  deploy-url-shortener:
    runs-on: ubuntu-latest
    steps:
      - name: "Checkout limistah:url-shortener"
        uses: actions/checkout@v1
        with:
          repository: "limistah/url-shortener"
          ref: "master"

The above YAML snippet is a typical Github Action workflow, and in that workflow, we have set the name of the workflow in the first line to be “Clone URL Shortener Github Actions” and also listen to a push event on line 3 which will make the workflow to be triggered once a new push is being made to the repository on Github.

The focal point of a Github Action workflow is steps — that could be found under the jobs specification. The above workflow specifies a deploy-url-shortener job, and within it, we have defined where we want the job to run using the runs-on field, and have the commands to be executed inside of the steps fields.

The steps declaration has some sub-items:

  • name field that distinguishes the step;
  • uses field which could be used to import actions from the community;
  • with accept items that stand as arguments to the current action.

In our example workflow, we have a step which we are using to check out a repository that we want to deploy to Heroku. We could have pulled the code to our new repository since Github action can do this for us, we should leverage on that. As we are not forking the repository or using our own personal repository, we are restricted to the features provided by the repository, we can’t make updates or fixes to our deployment except the author of the repository does the update.

To test the workflow, we will commit the change we have (a new file in the .github/workflows/action.yml), and check the Action tab of our repository on https://github.com/{your-username}/easy-urls/actions.

On the Actions page of the repository, we will find all the workflows that we have in it. We can view the details of the workflow by clicking on the name of the workflow.

To the right on a workflow details page, we will find the jobs listed for the particular workflow. We will click on the deploy-url-shortener to find the logs on the runner for the commit push we made. Click on the name of a job(deploy-url-shortener) to list all the steps for the job, also click on the name of a job to see the details of the step.

Looking closely, and inspecting the Checkout limistah:url-shortener step reveals that the current runner has access to the url-shortener code we want to deploy to Heroku.

Authenticating Heroku

To deploy to Heroku, we have to authenticate Heroku on the runner for our deployment workflow. We can use the Auth Token method of authentication by Heroku which stores the email and an auth-token to a .netrc file in the current user’s home directory.

Firstly, ensure that you have Heroku CLI installed, open a shell/terminal/cmd, and use the command heroku login. This should pop a page on your default browser to log in to Heroku by providing your email and password.

Once you are logged in, a file .netrc should have been created in the home directory of the current user attached to the shell, use cat ~/.netrc command to view the content of the file it should follow the format:

machine api.heroku.com
  login me@example.com
  password c4cd94da15ea0544802c2cfd5ec4ead324327430
machine git.heroku.com
  login me@example.com
  password c4cd94da15ea0544802c2cfd5ec4ead324327430

Now, we can get the auth token using heroku auth:token which should output same string as the password in the .netrc file c4cd94da15ea0544802c2cfd5ec4ead324327430.

With this token, we can do authenticated action from any machine and even on our Github Action runner.

Using Secrets To Store Confidential Information

We can store secrets and confidential information without exposing them to the public in our repository by using Encrypted Secrets, we will do this with our Heroku auth token.

From the repository page, click on Settings, then Secrets from the left menu-list, finally, click on Add New Secret. The New Secret page contains a form with Name and Value inputs, enter HEROKU_AUTH_TOKEN as the name and the string provided from the output of heroku auth:token as the value and click on the Add secret button to save the secret. Accessing Secrets

By default, secrets are not made available to workflows and jobs, to have access to secrets, we have to explicitly request for them at the steps that they are required.

In our case, we are deploying to Heroku we have to create a .netrc file for every run of our workflow. We will use the cat command to create the file and have the secret embedded as an environment variable within the content of the file.

`cat >~/.netrc <<EOF
          machine api.heroku.com
              login $EMAIL
              password $HEROKU_AUTH_TOKEN
          machine git.heroku.com
              login $EMAIL
              password $HEROKU_AUTH_TOKEN
          EOF`

We can update our action.yml to look like this:

name: "Clone URL Shortener Github Actions"

on:
  push:
jobs:
  deploy-url-shortener:
    runs-on: ubuntu-latest
    steps:
      - name: "Checkout limistah:url-shortener"
        uses: actions/checkout@v1
        with:
          repository: "limistah/url-shortener"
          ref: "master"
      - name: "Create .netrc for Heroku Auth"
        shell: bash
        run: |
          `cat ≶~/.netrc <<EOF
          machine api.heroku.com
              login $EMAIL
              password $HEROKU_AUTH_TOKEN
          machine git.heroku.com
              login $EMAIL
              password $HEROKU_AUTH_TOKEN
          EOF`
        env:
          EMAIL: me@gmail.com
          HEROKU_AUTH_TOKEN: ${{ secrets.HEROKU_AUTH_TOKEN }}

The env field seems new; it is a method for setting the environment variables that a runner step will have access to. The env var can be any valid string, and could be sourced from the secrets stored in a repository’s settings.

We are setting the HEROKU_AUTH_TOKEN to use the secrets, which we are accessing through the secrets variable provided by Github Actions to access any secret specified for the repository in its Secret Settings.

Adding Heroku To The Remote

Now that we can authenticate a runner, we can carry out authenticated actions using Heroku CLI. We will add Heroku git remote URL to the URL-shortener repository we had pulled in the checkout action through the command heroku git:remote --app app-name for the particular app we have created.

We will append our steps to include the below configuration:

- name: "Add remote"
        shell: "bash"
        run: |
          heroku git:remote --app aleem-urls

Note: The value for aleem-urls should the unique name for the app we created on Heroku.

Deploying The Master Branch

Finally, we can add a step to push the master branch to Heroku for deployment, we will append our workflow steps to include:

- name: "Push to heroku"
        shell: "bash"
        run: |
          git push heroku HEAD:master

The final configuration for the Heroku deployment should look like the below:

name: "Clone URL Shortener Github Actions"

on:
  push:
jobs:
  deploy-url-shortener:
    runs-on: ubuntu-latest
    steps:
      - name: "Checkout limistah:url-shortener"
        uses: actions/checkout@v1
        with:
          repository: "limistah/url-shortener"
          ref: "master"
      - name: "Create .netrc for Heroku Auth"
        shell: bash
        run: |
          `cat >~/.netrc <<EOF
          machine api.heroku.com
              login $EMAIL
              password $HEROKU_AUTH_TOKEN
          machine git.heroku.com
              login $EMAIL
              password $HEROKU_AUTH_TOKEN
          EOF`
        env:
          EMAIL: aleemisiaka@gmail.com
          HEROKU_AUTH_TOKEN: ${{ secrets.HEROKU_AUTH_TOKEN }}
      - name: "Add remote"
        shell: "bash"
        run: |
          heroku git:remote --app aleem-urls
      - name: "Push to heroku"
        shell: "bash"
        run: |
          git push heroku HEAD:master
Testing The Deployment

In order to verify whether our workflow is correct, we have to commit the changes and push the new commit to the repository. We can visualize the processes that were carried out with following steps:

  • On the repo page, Click on the Actions tab;
  • On the Actions page, click the name of our workflow (which should be Clone URL Shortener Github Actions);
  • On the Workflow page, click on the name of the job (i.e. deploy-url-shortener);
  • On the Job page, you will find the workflows that were run. Click on the name of your commit for the deployment to check the output of the action.

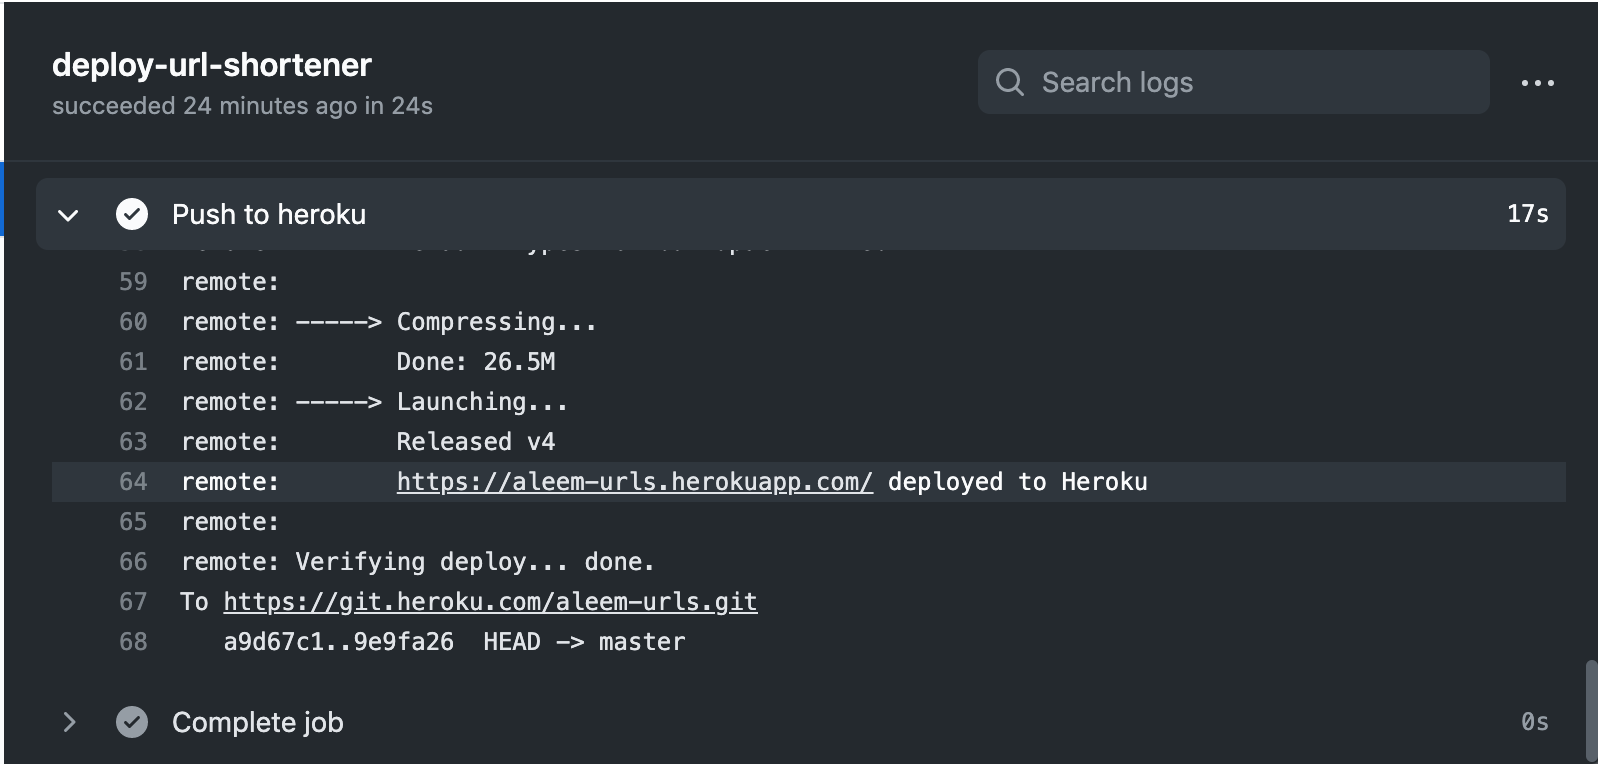
If any of the processes have failed, we can click on the name of the step in order to inspect the logs. We are more interested in the Push to heroku step since that’s the one that informs us whether there has been a successful deployment, and provide us with a URL to access the application.

Visiting the URL https://aleem-urls.herokuapp.com/ should load a status page of the URL-shortener application. Voilà!

Scheduling actions

Github Action can also serve as a cron, which runs workflows at a specific time of the day. We can use this feature to automate the deployment of our application at a certain time of the day, we can achieve this by adding a few instructions to our workflow YAML file.

From the last full version that we had, we need to update the on key item and add a child property, schedule. The schedule item accepts a child item cron which should be set to a value that matches the POSIX cron syntax.

The POSIX cron syntax follows the format:

┌───────────── minute (0 - 59)
│ ┌───────────── hour (0 - 23)
│ │ ┌───────────── day of the month (1 - 31)
│ │ │ ┌───────────── month (1 - 12 or JAN-DEC)
│ │ │ │ ┌───────────── day of the week (0 - 6 or SUN-SAT)
│ │ │ │ │                                   
│ │ │ │ │
│ │ │ │ │
*  *  *  *  *

We can also use * in place of the numeric value for every unit if we want that section to match every possible value. For example, we can set a cron to run every day using 0 24 * * *, so we can translate the time format to mean:

0 The exact second 0 for the matched time.
24 The 24th hour from the start time.
* Matches every possible day in the month.
* Matches every possible month in a year.
* Matches every day of a week.

Another cool feature we can achieve with POSIX cron time format is that we can instruct a cron to run at a fraction of a time unit. For example, we can have a cron to run every 2 minutes (the format would be */2 * * * *) or have it run every day of a month (the format would be 0 0 */1 * *). The */fractional-unit helps to create repeated cron tasks that run when a fraction of the specified time unit is matched. Github has great documentation on the possible formats we can have using cron to schedule our workflows. We can also create and verify a cron syntax using https://crontab.guru.

For our use case, we want to deploy our application every 10 minutes. Our cron time format would then be */10 * * * *, so the final workflow file should look like this:

name: "Clone URL Shortener Github Actions"

on:
  push:
  schedule:
    - cron: "*/10 * * * *"
jobs:
  deploy-url-shortener:
    runs-on: ubuntu-latest
    steps:
      - name: "Checkout limistah:url-shortener"
        uses: actions/checkout@v1
        with:
          # Repository name with owner. For example, actions/checkout
          # Default: ${{ github.repository }}
          repository: "limistah/url-shortener"
          ref: "master"
      - name: "Create .netrc for Heroku Auth"
        shell: bash
        run: |
          `cat >~/.netrc <<EOF
          machine api.heroku.com
              login $EMAIL
              password $HEROKU_AUTH_TOKEN
          machine git.heroku.com
              login $EMAIL
              password $HEROKU_AUTH_TOKEN
          EOF`
        env:
          EMAIL: aleemisiaka@gmail.com
          HEROKU_AUTH_TOKEN: ${{ secrets.HEROKU_AUTH_TOKEN }}
      - name: "Add remote"
        shell: "bash"
        run: |
          heroku git:remote --app aleem-urls
      - name: "Push to heroku"
        shell: "bash"
        run: |
          git push heroku HEAD:master

At this point, we will commit and push this change, then head over to Github to monitor this workflow by clicking on the Actions, then clicking the name of the workflow (Clone URL Shortener Github Actions), then the name of the job we want to inspect (deploy-url-shortener) and finally click on an action from the list of actions for the current job.

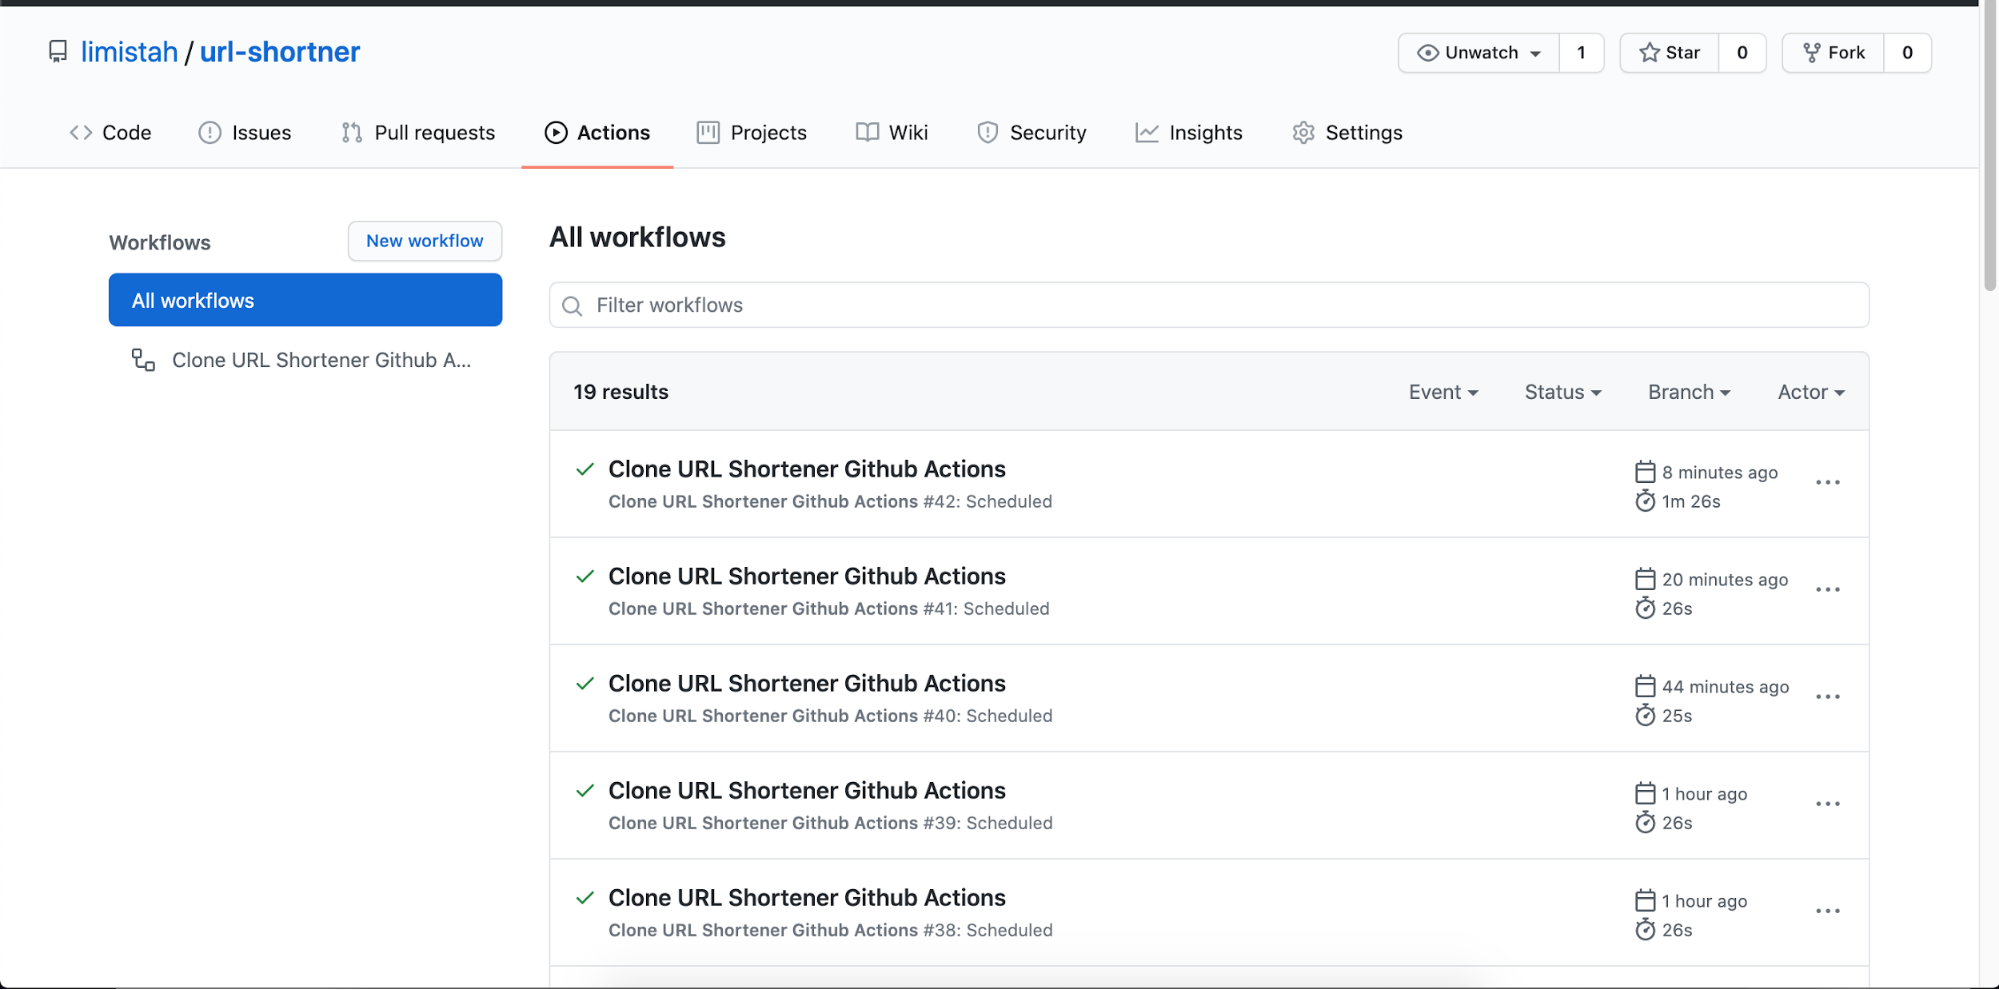
We can monitor the result of this scheduled process from the Github Action dashboard where we will see the logs of our scheduled action running at the specified time we had set using the POSIX time syntax.

Leveraging on the readily available actions

In the last section of this post, we deployed a NodeJS application to Heroku although we could have other applications following this workflow process with just a few changes. The changes that we could have are the following:

  • The name of the app on Heroku;
  • The repository where the code to deploy lives.

Copying the workflow file over many repositories for deployment could become repetitive, also, the original workflow we would be duplicating could have an error, making us copy errors over our workflows and deployments.

We can avert the scenario above by reusing our actions or leverage on the actions created by the community. In fact, we had used a community developed action in our workflow file named checkout.

We can do this to deploy our application to Heroku by using a community developed action named Deploy to Heroku.

To import this action, we have to update the steps section of our deploy job to have the below code:

- uses: akhileshns/heroku-deploy@v3.5.7 # This is the action we are importing
  with: # It accepts some arguments to work, we can pass the argument using with
    heroku_api_key: ${{secrets.HEROKU_AUTH_TOKEN}} # This is the same as the auth key we generated earlier
    heroku_app_name: "aleem-urls" #Must be unique in Heroku
    heroku_email: "me@email.com" # Email attached to the account

We don’t want double deploys; we would rather update the deploy action of our workflow with this new version using reusable action.

The final workflow file would look like this:

name: "Clone URL Shortener Github Actions"

on:
  push:
  schedule:
    - cron: "*/30 * * * *"
jobs:
  deploy-url-shortener:
    runs-on: ubuntu-latest
    steps:
      - name: "Checkout limistah:url-shortener"
        uses: actions/checkout@v1
        with:
          # Repository name with owner. For example, actions/checkout
          # Default: ${{ github.repository }}
          repository: "limistah/url-shortener"
          ref: "master"
      - name: "Create .netrc for Heroku Auth"
        uses: akhileshns/heroku-deploy@v3.5.7 # This is the action we are importing
        with: # It accepts some arguments to work, we can pass the argument using with
          heroku_api_key: ${{secrets.HEROKU_AUTH_TOKEN}} # This is the same as the auth key we generated earlier
          heroku_app_name: "aleem-urls" #Must be unique in Heroku
          heroku_email: "aleemisiaka@gmail.com" # Email attached to the account

We will commit this new change and then push, then wait for the scheduled time for our cron to verify the result of our action.

Using reusable actions does not only make our workflow more readable; it also ensures it functions in a predictable manner and we have just a few places to look out for errors in any case we run into unexpected results.

Aside from the many available custom actions from the community which could be found at the Github Actions Marketplace, we can also create our own by following the guide by Github on how to create custom actions for each use case that is available.

Conclusion

In this tutorial, we have explored CI/CD and used Github Actions as our CI/CD provider to deploy a NodeJS application from a Github repository to Heroku.

We could have achieved this same process with other CI/CD providers but Github has some features that make it a great choice for developers. Aside from being a part of software development tools, Github Actions was created to follow the open-source idea of Github by ensuring that reusable actions can be shared across the community, which in turn reduces the time it takes to deploy a CI/CD pipeline for an application.

The scheduled event trigger is another edge that makes Github Action stand as a good choice, a unique utilization of this is a weather repository by ruanyf which sends the weather report for the day directly to an email at a specific time of the day. (This is possible by using a scheduled event trigger.)

Aside from the setup being very simple through a structured YAML file, Github Action is a great CI/CD option considering the level of flexibility it provides its users.

References

Advanced GraphQL Usage In Gatsby Websites

Before the release of GraphQL in 2015, Representational State Transfer (REST) was the main way to interface with an API. The introduction of GraphQL was therefore a major change in software development.

As a modern static site generator, Gatsby leverages GraphQL to provide a concise methodology for bringing in and manipulating data into the framework. In this article, we will take a closer look at GraphQL and how we can integrate it into a Gatsby website by building and implementing advanced data sourcing and transformation in Gatsby. The result is a publisher’s blog that could be used by any publishing firm to share content of their authors.

What Is GraphQL?

Going by the _QL_ in its name, GraphQL is a query language combined with a set of tools created to provide flexibility and efficiency in the way we pull data from a source. With GraphQL, a client/consumer can request exactly the data it requires. The server/provider responds with a JSON response signature matching the requirements specified in the query. It allows us to express our data needs declaratively.

Why Use GraphQL?

As a static site generator, Gatsby stores static files, which makes querying data close to impossible. There are often page components that have to be dynamic like the single blog post page, so the need to pull data from a source and transform it to the needed format would arise, just like having blog posts stored in markdown files. Some plugins provide data from various sources, which leaves you with querying and transforming the required data from a source.

According to a list on gatsby.org, GraphQL is useful in Gatsby to:

  • Eliminate boilerplate
  • Push frontend complexities into queries
  • Provide a perfect solution for the always complex data of a modern-day application
  • Finally, to remove code bloat, thereby improving performance.

GraphQL Concepts

Gatsby maintains the same ideas of GraphQL as widely used; some of these concepts are:

Schema Definition Language

GraphQL SDL is a type system incorporated into GraphQL, and you can use it to create new types for your data.

We can declare a type for a country, and its attributes could include a name, continent, population, gdp and number of states.

As an example below, we have created a new type with the name of Aleem. It has hobbies which is an array of strings and are not required, but country, marital status, and posts are needed due to the ! they include, also posts references another type, Post.

type Authors {
  name: String!,
  hobbies: [String]
  country: String!
  married: Boolean!
  posts: [Post!]
}

type Post {
  title: String!
  body: String!
}

type Query {
  author: Author
}

schema {
  query: Query
}

Queries

We can use Queries to pull data from a GraphQL source.

Considering a data set like the below

{
  data: {
    author: [
      {
        hobbies: ["travelling", "reading"],
        married: false,
        country: "Nigeria",
        name: "Aleem Isiaka",
        posts: [
          {
            title: "Learn more about how to improve your Gatsby website",
          },
          {
            title: "The ultimate guide to GatsbyJS",
          },
          {
            title: "How to start a blog with only GatsbyJS",
          },
        ],
      },
    ],
  },
};

We can have a query that to fetch the country and posts from the data:

query {
  authors {
    country,
    posts {
      title
    }
  }
}

The response that we will get should contain JSON data of blog posts with just the title and nothing more:

[
  { country: “Nigeria”, posts: [{...}, {...}, {...}] },
  { country: “Tunisia”, posts: [] },
  { title: “Ghana”, posts: []},
]

We can also use arguments as conditions for a query:

query {
  authors (country: “Nigeria”) {
    country,
    posts {
      title
    }
  }
}

Which should return

[
  { country: “Nigeria”, posts: [{...}, {...}, {...}] }
]

Nested fields can also be queried, like the posts with the Post type, you can ask for just the titles:

query {
  authors(country: ‘Nigeria’) {
    country,
    posts {
      title
    }
  }
}

And it should return any Author type matching Nigeria returning the country and posts array containing objects with just the title field.

Gatsby with GraphQL

To avoid the overhead of having a server/service that serves data that GraphQL can transform, Gatsby executes GraphQL queries at build time. Data is provided to the components during the build process, making them readily available inside the browser without a server.

Still, Gatsby can run as a server that can be queried by other GraphQL clients, like GraphiQL, in a browser.

Gatsby Ways Of Interacting With GraphQL

There are two places where Gatsby can interact with GraphQL, through a gatsby-node.js API file, and through page components.

gatsby-node.js

The createPage API can be configured as a function which will receive a graphql helper as part of the items in the first argument passed to the function.

// gatsby-node.js source: https://www.gatsbyjs.org/docs/node-apis/#createPages
exports.createPages = async ({ graphql, actions }) => {
  const result = await graphql(query loadPagesQuery ($limit: Int!) {
      allMarkdownRemark(limit: $limit) {
        edges {
          node {
            frontmatter {
              slug
            }
          }
        }
      }
    })
}

In the above code, we have used the GraphQL helper to fetch markdown files from Gatsby’s data layer. And we can inject this to create a page and modify existing data inside the Gatsby data layer.

Page Components

Page components inside of /pages directory or templates rendered by the createPage API action can import graphql from the gatsby module and export a pageQuery. In turn, Gatsby would inject a new prop data into the props of the page component containing the resolved data.

import React from "react";
import { graphql } from "gatsby";

const Page = props => {
  return 
{JSON.stringify(props.data)}
; }; export const pageQuery = graphql` query { ... } `; export default Page;
In Other Components

Other components can import graphql and StaticQuery components from the gatsby module, render the &lt;StaticQuery/> passing query props that implement the Graphql helper and render to get the returned data.

import React from "react";
import { StaticQuery, graphql } from "gatsby";

const Brand = props => {
  return (
    <div>
      <h1>{data.site.siteMetadata.title}</h1>
    </div>
  );
};

const Navbar = props => {
  return (
    <StaticQuery
      query={graphql`
        query {
          site {
            siteMetadata {
              title
            }
          }
        }
      `}
      render={data => <Brand data={data} {...props} />}
    />
  );
};

export default Navbar;

Building A Modern And Advanced Gatsby Publishing Blog

In this section we will walk through a process of creating a blog that supports tagging, categorization, pagination and grouping articles by authors. We will use plugins of Gatsby’s ecosystem to bring in some features and use logics in GraphQL queries to make a publisher’s blog that is ready for multiple author publications.

The final version of the blog we will build can be found here, also the code is hosted on Github.

Initializing The Project

Like any Gatsby website, we initialize from a starter, here we will be using the advanced starter but modified to cater for our use case.

First clone this Github repo, change the working branch to the dev-init, and then run npm run develop from the project’s folder to start the development server making the site available at http://localhost:8000.

git clone git@github.com:limistah/modern-gatsby-starter.git 
cd modern-gatsby-starter
git checkout dev-init
npm install
npm run develop

Visiting http://localhost:8000 will show the default homepage for this branch.

Creating Blog Posts Content

Some post content included in the project repository could be accessed at the dev-blog-content branch. The organization of the content directory looks like this /content/YYYY_MM/DD.md, which group posts by the created month of a year.

The blog post content has title, date, author, category, tags as its frontmatter, which we will use to distinguish a post and do some further processing on, while the rest of the content is the body of the post.

title: "Bold Mage"
date: "2020-07-12"
author: "Tunde Isiaka"
category: "tech"
tags:
  - programming
  - stuff
  - Ice cream
  - other
---

# Donut I love macaroon chocolate bar

Oat cake marshmallow lollipop fruitcake I love jelly-o. Gummi bears cake wafer chocolate bar pie. Marshmallow pastry powder chocolate cake candy chupa chups. Jelly beans powder soufflé biscuit pie macaroon chocolate cake. Marzipan lemon drops chupa chups sweet cookie sesame snaps jelly halvah.

Displaying Post Content

Before we can render our Markdown posts in HTML, we have to do some processing. First, loading the files into the Gatsby storage, parsing the MD to HTML, linking image dependencies, and likes. To ease this, we will use a host of plugins by the Gatsby ecosystem.

We can use these plugins by updating the gatsby-config.js at the root of the project to look like this:

module.exports = {
  siteMetadata: {},
  plugins: [
    {
      resolve: "gatsby-source-filesystem",
      options: {
        name: "assets",
        path: `${__dirname}/static/`,
      },
    },
    {
      resolve: "gatsby-source-filesystem",
      options: {
        name: "posts",
        path: `${__dirname}/content/`,
      },
    },
    {
      resolve: "gatsby-transformer-remark",
      options: {
        plugins: [
          {
            resolve: `gatsby-remark-relative-images`,
          },
          {
            resolve: "gatsby-remark-images",
            options: {
              maxWidth: 690,
            },
          },
          {
            resolve: "gatsby-remark-responsive-iframe",
          },
          "gatsby-remark-copy-linked-files",
          "gatsby-remark-autolink-headers",
          "gatsby-remark-prismjs",
        ],
      },
    },
  ],
};

We have instructed gatsby to include the plugins to assist us in carrying out some actions, notably pulling files from the /static folder for static files and /content for our blog posts. Also, we have included a remark transformer plugin to transform all files ending with .md or .markdown into a node with all the fields of remark for rendering markdown as HTML.

Lastly, we included plugins in operating on the nodes generated by gatsby-transformer-remark.

Implementing The gatsby-config.js API File

Moving forward, inside of gatsby-node.js in the project root, we can export a function named createPage and have the content of the function to use the graphQL helper to pull nodes from the content layer of GatsbyJS.

The first update to this page would include ensuring that we have a slug set on the MarkDown remark nodes. We will listen to the onCreateNode API and get the node created to determine if it is a type of MarkdownRemark before we update the node to include a slug and date accordingly.

const path = require("path");
const _ = require("lodash");
const moment = require("moment");

const config = require("./config");

// Called each time a new node is created
exports.onCreateNode = ({ node, actions, getNode }) => {
  // A Gatsby API action to add a new field to a node
  const { createNodeField } = actions;
  // The field that would be included
  let slug;
  // The currently created node is a MarkdownRemark type
  if (node.internal.type === "MarkdownRemark") {
    // Recall, we are using gatsby-source-filesystem?
    // This pulls the parent(File) node,
    // instead of the current MarkdownRemark node
    const fileNode = getNode(node.parent);
    const parsedFilePath = path.parse(fileNode.relativePath);
    if (
      Object.prototype.hasOwnProperty.call(node, "frontmatter") &&
      Object.prototype.hasOwnProperty.call(node.frontmatter, "title")
    ) {
      // The node is a valid remark type and has a title,
      // Use the title as the slug for the node.
      slug = /${_.kebabCase(node.frontmatter.title)};
    } else if (parsedFilePath.name !== "index" && parsedFilePath.dir !== "") {
      // File is in a directory and the name is not index
      // e.g content/2020_02/learner/post.md
      slug = /${parsedFilePath.dir}/${parsedFilePath.name}/;
    } else if (parsedFilePath.dir === "") {
      // File is not in a subdirectory
      slug = /${parsedFilePath.name}/;
    } else {
      // File is in a subdirectory, and name of the file is index
      // e.g content/2020_02/learner/index.md
      slug = /${parsedFilePath.dir}/;
    }

    if (Object.prototype.hasOwnProperty.call(node, "frontmatter")) {
      if (Object.prototype.hasOwnProperty.call(node.frontmatter, "slug"))
        slug = /${_.kebabCase(node.frontmatter.slug)};
      if (Object.prototype.hasOwnProperty.call(node.frontmatter, "date")) {
        const date = moment(new Date(node.frontmatter.date), "DD/MM/YYYY");
        if (!date.isValid)
          console.warn(WARNING: Invalid date., node.frontmatter);
        // MarkdownRemark does not include date by default

        createNodeField({ node, name: "date", value: date.toISOString() });
      }
    }
    createNodeField({ node, name: "slug", value: slug });
  }
};

The Post Listing

At this point, we can implement the createPages API to query for all markdowns and create a page with the path as the slug we have created above. See it on Github.

//gatsby-node.js
// previous code

// Create Pages Programatically!
exports.createPages = async ({ graphql, actions }) => {
  // Pulls the createPage action from the Actions API
  const { createPage } = actions;

  // Template to use to render the post converted HTML
  const postPage = path.resolve("./src/templates/singlePost/index.js");

  // Get all the markdown parsed through the help of gatsby-source-filesystem and gatsby-transformer-remark
  const allMarkdownResult = await graphql({
      allMarkdownRemark {
        edges {
          node {
            fields {
              slug
            }
            frontmatter {
              title
              tags
              category
              date
              author
            }
          }
        }
      }
    });

  // Throws if any error occur while fetching the markdown files
  if (allMarkdownResult.errors) {
    console.error(allMarkdownResult.errors);
    throw allMarkdownResult.errors;
  }

  // Items/Details are stored inside of edges
  const postsEdges = allMarkdownResult.data.allMarkdownRemark.edges;

  // Sort posts
  postsEdges.sort((postA, postB) => {
    const dateA = moment(
      postA.node.frontmatter.date,
      siteConfig.dateFromFormat
    );

    const dateB = moment(
      postB.node.frontmatter.date,
      siteConfig.dateFromFormat
    );

    if (dateA.isBefore(dateB)) return 1;
    if (dateB.isBefore(dateA)) return -1;

    return 0;
  });

  // Pagination Support for posts
  const paginatedListingTemplate = path.resolve(
    "./src/templates/paginatedListing/index.js"
  );

  const { postsPerPage } = config;
  if (postsPerPage) {
    // Get the number of pages that can be accommodated
    const pageCount = Math.ceil(postsEdges.length / postsPerPage);

    // Creates an empty array
    Array.from({ length: pageCount }).forEach((value, index) => {
      const pageNumber = index + 1;
      createPage({
        path: index === 0 ? /posts : /posts/${pageNumber}/,
        component: paginatedListingTemplate,
        context: {
          limit: postsPerPage,
          skip: index * postsPerPage,
          pageCount,
          currentPageNumber: pageNumber,
        },
      });
    });
  } else {
    // Load the landing page instead
    createPage({
      path: /,
      component: landingPage,
    });
  }
};

In the createPages function, we use the graphql helper provided by Gatsby to query data from the content layer. We used a standard Graphql query to do this and passed a query to get content from allMarkdownRemark type. Then moved forward to sort the posts by the created date.

We then pulled a postPerPage property from an imported config object, which is used to chunk down the total posts to the specified number of posts for a single page.

To create a listing page that supports pagination, we need to pass in the limit, pageNumber, and the number of pages to skip to the component that would be rendering the list. We are achieving this using the context property of the createPage config object. We will be accessing these properties from the page to make another graphql query to fetch posts within the limit.

We can also notice that we use the same template component for the listing, and only the path is changing utilizing the index of the chunk array we had defined ahead. Gatsby will pass the necessary data for a given URL matching /{chunkIndex}, so we can have / for the first ten posts, and /2 for the next ten posts.

Rendering Post Listing

The component rendering these pages could be found at src/templates/singlePost/index.js of the project folder. It also exports a graphql helper which pulls the limit and page query parameter it received from the createPages process to query gatsby for posts within the range of the current page.

import React from "react";
import { graphql, Link } from "gatsby";
import Layout from "../../layout";
import PostListing from "../../components/PostListing";
import "./index.css";

const Pagination = ({ currentPageNum, pageCount }) => {
  const prevPage = currentPageNum - 1 === 1 ? "/" : /${currentPageNum - 1}/;
  const nextPage = /${currentPageNum + 1}/;
  const isFirstPage = currentPageNum === 1;
  const isLastPage = currentPageNum === pageCount;

  return (
    <div className="paging-container">
      {!isFirstPage && <Link to={prevPage}>Previous</Link>}
      {[...Array(pageCount)].map((_val, index) => {
        const pageNum = index + 1;
        return (
          <Link
            key={listing-page-${pageNum}}
            to={pageNum === 1 ? "/" : /${pageNum}/}
          >
            {pageNum}
          </Link>
        );
      })}
      {!isLastPage && <Link to={nextPage}>Next</Link>}
    </div>
  );
};

export default (props) => {
  const { data, pageContext } = props;
  const postEdges = data.allMarkdownRemark.edges;
  const { currentPageNum, pageCount } = pageContext;

  return (
    <Layout>
      <div className="listing-container">
        <div className="posts-container">
          <PostListing postEdges={postEdges} />
        </div>

        <Pagination pageCount={pageCount} currentPageNum={currentPageNum} />
      </div>
    </Layout>
  );
};

/* eslint no-undef: "off" */
export const pageQuery = graphqlquery ListingQuery($skip: Int!, $limit: Int!) {
    allMarkdownRemark(
      sort: { fields: [fields___date], order: DESC }
      limit: $limit
      skip: $skip
    ) {
      edges {
        node {
          fields {
            slug
            date
          }
          excerpt
          timeToRead
          frontmatter {
            title
            tags
            author
            category
            date
          }
        }
      }
    }
  };

The Post Page

To view the content of a page, we need to programmatically create the page inside the gatsby-node.js API File. First, we have to define a new component to render the content with, for this, we have src/templates/singlePost/index.jsx.

import React from "react";
import { graphql, Link } from "gatsby";
import _ from "lodash";
import Layout from "../../layout";
import "./b16-tomorrow-dark.css";
import "./index.css";
import PostTags from "../../components/PostTags";

export default class PostTemplate extends React.Component {
  render() {
    const { data, pageContext } = this.props;
    const { slug } = pageContext;
    const postNode = data.markdownRemark;
    const post = postNode.frontmatter;
    if (!post.id) {
      post.id = slug;
    }

    return (
      <Layout>
        <div>
          <div>
            <h1>{post.title}</h1>
            <div className="category">
              Posted to{" "}
              <em>
                <Link
                  key={post.category}
                  style={{ textDecoration: "none" }}
                  to={/category/${_.kebabCase(post.category)}}
                >
                  <a>{post.category}</a>
                </Link>
              </em>
            </div>
            <PostTags tags={post.tags} />
            <div dangerouslySetInnerHTML={{ __html: postNode.html }} />
          </div>
        </div>
      </Layout>
    );
  }
}

/* eslint no-undef: "off" */
export const pageQuery = graphqlquery BlogPostBySlug($slug: String!) {
    markdownRemark(fields: { slug: { eq: $slug } }) {
      html
      timeToRead
      excerpt
      frontmatter {
        title
        date
        category
        tags
      }
      fields {
        slug
        date
      }
    }
  };

Again, we are using a graphQL helper to pull out a page by a slug query that would be sent to the page through the createPages API.

Next, we should have the below code added to gatsby-node.js at the end of the createPages API function.

// Template to use to render the post converted HTML
  const postPage = path.resolve("./src/templates/singlePost/index.jsx");

// Loops through all the post nodes
postsEdges.forEach((edge, index) => {
  // Create post pages
  createPage({
    path: edge.node.fields.slug,
    component: postPage,
    context: {
      slug: edge.node.fields.slug,
    },
  });
});

And we could visit ‘/{pageSlug}’ and have it render the content of the markdown file for that page as HTML. As an example, http://localhost:8000/the-butterfly-of-the-edge should load the converted HTML for the markdown at: content/2020_05/01.md, similar to all valid slugs. Great!

Rendering Categories And Tags

The single post template component has a link to a page in the format /categories/{categoryName} to list posts with similar categories.

We can first catch all the categories and tags as we build the single post page in the gatsby-node.js file, then create pages for each caught category/tag passing the category/tag name.

A modification to the section for creating single post page in the gatsby-node.js looks like this:

const categorySet = new Set();
const tagSet = new Set();


const categoriesListing = path.resolve(
  "./src/templates/categoriesListing/index.jsx"
);
// Template to use to render posts based on categories
const tagsListingPage = path.resolve("./src/templates/tagsListing/index.jsx");

// Loops through all the post nodes
postsEdges.forEach((edge, index) => {
  // Generate a list of categories
  if (edge.node.frontmatter.category) {
    categorySet.add(edge.node.frontmatter.category);
  }

  // Generate a list of tags
  if (edge.node.frontmatter.tags) {
    edge.node.frontmatter.tags.forEach((tag) => {
      tagSet.add(tag);
    });
  }

  // Create post pages
  createPage({
    path: edge.node.fields.slug,
    component: postPage,
    context: {
      slug: edge.node.fields.slug,
    },
  });
});

And inside the component for listing posts by tags, we can have the pageQuery export query graphql for posts, including that tag in its tags list. We will use the filter function of graphql and the $in operator to achieve this:

// src/templates/tagsListing/

import React from "react";
import { graphql } from "gatsby";
import Layout from "../../layout";
import PostListing from "../../components/PostListing";

export default ({ pageContext, data }) => {
  const { tag } = pageContext;
  const postEdges = data.allMarkdownRemark.edges;
  return (
    <Layout>
      <div className="tag-container">
        <div>Posts posted with {tag}</div>
        <PostListing postEdges={postEdges} />
      </div>
    </Layout>
  );
};

/* eslint no-undef: "off" */
export const pageQuery = graphql`
  query TagPage($tag: String) {
    allMarkdownRemark(
      limit: 1000
      sort: { fields: [fields___date], order: DESC }
      filter: { frontmatter: { tags: { in: [$tag] } } }
    ) {
      totalCount
      edges {
        node {
          fields {
            slug
            date
          }
          excerpt
          timeToRead
          frontmatter {
            title
            tags
            author
            date
          }
        }
      }
    }
  }
`;

And we have the same process in the categories listing component, and the difference is that we only need to find where the categories match precisely with what we pass to it.

// src/templates/categoriesListing/index.jsx
import React from "react";
import { graphql } from "gatsby";
import Layout from "../../layout";
import PostListing from "../../components/PostListing";

export default ({ pageContext, data }) => {
  const { category } = pageContext;
  const postEdges = data.allMarkdownRemark.edges;
  return (
    <Layout>
      <div className="category-container">
        <div>Posts posted to {category}</div>
        <PostListing postEdges={postEdges} />
      </div>
    </Layout>
  );
};

/* eslint no-undef: "off" */
export const pageQuery = graphql`
  query CategoryPage($category: String) {
    allMarkdownRemark(
      limit: 1000
      sort: { fields: [fields___date], order: DESC }
      filter: { frontmatter: { category: { eq: $category } } }
    ) {
      totalCount
      edges {
        node {
          fields {
            slug
            date
          }
          excerpt
          timeToRead
          frontmatter {
            title
            tags
            author
            date
          }
        }
      }
    }
  }
`;

Noticeable, inside both of the tags and categories components, we render links to the single post page for further reading of a post’s content.

Adding Support For Authors

To support multiple authors, we have to make some modifications to our post content and introduce new concepts.

Load JSON Files

First, we should be able to store the content of authors in a JSON file like this:

{
  "mdField": "aleem",
  "name": "Aleem Isiaka",
  "email": "aleem.isiaka@gmail.com",
  "location": "Lagos, Nigeria",
  "avatar": "https://api.adorable.io/avatars/55/abott@adorable.png",
  "description": "Yeah, I like animals better than people sometimes... Especially dogs. Dogs are the best. Every time you come home, they act like they haven’t seen you in a year. And the good thing about dogs... is they got different dogs for different people.",
  "userLinks": [
    {
      "label": "GitHub",
      "url": "https://github.com/limistah/modern-gatsby-starter",
      "iconClassName": "fa fa-github"
    },
    {
      "label": "Twitter",
      "url": "https://twitter.com/limistah",
      "iconClassName": "fa fa-twitter"
    },
    {
      "label": "Email",
      "url": "mailto:aleem.isiaka@gmail.com",
      "iconClassName": "fa fa-envelope"
    }
  ]
}

We would be storing them in an author’s directory in the root of our project as /authors. Notice that the author JSON has mdField that would be the unique identifier to the author field we will be introducing to the markdown blog content; this ensures that authors can have multiple profiles.

Next, we have to update gatsby-config.js plugins instructing gatsby-source-filesystem to load the content from the authors/ directory into the Files Node.

// gatsby-config.js
{
  resolve: `gatsby-source-filesystem`,
  options: {
    name: "authors",
    path: `${__dirname}/authors/`,
  },
}

Lastly, we will install gatsby-transform-json to transform JSON files created for easy handling and proper processing.

npm install gatsby-transformer-json --save

And include it inside the plugins of gatsby-config.js,

module.exports = {
  plugins: [
    // ...other plugins
    `gatsby-transformer-json`
  ],
};

Querying And Creating Authors Page

To begin with, we need to query all of the authors in our authors/ directory inside of gatsby-config.js that have been loaded into the data layer, we should append the code below to createPages API function

const authorsListingPage = path.resolve(
  "./src/templates/authorsListing/index.jsx"
);

const allAuthorsJson = await graphql(`
  {
    allAuthorsJson {
      edges {
        node {
          id
          avatar
          mdField
          location
          name
          email
          description
          userLinks {
            iconClassName
            label
            url
          }
        }
      }
    }
  }
`);

const authorsEdges = allAuthorsJson.data.allAuthorsJson.edges;
authorsEdges.forEach((author) => {
  createPage({
    path: `/authors/${_.kebabCase(author.node.mdField)}/`,
    component: authorsListingPage,
    context: {
      authorMdField: author.node.mdField,
      authorDetails: author.node,
    },
  });
});

In this snippet, we are pulling all the authors from the allAuthorsJson type, then, calling forEach on the nodes to create a page where we pass the mdField to distinguish the author and the authorDetails for full information about the author.

Rendering Author’s Posts

In the component rendering the page which could be found at src/templates/authorsListing/index.jsx, we have the below content for the file

import React from "react";
import { graphql } from "gatsby";
import Layout from "../../layout";
import PostListing from "../../components/PostListing";
import AuthorInfo from "../../components/AuthorInfo";

export default ({ pageContext, data }) => {
  const { authorDetails } = pageContext;
  const postEdges = data.allMarkdownRemark.edges;
  return (
    <Layout>
      <div>
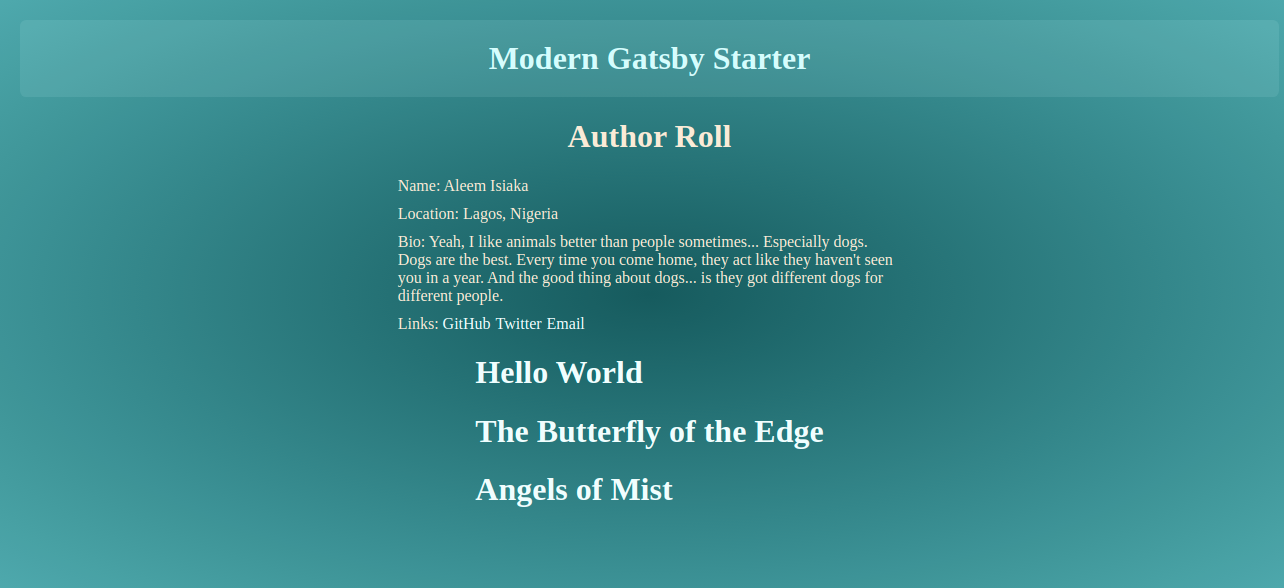
        <h1 style={{ textAlign: "center" }}>Author Roll</h1>
        <div className="category-container">
          <AuthorInfo author={authorDetails} />
          <PostListing postEdges={postEdges} />
        </div>
      </div>
    </Layout>
  );
};

/* eslint no-undef: "off" */
export const pageQuery = graphql`
  query AuthorPage($authorMdField: String) {
    allMarkdownRemark(
      limit: 1000
      sort: { fields: [fields___date], order: DESC }
      filter: { frontmatter: { author: { eq: $authorMdField } } }
    ) {
      totalCount
      edges {
        node {
          fields {
            slug
            date
          }
          excerpt
          timeToRead
          frontmatter {
            title
            tags
            author
            date
          }
        }
      }
    }
  }
`;

In the above code, we exported the pageQuery like we do, to create a GraphQL query to fetch posts matched by an author, we are using the $eq operator to achieve this are generating links to a single post page for further reading.

Conclusion

In Gatsby, we can query any data that exists inside of its data access layer with the use of GraphQL query and pass variables around using some constructs defined by the architecture of Gatsby. we have seen how we could use the graphql helper in various places and understand widely used patterns for querying data in Gatsby’s websites with the help of GraphQL.

GraphQL is very powerful and could do other things like data mutation on a server. Gatsby does not need to update its data at runtime, so it does not support the mutation feature of GraphQL.

GraphQL is a great technology, and Gatsby makes it very interesting to use in their framework.

References

Understanding Plugin Development In Gatsby

Understanding Plugin Development In Gatsby

Understanding Plugin Development In Gatsby

Aleem Isiaka

Gatsby is a React-based static-site generator that has overhauled how websites and blogs are created. It supports the use of plugins to create custom functionality that is not available in the standard installation.

In this post, I will introduce Gatsby plugins, discuss the types of Gatsby plugins that exist, differentiate between the forms of Gatsby plugins, and, finally, create a comment plugin that can be used on any Gatsby website, one of which we will install by the end of the tutorial.

What Is A Gatsby Plugin?

Gatsby, as a static-site generator, has limits on what it can do. Plugins are means to extend Gatsby with any feature not provided out of the box. We can achieve tasks like creating a manifest.json file for a progressive web app (PWA), embedding tweets on a page, logging page views, and much more on a Gatsby website using plugins.

Types Of Gatsby Plugins

There are two types of Gatsby plugins, local and external. Local plugins are developed in a Gatsby project directory, under the /plugins directory. External plugins are those available through npm or Yarn. Also, they may be on the same computer but linked using the yarn link or npm link command in a Gatsby website project.

Forms Of Gatsby Plugins

Plugins also exist in three primary forms and are defined by their use cases:

Components Of A Gatsby Plugin

To create a Gatsby plugin, we have to define some files:

  • gatsby-node.js
    Makes it possible to listen to the build processes of Gatsby.
  • gatsby-config.js
    Mainly used for configuration and setup.
  • gatsby-browser.js
    Allows plugins to run code during one of the Gatsby’s processes in the browser.
  • gatsby-ssr.js
    Customizes and adds functionality to the server-side rendering (SSR) process.

These files are referred to as API files in Gatsby’s documentation and should live in the root of a plugin’s directory, either local or external.

Not all of these files are required to create a Gatsby plugin. In our case, we will be implementing only the gatsby-node.js and gatsby-config.js API files.

Building A Comment Plugin For Gatsby

To learn how to develop a Gatsby plugin, we will create a comment plugin that is installable on any blog that runs on Gatsby. The full code for the plugin is on GitHub.

Serving and Loading Comments

To serve comments on a website, we have to provide a server that allows for the saving and loading of comments. We will use an already available comment server at gatsbyjs-comment-server.herokuapp.com for this purpose.

The server supports a GET /comments request for loading comments. POST /comments would save comments for the website, and it accepts the following fields as the body of the POST /comments request:

  • content: [string]
    The comment itself,
  • author: [string]
    The name of the comment’s author,
  • website
    The website that the comment is being posted from,
  • slug
    The slug for the page that the comment is meant for.

Integrating the Server With Gatsby Using API Files

Much like we do when creating a Gatsby blog, to create an external plugin, we should start with plugin boilerplate.

Initializing the folder

In the command-line interace (CLI) and from any directory you are convenient with, let’s run the following command:

gatsby new gatsby-source-comment-server https://github.com/Gatsbyjs/gatsby-starter-plugin

Then, change into the plugin directory, and open it in a code editor.

Installing axios for Network Requests

To begin, we will install the axios package to make web requests to the comments server:

npm install axios --save
// or
yarn add axios
Adding a New Node Type

Before pulling comments from the comments server, we need to define a new node type that the comments would extend. For this, in the plugin folder, our gatsby-node.js file should contain the code below:

exports.sourceNodes = async ({ actions }) => {
  const { createTypes } = actions;
  const typeDefs = `
    type CommentServer implements Node {
      _id: String
      author: String
      string: String
      content: String
      website: String
      slug: String
      createdAt: Date
      updatedAt: Date
    }
  `;
  createTypes(typeDefs);
};

First, we pulled actions from the APIs provided by Gatsby. Then, we pulled out the createTypes action, after which we defined a CommentServer type that extends Node.js. Then, we called createTypes with the new node type that we set.

Fetching Comments From the Comments Server

Now, we can use axios to pull comments and then store them in the data-access layer as the CommentServer type. This action is called “node sourcing” in Gatsby.

To source for new nodes, we have to implement the sourceNodes API in gatsby-node.js. In our case, we would use axios to make network requests, then parse the data from the API to match a GraphQL type that we would define, and then create a node in the GraphQL layer of Gatsby using the createNode action.

We can add the code below to the plugin’s gatsby-node.js API file, creating the functionality we’ve described:

const axios = require("axios");

exports.sourceNodes = async (
  { actions, createNodeId, createContentDigest },
  pluginOptions
) => {
  const { createTypes } = actions;
  const typeDefs = `
    type CommentServer implements Node {
      _id: String
      author: String
      string: String
      website: String
      content: String
      slug: String
      createdAt: Date
      updatedAt: Date
    }
  `;
  createTypes(typeDefs);

  const { createNode } = actions;
  const { limit, website } = pluginOptions;
  const _website = website || "";

  const result = await axios({
    url: `https://Gatsbyjs-comment-server.herokuapp.com/comments?limit=${_limit}&website=${_website}`,
  });

  const comments = result.data;

  function convertCommentToNode(comment, { createContentDigest, createNode }) {
    const nodeContent = JSON.stringify(comment);

    const nodeMeta = {
      id: createNodeId(`comments-${comment._id}`),
      parent: null,
      children: [],
      internal: {
        type: `CommentServer`,
        mediaType: `text/html`,
        content: nodeContent,
        contentDigest: createContentDigest(comment),
      },
    };

    const node = Object.assign({}, comment, nodeMeta);
    createNode(node);
  }

  for (let i = 0; i < comments.data.length; i++) {
    const comment = comments.data[i];
    convertCommentToNode(comment, { createNode, createContentDigest });
  }
};

Here, we have imported the axios package, then set defaults in case our plugin’s options are not provided, and then made a request to the endpoint that serves our comments.

We then defined a function to convert the comments into Gatsby nodes, using the action helpers provided by Gatsby. After this, we iterated over the fetched comments and called convertCommentToNode to convert the comments into Gatsby nodes.

Transforming Data (Comments)

Next, we need to resolve the comments to posts. Gatsby has an API for that called createResolvers. We can make this possible by appending the code below in the gatsby-node.js file of the plugin:

exports.createResolvers = ({ createResolvers }) => {
  const resolvers = {
    MarkdownRemark: {
      comments: {
        type: ["CommentServer"],
        resolve(source, args, context, info) {
          return context.nodeModel.runQuery({
            query: {
              filter: {
                slug: { eq: source.fields.slug },
              },
            },
            type: "CommentServer",
            firstOnly: false,
          });
        },
      },
    },
  };
  createResolvers(resolvers);
};

Here, we are extending MarkdownRemark to include a comments field. The newly added comments field will resolve to the CommentServer type, based on the slug that the comment was saved with and the slug of the post.

Final Code for Comment Sourcing and Transforming

The final code for the gatsby-node.js file of our comments plugin should look like this:

const axios = require("axios");

exports.sourceNodes = async (
  { actions, createNodeId, createContentDigest },
  pluginOptions
) => {
  const { createTypes } = actions;
  const typeDefs = `
    type CommentServer implements Node {
      _id: String
      author: String
      string: String
      website: String
      content: String
      slug: String
      createdAt: Date
      updatedAt: Date
    }
  `;
  createTypes(typeDefs);

  const { createNode } = actions;
  const { limit, website } = pluginOptions;
  const _limit = parseInt(limit || 10000); // FETCH ALL COMMENTS
  const _website = website || "";

  const result = await axios({
    url: `https://Gatsbyjs-comment-server.herokuapp.com/comments?limit=${_limit}&website=${_website}`,
  });

  const comments = result.data;

  function convertCommentToNode(comment, { createContentDigest, createNode }) {
    const nodeContent = JSON.stringify(comment);

    const nodeMeta = {
      id: createNodeId(`comments-${comment._id}`),
      parent: null,
      children: [],
      internal: {
        type: `CommentServer`,
        mediaType: `text/html`,
        content: nodeContent,
        contentDigest: createContentDigest(comment),
      },
    };

    const node = Object.assign({}, comment, nodeMeta);
    createNode(node);
  }

  for (let i = 0; i < comments.data.length; i++) {
    const comment = comments.data[i];
    convertCommentToNode(comment, { createNode, createContentDigest });
  }
};

exports.createResolvers = ({ createResolvers }) => {
  const resolvers = {
    MarkdownRemark: {
      comments: {
        type: ["CommentServer"],
        resolve(source, args, context, info) {
          return context.nodeModel.runQuery({
            query: {
              filter: {
                website: { eq: source.fields.slug },
              },
            },
            type: "CommentServer",
            firstOnly: false,
          });
        },
      },
    },
  };
  createResolvers(resolvers);
};
Saving Comments as JSON Files

We need to save the comments for page slugs in their respective JSON files. This makes it possible to fetch the comments on demand over HTTP without having to use a GraphQL query.

To do this, we will implement the createPageStatefully API in thegatsby-node.js API file of the plugin. We will use the fs module to check whether the path exists before creating a file in it. The code below shows how we can implement this:

import fs from "fs"
import {resolve: pathResolve} from "path"
exports.createPagesStatefully = async ({ graphql }) => {
  const comments = await graphql(
    `
      {
        allCommentServer(limit: 1000) {
          edges {
            node {
              name
              slug
              _id
              createdAt
              content
            }
          }
        }
      }
    `
  )

  if (comments.errors) {
    throw comments.errors
  }

  const markdownPosts = await graphql(
    `
      {
        allMarkdownRemark(
          sort: { fields: [frontmatter___date], order: DESC }
          limit: 1000
        ) {
          edges {
            node {
              fields {
                slug
              }
            }
          }
        }
      }
    `
  )

  const posts = markdownPosts.data.allMarkdownRemark.edges
  const _comments = comments.data.allCommentServer.edges

  const commentsPublicPath = pathResolve(process.cwd(), "public/comments")

  var exists = fs.existsSync(commentsPublicPath) //create destination directory if it doesn't exist

  if (!exists) {
    fs.mkdirSync(commentsPublicPath)
  }

  posts.forEach((post, index) => {
    const path = post.node.fields.slug
    const commentsForPost = _comments
      .filter(comment => {
        return comment.node.slug === path
      })
      .map(comment => comment.node)

    const strippedPath = path
      .split("/")
      .filter(s => s)
      .join("/")
    const _commentPath = pathResolve(
      process.cwd(),
      "public/comments",
      `${strippedPath}.json`
    )
    fs.writeFileSync(_commentPath, JSON.stringify(commentsForPost))
  })
}

First, we require the fs, and resolve the function of the path module. We then use the GraphQL helper to pull the comments that we stored earlier, to avoid extra HTTP requests. We remove the Markdown files that we created using the GraphQL helper. And then we check whether the comment path is not missing from the public path, so that we can create it before proceeding.

Finally, we loop through all of the nodes in the Markdown type. We pull out the comments for the current posts and store them in the public/comments directory, with the post’s slug as the name of the file.

The .gitignore in the root in a Gatsby website excludes the public path from being committed. Saving files in this directory is safe.

During each rebuild, Gatsby would call this API in our plugin to fetch the comments and save them locally in JSON files.

Rendering Comments

To render comments in the browser, we have to use the gatsby-browser.js API file.

Define the Root Container for HTML

In order for the plugin to identify an insertion point in a page, we would have to set an HTML element as the container for rendering and listing the plugin’s components. We can expect that every page that requires it should have an HTML element with an ID set to commentContainer.

Implement the Route Update API in the gatsby-browser.js File

The best time to do the file fetching and component insertion is when a page has just been visited. The onRouteUpdate API provides this functionality and passes the apiHelpers and pluginOpions as arguments to the callback function.

exports.onRouteUpdate = async (apiHelpers, pluginOptions) => {
  const { location, prevLocation } = apiHelpers
}
Create Helper That Creates HTML Elements

To make our code cleaner, we have to define a function that can create an HTML element, set its className, and add content. At the top of the gatsby-browser.js file, we can add the code below:

// Creates element, set class. innerhtml then returns it.
 function createEl (name, className, html = null) {
  const el = document.createElement(name)
  el.className = className
  el.innerHTML = html
  return el
}
Create Header of Comments Section

At this point, we can add a header into the insertion point of comments components, in the onRouteUpdate browser API . First, we would ensure that the element exists in the page, then create an element using the createEl helper, and then append it to the insertion point.

// ...

exports.onRouteUpdate = async ({ location, prevLocation }, pluginOptions) => {
  const commentContainer = document.getElementById("commentContainer")
  if (commentContainer && location.path !== "/") {
    const header = createEl("h2")
    header.innerHTML = "Comments"
    commentContainer.appendChild(header)
  }
}
Listing Comments

To list comments, we would append a ul element to the component insertion point. We will use the createEl helper to achieve this, and set its className to comment-list:

exports.onRouteUpdate = async ({ location, prevLocation }, pluginOptions) => {
  const commentContainer = document.getElementById("commentContainer")
  if (commentContainer && location.path !== "/") {
    const header = createEl("h2")
    header.innerHTML = "Comments"
    commentContainer.appendChild(header)
    const commentListUl = createEl("ul")
    commentListUl.className = "comment-list"
    commentContainer.appendChild(commentListUl)
}

Next, we need to render the comments that we have saved in the public directory to a ul element, inside of li elements. For this, we define a helper that fetches the comments for a page using the path name.

// Other helpers
const getCommentsForPage = async slug => {
  const path = slug
    .split("/")
    .filter(s => s)
    .join("/")
  const data = await fetch(`/comments/${path}.json`)
  return data.json()
}
// ... implements routeupdate below

We have defined a helper, named getCommentsForPage, that accepts paths and uses fetch to load the comments from the public/comments directory, before parsing them to JSON and returning them back to the calling function.

Now, in our onRouteUpdate callback, we will load the comments:

// ... helpers
exports.onRouteUpdate = async ({ location, prevLocation }, pluginOptions) => {
  const commentContainer = document.getElementById("commentContainer")
  if (commentContainer && location.path !== "/") {
    //... inserts header
    const commentListUl = createEl("ul")
    commentListUl.className = "comment-list"
    commentContainer.appendChild(commentListUl)
   const comments = await getCommentsForPage(location.pathname)
}

Next, let’s define a helper to create the list items:

// .... other helpers

const getCommentListItem = comment => {
  const li = createEl("li")
  li.className = "comment-list-item"

  const nameCont = createEl("div")
  const name = createEl("strong", "comment-author", comment.name)
  const date = createEl(
    "span",
    "comment-date",
    new Date(comment.createdAt).toLocaleDateString()
  )
  // date.className="date"
  nameCont.append(name)
  nameCont.append(date)

  const commentCont = createEl("div", "comment-cont", comment.content)

  li.append(nameCont)
  li.append(commentCont)
  return li
}

// ... onRouteUpdateImplementation

In the snippet above, we created an li element with a className of comment-list-item, and a div for the comment’s author and time. We then created another div for the comment’s text, with a className of comment-cont.

To render the list items of comments, we iterate through the comments fetched using the getComments helper, and then call the getCommentListItem helper to create a list item. Finally, we append it to the <ul class="comment-list"></ul> element:

// ... helpers
exports.onRouteUpdate = async ({ location, prevLocation }, pluginOptions) => {
  const commentContainer = document.getElementById("commentContainer")
  if (commentContainer && location.path !== "/") {
    //... inserts header
    const commentListUl = createEl("ul")
    commentListUl.className = "comment-list"
    commentContainer.appendChild(commentListUl)
   const comments = await getCommentsForPage(location.pathname)
    if (comments && comments.length) {
      comments.map(comment => {
        const html = getCommentListItem(comment)
        commentListUl.append(html)
        return comment
      })
    }
}

Posting a Comment

Post Comment Form Helper

To enable users to post a comment, we have to make a POST request to the /comments endpoint of the API. We need a form in order to create this form. Let’s create a form helper that returns an HTML form element.

// ... other helpers
const createCommentForm = () => {
  const form = createEl("form")
  form.className = "comment-form"
  const nameInput = createEl("input", "name-input", null)
  nameInput.type = "text"
  nameInput.placeholder = "Your Name"
  form.appendChild(nameInput)
  const commentInput = createEl("textarea", "comment-input", null)
  commentInput.placeholder = "Comment"
  form.appendChild(commentInput)
  const feedback = createEl("span", "feedback")
  form.appendChild(feedback)
  const button = createEl("button", "comment-btn", "Submit")
  button.type = "submit"
  form.appendChild(button)
  return form
}

The helper creates an input element with a className of name-input, a textarea with a className of comment-input, a span with a className of feedback, and a button with a className of comment-btn.

Append the Post Comment Form

We can now append the form into the insertion point, using the createCommentForm helper:

// ... helpers
exports.onRouteUpdate = async ({ location, prevLocation }, pluginOptions) => {
  const commentContainer = document.getElementById("commentContainer")
  if (commentContainer && location.path !== "/") {
    // insert header
    // insert comment list
    commentContainer.appendChild(createCommentForm())
  }
}

Post Comments to Server

To post a comment to the server, we have to tell the user what is happening — for example, either that an input is required or that the API returned an error. The <span class="feedback" /> element is meant for this. To make it easier to update this element, we create a helper that sets the element and inserts a new class based on the type of the feedback (whether error, info, or success).

// ... other helpers
// Sets the class and text of the form feedback
const updateFeedback = (str = "", className) => {
  const feedback = document.querySelector(".feedback")
  feedback.className = `feedback ${className ? className : ""}`.trim()
  feedback.innerHTML = str
  return feedback
}
// onRouteUpdate callback

We are using the querySelector API to get the element. Then we set the class by updating the className attribute of the element. Finally, we use innerHTML to update the contents of the element before returning it.

Submitting a Comment With the Comment Form

We will listen to the onSubmit event of the comment form to determine when a user has decided to submit the form. We don’t want empty data to be submitted, so we would set a feedback message and disable the submit button until needed:

exports.onRouteUpdate = async ({ location, prevLocation }, pluginOptions) => {
  // Appends header
  // Appends comment list
  // Appends comment form
  document
    .querySelector("body .comment-form")
    .addEventListener("submit", async function (event) {
      event.preventDefault()
      updateFeedback()
      const name = document.querySelector(".name-input").value
      const comment = document.querySelector(".comment-input").value
      if (!name) {
        return updateFeedback("Name is required")
      }
      if (!comment) {
        return updateFeedback("Comment is required")
      }
      updateFeedback("Saving comment", "info")
      const btn = document.querySelector(".comment-btn")
      btn.disabled = true
      const data = {
        name,
        content: comment,
        slug: location.pathname,
        website: pluginOptions.website,
      }

      fetch(
        "https://cors-anywhere.herokuapp.com/gatsbyjs-comment-server.herokuapp.com/comments",
        {
          body: JSON.stringify(data),
          method: "POST",
          headers: {
            Accept: "application/json",
            "Content-Type": "application/json",
          },
        }
      ).then(async function (result) {
        const json = await result.json()
        btn.disabled = false

        if (!result.ok) {
          updateFeedback(json.error.msg, "error")
        } else {
          document.querySelector(".name-input").value = ""
          document.querySelector(".comment-input").value = ""
          updateFeedback("Comment has been saved!", "success")
        }
      }).catch(async err => {
        const errorText = await err.text()
        updateFeedback(errorText, "error")
      })
    })
}

We use document.querySelector to get the form from the page, and we listen to its submit event. Then, we set the feedback to an empty string, from whatever it might have been before the user attempted to submit the form.

We also check whether the name or comment field is empty, setting an error message accordingly.

Next, we make a POST request to the comments server at the /comments endpoint, listening for the response. We use the feedback to tell the user whether there was an error when they created the comment, and we also use it to tell them whether the comment’s submission was successful.

Adding a Style Sheet

To add styles to the component, we have to create a new file, style.css, at the root of our plugin folder, with the following content:

#commentContainer {
}

.comment-form {
  display: grid;
}

At the top of gatsby-browser.js, import it like this:

import "./style.css"

This style rule will make the form’s components occupy 100% of the width of their container.

Finally, all of the components for our comments plugin are complete. Time to install and test this fantastic plugin we have built.

Test the Plugin

Create a Gatsby Website

Run the following command from a directory one level above the plugin’s directory:

// PARENT
// ├── PLUGIN
// ├── Gatsby Website

gatsby new private-blog https://github.com/gatsbyjs/gatsby-starter-blog

Install the Plugin Locally and Add Options

Next, change to the blog directory, because we need to create a link for the new plugin:

cd /path/to/blog
npm link ../path/to/plugin/folder
Add to gatsby-config.js

In the gatsby-config.js file of the blog folder, we should add a new object that has a resolve key and that has name-of-plugin-folder as the value of the plugin’s installation. In this case, the name is gatsby-comment-server-plugin:

module.exports = {
  // ...
  plugins: [
    // ...
    "gatsby-plugin-dom-injector",
    {
      resolve: "gatsby-comment-server-plugin",
      options: {website: "https://url-of-website.com"},
    },
  ],
}

Notice that the plugin accepts a website option to distinguish the source of the comments when fetching and saving comments.

Update the blog-post Component

For the insertion point, we will add <section class="comments" id="commentContainer"> to the post template component at src/templates/blog-post.js of the blog project. This can be inserted at any suitable position; I have inserted mine after the last hr element and before the footer.

Start the Development Server

Finally, we can start the development server with gatsby develop, which will make our website available locally at http://localhost:8000. Navigating to any post page, like http://localhost:8000/new-beginnings, will reveal the comment at the insertion point that we specified above.

Create a Comment

We can create a comment using the comment form, and it will provide helpful feedback as we interact with it.

List Comments

To list newly posted comments, we have to restart the server, because our content is static.

Conclusion

In this tutorial, we have introduced Gatsby plugins and demonstrated how to create one.

Our plugin uses different APIs of Gatsby and its own API files to provide comments for our website, illustrating how we can use plugins to add significant functionality to a Gatsby website.

Although we are pulling from a live server, the plugin is saving the comments in JSON files. We could make the plugin load comments on demand from the API server, but that would defeat the notion that our blog is a static website that does not require dynamic content.

The plugin built in this post exists as an npm module, while the full code is on GitHub.

References:

Resources:

  • Gatsby’s blog starter, GitHub
    A private blog repository available for you to create a Gatsby website to consume the plugin.
  • Gatsby Starter Blog, Netlify
    The blog website for this tutorial, deployed on Netlify for testing.
Smashing Editorial (yk)

Exploring Node.js Internals

Exploring Node.js Internals

Exploring Node.js Internals

Aleem Isiaka

Since the introduction of Node.js by Ryan Dahl at the European JSConf on 8 November 2009, it has seen wide usage across the tech industry. Companies such as Netflix, Uber, and LinkedIn give credibility to the claim that Node.js can withstand a high amount of traffic and concurrency.

Armed with basic knowledge, beginner and intermediate developers of Node.js struggle with many things: “It’s just a runtime!” “It has event loops!” “Node.js is single-threaded like JavaScript!”

While some of these claims are true, we will dig deeper into the Node.js runtime, understanding how it runs JavaScript, seeing whether it actually is single-threaded, and, finally, better understanding the interconnection between its core dependencies, V8 and libuv.

Prerequisites

  • Basic knowledge of JavaScript
  • Familiarity with Node.js semantics (require, fs)

What Is Node.js?

It might be tempting to assume what many people have believed about Node.js, the most common definition of it being that it’s a runtime for the JavaScript language. To consider this, we should understand what led to this conclusion.

Node.js is often described as a combination of C++ and JavaScript. The C++ part consists of bindings running low-level code that make it possible to access hardware connected to the computer. The JavaScript part takes JavaScript as its source code and runs it in a popular interpreter of the language, named the V8 engine.

With this understanding, we could describe Node.js as a unique tool that combines JavaScript and C++ to run programs outside of the browser environment.

But could we actually call it a runtime? To determine that, let’s define what a runtime is.

In one of his answers on StackOverflow, DJNA defines a runtime environment as “everything you need to execute a program, but no tools to change it”. According to this definition, we can confidently say that everything that is happening while we run our code (in any language whatsoever) is running in a runtime environment.

Other languages have their own runtime environment. For Java, it is the Java Runtime Environment (JRE). For .NET, it is the Common Language Runtime (CLR). For Erlang, it is BEAM.

Nevertheless, some of these runtimes have other languages that depend on them. For example, Java has Kotlin, a programming language that compiles to code that a JRE can understand. Erlang has Elixir. And we know there are many variants for .NET development, which all run in the CLR, known as the .NET Framework.

Now we understand that a runtime is an environment provided for a program to be able to execute successfully, and we know that V8 and a host of C++ libraries make it possible for a Node.js application to execute. Node.js itself is the actual runtime that binds everything together to make those libraries an entity, and it understands just one language — JavaScript — regardless of what Node.js is built with.

Internal Structure Of Node.js

When we attempt to run a Node.js program (such as index.js) from our command line using the command node index.js, we are calling the Node.js runtime. This runtime, as mentioned, consists of two independent dependencies, V8 and libuv.

Core Node.js dependencies
Core Node.js Dependencies (Large preview)

V8 is a project created and maintained by Google. It takes JavaScript source code and runs it outside of the browser environment. When we run a program through a node command, the source code is passed by the Node.js runtime to V8 for execution.

The libuv library contains C++ code that enables low-level access to the operating system. Functionality such as networking, writing to the file system, and concurrency are not shipped by default in V8, which is the part of Node.js that runs our JavaScript code. With its set of libraries, libuv provides these utilities and more in a Node.js environment.

Node.js is the glue that holds the two libraries together, thereby becoming a unique solution. Throughout the execution of a script, Node.js understands which project to pass control to and when.

Interesting APIs For Server-Side Programs

If we study a little history of JavaScript, we would know that it’s meant to add some functionality and interaction to a page in the browser. And in the browser, we would interact with the elements of the document object model (DOM) that make up the page. For this, a set of APIs exists, referred to collectively as the DOM API.

The DOM exists only in the browser; it is what is parsed to render a page, and it is basically written in the markup language known as HTML. Also, the browser exists in a window, hence the window object, which acts as a root for all of the objects on the page in a JavaScript context. This environment is called the browser environment, and it is a runtime environment for JavaScript.

Node.js APIs call libuv for some functions
Node.js APIs interact with libuv (Large preview)

In a Node.js environment, we have nothing like a page, nor a browser — this nullifies our knowledge of the global window object. What we do have is a set of APIs that interact with the operating system to provide additional functionality to a JavaScript program. These APIs for Node.js (fs, path, buffer, events, HTTP, and so on), as we have them, exist only for Node.js, and they are provided by Node.js (itself a runtime) so that we can run programs written for Node.js.

Experiment: How fs.writeFile Creates A New File

If V8 was created to run JavaScript outside of the browser, and if a Node.js environment does not have the same context or environment as a browser, then how would we do something like access the file system or make an HTTP server?

As an example, let’s take a simple Node.js application that writes a file to the file system in the current directory:

const fs = require("fs")

fs.writeFile("./test.txt", "text");

As shown, we are trying to write a new file to the file system. This feature is not available in the JavaScript language; it is available only in a Node.js environment. How does this get executed?

To understand this, let’s take a tour of the Node.js code base.

Heading over to the GitHub repository for Node.js, we see two main folders, src and lib. The lib folder has the JavaScript code that provides the nice set of modules that are included by default with every Node.js installation. The src folder contains the C++ libraries for libuv.

If we look in the src folder and go through the fs.js file, we will see that it is full of impressive JavaScript code. On line 1880, we will notice an exports statement. This statement exports everything we can access by importing the fs module, and we can see that it exports a function named writeFile.

Searching for function writeFile( (where the function is defined) leads us to line 1303, where we see that the function is defined with four parameters:

function writeFile(path, data, options, callback) {
  callback = maybeCallback(callback || options);
  options = getOptions(options, { encoding: 'utf8', mode: 0o666, flag: 'w' });
  const flag = options.flag || 'w';

  if (!isArrayBufferView(data)) {
    validateStringAfterArrayBufferView(data, 'data');
    data = Buffer.from(data, options.encoding || 'utf8');
  }

  if (isFd(path)) {
    const isUserFd = true;
    writeAll(path, isUserFd, data, 0, data.byteLength, callback);
    return;
  }

  fs.open(path, flag, options.mode, (openErr, fd) => {
    if (openErr) {
      callback(openErr);
    } else {
      const isUserFd = false;
      writeAll(fd, isUserFd, data, 0, data.byteLength, callback);
    }
  });
}

On lines 1315 and 1324, we see that a single function, writeAll, is called after some validation checks. We find this function on line 1278 in the same fs.js file.

function writeAll(fd, isUserFd, buffer, offset, length, callback) {
  // write(fd, buffer, offset, length, position, callback)
  fs.write(fd, buffer, offset, length, null, (writeErr, written) => {
    if (writeErr) {
      if (isUserFd) {
        callback(writeErr);
      } else {
        fs.close(fd, function close() {
          callback(writeErr);
        });
      }
    } else if (written === length) {
      if (isUserFd) {
        callback(null);
      } else {
        fs.close(fd, callback);
      }
    } else {
      offset += written;
      length -= written;
      writeAll(fd, isUserFd, buffer, offset, length, callback);
    }
  });
}

It is also interesting to note that this module is attempting to call itself. We see this on line 1280, where it is calling fs.write. Looking for the write function, we will discover a little information.

The write function starts on line 571, and it runs about 42 lines. We see a recurring pattern in this function: the way it calls a function on the binding module, as seen on lines 594 and 612. A function on the binding module is called not only in this function, but in virtually any function that is exported in the fs.js file file. Something must be very special about it.

The binding variable is declared on line 58, at the very top of the file, and a click on that function call reveals some information, with the help of GitHub.

Declaration of the binding variable
Declaration of the binding variable (Large preview)

This internalBinding function is found in the module named loaders. The main function of the loaders module is to load all libuv libraries and connect them through the V8 project with Node.js. How it does this is rather magical, but to learn more we can look closely at the writeBuffer function that is called by the fs module.

We should look where this connects with libuv, and where V8 comes in. At the top of the loaders module, some good documentation there states this:

// This file is compiled and run by node.cc before bootstrap/node.js
// was called, therefore the loaders are bootstraped before we start to
// actually bootstrap Node.js. It creates the following objects:
//
// C++ binding loaders:
// - process.binding(): the legacy C++ binding loader, accessible from user land
//   because it is an object attached to the global process object.
//   These C++ bindings are created using NODE_BUILTIN_MODULE_CONTEXT_AWARE()
//   and have their nm_flags set to NM_F_BUILTIN. We do not make any guarantees
//   about the stability of these bindings, but still have to take care of
//   compatibility issues caused by them from time to time.
// - process._linkedBinding(): intended to be used by embedders to add
//   additional C++ bindings in their applications. These C++ bindings
//   can be created using NODE_MODULE_CONTEXT_AWARE_CPP() with the flag
//   NM_F_LINKED.
// - internalBinding(): the private internal C++ binding loader, inaccessible
//   from user land unless through `require('internal/test/binding')`.
//   These C++ bindings are created using NODE_MODULE_CONTEXT_AWARE_INTERNAL()
//   and have their nm_flags set to NM_F_INTERNAL.
//
// Internal JavaScript module loader:
// - NativeModule: a minimal module system used to load the JavaScript core
//   modules found in lib/**/*.js and deps/**/*.js. All core modules are
//   compiled into the node binary via node_javascript.cc generated by js2c.py,
//   so they can be loaded faster without the cost of I/O. This class makes the
//   lib/internal/*, deps/internal/* modules and internalBinding() available by
//   default to core modules, and lets the core modules require itself via
//   require('internal/bootstrap/loaders') even when this file is not written in
//   CommonJS style.

What we learn here is that for every module called from the binding object in the JavaScript section of the Node.js project, there is an equivalent of it in the C++ section, in the src folder.

From our fs tour, we see that the module that does this is located in node_file.cc. Every function that is accessible through the module is defined in the file; for example, we have the writeBuffer on line 2258. The actual definition of that method in the C++ file is on line 1785. Also, the call to the part of libuv that does the actual writing to the file can be found on lines 1809 and 1815, where the libuv function uv_fs_write is called asynchronously.

What Do We Gain From This Understanding?

Just like many other interpreted language runtimes, the runtime of Node.js can be hacked. With greater understanding, we could do things that are impossible with the standard distribution just by looking through the source. We could add libraries to make changes to the way some functions are called. But above all, this understanding is a foundation for further exploration.

Is Node.js Single-Threaded?

Sitting on libuv and V8, Node.js has access to some additional functionalities that a typical JavaScript engine running in the browser does not have.

Any JavaScript that runs in a browser will execute in a single thread. A thread in a program’s execution is just like a black box sitting on top of the CPU in which the program is being executed. In a Node.js context, some code could be executed in as many threads as our machines can carry.

To verify this particular claim, let’s explore a simple code snippet.

const fs = require("fs");
// A little benchmarking
const startTime = Date.now()
fs.writeFile("./test.txt", "test", (err) => {
    If (error) {
        console.log(err)
    }
    console.log("1 Done: ", Date.now() — startTime)
});

In the snippet above, we are trying to create a new file on the disk in the current directory. To see how long this could take, we’ve added a little benchmark to monitor the start time of the script, which gives us the duration in milliseconds of the script that is creating the file.

If we run the code above, we will get a result like this:

Result of the time it takes to create a single file in Node.js
Time taken to create a single file in Node.js (Large preview)
$ node ./test.js
    -> 1 Done: 0.003s

This is very impressive: just 0.003 seconds.

But let’s do something really interesting. First let’s duplicate the code that generates the new file, and update the number in the log statement to reflect their positions:

const fs = require("fs");
// A little benchmarking
const startTime = Date.now()
fs.writeFile("./test1.txt", "test", function (err) {
     if (err) {
        console.log(err)
    }
    console.log("1 Done: %ss", (Date.now() — startTime) / 1000)
});

fs.writeFile("./test2.txt", "test", function (err) {
     if (err) {
        console.log(err)
    }
    console.log("2 Done: %ss", (Date.now() — startTime) / 1000)
});


fs.writeFile("./test3.txt", "test", function (err) {
     if (err) {
        console.log(err)
    }
    console.log("3 Done: %ss", (Date.now() — startTime) / 1000)
});

fs.writeFile("./test4.txt", "test", function (err) {
     if (err) {
        console.log(err)
    }
    console.log("4 Done: %ss", (Date.now() — startTime) / 1000)
});

If we attempt to run this code, we will get something that blows our minds. Here is my result:

Result of the time it takes to create multiple files
Creating many files at once (Large preview)

First, we will notice that the results are not consistent. Secondly, we see that the time has increased. What’s happening?

Low-Level Tasks Get Delegated

Node.js is single-threaded, as we know now. Parts of Node.js are written in JavaScript, and others in C++. Node.js uses the same concepts of the event loop and the call stack that we are familiar with from the browser environment, meaning that the JavaScript parts of Node.js are single-threaded. But the low-level task that requires speaking with an operating system is not single-threaded.

Low-level tasks are delegated to the OS through libuv
Node.js low-level task delegation (Large preview)

When a call is recognized by Node.js as being intended for libuv, it delegates this task to libuv. In its operation, libuv requires threads for some of its libraries, hence the use of the thread pool in executing Node.js programs when they are needed.

By default, the Node.js thread pool provided by libuv has four threads in it. We could increase or reduce this thread pool by calling process.env.UV_THREADPOOL_SIZE at the top of our script.

// script.js
process.env.UV_THREADPOOL_SIZE = 6;

// …
// …

What Happens With Our File-Making Program

It appears that once we invoke the code to create our file, Node.js hits the libuv part of its code, which dedicates a thread for this task. This section in libuv gets some statistical information about the disk before working on the file.

This statistical checking could take a while to complete; hence, the thread is released for some other tasks until the statistical check is completed. When the check is completed, the libuv section occupies any available thread or waits until a thread becomes available for it.

We have only four calls and four threads, so there are enough threads to go around. The only question is how fast each thread will process its task. We will notice that the first code to make it into the thread pool will return its result first, and it blocks all of the other threads while running its code.

Conclusion

We now understand what Node.js is. We know it’s a runtime. We’ve defined what a runtime is. And we’ve dug deep into what makes up the runtime provided by Node.js.

We have come a long way. And from our little tour of the Node.js repository on GitHub, we can explore any API we might be interested in, following the same process we took here. Node.js is open source, so surely we can dive into the source, can’t we?

Even though we have touched on several of the low levels of what happens in the Node.js runtime, we mustn’t assume that we know it all. The resources below point to some information on which we can build our knowledge:

  • Introduction to Node.js
    Being an official website, Node.dev explains what Node.js is, as well as its package managers, and lists web frameworks built on top of it.
  • JavaScript & Node.js”, The Node Beginner Book
    This book by Manuel Kiessling does a fantastic job of explaining Node.js, after warning that JavaScript in the browser is not the same as the one in Node.js, even though both are written in the same language.
  • Beginning Node.js
    This beginner book goes beyond an explanation of the runtime. It teaches about packages and streams and creating a web server with the Express framework.
  • LibUV
    This is the official documentation of the supporting C++ code of the Node.js runtime.
  • V8
    This is the official documentation of the JavaScript engine that makes it possible to write Node.js with JavaScript.
Smashing Editorial (ra, il, al)