Mastering Props And PropTypes In React

Mastering Props And PropTypes In React

Mastering Props And PropTypes In React

Adeneye David Abiodun

Do props and PropTypes confuse you? You’re not alone. I’m going to guide you through everything about props and PropTypes. They can make your life significantly easier when developing React apps. This tutorial will introduce you to the details about props, passing and accessing props, and passing information to any component using props.

Building React applications involves breaking down the UI into several components, which implies that we will need to pass data from one component to another. Props are an important mechanism for passing information between React components, and we’re going to look into them in great detail. This article would be incomplete without looking into PropTypes, because they ensure that components use the correct data type and pass the right data.

It’s always a good practice to validate the data we get as props by using PropTypes. You will also learn about integrating PropTypes in React, typechecking with PropTypes, and using defaultProps. At the end of this tutorial, you will understand how to use props and PropTypes effectively. It is important that you already have basic knowledge of how React works.

Understanding Props

React allows us to pass information to components using things called props (short for properties). Because React comprises several components, props make it possible to share the same data across the components that need them. It makes use of one-directional data flow (parent-to-child components). However, with a callback function, it’s possible to pass props back from a child to a parent component.

These data can come in different forms: numbers, strings, arrays, functions, objects, etc. We can pass props to any component, just as we can declare attributes in any HTML tag. Take a look at the code below:

<PostList posts={postsList} />

In this snippet, we are passing a prop named posts to a component named PostList. This prop has a value of {postsList}. Let’s break down how to access and pass data.

Passing and Accessing Props

To make this tutorial interesting, let’s create an application that shows a list of users’ names and posts. The app demo is shown below:

See the Pen [Passing and Accessing Props](https://codepen.io/smashingmag/pen/MWyKQpd) by David Adeneye.

See the Pen Passing and Accessing Props by David Adeneye.

The app comprises collections of components: an App component, a PostList component, and a Post component.

The list of posts will require data such as the content and the name of the user. We can construct the data like so:

const postsList = [
  {
    id: 1,
    content: "The world will be out of the pandemic soon",
    user: "Lola Lilly",
  },
  {
    id: 2,
    content: "I'm really exited I'm getting married soon",
    user: "Rebecca Smith",
  },
  {
    id: 3,
    content: "What is your take on this pandemic",
    user: "John Doe",
  },
  {
    id: 4,
    content: "Is the world really coming to an end",
    user: "David Mark",
  },
];

After this, we need the App component to pull the data, Here is the basic structure of that component:

const App = () => {
  return (
    <div>
      <PostList posts={postsList} />
    </div>
  );
};

Here, we are passing an array of posts as a prop to the PostList (which we’ll create in a bit). The parent component, PostList, will access the data in postsList, which will be passed as posts props to the child component (Post). If you’ll remember, our app comprises three components, which we’ll create as we proceed.

Let’s create the PostList:

class PostList extends React.Component {
  render() {
    return (
      <React.Fragment>
        <h1>Latest Users Posts</h1>
        <ul>
          {this.props.posts.map((post) => {
            return (
              <li key={post.id}>
                <Post {...post} />
              </li>
            );
          })}
        </ul>
      </React.Fragment>
    );
  }
}

The PostList component will receive posts as its prop. It will then loop through the posts prop, this.props.posts, to return each posted item as a Post component (which we will model later). Also, note the use of the key in the snippet above. For those new to React, a key is a unique identifier assigned to each item in our list, enabling us to distinguish between items. In this case, the key is the id of each post. There’s no chance of two items having the same id, so it’s a good piece of data to use for this purpose.

Meanwhile, the remaining properties are passed as props to the Post component ( <Post {...post} /> ).

So, let’s create the Post component and make use of the props in it:

const Post = (props) => {
  return (
    <div>
      <h2>{props.content}</h2>
      <h4>username: {props.user}</h4>
    </div>
  );
};

We are constructing the Post component as a functional component, rather than defining it as a class component like we did for the PostList component. I did this to show you how to access props in a functional component, compared to how we access them in a class component with this.props. Because this a functional component, we can access the values using props.

We’ve learned now how to pass and access props, and also how to pass information from one component to the other. Let’s consider now how props work with functions.

Passing Functions Via Props

In the preceding section, we passed an array of data as props from one component to another. But what if we are working with functions instead? React allows us to pass functions between components. This comes in handy when we want to trigger a state change in a parent component from its child component. Props are supposed to be immutable; you should not attempt to change the value of a prop. You have to do that in the component that passes it down, which is the parent component.

Let’s create a simple demo app that listens to a click event and changes the state of the app. To change the state of the app in a different component, we have to pass down our function to the component whose state needs to change. In this way, we will have a function in our child component that is able to change state.

Sounds a bit complex? I have created a simple React application that changes state with the click of a button and renders a piece of welcome information:

See the Pen [Passing Function via Props in React](https://codepen.io/smashingmag/pen/WNwrMEY) by David Adeneye.

See the Pen Passing Function via Props in React by David Adeneye.

In the demo above, we have two components. One is the App component, which is the parent component that contains the app’s state and the function to set the state. The ChildComponent will be the child in this scenario, and its task is to render the welcome information when the state changes.

Let’s break this down into code:

class App extends React.Component {
  constructor(props) {
    super(props);
    this.state = {
      isShow: true,
    };
  }
  toggleShow = () => {
    this.setState((state) => ({ isShow: !state.isShow }));
  };
  render() {
    return (
      <div>
        <ChildComponent isShow={this.state.isShow} clickMe={this.toggleShow} />
      </div>
    );
  }
}

Notice that we’ve set our state to true, and the method to change the state is created in the App component. In the render() function, we pass the state of the app, as the prop isShow, to the ChildComponent component. We also pass the toggleShow() function as a prop named clickMe.

We will use this in the ChildComponent which looks like this:

class ChildComponent extends React.Component {
  clickMe = () => {
    this.props.clickMe();
  };
  render() {
    const greeting = "Welcome to React Props";
    return (
      <div style={{ textAlign: "center", marginTop: "8rem" }}>
        {this.props.isShow ? (
          <h1 style={{ color: "green", fontSize: "4rem" }}>{greeting}</h1>
        ) : null}
        <button onClick={this.clickMe}>
          <h3>click Me</h3>
        </button>
      </div>
    );
  }
}

The most important thing above is that the App component passes down a function as a prop to the ChildComponent. The function clickMe() is used for the click handler in the ChildComponent, whereas the ChildComponent doesn’t know the logic of the function — it only triggers the function when the button gets clicked. The state is changed when the function is called, and once the state has changed, the state is passed down as a prop again. All affected components, like the child in our case, will render again.

We have to pass the state of the app, isShow, as a prop to the ChildComponent, because without it, we cannot write the logic above to display greeting when the state is updated.

Now that we’ve looked at functions, let’s turn to validation. It’s always a good practice to validate the data we get through props by using PropTypes. Let’s dive into that now.

What Are PropTypes In React?

PropTypes are a mechanism to ensure that components use the correct data type and pass the right data, and that components use the right type of props, and that receiving components receive the right type of props.

We can think of it like a puppy being delivered to a pet store. The pet store doesn’t want pigs, lions, frogs, or geckos — it wants puppies. PropTypes ensure that the correct data type (puppy) is delivered to the pet store, and not some other kind of animal.

In the section above, we saw how to pass information to any component using props. We passed props directly as an attribute to the component, and we also passed props from outside of the component and used them in that component. But we didn’t check what type of values we are getting in our component through props or that everything still works.

It’s totally upon us whether to validate the data we get in a component through props. But in a complex application, it is always a good practice to validate that data.

Using PropTypes

To make use of PropTypes, we have to add the package as a dependency to our application through npm or Yarn, by running the following code in the command line. For npm:

npm install --save prop-types

And for Yarn:

yarn add prop-types

To use PropTypes, we first need to import PropTypes from the prop-types package:

import PropTypes from 'prop-types';

Let’s use ProTypes in our app that lists users’ posts. Here is how we will use it for the Post component:

Post.proptypes = {
  id: PropTypes.number,
  content: PropTypes.string,
  user: PropTypes.string
}

Here, PropTypes.string and PropTypes.number are prop validators that can be used to make sure that the props received are of the right type. In the code above, we’re declaring id to be a number, while content and user are to be strings.

Also, PropTypes are useful in catching bugs. And we can enforce passing props by using isRequired:

Post.proptypes = {
  id: PropTypes.number.isRequired,
  content: PropTypes.string.isRequired,
  user: PropTypes.string.isRequired
}

PropTypes have a lot of validators. Here are some of the most common ones:

Component.proptypes = {
  stringProp: PropTypes.string,         // The prop should be a string 
  numberProp: PropTypes.number,         // The prop should be a number
  anyProp: PropTypes.any,               // The prop can be of any data type 
  booleanProp: PropTypes.bool,          // The prop should be a function
  functionProp: PropTypes.func          // The prop should be a function
  arrayProp: PropTypes.array            // The prop should be an array
}

More types are available, which you can check in React’s documentation].

Default Props

If we want to pass some default information to our components using props, React allows us to do so with something called defaultProps. In cases where PropTypes are optional (that is, they are not using isRequired), we can set defaultProps. Default props ensure that props have a value, in case nothing gets passed. Here is an example:

Class Profile extends React.Component{

  // Specifies the default values for props 
  static defaultProps = {
    name: 'Stranger'
  };

  // Renders "Welcome, Stranger":
  render() {
    return <h2> Welcome, {this.props.name}<h2>
  }
}  

Here, defaultProps will be used to ensure that this.props.name has a value, in case it is not specified by the parent component. If no name is passed to the class Profile, then it will have the default property Stranger to fall back on. This prevents any error when no prop is passed. I advise you always to use defaultProps for every optional PropType.

Conclusion

I hope you’ve enjoyed working through this tutorial. Hopefully, it has shown you how important props and propTypes are to building React applications, because without them, we wouldn’t be able to pass data between components when interactions happen. They are a core part of the component-driven and state-management architecture that React is designed around.

PropTypes are a bonus for ensuring that components use the correct data type and pass the right data, and that components use the right type of props, and that receiving components receive the right type of props.

If you have any questions, you can leave them in the comments section below, and I’ll be happy to answer every one and work through any issues with you.

References

Smashing Editorial (ks, ra, al, il)

Practical Guide To Testing React Applications With Jest

Practical Guide To Testing React Applications With Jest

Practical Guide To Testing React Applications With Jest

Adeneye David Abiodun

In this article, I’m going to introduce you to a React testing tool named Jest, along with the popular library Enzyme, which is designed to test React components. I’ll introduce you to Jest testing techniques, including: running tests, testing React components, snapshot testing, and mocking. If you are new to testing and wondering how to get started, you will find this tutorial helpful because we will start with an introduction to testing. By the end, you’ll be up and running, testing React applications using Jest and Enzyme. You should be familiar with React in order to follow this tutorial.

A Brief Introduction To Testing

Testing is a line-by-line review of how your code will execute. A suite of tests for an application comprises various bit of code to verify whether an application is executing successfully and without error. Testing also comes in handy when updates are made to code. After updating a piece of code, you can run a test to ensure that the update does not break functionality already in the application.

Why Test?

It’s good to understand why we doing something before doing it. So, why test, and what is its purpose?

  1. The first purpose of testing is to prevent regression. Regression is the reappearance of a bug that had previously been fixed. It makes a feature stop functioning as intended after a certain event occurs.
  2. Testing ensures the functionality of complex components and modular applications.
  3. Testing is required for the effective performance of a software application or product.

Testing makes an app more robust and less prone to error. It’s a way to verify that your code does what you want it to do and that your app works as intended for your users.

Let’s go over the types of testing and what they do.

Unit Test

In this type of test, individual units or components of the software are tested. A unit might be an individual function, method, procedure, module, or object. A unit test isolates a section of code and verifies its correctness, in order to validate that each unit of the software’s code performs as expected.

In unit testing, individual procedures or functions are tested to guarantee that they are operating properly, and all components are tested individually. For instance, testing a function or whether a statement or loop in a program is functioning properly would fall under the scope of unit testing.

Component Test

Component testing verifies the functionality of an individual part of an application. Tests are performed on each component in isolation from other components. Generally, React applications are made up of several components, so component testing deals with testing these components individually.

For example, consider a website that has different web pages with many components. Every component will have its own subcomponents. Testing each module without considering integration with other components is referred to as component testing.

Testing like this in React requires more sophisticated tools. So, we would need Jest and sometimes more sophisticated tools, like Enzyme, which we will discuss briefly later.

Snapshot Test

A snapshot test makes sure that the user interface (UI) of a web application does not change unexpectedly. It captures the code of a component at a moment in time, so that we can compare the component in one state with any other possible state it might take.

We will learn about snapshot testing in a later section.

Advantages and Disadvantages of Testing

Testing is great and should be done, but it has advantages and disadvantages.

Advantages

  1. It prevents unexpected regression.
  2. It allows the developer to focus on the current task, rather than worrying about the past.
  3. It allows modular construction of an application that would otherwise be too complex to build.
  4. It reduces the need for manual verification.

Disadvantages

  1. You need to write more code, as well as debug and maintain.
  2. Non-critical test failures might cause the app to be rejected in terms of continuous integration.

Introduction to Jest

Jest is a delightful JavaScript testing framework with a focus on simplicity. It can be installed with npm or Yarn. Jest fits into a broader category of utilities known as test runners. It works great for React applications, but it also works great outside of React applications.

Enzyme is a library that is used to test React applications. It’s designed to test components, and it makes it possible to write assertions that simulate actions that confirm whether the UI is working correctly.

Jest and Enzyme complement each other so well, so in this article we will be using both.

Process Of Running A Test With Jest

In this section, we will be installing Jest and writing tests. If you are new to React, then I recommend using Create React App, because it is ready for use and ships with Jest.

npm init react-app my-app

We need to install Enzyme ****and enzyme-adapter-react-16 with react-test-renderer (the number should be based on the version of React you’re using).

npm install --save-dev enzyme enzyme-adapter-react-16 react-test-renderer

Now that we have created our project with both Jest and Enzyme, we need to create a setupTest.js file in the src folder of the project. The file should look like this:

import { configure } from "enzyme";
import Adapter from "enzyme-adapter-react-16";
configure({ adapter: new Adapter() });

This imports Enzyme and sets up the adapter to run our tests.

Before continuing, let’s learn some basics. Some key things are used a lot in this article, and you’ll need to understand them.

  • it or test You would pass a function to this method, and the test runner would execute that function as a block of tests.
  • describe This optional method is for grouping any number of it or test statements.
  • expect This is the condition that the test needs to pass. It compares the received parameter to the matcher. It also gives you access to a number of matchers that let you validate different things. You can read more about it in the documentation.
  • mount This method renders the full DOM, including the child components of the parent component, in which we are running the tests.
  • shallow This renders only the individual components that we are testing. It does not render child components. This enables us to test components in isolation.

Creating A Test File

How does Jest know what’s a test file and what isn’t? The first rule is that any files found in any directory with the name __test__ are considered a test. If you put a JavaScript file in one of these folders, Jest will try to run it when you call Jest, for better or for worse. The second rule is that Jest will recognize any file with the suffix .spec.js or .test.js. It will search the names of all folders and all files in your entire repository.

Let’s create our first test, for a React mini-application created for this tutorial. You can clone it on GitHub. Run npm install to install all of the packages, and then npm start to launch the app. Check the README.md file for more information.

Let’s open App.test.js to write our first test. First, check whether our app component renders correctly and whether we have specified an output:

it("renders without crashing", () => {
  shallow(<App />);
});

it("renders Account header", () => {
  const wrapper = shallow(<App />);
  const welcome = <h1>Display Active Users Account Details</h1>;
  expect(wrapper.contains(welcome)).toEqual(true);
});

In the test above, the first test, with shallow, checks to see whether our app component renders correctly without crashing. Remember that the shallow method renders only a single component, without child components.

The second test checks whether we have specified an h1 tag output of “Display Active User Account” in our app component, with a Jest matcher of toEqual.

Now, run the test:

npm run test 
/* OR */
npm test

The output in your terminal should like this:

  PASS  src/App.test.js
  √ renders without crashing (34ms)
  √ renders Account header (13ms)

Test Suites: 1 passed, 1 total
Tests:       2 passed, 2 total
Snapshots:   0 total
Time:        11.239s, estimated 16s
Ran all test suites related to changed files.

Watch Usage: Press w to show more.

As you can see, our test passed. It shows we have one test suite named App.test.js, with two successful tests when Jest ran. We’ll talk about snapshot testing later, and you will also get to see an example of a failed test.

Skipping Or Isolating A Test

Skipping or isolating a test means that when Jest runs, a specific marked test is not run.

it.skip("renders without crashing", () => {
  shallow(<App />);
});

it("renders Account header", () => {
  const wrapper = shallow(<App />);
  const header = <h1>Display Active Users Account Details</h1>;
  expect(wrapper.contains(header)).toEqual(true);
});

Our first test will be skipped because we’ve used the skip method to isolate the test. So, it will not run or make any changes to our test when Jest runs. Only the second one will run. You can also use it.only().

It’s a bit frustrating to make changes to a test file and then have to manually run npm test again. Jest has a nice feature called watch mode, which watches for file changes and runs tests accordingly. To run Jest in watch mode, you can run npm test -- --watch or jest --watch. I would also recommend leaving Jest running in the terminal window for the rest of this tutorial.

Mocking Function

A mock is a convincing duplicate of an object or module without any real inner workings. It might have a tiny bit of functionality, but compared to the real thing, it’s a mock. It can be created automatically by Jest or manually.

Why should we mock? Mocking reduces the number of dependencies — that is, the number of related files that have to be loaded and parsed when a test is run. So, using a lot of mocks makes tests execute more quickly.

Mock functions are also known as “spies”, because they let you spy on the behavior of a function that is called directly by some other code, rather than only testing the output.

There are two ways to mock a function: either by creating a mock function to use it in test code, or by writing a manual mock to override a module dependency.

Manual mocks ****are used to stub out functionality with mock data. For example, instead of accessing a remote resource, like a website or a database, you might want to create a manual mock that allows you to use fake data.

We will use a mock function in the next section.

Testing React Components

The section will combine all of the knowledge we have gained so far in understanding how to test React components. Testing involves making sure the output of a component hasn’t unexpectedly changed to something else. Constructing components in the right way is by far the most effective way to ensure successful testing.

One thing we can do is to test components props — specifically, testing whether props from one component are being passed to another. Jest and the Enzyme API allow us to create a mock function to simulate whether props are being passed between components.

We have to pass the user-account props from the main App component to the Account component. We need to give user-account details to Account in order to render the active account of users. This is where mocking comes in handy, enabling us to test our components with fake data.

Let’s create a mock for the user props:

const user = {
  name: "Adeneye David",
  email: "david@gmail.com",
  username: "Dave",
};

We have created a manual mock function in our test file and wrapped it around the components. Let’s say we are testing a large database of users. Accessing the database directly from our test file is not advisable. Instead, we create a mock function, which enables us to use fake data to test our component.

describe("", () => {
  it("accepts user account props", () => {
    const wrapper = mount(<Account user={user} />);
    expect(wrapper.props().user).toEqual(user);
  });
  it("contains users account email", () => {
    const wrapper = mount(<Account user={user} />);
    const value = wrapper.find("p").text();
    expect(value).toEqual("david@gmail.com");
  });
});

We have two tests above, and we use a describe layer, which takes the component being tested. By specifying the props and values that we expect to be passed by the test, we are able to proceed.

In the first test, we check whether the props that we passed to the mounted component equal the mock props that we created above.

For the second test, we pass the user props to the mounted Account component. Then, we check whether we can find the <p> element that corresponds to what we have in the Account component. When we run the test suite, you’ll see that the test runs successfully.

We can also test the state of our component. Let’s check whether the state of the error message is equal to null:

it("renders correctly with no error message", () => {
  const wrapper = mount();
  expect(wrapper.state("error")).toEqual(null);
});

In this test, we check whether the state of our component error is equal to null, using a toEqual() matcher. If there is an error message in our app, the test will fail when run.

In the next section, we will go through how to test React components with snapshot testing, another amazing technique.

Snapshot Testing

Snapshot testing captures the code of a component at a moment in time, in order to compare it to a reference snapshot file stored alongside the test. It is used to keep track of changes in an app’s UI.

The actual code representation of a snapshot is a JSON file, and this JSON contains a record of what the component looked like when the snapshot was made. During a test, Jest compares the contents of this JSON file to the output of the component during the test. If they match, the test passes; if they don’t, the test fails.

To convert an Enzyme wrapper to a format that is compatible with Jest snapshot testing, we have to install enzyme-to-json:

npm install --save-dev enzyme-to-json

Let’s create our snapshot test. When we run it the first time, the snapshot of that component’s code will be composed and saved in a new __snapshots__ folder in the src directory.

it("renders correctly", () => {
  const tree = shallow(<App />);
  expect(toJson(tree)).toMatchSnapshot();
});

When the test above runs successfully, the current UI component will be compared to the existing one.

Now, let’s run the test:

npm run test

When the test suite runs, a new snapshot will be generated and saved to the __snapshots__ folder. When we run a test subsequently, Jest will check whether the components match the snapshot.

As explained in the previous section, that shallow method from the Enzyme package is used to render a single component and nothing else. It doesn’t render child components. Rather, it gives us a nice way to isolate code and get better information when debugging. Another method, named mount, is used to render the full DOM, including the child components of the parent component, in which we are running the tests.

We can also update our snapshot, Let’s make some changes to our component in order to make our test fail, which will happen because the component no longer corresponds to what we have in the snapshot file. To do this, let’s change the <h3> tag in our component from <h3> Loading...</h3> to <h3>Fetching Users...</h3>. When the test runs, this what we will get in the terminal:

 FAIL  src/App.test.js (30.696s)
  × renders correctly (44ms)

  ● renders correctly

    expect(received).toMatchSnapshot()
    Snapshot name: `renders correctly
1

    - Snapshot
    + Received


Display Active Users Account Details

- Loading... + Fetching Users...

7 | it("renders correctly", () => { 8 | const wrapper = shallow(); > 9 | expect(toJson(wrapper)).toMatchSnapshot(); | ^ 10 | }); 11 | 12 | /* it("renders without crashing", () => { at Object. (src/App.test.js:9:27) › 1 snapshot failed. Snapshot Summary › 1 snapshot failed from 1 test suite. Inspect your code changes or press `u` to update them. Test Suites: 1 failed, 1 total Tests: 1 failed, 1 total Snapshots: 1 failed, 1 total Time: 92.274s Ran all test suites related to changed files. Watch Usage: Press w to show more.

If we want our test to pass, we would either change the test to its previous state or update the snapshot file. In the command line, Jest provides instruction on how to update the snapshot. First, press w in the command line to show more, and then press u to update the snapshot.

› Press u to update failing snapshots.

When we press u to update the snapshot, the test will pass.

Conclusion

I hope you’ve enjoyed working through this tutorial. We’ve learned some Jest testing techniques using the Enzyme testing library. I’ve also introduced you to the process of running a test, testing React components, mocking, and snapshot testing. If you have any questions, you can leave them in the comments section below, and I’ll be happy to answer every one and work through any issues with you.

Resources And Further Reading

Smashing Editorial (ks, ra, il, al)

Building A Facial Recognition Web Application With React

Building A Facial Recognition Web Application With React

Building A Facial Recognition Web Application With React

Adeneye David Abiodun

If you are going to build a facial recognition web app, this article will introduce you to an easy way of integrating such. In this article, we will take a look at the Face Detection model and Predict API for our face recognition web app with React.

What Is Facial Recognition And Why Is It Important?

Facial recognition is a technology that involves classifying and recognizing human faces, mostly by mapping individual facial features and recording the unique ratio mathematically and storing the data as a face print. The face detection in your mobile camera makes use of this technology.

How Facial Recognition Technology Works

Facial recognition is an enhanced application bio-metric software that uses a deep learning algorithm to compare a live capture or digital image to the stored face print to verify individual identity. However, deep learning is a class of machine learning algorithms that uses multiple layers to progressively extract higher-level features from the raw input. For example, in image processing, lower layers may identify edges, while higher layers may identify the concepts relevant to a human such as digits or letters or faces.

Facial detection is the process of identifying a human face within a scanned image; the process of extraction involves obtaining a facial region such as the eye spacing, variation, angle and ratio to determine if the object is human.

Note: The scope of this tutorial is far beyond this; you can read more on this topic in “Mobile App With Facial Recognition Feature: How To Make It Real”. In today’s article, we’ll only be building a web app that detects a human face in an image.

A Brief Introduction To Clarifai

In this tutorial, we will be using Clarifai, a platform for visual recognition that offers a free tier for developers. They offer a comprehensive set of tools that enable you to manage your input data, annotate inputs for training, create new models, predict and search over your data. However, there are other face recognition API that you can use, check here to see a list of them. Their documentation will help you to integrate them into your app, as they all almost use the same model and process for detecting a face.

Getting Started With Clarifai API

In this article, we are just focusing on one of the Clarifai model called Face Detection. This particular model returns probability scores on the likelihood that the image contains human faces and coordinates locations of where those faces appear with a bounding box. This model is great for anyone building an app that monitors or detects human activity. The Predict API analyzes your images or videos and tells you what’s inside of them. The API will return a list of concepts with corresponding probabilities of how likely it is that these concepts are contained within the image.

You will get to integrate all these with React as we continue with the tutorial, but now that you have briefly learned more about the Clarifai API, you can deep dive more about it here.

What we are building in this article is similar to the face detection box on a pop-up camera in a mobile phone. The image presented below will give more clarification:

Sample-App
Sample-App. (Large preview)

You can see a rectangular box detecting a human face. This is the kind of simple app we will be building with React.

Setting Development Environment

The first step is to create a new directory for your project and start a new react project, you can give it any name of your choice. I will be using the npm package manager for this project, but you can use yarn depending on your choice.

Note: Node.js is required for this tutorial. If you don’t have it, go to the Node.js official website to download and install before continuing.

Open your terminal and create a new React project.

We are using create-react-app which is a comfortable environment for learning React and is the best way to start building a new single-pageapplication to React. It is a global package that we would install from npm. it creates a starter project that contains webpack, babel and a lot of nice features.

/* install react app globally */
npm install -g create-react-app

/* create the app in your new directory */
create-react-app face-detect

/* move into your new react directory */
cd face-detect

/* start development sever */
npm start

Let me first explain the code above. We are using npm install -g create-react-app to install the create-react-app package globally so you can use it in any of your projects. create-react-app face-detect will create the project environment for you since it’s available globally. After that, cd face-detect will move you into our project directory. npm start will start our development server. Now we are ready to start building our app.

You can open the project folder with any editor of your choice. I use visual studio code. It’s a free IDE with tons of plugins to make your life easier, and it is available for all major platforms. You can download it from the official website.

At this point, you should have the following folder structure.

FACE-DETECT TEMPLATE
├── node_modules
├── public 
├── src
├── .gitignore
├── package-lock.json
├── package.json
├── README.md

Note: React provide us with a single page React app template, let us get rid of what we won’t be needing. First, delete the logo.svg file in src folder and replace the code you have in src/app.js to look like this.

import React, { Component } from "react";
import "./App.css";
class App extends Component {
  render() {
    return (
      
); } } export default App;
src/App.js

What we did was to clear the component by removing the logo and other unnecessary code that we will not be making use of. Now replace your src/App.css with the minimal CSS below:

.App {
  text-align: center;
}
.center {
  display: flex;
  justify-content: center;
}

We’ll be using Tachyons for this project, It is a tool that allows you to create fast-loading, highly readable, and 100% responsive interfaces with as little CSS as possible.

You can install tachyons to this project through npm:

# install tachyons into your project
npm install tacyons

After the installation has completely let us add the Tachyons into our project below at src/index.js file.

import React from "react";
import ReactDOM from "react-dom";
import "./index.css";
import App from "./App";
import * as serviceWorker from "./serviceWorker";
// add tachyons below into your project, note that its only the line of code you adding here
import "tachyons";

ReactDOM.render(<App />, document.getElementById("root"));
// If you want your app to work offline and load faster, you can change
// unregister() to register() below. Note this comes with some pitfalls.
// Learn more about service workers: https://bit.ly/CRA-PWA
serviceWorker.register();

The code above isn’t different from what you had before, all we did was to add the import statement for tachyons.

So let us give our interface some styling at src/index.css file.


body {
  margin: 0;
  font-family: "Courier New", Courier, monospace;
  -webkit-font-smoothing: antialiased;
  -Moz-osx-font-smoothing: grayscale;
  background: #485563; /* fallback for old browsers */
  background: linear-gradient(
    to right,
    #29323c,
    #485563
  ); /* W3C, IE 10+/ Edge, Firefox 16+, Chrome 26+, Opera 12+, Safari 7+ */
}
button {
  cursor: pointer;
}
code {
  font-family: source-code-pro, Menlo, Monaco, Consolas, "Courier New",
    monospace;
}
src/index.css

In the code block above, I added a background color and a cursor pointer to our page, at this point we have our interface setup, let get to start creating our components in the next session.

Building Our React Components

In this project, we’ll have two components, we have a URL input box to fetch images for us from the internet — ImageSearchForm, we’ll also have an image component to display our image with a face detection box — FaceDetect. Let us start building our components below:

Create a new folder called Components inside the src directory. Create another two folders called ImageSearchForm and FaceDetect inside the src/Components after that open ImageSearchForm folder and create two files as follow ImageSearchForm.js and ImageSearchForm.css.

Then open FaceDetect directory and create two files as follow FaceDetect.js and FaceDetect.css.

When you are done with all these steps your folder structure should look like this below in src/Components directory:

src/Components TEMPLATE

├── src
  ├── Components 
    ├── FaceDetect
      ├── FaceDetect.css 
      ├── FaceDetect.js 
    ├── ImageSearchForm
      ├── ImageSearchForm.css 
      ├── ImageSearchForm.js

At this point, we have our Components folder structure, now let us import them into our App component. Open your src/App.js folder and make it look like what I have below.

import React, { Component } from "react";
import "./App.css";
import ImageSearchForm from "./components/ImageSearchForm/ImageSearchForm";
// import FaceDetect from "./components/FaceDetect/FaceDetect";

class App extends Component {
  render() {
    return (
      <div className="App">
        <ImageSearchForm />
        {/* <FaceDetect /> */}
      </div>
    );
  }
}
export default App;
src/App.js

In the code above, we mounted our components at lines 10 and 11, but if you notice FaceDetect is commented out because we are not working on it yet till our next section and to avoid error in the code we need to add a comment to it. We have also imported our components into our app.

To start working on our ImageSearchForm file, open the ImageSearchForm.js file and let us create our component below. This example below is our ImageSearchForm component which will contain an input form and the button.

import React from "react";
import "./ImageSearchForm.css";

// imagesearch form component

const ImageSearchForm = () => {
  return (
    <div className="ma5 to">
      <div className="center">
        <div className="form center pa4 br3 shadow-5">
          <input className="f4 pa2 w-70 center" type="text" />
          <button className="w-30 grow f4 link ph3 pv2 dib white bg-blue">
            Detect
          </button>
        </div>
      </div>
    </div>
  );
};
export default ImageSearchForm;
ImageSearchForm.js

In the above line component, we have our input form to fetch the image from the web and a Detect button to perform face detection action. I’m using Tachyons CSS here that works like bootstrap; all you just have to call is className. You can find more details on their website.

To style our component, open the ImageSearchForm.css file. Now let’s style the components below:

.form {
  width: 700px;
  background: radial-gradient(
      circle,
      transparent 20%,
      slategray 20%,
      slategray 80%,
      transparent 80%,
      transparent
    ),
    radial-gradient(
        circle,
        transparent 20%,
        slategray 20%,
        slategray 80%,
        transparent 80%,
        transparent
      )
      50px 50px,
    linear-gradient(#a8b1bb 8px, transparent 8px) 0 -4px,
    linear-gradient(90deg, #a8b1bb 8px, transparent 8px) -4px 0;
  background-color: slategray;
  background-size: 100px 100px, 100px 100px, 50px 50px, 50px 50px;
}

The CSS style property is a CSS pattern for our form background just to give it a beautiful design. You can generate the CSS pattern of your choice here and use it to replace it with.

Open your terminal again to run your application.

/* To start development server again */
npm start

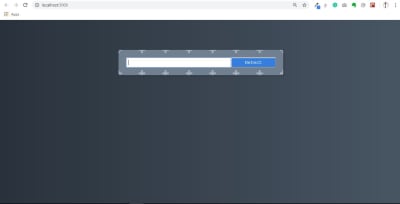
We have our ImageSearchForm component display in the image below.

Image-Search-Page
Image-Search-Page. (Large preview)

Now we have our application running with our first components.

Image Recognition API

It’s time to create some functionalities where we enter an image URL, press Detect and an image appear with a face detection box if a face exists in the image. Before that let setup our Clarifai account to be able to integrate the API into our app.

How to Setup Clarifai Account

This API makes it possible to utilize its machine learning app or services. For this tutorial, we will be making use of the tier that’s available for free to developers with 5,000 operations per month. You can read more here and sign up, after sign in it will take you to your account dashboard click on my first application or create an application to get your API-key that we will be using in this app as we progress.

Note: You cannot use mine, you have to get yours.

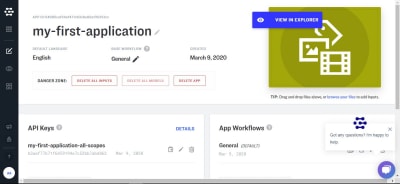
Clarifai-Dashboard
Clarifai-Dashboard. (Large preview)

This is how your dashboard above should look. Your API key there provides you with access to Clarifai services. The arrow below the image points to a copy icon to copy your API key.

If you go to Clarifai model you will see that they use machine learning to train what is called models, they train a computer by giving it many pictures, you can also create your own model and teach it with your own images and concepts. But here we would be making use of their Face Detection model.

The Face detection model has a predict API we can make a call to (read more in the documentation here).

So let’s install the clarifai package below.

Open your terminal and run this code:

/* Install the client from npm */
npm install clarifai

When you are done installing clarifai, we need to import the package into our app with the above installation we learned earlier.

However, we need to create functionality in our input search-box to detect what the user enters. We need a state value so that our app knows what the user entered, remembers it, and updates it anytime it gets changes.

You need to have your API key from Clarifai and must have also installed clarifai through npm.

The example below shows how we import clarifai into the app and also implement our API key.

Note that (as a user) you have to fetch any clear image URL from the web and paste it in the input field; that URL will the state value of imageUrl below.

import React, { Component } from "react";
// Import Clarifai into our App
import Clarifai from "clarifai";
import ImageSearchForm from "./components/ImageSearchForm/ImageSearchForm";
// Uncomment FaceDetect Component
import FaceDetect from "./components/FaceDetect/FaceDetect";
import "./App.css";

// You need to add your own API key here from Clarifai.
const app = new Clarifai.App({
  apiKey: "ADD YOUR API KEY HERE",
});

class App extends Component {
  // Create the State for input and the fectch image
  constructor() {
    super();
    this.state = {
      input: "",
      imageUrl: "",
    };
  }

// setState for our input with onInputChange function
  onInputChange = (event) => {
    this.setState({ input: event.target.value });
  };

// Perform a function when submitting with onSubmit
  onSubmit = () => {
        // set imageUrl state
    this.setState({ imageUrl: this.state.input });
    app.models.predict(Clarifai.FACE_DETECT_MODEL, this.state.input).then(
      function (response) {
        // response data fetch from FACE_DETECT_MODEL 
        console.log(response);
        /* data needed from the response data from clarifai API, 
           note we are just comparing the two for better understanding 
           would to delete the above console*/ 
        console.log(
          response.outputs[0].data.regions[0].region_info.bounding_box
        );
      },
      function (err) {
        // there was an error
      }
    );
  };
  render() {
    return (
      <div className="App">
        // update your component with their state
        <ImageSearchForm
          onInputChange={this.onInputChange}
          onSubmit={this.onSubmit}
        />
        // uncomment your face detect app and update with imageUrl state
        <FaceDetect imageUrl={this.state.imageUrl} />
      </div>
    );
  }
}
export default App;

In the above code block, we imported clarifai so that we can have access to Clarifai services and also add our API key. We use state to manage the value of input and the imageUrl. We have an onSubmit function that gets called when the Detect button is clicked, and we set the state of imageUrl and also fetch image with Clarifai FACE DETECT MODEL which returns a response data or an error.

For now, we’re logging the data we get from the API to the console; we’ll use that in the future when determining the face detect model.

For now, there will be an error in your terminal because we need to update the ImageSearchForm and FaceDetect Components files.

Update the ImageSearchForm.js file with the code below:

import React from "react";
import "./ImageSearchForm.css";
// update the component with their parameter
const ImageSearchForm = ({ onInputChange, onSubmit }) => {
  return (
    <div className="ma5 mto">
      <div className="center">
        <div className="form center pa4 br3 shadow-5">
          <input
            className="f4 pa2 w-70 center"
            type="text"
            onChange={onInputChange}    // add an onChange to monitor input state
          />
          <button
            className="w-30 grow f4 link ph3 pv2 dib white bg-blue"
            onClick={onSubmit}  // add onClick function to perform task
          >
            Detect
          </button>
        </div>
      </div>
    </div>
  );
};
export default ImageSearchForm;

In the above code block, we passed onInputChange from props as a function to be called when an onChange event happens on the input field, we’re doing the same with onSubmit function we tie to the onClick event.

Now let us create our FaceDetect component that we uncommented in src/App.js above. Open FaceDetect.js file and input the code below:

In the example below, we created the FaceDetect component to pass the props imageUrl.

import React from "react";
// Pass imageUrl to FaceDetect component
const FaceDetect = ({ imageUrl }) => {
  return (
  # This div is the container that is holding our fetch image and the face detect box
    <div className="center ma">
      <div className="absolute mt2">
                        # we set our image SRC to the url of the fetch image 
        <img alt="" src={imageUrl} width="500px" heigh="auto" />
      </div>
    </div>
  );
};
export default FaceDetect;

This component will display the image we have been able to determine as a result of the response we’ll get from the API. This is why we are passing the imageUrl down to the component as props, which we then set as the src of the img tag.

Now we both have our ImageSearchForm component and FaceDetect components are working. The Clarifai FACE_DETECT_MODEL has detected the position of the face in the image with their model and provided us with data but not a box that you can check in the console.

Image-Link-Form
Image-Link-Form. (Large preview)

Now our FaceDetect component is working and Clarifai Model is working while fetching an image from the URL we input in the ImageSearchForm component. However, to see the data response Clarifai provided for us to annotate our result and the section of data we would be needing from the response if you remember we made two console.log in App.js file.

So let’s open the console to see the response like mine below:

Image-Link-Form[Console]
Image-Link-Form[Console]. (Large preview)

The first console.log statement which you can see above is the response data from Clarifai FACE_DETECT_MODEL made available for us if successful, while the second console.log is the data we are making use of in order to detect the face using the data.region.region_info.bounding_box. At the second console.log, bounding_box data are:

bottom_row: 0.52811456
left_col: 0.29458505
right_col: 0.6106333
top_row: 0.10079138

This might look twisted to us but let me break it down briefly. At this point the Clarifai FACE_DETECT_MODEL has detected the position of face in the image with their model and provided us with a data but not a box, it ours to do a little bit of math and calculation to display the box or anything we want to do with the data in our application. So let me explain the data above,

bottom_row: 0.52811456 This indicates our face detection box start at 52% of the image height from the bottom.
left_col: 0.29458505 This indicates our face detection box start at 29% of the image width from the left.
right_col: 0.6106333 This indicates our face detection box start at 61% of the image width from the right.
top_row: 0.10079138 This indicates our face detection box start at 10% of the image height from the top.

If you take a look at our app inter-phase above, you will see that the model is accurate to detect the bounding_box from the face in the image. However, it left us to write a function to create the box including styling that will display a box from earlier information on what we are building based on their response data provided for us from the API. So let’s implement that in the next section.

Creating A Face Detection Box

This is the final section of our web app where we get our facial recognition to work fully by calculating the face location of any image fetch from the web with Clarifai FACE_DETECT_MODEL and then display a facial box. Let open our src/App.js file and include the code below:

In the example below, we created a calculateFaceLocation function with a little bit of math with the response data from Clarifai and then calculate the coordinate of the face to the image width and height so that we can give it a style to display a face box.

import React, { Component } from "react";
import Clarifai from "clarifai";
import ImageSearchForm from "./components/ImageSearchForm/ImageSearchForm";
import FaceDetect from "./components/FaceDetect/FaceDetect";
import "./App.css";

// You need to add your own API key here from Clarifai.
const app = new Clarifai.App({
  apiKey: "ADD YOUR API KEY HERE",
});

class App extends Component {
  constructor() {
    super();
    this.state = {
      input: "",
      imageUrl: "",
      box: {},  # a new object state that hold the bounding_box value
    };
  }

  // this function calculate the facedetect location in the image
  calculateFaceLocation = (data) => {
    const clarifaiFace =
      data.outputs[0].data.regions[0].region_info.bounding_box;
    const image = document.getElementById("inputimage");
    const width = Number(image.width);
    const height = Number(image.height);
    return {
      leftCol: clarifaiFace.left_col * width,
      topRow: clarifaiFace.top_row * height,
      rightCol: width - clarifaiFace.right_col * width,
      bottomRow: height - clarifaiFace.bottom_row * height,
    };
  };

  /* this function display the face-detect box base on the state values */
  displayFaceBox = (box) => {
    this.setState({ box: box });
  };

  onInputChange = (event) => {
    this.setState({ input: event.target.value });
  };

  onSubmit = () => {
    this.setState({ imageUrl: this.state.input });
    app.models
      .predict(Clarifai.FACE_DETECT_MODEL, this.state.input)
      .then((response) =>
        # calculateFaceLocation function pass to displaybox as is parameter
        this.displayFaceBox(this.calculateFaceLocation(response))
      )
      // if error exist console.log error
      .catch((err) => console.log(err));
  };

  render() {
    return (
      <div className="App">
        <ImageSearchForm
          onInputChange={this.onInputChange}
          onSubmit={this.onSubmit}
        />
        // box state pass to facedetect component
        <FaceDetect box={this.state.box} imageUrl={this.state.imageUrl} />
      </div>
    );
  }
}
export default App;

The first thing we did here was to create another state value called box which is an empty object that contains the response values that we received. The next thing we did was to create a function called calculateFaceLocation which will receive the response we get from the API when we call it in the onSubmit method. Inside the calculateFaceLocation method, we assign image to the element object we get from calling document.getElementById("inputimage") which we use to perform some calculation.

leftCol clarifaiFace.left_col is the % of the width multiply with the width of the image then we would get the actual width of the image and where the left_col should be.
topRow clarifaiFace.top_row is the % of the height multiply with the height of the image then we would get the actual height of the image and where the top_row should be.
rightCol This subtracts the width from (clarifaiFace.right_col width) to know where the right_Col should be.
bottomRow This subtract the height from (clarifaiFace.right_col height) to know where the bottom_Row should be.

In the displayFaceBox method, we update the state of box value to the data we get from calling calculateFaceLocation.

We need to update our FaceDetect component, to do that open FaceDetect.js file and add the following update to it.

import React from "react";
// add css to style the facebox
import "./FaceDetect.css";
// pass the box state to the component

const FaceDetect = ({ imageUrl, box }) => {
  return (
    <div className="center ma">
      <div className="absolute mt2">
            /* insert an id to be able to manipulate the image in the DOM */
        <img id="inputimage" alt="" src={imageUrl} width="500px" heigh="auto" />
       //this is the div displaying the faceDetect box base on the bounding box value 
      <div
          className="bounding-box"
          // styling that makes the box visible base on the return value
          style={{
            top: box.topRow,
            right: box.rightCol,
            bottom: box.bottomRow,
            left: box.leftCol,
          }}
        ></div>
      </div>
    </div>
  );
};
export default FaceDetect;

In order to show the box around the face, we pass down box object from the parent component into the FaceDetect component which we can then use to style the img tag.

We imported a CSS we have not yet created, open FaceDetect.css and add the following style:

.bounding-box {
  position: absolute;
  box-shadow: 0 0 0 3px #fff inset;
  display: flex;
  flex-wrap: wrap;
  justify-content: center;
  cursor: pointer;
}

Note the style and our final output below, you could see we set our box-shadow color to be white and display flex.

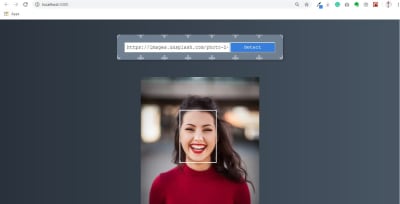
At this point, your final output should look like this below. In the output below, we now have our face detection working with a face box to display and a border style color of white.

Final-App1
Final App. (Large preview)

Let try another image below:

Final-App2
Final App. (Large preview)

Conclusion

I hope you enjoyed working through this tutorial. We’ve learned how to build a face recognition app that can be integrated into our future project with more functionality, you also learn how to use an amazing machine learning API with react. You can always read more on Clarifai API from the references below. If you have any questions, you can leave them in the comments section and I’ll be happy to answer every single one and work you through any issues.

The supporting repo for this article is available on Github.

Resources And Further Reading

Smashing Editorial (ks, ra, yk, il)

Best Practices With React Hooks

Best Practices With React Hooks

Best Practices With React Hooks

Adeneye David Abiodun

React Hooks are a new addition in React 16.8 that let you use state and other React features without writing a class component. In other words, Hooks are functions that let you “hook into” React state and lifecycle features from function components. (They do not work inside class components.)

React provides a few built-in Hooks like useState. You can also create your own Hooks to reuse stateful behavior between different components. The example below shows a counter whose state is managed using the useState() hook. Each time you click on the button, we make use of setCount() to update the value of count by 1.

See the Pen [React Hook example with Counter](https://codepen.io/smashingmag/pen/QWbXMyM) by Adeneye Abiodun David.

See the Pen React Hook example with Counter by Adeneye Abiodun David.

This example renders a counter with a value of 0. When you click the button, it increments the value by 1. The initial value of the component is defined using useState.

const [count, setCount] = useState(0)

As you can see, we set that to be 0. Then we use the onClick() method to call setCount when we want to increment the value.

<button onClick={() => setCount(count + 1)}>
  Click me
</button>

Before the release of React Hooks, this example would have used more lines of code, as we’d have had to make use of a class component.

Rules Of React Hooks

Before we dive deep into the best practices, we need to understand the rules of React Hooks which are also some of the fundamental concepts of the practices presented in this article.

React Hooks are JavaScript functions, but you need to follow two rules when using them.

  1. Call Hooks at the top level;
  2. Only call Hooks from React components.

Note: These two rules were introduced in React Hooks, as opposed to being part of JavaScript itself.

Let’s look at these rules in more detail.

Call Hooks At The Top Level

Don’t call Hooks inside loops, conditions, or nested functions. Always use Hooks at the top level of your React function. By following this rule, you ensure that Hooks are called in the same order each time a component renders. That’s what allows React to correctly preserve the state of Hooks between multiple useState and useEffect calls.

Let’s make a Form component which will have two states:

  • accountName
  • accountDetail

These states will have default values, we’ll make use of the useEffect hook to persist the state to either the local storage of our browser or to the title of our document.

Now, this component will be maybe to successfully manage its state if it remains the same between multiple calls of useState and useEffect.

function Form() {
  // 1. Use the accountName state variable
  const [accountName, setAccountName] = useState('David');

  // 2. Use an effect for persisting the form
  useEffect(function persistForm() {
    localStorage.setItem('formData', accountName);
  });

  // 3. Use the accountDetail state variable
  const [accountDetail, setAccountDetail] = useState('Active');

  // 4. Use an effect for updating the title
  useEffect(function updateStatus() {
    document.title = accountName + ' ' + accountDetail;
  });

  // ...
}

If the order of our Hooks changes (which can be possible when they are called in loops or conditionals), React will have a hard time figuring out how to preserve the state of our component.

// ------------
useState('David')           // 1. Initialize the accountName state variable with 'David'
useEffect(persistForm)     // 2. Add an effect for persisting the form
useState('Active')        // 3. Initialize the accountdetail state variable with 'Active'
useEffect(updateStatus)     // 4. Add an effect for updating the status

// -------------
// Second render
// -------------
useState('David')           // 1. Read the accountName state variable (argument is ignored)
useEffect(persistForm)     // 2. Replace the effect for persisting the form
useState('Active')        // 3. Read the accountDetail state variable (argument is ignored)
useEffect(updateStatus)     // 4. Replace the effect for updating the status

// ...

That’s the order React follows to call our hooks. Since the order remains the same, it will be able to preserve the state of our component. But what happens if we put a Hook call inside a condition?

// 🔴 We're breaking the first rule by using a Hook in a condition
  if (accountName !== '') {
    useEffect(function persistForm() {
      localStorage.setItem('formData', accountName);
    });
  }

The accountName !== '' condition is true on the first render, so we run this Hook. However, on the next render the user might clear the form, making the condition false. Now that we skip this Hook during rendering, the order of the Hook calls becomes different:

useState('David')           // 1. Read the accountName state variable (argument is ignored)
// useEffect(persistForm)  // 🔴 This Hook was skipped!
useState('Active')        // 🔴 2 (but was 3). Fail to read the accountDetails state variable
useEffect(updateStatus)     // 🔴 3 (but was 4). Fail to replace the effect

React wouldn’t know what to return for the second useState Hook call. React expected that the second Hook call in this component corresponds to the persistForm effect, just like during the previous render — but it doesn’t anymore. From that point on, every next Hook call after the one we skipped would also shift by one — leading to bugs.

This is why Hooks must be called on the top level of our components. If we want to run an effect conditionally, we can put that condition inside our Hook.

Note: Check out the React Hook docs to read more on this topic.

Only Call Hooks From React Components

Don’t call Hooks from regular JavaScript functions. Instead, you can call Hooks from React function components. Let’s take look at the difference between JavaScript function and React component below:

JavaScript Function
import { useState } = "react";

function toCelsius(fahrenheit) {
  const [name, setName] = useState("David");
  return (5/9) * (fahrenheit-32);
}
document.getElementById("demo").innerHTML = toCelsius;

Here we import the useState hook from the React package, and then declared our function. But this is invalid as it is not a React component.

React Function

import React, { useState} from "react";
import ReactDOM from "react-dom";

function Account(props) {
  const [name, setName] = useState("David");
  return <p>Hello, {name}! The price is <b>{props.total}</b> and the total amount is <b>{props.amount}</b></p>
}
ReactDom.render(
  <Account total={20} amount={5000} />,
  document.getElementById('root')
);

Even though the body of both looks similar, the latter becomes a component when we import React into the file. This is what makes it possible for us to use things like JSX and React hooks inside.

If you happened to import your preferred hook without importing React (which makes it a regular function), you will not be able to make use of the Hook you’ve imported as the Hook is accessible only in React component.

Call Hooks From Custom Hooks

A custom Hook is a JavaScript function whose name starts with use and that may call other Hooks. For example, useUserName is used below a custom Hook that calls the useState and useEffect hooks. It fetches data from an API, loops through the data, and calls setIsPresent() if the specific username it received is present in the API data.

export default function useUserName(userName) {
  const [isPresent, setIsPresent] = useState(false);
  
  useEffect(() => {
    const data = MockedApi.fetchData();
    data.then((res) => {
      res.forEach((e) => {
        if (e.name === userName) {
          setIsPresent(true);
        }
     });
    });
  });
    
  return isPresent;
}

We can then go on to reuse the functionality of this hook in other places where we need such in our application. In such places, except when needed, we don’t have to call useState or useEffect anymore.

By following this rule, you ensure that all stateful logic in a component is clearly visible from its source code.

ESLint Plugin

ESLint plugin called eslint-plugin-react-hooks enforces the rules above. This comes in handy in enforcing the rules when working on a project. I suggest you make use of this plugin when working on your project, especially when working with others. You can add this plugin to your project if you’d like to try it:

// Your ESLint configuration
{
  "plugins": [
    // ...
    "react-hooks"
  ],
  "rules": {
    // ...
    "react-hooks/rules-of-hooks": "error", // Checks rules of Hooks
    "react-hooks/exhaustive-deps": "warn" // Checks effect dependencies
  }
}

This plugin is included by default in Create React App. So you don’t need to add it if you bootstrap your React applications using Create-React-App.

Thinking In Hooks

Let’s take a brief look at class components and functional components (with Hooks), before diving into the few Hooks best practices.

The simplest way to define a component in React is to write a JavaScript function that returns a React element:

function Welcome(props) {
  return <h1>Hello, {props.name}</h1>;
}

The Welcome component accepts props which is an object that contains data and returns a React element. We can then import and render this component in another component.

The class component uses a programming methodology called Encapsulation which basically means that everything relevant to the class component will live within it. Life-cycle methods (constructors, componentDidMount(), render, and so on) give components a predictable structure.

Encapsulation is one of the fundamentals of OOP (Object-Oriented Programming). It refers to the bundling of data within the methods that operate on that data, and is used to hide the values or state of a structured data object inside a class — preventing unauthorized parties’ direct access to them.

With Hooks, the composition of a component changes from being a combination of life-cycle Hooks — to functionalities with some render at the end.

Function Component

The example below shows how custom Hooks can be used in a functional component (without showcasing what the body is). However, what it does or can do is not limited. It could be instantiating state variables, consuming contexts, subscribing the component to various side effects — or all of the above if you’re using a custom hook!

function {
  useHook{...};
  useHook{...};
  useHook{...};
  return (
    
...
); }

Class Component

A class component requires you to extend from React.Component and create a render function which returns a React element. This requires more code but will also give you some benefits.

class {
  constructor(props) {...}
  componentDidMount() {...}
  componentWillUnmount() {...}
  render() {...}
}

There are some benefits you get by using functional components in React:

  1. It will get easier to separate container and presentational components because you need to think more about your component’s state if you don’t have access to setState() in your component.
  2. Functional components are much easier to read and test because they are plain JavaScript functions without state or lifecycle-hooks.
  3. You end up with less code.
  4. The React team mentioned that there may be a performance boost for functional components in future React versions.

This leads to the first best practice when using React Hooks.

Hooks Best Practices

1. Simplify Your Hooks

Keeping React Hooks simple will give you the power to effectively control and manipulate what goes on in a component throughout its lifetime. Avoid writing custom Hooks as much as possible; you can inline a useState() or useEffect() instead of creating your own hook.

If you find yourself making use of a bunch of custom Hooks that are related in functionality, you can create a custom hook that acts as a wrapper for these. Let’s take a look at two different functional components with hooks below.

Functional Component v1
function {
  useHook(...);
  useHook(...);
  useHook(...);
  return(
    <div>...</div>
  );
}
Functional Component v2
function {
  useCustomHook(...);
    useHook(...);
    useHook(...);
  return(
    <div>...</div>
  );
}

v2 is a better version because it keeps the hook simple and all other useHooks are inline accordingly. This allows us to create functionality that can be reused across different components and also gives us more power to control and manipulate our components effectively. Instead of adopting v1 in which our components are littered with Hooks, you should make use of v2 which will make debugging easy and your code cleaner.

2. Organize And Structure Your Hooks

One of the advantages of React Hooks is the ability to write less code that is easy to read. In some cases, the amount of useEffect() and useState() can still be confusing. When you keep your component organized it will help in readability and keep the flow of your components consistent and predictable. If your custom Hooks are too complicated, you can always break them down to sub-custom Hooks. Extract the logic of your component to custom Hooks to make your code readable.

3. Use React Hooks Snippets

React Hooks Snippets is a Visual Studio Code extension to make React Hooks easier and faster. Currently, five hooks are supported:

  • useState()
  • useEffect()
  • useContext()
  • useCallback()
  • useMemo()

Other snippets have also been added. I have tried working with these Hooks and it has been one of the best practices I’ve personally used while working with them.

There are two ways you can add React Hooks snippets to your project:

  1. Command
    Launch the VS Code Quick open (Ctrl+P), paste ext install ALDuncanson.react-hooks-snippets and press Enter.
  2. Extension Marketplace
    Launch ‘VS Code Extension Marketplace’ (Ctrl+Shift+X) and search for ‘React Hook Snippets’. Then, look for the ‘Alduncanson’ icon.

I recommend the first snippet. Read more about the snippets here or check for the lastest Hooks snippets here.

4. Put Hooks Rules Into Consideration

Endeavor to always put the two rules of Hooks we learned earlier into consideration while working with React Hooks.

  • Only call your Hooks at the top level. Don’t call Hooks inside loops, conditions or nested functions.
  • Always call Hooks from React function components or from custom Hooks, don’t call Hooks from regular JavaScript functions.

The ESlint plugin called eslint-plugin-react-hooks enforces these two rules, you can add this plugin to your project if you’d like it as we explain above in rules of hooks section.

Best practices have not been fully resolved because Hooks are still relatively new. So adoption should be taken with precaution one would take in adopting in any early technology. With that in mind, Hooks are the way for the future of React.

Conclusion

I hope you enjoyed this tutorial. We’ve learned the two most important rules of React Hooks and how to effectively think in Hooks. We looked at functional components and some best practices in writing Hooks the right and effective way. As brief as the rules are, it’s important to make them your guiding compass when writing rules. If you are prone to forget it, you can make use of the ESLint plugin to enforce it.

I hope you will take all of the lessons learned here in your next React project. Good luck!

Resources

Smashing Editorial (ks, ra, yk, il)