What are the main objectives we want to achieve when we talk about web strats? It would be great if theirs response to my question.
Please send me a Direct Message if interested or Check my Profile
Thanks

Tips, Expertise, Articles and Advice from the Pro's for Your Website or Blog to Succeed

What are the main objectives we want to achieve when we talk about web strats? It would be great if theirs response to my question.
Please send me a Direct Message if interested or Check my Profile
Thanks
Installing Joomla on one of Microsoft's SQL-based back-ends can be simple with the setup utilities provided. The process is shown in detail via tutorials on Hooduku's channel on YouTube. Here is a pair of videos that can get you set up quickly and easily!
You can find the second part of this installation guide on the site linked below, as it hasn't been put on YouTube yet.
Well, sheesh. I opened a little can of worms when sharing Miriam’s “Am I on the IndieWeb yet?” with a short post bemoaning my own trouble getting on the IndieWeb train. But it’s a good can of worms.
I think it was something like the next day after publishing that short post that David Shanske reached out and offered to help wrap my head around IndieWeb and the components that it comprises. And gosh dang if it wasn’t ridiculously helpful! So much so that I’d like to link you up to a new post David wrote after we talked, then summarize things here as best as I can because (1) it’s helpful to write things down and (2) have a reference for later.
David had actually helped someone get their WordPress site all set up with IndieWeb powers. That person, too, was struggling to understand how the various pieces fit together. So, David already had this top of mind when Miriam and I were writing.
“IndieWeb” is a new term for many folks and that’s where a lot of confusion breeds. Is it a framework? A philosophy? A set of standards? Depending on which one it is, the expectations shift as far as what it looks like to be a part of it.
It’s sort of all of the above. And that needs to be solidified a bit. There’s nothing inherently confusing about IndieWeb itself once you view it through those different lenses. After reading David’s post my understanding is that IndieWeb is more of a set of protocols. Sorta like working with structured data or OpenGraph in markup. There’s nothing to install per se, but there are standards for how to integrate them into your work.
Your identity powers IndieWeb. In other words, your site establishes your identity and can be used to do lots of things, like:
If that sorta sounds like pingbacks, well, it sorta is. But much more robust and maintained.
The big difference is that WordPress provides a lot of the requirements needed to do IndieWeb-y things. I like how David explains it:
The IndieWeb implementation on WordPress is a [series] of building blocks that you can or cannot choose to use, which is what makes it wonderful, but sometimes confusing. WordPress has a philosophy of decisions, not options. But the IndieWeb is all about options…about building the features that are right for you.
Those building blocks are plugins that you install to add IndieWeb protocols and technologies to WordPress. It’s awesome those are readily available because that takes a a lot of the work out of things. Running a static site, though, you’re on the hook for establishing most of that yourself.
David’s post is 100% focused on the WordPress implementation. Your mileage may vary, but you will certainly walk away with a better idea of what protocols are available and how they fit together after reading his post — and hopefully this one as well.

I thought it was doing so much stuff behind the scenes, but it’s a lot more simple than that:
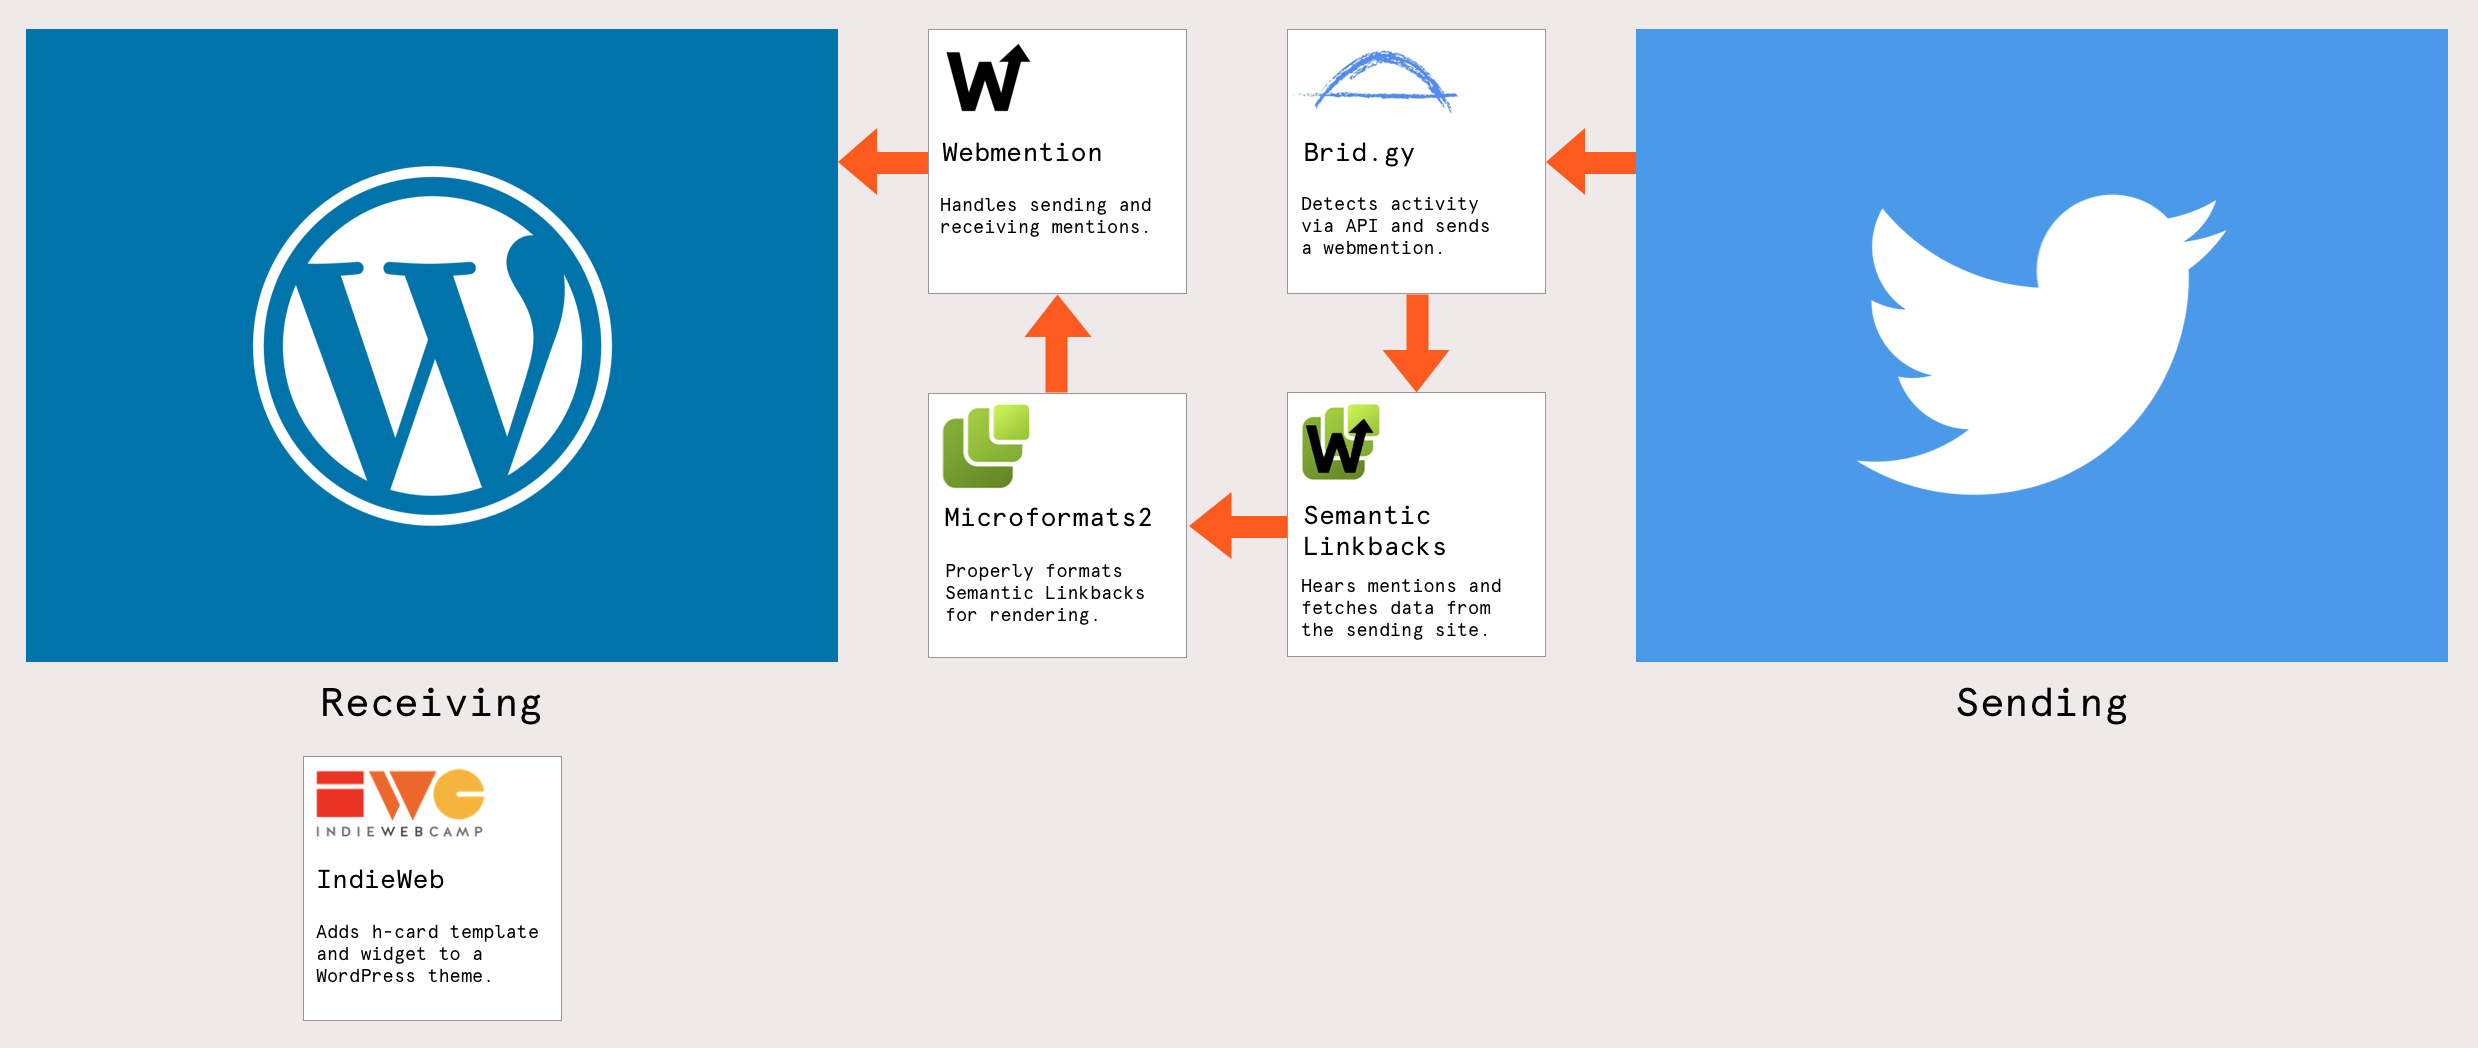
The plugin by itself handles establishing your identity as the IndieWeb sees it. It offers an h-card template and widget. H-Card is the markup for marking up information about a person or place. So, this is an element many people opt to put on their site anyway.
So, really, it’s possible to get the same sort of thing by correctly marking up a WordPress theme. The convenience here is that you get a handy little template that’s marked up to support the h-card open format and a widget to drop it into a theme’s widget area.
Here’s a super detailed example of the h-card markup pulled from the documentation for Microformats2:
<div class="h-card">
  <img class="u-photo" alt="photo of Mitchell"
       src="https://webfwd.org/content/about-experts/300.mitchellbaker/mentor_mbaker.jpg"/>
  <a class="p-name u-url"
     href="http://blog.lizardwrangler.com/"
    >Mitchell Baker</a>
 (<a class="u-url"
     href="https://twitter.com/MitchellBaker"
    >@MitchellBaker</a>)
  <span class="p-org">Mozilla Foundation</span>
  <p class="p-note">
    Mitchell is responsible for setting the direction and scope of the Mozilla Foundation and its activities.
  </p>
  <span class="p-category">Strategy</span>
  <span class="p-category">Leadership</span>
</div>
See those class names? Classes like .h-card, u-photo, p-name, etc. all provide contextual meaning for a person’s identity which it then parsed as JSON:
{
  "items": [{
    "type": ["h-card"],
    "properties": {
      "photo": ["https://webfwd.org/content/about-experts/300.mitchellbaker/mentor_mbaker.jpg"],
      "name": ["Mitchell Baker"],
      "url": [
        "http://blog.lizardwrangler.com/",
        "https://twitter.com/MitchellBaker"
      ],
      "org": ["Mozilla Foundation"],
      "note": ["Mitchell is responsible for setting the direction and scope of the Mozilla Foundation and its activities."],
      "category": [
        "Strategy",
        "Leadership"
      ]
    }
  }]
}
The plugin isn’t doing the sending, receiving, or parsing. Instead, it provides a WordPress site with a way to verify your identity in the markup.

If you scratched your head first time you saw “Microformats” like I did, David defines it nicely:
[…] Microformats…a way of marking up HTML to allow elements to be identified. It is one of several ways of doing this, but is a very simple and readable one, which is why it is popular in the IndieWeb community.
The problem, as David continues, is that many themes aren’t marked up in a Microformats-friendly way — which is what the Microformats2 plugin is designed to fix. That said, David is quick to call out that the plugin is extremely limited in how it accomplishes this, and he recommends instead marking up a theme by hand.
According to David, the next major release of the Webmention plugin will likely include smarter ways of detecting content and images it can use and formatting them for Microformats2 support.

OK, so if you’ve established your identity through your site so you are discoverable, and your site is marked up for h-card support using Microformats2. Great! You still need something in the middle working as an operator that sends and receives notifications. In other words, when another site mentions you — called a Webmention — the site mentioning you needs a way to support sending that mention to you, and your site needs a way to accept it (or vice versa).
That’s what the Webmention plugin is for. It’s also probably the source of most of my IndieWeb confusion. I thought it was formatting data and needed an additional service to send and receive it. Nope! It’s actually sending and receiving the data rather than creating the mention. Back to David:
Back when it was built, the plugin handled only the business of receiving and sending webmentions, not handling display to any degree. Semantic Linkbacks, a separate plugin handled that for not only webmentions, but the older pingback and trackback protocols.
So, the Webmention plugin is communicating notifications. Meanwhile, another plugin called Semantic Linkbacks is what handles the data. And what the heck are Semantic Linkbacks?

Semantic Linkbacks is another plugin that handles another piece of the process. There’s no way I can explain it better than David already does:
Semantic Linkbacks takes a webmention, which is a notification that another site has linked to something on your site, fetches the other site, and tries to render a display of the information. How that is done can vary from just a profile photo (if it can find one), to interpreting it as a full comment.
It does this using Microformats.
I expected that the main IndieWeb plugin was already doing this since it handles other markup. But it only provides the template and widget to get your identity on your site. Once the Semantic Linkbacks plugin fetches an incoming webmention, it takes the data, formats it, then attempts to display it.
Sounds like the plugin will be somewhat merged with (or replaced by) an upcoming version of the Webmention plugin:
Since many people are not inclined, or not comfortable modifying a theme, the new version of Webmentions will include several different alternative ways to try to find an image or summary to display…from OpenGraph (which Facebook and Twitter use to display URLs provided to it) to detecting the WordPress REST API version of a page and using that to get the author name and profile image. None of them will provided as much context as Microformats, but the experience will still be something worth installing.
That’s certainly nice as it taps into the WordPress REST API for the JSON response and formats that for display.
A Webmention can be an interaction, say someone likes your post on Twitter or retweets it.

Differentiating a like from a repost from a comment from a whatever needs to happen, and you’d need to implement the Twitter (or whatever) API to draw those distinctions.
That’s something you can certainly do! But if you’d rather plug and play, one of the IndieWeb community members made a service called Brid.gy. You create an account, hook up your site, and give app permissions to the service… then you’re done!
What Brid.gy has done is essentially implement the APIs for Twitter, Facebook, Instagram, and others, so that when it detects that a post in those services that interacts with your syndicated post, a Webmention is sent to your site and goes through the process of publishing on your own site.
Quick hits:
I attempted to make an illustration that outlines the various pieces in my last post, but let’s try again with an updated understanding of what’s happening:

High fives to David for both reaching out and taking the time to show me what it looks like to implement IndieWeb on WordPress. I can’t claim I fully understand all the nuances, but I at least feel like I have a decent grasp of the pieces — the philosophy, protocols, and tech — that are required to make it happen.
I’d like to turn it around to you! Does this help clarify things for you? Is there anything you’re struggling to understand? Think you’re able to configure a WordPress site with IndieWeb features now? Let’s take it to the comments!
De-Mystifying IndieWeb on a WordPress Site originally published on CSS-Tricks. You should get the newsletter.
In Bruce Lee’s famous movie, “Enter the Dragon,” there’s a scene of Bruce on the junk with the other contenders. One of them, Parsons, asks, “What’s your style?” Bruce answers, “The art of fighting without fighting,” after which he tricks Parsons onto the lifeboat, and Parsons is dragged in that boat behind the ship while the onlookers laugh.
Similar to the “What’s your style?” is “What’s your goal?” questions, there is no one right style, and there is no one right goal. Before testing APIs, determine the goals of testing; the goals of testing will help determine the tool specifications. Are there compliance standards to meet? What are the internal departmental and business goals? Are there contractual requirements? Does the SDLC require SAST and DAST to be applied? Does the CISO require RASP and IAST? Define and document the requirements. Remember – if it isn’t documented, it doesn’t exist.
Multiple outlets, including mint, are reporting that WhatsApp is poised to release an API dedicated to providing alerts for missed calls. This new API was first spotted by a platform tracker who noticed its inclusion in upcoming releases.
The platform tracker, named WABetaInfo, noted that:


Java and Python are two of the most popular computer languages in use today. Both are very mature and provide the tools and technology ecosystems to support developing solutions to the challenging problems that arise in the world of data science. Each has its idiosyncrasies. It’s important to understand how they compare tackling different problems, whether they shine or lack the required flexibility to handle the assigned tasks. When one is preferable over the other or when they work in tandem complementing each other.
Python is a dynamically typed language, very straightforward to work with, and is certainly the language of choice to do complex computations if we don't have to worry about intricate program flows. It provides excellent libraries (Pandas, NumPy, Matplotlib, ScyPy, PyTorch, TensorFlow, etc.) to support logical, mathematical, and scientific operations on data structures or arrays.
GovPilot, a provider of modern cloud-based government management software has partnered with the International Code Council (ICC) and General Code to integrate the organization’s newly launched, ICC Code Connect API. ICC Code Connect API was created to empower organizations with instant, digital access to the latest building code requirements within their existing workflow applications.


There is no doubt that our current state of living is based on our connection to the digital space. The 21st century has had a big shift in the majority of things online, companies are now relocating to the cloud, and we have the availability of online banking and marketing; see also, our social and personal life are all out there in the digital world.
This implies that no matter how open you are to people within your circle, there is some data or information that you keep private to yourself alone. The same is done digitally in terms of personal or business information processed using your computer or other devices online.
API gateways play a vital role while exposing microservices. They are an additional hop in the network that the incoming request must go through in order to communicate with the services. An API gateway does routing, composition, protocol translation, and user policy enforcement after it receives a request from the client and then reverse proxies it to the appropriate underlying API. As the API gateways are capable of doing the above-mentioned tasks, they can be also configured to send the incoming client requests to an external third-party authorization (authz) server. The fate of the incoming request then depends upon the response from this external auth server to the gateway. This is exactly where Open Policy Agent (OPA) comes into the picture.
There are many open-source Kubernetes native API gateways out there like Contour, Kong Gateway, Traefik, Gloo, etc. In this article, we will be exploring the Emissary Ingress.
Hi guys, I am relatively new to Python and have been working on a calculator application. It is relatively simple, but I would like to share it with everyone here in the group. I hope that there is someone in Daniweb who can guide me through Python.
As I read about Python, it is among the top three programming languages, and has many areas of use.
My background is in Electrical engineering, and I hope to use Python for some purpose in electrical engineering.
Please feel free to make any suggestions or improvements to the code.
# Program make a simple calculator

# This function adds two numbers
def add(x, y):
    return x + y

# This function subtracts two numbers
def subtract(x, y):
    return x - y

# This function multiplies two numbers
def multiply(x, y):
    return x * y

# This function divides two numbers
def divide(x, y):
    return x / y


print("Select your operation.")
print("1.Add")
print("2.Subtract")
print("3.Multiply")
print("4.Divide")

while True:
    # take input from the user
    choice = input("Enter your choice(1/2/3/4): ")

    # check if choice is one of the four options
    if choice in ('1', '2', '3', '4'):
        num1 = float(input("Enter the first number: "))
        num2 = float(input("Enter the second number: "))

        if choice == '1':
            print(num1, "+", num2, "=", add(num1, num2))

        elif choice == '2':
            print(num1, "-", num2, "=", subtract(num1, num2))

        elif choice == '3':
            print(num1, "*", num2, "=", multiply(num1, num2))

        elif choice == '4':
            print(num1, "/", num2, "=", divide(num1, num2))

        # check if user wants another calculation
        # break the while loop if answer is no
        next_calculation = input("Wanna do another calculation? (y/n): ")
        if next_calculation == "no":
          break

    else:
print("Invalid Input")Do you want to show your WordPress form entries on the front end of your site?
Displaying form entries on the front end allows you to show important information to your visitors. You can use it to show positive reviews, create directories, display event calendars, and more.
In this article, we’ll show you how to display WordPress form entries on your site.

Forms are great for keeping in touch with your visitors, getting feedback and suggestions, helping users resolve their issues, and more. Displaying form entries on your WordPress website for your visitors can be helpful in certain situations.
For example, you can display testimonials and product reviews that users submit through an online form. This way, you can leverage social proof to build brand trust and boost conversions.
You can also display form entries to create a business directory, display user-submitted events on a calendar, display statistics, and show other important information collected through online forms on your website.
However, by default, when users submit a form on your WordPress website, their entries are kept private. Only the WordPress admin and other users who have permission can view the form entries.
Let’s see how you can show form entries on the front end of your WordPress website using Formidable Forms and WPForms. You can click the links below to jump ahead to your preferred section.
The easiest way of showing form entries in WordPress is using Formidable Forms. It is a popular WordPress contact form plugin and offers an all-in-one form builder with lots of features for customization.
You can create all kinds of forms like surveys, quizzes, payment forms, and advanced forms like event calendars, directories, and calculators.
First, you’ll need to install and activate the Formidable Forms plugin on your site. If you need help, then please see our guide on how to install a WordPress plugin.
For this tutorial, we’ll be using the Formidable Forms Pro version because it includes the Visual Views addon.
Upon activation, you can go to Formidable » Forms and click the ‘+ Add New’ button at the top.

After that, a popup will appear that will ask you to select a form type, like a contact us form, user registration form, survey, and more.
Go ahead and select your preferred form type. For the sake of this tutorial, we’ll create a contact form to collect testimonials from users.

Next, you’ll need to enter a form name and description.
When you’re done, simply click the ‘Create’ button.

Now you can use the form builder to customize your form.
Formidable offers a drag and drop builder which is super easy to use. Simply select any form field you would like to add to your form from the options on your left and place them in the form template.

After customizing your contact form, go ahead and embed it anywhere on your website.
The plugin offers multiple options to add your form. The easiest way is to click the ‘Embed’ button in the form builder at the top and then select an existing page or create a new page to add your form.

Alternatively, you can also use a Formidable Forms block or a shortcode block in the WordPress content editor to embed your forms.
Next, you can give a name to your page and preview it.
When you’re satisfied with its appearance, go ahead and publish your page.

After your form is live, and you start to get entries, then you’ll need to install and activate the Visual Views addon in Formidable Forms.
To do that, simply go to Formidable » Add-Ons from your WordPress dashboard. Next, scroll down to the ‘Visual Views’ addon and click the ‘Install’ button.

Once the addon is active, you can go to Formidable » Views from your WordPress dashboard.
After that, simply click the ‘+ Add New’ button at the top.

Next, a popup window will appear where you’ll need to select a view type. The plugin offers a grid, table, calendar, and classic view that you can use.
For this tutorial, we’ll use the ‘Grid’ view to show form entries.

After that, you will have to select a data source for your view.
Go ahead and click on the ‘Use Entries from Form’ dropdown menu and select your form. There’s also an option to enter a view name.
After selecting your data source, simply click the ‘Create a view’ button.

This will launch the view builder in Formidable Forms.
To get started, go ahead and click the ‘Layout Builder’ button.

Next, you’ll need to select a layout to display your form entries.
Simply choose a layout from the given options at the top. You can add multiple layouts to show form entries.

After selecting a layout, go ahead and click the ‘Save layout’ button.
Next, you can add content to the view builder by clicking the ‘+’ button. There are options to customize the layout of the form entries and add content before and after the form entries.
The plugin also gives options to change the typography, background color, border, and more under the Grid Style Settings panel on your left.
You’ll also see a shortcode under the View Name field, which you’ll need when showing form entries on your site.

There are more advanced options in the Grid Style Settings panel. In the advanced settings, you can limit the number of entries, page size, and more.
When you’ve customized the view, don’t forget to click the ‘Update’ button at the top.
Next, you’ll need to display your form entries on your WordPress website. To do that, copy the shortcode given under the View Name.
The shortcode will look like this:
[display-frm-data id=2410]
After that, go to any post or page where you’d like to display form entries. Once you’re in the content editor, simply add a ‘Shortcode’ block.

Now, enter the shortcode you copied earlier in the shortcode block.
After that, you can preview the page and publish it.

You can now visit your website to see the form entries in action.
Here’s what they look like on our demo website:

Another way of displaying form entries on the front end of your WordPress website is through WPForms. However, this method requires editing code and is recommended for advanced users who have knowledge about coding.
WPForms is the best contact form plugin for WordPress and lets you create different types of forms using a drag and drop form builder.
Just note that if you want to see your form entries in the WordPress dashboard, then you’ll need the WPForms Pro version. There is also a WPForms Lite version that you can use for free, which sends email notifications of all your form entries.
First, you’ll need to install and activate the WPForms plugin. For more details, please see our guide on how to install a WordPress plugin.
Next, you will need to create an online form using WPForms. You can check out our step-by-step guide on how to create a contact form in WordPress.
Once you start to get form entries, you’ll need to enter the following code into your theme’s functions.php file or in a site-specific plugin. Please see our guide on how to easily add custom code in WordPress for more information.
/**
 * Custom shortcode to display WPForms form entries in table view.
 *
 * Basic usage: [wpforms_entries_table id="FORMID"].
 *
 * Possible shortcode attributes:
 * id (required)  Form ID of which to show entries.
 * user           User ID, or "current" to default to current logged in user.
 * fields         Comma separated list of form field IDs.
 * number         Number of entries to show, defaults to 30.
 *
 * @link https://wpforms.com/developers/how-to-display-form-entries/
 *
 * Realtime counts could be delayed due to any caching setup on the site
 *
 * @param array $atts Shortcode attributes.
 *
 * @return string
 */

function wpf_entries_table( $atts ) {

    // Pull ID shortcode attributes.
    $atts = shortcode_atts(
        [
            'id'     => '',
            'user'   => '',
            'fields' => '',
            'number' => '',
                        'type' => 'all' // all, unread, read, or starred.
        ],
        $atts
    );

    // Check for an ID attribute (required) and that WPForms is in fact
    // installed and activated.
    if ( empty( $atts['id'] ) || ! function_exists( 'wpforms' ) ) {
        return;
    }

    // Get the form, from the ID provided in the shortcode.
    $form = wpforms()->form->get( absint( $atts['id'] ) );

    // If the form doesn't exists, abort.
    if ( empty( $form ) ) {
        return;
    }

    // Pull and format the form data out of the form object.
    $form_data = ! empty( $form->post_content ) ? wpforms_decode( $form->post_content ) : '';

    // Check to see if we are showing all allowed fields, or only specific ones.
    $form_field_ids = isset( $atts['fields'] ) && $atts['fields'] !== '' ? explode( ',', str_replace( ' ', '', $atts['fields'] ) ) : [];

    // Setup the form fields.
    if ( empty( $form_field_ids ) ) {
        $form_fields = $form_data['fields'];
    } else {
        $form_fields = [];
        foreach ( $form_field_ids as $field_id ) {
            if ( isset( $form_data['fields'][ $field_id ] ) ) {
                $form_fields[ $field_id ] = $form_data['fields'][ $field_id ];
            }
        }
    }

    if ( empty( $form_fields ) ) {
        return;
    }

    // Here we define what the types of form fields we do NOT want to include,
    // instead they should be ignored entirely.
    $form_fields_disallow = apply_filters( 'wpforms_frontend_entries_table_disallow', [ 'divider', 'html', 'pagebreak', 'captcha' ] );

    // Loop through all form fields and remove any field types not allowed.
    foreach ( $form_fields as $field_id => $form_field ) {
        if ( in_array( $form_field['type'], $form_fields_disallow, true ) ) {
            unset( $form_fields[ $field_id ] );
        }
    }

    $entries_args = [
        'form_id' => absint( $atts['id'] ),
    ];

    // Narrow entries by user if user_id shortcode attribute was used.
    if ( ! empty( $atts['user'] ) ) {
        if ( $atts['user'] === 'current' && is_user_logged_in() ) {
            $entries_args['user_id'] = get_current_user_id();
        } else {
            $entries_args['user_id'] = absint( $atts['user'] );
        }
    }

    // Number of entries to show. If empty, defaults to 30.
    if ( ! empty( $atts['number'] ) ) {
        $entries_args['number'] = absint( $atts['number'] );
    }

// Filter the type of entries all, unread, read, or starred
    if ( $atts['type'] === 'unread' ) {
        $entries_args['viewed'] = '0';
    } elseif( $atts['type'] === 'read' ) {
        $entries_args['viewed'] = '1';
    } elseif ( $atts['type'] === 'starred' ) {
        $entries_args['starred'] = '1';
    }

    // Get all entries for the form, according to arguments defined.
    // There are many options available to query entries. To see more, check out
    // the get_entries() function inside class-entry.php (https://a.cl.ly/bLuGnkGx).
    $entries = wpforms()->entry->get_entries( $entries_args );

    if ( empty( $entries ) ) {
        return '<p>No entries found.</p>';
    }

    ob_start();

    echo '<table class="wpforms-frontend-entries">';

        echo '<thead><tr>';

            // Loop through the form data so we can output form field names in
            // the table header.
            foreach ( $form_fields as $form_field ) {

                // Output the form field name/label.
                echo '<th>';
                    echo esc_html( sanitize_text_field( $form_field['label'] ) );
                echo '</th>';
            }

        echo '</tr></thead>';

        echo '<tbody>';

            // Now, loop through all the form entries.
            foreach ( $entries as $entry ) {

                echo '<tr>';

                // Entry field values are in JSON, so we need to decode.
                $entry_fields = json_decode( $entry->fields, true );

                foreach ( $form_fields as $form_field ) {

                    echo '<td>';

                        foreach ( $entry_fields as $entry_field ) {
                            if ( absint( $entry_field['id'] ) === absint( $form_field['id'] ) ) {
                                echo apply_filters( 'wpforms_html_field_value', wp_strip_all_tags( $entry_field['value'] ), $entry_field, $form_data, 'entry-frontend-table' );
                                break;
                            }
                        }

                    echo '</td>';
                }

                echo '</tr>';
            }

        echo '</tbody>';

    echo '</table>';

    $output = ob_get_clean();

    return $output;
}
add_shortcode( 'wpforms_entries_table', 'wpf_entries_table' );
After adding the custom code to your website, you’ll need to enter the following shortcode to any page or post to show form entries.
[wpforms_entries_table id="FORMID"]
Just replace the FORMID with your form’s ID.
You can find the form ID by going to WPForms » All Forms and then looking at the Shortcode column.

To add a shortcode, simply create a new page or edit an existing one.
Next, go ahead and add a ‘Shortcode’ block.
After adding the block, simply enter your shortcode.
Now preview your WordPress page and click the ‘Publish’ button at the top.

Here’s what the preview of our form entries looked like on the front-end:

You can further customize the display using custom CSS styles as needed.
We hope that this article helped you learn how to display WordPress form entries on your site. You may also want to see our guide on how to create a custom WordPress theme, or our expert comparison of the best live chat software for small business.
If you liked this article, then please subscribe to our YouTube Channel for WordPress video tutorials. You can also find us on Twitter and Facebook.
The post How to Display WordPress Form Entries on Your Site first appeared on WPBeginner.


I am in the middle of making a web based system for shows and each show as a different closing date for entries. The closing date is stored in a database. I need to display a export to excel button once the closing date has passed for each show.
I have already done the export to excel button and that works but it's clickable all the time, I need the button to only be clickable once the closing date for each show has passed. I'm thinking I need to check if the closing date in the database has passed compared to todays(current) date.
Not sure how it would work if each show has a different closing date though?
Below is what I came up with but know it's way off
<?php
$sql="SELECT closing_date FROM shows";
$result1 = mysqli_query($mysqli, $sql);
while($info = mysqli_fetch_assoc($result1)){
if(date('Y-m-d') > $info['closing_date'] ){
echo '<input type="submit" name="export_excel" class="btn btn-success float-md-right" value="Export to Excel">';
break;
}
elseif(date("Y-m-d") < $info['closing_date'] ){
echo '<a href="javascript:void(0);"><input type="submit" name="export_excel" class="btn btn-dark float-md-right" value="Export to Excel"></a>';
break;
}
}
?>Hi everyone. I'm Mile and am a Python enthusiast and IT professional