In the video below, we take a closer look at the Spring Boot, specifically, how we can reload changes without restarting the server. Let's get started!
Spring Boot: How to Reload Changes Without Restarting the Server [Video]


Tips, Expertise, Articles and Advice from the Pro's for Your Website or Blog to Succeed
In the video below, we take a closer look at the Spring Boot, specifically, how we can reload changes without restarting the server. Let's get started!
Are you just getting started in web design? We are guessing you have a bit of a creative side to you if you’re traveling down the road of web design, but you may be feeling lost and overwhelmed with where to start.
Don’t worry. You aren’t alone. There are many moving parts to creating a website of your own, and figuring out what they are can leave you feeling confused.
That’s where we come in. This guide will help prepare you to take on your first web design project as a beginner.
While we feel that the design part is the most fun part of building a website, there are necessary steps to take to make sure you create a website that not only looks great but functions well, too.
Read on for our beginner’s guide to website design.
Let’s start with the basics here: What is website design? Website design (often referred to as simply ‘web design’) is what you see when you look at a website. It is the design of the site that is displayed.
Web design focuses on user experience and website development instead of software development, which makes the website function.
Someone who is a web designer focuses their attention and work on how the website looks: its layout and the content. This work is important because it determines how well people can interact with your website, how much the appearance makes them want to interact, and even how well your website does in search engines such as Google.
Designing a website is getting easier and easier thanks to advances in software and tools. A website designer no longer has to spend hour after hour writing long lines of code to get a site to look how they want. While there may still be some coding involved, much of web design is rooted in tools that can give you the designs you’re after with less work and less stress.
Sounds great, right? Here are the top tools that will help you improve your design skills.
If you are looking to take the easiest route in website design, a website builder like Wix will be your key. Whether you are a complete beginner or a pro at building websites, this builder will make your experience much better.
By answering a few questions on Wix, its artificial intelligence builds your custom website for you, which you can then customize.
It starts with “What kind of website do you need?” There, you can enter what kind of blog, online store, portfolio, or other site purpose you’re looking to make, or even choose from popular suggestions.

After that, you can select features you want in your Wix site like live chat, a blog, an online store, events, bookings, and many more.
From here, you can decide whether to let Wix’s ADI take it from there (which will involve answers just a few more simple questions), or you can opt for a more DIY route that allows you to use Wix’s templates to build your site yourself.
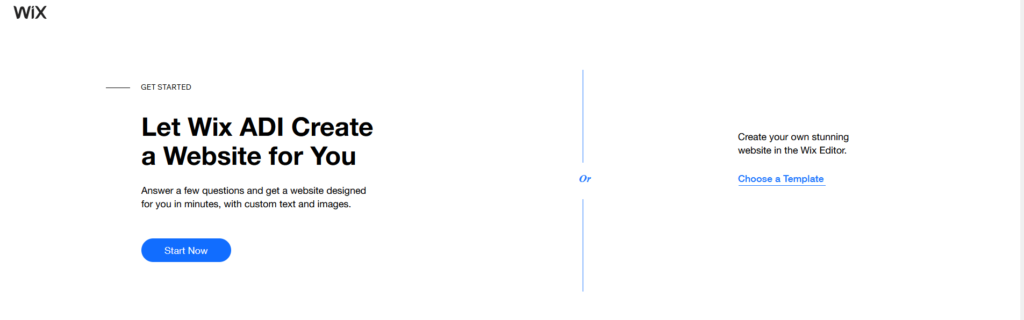
We recommend opting for a paid plan with Wix, as the free version does not provide the options you want in building your site, and also does not allow you to have the domain you’d like and instead adds your website name into a Wix domain (yourusername.wix.com/sitename), rather than yourcompanyname.com.
The Adobe Suite has no shortage of incredibly helpful tools for web designers, but it can be argued that none is as important as Photoshop.
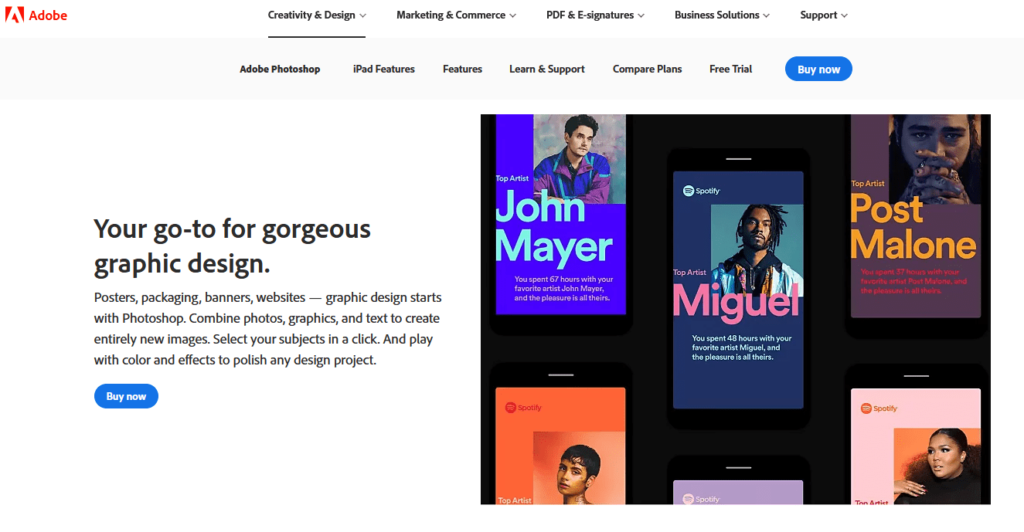
The options feel almost unlimited with this tool because it allows you to create all sorts of prints, patterns, and images for your design project. Photoshop was created for professional photographers and designers, so you can trust that it is the top choice for creating web graphics and images.
By mastering this program, you can create truly authentic designs for your website that you won’t find anywhere else.
As a beginner, you may not know the importance of mapping out your website’s sitemap until it’s too late. Avoid learning this mistake the hard way, and trust us when we say that Flowmapp is a tool that will make building your website much easier for you.
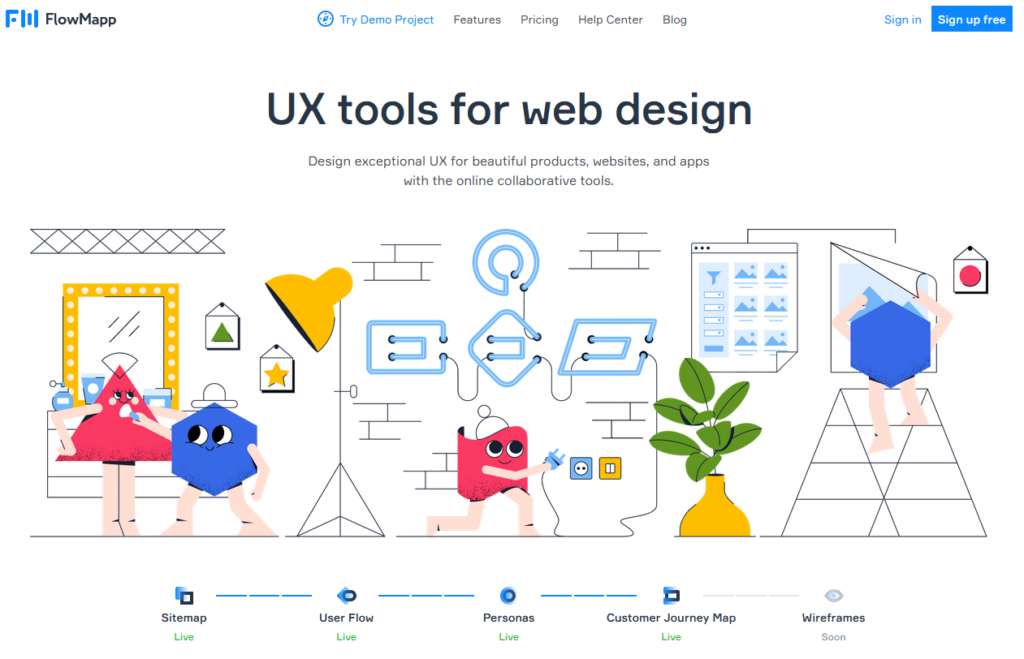
If you’re building a site for a client, Flowmapp allows you to build out the sitemap and share it with your client so they can see the list of pages on the site and how they will be grouped together. And if you’re building a site for yourself, Flowmapp will help you get the flow of your website sorted out so that people who come onto your page can have a nice, smooth experience.
In addition to that, Flowmapp has a tool called User Flow that you use to simulate a user’s journey on your site and, from that, create a conversion strategy that will help you get more out of your site.
If you are a designer planning to use vector UI designs, Sketch needs to be in your toolbox.
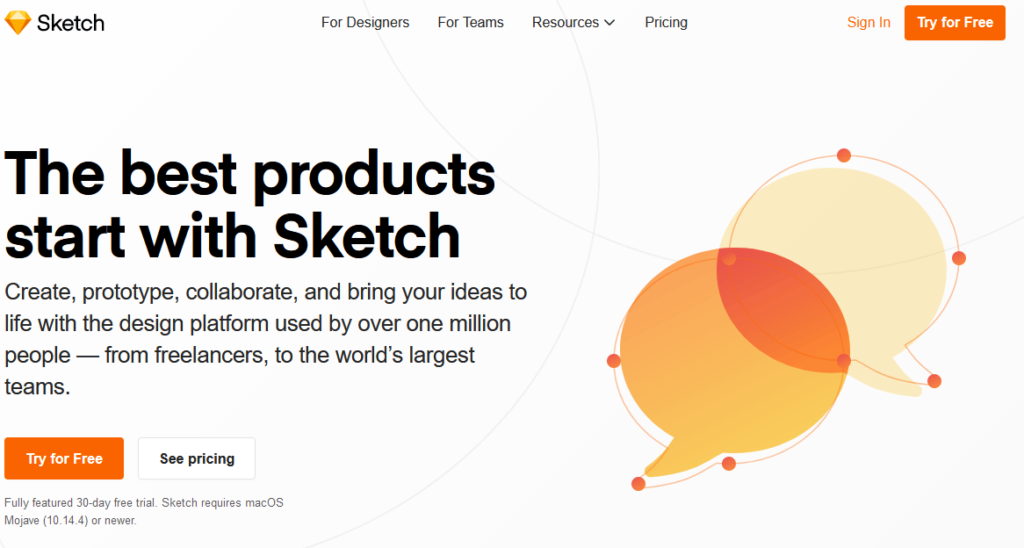
Sketch can be used along with Photoshop or instead of it. Sketch features tools specifically for web design, so it is easy to access the most commonly used tools within Sketch to build your site. In addition to that, Sketch makes it easy to export designs to different formats and makes it easy to preview designs in your browser to see what they will look like to a user.
The only issue people run into with Sketch is that it is only available to Mac users. Thus, if you have a PC, Photoshop will be your go-to. Or you can work from Sketch files and then import the designs to another tool.
Now that you know some of the tools that can help you build your website, it’s time to get into the basics of website design.
The idea of building a website sounds great, sure. But when it comes time to actually making it, you may be asking yourself, ‘Where do I start?’ This is a common question for those new to web design, so that’s why a guide like this is so useful.
Read on to find the basics you need to understand to get your website started.
There are some beautiful websites out there on the internet that have every detail down to an art. However, chances are good the first iteration of those sites was nowhere near as awe-inspiring.
When looking to build your first website, you may have a dream or a vision of what you want your site to look like, and that’s great—as long as what you have in mind is basic enough for you to create.
Things can get complicated quickly when building a site, and as a beginner, this is not the headache you need. Instead, focus on creating a simple website that allows you to understand the basics of web design, and then you can grow from there for future websites.
Blogs are a great starting point for new web designers as there are plenty of blog templates that make it easy for you to create one without starting from scratch. If blogs aren’t your cup of tea, then consider creating a website that shows off your photography skills or another hobby of yours.
By starting with something simple, you can first master the basics and then add new steps to take your skill level up little by little.
As a beginner web designer, chances are good that you have come across some beautiful websites that have inspired you to pursue this journey of design. And it’s a good idea to keep a list of the sites that have brought you inspiration.
Pinterest is another place where inspiration flows like a river, and all sorts of beautiful designs can be found there.
Use this inspiration to get an idea of what you want your site to look like. As mentioned above, aim for more simple inspiration sites initially, and as your skills improve, you can work toward the more complex.
Having a website that looks good is a goal of a web designer, but it is important to remember that having a website that serves your audience well is equally, if not more, important. How a user interacts with and experiences your website is called ‘user experience,’ or UX for short.
The focus of UX is seeing your design through the eyes of a visitor to your website and understanding the experience they have on your page. This includes things such as:
The user experience is created by all of the above, which means you need to have a good handle on the type of experience you are looking to create, and how you will bring it to life.
While the way the website looks to a user is important, the way the website is arranged and functions are essential, too. This is referred to as ‘user interface,’ or UI.
The goal of UI is to provide a visitor to your website with the tools they need to experience your website as smoothly and easily as possible. This means having buttons that are easy to see and click on and design choices that serve a clear purpose. It means a logical flow of your site. It means high functionality of interactive elements and much more.
By mastering the user interface of your website, you are ensuring that any visitor to your site has as good of an experience as possible, and hopefully one that will bring them back.
Few things can make someone leave your website faster than a poor layout. If your website feels jumbled and it is unclear how someone can best utilize it, then they will click out of your site. Since that’s not what you want, you need to pick a simple layout that keeps things uncomplicated.
There is no need to get overly complicated with your website layout, especially as a beginner. First, think about what are the important things you want people to see. Why did they come to your site in the first place? Make that clear with your layout.
Also, you want to build your website in grids. Grids are pleasing to the eye and make sense visually, as they create a sense of order on the pages.
Take the Quick Sprout home page, for example.
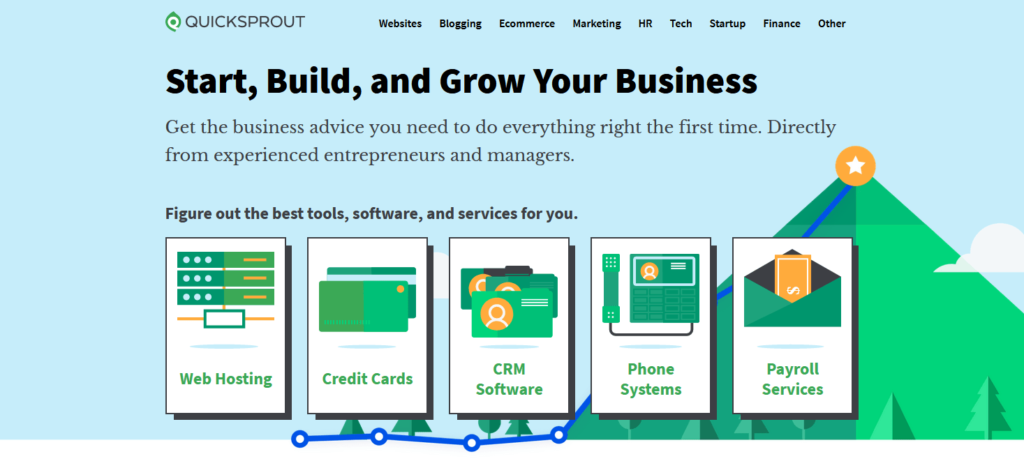
When you arrive at this page, you can see very clearly what your options are. You can see what you’re looking for and click on it to move to the next step. This is a great example of an easy layout that provides a smooth experience for the user.
While you have every color of the rainbow and then some to choose from with your site, that does not mean you should use them.
You should do the opposite. Before building your website, choose a color scheme that is clean and simple.
For a lot of designers, that means opting for a monochrome theme. This means you choose one color as your base color and then create both darker and lighter versions of this color to create different hues that work together. The monochrome approach to color will always provide you with a very clean and classy look.
Another option is to choose complementary colors. The way to do this is by using a color wheel and picking colors on opposite sides of the wheel. The way that the wheel is designed means that these contrasting colors work well together.
You know how frustrating it is to try and decipher someone’s handwriting. You don’t want visitors to your website to suffer through the same thing simply because you didn’t take the time to pick a clear font.
Fonts hold more power on your website than you may imagine. Here’s why.
Fonts determine the tone of your website. If you’re making a site geared toward kids, you want fonts that are fun and loud. However, if you’re making a site geared toward adults and has a more serious subject matter, you’ll want professional and clear fonts.
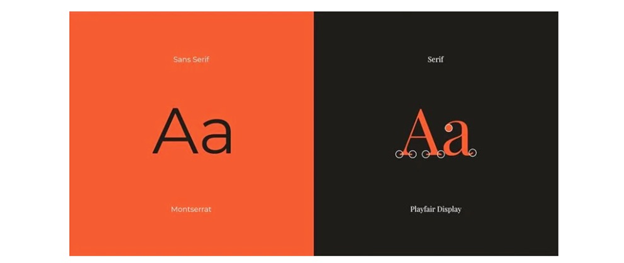
You may have heard the terms ‘serif’ and ‘sans serif,’ so let’s get into what they mean.
Serif fonts have a decorative taper on the letter’s stem, and sans serif fonts do not (hence the use of ‘sans’ in the name). Serif fonts have a more traditional and professional feel, while sans serif fonts have a more modern and sophisticated feel.
Here is a visual example from Canva.
Once you finish your website, take a moment to congratulate yourself and celebrate! However, before making your site live, make sure you get some feedback from others.
This may be one of the hardest steps of building a website. You have put your heart, soul, and countless hours of work into building this, and opening up your work for criticism can be hard. However, it is necessary.
Look to people whose input you trust and who you think will be best about giving you constructive criticism, and won’t simply tell you it looks great when it doesn’t. To get through this final step of the process, you must accept that any criticism and ideas for changes are not a personal attack but rather input on making the site the great product you want it to be.
Feeling like you’re almost ready to get started on your first website? Read through these tips and tricks that will make your website design experience a good one before you do. These will help you improve and will have a big impact on the websites you create.
The homepage is the first page people will see of your website, and seeing a bunch of clutter may cause them to run for the hills. There is enough clutter in peoples’ lives that you don’t need to add to it with a messy homepage.
Here are some ways to achieve that minimalistic homepage look:
Going to a site that is covered in text will overwhelm the visitor. If you have a lot of information you need to present on your website, photos will be your friend. Use images to create space in between text and to make your website look more visually pleasing.
Even if your site doesn’t have a lot of copy on it, include visuals to bring it to life.
It seems that more and more people are using phones to access websites, so it is vital that you make your website so that it looks great on phones as well as on computers and tablets. The term for this is ‘mobile responsive.’
Here are some things to keep in mind:
HI acn someone recommend very good and free social marketing course online?
The title of this article is misleading. It’s not actually very important for an Engineering Manager to use career laddering, per se, or my process. It is, however, very important that an Engineering Manager is clear with their employees about what their expectations and direction, not to mention where they are in terms of a raise and promotion.
I’ve personally found that career laddering can help with this, but is only one small supportive piece of a whole. You can have formalized career laddering in place and still mislead your staff, so it’s critical that career laddering docs are just one tool embedded in a deeper process.
Before we dive any further, let’s clarify first what we mean by a career ladder. Career laddering is typically a system used to show what expectations are at different levels of a role, a purpose of which is defining how one might be promoted. This can have different forms, but tends to be an internal document that states the expectations of a staff member at any given stage of their career.
Here is a microsite I set up where I open sourced all of my career ladders >
As you can see in the site, it outlines each of the different levels of the job, as well as the roles and responsibilities expected at that level. In this particular example, there is a basic concept that ties the whole thing together:
What I like about this system is that the job of the most advanced folks becomes helping support and grow other people or system in such a way that benefits everyone. Principal-level folks don’t lord knowledge over others; they work to put the knowledge into practice in a way that’s truly helpful.
Again, it’s not important that you use my exact system, but I want to show that having clarity about the roles and expectations of each team member can really go a long way. Why? Let’s dive in.

“You can’t call yourself a leader by coming into a situation that is by nature uncertain, ambiguous — and create confusion. You have to create clarity where none exists.”
— Satya Nadella
I have never seen employees more demoralized than when they’re unsure where their career is headed and whether their title/compensation is fair. It’s frustrating, exhausting, and can lead to burnout. It’s also incredibly distracting — who can get their job done when they have no clue if what they’re doing is valued?
Some may ask about intrinsic motivation. You can have an employee that cares intrinsically about their work and still feels misaligned with the overall impact that the company sees in it. That’s often when the disconnect feels the most hurtful. If you have an employee who is working extremely hard and doing absolutely everything they can, the feeling of being undervalued can be heartbreaking.
Clarity with people about their level and being explicit about what they should be working on is critical. Transparency around timing for such a promotion cycle if you know it can help as well.
There’s a bit about trust in here, too. If you are working with someone on their growth path and trust that you will honor it, you enter into a sort of partnership.
Personally, I love it when the qualities you’re working on are things that would serve them anywhere, not just the company. These should be things that expand their skill set. These types of tasks typically take some long term work, but it can be very rewarding to work together on because there’s a larger purpose.
One thing is critical: if you guide employees on this journey, you need to give them the promotion at the end. The promotion is a change in title and compensation, of course, you break the bond of that partnership if you don’t follow through. Always give the promotion if that person has earned it on their end.
I mentioned that a career laddering document alone will not help drive a team, and I also mentioned the importance of clarity. So, let’s tie this all together and talk through how to use this in practice.

I am one of those annoying managers who asks people where they’d like to be in five years. I call it “annoying” because it’s a lot to think about. But I still ask it, not because I’m not looking for a perfect answer, but because it gives them an opportunity to consider their future and, usually, they tell me something I should know.
Here are some examples:
Notice that these are not a formal outline for the next five years. But you can already get a sense of people’s values, their boundaries, and what we may want to incorporate as part of their working environment.
If you don’t know where you are going, you might wind up someplace else.
— Yogi Berra
In this step, we go through the career laddering doc. What I typically do is have an employee read out every list item in their current role to me, then self-assess the progress they’ve made on each item. I sound off a bit on it. We generally align; people tend to be fair and honest. I personally think it’s important that they read their list to me instead of the other way around, there’s a sense of ownership that way.
We also go over the next stage in their career and the list items for it. At the end of the process, we break down any common themes. For example:
“You’re solidly a Senior, and doing quite well in your role. To get to Staff, you need to be helping others a bit more. Let’s make sure you have the time to be available for more PR reviews and pairing in the next few weeks. Let’s also talk about getting that internal tool you were building over the line, that would likely help the team move faster
“
The next step I do is called a 30/60/90. The concept is that you break down the work you want to be doing in 30, 60, and 90 days.
I tend to do this with a bit of a twist: We start with 90 days and ask: what would you like to accomplish here within the next three months?
Since the career laddering is fresh in their minds, there’s already some guidance on what their focus should include. It’s safe at this point to let them drive, and tell you what they should be doing instead of the other way around.
Sometimes this can be quantifiable:
I would like to close five issues each week, ideally with at least two PRs.
I would like to address content gaps on two features.
I would like to pair with at least two people.
It can be expressed as a metric:
I would like to help increase adoption of our npm package by 10%.
Or it can be less measurable:
I would like to try to understand our component library a little more as a newcomer.
I would like to try to interrupt other people less in meetings.
All of these are valid.

Now that we’ve taken the time to define the 90 day plan, we figure out what’s doable in a 30-day period. Again, it’s up to them what they think they can accomplish in this time. I only chime in if I think they’re being too ambitious, or they are missing something that the company needs.
It can also be helpful to state that things change, and nothing in this plan is set in stone — other things may come up that need attention. We’ll adjust, it’s no big deal. I honestly don’t find the 60-day piece to be very useful because a lot changes in a month. I usually skip it, but you can absolutely use it if you find it helpful!
We also get to talk through what they shouldn’t be doing. If you find that something they are spending time on is not useful for the employee or the company, you may be able to remove the task and clarify this to other stakeholders. The employees themselves may not be able to have that conversation.
This can be incredibly useful for someone who may be an over-performer, but are burning out. It helps us align on the tasks that are overextending them so that they can properly prioritize and focus. It’s tempting to think that over-performers need less guidance but I’ve found that they tend to need more clarity, not less, so that we can define scope and help them set a good direction.
I’ve also seen under-performers turn around after the career laddering process. What one might see as a lazy quality in that person might actually be a symptom of being misaligned with the purpose of the tasks. A career ladder helps them recognize what, when, why and how the things they’re working on fit into the bigger picture.
From here, it’s probably pretty clear what you do — keep revisiting the list! I try to set a reminder in our one-on-one doc to revisit the 30/90 plan in about a month. When we check in, we see how far they’ve come on each task, putting little checkmarks next to what’s done. I’ll sometimes put a celebration emoji on something they did particularly well — I believe it’s important to celebrate those as successes, even if it makes me sound like Mr. Rogers. Show folks that you appreciate their work and how far they’ve come.
From there, you can carve out another block for the 90, so they have direction for the next 30 days. If they didn’t finish something, carry it over to the next month.
Every few months, we’ll go back and do the career laddering exercise again, but this time denoting the progress that’s been made in every area. When they’ve filled their end of the deal of the things you asked them to work on, it’s time to promote them! 🎉 Don’t forget to celebrate that as well!
This is not the only way to provide direction and clarity in a person’s work — the sky’s the limit. Anything that provides clarity for your staff can be helpful.
What I’ve liked about the career laddering process is that there are no surprises: people know where they are, and what it will take to get to the next level. There are no surprises in 360 reviews as far as what stage they’re at and what they should be working on between now and the next check in. The progress is a tangible thing that becomes a partnership between the both of you, and the work is just a unit within something measurable on that path.
It can be clarifying for everyone around: they know the system — there should be no surprises why a person is getting promoted at a given time. Hopefully that alleviates any tension in the process.
Our collective aim as managers should be taking the careers of our employees as seriously as we do the team’s technical processes. Promotions ideally come exactly when and how everyone thinks it will. The goal is to set your team up for success: everyone has a good path forward and they can focus on doing work that is both impactful and rewarding.
The post The Importance of Career Laddering appeared first on CSS-Tricks.
You can support CSS-Tricks by being an MVP Supporter.
Svelte is a free and open-source front end JavaScript framework that enables developers to build highly performant applications with smaller application bundles. Svelte also empowers developers with its awesome developer experience.
Svelte provides a different approach to building web apps than some of the other frameworks such as React and Vue. While frameworks like React and Vue do the bulk of their work in the user’s browser while the app is running, Svelte shifts that work into a compile step that happens only when you build your app, producing highly-optimized vanilla JavaScript.
The outcome of this approach is not only smaller application bundles and better performance, but also a developer experience that is more approachable for people that have limited experience of the modern tooling ecosystem.
Svelte sticks closely to the classic web development model of HTML, CSS, and JS, just adding a few extensions to HTML and JavaScript. It arguably has fewer concepts and tools to learn than some of the other framework options.
The recommended way to initialize a Svelte app is by using degit which sets up everything automatically for you.
You will be required to either have yarn or npm installed.
# for Rollup
npx degit "sveltejs/sapper-template#rollup" hn-clone
# for webpack
npx degit "sveltejs/sapper-template#webpack" hn-clone
cd hn-clone
yarn #or just npm install── package.json
├── README.md
├── rollup.config.js
├── scripts
│ └── setupTypeScript.js
├── src
│ ├── ambient.d.ts
│ ├── client.js
│ ├── components
│ │ └── Nav.svelte
│ ├── node_modules
│ │ └── images
│ │ └── successkid.jpg
│ ├── routes
│ │ ├── about.svelte
│ │ ├── blog
│ │ │ ├── index.json.js
│ │ │ ├── index.svelte
│ │ │ ├── _posts.js
│ │ │ ├── [slug].json.js
│ │ │ └── [slug].svelte
│ │ ├── _error.svelte
│ │ ├── index.svelte
│ │ └── _layout.svelte
│ ├── server.js
│ ├── service-worker.js
│ └── template.html
├── static
│ ├── favicon.png
│ ├── global.css
│ ├── logo-192.png
│ ├── logo-512.png
│ └── manifest.json
└── yarn.lockIn this tutorial, we will build a basic HN clone with the ability to create a post and comment on that post.
yarn add faunadbTo hold all our application’s data, we will first need to create a database. Fortunately, this is just a single command or line of code, as shown below. Don’t forget to create a Fauna account before continuing!
Fauna’s API has many interfaces/clients, such as drivers in JS, GO, Java and more, a cloud console, local and cloud shells, and even a VS Code extension! For this article, we’ll start with the local Fauna Shell, which is almost 100% interchangeable with the other interfaces.
npm install -g fauna-shellAfter installing the Fauna Shell with npm, log in with your Fauna credentials:
$ fauna cloud-login
Email: email@example.comPassword: **********
Now we are able to create our database.
fauna create-database hn-cloneNow that we have our database created, it’s time to create our collections.
In Fauna, a database is made up of one or more collections. The data you create is represented as documents and saved in a collection. A collection is like an SQL table. Or rather, a collection, is a collection of documents.
A fair comparison with a traditional SQL database would be as below.
| FaunaDB Terminology | SQL Terminology |
|---|---|
| Database | Database |
| Collection | Table |
| Document | Row |
| Index | Index |
For our two microservices, we will create two collections in our database. Namely:
To start an interactive shell for querying our new database, we need to run:
fauna shell hn-cloneWe can now operate our database from this shell.
$ fauna shell hn-clone

Starting shell for database hn-clone
Connected to https://db.fauna.com
Type Ctrl+D or .exit to exit the shell
hn-clone>
To create our posts collection, run the following command in the shell to create the collection with the default configuration settings for collections.
hn-clone> CreateCollection({ name: "posts" })Next, let’s do the same for the comments collections.
hn-clone> CreateCollection({ name: "comments" })To view all our posts we will create a page to view all our posts in a time ordered feed.
In our src/routes/index.svelte file add the following content. This will create the list of all available posts that are stored in our Fauna database.
<script context="module">
  import faunadb, { query as q } from "faunadb";
  import Comment from "../components/Comment.svelte";
  const client = new faunadb.Client({
    secret: process.env.FAUNA_SECRET,
  });

  export async function preload(page, session) {

    let posts = await client.query(
      q.Get(
        q.Paginate(q.Documents(q.Collection("posts"))
      )
    )
  );
  console.log(posts)

  return { posts };
}
</script>

<script>
  import Post from "../components/Post.svelte";

  export let posts;
  console.log(posts);
</script>

<main class="container">
  {#each posts as post}
    <!-- content here -->
    <div class="card">
      <div class="card-body">
        <p>{post}</p>
          <Comment postId={post.id}/>
      </div>
    </div>
  {/each}
</main>To create a comment we will create a component to send our data to Fauna using the query below.
let response = await client.query(
  q.Create(
    q.Collection('comments'),
    { data: { title: comment, post: postId } },)
  )
Our final component will have the following code.
<script>
  export let postId;
  import faunadb, { query as q } from 'faunadb'

  const client = new faunadb.Client({secret: process.env.FAUNA_SECRET})

  let comment;

  let postComment = async () => {
    if (!comment) { return }

  let response = await client.query(
    q.Create(
      q.Collection('comments'),
      { data: { title: comment, post: postId } },
    )
  )

  console.log(response)
  }
</script>

<div class="row">
  <div class="col-sm-12 col-lg-6 col-sm-8">
    <p></p>
    <textarea type="text" class="form-control" bind:value={comment} placeholder="Comment" ></textarea>
    <p></p>
    <button class="btn btn-warning" style="float:right;" on:click={postComment}>Post comment</button>
  </div>
</div>
We run the dev server:
yarn devWhen you visit http://localhost:5000 you will be greeted with the feeds with a panel to comment on the same page.
For this tutorial, we are able to see how fast it can be to develop a full stack application with Fauna and Svelte.
Svelte provides a highly productive, powerful and fast framework that we can use to develop both backend and frontend components of our full stack app while using the pre-rendered framework Sapper.
Secondly, we can see how Fauna is indeed a powerful database; with a powerful FQL, which supports complex querying and integration with the serverless and JAMStack ecosystem through its API first approach. This enables developers to simplify code and ship faster.
I hope you find Fauna to be exciting, like I do, and that you enjoyed this article. Feel free to follow me on Twitter @theAmolo if you enjoyed this!
The post How to Build a FullStack Serverless HN Clone With Svelte and Fauna appeared first on CSS-Tricks.
You can support CSS-Tricks by being an MVP Supporter.

A beautiful design with excellent typography and interactive goodness. Our pick this week.

With the Divi Layout Packs you’ll get world-class designs ready to be used for your client projects.

Learn all about how CSS container queries work with lots of examples and use-cases. By Ahmad Shadeed.

A fantastic nodes/globs based editor made by Steve Ruiz.

An open source typeface catalogue, focusing on somewhat contemporary type.

Vitaly Friedman looks into templates and tools for building and designing HTML emails.

A curated selection of live lofi stations from YouTube, in a beautiful online player.

A multi-talented JS playground where you can run scripts and that is also an API client, JSON viewer and datavisusalization tool. Made by Paul Shen.

Frontend Toolkit is a customizable dashboard for your recurring Frontend tasks. By Damian Frizzi.

A tutorial to using paged.js for creating great looking PDFs from HTML.

Mary Rose Cook wrote Gitlet to show how Git works under the covers.

A fantastic web experience with an incredible isometric layout.

Ahmad Shadeed explores the causes of overflow issues and shows how to solve them.

Learn how to use modern CSS to make layouts more accessibly inclusive for users of all abilities across any device. By Stephanie Eckles.

Manuel Matuzovi? shares his up-to-date HTML boilerplate with a line-by-line explanation.

A cool distorted scrolling effect by Toshiya Marukubo.

Kitty Giraudel revisits his pure CSS pie timer

An interesting article by Eric Bailey on why CSS can be perceived as strongly typed language.

Tomas Pustelnik’s case study on how CSS-in-JS impacts the performance of a website compared to plain CSS.

Free UI kit for building in-app mobile chat including 50+ handcrafted messaging screens for Sketch, Figma, and Adobe Xd.

A JavaScript cheat sheet made by Sunil Kumar.

A recreation of the wobbly shape effect seen on Cédric Pereira’s website using Matter.js and Paper.js.
The post Collective #657 appeared first on Codrops.
In part 1, we explained how to use a monthly recurring revenue (MRR) model to grow your web design business. In this second part, we’ll explain how to use proven sales techniques to keep scaling your business profitably.
If you’re an agency owner, you know that you need customers to grow. No matter how big your dreams are, customers are the lifeblood of your business. But you’re probably wondering — how do you attract quality, high-paying clients?
We started our design agency from zero. Two and a half years later, that same business generated $50,000 USD in monthly revenue, and today, it’s many times that size and still growing — all thanks to the sales techniques you’re about to read.
The secret to any successful company is sales, and that applies to design businesses too. Some people are worried about their lack of experience, especially since real-world sales techniques aren’t taught in school. But don’t worry. Sales savvy is like anything else — a skill that you can learn. If you’re ready to learn how to get web design clients fast, keep reading.
To set a sales objective, choose a target monthly recurring revenue number and deadline. You can base this on your ideal income or what you currently make with one-off clients. For example, your goal could be earning $7,000 USD per month within 24 months after you kick-off. Then divide that figure by your average price. So if you charge $100 per month, you’ll need 70 customers.
When you start, you’ll probably convert about 2–3% of your leads, so you’ll need to contact 33 people for each new customer. So a goal of 70 customers for $7,000 USD per month means reaching 2,300–4,600 leads. (This number may be higher or lower depending on your sales skills and lead quality.)
Thousands of leads probably sounds like a lot! But it’s manageable if you break it down. Each month, you’ll need to contact about 100–200 leads. If you work Monday–Friday, that’s just 5–10 leads a day. Stick with that goal and have an accountability system to track how well you’re doing.
Focus on hitting those lead goals every day or week, even if you don’t see immediate results. Sometimes you’ll close a prospect the same day, but it will more likely take a few days or even weeks of follow-up, explanations, and demos before you finally win them over.
If you don’t work consistently on your goals, it will be frustrating down the line. If you pitch 40 prospects the first week, then 5 the next week, then 15, then 40 again, you’ll have a patchy funnel and inconsistent growth. Put in consistent work, and you’ll see continual progress that will snowball over time.
Once you have your goal set, where should you look for those MRR clients? Here are the best strategies we’ve learned.
When you’re just starting, you should try different methods to get clients. As you gain more experience, you’ll learn where to focus your efforts, and you’ll get better at converting those clients. Cold pitching a potential client might work best for you, while digital marketing does well for someone else.
Chances are, you already know someone who could become a new web design client—or you know someone who knows someone. Share what you’re doing with friends, family, neighbors, and especially any local business owners you know.
You never know which referral might get you another client.
Do you want a salesperson that is always working, never gets tired, and can sell to thousands of clients at once? Then you’ll want to make sure your current website is at its very best. If you’re using a basic theme, switch to a modern custom design. Web design clients will judge your design skills by the quality of your own site, so make sure it’s always looking good.
For our agency, we’re continually improving our website to keep it up-to-date and modern. We also include a portfolio of sites we’ve designed so that prospects can see the kind of quality we offer.
You’ve worked insanely hard to get the customers you have. Why not leverage your trust with them for even more profit and sales? Ask a happy client to tell their hairdresser, favorite restaurant, plumber, dentist, lawyer, and other local businesses. Then check up on those leads and convince them to hire you as a web designer.
Remember, referring a friend is the best way past clients can thank you. To get referrals, you’ll need to ask! As a bonus, thank your customers or friends for a referral. A surprise gift for a referral goes a long way.
Some referral gifts we recommend are:
Another strategy to grow your client list is to partner with related businesses, like SEO firms or ad agencies. When you can find a great company in a related but non-competitive niche, reach out and form a partnership. You recommend clients to them, and they’ll recommend clients to you.
Everyone wins. Your customers get helpful services, and both of you will benefit from the referrals you share.
You can also use inbound marketing to attract customers to you with content instead of going to them. Blogging on your own site gives you credibility, especially if you focus on writing about solutions for the biggest problems your clients have. New customers already see you as the expert because they’ve read a blog post. Write articles that cover the basic principles of building an online presence and growing a customer base.
The second strategy is guest posting. For example, you can write about best practices for a restaurant website and post them on a blog where restaurant owners get the latest news for their business. Educational content establishes you as an authority and opens you up to a new audience eager to learn about their industry. Writing for other sites has helped us a lot — you’re reading one of those articles now!
Note: We go into more detail on using content marketing in our free guide to finding web design clients.
We’ve seen success promoting our content on social media. The two that have worked the best for us have been Facebook and LinkedIn, but feel free to experiment with others. Various industries will have a preferred social media platform, so learn about this for your niche and target accordingly.
Organic social media works best as a part of your strategy alongside other methods. It might not bring in leads itself, but a strong social media presence helps convert potential clients who need a good reason to choose you. If you’re doing well on social networks, it can help with that decision-making process and close the deal.
The most important content you can share solves your customer’s problems. And it isn’t just about selling — think of how to teach your customers to take advantage of new digital technologies. For example, you can teach restaurants how to set up a QR code for a digital menu. In addition to helpful content, we recommend sharing sites you’ve designed and using hashtags your target customer will recognize. But make sure to keep your feed professional — don’t post pictures of what you ate for breakfast!
The reality is that you won’t keep growing with free methods after a certain point. That’s why we recommend using paid ads as you grow. We’ve used various platforms, from Google Ads to job boards. We’ve also seen a lot of success in offering an email newsletter with multiple opt-ins.
You can also try Facebook Ads and a more complex sales funnel system, complete with a landing page to collect web design leads. Paid ads have brought in lots of new customers for us.
An effective way of getting new clients is by building your professional network. First, connect with other founders in person. If you’re not already involved in your local community of business leaders, start as soon as possible. You’ll get valuable advice and business contacts that can lead to more sales in the future.
One of the best places to do this is networking events, like local community business leader meetups. You’ll meet lots of potential clients and get leads for many more. Don’t pitch these contacts, just build relationships. Care about their business and learn what they’re looking for. When they need a website, they’ll know who to turn to.
As the world has gone remote, look for virtual events as well. Check out local business leader Facebook groups, digital summits, and other opportunities to connect remotely.
Last but not least is cold outreach. You’ll need to research a target audience, find a potential client, and reach out with a phone call introducing yourself. Cold outreach has been the main way we’ve built our agency. It’s a lot of hard work, but the results speak for themselves!
The best way to make a sale is by positioning a business website as the solution to a challenge your prospect faces, like restaurants wanting new customers or losing foot traffic to national chain competitors.
We’ll go into cold outreach more in the next section, but these three principles are a great starting point:
With these points in mind, you can use the following script to make the sale.

We’ll walk through the template we’ve used to convert hundreds of cold leads into happy customers. This successful sales technique boils down to five key steps.
Before you jump into a sales pitch, show you care about the business owner and want them to succeed. Start by introducing yourself with your name. Make sure you’re talking to the owner or decision-maker before moving on.
Next, draw a connection to their business—the more personal, the better. Maybe you ate at the client’s restaurant recently, saw one of their delivery vans, or found them on the internet (this neutral intro always works if you don’t have anything specific to point out).
Here’s a version of the script we might use:
Hi, it’s Dave Smith speaking!
Am I speaking to Lisa Samuelson? Great!
Some friends had dinner at Lisa’s Diner a few weeks ago and gave you very high praise.
Your goal here is to offer a way to bring in new paying customers without extra work. Who wouldn’t take you up on that deal? Most of the time, business owners don’t want a website—they want the results a website will bring, like better visibility, high search rankings, more customers, more job applicants, and so on.
You can develop your versions of the following and include a relevant case study from a previous client. For example, a painter specializing in complete house exteriors might tire of requests for small interior jobs. A specialized website can filter their prospects and bring them better business.
Here’s a basic script our team has developed:
Well, Lisa, I run a firm here in CITY that helps business owners become more successful in the digital world with high-quality, full-service websites.
We realized most business owners don’t have the time or tech skills to build and maintain their own website. As a result, they have an outdated site or no site and lose potential customers every day.
We believe business owners should focus on their business. We handle every part of your site, from updates to domain, hosting, email, and even search engine optimization if you want.
Up next, you’ll need to show why the prospect must choose you. Cover the advantages of the recurring revenue model here and explain your fees. Explain that you deliver top-quality modern websites combined with outstanding service, all at affordable prices.
Here are the best talking points you can use:
We run a technology that allows us to deliver top-quality modern websites combined with outstanding service, all at affordable prices.
Unlike traditional agencies or web designers, you don’t pay us thousands upfront, only to get a website to maintain on your own that will be technically outdated in two years.
For a one-time setup fee of $499 USD and a monthly charge of just $99 USD, we’ll create a professional site, update the content, do technical maintenance, keep your domain name current, host the site, and keep your email accounts running.
We have a 20% discount on the monthly fee when billed annually.
The next step is to understand their business and show you care about it. The more you find out about the client’s business and problems, the better you’ll be able to tailor your sales pitch!
Here are the best types of questions to use and how to show how a website will help:
Gathering data upfront from your customer and asking the right questions will show that you are a pro. You’ll demonstrate that you really care and thus build trust.
The most important part of the sales process is closing. Move the prospect to make a firm commitment to start working with you. If they aren’t ready to start immediately, offer a smaller next step, like scheduling a later meeting or sharing testimonials. Always make sure a decision-maker is participating in the next meeting!
Up next, we’ll look at some closing strategies that can help you seal the deal with clients.
When you reach the end of a call with a potential client, your job is simple—get them to pay for your web design services. But while the idea is simple, getting a prospect to sign up can be very difficult in practice. To help, here are some techniques we’ve used to close more deals faster.
One of the best ways to convince a prospect is by showing them a previous site you’ve designed for a similar client or letting them talk to a current client of yours. Keep portfolio sites for the various verticals you target, like salons, restaurants, dentist offices, and the like. With permission, you can also share the contact information of a current happy customer.
One technique that worked well for us at the beginning was doing web design first, then charging later. Charging later works best if you don’t have an extensive portfolio or are branching into a new web design niche without relevant work samples. (For example, if you have a dozen restaurant websites but want to land a new hairdresser client.)
To use this strategy, you’ll first design a draft of the new website. Then if the client likes it, they’ll pay the upfront design fee and move forward. This strategy involves more work for you upfront, but it proves to the client that you can build great sites and understand their business. And if they don’t like the website? Not to worry—you’ve created a portfolio piece you can use for another customer down the road.
Another strategy you can use is waiving the setup fee. This fee can be a significant barrier for many new clients since they have to pay $500 USD (or whatever your setup fee is) before seeing results. Instead, just charge your monthly recurring payment. You’ll make less money in the short term, but you’ll be more likely to win over an ideal client to stay with you for a while.
If you don’t want to design a site for free like the previous suggestion, this is a great middle option that gives the client a great site with less risk but still lets you get paid for your work.
You can also build trust by showing your web design process, from draft to design to publication. Doing this as the final stage before you ask for a sale can help create confidence in the prospect’s mind about what you have to offer. People don’t trust what they don’t understand, so show the steps and build trust.
This tip applies once you close a sale and want to make sure you still get paid every month: use automatic billing. If you have to ask for payment every month, it’s a constant reminder of what they’re paying. But if you have a credit card on file or use a payment processor that charges your clients automatically each month, you can count on steady, regular cashflow.
It’s also a timesaver for everyone—your client doesn’t have to spend time paying yet another bill, and you can rest easy knowing you don’t have to follow up for a missed payment.
If all else fails and the perfect prospect doesn’t want to sign up at the last minute, never burn the bridge. Don’t let the rejection get to you, and remember you’re a website expert, but also friendly and accessible and willing to help your clients understand what’s going on.
Take the chance to explain what a client might want to look for if they decide to launch a website later. Explain what features are most important based on your knowledge. If a client doesn’t want a website now, there still may be opportunities in the future. Build trust, strengthen the relationship, and play the long game.
Over the last few years, we’ve been privileged to work with so many incredible clients—all following the ideas and suggestions outlined above. The real secret was, of course, putting in hard work and focusing on growth goals. The sales techniques mentioned above helped us then convert those prospects into paying customers.
We also used internal software that we recently released Sitejet to speed up the process and become more profitable. We designed Sitejet to help agencies grow with MRR clients by cutting site creation time by as much as 70% and streamlining client interactions. It’s created to help designers grow their business and give back time for what you love: being creative.
Anyone can successfully grow their design agency. As we explained in the first part of this series, starting takes motivation and an effective pricing model and mindset. And as we shared in this second part, growth comes once you combine proven techniques with lots of hard work! Good luck—and we can’t wait to hear your stories in the comments to this article!
Not many people know that the entire Smashing Family is a very small team with just 15 wonderful people working day-to-day on everything from magazine and books to front-end and design. At times it might feel like that’s quite a bit of work, but we do our best to be well-organized and be productive, while working (well, mostly) 100% remote for almost a decade now.
In fact, we’ve been quite busy over the last few months. We’ve been running our online workshops, redesigned our navigation, refactored a number of components, refined performance and improved accessibility. There are more subtle UX changes coming in, and we’d love to share what we’ve been cooking. Settle in.
We’ve run 40 workshops with 2.600 attendees so far, and we’ve learned how to run a workshop where you, dear readers, learn best. So for the next months, we’ve set up a full schedule on front-end and design, from web performance to interface design. Jump to all workshops ↬
 Meet our friendly front-end & UX workshops. Boost your skills online and learn from experts — live.
No pre-recorded sessions, no big picture talks. Our online workshops take place live and span multiple days across weeks. They are split into 2.5h-sessions, plus you’ll get all workshop video recordings, slides and a friendly Q&A in every session. (Ah, you can save up to 25% off with a Smashing Membership — just sayin’!.)
With so many articles on the site, finding the right articles can be difficult. So for the last weeks, we’ve been going through 3.500 articles and manually refining and standardizing the underlying taxonomy of our posts. You might have been there as well: dealing with articles accommodated over 15 years wasn’t quite easy.

That was quite an exercise in patience and hard work — but now we are happy to roll out the new navigation, with important navigation options surfaced prominently across the entire site. Hopefully, you’ll find the new navigation (on the top of this page, too) more useful.
Please leave a comment if you spot any bugs, mistakes, or perhaps something important missing — we’ll do our best to fix it and deploy right away.
We have also rolled out new article formats — evegreen guides. These are the articles with curated articles, tutorials, tools and resources that we keep updating regularly. There are a few more of those coming up, but they should be a reliable source of techniques and tools.
Here’s what we’ve published so far:
You can also access the guide on the new Smashing Magazine's frontpage, although some UI/UX changes will be coming in there as well. Feedback? We are listening on Twitter, of course.
We’re getting closer and closer to our free online meetup coming April 27 — and we’d be honored and humbled to welcome you there. There we will be running a website makeover of the Powercoders NGO, live.

Tickets are absolutely free. So, if you don’t have one yet, please check out the details, speakers, schedule and timezones and get your ticket today, mark your calendars and invite your friends and colleagues to join in.
We are very committed to improving Smashing in every possible way, and we are working hard to do just that behind the scenes. We’d sincerely appreciate you recommending our little site, our articles and workshops to your friends and colleagues — and we hope that they will help you boost your skills and the quality of your work.
A sincere thank you for your kind, ongoing support and generosity — thank you for being smashing, now and ever. Ah, and subscribe to our newsletter — we have plenty of new announcements coming up soon! ;)
Q what does Google stands for ?
function to add two numbers, taking as arg/param & using inputs.
Do you want to add custom after post widgets in WordPress?
After post widgets allow you to display different elements at the end of blog posts or pages. For instance, you can add a newsletter sign-up form, show related posts, display recent articles, or popular products.
In this article, we’ll show you how to easily add custom after post widgets in WordPress to keep users engaged and spend more time on your website.

You may have seen call to actions at the end of an article on many popular websites. That’s because if a user has scrolled down till the end of an article, then they are already hooked and more likely to engage with your offer.

This space can be utilized to put an email sign-up form, a lead generation form, or boost user engagement with related posts, popular posts, and other content discovery features.
Similarly, if you run an online store, then you may want to show related products or promote a sale by offering a discount.

Now there are different ways to do this. You could use plugins like MonsterInsights popular posts addon which lets you automatically add popular posts or popular products after your post content.
You can add that after-post content manually while writing your posts using the block editor.
This is a lot of work and the problem with this method is that if you wanted to change something, then you will have to manually do that.
That’s where widgets come in.
In web development terminology widgets are non-content blocks that you can add to different areas of your website separate from the main content area.
WordPress comes with a set of built-in widgets that you can add to any widget-ready areas provided by your WordPress theme.
All popular WordPress themes come with common widget ready areas like sidebars, footer, header widget areas. However, very few WordPress themes include an after-post widget area.
That being said, let’s take a look at how you can easily add after-post widgets in WordPress regardless of which WordPress theme you are using.
This method is a bit limited but easier and works with all types of WordPress widgets. It relies a little bit on your WordPress theme for styling but would work well for most users.
First thing you need to do is install and activate the Add Widget After Content plugin. For more details, see our step by step guide on how to install a WordPress plugin.
Upon activation, go to the Appearance » Widgets page and there you’ll notice a new widget area called ‘After Content’.

Now you can simply add any widget from the available widgets column into the After Content area. For instance, here we have added Recent Posts, and a newsletter sign up form widget we made using WPForms.

Feel free to edit each widget setting as you would normally do and don’t forget to save your changes.
Once, finished you can visit your website to see your after post content widgets in action. This is how it looked on our demo website.

Depending on how many widgets you are trying to add and your WordPress theme, your widgets may appear slightly off balanced.
By default, the plugin adds widgets one after another, so if you wanted to show them side by side, then you’ll have to use custom CSS. You can also change background color, add padding, change text color, and more.
Simply go to Appearance » Customize page and switch to the Additional CSS tab. You can start off by adding this custom CSS as a starting point.
.awac.widget {
    width: 50%;
    display: inline-block;
    float: left;
    padding: 20px;
    background-color: #fff8e9;
    border: 1px dashed #fde2a9;
    min-height:400px;
}

.awac.widget h4 {
font-size:18px;
color:#666;
}

.awac.widget li{
font-size:16px;
}
In this custom CSS code, we changed the widget width to display two widgets side by side. We have also changed background color and font sizes. Feel free to adjust the CSS to meet your requirements.
Don’t forget to click on the Publish button to save your changes.
This is how it looked on our demo website.

Don’t want to use custom CSS? Try the CSS Hero plugin. It lets you customize all areas of your site without any CSS knowledge.
Show or Hide After Post Widgets
By default, the plugin will show your after post widgets on all posts and pages. It also allows you to hide it on places where you don’t want to show after content widgets.
For instance, you may not want to display after post widgets on static pages.
Simply go to the Appearance » Widget After Content page. From here, you can choose which categories or post types will not display your after-content widget.

Don’t forget to click on the Save Changes button to store your settings.
You can also hide the after content widget area for individual posts and pages. Simply edit the post of page where you don’t want to show after post widgets and scroll down to the ‘Widget After Content’ box at the bottom.

Next, check the box to hide the widget area and then save your post or page. The plugin will now stop showing the widget area for that particular post/page.
This method is prettier and more powerful, but it does not use default WordPress widgets. Instead, it allows you to add any content you want with beautiful designs and templates to choose from.
Another advantage of this method is that it gives you a ton of targeting options. For instance, you can show personalized content to different users, change content based on what users are currently viewing, or use on-site retargeting for more impact.
For this method, you’ll need OptinMonster. It is the best lead generation and conversion optimization software on the market and allows you to convert website visitors into subscribers and customers.
First, you need to sign up for an OptinMonster account.

After signing up, switch to your WordPress website to install and activate the OptinMonster plugin. For more details, see our step by step guide on how to install a WordPress plugin.
This plugin acts as a connector between your WordPress website and your OptinMonster account.
Upon activation, you need to visit OptinMonster » Settings page and click on the ‘Connect existing account’ button.

This will bring up a popup where you can log in and connect your WordPress site to your OptinMonster account.
Now that your WordPress site is connected, you are ready to create your first geotargeted campaign. Go to the OptinMonster » Campaigns page and click on the ‘Add New’ button.

First, you’ll need to choose your campaign type. OptinMonster supports lightbox popups, floating bars, inline optins, fullscreen, slide-in, and gamified campaigns.
For the sake of this tutorial, we’ll choose a inline campaign which allows us to automatically display our campaign after content.

Below that, you can select a campaign template by clicking on it.
Next, you need to enter a name for your campaign. You can enter any name here, and then click on the ‘Start building’ button.

This will launch OptinMonster’s campaign builder interface with a live preview of your campaign in the right panel.

You can simply point and click on any item in the preview to edit, move, or delete it. You can also add new elements by clicking on the Add Blocks button at the top.

From here, you can choose more powerful elements not available in the default WordPress widgets. For instance, you can add countdown timers, buttons, chatbots, and columns.
Once you have designed your after post campaign, switch to the Publish tab and change the campaign status to ‘Publish’.

After that, click on the Save button to store your settings and close the campaign builder.
OptinMonster will now take you to the Output settings page. From here, you can choose where you want to display your after post content.
Simply select Automatic and then you can choose to show your campaign inside, below, or before the post content.

For the sake of this tutorial, we’ll choose below the post content option. After that, change the Visibility status to Published and click on the Save button to make your campaign live.
You can now visit your website to see your custom after post widget in action.

We hope this article helped you learn how to add custom after post widgets in WordPress.
Want to see how users are interacting with your after post widgets? See our tutorial on how to track user engagement in WordPress and then try these tips to easily boost your website traffic.
If you liked this article, then please subscribe to our YouTube Channel for WordPress video tutorials. You can also find us on Twitter and Facebook.
The post How to Add Custom After Post Widgets in WordPress appeared first on WPBeginner.
I want to this project for a few days, so execusem send for a short in the time.
Develop the following HTML page (with CSS file). The following apply : The text "2020-2021" is heading style 3 at center of The figure is highlighted with grey color. The hyperlinks are at left of page. The social media logos are at left of hyperlinks. The form elements are at right of page. When the user clicks on the "send" button, the page sends the data to (thanks.php) page having all the values hidden in the URL. The page should appear exactly as the screenshot below. * Points) page.
 In our previous article from this series we introduced a use case around headless e-commerce for retail stores.
The process was laid out how we've approached the use case and how portfolio solutions are the base for researching a generic architectural blueprint.
Hi every one! I real like programming, but I dont know which language to learn to become a best programer. I just need advise becouse there are many languages out there. Thank you
One may not get One Shot Keto diet pill in any neighborhood store or shop. It should be requested uniquely from the authority rundown of the producer. To arrange this item on the web, one should initially go to the authority website and fill an online structure. In the structure, one should compose subtleties like name, address, versatile number, postal division, city, and email ID. The following stage is to pick the method of installment from the rundown. There are a few methods of installment, for example, e-wallet, Mastercard, check card, and others. One needs to likewise enter the quantity of items to buy. At long last, the client will get the conveyance of the item inside a couple of business days. Visit our Official Website To Know More: https://finance.yahoo.com/news/one-shot-keto-reviews-2021-160300158.html