I Built a Telnet App in 2021 With WebAssembly

I love the aesthetics of terminals and I’m not the only one. There is a whole subreddit dedicated to people sharing their desktops and showcasing different terminal setups. Last year, I spent time working on an innovative WebAssembly runtime called Lunatic. Recently, we landed TCP support and I was super excited to start building real-world applications with it, and what would be a better fit than a terminal-based chat server with a retro vibe?

It took me around a week to build it with Rust + Lunatic and you can check out the code here. If you would like to try it out you can connect to it with:

Python Developer: Roles, Responsibilities, Skills, and Proficiency

The canonical, “Python is a great first language”, elicited, “Python is a great last language!” — Noah Spurrier

 A rising programming language in the IT scenario, one of the most popular amongst the developer community — Python needs no introduction. Python programming has been in demand and so has been the demand for skilled Python developers. Simply learning Python may not suffice for a developer, understanding Python in detail, learning about the roles and responsibilities, skills, and salaries are important too.

9 AWS Security Best Practices: Securing Your AWS Cloud

The digitalization drive has become the dominating trend, with computer technologies penetrating all spheres of social and personal life in the modern world. Alongside ushering innumerable benefits, the ubiquitous advent of IT devices has brought serious concerns in its wake. One of the most pressing questions that worries both individuals and organizations is, “How secure is my virtual data?”

Public anxiety is continuously fed by reports of security breaches and data leakages that cost companies a pretty penny. Their financial losses manifest an ever-growing pattern, with businesses having to spend (or waste?) millions of dollars to redress gruesome consequences. For example, Desjardines Group lost over $50 million to cover for the data leakage of their clientele, and Norsk Hydro had to fork out $75 million to eliminate the effects of a cyberattack. Such exorbitant losses are rare, but IBM experts believe that on average, corporate victims of cybercrime have to foot a bill equal to $4 million. Because of such appalling statistics, establishing cybersecurity of their IT environment is prioritized by many organizations. Even the malicious onslaught of the global pandemic didn’t relegate security considerations to a secondary place, with companies reluctant to cut down on the security strategy enforcement expenditures.

Web Crawlers, the DMCA, and Thinking Ahead

Who Should Read It?

This article is for web content makers and owners of the public content platforms, web developers, and anyone who can suddenly publish content that might become a subject of DMCA claim. A couple of examples are Twitter, GitHub, and Vimeo platforms that allow users to publish pictures, videos, and source codes that might appear to violate copyright laws. 

Disclaimer

Of course, when we are talking about Public resources like Twitter, it is not a problem for someone to write a web-crawler smart enough to analyze specific resources and copy/download all the possible content from it (or save the content on the user machine). In this case, your platform/web-site is simply one point in the content distribution chain and does not know how this content is supposed to be shared after all. Since it is a separate resource with its mission and reasons to work with this information (so they might need or don't need to satisfy DMCA rules), I don't think it's something you can do with it. Web-crawlers overall may become a massive problem in the DMCA applicability. On the other side, they play a substantial role as an external cache that allows people to find information lost on the original resource. So, web crawlers, not always bad, actually. 

Working With Spring Boot and Hazelcast (Distributed Cache)

Hazelcast provides central and predictable scaling of applications via in-memory access to frequently used data and across an elastically scalable data grid. These techniques both reduce the query load on databases and help improve application speed.

Spring Boot is often used to create stand-alone, production-grade Spring-based Applications that you can 'just run.'

4 Best Practices for IoT OTA Updates

Every embedded device needs device firmware update (DFU) capability. Why?

Inevitably, you are bound to ship bugs. You can’t anticipate every user’s input, and you can’t anticipate all the ways in which end users will use your device. But that’s only half of it; devices are now increasingly complex. Even the best QA teams won’t be able to catch every issue. Consider NASA, which is no stranger to needed firmware updates for the Mars Rover, whether due to an unintended crash bug or a crash after a software update. No one disputes NASA’s extremely rigorous process and well-documented testing regimens but, even NASA relies on firmware updates.

MXReflection: A Java Math Framework

MXReflection is a Java math framework based on mXparser library capabilities.

You can calculate complex mathematical operations and functions with Java, just by using class-related fields. MXReflection reads values from the assigned fields and injects the results in the @Expression annotated fields.

Examining Serverless Security Strategies, Tools, and (Current) Best Practices

Developers and DevOps teams considering the efficiency, scalability, and cost benefits that serverless functions have to offer shouldn’t be daunted by the challenge of securing serverless applications throughout development and into production. They should take it very seriously. In this article, I will cover how to begin developing serverless functions using AWS Lambda and the best development tools to use, as well as the most effective serverless security strategies and best practices. 

To begin, approaches to serverless security fall into two categories: runtime security, and static security.

What Is DevOps Culture?

At its essence, a DevOps culture involves closer collaboration and a shared responsibility between development and operations for the products they create and maintain. This helps companies align their people, processes, and tools toward a more unified customer focus. 

It involves cultivating multidisciplinary teams who take accountability for the entire lifecycle of a product. DevOps teams work autonomously and embrace a software engineering culture, workflow, and toolset that elevates operational requirements to the same level of importance as architecture, design and development. The understanding that developers who build it, also run it, brings developers closer to the user, with a greater understanding of user requirements and needs. With operations teams more involved in the development process, they can add maintenance requirements and customer needs for a better product. 

My First GoLang Application in Kubernetes

Hi,

In an era of Kubernetes and container-based applications, it is very important to know Go Language as well. Go Lang is one of the popular (might be most popular) languages for developing Microservices or Enterprise Applications in Kubernetes or OpenShift. In this article, we will learn how to deploy the Go application in Kubernetes.

How to Save and Search Your (Free-Tier) Slack History

The Slack free tier saves only the last 10K messages. For social Slack instances, it may be impractical to upgrade to a paid plan to retain these messages. Similarly, for an open-source project like Airbyte where we interact with our community through a public Slack instance, the cost of paying for a seat for every Slack member is prohibitive.

However, searching through old messages can be really helpful. Losing that history feels like some advanced form of memory loss. What was that joke about Java 8 Streams? This contributor question sounds familiar—haven't we seen it before? But you just can't remember!

Timed & Tested: Our New Australia Data Center Shaves Seconds Off Your Load Time!

At the end of 2020, WPMU DEV Hosting introduced a new data center location in Australia. In this article we put it to the test to see how much speed WPMU DEV members can now gain targeting an audience down under.

There’s a reason droves of WPMU DEV members demand we scour the globe looking for new locations (like Australia) to plant our hosting flag into and claim.

Server location matters.

After all, it’s no secret that if your visitors are closer to your site’s data center, then said site is naturally going to load faster for them.

The real question is:

“How much does server location matter?” 

That’s what I’m investigating in this article.

I’ll be testing the performance of a site hosted in Australia and comparing to one hosted in Singapore – which before now, was the closest WPMU members could host to Australia.

Is it worth switching locations if you or your clients target (or wish to target) our Aussie friends? Read on to find out.

As a little bonus, I’ll also show you how to inject your sites with even more horsepower using our hosting’s Static Server Caching (Fast CGI) which increased speed 20 times over! See below.


Skip Ahead:

The Introduction Of Our New Australia and Japan Data Centers

Right before Christmas last year our brand new hosting locations in Australia (Sydney) and Japan (Tokyo) went live.

The addition of these two new locations (particularly Australia) was highly requested by our members, and after months of modifying the API of our hosting and selecting the perfect provider, we finally made it happen.

Speaking of providers, if you aren’t aware, we use DigitalOcean for all our other hosting servers. Sadly, DO does not have data centers in Australia or Japan, but we didn’t let that stop us…

Long story short, we teamed up with Linode, who have a similar setup to DO, with the added bonus of servers in the new locations. Score!

All of this means that if you (or your own clients) have potential customers in these regions, our hosting can now serve your sites to them in blazing-quick time.

But let’s test it to be sure.

How The Server Testing is Going To Work

To demonstrate the performance benefits of hosting closer to your audience, I used a couple of different performance testing tools.

  1. KeyCDN’s performance test – measures the TTFB of a site from a range of different locations around the world.
  2. Chrome DevTools – a handy tool built straight into your Chrome browser. I’ll also be using this to measure TTFB, as well as the load time of our test sites.

FYI, both of these tools are free, so follow along and run your own tests if you want.

Establishing a Level Playing Field

I started by creating two Bronze-level sites on WPMU DEV Hosting. Using the same site template for each – which members can quickly whip-up using our site cloning feature.

I also selected this simple freelancer template by Beaver Builder for both sites:

A screen of the freelancer site template I used for these experiments

Next, was selecting a unique server location for each site – one in our new Australian location and the other in Singapore.

A screen where you can select your hosting location
WPMU DEV Hosting gives you 10 server locations around the world to choose from.

As mentioned, I chose Singapore, as before the end of last year, it was the closest location WPMU DEV members could select if they were targeting an Australian audience.

Making this a great way to compare and show the speed-benefits the new server gives you.

That was all I did with the sites for the time being. Both identical, completely out-of-the-box, no adjustments made.

Testing Server TTFB With KeyCDN

First up we have KeyCDN’s performance testing tool, which we also used in our recent WordPress hosting experiments, where WPMU DEV faced off against the best in the biz (and did pretty darn well!).

The tool tests a selected URL from 10 different locations around the world. The results then give you a breakdown of various load times and HTTP response headers.

In this case we’re using the tool to measure the TTFB of our two sites. In short, TTFB is the time taken from when a client makes a request to receiving the first byte of data.

*You can learn more about TTFB in our in-depth guide: How To Reduce Your TTFB and Boost WordPress Page Speed.

To get started, paste the URL of the site you want to test and in seconds you’ll have a breakdown of the various performance metrics.

A look at the Key CDN performance test we used for testing
Simply enter in a URL and and hit test.

It’s also worth noting that refreshing the test will give you different results.

As a rule of thumb, I refreshed the test a handful of times to see what kind of speed was possible. After a few tests you should notice a rough trend starts to appear. I applied this same logic to all the other tests performed in this article.

One more thing to keep in mind… something I found out the hard way…

Beware Of The Daily Testing Limit!

Although the tool is free, there’s a limit to how many performance tests you can run per day.

The lesson here – don’t be like Rick!

A screen showing the test limit reached notification that popped up
Don’t do what I did people! :(

KeyCDN Performance Test Results

Here are the results I got back after running both sites through the tool:

Test 1 – Australian server:

A look at the results that came from the first Australian server test

Test 2 – Singapore server:

A look at the first results that I got back from the Singapore server TTFB test

Takeaways:

Both servers performed as expected. The Australian server had a TTFB of 195.61ms in the location of Sydney.

The Singapore server wasn’t too shabby either, posting a respectable TTFB of 280.9ms in Singapore.

However, the key metric to highlight here is the difference in speed between the Australian and Singapore servers from Sydney.

In this case, we’re comparing the Australian site’s time of 195.61ms, to Singapore’s 756.45ms.

Which tells us that with the release of our Australian server, your site could possibly now gain an extra 560.84ms of speed.

Plus, Singapore’s score of 756.45ms isn’t great as Google PageSpeed recommends reducing your TTFB speed to less than 600 ms (instant test fail!).

But it doesn’t stop there.

Testing TTFB and Load Time With Chrome DevTools

Another method of testing which was brought to my attention by one of our in-house developers (as he’s a lot smarter than I am), was using Chrome DevTools.

Like our previous performance test, anyone can do this for free, and even better… NO TEST LIMITS!

During this round of testing we’ll be once again measuring TTFB, along with site load time.

One key difference here is that in contrast to how KeyCDN tests from locations around the world, this test is instead relevant to where you are.

The results can also be impacted by factors like: the quality of your internet connection, internet speed, if you’re streaming an addictive Netflix series while testing. You get the idea.

As long as a comparison is done at the same time, under the same conditions, it should be fine.

Finally, for reference, I live in New Zealand, meaning the results should be better for our Australian-hosted site.

Let’s find out.

Not Familiar With Google DevTools?

Here’s a quick breakdown of how to run this test.

This was done on a Mac, using a Chrome Browser. If you use another browser, here are some alternative DevTools options.

Start by navigating to Developer Tools via the toolbar or keyboard shortcut (depending on your device).

A visual showing how to navigate to DevTools

You’ll then need to find the Network tab, and select Disable cache to ensure you’re not using your local browser’s cache.

A look inside Google DevTools and navigating to the network tab

Next, refresh the page and you’ll see a list of all the server requests, as well as Load time, which is one of the metrics we’re focusing on here.

The other metric is of course TTFB. To view TTFB, click on the first item, which should be the URL of your site and the first request the server has responded to.

A screen showing how you have to click on the first item of data to see TTFB

You’ll then see the TTFB data. Note that each request has its own TTFB and they all impact your overall speed.

It’s also why these results appear different to the TTFB results we got from KeyCDN earlier.

So in order to not drive ourselves insane, we’ll stick to recording the TTFB of our first request.

A view of the TTFB data for the selected site and the first server request

DevTools TTFB Test Results

Let’s have a look at the results of our tests:

Test 1 – Australian server:

A look at the results of the TTFB test I ran on Google DevTools

Test 2 – Singapore server:

A look at the TTFB test we ran on Google DevTools for the Singapore server

Takeaways:

Like our KeyCDN results, from my location in NZ, The TTFB difference between the two sites was significant. Over 600ms in this case.

We also now have our new testing metric to look at: Page load time – which is the time taken for your site to load in its entirety (CSS, images, assets, scripts, fonts, etc.).

DevTools Load Test Results

Test 1 – Australian server:

A view showing our Aussie site's load time

Test 2 – Singapore server:

A view showing our Singapore site's loading time

Takeaways:

We saw quite a significant contrast, with Australia recording 1.53 seconds and Singapore lagging behind slightly with 3.44 seconds. A difference of 1.91 seconds.

Upon first look, it may not seem like much. But to put it into perspective – according to Google, the chance of someone bouncing from your site increases by 32% when a page load time goes from one to three seconds.

And most would agree, every second (or MS!) counts when it comes to page speed.

BONUS ROUND: Enable Static Server Cache For 20X More TTFB Speed

Now let’s take things up a notch. We’re going to show you how to add even more horsepower to your site, with the help our hosting’s Static Server Caching (Fast CGI).

SSC enables page caching at the server-side using FastCGI, greatly speeding up your site and allowing for an average of 10 times more concurrent visitors.

Think of it kind of like the 100m Sprint at the Olympics… only the competitors are allowed to enhance themselves as much as they want!

Let’s see the full potential of our site-sprinters.

Start By Activating Static Server Cache On WPMU DEV Hosting

This can be easily done from our site management platform, The Hub.

Select the site you wish to optimize and find the Hosting tab.

A screen showing the Hub dashboard where you will select the Hosting tab

Next click on Tools and then scroll down until you find Static Server Cache.

A visual showing the Static Server Cache option in WPMU DEV Hosting

It’s then as simple as activating SSC and choosing to clear it.

Static Server Cache TTFB Results

With SSC activated, I went back to our KeyCDN performance test and re-tested the Singapore site.

Test 1: Singapore Server No Static Cache

A look at the first results that I got back from the Singapore server TTFB test

Test 2: Singapore Server Static Cache Enabled

The TTFB results of the Singapore server with static server cache enabled

Takeaways:

Fast CGI lived up to its name in this instance. Activating and clearing Static Server Cache resulted in a 20X speed improvement! Dropping our original reading of 280.9ms down to a mere 14.41ms.

And Our Australian Site Was No Different…

Before:

A look at the results that came from the first Australian server test

After:

A look at the TTFB reading of our Australian site with static server cache enabled

Okay, so it wasn’t quite 20X in this case, but I’m sure most people would be fairly pleased increasing their TTFB speed 7.5 times over.

It’s All About [Server] Location, Location, Location

That’s a wrap on this behind-the-scenes look at our server performance testing process.

To sum up, the release of our new Australian server location means WPMU DEV members targeting an audience down under can now enjoy a significant speed increase.

This was evidenced further by the results of our own tests where we managed:

  • An extra 560.84ms of TTFB speed
  • A site load time increase of 1.91 seconds

In an environment where a high page speed score is the Holy Grail, shaving off those extra seconds becomes crucial. Plus, fast loading sites are only going to improve UX and make your visitors less likely to bounce.

On that note, if you’re a WPMU DEV member and you want to migrate an existing site to a new hosting region, using the Cloning feature is the easiest way to do so. Get in touch with 24/7 support if you need any help with this.

Not Hosting With WPMU DEV? We’ll Help You Migrate For Free

We won’t judge, but consider this a great opportunity to finally make the jump! Especially if your target audience includes (or potentially includes!) Australia or Japan. You’ll also get instant access to the 20X Static Server Caching (Fast CGI) we mentioned above.

Better still, you won’t have to lift a finger – we’ll happily migrate your site(s) for no extra charge.

Check out our WPMU DEV Hosting page for full details and keep an eye out for more exciting developments coming in future.

Teaching Web Dev for Free is Good Business

It feels like a trend (and a smart one) for tech platforms to invest in really high-quality learning material for their platform. Let’s have a gander.

Webflow University

Surely Webflow is thinking: if people invest in learning Webflow, they’ll be able to build what they need for themselves and their clients in Weblow, and they’ll stick around and be a good customer.

Jamstack Explorers

Surely Netlify is thinking: if people really grok Jamstack, they’ll build their existing and future sites using it. They’ll get comfortable using Netlify’s features to solve their problems, and they’ll stick around and be a good customer.

Salesforce Trailhead

Surely Salesforce is thinking: if we train people to learn Salesforce and build Salesforce-specific software, not only will they be a good customer, but they’ll bring more customers to us and help big companies stay good customers.

Figma Crash Course

This is not created by Figma themselves, but by Pablo Stanley, who must be thinking: I can teach people to use Figma, and along the way show them how cool and powerful Blush is, which will gain Blush good customers.

Apollo Odyssey

Surely Apollo is thinking: if y’all know GraphQL, and learned it in the context of Apollo, you probably continue using Apollo and bring it to the teams you’re on, which might make for great customers.

WP Courses 

This one is an outlier because these are paid courses, but my guess is that Automattic is thinking: there is already a ton of WordPress learning material out there, why not leverage our brand and deep expertise to make content people are willing to pay for.

Git Tutorials & Training

Surely Atlassian is thinking: if we are the place where people literally learned Git, we can sprinkle in our tooling into those lessons, and you’ll use those tools for your Git workflow, which will follow you through your entire developer career. Not to mention this is good SEO juice.

GitHub does the same thing.


Helping your customers learn your platform is certainly not a new concept. The word “webinar” exists after all. It’s a funny word, but effective. For example, AWS Marketplace sponsors CodePen emails sometimes with the idea of getting people to attend webinars about certain technologies. Wanna learn about Apache Kafka? You can do that for free coming up Thursday, February 25th. Surely AWS is thinking if people learn how this technology works, they’ll use AWS and AWS Marketplace partners to spin it up when they get to using it.

Cypress publishes their webinars. Appcues publishes their webinars. It’s not rare.

What feels a new here is the idea of packaging up learning material on a microsite with a fancy design and making it feel in-line with modern learning platforms. Like you are going to some expensive code school, except you’re getting it for free.

I’m a fan of all this. It’s good marketing for companies. It’s a good learning opportunity for everyone else. It’s also very biased. Learning materials you get directly from companies is going to tell you all about how great the technology of that company is. You should know that going in, if it’s isn’t obvious.

I’m also a fan—perhaps an even bigger fan—of paying for high-quality learning material. Our learning partner, Frontend Masters, has no particular bias to technology because you’re their customer. If they help you, they succeed and you succeed as well.


The post Teaching Web Dev for Free is Good Business appeared first on CSS-Tricks.

You can support CSS-Tricks by being an MVP Supporter.

Build a Full WordPress Site via Block Patterns With the Hansen Theme

Front page output of the Hansen WordPress theme.

Earlier today, the WordPress theme directory welcomed its fourth block-based theme. Built by UXL Themes, Hansen is one of the more stylish projects capable of working with the site editor in the Gutenberg plugin. The theme author also stepped it up a notch and included several block patterns.

I have written about how patterns will be a game-changer. I have talked about the need for a UI overhaul to better expose them to users. And I have proposed that theme authors use the pattern system instead of templates, allowing users to build out full sections of their sites at the click of a button.

UXL Themes has done just that. Most patterns that we have seen thus far have been built primarily for post or page content. The Hansen theme takes that idea a step further and creates patterns for different site sections.

Want to try a different look for the header? Just remove the old one and swap in another header pattern.

Header patterns included with the Hansen WordPress theme: dark and light.
Inserting the dark header pattern.

How about changing the look of your blog posts page? The theme comes with two and three-column patterns for outputting the latest posts.

Blog posts patterns included in the Hansen WordPress theme.
Inserting a two-column blog posts pattern.

It also packages a Content and Sidebar pattern that is more suitable for single posts and pages.

I am still undecided on whether the patterns or template parts system is the ideal solution for this. Right now, patterns have a cleaner UI overall and can be categorized. Template parts might be easier to switch, but there is no way to group them (e.g., header templates, footer templates, etc.). Regardless of what becomes the de facto standard in the long term, we need more theme authors like UXL Themes experimenting with these concepts, seeing what works, and gathering user feedback.

The theme does not add much in the way of content patterns. However, it does include one named “2 Columns of Text and a Full-Width Cover.” While it is a bit of a mouthful, the name does fully describe what it does. This is also the pattern in use for the homepage in the theme’s demo. However, the demo has a slight modification, adding a custom latest posts section.

A custom block pattern with two columns and a cover/hero section.
Hansen content-related pattern.

Hansen is more than just its patterns. The theme generally looks pretty good too. It has a bit more pizazz than we have seen from some other block-based experiments. Like the recently-released Phoenix theme, developers are becoming more comfortable moving beyond the bare-bones block-based designs from previous months.

These themes are obviously not on par with what one could build on more mature systems. However, Gutenberg’s FSE system is inching forward. The theme authors who are experimenting now are paving the way for the next generation of themes, which I am excited to see.

The Hansen theme also includes several block styles. Most are geared toward blocks that users would typically use in the site editor. I have not seen such an approach in previous block-based themes.

Two of the styles are for mobile navigation. The Mobile Friendly style displays a horizontal nav menu on desktop while switching to a hamburger-flydown on mobile devices. The Mobile Style alternative retains the mobile layout on all screen sizes.

There is a Box Shadow style for the Query Loop block, which adds a shadow to each post. In the future, I hope to see WordPress provide box-shadow options for this instead of themes relying on block styles. Nevertheless, it is a welcome addition for the moment.

Selecting the Box Shadow style in the block editor for the Query Loop block.
Box Shadow style for the Query Loop block.

The No Bottom Margin style allows users to remove bottom margin from Columns. I assume the theme author used this to address the common issue of nested blocks and their bottom margins adding on top of each other. I do not like this as a style because it gives the user the responsibility of fixing a design issue that should be taken care of under the hood. Generally, the problem stems from tackling spacing in design using a bottom margin instead of a top margin. It can be corrected in either case, but going with a top-margin approach is easier.

Outside of that one stylistic issue, the other downside to the theme is that it is not well-suited to long-form content out of the box. The content area stretches too wide for the default font size, making for uncomfortable reading. The theme includes a Narrow Width style for the Group block that corrects this. However, it would ideally be the reverse, with the content defaulting to a narrower width. Whenever a user wants to write a long-form blog post, they would need to wrap it in a Group block and apply the Narrow Width style. The more common use case should be the default.

Overall, I love the experimentation. Hansen is one of the best themes for playing around with the site editor in Gutenberg right now.

How to Use Squarespace

You want a website that looks good, functions properly, and is easy to set up.

Well, welcome to the club!

But what makes things slightly trickier is that you aren’t a coder.

So does this mean you should give up on your dream of having a great website? Absolutely not, especially when we have some truly fantastic website builders.

Case in point: Squarespace.

Squarespace guarantees phenomenal-looking websites, thanks to its beautiful and modern templates. But there’s a hard-to-ignore learning curve involved, which brings me to the point of writing this article.

Below, I’ll give you a step-by-step tutorial on how to use Squarespace to create a beautifully designed and functional website in no time.

What to Expect When Using Squarespace

Squarespace is undoubtedly one of the best website builders on the market. It’s feature-rich and has several modern and beautiful templates that could be a delight for any website owner.

Here’s how you create a Squarespace website:

  • Step 1 — Sign Up With Squarespace
  • Step 2 — Design the Basic Look of Your Website
  • Step 3 — Customize Your Website Homepage
  • Step 4 — Optimize Your Website for Mobile Phones
  • Step 5 — Create Relevant Sub-Pages
  • Step 6 — Make Your Squarespace Website Public

The Good

Squarespace has many things going for it.

As it’s an all-in-one platform, you don’t have to worry about extension or app compatibility. Plus, the knowledge base and customer support cover every potential troubleshooting topic quite efficiently.

Its template selection is contemporary and beautiful, and fully responsive, meaning your site design can adjust itself automatically to appear correctly on mobile devices, tablets, and desktops. You can also edit the templates to customize them according to your preferences.

Squarespace also has a logo designing app that lets you design logos from a list of symbols and typefaces.

Moreover, the website builder takes full care of website security, backups, and redundancy. This takes away a lot of responsibility from your shoulders.

The Bad

The Squarespace interface is slightly more complicated than its competitors. As there are so many features and functionalities, putting together your website can be overwhelming at times, especially where positioning is concerned.

They keep sending you notifications about where you’re going wrong with the editing or that you can unlock a specific feature by upgrading to a paid subscription. But they don’t go the extra step to make it easier for you to make the required move.

The end result? Lots of trial and error.

You also cannot add third-party apps and extensions to Squarespace. Your options are limited to the platform’s range of premium add-ons. As you may have guessed, these extensions—around 20 in number—are quite pricey.

Squarespace is also a pricier option. It may not be feasible for people with tight budgets or those who want to launch a store or multiple websites.

Step 1 — Sign Up With Squarespace

If you don’t already have an account with Squarespace, this is your first step. If you do, you can jump ahead to Step 2. The website builder offers a 14-day free trial, so you can test out the features before subscribing.

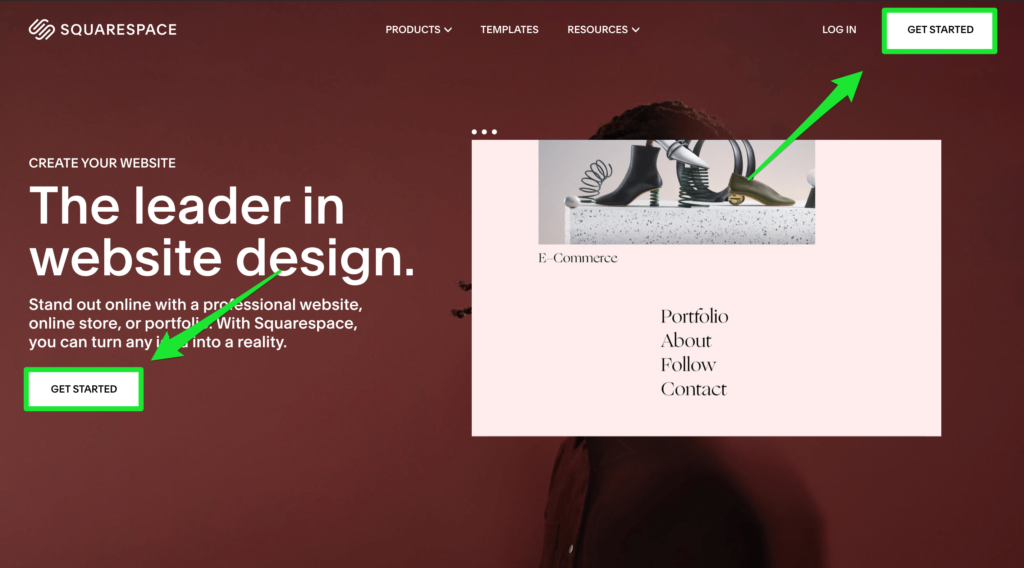
Head Over to Squarespace

Go to the Squarespace homepage and click on Get Started.

Type in the text about the goal of your sites. This will help you see a customized selection of suggested designs. If you don’t have anything specific in mind, you can always click on Skip to move ahead.

Pick a Website Design Template

Squarespace has modern and beautiful website templates, with every template included in your standard Squarespace membership. In other words, you don’t have to worry about any extra charges.

On the left-hand side of the screen, the template catalog sits neatly organized by niche/purpose. For instance, ecommerce sellers can click on the Online Stores category. Each one of these templates has been optimized specifically to work for online stores.

Browse through these designs before committing to any template. You can also preview how a template will look like with some demo content.

Once you find something you like, click on Start with…, and enter your personal credentials. Click on Create Account.

You’ll be logged in to your new trial site.

Step 2 — Design the Basic Look of Your Website

Squarespace takes you through the whole process of getting your website started. I recommend paying full attention at this stage, so you don’t miss out on any important stuff.

Name Your Website

The first step is to enter your website title. After this, Squarespace will demonstrate how you can customize your site, like editing pages, creating new ones, and styling them.

Add Website Logo

Let’s start with the logo first.

Adding a logo to the site is very simple. Hover your mouse just below Home until you see Edit Site Header. Click on it. Just upload the logo file, and it’ll appear on the canvas instantly.

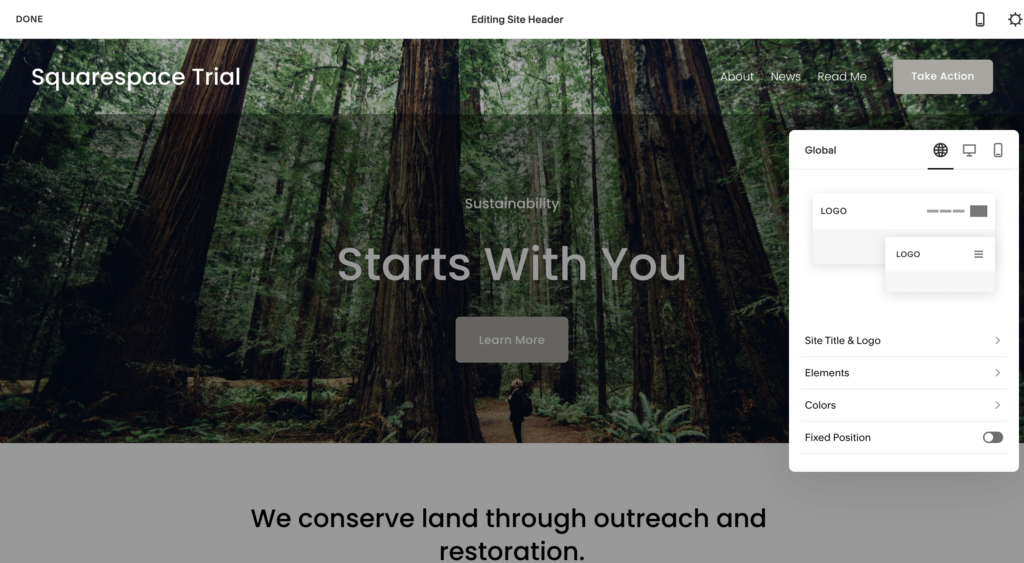
Don’t have a logo yet? No worries, Squarespace will help you create one.

The website builder has a logo maker tool, along with basic editing features. You can also use stock icons to add to your logo. Alternatively, you can use third-party logo maker tools like Wix, Tailor Brands, and Canva as well.

Save your photo from the tool and upload it to the main Squarespace website editor. Once the upload is complete, the logo will appear on the canvas.

Select Next.

Choose an Appropriate Font

Thought that adding a logo was easy? Customizing your website font is even easier.

Squarespace gives you specific font pairings that go well together instead of an endless list of individual forms. All you have to do is decide whether you want to choose sans-serif, serif, or mixed fonts, which will save you lots of time.

Go to the main dashboard, and select Designs. Click on any font pairing to see how it looks in the Preview section. Additionally, you can adjust the base font size.

Select the font pairing you like, and click on Next to proceed.

Pick Your Website Colors

Color settings are similar to font settings. Again, Squarespace lets you pick your colors from the set of designer palettes (a set of colors that match) instead of choosing individually one by one. They are presented as groupings of three colors:

  • The primary color (this is for standout elements on your page, such as links, buttons, and other similar elements)
  • The background color
  • The secondary color (for secondary backgrounds, links, and so on)

Considering these palettes are put together by a professional designer, you’re guaranteed that everything will look good on your website, plus save time. You can also put together a custom palette if you want.

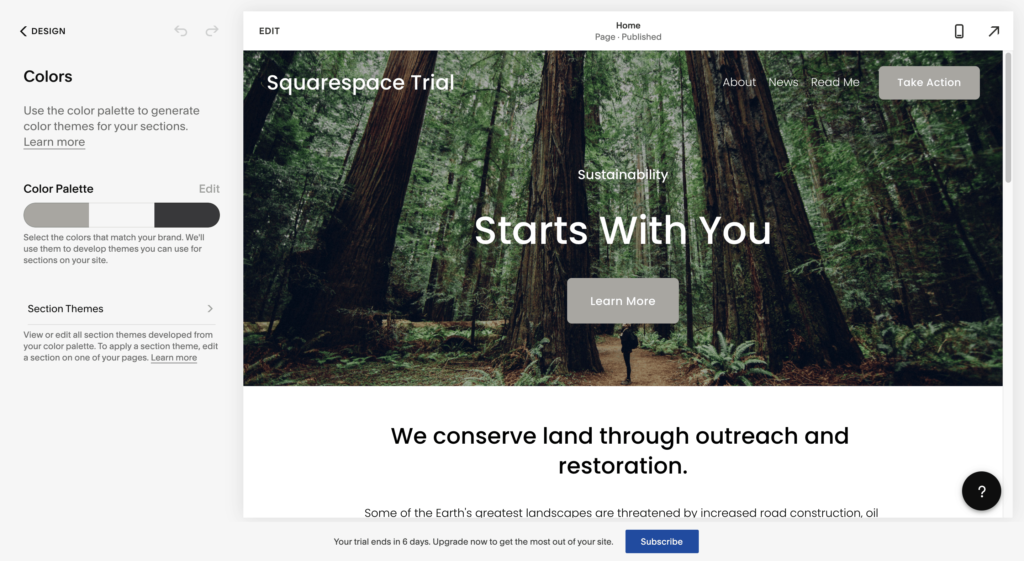
Choose a color palette that suits you best. Click on Done to finalize these changes.

You’ll now see your logo, fonts, and colors added to your website.

Step 3 — Customize Your Website Homepage

You can customize your homepage and replace the demo content with your own.

Squarespace divides all your content into separate rows. Here’s how your homepage design will look before you customize any aspect of the website:

Your website will have three different rows:

  • The menu row
  • The hero section row, which includes the image and the headline on top
  • The text section row that is the lower part of your website

Every row has different options and customizations available. Hover your mouse over any element on the page to see options pop up. This can include replacing the logo, adding extra elements, and changing the header layout.

Select the Edit button located at the top of the canvas. A visual website editor will crop up on your screen, where you can modify any element on the page, including adding and deleting options.

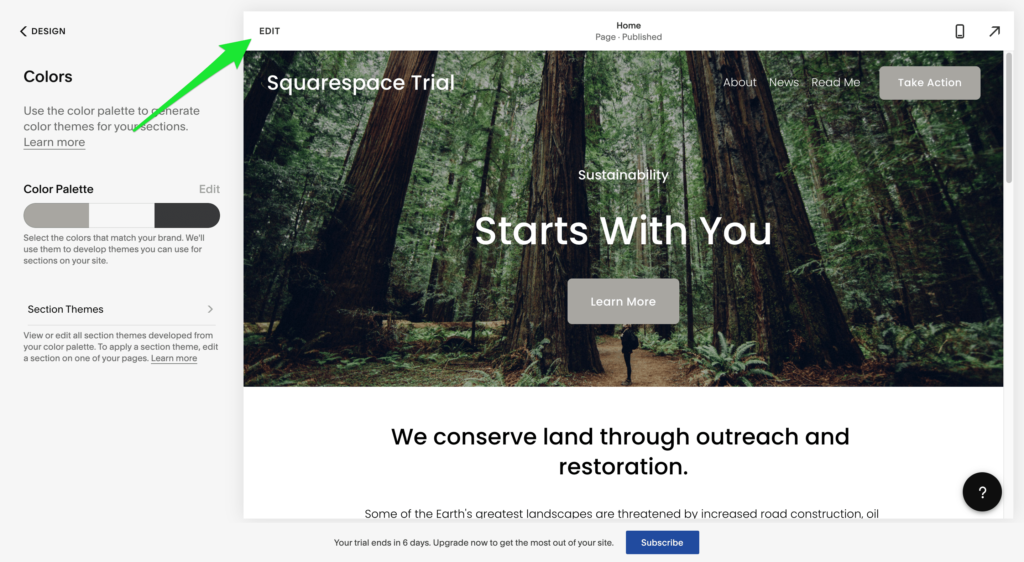
Keep in mind that any text you add or edit is saved automatically.

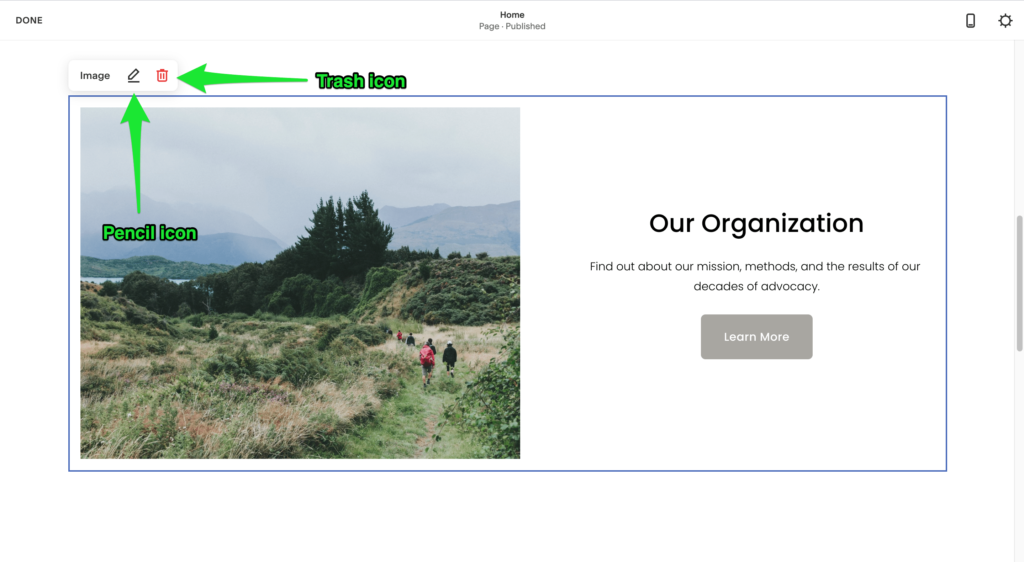
Deleting Website Elements

You can remove a whole row or any individual element. Simply click over the part you want to delete, and click the Trash icon.

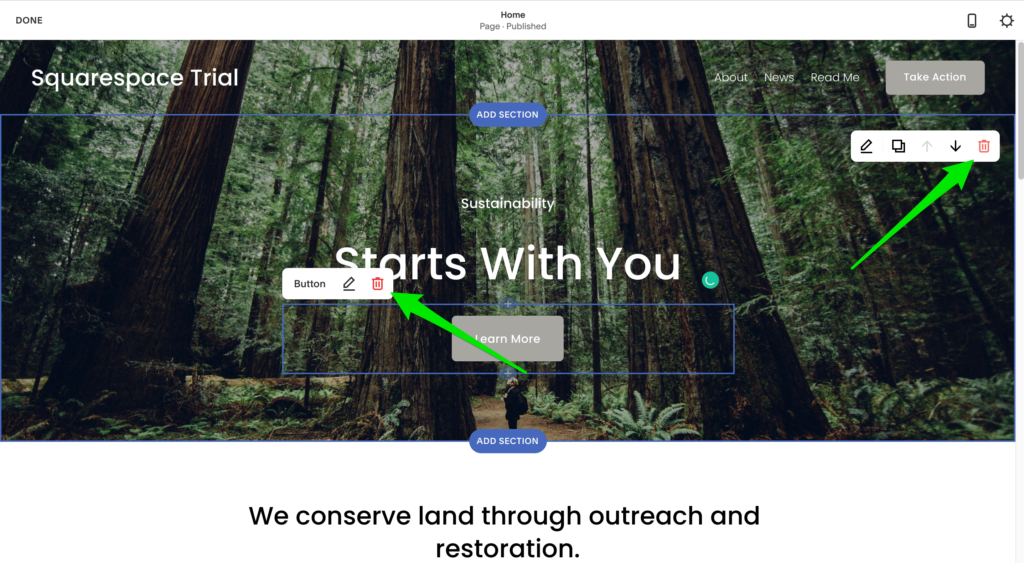
Opening ‘Options’ Panel of Elements

Your website design consists of elements that have their own options panels. To access these panels, click on the Pencil icon on the upper right-hand corner of the element in question. This will show you a set of additional options for the specific section.

Every element will have a different set of options concerning formatting, backgrounds, colors, and alignment. For instance, here’s how the additional options for the Hero row will look:

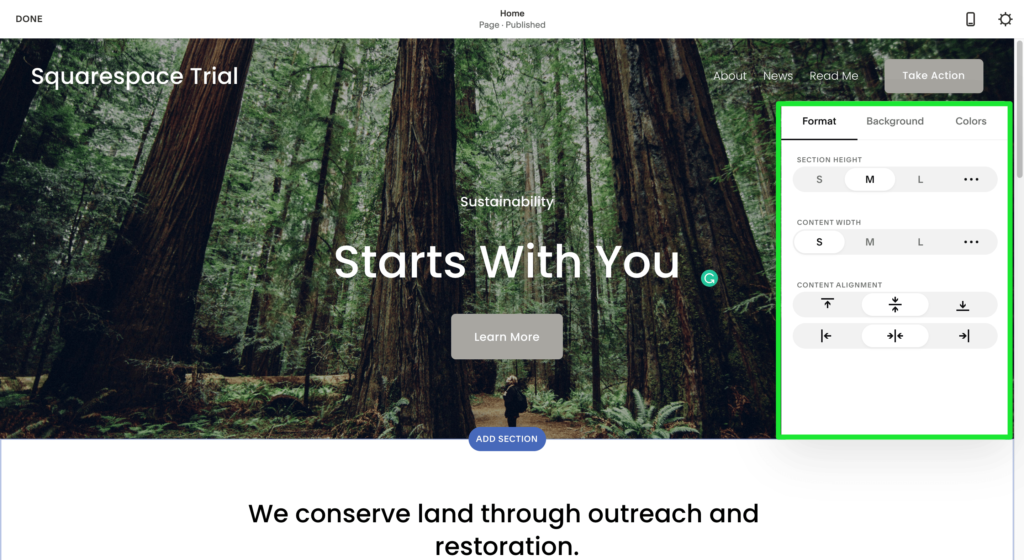
You can adjust the look for every row by clicking on the displayed options.

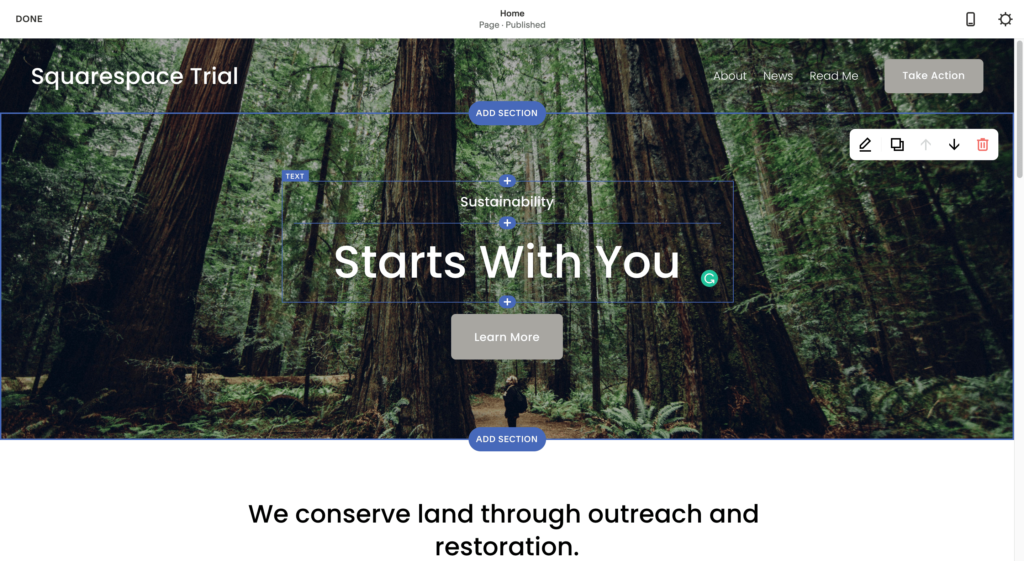
Adding or Realigning Website Sections

You can add a new section as well as realign existing sections.

Adding new sections lets you accommodate any new content that you want to include in your pages. Pick the spot where you want to add a new section and click on the corresponding ‘+’ buttons you’ll find before and every content section.

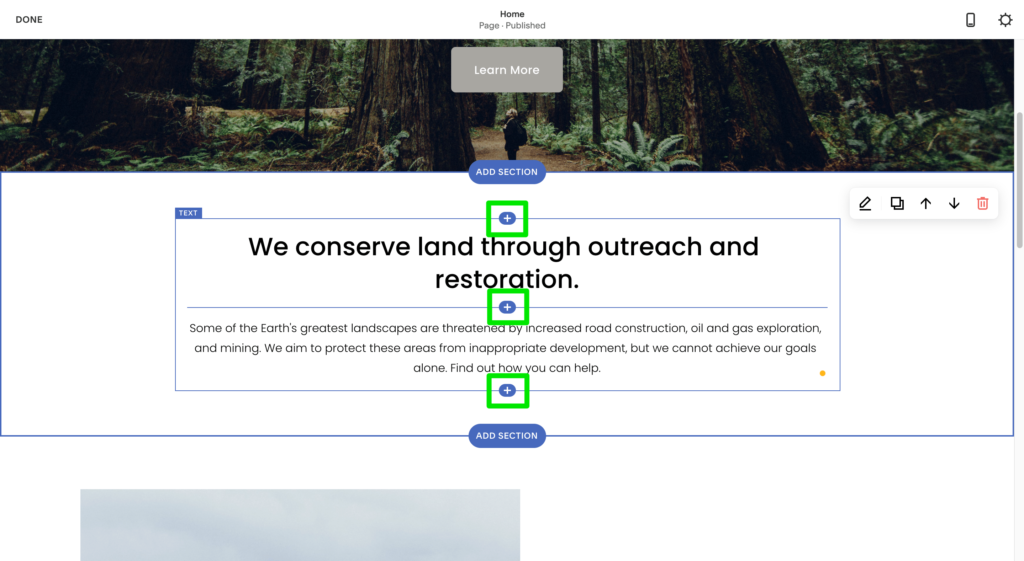
In addition to adding standard content sections like headings, images, and quotes, you can also add specialized fields for appointments, reservations, newsletters, FAQs, restaurant menus, and more.

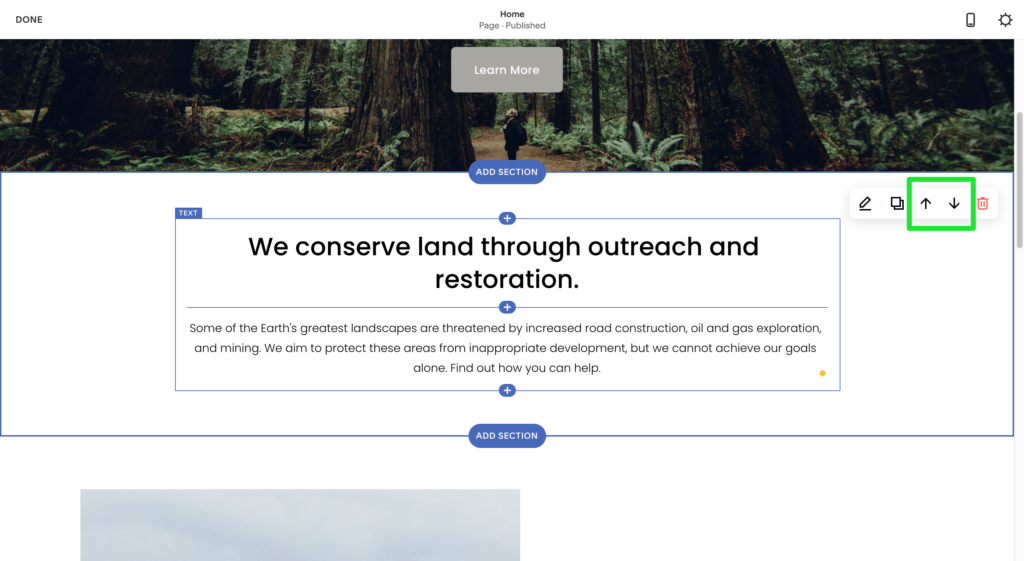
Squarespace also allows you to realign sections by dragging around individual elements and dropping them into another place on the canvas. You can move sections up and down or use the arrow button in the top-right corner of a given row to switch between sections.

Adding Images and Other Visual Elements

Squarespace has templates for image gallery blogs, single videos and images, charts, and music.

Important: Click on the ‘+’ button next to where you want to place that content to add new content to your site—in this case, an image or video.

If you click on Images, you’ll see a selection of different layouts for image presentation. Click on the Pencil icon next to the image you want to replace and then on the Trash icon. You can also upload an original image if you want.
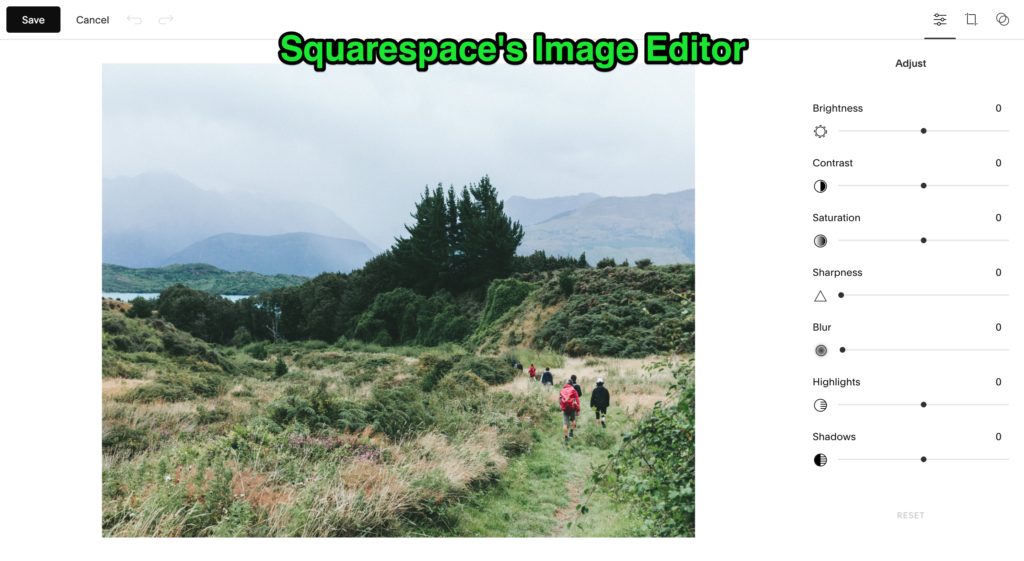
But that’s not it.

Squarespace offers editing tools that let you edit your image and change some of its parameters. Click on the Image Editor button to crop, flip, add filters, change the aspect ratio, and adjust the image’s brightness, contrast, and saturation.

Step 4 — Optimize Your Website for Mobile Phones

An unoptimized website can seriously harm your traffic and conversions.

Why? You see, it’s more likely for users to visit your website from a mobile phone than a laptop or desktop. Mobile traffic has increased to more than 200% in the last seven years.

Luckily, Squarespace makes mobile optimization super easy.

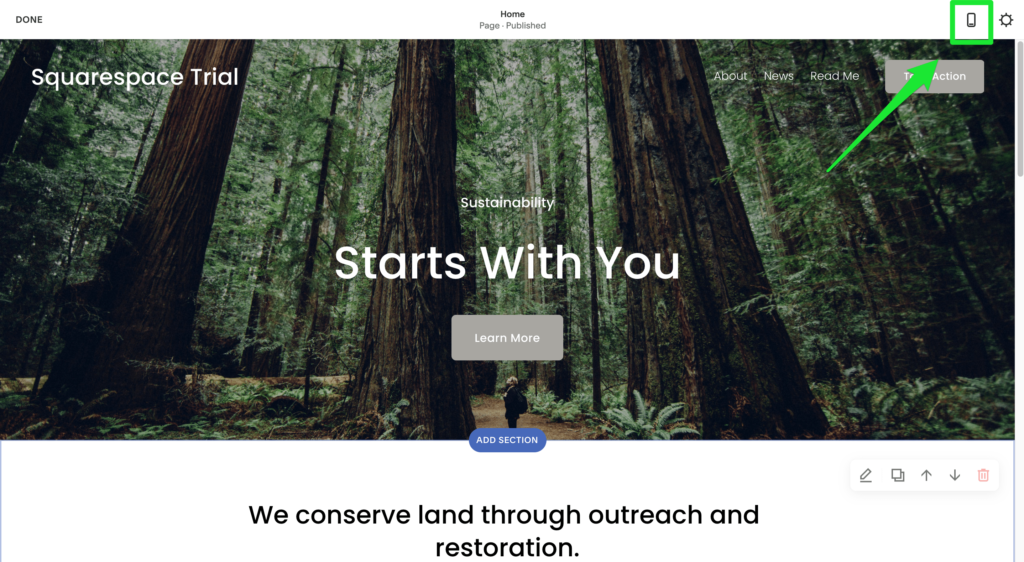
It has a clever mechanism that predicts what the best mobile layout for your website design should be. As such, you don’t have to worry about mobile when using this website builder.

Click on the Mobile Phone icon in the top right-hand corner of the Squarespace interface to view a preview of the mobile version of your site.

Adding Extensions

Squarespace already has plenty of features and abilities, but if you want to extend it further, you can choose third-party integrations as well. For instance, you can add your preferred accounting software or an email marketing tool to your site.

Select the extension you want to add to your site, and then click on Connect to site.

Step 5 — Create Relevant Sub-Pages

Squarespace users generally want to build more pages than the homepage. This can include the About page, Team page, Contact page, and Privacy Policy and Terms of Service page.

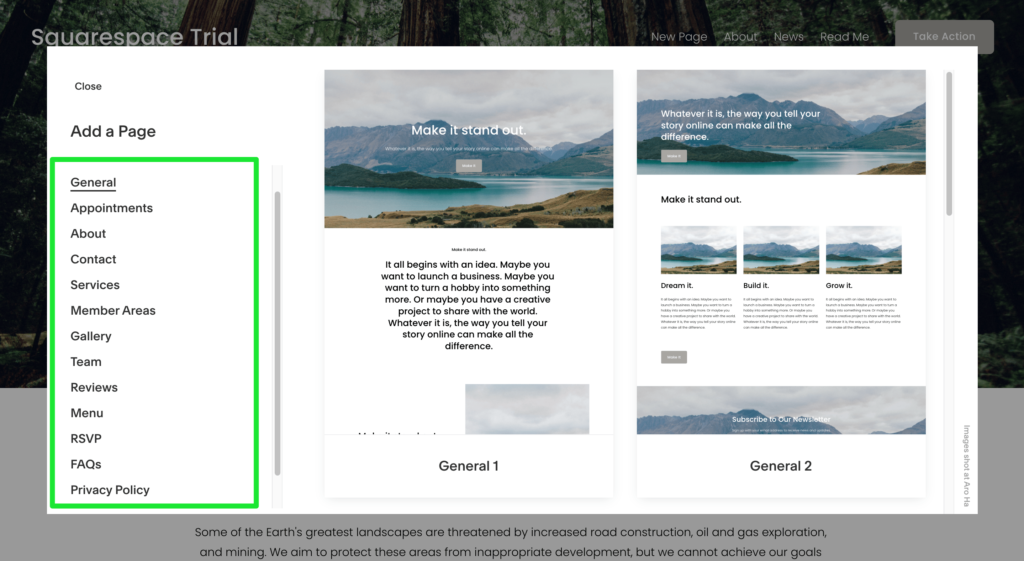
Add a Blank Template

Go to the main Squarespace dashboard to add a page. Select Pages, and then click on the ‘+’ button. You can click on either the Blank Page template or Page Layout.

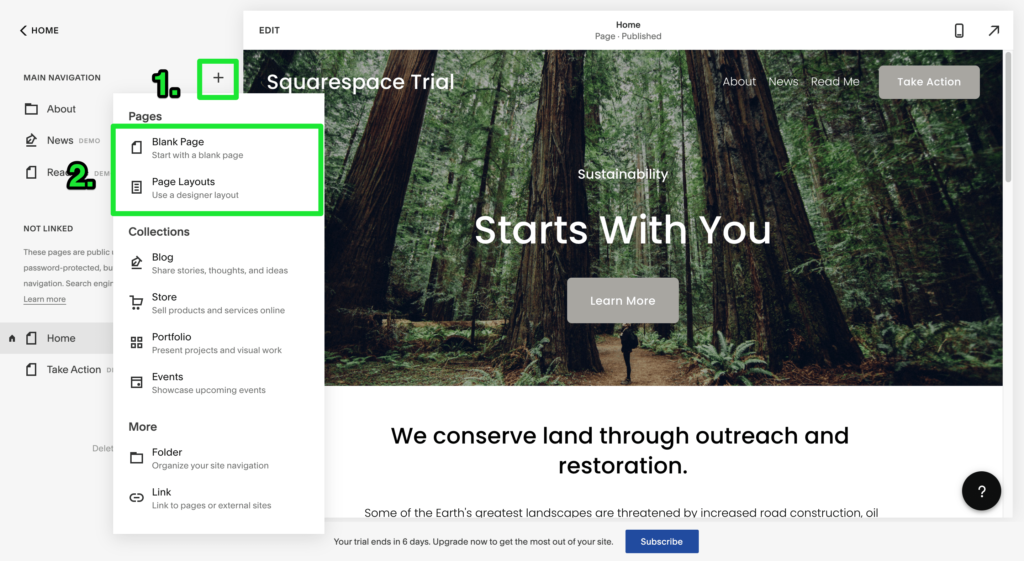
Suppose you click on Page Layout. After this, pick the category of the page you want to build and then select a specific page layout.
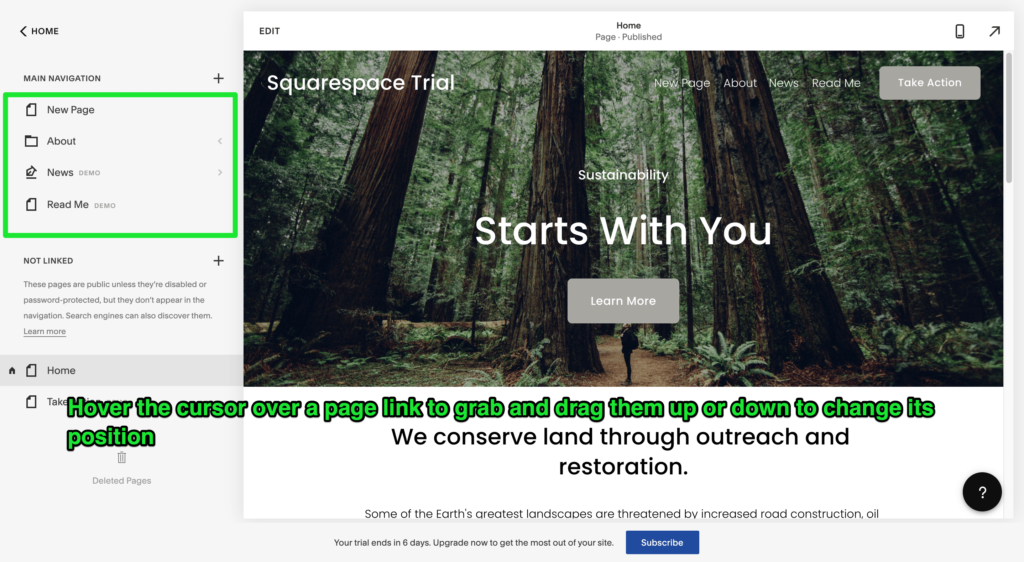
Customize Main Menu

Every newly added page is automatically added to the main menu of your site. But you can tweak things to make the menu look precisely how you want it.

For customizing your menu, you’ll have to go back to the main Squarespace dashboard. Select Pages from there. You can then grab any of the page links in the sidebar and drag them up and down to place them where you want.

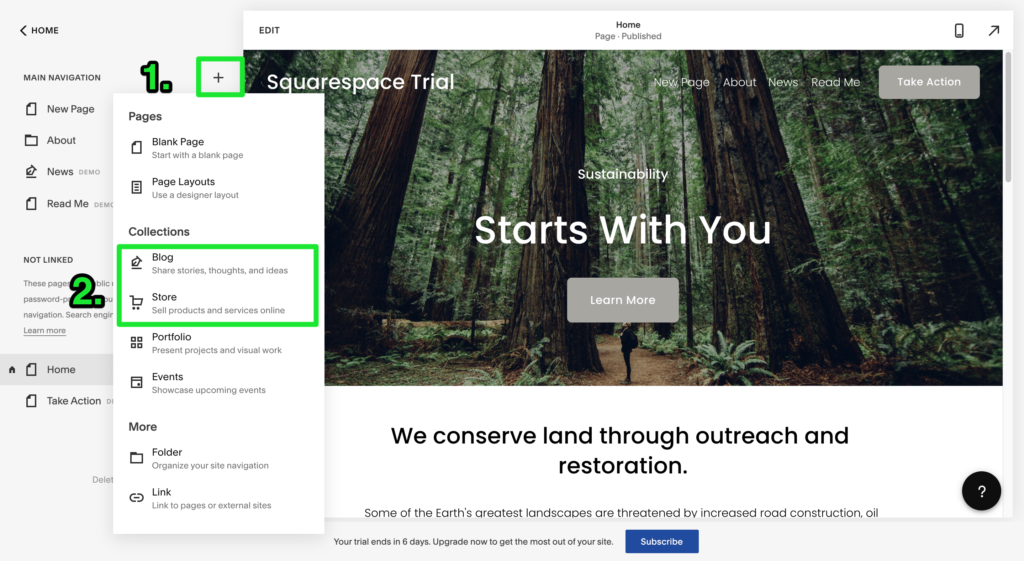
Adding Optional Pages

You can add a blog or an online store to your website at this stage. Both are optional, so only proceed with this if you really want to add them.

Click on Pages on the Squarespace dashboard, followed by the ‘+’ button in the sidebar to add a new page. Select Blog or Store according to what you want.

Step 6 — Make Your Squarespace Website Public

Your Squarespace website is private at the moment. If you want to make it visible to the outside world, you have to activate it.

Here’s what you need to do:

1. Go to the main Squarespace dashboard.

2. Select Settings, followed by Site Availability.

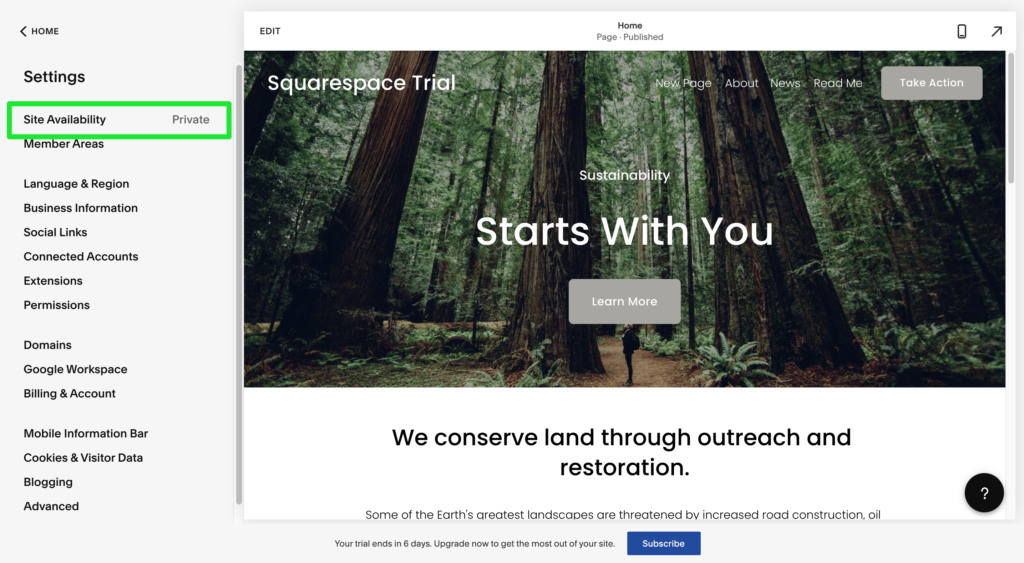
3. Upgrade to one of Squarespace‘s paid plans to launch the site.

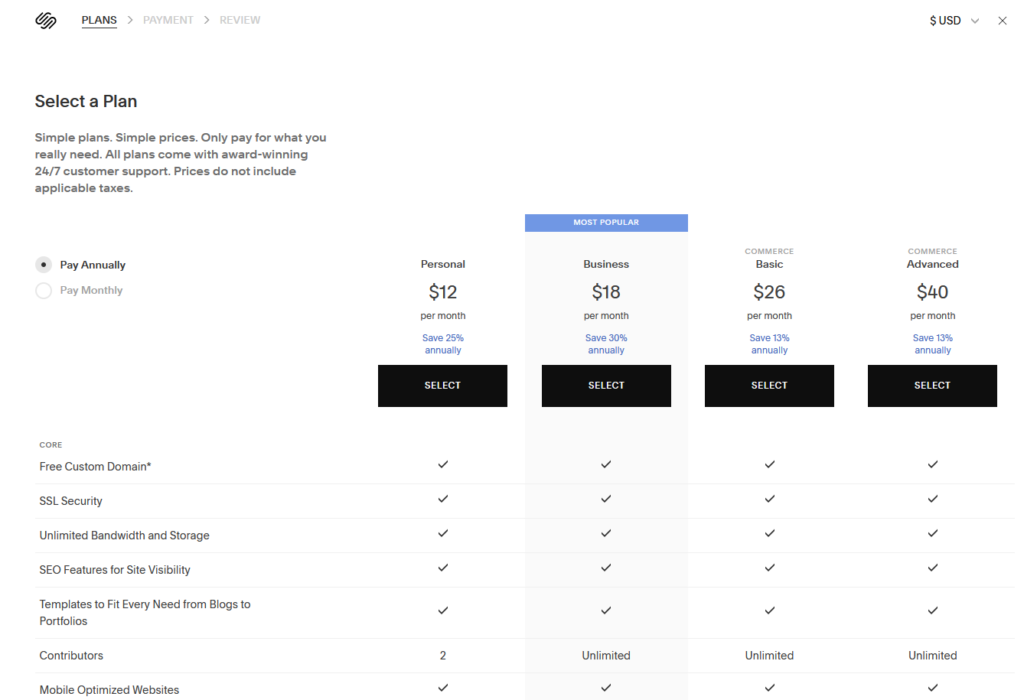
Choose the Right Subscription Plan

I recommend opting for the personal plan that starts at $12 if you plan on building only one website. However, if you want to run an e-commerce store, the Business or Commerce plans would be a better fit. Compare plans to find the best one for you.

Also, every plan comes with a free domain name, so you don’t have to pay extra.

You know what? You now have a live Squarespace website that’s available to the public. Well done!