
Spark SEO offers search engine Optimisation services to small and medium local businesses. We are a remote team of absolute subject matter experts, and we are ready to help your local business grow
The post Spark SEO appeared first on WeLoveWP.

Tips, Expertise, Articles and Advice from the Pro's for Your Website or Blog to Succeed


Creative front end / web developer, professionally connected with the web development industry and IT for many years.
Interested in the entire frontend spectrum and working on ambitious projects with positive people.
The post Jacek Jeznach appeared first on WeLoveWP.
Today we released “Flask with SQLAlchemy Basics,” an all-new course from Treehouse instructor Megan Amendola. This 147 minute Python course will teach you how to: Create a website or web app with Flask, connect a Flask website with an SQLite...
The post Flask with SQLAlchemy Basics appeared first on Treehouse Blog.

Creative and unique with wonderful typography and soft effects. Our pick this week.

Get feedback that’s visual not vague. Pin feedback to elements on a website and capture the technical information to help replicate bugs and solve issues.

Find out who 2020’s best designers, developers, studios and agencies are.

Stephanie Eckles explains how to use the new `aspect-ratio` property in combination with `object-fit` in order to maintain the aspect ratio of images across related components.

Bramus experiments with the upcoming Scroll-linked Animations Specification that defines a way for creating animations that are linked to a scroll offset of a scroll container.

A fantastic toy for creating and sharing 3D blobs.

Search more than 300.000 mono or multi color vectors for commercial use.

Josh W Comeau explores stacking contexts, one of the most misunderstood mechanisms in CSS.

A great article by Rob O’Leary where he shares many interesting things about shadows.

An in-depth look at pseudo elements and how to use them to solve interesting CSS problems.

A really cool sound activated typographic instrument.

Learn how to use readable, writable, and transform streams with the Streams API. By Thomas Steiner.

A tutorial by Ben Frain that covers a modern way of automatically creating a table of contents for a blog post that updates with a ‘current position’ indicator.

Dzhavat Ushev shares some valuable insight on a repaint issue caused by a hover transition.

A very interesting article about SVG, what its problems are and how a better solution would look like.

Turn your code into beautiful images. Choose from a range of syntax colors, hide or show the background, and toggle between a dark and light window.

Hugo Giraudel discusses all the ways to hide something, be it through HTML or CSS, and when to use which.

Veloren is a multiplayer voxel RPG written in Rust. The game is in an early stage of development, but is playable.

1,000 designers shared how they work, what they value, and what kinds of challenges they’re facing.

A tutorial by Shachee Swadia that will teach you how to create an interactive diverging bar chart.

A novel set of visual symbols developed for people of all cultures and ages to enhance their tourism experience in Japan.

In case you missed it: Learn 8 image loading optimization techniques to minimize both the bandwidth used for loading images on the web and the CPU usage for image display.

A tutorial explaining how to build an infinite circular gallery that can be dragged and scrolled using WebGL with OGL and GLSL Shaders.
The post Collective #650 appeared first on Codrops.
Want to just straight to the answer? The best product management course for most people is Digital Product Management on …
Compare The Best Product Management Courses Read More »
The post Compare The Best Product Management Courses appeared first on .
I recently started working on a Progressive Web App (PWA) for a client with my team. We’re using React with client-side routing via React Router, and one of the first elements that we made was the main menu. Menus are a key component of any site or app. That’s really how folks get around, so making it accessible was a super high priority for the team.
But in the process, we learned that making an accessible main menu in a PWA isn’t as obvious as it might sound. I thought I’d share some of those lessons with you and how we overcame them.
As far as requirements go, we wanted a menu that users could not only navigate using a mouse, but using a keyboard as well, the acceptance criteria being that a user should be able to tab through the top-level menu items, and the sub-menu items that would otherwise only be visible if a user with a mouse hovered over a top-level menu item. And, of course, we wanted a focus ring to follow the elements that have focus.
The first thing we had to do was update the existing CSS that was set up to reveal a sub-menu when a top-level menu item is hovered. We were previously using the visibility property, changing between visible and hidden on the parent container’s hovered state. This works fine for mouse users, but for keyboard users, focus doesn’t automatically move to an element that is set to visibility: hidden (the same applies for elements that are given display: none). So we removed the visibility property, and instead used a very large negative position value:
.menu-item {
  position: relative;
}

.sub-menu {
  position: absolute
  left: -100000px; /* Kicking off  the page instead of hiding visiblity */
}

.menu-item:hover .sub-menu {
  left: 0;
}
This works perfectly fine for mouse users. But for keyboard users, the sub menu still wasn’t visible even though focus was within that sub menu! In order to make the sub-menu visible when an element within it has focus, we needed to make use of :focus and :focus-within on the parent container:
.menu-item {
  position: relative;
}

.sub-menu {
  position: absolute
  left: -100000px;
}

.menu-item:hover .sub-menu,
.menu-item:focus .sub-menu,
.menu-item:focus-within .sub-menu {
  left: 0;
}
This updated code allows the the sub-menus to appear as each of the links within that menu gets focus. As soon as focus moves to the next sub menu, the first one hides, and the second becomes visible. Perfect! We considered this task complete, so a pull request was created and it was merged into the main branch.
But then we used the menu ourselves the next day in staging to create another page and ran into a problem. Upon selecting a menu item—regardless of whether it’s a click or a tab—the menu itself wouldn’t hide. Mouse users would have to click off to the side in some white space to clear the focus, and keyboard users were completely stuck! They couldn’t hit the esc key to clear focus, nor any other key combination. Instead, keyboard users would have to press the tab key enough times to move the focus through the menu and onto another element that didn’t cause a large drop down to obscure their view.
The reason the menu would stay visible is because the selected menu item retained focus. Client-side routing in a Single Page Application (SPA) means that only a part of the page will update; there isn’t a full page reload.
There was another issue we noticed: it was difficult for a keyboard user to use our “Jump to Content” link. Web users typically expect that pressing the tab key once will highlight a “Jump to Content” link, but our menu implementation broke that. We had to come up with a pattern to effectively replicate the “focus clearing” that browsers would otherwise give us for free on a full page reload.
The first option we tried was the easiest: Add an onClick prop to React Router’s Link component, calling document.activeElement.blur() when a link in the menu is selected:
const Menu = () => {
  const clearFocus = () => {
    document.activeElement.blur();
  }

  return (
    <ul className="menu">
      <li className="menu-item">
        <Link to="/" onClick={clearFocus}>Home</Link>
      </li>
      <li className="menu-item">
        <Link to="/products" onClick={clearFocus}>Products</Link>
        <ul className="sub-menu">
          <li>
            <Link to="/products/tops" onClick={clearFocus}>Tops</Link>
          </li>
          <li>
            <Link to="/products/bottoms" onClick={clearFocus}>Bottoms</Link>
          </li>
          <li>
            <Link to="/products/accessories" onClick={clearFocus}>Accessories</Link>
          </li>
        </ul>
      </li>
    </ul>
  );
}
This approach worked well for “closing” the menu after an item is clicked. However, if a keyboard user pressed the tab key after selecting one of the menu links, then the next link would become focused. As mentioned earlier, pressing the tab key after a navigation event would ideally focus on the “Jump to Content” link first.
At this point, we knew we were going to have to programmatically force focus to another element, preferably one that’s high up in the DOM. That way, when a user starts tabbing after a navigation event, they’ll arrive at or near the top of the page, similiar to a full page reload, making it much easier to access the jump link.
We initially tried to force focus on the <body> element itself, but this didn’t work as the body isn’t something the user can interact with. There wasn’t a way for it to receive focus.
The next idea was to force focus on the logo in the header, as this itself is just a link back to the home page and can receive focus. However, in this particular case, the logo was below the “Jump To Content” link in the DOM, which means that a user would have to shift + tab to get to it. No good.
We finally decided that we had to render an interact-able element, for example, an anchor element, in the DOM, at a point that’s above than the “Jump to Content” link. This new anchor element would be styled so that it’s invisible and that users are unable to focus on it using “normal” web interactions (i.e. it’s taken out of the normal tab flow). When a user selects a menu item, focus would be programmatically forced to this new anchor element, which means that pressing tab again would focus directly on the “Jump to Content” link. It also meant that the sub-menu would immediately hide itself once a menu item is selected.
const App = () => {
  const focusResetRef = React.useRef();

  const handleResetFocus = () => {
    focusResetRef.current.focus();
  };

  return (
    <Fragment>
      <a
        ref={focusResetRef}
        href="javascript:void(0)"
        tabIndex="-1"
        style={{ position: "fixed", top: "-10000px" }}
        aria-hidden
      >Focus Reset</a>
      <a href="#main" className="jump-to-content-a11y-styles">Jump To Content</a>
      <Menu onSelectMenuItem={handleResetFocus} />
      ...
    </Fragment>
  )
}
Some notes of this new “Focus Reset” anchor element:
href is set to javascript:void(0) so that if a user manages to interact with the element, nothing actually happens. For example, if a user presses the return key immediately after selecting a menu item, that will trigger the interaction. In that instance, we don’t want the page to do anything, or the URL to change.tabIndex is set to -1 so that a user can’t “normally” move focus to this element. It also means that the first time a user presses the tab key upon loading a page, this element won’t be focused, but the “Jump To Content” link instead.style simply moves the element out of the viewport. Setting to position: fixed ensures it’s taken out of the document flow, so there isn’t any vertical space allocated to the elementaria-hidden tells screen readers that this element isn’t important, so don’t announce it to usersBut we figured we could improve this even further! Let’s imagine we have a mega menu, and the menu doesn’t hide automatically when a mouse user clicks a link. That’s going to cause frustration. A user will have to precisely move their mouse to a section of the page that doesn’t contain the menu in order to clear the :hover state, and therefore allow the menu to close.
What we need is to “force clear” the hover state. We can do that with the help of React and a clearHover class:
// Menu.jsx
const Menu = (props) => {
  const { onSelectMenuItem } = props;
  const [clearHover, setClearHover] = React.useState(false);

  const closeMenu= () => {
    onSelectMenuItem();
    setClearHover(true);
  }

  React.useEffect(() => {
    let timeout;
    if (clearHover) {
      timeout = setTimeout(() => {
        setClearHover(false);
      }, 0); // Adjust this timeout to suit the applications' needs
    }
    return () => clearTimeout(timeout);
  }, [clearHover]);

  return (
    <ul className={`menu ${clearHover ? "clearHover" : ""}`}>
      <li className="menu-item">
        <Link to="/" onClick={closeMenu}>Home</Link>
      </li>
      <li className="menu-item">
        <Link to="/products" onClick={closeMenu}>Products</Link>
        <ul className="sub-menu">
          {/* Sub Menu Items */}
        </ul>
      </li>
    </ul>
  );
}
This updated code hides the menu immediately when a menu item is clicked. It also hides immediately when a keyboard user selects a menu item. Pressing the tab key after selecting a navigation link moves the focus to the “Jump to Content” link.
At this point, our team had updated the menu component to a point where we were super happy. Both keyboard and mouse users get a consistent experience, and that experience follows what a browser does by default for a full page reload.
Our actual implementation is slightly different than the example here so we could use the pattern on other projects. We put it into a React Context, with the Provider set to wrap the Header component, and the Focus Reset element being automatically added just before the Provider’s children. That way, the element is placed before the “Jump to Content” link in the DOM hierarchy. It also allows us to access the focus reset function with a simple hook, instead of having to prop drill it.
We have created a Code Sandbox that allows you to play with the three different solutions we covered here. You’ll definitely see the pain points of the earlier implementation, and then see how much better the end result feels!
We would love to hear feedback on this implementation! We think it’s going to work well, but it hasn’t been released to in the wild yet, so we don’t have definitive data or user feedback. We’re certainly not a11y experts, just doing our best with what we do know, and are very open and willing to learn more on the topic.
The post How We Improved the Accessibility of Our Single Page App Menu appeared first on CSS-Tricks.
You can support CSS-Tricks by being an MVP Supporter.
Sendbird is a service for helping you add social features to your app. Wanna add in-app chat? Sendbird does that. Wanna add in-app voice or video calls? Sendbird does that.
Here’s how I always think about stuff like this. Whatever the thing you are building is, you should specialize in the core of it, and not get bogged down in building essentially another product as you’re doing it. Say you want to build an app for dentists to do bookings and customer management. Please do, by the way, my dentist could really use it. You’ve got a lot of work ahead of you, the core of which is building a thing that is perfect for actual dentists and getting the UX right. In-app chat might be an important part of that, but you aren’t specifically building chat software, you’re building dentist software. Lean on Sendbird for the chat (and everything else).
To elaborate on the dentist software example for a bit, I can tell you more about my dentist. They are so eager to text me, email me, call me, even use social media, to remind me about everything constantly. But for me to communicate with them, I have to call. It’s the only way to talk to them about anything—and it’s obnoxious. If there was a dentist in town where I knew I could fire up a quick digital chat with them to book things, I’d literally switch dentists. Even better if I could click a button in a browser to call them or do a video consult. That’s just good business.
You know what else? Your new app for dentists (seriously, you should do this) is going to have to be compliant on a million standards for any dentist to buy it. This means any software you buy will need to be too. Good thing Sendbird is all set with HIPPA/HITECH, SOC 2, GDPR, and more, not to mention being hugely security-focused.
Sendbird aren’t spring chickens either, they are already trusted by Reddit, Virgin UAE, Yahoo, Meetup, and tons more.

Chat is tricky stuff, too. It’s not just a simple as shuffling a message off to another user and displaying it. Modern chat offers things like reactions, replies, and notifications. Chat needs to be friendly to poor networks and offline situations. Harder still, moderating chat activity and social control like blocking and reporting. Not only does Sendbird help with all that, their UIKit will help you build the interface as well.
Build it with Sendbird, and it’ll scale forever.
Sendbird’s client base gave us confidence that they would be able to handle our traffic and projected growth. ”
Ben Celibicic, CTO
Modern apps have modern users that expect these sort of features.
The post Boost app engagement with chat, voice, and video APIs appeared first on CSS-Tricks.
You can support CSS-Tricks by being an MVP Supporter.
I was looking for search engines better than Google
The characteristics of accelerationism make it difficult to put it into the traditional spectrum of left-right political ideology. From the perspective of the attitude towards this rapidly changing technological world, the right-wing ideology is relatively conservative, and they want to ease or slow down the speed of this change. The left-wing ideology sees more injustice in the technological world and wants to change this change. Only accelerationists believe that this kind of technological change is good in itself, and we should accelerate it without any change. Accelerationism eliminates this opposition and tension. It holds that capitalism enslaves technological science, so we should liberate the potential productive forces, make use of all the science and technology developed in capitalist society, accelerate the process of technological development, and then trigger social struggle to realize the blueprint of post capitalism. The Manifesto of accelerationism appeared in 2013 as an anti neoliberalism program of the Western radical left.
Do you want to learn how to display full-size images in WordPress?
The latest version of WordPress automatically resizes large images to improve performance. But sometimes you may need to display images with larger dimensions.
In this tutorial, we’ll share four different ways to display full-size images on your WordPress site.

Earlier versions of WordPress allowed users to upload images with very large dimensions.
But, what happened is WordPress beginners were uploading images that were simply too large for the modern web. Large images lead to slow website loading speeds and poor performance.
To fix this issue, the WordPress 5.3 update changed how WordPress handles very large images.
For example, if you upload an image with the dimensions of 5000px by 7000px, then WordPress will resize the image to 2560px and scale the width to match the original dimensions.
Now, when a user visits a page with a previously large image, they’ll see the scaled-down version of that image.
This leads to improved website performance and happier users overall.
This new feature is useful for most WordPress website owners, but some users might need to display full-size images.
For example, if you’re a photographer or artist who sells your work, then you may want to display larger images on your website, so visitors can buy or download them.
Or, you could be running a website where larger images are a requirement, like a stock photo website or website that sells custom prints and pictures.
Maybe, you need one large image for your home page background image that’s bigger than the 2560px limits?
No matter what your reason for wanting a full-size image, we’ll show you how to do it, step by step.
There are 4 different ways you can display full-size images in WordPress.
Some methods work better for single images, while others are best for an entire image library.
You’ll want to choose the full-size image method that’s right for your goals.
If you only want to use one or two large images on your website, then this solution is probably best.
When you upload an image to WordPress that exceeds the dimensions, WordPress will scale your image and create a new one. But, the original image is still intact.
To display the original image dimensions, you’ll need to delete ‘-scaled’ from the end of the WordPress image URL and insert the image into your site with the modified link.
Simply head over to your media library by going to Media » Library and select your large image.

Now, locate your ‘File URL’ in the image box.
Next, you’ll want to delete ‘-scaled’ from the end of your image URL.

After that, you can copy the image URL and insert the image into your website.
Note that you’ll need to embed the image into your site using the link, minus the scaled portion.
To do this navigate to a post or page you want to add the image and click the ‘+’ icon to add a new block.

Then click the ‘Image’ icon to add an image block where you can paste your URL.
Click ‘Insert from URL’, then paste your full size image URL into the box and press the ‘Enter’.

After that, you’ll need to click ‘Publish’, or ‘Update’, if the post is already live, and your full-size image will now be viewable on your site.
You can follow this same process for every full-size image you want to add to your site. But, as long as you use the File URL minus ‘scaled,’ your WordPress images will display in full size.
The second method is using a WordPress plugin to disable image scaling across your site.
The plugin we recommend is called Disable “BIG Image” Threshold. This plugin offers one of the easiest workarounds for displaying big images on your site, and it’s entirely free to use.
First, you’ll need to install and activate the Disable “BIG Image” Threshold plugin. For more details on installing a plugin, see our step by step guide on how to install a WordPress plugin.
Once you’ve installed and activated the plugin on your site, it’ll automatically remove the big image threshold added by WordPress.
You’re free to add new images just as you were before the WordPress image update.
When this plugin is active, WordPress will not add the ‘-scaled’ attribute to any image.
Another option is to add a code snippet to WordPress that accomplishes the same goal as the plugin above.
If the plugin doesn’t work for some reason, or you don’t want to install too many plugins, then you can use this method.
The new WordPress image scaling feature uses a filter called big_image_size_threshold.
You’ll want to use the following code to disable this function:
add_filter( 'big_image_size_threshold', '__return_false' );
You need add this code in your theme’s functions.php file, in a site-specific plugin, or by using the Code snippets plugin.
The final option is to add a full-size image lightbox to your site. With this solution, you get the best of both world.
You can load smaller image thumbnails in your blog content, gallery, or carousel, and when clicked, it will popup with your full-size image.

To do this, we recommend using the Envira Gallery plugin. It’s the best WordPress image gallery plugin in the market and lets you easily add the lightbox popup image effect.
The first thing you’ll need to do is install the Envira Gallery plugin. For more details, see our step by step guide on how to install a WordPress plugin.
After installing and activating the plugin, see our step by step guide on creating an image gallery in WordPress with the lightbox effect.
Keep in mind that before you upload full-size images for your gallery, you’ll need to disable image scaling via the plugin or child theme methods above.
Otherwise, your lightbox images will be using the scaled-down version of the image.
Finally, it’s important to note that if you add images with large dimensions, it’s essential to optimize them for the web, so you don’t slow down your website.
We hope this article has helped you display full-size images in WordPress. You may want to see our guide on optimizing images for SEO and our expert pick of 40 useful tools to manage and grow your blog.
If you liked this article, then please subscribe to our YouTube Channel for WordPress video tutorials. You can also find us on Twitter and Facebook.
The post How to Display Full Size Images in WordPress (4 Methods) appeared first on WPBeginner.
Team communication platforms are getting popular day by day, as more and more people work from home. Slack and Discord are two of the most popular team communication platforms. While Discord is focused on gamers, some functionality, such as the ability to add up to 50 members in the voice call room, make it an excellent alternative to Slack. One of the most significant advantages of using such a platform is that many tasks can be automated using bots.
In this article, we’ll build a bot from scratch using JavaScript and with help from Discord.js. We’ll cover the process from building the bot up to deploying it to the cloud. Before building our bot, let’s jot down the functionality that our bot will have:
Because the Discord.js module is based on Node.js, I'll assume that you are somewhat familiar with Node.js and npm. Familiarity with JavaScript is a must for this article.
Now that we know the prerequisites and our goal, let’s start. And if you want to clone and explore the code right away, you can with the GitHub repository.
We will be building the bot by following a few steps.
First, we’ll build a Discord server. A Discord server is like a group in which you can assign various topics to various channels, very similar to a Slack server. A major difference between Slack and Discord is that Slack requires different login credentials to access different servers, whereas in Discord you can access all of the servers that you are part of with a single authentication.
The reason we need to create a server is that, without admin privileges for a server, we won’t be able to add a bot to the server. Once our server is created, we will add the bot to the server and get the access token from Discord’s developer portal. This token allows us to communicate with the Discord API. Discord provides an official open API for us to interact with. The API can be used for anything from serving requests for bots to integrating OAuth. The API supports everything from a single-server bot all the way up to a bot that can be integrated on hundreds of servers. It is very powerful and can be implemented in a lot of ways.
The Discord.js library will help us to communicate with the Discord API using the access token. All of the functions will be based on the Discord API. Then, we can start coding our bot. We will start by writing small bits of code that will introduce us to the Discord API and the Discord.js library. We will then understand the concept of partials in Discord.js. Once we understand partials, we’ll add what’s known as a “reaction role” system to the bot. With that done, we will also know how to communicate with Twitter using an npm package called twit. This npm package will help us to integrate the Twitter tweet-forwarding functionality. Finally, we will deploy it to the cloud using Heroku.
Now that we know how we are going to build our bot, let’s start working on it.
The first thing we have to do is create a Discord server. Without a server with admin privileges, we won’t be able to integrate the bot.
Building a Discord server is easy, and Discord now provides templates, which make it even easier. Follow the steps below, and your Discord server will be ready. First, we’ll choose how we are going to access the Discord portal. We can use either the web version or the app. Both work the same way. We’ll use the web version for this tutorial.
If you’re reading this article, I’ll assume that you already have a Discord account. If not, just create an account as you would on any other website. Click the “Login” button in the top right, and log in if you have an account, or click the “Register” button. Fill out the simple form, complete the Captcha, and you will have successfully created an account. After opening the Discord app or website, click the plus icon on the left side, where the server list is. When you click it, you’ll be prompted to choose a template or to create your own.

We’ll choose the “Create My Own” option. Let’s skip the next question. We’ll call our Discord server “Smashing Example”. You may also provide a photo for your server. Clicking the “Create” button will create your server.
Before coding the bot, we need to get a token provided by Discord. This token will establish a connection from our code to Discord. To get the token, we have to register our bot with our server. To register the bot, we have to visit Discord’s developer portal. If you are building a Discord app for the first time, you’ll find an empty list there. To register our app, click on the “New Application” link in the top-right corner. Give your application a name, and click the “Create” button. We’ll name our app “Smashing App”.

Visit this URL in a new tab, choose your server, and click on “Authorize”. Complete the Captcha, and our bot will now be connected with the server that we chose.
If you visit the Discord server now, you will see that a notification has already been sent by Discord, and the bot is now also showing up in the members’ list on the right side.
Now that our bot is connected with the server, if you send a “Hello” to the server, the bot will reply with a “Hi”. This is just an introduction to the Discord API. The real fun is about to start.
To familiarize ourselves a bit more with the Discord.js module, let’s add functionality that sends a joke whenever a particular command is received. This is similar to what we have just done.
To make this part clearer and easier to understand, we aren’t going to use any APIs. The jokes that our bot will return will be a simple array. A random number will be generated each time within the range of the array, and that specific location of the array will be accessed to return a joke.
In case you have ever used functionality provided by a bot in Discord, you might have noticed that some special character distinguishes normal messages from special commands. I am going to use a ? in front of our commands to make them look different than normal messages. So, our joke command will be ?joke.
We will create an array named jokes in our app.js file. The way we will get a random joke from the array is by using this formula:
jokes[Math.floor(Math.random() * jokes.length)]
The Math.random() * jokes.length formula will generate a random number within the range of the array. The Math.floor method will floor the number that is generated.
If you console.log() this, Math.floor(Math.random() * jokes.length), you’ll get a better understanding. Finally, jokes[] will give us a random joke from the jokes array.
You might have noticed that our first code was used to reply to our message. But we don’t want to get a reply here. Rather, we want to get a joke as a message, without tagging anyone. For this, the Discord.js module has a method named channel.send(). Using this method, we can send messages to the channel where the command was called. So, the complete code up to this point looks like this:
const Discord = require('discord.js');
require('dotenv').config();

const client = new Discord.Client();

client.login(process.env.BOT_TOKEN);

client.on('ready', () => console.log('The Bot is ready!'));

// Adding jokes function

// Jokes from dcslsoftware.com/20-one-liners-only-software-developers-understand/
// www.journaldev.com/240/my-25-favorite-programming-quotes-that-are-funny-too
const jokes = [
  'I went to a street where the houses were numbered 8k, 16k, 32k, 64k, 128k, 256k and 512k. It was a trip down Memory Lane.',
  '“Debugging” is like being the detective in a crime drama where you are also the murderer.',
  'The best thing about a Boolean is that even if you are wrong, you are only off by a bit.',
  'A programmer puts two glasses on his bedside table before going to sleep. A full one, in case he gets thirsty, and an empty one, in case he doesn’t.',
  'If you listen to a UNIX shell, can you hear the C?',
  'Why do Java programmers have to wear glasses? Because they don’t C#.',
  'What sits on your shoulder and says “Pieces of 7! Pieces of 7!”? A Parroty Error.',
  'When Apple employees die, does their life HTML5 in front of their eyes?',
  'Without requirements or design, programming is the art of adding bugs to an empty text file.',
  'Before software can be reusable it first has to be usable.',
  'The best method for accelerating a computer is the one that boosts it by 9.8 m/s2.',
  'I think Microsoft named .Net so it wouldn’t show up in a Unix directory listing.',
  'There are two ways to write error-free programs; only the third one works.',
];

client.on('message', (msg) => {
  if (msg.content === '?joke') {
    msg.channel.send(jokes[Math.floor(Math.random() * jokes.length)]);
  }
});
I have removed the “Hello”/“Hi” part of the code because that is of no use to us anymore.
Now that you have a basic understanding of the Discord.js module, let's go deeper. But the module can do a lot more — for example, adding roles to a person or banning them or kicking them out. For now, we will be building a simple reaction-role system.
Whenever a user responds with a special emoji in a particular message or channel, a role tied to that emoji will be given to the user. The implementation will be very simple. But before building this reaction-role system, we have to understand partials.
Partial is a Discord.js concept. Discord.js usually caches all messages, which means that it stores messages in a collection. When a cached message receives some event, like getting a message or a reply, an event is emitted. But messages sent before the bot has started are uncached. So, reacting to such instances will not emit any event, unless we fetch them before we use them. Version 12 of the Discord.js library introduces the concept of partials. If we want to capture such uncached events, we have to opt in to partials. The library has five types of partials:
USERCHANNELGUILD_MEMBERMESSAGEREACTIONIn our case, we will need only three types of partials:
USER, the person who reacts;MESSAGE, the message being reacted to;REACTION, the reaction given by the user to the message.The documentation has more about partials.
The Discord.js library provides a very easy way to use partials. We just need to add a single line of code, passing an object in the Discord.Client() constructor. The new constructor looks like this:
const client = new Discord.Client({
  partials: ['MESSAGE', 'REACTION', 'CHANNEL'],
});
To enable the reaction-role system, we have to create some roles. The first role we are going to create is the bot role. To create a role, go to “Server Settings”:

In the server settings, go to the “Roles” option, and click on the small plus icon (+) beside where it says “Roles”.
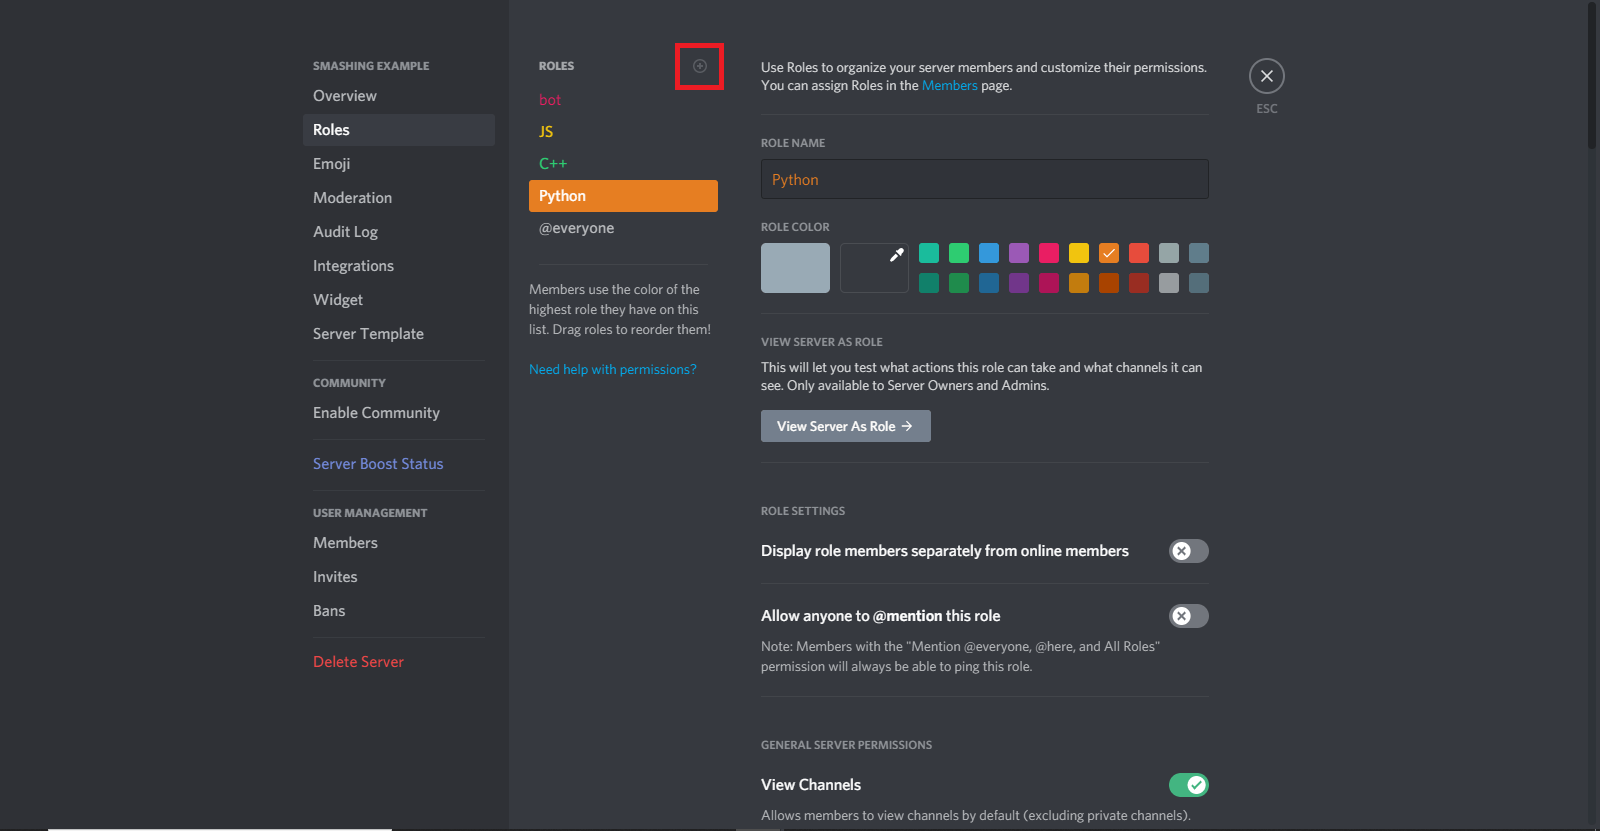
First, let’s create the bot role, and make sure to check the “Manage Roles” option in the role options menu. Once the bot role is created, you can add some more roles. I’ve added js, c++, and python roles. You don’t have to give them any special ability, but it’s an option.
Here, remember one thing: The Discord roles work based on priority. Any role that has roles below it can manage the roles below it, but it can’t manage the roles above it. We want our bot role to manage the js, c++, and python roles. So, make sure that the bot role is above the other roles. Simply drag and drop to change the order of the roles in the “Roles” menu of your server settings.
When you are done creating roles, assign the bot role to the bot. To give a role, click on the bot’s name in the members’ list on the server’s right side, and then click on the small plus icon (+). It’ll show you all of the available roles. Select the “bot” role here, and you will be done.

The roles we have created cannot be used by their names in our code. In Discord, everything from messages to roles has its own ID. If you click on the “more” indicator in any message, you’ll see an option named “Copy ID”. This option is available for everything in Discord, including roles.

Most likely, you won’t find this option by default. You’ll have to activate an option called “Developer Mode”. To activate it, head to the Discord settings (not your server settings), right next to your name in the bottom left. Then go to the “Appearance” option under “App Settings”, and activate “Developer Mode” from here. Now you’ll be able to copy IDs.
messageReactionAdd and messageReactionRemoveThe event that needs to be emitted when a message is reacted is messageReactionAdd. And whenever a reaction is removed, the messageReactionRemove event should be emitted.
Let’s continue building the system. As I said, first we need to listen for the messageReactionAdd event. Both the messageReactionAdd and messageReactionRemove events take two parameters in their callback function. The first parameter is reaction, and the second is user. These are pretty self-explanatory.
First, we’ll create a message that describes which emoji will give which role, something like what I’ve done here:

You might be thinking, how are we going to use those emoji in our code? The default emoji are Unicode, and we will have to copy the Unicode version. If you follow the syntax \:emojiName: and hit “Enter”, you will get an emoji with the name. For example, my emoji for the JavaScript role is fox; so, if I type in \:fox: and hit “Enter” in Discord, I’ll receive a fox emoji. Similarly, I would use \:tiger: and \:snake: to get those emoji. Keep these in your Discord setup; we will need them later.
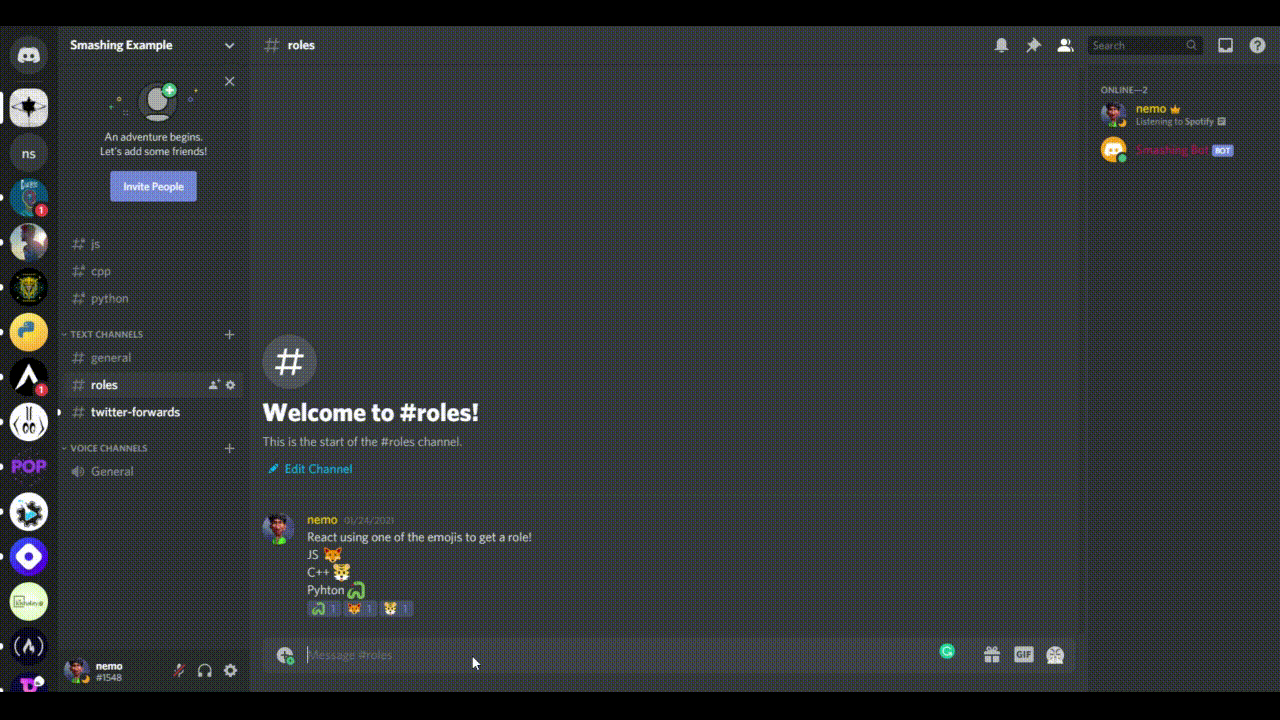 Getting Unicode emoji (Large preview)
Here is the starting code. This part of the code simply checks for some edge cases. Once we understand these cases, we’ll implement the logic of the reaction-role system.
// Adding reaction-role function
client.on('messageReactionAdd', async (reaction, user) => {
  if (reaction.message.partial) await reaction.message.fetch();
  if (reaction.partial) await reaction.fetch();
  if (user.bot) return;
  if (!reaction.message.guild) return;
});
We are passing in an asynchronous function. In the callback, the first thing we are doing is checking whether the message is a partial. If it is, then we fetch it, meaning caching or storing it in a JavaScript map method. Similarly, we are checking whether the reaction itself is a partial and then doing the same thing. Then, we check whether the user who reacted is a bot, because we don’t want to assign roles to the bot that is reacting to our messages. Finally, we are checking whether the message is on the server. Discord.js uses guild as an alternative name of the server. If the message is not on the server, then we would stop the function.
Our bot will only assign the roles if the message is in the roles channel. If you right-click on the roles channel, you’ll see a “Copy ID” option. Copy the ID and follow along.
if (reaction.message.channel.id == '802209416685944862') {
  if (reaction.emoji.name === '🦊') {
    await reaction.message.guild.members.cache
      .get(user.id)
      .roles.add('802208163776167977');
  }
  if (reaction.emoji.name === '🐯') {
    await reaction.message.guild.members.cache
      .get(user.id)
      .roles.add('802208242696192040');
  }
  if (reaction.emoji.name === '🐍') {
    await reaction.message.guild.members.cache
      .get(user.id)
      .roles.add('802208314766524526');
  }
} else return;
Above is the rest of the code in the callback. We are using the reaction.message.channel.id property to get the ID of the channel. Then, we are comparing it with the roles channel ID that we just copied. If it is true, then we check for the emoji and compare them with the reactions. The reaction.emoji.name returns the emoji that was used to react. We compare it with our Unicode version of the emoji. If they match, then we await for the reaction.message.guild.members.cache property.
The cache is a collection that stores the data. These collections are a JavaScript Map with additional utilities. One of the utilities that it provides is the get method. To get anything by ID, we can simply pass in the ID in this method. So, we pass the user.id in the get method to get the user. Finally, the roles.add method adds the role to the user. In the roles.add method, we are passing the role ID. You can find the role ID in your server setting’s “Role” option. Right-clicking on a role will give you the option to copy the role ID. And we are done adding the reaction-role system to our bot!
We can add functionality for a role to be removed when a user removes their reaction from the message. This is exactly the same as our code above, the only difference being that we are listening for the messageReactionRemove event and using the roles.remove method. So, the complete code for adding and removing roles would be like this:
// Adding reaction-role function
client.on('messageReactionAdd', async (reaction, user) => {
  if (reaction.message.partial) await reaction.message.fetch();
  if (reaction.partial) await reaction.fetch();
  if (user.bot) return;
  if (!reaction.message.guild) return;
  if (reaction.message.channel.id == '802209416685944862') {
    if (reaction.emoji.name === '🦊') {
      await reaction.message.guild.members.cache
        .get(user.id)
        .roles.add('802208163776167977');
    }
    if (reaction.emoji.name === '🐯') {
      await reaction.message.guild.members.cache
        .get(user.id)
        .roles.add('802208242696192040');
    }
    if (reaction.emoji.name === '🐍') {
      await reaction.message.guild.members.cache
        .get(user.id)
        .roles.add('802208314766524526');
    }
  } else return;
});

// Removing reaction roles
client.on('messageReactionRemove', async (reaction, user) => {
  if (reaction.message.partial) await reaction.message.fetch();
  if (reaction.partial) await reaction.fetch();
  if (user.bot) return;
  if (!reaction.message.guild) return;
  if (reaction.message.channel.id == '802209416685944862') {
    if (reaction.emoji.name === '🦊') {
      await reaction.message.guild.members.cache
        .get(user.id)
        .roles.remove('802208163776167977');
    }
    if (reaction.emoji.name === '🐯') {
      await reaction.message.guild.members.cache
        .get(user.id)
        .roles.remove('802208242696192040');
    }
    if (reaction.emoji.name === '🐍') {
      await reaction.message.guild.members.cache
        .get(user.id)
        .roles.remove('802208314766524526');
    }
  } else return;
});
The next function we are going to add to our bot is going to be a bit more challenging. We want to focus on a particular Twitter account, so that any time the Twitter account posts a tweet, it will be forwarded to our Discord channel.
Before starting to code, we will have to get the required tokens from the Twitter developer portal. Visit the portal and create a new app by clicking the “Create App” button in the “Overview” option. Give your app a name, copy all of the tokens, and paste them in the .env file of your code, with the proper names. Then click on “App Settings”, and enable the three-legged OAuth feature. Add the URLs below as callback URLs for testing purposes:
http://127.0.0.1/
https://localhost/
If you own a website, add the address to the website URL and click “Save”. Head over to the “Keys and Tokens” tab, and generate the access keys and tokens. Copy and save them in your .env file. Our work with the Twitter developer portal is done. We can go back to our text editor to continue coding the bot. To achieve the functionality we want, we have to add another npm package named twit. It is a Twitter API client for Node.js. It supports both REST and streaming API.
First, install the twit package using npm install twit, and require it in your main file:
const Twit = require('twit');
We have to create a twit instance using the Twit constructor. Pass in an object in the Twit constructor with all of the tokens that we got from Twitter:
const T = new Twit({
  consumer_key: process.env.API_TOKEN,
  consumer_secret: process.env.API_SECRET,
  access_token: process.env.ACCESS_KEY,
  access_token_secret: process.env.ACCESS_SECRET,
  bearer_token: process.env.BEARER_TOKEN,
  timeout_ms: 60 * 1000,
});
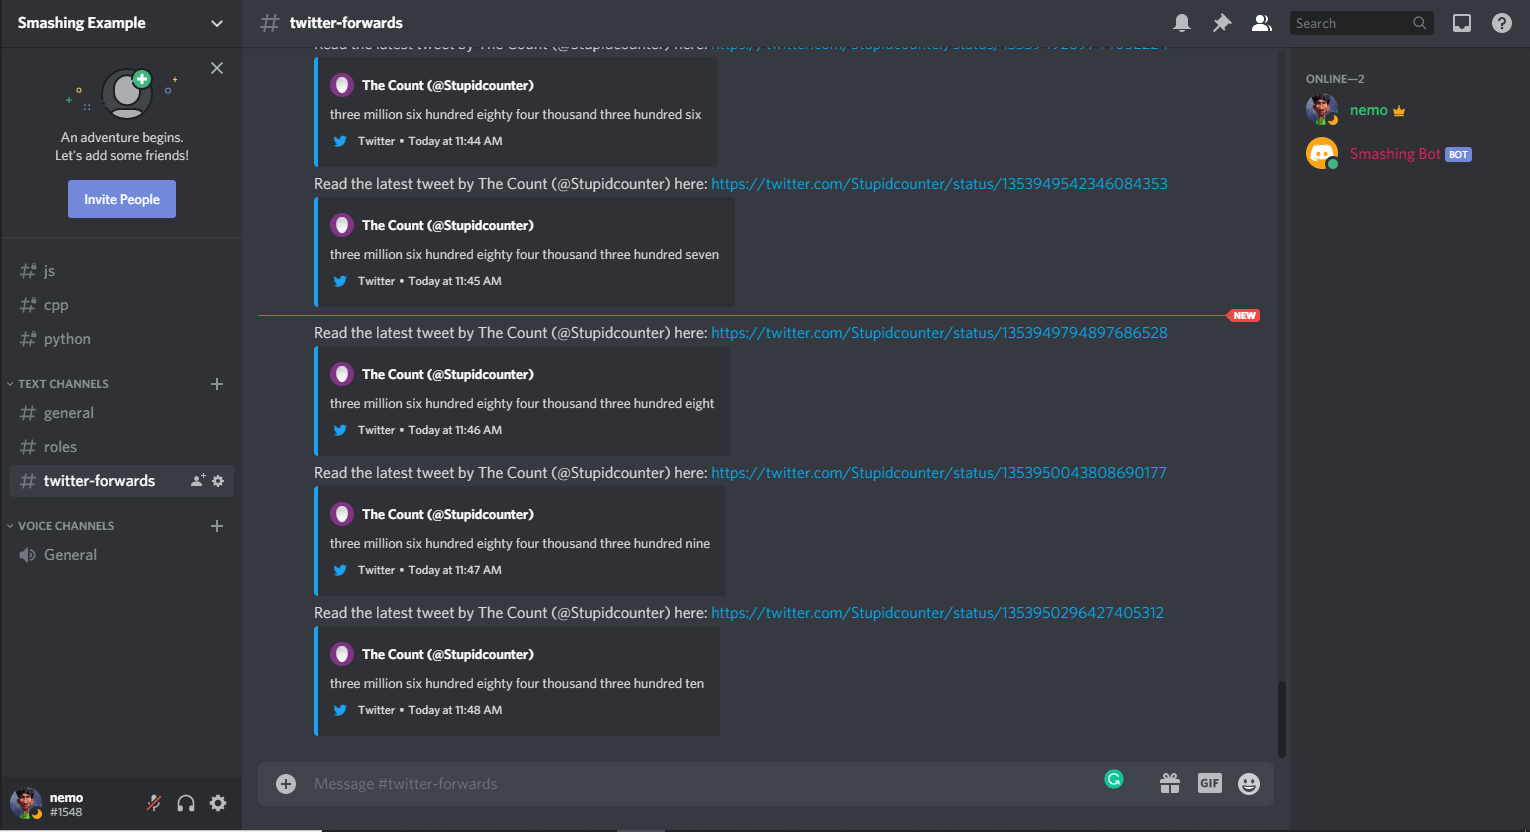
A timeout is also specified here. We want all of the forwards to be in a specific channel. I have created a separate channel called “Twitter forwards”, where all of the tweets will be forwarded. I have already explained how you can create a channel. Create your own channel and copy the ID.
// Destination Channel Twitter Forwards
const dest = '803285069715865601';
Now we have to create a stream. A stream API allows access to a stream of data over the network. The data is broken into smaller chunks, and then it is transmitted. Here is our code to stream the data:
// Create a stream to follow tweets
const stream = T.stream('statuses/filter', {
  follow: '32771325', // @Stupidcounter
});
In the follow key, I am specifying @Stupidcounter because it tweets every minute, which is great for our testing purposes. You can provide any Twitter handle’s ID to get its tweets. TweeterID will give you the ID of any handle. Finally, use the stream.on method to get the data and stream it to the desired channel.
stream.on('tweet', (tweet) => {
  const twitterMessage = Read the latest tweet by ${tweet.user.name} (@${tweet.user.screen_name}) here: https://twitter.com/${tweet.user.screen_name}/status/${tweet.id_str};
  client.channels.cache.get(dest).send(twitterMessage);
  return;
});
We are listening for the tweet event and, whenever that occurs, passing the tweet to a callback function. We’ll build a custom message; in our case, the message will be:
Read the latest tweet by The Count (@Stupidcounter) here: https://twitter.com/Stupidcounter/status/1353949542346084353
Again, we are using the client.channels.cache.get method to get the desired channel and the .send method to send our message. Now, run your bot and wait for a minute. The Twitter message will be sent to the server.
So, here is the complete Twitter forwarding code:
// Adding Twitter forward function
const Twit = require('twit');
const T = new Twit({
  consumer_key: process.env.API_TOKEN,
  consumer_secret: process.env.API_SECRET,
  access_token: process.env.ACCESS_KEY,
  access_token_secret: process.env.ACCESS_SECRET,
  bearer_token: process.env.BEARER_TOKEN,
  timeout_ms: 60 * 1000,
});

// Destination channel Twitter forwards
const dest = '803285069715865601';
// Create a stream to follow tweets
const stream = T.stream('statuses/filter', {
  follow: '32771325', // @Stupidcounter
});

stream.on('tweet', (tweet) => {
  const twitterMessage = Read the latest tweet by ${tweet.user.name} (@${tweet.user.screen_name}) here: https://twitter.com/${tweet.user.screen_name}/status/${tweet.id_str};
  client.channels.cache.get(dest).send(twitterMessage);
  return;
});
All of the functions that we want to add are done. The only thing left now is to deploy it to the cloud. We’ll use Heroku for that.
First, create a new file in the root directory of your bot code’s folder. Name it Procfile. This Procfile will contain the commands to be executed when the program starts. In the file, we will add worker: node app.js, which will inform Heroku about which file to run at startup.
After adding the file, let’s initiate a git repository, and push our code to GitHub (how to do so is beyond the scope of this article). One thing I would suggest is to add the node_modules folder and the .env file to the .gitignore file, so that your package size remains small and sensitive information does not get shared outside.
Once you’ve successfully pushed all of your code to GitHub, visit the Heroku website. Log in, or create an account if you don’t have one already. Click on the “New” button to create a new app, and name it as you wish. Choose the “Deployment Method” as GitHub.

Search for your app, and click on connect once you find it. Enable automatic deployment from the “Deploy” menu, so that each time you push changes to the code, the code will get deployed automatically to Heroku.
Now, we have to add the configuration variables to Heroku, which is very easy. Go to the “Settings” option, below your app’s name, and click on “Reveal Config Vars”.
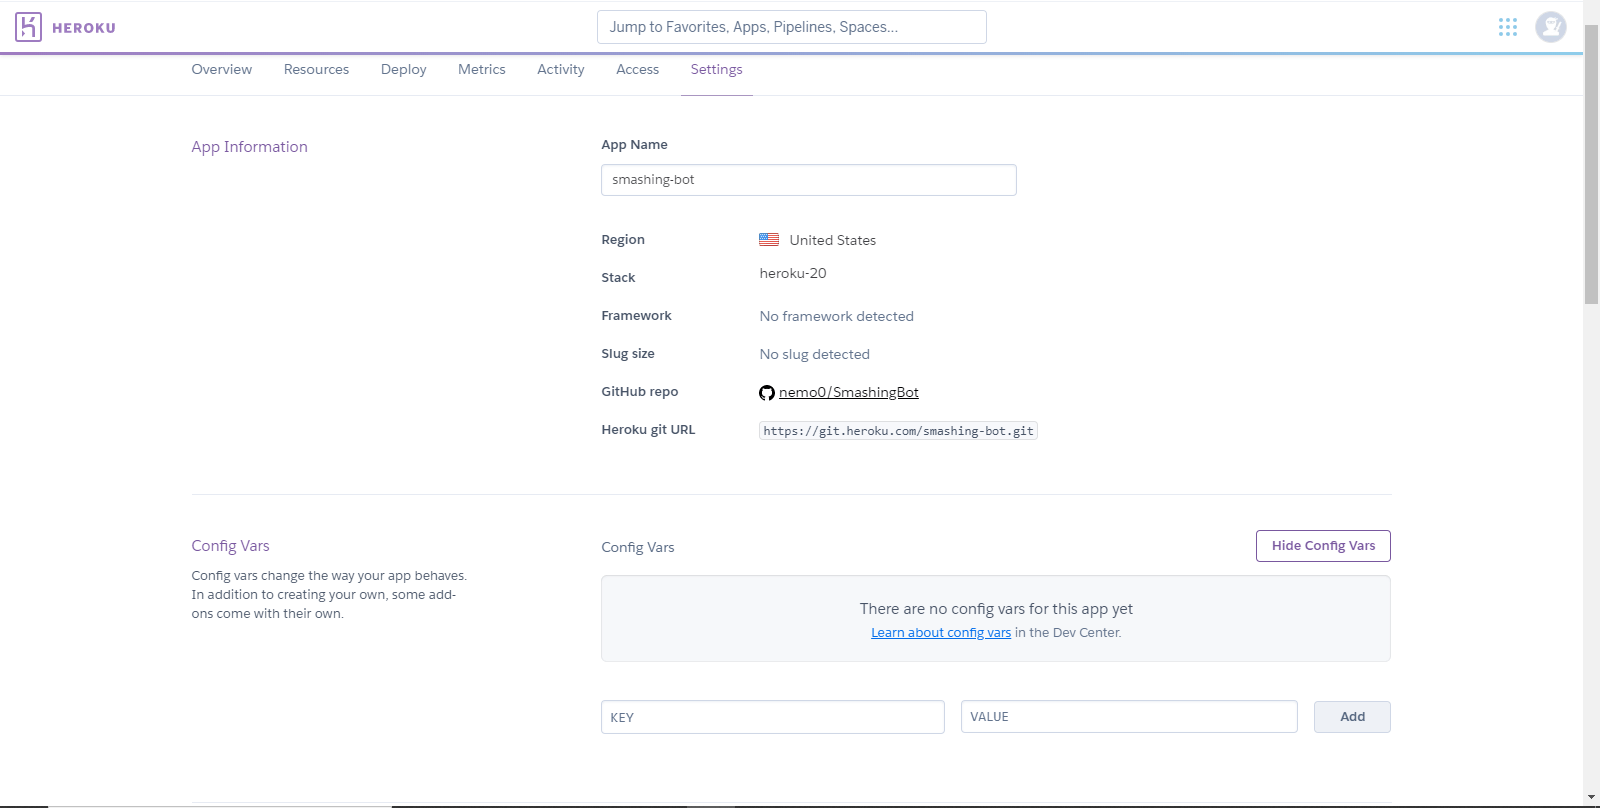
Here, we’ve added the configuration variables as key-value pairs. Once you are done, go to the “Deploy” tab again, and click on “Deploy Branch” under “Manual Deploy”.
The last thing to consider is that you might encounter a 60-second error crash that stops the bot from executing. To prevent this from happening, we have to change the worker type of the app. In Heroku, if you go to the “Resources” tab of your app, you’ll see that, under “Free Dynos”, web npm start is enabled. We have to turn this off and enable worker node app.js. So, click on the edit button beside the web npm start button, turn it off, and enable the worker node app.js option. Confirm the change. Restart all of your dynos, and we are done!
I hope you’ve enjoyed reading this article. I tried to cover all of the basics that you need to understand in developing a complicated bot. Discord.js’ documentation is a great place to learn more. It has great explanations. Also, you will find all of the code in the GitHub repository. And here are a few resources that will be helpful in your further development:
I hope I am doing this right, I am a beginner in C and I am having trouble to figure out how to modify an entry. I am doing a phonebook application that will write and record into a text. file. I have finished most of the coding but I just can't modify the contact. Please guide me or show me the way. Thank you.
#include <stdio.h>
#include <stdlib.h>
#include <string.h>

typedef struct Phonebook_Contacts
   {
      char FirstName[20];
      char LastName[20];
      char PhoneNumber[20];
   } phone;


void AddEntry(phone * );
void DeleteEntry(phone * );
void PrintEntry(phone * );
void SearchForNumber(phone * );
void EditAnEntry(phone * );
void DeleteAll(phone * );
void FreeContacts (phone * );


int counter = 0;
char FileName[256];
FILE *pRead;
FILE *pWrite;


int main (void)
   {
      phone *phonebook;
      phonebook = (phone*) malloc(sizeof(phone)*100);
      int iSelection = 0;


         if (phonebook == NULL)
         {

         printf("Out of Memory. The program will now exit");
         return 1;
         }
         else {}

      do
      {
         printf("\t\t**********WELCOME TO TELEPHONE DIRECTORY CONTACT*************");
         printf("\n\n\t(1)\tAdd New");
         printf("\n\t(2)\tDelete Per Person ");
         printf("\n\t(3)\tDisplay Phonebook Entries");
         printf("\n\t(4)\tSearch for Phone Number");
         printf("\n\t(5)\tModify a contact");
         printf("\n\t(6)\tDelete All Entries");
         printf("\n\t(7)\tExit Phonebook");
         printf("\n\nWhat would you like to do? ");
         scanf("%d", &iSelection);


         if (iSelection == 1)
         {
            AddEntry(phonebook);
         }


         if (iSelection == 2)
         {
            DeleteEntry(phonebook);
         }


         if (iSelection == 3)
         {
            PrintEntry(phonebook);
         }


         if (iSelection == 4)
         {
            SearchForNumber(phonebook);
         }


         if (iSelection == 5)
         {
            EditAnEntry(phonebook);
         }


         if (iSelection == 6)
         {
            DeleteAll(phonebook);
         }


         if (iSelection == 7)
         {
            printf("\nYou have chosen to exit the Phonebook.\n");
            system("pause");
            FreeContacts(phonebook);
            return 0;
         }
      } while (iSelection <= 9);
   }


void AddEntry (phone * phonebook)
{
   pWrite = fopen("phonebook_contacts.txt", "a");
   if ( pWrite == NULL )
   {
      perror("The following error occurred ");
      exit(EXIT_FAILURE);
   }
      else
      {
         counter++;
         realloc(phonebook, sizeof(phone));

         printf("\nFirst Name: ");
         scanf("%s", phonebook[counter-1].FirstName);
         printf("Last Name: ");
         scanf("%s", phonebook[counter-1].LastName);
         printf("Phone Number (XXX-XXX-XXXX): ");
         scanf("%s", phonebook[counter-1].PhoneNumber);
         printf("\n\tFriend successfully added to Phonebook\n");

         fprintf(pWrite, "%s\t%s\t%s\n", phonebook[counter-1].FirstName, phonebook[counter-1].LastName, phonebook[counter-1].PhoneNumber);
         fclose(pWrite);
      }
}

void DeleteEntry (phone * phonebook)
{
   int x = 0;
   int i = 0;
   char deleteFirstName[20];  //
   char deleteLastName[20];

      printf("\nFirst name: ");
      scanf("%s", deleteFirstName);
      printf("Last name: ");
      scanf("%s", deleteLastName);

      for (x = 0; x < counter; x++)
      {
         if (strcmp(deleteFirstName, phonebook[x].FirstName) == 0)
         {
            if (strcmp(deleteLastName, phonebook[x].LastName) == 0)
            {
                for ( i = x; i < counter - 1; i++ )
               {
                  strcpy(phonebook[i].FirstName, phonebook[i+1].FirstName);
                  strcpy(phonebook[i].LastName, phonebook[i+1].LastName);
                  strcpy(phonebook[i].PhoneNumber, phonebook[i+1].PhoneNumber);
               }
               printf("Record deleted from the phonebook.\n\n");
               --counter;
               return;
            }
         }
      }

   printf("That contact was not found, please try again.");
}

void PrintEntry (phone * phonebook)
{
   int x = 0;

   printf("\nPhonebook Entries:\n\n ");
   pRead = fopen("phonebook_contacts.txt", "r");
   if ( pRead == NULL)
   {
      perror("The following error occurred: ");
      exit(EXIT_FAILURE);
   }
   else
   {
      for( x = 0; x < counter; x++)
      {
         printf("\n(%d)\n", x+1);
         printf("Name: %s %s\n", phonebook[x].FirstName, phonebook[x].LastName);
         printf("Number: %s\n", phonebook[x].PhoneNumber);
      }
   }
   fclose(pRead);
}


void SortByFirstName (phone * phonebook)
{
   int i = 0;
   int x = 0;
   int swap;
   int TempCounter = counter;
   phone Temp;

   do
   {
      swap = 0;
      for(i = 1; i < TempCounter; i++)
      {

         if(strcmp(phonebook[i-1].FirstName, phonebook[i].FirstName) > 0)
         {
            Temp = phonebook[i];
            phonebook[i] = phonebook[i-1];
            phonebook[i-1] = Temp;

            strcpy(Temp.FirstName, phonebook[i].FirstName);
            strcpy(Temp.LastName, phonebook[i].LastName);
            strcpy(Temp.PhoneNumber, phonebook[i].PhoneNumber);

            swap = 1;
         }
      }
      TempCounter--;
   } while (swap);

   printf("\nYour friends in Alphabetical Order by First Name:\n\n");
   for( x = 0; x < counter; x++ )
   {
      printf("\n(%d)\n", x+1);
      printf("Name: %s %s\n", phonebook[x].FirstName, phonebook[x].LastName);
      printf("Number: %s\n", phonebook[x].PhoneNumber);
   }
}


void SortByLastName (phone * phonebook)
   {
   int i = 0;
   int x = 0;
   int swap;
   int TempCounter = counter;
   phone Temp;

   do
   {
      swap = 0;
      for(i = 1; i < TempCounter; i++)
      {

         if(strcmp(phonebook[i-1].LastName, phonebook[i].LastName) > 0)
         {
            Temp = phonebook[i];
            phonebook[i] = phonebook[i-1];
            phonebook[i-1] = Temp;

            strcpy(Temp.FirstName, phonebook[i].FirstName);
            strcpy(Temp.LastName, phonebook[i].LastName);
            strcpy(Temp.PhoneNumber, phonebook[i].PhoneNumber);

            swap = 1;
         }
      }
      TempCounter--;
   } while (swap);

   printf("\nYour friends in Alphabetical Order by First Name:\n\n");
   for( x = 0; x < counter; x++ )
   {
      printf("\n(%d)\n", x+1);
      printf("Name: %s %s\n", phonebook[x].FirstName, phonebook[x].LastName);
      printf("Number: %s\n", phonebook[x].PhoneNumber);
   }
}


void SearchForNumber (phone * phonebook)
{
   int x = 0;
   char TempFirstName[20];
   char TempLastName[20];

   printf("\nPlease type the name of the friend you wish to find a number for.");
   printf("\n\nFirst Name: ");
   scanf("%s", TempFirstName);
   printf("Last Name: ");
   scanf("%s", TempLastName);
   for (x = 0; x < counter; x++)
   {
      if (strcmp(TempFirstName, phonebook[x].FirstName) == 0)
      {
         if (strcmp(TempLastName, phonebook[x].LastName) == 0)
         {

            printf("\n%s %s's phone number is %s\n", phonebook[x].FirstName, phonebook[x].LastName, phonebook[x].PhoneNumber);
         }
      }
   }
}


void EditAnEntry (phone * phonebook)
{
     int c;
     FILE *f;
     char  name[50];
     f = fopen("phonebook_contacts.txt", "r+");
   if ( f == NULL )

   {
      perror("The following error occurred ");
      exit(EXIT_FAILURE);
   }
      else
      {

         printf("\nEnter CONTACT'S NAME TO MODIFY:\n");
         counter++;
         realloc(phonebook, sizeof(phone));

         printf("\nFirst Name: ");
         scanf("%s", phonebook[counter-1].FirstName);
         printf("Last Name: ");
         scanf("%s", phonebook[counter-1].LastName);
         printf("Phone Number (XXX-XXX-XXXX): ");
         scanf("%s", phonebook[counter-1].PhoneNumber);
         printf("\n\tFriend successfully added to Phonebook\n");

         fprintf(pWrite, "%s\t%s\t%s\n", phonebook[counter-1].FirstName, phonebook[counter-1].LastName, phonebook[counter-1].PhoneNumber);
         fclose(pWrite);
      }
 }


void DeleteAll (phone * phonebook)
{
   int x = 0;
   char nullStr[20] = {'\0'};

   for ( x = 0; x < counter; x++ )
   {
      strcpy(phonebook[x].FirstName, nullStr);
      strcpy(phonebook[x].LastName, nullStr);
      strcpy(phonebook[x].PhoneNumber, nullStr);
      --counter;
   }

   printf("All Contacts have been deleted.\n");
}
void FreeContacts (phone * phonebook)
{
     --counter;
     for ( ; counter > 0; --counter)
     {
        free(phonebook[counter].FirstName);
        free(phonebook[counter].LastName);
        free(phonebook[counter].PhoneNumber);
        free(phonebook);
        counter = 0;
        return;
     }

}Are you looking for great tips, tutorials, and hacks from experienced web developers to take your skills to the next level and help you solve client problems faster? Well, so are we! That’s why we are launching The BLOG XCHANGE!

tl;dr – The Blog XChange is a new initiative for WPMU DEV members aimed at providing better engagement with our member community by focusing on the content that matters most to you. Help us to help you and we’ll reward you with Hero points and links to your site.
Here at WPMU DEV’s secret content lab, we are always searching for new blog content ideas.
You would think that hiring the most brilliant writers in the WordPress universe would result in endless blog content, but alas, this isn’t so.
Which is ironic, I know, given that one of us is the author of a best ok-selling book called “Infinite Content Creation (How to Never Run out of Content Ideas for Your Blog).”
The WPMU DEV blog, however, is a different beast. We don’t publish fluffy filler content about WordPress. We know that our audience (yes, YOU!!) would never stand for it.
We know that you expect us to write articles and tutorials with substance. Beefy content (or tofurkey if you prefer non-meaty adjectives) that you can apply in your business to improve not only your skills but also solve real challenges for your clients and deliver them better and faster websites that will help them get results.

Writing blog content targeted to your needs requires us to spend a lot of time researching previous post comments, scouring our members’ forum, analyzing analytics, doing keyword research, peeking into our competitors’ sites, reading through tons of industry newsletters, etc.
Sometimes, we come near, but near just isn’t close enough.
We want to post content on our blog that reflects who you are, what you do, and how you solve everyday challenges in your business working at the coalface and deep in the trenches.
Since we can’t be you (somebody’s gotta write the blog, right?) we came up with an ingenious idea:
“Why not tap into your knowledge and experiences as a WordPress web developer and reward you for all contributions you make to our blog?”
When we recently floated the suggestion to create an area where members could exchange their knowledge for hero points and links to their sites, we received overwhelmingly positive feedback and support from our members…“provided it’s a fair trade,” said all of you in unison.
We know you’re busy running a business and that you pay us to serve you, so we don’t expect you to give us something for nothing.
We’re all about fair trading here at the DEV…(you’re probably not even aware of this, but did you know that you can now get hero points just for commenting on our blog posts?)
Hence, Blog XChange (and not Blog XPloitation!)
By sharing your knowledge and experiences on the Blog XChange, you will be helping other members and helping us too! In return, we will reward you for your contributions with loads of hero points and, if we use your content on our blog, with links to help promote your business.

In this post, I’ll briefly tell you how it works and how to get started if you’d like to contribute. For full details, including guidelines for posting content and exactly how we will reward you for your contributions, see the pinned post inside the Blog XChange. (Check it out…it’s now live in your Member’s Area!)
First off, we’re not looking for Pulitzer-prize-winning authors. You don’t have to submit polished prose or perfectly-presented publish-ready posts…we’ll take care of that.
What we’re looking for is a good ‘chunky’ piece of content that comes from your experience as a WordPress web developer, website builder, digital agency, tech support services provider, etc.
In your own words, tell us about a problem you have solved or a solution, fix, or hack you discovered that improved some aspect of your or your client’s website or business.
Test and compare different plugins you are currently using against ours and share your results.
If you like, also feel free to share code snippets, screenshots, links to your favorite time-saving tools and resources, etc.
Preferably, it would be ideal if the content you share on the Blog XChange includes using our plugins or services (you’ll get extra points for that!) but it’s not a requirement.
Every contribution you make on the Blog XChange will earn you points. After all, just by posting it, you are helping other members.

What the blog team will do, is regularly scan the contributions posted on the Blog XChange. We will then reward you for anything we use on the blog. This includes quotable sentences, paragraphs, or sections of text, code snippets, mini-tutorials, video reviews,…even links to great tutorials published on your own sites, or a great headline idea for a new post will earn you a point.
In some cases, we may contact you to discuss publishing a full-blown article, tutorial, or case study. This is exactly what happened when one of our members posted a comment on one of our discussions. We then created a case study and promoted her business throughout the post…so, win-win!
Obviously, there are some things we will not publish, like content designed to promote affiliate links or hyped-up self-promotional stuff…basically we’ll apply the same editorial guidelines and criteria to whatever you submit that we ourselves use to ensure that we maintain our blog to the highest standards.
Contributing content to the Blog XChange is super easy. Any WPMU DEV member can do it.
As soon as you get an idea for a post, head on over to the Members section and click on the Blog XChange link (or click here to go there now.)

Click ‘Start Discussion’.

Enter the title of your post in the ‘Subject’ field (it doesn’t have to be a snazzy title or an SEO-optimized headline…just tell us what it’s about!)
Under ‘Topic’ select ‘Blog XChange’.
Type or paste in your content in the ‘Discussion’ field. Feel free to use the formatting, quotation, and hyperlink tools too!)
If you’d like to keep track of any discussions on your thread, check the ‘Notify me by Email’ box.
Click the Post button to submit your contribution.

Your contribution is now added to the Blog XChange. If you need to make any adjustments to your post, just click on the Edit link.

That’s it! you’re all done.
Thank you! Hero points coming right up…check your sidebar!
We’ll get in touch with you if we use your content on our blog (e.g. to confirm the URL we’ll be linking to) and to discuss things further if we have any questions.

As web developers and WordPress service providers, you know the challenges that you and your clients face every day. Better still, you know how good it feels to solve these challenges and come up with better, faster, more efficient ways to get things done.
By sharing your knowledge and experiences with us, you’ll be helping us write the exact content you’d like to see on our blog, helping other members, and helping yourself too!
As Winston Churchill famously never stated…
“To improve is to XChange; to be perfect is to XChange often.”
We look forward to seeing your contributions and to working more closely with you to benefit our valued members and help improve your businesses.
See you at the Blog XChange!
Hello everyone! i have a local business for Glasvlies behanger
and i haveused heavy images to my website which directly affects my site speed.
Here is the URL
Can any one solve my problem?
Thanks!
Bluehost was called out this week for misusing WordPress’ trademark, as the WordPress Foundation prohibits its use in advertising. The company has been featured on WordPress’ recommended hosting page for the past 16 years, as one of a handful of hosts that have been arbitrarily selected based on an incomplete list of criteria.
The wording of the ad in this instance, “There is a reason WordPress officially recommends Bluehost more than any other hosting service,” was a visceral reminder to the hosting community of being excluded from the benefits that listing confers.
In response to the issue, WordPress’ Executive Director, Josepha Haden Chomphosy scheduled a call with Bluehost to find a resolution. She provided the following statement after the call:
This was flagged to me on Twitter, and I immediately reached out to learn more. Bluehost removed the ad proactively, and they scheduled a call with me and a representative of Automattic to understand the concerns being raised. As Matt mentioned, commercial use of the WordPress trademark is permitted, and Automattic can sub-license that use.
From a WordPress project standpoint, Bluehost was swift to respond to this issue, and took immediate steps to better understand how the trademark and logo are allowed to be used. When mistakes like this happen, we ask companies to keep us informed about how the issue is resolved, and Bluehost has agreed to do that.
Bluehost has not yet responded to our request for comment.
In the meantime, the incident reignited the controversy that has plagued WordPress’ recommended hosting page for years. Continuing the conversation that started on Twitter, members of the Post Status community pressed for more clarification in the club’s #hosting channel.
In response to claims that inclusion on the page is a closed process, and that the selected hosts haven’t changed in three years, Matt Mullenweg offered what is perhaps the most forthcoming response the community has seen on this topic:
When the list is open, anyone can apply. I take 100% responsibility for the editorial, though in the past and future will have people help with testing hosts, and collating all the threads in the forums. I also get a fair number of people emailing me directly feedback about the hosts listed, and how the host follows up is part of my evaluation.
It’s true the list of hosts hasn’t been changed in a while. The current list is all in good standing. I stand by the long-term behavior and service of every company linked on that page. It is past-due for open applications again, but I have prioritized other work on .org.
No one can pay to be on the page, and there are no affiliate payments made for customers sent from that page. It’s free, opinionated, and editorially driven. I do believe it drives many millions of year in business, which is why the potential for things like bribery or conflict is high if it were open to a larger group deciding who’s on there.
The hosting recommendations page exists to reduce barriers for new users looking to get started with WordPress without having to shop around among thousands of hosts. WordPress.org is not transparent about who makes the decisions regarding recommended hosts or what criteria is used. Because it benefits a select few very large companies who have dominated the recommendations for years with few changes, rumors abound.
Mullenweg’s response confirms that currently there is no “pay-to-play” type of arrangement, but he did not say if this has always been the case. In the beginning, this page was called “WordPress Hosting Partners” and included the following text: “Signing up through this page will help us finance WordPress.org’s operations through partner deals.” That wording was changed in April 2005 to remove the reference to partners. However, previous versions of the page from years ago include what appear to be tracking or affiliate links for the hosts listed. For example, a version of the page from 2007 includes the following links:
According to the Internet Archive, 2009 was the last year that tracking ID’s were appended to the links on the recommended hosts page. A few examples from that year include:
The copy on the page hasn’t changed much over recent years. It currently gives the following criteria to be listed but it doesn’t specify why only three companies meet these standards:
We’ll be looking at this list several times a year, so keep an eye out for us re-opening the survey for hosts to submit themselves for inclusion. Listing is completely arbitrary, but includes criteria like: contributions to WordPress.org, size of customer base, ease of WP auto-install and auto-upgrades, avoiding GPL violations, design, tone, historical perception, using the correct logo, capitalizing WordPress correctly, not blaming us if you have a security issue, and up-to-date system software.
With such a diverse hosting ecosystem supporting WordPress users around the world, it’s difficult to understand why there aren’t more companies included among these listings. The era when tracking links were included on this page was a different time before many things were formalized, but the community could stand to receive a transparent history of this page.
“To my knowledge, no one has ever paid to be on that page, and certainly no one has ever approached me about doing so,” Josepha Haden Chomphosy said when asked about the process for getting listed.
Thousands of volunteer contributors are continually building and improving this software. It’s only natural that the community is curious about who is benefiting from the project’s hosting recommendations and the nature of those arrangements. Mullenweg estimates the impact of that page as “many millions per year in business,” but the process surrounding the selection of hosts is closed and not clearly outlined.
Following the incident with Bluehost, Mullenweg briefly elaborated on why Bluehost retains its position on the page despite some people reporting poor service:
Regarding Bluehost or other large hosts, there is an aspect of WordPress Utilitarianism, any business will have some unhappy people, but a small % gets to a high absolute number at scale. I try to look at hosts that are doing the most good for the most number of people. Will definitely keep an eye on if anything with their approach to WP customers post-merger, but they also have a lot of good karma built up over a very long period of time. Bluehost, for example, does the best job I’m aware of in keeping the largest number of WPs on the latest version, and deploying updates incredibly fast. (If another host does more, please let me know! GD I think has more sites, but fewer on latest version.)
Another point of contention that regularly pops up is Automattic’s exclusive commercial license for using the WordPress trademark. Mullenweg clarified why the company is in possession of this exclusive right after Automattic donated it to the foundation. He confirmed that Bluehost was not given permission to run the ad with the trademark:
A common misunderstanding is that there is no commercial use of the WordPress trademark allowed. As some know, the trademark was originally held by Automattic, which donated it to the Foundation, and in return got an exclusive commercial license back. That commercial use can be sub-licensed by Automattic, and has been in the past. The ad that is bugging everyone was not approved, as far as I’m aware, and that will resolve once everyone has had a chance to talk to each other. Automattic can lose its commercial license to the trademark if it is not a good steward. This license is a bit of an accident of history, but also an entirely fair criticism of Automattic having a special privilege to commercial use of the WordPress trademark (because it’s true, vs most of what the company gets accused of). This happened in 2010, and the growth of WP and the WP ecosystem has been incredibly strong since then so I think the idea of a for-profit and non-profit complementing each other has proven successful, and I think better than either would have done on their own.
Mullenweg seems to recognize the friction that trademark matters can create in the community and said that he would change the naming of WordPress.com if he could go back in time.
“If I could wave a magic wand and go back to 2004, though, it would be nice if .com and .org had distinct names ‘before the dot,’ as it can be a source of confusion,” he said.
These things can certainly be changed in the present but not without a severe blow to the benefits of Automattic’s special privilege of commercial use. It would also impact the company’s millions of users who call WordPress.com their home on the web.
In the interest of eliminating some of the confusion regarding conflicts of interest and commercial use of the trademark, a continual movement towards transparency will be required. WordPress.org’s recommended hosts page is overdue for an update. Ideally, this page will provide clear guidelines about the process and criteria for inclusion before opening up applications again.
While on-premise Agile PLM allows for product development, processes, and development of product records and more; these are essential features of any PLM. Moving to the Cloud brings you a step ahead in the product conception, with the following advantages:
To make the transition to the cloud easier, GoSaaS has a clear and well-defined process that captures input from within the company to ensure every requirement is fulfilled.
Artificial Intelligence for IT Operations (AIOps) involves using Artificial Intelligence and Machine Learning technologies along with big data, data integration, and automation technologies to help make IT operations smarter and more predictive. AIOps complement manual operations with machine-driven decisions.
At a high level, AIOps solutions are categorized into two areas: domain-centric and domain-agnostic, as defined by Gartner. Domain-centric solutions apply AIOps for a certain domain like network monitoring, log monitoring, application monitoring, or log collection. You will often see monitoring vendors claim AIOps but primarily they are domain-agnostic, bringing the power of AI to the domain they manage. Domain-agnostic solutions operate more broadly and work across domains, monitoring, logging, cloud, infrastructure, etc., and they take data from all domains/tools and learn from this data to more accurately establishing patterns and inferences.
In his article, ROI Valuation, The IT Productivity GAP, Erik Brynjolfsson states, “The critical question facing IT managers today is not, ‘Does IT pay off?’ but rather, ‘How can we best use computers?’” This is not a simple question for CTOs to answer because each data center and IT operation is unique, with a multitude of variables affecting the overall operation. Two different companies with almost identical IT ecosystems yet one might have a fraction of their competitor's productivity, argues Brynolfsson. However, there are several best practices that CTOs can follow to ensure their IT operation is efficient, running within capacity, and executing as productively as possible.
“Cleanliness is godliness” as the old saying goes, and it could also be stress-relieving when it comes to IT. Servers and networking equipment all have set lifespans and old equipment should be decommissioned on a schedule defined by the manufacturers. Old equipment should be properly destroyed, recycled, or returned to the manufacturer, with all data wiped clean to ensure proper security.