API Security Weekly: Issue #120

This week, we take a look at the security issues in cheap video doorbells and security cameras, as well as tutorials and webinars on protecting APIs running in Kubernetes, JSON web tokens (JWT), and web and API authentication and authorization.

Oh, and we also have a link to DZone community awards where you can vote for this newsletter!

Why Agile 2 Is Not a Manifesto

Quite a few of the comments that we have received after launching Agile 2 have pointed out that Agile 2 does not look like the Agile Manifesto. I am not talking about the web page layout. I am talking about the length, the tone, and the nature of the content itself.

In particular, several people have said that Agile 2 does not read like a “call to arms.” The Agile Manifesto was (and is) seen as a rebellious document: it called into question many traditional methods and said, in effect,

Graph-Based Recommendation System With Milvus

Background

A recommendation system (RS) can identify user preferences based on their historical data and suggest products or items to them accordingly. Companies will enjoy considerable economic benefits from a well-designed recommendation system.

There are three elements in a complete set of recommendation systems: user model, object model, and the core element—recommendation algorithm. Currently, established algorithms include collaborative filtering, implicit semantic modeling, graph-based modeling, combined recommendation, and more. In this article, we will provide some brief instructions on how to use Milvus to build a graph-based recommendation system.

COVID-19 Research and Uninitialized Variable

There is an open project, COVID-19 CovidSim Model, written in C++. There is also a PVS-Studio static code analyzer that detects errors very well. One day they met. Let's embrace the fragility of mathematical modeling algorithms and why you need to make every effort to enhance code quality.

This little story begins with an ordinary search on GitHub. While looking through the search results, I accidentally came across the COVID-19 CovidSim Model project. Without thinking twice, I decided to check it out using the PVS-Studio analyzer.

Automation: Are We Looking at the Next Evolution of APIs?

Editor’s note: This interview of Zdenek Nemec was recorded for Coding Over Cocktails - a podcast by TORO Cloud.

APIs are considered the cornerstone of any digital transformation project. Through APIs, organizations can securely expose data to internal systems, customers, and business partners. They can also be a path to new revenue opportunities by creating digital products out of an organization’s data or business processes.

Business Activity Monitoring in Serverless360 With Real-Time Scenarios

This blog gives some interesting use cases of Business Activity Monitoring in Serverless360 using Cab Booking Management System. Let's take the booking scenario of this system backed with the Azure Serverless services and see how the business activity monitoring in Serverless360 will be useful in detecting the exceptions and tracking the custom properties of the messages flowing through the business process.

Scenario

Scenario graphic

The above is a Cab booking application built with Azure Serverless. Consider a business user who would need to track message flows through every stage in the above business activity. They should be informed of any exceptions in the business transaction along with the reasons behind the failure. A business development manager would need to have analytic information on the booking trends at various locations.

RingCentral Phone Review

RingCentral is a deep and fully-featured virtual phone number provider, and it stands tall among the competition. Easy to use, affordable, and powerful enough for almost anything you can throw at it, RingCentral doesn’t disappoint. While others may have a slight edge in an area or two, what you receive for the monthly subscription fee is both compelling and hard to resist. It’s a consistent and dependable VoIP solution.

RingCentral Pros and Cons

Pros

  • Affordable
  • Packed with features
  • Easy to set up
  • Dedicated mobile app

Cons

  • Resource intensive
  • App needs improvement
Compare the Best Business Phone Services
We’ve reviewed dozens of business phone service providers and narrowed them down to the best options available.
See Our Top Picks

How RingCentral Compares to Top Virtual Phone Number Companies

RingCentral compares favorably to other products in the virtual phone number provider space. It doesn’t win on every front—no product does—but it gets a lot right in the areas that count. RingCentral specifically offers robust, enhanced features such as video conferencing, team messaging, and file sharing across multiple devices. In a nutshell: it’s a product for those that need everything for their team, instead of just a few typical features.

Other top alternatives such as Talkroute offer a powerful suite of tools, including extensions, call stacking, and call forwarding functionality. Nextiva has unlimited calls, call queueing, and free toll-free numbers, as well as one of the most affordable enterprise plans.

RingCentral Toll-free Numbers

RingCentral offers toll-free numbers at an affordable price with high-volume minute bundles available to help you connect with customers—in a way that benefits you and them. Choices available on RingCentral include the well-known 800 number prefix and 888, 877, 866, 855, and 844.

If you desire a more custom number, you can purchase a vanity phone number from RingCentral. Vanity numbers are easily remembered for both you and your customers—for example, 1-800-DENTIST. I think these numbers are priced well on RingCentral, with bundles available from 1000 to 100,000 minutes for high-volume business. If that’s not enough for you, additional minutes can be purchased. It’s a great offering.

With that said, 800.com—another good virtual phone number provider—offers all of the toll-free prefixes RingCentral does but includes 833 as well. Talkroute also provides the 833 prefixes in competitive packages, and Nextiva does offer the 833 prefixes and offers a free toll-free number in its Business Phone Service package. The bottom line is that all of them are worthy choices, and RingCentral doesn’t fall behind.

RingCentral Extensions and Routing

RingCentral provides flexible phone extensions for different departments. These extensions can be connected to mobile devices for portability away from the desktop. I particularly like how every extension has its own voicemail inbox and how employees can set up custom greetings for their extensions. Departments can even set up recorded announcements for events to prevent the need to answer the phone for frequently asked information. It’s impressive little extras like these that make RingCentral a practical option.

On the routing front, RingCentral allows each number to have its own call routing flow to make sure calls go through to the right department without manual input. This routing takes place quickly and means customers won’t be kept waiting for too long to get through.

RingCentral Setup Process

Virtual phone providers’ setup process should be easy, but it might be an area businesses fret over. RingCentral promises it should take no more than 30 days to get set up and running with them, although it should be far sooner than that, depending on the package and plan.

There’s a multi-stage approach to the initial set up—which has no additional fees—and it starts with a welcome call from RingCentral to discuss a project timeline and to set expectations. A couple of training sessions are provided in the setup process, so you’ll be familiar with the critical areas by the end of them.

Impressively, a team is ready to drop in and help should you become stuck at any point. This includes a professional service advisor who leads the training sessions. An account executive can also go through pricing information and provide any additional assistance for the product. It’s fair to say RingCentral does an excellent job of looking after its customers in the setup process.

How much you value that initial setup support does vary—some will want independence and like to tackle things on their own where possible—but it’s clear RingCentral does very well in this area if you need it, and the setup process is guided from the start. While its competitors generally offer great support and easy setups, I think RingCentral more than holds its own here.

RingCentral Video Meetings

RingCentral offers robust and reliable video meeting functionality, and the quality and system on offer are impressive. For example, no additional downloads are needed—you can jump into a video call, host one for others, or invite people in a few simple clicks or taps in the app. Each call you make is backed up with HD video clarity and audio. You can password protect any meeting set up, and I think this extra control is small but important, especially to minimize potential disruption throughout a day.

Notably, RingCentral allows you to invite up to 200 people to a video call. The process for doing this is as simple as sending a link, an email, or a text. While calls of this size might not be regular for some, it’s good to know the ability to do so is, in fact, there. For others, especially larger businesses, this functionality is vital. In other words, RingCentral caters to companies of all sizes.

Top competitors in the space, such as Talkroute and CallHippo, don’t offer a conferencing or video calling feature as RingCentral does. RingCentral is easily ahead of the game here. While it’s only one area of the whole package, video conferencing and calling might be critical for a business, especially one that combines it with an intelligent phone system. This is a new offering from RingCentral, and it certainly adds another notable feature to an already great line-up.

RingCentral Messaging

RingCentral is no slouch when it comes to the messaging options on offer either. For a start, anyone can join a conversion on the platform, whether that’s a customer or a teammate. On top of that, you can send files to them, connect tools like Google Workspace, and pin documents for later. I feel like RingCentral has thought about a variety of different scenarios here and has implemented the functionality to back them up. It doesn’t stop there, though, as the option for dedicated threads for projects is available, including topics and teams.

Anyone familiar with Skype or Zoom will appreciate the moments where sharing your screen with another comes in handy. Whether that’s to run through a task or to discuss a new project, it’s a useful feature of that platform. The good news is that RingCentral offers that functionality as well, allowing a whole team to see your screen as you navigate whatever is on the agenda. Losing track of files and notes is also taken care of, and you can search for keywords and filter results by emails, teams, or just a name.

RingCentral Mobile App

A business that takes itself seriously really does need a mobile app. RingCentral offers one with a host of features, as you might expect. From sending messages to sharing files and with the option of managing tasks directly from your phone or tablet, there’s a lot you can do on the go with the RingCentral app. Video meetings are possible on the app, too, although they aren’t as stable as they are on the desktop.

The app itself is generally easy to use and quick to load, and signing in and uploading prove to be hassle-free. Although I have found the app doesn’t always notify users when a message has been sent to them, which can be a little bit problematic in the right circumstance. Being able to take the system anywhere is undoubtedly impressive. Overall, while I do believe the app needs some refinement, it’s a good offering. It’s also worth mentioning that the app is new, so expect some extensive updates and improvements over time.

Overall, there isn’t a great deal of difference between the top competitors here, but it’s good to see mobile apps offered in the first place, certainly with the continuing growth of mobile users.

RingCentral Contact Center

RingCentral essentially turns a business into an inbound contact center when it needs to be one. With the ability to handle calls and connect them to the right people, along with advanced routing and analytics, it proves to be both a powerful and flexible virtual phone system. There are even SDKs available to allow you to adapt to new digital platforms that customers might move to over time. All of this makes it feels like a future-proof system ready to tackle any problems a company might face.

Supervisor tools can be used when a situation might require it, too. For example, if an agent needs to take a different course of action on a call, whisper coaching allows managers to steer them on the right path and coach them. Barge-in functionality is also a part of this should a manager need to take over the call directly. It’s a scenario that can happen to any business, so this option is another reason RingCentral excels.

Compare the Best Business Phone Services
We’ve reviewed dozens of business phone service providers and narrowed them down to the best options available.
See Our Top Picks

Summary

To summarize, there are areas in which top providers overlap. Specifically, we see a lot of the same offering regarding toll-free numbers, extensions, and routing functionality. That’s true with the general contact center features and the mobile app side of things. Where RingCentral edges ahead here is in its exclusive video meeting functionality, its powerful messaging system, and a setup process that feels more personal overall with team members on standby.

WordPress 5.7: Big ol’ jQuery Update

WordPress core is making the jump from jQuery 1.12.4 to jQuery 3.5.1! This is a big deal for lots of reasons — like modern features, better DX, and security improvements to name a few. Right now, the plan is to release the update in WordPress 5.7, which is slated to release on March 9. 🤞

WordPress is notorious for its backwards compatibility and you could say this change is a relic of that philosophy. A line has been drawn in the sand when it comes to jQuery, and 1.x ain’t a part of plans moving forward. But it also represents a breaking change, and that’s sorta rare in the WordPress world. Because WordPress ships with jQuery installed, many developers call that version of it rather than re-installing it in another location. That includes lots of theme and plugin developers, all of whom now need to make sure their code is compatible with jQuery 3.x.

Not doing so could result in lots on borked sites. But, hey, we have about a month left to work on it, right?

The change has actually been in the works for some time. The work began in WordPress 5.5, and 5.7 is technically the third of three phases. WordPress 5.6 is where the Core Team bumped jQuery up to version 3.5.1 and updated jQuery Migrate to help developers revert back to legacy jQuery, if needed. In other words, this has been a super methodical approach. The Core Team deserves a lot of kudos for that, including all of the communications that have gone out about the change.

I wrote something up about the transition a couple of weeks ago, including a sort of how-to for testing things in advance, and troubleshooting issues after the fact. It’s aimed at beginners, but maybe you’ll find it helpful too. Make WordPress Support has its own thorough article as well, and it calls out a plugin that the WordPress team made just for this transition. It’s pretty sweet: it can roll your site back to jQuery1.x automatically if it detects a fail. It also documents those fails and sends notifications when they happen.

The key is to start testing now in WordPress 5.6. The plan is to disable jQuery Migrate in WordPress 5.7, so waiting for that release is too late. If you do wait that long and find issues, your best path forward is likely to roll back to 5.6 anyway to take advantage of jQuery Migrate and the helper plugin.


The post WordPress 5.7: Big ol’ jQuery Update appeared first on CSS-Tricks.

You can support CSS-Tricks by being an MVP Supporter.

How to Build a GraphQL API for Text Analytics with Python, Flask and Fauna

GraphQL is a query language and server-side runtime environment for building APIs. It can also  be considered as the syntax that you write in order to describe the kind of data you want from APIs. What this means for you as a backend developer is that with GraphQL, you are able to expose a single endpoint on your server to handle GraphQL queries from client applications, as opposed to the many endpoints you’d need to create to handle specific kinds of requests with REST and turn serve data from those endpoints.

If a client needs new data that is not already provisioned. You’d need to create new endpoints for it and update the API docs. GraphQL makes it possible to send queries to a single endpoint, these queries are then passed on to the server to be handled by the server’s predefined resolver functions and the requested information can be provided over the network.

Running Flask server

Flask is a minimalist framework for building Python servers. I always use Flask to expose my GraphQL API to serve my machine learning models. Requests from client applications are then forwarded by the GraphQL gateway. Overall, microservice architecture allows us to use the best technology for the right job and it allows us to use advanced patterns like schema federation. 

In this article, we will start small with the implementation of the so-called Levenshetein distance. We will use the well-known NLTK library and expose the Levenshtein distance functionality with the GraphQL API. In this article, i assume that you are familiar with basic GraphQL concepts like BUILDING GraphQL mutations. 

Note: We will be working with the free and open source example repository with the following:

In the projects, Pipenv was used for managing the python dependencies. If you are located in the project folder. We can create our virtual environment with this:

…and install dependencies from Pipfile.

We usually define a couple of script aliases in our Pipfile to ease our development workflow.

It allows us to run our dev environment easily with a command aliases as follows:

The flask server should be then exposed by default at port 5000. You can immediately move on to the GraphQL Playground, which serves as the IDE for the live documentation and query execution for GraphQL servers. GraphQL playground uses the so-called GraphQL introspection for fetching information about our GraphQL types. The following code initializes our Flask server:

It is a good practice to use the WSGI server when running a production environment. Therefore, we have to set-up a script alias for the gunicorn with: 

Levenshtein distance (edit distance)

The levenshtein distance, also known as edit distance, is a string metric. It is defined as the minimum number of single-character edits needed to change a one character sequence  a to another one b. If we denote the length of such sequences |a| and |b| respectively, we get the following:

Where

1(ai≠bj) is the distance between the first i characaters of a and the first j character of b. For more on the theoretical background, feel free to check out the Wiki.

In practice, let’s say that someone misspelt ‘machine learning’ and wrote ‘machinlt learning’. We would need to make the following edits:

EditEdit typeWord state
0Machinlt lerning
1SubstitutionMachinet lerning
2DeletionMachine lerning
3InsertionMachine learning

For these two strings, we get a Levenshtein distance equal to 3. The levenshtein distance has many applications, such as spell checkers, correction system for optical character recognition, or similarity calculations.

Building a Graphql server with graphene in Python

We will build the following schema in our article:

Each GraphQL schema is required to have at least one query. We usually define our first query in order to health check our microservice. The query can be called like this:

query {
  healthcheck
}

However, the main function of our schema is to enable us to calculate the Levenshtien distance. We will use variables to pass dynamic parameters in the following GraphQL document:

We have defined our schema so far in SDL format. In the python ecosystem, however, we do not have libraries like graphql-tools, so we need to define our schema with the code-first approach. The schema is defined as follows using the Graphene library:

We have followed the best practices for overall schema and mutations. Our input object type is written in Graphene as follows:

Each time, we execute our mutation in GraphQL playground:

With the following variables:

{
  "input": {
    "s1": "test1",
    "s2": "test2"
  }
}

We obtain the Levenshtein distance between our two input strings. For our simple example of strings test1 and test2, we get 1. We can leverage the well-known NLTK library for natural language processing (NLP). The following code is executed from the resolver:

It is also straightforward to implement the Levenshtein distance by ourselves using, for example, an iterative matrix, but I would suggest to not reinvent the wheel and use the default NLTK functions.

Serverless GraphQL APIs with Fauna

First off some introductions, before we jump right in. It’s only fair that I give Fauna a proper introduction as it is about to make our lives a whole lot easier. 

Fauna is a serverless database service, that handles all optimization and maintenance tasks so that developers don’t have to bother about them and can focus on developing their apps and shipping to market faster.

Again, serverless doesn’t actually mean “NO SERVERS” but to simply put it: what serverless means is that you can get things working without necessarily having to set things up from scratch. Some apps that use serverless concepts don’t have a backend service written from scratch, they employ the use of cloud functions which are technically scripts written on cloud platforms to handle necessary tasks like login, registration, serving data etc.

Where does Fauna fit into all of this? When we build servers we need to provision our server with a database, and when we do that it’s usually a running instance of our database. With serverless technology like Fauna, we can shift that workload to the cloud and focus on actually writing our auth systems, implementing business logic for our app. Fauna also manages things like, maintenance and scaling which usually calls for concern with systems that use conventional databases.

If you are interested in getting more info about Fauna and it’s features, check the Fauna docs. Let’s get started with building our GraphQL API the serverless way with the GraphQL.

Requirements

  1. Fauna account: That’s all you need, an account with Fauna is all you need for the session, so click here to go to the sign up page.
  2. Creating a Fauna Database
  3. Login to your Fauna account once you have created an account with them. Once on the dashboard, you should see a button to create a new database, click on that and you should see a little form to fill in the name of the database, that resembles the ones below:

I call mine “graphqlbyexample” but you can call yours anything you wish. Please, ignore the pre-populate with demo data option we don’t need that for this demo. Click “Save” and you should be brought to a new screen as shown below:

Adding a GraphQL Schema to Fauna

  1. In order to get our GraphQL server up and running, Fauna allows us to upload our own graphQL schema, on the page we are currently on, you should see a GraphQL options; select that and it will prompt you to upload a schema file. This file usually contains raw GraphQL schema and is saved with either the .gql or .graphql file extension. Let’s create our schema and upload it to Fauna to spin up our server.
  1. Create a new file anywhere you like. I’m creating it in the same directory as our previous app, because it has no impact on it. I’m calling it schema.gql and we will add the following to it:

Here, we simply define our data types in tandem to our two tables (Notes, and user). Save this and go back to that page to upload this schema.gql that we just created. Once that is done, Fauna processes it and takes us to a new page — our GraphQL API playground.

We have literally created a graphql server by simply uploading that really simple schema to Fauna and to highlight some of the really cool feats that Fauna has, observe:

  1. Fauna automatically generates collections for us, if you notice, we did not create any collection(translates to Tables, if you are only familiar with relational databases). Fauna is a NoSQL database and collections are technically the same as tables, and documents as to rows in tables. If we go to the collections options and click on that we had see the tables that were auto-generated on our behalf, courtesy of the schema file that we uploaded.
  1. Fauna automatically creates indexes on our behalf: head over to the indexes option and see what indexes have been created on behalf of the API. Fauna is a document-oriented database and does not have primary keys or foreign-keys as you have in relational databases for search and index purposes, instead, we create indexes in Fauna to help with data retrieval.
  1. Fauna automatically generates graphql queries and mutations as well as API Docs on our behalf: This is one of my personal favorites and I can’t seem to get over just how efficient Fauna does this. Fauna is able to intelligently generate some queries that it thinks you might want in your newly created API. Head over back to the GraphQL option and click on the “Docs” tab to open up the Docs on the playground.

As you can see two queries and a handful of mutations already auto-generated (even though we did nit add them to our schema file), you can click on each one in the docs to see the details. 

Testing our server

Let’s test out some of these queries and mutations from the playground, we also use our server outside of the playground (by the way, it is a fully functional GraphQL server).

Testing from the Playground

  1. We will test our first off by creating a new user, with the predefined createUser mutations as follows:

If we go to the collections options and choose User, we should have our newly created entry(document aka row) in our User collections.

  1. Let’s create a new note and associate it with a user as the author via it’s document ref id, which is a special ID generated by Fauna for all documents for the sake of references like this much like a key in relational tables. To find the ID for the user we just created simply navigate to the collection and from the list of documents you should see the option(a copy Icon)to copy Ref ID:

Once you have this you can create a new note and associate is as follows:

  1. Let’s make a query this time, this time to get data from the database. Currently, we can fetch users by ID or fetch a note by it’s ID. Let’s see that in action:

You must have been thinking it, what if we wanted to fetch info of all users, currently, we can’t do that because Fauna did not generate that automatically for us, but we can update our schema so let’s add our custom query to our schema.gql file, as follows. Note that this is an update to the file so don’t clear everything in the file out just add this to it:

Once you have added this, save the file and click on the update schema option on the playground to upload the file again, it should take a few seconds to update, once it’s done we will be able to use our newly created query, as follows:

Don’t forget that as opposed to having all the info about users served (namely: name, email, password) we can choose what fields we want because it’s a GraphQL and not just that. It’s Fauna’s GraphQL so feel free to specify more fields if you want. 

Testing from without the playground – Using python (requests library)

Now that we’ve seen that our API works from the playground lets see how we can actually use this from an application outside the playground environment, using python’s request library so if you don’t have it installed kindly install it using pip as follows:

pip install requests
  • Before we write any code we need to get our API key from Fauna which is what will help us communicate with our API from outside the playground. Head over to security on your dashboard and on the keys tab select the option to create a new key, it should bring up a form like this:

Leave the database option as the current one, change the role of the key from admin to the server and then save. It’ll generate for you a new key secret that you must copy and save somewhere safe, as an environment variable most probably.

  • For this I’m going to create a simple script to demonstrate, so add a new file call it whatever you wish — I’m calling mine test.py to your current working directory or anywhere you wish. In this file we’ll add the following:

Here we add a couple of imports, including the requests library which we use to send the requests, as well as the os module used here to load our environment variables which is where I stored the Fauna secret key we got from the previous step.

Note the URL where the request is to be sent, this is gotten from the Fauna GraphQL playground here:

Next, we create a query which is to be sent this example shows a simple fetch query to find a user by id (which is one of the automatically generated queries from Fauna), we then retrieve the key from the environment variable and store it in a variable called a token, and create a dictionary to represent out headers, this is, after all, an HTTP request so we can set headers here, and in fact, we have to because Fauna will look for our secret key from the headers of our request.

  • The concluding part of the code features how we use the request library to create the request, and is shown as follows:

We create a request object and check to see if the request went through via its status_code and print the response from the server if it went well otherwise we print an error message lets run test.py and see what it returns.

Conclusion

In this article, we covered creating GraphQL servers from scratch and looked at creating servers right from Fauna without having to do much work, we also saw some of the awesome, cool perks that come with using the serverless system that Fauna provides, we went on to further see how we could test our servers and validate that they work.

Hopefully, this was worth your time, and taught you a thing or two about GraphQL, Serverless, Fauna, and Flask and text analytics. To learn more about Fauna, you can also sign up for a free account and try it out yourself!


By: Adesina Abdrulrahman


The post How to Build a GraphQL API for Text Analytics with Python, Flask and Fauna appeared first on CSS-Tricks.

You can support CSS-Tricks by being an MVP Supporter.

Common Python Security Pitfalls and How to Avoid Them

Introduction

Python is undoubtedly a popular language. It consistently ranks among the most popular and most loved languages year after year. That's not hard to explain, considering how fluent and expressive it is. Its pseudocode-like syntax makes it extremely easy for beginners to pick it up as their first language, while its vast library of packages (including the likes of giants like Django and TensorFlow) ensure that it scales up for any task required of it.

Being such a widely-used language makes Python a very attractive target for malicious hackers. Let's see a few simple ways to secure your Python apps and keep the black-hats at bay.

Collective #648


Collective 648 item image

BitmapFonts

A gigantic collection of bitmap fonts pulled from various demoscene archives over the years.

Check it out


Collective 648 item image

Same Energy

Jacob Jackson has been working on a visual search engine called Same Energy for the past couple of months. Give it a try, it’s amazing!

Check it out


Collective 648 item image

VOLE.wtf

The home of Can You Draw a Perfect Circle?, Hit the High Notes, Kick the Ball Back, Programming Language Inventor or Serial Killer?, ButtyStock, Goth or Moth? and oodles more. Formerly known as ‘malevole’.

Check it out


Collective 648 item image

Form.taxi

Submit your web forms with form.taxi — no programming, PHP scripting, or FormMailer required. Free for small websites.

Check it out


Collective 648 item image

My 90’s TV

Go back to the 1990’s via this nostalgic TV simulator and relive the original ads, music videos, movie trailers, shows and more!

Check it out


The post Collective #648 appeared first on Codrops.

How to Overcome Negativity in the Workplace

Please note: This article is not a technical article for your career development, but a philosophical one to shape your attitude.

Do you ever feel that you do not receive enough credit for the effort you put in? You may have a particular field of focus, but your organization wants something new. Constructive criticism is fine, but have you ever been in a situation where your work and effort have been poorly regarded? Have you ever felt that you lost respect at your workplace? Research indicates that disappointment may lead to distress. Furthermore, studies state that nervous stress can hinder one's ability to execute tasks. However, some researchers suggest that insult and indignation can encourage people to avoid failure. Overall, how our work is received in the workplace is integral to how we view ourselves and our successes.

iframe feedback

What if an <iframe> had within it another <iframe> of the exact same source? Inception, as they say. Baptise Crespy does this all-important research in the name of art and science.

Turns out browsers are smart enough to not allow this infinite looping to occur (and likely crash your browser/computer). They strip the content after the 2nd nest. But! If you change the URL of the src to be unique (but still essentially serve the same document), it works. Adding some random colors and animations and things get weird really fast.

Motion warning video:

Direct Link to ArticlePermalink


The post iframe feedback appeared first on CSS-Tricks.

You can support CSS-Tricks by being an MVP Supporter.

Building A Web App With React, Redux And Sanity.io

The fast evolution of digital platforms have placed serious limitations on traditional CMS like Wordpress. These platforms are coupled, inflexible and are focused on the project, rather than the product. Thankfully, several headless CMS have been developed to tackle these challenges and many more.

Unlike traditional CMS, headless CMS, which can be described as Software as a Service (SaaS), can be used to develop websites, mobile apps, digital displays, and many more. They can be used on limitless platforms. If you are looking for a CMS that is platform independent, developer-first, and offers cross platform support, you need not look farther from headless CMS.

A headless CMS is simply a CMS without a head. The head here refers to the frontend or the presentation layer while the body refers to the backend or the content repository. This offers a lot of interesting benefits. For instance, it allows the developer to choose any frontend of his choice and you can also design the presentation layer as you want.

There are lots of headless CMS out there, some of the most popular ones include Strapi, Contentful, Contentstack, Sanity, Butter CMS, Prismic, Storyblok, Directus, etc. These headless CMS are API-based and have their individual strong points. For instance, CMS like Sanity, Strapi, Contentful, and Storyblok are free for small projects.

These headless CMS are based on different tech stacks as well. While Sanity.io is based on React.js, Storyblok is based on Vue.js. As a React developer, this is the major reason why I quickly picked interest in Sanity. However, being a headless CMS, each of these platforms can be plugged on any frontend, whether Angular, Vue or React.

Each of these headless CMS has both free and paid plans which represent significant price jump. Although these paid plans offer more features, you wouldn’t want to pay all that much for a small to mid-sized project. Sanity tries to solve this problem by introducing pay-as-you-go options. With these options, you will be able to pay for what you use and avoid the price jump.

Another reason why I choose Sanity.io is their GROQ language. For me, Sanity stands out from the crowd by offering this tool. Graphical-Relational Object Queries (GROQ) reduces development time, helps you get the content you need in the form you need it, and also helps the developer to create a document with a new content model without code changes.

Moreover, developers are not constrained to the GROQ language. You can also use GraphQL or even the traditional axios and fetch in your React app to query the backend. Like most other headless CMS, Sanity has comprehensive documentation that contains helpful tips to build on the platform.

Note: This article requires a basic understanding of React, Redux and CSS.

Getting Started With Sanity.io

To use Sanity in your machine, you’ll need to install the Sanity CLI tool. While this can be installed locally on your project, it is preferable to install it globally to make it accessible to any future applications.

To do this, enter the following commands in your terminal.

npm install -g @sanity/cli

The -g flag in the above command enables global installation.

Next, we need to initialize Sanity in our application. Although this can be installed as a separate project, it is usually preferable to install it within your frontend app (in this case React).

In her blog, Kapehe explained in detail how to integrate Sanity with React. It will be helpful to go through the article before continuing with this tutorial.

Enter the following commands to initialize Sanity in your React app.

sanity init

The sanity command becomes available to us when we installed the Sanity CLI tool. You can view a list of the available Sanity commands by typing sanity or sanity help in your terminal.

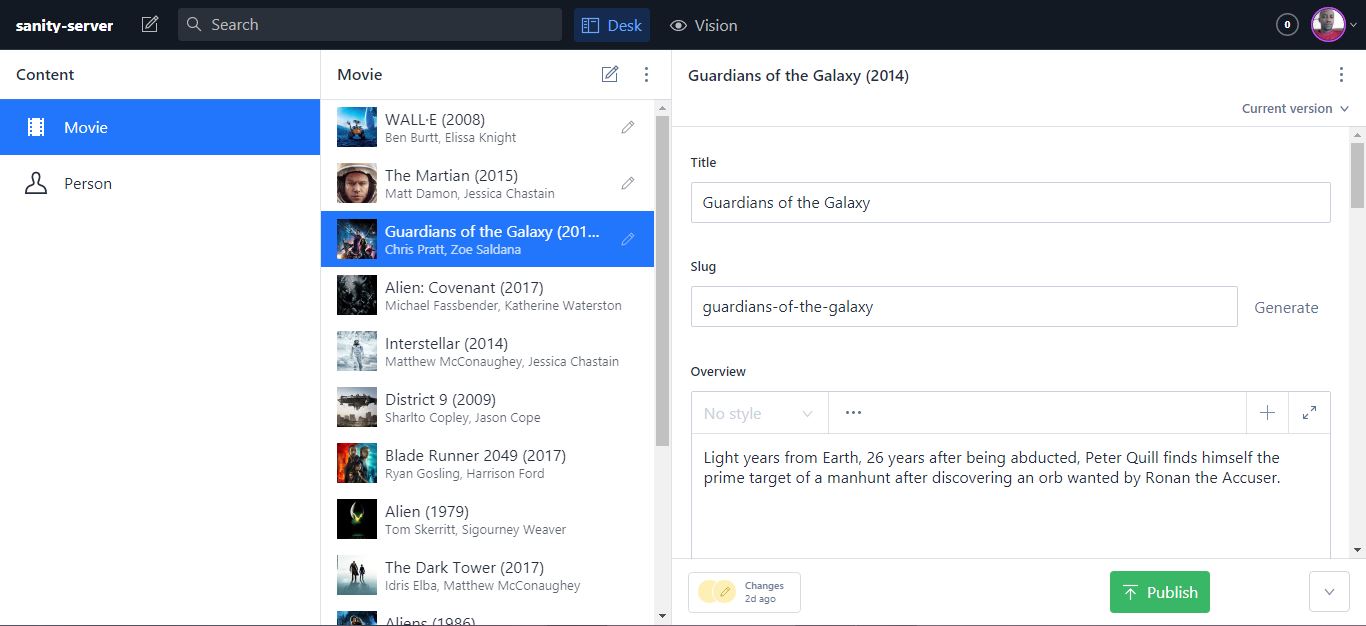
When setting up or initializing your project, you’ll need to follow the prompts to customize it. You’ll also be required to create a dataset and you can even choose their custom dataset populated with data. For this listing app, we will be using Sanity’s custom sci-fi movies dataset. This will save us from entering the data ourselves.

To view and edit your dataset, cd to the Sanity subdirectory in your terminal and enter sanity start. This usually runs on http://localhost:3333/. You may be required to login to access the interface (make sure you login with the same account you used when initializing the project). A screenshot of the environment is shown below.
Sanity-React Two-way Communication

Sanity and React need to communicate with each other for a fully functional application.

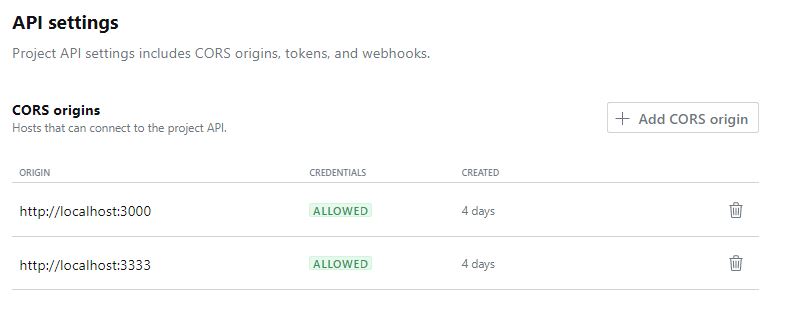
CORS Origins Setting In Sanity Manager

We’ll first connect our React app to Sanity. To do this, login to https://manage.sanity.io/ and locate CORS origins under API Settings in the Settings tab. Here, you’ll need to hook your frontend origin to the Sanity backend. Our React app runs on http://localhost:3000/ by default, so we need to add that to the CORS.

This is shown in the figure below.
Connecting Sanity To React

Sanity associates a project ID to every project you create. This ID is needed when connecting it to your frontend application. You can find the project ID in your Sanity Manager.

The backend communicates with React using a library known as sanity client. You need to install this library in your Sanity project by entering the following commands.

npm install @sanity/client

Create a file sanitySetup.js (the filename does not matter), in your project src folder and enter the following React codes to set up a connection between Sanity and React.

import sanityClient from "@sanity/client"
export default sanityClient({
    projectId: PROJECT_ID,
    dataset: DATASET_NAME,
    useCdn: true
});

We passed our projectId, dataset name and a boolean useCdn to the instance of the sanity client imported from @sanity/client. This works the magic and connects our app to the backend.

Now that we’ve completed the two-way connection, let’s jump right in to build our project.

Setting Up And Connecting Redux To Our App

We’ll need a few dependencies to work with Redux in our React app. Open up your terminal in your React environment and enter the following bash commands.

npm install redux react-redux redux-thunk

Redux is a global state management library that can be used with most frontend frameworks and libraries such as React. However, we need an intermediary tool react-redux to enable communication between our Redux store and our React application. Redux thunk will help us to return a function instead of an action object from Redux.

While we could write the entire Redux workflow in one file, it is often neater and better to separate our concerns. For this, we will divide our workflow into three files namely, actions, reducers, and then the store. However, we also need a separate file to store the action types, also known as constants.

Setting Up The Store

The store is the most important file in Redux. It organizes and packages the states and ships them to our React application.

Here is the initial setup of our Redux store needed to connect our Redux workflow.

import { createStore, applyMiddleware } from "redux";
import thunk from "redux-thunk";
import reducers from "./reducers/";

export default createStore(
  reducers,
  applyMiddleware(thunk)
);

The createStore function in this file takes three parameters: the reducer (required), the initial state and the enhancer (usually a middleware, in this case, thunk supplied through applyMiddleware). Our reducers will be stored in a reducers folder and we’ll combine and export them in an index.js file in the reducers folder. This is the file we imported in the code above. We’ll revisit this file later.

Introduction To Sanity’s GROQ Language

Sanity takes querying on JSON data a step further by introducing GROQ. GROQ stands for Graph-Relational Object Queries. According to Sanity.io, GROQ is a declarative query language designed to query collections of largely schema-less JSON documents.

Sanity even provides the GROQ Playground to help developers become familiar with the language. However, to access the playground, you need to install sanity vision. Run sanity install @sanity/vision on your terminal to install it.

GROQ has a similar syntax to GraphQL but it is more condensed and easier to read. Furthermore, unlike GraphQL, GROQ can be used to query JSON data.

For instance, to retrieve every item in our movie document, we’ll use the following GROQ syntax.

*[_type == "movie"]

However, if we wish to retrieve only the _ids and crewMembers in our movie document. We need to specify those fields as follows.

`*[_type == 'movie']{                                             
    _id,
    crewMembers
}

Here, we used * to tell GROQ that we want every document of _type movie. _type is an attribute under the movie collection. We can also return the type like we did the _id and crewMembers as follows:

*[_type == 'movie']{                                             
    _id,
    _type,
    crewMembers
}

We’ll work more on GROQ by implementing it in our Redux actions but you can check Sanity.io’s documentation for GROQ to learn more about it. The GROQ query cheat sheet provides a lot of examples to help you master the query language.

Setting Up Constants

We need constants to track the action types at every stage of the Redux workflow. Constants help to determine the type of action dispatched at each point in time. For instance, we can track when the API is loading, fully loaded and when an error occurs.

We don’t necessarily need to define constants in a separate file but for simplicity and clarity, this is usually the best practice in Redux.

By convention, constants in Javascript are defined with uppercase. We’ll follow the best practices here to define our constants. Here is an example of a constant for denoting requests for moving movie fetching.

export const MOVIE_FETCH_REQUEST = "MOVIE_FETCH_REQUEST";

Here, we created a constant MOVIE_FETCH_REQUEST that denotes an action type of MOVIE_FETCH_REQUEST. This helps us to easily call this action type without using strings and avoid bugs. We also exported the constant to be available anywhere in our project.

Similarly, we can create other constants for fetching action types denoting when the request succeeds or fails. A complete code for the movieConstants.js is given in the code below.

export const MOVIE_FETCH_REQUEST = "MOVIE_FETCH_REQUEST";
export const MOVIE_FETCH_SUCCESS = "MOVIE_FETCH_SUCCESS";
export const MOVIE_FETCH_FAIL = "MOVIE_FETCH_FAIL";

export const MOVIES_FETCH_REQUEST = "MOVIES_FETCH_REQUEST";
export const MOVIES_FETCH_SUCCESS = "MOVIES_FETCH_SUCCESS";
export const MOVIES_FETCH_FAIL = "MOVIES_FETCH_FAIL";
export const MOVIES_FETCH_RESET = "MOVIES_FETCH_RESET";

export const MOVIES_REF_FETCH_REQUEST = "MOVIES_REF_FETCH_REQUEST";
export const MOVIES_REF_FETCH_SUCCESS = "MOVIES_REF_FETCH_SUCCESS";
export const MOVIES_REF_FETCH_FAIL = "MOVIES_REF_FETCH_FAIL";

export const MOVIES_SORT_REQUEST = "MOVIES_SORT_REQUEST";
export const MOVIES_SORT_SUCCESS = "MOVIES_SORT_SUCCESS";
export const MOVIES_SORT_FAIL = "MOVIES_SORT_FAIL";

export const MOVIES_MOST_POPULAR_REQUEST = "MOVIES_MOST_POPULAR_REQUEST";
export const MOVIES_MOST_POPULAR_SUCCESS = "MOVIES_MOST_POPULAR_SUCCESS";
export const MOVIES_MOST_POPULAR_FAIL = "MOVIES_MOST_POPULAR_FAIL";

Here we have defined several constants for fetching a movie or list of movies, sorting and fetching the most popular movies. Notice that we set constants to determine when the request is loading, successful and failed.

Similarly, our personConstants.js file is given below:

export const PERSONS_FETCH_REQUEST = "PERSONS_FETCH_REQUEST";
export const PERSONS_FETCH_SUCCESS = "PERSONS_FETCH_SUCCESS";
export const PERSONS_FETCH_FAIL = "PERSONS_FETCH_FAIL";

export const PERSON_FETCH_REQUEST = "PERSON_FETCH_REQUEST";
export const PERSON_FETCH_SUCCESS = "PERSON_FETCH_SUCCESS";
export const PERSON_FETCH_FAIL = "PERSON_FETCH_FAIL";

export const PERSONS_COUNT = "PERSONS_COUNT";

Like the movieConstants.js, we set a list of constants for fetching a person or persons. We also set a constant for counting persons. The constants follow the convention described for movieConstants.js and we also exported them to be accessible to other parts of our application.

Finally, we’ll implement light and dark mode in the app and so we have another constants file globalConstants.js. Let’s take a look at it.

export const SET_LIGHT_THEME = "SET_LIGHT_THEME";
export const SET_DARK_THEME = "SET_DARK_THEME";

Here we set constants to determine when light or dark mode is dispatched. SET_LIGHT_THEME determines when the user switches to the light theme and SET_DARK_THEME determines when the dark theme is selected. We also exported our constants as shown.

Setting Up The Actions

By convention, our actions are stored in a separate folder. Actions are grouped according to their types. For instance, our movie actions are stored in movieActions.js while our person actions are stored in personActions.js file.

We also have globalActions.js to take care of toggling the theme from light to dark mode.

Let’s fetch all movies in moviesActions.js.

import sanityAPI from "../../sanitySetup";
import {
  MOVIES_FETCH_FAIL,
  MOVIES_FETCH_REQUEST,
  MOVIES_FETCH_SUCCESS  
} from "../constants/movieConstants";

const fetchAllMovies = () => async (dispatch) => {
  try {
    dispatch({
      type: MOVIES_FETCH_REQUEST
    });
    const data = await sanityAPI.fetch(
      `*[_type == 'movie']{                                            
          _id,
          "poster": poster.asset->url,
      } `
    );
    dispatch({
      type: MOVIES_FETCH_SUCCESS,
      payload: data
    });
  } catch (error) {
    dispatch({
      type: MOVIES_FETCH_FAIL,
      payload: error.message
    });
  }
};

Remember when we created the sanitySetup.js file to connect React to our Sanity backend? Here, we imported the setup to enable us to query our sanity backend using GROQ. We also imported a few constants exported from the movieConstants.js file in the constants folder.

Next, we created the fetchAllMovies action function for fetching every movie in our collection. Most traditional React applications use axios or fetch to fetch data from the backend. But while we could use any of these here, we’re using Sanity’s GROQ. To enter the GROQ mode, we need to call sanityAPI.fetch() function as shown in the code above. Here, sanityAPI is the React-Sanity connection we set up earlier. This returns a Promise and so it has to be called asynchronously. We’ve used the async-await syntax here, but we can also use the .then syntax.

Since we are using thunk in our application, we can return a function instead of an action object. However, we chose to pass the return statement in one line.

const fetchAllMovies = () => async (dispatch) => {
  ...
}

Note that we can also write the function this way:

const fetchAllMovies = () => {
  return async (dispatch)=>{
    ...
  }
}

In general, to fetch all movies, we first dispatched an action type that tracks when the request is still loading. We then used Sanity’s GROQ syntax to asynchronously query the movie document. We retrieved the _id and the poster url of the movie data. We then returned a payload containing the data gotten from the API.

Similarly, we can retrieve movies by their _id, sort movies, and get the most popular movies.

We can also fetch movies that match a particular person’s reference. We did this in the fetchMoviesByRef function.

const fetchMoviesByRef = (ref) => async (dispatch) => {
  try {
    dispatch({
      type: MOVIES_REF_FETCH_REQUEST
    });
    const data = await sanityAPI.fetch(
      `*[_type == 'movie' 
            && (castMembers[person._ref match '${ref}'] || 
                crewMembers[person._ref match '${ref}'])            
            ]{                                             
                _id,                              
                "poster" : poster.asset->url,
                title
            } `
    );
    dispatch({
      type: MOVIES_REF_FETCH_SUCCESS,
      payload: data
    });
  } catch (error) {
    dispatch({
      type: MOVIES_REF_FETCH_FAIL,
      payload: error.message
    });
  }
};

This function takes an argument and checks if person._ref in either the castMembers or crewMembers matches the passed argument. We return the movie _id, poster url, and title alongside. We also dispatch an action of type MOVIES_REF_FETCH_SUCCESS, attaching a payload of the returned data, and if an error occurs, we dispatch an action of type MOVIE_REF_FETCH_FAIL, attaching a payload of the error message, thanks to the try-catch wrapper.

In the fetchMovieById function, we used GROQ to retrieve a movie that matches a particular id passed to the function.

The GROQ syntax for the function is shown below.

const data = await sanityAPI.fetch(
      `*[_type == 'movie' && _id == '${id}']{                                               
                _id,
                "cast" :
                    castMembers[]{
                        "ref": person._ref,
                        characterName, 
                        "name": person->name,
                        "image": person->image.asset->url
                    }
                ,
                "crew" :
                    crewMembers[]{
                        "ref": person._ref,
                        department, 
                        job,
                        "name": person->name,
                        "image": person->image.asset->url
                    }
                ,                
                "overview":   {                    
                    "text": overview[0].children[0].text
                  },
                popularity,
                "poster" : poster.asset->url,
                releaseDate,                                
                title
            }[0]`
    );

Like the fetchAllMovies action, we started by selecting all documents of type movie but we went further to select only those with an id supplied to the function. Since we intend to display a lot of details for the movie, we specified a bunch of attributes to retrieve.

We retrieved the movie id and also a few attributes in the castMembers array namely ref, characterName, the person’s name, and the person’s image. We also changed the alias from castMembers to cast.

Like the castMembers, we selected a few attributes from the crewMembers array, namely ref, department, job, the person’s name and the person’s image. we also changed the alias from crewMembers to crew.

In the same way, we selected the overview text, popularity, movie's poster url, movie's release date and title.

Sanity's GROQ language also allows us to sort a document. To sort an item, we pass order next to a pipe operator.

For instance, if we wish to sort movies by their releaseDate in ascending order, we could do the following.

const data = await sanityAPI.fetch(
      `*[_type == 'movie']{                                            
          ...
      } | order(releaseDate, asc)`
    );

We used this notion in the sortMoviesBy function to sort either by ascending or descending order.

Let’s take a look at this function below.

const sortMoviesBy = (item, type) => async (dispatch) => {
  try {
    dispatch({
      type: MOVIES_SORT_REQUEST
    });
    const data = await sanityAPI.fetch(
      `*[_type == 'movie']{                                
                _id,                                               
                "poster" : poster.asset->url,    
                title
                } | order( ${item} ${type})`
    );
    dispatch({
      type: MOVIES_SORT_SUCCESS,
      payload: data
    });
  } catch (error) {
    dispatch({
      type: MOVIES_SORT_FAIL,
      payload: error.message
    });
  }
};

We began by dispatching an action of type MOVIES_SORT_REQUEST to determine when the request is loading. We then used the GROQ syntax to sort and fetch data from the movie collection. The item to sort by is supplied in the variable item and the mode of sorting (ascending or descending) is supplied in the variable type. Consequently, we returned the id, poster url, and title. Once the data is returned, we dispatched an action of type MOVIES_SORT_SUCCESS and if it fails, we dispatch an action of type MOVIES_SORT_FAIL.

A similar GROQ concept applies to the getMostPopular function. The GROQ syntax is shown below.

const data = await sanityAPI.fetch(
      `
            *[_type == 'movie']{ 
                _id,                              
                "overview":   {                    
                    "text": overview[0].children[0].text
                },                
                "poster" : poster.asset->url,    
                title 
            }| order(popularity desc) [0..2]`
    );

The only difference here is that we sorted the movies by popularity in descending order and then selected only the first three. The items are returned in a zero-based index and so the first three items are items 0, 1 and 2. If we wish to retrieve the first ten items, we could pass [0..9] to the function.

Here’s the complete code for the movie actions in the movieActions.js file.

import sanityAPI from "../../sanitySetup";
import {
  MOVIE_FETCH_FAIL,
  MOVIE_FETCH_REQUEST,
  MOVIE_FETCH_SUCCESS,
  MOVIES_FETCH_FAIL,
  MOVIES_FETCH_REQUEST,
  MOVIES_FETCH_SUCCESS,
  MOVIES_SORT_REQUEST,
  MOVIES_SORT_SUCCESS,
  MOVIES_SORT_FAIL,
  MOVIES_MOST_POPULAR_REQUEST,
  MOVIES_MOST_POPULAR_SUCCESS,
  MOVIES_MOST_POPULAR_FAIL,
  MOVIES_REF_FETCH_SUCCESS,
  MOVIES_REF_FETCH_FAIL,
  MOVIES_REF_FETCH_REQUEST
} from "../constants/movieConstants";

const fetchAllMovies = () => async (dispatch) => {
  try {
    dispatch({
      type: MOVIES_FETCH_REQUEST
    });
    const data = await sanityAPI.fetch(
      `*[_type == 'movie']{                                             
          _id,
          "poster" : poster.asset->url,
      } `
    );
    dispatch({
      type: MOVIES_FETCH_SUCCESS,
      payload: data
    });
  } catch (error) {
    dispatch({
      type: MOVIES_FETCH_FAIL,
      payload: error.message
    });
  }
};

const fetchMoviesByRef = (ref) => async (dispatch) => {
  try {
    dispatch({
      type: MOVIES_REF_FETCH_REQUEST
    });
    const data = await sanityAPI.fetch(
      `*[_type == 'movie' 
            && (castMembers[person._ref match '${ref}'] || 
                crewMembers[person._ref match '${ref}'])            
            ]{                                             
                _id,                              
                "poster" : poster.asset->url,
                title
          }`
    );
    dispatch({
      type: MOVIES_REF_FETCH_SUCCESS,
      payload: data
    });
  } catch (error) {
    dispatch({
      type: MOVIES_REF_FETCH_FAIL,
      payload: error.message
    });
  }
};

const fetchMovieById = (id) => async (dispatch) => {
  try {
    dispatch({
      type: MOVIE_FETCH_REQUEST
    });
    const data = await sanityAPI.fetch(
      `*[_type == 'movie' && _id == '${id}']{      
                _id,
                "cast" :
                    castMembers[]{
                        "ref": person._ref,
                        characterName, 
                        "name": person->name,
                        "image": person->image.asset->url
                    }
                ,
                "crew" :
                    crewMembers[]{
                        "ref": person._ref,
                        department, 
                        job,
                        "name": person->name,
                        "image": person->image.asset->url
                    }
                ,                
                "overview":   {                    
                    "text": overview[0].children[0].text
                  },
                popularity,
                "poster" : poster.asset->url,
                releaseDate,                                
                title
            }[0]`
    );
    dispatch({
      type: MOVIE_FETCH_SUCCESS,
      payload: data
    });
  } catch (error) {
    dispatch({
      type: MOVIE_FETCH_FAIL,
      payload: error.message
    });
  }
};

const sortMoviesBy = (item, type) => async (dispatch) => {
  try {
    dispatch({
      type: MOVIES_MOST_POPULAR_REQUEST
    });
    const data = await sanityAPI.fetch(
      `*[_type == 'movie']{                                
                _id,                                               
                "poster" : poster.asset->url,    
                title
                } | order( ${item} ${type})`
    );
    dispatch({
      type: MOVIES_SORT_SUCCESS,
      payload: data
    });
  } catch (error) {
    dispatch({
      type: MOVIES_SORT_FAIL,
      payload: error.message
    });
  }
};

const getMostPopular = () => async (dispatch) => {
  try {
    dispatch({
      type: MOVIES_SORT_REQUEST
    });
    const data = await sanityAPI.fetch(      `
            *[_type == 'movie']{ 
                _id,                              
                "overview":   {                    
                    "text": overview[0].children[0].text
                },                
                "poster" : poster.asset->url,    
                title 
            }| order(popularity desc) [0..2]`
    );
    dispatch({
      type: MOVIES_MOST_POPULAR_SUCCESS,
      payload: data
    });
  } catch (error) {
    dispatch({
      type: MOVIES_MOST_POPULAR_FAIL,
      payload: error.message
    });
  }
};
export {
  fetchAllMovies,
  fetchMovieById,
  sortMoviesBy,
  getMostPopular,
  fetchMoviesByRef
};

Setting Up The Reducers

Reducers are one of the most important concepts in Redux. They take the previous state and determine the state changes.

Typically, we’ll be using the switch statement to execute a condition for each action type. For instance, we can return loading when the action type denotes loading, and then the payload when it denotes success or error. It is expected to take in the initial state and the action as arguments.

Our movieReducers.js file contains various reducers to match the actions defined in the movieActions.js file. However, each of the reducers has a similar syntax and structure. The only differences are the constants they call and the values they return.

Let’s start by taking a look at the fetchAllMoviesReducer in the movieReducers.js file.

import {
  MOVIES_FETCH_FAIL,
  MOVIES_FETCH_REQUEST,
  MOVIES_FETCH_SUCCESS,  
} from "../constants/movieConstants";

const fetchAllMoviesReducer = (state = {}, action) => {
  switch (action.type) {
    case MOVIES_FETCH_REQUEST:
      return {
        loading: true
      };
    case MOVIES_FETCH_SUCCESS:
      return {
        loading: false,
        movies: action.payload
      };
    case MOVIES_FETCH_FAIL:
      return {
        loading: false,
        error: action.payload
      };
    case MOVIES_FETCH_RESET:
      return {};
    default:
      return state;
  }
};

Like all reducers, the fetchAllMoviesReducer takes the initial state object (state) and the action object as arguments. We used the switch statement to check the action types at each point in time. If it corresponds to MOVIES_FETCH_REQUEST, we return loading as true to enable us to show a loading indicator to the user.

If it corresponds to MOVIES_FETCH_SUCCESS, we turn off the loading indicator and then return the action payload in a variable movies. But if it is MOVIES_FETCH_FAIL, we also turn off the loading and then return the error. We also want the option to reset our movies. This will enable us to clear the states when we need to do so.

We have the same structure for other reducers. The complete movieReducers.js is shown below.

import {
  MOVIE_FETCH_FAIL,
  MOVIE_FETCH_REQUEST,
  MOVIE_FETCH_SUCCESS,
  MOVIES_FETCH_FAIL,
  MOVIES_FETCH_REQUEST,
  MOVIES_FETCH_SUCCESS,
  MOVIES_SORT_REQUEST,
  MOVIES_SORT_SUCCESS,
  MOVIES_SORT_FAIL,
  MOVIES_MOST_POPULAR_REQUEST,
  MOVIES_MOST_POPULAR_SUCCESS,
  MOVIES_MOST_POPULAR_FAIL,
  MOVIES_FETCH_RESET,
  MOVIES_REF_FETCH_REQUEST,
  MOVIES_REF_FETCH_SUCCESS,
  MOVIES_REF_FETCH_FAIL
} from "../constants/movieConstants";

const fetchAllMoviesReducer = (state = {}, action) => {
  switch (action.type) {
    case MOVIES_FETCH_REQUEST:
      return {
        loading: true
      };
    case MOVIES_FETCH_SUCCESS:
      return {
        loading: false,
        movies: action.payload
      };
    case MOVIES_FETCH_FAIL:
      return {
        loading: false,
        error: action.payload
      };
    case MOVIES_FETCH_RESET:
      return {};
    default:
      return state;
  }
};
const fetchMoviesByRefReducer = (state = {}, action) => {
  switch (action.type) {
    case MOVIES_REF_FETCH_REQUEST:
      return {
        loading: true
      };
    case MOVIES_REF_FETCH_SUCCESS:
      return {
        loading: false,
        movies: action.payload
      };
    case MOVIES_REF_FETCH_FAIL:
      return {
        loading: false,
        error: action.payload
      };
    default:
      return state;
  }
};
const fetchMovieByIdReducer = (state = {}, action) => {
  switch (action.type) {
    case MOVIE_FETCH_REQUEST:
      return {
        loading: true
      };
    case MOVIE_FETCH_SUCCESS:
      return {
        loading: false,
        movie: action.payload
      };
    case MOVIE_FETCH_FAIL:
      return {
        loading: false,
        error: action.payload
      };
    default:
      return state;
  }
};
const sortMoviesByReducer = (state = {}, action) => {
  switch (action.type) {
    case MOVIES_SORT_REQUEST:
      return {
        loading: true
      };
    case MOVIES_SORT_SUCCESS:
      return {
        loading: false,
        movies: action.payload
      };
    case MOVIES_SORT_FAIL:
      return {
        loading: false,
        error: action.payload
      };
    default:
      return state;
  }
};
const getMostPopularReducer = (state = {}, action) => {
  switch (action.type) {
    case MOVIES_MOST_POPULAR_REQUEST:
      return {
        loading: true
      };
    case MOVIES_MOST_POPULAR_SUCCESS:
      return {
        loading: false,
        movies: action.payload
      };
    case MOVIES_MOST_POPULAR_FAIL:
      return {
        loading: false,
        error: action.payload
      };
    default:
      return state;
  }
};
export {
  fetchAllMoviesReducer,
  fetchMovieByIdReducer,
  sortMoviesByReducer,
  getMostPopularReducer,
  fetchMoviesByRefReducer
};

We also followed the exact same structure for personReducers.js. For instance, the fetchAllPersonsReducer function defines the states for fetching all persons in the database.

This is given in the code below.

import {
  PERSONS_FETCH_FAIL,
  PERSONS_FETCH_REQUEST,
  PERSONS_FETCH_SUCCESS,
} from "../constants/personConstants";

const fetchAllPersonsReducer = (state = {}, action) => {
  switch (action.type) {
    case PERSONS_FETCH_REQUEST:
      return {
        loading: true
      };
    case PERSONS_FETCH_SUCCESS:
      return {
        loading: false,
        persons: action.payload
      };
    case PERSONS_FETCH_FAIL:
      return {
        loading: false,
        error: action.payload
      };
    default:
      return state;
  }
};

Just like the fetchAllMoviesReducer, we defined fetchAllPersonsReducer with state and action as arguments. These are standard setup for Redux reducers. We then used the switch statement to check the action types and if it’s of type PERSONS_FETCH_REQUEST, we return loading as true. If it’s PERSONS_FETCH_SUCCESS, we switch off loading and return the payload, and if it’s PERSONS_FETCH_FAIL, we return the error.

Combining Reducers

Redux's combineReducers function allows us to combine more than one reducer and pass it to the store. We'll combine our movies and persons reducers in an index.js file within the reducers folder.

Let’s take a look at it.

import { combineReducers } from "redux";
import {
  fetchAllMoviesReducer,
  fetchMovieByIdReducer,
  sortMoviesByReducer,
  getMostPopularReducer,
  fetchMoviesByRefReducer
} from "./movieReducers";

import {
  fetchAllPersonsReducer,
  fetchPersonByIdReducer,
  countPersonsReducer
} from "./personReducers";

import { toggleTheme } from "./globalReducers";

export default combineReducers({
  fetchAllMoviesReducer,
  fetchMovieByIdReducer,
  fetchAllPersonsReducer,
  fetchPersonByIdReducer,
  sortMoviesByReducer,
  getMostPopularReducer,
  countPersonsReducer,
  fetchMoviesByRefReducer,
  toggleTheme
});

Here we imported all the reducers from the movies, persons, and global reducers file and passed them to combineReducers function. The combineReducers function takes an object which allows us to pass all our reducers. We can even add an alias to the arguments in the process.

We’ll work on the globalReducers later.

We can now pass the reducers in the Redux store.js file. This is shown below.

import { createStore, applyMiddleware } from "redux";
import thunk from "redux-thunk";
import reducers from "./reducers/index";

export default createStore(reducers, initialState, applyMiddleware(thunk));

Having set up our Redux workflow, let’s set up our React application.

Setting Up Our React Application

Our react application will list movies and their corresponding cast and crewmembers. We will be using react-router-dom for routing and styled-components for styling the app. We’ll also use Material UI for icons and some UI components.

Enter the following bash command to install the dependencies.

npm install react-router-dom @material-ui/core @material-ui/icons query-string

Here’s what we’ll be building:

Connecting Redux To Our React App

React-redux ships with a Provider function that allows us to connect our application to the Redux store. To do this, we have to pass an instance of the store to the Provider. We can do this either in our index.js or App.js file.

Here’s our index.js file.

import React from "react";
import ReactDOM from "react-dom";
import "./index.css";
import App from "./App";
import { Provider } from "react-redux";
import store from "./redux/store";
ReactDOM.render(
  <Provider store={store}>
    <App />
  </Provider>,
  document.getElementById("root")
);

Here, we imported Provider from react-redux and store from our Redux store. Then we wrapped our entire components tree with the Provider, passing the store to it.

Next, we need react-router-dom for routing in our React application. react-router-dom comes with BrowserRouter, Switch and Route that can be used to define our path and routes.

We do this in our App.js file. This is shown below.

import React from "react";
import Header from "./components/Header";
import Footer from "./components/Footer";
import { BrowserRouter as Router, Switch, Route } from "react-router-dom";
import MoviesList from "./pages/MoviesListPage";
import PersonsList from "./pages/PersonsListPage";

function App() {

  return (
      <Router>
        <main className="contentwrap">
          <Header />
          <Switch>
            <Route path="/persons/">
              <PersonsList />
            </Route>
            <Route path="/" exact>
              <MoviesList />
            </Route>
          </Switch>
        </main>
        <Footer />
      </Router>
  );
}
export default App;

This is a standard setup for routing with react-router-dom. You can check it out in their documentation. We imported our components Header, Footer, PersonsList and MovieList. We then set up the react-router-dom by wrapping everything in Router and Switch.

Since we want our pages to share the same header and footer, we had to pass the <Header /> and <Footer /> component before wrapping the structure with Switch. We also did a similar thing with the main element since we want it to wrap the entire application.

We passed each component to the route using Route from react-router-dom.

Defining Our Pages And Components

Our application is organized in a structured way. Reusable components are stored in the components folder while Pages are stored in the pages folder.

Our pages comprise movieListPage.js, moviePage.js, PersonListPage.js and PersonPage.js. The MovieListPage.js lists all the movies in our Sanity.io backend as well as the most popular movies.

To list all the movies, we simply dispatch the fetchAllMovies action defined in our movieAction.js file. Since we need to fetch the list as soon as the page loads, we have to define it in the useEffect. This is shown below.

import React, { useEffect } from "react";
import { fetchAllMovies } from "../redux/actions/movieActions";
import { useDispatch, useSelector } from "react-redux";

const MoviesListPage = () => {
  const dispatch = useDispatch();
  useEffect(() => {    
      dispatch(fetchAllMovies());
  }, [dispatch]);

  const { loading, error, movies } = useSelector(
    (state) => state.fetchAllMoviesReducer
  );

  return (
    ...
  )
};
export default MoviesListPage;

Thanks to the useDispatch and useSelector Hooks, we can dispatch Redux actions and select the appropriate states from the Redux store. Notice that the states loading, error and movies were defined in our Reducer functions and here selected them using the useSelector Hook from React Redux. These states namely loading, error and movies become available immediately we dispatched the fetchAllMovies() actions.

Once we get the list of movies, we can display it in our application using the map function or however we wish.

Here is the complete code for the moviesListPage.js file.

import React, {useState, useEffect} from 'react'
import {fetchAllMovies, getMostPopular, sortMoviesBy} from "../redux/actions/movieActions"
import {useDispatch, useSelector} from "react-redux"
import Loader from "../components/BackdropLoader"
import {MovieListContainer} from "../styles/MovieStyles.js"
import SortIcon from '@material-ui/icons/Sort';
import SortModal from "../components/Modal"
import {useLocation, Link} from "react-router-dom"
import queryString from "query-string"
import {MOVIES_FETCH_RESET} from "../redux/constants/movieConstants"

const MoviesListPage = () => {
    const location = useLocation()
    const dispatch = useDispatch()
const [openSort, setOpenSort] = useState(false)
useEffect(()=>{ dispatch(getMostPopular()) const {order, type} = queryString.parse(location.search) if(order && type){
dispatch({ type: MOVIES_FETCH_RESET }) dispatch(sortMoviesBy(order, type)) }else{
dispatch(fetchAllMovies())
} }, [dispatch, location.search]) const {loading: popularLoading, error: popularError, movies: popularMovies } = useSelector(state => state.getMostPopularReducer) const { loading: moviesLoading, error: moviesError, movies } = useSelector(state => state.fetchAllMoviesReducer) const { loading: sortLoading, error: sortError, movies: sortMovies } = useSelector(state => state.sortMoviesByReducer) return ( <MovieListContainer> <div className="mostpopular">
{ popularLoading ? <Loader />
: popularError ? popularError :
popularMovies && popularMovies.map(movie => ( <Link to={/movie?id=${movie.&#95;id}} className="popular" key={movie._id} style={{backgroundImage: url(${movie.poster})}}>
<div className="content"> <h2>{movie.title}</h2> <p>{movie.overview.text.substring(0, 50)}…</p> </div>
</Link> )) } </div>
<div className="moviespanel"> <div className="top"> <h2>All Movies</h2> <SortIcon onClick={()=> setOpenSort(true)} /> </div> <div className="movieslist"> { moviesLoading ? <Loader /> : moviesError ? moviesError : movies && movies.map(movie =>( <Link to={/movie?id=${movie.&#95;id}} key={movie._id}> <img className="movie" src={movie.poster} alt={movie.title} /> </Link> )) } { ( sortLoading ? !movies && <Loader /> : sortError ? sortError : sortMovies && sortMovies.map(movie =>( <Link to={/movie?id=${movie.&#95;id}} key={movie._id}> <img className="movie" src={movie.poster} alt={movie.title} /> </Link> )) ) } </div> </div>
<SortModal open={openSort} setOpen={setOpenSort} />
</MovieListContainer> ) } export default MoviesListPage

We started by dispatching the getMostPopular movies action (this action selects the movies with the highest popularity) in the useEffect Hook. This allows us to retrieve the most popular movies as soon as the page loads. Additionally, we allowed users to sort movies by their releaseDate and popularity. This is handled by the sortMoviesBy action dispatched in the code above. Furthermore, we dispatched the fetchAllMovies depending on the query parameters.

Also, we used the useSelector Hook to select the corresponding reducers for each of these actions. We selected the states for loading, error and movies for each of the reducers.

After getting the movies from the reducers, we can now display them to the user. Here, we have used the ES6 map function to do this. We first displayed a loader whenever each of the movie states is loading and if there’s an error, we display the error message. Finally, if we get a movie, we display the movie image to the user using the map function. We wrapped the entire component in a MovieListContainer component.

The <MovieListContainer> … </MovieListContainer> tag is a div defined using styled components. We’ll take a brief look at that soon.

Styling Our App With Styled Components

Styled components allow us to style our pages and components on an individual basis. It also offers some interesting features such as inheritance, Theming, passing of props, etc.

Although we always want to style our pages on an individual basis, sometimes global styling may be desirable. Interestingly, styled-components provide a way to do that, thanks to the createGlobalStyle function.

To use styled-components in our application, we need to install it. Open your terminal in your react project and enter the following bash command.

npm install styled-components

Having installed styled-components, Let’s get started with our global styles.

Let’s create a separate folder in our src directory named styles. This will store all our styles. Let’s also create a globalStyles.js file within the styles folder. To create global style in styled-components, we need to import createGlobalStyle.

import { createGlobalStyle } from "styled-components";

We can then define our styles as follows:

export const GlobalStyle = createGlobalStyle`
  ...
`

Styled components make use of the template literal to define props. Within this literal, we can write our traditional CSS codes.

We also imported deviceWidth defined in a file named definition.js. The deviceWidth holds the definition of breakpoints for setting our media queries.

import { deviceWidth } from "./definition";

We set overflow to hidden to control the flow of our application.

html, body{
        overflow-x: hidden;
}

We also defined the header style using the .header style selector.

.header{
  z-index: 5;
  background-color: ${(props)=>props.theme.midDarkBlue}; 
  display:flex;
  align-items:center;
  padding: 0 20px;
  height:50px;
  justify-content:space-between;
  position:fixed;
  top:0;
  width:100%;
  @media ${deviceWidth.laptop_lg}
  {
    width:97%;
  }
  ...
}

Here, various styles such as the background color, z-index, padding, and lots of other traditional CSS properties are defined.

We’ve used the styled-components props to set the background color. This allows us to set dynamic variables that can be passed from our component. Moreover, we also passed the theme’s variable to enable us to make the most of our theme toggling.

Theming is possible here because we have wrapped our entire application with the ThemeProvider from styled-components. We’ll talk about this in a moment. Furthermore, we used the CSS flexbox to properly style our header and set the position to fixed to make sure it remains fixed with respect to the browser. We also defined the breakpoints to make the headers mobile friendly.

Here is the complete code for our globalStyles.js file.

import { createGlobalStyle } from "styled-components";
import { deviceWidth } from "./definition";

export const GlobalStyle = createGlobalStyle`
    html{
        overflow-x: hidden;
    }
    body{
        background-color: ${(props) => props.theme.lighter};
overflow-x: hidden;
min-height: 100vh;
display: grid; grid-template-rows: auto 1fr auto; } #root{
display: grid; flex-direction: column;
}
h1,h2,h3, label{ font-family: 'Aclonica', sans-serif;
} h1, h2, h3, p, span:not(.MuiIconButton-label), div:not(.PrivateRadioButtonIcon-root-8), div:not(.tryingthis){ color: ${(props) => props.theme.bodyText} } p, span, div, input{ font-family: 'Jost', sans-serif;
} .paginate button{ color: ${(props) => props.theme.bodyText} } .header{ z-index: 5;
background-color: ${(props) => props.theme.midDarkBlue};
display: flex; align-items: center;
padding: 0 20px;
height: 50px; justify-content: space-between; position: fixed; top: 0; width: 100%; @media ${deviceWidth.laptop_lg}{ width: 97%;
}
@media ${deviceWidth.tablet}{ width: 100%; justify-content: space-around; } a{ text-decoration: none; } label{ cursor: pointer; color: ${(props) => props.theme.goldish}; font-size: 1.5rem; }
.hamburger{ cursor: pointer;
color: ${(props) => props.theme.white}; @media ${deviceWidth.desktop}{ display: none; } @media ${deviceWidth.tablet}{ display: block;
} }
}
.mobileHeader{ z-index: 5;
background-color: ${(props) => props.theme.darkBlue};
color: ${(props) => props.theme.white}; display: grid; place-items: center;
width: 100%;
@media ${deviceWidth.tablet}{ width: 100%;
}
height: calc(100% - 50px);
transition: all 0.5s ease-in-out; position: fixed;
right: 0; top: 50px; .menuitems{ display: flex; box-shadow: 0 0 5px ${(props) => props.theme.lightshadowtheme};
flex-direction: column; align-items: center; justify-content: space-around;
height: 60%;
width: 40%; a{ display: flex; flex-direction: column; align-items:center; cursor: pointer; color: ${(props) => props.theme.white}; text-decoration: none;
&:hover{ border-bottom: 2px solid ${(props) => props.theme.goldish}; .MuiSvgIcon-root{ color: ${(props) => props.theme.lightred} } } } } } footer{
min-height: 30px;
margin-top: auto; display: flex; flex-direction: column; align-items: center; justify-content: center;
font-size: 0.875rem;
background-color: ${(props) => props.theme.midDarkBlue};
color: ${(props) => props.theme.white};
}
`;

Notice that we wrote pure CSS code within the literal but there are a few exceptions. Styled-components allows us to pass props. You can learn more about this in the documentation.

Apart from defining global styles, we can define styles for individual pages.

For instance, here is the style for the PersonListPage.js defined in PersonStyle.js in the styles folder.

import styled from "styled-components";
import { deviceWidth, colors } from "./definition";

export const PersonsListContainer = styled.div`
  margin: 50px 80px;
  @media ${deviceWidth.tablet} {
    margin: 50px 10px;
  }
  a {
    text-decoration: none;
  }
  .top {
    display: flex;
    justify-content: flex-end;
    padding: 5px;
    .MuiSvgIcon-root {
      cursor: pointer;
      &:hover {
        color: ${colors.darkred};
      }
    }
  }
  .personslist {
    margin-top: 20px;
    display: grid;
    place-items: center;
    grid-template-columns: repeat(5, 1fr);
    @media ${deviceWidth.laptop} {
      grid-template-columns: repeat(4, 1fr);
    }
    @media ${deviceWidth.tablet} {
      grid-template-columns: repeat(3, 1fr);
    }
    @media ${deviceWidth.tablet_md} {
      grid-template-columns: repeat(2, 1fr);
    }
    @media ${deviceWidth.mobile_lg} {
      grid-template-columns: repeat(1, 1fr);
    }
    grid-gap: 30px;
    .person {
      width: 200px;
      position: relative;
      img {
        width: 100%;
      }
      .content {
        position: absolute;
        bottom: 0;
        left: 8px;
        border-right: 2px solid ${colors.goldish};
        border-left: 2px solid ${colors.goldish};
        border-radius: 10px;
        width: 80%;
        margin: 20px auto;
        padding: 8px 10px;
        background-color: ${colors.transparentWhite};
        color: ${colors.darkBlue};
        h2 {
          font-size: 1.2rem;
        }
      }
    }
  }
`;

We first imported styled from styled-components and deviceWidth from the definition file. We then defined PersonsListContainer as a div to hold our styles. Using media queries and the established breakpoints, we made the page mobile-friendly by setting various breakpoints.

Here, we have used only the standard browser breakpoints for small, large and very large screens. We also made the most of the CSS flexbox and grid to properly style and display our content on the page.

To use this style in our PersonListPage.js file, we simply imported it and added it to our page as follows.

import React from "react";

const PersonsListPage = () => {
  return (
    <PersonsListContainer>
      ...
    </PersonsListContainer>
  );
};
export default PersonsListPage;

The wrapper will output a div because we defined it as a div in our styles.

Adding Themes And Wrapping It Up

It’s always a cool feature to add themes to our application. For this, we need the following:

  • Our custom themes defined in a separate file (in our case definition.js file).
  • The logic defined in our Redux actions and reducers.
  • Calling our theme in our application and passing it through the component tree.

Let’s check this out.

Here is our theme object in the definition.js file.

export const theme = {
  light: {
    dark: "#0B0C10",
    darkBlue: "#253858",
    midDarkBlue: "#42526e",
    lightBlue: "#0065ff",
    normal: "#dcdcdd",
    lighter: "#F4F5F7",
    white: "#FFFFFF",
    darkred: "#E85A4F",
    lightred: "#E98074",
    goldish: "#FFC400",
    bodyText: "#0B0C10",
    lightshadowtheme: "rgba(0, 0, 0, 0.1)"
  },
  dark: {
    dark: "white",
    darkBlue: "#06090F",
    midDarkBlue: "#161B22",
    normal: "#dcdcdd",
    lighter: "#06090F",
    white: "white",
    darkred: "#E85A4F",
    lightred: "#E98074",
    goldish: "#FFC400",
    bodyText: "white",
    lightshadowtheme: "rgba(255, 255, 255, 0.9)"
  }
};

We have added various color properties for the light and dark themes. The colors are carefully chosen to enable visibility both in light and dark mode. You can define your themes as you want. This is not a hard and fast rule.

Next, let's add the functionality to Redux.

We have created globalActions.js in our Redux actions folder and added the following codes.

import { SET_DARK_THEME, SET_LIGHT_THEME } from "../constants/globalConstants";
import { theme } from "../../styles/definition";

export const switchToLightTheme = () => (dispatch) => {
  dispatch({
    type: SET_LIGHT_THEME,
    payload: theme.light
  });
  localStorage.setItem("theme", JSON.stringify(theme.light));
  localStorage.setItem("light", JSON.stringify(true));
};

export const switchToDarkTheme = () => (dispatch) => {
  dispatch({
    type: SET_DARK_THEME,
    payload: theme.dark
  });
  localStorage.setItem("theme", JSON.stringify(theme.dark));
  localStorage.setItem("light", JSON.stringify(false));
};

Here, we simply imported our defined themes. Dispatched the corresponding actions, passing the payload of the themes we needed. The payload results are stored in the local storage using the same keys for both light and dark themes. This enables us to persist the states in the browser.

We also need to define our reducer for the themes.

import { SET_DARK_THEME, SET_LIGHT_THEME } from "../constants/globalConstants";

export const toggleTheme = (state = {}, action) => {
  switch (action.type) {
    case SET_LIGHT_THEME:
      return {
        theme: action.payload,
        light: true
      };
    case SET_DARK_THEME:
      return {
        theme: action.payload,
        light: false
      };
    default:
      return state;
  }
};

This is very similar to what we’ve been doing. We used the switch statement to check the type of action and then returned the appropriate payload. We also returned a state light that determines whether light or dark theme is selected by the user. We’ll use this in our components.

We also need to add it to our root reducer and store. Here is the complete code for our store.js.

import { createStore, applyMiddleware } from "redux";
import thunk from "redux-thunk";
import { theme as initialTheme } from "../styles/definition";
import reducers from "./reducers/index";

const theme = localStorage.getItem("theme")
  ? JSON.parse(localStorage.getItem("theme"))
  : initialTheme.light;

const light = localStorage.getItem("light")
  ? JSON.parse(localStorage.getItem("light"))
  : true;

const initialState = {
  toggleTheme: { light, theme }
};
export default createStore(reducers, initialState, applyMiddleware(thunk));

Since we needed to persist the theme when the user refreshes, we had to get it from the local storage using localStorage.getItem() and pass it to our initial state.

Adding The Functionality To Our React Application

Styled components provide us with ThemeProvider that allows us to pass themes through our application. We can modify our App.js file to add this functionality.

Let's take a look at it.

import React from "react";
import { BrowserRouter as Router, Switch, Route } from "react-router-dom";
import { useSelector } from "react-redux";
import { ThemeProvider } from "styled-components";

function App() {
  const { theme } = useSelector((state) => state.toggleTheme);
  let Theme = theme ? theme : {};
  return (
    <ThemeProvider theme={Theme}>
      <Router>
        ...
      </Router>
    </ThemeProvider>
  );
}
export default App;

By passing themes through the ThemeProvider, we can easily use the theme props in our styles.

For instance, we can set the color to our bodyText custom color as follows.

color: ${(props) => props.theme.bodyText};

We can use the custom themes anywhere we need color in our application.

For example, to define border-bottom, we do the following.

border-bottom: 2px solid ${(props) => props.theme.goldish};

Conclusion

We began by delving into Sanity.io, setting it up and connecting it to our React application. Then we set up Redux and used the GROQ language to query our API. We saw how to connect and use Redux to our React app using react-redux, use styled-components and theming.

However, we only scratched the surface on what is possible with these technologies. I encourage you to go through the code samples in my GitHub repo and try your hands on a completely different project using these technologies to learn and master them.

Resources

Displaying HTML elements?

Hello,

Hope all doing well,

I'm very new to this coding and this place. Was preparing for the questions from this source . Just had a query is there are any other ways you can display HTML elements? Q No - 23

TIA!!

How to Allow Users to Upload Images on a WordPress Site

Do you want users to be able to upload images on your WordPress site?

If you want to accept guest post submissions, product reviews, or run a photo contest, then you will need to allow users to upload images. However, you may not want to give them access to your WordPress admin area.

In this article, we’ll show you how to safely allow users to upload images on a WordPress site without giving them access to WordPress admin.

How to allow users to upload images on a WordPress site

Allowing Users to Safely Upload Images in WordPress

If you want to run a multi-author blog, then the easiest way to allow users to upload images is by adding them as an author on your website.

However giving users access to the WordPress admin area isn’t ideal for one-time scenarios such as guest post submission, product reviews, photo contests, etc.

Luckily there are several WordPress plugins that let users upload images, without compromising your website security or giving them access to the WordPress admin area.

Having said that, let’s take a look at some ways to easily allow users to upload images in WordPress.

Method 1. Let Users Upload Images Using a File Upload Form

This method comes in handy when you only need users to upload an image or another file such as resumes, cover letter, etc.

You can simply create a file upload form that collects the user’s name, email address, the photo / file itself, and any message they want to include.

First, you will need to install and activate the WPForms plugin. For more details, see our step by step guide on how to install a WordPress plugin.

WPForms is the best WordPress form builder plugin that’s used by over 4 million websites. It comes with a file upload field that we’ll be using in this tutorial.

Upon activation you need to visit the WPForms » Settings page in your WordPress dashboard to enter your license key. You can find your license key in your account area on the WPForms site, under the ‘Downloads’ tab.

This is how it will look when you enter it on your site:

Entering your license key for WPForms

Now, go to WPForms » Add New to create your form. We’re going to use the ‘Simple Contact Form’ for this example. Click on it, and your new form will appear.

The default simple contact form, showing fields for Name, Email, and Message

Next, drag and drop a ‘File Upload’ field onto your form. You can find this field under the ‘Fancy Fields’ section on the left.

Adding a File Upload field to the form

Once added, click on the File Upload field on your form to edit it.

We’ll change the name of this field (its label) to “Your Photograph” and specify which file extensions are allowed. We only want image files, so we’re going to allow JPG/JPEG, GIF, and PNG files.

Note: By default, WordPress only allows certain file types to be uploaded. For instance, users won’t be able to upload .svg images, or .zip files unless you explicitly add them to the allow list. We’re going to explain how to do that in a moment.

For now, let’s continue tweaking our field settings. We recommend specifying a maximum file size of 5 MB and check the box next to ‘Required’, so that the user can’t submit the form until they’ve uploaded an image.

The file size limit helps you save disk cost on your WordPress hosting account.

Editing the file upload field. Label now reads 'Your Photograph'.

You can also set further options for this field by clicking the downward arrow next to ‘Advanced Options’.

Here, you can choose the style of your upload field. It defaults to a ‘Modern’ drag and drop field. If you want, you can replace it with a ‘Classic’ field that looks like this instead:

Switching to the Classic upload field

You can also choose to store the image in the WordPress Media Library by checking that box. This is a good idea if you’re going to collate your submitted images for a blog post or similar.

Once you are satisfied with your form, you can save and exit the form builder.

Adding Your Image Upload Form in WordPress

Next, you would want to add your form to a WordPress post or page. WPForms makes it super easy to add your forms anywhere on your website.

Simply edit the post or page where you want to add the image upload form. In the WordPress content editor, you need to add the WPForms block to your content area.

Adding a WPForms block to your page

After that, you need to select the form you created earlier from the dropdown menu. WPForms will display a preview of your form inside the content area.

You can now save your post or page and view it live to see your image upload form in action.

Allowing Additional File Types to Be Uploaded

Sometimes, your users might see this error when trying to upload a file, even when you’ve allowed that file type in your upload field’s settings:

Sorry, this file type is not permitted for security reasons

The problem is that WordPress only allows certain file types by default. The easiest way to allow more file types is to use a companion plugin.

We recommend the File Upload Types plugin from WPForms.

Once you’ve installed the plugin in WordPress and activated it, go to Settings » File Upload Types.

You can then pick file types from the list that you want to allow, or you can add custom file types.

Whitelisting additional file types in WordPress
Note that the list doesn’t include the types that WordPress already allows by default.

Method 2. Allow Users to Upload Images as Guest Authors

A key reason to let users upload images is if you’re collecting guest post submissions. You could also use a very similar method for other user-generated content, like testimonials.

First, you will need to install and activate the WPForms plugin. For more details, see our step by step guide on how to install a WordPress plugin.

Note: You’ll need the ‘Pro’ version (or higher) in order to use the ‘Post Submissions’ addon.

After activating the plugin, you need to visit the WPForms » Settings page in your WordPress dashboard to enter your license key. You can find your license key under the ‘Downloads’ tab of your account on the WPForms site.

This is what you’ll see when you enter the license key on your site:

Entering your license key for WPForms

Next, go to WPForms » Addons to install the Post Submission Addon. Click the ‘Install Addon’ button. It will automatically install and activate

Installing the WPForms post submissions addon

Now, you can start building your guest post submission form.

Go to WPForms » Add New, then scroll down to find the Blog Post Submissions Form.

Creating a Blog Post Submission form

Click on it, and your new form will be created for you. This will have default fields for the guest author’s details as well as the post’s proposed title, content, featured image, post excerpt, and category.

You can add more fields (sections of your form) if you want. For instance, you might want to add a ‘Website / URL’ field where the author can enter their own blog’s URL.

Adding a website/URL field

To change the label on a field or any text on the form, just click on it.

For instance, you can click on the ‘Featured Image’ box and change the ‘Description’ to give your preferred size for featured images.

Editing the File Upload field in WPForms

Files uploaded through the preset ‘Featured Image’ field will be stored in your Media Library within WordPress.

You can toggle this option on and off by clicking on the ‘Advanced Options’ dropdown for the field.

Choose whether to store uploaded images in the Media Library

Tip: If you want to create a form from scratch, note that the ‘File Upload’ field does not store files in the Media Library by default. Make sure you switch this setting on if you want to use it.

If you want, you can change the image types that the ‘File Upload’ field will accept. For instance, you might want users to only upload PNG files.

You can also enter a maximum file size, in MB. If you want, you can allow users to upload 2 or more files.

Changing the file upload settings

The ‘Modern’ upload field (the default) allows users to drag and drop files. If you prefer, you can change it to a ‘Classic’ field under advanced options. Note that this only allows users to upload a single file.

Switching to the classic upload

Once you’ve got all the fields you want on your form, go to the ‘Settings’ tab. You may want to change details under ‘Notifications’ here.

For instance, if your guest posts go to an editor, you’ll want their address in the ‘Send to Email Address’ box.

Changing your form's settings

You might also want to change the confirmation message that a user sees after submitting the form. You can do this under Settings » Confirmation.

Once you’re happy with your form, click the ‘Save’ button at the top of the screen.

Adding the Guest Post Submission Form to Your Site

You can add your form to your site in any post or page. You might want to create a new page specifically for guest post submissions.

If you’re using the Gutenberg (block) editor, simply click the (+) icon to create a new block. Then, select ‘WPForms’ from the ‘Widgets’ section.

Adding a form to your page using the block editor (Gutenberg)

Next, you’ll see a WPForms dropdown. Select your form from the list and it’ll be added to your post.

Tip: If you’re still using the Classic editor, then you’ll see an ‘Add Form’ button next to ‘Add Media’ instead. Click this to get a dropdown list of your forms. Select the one you want, then click ‘Add Form’ to put it into your post.

You can use the ‘File Upload’ field in any form you create, of course. That means you can use the above method for any type of user-generated content you’d like to collect.

Method 3. Allow Users to Upload Photos for a Contest

While a file upload form allows users to upload any type of file, it may not be the best solution if you’re running a photo contest.

That’s because WPForms is a form builder, not a contest plugin. It doesn’t come with features like selecting winners, viral sharing, etc.

That’s where RafflePress comes in. It’s the best WordPress giveaway plugin that lets you create viral contests to grow your traffic and social media followers.

You can use it to design a contest widget that lets users upload photos, but also incentivize sharing and other engagement actions to grow your following.

Submit an image action

We have created a detailed guide on how to create a photo contest in WordPress with RafflePress that you can follow more details.

We hope this article has helped you learn how to allow users to upload images on a WordPress site. You may also want to see our comparison of the best email marketing services and best push notification software to connect with your visitors after they leave your website.

If you liked this article, then please subscribe to our YouTube Channel for WordPress video tutorials. You can also find us on Twitter and Facebook.

The post How to Allow Users to Upload Images on a WordPress Site appeared first on WPBeginner.