On Monday, GoDaddy officially launched the Hub by GoDaddy Pro, a dashboard that brings together all of its products, pro-specific tools, and solutions. The experience is geared toward website developers and designers, creating a central location to manage their client work.
GoDaddy Pro is not a new service by GoDaddy. The hosting company launched its initial beta in 2015. However, GoDaddy Pro is now offering a fresh experience powered by the Hub. According to Adam Warner, the Global Field Marketing Sr. Manager at GoDaddy, the Hub is being built in collaboration with real-world web designers and developers from their Customer Advisory Board.
The Hub is at hub.godaddy.com. Existing GoDaddy Pro users can opt-in to the new Hub experience. However, they may continue using the legacy experience at pro.godaddy.com. They can also jump between both as needed. Eventually, the Hub will completely replace the legacy experience.
The Hub home screen.
“You can manage all your client projects, sites, and GoDaddy products from within the Hub,” said Warner. “Your clients’ WordPress sites don’t have to be hosted at GoDaddy. The Hub works with all web hosts. You can run one-click WordPress updates, security checks, backups, and other bulk site maintenance work within the Hub. We’ve seen users save an average of three hours per month, per site.”
The Hub allows web developers to access their clients’ GoDaddy products without needing to pass around credentials. Developers can also send a pre-loaded shopping cart or purchase products on their clients’ behalf.
“This makes it easier, and faster, to get a new project up and running,” said Warner. “You don’t have to worry about your client buying the wrong hosting plan or domain. Project management is integrated into the Hub, so you can keep track of client communications and ensure you’re delivering projects on time.”
Part of this journey began when GoDaddy acquired ManageWP and brought its team over in 2016. The acquisition was anything but popular at the time.
“We built the first version of our GoDaddy Pro site management tools on top of ManageWP Orion,” said Warner. “We added new GoDaddy-specific features, like allowing clients to grant delegated access to manage their GoDaddy products. We also included some premium addons for free on GoDaddy-hosted websites. Just like with ManageWP, sites managed in the Hub can be hosted anywhere, not just at GoDaddy.”
The Hub has an interface that feels more Average Joe than tech savant. I half expected to see call-to-action buttons littering the screen, funneling users to every conceivable GoDaddy product, but none were found. Expectations from the GoDaddy of 10 years ago still linger and die hard. However, the company continues to move beyond its old reputation with its free tools and more recent willingness to give back to the open-source community, including its contribution to Five for the Future.
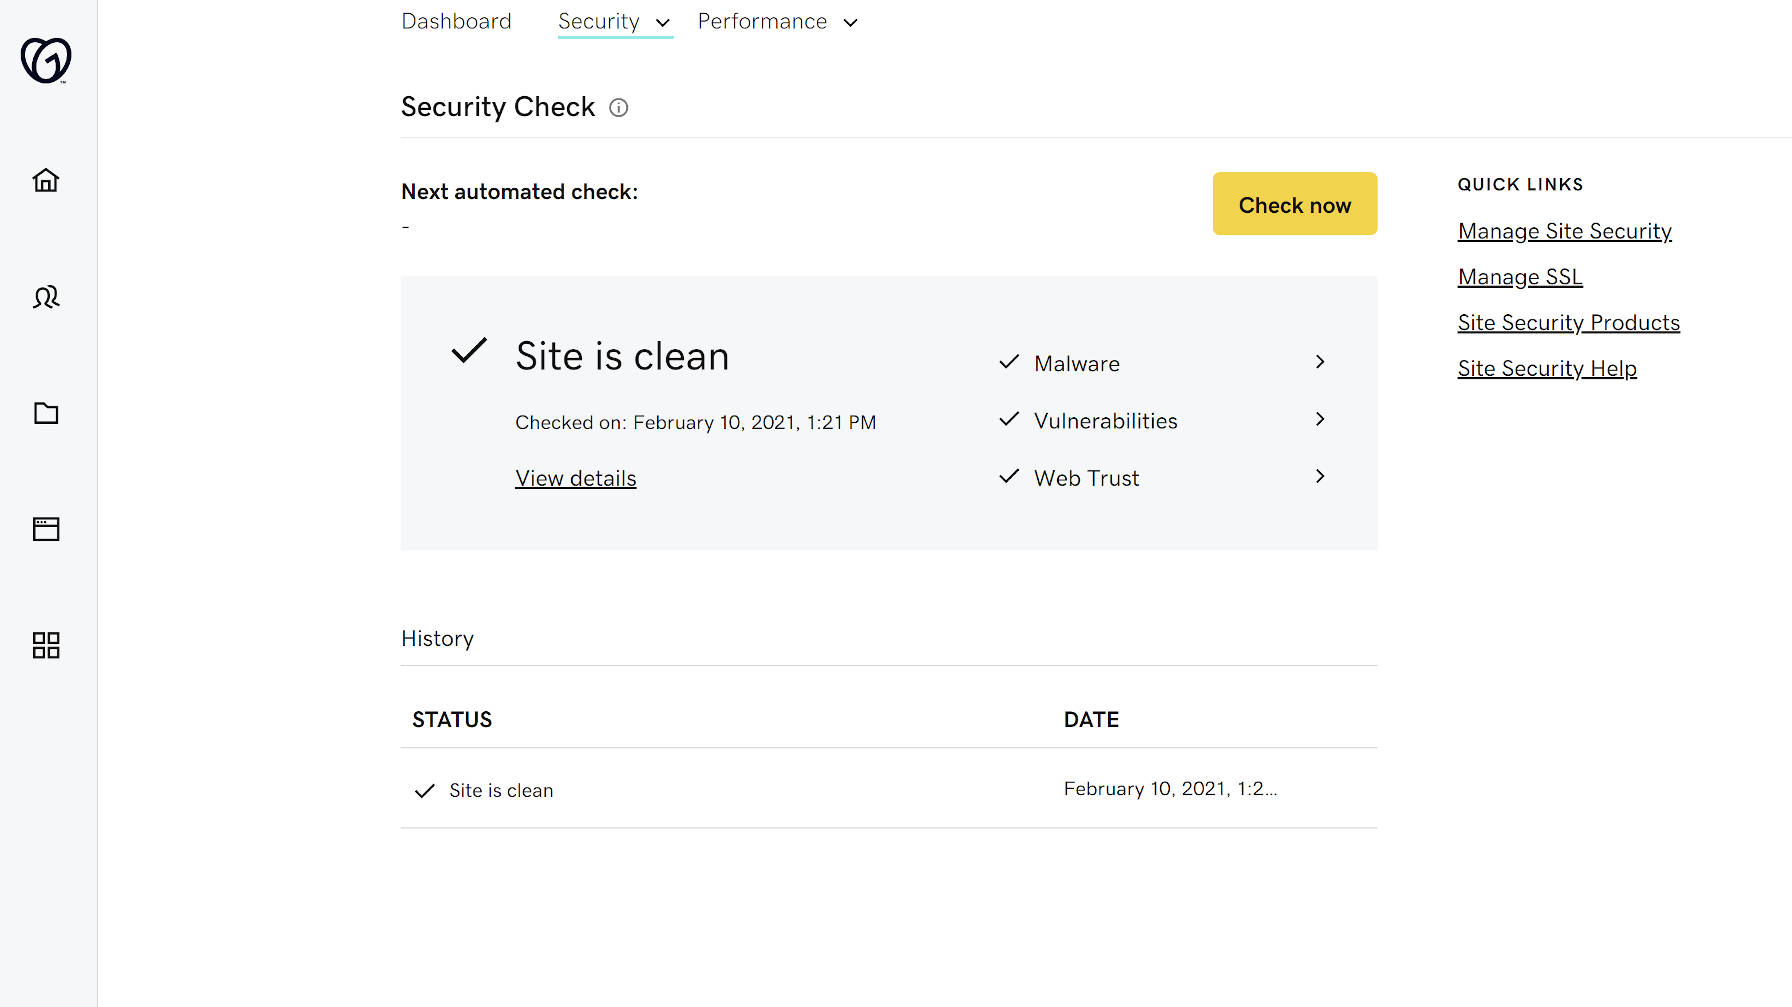
Running a site security check.
“My goal in joining GoDaddy in 2018 was, and still is, to continue my participation in the WordPress and wider web designer and developer (WD&D) communities in order to listen and return feedback internally on how we can best support freelancers in starting, growing, and streamlining their businesses,” said Warner. “GoDaddy Pro (the legacy tool) already existed when I joined GoDaddy, and my mission was to spread the word and offer suggested enhancements based on real-world conversations with freelancers and their specific needs.”
Creating clients, projects, and sites from within the interface is simple. Performance and security checks went well for the one site I have connected. The tests seemed to be spot on in comparison to other tools I have used.
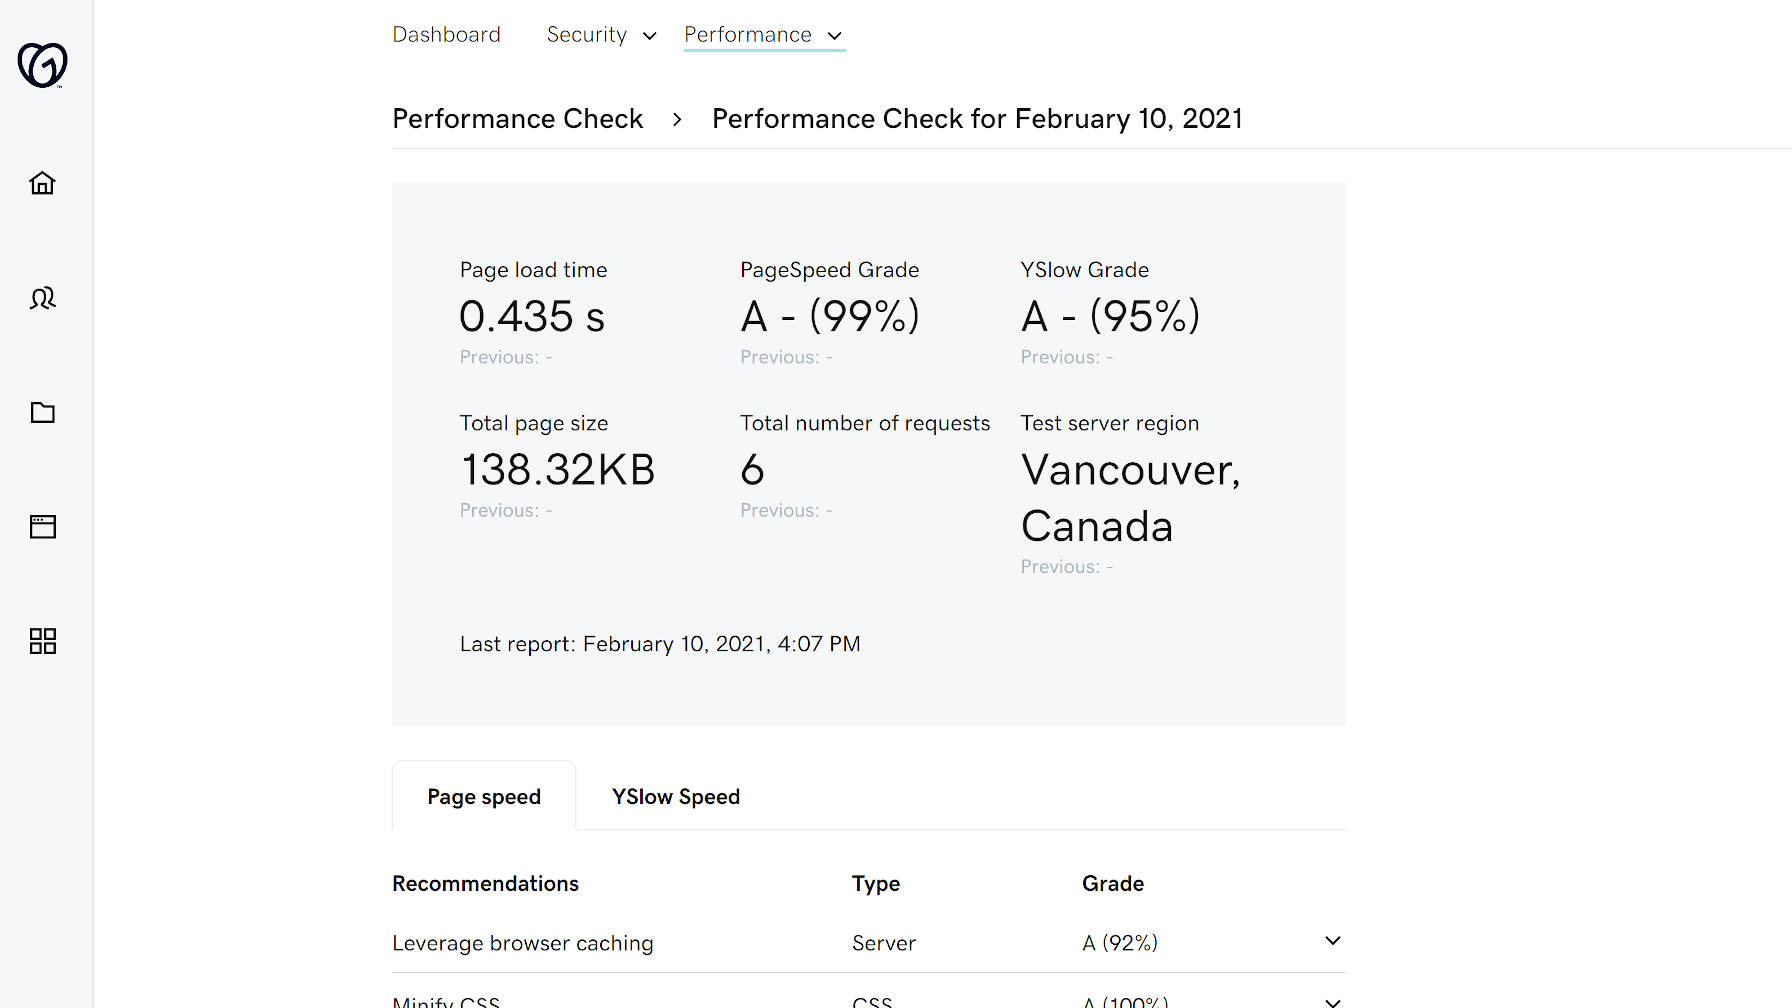
Site performance check.
GoDaddy Pro membership is free. However, the Hub will have premium site maintenance tools in the future. Automated security checks, performance checks, backups, and uptime monitoring are currently free. There is no timetable on when they will be behind a paywall. Some of the premium features will have a downgraded free option when the switch is flipped.
“While some adjacent programs (e.g. GoDaddy Reseller program, Pro subscription) may have associated costs or fees, GoDaddy Pro’s integrated project management, site management, and client management tools are free,” said Warner.
The commitment to offering the management tools for free is undoubtedly a good thing. Thus far, I like what I am seeing with the new Hub experience.
What’s so cool about :focus-visible? It’s all about the blue focus ring that displays around elements that are in focus. It’s sort of a happy medium between loving the outline for accessibility purposes (gotta know what element is selected when tabbing on a keyboard) but not-really-loving how it looks (gotta have everything follow brand).
The strategy has largely been an all-or-nothing choice between using a custom outline when any element is in :focus (great, but that means for both keyboard tabbing and mouse clicks) or ditching the outline altogether (not great, like ever). :focus-visible accomplishes the same thing as :focus, but uses a browser’s knowledge of user inputs (or heuristics) to determine whether the focus is coming from a keyboard or a mouse.
(Are a browser’s heuristics perfect at determining the input? That depends. Things get murky once we start factoring in things like touch interactions.)
That means, we get to remove the default focus ring (yay!) for the right types of interactions (double yay!) and display our own custom styles while we’re at it (triple yay!). Allow me to pluck Andy Adams’ fine example straight from our almanac. Note that :focus-visible cannot remove the focus ring like :focus can, so the two are used together:
Chrome implemented :focus-visibleback in 2018. Firefox had it’s own prefixed version, :-moz-focusring, prior to this implementation. Safari? Go vote for the feature!
I always appreciate someone looking into and re-evaluating the best practices of something that literally every website needs and has a complex set of requirements. Andrey Sitnik has done that here with favicons.
It was good timing to do this here on CSS-Tricks, so I tried following the advice to the letter, and it’s working great so far. I think I got fed up at how complex it was at some point that I went ultra-minimalist and only had favicon.ico file. Now I’ve got all of the above in place.
Where I differed…
I don’t have GIMP or Inkscape installed, which can export .ico format, so I used this favicon generator (I fed it my “main” SVG”) just for that one icon.
I found Figma helpful for resizing frames and exporting the right sizes.
I used ImageOptim for optimizing all the images.
I was nervous about adding a “manifest” because I don’t have any other PWA-like steps in place and it feels like an extra web request for little value. But I did it anyway.
I have a theme color (<meta name="theme-color" content="rgb(255, 122, 24)">) because I was told it was a nice touch. Feels related.
Anvil, a company that provides paperwork automation services, has announced the release of a new PDF API that is intended to aid in the integration of legacy PDF systems with modern paperwork processes. Although the company has targeted the HR, financial services, legal, education, and healthcare industries, the API is designed to be industry agnostic.
What's up guys! My question is: Has any form or tool been created that allows data to be saved in an offline database if the customer's internet goes down? I will explain better, my application is Web, made in .Net, runs entirely on the Browser and at first, it will record everything in the online database, but what if the client connection drops? I would need this data to be recorded on the client's machine locally, so that when the connection comes back, all this information stored locally would be posted in the online database. Any idea?
Some say it is a universal fraud, nothing more than hype; others consider it not just our future but already our present. Cryptocurrency has become a big part of our life. “Bitcoin accepted here” is popping up everywhere. More websites, …
What’s the difference between hosting providers? For example, what is the difference between GoDaddy and Hostgator, which seems like “traditional” web hosting providers, to others like Heroku, Digital Ocean, AWS, and Firebase?
When would I use one over the other?
They were hoping for detailed thoughts, so I’m going to oblige!
To be honest, I’m already confused. (Sorry, I promise I’ll try to be more helpful as we go on.) Why is WordPress hosting one dollar more expensive than the Web Hosting plan? If you buy the $5.99 Web Hosting plan are you prevented from installing WordPress on it? Or is it just convenient in that if you pick the WordPress hosting it comes pre-installed and configured? WooCommerce is just a plugin for WordPress, so are you prevented from installing that on the WordPress hosting plan until you upgrade to the WordPress Ecommerce Hosting plan? (To be fair, WordPress.com unlocks WooCommerce at the highest plan as well, so it’s trod territory.) Why is the VPS Hosting plan the cheapest? I don’t blame you if you also find this as confusing as I do, especially as this is just one of many different charts of hosting options they offer.
GoDaddy makes a billion zillion dollars a year, so I’m sure they’ve got this stuff figured out, but I’ll tell ya, after a couple of decades of web development experience, I’d be totally guessing at choosing a plan from options like this. Cynically, it feels like confusion might be a sales tactic.
Technology
I do know this: these plans are for PHP / MySQL sites. That means WordPress, Craft, Perch, Ghost, Drupal, Joomla, etc. This is the LAMP stack which has all the big CMSs covered. Just the way it is. This is going to be the case at Media Temple, Hostgator, Bluehost, and lots of hosts like that. I think a “traditional” web host, as you put it, isn’t a bad way to think about it.
Do you wanna run PostgreSQL or MariaDB instead of MySQL? Or you wanna run ASP instead of PHP? I’ll bet you all these hosts have some kind of answer for those things. The answer is going to be something like “Don’t use our shared hosting product, use our raw VPS (‘Virtual Private Server’) product which has direct root access, and you can install it yourself.” I guess that’s fine, but just know those things aren’t first-class citizens of their hosting. If you have trouble, I’d worry you’ll have a hard time getting good support.
Which leads me to my point: you should go with the happy path offerings from hosting providers.
Say I want to write a Python app. I’m not going to buy a Hostgator server. I’m sure you can get it to work, but it’s not something they really promote. It doesn’t feel like it’s on a happy path. Whereas if I look around at Heroku, they make it a first-class citizen of what they offer:
I can’t vouch for it directly as I’ve never used Heroku, but I’ve heard lots of good things and they’ve been doing this for a good 15 years.
Happy paths are about friendly pairings
Heroku reminds me of another divide in hosting providers that I think is significant. Those “traditional” web hosts don’t lift a finger to help you get your websites over to them. It’s more like: here’s your FTP credentials, good luck. With a host like Heroku, they are giving you a CLI to like heroku container:push to deploy your local code to production. Better, it will deploy right from your GitHub repository. Why every single web host in the world doesn’t help with that is a mystery to me. A web host that helps you with deployment is a valuable thing.
We were talking about happy paths, right? Heroku calls themselves a “Cloud Application Platform.” The happy path there is those server-y languages. Node, Ruby, Python, Go. What if you don’t need any of that? Say you’re building a static site, using a static site generator (like Eleventy) at the core (Jamstack, as it were). Do you pick Heroku? Probably not. While surely you could pull it off on Heroku, static site hosting isn’t core to Heroku, and so not a happy path.
Where should you host a static site? That’s Netlify’s whole ball game. Netlify is a super happy path for static sites.
In fact, Netlify nailed the Jamstack-style hosting thing so strongly that lots of companies have been trying to provide similar offerings. I think of Azure’s Static Web Apps as an example. So why use Azure over Netlify? If it feels like a happy path, and it might if you’re using other Azure products, assuming their products play well together. Azure is a massive cloud platform with loads of other offerings. Or you might just have more experience and developer muscle memory for Microsoft products. We’ll get to that later.
Jamstack (essentially meaning static hosting + services) is available in lots of places now. Cloudflare has Cloudflare Pages, which you might take advantage of because of the unlimited promises (unlimited sites, unlimited requests, unlimited bandwidth, and even unlimited team seats).
You might choose Cloudflare Pages because your Cloudflare products like access or workers that are important to you and it feels like the happy path to keep it all together.
Vercel has Jamstack hosting, but they’ll run servers for you if you need them. Their popular framework, Next.js, prebuilds pages, but can also deliver server-side rendered pages with a Node back end. Vercel gives you that back end.
Next.js on Vercel is a very happy path. “Deploy on the platform made for Next.js,” they say. Hard to beat that.
AWS Amplify is ultimately Jamstack hosting, and the happy path there is using Amplify to stitch together other AWS services. That’s literally the point of AWS Amplify.
Need auth? It’s Amazon Cognito under the hood, but Amplify helps you stitch it into what you are doing. Need storage? S3 is an industry standard, and Amplify helps you integrate it. Need a database? Amplify helps you model it and build APIs.
Firebase has Jamstack-style hosting, and the happy path is leaning into the Firebase framework.
Firebase has lots of very useful features, like real-time data storage, authentication, and RUM analytics. If I wasn’t using any of those things, I’m not sure I’d pick Firebase hosting. Like for a basic Jekyll blog, can it be done? Absolutely. Would I personally do it? Probably not. It’s not really leaning into the Firebase offerings, making it way less of a happy path.
It’s worth talking about 💪 developer “muscle memory” for a moment. You build muscle memory for the things you do a lot. If you’ve got five sites on Netlify already, and you’ve gone through those motions over and over, it makes sense that your sixth site is on Netlify as well — even if some other host might be a slightly better fit. Knowing your tools well and feeling comfortable is a big deal. You can compare pricing and features and all the bits and bobs, but muscle memory is one of the most powerful choice influences, and I think that’s perfectly fine.
Your host should take care of your core needs
Remember how I mentioned a web host that helps you with deployment is a valuable thing? All of these hosts do that: Netlify, Vercel, AWS Amplify, Google Firebase, Cloudflare Pages, Azure Static Sites. That’s become table-stakes for hosting providers. There are more table-stakes as well.
The table stakes of modern web hosts.
Beyond, ya know, hosting the website.
HTTPS. The host should give my site an SSL certificate. Probably automatically, and probably for free (since Let’s Encrypt is free).
CDN. The host should help serve as much as my site as is practical from a CDN, even if it’s a paid feature or requires configuration.
Deployment. The host should connect to Git repositories and move files from the main branch to the production site.
Staging. The host should provide staging environment(s).
I should circle back to the WordPress (and other PHP/MySQL CMS) thing. That’s what this site is. Traditional hosts serve this market. WordPress is 35.2% of all websites, which is bananas, and means there are wheelbarrows full of money in that hosting market. But in my experience, the traditional hosts do almost none of what I just called table stakes in hosting. A lot of times, you’re on your own for HTTPS. You’re on your own for integrating a CDN. You’re on your own for deployment. Staging just means buy another server. It’s just a weird time for hosting right now, with such a wide gap in modern web hosts doing so much and traditional web hosts doing so little.
That’s not true of all WordPress-specific hosts though. Using a WordPress-specific host for hosting WordPress is about as happy path as you can get. I’m on Flywheel now and appreciate all they do. They cover that entire list of table stakes, and go further still, helping with local development.
You asked about Digital Ocean specifically…
I feel the least qualified to explain Digital Ocean, but I think it’s fair to say that Digital Ocean has a lot of happy paths. They have this concept of a “Droplet” (it’s a server) which is spun up from “containers.” I wouldn’t worry terribly much about the idea of containers at this point, but suffice it to say, they are pre-configured servers that can run any sort of combination of technologies. If you want to fire up a LAMP stack thing in a Droplet, that’s a first-class citizen. But so are lots of other technologies. Consider Strapi, a CMS that is Node, Nginx, and PostgreSQL. Digital Ocean has a Droplet for that’s ready for it out of the box.
Droplets also start at $5/month, so they are just as economical as other hosts, if not more so. You might find hosting products that are actually Digital Ocean under the hood! For example, the WordPress hosting tool SpinupWP allows you to quickly create configured WordPress hosting environments, but it doesn’t do the hosting itself, you “bring your own” host, which is likely Digital Ocean or AWS (Amazon Web Services).
It only gets more complicated from here
If Digital Ocean seems complex, wait until you hear about AWS. We talked about AWS Amplify earlier, but that’s like AWS designed for individual developers like you and me to scaffold apps quickly. It’s very cool, but it’s a small wedge of what all that is AWS.
AWS is this massive cloud services provider, meaning that, sure, you can spin up web servers, but there are also hundreds of other services for things, like databases, storage, serverless stuff, APIs, logs, heck — you can rent a damn quantum computer there, which is like sci-fi stuff. It’s not that a normal developer can’t use AWS for a web host, it’s just like, not really designed with that kind of DX in mind. This guide on installing WordPress makes me sweat. AWS is super powerful, has solutions for everything, and is priced as low as it gets. Perhaps it’s useful to think of AWS as like down-to-the-metal web infrastructure, designed for large-scale operations. Web hosts might even be built on top of AWS, for example.
Matching your needs to what’s available
Let’s do some quick hits of needs matched to options. This is in no way comprehensive. I just slapped it together with things that popped to mind that feel happy path aligned.
It’s worth re-iterating that there is a lot of commonality in hosting. Say you’ve got an index.html file you want to host and that’s your entire website; literally any web host will do that. These are all web hosts, after all. They serve files and run code. They aren’t that different. We’re largely talking about DX here: do they run what I need to run? Is it straightforward? Do they help make it easy? Do they clearly offer support for it?
Is it the happy path?
Then there’s pricing
We haven’t really talked much about price. I know that’s a major consideration for a lot of people and I don’t want to downplay it. But it’s hard to talk about without knowing your needs. I also don’t want people to make major web hosting decisions based on something like a few dollars difference in monthly cost. If you spend half an hour troubleshooting you otherwise wouldn’t have had to, those savings are blown.
I find that web hosting is somewhat of a commodity market. The prices are fairly stable. If a host seems expensive, it’s probably because they offer a lot. If a host seems cheap, it’s probably because they cut costs in a way you’ll eventually feel. If you’ve got a little baby site, chances are, you’re going to be hosting it for free. And if and when the site grows up, the hosting costs will feel minimal and fair.
🛠 Does all this seem kinda fun and exciting to you? If it does, you might think about a career in DevOps dealing with servers, deployment, infrastructure, and supporting developers doesn’t have to be a side-job to other development work, it can be a whole job.
While CodePen itself is about 8.5 years old as I write, Rach was part of the first round of hires we ever did, and has crossed the ever-so-rare and round-of-applause worthy 5-year milestone. She blogged it as well. So has Marie! Both of them join me (Chris) in a chat about that half-decade of life and work here at CodePen.
Netlify is great for a million reasons, chief among them how easy it makes to deploy your code. Not just static files, either. Netlify helps you deploy serverless functions as well. And now, those functions can run much longer: 15 minutes. That’s enough time to do long-running tasks like web scraping, media generation and optimization, and things like data syncing.
Those little line animations are a perfect way to enhance a design and add subtle micro-interactions to a website. Today I’d love to share some super-simple ideas that are based on CSS only, no JavaScript involved.
Most effects use a pseudo-element as line and some have a little SVG line animation, like this one:
The effect works by animating the stroke-dashoffset and we can use a super cool trick to “normalize” the path length so that we don’t have to bother with the real length that we would need to do the SVG line animation.
this is the task given to me guix i hope you can help me
Create a program that will read the data from a file and save the output in another file
1.Create an input file named CS122Grades.
2.The contents of the input file should be the names,midterm grades and finalterm grades of 5 students (grades are from 0-100)
3.Create a main program named FinalGradeCalculator.
4.The main program will read the names,midterm grades,and finalterm gradesof the 5 students and compute the final grade (50% midterm+50%finalterm)and determine the remarks whether the student passed or failed (passing grade is 75)
5.The man program will save the outputin a file named CS122FinalGrades.The content of the output file should be the name of the student, the final grade and the remarks with labels.
6.The program shoundappend new data to your output file.
Do you want to learn how to hide a Pinterest image in WordPress?
Pinterest can be a great way to drive traffic to your blog, but displaying a Pinterest image in your post can make your content harder to read.
In this article, we’ll show you how to easily hide a Pinterest image in blog posts while still letting readers pin a custom Pinterest image when they share your content on Pinterest.
But, the Pinterest recommended image sizes don’t always look good when added to blog posts. That’s because the Pinterest image dimensions are long and narrow (3:2) which doesn’t fit most blog layouts.
Not to mention, these large images have the potential to slow down your website.
So you might be wondering why do bloggers use longer Pinterest images?
They stand out in the Pinterest pin feed and search results
They allow you to repin your content with new fresh images
They get more traffic than traditional image sizes
By hiding the Pinterest images, you can improve the appearance of your blog posts and make your site faster. All while reaping the benefits of letting readers pin a high-quality image.
Does Hiding Images Interfere with Pinterest Terms of Service?
You might have heard that hiding Pinterest images on your WordPress blog goes against the Pinterest Terms of Service (TOS).
But, this isn’t true.
Hiding a Pinterest image on your website is allowed, as long as you meet the following requirements:
The Pinterest image matches the content of your post
The Pin description matches the content or title of your post
Essentially, you can hide images on your WordPress blog as long as the image you’re hiding is relevant to your page.
Does Hidden Pinterest Images impact Google Ranking?
For Google to properly rank your site it needs to be able to index your content. This means the search engines crawl your website to see what pages and media your website contains.
Google isn’t necessarily a big fan of hidden images or hidden content. Especially, since hidden content can be associated with spam websites.
However for legitimate use-cases like this one, it’s completely ok for you to hide Pinterest images without impacting your Google ranking.
How to Hide Pinterest Images in WordPress
There are several WordPress plugins that makes it easy to hide Pinterest images in WordPress. There are premium sharing plugins like WPTasty or Grow by Mediavine (formerly Social Pug).
The plugin settings are fairly straight forward, but we do have a detailed tutorial on adding social sharing buttons to WordPress that you can use as a guide to get started.
Once the Shared Counts plugin is fully set up, you’ll need to install and activate the Shared Counts – Pinterest Image addon to your site.
There are no unique settings to configure for this plugin.
It automatically adds a custom Pinterest image box to your blog posts.
Instead of having users pin random images from your blog post, you can create a higher-quality image that’ll perform better on Pinterest.
When your website visitors click on your Pinterest share button, Pinterest will pop up with the perfect image you’ve created for your post.
To add your custom Pinterest image for your blog posts, simply go to Posts » All Posts in your WordPress dashboard and open up the post you want to edit.
In the WordPress content editor, you’ll see a meta box labeled ‘Pinterest Sharing Image’ in bottom right-hand corner.
You need click on the ‘Select Image’ button and upload a new image or choose an existing image from your media library.
When you’ve found the image you’d like to use, you can add the ‘Title’ and ‘Alt Text’, then click the ‘Use Image’ button.
Next, click ‘Publish’ to publish your new post with the Pinterest sharing image, or ‘Update’ if the post is already live.
Now, when your visitors click the Pinterest share button there will be a pop-up that has your Pinterest image with the proper dimensions.
One of the best parts about using this plugin is that it automatically hides the Pinterest image for you.
Once you add your Pinterest featured image to your blog post, the plugin will add it to the bottom of your post, and apply the “display:none;” element automatically. This makes it completely hidden from view.
There is no need to add the image to your post and manually hide it or make any additional changes.
You might have seen other methods online, like using CSS to hide your Pinterest images, or adding HTML code with the “display:none;” element, but you don’t need to worry about any of that.
The plugin addon takes care of everything for you, which is why we recommend this option above all else.
Finally, it’s important you optimize your images before uploading them to WordPress. This plugin hides the image from view, but it still loads on your post. So, if it’s not properly optimized, then it could slow down your website.
Building a freelance career requires multiple skills. One that's often overlooked is how to manage your personal finances. To make that a little easier, we’ve prepared personal finance tips that every freelancer should know.