SmashingConf Live! Is A Wrap

SmashingConf Live! Is A Wrap

SmashingConf Live! Is A Wrap

Rachel Andrew

Last week, we ran our very first SmashingConf Live! event, the first in a series of online events taking us through to the end of 2020. We had an amazing two days and we hope that all of our speakers and attendees did too. In this post, I’ll round up some of the key moments and feedback we’ve had.

A Team Spread Around The World

Here at Smashing, we take remote, distributed working to the extreme, and are very used to dealing with all of our different timezones. However, the conferences are the one time when most of us are together in one place. With all of us in our home locations and timezones, things were very different this time. We shared pictures of our setups in the Slack for the event, and lots of attendees joined in the fun and showed us how they were attending the conference themselves.

Some of the desks that brought you SmashingConf Live!
Top row (left to right): Amanda, Charis and Jarijn, Rachel. Bottom row (left to right): Phil, Vitaly, Tobi

It takes a lot of people to bring you an online multi-track conference, so the full team taking care of everything and everyone behind the scenes on the day were:

  • Andrea de Souza (Volunteer): Canada
  • Amanda Annandale (Head of Events): Bristol, UK
  • Bash Choudhry (Volunteer): USA
  • Bethany Andrew (Event Assistant): London, UK
  • Charis Rooda (Marketing Coordinator): Hong Kong
  • Esther Fernandez (Partnerships Coordinator): Barcelona, Spain
  • Jan Constantin (Smashing Team): Freiburg, Germany
  • Jarijn Nijkamp (Membership Lead): Hong Kong
  • Marc Thiele (Board Member): Dusseldorf, Germany
  • Mariona Ciller (Partnerships Manager): Barcelona, Spain
  • Rachel Andrew (Editor-in-Chief): Bristol, UK
  • Raffaella Isidori (Volunteer): Milan, Italy
  • Ricardo Gimenes (Illustrator): Malmö, Sweden
  • Vitaly Friedman (Co-Founder): Dusseldorf, Germany

Our Conference Platform

When selecting a conference platform it was important to us to have something that would enable the fun and interactivity of an in-person SmashingConf. We wanted to have sidetracks, games, places to ask questions of our speakers, all along with main stage content. While we use Zoom for workshops, we didn’t feel that asking you all to sit through two days of Zoom meetings would be very Smashing at all.
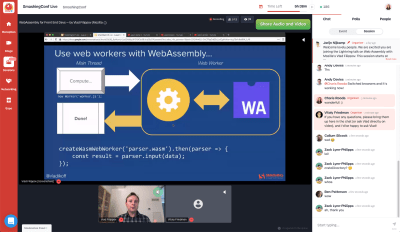
The platform mid-session
We're running our conferences on Hopin, a friendly, inclusive platform, with Smashing branding and plenty of cats. With interactive, live sessions and live captioning. Watch a video preview. (Large preview)

Amanda and the rest of the team looked at a number of options and we ultimately chose to use Hopin. We trialed the platform for our Smashing Meets events, but this was the first time we would be running at such a scale. Everything worked really well, and speakers and attendees seemed to like the setup. As a speaker, I found it felt far more interactive than the usual online conference solutions, and less like I was presenting to my office wall!

A Lot Of Fun, And A Lot Of Learning

With multiple sessions happening at once we had a lot of speakers sharing their knowledge with us. As with our in-person events, everyone created shared Google Docs of takeaways over the two days — Day One, Day Two. MC Phil Hawksworth kept everything on track on the main stage.

Some amazing sketchnotes were created by Ximena which give you a snapshot of the key takeaways from many of the talks and sessions.

We even had our conference DJ Tobi playing some tunes between the mainstage talks — just like at our in-person events.

Badges

We felt that a virtual conference should have badges too. So, for SmashingConf Live we had badges featuring a variety of cats. Attendees tried to find all of the different cats — all 96 of them!
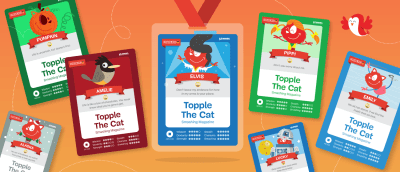
A preview of some of the badges used at SmashingConf Live! of Topple the Cat in a variety of disguises
Friendly SmashingConf badges for cat collectors! Every attendee gets their own badge and can trade them when meeting new people. Illustrated by our cherished illustrator, Ricardo Gimenes.

It really did feel like an event, rather than a webinar, and it was great to see so many people — and to meet their cats! That’s something we don’t get to do at our usual events.

Wishing You Were There?

If you wish you could have joined us then you have three more chances for some SmashingConf online fun! We’ve taken all of our 2020 events online, which means that between now and the end of the year you have three to choose from.

SmashingConf Freiburg Online (Sep 7–8)

SmashingConf Freiburg Online 2020The SmashingConf Freiburg is moving online on the original dates: September 7th–8th. One track, two days and 13 speakers, with all of the actionable insights you expect from SmashingConf. We’ll be running the event tied to the timezone in Germany — making this a great event for Europeans. Check out the schedule, and buy tickets here.

SmashingConf Austin/NY Online (Oct 13–14)

SmashingConf Austin Online 2020We have combined the programming for New York and Austin as these two events were so close together and similar to each other. We’ll be running this event in Central time, just as if we were all in Austin. Check out the schedule, and buy tickets here. We’d love to see you in October!

SmashingConf SF Online (Nov 10–11)

SmashingConf San Francisco Online 2020In PST, join us for a SmashingConf San Francisco on November 10th–11th. The schedule and tickets are online for you to take a look at. We’ll be sure to have a great celebration for our final event of 2020!

Can’t wait to virtually see you there!

Smashing Editorial (il)
Autonomy Online: A Case For The IndieWeb

Autonomy Online: A Case For The IndieWeb

Autonomy Online: A Case For The IndieWeb

Ana Rodrigues

Web 2.0 celebrated the idea of everyone being able to contribute to the web regardless of their technical skill and knowledge. Its major features include self-publishing platforms, social networking websites, “tagging”, “liking”, and bookmarking.

Many individuals and companies began creating these platforms so that anyone could contribute to the Web, and not just people who had the privilege to learn to code. In fact, to recognize our contributions to the web, “we” were Time magazine’s Person of the Year in 2006.

Cover of TIME magazine presenting the person of the year as “You”
Simpler times. (Image source: TIME USA)(Large preview)

Nowadays whether you’re consuming or sharing content on the web, it is likely to be via a big website. Twitter, Youtube, or a Facebook-owned service are popular examples. Whilst this gives us the advantage of being able to participate in a larger conversation at almost no monetary cost, there is also the downside of potentially losing all our content if a company closes, as has happened in the past.

In the past few years, I began to notice I was losing control of online life. What follows is a case for why the IndieWeb is a great opportunity for personal development, taking ownership of your content, and learning by building personal websites.

Learning On The “Corporate Web”

After years of seemingly endless growth and acquisitions, we have ended up with a handful of big websites that control our whole online identity, data, and privacy. The main mode of participation on the web, for many people, is through major web corporations that need to own data to sell to advertisers. This has become what many people call the corporate web, where users are the product and engagement is king.

The corporate web allows our family and friends and anyone with lower-tech skills to develop their web presence and have access to the digital world. Anyone can sign up to a handful of social media websites and see and interact with what people are sharing, especially at times of physical distance.

However, nothing online is truly free. Many of these websites rely on advertising revenue for income. Consequently, these websites need to change a lot to keep the engagement up so that the users don’t leave. This is not always in the best interest of the people who use it.

Exploring The Corporate Web

Social media websites allowed me to find and connect with industry peers. When I first started working as a web developer, one of the first things I did was to sign up to popular social media websites and subscribe to updates of people who also worked in the industry. Some of them I personally knew but others were recommended to me by the algorithm itself and throughout the years I would adjust my subscription list.

Regardless if it was shared via an article or a social media post, lots of things I learned were because someone wrote about it and I was able to read it for free. And when I engaged I was potentially building a professional network from my home. All this for free! How cool is that?

However, as time went by I began to lose control of what I wanted to see and when. In order to increase engagement, many social media websites began to use algorithms to dictate what they thought I wanted to see and they also started to show me things I didn’t actually subscribe to. While now I can rationalize this, at the time I was just entering the industry so I thought I was the one who needed to catch up on everything.

Social media doesn’t take breaks, but at some point in my life, I needed a break from it, which made me realize that my personal development was going to suffer. I began to experience strange anxiety of missing out because I also knew that I couldn’t scroll through my whole timeline to see everything that was shared while I was offline. It became really hard to search and find anything I had a glimpse of some weeks ago.

Making Stuff On The Corporate Web

So far I’ve been talking about consuming content, but I also wanted to share. While one may always be keen to continuously improve their craft, I was feeling an intense pressure to follow trends and build things using the latest shiny thing for the sake of being employable and impress people I’ve never met. Even sharing stuff that immediately reaches many people, would come with its own limitations as I would be using a platform not built by me.

Most importantly, it was doing a disservice to a whole group of people who can’t even join certain corporate websites because of the geopolitical restrictions of where they live. There is always the possibility of having your account (and your content) removed at any time if the corporation decides you’re breaking a rule.

Whether it would be accessibility, character limits, moderation, or even the option of not receiving feedback, many times it felt unwelcoming and intimidating. Often I felt like an impostor and as if I was running a never-ending marathon.

I began to ask myself, “who am I doing this for?” Is the “corporate web” bringing to the surface “corporate values” that get in the way of personal development?

What Is The IndieWeb?

Do you ever wonder what would happen if your social identity was stolen or reassigned by the corporation to someone else? Or, as I mentioned before, if these big websites close down, and all the content you created is gone? Corporate websites control who, when, if, and where the content created by its users can be accessed.

I didn’t wonder about these things until 2017. It was in ViewSource that I saw a talk by Jeremy Keith that introduced me to the IndieWeb called “Building blocks of the IndieWeb”. The IndieWeb is a community of individual personal websites connected by principles that lead to an alternative to the corporate web.

A photo of Ana Rodrigues at a previous IndieWebCamp working on their blog with other participants in the background
(Large preview)

IndieWebCamps are an opportunity to work on my personal website blog and to ask for help. Photograph by Julie Anne Noyingurce.

The IndieWeb community is about creating or improving your personal website while also helping others to build theirs, either by documenting or creating tools. To help create an alternative to the corporate web, members of the IndieWeb community have built tools that anyone can use on their personal website that helps create the interaction and community building between personal websites.

One of the principles of the IndieWeb is that you own your content and that principle alone solves one of the main problems I mentioned above. Other tenets include:

  • Ownership of your identity.
    I didn’t realize until this point how much it made sense to have a “one true version” of yourself online instead of multiple accounts spread on many websites;
  • Using tools you’ve built yourself.
    At some point, I thought the worth of the things I built were related to the number of people who can use it. IndieWeb promotes the idea of building something for me and actively using it;
  • Documenting your journey.
    I used to be an active blogger and I had stopped when I began to work as a developer. At the time I was afraid of writing beginner-friendly content and this principle helped me embrace every bit that I wanted to share;
  • Contributing to open-source.
    Before joining the IndieWeb community I felt that I had nothing to contribute anywhere. For the first time in my life, I began to edit wiki pages, create issues in GitHub, organize meetups, and give talks. There are all examples of not only contributing to open source but also contributing to a community;

As I learned more about the IndieWeb, I found support and encouragement, especially as I read about the principles of plurality and using what one makes. That’s when I found a sense of freedom and permission to build something for myself — even if it only serves me and even if it has already been built by someone else too.

Creating A Personal Website And Learning From It

How many times does one have the opportunity to build a website from scratch at work? When you have a job in a really big company it is an unbelievably bureaucratic process to change anything we consider “base code”, especially how to choose a particular flavor of framework. I couldn’t believe I was so excited to write every cool thing inside an <head> tag! I’ve lost count of how many “Hello worlds” I’ve created and binned in my lifetime when I had a real “product” to build: me.

When I began my quest to have an IndieWeb blog I chose to build almost everything from scratch but it isn’t necessarily the only option. If someone wants a full-fledged Indie Website without coding, there are services that support IndieWeb (Micro.blog for example) as well as some known CMS such as WordPress.

At the time, on my daily job, I was mostly writing JavaScript so I felt that this was an opportunity to do something a little bit different. I started to follow a couple of IndieWeb websites that were using static website generators and right now I am using Eleventy. My decision was based on visiting IndieWeb blogs that I liked that were also using this particular static website generator and looking up their code in Github. There isn’t a right or wrong answer here.

Building my personal website and blog from scratch forced me to refresh my HTML, accessibility, and CSS knowledge (with the bonus of no one telling me I wasn’t allowed to use the latest CSS cool things). As I began to IndieWebify myself, I learned so many new things! For example:

  • Jamstack (a stack that generates static code that doesn’t depend on a web server);
  • Microformats (extensions to HTML represent commonly published things like people, locations, blog posts and more. They provide an API to the information on your website);
  • Micropub (which is a standard API for creating content on a website);
  • Microsub (provides a standardized way for reader apps to interact with feeds);
  • Webmentions (a standard that allows you to notify another site that you’ve interacted with them);
  • Web Sign In / IndieAuth (a federated login protocol for Web sign-in that allows you to use your own domain to sign in to other sites and services);

Owning my content made me want to connect to APIs of existing “corporate websites” and also, where possible, automating the process of syndicating to them when I share something (also known as POSSE).

Now, the IndieWeb doesn’t require one to automate this process. You’re already adhering to the idea by publishing on your own domain and sharing the link to the original manually, for example, on Twitter! But the possibility to automate this process exists too and it is a great experiment. Similar to “what should you use to build your own website”, there is no right answer — as long as it works.

Exploring how this could work, led me to experiment using services like IFTTT to connect my RSS feed to my Twitter account. Other times, it made me navigate for hours in GitHub to see how other people built their own services to automatically publish on social media from their websites.

There are still many things I want to build and learn. For example, when I was able to bring my content from a corporate website into my server I grew the desire to optimize that output, so I began to make changes on my deployment build. This is something that would likely not happen at work or maybe I wouldn’t find the inspiration or need to build for anything else.

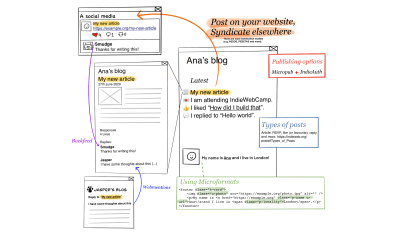
A flow showing some examples of types of IndieWeb posts and how the interactions that an article has on social media and other blogs can appear on the original blog post
(Large preview)

A snapshot of POSSE and IndieWeb posts. The flow begins on a personal website, syndicated to social media where interactions are backfeed to the original blog post. The original blog post can also receive and show interactions from other blogs via Webmentions.

Building my personal website and blog into my playground has been the place where I’ve learned the most. It is where I can experiment, write, build, try, and learn without censorship or limitations.

An unexpected consequence is that I felt more confident in writing on my blog compared to social media. Social media feels like a tiny stage with a massive audience compared to my blog that allows me to have a massive stage production but only perform to those who want to be there. I have control of who can interact with it (by not having comments available) and plenty of room to express myself without having to censor what I do.

So I also began to blog more and after I blog, I share on social media because we can then have the best of both worlds. My content may be buried by an algorithm in social media but that can never happen on my own personal website.

With Webmentions and publisher services, I can see what interactions my blog posts had on some social media websites. In order to receive Webmentions, you must have a Webmention endpoint. Luckily, lots of people have shared ways of how you can build one. While I still haven’t dared to create mine from scratch, I’ve been using a service called Webmentio.io to create and host my endpoint so that I can receive Webmentions. As for sending them, sometimes I do it manually using Telegraph but I’ve recently had a go at automating that process as well using Webmention.app.

Other great services, like Bridgy, send Webmentions for comments/replies, likes, and reposts on some social media websites like Twitter which also helps the process of “backfeeding” the interactions back to the original post. I recommend experimenting with existing services as it may be a bit overwhelming to build everything from scratch.

By slowly creating an alternative to the corporate web, one can have one place to document and share — a fixed place that anyone at any time can go back to whenever they need. All this while keeping the door open for all the good things that corporate web offers with the bonus of a very personalized touch.

My current website is a constant work in progress but I have a lot of joy when I scroll through my archives. I am always excited to improve it and try new things, I can break it and fix it at my own pace and I don’t have a deadline on it. It is my safe space.

Where To Begin

The IndieWeb community is open for everyone. You can start today by buying your domain name and building a homepage. With this single step alone, you will already have one place that anyone in the world can visit to be in touch with you.

Ever since joining the community, I participated and organized events, met great creators, and challenged myself with not only code but also in topics like privacy and ethics. I discovered new and fantastic personal websites and blogs that I probably wouldn’t find via social media and felt less alone in this constant journey of learning in our industry.

If you relate to anything I’ve said above and would like to get started there is a page that goes into more detail. We have an online chat room and weekly community meet-ups where you can connect with other members of the IndieWeb community who are happy to share their experiences and answer questions.

Dive straight into some welcoming guides built by community members (that anyone can contribute to) like IndieWebify.me and the IndieWeb Guides. I also recommend looking out for blog posts with IndieWeb introductions on personal websites as they all have different voices that may match your way of learning.

The wonderful thing about the IndieWeb community is that you’re welcome to do what works for you. It isn’t about following trends and there isn’t only one ‘right way’ to build things — just your way.

Smashing Editorial (fb, ra, il)
How to Create a Questionnaire in WordPress (Easy Way)

Do you want to create a questionnaire in WordPress to survey your visitors or collect data?

Getting feedback on your products or simply learning more about your users can help your business to succeed.

In this article, we will show you how to easily create a questionnaire in WordPress, step by step.

The easy way to create a questionnaire in WordPress

Why Create a Questionnaire in WordPress?

Creating a questionnaire is a great way to learn more about your audience. This lets you tailor your content to their needs. You can also use the results to create or modify the products / services that will be most helpful to your audience.

There are several survey tools that you can use outside your website, but having your questionnaire on your website itself means you have full control over how it’s displayed. Plus, it’s more familiar and reassuring for your audience.

That being said, let’s take a look at how to easily add a questionnaire to your WordPress site.

Creating a Questionnaire Form in WordPress

For this tutorial, we’ll be using WPForms to create a questionnaire.

WPForms is the best forms plugin for WordPress and allows you to easily create any kind of forms using a simple drag and drop form builder.

First, you need to install and activate the WPForms plugin on your WordPress site. For more details, see our step by step guide on how to install a WordPress plugin.

Note: You’ll need the Pro version of the plugin to get the features that we will use in this tutorial.

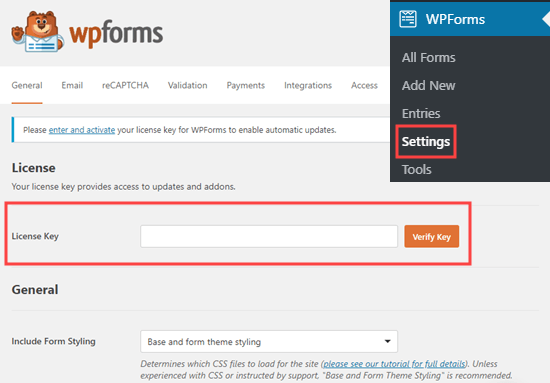
Upon activation, you need to visit the WPForms » Settings page in your WordPress admin area to enter your license key. You’ll find the license key under your account on the WPForms website.

Entering your license key for WPForms

Now, it’s time to move on and create your questionnaire.

Creating a Questionnaire Using WPForms’ Survey and Polls Feature

WPForms’ powerful surveys and polls addon lets you create questionnaires easily. It also produces beautiful visual graphs of the results.

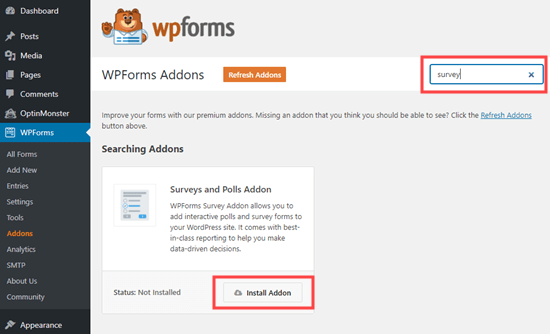
First, visit the WPForms » Addons page to install the Survey and Polls addon. Use the search bar to find it, then click the Install Addon button.

Installing the Survey and Polls addon for WPForms

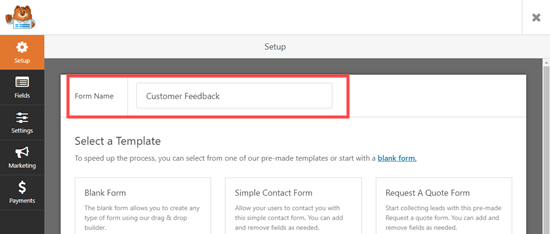
Next, go to WPForms » Add New to create a new form. First, type in a name for your form at the top of the screen:

Naming your questionnaire in WPForms

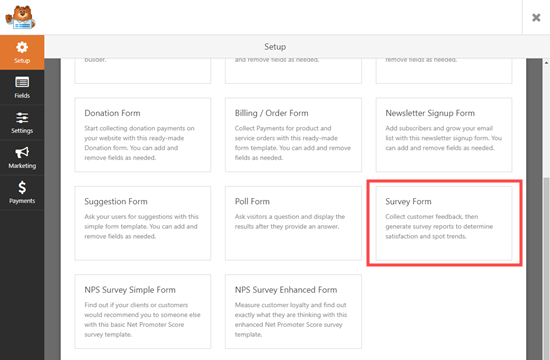
There are 4 different pre-built survey form templates to choose from. These are the Poll Form, the Survey Form, the NPS Survey Simple Form, and the NPS Survey Enhanced Form.

We are going to use the Survey Form for our questionnaire.

Select the Survey form template in WPForms

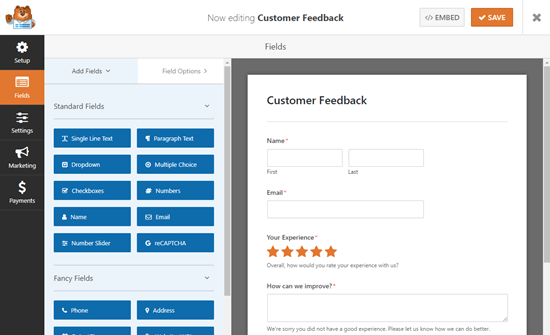
After you select the template, it will open up in the WPForms editor.

The Survey template in the WPForms editor

We recommend that you edit the questions to make them appropriate for your audience and needs. We are going to use the form to gather customer feedback on products and delivery.

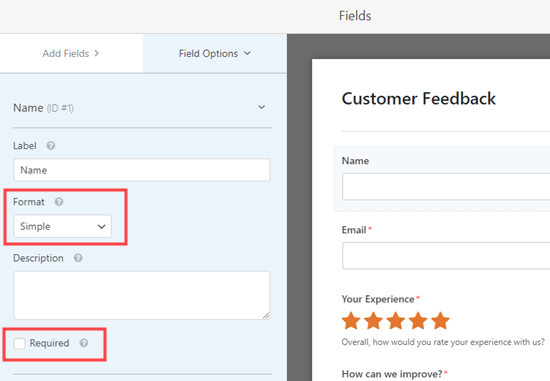
To edit any field, simply click on it. The editing view will then open up on the left-hand side of your screen. Here, we are editing the Name field at the top. We changed the format to ‘Simple’ using the dropdown.

We also made it optional by unchecking the ‘Required’ box.

Editing the Name field in our WPForms questionnaire

The ‘How can we improve?’ box only appears if the user rates their experience as 1 star or 2 stars.

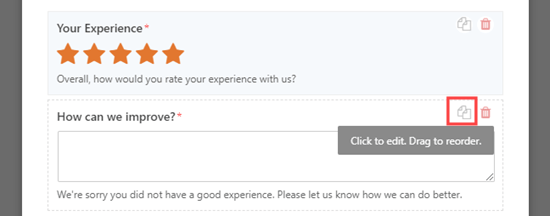
We’re going to add a new feedback box that will appear if the user rates their experience as 3 or 4 stars. To do this, simply bring your mouse cursor over the ‘How can we improve?’ box then click the Copy button:

Clicking the button to copy a field in WPForms

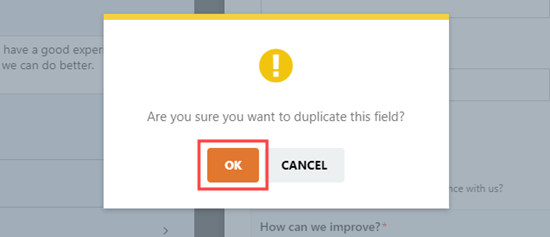
Next, WPForms will check that you want to duplicate the field. Go ahead and click the ‘OK’ button to continue:

Click the OK button to go ahead and duplicate the field

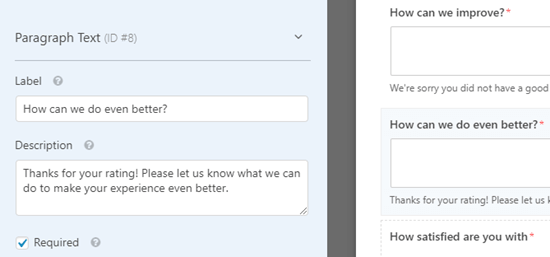
Now, you can edit your new field on the left-hand side of the screen. We have changed the label, which appears above the box. We also changed the description, which appears below the box:

Editing the new feedback box that you've created in WPForms

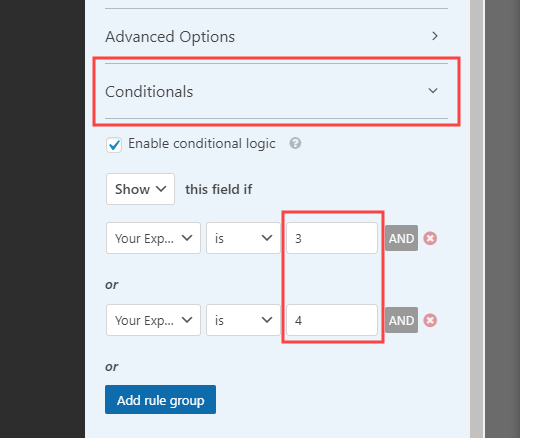
You also need to set the conditional logic for this field. To do that, click the Conditionals tab. Then, set the numbers to 3 and 4 instead of 1 and 2:

Opening up and editing the conditional logic for the field in WPForms

Finally, we are going to edit the ‘How satisfied are you with’ Likert scale. A Likert rating scale is a 5 or 7 point scale that is often used to measure satisfaction or attitudes.

Again, simply click on the field to edit it. Then, change the labels of the rows or columns to the text you want to use.

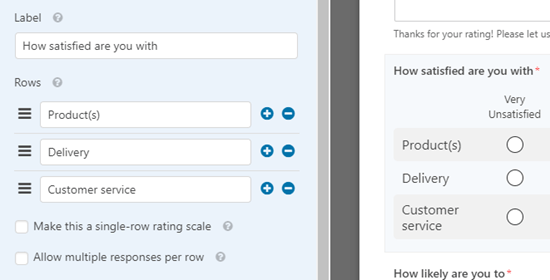
We are going to change the labels of the rows to make them more specific:

Editing the options on the Likert satisfaction scale

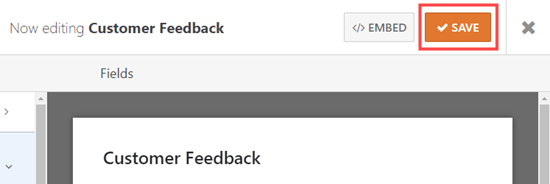
Go ahead and make as many changes to the form as you like. Don’t forget to click the ‘Save’ button at the top of the screen:

Save the customer feedback form after editing

Setting Up Notifications for Your Questionnaire

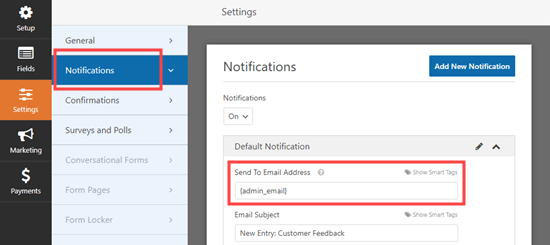
WPForms will send each completed questionnaire to the business email address that’s set in your website settings. It’s easy to change this by going to Settings » Notifications.

Simply delete the {admin_email} in the ‘Send To Email Address’ box and enter the email address you want to use instead:

Changing the email address that the questionnaire is sent to

Tip: Not sure what your WordPress administration email is? Go to Settings » General and check what is listed in the ‘Administration Email Address’ box.

Don’t forget to save your questionnaire after making any changes.

Adding Your Questionnaire to Your Website

You can add your questionnaire to any post or page on your website. You can even add it to your sidebar.

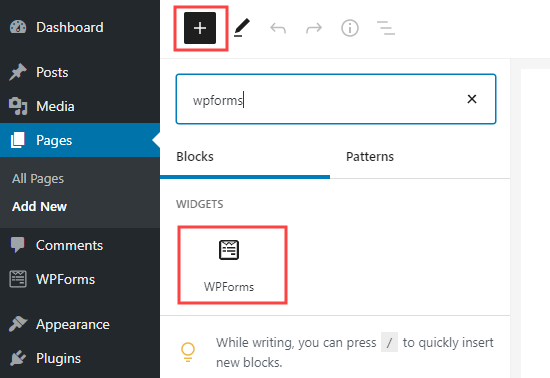
To add your form to a page, edit your page or go to Pages » Add New to create a new one. Then, click the + button to add a new block. Select the ‘WPForms’ block:

Add a WPForms block to your page in WordPress

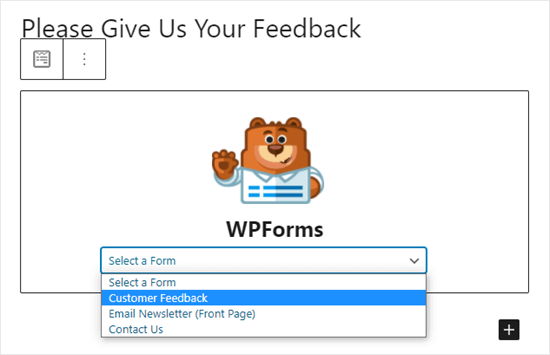
Next, simply click on the dropdown and select your questionnaire form.

Select your questionnaire from the dropdown list

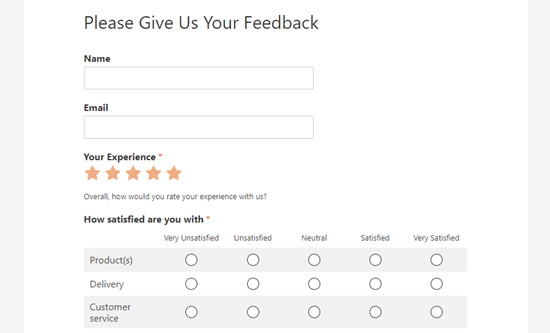
Now, simply preview or publish your post to see the form live on your WordPress website:

Your finished questionnaire live on the website

Creating a Questionnaire Using Conversational Forms

You can also use WPForms’ conversational forms feature.

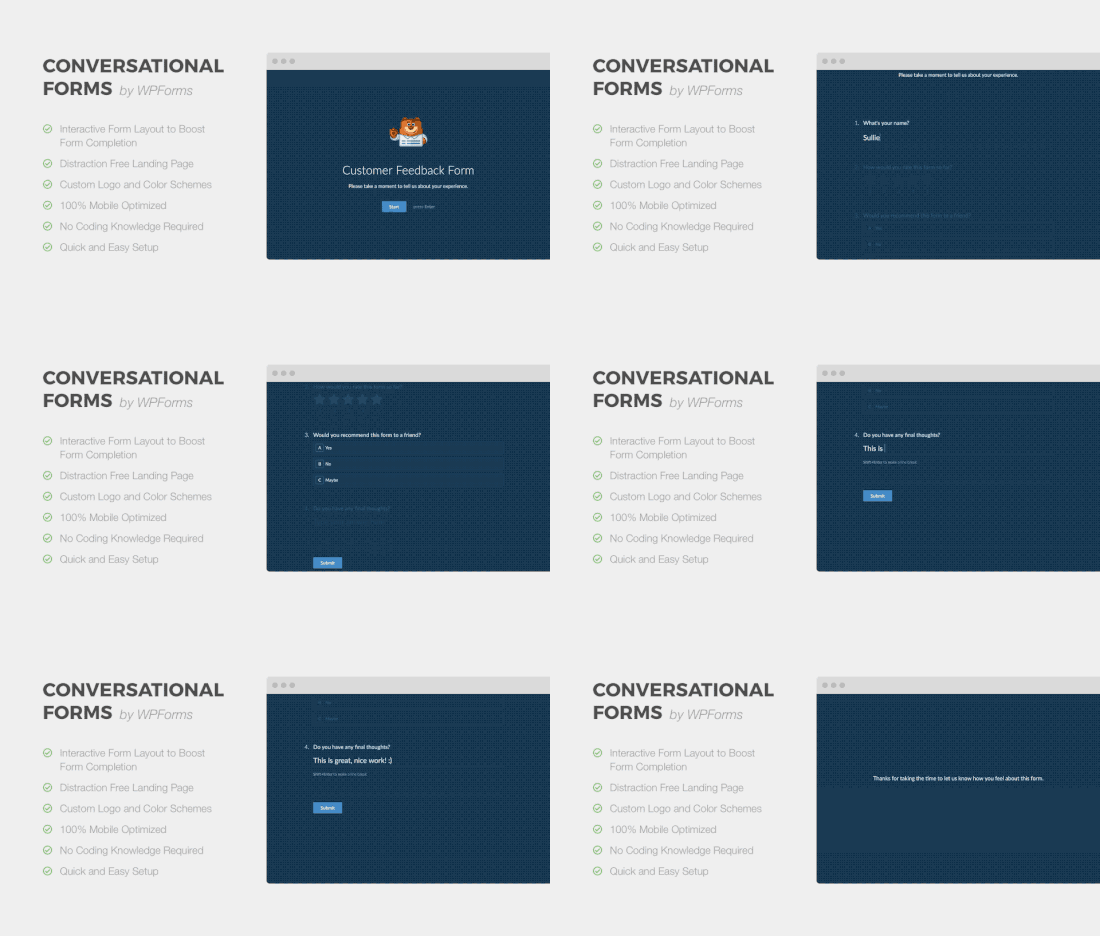
A conversational form is an interactive form that flows like a conversation. Users answer a question and it automatically shows them the next one.

It makes longer forms like a questionnaire easier to fill out and reduces form abandonment.

Conversational forms example

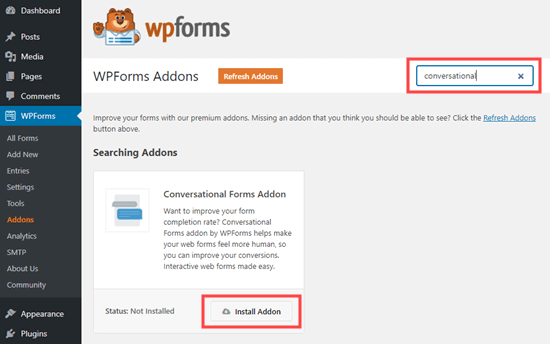
First, you need to go to WPForms » Addons in your WordPress admin. Then, search for and install the Conversational Forms addon:

Installing the conversational forms addon in WPForms

After that, go to WPForms » Add New and create a new form using the instructions in the previous method.

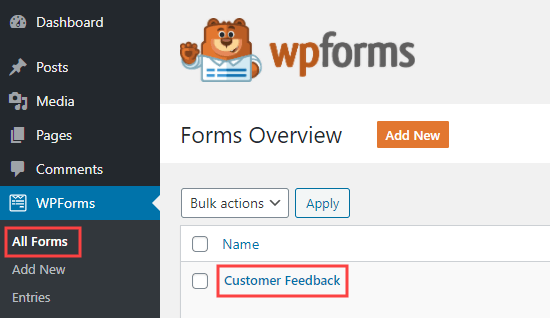
If you already created your form, then simply go to WPForms » All Forms page and click on it to edit it:

Editing your questionnaire form in WPForms

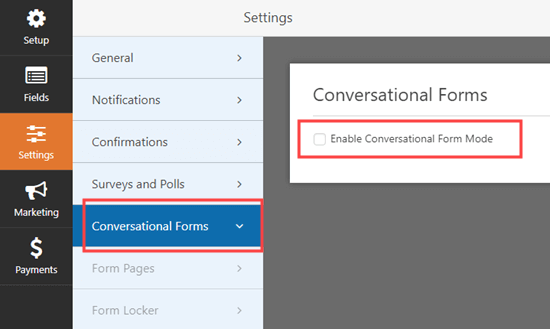
Now, we are going to convert your form into a conversational form. First, go to the Settings » Conversational Forms tab. Then, simply check the ‘Enable Conversational Form Mode’ box.

Enabling conversational form mode for your questionnaire form

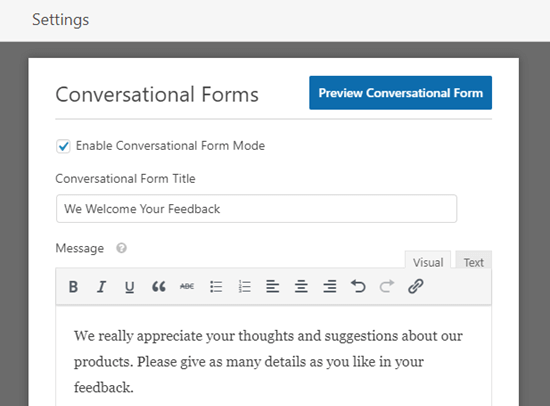
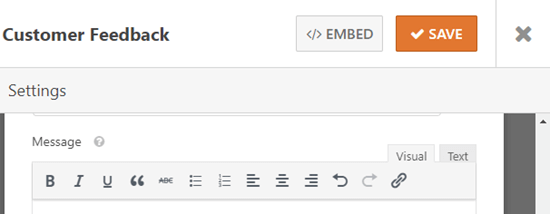
You will then see a number of extra options to fill in. Conversational forms can’t be embedded in a post or page, so you need to give your form a title here. You can also write any text that you want to display above the form:

Entering a title and message for your conversational form

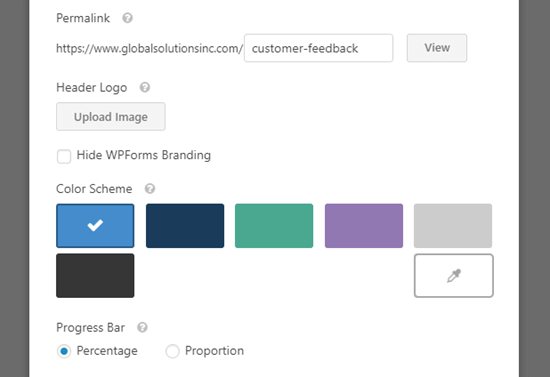
WPForms will automatically create a URL for your conversational form based on the form’s name. If you want to change this, simply type in a different URL here.

Optionally, you can also upload a header image, choose a color scheme, and change the Progress Bar style.

Editing the other options for your conversational form

Once you are happy with your form’s settings, don’t forget to click the ‘Save’ button at the top of the screen:

Make sure you save your conversational form before moving on

Now, click the ‘View’ button next to the permalink for your form to see it live on your site:

Click the button to view your conversational form live on your site

The customer simply clicks the Start button to begin the form.

The conversational questionnaire - user clicks the Start button to begin

They can then enter their responses one question at a time. The questions that aren’t active will be faded out until the customer moves to them.

The questions displaying on the conversational questionnaire

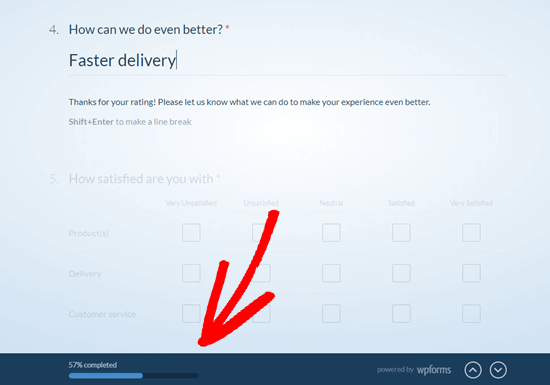
The sticky progress bar at the bottom of the screen will show how far through the form the customer is:

WPForms will show the user how far through the questionnaire they are, using the progress bar

That’s it. You’ve successfully created your conversational questionnaire.

Viewing the Results from Your Questionnaire

Whether you created a regular survey or a conversational form, the process for viewing the results is the same.

Each questionnaire response will be emailed to the email address you set up under Settings » Notifications.

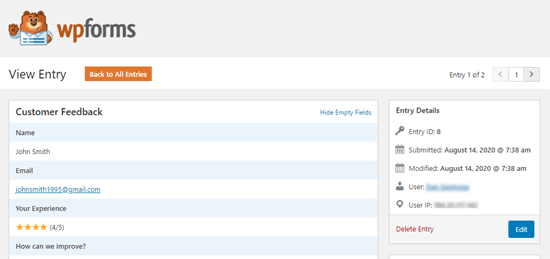
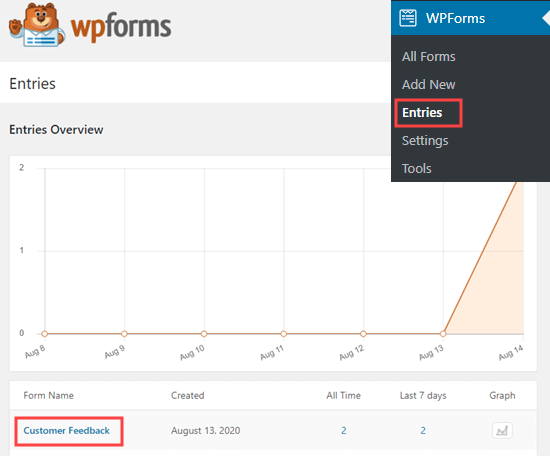
WPForms also stores all your survey results in your WordPress database. To view them, go to WPForms » Entries in your WordPress dashboard. Then, click on the name of your survey form:

Click on the name of your form to view the questionnaire results

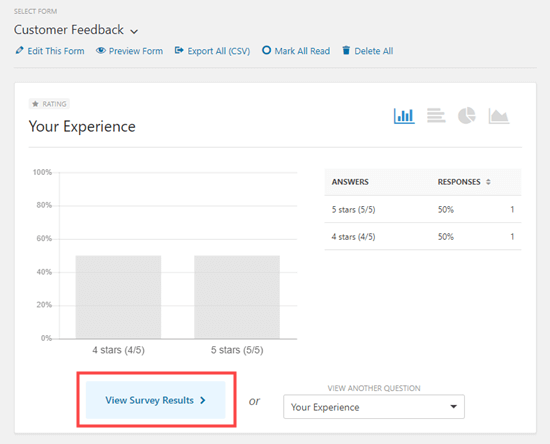
You will then see some of the answers from your questionnaire. Simply click the ‘View Survey Results’ button to view all the questionnaire results.

Click the View Survey Results button to see all the graphs and charts from your questionnaire results

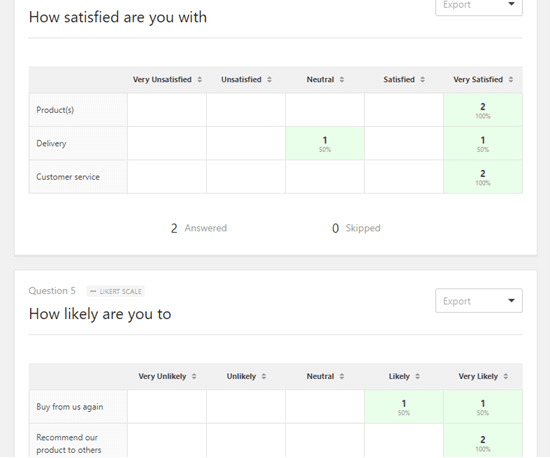
WPForms will automatically create graphs and charts to make it easy to interpret the results:

Two of the charts that WPForms has automatically created from the questionnaire results

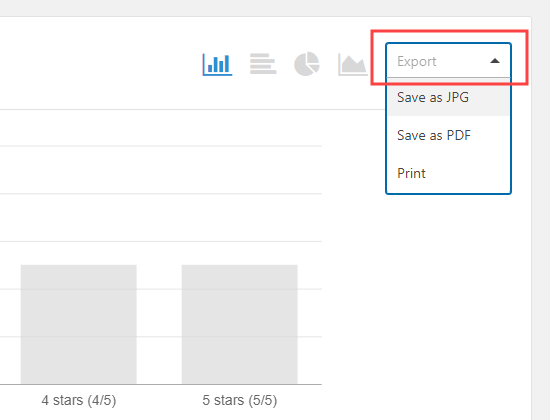
It’s easy to export any of the graphs as a PDF or JPG. You can even print them to share with others in your organization. Just click the ‘Export’ link next to any item and choose from the dropdown menu:

Exporting a chart from the questionnaire using the Export dropdown for that question

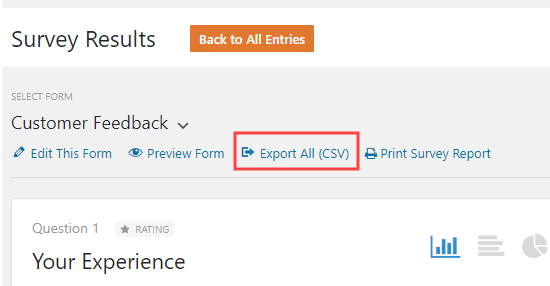
You can also download all your results as a CSV file. Just click the ‘Export All (CSV)’ button near the top of the page to download all the results:

Exporting all answers from the questionnaire as a CSV file

If you want to view the questionnaire answers from individual customers, then click the ‘Back to All Entries’ button at the top of the screen:

Going back to view all the entries for the WPForms questionnaire

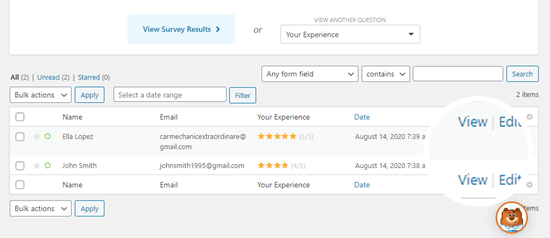
Next, scroll down to the table at the bottom of the screen. Click the ‘View’ button for the entry you want to see:

Viewing individual answers to the questionnaire

You will now see all the answers submitted by that person.

Viewing the details of one submitted survey response

We hope this article helped you learn how to create a questionnaire in WordPress. You might also enjoy our articles on the best email marketing services and how to start an online store.

If you liked this article, then please subscribe to our YouTube Channel for WordPress video tutorials. You can also find us on Twitter and Facebook.

The post How to Create a Questionnaire in WordPress (Easy Way) appeared first on WPBeginner.

Best AliExpress Alternatives for Buyers: 10 Platforms to Buy From in 2020

AliExpress is one of the most established eCommerce marketplaces with buyers from all over the globe. The main reason they’re this popular is because of their huge catalog of products and really low prices (compared to what you’d have to pay with a retailer in your country). However, just if you happen to be looking for some quality AliExpress alternatives, we’ve curated a list of the top options for you here.

Can anybody help me to complete this code in C++ as I am new to this

// complete the following code.
// Do not use 2-D array, such as int a[2][3];
#include <iostream>

#include <stdlib.h>
using namespace std;

// implement the functions : add, sub, mult, transpose
class Matrix {
public:
    Matrix(int row, int col);
    int GetData();
    Matrix Transpose();
    int Display();
    Matrix Multiply(Matrix b);
    Matrix Add(Matrix b);
    Matrix Sub(Matrix b);
    Matrix Multiply2(Matrix b);
    int CompareRowCol(Matrix b);
private:
    int rows, cols;
    int* Term;
};

Matrix::Matrix(int row, int col) : rows(row), cols(col)
{
    Term = new int[rows * cols];
}

int Matrix::GetData() {
    int input_value;
    cout << "rows = " << rows << "  cols = " << cols << endl;
    for (int j = 0; j < rows * cols; j++)
    {
        cout << "term value = ";
        cin >> input_value;
        cout << " " << endl;
        Term[j] = input_value;
    }
    return 0;
}

Matrix Matrix::Transpose() {
    Matrix b(cols, rows);

    int n = rows * cols;
    for (int i = 0; i < cols; i++)
    {
    //To be implemented
    }
    cout << endl;
    return b;
}

Matrix Matrix::Multiply(Matrix b) {
    if (cols != b.rows) cout << "Incompatible matrices" << endl;
    Matrix d(rows, b.cols);
    for (int i = 0; i < rows; i++)

    {
        for (int j = 0; j < b.cols; j++)
        {
            //To be implemented
        }
    }
    return d;
}
Matrix Matrix::Add(Matrix b) {
    if (cols != b.cols) cout << "Incompatible matrices" << endl;
    if (rows != b.rows) cout << "Incompatible matrices" << endl;

    Matrix d(rows, cols);
    for (int i = 0; i < rows; i++)

    {
        //To be implemented
    }
    return d;
}
Matrix Matrix::Sub(Matrix b) {
    if (cols != b.cols) cout << "Incompatible matrices" << endl;
    if (rows != b.rows) cout << "Incompatible matrices" << endl;

    Matrix d(rows, cols);
    for (int i = 0; i < rows; i++)

    {
        for (int j = 0; j < cols; j++)
        {
            //To be implemented
        }
    }
    return d;
}
Matrix Matrix::Multiply2(Matrix b) {
    if (cols != b.rows) cout << "Incompatible matrices" << endl;
    Matrix bXpose = b.Transpose();
    Matrix d(rows, b.cols);
    //  Must be implemented by using bXpose
    return d;
}
int Matrix::CompareRowCol(Matrix b) {
    if (cols != b.rows) return 1;
    else return 0;
}
int Matrix::Display() {

    int n;
    n = rows * cols;
    for (int i = 0; i < rows; i++)
    {
        //To be implemented
    }
    cout << endl;
    return 0;
}

int main()
{
    Matrix a(2, 2);
    Matrix b(2, 2);
    Matrix c(2, 2);

    cout << "Enter first matrix: " << endl;
    a.GetData();
    cout << "Enter second matrix: " << endl;
    b.GetData();

    cout << "Display first matrix: " << endl;
    a.Display();
    cout << "Display second matrix: " << endl;
    b.Display();

    Matrix d(2, 2);
    d = b.Transpose();
    cout << "Transpose() of Matrix b" << endl;
    d.Display();

    /* If colum of first matrix in not equal to row of second matrix, asking user to enter the size of matrix again. */
    if (a.CompareRowCol(b))
    {
        cout << "Error! column of first matrix not equal to row of second.";
        cout << "Enter rows and columns for first matrix: ";
    }

    c = a.Multiply(b);//not using transpose()
    c.Display();
    c = a.Sub(b);
    c.Display();
    cout << "Multiply of Matrix a,b" << endl;
    c.Display();
    cout << "using transpose()" << endl;
    c = a.Multiply2(b);//using transpose()
    c.Display();
    system("pause");
    return 0;
}

Complete the following code. And Do not use 2-D array, such as int a[2][3];

Slimymed Negative Erfahrungen

The main purpose Slimymed Negative Erfahrungen of this section is to illustrate that psychology plays a serious role in determining if people are successful with future weight loss. If it's not addressed as part of the general organize, it can be the issue that produces or Slimy Med Premium breaks your success. This, however, isn't an space most nutrition programs can adequately tackle and should not be expected to. But, the better programs do typically try to help with motivation, goal setting, and support. Buy here: http://slimymedpremium.de/