We continue our tutorial with the wheels of our Porsche 911 car, but before we proceed with the next steps, I’d like to shine the spotlight on the famous Fuchs wheels that were designed in the shape of a cloverleaf (or a wing). First, a bit of history:
“The Fuchs wheel is a specialty wheel made for the first Porsche 911/911S model in the early 1960's. Designed in conjunction with Otto Fuchs KG, Porsche modeler Heinrich Klie, and Ferdinand Porsche Jr., the Fuchs wheel was the first lightweight forged wheel to be fitted to a production automotive vehicle. They provided the rear-engined Porsche 911 sports car with a reduction in unsprung mass, through a strong and lightweight alloy wheel.”
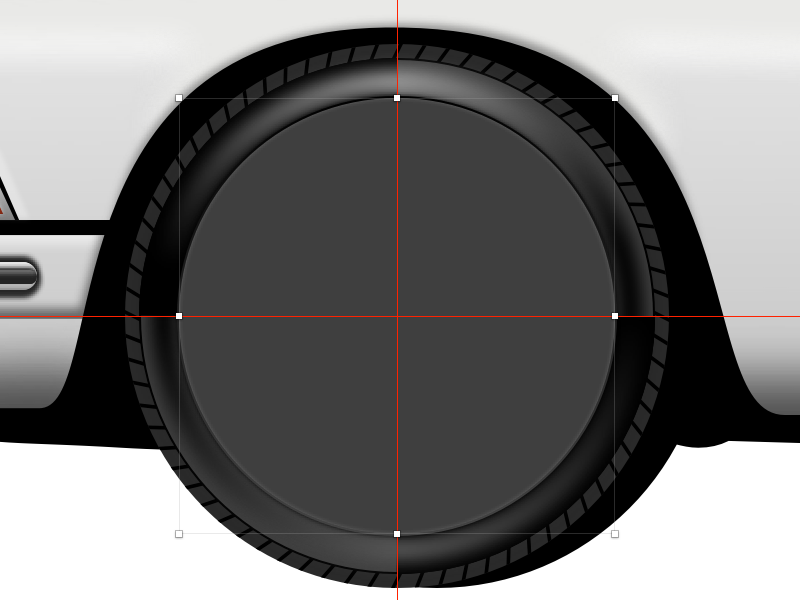
Un-hide the wheel base in the Layers panel. Turn off Borders and set Fills to #2A2A2A. Then, duplicate this shape, change Fills to #000000, move it behind the base wheel (right-click on it and choose Move Backward) and push it 20px to the right.
Tip: Holding Shift + → will move the selection in 10-pixel increments.
Let’s start working on the tire design. (Large preview)
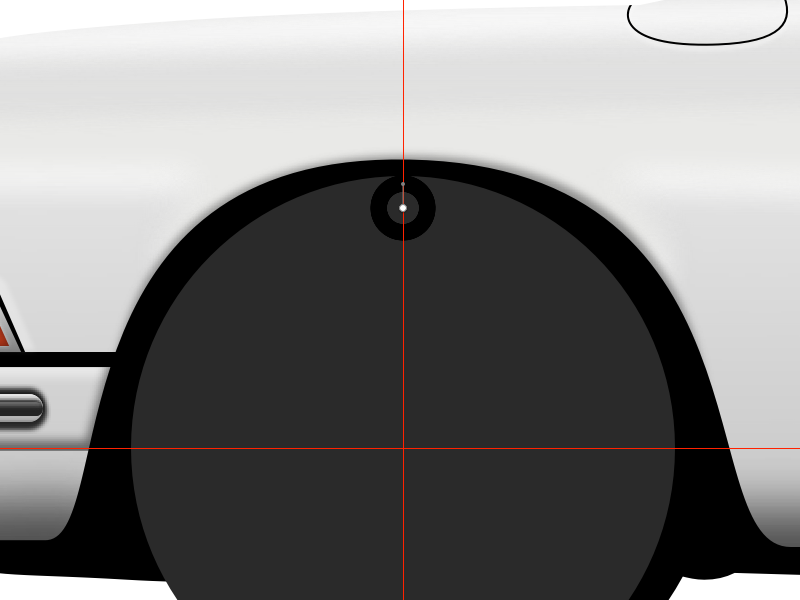
Select the base wheel and add some guidelines to make alignment of all elements easier. To do this, show the Sketch rulers (press Ctrl + R). Then, add a vertical guideline at the center of the base wheel with a click on the upper ruler, and do the same for the horizontal guide on the left ruler.
Add a vertical and a horizontal guideline at the center of the ‘base wheel’. (Large preview)
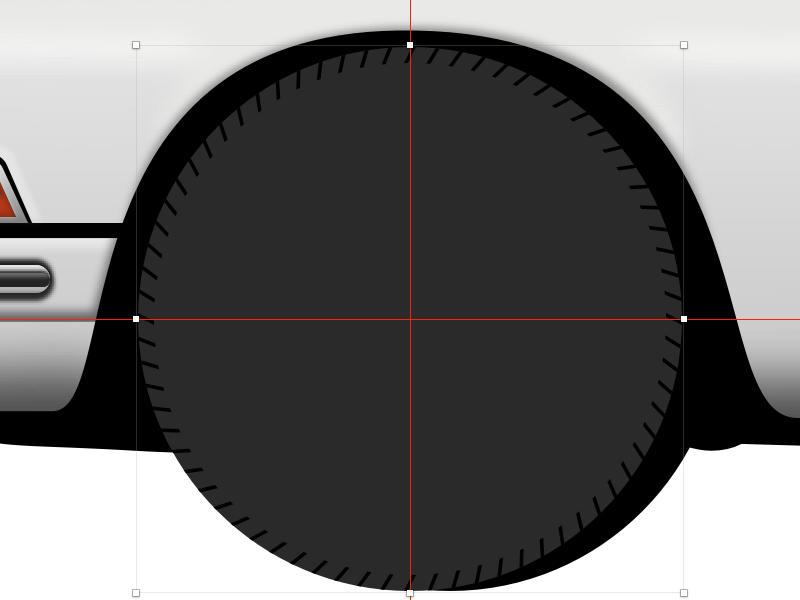
Temporarily turn off the guidelines by pressing Ctrl + R on the keyboard. Create a tiny rectangle with a width of 2px and a height of 8px, with the Fills set to #000000 and the Borders turned off. This rectangle will serve as the base unit for creating the treads (a.k.a. the tread pattern). Center the rectangle to the base wheel horizontally.
Create the base unit for the treads. (Large preview)
Zoom in close enough (here, I zoomed in to 3200%), choose Transform from the top toolbar, select the top middle point and push it 2px to the right, then select the middle bottom point and push it 2px to the left to make it look slanted.
Note: If you don’t see the Transform tool in the top toolbar, you can add it there via View → Customize Toolbar… or you can use the keyboard shortcut Cmd + Shift + T.
Transform the tread base unit and make it look slanted. (Large preview)
Turn back on the guidelines (Ctrl + R) and make sure this rectangle is selected. Put the rectangle into a group by pressing Cmd + G on the keyboard. Give this group the name treads.
We will use the Rotate Copies tool to create the treads around the wheel base. Like Create Symbol, Rotate Copies can be one of those features that will save you a lot of time and effort!
Note: If you are using Sketch version 67.0 or 67.1, you may experience a bug with Rotate Copies operation. If this happens, you will need to create the treads around the wheel base manually; or (better), you should update to v. 67.2 (or later) where this issue has been resolved.
Make sure the rectangle inside the group treads is selected, then go to Layer → Path → select Rotate Copies. A dialog box that will open will let you define how many additional copies of the selected element to make. Enter 71 so that in total we will have 72 rectangles around the wheel base that will be the treads. Press Rotate in the dialog box. After you have entered this value in the dialog, you will be presented with all of the rectangles and a circular indicator in the middle.
Tip: Performing this step in Sketch is very CPU and memory intensive! If you are working on a modern machine, probably you will not experience any issues; but if your Mac is a bit older, then your mileage may vary. In general, when working with a large number of copies, try to first turn off Borders to avoid getting stuck and to achieve the result of the operation faster.
Use the Rotate Copies feature to create the treads. (Large preview)
Now, move this circular indicator down until it is located precisely at the intersection of the guides — and voilà! we have 72 rectangles evenly placed around the wheel base. When you’re done, press Esc or Enter. Note that if you miss putting the circular indicator (the center of rotation) right at the intersection of the guides, the rectangles won’t be distributed perfectly around the wheel base so be careful.
Note: The Rotate Copies tool doesn’t create a compound shape in the newer versions of Sketch (version 52 or later) and instead creates (and rotates) separate copies of the shape. By putting the first shape into a group we’ve secured that all created and rotated shapes are inside this group named treads.
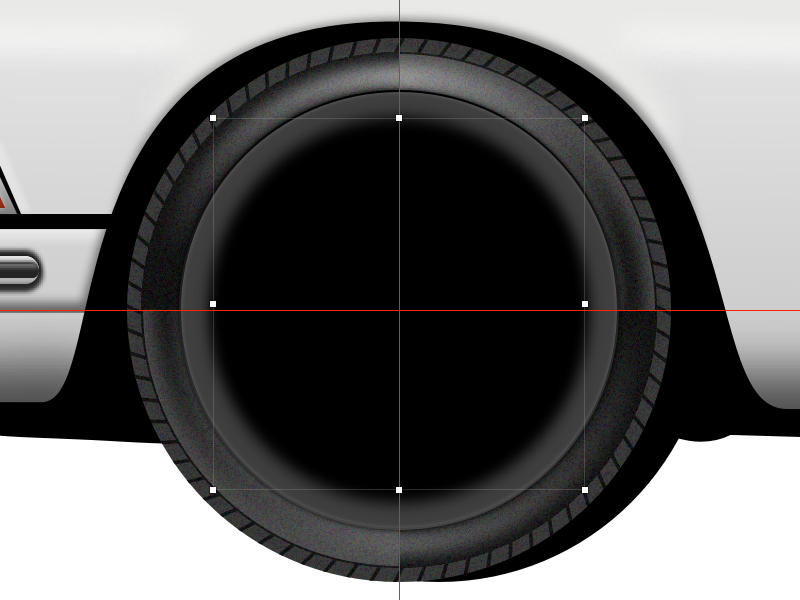
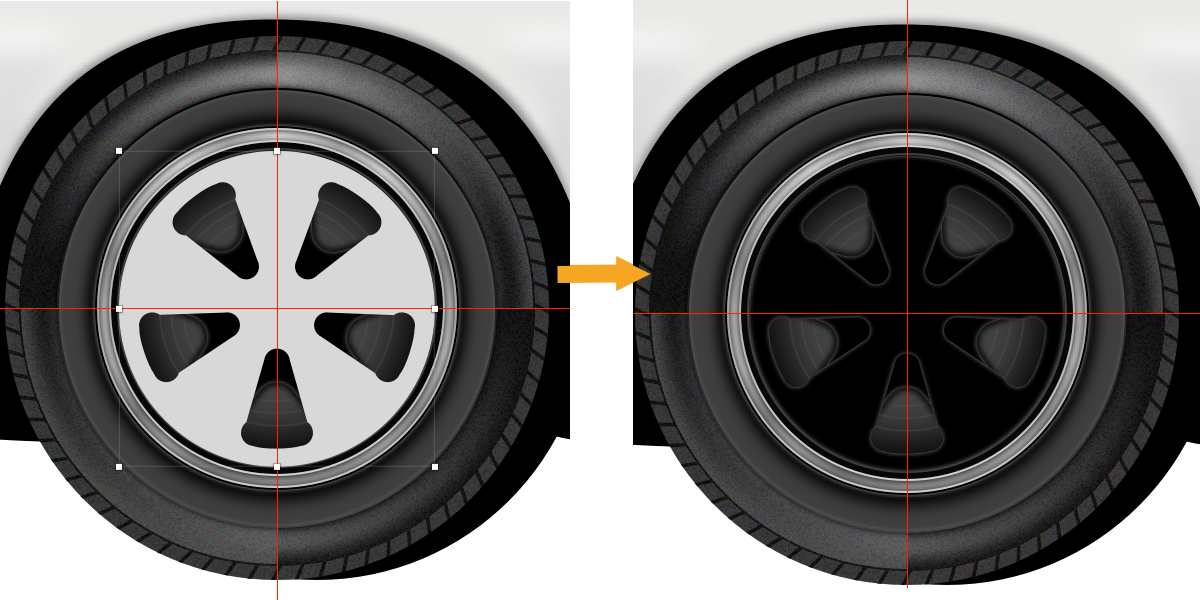
Select the base wheel again, duplicate, position it above treads in the Layers panel list, and scale it down by 14px. Change Color to #3F3F3F and turn on Borders — set Color to #000000, Position to Inside and Width to 1px.
Continue working on the tire details. (Large preview)
Duplicate this circle, turn off Fills and set the BorderWidth to 20px. We only want to show 2⁄4 of the Borders — 1⁄4 on the top left side and 1⁄4 on the bottom right side. To do that, type in the Dash field r*π*0.25 where r is diameter of the circle (254px in my case), 0.25 is 25% (or 1⁄4) of the border, and π is 3.14.
So in this case enter the following formula in the Dash field: 254*3.14*0.25, and press Enter (or Tab) on the keyboard.
Note: If you enter a number in the Dash field and press Tab on the keyboard, Sketch will automatically fill the Gap field with the same number. Same thing will happen if you press Enter.
Once again, duplicate the circle, turn off Gaussian Blur and scale it down. Turn on Fills, make sure it is still #3F3F3F, set the Borders to Outside position and Width to 1px. Change Color to Linear Gradient and use #000000 for the first color stop and #444444 for the last color stop.
Add Inner Shadows — for the Color use #FFFFFF at 20% Alpha and set Blur to 2; then apply Shadows — for the Color use #000000 at 90% Alpha and set Blur to 2.
Now it’s the perfect time to add a bit of a texture! Select and copy the wheel base shape, paste it on top, then Move Backward once so it sits just beneath the circle we’ve just created. Set Fills to Pattern Fill, Type to Fill Image and choose the bottom right pattern. Set Opacity for this shape to 10%.
Select the circle on top, duplicate, turn off Borders, Inner Shadows and Shadows. Set Fills to #000000 and Opacity to 100% and scale down this circle by 32px. Apply a Gaussian Blur with the Amount of 4.
Push it down 3px, then duplicate and move the duplicate 6px up.
Duplicate then move the duplicate up. (Large preview)
Duplicate the last circle, turn off the Gaussian Blur, push it down by 3px and scale it down by 4px. Add a Shadows effect with the Color set to #FFFFFF at 90% Alpha and Blur set to 2.
Duplicate the circle again, push and scale it down a bit. Almost there! (Large preview)
Now, duplicate this circle, turn off Shadows and scale it down a bit (by 2px). Turn on Borders, set position to Inside, Width to 1px and apply a Linear Gradient:
Then, add an Inner Shadows effect — set Color to #000000 at 50% Alpha and set Blur and Spread to 2.
Duplicate, scale it down by 14px, change Fills to #434343Solid Color, Borders position to Outside, and Inner Shadows properties to: Color#000000 at 90% Alpha, Blur and Spread set to 24.
Then add two Shadows effects:
first — Color: #000000 at 50% Alpha; Y: 2; Blur: 5
Again, duplicate the shape, scale it down by 8px, turn off Fills, Shadows and Inner Shadow, and set BordersColor to #414141.
Duplicate and scale down the circle. (Large preview)
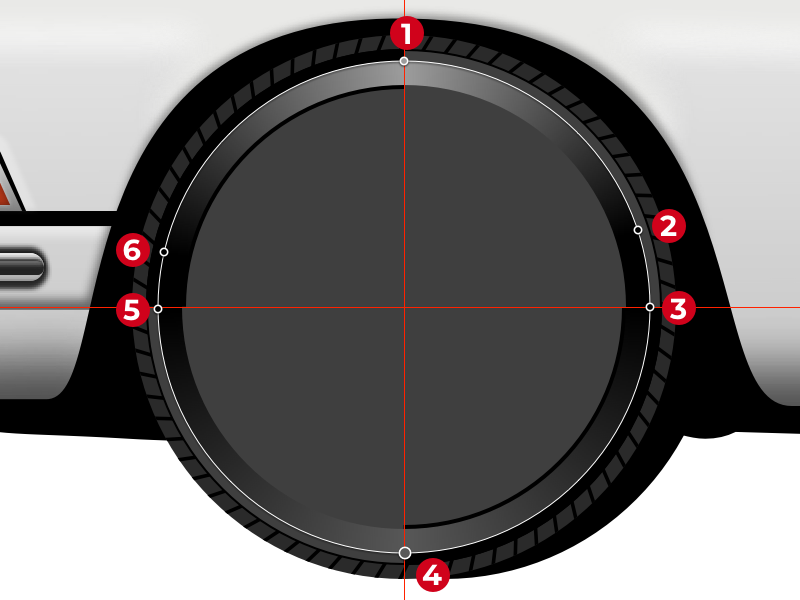
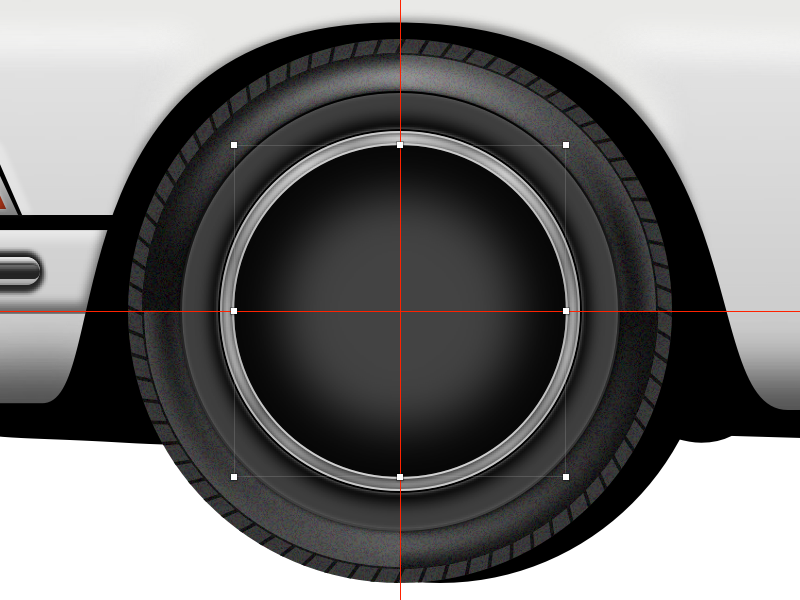
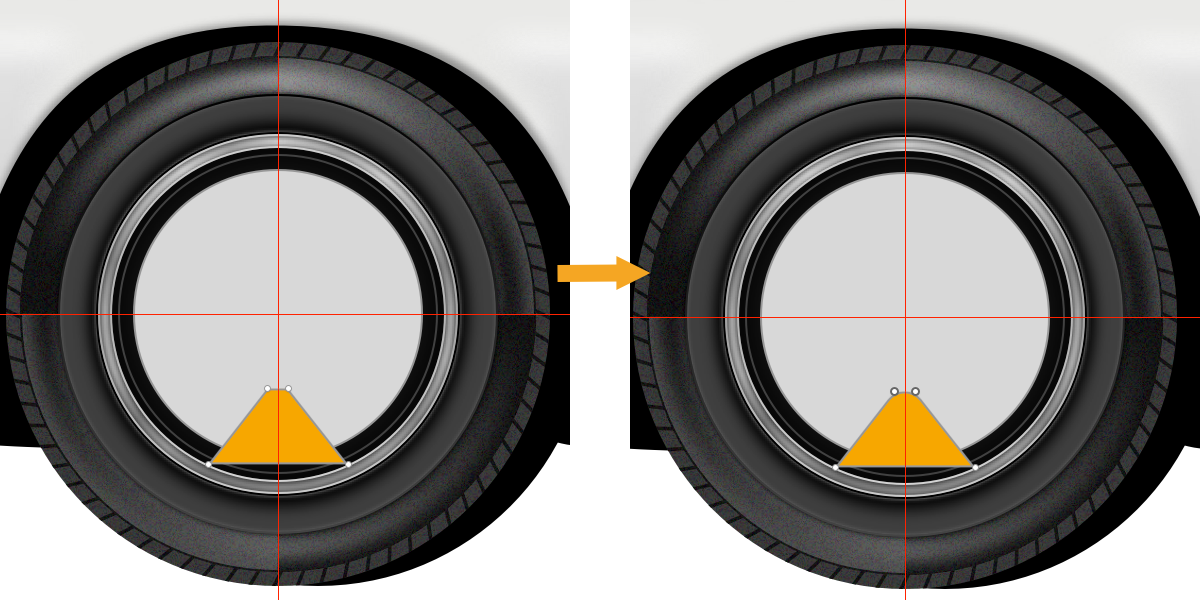
Switch to the Oval tool (O), and draw a circle from the intersection of the guides. Turn off Fills, set BordersColor to #575757, position to Inside and Width to 1px.
Duplicate, scale it down a bit and make sure the border Width is 1px. Repeat this seven more times, so at the end you have nine concentric circles. Make sure that all BordersWidth are 1px. Use the image below as reference.
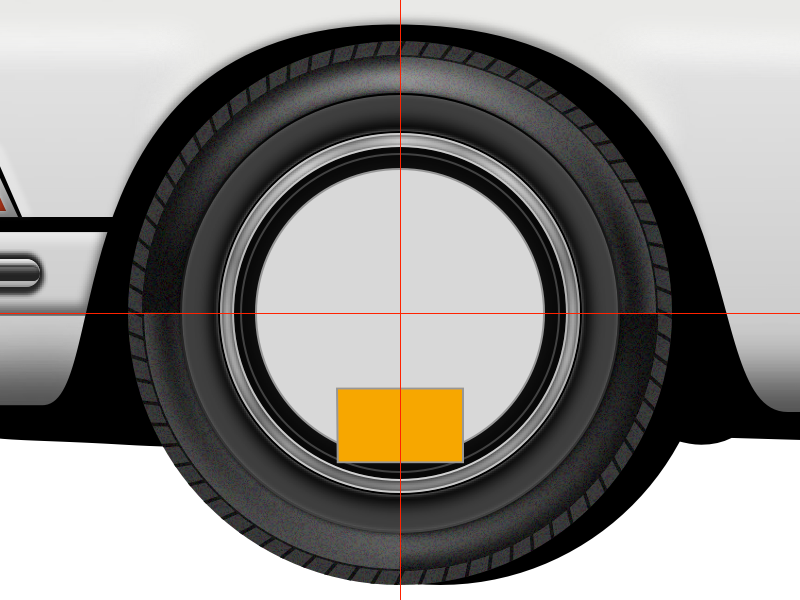
Select this rectangle, double-click on it to switch to vectorediting mode and move the points until you have something like on the image below. Select the top two points and set the Radius to 20.
Set the radius of the top two points. (Large preview)
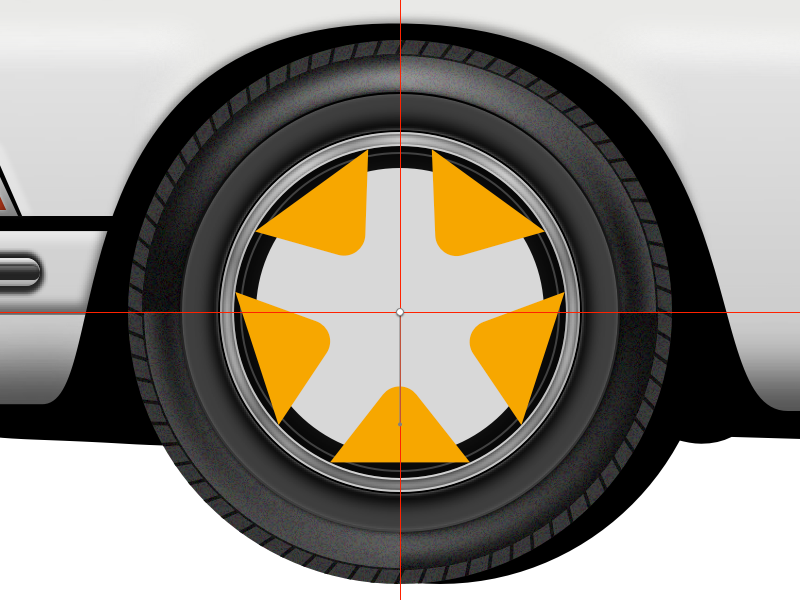
We will use Rotate Copies again to distribute this shape around the circle. Select both — circle and the modified rectangle — turn off Borders and place them into a group. Now select the modified rectangle, go to Layer → Path, select Rotate Copies, enter 4 in the dialog box (so we’ll have a total of five shapes), click Rotate, and align the circular indicator to the intersection of the guides. When done, press Esc or Enter.
Use Rotate Copies to distribute this shape around the circle. We’re getting closer to the cloverleaf design! (Large preview)
Select all shapes inside the group and apply a Subtract operation from the top toolbar. Add Inner Shadows effect — for the Color use #FFFFF at 50% Alpha and set Blur to 2. Then apply Shadows with Color set to #000000 at 70% Alpha and both Blur and Spread set to 2. Finally, change Fills to #000000.
Subtract, add Inner Shadows and Shadows, change Fills to black. (Large preview)
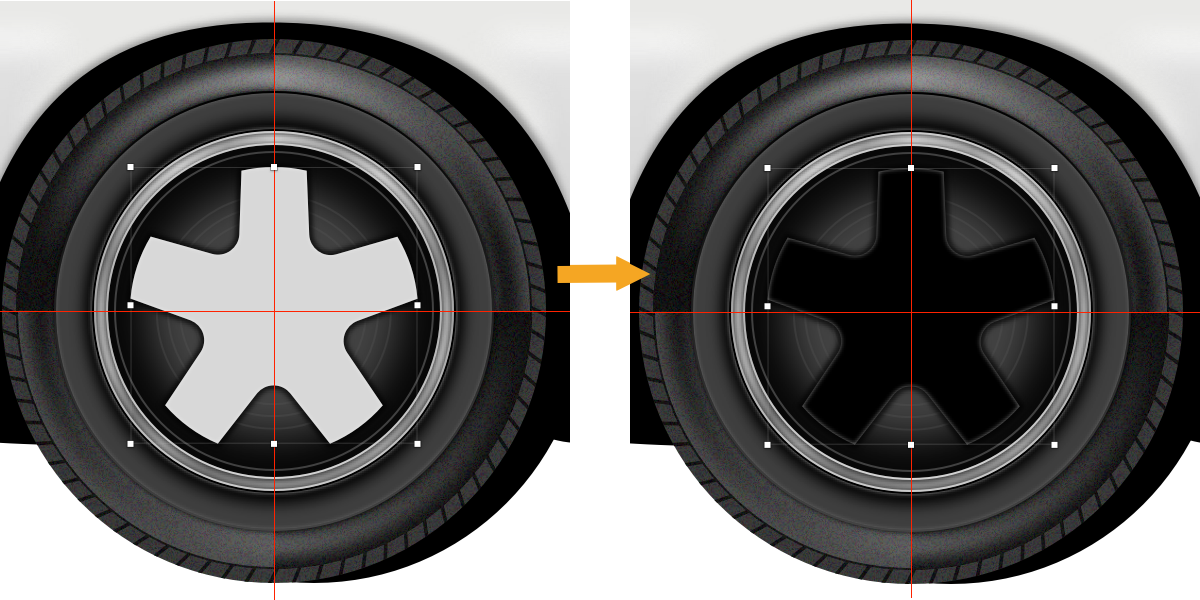
Draw a circle from the intersection of the guides but make it a bit bigger than the shape below, then draw a shape and center it horizontally to the circle. Select both, turn off Borders and put them into a group. Select the shape and perform a Rotate Copies operation. Enter 4 in the dialog box (so again, we’ll have a total of five shapes), click Rotate, and align the circular indicator to the intersection of the guides. When ready, press Esc or Enter.
The Rotate Copies feature is useful again. (Large preview)
Select all shapes inside the group and apply a Subtract operation from the top toolbar. Add an Inner Shadows effect — for the Color use #FFFFF at 50% Alpha and set Blur to 2. Change Fills to #131313.
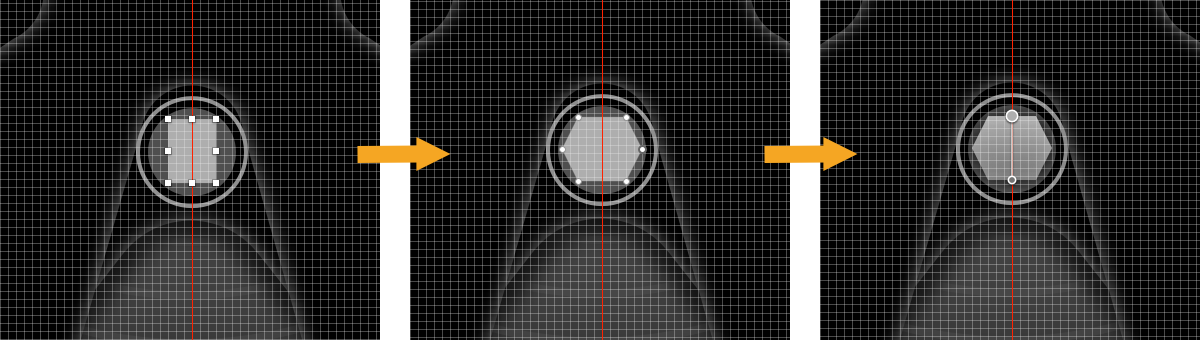
Zoom in close enough (I zoomed in to 400%) and draw a circle. Set Fills to #4F4F4F, change Borders position to Outside, Width to 1px and use #8F8F8F for the Color. Add one more border but this time use #000000 for the Color, set position to Center and make sure the Width is 1px.
Draw a rectangle in the middle of the circle, turn off Borders, enter vectorediting mode, hold Shift and click on the right segment to add a point in the middle, then do the same for the left segment. Push those points 2px to the left and to the right to create a hexagonal shape. Apply a Linear Gradient for the Fills — use #AEAEAE for the top and #727272 for the bottom color stop. Add Inner Shadows using #000000 at 50% Alpha for the Color and set Blur to 2, and apply Shadows using #000000 at 90% Alpha for the Color and set Blur to 2.
Duplicate the hexagonal shape, enter vectorediting mode, select all the point on the left side and push them 1px to the right, then select all top points and push them 1px down, push the bottom points 1px up and the right points 1px left. Clear the Shadows and modify the Linear Gradient:
#8F8F8F
#979797
#A4A4A4
#636363
#4A4A4A
Now apply an Inner Shadows effect. For the Color use #000000 with 50% Alpha and set Blur to 2.
The bolt head details, now with the gradient applied. (Large preview)
Select all the shapes that we used to create the bolt head and group them into a bolt head group. We can Create Symbol out of the bolt head group and we can use it as many time as we need it.
To create the new Symbol, select the bolt head group, right-click on it, and choose Create Symbol from the menu. The dialog box Create New Symbol will appear, give a name to the symbol (bolt head) and click OK.
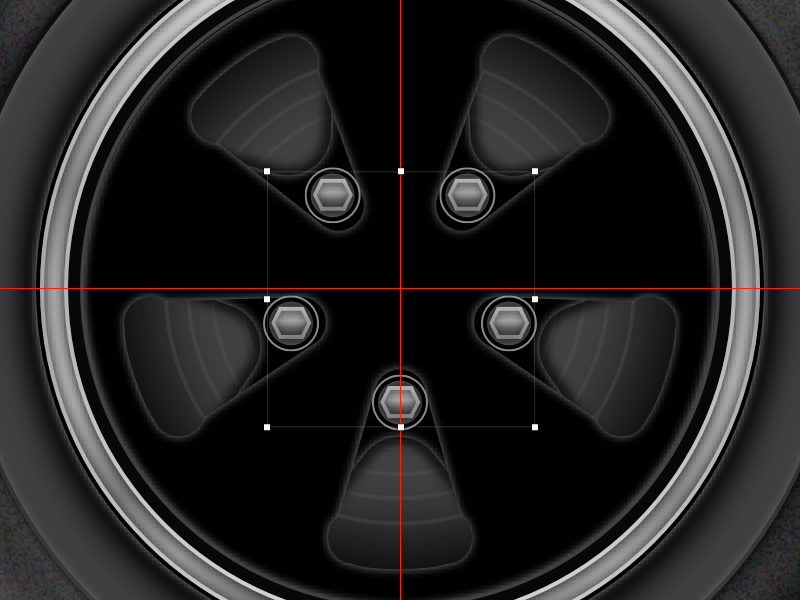
Now we need to distribute the bolt head symbols around the circle. Duplicate the symbol, choose Rotate from the top toolbar, drag the crosshair marker to the the intersection of the guides, and rotate it 72 degrees. Continue duplicating and rotating the symbol in 72-degree increments, without letting the selection go.
Distribute the ‘bolt head’ symbols around the circle. (Large preview)
Now select each symbol instance and adjust the angle of rotation to 0 degrees.
Tip: I’m suggesting to initially adjust the angle to 0 degrees so that you can better see the process and how the bolts will look like when placed on the rim. Once the rim bolts are in place, though, my recommendation is to experiment some more and try setting a different angle of rotation for each bolt symbol. This will make the wheels look more realistic — after all, in real life it’s much more likely to see rim bolts at random angles than aligned perfectly to 0 degrees!
Finally, select all the instances of the bolt head symbol, place them into a group bolts and perform a Move Backward once.
Draw a shape, set BorderColor to #CFCFCF, set Width to 1px and position to Inside, and use a Linear Gradient for the Fills:
#5F5F5F
#B5B5B5
#CBCBCB
Then add Inner Shadows effect using #000000 at 30% Alpha, and Blur set to 2.
Continue working on the rim details. (Large preview)
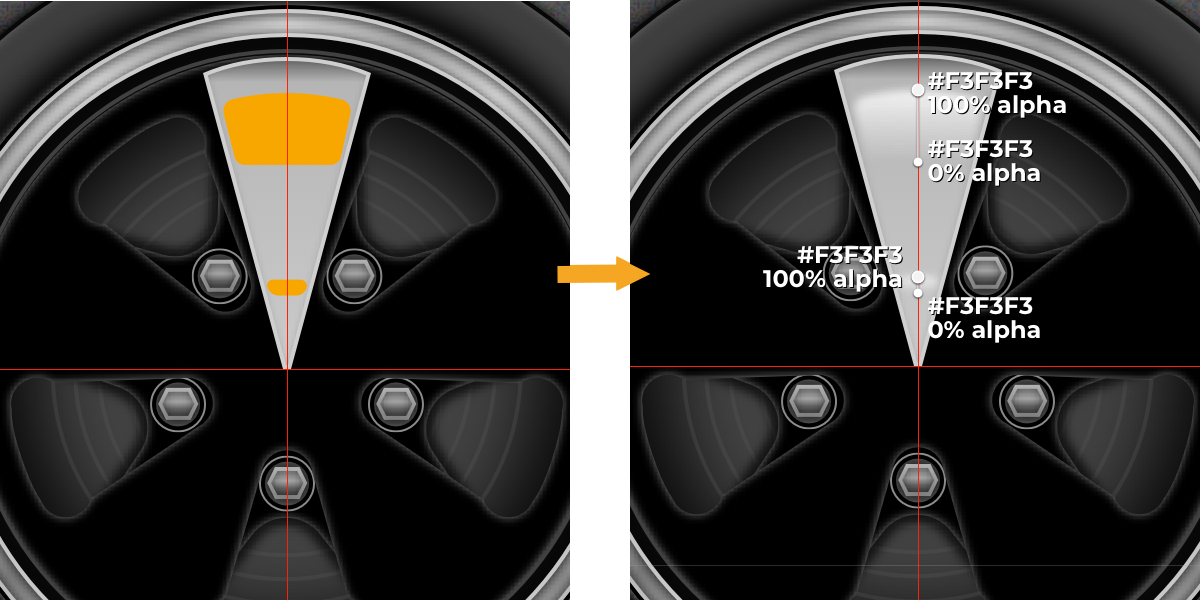
Grab the Vector tool (V) and draw two shapes that we will use for the highlights. Use a Linear Gradient for the Fills — use for the top color stop #F3F3F3 at 100% Alpha and the same color for the bottom but at 0% Alpha. Use the same gradient settings for both shapes and also apply a Gaussian Blur with the Amount of 1 to both shapes.
Select all shapes that we’ve just created, group them and distribute them evenly around the rim. Use the same method that we used for the bolt heads.
Distribute the shapes around the rim. (Large preview)
Select the Oval tool (O) and draw a circle from the intersection of the guides. Turn off Borders and use Linear Gradient with colors set to #D8D8D8 for the top stop and #848484 for the bottom stop. Use Inner Shadows and Shadows to make it look slightly raised.
Let’s add a light Inner Shadows effect with the following properties:
Color: #FFFFFF at 80% Alpha
Blur: 2
Then, add a dark Inner Shadows effect:
Color: #000000 at 50% Alpha
Blur: 2
Finally, apply a Shadows effect:
Color: #000000 at 50% Alpha
Blur: 2
Spread: 1
Create the circle in the middle and apply all the styles. (Large preview)
Duplicate this circle, scale it down a bit, turn off Inner Shadows and Shadows, turn on Borders and add the first border:
Color: #B5B5B5;
Position: Outside
Width: 1px
Then add a second one on the top:
Color: #656565
Position: Center
Width: 1px
Work on the details in the center of the rim. (Large preview)
Let’s finish the wheel design by adding to the rim the Porscheemblem.
Note: Recreating the original Porsche logo for the rims, all in vectors, is outside of the scope of this tutorial. There are a few options — you can create it yourself by following the same basic principles outlined on these pages; you can download the logo from Wikipedia in SVG format and then try to modify it; or you can download a copy of the logo in vector lines from my website (porsche-line-logo-f.svg). This copy of the Porsche logo was created by me from scratch, all in vectors, and this is the variant that I recommend you to use.
After downloading the logo file (porsche-line-logo-f.svg) bring it into our design.
Switch to the Scale tool in the top toolbar, and in the dialog box enter 20px in the height field, to adjust the size of the logo. Align the logo horizontally with the circle below.
Add the Porsche logo to the center of the rim. (Large preview)
The Porsche emblem in the center of the rim (detail close-up). (Large preview)
Completing the wheels — two possible workflows
Since a copy of the front wheel (once it’s complete) will be used more than once in our illustration, we have two options now:
A. We can complete the front wheel design, duplicate the wheel, make a couple of tweaks, and use the duplicate as the rear wheel. This is the easiest variant.
B. Or, for learning purposes, we can use a workflow involving the use of nested symbols. This is the more interesting option which I’ll explore in more detail in a bit. Buckle up!
A. Workflow #1: duplicate the wheel and adjust the copy
Pick up the Vector tool (V) and draw a shape on top of the wheel. Turn off Borders and Fill the shape with black #000000 color. Apply Gaussian Blur with an Amount of 10. This way we will recreate the shadow from the car body over the wheel — just an extra bit of realism added.
Add the shadow from the car body over the wheel. (Large preview)
Select the wheel group, wheel base copy layer and the shadow shape layer and group these into a front wheel group.
Now that the wheel is ready, duplicate the front wheel group, rename the group in the Layers panel list to rear wheel and drag it to the right to its place.
[Move the ‘rear wheel’ group to its place. (Large preview)
Select the wheel group inside and push it 20px to the right, then select the wheel base copy layer and push it 20px to the left. The rear wheel is ready.
Move the ‘wheel’ group to the right, and the ‘wheel base copy’ layer to the left. The ‘rear wheel’ group is ready. (Large preview)
B. Workflow #2: use nested symbols
Pick up the Vector tool (V) and draw a shape on top of the wheel. Turn off Borders and Fill the shape with black #000000 color. Apply Gaussian Blur with an Amount of 10. This way we will recreate the shadow from the car body over the wheel — just an extra bit of realism added.
Add the shadow from the car body over the wheel. (Large preview)
The wheel is finished. Now we’ll use a symbol and a nested symbol to create the front and rear wheels.
Select the wheel group, wheel base copy layer and the shadow shape layer and group these into a front wheel group.
Here we’re coming to the more interesting bits! Select the wheel group and create a wheel symbol, then select the front wheel and create a front wheel symbol. The front wheel symbol is now a nested symbol!
Nested symbols are regular symbols that are made from other symbols that already exist in your Sketch file. In this case, the front wheel symbol is made from the wheel symbol, so the wheel symbol is nested inside the front wheel symbol.
What could be better than one symbol? Perhaps a symbol with another one inside it — enter Nested Symbols! This feature gives you a lot of possibilities when combining symbols together. Nesting symbols can be especially useful when you need to create variations of one symbol. — Javier-Simon Cuello, “Unleashing The Full Potential Of Symbols In Sketch”
Now, go to the Symbols page in Sketch, duplicate the front wheel symbol, select the wheel group and push it 20px to the right, then select the wheel base copy and push it 20px to the left. At the end, rename this symbol to rear wheel.
Go back to our design, select and duplicate the front wheel symbol, then using the Inspector panel change the symbol to rear wheel, rename the symbol in the Layers panel list to rear wheel and drag it to the right. Done!
So far it may seem that we’ve spent more time playing with nested symbols, compared to the other workflow. That’s true. But also we have learned how to use this feature — and now if you would like to change the design of the wheels, instead of doing so in two separate groups, you’ll need to do it only once inside the wheel symbol and the changes will be automatically applied to both wheels of the car. This is why we used a nested symbol to create the front and rear wheels. (Also, imagine if you’re working on a design of a vehicle that has many more wheels visible from the side, not only two! The time saved will multiply.)
Back to the bigger picture — with the wheels complete, we are very close to the final design. Let’s take a look.
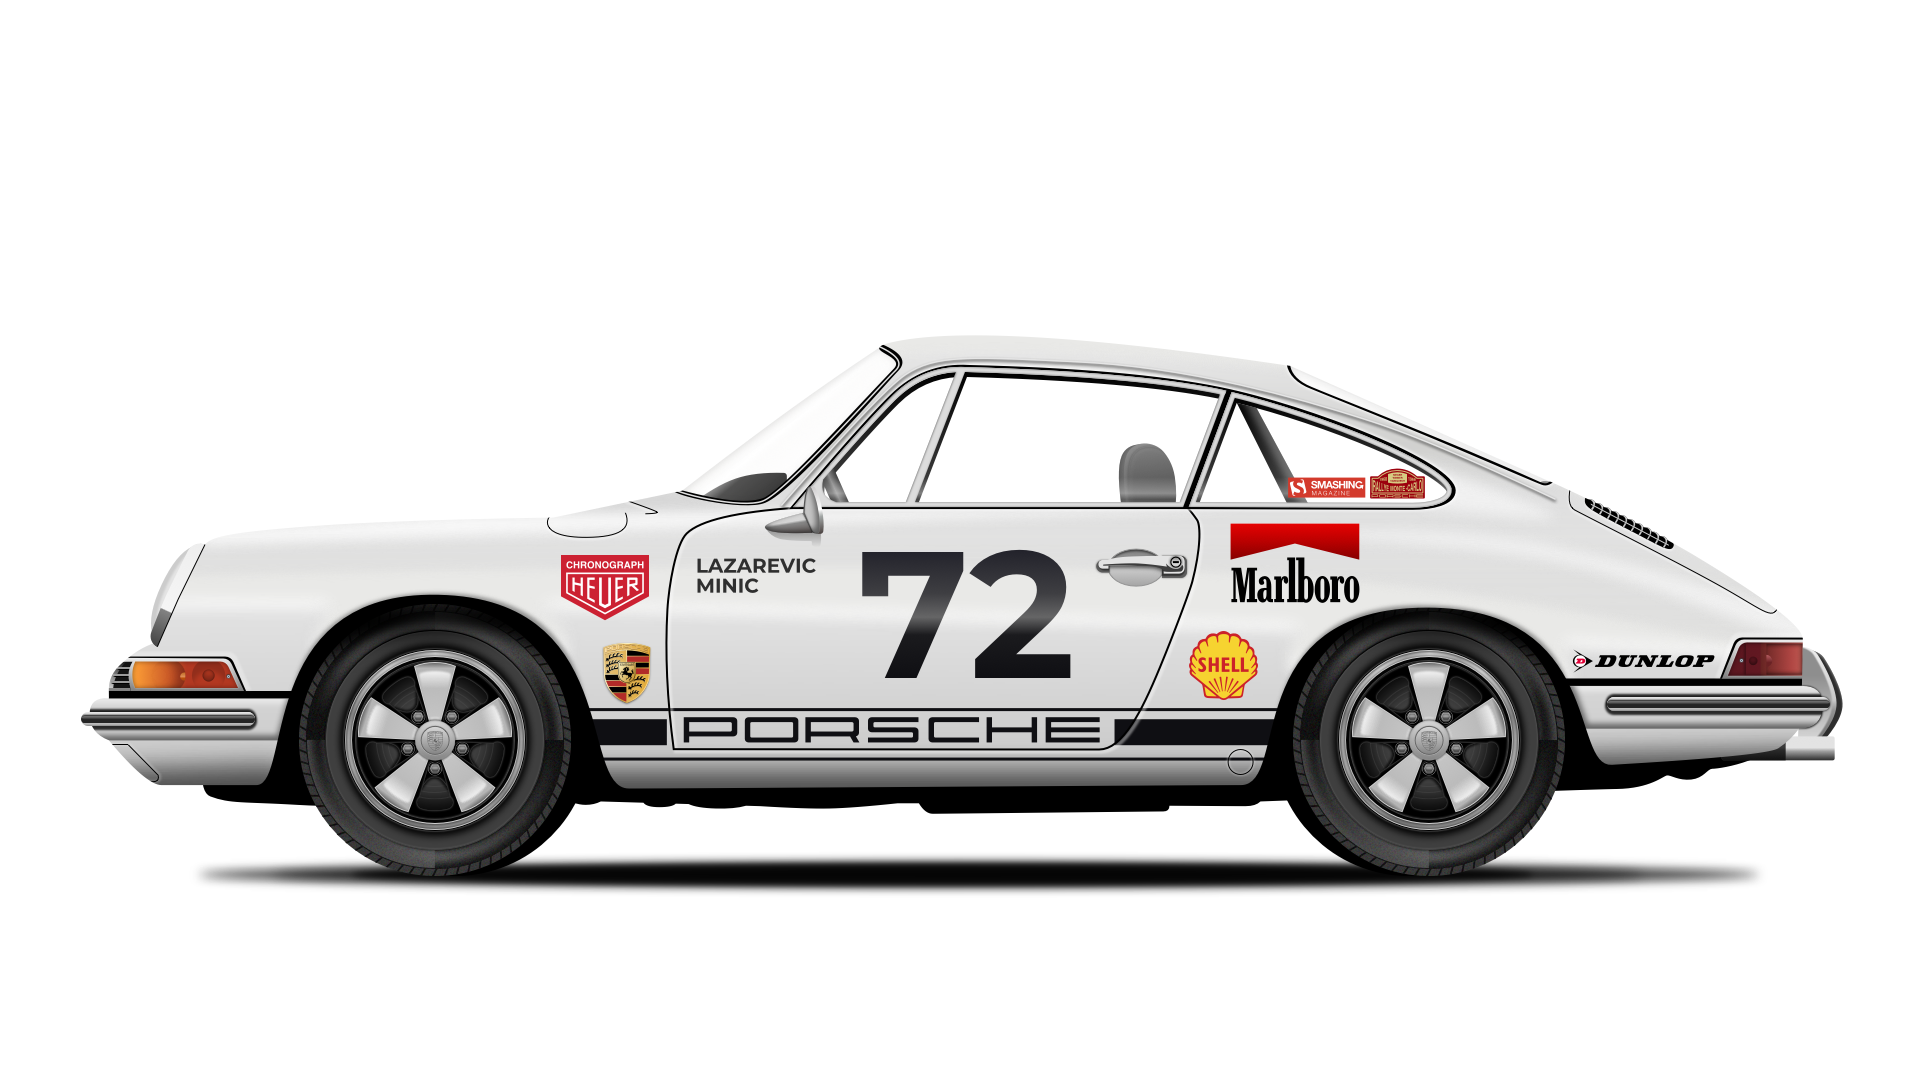
The Porsche 911 should look similar to this now. (Large preview)
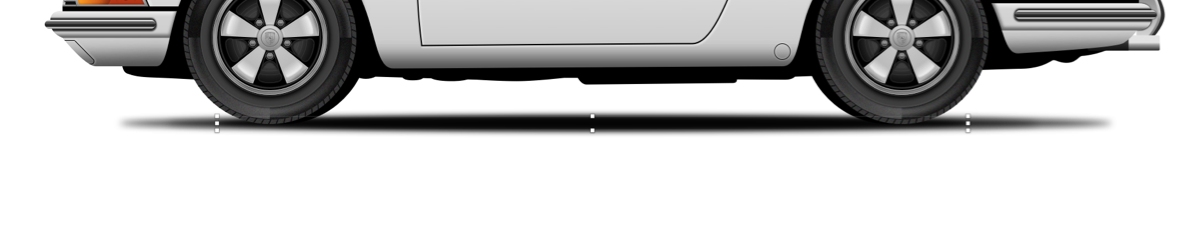
The Shadow Under the Wheels and the Car Body
Pick the Oval tool and draw an ellipse under the wheels. Set Fills to #000000 with 80%Opacity, turn off Borders and apply a Gaussian Blur with an Amount of 5.
Start making the shadow below the car. (Large preview)
Duplicate the oval shape, adjust the width using Resize handles (make it smaller), and set FillsOpacity to 50%.
Select the shadow ellipses and group them all into a shadows group. Move this group to the very bottom in the Layers panel list.
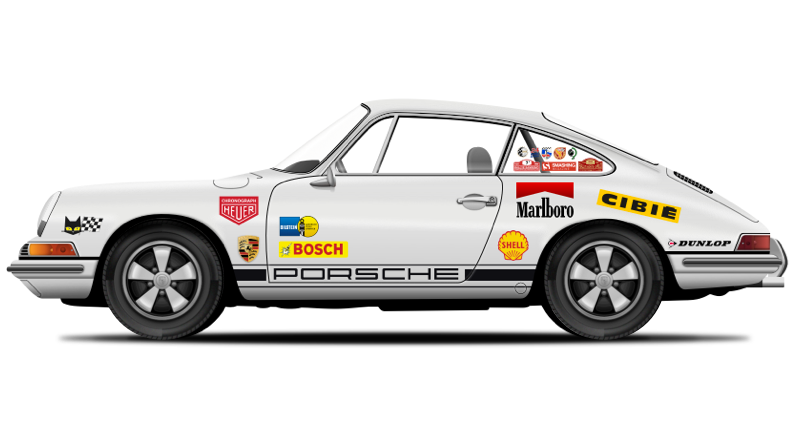
17. Final Touches — The Racing Decals
We are almost there! It’s time to add some racing decals to the car body and to the windshields.
Try to find some inspiration for the racing decals and stickers. (Large preview)
The Porsche sticker
Jump over to the Wikimedia Commons website and download the Porsche Wortmarke in SVG format. Bring it to our design, scale it up and position it like on the image below.
The ‘Porsche Wortmarke’ added to the door. (Large preview)
Create some rectangles using the Rectangle tool (R), set Fills to #0F0F13 and turn off Borders. Select all elements and group them into a porsche sticker group, then drag this group inside bodywork just below the door layer.
Add some decoration around the ‘Porsche’ sticker letters. (Large preview)
Shell sticker
Next, download the vintage Shell logo in SVG format and open it in Sketch. Delete the white rectangle at the bottom inside the logo group, then copy and paste it into our design. Place it just above the porsche sticker in the Layers panel list and position it like on the image below.
Download the Dunlop logo in SVG format, open it in Sketch and delete the yellow rectangle. Bring it to our design, scale it down a bit and place in close to the tail light. Make sure that the logo is inside the bodywork group, right above the Shell logo in the list of layers.
Get the SVG version of the Marlboro logo from Wikimedia Commons, paste into our design and scale it down. Use the resize handles to squeeze the red shape, then move the letters up, close to the red shape, and finally change Fills for the red shape to Linear Gradient with the following parameters:
#E60202
#BB0101
#860000
Add and modify the Marlboro logo sticker. (Large preview)
Please make sure that this logo is inside bodywork group and above “Dunlop” logo.
Heuer Chronograph sticker
Download and open in Sketch the Tag Heuer SVG logo. Delete everything except: the rectangle with the black border, the red rectangle, and the word “Heuer”.
Select the rectangle with the black border, turn off Borders and change Fills to #CC2132. Next, select the inner red rectangle, turn on Borders, set Color to #FFFFFF, position to Outside and Width to 12px. Then use the Type tool (T) and type the word Chronograph — for the font use Helvetica Bold, with the size set to 72px.
Note: If you don’t have Helvetica Bold installed, use a font similar in appearance (for example, Arial Bold), as this scale it would be difficult to spot the differences.
Convert the text block into vector shapes, by right-clicking on it and selecting Convert to Outlines. Finally, select the bigger red rectangle, enter vectorediting mode, select the top two points and push them down a bit. Select everything and place all the elements into a heuer chronograph logo group.
Create the ‘heuer chronograph logo’ group. (Large preview)
Bring this modified logo to our design, scale it down and place it onto the car body. Like before, make sure it’s inside bodywork, and it’s above the Marloboro logo.
Put the Heuer Chronograph sticker on the car, to the left of the driver’s door. (Large preview)
Porsche Crest Badge
Jump over to Wikimedia and download the Porsche logo in SVG format. We will need to modify and simplify it a bit because it’s too complex and we don’t need all of these details for the scale at which we’ll be using it in our illustration.
Open the SVG logo file in Sketch, and first delete all the groups (amw-link and d-link) inside it. Then, select the shape on top, press Enter to switch to vectorediting mode, select the word “Porsche” and the registered trademark symbol and delete them as well.
Next, click on the arrow in the front second crest compound shape to reveal its components, select the four paths and drag them outside the compound path, then change their color to #B12B28. Reveal the contents of the first compound crest shape, select all the paths that form the word “Porsche” and delete them.
The Porsche crest logo is now complete. (Large preview)
Bring the modified Porsche crest logo to our design, scale it down, select the path that is the last one inside the Porsche logo group and add a Shadows effect — for the Color use #000000 at 50% Alpha and set Blur to 2.
Put the Porsche crest logo in place on the car body. (Large preview)
The Porsche crest badge should be placed inside the bodywork group just like the previous stickers that we added, above the heuer chronograph logo group.
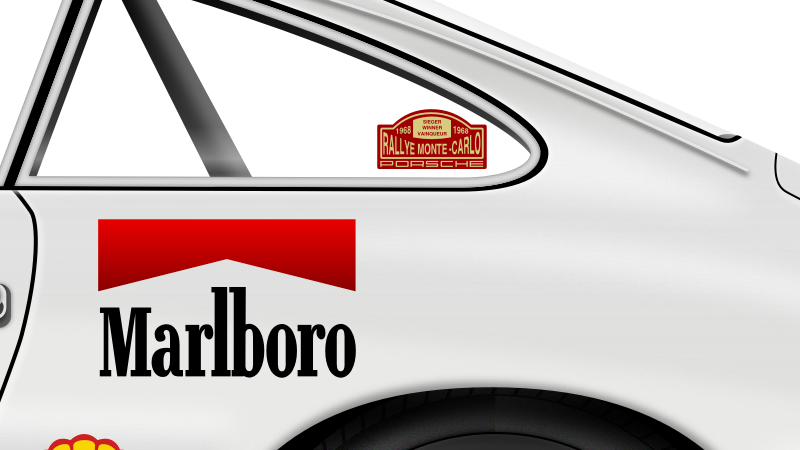
Rallye Monte-Carlo sticker
Draw a rounded rectangle using the RoundedRectangle tool (U), enter vectorediting mode and add and move the vector points to make the shape like on the image below.
Set Color to #9C010E and turn off Borders. Duplicate this shape, change Color to, i.e., #000000 so you can see better what you are doing, enter vectorediting mode, select the top points and push them down a bit. Push by the same distance the right points to the left, and the left points to the right. Then push up the bottom points a bit more.
Turn off Fills, turn on Borders with position set to Inside, Width set to 6px, and Color to #D7CB82. Convert Borders into a shape by going to Layer → Convert to Outlines.
Start working on the Rallye Monte-Carlo sticker. (Large preview)
Draw a rectangle without Borders, set Color to #D7CB82, enter vectorediting mode, add points in the middle of the top and bottom segment, and push them up and down a bit. Type the words: “SIEGER, WINNER, VAINQUEUR, 1968”. For the font use Helvetica Bold (or alternatively Arial Bold) with the #9C010EColor. Add the Porsche Wortmarke (we’ve used it earlier, remember?) to the bottom, and set Color to #D7CB82.
Add the shape, text, and the ‘Porsche Wortmarke’. (Large preview)
Convert text to outlines, select the “1968” shape on the left side of the rectangle, zoom in and use Transform from the top toolbar to modify the shape:
select the middle point on the right side and push it up a bit;
select the bottom point on the right side and push it down the same amount of pixels.
Perform a similar action for the “1968” on the right side of the rectangle, but this time use the middle and bottom points on the left side.
Continue adding the details to the Rallye Monte-Carlo sticker. (Large preview)
Type “RALLYE” “MONTE” “-CARLO” as a threeseparate words, use the same font and change the Color to #D7CB82.
Again, do a Convert to Outlines action and use Transform from the top toolbar to modify the shapes. I won’t go much into details here, but first modify the words “RALLYE” and “-CARLO” by using the method outlined above. Then, select all three shapes (the words), invoke the Transform tool, select the middle top point and push it up a bit to make the shapes elongated, and finally scale it up a bit by holding Alt + Shift on the keyboard while dragging the top right Resize handle. Use the image below as a reference.
The Rallye Monte-Carlo sticker finished. (Large preview)
Select and group all the elements we used to create this sticker into a rallye monte-carlo group, bring it into our design, and put it on the side windshield. In the Layers panel list this sticker should be inside the windshields group on top.
Put the Monte-Carlo sticker on the side windshield. (Large preview)
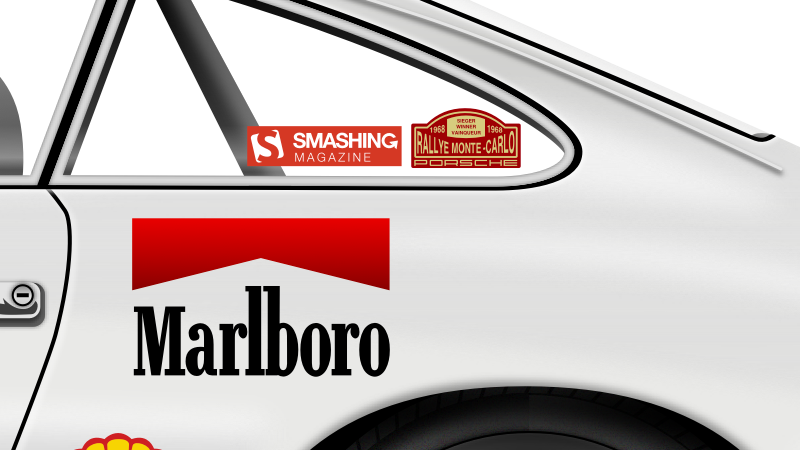
Smashing Magazine Sticker
This is the last sticker we are going to put on the car. Download the Smashing Magazine logo in SVG format, open it in Sketch and draw a red (#D33A2C) rectangle below the logo. Select both, create a group Smashing Magazine sticker, copy and paste into our design. Place it next to Rallye Monte Carlo sticker and scale it if needed.
In the Layers panel list this should be inside the windshields group on top.
The Smashing Magazine sticker added. (Large preview)
I encourage you to add even more decals to the car body and the side windshield. Use the image below as a source for your inspiration.
Note: These are just examples and recreating all the decals in vectors is outside of the scope of this tutorial. You can apply the principles learned from this tutorial and tweak the decals in vector format in a similar way.
Some side windshield decals examples. (Large preview)
The Porsche 911 car body decals examples. (Large preview)
Racing Number and Drivers Names
One more important detail — since this car is a racing car we need to add a racing number to it.
Download the Montserrat font family (if you don’t have it already), install only the “Montserrat Bold” font variant, and type the racing number. Set the Size to 180px and the Color to #000000. Then, Convert to Outlines to be able to apply a gradient to the racing number, and change Fills to a Linear Gradient:
Now add the drivers’ last names. I will add shamelessly my last name and the last name of one of my best friends, Ivan Minic. Use the Text tool to add the names, for the font use again “Montserrat Bold”, set Size and Line to 20px and Color to #2F2F2F.
Select the names and the racing number, and move them inside the bodywork group, just above the door layer.
Select and put all elements created so far into one group — Porsche 911. Our Porsche 911 is now officially finished!
The Porsche 911 in all its glory! Great job! (Large preview)
Finally, let’s add a background. Create a rectangle of the same size as the artboard, set the Fills to #F4F3F2, and push it below the Porsche 911 group.
Final image 3/3: Add the background and complete the Porsche 911 tutorial illustration! (Large preview)
Conclusion
We’ve put a lot of time and effort to reach the final destination and now you know too how to create all in vectors one of my favorite cars, the original Porsche 911 from 1968, in Sketch app. :)
The tutorial probably wasn’t too easy, but the end results were well worth it, in my opinion.
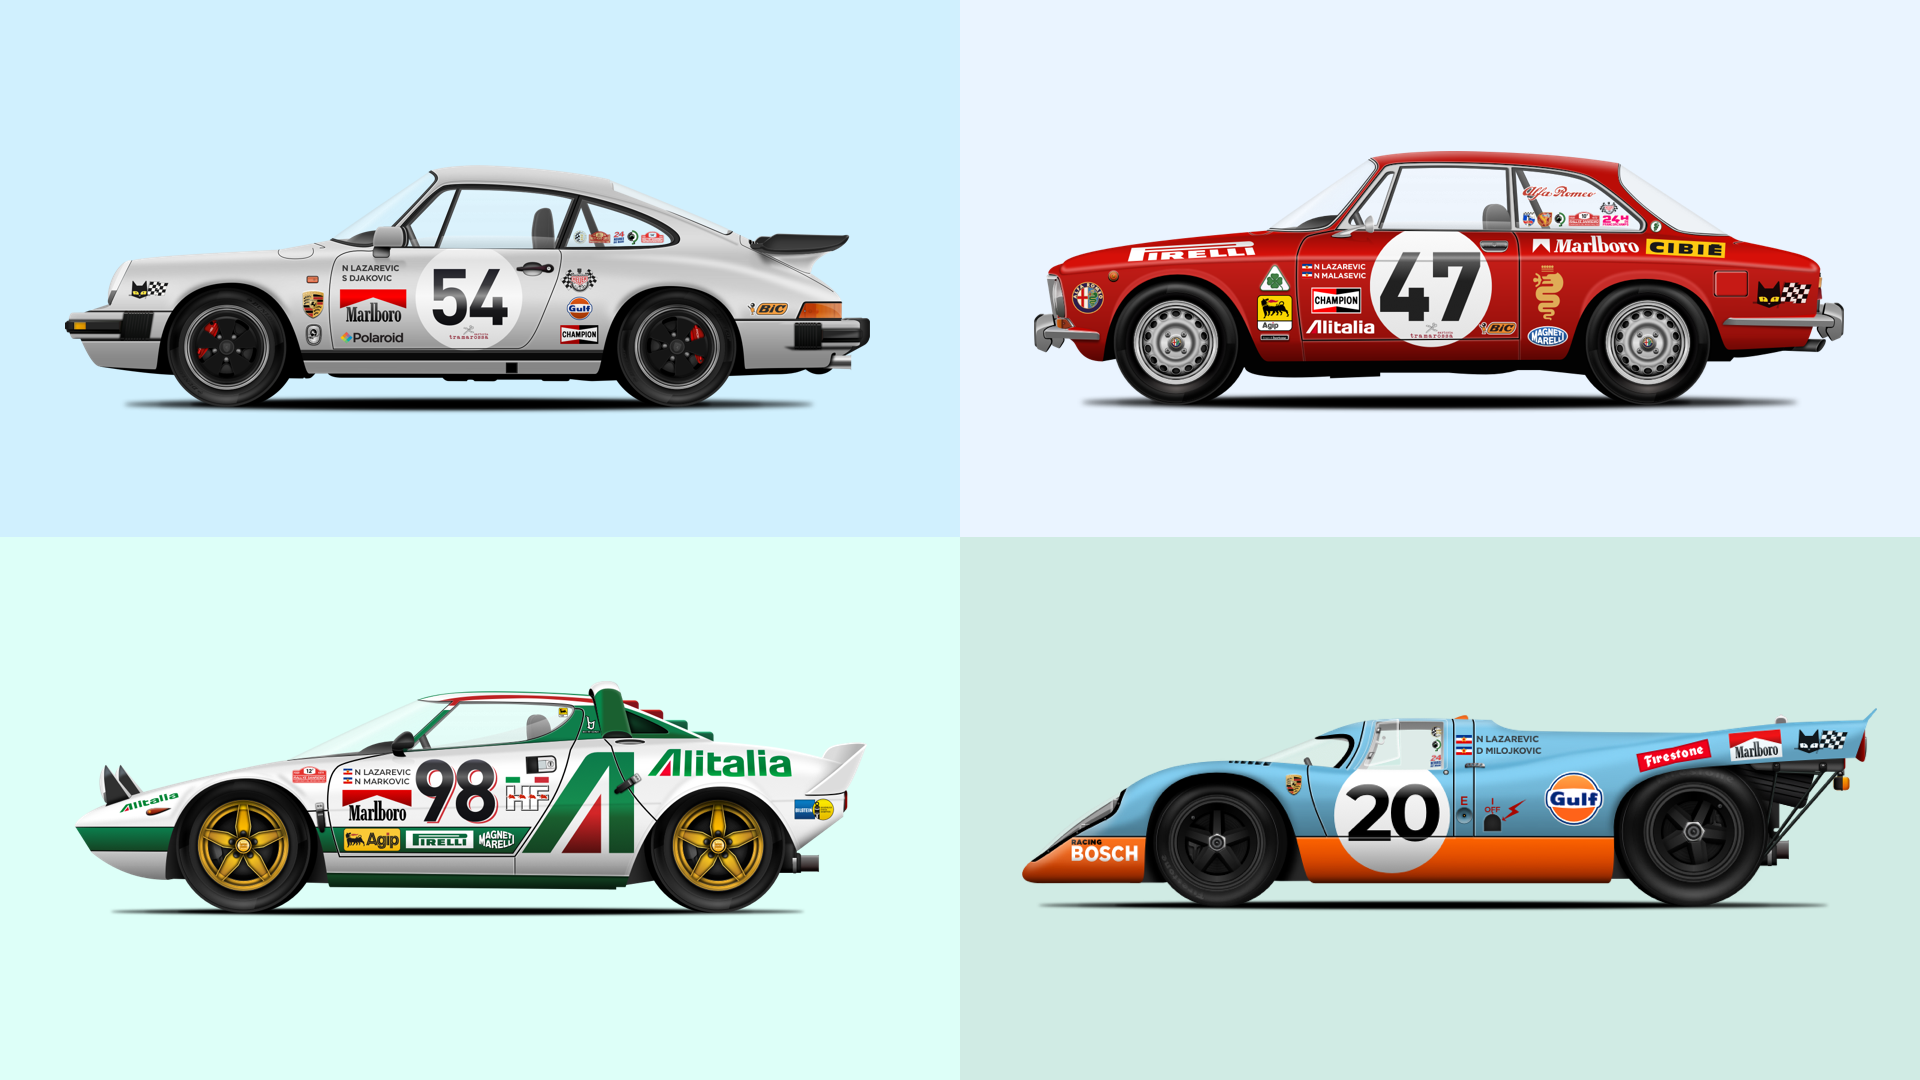
The next step, of course, is to design yourown favorite car. Select a car (or another object you like) and be sure to find as many photos of it from different angles, so that you can carefully replicate all of the important details.
More car illustrations for your inspiration — these are some of other racing cars that I’ve been creating in Sketch recently. (Large preview)
As you can see, there are certain tools and features in Sketch that you can master to create similar objects — use them to speed up and simplify the whole process.
I hope you will also remember how important is the proper naming of the layers/shapes (and groups), and stacking them in the right order so that even the most complex of illustrations are easy to organize and to work with.
Finally, if you have any questions, please leave a comment below or ping me on Twitter (@colaja) and I will gladly help you.
Mr.X owns a small business in a region with poor law-and-order. Recently his warehouse has been plagued by thieves. Gangs of thieves raid over his warehouse from time to time, stealing his raw material, affecting his business. He has studied the occurrences and noticed it that they are cyclical.
Assuming that a work week starts every Monday, and Sat and Sun are holidays, predict the total number of days when business would be affected.
Ex:
He has noticed that currently there seem to be 2 gangs. Gang 1 raids every 4 days, whereas Gang 2 strikes every 6 days.( See attached image )
Raids On Holidays are okay - since there is no raw material on those days. If more than gang raids the warehouse on a particular day, it is still counted as one bad day only . So the answer in this case is 5.
Sample Input:
2
2
4 6
21
3
3 4 8
14
The first line indicates the number of test cases - 2 above. Each test case is made up of 3 lines.
The first line of every test case indicates the number of gangs, n. (i.e 2 for Test Cases#1)
The next line contains n integers, where each number k indicates that the gang strikes every k days. (i.e. 4 and 6 for TestCase#1)
The next line is the number of days d, for which the prediction is needed. 0 <= d <= 365 (i.e. 21 days for TestCase#1)
Selling items on WordPress has never been as streamlined, thanks to Forminator, our 5-star forms plugin. You can set up your shop quickly and efficiently with free payment options like Stripe and Paypal integration, customizable product features, discount codes, and more — all for free!
If you’re trying to figure out an easier way to accepts payments online securely or put together a functional eStore without overcomplicating things, this tutorial will show you how you can sell stuff super easily without having to worry about an elaborate WooCommerce setup.
We’ll take you step-by-step through some of Forminator’s more advanced features that will benefit you and your shoppers.
You’ll also see how Forminator, combined with our free email capture plugin, Hustle, can make your online shop “pop” (literally, as you’ll see). Hustle can offer special discounts to your visitors before leaving your site and collect their email at the same time so you can continue marketing to them.
With Forminator, your visitors can be shopping in no time on a storefront like this…
Sell stuff super easily…no WooCommerce required!
We’ll start by setting up an order form and then look at enhancing it further with Hustle.
Throughout this tutorial, we’ll be working with an ordering form for a Dev Man t-shirt as an example:
The sales page we’re using has a ton of customized options.
Sure, you can create a simple order form with Forminator in just a few clicks, but we’re taking things up a notch.
Forminator can build pretty impressive sales pages with advanced options, such as the number of items, sales tax, discount codes, and more.
As you’ll see, you can create professional payment and order forms that will give your shoppers more choices and be visually appealing. Plus, depending on your offering, many of these features may need to be included.
Though it’s advanced, it’s still simple to set up.
By the time we’re done, you will know how to put together a sophisticated eCommerce payment form with advanced functionality, calculations, and more…all built with free components!
2. Structure Your Order Form with Pagination
Pagination is the field for page breaks. This is perfect for breaking down your ordering form into sections and making it less cluttered.
When you add your first Page Break field to your form, you’ll see a Pagination at the top of the other areas.
This order form has three sections. Here’s a quick look at them…
Click the Pagination section to open it up and edit the page breaks in the form. In this example, under Labels, it’s broken up as:
Page 1: Choose Product
Page 2: Shipping Address
Finish: Checkout
Where you add the page break labels for the form.
In the Settings section, you have the option for a progress indicator to show users how far they are through your form. Also, you can customize the text for the Next and Previous buttons.
Pagination settings area.
Breaking up an order form is a great way to walk your users through the checkout process.
3. Create Product Labels with Select Field Options
It’s time to determine the options for t-shirts and incorporate this into the form. For this, we are using the Select fields for the choices of Style, Color, and Size.
They are labeled accordingly and placed at the top of the form in the upper section.
The Select fields labeled according to what they are.
Each one can then be edited by what to include in the Labels section. For example, with the colors, the form has the options of green and yellow.
The labels section where you can add various options.
The process is the same for the Style field.
With Size, this has some calculation variables that we need to include since this is also where it displays the price. The prices are all different, depending on the size.
You can see the various prices that vary by size.
The Calculations tab is where you’ll make calculations (I’ll show you how this all adds-up soon).
You can Enable this and indicate the price by a numerical value for each size. As you can see, they all vary.
Individual prices are calculated here.
The next option to indicate is the amount. For this, we’re using a Number field. How many do you want? is the way it’s labeled.
The Number field option to indicate the number of items a user wants to purchase.
You can adjust the settings in the field and indicate a minimum and maximum amount available for purchase.
4. Set Up Discounts and a Base Price
When a user decides what they want to purchase, it all needs to be added up. This section is where you add calculations and discounts.
With a Text field, you can mention an option for a discount. Here we have it worded Have a discount coupon?
The Text field with the discount feature.
We’ll now include two Calculations fields to get the discount feature to function. Calculations are to the right of the Text field.
The first Discount field is for when someone enters the correct discount code. The Calculation field then calculates a 20% discount and becomes visible.
The calculation field is still required when the coupon code isn’t entered, so that, in these cases, this Discount field will become visible (you’ll see in the Visibility screenshot coming up) and show the discounted amount as 0.
The two Calculations fields.
To get this to function, go to the Settings area of the first field (calculator-4). The Field Type needs to be set at Read-Only, and the Decimal Places placed at 2.
Calculation settings.
In the Calculations area, we’ve added the formula ({select-3)*{number-1})*0.2. This indicates that Select-3 (Size) multiplies the Number-1 (How many do you want?) and the percentage discount we want to offer (in this case, 20%).
Where you’ll enter the calculations formula for size and the number of items.
This calculation works by multiplying the “size*quantity” by 0.2 to find out the discounted amount.
The rule for the discount coupon is in the Visibility tab. We’ll be using the coupon code DEVMAN20. We used the Field as Text-1 (Have a discount coupon?), have the Condition as Is, and the Value is DEVMAN20.
When all the conditions are in place, hit Done and Apply to save.
The next Calculations field (calculation-5) will be set similar to the other one; however, there are a couple of changes.
We’ll be using the calculation ({select-3}*{number-1})*0.
The calculation formula for the size and number of items a customer wants.
Also, in the Visibility tab, we’re changing the Condition to Is not. Every other setting is the same as the previous Calculations tab.
The other rule in the Calculations tab.
Now that we have these conditions set, we add the base price. The Base Price is another Calculation field (calculation-1).
Where to put the Base Price field.
Under Settings, it’s set as Read-Only and has two as the number of decimals.
For the Calculations field, it includes the calculation set at ({select-3}*{number-1})-({calculation-4}).
The calculation formula for the base price.
This calculation works by finding the original price and multiplying the size with the quantity field (e.g., {select-3)*{number-1}) and then subtracting the discount.
Beyond that, there are no rules or anything else to add to this field.
5. Calculate the Tax and Total Price
The last piece of the numbers puzzle is adding in the Tax and Total Price. These are both Calculation fields (calculation-1 and calculation-2) added below Base Price in our form.
The Tax and Total Price fields.
For the tax field, add a description of the tax amount under Labels, so users will know that it’s 18% (you can set any rate that you require).
Where you describe the amount of tax a customer will be charged.
In Settings, the Field Type is Read-Only, and the Decimal Places is 2.
As for the Calculations, the one that included for tax is the formula {calculation-1}*0.18. This means that 18% of Base Price is the price that we calculated in the previous step.
The tax formula.
Nothing else is necessary for this field.
Finally, the field for the total price (calculation-3) includes the formula {calculation-1}+{calculation-2}. This formula will add up the total amount by combining the base price with tax.
Total amount calculation.
That will do it for all of the calculations and the first section of the form. Forminator will calculate the numbers for the customer and add everything up to determine the price.
From here, customers will go onto the next section, where they’ll enter their address.
You can see a page break indicates that the next section will be just for the Address, created with the Address field. Another page break follows it.
The address field between page breaks.
For the address field, it includes the vital information needed and nothing else. You can edit specific information (e.g., ‘country’) anyway that you’d like.
Customers can now click ‘Next’ to check out. Cha-ching!
6. Create the Checkout Section
Getting this part set up is extremely simple. Just be sure you have a Stripe or PayPal account connected with Forminator. If you need help with this, please refer to our documentation.
All we’ve included are fields for Name, Email, and Stripe.
The fields created for the checkout area.
From this point, the only thing that was changed is the Submit button at the bottom of the fields. Place Order is the text.
The Submit button field.
We also edited the Error Message in the Labels area to Error: Your form is not valid, please fix the errors!
The Button Text and Error Message.
With all of this information in place, it’s now time to cash out and complete the purchase!
But uh-oh…
It looks like a customer is about to leave the page without buying our fantastic t-shirt. The pop-up is where you hook them with an offer they can’t refuse before they take-off.
7. Set Up a Special Discount Exit-Intent Pop-Up — (with Hustle)
Hustle is our free marketing plugin that pops-in and saves the sale just when you need it. You’ll see how beneficial it is to include him with Forminator when a customer is ready to bail.
Hustle and Forminator: Together they form the perfect duo.
You can set up a promotion that pops up and offers a special discount code that corresponds with the order form.
If they opt for the discount, you’ll also capture their email address to continue marketing.
So, let’s set this form up and keep this shopper from going anywhere…
When Hustle is downloaded and activated, you can create a new pop-up in the WordPress admin.
In the Content area of Hustle, we’ve added the title Don’t miss this! and a subtitle of We are giving away a 20% discount. We also added images.
The Content area of Hustle.
In the Main Content area, we’ve included a message urging users to sign up.
Hustle’s Main Content area.
To offer the code, the user needs to enter their email address. Inserting email is done in the Email section of Hustle. You’ll simply place the Email field. Also, the button text was changed to Get my discount coupon.
The Email area of Hustle.
Once they opt-in, the discount code is provided to them by adding it in Submission Behavior.
Where you’ll enter any message and also the promo code.
Their email address can also be added to a 3rd party application (e.g. MailChimp) in the Integrations area.
With this promo now launched, Hustle knows when to grab their attention before they leave. In the Behavior section, under Pop-up Trigger, you can pick Exit Intent on when this is displayed.
Where to set the pop-up for the ad.
And users will then be greeted with a special discount:
The promotion pop-up.
Once they opt-in, they get the promo code. Who could pass on 20% off?
DEVMAN20 is what they can use for the discount.
And with this, there’s a good chance they’ll hit PLACE ORDER…
As you can see, thanks to Forminator, you can launch and fund off an online store on WordPress for free by creating an above normal checkout process.
There’s also much more you can do with Forminator. He has options for eSignatures, integration with FortressDB, calculators, and much more! With all of the customization options, you can set up your online store exactly how you want.
And if you ever need additional help setting up shop, contact our WPMU DEV 24/7 support superheroes.
With Forminator and Hustle, your store should take form in no time.


