Around the web and within the CSS Working Group, there has been some discussion about whether we should specify a version of CSS — perhaps naming it CSS4. In this article, Rachel Andrew rounds up some of the pros and cons of doing so, and asks for your feedback on the suggestion.
React Native vs Flutter can be a good foundation for further analysis and research. In considering which framework to use for cross-platform app development, it will be wise to ask two questions.
Are you looking at developing your apps at a rapid pace?
Are you looking at reducing the cost of cross-application app development?
If the answer to both these questions is a confident yes, then the comparison we provide will help you decide which framework to choose for your cross-application app development.
So you are at the beginning of 2020 and probably have committed to a New Year's resolution as a tester to leap into automation testing. However, to automate your test scripts, you need to get your hands dirty on a programming language, and that is where you are stuck!
Or you are already proficient in automation testing through a single programming language and are thinking about venturing into new programming languages for test automation, along with their respective frameworks. You are bound to be confused about picking your next milestone. After all, there are numerous programming languages to choose from.
Hyperconvergence is a term that is gaining rapid interest across the manufacturing industry due to the undeniable benefits it has delivered to IT professionals seeking to modernize their data center, or as is a popular buzzword today ― "transform." Today, in particular, the manufacturing industry is looking to hyperconvergence for the potential benefits it can provide to its emerging and growing use of IoT and its growing need for edge computing systems.
Let's talk about today's Swiss army knife software systems called "Enterprise Resource Planning Systems" (ERP systems). These are really powerful tools, no question, but in some situations, they can cause more harm than good — especially when they are really old and called "legacy systems." So, I want to tell a fictive story that shows how an organization can get deep into trouble. For this, I’ll try to use Nick Tune’s brand new Core Domain Patterns and Wardley Mapping (if you aren't familar with Wardley Maps, I recommend watching the YouTube video "Investing in innovation").
For understanding the context around ERP systems better, we first take a brief look at the role of IT systems in the past decades:
AI has permeated our lives in nearly every aspect. We rely on it to get accurate search results, to enable conversational marketing, ad personalization, and even to suggest medical treatment.
In spite of headways in AI and it’s widespread use, there’s considerable distrust in it. Such distrust and unease arise from popular media representations of AI in movies where robots threaten to overthrow the human race.
In 1986 Hirotaka Takeuchiand Ikujiro Nonakapublished The New New Product Development Gamein Harvard Business Review. They described a groundbreaking approach to complex product development. In the article, they borrowed the word "Scrum" from the game of Rugby. The analogy of product development to a game is quite interesting here. A team can achieve full potential if they are enjoying their work, like players playing a game with fun.
Scrum masters can facilitate the ways to create this fun element in their team’s day to day work. Following are some actionable techniques which can help in doing it:
Google AdSense is one of the most popular ways to monetize your website.
It allows you to automatically sell your website’s ad space to advertisers and get paid. AdSense is one of the easiest way to start making money online with your website.
In this article, we will show you how to add Google AdSense in WordPress along with some best practices and tips to increase your earnings.
What is Google AdSense?
Google AdSense is an advertising network run by Google that allows bloggers and website owners an opportunity to earn money by showing text, image, video, and other interactive advertisement on their websites. These ads are targeted by site content and audience, so they’re highly relevant.
Google AdSense is hassle-free because you don’t have to deal with advertisers or worry about collecting money. Google administers and maintains relationships with advertisers. They collect the payment, take their management fee, and send the rest of the money to you.
AdSense offers cost-per-click ads (CPC) which means that you earn money every time a user clicks on the ad on your website. The amount received per click varies based on a variety of factors.
Video Tutorial
If you don’t like the video or need more instructions, then continue reading.
Getting Started with AdSense
First thing you need to do is sign up for a Google AdSense account. If you have a Gmail account, then you can use your existing account to sign up.
Once you’ve submitted your application, you will need to wait for the Google AdSense team to review it. This may take a few hours to a few weeks for some publishers.
Once it is approved, then you can log in to your AdSense account and get your ad code. This is the code that you need to place on your website to display ads.
Recently, Google AdSense announced auto ads, which means you paste just one piece of code and Google automatically decides when, where, and how many ads to show on each page.
However, most publishers are still using the manual method to individually place ads on their website.
We’ll show you both methods. We recommend starting with the manual ad placement first. Once you have started earning, then you can experiment with auto-ads to compare them yourself.
1. Manually Place Google AdSense Ad Code in WordPress
You’ll start by clicking on the Ads menu in the left column and then switching to the ‘By ad unit’ tab. From here you need to click on ‘Create New Ad’.
You will be asked to choose an ad type. You can select from ‘Display ads’, ‘In-feed ads’, and ‘In-article ads’.
If you are unsure, then start with the display ads.
Next, you need to provide a name for this ad unit and select the ad size and type.
The name of the Ad is only used for internal purposes, so you can name it anything like “SiteName Sidebar”.
The next option is choosing the Ad Size. While Google offers a wide variety of ad sizes, there are certain sizes that are listed under recommended because those are the most popular among advertisers.
You can also choose whether you want your ad to be responsive or fixed. We recommend choosing responsive ads as they work well on all devices and screen sizes.
Next, click on the Create button to continue.
AdSense will now generate the ad code for you. It contains the unique ad unit ID and your publisher ID.
If your website has a Google AMP version, then you can also copy the code for your AMP pages.
Simply copy your ad code and paste it in a plain text editor like Notepad or TextEdit. You will need it in the next step.
Adding Google AdSense in WordPress
You need to determine where you want to show the ad on your website. Ads are most commonly displayed in the sidebar. You can add Google Adsense in your sidebar by using WordPress widgets.
Simply go to Appearance » Widgets page in your WordPress admin area. Next, drag & drop the ‘Custom HTML’ widget to the appropriate widget area and paste your Google AdSense code in there.
Adding individual ads to different areas of your website takes a lot of time. Most beginners struggle to find the best locations to display ads on their sites.
To solve this, Google has introduced auto-ads. This allows you to simply add one code snippet to your site and let Google AdSense figure out the highest paying location, ad-size, and type.
The disadvantage of this method is that you have less control over ad placement on your website.
If you want to add use auto-ads feature, then this is how you’ll add Google AdSense to your website.
First login to your Google AdSense account and click on the Ads tab. Next, you need to click on the Get Code button to generate the auto-ads code.
AdSense will now generate a code snippet with your publisher ID and show it on the screen. You can now copy and paste this code in a text editor.
Adding AdSense Auto-Ads Code in WordPress
The auto-ads code uses the single code snippet to generate ads everywhere on your WordPress website. This means you need to add the code to all the pages where you want to display the ad.
One way to do this is by adding the code in your WordPress theme’s header.php file. However, the disadvantage of this method is that your ad code will disappear if you update or change your theme.
The best way to add any site-wide code to your website is by using a plugin like Insert Headers and Footers.
Upon activation, go to the Settings » Insert Headers and Footers page. From here, you need to paste your Google AdSense code in the header section.
Don’t forget to click on the ‘Save’ button to store your changes.
The plugin will now add the ad code on all pages of your website. It may take Google AdSense sometime to start showing ads.
AdSense Best Practices and Frequently Asked Questions
Over the years, we’ve answered several AdSense related questions. Having used AdSense on several of our sites in the past, we’ve learned a whole lot about optimizing. Below are some AdSense best practices and frequently asked questions.
What’s the best AdSense Ad Size?
Although ad placement is key, we’ve found that the best sizes are 336×280 and 300×250. These ads tend to fit on most screen sizes and have the best pay rate as well.
What’s the Best AdSense Placement?
This entirely depends on your layout. The goal is to get more clicks, so you want to place your ads in a more prominent spot. We have found that ads within post content towards the top of the screen tends to get the most clicks.
Several users have asked us about adding AdSense in a floating widget because it will be very prominent. We strongly recommend against that because it is not allowed by Google Terms of Service. If you violate their TOS, then you can get banned from the program.
Can I click on my own Google AdSense Ads?
Often beginners are tempted to click on their own ads or ask their family members to click on their ads. Please don’t do that. Google’s algorithm is very smart and knows when you’re clicking on your own ad. This can get you banned from the program.
What is Page RPM in Google AdSense?
RPM stands for Revenue per Mille meaning revenue per 1000 impressions. This is determined by multiplying the total number of clicks and cost per click and then dividing that by the total number of pageviews.
Can I use my Blogger or YouTube AdSense account with WordPress?
Yes, you can. If you started using AdSense on one of Google’s hosted platforms like Blogger or YouTube, then you can change your AdSense account type and use it with WordPress. You’ll need to provide Google AdSense with the URL of the site you want to monetize by filling out an application form.
Simply login to your AdSense account and then under ‘My Ads’ click on ‘Other Products’ option. Next, you need to click ‘Upgrade now’ and complete the application form.
What is CTR in Google AdSense?
CTR or click-through-rates differ vastly for different kind of websites. Your ad clicks depend on a lot of factors like your website’s topics, your audience type, ad placement on your site, and more. The ideal CTR for Google AdSense is really hard to define because you don’t have access to the click rates of other websites like your own.
However, Google AdSense has built-in tools that will start showing you messages if your site is not getting a good CTR. You can follow the optimization guides shown inside Google AdSense dashboard to improve your ad revenue.
When and how does Google AdSense pay publishers?
Each month, Google AdSense calculates your previous month’s earnings and shows them on your ‘Transactions’ page. If your earnings match the required threshold, then your payment is processed and released by the 21st of that month.
There are multiple payment methods available including direct electronic transfer, wire transfer, check, Western Union, and more.
Why Google AdSense rejected my application?
Google Adsense may reject your application if your website doesn’t meet the AdSense program policies or their terms and conditions.
What are the requirements to get Google AdSense application approved?
Here are the minimum requirements to get your Google AdSense account application approved.
Your website and all its content must comply with AdSense program policies and terms and conditions.
Your website should be at least 6 months old.
You, the applicant, must be over 18 years old.
Note: Even if your application meets all the requirements, Google AdSense still reserves the right to decline your application.
Can I add Google AdSense in my WordPress.com blog?
WordPress.com does not allow you to add Google AdSense to your website unless you upgrade to the Business plan. For more on this topic, please see our guide on the difference between WordPress.com vs WordPress.org.
What is the difference between Google AdSense vs Google AdWords?
Google AdWords allows you to advertise on other websites including those participating in the Google AdSense program.
Google AdSense allows you to make money from your website by showing ads on your website.
We all love that satisfying feeling you get when 2 objects just fit perfectly together.
If you’re anything like me, I bet you love watching a good satisfying video that occasionally pops up on my Instagram feed, or seeing the most satisfying logo ever.
One sure-fire way to create and design the perfect, aesthetically-pleasing logo is by creating a symmetrical logo.
What is a symmetrical logo?
A symmetrical is a logo that mirrors itself perfectly from the left side to the right side.
There’s a reason why symmetrical logos work so perfectly together, though.
Actually, there are quite a few reasons why symmetrical logos work so well.
The first reason why symmetrical logos work so well is because our brains automatically and subconsciously love to organize and group the things that it sees in order to make sense of it all. A symmetrical logo makes it easier for the brain to digest and process than, perse, a different type of logo.
Secondly, symmetrical logos create a sense of balance. Having a symmetrical design naturally creates a great sense of balance. Now, whether or not your viewers and clients realize that consciously or not, will always be a mystery.
Thirdly, we all know that symmetrical designs and logos are just aesthetically-pleasing as heck. And who doesn’t love some aesthetically pleasing content? I know I do.
Finally, creating and designing a symmetrical logo could be easier for you. First, you just have to create the perfect half-design, duplicate it, and mirror it, and you’re done! Not to say that that ever actually happens though. We all know designers put (or at least, we try to…) our entire hearts and souls into our designs. If we’re passionate about our project, that is.
20 Symmetrical Logos That Will Have You Shook
There are probably loads more famous symmetrical logo designs out there than you ever realized.
Today, we’re going over 20 symmetrical logos that you can be inspired from in order to create your own.
Let’s do this!
1. McDonald’s
You probably weren’t expecting this one to be our first pick, were you?
Mcdonald’s is a prime example of a symmetrical design, but did you ever consciously realize that?
Also, did you know that the color red is scientifically proven to raise your sense of appetite?
McDonald’s surely had a great design and marketing team on their side.
2. Target
Target. Only my favorite retailer of all time. Besides the fact that they literally have everything you could ever want in one place, they have amazing branding and a symmetrical logo. Also, how cute is that iconic dog you see in all their advertisements?
3. Airbnb
Need a place to stay, anywhere, ever? Airbnb has got you covered. Also, just check out that intricate, symmetrical logo design.
4. Mercedes
Next up we have Mercedes. I know, you never thought about putting them into your list of symmetrical designs, but here we are. This gorgeous and simplistic logo will always be iconic.
5. Adidas
6. Starbucks
8. Chanel
9. Volkswagen
10. Honda
11. Xbox
12. Walmart
13. Audi
14. Toyota
15. Mazda
16. Motorola
17. Snapchat
18. Batman
19. Shell
20. Mitsubishi
We hope you enjoyed looking over all these famous symmetrical logos and felt inspired to create your own.
Introducing Alpine.js: A Tiny JavaScript Framework
Introducing Alpine.js: A Tiny JavaScript Framework
Phil Smith
Like most developers, I have a bad tendency to over-complicate my workflow, especially if there’s some new hotness on the horizon. Why use CSS when you can use CSS-in-JS? Why use Grunt when you can use Gulp? Why use Gulp when you can use Webpack? Why use a traditional CMS when you can go headless? Every so often though, the new-hotness makes life simpler.
Recently, the rise of utility based tools like Tailwind CSS have done this for CSS, and now Alpine.js promises something similar for JavaScript.
In this article, we’re going to take a closer look at Alpine.js and how it can replace JQuery or larger JavaScript libraries to build interactive websites. If you regularly build sites that require a sprinkling on Javascript to alter the UI based on some user interaction, then this article is for you.
Throughout the article, I refer to Vue.js, but don’t worry if you have no experience of Vue — that is not required. In fact, part of what makes Alpine.js great is that you barely need to know any JavaScript at all.
Now, let’s get started.
What Is Alpine.js?
According to project author Caleb Porzio:
“Alpine.js offers you the reactive and declarative nature of big frameworks like Vue or React at a much lower cost. You get to keep your DOM, and sprinkle in behavior as you see fit.”
Let’s unpack that a bit.
Let’s consider a basic UI pattern like Tabs. Our ultimate goal is that when a user clicks on a tab, the tab contents displays. If we come from a PHP background, we could easily achieve this server side. But the page refresh on every tab click isn’t very ‘reactive’.
To create a better experience over the years, developers have reached for jQuery and/or Bootstrap. In that situation, we create an event listener on the tab, and when a user clicks, the event fires and we tell the browser what to do.
That works. But this style of coding where we tell the browser exactly what to do (imperative coding) quickly gets us in a mess. Imagine if we wanted to disable the button after it has been clicked, or wanted to change the background color of the page. We’d quickly get into some serious spaghetti code.
Developers have solved this issue by reaching for frameworks like Vue, Angular and React. These frameworks allow us to write cleaner code by utilizing the virtual DOM: a kind of mirror of the UI stored in the browser memory. The result is that when you ‘hide’ a DOM element (like a tab) in one of these frameworks; it doesn’t add a display:none; style attribute, but instead it literally disappears from the ‘real’ DOM.
This allows us to write more declarative code that is cleaner and easier to read. But this is at a cost. Typically, the bundle size of these frameworks is large and for those coming from a jQuery background, the learning curve feels incredibly steep. Especially when all you want to do is toggle tabs! And that is where Alpine.js steps in.
Like Vue and React, Alpine.js allows us to write declarative code but it uses the “real” DOM; amending the contents and attributes of the same nodes that you and I might edit when we crack open a text editor or dev-tools. As a result, you can lose the filesize, wizardry and cognitive-load of larger framework but retain the declarative programming methodology. And you get this with no bundler, no build process and no script tag. Just load 6kb of Alpine.js and you’re away!
Alpine.js
JQuery
Vue.js
React + React DOM
Coding style
Declarative
Imperative
Declarative
Declarative
Requires bundler
No
No
No
Yes
Filesize (GZipped, minified)
6.4kb
30kb
32kb
5kb + 36kb
Dev-Tools
No
No
Yes
Yes
When Should I Reach For Alpine?
For me, Alpine’s strength is in the ease of DOM manipulation. Think of those things you used out of the box with Bootstrap, Alpine.js is great for them. Examples would be:
Showing and hiding DOM nodes under certain conditions,
Binding user input,
Listening for events and altering the UI accordingly,
Appending classes.
You can also use Alpine.js for templating if your data is available in JSON, but let’s save that for another day.
When Should I Look Elsewhere?
If you’re fetching data, or need to carry out additional functions like validation or storing data, you should probably look elsewhere. Larger frameworks also come with dev-tools which can be invaluable when building larger UIs.
From jQuery To Vue To Alpine
Two years ago, Sarah Drasner posted an article on Smashing Magazine, “Replacing jQuery With Vue.js: No Build Step Necessary,” about how Vue could replace jQuery for many projects. That article started me on a journey which led me to use Vue almost every time I build a user interface. Today, we are going to recreate some of her examples with Alpine, which should illustrate its advantages over both jQuery and Vue in certain use cases.
Alpine’s syntax is almost entirely lifted from Vue.js. In total, there are 13 directives. We’ll cover most of them in the following examples.
Getting Started
Like Vue and jQuery, no build process is required. Unlike Vue, Alpine it initializes itself, so there’s no need to create a new instance. Just load Alpine and you’re good to go.
x-model allow us to keep any input element in sync with the values set using x-data. In the following example, we set the name value to an empty string (within the form tag). Using x-model, we bind this value to the input field. By using x-text, we inject the value into the innerText of the paragraph element.
This highlights the key differences with Alpine.js and both jQuery and Vue.js.
Updating the paragraph tag in jQuery would require us to listen for specific events (keyup?), explicitly identify the node we wish to update and the changes we wish to make. Alpine’s syntax on the other hand, just specifies what should happen. This is what is meant by declarative programming.
Updating the paragraph in Vue while simple, would require a new script tag:
new Vue({ el: '#app', data: { name: '' } });
While this might not seem like the end of the world, it highlights the first major gain with Alpine. There is no context-switching. Everything is done right there in the HTML — no need for any additional JavaScript.
Click Events, Boolean Attributes And Toggling Classes
Like with Vue, : serves as a shorthand for x-bind (which binds attributes) and @ is shorthand for x-on (which indicates that Alpine should listen for events).
In the following example, we instantiate a new component using x-data, and set the default value of show to be false. When the button is clicked, we toggle the value of show. When this value is true, we instruct Alpine to append the aria-expanded attribute.
x-bind works differently for classes: we pass in object where the key is the class-name (active in our case) and the value is a boolean expression (show).
This will set a given DOM node to display:none. If you need to remove a DOM element completely, x-if can be used. However, because Alpine.js doesn’t use the Virtual DOM, x-if can only be used on a <template></template> (tag that wraps the element you wish to hide).
Magic Properties
In addition to the above directives, three Magic Properties provide some additional functionality. All of these will be familiar to anyone working in Vue.js.
$el fetches the root component (the thing with the x-data attribute);
$refs allows you to grab a DOM element;
$nextTick ensures expressions are only executed once Alpine has done its thing;
$event can be used to capture a nature browser event.
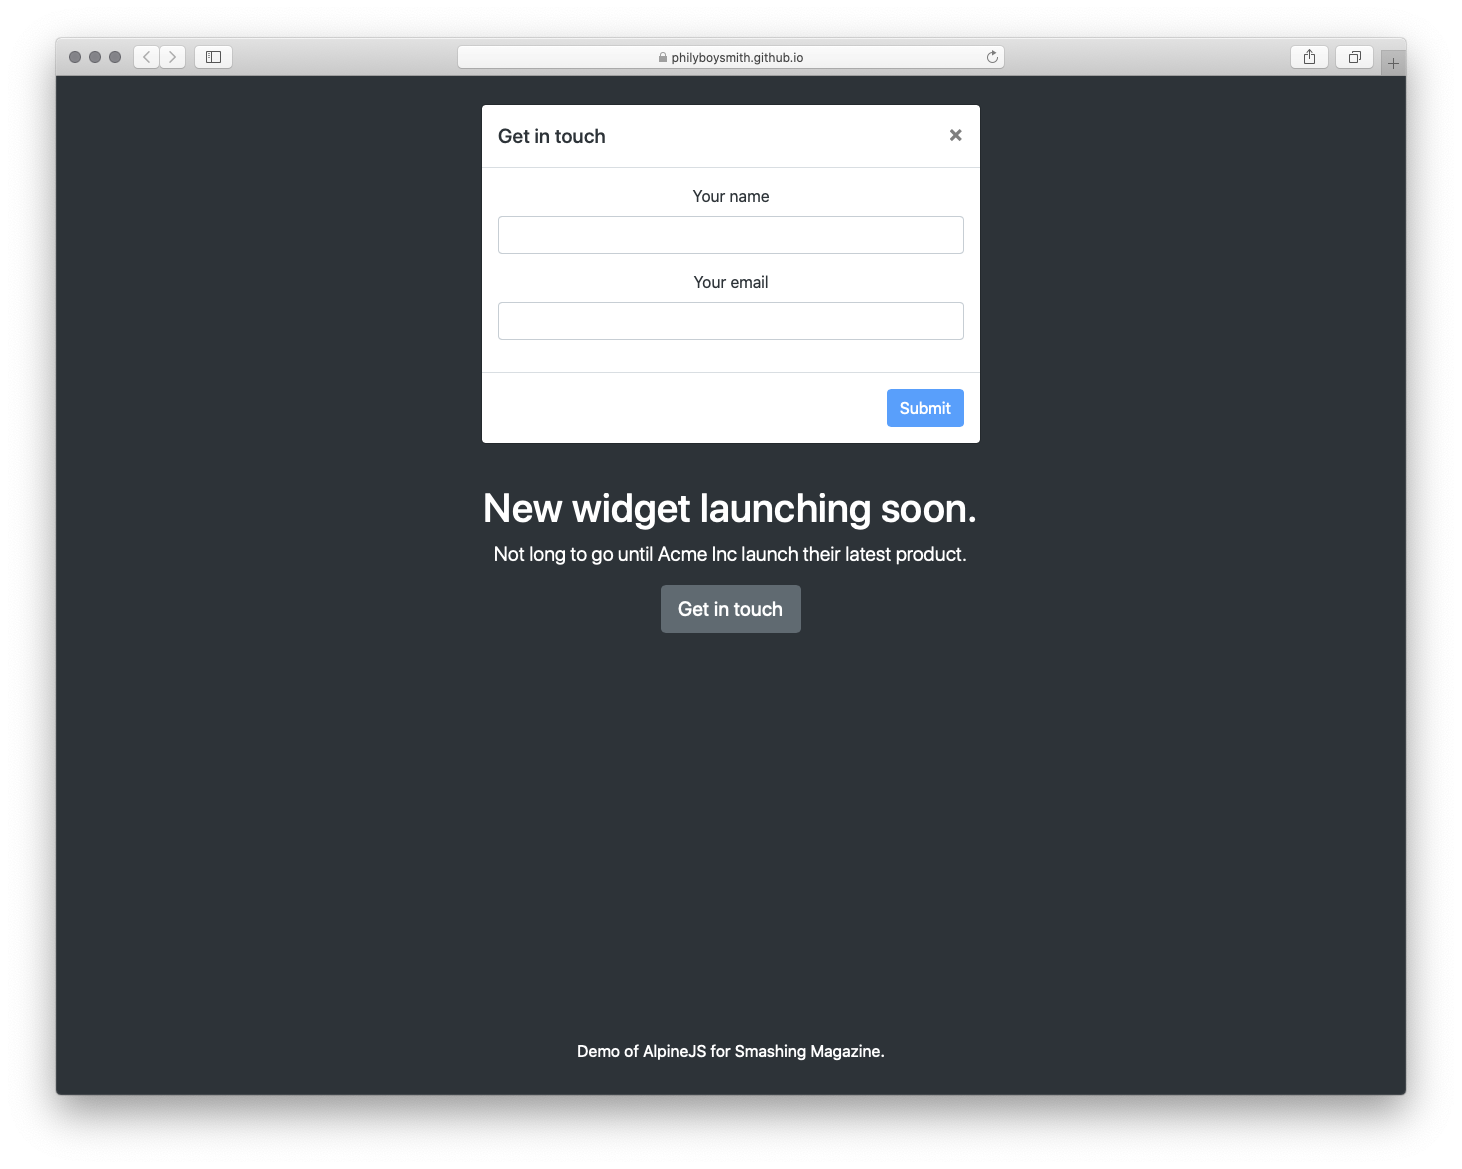
It’s time to build something for the real world. In the interests of brevity I’m going to use Bootstrap for styles, but use Alpine.js for all the JavaScript. The page we’re building is a simple landing page with a contact form displayed inside a modal that submits to some form handler and displays a nice success message. Just the sort of thing a client might ask for and expect pronto!
To make this work, we could add jQuery and Bootstrap.js, but that is quite a bit of overhead for not a lot of functionality. We could probably write it in Vanilla JS, but who wants to do that? Let’s make it work with Alpine.js instead.
When building websites, I’m increasingly trying to ask myself what would be “just enough JavaScript”? When building a sophisticated web application, that might well be React. But when building a marketing site, or something similar, Alpine.js feels like enough. (And even if it’s not, given the similar syntax, switching to Vue.js takes no time at all).
It’s incredibly easy to use (especially if you’ve never used VueJS). It’s tiny (< 6kb gzipped). And it means no more context switching between HTML and JavaScript files.
There are more advanced features that aren’t included in this article and Caleb is constantly adding new features. If you want to find out more, take a look at the official docs on Github.