This week, we take a look at the recent API vulnerabilities found in SoundCloud and the electric scooter service Lime. In addition, we have a set of tips for API penetration testing, and NIST whitepaper on the microservices security.
This is the second part of my two-part series on thread synchronization. If you missed the first article, check it out. In the previous article, we covered concepts of threads, synchronization techniques, and memory model of both Java and CPU. In this article, we'll focus on concepts of concurrency, how to execute tasks in concurrent mode, and the various classes and services in Java that offer concurrency (thread-pool).
Multi-Threading Costs
Before getting into concurrency, we have to understand the costs associated with multi-threading. The costs include application design, CPU, memory, and context switching. Below are some of the considerations for concurrency:
This is the second part of a series of articles that present a service mesh project. If you haven’t seen part 1, check it out.
The idea of this project is to provide you with a bootstrap for your next distributed system architecture. This project will definitely help you to get an understanding of how to solve distributed application challenges and save you a lot of time in setting up your next service mesh.
Every so often, I enjoy taking things into a different perspective. In this article, I want to talk about some experiences which have caused me to think about how I am communicating with others — not only in IT, but in my daily life.
But...I Am Not IN Canada!
About every six weeks, I place an online order for a container of liquid iron for my toddler son to take on a daily basis. From my home in the Midwest portion of the United States, I open up a browser, navigate to the website, and start my shopping experience. Where things get a little off track is when I start looking at the pricing — especially during the check-out phase of my online order experience.
By experience, most of us know how difficult it is to express what we mean talking about quality. Why is that so? There exist many different views on quality and every one of them has its importance. What has to be defined for our project is something that fits its needs and works with the budget. Trying to reach perfectionism can be counterproductive if a project is to be terminated successfully. We will start based on a research paper written by B. W. Boehm in 1976 called “Quantitative evaluation of software quality." Boehm highlights the different aspects of software quality and the right context. Let's have a look more deeply into this topic.
In the Midwest, raking leaves is typically something that occurs in the fall and early winter season. For those who tend to not keep up on things, late winter and early spring can result in some leaf-raking exercises.
While talking with Russell (@RussellScheerer) over Slack the other day, he posed the question...
Choosing the right software testing partner is a vital step aimed at lessening your software release cycle and stopping defects before they're reported by your customers.
But the benefits extend way beyond expectation – a professional software testing company can augment your company's role by boosting your company's brand value and, as a result, unlock new revenue streams.
This is mostly for native iOS apps kinda stuff, but it makes me wonder how much of this is expected when doing a mobile Progressive Web App. On one hand, this kind of stuff looks fun to try to build on the web, and it would be kinda cool to make your web app feel super native. On the other hand, doesn't that make it extra awkward for Android and other non-iOS platforms?
A few other thoughts:
How much of this stuff do you get "for free" with SwiftUI?
As I understand it, when you build apps with Flutter / Material, the native apps that get built do some smart cross-platform stuff, mimicking how that platform does things.
Erik also does very in-depth design training with enrollment only opening once in a while, the next opens March 4th.
Another week is in the books, and that means it’s time for us to catch up with all the articles we’ve found that were published about web design and development over the past 7 days. Whether it’s front end development, CSS, JavaScript, WordPress, web design, or any other related skills, we’ve got you covered with our weekly roundup. Enjoy!
I recently discovered most people aren’t even aware that double position for gradient stops is something that actually exists in the spec, so I decided to write about it.
People have built great tools to help you manage multiple WordPress sites from a single unified dashboard, and I’ve collected the best options in this post.
WordPress 5.4 is scheduled to be released on March 31, 2020. It will be the first major release of the year and will ship with some significant improvements.
Reports and surveys that shed light on: The battle between mobile and desktop, Why so many websites keep getting hacked, What’s keeping ecommerce business owners awake at night, and What Google is now saying about mobile-first indexing.
Let’s take a look at the whole world of links and buttons, and all the considerations at the HTML, CSS, JavaScript, design, and accessibility layers that come with them.
A list of terrible web design clients you should stay away from at all costs. Make sure to learn how to spot them and prepare yourself for any potential troubles.
In this tutorial, we’ll build a React drag-and-drop component for file and image uploads. In the process, we’ll learn about the HTML drag-and-drop API. We will also learn how to use the useReducer hook for managing state in a React functional component.
There’s a trend afoot in website design that mixes real images with illustrations and art elements in interesting ways. And it’s quirky, unique, and beautiful!
This guide covers what’s available in the console object of Firefox and Chrome as they are often the most popular browsers for development and they do have a few differences in various aspects of the console.
Are you looking to add a countdown timer to their WordPress website?
Countdown timers are a great way to build anticipation, excitement, and create a FOMO effect on your website. There are many different countdown plugins that let you create a countdown timer, so which one should you use?
In this article, we’ll share the best countdown plugins for WordPress and explain the key features of each.
What is a Countdown Timer Plugin & When You Need it?
A countdown timer WordPress plugin allows you to display a timer that counts down to a specific time or date.
Savvy marketers use countdown timers to build excitement and create a sense of urgency among their customers. It helps them take advantage of the FOMO effect to boost conversions.
There are many plugins that allow you to add countdown timers to your website. These countdown timers can be divided into two groups:
Normal Countdown Timers
A normal countdown timer, sometimes called a static or fixed countdown timer, is what most people think of when they imagine a timer. This timer counts down to a certain fixed time. That might be the launch of a WordPress website, the end of a sale, or another event.
The countdown clock’s endpoint is the same for everyone and doesn’t change depending on who’s viewing it.
Evergreen Timer
An evergreen countdown timer, sometimes called a dynamic countdown timer, is specific to each user. It begins counting down when the person arrives on your site. For instance, they might have 4 hours to take advantage of a special offer.
This can be a powerful marketing technique as it lets you create a sense of urgency.
Note that most WordPress plugins are designed to run normal countdown timers, and only some let you run evergreen timers.
Having said that, let’s take a look at some of the best countdown timer plugins for WordPress.
There are lots of ways you can position your countdown timer using OptinMonster. One of the best is to use a floating bar that sticks to the top or bottom of your page. That way, it stays visible at all times.
Here’s a countdown timer we created using the OptinMonster plugin:
You’ll need the OptinMonster’s Pro plan or higher to use countdown timers.
They allow you to add countdown timers on popups, floating bars, full-screen welcome mats, scroll boxes, and inline widgets. On top of that, you can personalize the timers based on the user’s location, which page they’re on, where they’re visiting from, and more.
SeedProd is the best WordPress website builder and landing page plugin. It is a great option if you want to add countdown timer animation to your landing pages.
SeedProd lets you easily set up a special landing page and put your site into coming soon or maintenance mode. Plus, it has a powerful drag-and-drop website builder. You can easily customize your WordPress theme without touching a single line of code.
With this plugin, you can create a normal and evergreen timer for your website. It offers lots of customization options, including pre-built templates for countdown timers.
Here’s a countdown timer we created using SeedProd’s Coming Soon Page Pro plugin:
Countdown Timer Ultimate is another good option to consider if you want to create a normal countdown timer. It’s a simple plugin that allows you to show timers on the entire website or specific to individual site visitors.
You can use Countdown Timer Ultimate to make as many countdown timers as you want, and you can customize how they look to some degree.
Here’s a preview of the countdown timer that you can create using the free version of the Countdown Timer Ultimate plugin:
The pro plugin gives you more advanced options. These include being able to show specific text when the countdown expires and extra design features.
Countdown Builder is a simple countdown timer with multiple different styles built in. These include circle countdowns, flip clock countdowns, and even a coming soon page.
You can place your timer within a post or page in the WordPress block editor by selecting the ‘Countdown’ block or using a shortcode. You can also choose to display it automatically on specific posts or pages.
Here’s a preview of a countdown timer you can create using the plugin:
If you want, you can edit how your clock looks in detail, changing things like the font size, the labels, and the animation style. You don’t need to do this with CSS. There’s a built-in editor in the plugin.
Evergreen Countdown Timer is the next countdown plugin on our list. It lets you create evergreen countdowns, as you might expect from its name. You can also use it to create normal countdowns as well.
You can choose how the plugin detects visitors by a cookie or their IP address.
To add the timers to your page, you’ll need to enter a shortcode. You can simply copy and paste this from the Manager section of your countdown timer settings.
Once your timer hits zero, you can automatically redirect the visitor to a URL of your choice. For instance, you could send them to a registration page if you’re counting down to the launch of your new course.
Here’s a timer we created using the Evergreen Countdown Timer plugin:
There’s a pro version of the plugin, which gives you lots of extra options. It also lets you choose more colors than just black or white for your timer.
With the Pro version, you can provide a countdown for available spots, such as seats or tickets. This could work well if you’re selling places for a paid webinar or another live event.
HurryTimer is a free countdown timer plugin that lets you create both evergreen and regular timers. The evergreen timer uses both cookie and IP detection to display the right timer to each individual user.
You can also set up timers to run a countdown between two fixed dates. This is useful if you want to get ready for an upcoming sale in advance.
The timer works with WooCommerce, though you don’t have to run WooCommerce to use it. You can display your timer several times on the same page if you want to.
Here’s a timer we created using HurryTimer:
If you have the Pro version, you can set up a recurring timer. This is a timer that runs according to the rules that you specify. For instance, you could have a timer that shows shipping cut-off times.
With the pro version, you can also create an announcement bar that sticks to the top or bottom of the screen to keep your timer visible.
7. Sales Countdown Timer
Sales Countdown Timer is designed for WooCommerce stores. It helps show timers for sale events, promotional offers, and the latest campaigns.
You can easily integrate the plugin with your WooCommerce products. Plus, it offers different customization options. You can change the style of the timers, edit the message, change the colors in the timer clock, and more.
Besides that, the plugin also lets you choose the location of the timer, whether you’d like to make it sticky, and also select which type of product pages you’d like to show the countdown timer.
Here is a look at the countdown timer we created using the plugin:
Is looking for the best WordPress hosting in Europe any different from looking for the best WordPress hosting overall? Let’s find out. Luckily, there are numerous WordPress hosting providers that boast European data centers, and other top features that will enable you to seamlessly run your WordPress website within Europe.
How To Build A Simple Cryptocurrency Blockchain In Node.js
How To Build A Simple Cryptocurrency Blockchain In Node.js
Alfrick Opidi
The unprecedented rise of cryptocurrencies, and their underpinning blockchain technology, have taken the world by storm — from the humble beginnings of being an academic concept over a decade ago to current increased adoption in various industries.
The blockchain technology is receiving a lot of attention because of its ability to enhance security in trustless environments, enforce decentralization, and make processes efficient.
Traditionally, Python has been the de facto programming language for blockchain development. However, with the proliferation of this amazing technology, the development options have also increased — and Node.js has not been left behind.
In this tutorial, I’m going to talk about how to build a simple cryptocurrency blockchain in Node.js. It’s not going to be too fancy, but just sufficient to assist you to understand how a blockchain works.
I’ll call this simple cryptocurrency smashingCoin.
If you are a JavaScript developer who wants to take a leap into the burgeoning field of cryptocurrency, this article will equip you with the necessary skills to get started. Or, if you’re curious about how things work in the world of cryptocurrencies, then this tutorial may help in answering some of your questions.
To follow this tutorial successfully, you’ll need to have the following:
Node.js installed on your machine. You can download it from here;
A code editor, such as Visual Studio Code, Sublime Text, or any other.
Let’s get started…
What Is A Blockchain?
Blockchain is the technology that powers digital currencies, such as Bitcoin and Ethereum. It is an innovative distributed public ledger technology that maintains a continuously growing list of records, referred to as blocks, which are connected securely using cryptography.
The term blockchain has earned its name because of the manner it keeps transaction data, i.e. in blocks that are connected to each other to create a chain. The size of the blockchain grows with an increase in the number of transactions undertaken.
Any valid transaction data is logged into the blockchain network, which is governed by peer-to-peer rules that the participants stipulate. For example, this data could contain the “value” of the block such as in digital currencies, a record of transactions (such as when parties exchange goods and services), or entitlement privileges such as when the chain records ownership information.
Besides the transaction data, every block may contain its own cryptographic hash (a unique identifier or digital footprint), its own nonce value (an arbitrary random number used once in cryptographic computations), the hash of the previous block, and a timestamp of recent authenticated transactions.
Since every new block should point to the previous block, if a block is incorporated into the chain without containing the right hash of the last block, it could render the entire blockchain invalid. This immutability property is key to the security of blockchains.
Furthermore, various types of consensus protocols are often applied to maintain the authenticity of the blockchain. Consensus ensures that all participants agree to the network-validated transactions.
For example, a commonly used consensus protocol is proof of work, which aims to identify a number that finds a solution to a complicated mathematical problem after completing a certain amount of computing work.
The main idea of proof work is that any participant in the blockchain network should find this number difficult to identify but easily verifiable. Consequently, it discourages spamming and tampering with the structure of the blockchain.
In the case of most cryptocurrencies, adding a new block to the blockchain requires solving a complex mathematical equation, which increases in difficulty over time as the blockchain grows. Consequently, any person who proves that they’ve done work by solving this problem is compensated with a digital currency, in a process referred to as “mining”.
How To Create A Block
Now, after introducing the blockchain technology and how it works, let’s see how we can apply the concepts in creating a block. As earlier mentioned, blocks are what interlink to each other to form a blockchain.
To create the smashingCoin currency, I’ll use JavaScript classes, which were introduced in ES6.
As you can see in the code above, I created the CryptoBlock class and added the constructor() method to it — just like it’s done in any other JavaScript class. Then, to initialize its properties, I assigned the following parameters to the constructor method:
index
It’s a unique number that tracks the position of every block in the entire blockchain.
timestamp
It keeps a record of the time of occurrence of each completed transaction.
data
It provides data about the completed transactions, such as the sender details, recipient’s details, and quantity transacted.
precedingHash
It points to the hash of the preceding block in the blockchain, something important in maintaining the blockchain’s integrity.
Furthermore, I used the computeHash method to calculate the hash of the block based on its properties, as given in the data above.
As you can see, I imported the crypto-js JavaScript library and used its crypto-js/sha256 module to calculate the hash of each block. Since the module returns a number object, I used the toString() method to convert it into a string.
To add the crypto-js library to your project, go the terminal and run the following command to install it using npm:
npm install --save crypto-js
After running the above command, the node modules directory, which contains the library and other essential files, will be added to your project’s folder.
How To Create A Blockchain
As earlier explained, the blockchain technology is based on the concept that all the blocks are chained to one another. So, let’s create a CryptoBlockchain class that will be responsible for handling the operations of the entire chain. This is where the rubber is going to meet the road.
The CryptoBlockchain class will maintain the operations of the blockchain using helper methods that accomplish different tasks, such as creating new blocks and adding them to the chain.
Here is the code for the CryptoBlockchain class:
class CryptoBlockchain{
    constructor(){
        this.blockchain = [this.startGenesisBlock()];
    }
    startGenesisBlock(){
        return new CryptoBlock(0, "01/01/2020", "Initial Block in the Chain", "0");
    }
    obtainLatestBlock(){
        return this.blockchain[this.blockchain.length - 1];
    }
    addNewBlock(newBlock){
        newBlock.precedingHash = this.obtainLatestBlock().hash;
        newBlock.hash = newBlock.computeHash();
        this.blockchain.push(newBlock);
    }
}
Let me talk about the roles of each of the helper methods that constitute the CryptoBlockchain class.
1. Constructor Method
This method instantiates the blockchain. Inside the constructor, I created the blockchain property, which refers to an array of blocks. Notice that I passed to it the startGenesisBlock() method, which creates the initial block in the chain.
2. Creating The Genesis Block
In a blockchain, the genesis block refers to the first-ever block created on the network. Whenever a block is integrated with the rest of the chain, it should reference the preceding block.
Conversely, in the case of this initial block, it does not have any preceding block to point to. Therefore, a genesis block is usually hardcoded into the blockchain. This way, subsequent blocks can be created on it. It usually has an index of 0.
I used the startGenesisBlock() method to create the genesis block. Notice that I created it using the afore-created CryptoBlock class and passed the index, timestamp, data, and precedingHash parameters.
3. Obtaining The Latest Block
Getting the latest block in the blockchain assists in ensuring the hash of the current block points to the hash of the previous block — thus maintaining the chain’s integrity.
I used the obtainLatestBlock() method to retrieve it.
4. Adding New Blocks
I used the addNewBlock() method to add a new block to the chain. To accomplish this, I set the previous hash of the new block to be equal to the hash of the last block in the chain — thus ensuring the chain is tamper-proof.
Since the properties of the new block get changed with every new calculation, it’s important to calculate its cryptographic hash again. After updating its hash, the new block is pushed into the blockchain array.
In reality, adding a new block to a blockchain is not that easy because of the several checks that have been placed. Nonetheless, for this simple cryptocurrency, it’s enough to demonstrate how a blockchain actually works.
Testing The Blockchain
Now, let’s test our simple blockchain and see if it works.
As you can see in the code above, I created a new instance of the CryptoBlockchain class and named it as smashingCoin. Then, I added two blocks into the blockchain using some arbitrary values. In the data parameter, I used an object and added sender details, recipient’s details, and quantity transacted.
If I run the code on the terminal, here is the output I get:
Testing to see if our blockchain works. (Large preview)
That’s what the smashingCoin looks like!
It’s an object that contains the blockchain property, which is an array containing all the blocks in the chain. As you can see in the image above, each block references the hash of the previous block. For example, the second block references the hash of the first block.
After testing and seeing that our blockchain works, let’s add some more functionalities to enhance the features of the smashingCoin.
How To Verify The Blockchain’s Integrity
As earlier mentioned, a key characteristic of a blockchain is that once a block has been added to the chain, it cannot be changed without invalidating the integrity of the rest of the chain.
Therefore, to verify the integrity of the blockchain, I’ll add a checkChainValidity() method to the CryptoBlockchain class.
Hashes are critical for ensuring the validity and security of a blockchain because any change in the contents of a block will result in the production of an entirely new hash, and invalidating the blockchain.
As such, the checkChainValidity() method will make use of if statements to verify whether the hash of every block has been tampered with. Starting from the first created block, it’ll loop over the entire blockchain and check for its validity. Note that since the genesis block was hardcoded, it’ll not be checked.
Also, the method will verify whether the hashes of each two consecutive blocks are pointing to one another. If the integrity of the blockchain has not been compromised, it returns true; otherwise, in case of any anomalies, it returns false.
As earlier mentioned, proof of work is the concept applied to increase the difficulty entailed in mining or adding new blocks to the blockchain.
In the case of smashingCoin, I’ll employ a simple algorithm that deters people from generating new blocks easily or spamming the blockchain.
So, in the CryptoBlock class, I’ll add another method called proofOfWork().Essentially, this simple algorithm identifies a number, passed as a difficulty property, such that the hash of every block contains leading zeros that correspond to this difficulty level.
Ensuring the hash of every block begins with the number of zeros as set in the difficulty level requires a lot of computing power. The higher the difficulty level, the more time it takes to mine new blocks.
Furthermore, I’ll add a random nonce value to every hashed block such that, when rehashing takes place, the difficulty level restrictions can still be met.
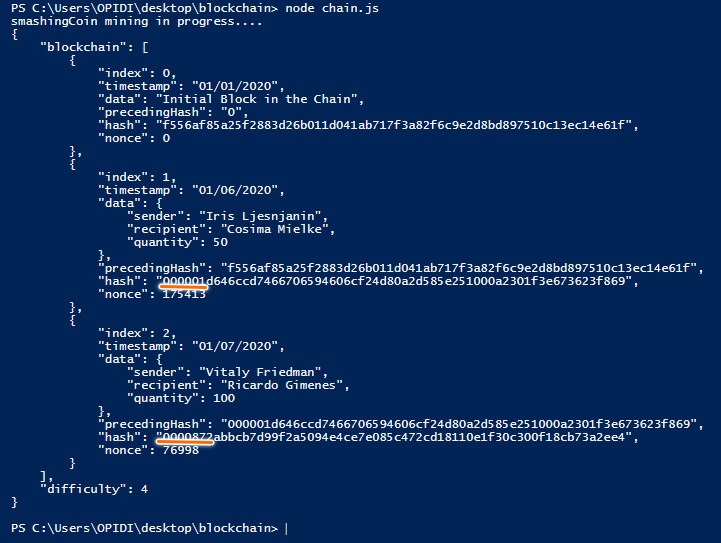
If I run the code on the terminal, here is the output I get:
At last, our smashingCoin cryptocurrency! (Large preview)
As you can see on the image above, the hashes now start with four zeros, which correspond with the difficulty level set in the proof of work mechanism.
Conclusion
That’s it! That’s how you can build a simple cryptocurrency blockchain using Node.js.
Of course, the smashingCoin cryptocurrency is far from complete. In fact, if you release it without making more improvements, it is unlikely to meet the current market demands for a secure, reliable, and intuitive digital currency — making you the only one using it!
Nonetheless, I hope that this tutorial has equipped you with some basic skills to get your feet wet in the thrilling world of cryptos.
If you have any comments or questions, please post them below.
I want to know about the exact difference between the XM Sitemap & HTML Sitemap. I already take the help of Google but not satisfied.
Expecting a better reply from your side.