6 Digital Marketing Mistakes To Avoid In 2020

It can often be tough to determine what direction the digital marketing world is going, considering how it is evolving in a time where technology is continually changing and evolving. However, many analysts and experts that can agree that there are methods that simply arent effective or might not be the smart strategy currently.

There is nothing wrong with digital marketing that eschews a traditional approach. Many companies have succeeded because of innovative digital marketing campaigns that have changed the way that we think about advertising in general. However, here are some digital marketing mistakes that you should work to avoid at all costs.

Not Testing Enough

One of the greatest aspects of technology is that it allows companies to understand what kind of content strategy works, whether it involves copywriting, promotions, or design/layout. Your business should continuously be understanding which e-mail promotion works the best through A/B testing.

A/B testing can help you do more than figuring out what marketing method works - they can provide insight with respect to demographics and price points, as well. Companies should also be testing as your marketing strategy evolves, to figure out what works and what doesnt. Of course, you should also listen to consumer/customer feedback in general, in addition to A/B testing.

Never Rewarding The Loyal Consumer/Customer

There is no question that every business needs to continually profit in order to survive. However, are you continually taking from the consumer rather than offering meaningful to them? You should understand that loyal consumers often receive all sorts of offers - whether its a discount code or a free shipping offer in their inbox.

Every company should work to reward loyal consumers - and this certainly isnt a strategy that is limited to digital marketing. Starbucks, one of the worlds largest coffee chains, has been particularly successful in creating revenue through loyalty programs. You may find that rewarding a consumer - whether its because they made a large purchase or signed up for your newsletter - is usually a smart decision.

Downplaying Social Media

There are many different social media platforms out there, but the truth is that Facebook alone boasts over two billion monthly users. This is a significant portion of the Earths population, and it would be ridiculous for a company of any kind to disregard the impact of a powerful social media strategy. There are also over 200 billion tweets per year, for an idea of how useful Twitter can be when it comes to marketing/advertising.

There are many businesses that have been able to find a particular voice on a social media platform that has translated to real profits. You also might find that social media can help amplify your other marketing campaigns, as commercials often go viral and can lead to meme creation. Regardless, every business should understand that a social media presence can help with customer loyalty and overall revenue. Companies have succeeded on social media through a minimal investment for some social media promotion, as well.

Its also important to remember WHY you are on social media, to help with brand messaging. You shouldnt create a Twitter account just for the sake of it - you should have concrete goals associated with your social media strategy.

Tracking Why You Succeed

There might be moments where you understand exactly why a marketing campaign worked and why. However, the truth is that you should always be using analytics to figure out more about why some methods are working. If you arent tracking the success of your marketing methods, then how will you improve?

You may find that some of your marketing strategies take more time/money than you thought, but that were well-worth it in the long-term. An organization might also find that a minimal investment in a particular marketing tactic brought more revenue than expected, and executives may decide that more attention should be considered to this strategy. At the end of the day, you cant improve what you arent actively tracking.

Content With No Value

You might think that producing content is of the utmost importance, but that the kind of content doesnt really matter. There are plenty of businesses with websites that offer hundreds of blog articles, for example. There is nothing wrong with blog articles, but often times, organizations stuff keywords in these articles hoping to rank higher on search engines.

The concept of search-engine optimization (SEO) is something that every organization should consider. However, if you are intent on continually producing content without caring about the quality of the content - you might find that you may eventually be giving up market share to a competitor that is offering real value, whether its in the form of actionable advice or a well-designed and informative landing page.

Lack Of Engagement

One of the reasons that businesses are successful with digital marketing is because they go out of their way to interact with the customer and make sure that they are satisfied. If you create social media platforms but arent too concerned with actually responding to anyone, it can appear like your company isnt really authentic in their social media presence.

You dont have to respond to every tweet, or post - but you should make it clear that you are there to not only promote your business but also to address any questions or concerns about your business. Some of the largest corporations in the world go out of their way to respond to their customers - and its because there is real value in engagement.

Conclusion

There are plenty of digital marketing strategies that have come in and out of style, and there will undoubtedly be more social media platforms that rise to prominence. Companies are now figuring out how to target the teenager demographic of Tiktok, for example.

However, there are clear situations where organizations should understand that they might be doing more harm than good. These digital marketing tactics should be avoided as much as possible, especially given the fact that we are entering a new decade.

Building the Community We Deserve

"2020" numbers laid over a wooden table with stars scattered around.

One of our internal discussions about the future of WP Tavern has stuck with me since it wrapped up. The discussion was centered on pushing comment threads in the right direction. We often receive comments that border on conspiracy-theory territory (and those that cross over head first). We also get comments that make statements of fact without backing up those claims with evidence.

Not all those who make such comments have ill intentions. The issue is often that the ideas presented in a comment are not fully-fleshed out. Often, the commentator had not taken the time to shape their words into something that births thoughtful responses. Such is the nature of comments on the web.

WP Tavern’s big goal for 2020 should be about shepherding our community. Going forward, we will take steps toward fostering better discussions.

Building Our Community in the New Year

Shepherding the community is about creating a welcoming environment for everyone. All of our readers should feel comfortable leaving their thoughts on a given topic.

As a new writer in a long-standing community, I sometimes receive uplifting private messages and emails from community members. They often have kind words or love the coverage of a specific topic. The trouble is getting some of those people to engage in the comments. As my grandma, who would welcome anyone into her home, would say, “Y’all stop by sometime and chat for a while.” Some people are timid about commenting publicly. Others feel like they will be attacked or their ideas will be dismissed offhand. Fostering a community they would feel comfortable participating in is the goal.

The first step toward this goal is an update to our comment policy.

The intention of our policy has remained the same. In general, be kind to people. The updated policy includes some new guidelines on what is unacceptable and some clearer language in some areas. It would be nice to eventually move back to the point where we no longer moderated every comment before publishing them on the site. We are not there yet, but I remain optimistic.

The other major plan is around integrating community elements into the site design. Rest assured that this is something being worked on. Better showcasing recent comments is high on the list. However, we can go beyond that by showcasing users with the most comments, top comments by the number of likes, and more. I have some ideas that I hope to implement this year to make our readers feel like they have more of a stake in the site. This place is as much about you all as it is about our team.

Ask the Bartender

We have quietly added an Ask the Bartender form on the site. This is our idea of an advice column that you might see in traditional journalism.

At this point, it is experimental. The plan is to publish a periodic article where one of our writers answers questions from our readers. This will give you all an opportunity to bring up the big questions that you want our community to discuss.

We do not have an official format for how this will work yet. It will largely depend on the questions that people submit. We are open to nearly any type of WordPress-related question right now.

What We All Can Do

The biggest thing I ask of the Tavern community that we make 2020 the year that we thoughtfully engage with one another.

More than that, when discussing topics with others online, there is no need to feel like you must win an argument. That usually leads to nowhere good. Present your ideas and let them stand on their own merit.

With that idea in mind, think about writing responses in the form of a blog post. Then, let us know about the post here at the Tavern. Taking the time to write a post allows your ideas to mature. Doing this lets you build a stronger argument if you rationally think it through. Also, WordPress is blogging software at heart. We should use it more often to blog about WordPress.

Happy New Year, everyone! Let’s make this a memorable one.

New Year, New Job? Let’s Make a Grid-Powered Resume!

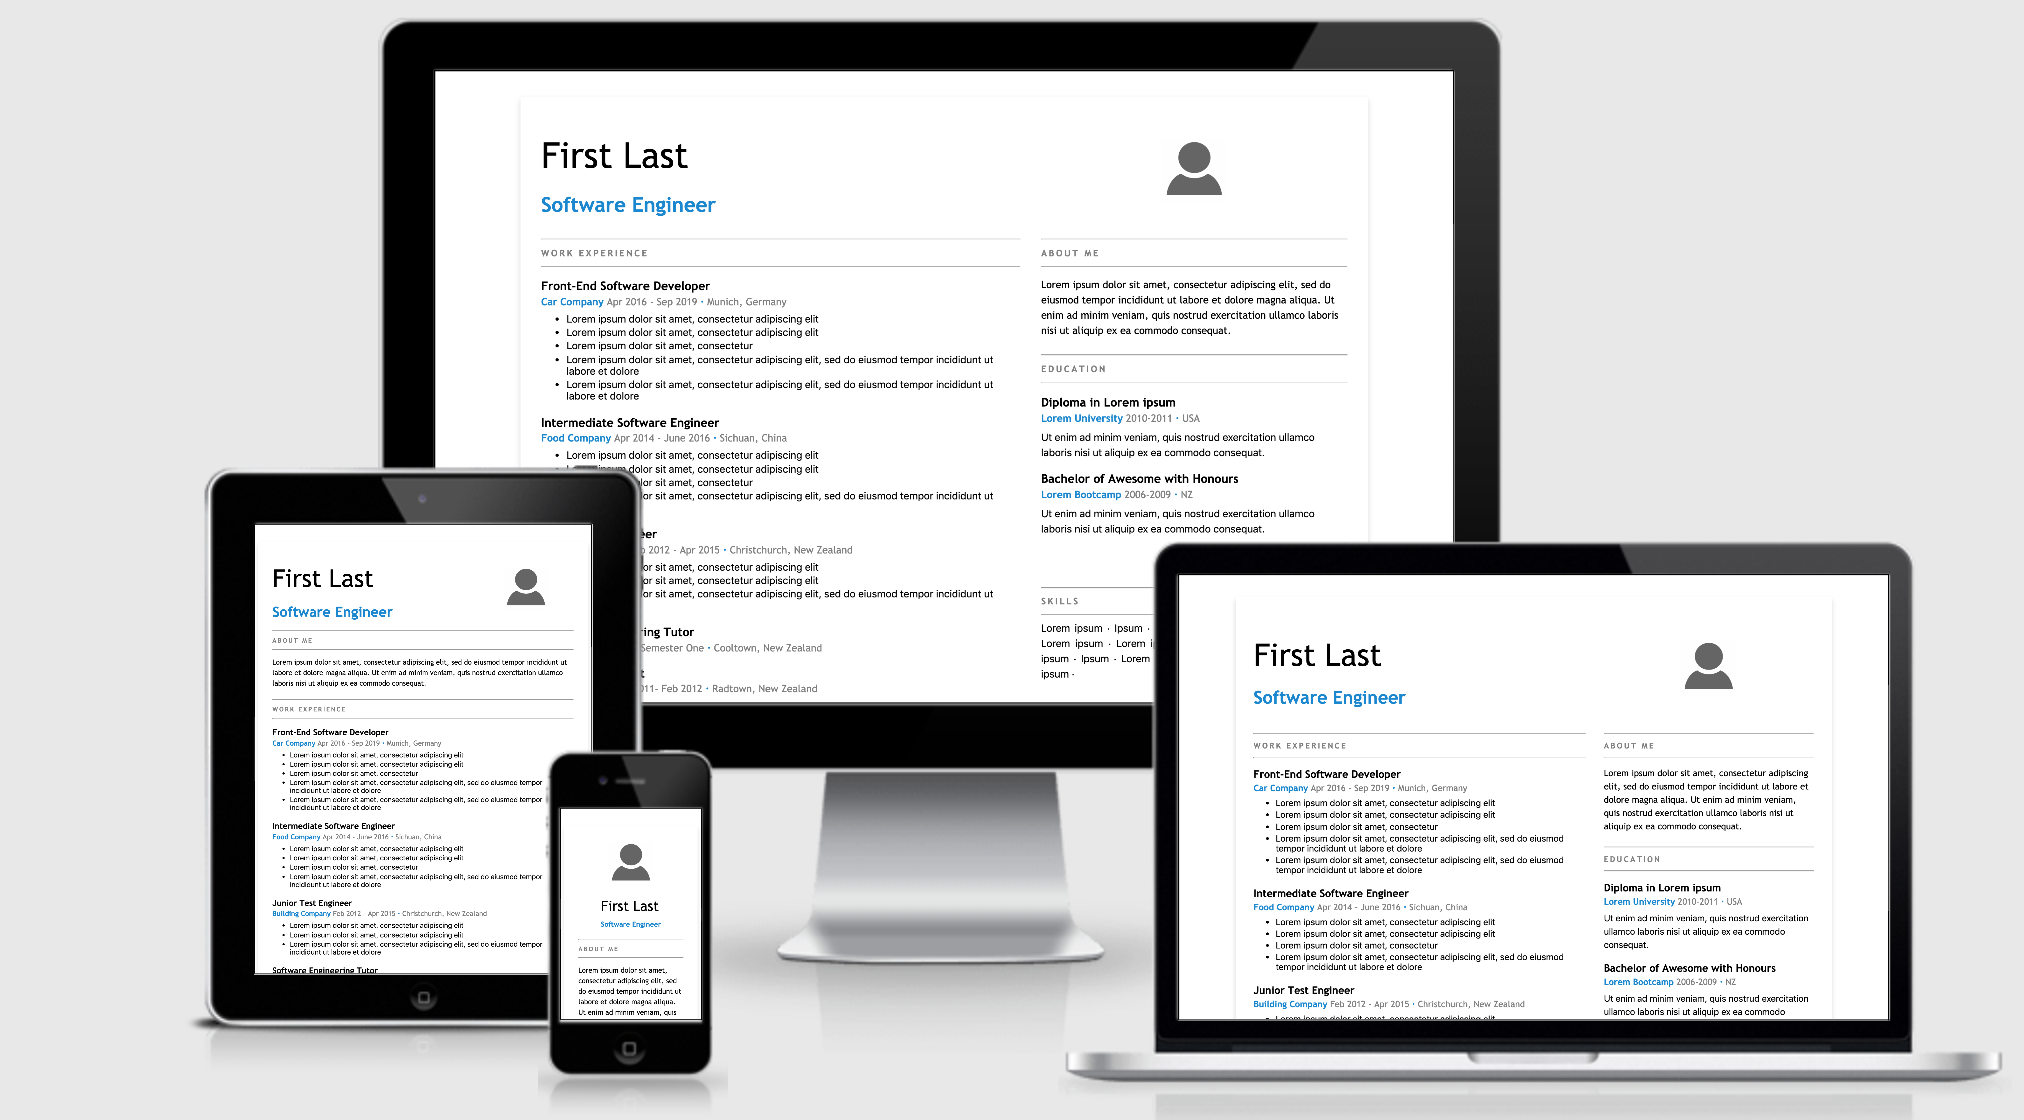
Many popular resume designs are making the most of the available page space by laying sections out in a grid shape. Let’s use CSS Grid to create a layout that looks great when printed and at different screen sizes. That way, we can use the resume online and offline, which might come in handy during the new year!

First, we will create a resume container, and our resume sections.

<article class="resume">
  <section class="name"></section>
  <section class="photo"></section>
  <section class="about"></section>
  <section class="work"></section>
  <section class="education"></section>
  <section class="community"></section>
  <section class="skills"></section>
</article>

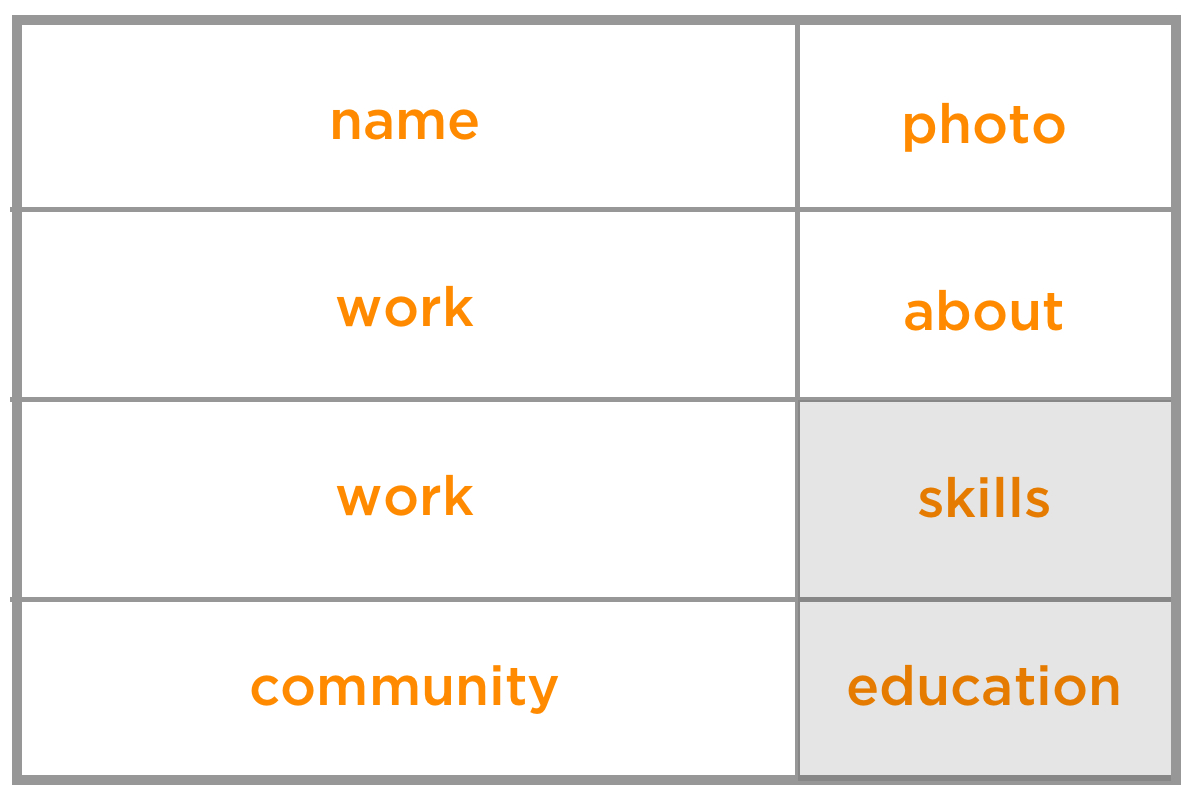
To start using Grid, we add display: grid to our outer resume element. Next, we describe how things should be placed on the grid. In this case, we will specify two columns and four rows.

We are using the CSS Grid’s fr unit to specify how many fractions on the available space to give. We will give the rows equal space (1fr each), and make the first column two times wider than the second (2fr).

.resume {
  display: grid;
  grid-template-columns: 2fr 1fr;
  grid-template-rows: 1fr 1fr 1fr 1fr;
}

Next we will describe how these elements should be placed on the grid by using the grid-template-area property. First we need to define a named grid-area for each of our sections. You can use any name but here we will use the same name as our sections:

.name {
  grid-area : name;
}

.photo {
  grid-area : photo;
}

/* define a grid-area for every section */

Now comes the fun part, and one that makes changing the design a breeze. Place the grid areas in the grid-template-areas property how you want them to be laid out. For example, here we will add the name section at the top left of the the grid-template-area to place our name at the top left of the resume. Our work section has a lot of content so we add it twice, meaning that it will stretch over two of the grid cells.

.resume {
  grid-template-areas:
    "name photo"
    "work about"
    "work education"
    "community skills";
}

Here’s what we have so far:

See the Pen
grid resume lines
by Ali C (@alichur)
on CodePen.

The CSS Grid specification provides many useful properties for sizing and laying things out on the grid and well as some shorthand properties. We are keeping things simple in this example by showing one possible method. Be sure to check out some of the great resources out there to learn how best to incorporate CSS Grid in your project.

Adjusting layout

grid-template-areas make it very easy to change your layout. For example, if you think an employer will be more interested in your skills section than your education you can switch the names in grid-template-areas and they will swap places in your layout, with no other changes required.

.resume {
  grid-template-areas:
    "name photo"
    "work about"
    "work skills"  /* skills now moved above education */
    "community education";
}

See the Pen
grid resume swapping sections
by Ali C (@alichur)
on CodePen.

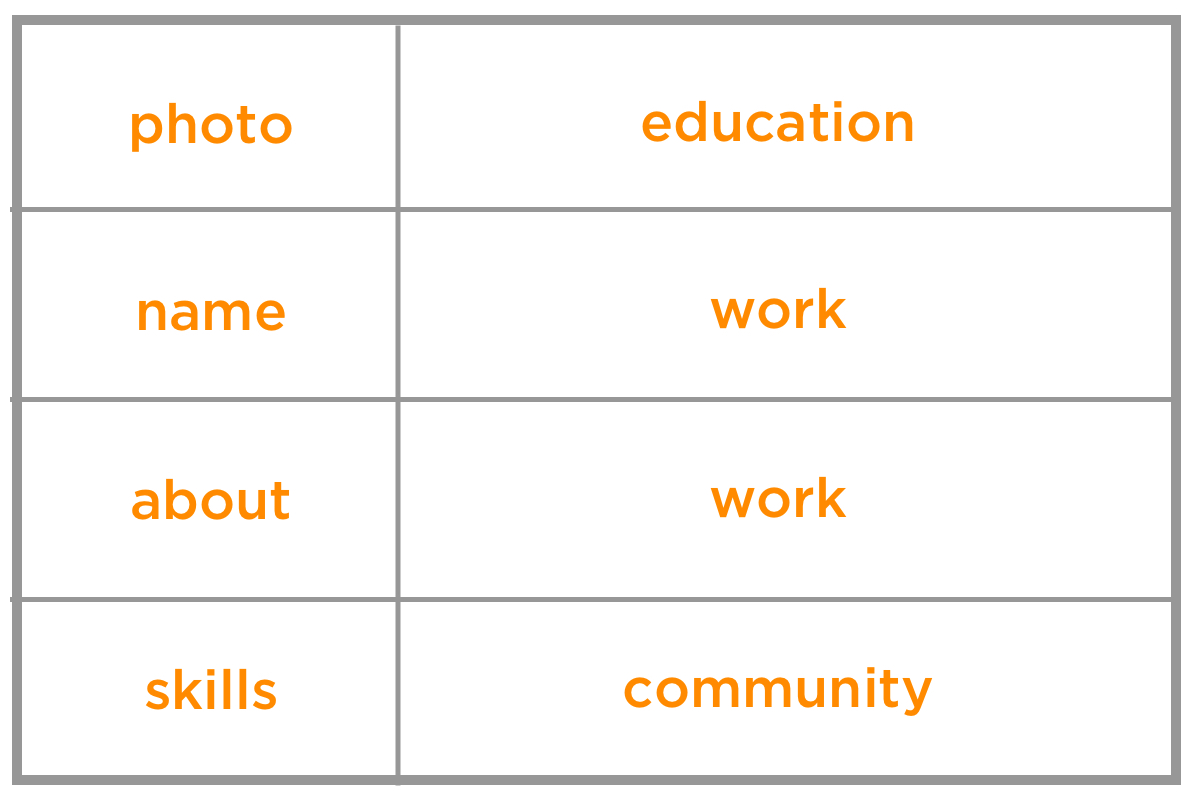
We can achieve a popular resume design where the thin column is on the left with minimal CSS changes. That’s one of the nice things about grid: We can rearrange the named grid areas to shift things around while leaving the source order exactly where it is!

.resume {
  grid-template-columns: 1fr 2fr;
  grid-template-areas:
    "photo education"
    "name work"
    "about work"
    "skills community";
}

See the Pen
grid resume left design
by Ali C (@alichur)
on CodePen.

Dividing columns

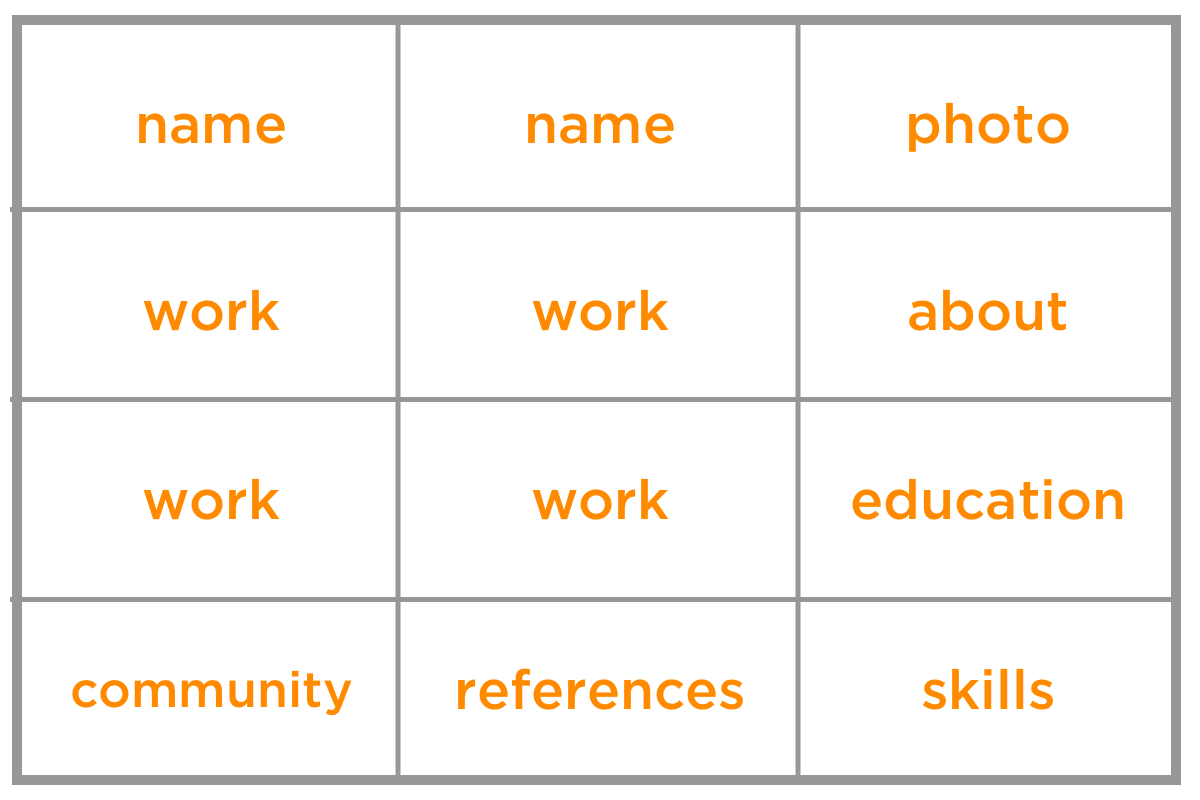
Perhaps you want to add personal references to the mix. We can add a third column to the grid template and slip those into the bottom row. Note that we also need to change the column units to equal fractions then update the template areas so that certain elements span two columns in order to keep our layout in place.

.resume {
  grid-template-columns: 1fr 1fr 1fr;
  grid-template-areas:
    "name name photo"
    "work work about"
    "work work education"
    "community references skills";
}

See the Pen
grid resume split columns
by Ali C (@alichur)
on CodePen.

The gap between sections can be controlled with the grid-gap property.

Making it responsive

For small screens, such as a mobile device, we can display the resume sections in a single full-width column.

grid-template-columns: 1fr;
grid-template-areas:
  "photo"
  "name"
  "about"
  "work"
  "education"
  "skills"
  "community"
  "references"
}

Then we can use a media query to change the layout for wider screens.

@media (min-width: 1200px) {
  .resume {
    grid-template-areas:
      "name photo"
      "work about"
      "work education"
      "community skills";
  }
}

Additional breakpoints can be added in between. For example, on medium screens like a tablet, we might want everything in a single column, but the personal and image sections to sit side-by-side at the top.

@media (min-width: 900px) {
  .resume {
      grid-template-columns: 2fr 1fr;
      grid-template-areas:
        "name image"
        "about about"
        "work work"
        "education education"
        "skills skills"
        "community community"
        "references references"
  }
}

Planning for single-page printing

If you want your resume to print nicely to a single piece of physical paper, there are a few things to keep in mind. The hardest challenge is often cutting down the number of words so that it fits on one page.

Avoid reducing the font size to squeeze more information, as it may become hard to read. One trick is to add a temporary size constraint to your resume element just while while you are developing.

.resume {
  /* for development only */
  width : 210mm;
  height: 297mm;
  border: 1px solid black;
}

By making this A4 paper-sized border it will be clearer to see if the sizes are too small, or the content spills out of the border, indicating it would print onto a second page.

You can provide printing CSS to hide things, like the date and page numbers, that the browser may insert.

@media print {
  /* remove any screen only styles, for example link underline */
}

@page {
  padding: 0;
  margin: 0cm;
  size: A4 portrait;
}

One thing to note is that different browsers may render your resume with different fonts that can vary slightly in size. If you want a very precise printed resume, another option is to save it as a PDF and provide a download link on your site.

Browser support

CSS Grid has good support in modern browsers.

Internet Explorer (IE) supports an older version of the CSS Grid specification using prefixes. For example grid-template-columns is written as -ms-grid-columns. Running the code through an Autoprefixer can help with adding these prefixes, but manual changes and thorough testing will be required because in the old specification some properties behave differently and some do not exist. It’s worth checking out Daniel Tonon’s article on how Autoprefixer can be configured to make things work as well as possible.

An alternative approach to autoprefixer is to provide a fallback, for example by using a float layout. Browsers that don't recognize CSS Grid properties will display using this fallback. Regardless of whether you need to support IE, a fallback is sensible for ensuring (potentially unknown) browsers that don't support CSS Grid still display your content.


Even if you’re not ready to host an online resume, it is still fun to play around with CSS Grid, explore different layouts, generate a great looking PDF, and learn an awesome part of CSS at the same time.

Happy job hunting!

The post New Year, New Job? Let’s Make a Grid-Powered Resume! appeared first on CSS-Tricks.

PSA: It’s That Time to Update the Copyright Year on Your Site

Every year about this time I see articles going around reminding people how to update the copyright on their websites. Usually somewhere in the footer. You know, a line like:

© Copyright 2007-2019 CSS-Tricks

I am very absolutely not a lawyer, but this is how I understand it:

  • You don't actually need that if your goal is copyrighting blog posts. Blog posts are copyrighted (in the United States) the second you publish them, with or without a copyright notice. You just can't sue anybody over infringement unless you register the copyright.
  • People say it may "defer" infringements (but I don't buy it).
  • People say it may win you greater settlements should you sue and win (but I wouldn't even know where to begin fact-checking that).

Personally, I usually don't bother with it, but don't take that as legal advice. I feel like it's usually included for a bit of swagger like, "lookie how long we've been around." In that same tune, if you're doing it, it makes a lot of sense to keep it up to date because having the incorrect or an outdated date definitely makes your site look stale.

So, sure, rock your <?php echo date("Y"); ?> or whatever you need to do to keep it up to date. Just be careful: I just saw a site going around that recommended an inline JavaScript document.write() technique. That's probably not the worst thing in the world since it's just injecting a string, but it's usually something to avoid for various reasons, and I'd way rather see you do it server-side or pre-rendered.

The post PSA: It’s That Time to Update the Copyright Year on Your Site appeared first on CSS-Tricks.

GDPR Compliance

The General Data Protection Regulation (GDPR) is aimed at giving citizens throughout the European Union (EU) control over their personal data. GDPR applies to you if you are a European Union citizen or, as a business, if your email subscribers are EU citizens, or you deal with any kind of personal data of EU citizens.

How our add-ons enable you to comply with EU’s GDPR policies

As a customer, you operate as the data controller and we are considered a data processor. You have the responsibility for ensuring that the personal data of subjects you are collecting is being processed lawfully and, similar to controllers, processors, that processes personal data on behalf of a data controller, are expected to comply with the GDPR.

Data Collection

With GDPR, you must have explicit consent from your email subscribers that they would like to receive emails from you. It is recommended that you use double opt-in to align with GDPR compliance requirements. For EU individuals who are already on your marketing lists, you may need to contact them by email asking them to confirm their consent.

You should include a visible unsubscribe link in your marketing emails that your subscribers can click to instantly unsubscribe from all your future communications.

Data Storage and Processing

All your customer’s data is stored in your Google account, inside Google Sheets, Docs, Gmail, Google Drive or Google Forms and not on our servers. Our addons read the data directly from your data source and perform the necessary actions (like sending emails, generating documents, saving emails) without transferring any personal data.

The email messages are not stored on our servers. If you choose to attach Google Drive files in your emails, the content of the files are not stored on our servers. Your form submissions are not stored on our servers. If you enable optional campaign tracking (opens, clicks, unsubscribes), the email addresses of recipients, unsubscribers, and bounced emails are stored in the database for reporting.

We store and process user data in Google Cloud database (us-east) and its servers are located in the United States (East) data center.

We use Google’ Stackdriver logging tool for error tracking and debugging errors. It includes stack traces, error messages and the logs do not include any PII data.

We use PayPal, Stripe, and Paddle to manage your payments. The payment processors only provide the customer’s email address and, in case of PayPal, the shipping address for generating invoice. We do not have access to any banking or credit card information of our customers.

Data Portability

We do not transfer, sell, make copies, or share any of your data processed by our Google Add-ons to third party services or companies. We only store data that is absolutely necessary for our add-ons to function.

You can use download and export all your subscriber’s information in Google Sheets. This allows for easier migration to other services.

Data Erasure (Right to be forgotten)

All addons have a deactivate option that will permanently delete all user’s data from the database. You can also contact us to submit a deletion requires and, in compliance towards GDPR, we’ll permanently delete all your data.

If you uninstall a Google Addon, or revoke access to the addon from your Google Account, the add-on will not be able to access any of your data and will instantly stop functioning.

Our Google Addons use your own Gmail account to send emails. You can feed your customer profile data directly into our Google Add-ons - through Google Sheets and Google Forms - to send marketing emails, transaction emails and form notifications. Our tools only facilitate your compliance to GDPR, your sending practice is key to complying with GDPR.

Contact Us

If you have any questions, please contact us by email: amit@labnol.org

How to Add Special Characters in WordPress Posts

Ever wondered how popular sites add trademark ™, copyright ©, registered ®, or currency characters into their articles?

Recently one of our users asked us if there was an easy way to add special characters into WordPress posts and pages. These characters are not found on an average keyboard which makes it difficult for beginners to use them.

In this article, we will show you multiple ways to easily add special characters in WordPress posts. You can choose an approach that best suits your workflow.

Adding special characters to your WordPress posts and pages

Add Special Characters in WordPress Block Editor

WordPress block editor does not come with a special block or menu button in the paragraph formatting options.

However there are two ways you can use to add special characters in WordPress block editor. Let’s take a look at both of them, so you can decide which one is easier for you.

1. Add Special Characters using HTML Entity Code

When you write a blog post, WordPress automatically formats it into HTML. It is the markup language used by almost all websites.

HTML comes with a list of HTML entities. These are special codes that you can use inside HTML to display characters, symbols, arrows, and more.

This allows you to add special characters in HTML that are not normally found in keyboard layouts.

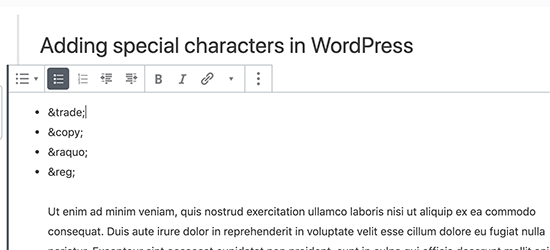
For example, if you wanted to add a trademark ™ symbol, then you can use the HTML entity code &trade; to display it.

Similarly, if you wanted to add a copyright © symbol, then you can use &copy; code in your article.

Adding HTML Entity in Gutenberg

Notice how each HTML entity code begins with an ampersand sign and ends with a semicolon.

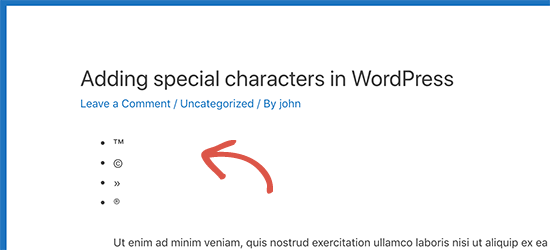
After you add an HTML entity code in the post editor, it will not immediately convert into the corresponding character. However, when you publish or preview your post, then you will see it automatically display the special character instead of the HTML entity code.

HTML entities converted into special characters

There is a whole range of characters available as HTML entities, including special characters, latin characters, mathematical symbols, currencies, scientific measurement symbols, and more.

For the complete reference, check out W3.org’s HTML character entity reference chart.

Method 2. Add Special Characters in WordPress using a Plugin

If you need to add special characters on a regular basis, then you would be better off using a plugin instead of checking the HTML entity reference chart each time.

First thing you need to do is install and activate the Insert Special Characters plugin. For more details, see our step by step guide on how to install a WordPress plugin.

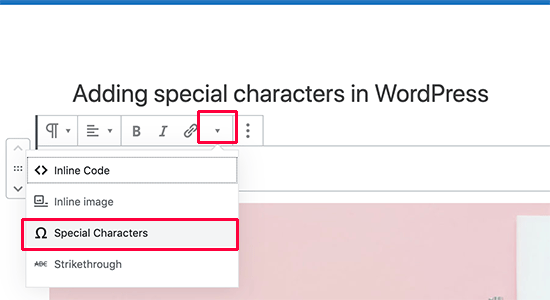
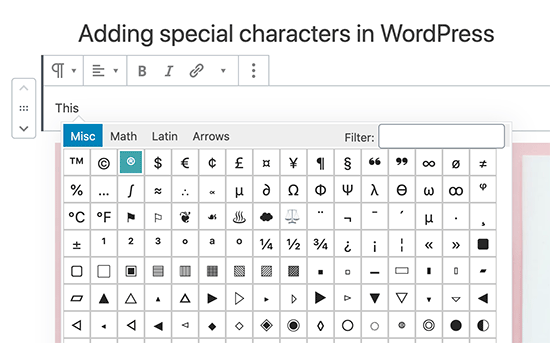
Upon activation, simply edit the post or page where you want to add special characters. Inside the paragraph block, click on the drop-down arrow in the block toolbar and select the ‘Special characters’ option.

Open special characters menu in block editor

This will bring up a popup displaying special characters. Simply locate the special character you want to add and then click to insert it into the editor.

Add special characters in Gutenberg WordPress block editor

Adding Special Characters in Old WordPress Editor

If you are still using the old classic editor in WordPress, then here is how you can easily add special characters while writing blog posts.

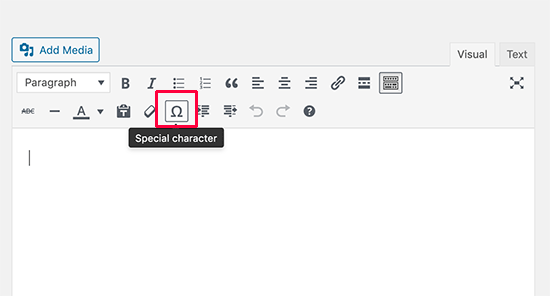
First, you need to click on the kitchen sink button. This will expand the second row of formatting options where you should see the Special Characters button.

Special characters button in the old editor

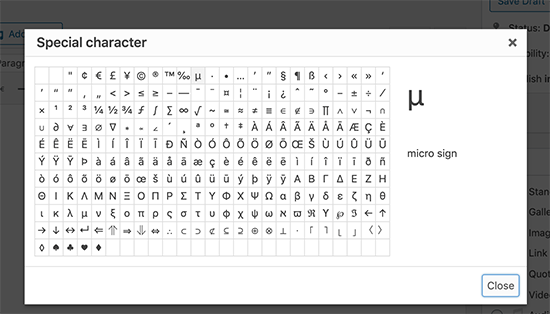
Clicking on the special characters button will bring up a pop-up window showing some commonly used special characters. It has currency symbols, trademark, copyright, registered signs, mathematical symbols and signs.

Special characters popup in old WordPress editor

Remember, this method would only work if you are using the old editor in WYSIWYG mode.

If you are using it in the text mode, then you’ll either need to switch to the Visual editor or use the HTML entities method described above.

You simply need to just click on the symbol or character you want to use, and it will be added in your post.

We hope this article helped you learn how to add special characters in WordPress posts and pages. You may also want to see our complete guide on mastering the WordPress block editor.

If you liked this article, then please subscribe to our YouTube Channel for WordPress video tutorials. You can also find us on Twitter and Facebook.

The post How to Add Special Characters in WordPress Posts appeared first on WPBeginner.