Version 1.1 of the AMP Plugin for WordPress was released this week after four months in development and 125 merged pull requests from contributors. It includes CSS tree shaking improvements that restore AMP compatibility for WordPress’ default Twenty Nineteen theme, reducing the size of its stylesheet by 53%.
In an effort to get more users opting for the Native mode option, the plugin’s development team has rebranded the template modes:
In this release the Paired mode has been rebranded as Transitional mode. One reason for this is that the classic mode was also a paired mode (where there are separate parallel URLs for the AMP version). But more importantly, the goal for this mode is to help facilitate a transition a site to being AMP-first, where there is no separate AMP-specific URLs. So the goal of the Transitional mode is to be a path to Native mode.
The team has also decided to rebrand Classic mode to “Reader” mode, instead of deprecating it. It provides a basic AMP template for getting started that doesn’t necessarily match the site’s theme. Users can can add an “Exit Reader Mode” to the header of their sites with a setting in the Customizer.
Version 1.1 introduces compatibility with the PWA feature plugin, bringing support for the service worker to AMP pages. It extends the service worker to cache AMP CDN assets, images, and Google Fonts. Since the PWA feature plugin is still under active development, the service worker integration is still considered experimental.
Support for creating AMP Stories in WordPress is the next major feature coming to the plugin. A pre-release of the AMP Stories editor is available in 1.2 alpha 1, which also requires the latest version of the Gutenberg plugin. It uses the Gutenberg editor to allow users to build AMP stories with rich media capabilities.
A preview of the AMP Stories editor was unveiled at AMP Conf 2019 in Tokyo, Japan. Check out the video below to see Alberto Medina give a quick demonstration of how it will work in the upcoming version 1.2 of the AMP for WordPress plugin.
Back in the day, books were the only way to gain knowledge. I remember spending hundreds of hours in book stores and in the local library, digging up old books about programming. Fast forward to 2019 and my focus has almost entirely shifted to blogs. Here's my personal list of my recommendations for .NET blogs to follow.
Scott Hanselman: He really doesn't need any introduction. Scott's blog is one of the best resources for .NET developers. Besides blogging about .NET, Scott also writes a lot of interesting posts about productivity.
Last month, Facebook admitted to storing million of Facebook passwords in plaintext.
The Verge Apr 18, 2019
We see students being taught login systems here and a recurring mistake is passwords being stored in databases. It appears that CompSci courses teach bad practices early and as we know it's hard to unlearn what you learn earlier.
Further reading seems to indicate these passwords may have collected via logging.
"But as Krebs on Security first reported, various errors seem to have caused Facebook’s systems to log some passwords in plain text since as early as 2012."
I'm been chided for pointing this out from time to time but the mistake happens over and over and in very big companies.
The updated core tool for developing Android applications, Android Studio, is now available in a new stable release. Android Studio 3.4 and Project Marble have been under development for six months and Google calls this a "milestone release" thanks to the rock-solid foundation of key workflows.
Scott O'Hara recently published "Inclusively Hidden," a nice walkthrough of the different ways to hide things on the web. Nothing is ever cut and dry when it comes to the web! What complicates this is that hidden begs the question: hidden for whom? Different answers to that have different solutions:
Hidden for everyone?display: none; or visibility: hidden; or the hidden attribute. (But watch out for that hidden attribute, says Monica Dinculescu.)
Hidden visually, but present for assistive tech? A .screen-reader-only class with a smattering of properties to do the job correctly.
Hidden for assistive tech, but not visually? The aria-hidden="true" attribute/value.
It's worth grokking all this because it's is a perfect example of why HTML and CSS is not some easy bolt-on skill for front-end web development. This is critical stuff that isn't done as correctly as it should be.
As I write this, I'm freshly back from Smashing Conf in San Francisco. Sara Soueidan had a wonderful talk that covered some "hiding things" situations that are even less intuitive than what we might be accustomed to seeing.
One thing she covered was the inert attribute and how it can be used to skip interactive elements from keyboard tabbing. It can even be used on a parent element, nullifying everything inside it. I understood that part, but not entirely why it's useful since it seems like you might as well use display: none; if an element is hidden and the elements inside aren't meant to be in focus. But I'm sure it's my lack of understanding, so I'm looking forward to Sara's video to come out so I can re-watch it. It had to do with maintaining a non-awkward tabbing order.
Another thing Sara covered is that some folks who use assistive technology also tend to explore touch screens with haptics, moving about the page with their fingers looking for interactive elements. If you, say, replace a native checkbox with a styled checkbox, it's possible to do that in a way thats mostly accessible by using a real checkbox that you hide and replace with a graphic, but Sara demoed how you can resize the checkbox over the top of the replacement and hide visually with opacity: 0; — that ensures someone can still find the element by touch. That doesn't seem to be the default way this kind of thing is taught or built, so it's great to see Sara calling it out. Yet another example of HTML and CSS being nuanced and tricky languages.
A very interesting roundtable discussion at Skillsoft's Perspectives 2019 user conference. The discussion was hosted by Ron Hovsepian, Executive Chairman, Skillsoft. Participants included Xi Xi Jia, Global Head of Learning and Development CoE, RELX Group, Heber Sambucetti, V.P. Learning and Development, Accenture, and Jennifer Rinck, V.P. Learning, Hilton.
They discussed how learning is a critical part of each organization given the need to attract, keep, and reskill employees. RELX, the parent of Reed Elsevier, Lexis Nexis and more, has 30,000 globally distributed employees in 40 countries. Accenture has gone from 40,000 to 275,000 employees in the past five years and has 40,000 employees participating in their Skillpoint learning portal every month. Hilton has 17 brands and 400,000 employees and uses curated, global content to train employees worldwide. All three are delivering learning to team members on a continuous basis with compliance and inclusion being a big issue.
We could use that skill to build some tabs, right? Right.
We got this.
Say we have this changing classes ability in our skillset now and we need to build a tabbed interface. If we just add a little more code that deals with click handlers, we could probably wire up some simple tabs, like this:
Totally functional tabs. I might pat myself on the back a little here. See how I used those anchor links to create jump links between the link and the tabbed section? That's mighty semantic, don't you think? The tabs are accessible with a keyboard, have focus styles, and can be activated with the Return key.
Did we win? Case closed? Perfect tabs?
Nothing is ever so easy, is it?
One issue here is that we didn't do anything special with keyboard handling, which tabbed interfaces may require. Heydon Pickering wrote about this:
Unlike a same-page link, a tab does not move the user to the associated section/panel of content. It just reveals the content visually. This is advantageous to sighted users (including sighted screen reader users) who wish to flit between different sections without having to wade back up the page each time they want to choose a new one.
This comes with an unfortunate side effect: If the user wishes to move to a section by keyboard and interact with its internal content, they have to step through any tabs to the right of the current tab, which are in focus order.
Turns out there is a whole checklist of other behavioral things tabs interfaces can and should be doing. In Heydon's explanation, the Tab key actually acts as a way to jump from the tab itself to the content related to that tab, actually moving the focus. Shift+Tab brings them back. Then the arrow keys are used to change tabs. All this requires more JavaScript and even some HTML to allow for the focus state... plus a sprinkle of aria-* attributes which I lack the expertise to explain you why they are important at all.
So the question becomes: are our class-changing skills actually a detriment to the web because they don't account for things like this? Is doing things with whatever basic tools we have a net loss for web accessibility? I dunno. Too big of a question for my little brain. It's interesting to consider, though.
Part of it comes down to muscle memory.
If we learn to code tabs like that first demo there, we'll tend to reach for that over and over so long as nobody bites our fingers off for doing it. I coded that demo in about three minutes because I've done it so many times. Creating those tabs is certainly part of my muscle memory.
There is plenty of talk about JavaScript frameworks being a scourge across the web because they seem to be ushering in an era of worst-in-class accessibility. But what if your muscle memory for building tabs was reaching for a pre-built tabs UI that brings along all the right functionality and left styling largely to you?
That's what Reach UI tabs are (which assumes we're working with React...).
I'm not telling you to go out and switch your projects to React so you can get some free tabs, but React is already massive. If good patterns like this become the defacto choice, then it's possible that the effect is a net gain on accessibility. Seems possible to me, anyway. It might just stop me from poorly hand-coding a tabbed interface for the 359th time.
Back in January, hackers pulled off the once unthinkable: They gained control of more than 50 percent of Ethereum Classic’s blockchain network, proving that with enough computing power, blockchain can (and decidedly will) get hacked.
I’m a Java/Scala/Groovy guy, that’s not a mystery. Some people, especially the youngsters, roll their eyes when they learn about it. Old fashioned, ineffective when compared to modern languages, and doomed — that’s basically what I hear all the time. But is that really the case?
Old Fashioned
Yes, the base constructs and constraints that Java offers are old fashioned and rely on how code was written 20 years ago. Programming languages are not created in a sterilized bubble. Developers’ habits and needs are central to language design, and while inventors try to infuse innovation into it, it’d be dumb to ignore how people will actually use it. The first milestone for Java dates back in 1995, and while some of its foundational blocks looked visionary for at least 10 years, it is pretty obvious that
29
24 years later… not so much.
A fixed width file is a very common flat file format when working with SAP, Mainframe, and Web Logs. Converting the data into a dataframe using metadata is always a challenge for Spark Developers. This particular article talks about all kinds of typical scenarios that a developer might face while working with a fixed witdth file. This solution is generic to any fixed width file and very easy to implement. This also takes care of the Tail Safe Stack as the RDD gets into the foldLeft operator.
Let's check the source file first and then the metadata file:
Angular and Spring Boot are both great frameworks which are nowadays in great combination especially by java developers gladly used for building microservices.
In this article I want to show therefore how you can setup a parent maven project which includes an angular and spring boot child, which is finally be deployed on a tomcat server, including production ready jar with some pre-requisties.
Isn't working from home the best? You can get so much done in the comfort of your own surroundings, not to mention without all the distractions that typically come with your run-of-the-mill office.
But if you have a boss who doesn't likewise see the merits of this perfect working scenario (which a lot of us unfortunately do), here are some things you can do to (hopefully) change his mind.
When I moved into an apartment, I didn’t build scaffolding around the building to support a rope and pulley system to lift boxes of my furniture and belongings to the 19th floor. My stuff was put into an elevator with a dedicated shaft, supported by specifically designed mechanical infrastructure and a simple computer system. The latter way is much safer, more effective, and automated.
In my last post, I wrote about how many DevOps practitioners are still manually generating and managing their machine identities, especially TLS certificates. Think about all of the load balancers, servers, containers, virtual machines, and other network entities that are constantly launched and killed within a DevOps environment. They all need machine identities, yet some of those entities have lifespans of only a few hours.
I've previously posted about defining Consumer Driven Contracts using the OpenAPI specification and Spring Cloud Contract. This approach works well because you can tie your contracts to your API specification, and also wire in a request validator into your contract tests.
But one problem that remained is typically your OpenAPI specification will span multiple services. Thus, when generating contract tests, you'd get tests generated for all services and not just a specific service.
Quarkus, the new “supersonic, subatomic” Java framework is currently getting a lot of attention. The ideas behind this build and runtime tool are indeed more than interesting for the future of enterprise Java. What are the benefits and shortcomings of using Quarkus? Let's find out.
Getting Rid of Dynamics
Quarkus takes the reasoning that most of the dynamics of an enterprise Java runtime is not really required in a containerized world. Once you build your application to a container image, the functionality is usually not supposed to change. All of the dynamics that an enterprise container brings allows for very powerful and flexible programming and deployment models, but once our applications have been started inside containers, they typically don’t change anymore.
A graph database is a data management system software. The building blocks are vertices and edges. To put it in a more familiar context, a relational database is also a data management software in which the building blocks are tables. Both require loading data into the software and using a query language or APIs to access the data.
Relational databases boomed in the 1980s. Many commercial companies (i.e. Oracle, Ingres, IBM) backed the relational model (tabular organization) of data management. In that era, the main data management need was to generate reports.
PWA (Progressive Web Apps) have been with us for some time now. Yet, each time I try explaining it to clients, the same question pops up: "Will my users be able to install the app using app stores?" The answer has traditionally been no, but this changed with Chrome 72 which shipped a new feature called TWA (Trusted Web Activities).
Trusted Web Activities are a new way to integrate your web-app content such as your PWA with yourAndroid app using a protocol based on Custom Tabs.
In this article, I will use Netguru’s existing PWA (Wordguru) and explain step-by-step what needs to be done to make the application available and ready to be installed straight from the Google Play app store.
Some of the things we cover here may sound silly to any Android Developers out there, but this article is written from the perspective of a front-end developer, particularly one who has never used Android Studio or created an Android Application. Also, please do note that a lot of what we're covering here is still extremely experimental since it's limited to Chrome 72.
Step 1: Set up a Trusted Web Activity
Setting up a TWA doesn’t require you to write any Java code, but you will need to have Android Studio. If you’ve developed iOS or Mac software before, this is a lot like Xcode in that it provides a nice development environment designed to streamline Android development. So, grab that and meet me back here.
Create a new TWA project in Android Studio
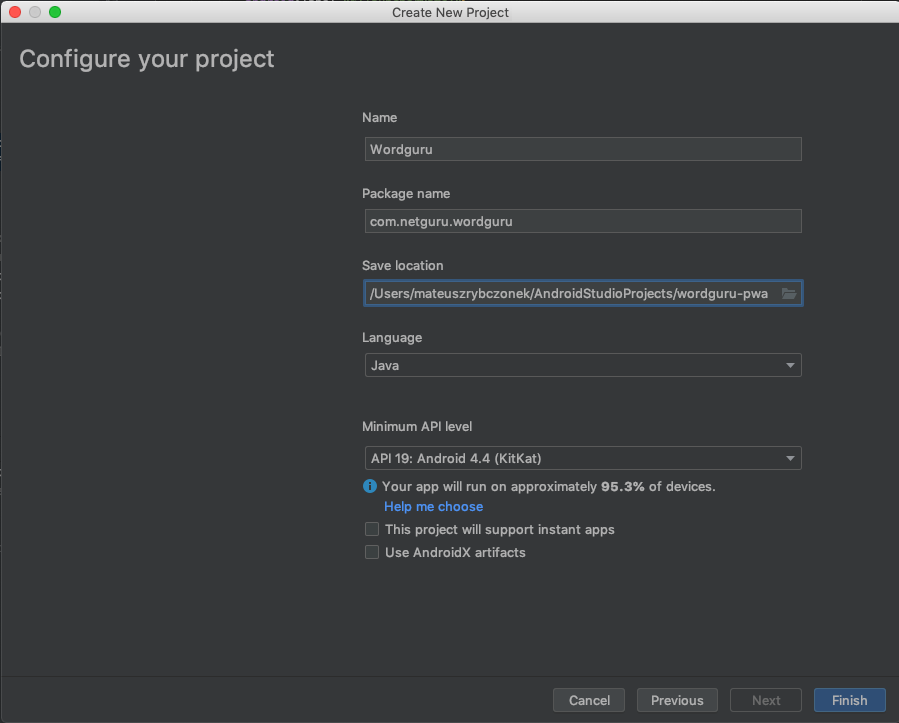
Did you get Android Studio? Well, I can’t actually hear or see you, so I’ll assume you did. Go ahead and crack it open, then click on "Start a new Android Studio project." From there, let’s choose the "Add No Activity" option, which allows us to configure the project.
The configuration is fairly straightforward, but it’s always good to know what is what:
Name The name of the application (but I bet you knew that).
Package name: An identifier for Android applications on the Play Store. It must be unique, so I suggest using the URL of the PWA in reverse order (e.g. com.netguru.wordguru).
Save location: Where the project will exist locally.
Language: This allows us to select a specific code language, but there’s no need for that since our app is already, you know, written. We can leave this at Java, which is the default selection.
Minimum API level: This is the version of the Android API we’re working with and is required by the support library (which we’ll cover next). Let’s use API 19.
There are few checkboxes below these options. Those are irrelevant for us here, so leave them all unchecked, then move on to Finish.
Add TWA Support Library
A support library is required for TWAs. The good news is that we only need to modify two files to fill that requirement and the both live in the same project directory: Gradle Scripts. Both are named build.gradle, but we can distinguish which is which by looking at the description in the parenthesis.
There’s a Git package manager called JitPack that’s made specifically for Android apps. It’s pretty robust, but the bottom line is that it makes publishing our web app a breeze. It is a paid service, but I’d say it’s worth the cost if this is your first time getting something into the Google Play store.
Editor Note: This isn’t a sponsored plug for JitPack. It’s worth calling out because this post is assuming little-to-no familiarity with Android Apps or submitting apps to Google Play and it has less friction for managing an Android App repo that connects directly to the store. That said, it’s totally not a requirement.
Once you’re in JitPack, let’s connect our project to it. Open up that build.gradle (Project: Wordguru) file we just looked at and tell it to look at JitPack for the app repository:
There are also variables called manifestPlaceholders that we’ll cover in the next section. For now, let’s add the following to define where the app is hosted, the default URL and the app name:
Every Android app has an Android App Manifest (AndroidManifest.xml) which provides essential details about the app, like the operating system it’s tied to, package information, device compatibility, and many other things that help Google Play display the app’s requirements.
The thing we’re really concerned with here is Activity (<activity>). This is what implements the user interface and is required for the "Activities" in "Trusted Web Activities."
Funny enough, we selected the "Add No Activity" option when setting up our project in Android Studio and that’s because our manifest is empty and contains only the application tag.
Let’s start by opening up the manfifest file. We’ll replace the existing package name with our own application ID and the label with the value from the manifestPlaceholders variables we defined in the previous section.
Then, we’re going to actually add the TWA activity by adding an <activity> tag inside the <application> tag.
And that, my friends, is Step 1. Let’s move on to Step 2.
Step 2: Verify the relationship between the website and the app
TWAs require a connection between the Android application and the PWA. To do that, we use Digital Asset Links.
The connection must be set on both ends, where TWA is the application and PWA is the website.
To establish that connection we need to modify our manifestPlaceholders again. This time, we need to add an extra element called assetStatements that keeps the information about our PWA.
Now, we need to add a new meta-data tag to our application tag. This will inform the Android application that we want to establish the connection with the application specified in the manifestPlaceholders.
That’s it! we just established the application to website relationship. Now let’s jump into the conversion of website to application.
To establish the connection in the opposite direction, we need to create a .json file that will be available in the app’s /.well-known/assetlinks.json path. The file can be created using a generator that’s built into Android Studio. See, I told you Android Studio helps streamline Android development!
We need three values to generate the file:
Hosting site domain: This is our PWA URL (e.g. https://wordguru.netguru.com/).
App package name: This is our TWA package name (e.g. com.netguru.wordguru).
App package fingerprint (SHA256): This is a unique cryptographic hash that is generated based on Google Play Store keystore.
We already have first and second value. We can get the last one using Android Studio.
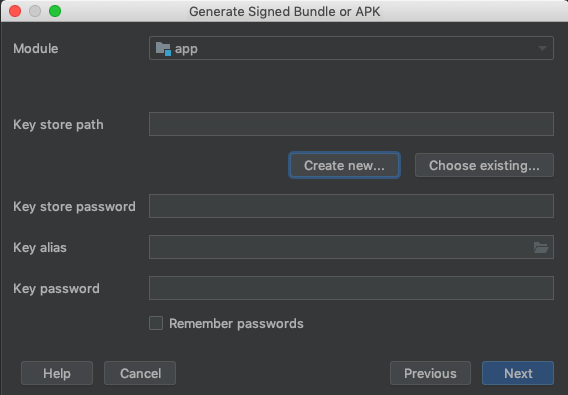
First we need to generate signed APK. In the Android Studio go to: Build → Generate Signed Bundle or APK → APK.
Next, use the existing keystore, if you already have one. If you need one, go to "Create new…" first.
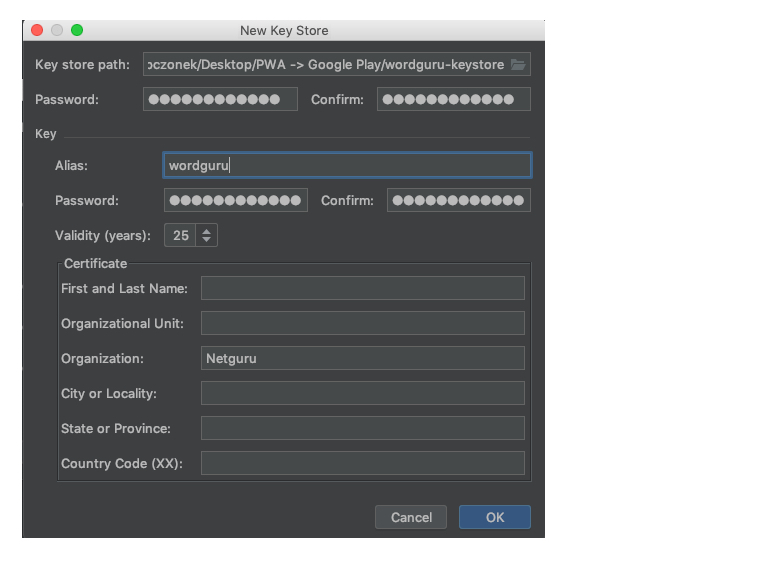
Then let’s fill out the form. Be sure to remember the credentials as those are what the application will be signed with and they confirm your ownership of the application.
This will create a keystore file that is required to generate the app package fingerprint (SHA256). This file is extremely important as it is works as a proof that you are the owner of the application. If this file is lost, you will not be able to do any further updates to your application in the store.
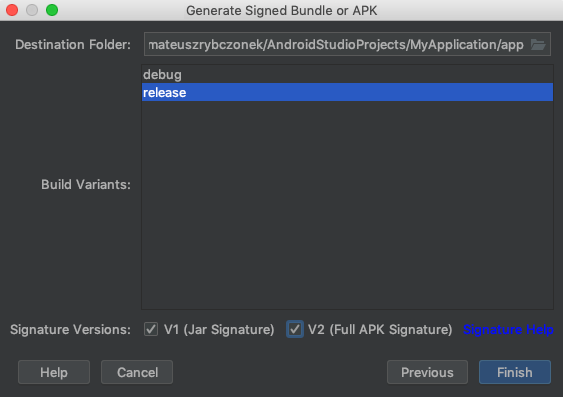
Next up, let’s select type of bundle. In this case, we’re choosing "release" because it gives us a production bundle. We also need to check the signature versions.
This will generate our APK that will be used later to create a release in Google Play store. After creating our keystore, we can use it to generate required app package fingerprint (the SHA256).
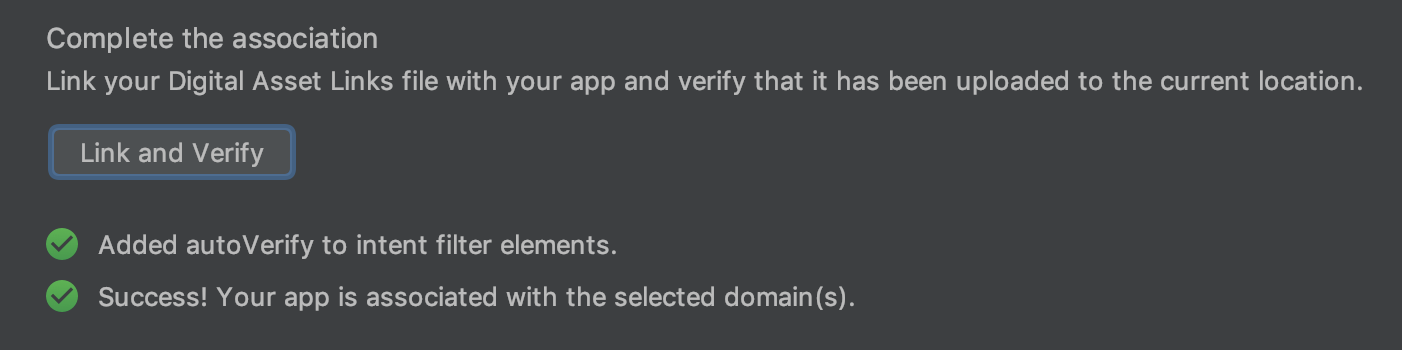
Let’s head back to Android Studio, and go to Tools → App Links Assistant. This will open a sidebar that shows the steps that are required to create a relationship between the application and website. We want to go to Step 3, "Declare Website Association" and fill in required data: Site domain and Application ID. Then, select the keystore file generated in the previous step.
After filling the form press "Generate Digital Asset Links file" which will generate our assetlinks.json file. If we open that up, it should look something like this:
This is the file we need to make available in our app’s /.well-known/assetlinks.json path. I will not describe how to make it available on that path as it is too project-specific and outside the scope of this article.
We can test the relationship by clicking on the "Link and Verify" button. If all goes well, we get a confirmation with "Success!"
Yay! We’ve established a two-way relationship between our Android application and our PWA. It’s all downhill from here, so let’s drive it home.
Step 3: Get required assets
Google Play requires a few assets to make sure the app is presented nicely in the store. Specifically, here’s what we need:
App Icons: We need a variety of sizes, including 48x48, 72x72, 96x96, 144x144, 192x192… or we can use an adaptive icon.
High-res Icon: This is a 512x512 PNG image that is used throughout the store.
Feature Graphic: This is a 1024x500 JPG or 24-bit PNG (no alpha) banner that Google Play uses on the app details view.
Screenshots: Google Play will use these to show off different views of the app that users can check out prior to downloading it.
Let’s go to the last step and finally push our app to the store.
Using the APK that we generated earlier (which is located in the AndroidStudioProjects directory), we need to go to the Google Play console to publish our application. I will not describe the process of publishing an application in the store as the wizard makes it pretty straightforward and we are provided step-by-step guidance throughout the process.
It may take few hours for the application to be reviewed and approved, but when it is, it will finally appear in the store.
If you can’t find the APK, you can create a new one by going to Build → Generate signed bundle / APK → Build APK, passing our existing keystore file and filling the alias and password that we used when we generated the keystore. After the APK is generated, a notice should appear and you can get to the file by clicking on the "Locate" link.
Congrats, your app is in Google Play!
That’s it! We just pushed our PWA to the Google Play store. The process is not as intuitive as we would like it to be, but still, with a bit of effort it is definitely doable, and believe me, it gives that great filling at the end when you see your app displayed in the wild.
It is worth pointing out that this feature is still very much early phase and I would consider it experimental for some time. I would not recommend going with a production release of your application for now because this only works with Chrome 72 and above — any version before that will be able to install the app, but the app itself will crash instantly which is not the best user experience.
Also, the official release of custom-tabs-client does not support TWA yet. If you were wondering why we used raw GitHub link instead of the official library release, well, that’s why.
According to psychotherapist Lucy Beresford, 83 percent of workers have seen a colleague lose it to ‘office rage’ on the job. And 63 percent have done the same themselves.
Whether it’s an inconsiderate colleague (you know that string cheese was not meant for you Jan) or technology that just won’t cooperate (all printers deserve to die), the result is often the same: swift, unadulterated anger.