IntersectionObserver has made lazy loading a lot easier and more efficient than it used to be, but to do it really right you still gotta remove the src and such, which is cumbersome. It's definitely not as easy as:
The loading attribute allows a browser to defer loading offscreen images and iframes until users scroll near them. loading supports three values:
lazy: is a good candidate for lazy loading.
eager: is not a good candidate for lazy loading. Load right away.
auto: browser will determine whether or not to lazily load.
I'll probably end up writing a WordPress content filter for this site that adds that attribute for every dang image on this site. Hallelujah, I say, and godspeed other browsers.
Easy lazy loading of images will have the biggest impact on the site as a whole, but lazy loaded iframes will be even bigger for the individual sites that use them. I'm into it.
Yes yes whatever native lazy loading of images but lazy loading of iframes is gonna be a goddamn game changer for ad tech: https://t.co/ADGc1UsVBf
I hope this pushes along the need for native aspect ratios as well, since a major reason for that is preventing content reflow from things loading later. We do have ways now, though.
In the wake of last week’s Pipdidg scandal, the WordPress blogger and developer communities have been working together to help the company’s customers get on new themes and ensure the safety of their websites. Pipdig has been reported to various UK and internet authorities and is currently under investigation.
Pipdig’s hosting provider has proactively disabled malicious code in certain files while the company conducts its own investigation.
Props to @kualo, @pipdig's hosting provider, for stepping in and commenting out (disabling) malicious code. To @pipdig's WordPress customers: make sure you're using version 4.9.0 and you'll be *okay*, for now at least. I still can't recommend staying with them, though. pic.twitter.com/V0c40A29lL
Meanwhile, Pipdig has been denying customers’ refund requests, in accordance with its “no refund” policy. Customers have received responses from the company claiming that the recent accusations were either “false, twisted, or sensationalized.”
Customers who have purchased Pipdig products within the last 180 days may still be able to receive a refund through other channels. The Twitter thread below suggests lodging a payment dispute with PayPal or your bank or credit card provider, by referencing consumer protection laws and providing evidence of Pipdig’s false and misleading conduct.
Explainer: How to get a refund from @Pipdig. If you have bought the plugin in the last 180 days first email #pipdig asking for a refund. /1
Help for Affected Pipdig Customers Switching to New Themes
If you work in WordPress every day, you may not realize how much of a challenge it is for some users to switch themes. WordPress developers and bloggers are stepping up to provide resources to help those who want to transition to a new theme.
“I understand that bloggers using Pipdig themes for WordPress might want to switch away, but don’t have the time, money, or skills to do so right away,” Mark Jaquith said. “So here’s P3 Neutraliser — a plugin that will prevent the P3 plugin from updating or ‘phoning home.'” The plugin is available on GitHub with step-by-step instructions for downloading and installing it. It is intended as a stopgap measure for users to activate while they are in the process of transitioning to a new theme.
Former Pipdig customers are struggling to find new themes, as a large number of them fall into the fashion blogger demographic. This is a niche with specific requirements for design and functionality. Many are also confused about the findings in the reports and don’t know how to act on this information.
I need to change my theme from Pipdig to another safe one but I'm struggling I'm in love with my Pipdig theme now. However, I do like the 17th Avenue themes. Does anyone know if they're safe? #pipdig I don't want to do this all over again in a few months
SO overwhelmed by all the #pipdig issues I'm reading & don't understand half of it… Defs time for a theme refresh but no idea where to start. Do I spend ££ designing one with a developer? V confusing for someone who has no coding knowledge at all. Anyone else feeling the same?
Searching WordPress.org for fashion-inspired themes does not turn up many relevant results. Former Pipdig customers hunting for new themes will need a more curated list of recommendations. WordPress developer Tia Wood published a post with a list of both free and commercial alternative themes that may be helpful to those still looking. Freelance designer Rachel Sulek has a Twitter thread with options that are comparable to Pipdig’s theme designs.
I've discovered a weird problem with my Linux Mint-system (Linux Mint 18).
After rebooting my system (or restarting as well) I got the GRUB menu, but my keyboard is not responding...
So I have to wait for the timeout to get my system booted.
The keyboard is wired to the computer through an USB-connection. So it's not wireless.
And it works OK as soon as my system has booted.. (?).
I have installed/loaded Linux kernel 4.4.142, 4.4.143 and 4.4.145.
When running kernel 4.4.142 Virtualbox and VMWare Workstation works as it should, but when I try to use 4.4.143 or 4.4.145 they both refuse to load.
So I want to be able to choose which kernel to run depending on what I want to do.. :-)
You used to be able to publish blog posts on just about anything, and you’d get at least some traffic.
But now, you won’t get any.
Quality content marketing takes a lot of time and effort—there’s just no way around it.
But there are, of course, some marketers who accomplish more than others and in less time.
I’d like to see you become one of those efficient content marketers, if you’re not one already.
There are a few ways to become faster, and one of the best is to use tools.
There are a ton of tools out there—some good, some bad. Some save you time, but some may actually cost you time.
Even if you are among the 42% of B2B marketers who say they’re effective at content marketing, there is always room for improvement. If you want to make the most of content marketing, you need to know which strategies to implement and which tools to use.
In this post, we’ll examine 93 different content marketing tools proven to increase reach, generate sales, boost traffic, and much more.
Here we go!
Content Discovery
#1. Quora – Quora was built on the premise of providing “the best answer to any question.”
Content marketers can use the popular social network to identify trends, communicate with others, and, most importantly, provide high quality answers to establish themselves as an authority on almost any subject.
#2. Reddit – What was once considered nothing more than an entertainment site, Reddit is now a “go to” service for content marketers.
With the right subject matter, a targeted strategy, and a bit of luck, your post has the potential to go viral. With more than 36 million user accounts and billions of comments, Reddit is the stuff content marketers dream about.
#3. Alltop – Are you seeking the most popular stories on a variety of topics? From business to technology to breaking news, you will find it all on Alltop. This can serve as ammunition for blog posts and give you an overall idea of what is hot.
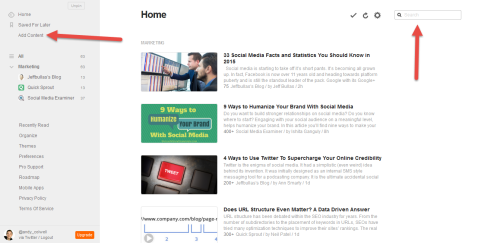
#4. Feedly: One of the most popular techniques to come up with content ideas is to look at content being published on other popular blogs and then improve upon it or extend it.
What you might do is compile a list of blogs you really like and then visit them when you need to come up with a few ideas.
A huge waste of time.
Instead, use an RSS reader (Feedly is arguably the best), which allows you to collect all the posts published from multiple sources all in one place.
You can quickly scan the titles to see if any pique your interest and click through if you need to.
Once you add a bunch of sites to your new Feedly account, you’ll log in to a page like this:
If you visited those 7 blogs individually to find those posts, it would take at least a few minutes. Instead, it takes a few seconds.
That doesn’t sound like much, but it adds up over time.
To add a site to your account, type in a site name in the search bar:
That should bring up the site you’re looking for. Just click the little plus icon next to the blog name, and you’ll automatically have all its posts added to your feed as they’re published.
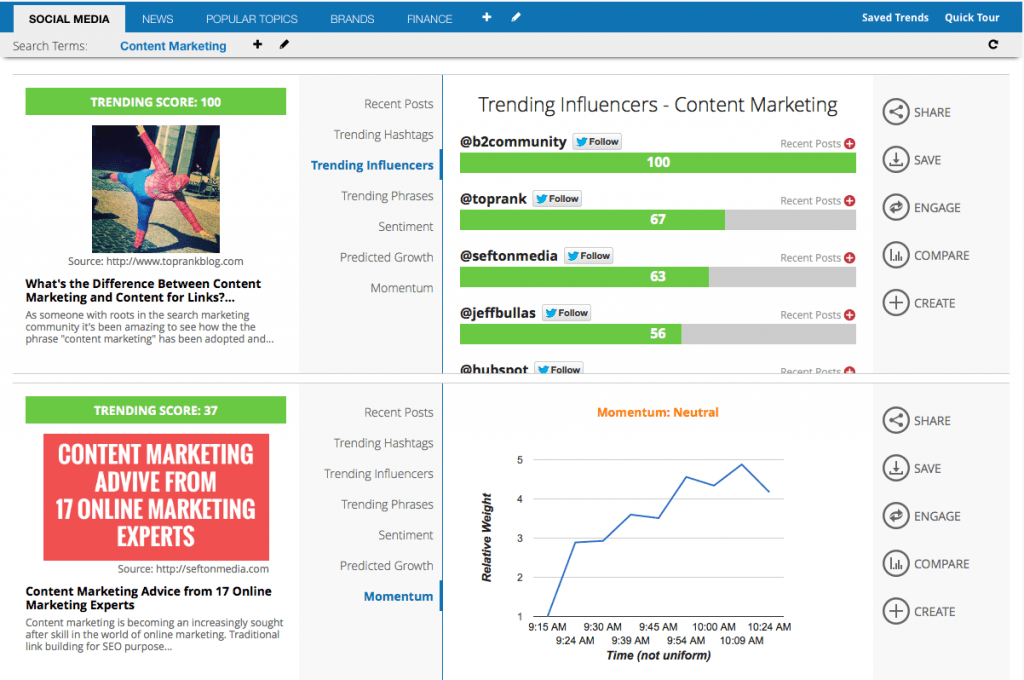
#5. TrendSpottr: If you’re able to create content on a trending topic before competitors do, it’s good not only for your reputation but also for getting a lot of extra traffic.
Spotting trends isn’t easy even if you’re an expert in the field.
This tool focuses on spotting trending content, hashtags, phrases, and even influencers before everyone else catches on.
You might not be the first, but you’ll be way ahead of most of your competition.
It’s a simple tool to use. You pick a search term, e.g., “content marketing,” and then a label inside the tool, e.g., “trending influencers.” The tool then finds the most trending users who post about that subject.
Use the tool to build relationships with up and comers and to create content around trending phrases and hashtags.
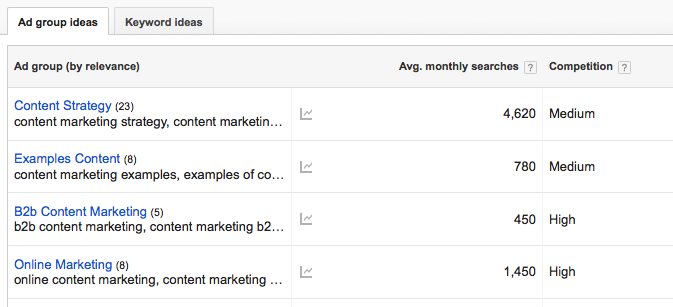
#6. Google Keyword Planner – Which keywords get the most traffic? Which keywords are best for a PPC campaign? Answering these questions is simple with the help of the Google Keyword Planner.
Use this tool to view keyword ideas, cost per click data, and more.
Before you create a blog post, for instance, you need to know which keywords to target. Google Keyword Planner can help you identify keywords that will drive more traffic to your website.
Content Distribution
#7. Buffer – The Buffer tagline says it all: “A better way to share on social media.”
Content marketing in 2016 means being active on social media. When time is tight, use Buffer to schedule posts across a variety of networks, including Twitter, Facebook, and LinkedIn. With this tool on your side, distributing social media posts is fast, efficient, and effective.
#8. Hootsuite – Much the same as Buffer, Hootsuite is a social media management dashboard. With 10+ million professionals using the service, it has to be doing something right.
Hootsuite connects with more than 35 social media platforms, allowing you to distribute social media content more efficiently. The days of visiting each social site to create updates is gone.
#9. SlideShare – Even if you consider PowerPoint presentations a thing of the past, SlideShare will change the way you feel about slide presentations.
Use the service to promote a product, service, new release, or anything else you want to share with the world. It gives you the opportunity to share high quality content in a visually appealing manner, all on a website that is extremely popular.
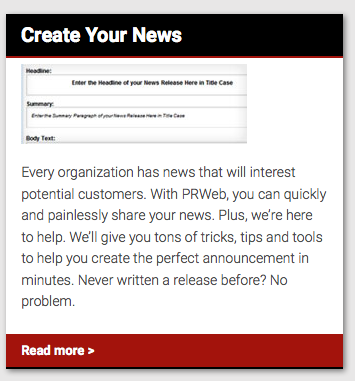
#10. PRWeb – When it comes to online press release services, PRWeb is king of the hill. With the right package, you can get your release in front of 25,000+ journalists and more than 250,000 email subscribers. Press release distribution is not dead. With PRWeb, it is alive and well.
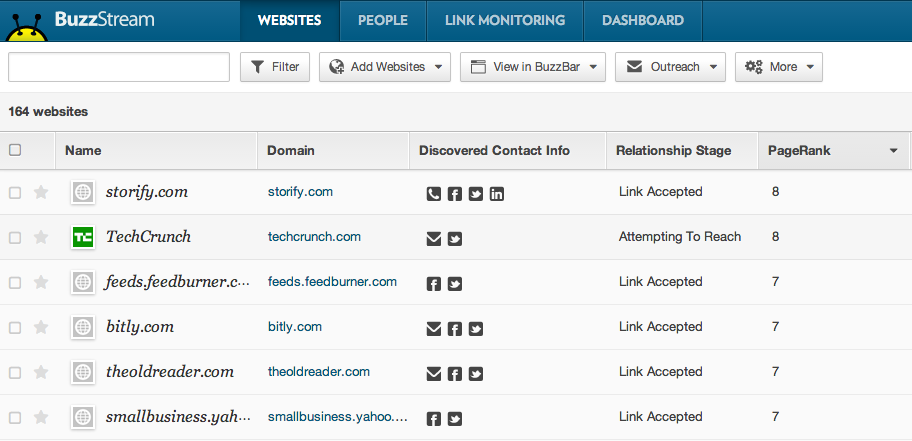
#11. BuzzStream – This tool could fit under a few categories, as it’s one of the most powerful and advanced you will find. It can be used for everything, including conducting outreach, contacting influencers, and managing relationships.
Its main goal is to save you time by helping you find contact information and send emails in bulk.
To start with, you can add domains or people to the tool that you’d like to connect with.
Then, the tool will find as much contact information as possible so that you can choose from the different options.
Then, you can select as many of those contacts as you’d like and pick a template (that you create) to send them. The tool will automatically fill in details like name and site name if you include it in the template.
Finally, it’s created mainly for marketers, so it has a few nice features like being able to set the stage of your relationships.
This helps you keep track of the people you shouldn’t contact again, those you need to contact, and those you might want to follow up with.
Finally, there’s another really cool aspect of the tool.
It integrates right into your browser. That means you can automatically pull all the information on any page you come across. Next, you can import these pages into your BuzzStream account, and it will begin pulling additional contact information.
There are many sites that this is useful for; one of them is BuzzSumo (which we’ll look at later in this post).
If you’ve ever done an outreach campaign from scratch, you can understand how this tool will save you several hours per week.
Analytics
#12. Google Analytics – It’s hard to go wrong with Google Analytics since it’s one of the top free analytics tools. You don’t need much knowledge to understand how this tool can improve your business.
Content marketing success is based largely on data. And data is what you get when you rely on Google Analytics.
#13. Dasheroo – A newcomer to the business dashboard space, Dasheroo is a free tool that allows users to track KPIs spanning a variety of platforms and apps.
Dasheroo integrates with many of the tools you use as a content marketer such as Twitter, Facebook, LinkedIn, Shopify, MailChimp, and many more.
In simple terms, Dasheroo imports all your data into a super-attractive dashboard. You can forget about opening multiple tabs and dealing with a crazy number of logins. Everything is in one place.
#14. SimpleReach – With a focus on content measurement and distribution, SimpleReach is a must for content marketers.
After you create killer content, use this tool to get your content in front of your target audience. By “bridging the gap between measurement and distribution,” you can better measure performance and optimize content reach.
#15. Zuum – You aren’t the only person in your space focused on content marketing. Regardless of your niche, you will have plenty of competition. Zuum is a tool to help you outdo the competition at every turn.
Here is what it can do for you: compare your social media efforts to that of your competition’s, pinpoint your competitor’s top campaigns, and identify on whom (influencers) they are relying to amplify their message.
Influencer Marketing Tools
#16. Traackr – “Influence marketing” is a buzz phrase you don’t want to ignore. The same holds true for this content marketing tool.
Traackr does more than just help you identify influencers in your niche. As an “Influencer Management Platform,” it also allows you to manage relationships and track their impact on your business.
#17. Kred – Kred was designed with the idea of connecting people with social media influencers. To go along with identifying influencers, Kred helps you boost your social media standing.
Social Media
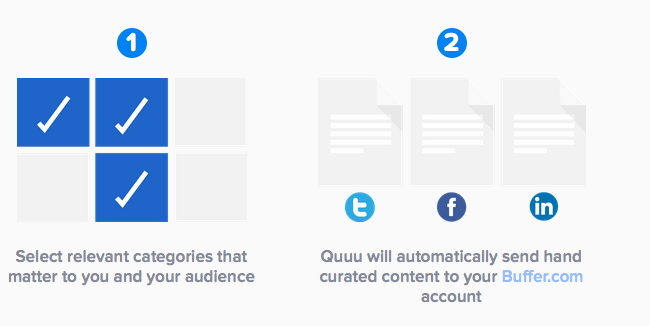
#18. Quuu – Time is money, right? If you believe this to be true, Quuu is the tool for you. By putting your social media marketing on autopilot, you have more time for other areas of your business. All the while, you can rest easy knowing that your social media strategy is in good hands.
You start by selecting categories relevant to your business. From there, hand-curated content is sent to your Buffer account (see #5 above). Finally, you can manually edit the posts, if you desire, before they are scheduled or published.
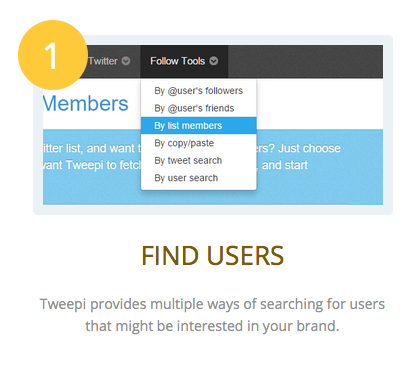
#19. Tweepi – Content marketing and Twitter go hand in hand. The problem with this is that Twitter management can eat up many hours of your day. Tweepi protects against this by helping you “make sense of your Twitter account.”
You can find users, interact with influencers, and use a variety of tools to get noticed.
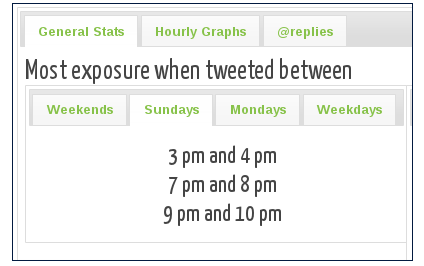
#20. Tweriod – Is there anything worse than finding out that nobody is paying attention to your tweets as you tweet away? Tweriod protects against this by determining the best time for your business to tweet.
After you run a report, you will know which days and times to tweet. This ensures that more people see your content, thus increasing the chance of engagement.
Tweriod is a simple tool that churns out serious data.
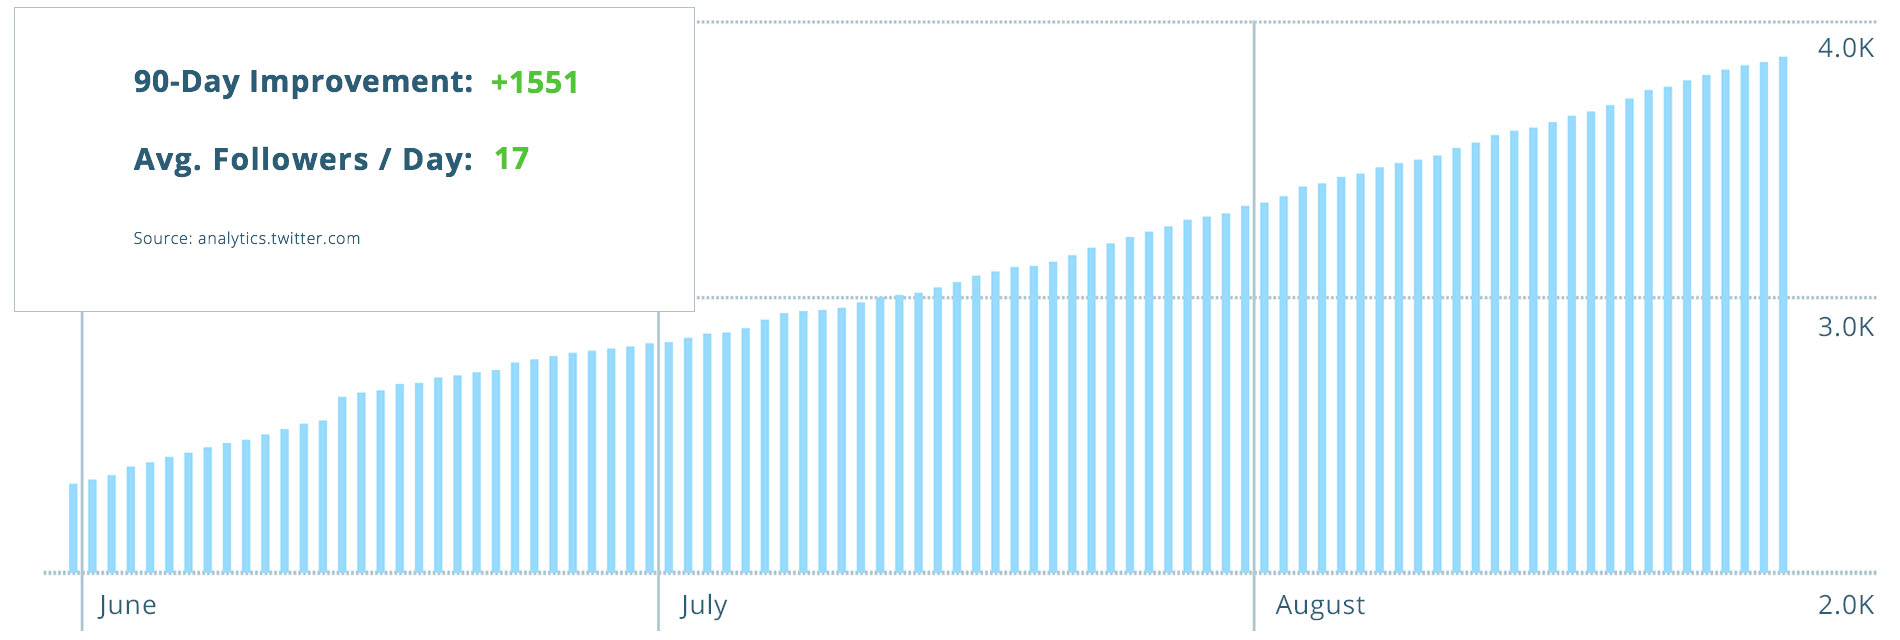
#21. Narrow.io – This is a new tool, but it seems to have a lot going for it, which is why it’s on this list.
I haven’t used it extensively myself, but others have reported being able to use it to grow their Twitter followings up to 2,160% faster.
The tool has one goal: get you more Twitter followers.
What sets it apart from all the other tools that have the same goal is a slightly more sophisticated algorithm.
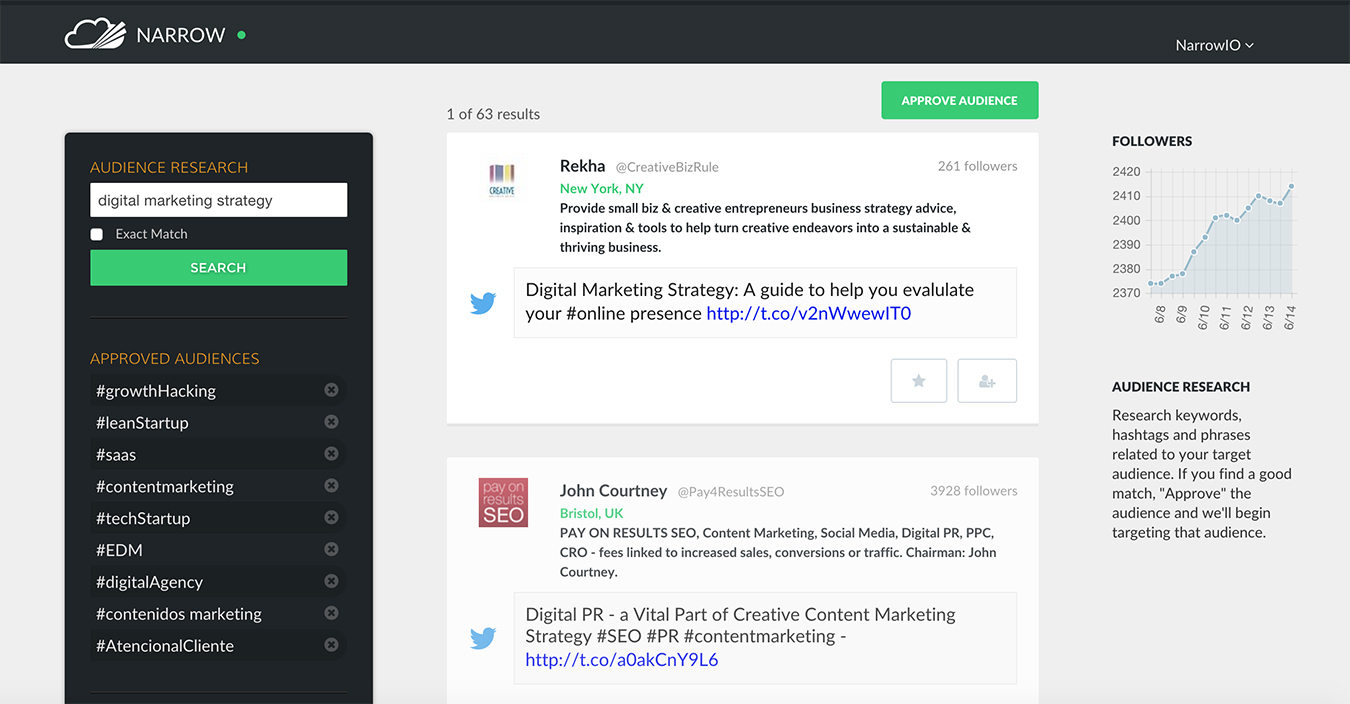
You can find users who might be interested in your business by searching for relevant keywords and hashtags.
With this information, the tool will create an audience you can target.
Then, Narrow will follow those users and even favorite relevant tweets.
If those people don’t follow you back, Narrow will unfollow them automatically.
There is a risk: Using tools to automatically follow and unfollow people could get your account suspended. However, you can lower your risk by not being very aggressive.
Additionally, the creators of the tool claim that they have actual people manually doing the following and unfollowing, which may circumvent the rules. Just remember that there is still probably some risk.
Also keep in mind that there are no free accounts. You can get a 7-day free trial, but then you’ll have to shift to a paid account.
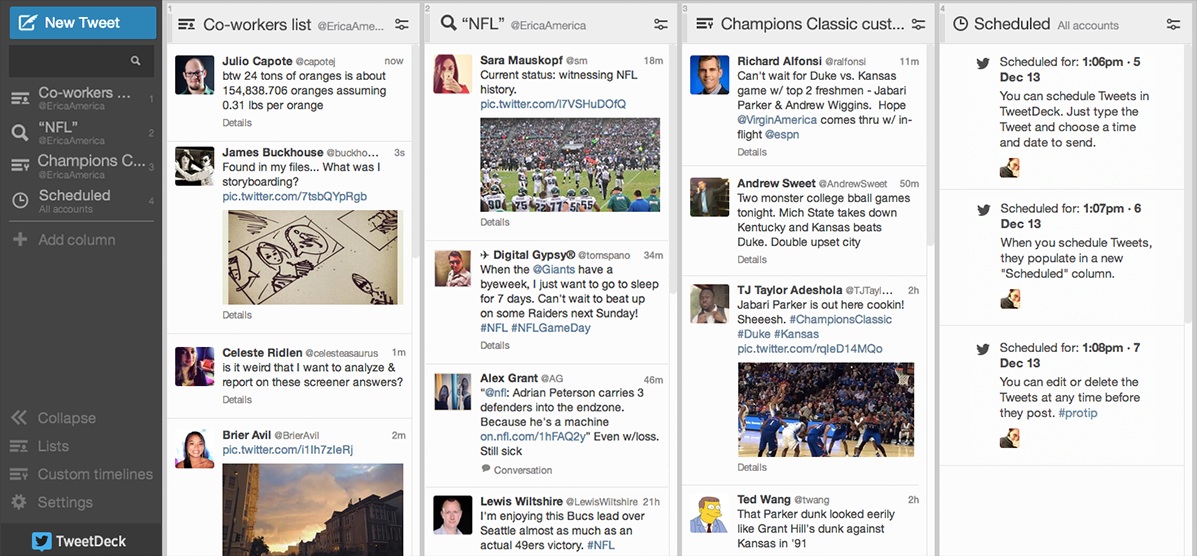
#22. Tweetdeck – This final Twitter tool is actually offered by Twitter itself.
It’s a great tool to monitor your Twitter activity all at once, similarly to HootSuite.
You can have as many columns as you’d like, but you’ll probably only want 4-5 so that they all fit on your screen at once.
You can remove any of them at any time and add new ones by clicking the “add column” button on the left sidebar:
There are a ton to choose from, so you can really customize it to stay updated on the parts of Twitter you care about.
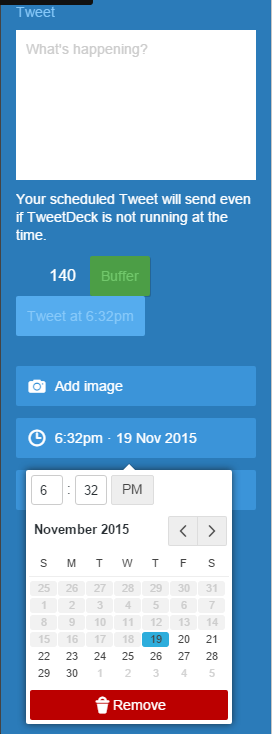
In addition, you can send tweets right from the tool and even schedule them beforehand (although other tools are easier if you need this function often):
How does this factor into your promotion?
First, you’ll want to tweet out your content to your followers, and not just once, but multiple times over the following few weeks and even a few times sporadically after that.
It’s nice to be able to schedule all of these activities at once, which you can do with TweetDeck.
The other side is monitoring. There are a few ways you can use this tool to your advantage.
The first is by monitoring tweets of your content. If someone is nice enough to share it, you’ll want to favorite it, retweet it, or reply to it. In addition, you can connect with any of that user’s followers who liked it as well.
Another great way to use it is to set up a search column for a main term in your content.
For example, I would set one up for “content promotion tools” if I was promoting this article. Then, when someone tweeted asking or saying something about some good promotion tools, I could reply with a link to this post.
Including images in your social media posts automatically makes them more successful. People are attracted to images and are likely to share them.
This plugin makes it easy for your blog readers to share your pictures on their favorite image-based social networks.
Once you install and activate the SumoMe image sharer plugin, all of your images will have sharing buttons added to them (you get to pick which networks you want displayed):
When a visitor clicks one of the buttons, a pop-up for that network will open, which will let them make a post that includes the link to the page and the image selected.
Not only does this make it easier for your own readers to share your content but it also guarantees that you will get more traffic from those shares (since the images get more attention).
Image and Video Creation
#24. Meme Generator – You don’t have to be serious all the time. There is a time and place for fun, and when you are ready to have it, you can use this free tool to create a killer meme.
Search popular memes, or create your own. This tool is fun to use, and if done right, your meme can yield some serious results on social media.
Visual.ly takes all the work out of the process. You can hand off the creation to a third party, allowing you to focus on content marketing techniques that better suit your skill set.
#26. PowToon – An animated video or presentation could be the type of content that puts your business on the map. Share it on social media as a standalone clip, or add it to a blog post. Whatever you choose, you know that an animated video will provide a unique experience.
With drag and drop templates, you can create a captivating and engaging message in 20 minutes or less.
#27. Magisto – There used to be a time when making a movie to promote your company, product, or service was an expensive endeavor. Not anymore. Magisto allows you to turn your photos and videos into professional videos you will be proud to share with the world.
Choose from a variety of themes, select your music, and customize it as you go. The final result is a video that will give your content marketing strategy a shot in the arm.
#28. Animoto – If you need a high quality, professional video to “share what matters most,” Animoto could be the answer.
More than 13 million customers have fallen in love with the Animoto’s three-step process:
Choose a style and song.
Customize your video using text, photos, and videos.
Produce, and share with your audience.
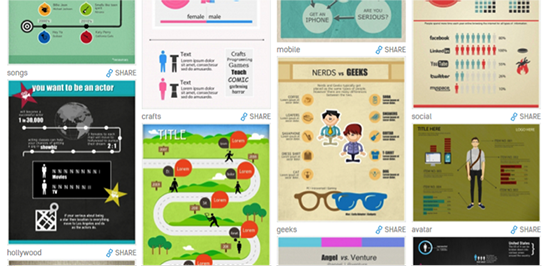
#29. Easel.ly – Creating images is one of the most time-consuming and expensive parts of creating great content.
Great images can turn good content into amazing content.
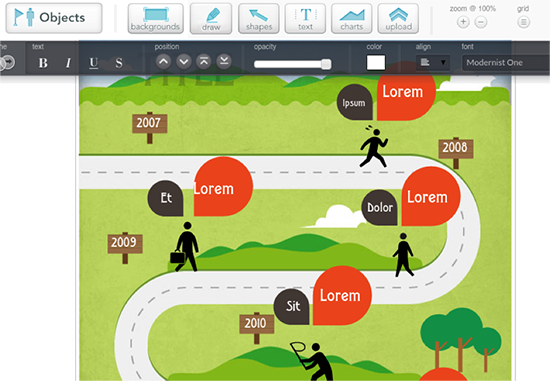
Easel.ly is a tool that allows even the design-challenged like me to create some fairly attractive infographics.
Of course, they don’t compare to the ones I get designed for hundreds of dollars, but if you need a decent infographic on a budget, give this tool a try.
To use it, create an account and then select a free template:
Next, you can click on any main element and change the text and alignment and even add shapes and backgrounds to it:
It’s designed to be as simple as possible, and you’ll have it figured out after using it for a few minutes.
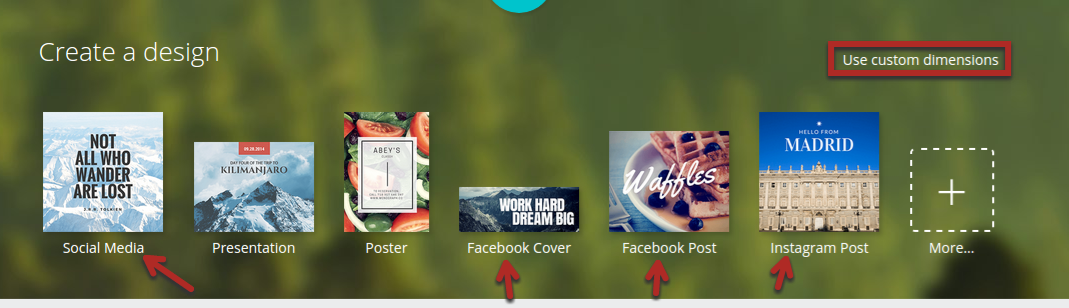
#30. Canva – This is another tool that can help you create great images without needing a great designer.
Most of the time, you don’t need a full infographic, just small images for your content to make it more attractive. That’s where Canva comes in.
The tool has several different templates to choose from for social media posts, blog posts, and more:
You can also create an image with custom dimensions.
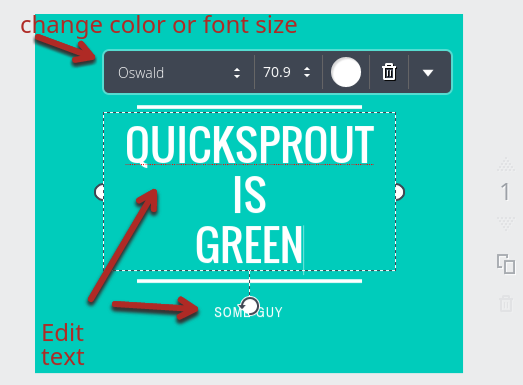
Depending on which template you choose, there will be different templates available in the “layouts” tab:
The canvas on the right is fully editable. You just click and drag, or click and type.
You can create great-looking images under 5 minutes—once you get good with Canva.
Automation
#31. Nutshell – Some may not consider Nutshell a content marketing tool, but once you dig deeper, you will see what it can do.
Nutshell is more than your basic CRM software. It brings a lot to the table, including tools for collecting data in one place, automation features for reporting and lead distribution, and features to nurture and develop relationships at all stages of the sales cycle.
#32. Pardot – A lead management tool that never disappoints, Pardot (by Salesforce) focuses its efforts on B2B marketing automation.
If you need to automate some of your marketing to free up time, this tool has a lot to offer. It gives you everything you need to excel, including:
Tools for generating leads.
Option to create custom and targeted emails.
Ability to calculate return on investment.
#33. Marketo – Marketo is all about one word: integration.
It brings together your content, email, social media efforts, and more, allowing you to target the best leads, create content specifically for your target audience, and measure performance.
It may not be the best tool for beginning content marketers, but for those who are more advanced and those who want to combine content marketing with other strategies, it is a reliable solution.
#34. Right On Interactive – An advanced marketing tool that uses customer lifecycle mapping to help you understand where a prospect fits into the sales funnel.
This automation software can be integrated with many of your content marketing tasks, such as email and social media marketing.
#35. Silverpop – More than 5,000 brands use this marketing tool to bring together all aspects of their marketing programs.
It offers many solutions to users, including an email marketing platform allowing for the simple creation and distribution of personal, relevant messages.
#36. Route – You can generate as many leads as you want, but you won’t feel good about yourself until some of them turn into customers.
Route begins to track people as soon as they land on your website. Once the tool identifies them, you can use it to provide valuable content, follow up, and move the sales process forward. Think of this tool as your personal assistant, helping you better understand how visitors interact with your website.
#37. Salesforce – Quite possibly the biggest brand on this list, Salesforce has long been known as the number one CRM solution in the world.
Although the tool has many sales components, it also has plenty of marketing tools that deserve your attention. For instance, you can provide a better social experience for your audience by using Salesforce to engage with them on a personal level.
#38. IFTTT – An interesting name for an interesting tool. IFTTT makes it easy for web applications and platforms to work together.
Given that the tool is compatible with nearly 300 “channels,” it won’t be long before you find a way to complement your content marketing efforts with this tool.
#39. Optimizely – With Optimizely, you can “test, personalize, and optimize” your website. Doing so helps increase conversions, thus improving your content marketing ROI.
With a code-free visual editor, ROI data generated in real time, and best-in-class integrations, this tool will fit in nicely with any and every content marketing strategy.
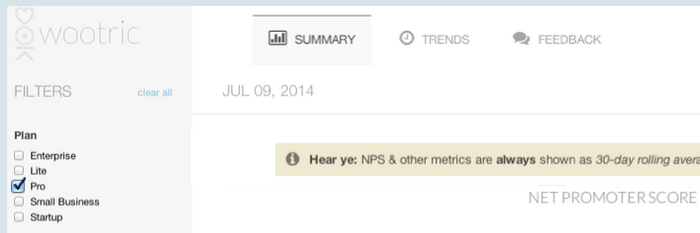
#40. Wootric – To understand Wootric, you must first become familiar with its tagline: “Wootric is the Net Promoter Score platform for boosting customer happiness.”
Here’s what it can do from a marketing perspective:
Data-driven approach.
Tools that allow for easy follow-up with promoters.
Targeted campaigns to convert consumers who like your product or service into loyal customers.
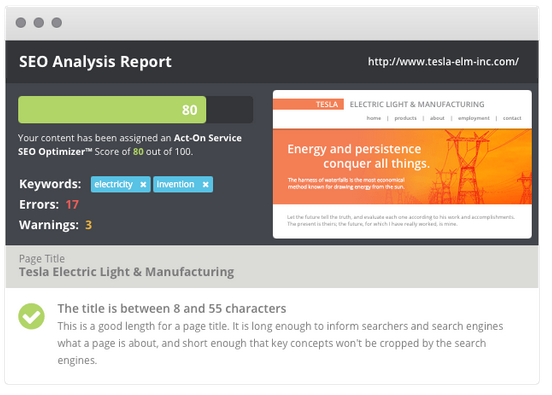
#41. Act-on – This marketing platform is a beginning-to-end solution, providing management for the entire lead-to-revenue lifecycle.
Generating leads through content marketing is a great start, but what matters most is converting these people into paying customers. From attracting prospects to building relationships, Act-on will provide you with the help you need.
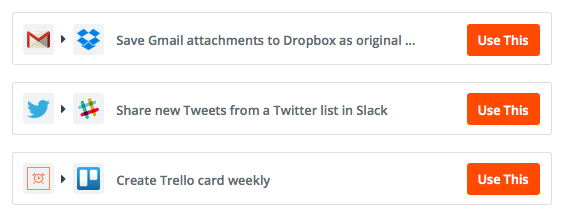
#42. Zapier – With Zapier, you can connect the apps you use the most, automate a variety of tasks, and dig deep into all sorts of data.
For example, you can set up a “Zap” that does the following: shares all new tweets from a Twitter list in Slack.
With 400+ supported apps, there isn’t much that Zapier can’t handle.
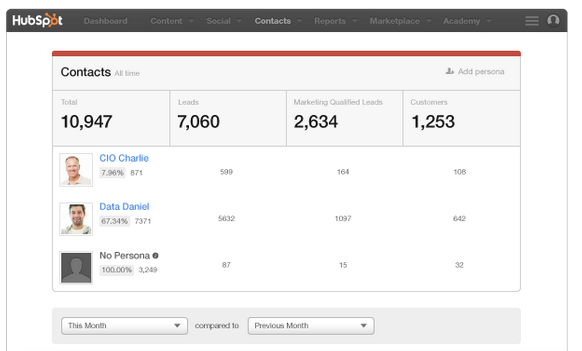
#43. HubSpot – HubSpot has quickly become one of the top brands in the inbound marketing game. Given how much this tool has to offer, it would be impossible to explain all the details associated with HubSpot marketing software.
Visit this page to take a product tour as this will give you a clear understanding of what the software can do for you.
HubSpot has tools for every marketing task imaginable, including:
Blogging
SEO
Social media
Lead management
Landing pages
Email
Analytics
#44. Cision – With 100,000 customers, you know Cision is doing something right. Cision provides a variety of software solutions, covering areas such as content marketing, media monitoring, and press release distribution.
With its content marketing component, for example, you get help with all aspects of content creation, content amplification, and results measurement.
Content Writing Tools
#45. Contently – Do you have dreams of scaling your content marketing strategy? This is where Contently excels. With this award-winning platform, you will get all the help you need in creating, distributing, and optimizing content.
Best yet, you can create and manage all your content in one place, ensuring that your entire team is on the same page.
Contently also has an advanced analytics tool that tells you what to do next, allowing you to get every last bit of juice from your content.
#46. NewsCred – NewsCred is a unique platform that helps your brand “grow with efficiency, agility and scale.”
For those who require help with content creation, NewsCred can solve this problem. With a large network of creators, you can leave the content writing to somebody else.
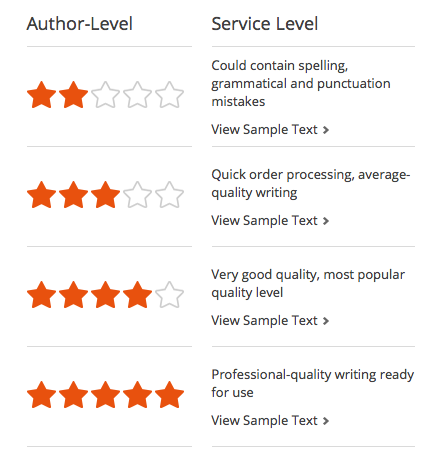
#47. Textbroker – Textbroker considers itself a leading content writing service, and there are many reasons to give the service a try.
With a self-service platform, you are in charge of the content creation process from beginning to end, despite the fact that you will never write a single word. You can also decide on the level of quality, which corresponds with the price you will pay.
You can’t succeed in content marketing if you don’t have access to quality content. Textbroker helps many marketers attack this issue.
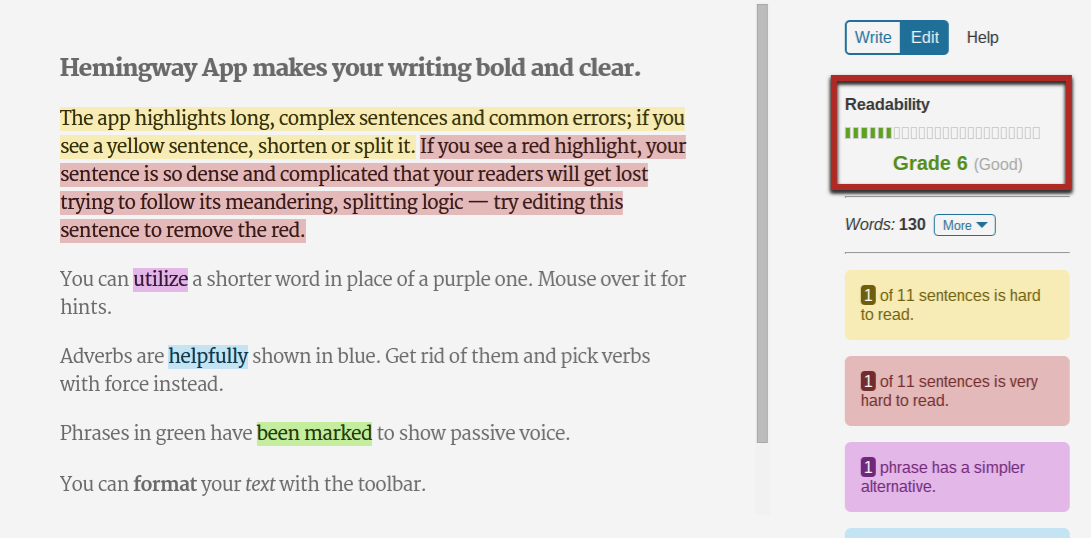
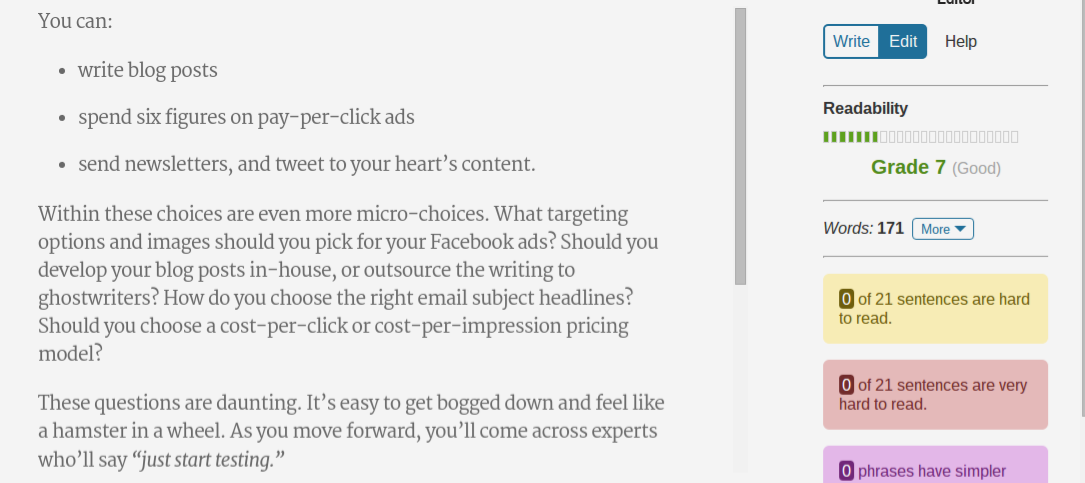
While there aren’t any huge mistakes (no red), there are areas for improvement (in yellow and blue).
I re-wrote those sentences until the tool indicated that the problems were fixed, as shown below:
The reading grade level went from 8 to 7, which is generally a good thing. In addition, it got more concise, going from 189 words to 171 (almost a 10% reduction).
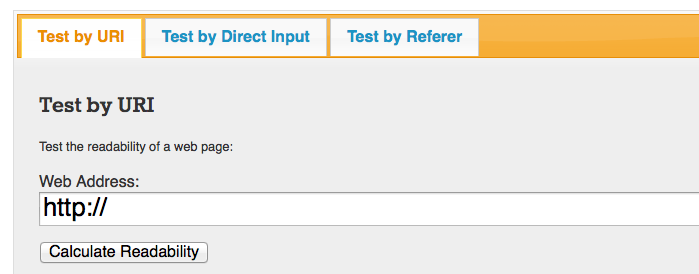
#49. Readability Test Tool – An interesting tool that tests the readability of any web page. You can test by URL or by direct input. Either way, the results are helpful.
This tool takes into consideration a variety of readability indicators, including Flesch Kincaid Reading Ease, Gunning Fog Score, and the Coleman Liau Index.
If your content has a low readability score, it’s time to revamp it.
Organization
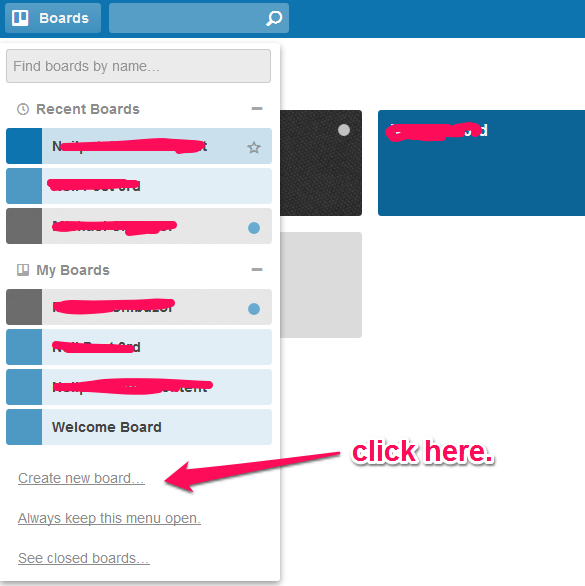
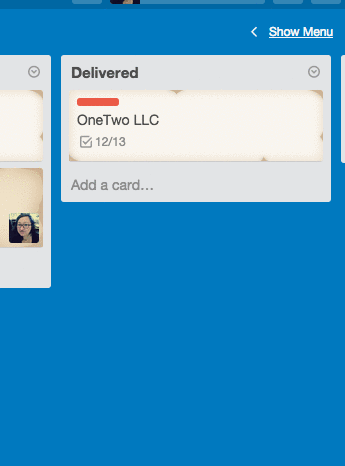
#50. Trello – Trello is a free project management tool. It’s built to be used by teams, but it is also useful for keeping your personal work organized.
It allows you to create “boards,” almost like one of those cork boards that people hang on walls, and then to create “cards” for them.
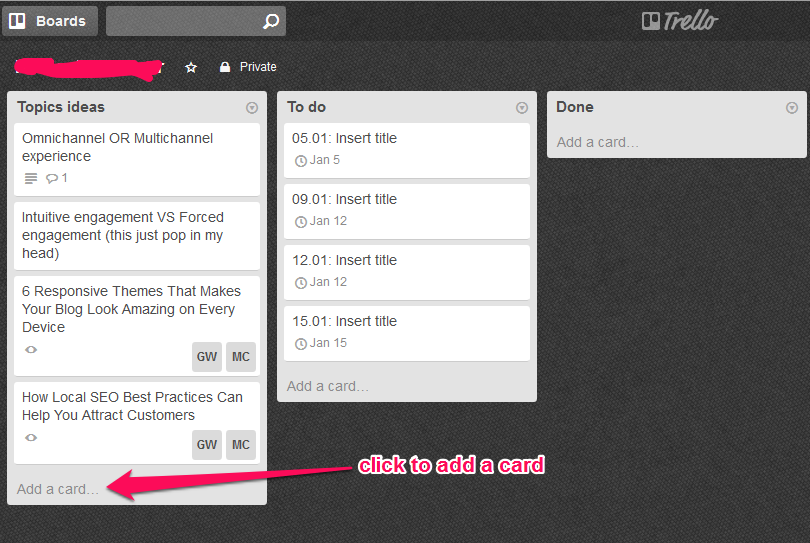
Create one board for each main thing you want to keep organized. For example, you might have one for your content schedule (with cards for content published, upcoming content, and content ideas) and another one for your promotional work.
On each board, you can create as many lists as you’d like and add cards to each of those lists. Here’s what a board for content ideas might look like:
You can edit the cards as well as drag and drop them from list to list.
Finally, it helps keep you organized by sending you reminders before the due date.
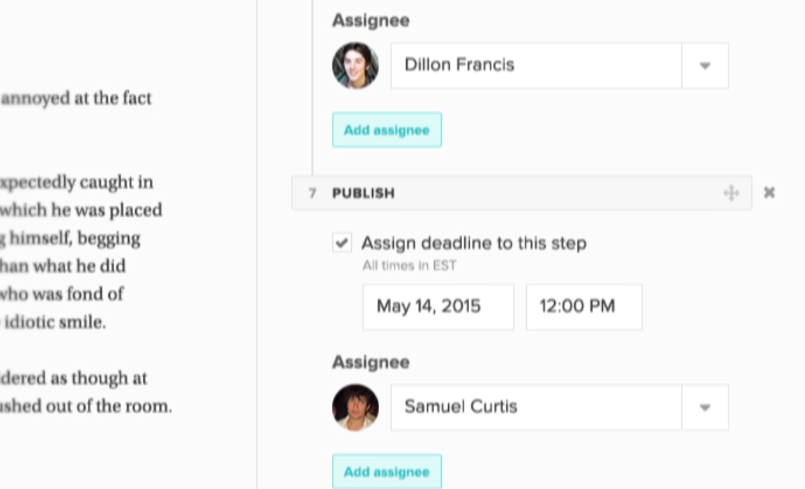
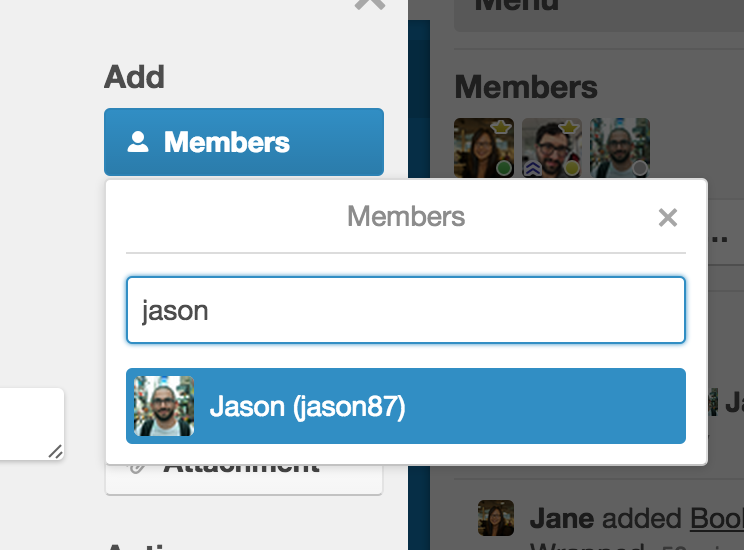
One more feature that you might want to use is the “add members” option, which can be found in the menu of any board.
Members can be assigned to particular cards so that they get notified of changes and due dates.
#51. Basecamp – It doesn’t matter whether you are managing a project or group, Basecamp gives you the tools you need to succeed.
For instance, content marketers use Basecamp to manage outreach projects. It keeps everyone involved on the same page, ensuring that nobody steps on another person’s toes.
Something else to note: Basecamp 3, complete with an all-new interface, was released in late 2015.
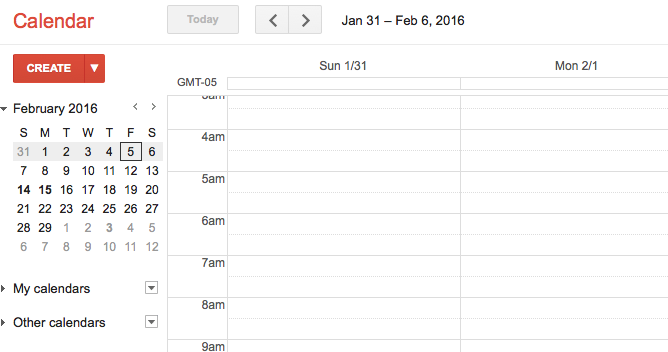
#52. Google Calendar – Content marketing success, in large part, depends on your ability to stay organized and complete tasks on time.
Google Calendar is a free tool that makes it easy to keep track of important events and tasks related to your content strategy. Share the calendar with anybody who needs access, from coworkers to clients.
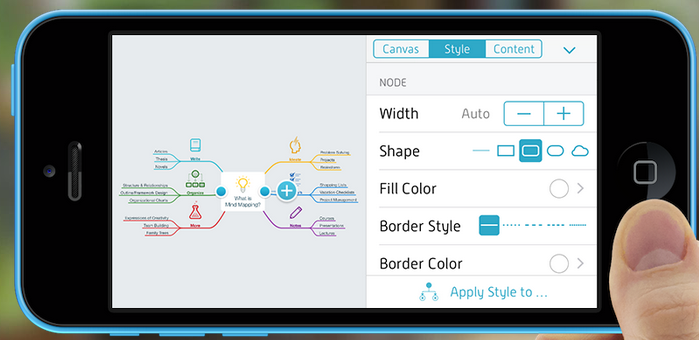
#53. MindNode – Mind mapping can go one of two ways. It can lead you towards a great idea, or it can cause an extreme sense of frustration. If you often find yourself in the latter group, MindNode can help.
The MindNode app provides a visual representation of your ideas, allowing you to better map out your brainstorming process and eventually take action.
How many times have you forgotten a great idea for a blog post? How many times has analysis paralysis slowed you down? This is no longer a concern thanks to MindNode.
#54. Asana – Make no bones about it, Asana has one goal: to help you keep your projects on track.
It doesn’t matter if you are a team of one or 100, every project needs to move through the pipeline in an efficient manner.
Trusted by Harvard University, Major League Baseball, and Uber, Asana makes this possible by providing tools that track projects from beginning to end.
#55. Evernote – If you have trouble with your memory, no matter the reason, Evernote can be your sidekick. This nifty tool is one of the top organizational platforms around, used by many who want to remember everything associated with their business.
Use Evernote to list blog post ideas, brainstorm your next steps, keep an editorial calendar, and share your thoughts with others.
#56. Wunderlist – Planning is a big part of any content marketing strategy. You plan when to write your next blog post; you plan when to publish it; and you plan your outreach strategy. You get the point.
Wunderlist has many features to simplify your life as a content marketer, including setting reminders to write a blog post and sharing lists with a business partner.
General Content Tools
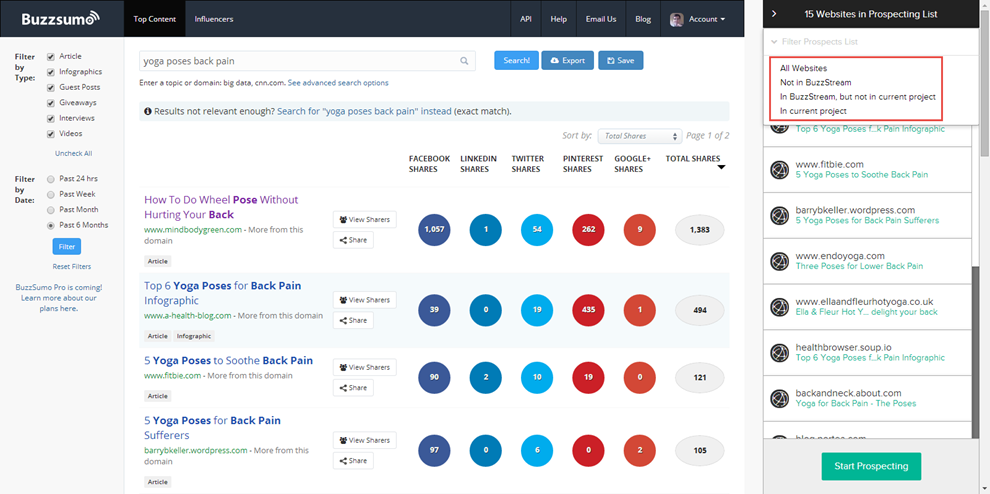
#57. BuzzSumo – Reading the BuzzSumo tagline will get you excited:
“Analyze what content performs best for any topic or competitor.”
Enter any topic or domain into the search box, and let BuzzSumo do the rest. Within seconds, you will be presented with the most shared content on any topic, including a breakdown by social platform. You can even view the backlinks generated by each post.
Use it for yourself, and/or use it to track the competition. It’s by far one of the most trusted and relied upon tools by content marketers.
#58. Help a Reporter Out (HARO) – If you need a quote for an upcoming blog post (or another piece of content), HARO helps you connect with journalists.
You can also use the service to get featured in a variety of publications. Sign up as an expert, and you will soon be presented with opportunities to share your knowledge to enhance your personal brand and authority.
#59. Google Drive – The more content you produce, the more content you need to store. You don’t want to lose any of it, which is why Google Drive is so popular.
Content marketers use Google Drive to save and share content. As a free cloud storage provider, this tool has a place in your toolbox!
#60. iSpionage – There are times when content marketing is more about the competition than yourself. With iSpionage, you can unearth your competitors’ PPC strategy.
iSpionage positions itself as the “only competitive intelligence tool that monitors the entire conversion funnel.”
If you want to examine the inner workings of your competition, with a close eye on paid advertising, this tool can help you do just that. You might just uncover a strategy that could boost your business.
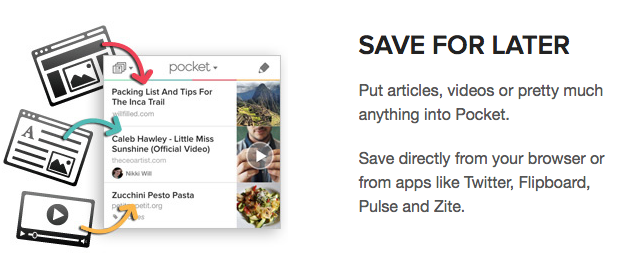
#61. Pocket – There will be times when you come across a story that you want to revisit later only to forget all about it.
Pocket protects against this, providing a way to discover and save any story of interest. Compatible with more than 300 apps, this tool will save any resource for you for your future use.
Email Marketing
#62. Aweber – Affordable. Easy to use. Full of features. These are just a few of the words and phrases that describe the Aweber email marketing platform.
If you want to do email marketing the right way, Aweber won’t let you down. An industry leader in deliverability and mobile tools, this platform will help you, as a content marketer, to achieve great results.
#63. MailChimp – Don’t let the name fool you. There is no monkeying around when you use this email marketing solution.
MailChimp has one goal and one goal only: to help customers “send better email.”
The company boasts more than 10 million users who send approximately 600 million emails every day. It’s impossible to list all the benefits and features of this email platform, but its flexibility deserves a special mention.
Regardless of industry, size, or personal style, MailChimp is designed to help marketers send better emails.
#64. GetResponse – Another email marketing platform, GetResponse attracts customers based on the premise that its solution is the “easiest” in the world.
GetResponse has 350,000 customers spanning 182 countries. Every month, these customers engage with more than 1 billion subscribers via email.
One of the primary benefits of GetResponse is a feature list for both beginners and expert email marketers.
#65. VerticalResponse – Are you interested in a tool that can combine your email marketing with your social media marketing? VerticalResponse does just that.
It is designed to help users create, send, and track emails and social media updates across every type of device.
With 15 years of experience in the business and more than 1 million customers, VerticalResponse is doing something right. It may be time to find out what.
#66. iContact – With a focus on small and medium sized businesses, iContact provides a variety of tools for email marketing success.
All forms of content marketing are judged by results. And with iContact’s results-oriented features, you will feel comfortable with the path you are following.
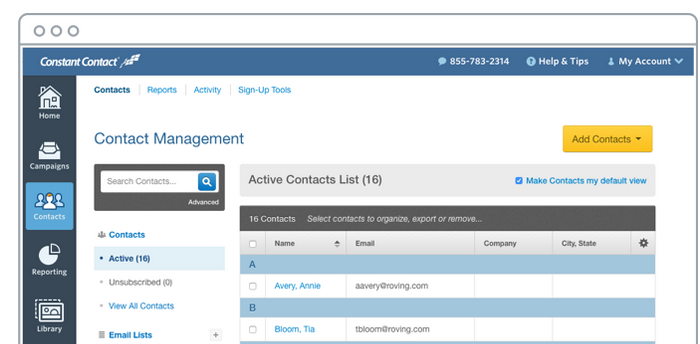
#67. Constant Contact – You have seen the commercials. You may even know a few people using Constant Contact for their email marketing. But until you try it yourself, you will never truly understand what it offers.
With easy to use features, including customizable templates, the tool can help anybody looking for help with email marketing to get started.
The company has positioned itself as the email marketing solution for anybody and everybody, which has turned it into a billion dollar company with customers all over the world.
That’s why I’ve hand-picked 22 of the best Gmail plugins that will help you clean up your inbox (and keep it clean), send emails that get opened more, and increase your email productivity.
You won’t and shouldn’t install them all, but I bet you can find at least a few that will make a significant difference in the results of your emailing efforts.
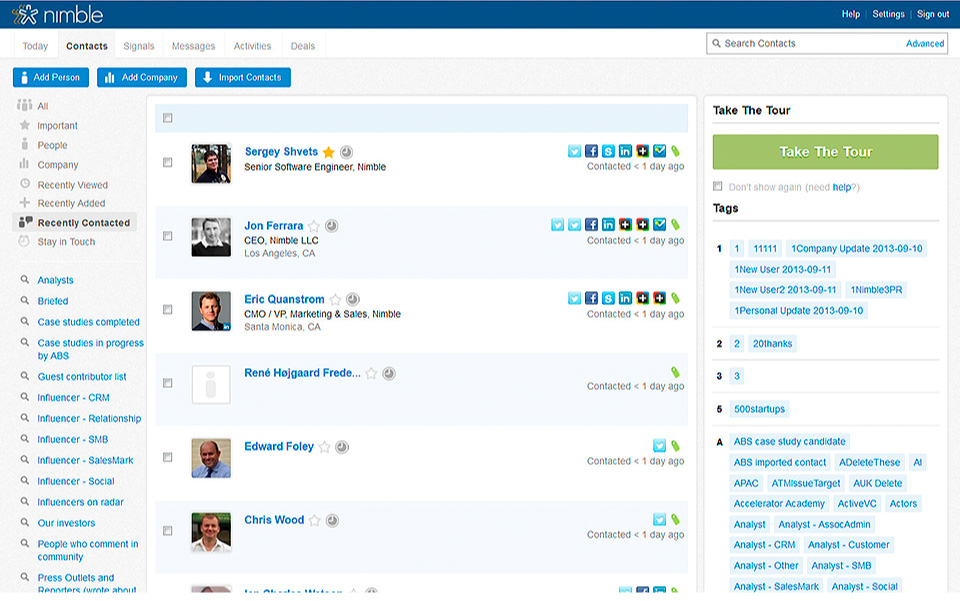
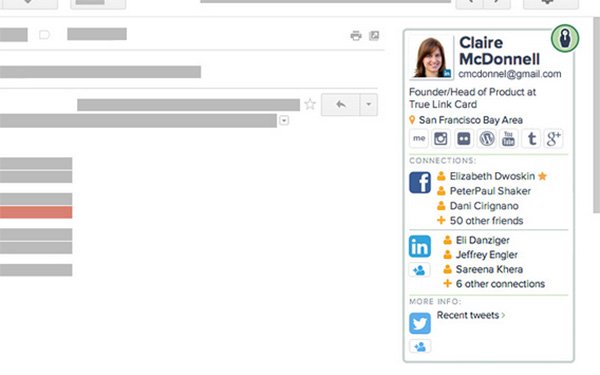
#68. Nimble – Nimble solves a big problem of keeping track of everything you know about a contact.
Plus, it can save you a ton of time.
The tool has a few really useful features.
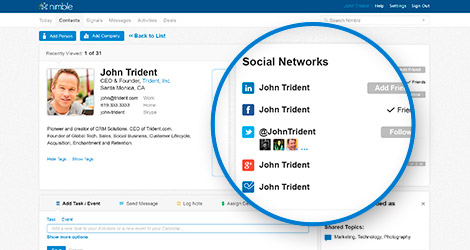
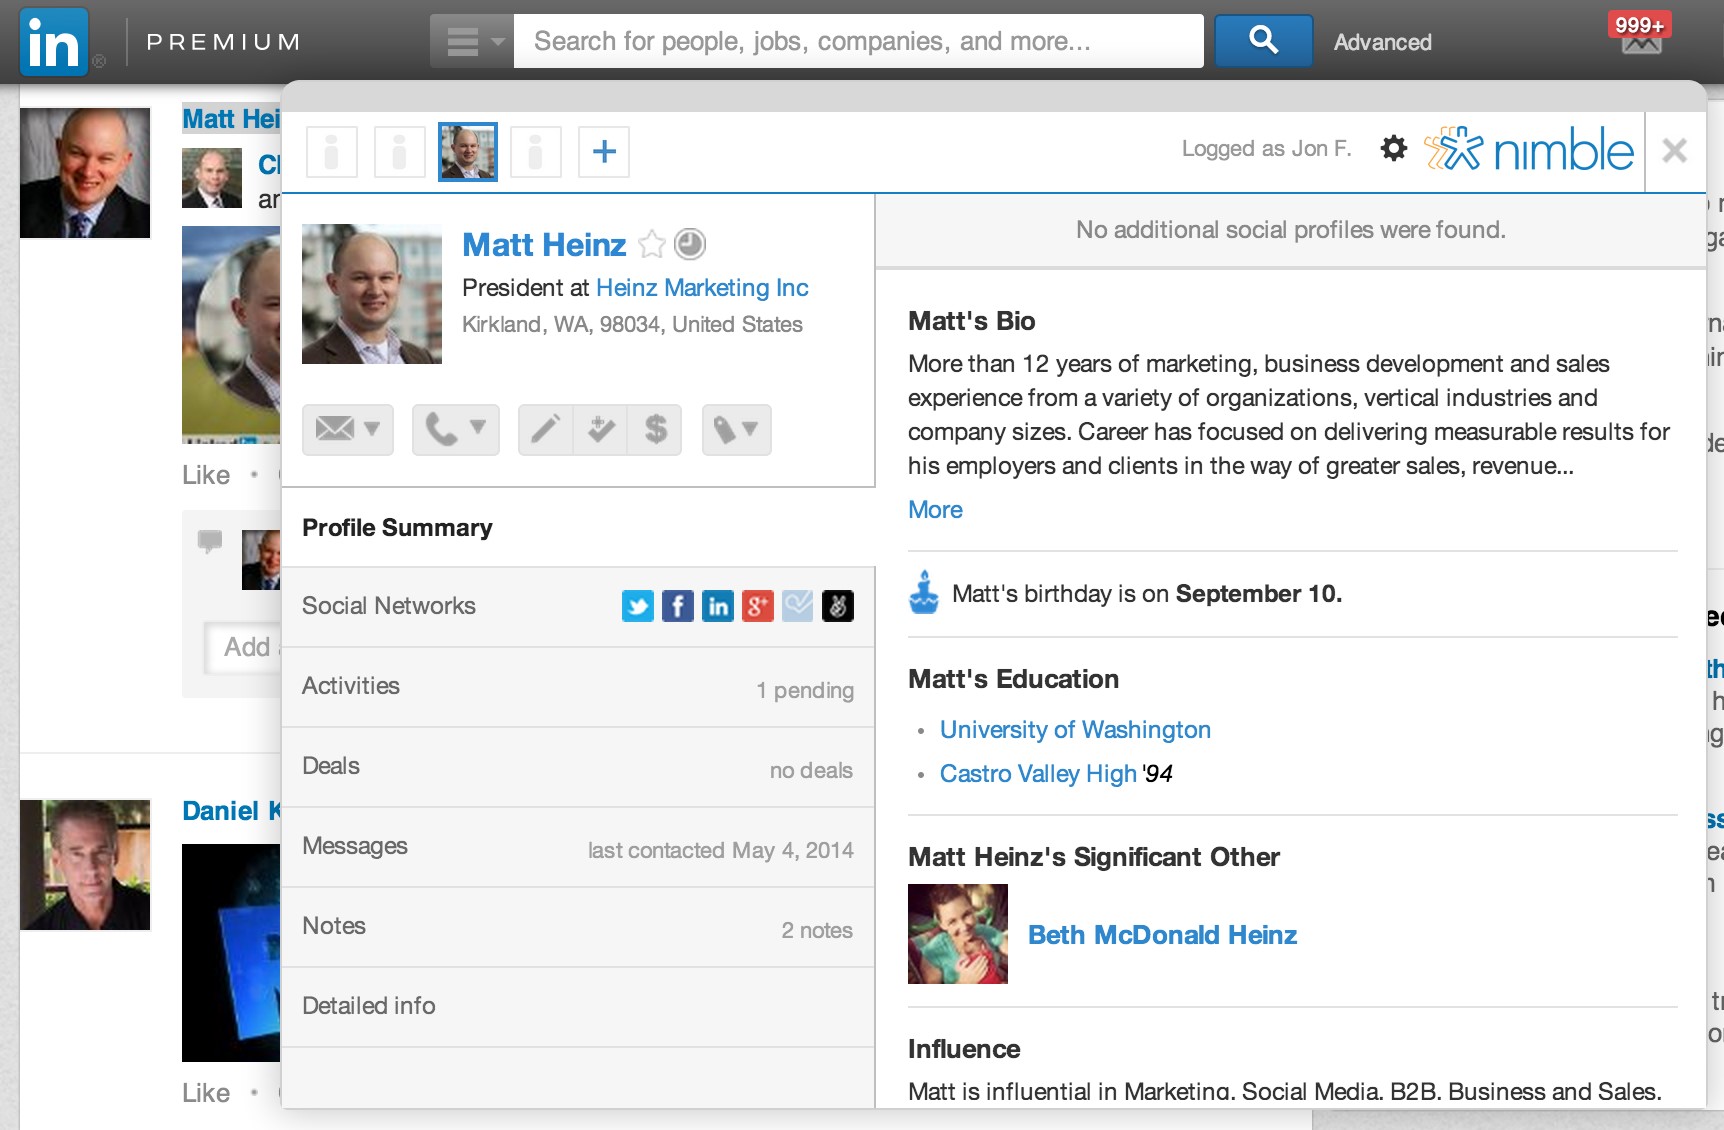
The main one is the “contact record” function. When you add a contact to the tool, it will pull up any easily findable information on that contact (like social media profiles on all the big networks):
You can go into any individual contact at any time and see all their social profiles as well as the information collected.
On top of that, it functions almost as a typical CRM (customer relationship management) tool by allowing you to add tasks for a person (for you or your team) and to keep track of your past communications with them.
One of the most useful parts of all this is that the tool actually draws information from all of those social profiles and somehow cuts out a lot of the redundant information. You end up with a really concise and useful profile of each contact:
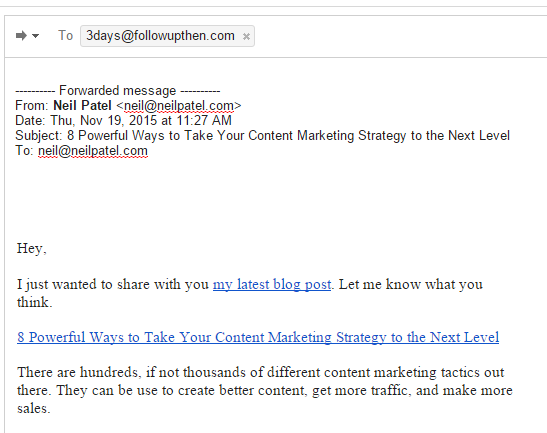
#69. FollowUpThen – When you start sending (and receiving) hundreds of emails in a short time period, things get hectic—fast.
At first, you might be able to keep your inbox fairly clean, but as soon as you don’t respond to a few right away, they start to build up.
This tool is the solution to that and a really simple way to keep your inbox clean so that you don’t miss important messages and are not stressed out.
Here’s how it works:
When you don’t want to deal with an email right away, for whatever reason, you simply forward it to an email address controlled by the tool.
All you do is send the email to one of those addresses, and it will resend you that original email when you’ve specified.
Keep in mind that you could also BCC one of these addresses when you send out an email if you want to make sure that you follow up with the recipient.
Here’s an example of it in action.
Let’s say you get an email from me about a new post. You’re super excited (right?), but you just don’t have the time to read the post right now.
Instead of letting it wait around in your inbox, possibly forgetting about it, you forward it to “3days@followupthen.com”.
Now, you can clear the email from your inbox and know that it will be back in three days when you’ll have more time.
Gmail Plugins
#70. Boomerang – Use it to schedule emails or remind you to send an email at a specific time.
Boomerang solves all sorts of common problems for content marketers.
Do you ever want to respond to an email, but not right away? For example, maybe you need to send an invoice in a week.
Boomerang lets you schedule when your email needs to go out. Here’s how you do it:
Once you send the email, you don’t have to worry about remembering to do it later, and it doesn’t clutter up your inbox.
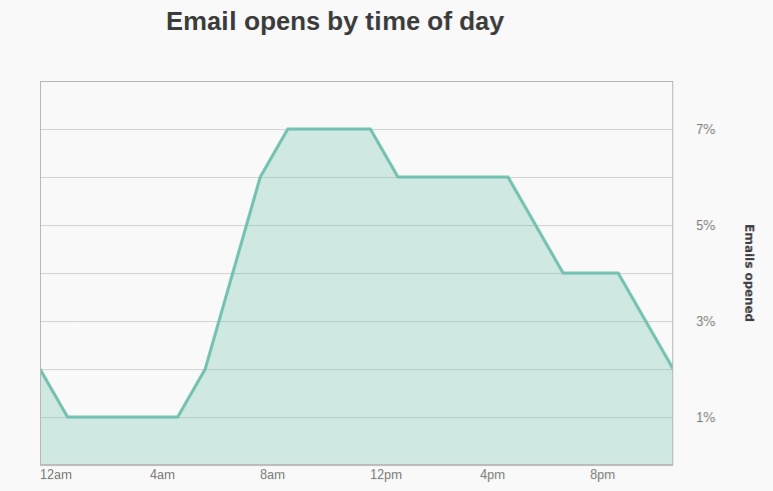
One other great reason to use the scheduling feature is for your link outreach campaigns. Emailing someone at 2 AM is a surefire way to get your email buried under the rest of someone’s morning email.
MailChimp found that the highest email open rates occur between 8 AM and 5 PM.
When sending emails to someone you don’t know well, schedule them to be sent during this window to maximize your chances of them being read.
While the plugin has a few other features, the next most useful one reflects why the plugin named Boomerang in the first place.
Sometimes, you can’t respond to an email right away even if you’d like to. You could be waiting for some results or for responses from other members of your team on a project.
So if someone, say a client, sends you an email asking for an update at the start of the day, you can “boomerang” the email to make it disappear from your inbox—for now—and show up at a later time marked “unread.”
This will prevent emails from being buried and forgotten. Here’s how simple it is:
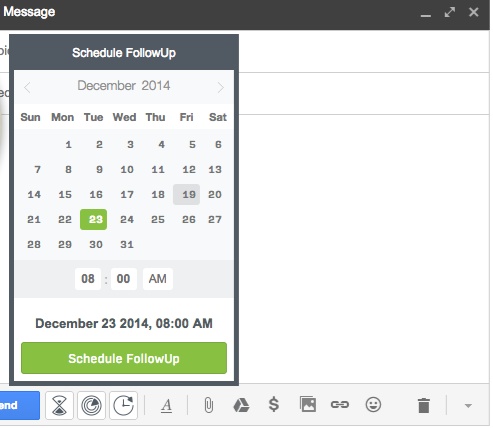
#71. FollowupCC – Sometimes we mean to follow up with someone, but forget to. This plugin gives you the choice to set a follow-up date when you are sending/replying to an email.
If you haven’t heard back from your recipient, you’ll get a new email in that thread reminding you to follow up.
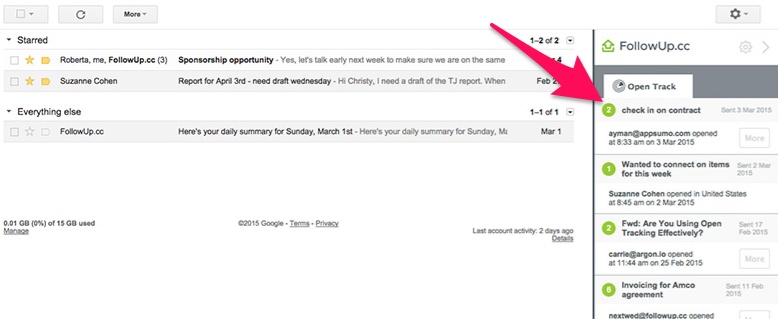
There’s another feature that made it hard to categorize this plugin. When you send emails, you have the option of tracking who’s looking at the email. The results can be seen in a sidebar as shown below:
When it comes to sales, only 2% of sales actually occur on the first contact. Eighty percent occur after the fifth contact.
Even if you’re not directly involved in the sales process, you likely use email to build relationships and work with people. If you don’t ever follow up, chances are that you’ve lost a lot of business (and profit) because your emails were simply forgotten or buried.
Considering how little it takes to send a follow-up (especially with a plugin), the results are definitely worth your effort.
Give it a try—start following up regularly when you don’t hear back from a contact. I think you’ll be pleasantly surprised with the results over time.
#72. Yet Another Mail Merge – Mail merges may have fallen out of fashion over the years, but in some situations they are still handy.
A mail merge, for those of you not familiar with the term, allows you to input contact information such as name, email address, and anything else you’d like into a spreadsheet. You can then send an email to all these addresses at the same time, complete with personalization.
Here’s how Yet Another Mail Merge works using a Google Sheet (spreadsheet) and your Gmail account:
#73. WiseStamp – Create an email signature that stands out. If you’ve ever emailed me, you know that I have a pretty unique signature at the end of all my emails:
A good email signature is a great personal branding opportunity. It’s a chance to stand out while also communicating important information without any extra effort.
If you have a really high volume of emails, adding a line like mine to your signature will significantly cut down on the number of emails people send you. In addition, it saves you from people thinking that you’re rude because of your short replies due to time constraints.
WiseStamp allows you to create a custom signature for your emails. You can include a picture, links to social profiles or websites, phone numbers, and any message you want—the sky’s the limit.
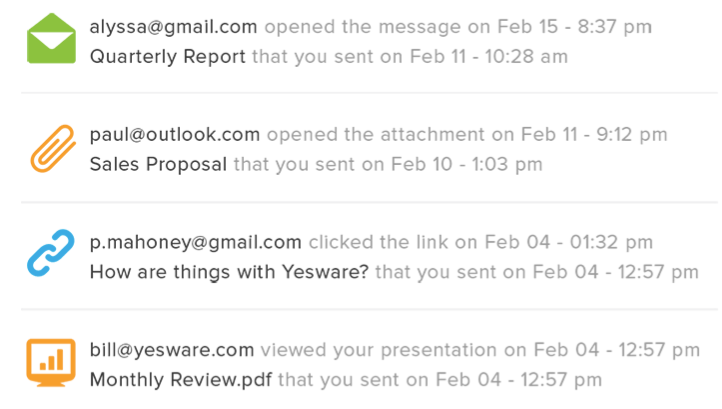
#74. Yesware – When you send an email, all you need to do is check the box beside “Track” at the bottom. Yesware will track all future actions your recipient takes with your email.
You have two types of ways to view the results of tracking. There’s a limited collapsible panel above your inbox that you can use to view the most recent email data, or you can dig into detailed reports on the Yesware website.
In the detailed reports, you can analyze your results for all the major metrics such as clicks and opens.
If you’re running an email outreach campaign, chances are you’ll be emailing hundreds of people with similar subject lines.
By creating a few variations of your subject line, you can split test which one gets the most opens and positive responses. Take the winner as your new default, and then begin a new test during your next campaign.
Finally, Yesware also lets you create and save email templates. If you find yourself sending a lot of similar emails, just create a template and insert it into your next blank email. This feature can save you a lot of time during email outreach campaigns.
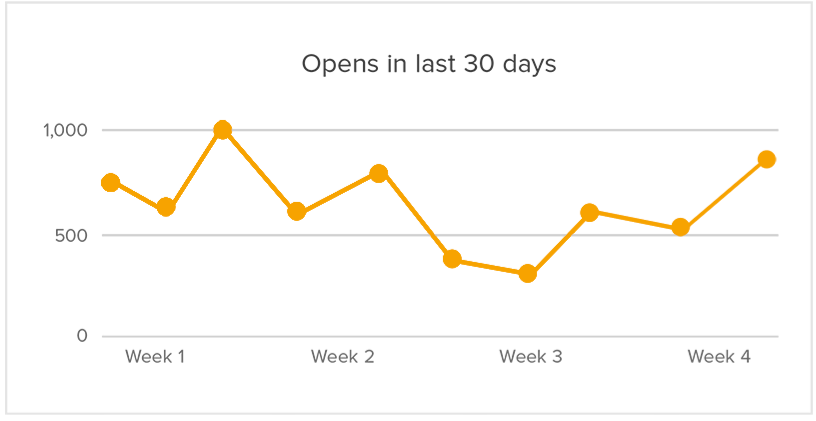
#75. BananaTag – This plugin is very similar to Yesware. Just click the tag option at the bottom of any email, and you will be able to see exactly when and who is opening it later on.
The analytics are also very solid, allowing you to examine your email open rate over time and improve it through experimentation.
One final note: they’ve also released a beta tool that allows you to schedule sending emails, which may eliminate the need for an extra plugin.
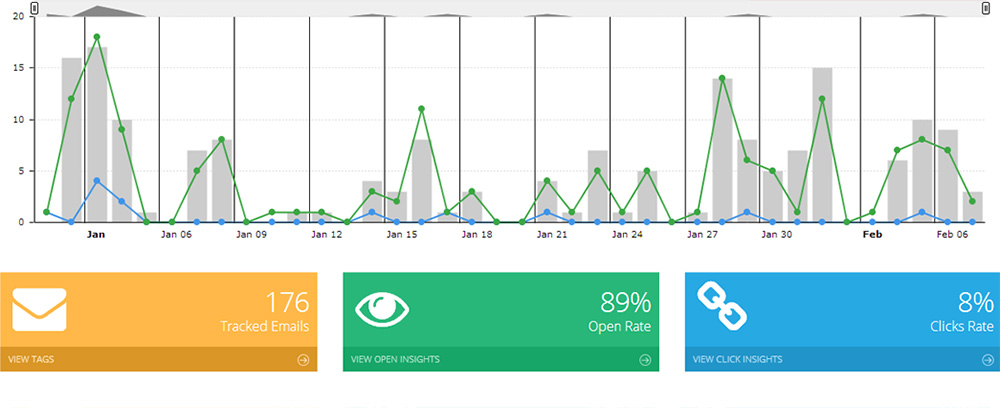
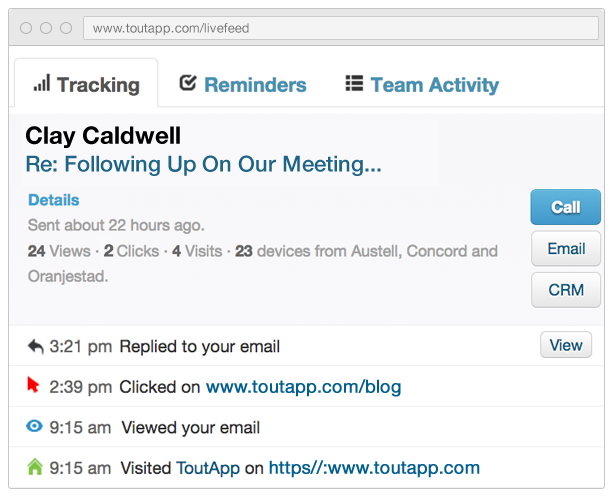
#76. ToutApp – This plugin is a little more robust and meant for a team use. It features similar tracking capabilities as the other plugins in this section, e.g., email opens, interactions (clicks/downloads), and replies.
ToutApp also features easy to save and use templates, which can speed up any repetitive outreach efforts.
I’d say the biggest difference between ToutApp and the other plugins in this category is that ToutApp focuses on tracking by the person rather than the email. This is a major benefit if you communicate with certain people over and over again and really want to learn which emails they respond to best.
Finally, note that ToutApp is exclusively a paid one. While they offer a 14-day free trial, there is no free level. It’s meant more for teams and professional marketers rather than those that are relatively new to the field.
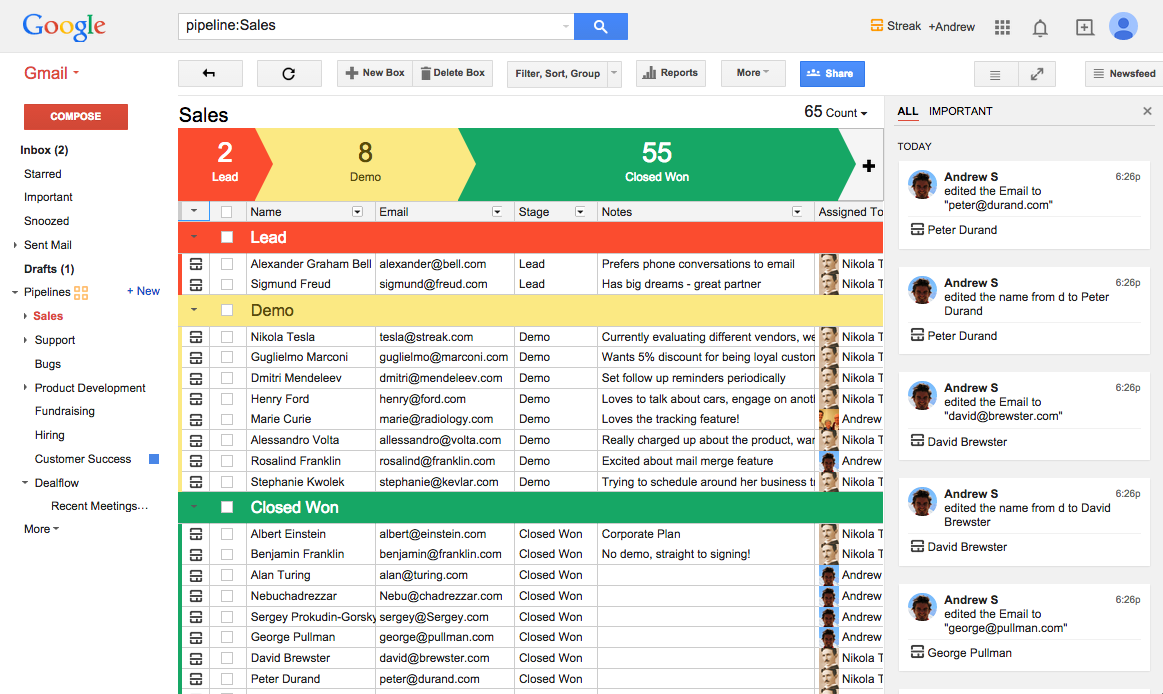
#77. Streak – Unlike most other CRM tools, Streak is specifically designed for Gmail, which gives it an advantage over many of the best-known CRM companies.
It features a lightweight dashboard that’s built right into Gmail. You can color-code prospects as they move through each stage in your funnel.
The big reason a CRM like this is helpful is that it takes a complex set of data and puts it on an easy to see chart/spreadsheet. Even with several leads at different stages in your funnel, you won’t forget to follow up with anyone.
And while this is typically meant for sales, there’s no reason why you can’t use a similar process for building relationships with influencers.
In addition to having standard CRM features, Streak also gives you other basic business tools that you might be interested in such as:
email support (customer service)
project development
fundraising
bug tracking
#78. WORKetc CRM – This is another highly rated CRM plugin for Gmail. It’s not as pretty as its competitors, but it performs well.
This CRM plugin is designed for teams, and it excels in that area. In addition, it has great built-in features for project management and billing, which is a huge asset for certain businesses.
Instead of being built right into Gmail, it syncs with Gmail. Sometimes this is inconvenient, but it can be beneficial if you’re working with outside docs and calendars that you want to sync up.
Here’s a more in-depth video of its features:
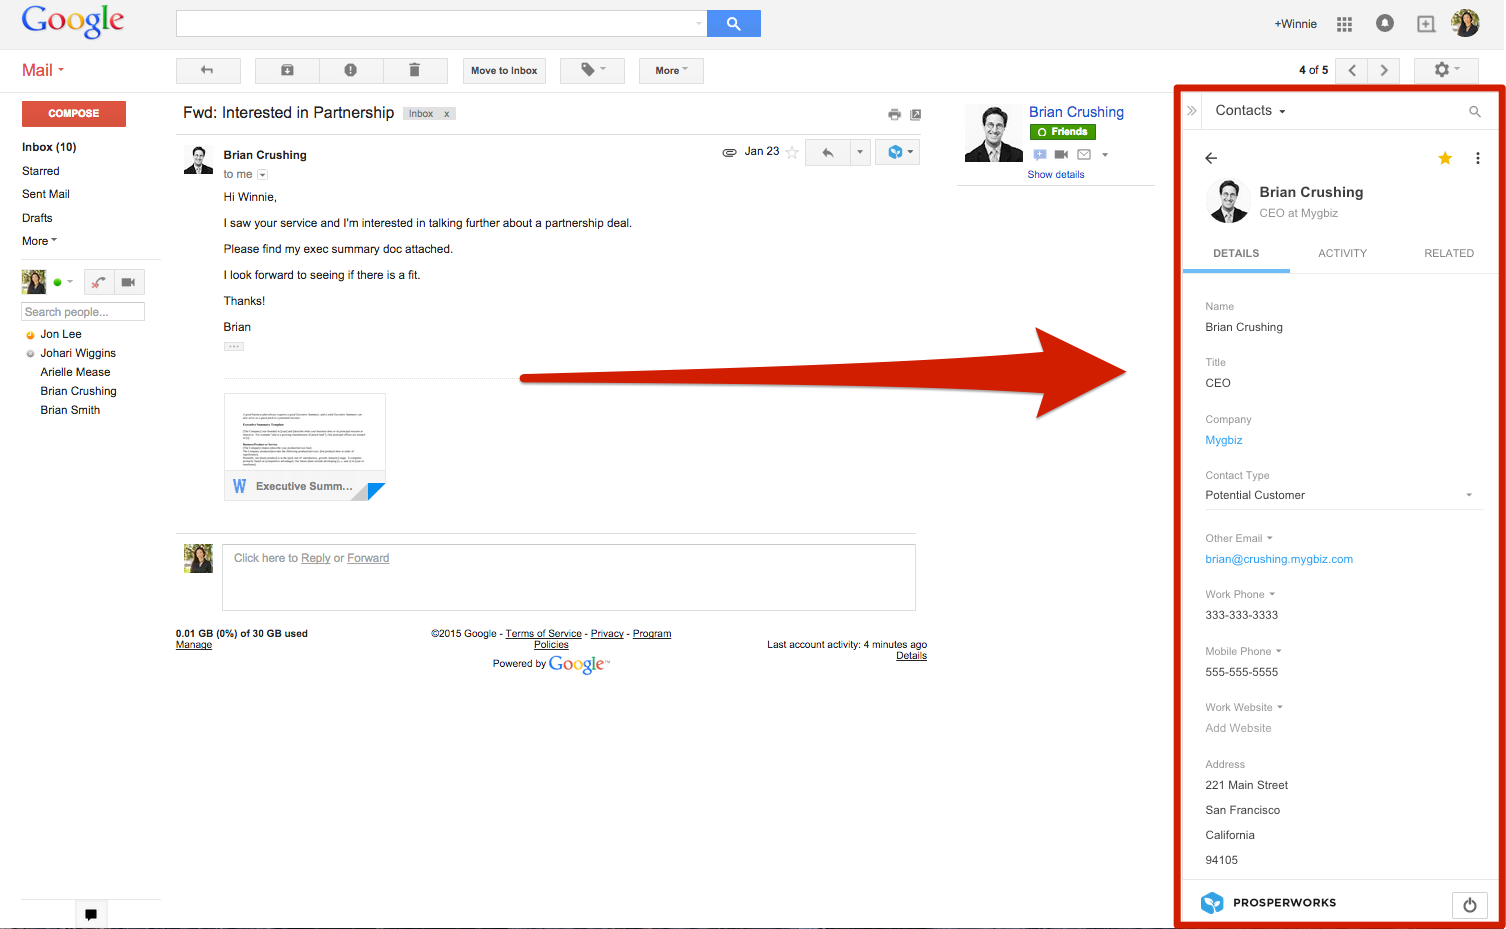
#79. ProsperWorks (formerly Strideapp) – Recognize the handsome guy on the homepage? That’s the startup I was talking about earlier. It’s another Google App designed for Gmail users (rather than a poor adaptation of an app).
It is simpler than some of the alternatives, but that’s also a good thing for anyone looking for a lightweight CRM. It is a CRM tool, and it does CRM well. And while it syncs with your Google calendar, contacts, etc., it doesn’t try to handle billing or project development.
Obviously, I’m biased, so let me instead copy part of a review from a user:
“[Where] The extension really SHINES are the task management features. There are so many situations where several of us are involved in working on different activities for one prospect that are all tied together. It eliminated ugly spreadsheet pipelines, strings of forwarded emails, and hours spent searching/coordinating things.”
You’ll get a standard sidebar when in Gmail, showing you your contact history and profile:
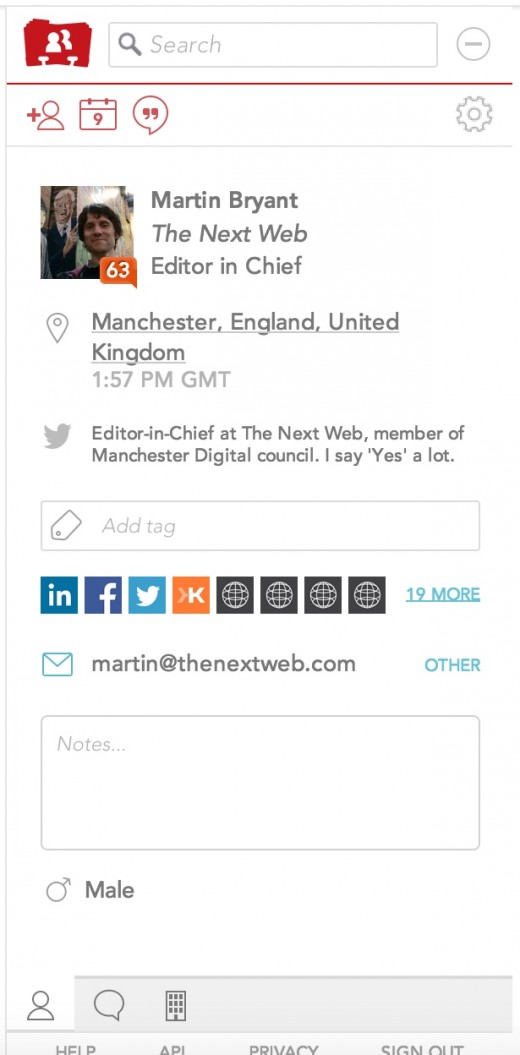
#80. Discoverly – One of the first major competitors to Rapportive was Discoverly. It has a lot of features similar to the original Rapportive.
You’ll see the sidebar widget on the right side as usual, and it contains links to the displayed contact’s profiles on popular social networks, such as Facebook and Twitter as well as information about connections (friends) and some recent activity.
It’s fairly simple, but that’s the appeal.
#81. Full Contact – This is one of the latest rising competitors to the now crowded space of contact profiling widgets.
It also features a fairly simple but very attractive design. On the main panel, the social activity is downplayed in favor of other information. While there are links to social networks (small logos), there is a lot of space dedicated to allowing you to add tags or notes to a contact.
In addition, it clearly displays your contact’s location and time zone, which can be very handy when scheduling emails. If you want to see recent social activity, you simply click on the social tab at the bottom of the widget.
The most important thing is that it seems to be one of the most reliable plugins currently when it comes to finding contact information, which is the biggest challenge for plugins in this area.
#82. Unroll.me – How many emails from other marketers do you end up deleting 90% of the time after glancing at them for a few seconds?
It’s normal to sign up for email lists. You might do it because you’re actually a fan of someone’s work or you just want to see what they’re up to. But over time, you’re likely to find yourself on a lot of lists that end up overwhelming you and your inbox.
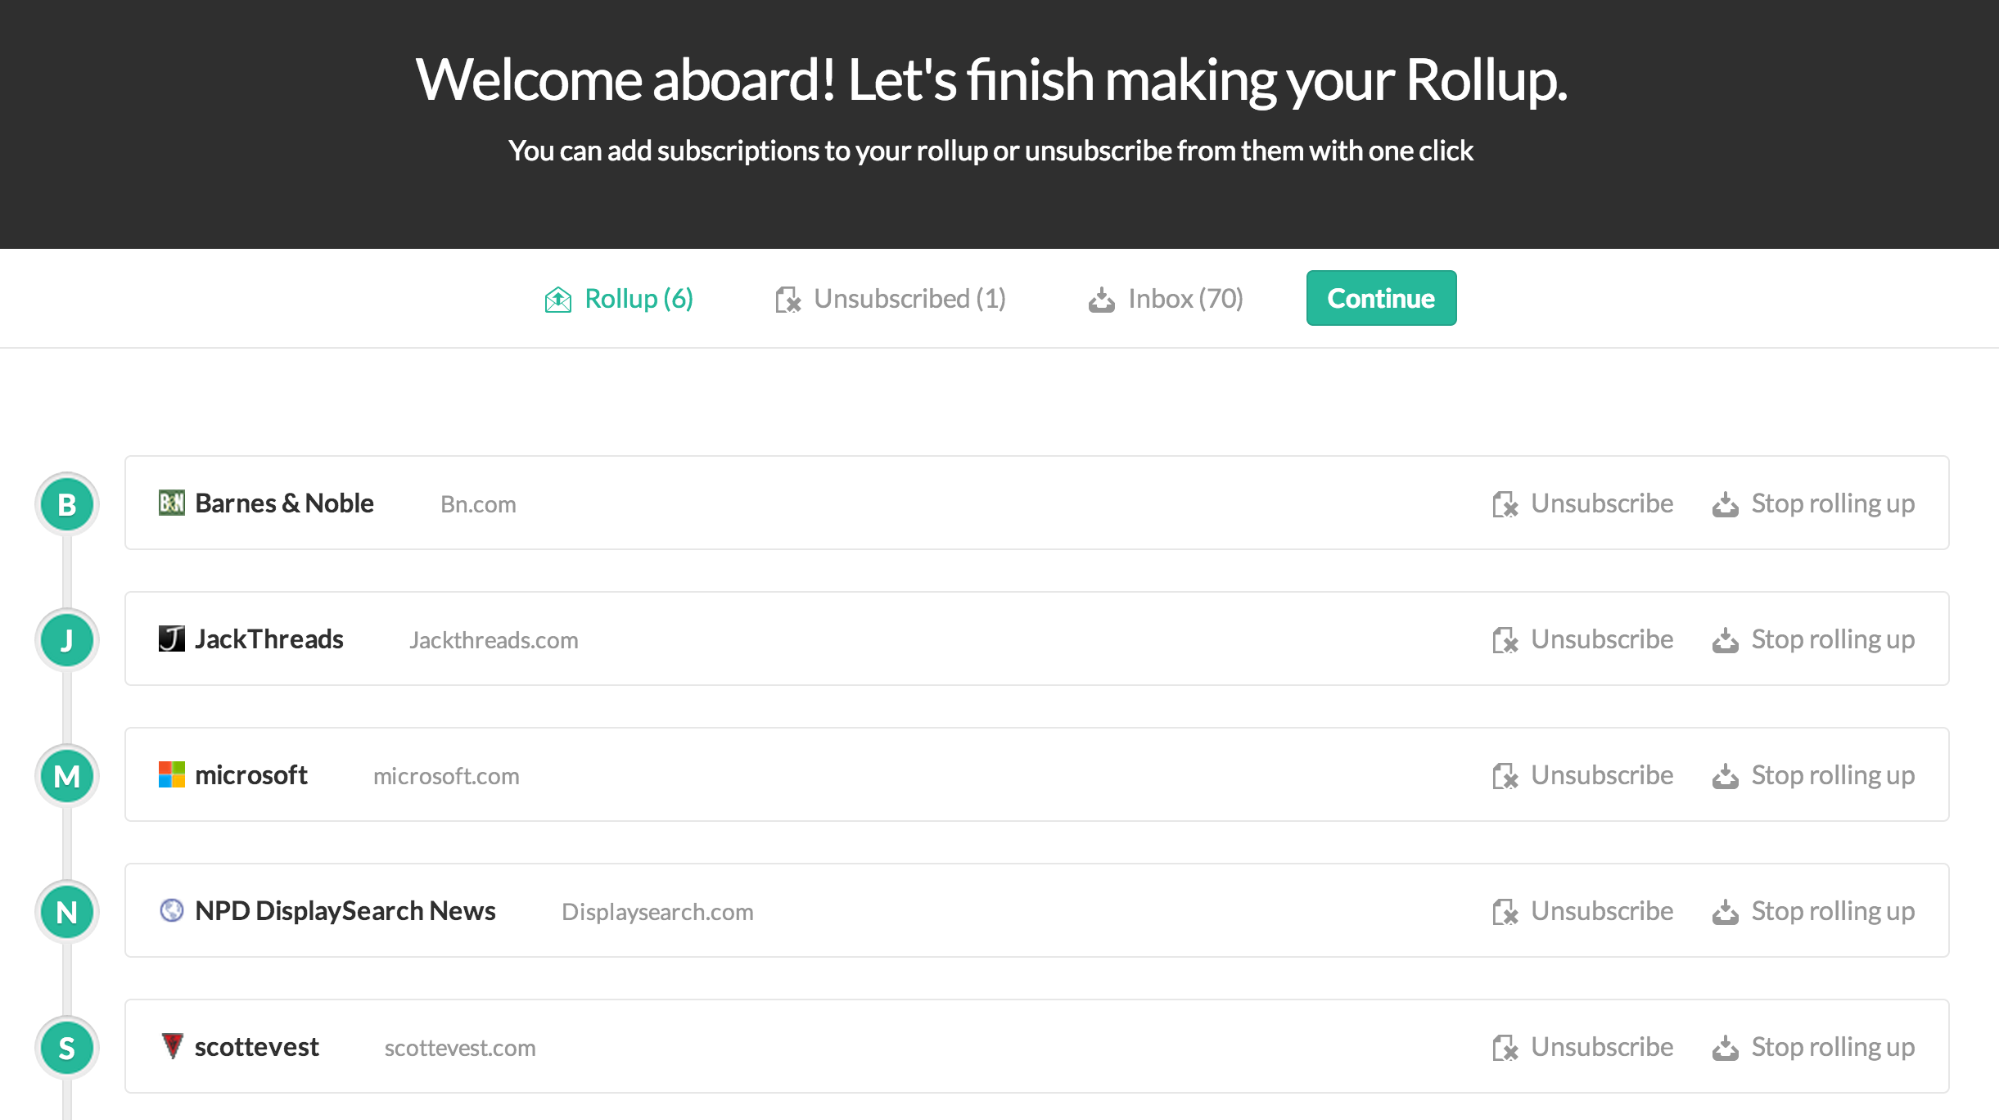
The point of Unroll.me is to consolidate all the messages that you do want to read into one easy-to-read email per day.
You can also easily go down the list of your current subscriptions and unsubscribe from any lists you don’t want to be on with one click. Sure, this will take you a few minutes now, but it’ll save you hours over the long run.
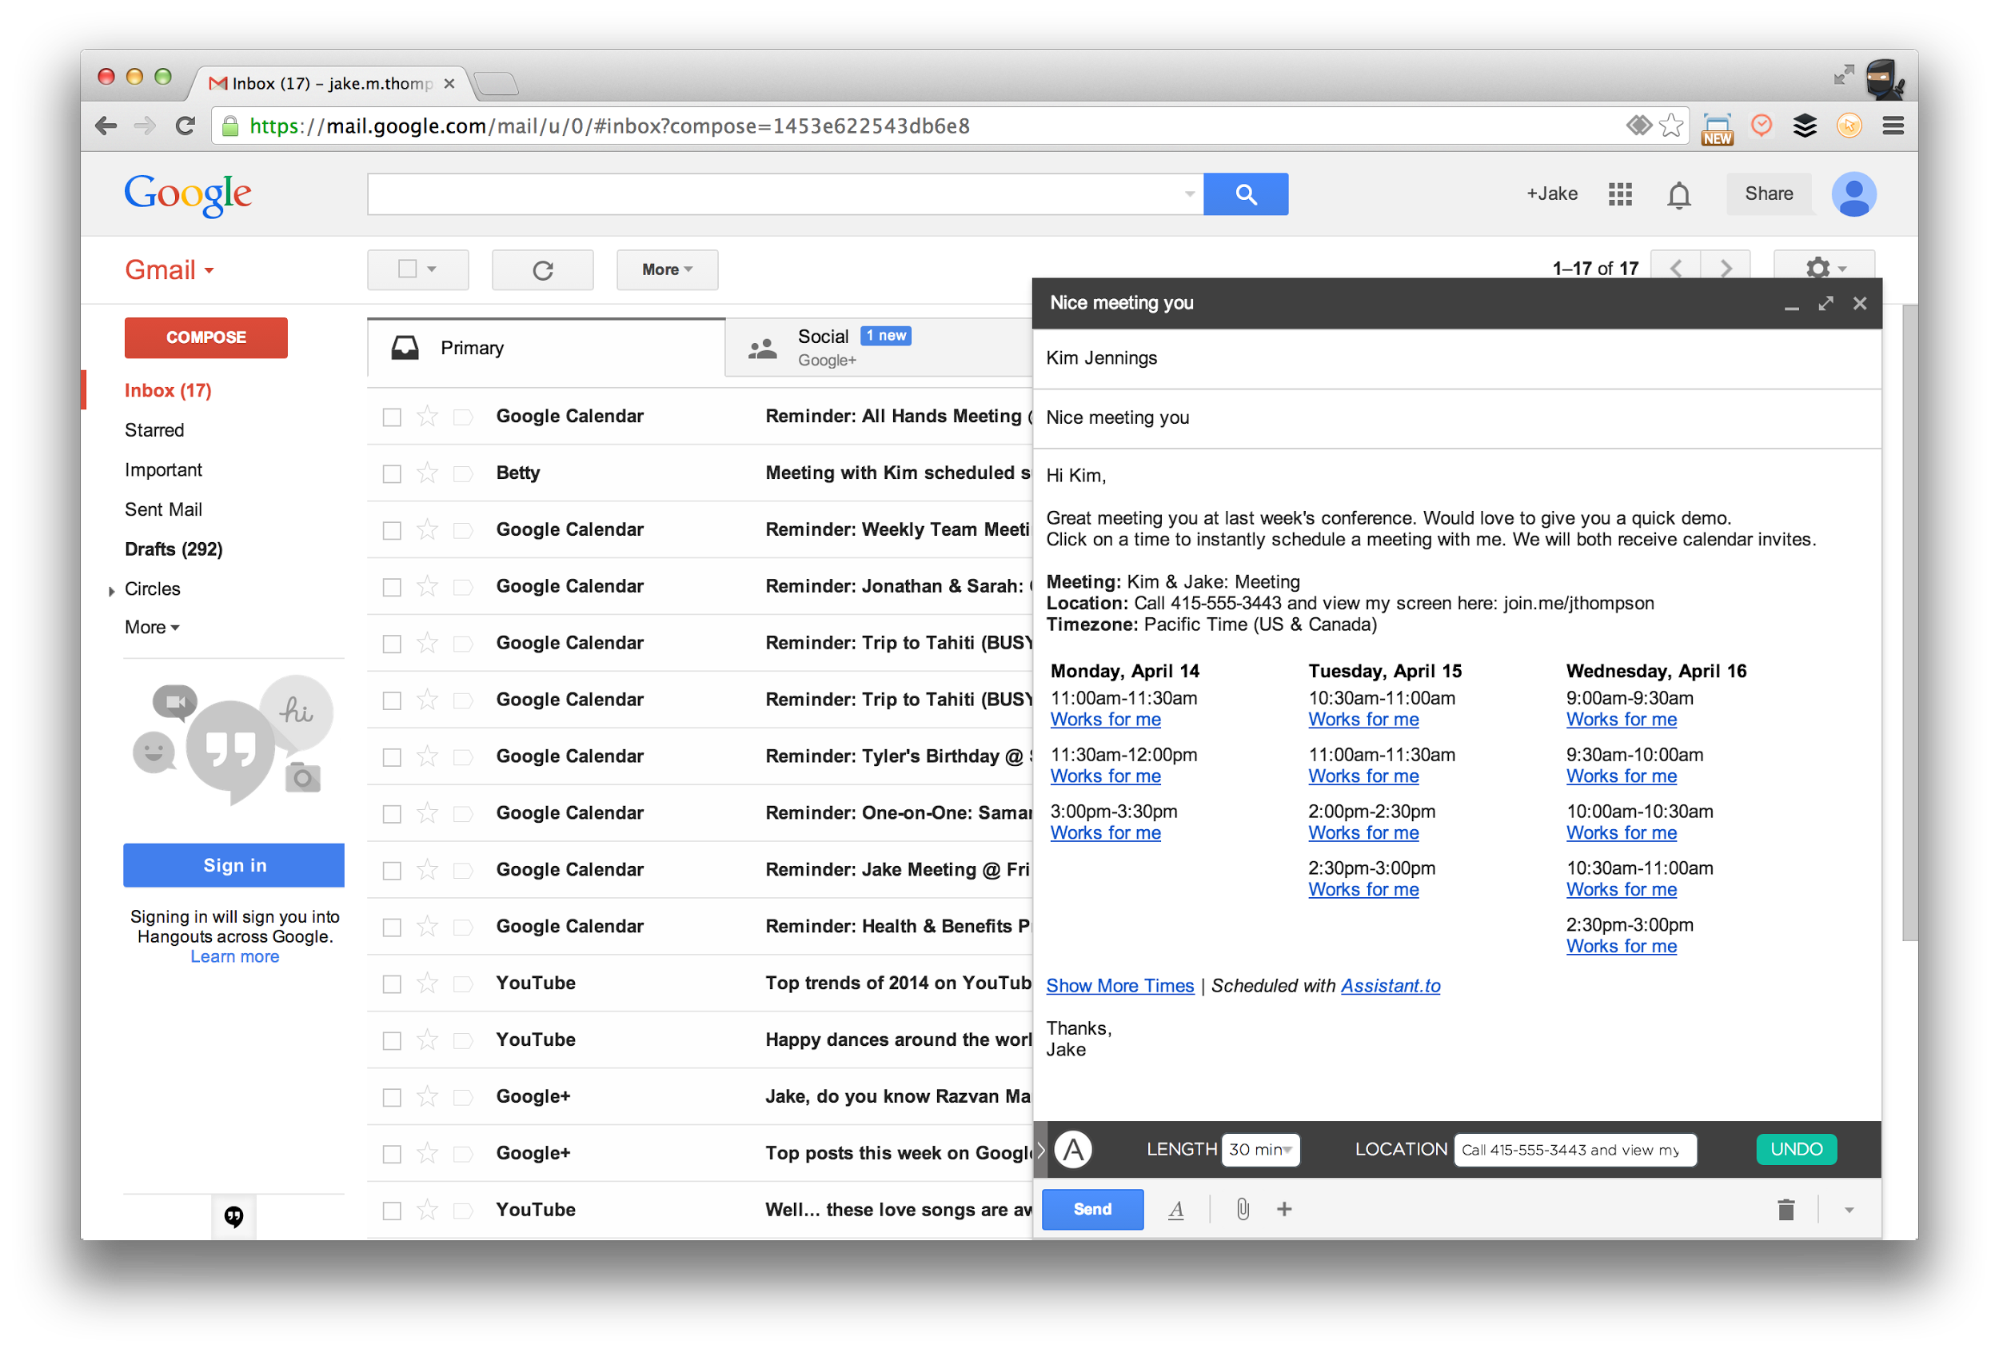
#83. Assistant.to – Ever get sick of trying to find a meeting time that works for both you and the other party? To help you with this task, this plugin is the best free plugin out there for you.
This plugin integrates with your Google Calendar to let you easily select free time in the upcoming days that you could use for meetings.
In the actual email you’re sending, you enter the length of time required for the meeting, then click on the free time in your calendar. The plugin formats the different time options so that your recipient can just click on a time that works for them, and the meeting will be automatically set.
#84. ActiveInbox – While some of us are better or worse than others, most people procrastinate until a deadline comes up. This plugin was created to deal with that problem.
You can go through a large batch of emails and assign them both a priority and a due date. They will be arranged in a logical order so that you can deal with them most efficiently.
One caveat: There’s a free trial, but after that, it’s a paid tool (a few dollars a month). You should know by the end of the trial if the tool is worth paying for.
#85. AwayFind – Put your hand up if you’re constantly checking your email throughout the day. Almost everyone does.
It’s obviously a huge waste of time and distracts you from doing actual work that produces value.
This plugin was created so that you could stop checking your inbox without worrying about missing anything important.
You create filters with it so that if a certain person sends you a message within a certain time frame, you will get a phone call or text to your cell phone with the text of the email.
This way, you’ll still get emails you want to read immediately within the time frame you want, but the less important stuff will wait for you until later.
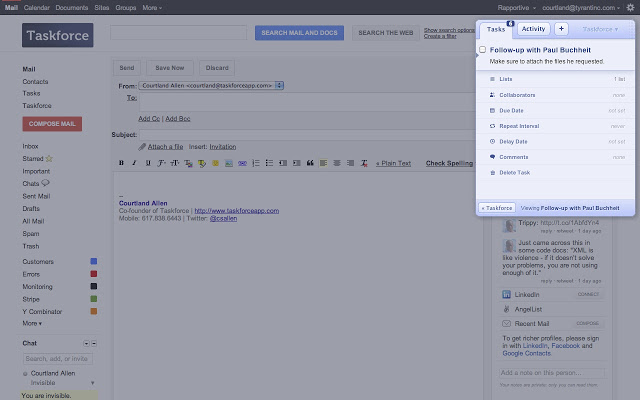
#86. Taskforce – Taskforce is a really handy to-do list that you can edit on the fly in Gmail.
This saves you from having to record things that you need to do in another spreadsheet or text file. In the case that you don’t write down tasks in the first place, this saves you from continually having to search for and open emails.
Additionally, you can add people to specific tasks. When you finish the task, they’ll get an email update.
Blogging
#87. WordPress – It’s not possible to have a list of the top content marketing tools without mentioning WordPress.
Even if you have no knowledge of blogging, you can set up a free WordPress website within minutes. From there, sharing your content with the world is a cinch.
For many brands, their WordPress-driven blogs are the basis for their entire content marketing strategies.
#88. Yoast – Content marketing and website optimization go together like peanut butter and jelly. Yoast provides a variety of WordPress plugins that help users optimize their blogs.
Google Analytics by Yoast and the Yoast SEO plugin have been downloaded tens of millions of times.
If you have a WordPress-powered website, Yoast plugins can help you from an optimization point of view.
Stay focused on your task
The tools here will help you focus like a laser.
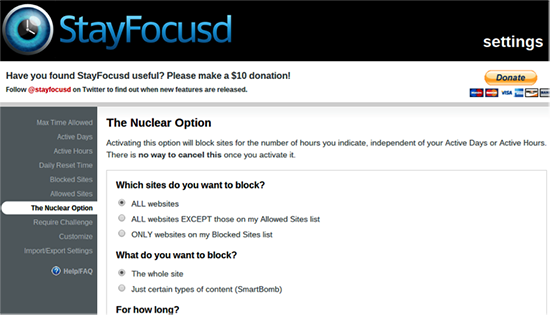
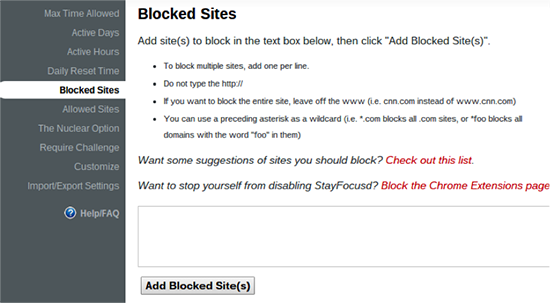
#89. StayFocused – The name of this tool gives away its use. It’s a free Chrome plugin that allows you to block distracting websites.
Once you install it, go into its settings and choose which sites you’d like to block:
You can choose the “nuclear option,” which blocks all websites for the time period you specify.
Or you can add a few websites that waste most of your time to your “blocked sites” list.
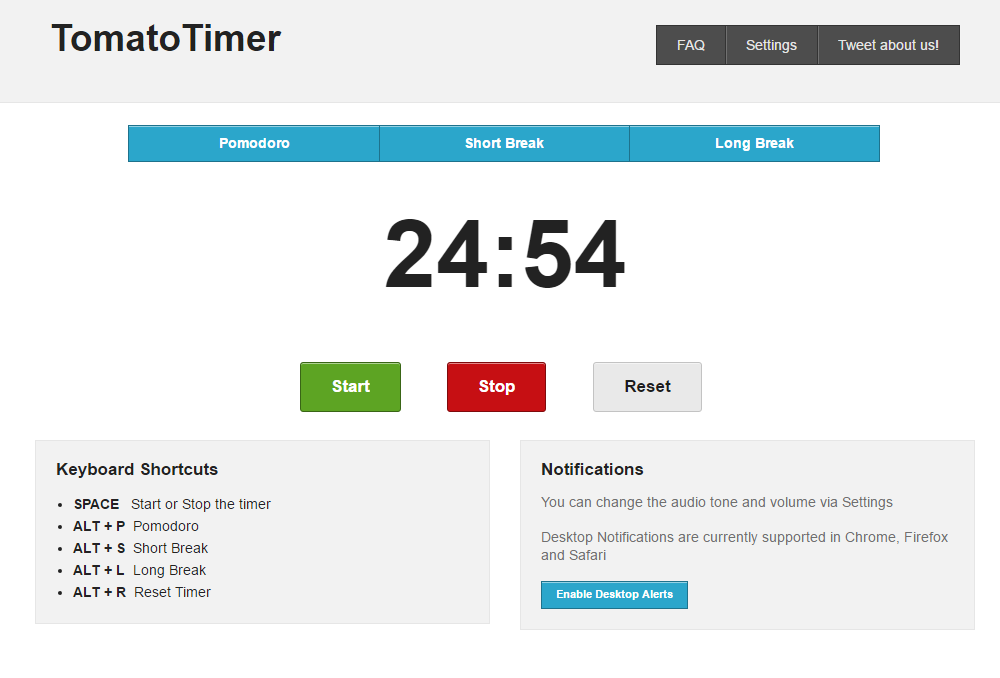
#90. Tomato Timer – There are many productivity techniques you can use to stay focused. One of the most well-known is called the pomodoro technique.
The basic idea is to break up your work into 25-minute periods with 5-minute breaks in between.
It’s a short enough time that you won’t feel too fatigued, but long enough that you maximize the amount of work you can do.
This is a simple timer built for this technique:
Get more high quality backlinks (and the SEO traffic they bring)
The final class of tools in this post focuses on helping you get more links to your content.
Links are a hugely important part of any promotional campaign. Often, links bring you immediate traffic, but they also bring you steady, long-term traffic because they help you rank better in search engines (that’s SEO 101).
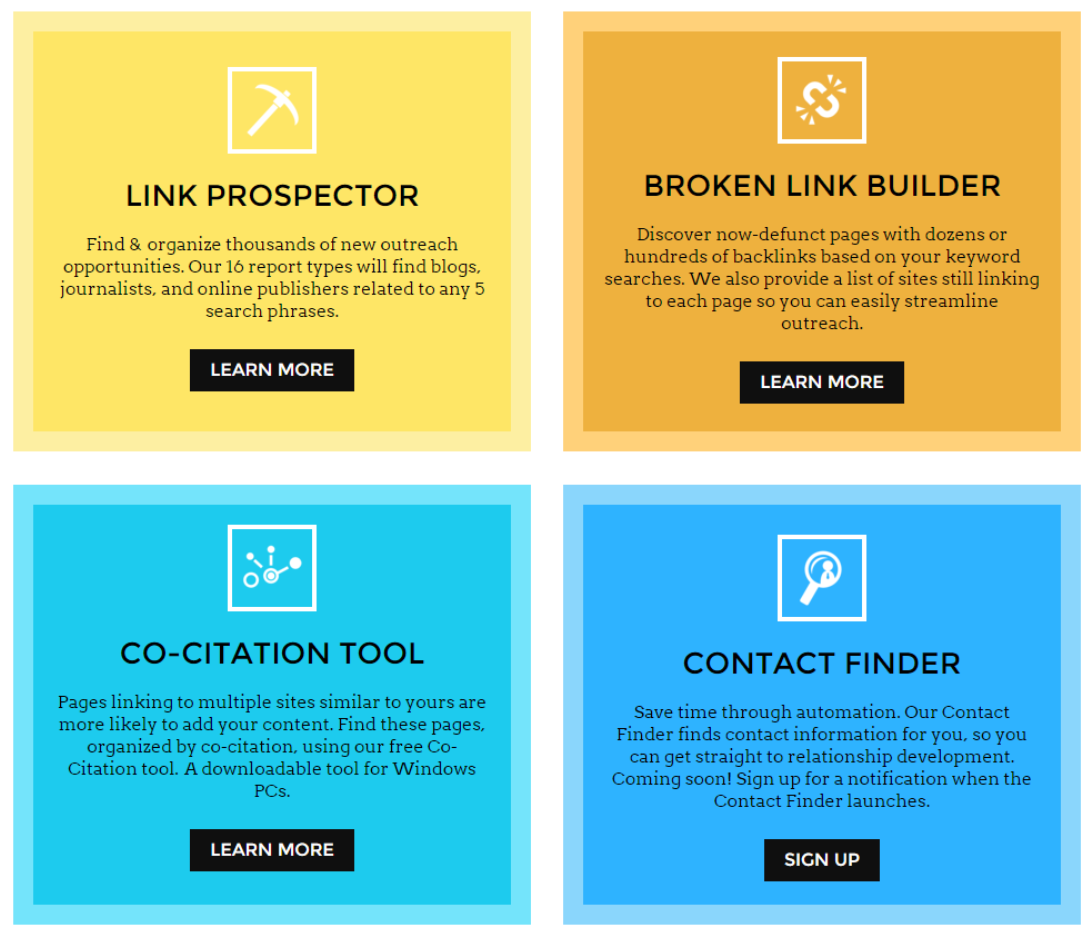
#91. Citation Labs – Citation labs isn’t actually a single tool; they offer many:
However, there are two in particular that are very useful for what we want here.
The first one is the broken link builder tool.
I’ll break down the main features for you quickly here, or you can just watch this 2-minute video:
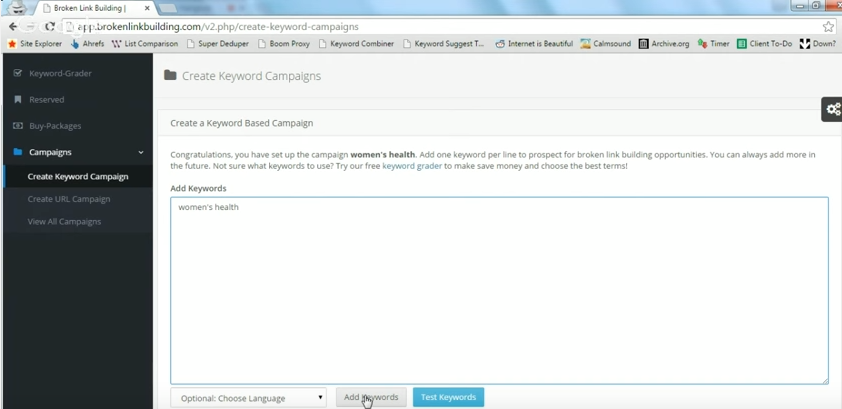
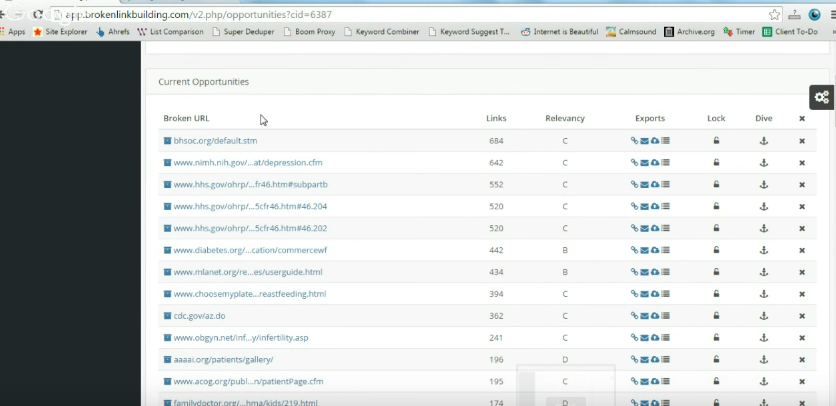
The tool is very simple to use. You add in a keyword or multiple keywords that describe the topic of the content you created:
Then, the tool will bring up a large list of broken URLs. These no longer work the way they’re supposed to.
But there’s one more column of the results that is crucial: the number of links that point to that broken page.
The idea here is to contact as many of those sites that link to the broken page as possible and tell them that their link no longer works. Then, you can suggest your new content as a replacement.
The closer your page is to the old content, the more successful you will be.
The link prospector: This is the second Citation Labs tool that can be useful here.
Again, you search for a keyword that matches your content.
This time, the tool brings up a list of pages and websites that you might be able to get links from:
Some of these will be resource pages. You can just email them and ask them to add your content.
Others might be guest posts. In this case, you will have to pitch your own guest post topic, and then you might be able to link back to your original piece of content.
This tool returns several types of content that are relevant to your content, so if you can get links from any of them, they’ll be useful.
It leaves you quite a bit of work to do yourself, but it will save you some time finding good sites and pages to target for links.
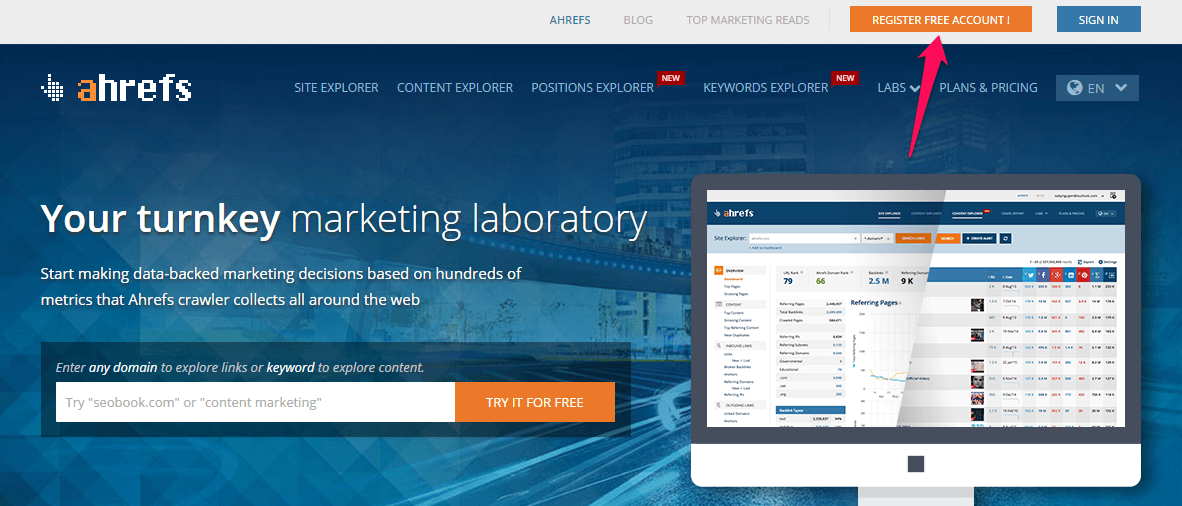
#92. Ahrefs – You can’t do scalable link building without access to a good link database. There are a few different options, but Ahrefs has arguably the most complete database of links.
You can test it out with a free account, but it will be pretty limited. Eventually, you’ll need a paid account, which costs a decent bit. If you want a slightly cheaper option, you can opt for the next tool—Majestic.
There are two main parts of Ahrefs.
The first is the content explorer, which is still relatively new.
When you search for a topic, the tool returns the most popular content in its database that is relevant.
You can sort by the number of social shares on any of the major networks as well as by the number of sites that link to the content.
The most basic way to use this information for promotion is to sort by linking domains and then to look at who linked to each of those results. Then, do email outreach to each of those linking domains, and see if they’d link to your content as well.
The second main part of Ahrefs is the link database, which is what it was originally known for.
Type in any domain or URL into the tool:
It will then return you a ton of useful linking information.
This pairs up nicely with the content explorer because then you can find all the sites that link to each piece of popular content.
You can also order the links by authority so that you only spend time reaching out to pages with a high URL rating that will have a significant effect on your search rankings.
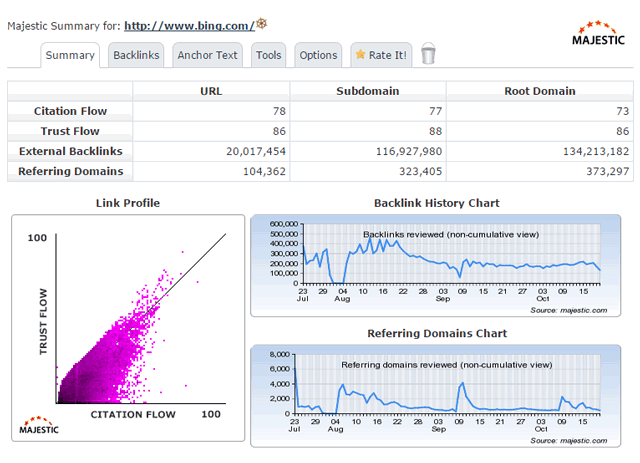
#93. Majestic – This is a realistic alternative to Ahrefs when it comes to a link database. It doesn’t have the content explorer, but it has one of the largest and most useful link databases there is.
It works almost in the same way as Ahrefs does. You input a URL or domain, and the tool returns all the link information it has:
You’ll notice that the tool splits the URL and domain ratings into citation flow and trust flow. It makes it really easy to spot spam links because their trust flow numbers are always much lower than their citation flow numbers.
Again, you can use this in a similar way. Find content that is similar to yours and that has backlinks to it. Then use Majestic to find those backlinks and contact them to try to get one to your content.
Conclusion
Just because you have a content marketing strategy in place doesn’t mean it’s perfect. You should always be on the lookout for tactics and tools that will strengthen your plan.
To fully utilize your skills, you need the right tools to help you out. You wouldn’t ask carpenters to build a house with a spoon; instead, you’d give them hammers and saws.
Hopefully, after reviewing these content marketing tools, you have a better idea of which ones fit best with your current approach and future plans.
Maybe you are seeking a few tools for more efficient content distribution. Or maybe you need one to help with the automation of your processes. Regardless of your situation, there are many options out there.
Good marketers know how to make use of available tools to not only keep their work at a consistently high quality but also save time that could be spent elsewhere.
Browse through 400+ pre-built websites that cover 40+ industries and businesses. From corporate websites to blogs and portfolios, you’ll find exactly what you need to the tiniest detail.
An AI Experiment to draw the world together using the same technology behind QuickDraw and AutoDraw. Read more about it in this tweet by Active Theory.
If you haven’t tried the highly addictive CSS Battle yet, you should definitely do so. Read this article by Sarthak Batra to understand how to approach the first challenge.
Danny Moerkerke argues that the modern Web API has evolved to the point where we don’t necessarily need a framework anymore to create reusable frontend components.
Hyper Editor is a block based, backend independent content editor that is intended to be integrated with any Content Management System (CMS) or Framework.
Google's Cloud Healthcare API is now available in beta. The API is meant to act as a bridge between on-site healthcare systems and applications hosted on Google Cloud. The goal of the API is to give hospitals and other healthcare facilities more analytical power and, in the long term, help them bring new healthcare solutions to the market.
While this post is not sponsored (it is based on Paul’s own personal experience), we have worked with Percy before on a sponsored video, that also goes through the process of setting up Percy on a site. It’s fascinating, powerful, useful stuff and I highly recommend checking it out.
Let me set the stage:
You've pushed some code and all the meticulously unit tests you wrote pass. Fantastic! Let’s get this branch into QA.
You receive a Slack message from your QA team asking why a button is now floating off the screen?
"But... I didn't touch any code in that part of the application," you think to yourself.
Then you remember you did change some CSS.
Panic! What else has changed in the UI? Does this affect iPad? Will Firefox behave differently than Chrome? What about mobile?
This is a very common scenario many of us face when building large-scale applications that deal with different screen sizes and browsers. It’s a Herculean task to test UI for each and every change to code.
What now, throw in the towel and move to the mountains? Thankfully, no. We have Percy to help save the day! And it’s really the best friend we have for testing unexpected outcomes that impact design and layout. Percy has become an indispensable part of my development stack and I convinced CSS-Tricks to let me share some things about it that have made my code stronger and helped prevent errors from shipping.
Plus, it integrates well with other tooling and is a relative breeze to set up. So hang with me a bit as we walk through what Percy is and how to leverage it for your projects.
So, what exactly is Percy?
According to Percy’s site, it’s an “all in one visual review platform."
I’ve found that holds true. What it boils down to is that Percy provides a way to test visual regressions. That’s pretty awesome if you think about it. Many changes to a codebase — especially working with CSS — can introduce breaking changes to a site’s design. If you’ve ever inherited a large legacy stylesheet, modified a class, and hit Save, then you probably have a great idea of how nerve-wracking that can feel. Percy’s goal is to provide confidence in those types of situations where it’s difficult to know all of the UI that depends on the same line of code.
Excited? Let's get started.
Setting up an example site
Let’s set up a little site that Percy can hook into and test some UI we’re going to make together. These days, this couldn't be easier, thanks to Gatsby and Netlify. It is way beyond the scope of this article to do a deep dive into these technologies, but rest assured, they are wonderful as well and can get us online without a bunch of server setup.
Head over over to Netlify templates and click the "Deploy to Netlify" button, which will set up a git repo on your GitHub account and also deploy the app using Netlify.
After completing the setup steps, we should get something like this (after the site is deployed):
Magically, our site is now live! We will use this to get to grips with Percy.
Using CircleCI for automated testing
Percy works best in a continuous integration (CI) environment that will trigger testing based on an action. We will use CircleCI to make it happen by integrating with the example site’s GitHub repo and running the builds, allowing us to test every commit.
The first thing we need to do is clone down our new repo on GitHub, I clone mine as follows:
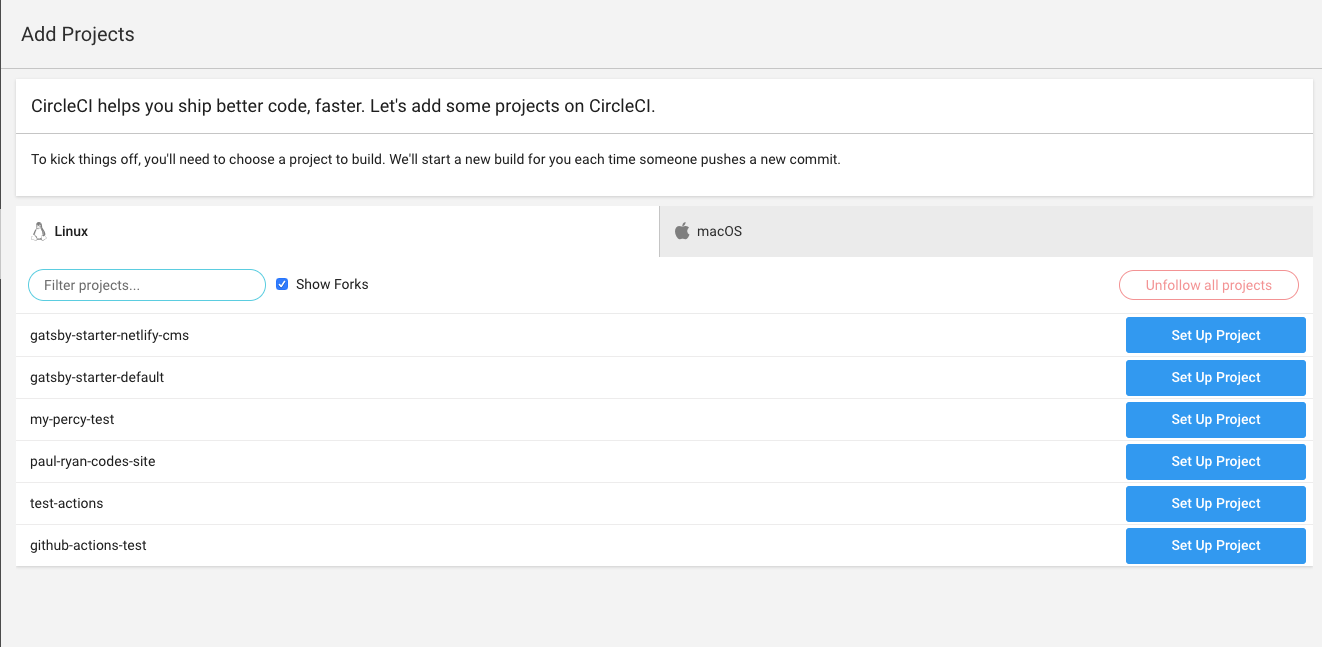
With our repo now cloned, we can head over to CircleCI and sign up with a GitHub account.
We now need to add our project, so click "Add Projects" in the side navigation and you should see a screen like the following screenshot. Find the project we just cloned and click “Set Up Project."
In the Set Up Project area, we want to select Linux as our operating system and Ruby as our language (pery-cli is in Ruby). Here are the rest of the steps for this part:
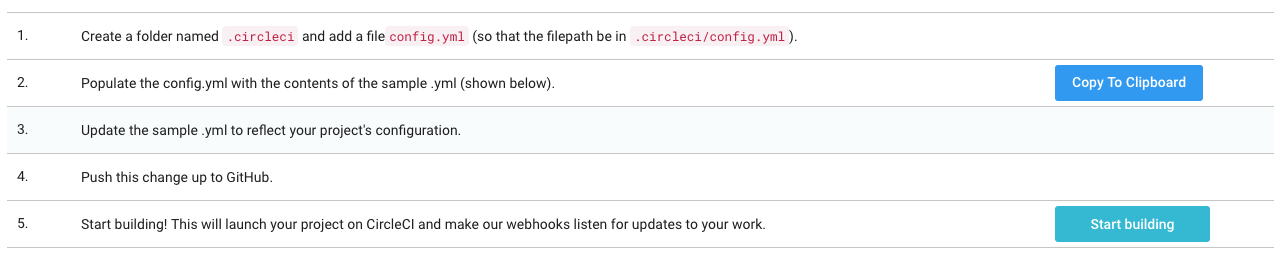
CircleCI tells us that we need a .circleci directory and that we need a config.yml file in it. Create the following structure within your project.
CircleCI offers a configuration snippet to copy and paste for our configuration, but it is far too verbose for us; we only need a simple config.yml file.
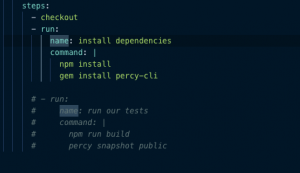
Go ahead and use the following snippet. You’ll see that we install the percy-cli gem along with Percy in our tests:
At first, It took me a while to figure out why my build was failing and turned out I was trying to install percy-cli as an npm module. Yikes!
We now have the CircleCI configuration set up so finally we can start using Percy!
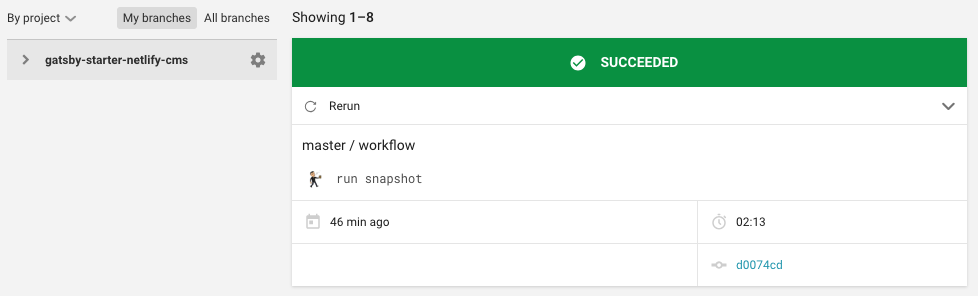
As a sanity check, comment out the run our tests step above and push your code to the master branch.
Now click the "Start building" button which will use the configuration you just pushed to create a build. Here's what you should see in the workflows section:
From here on out, CircleCI will create a build for us whenever we do a push.
Hooking Percy up to CircleCI
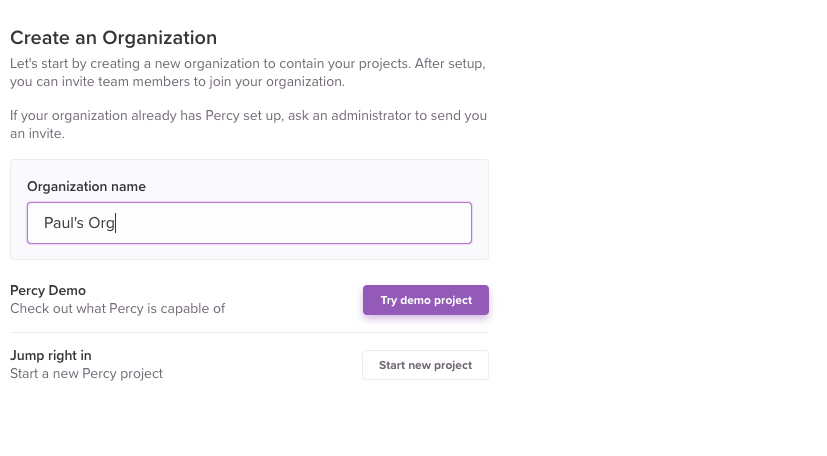
A Percy account is needed to use the service. Head over to Percy’s site and sign up with your GitHub account.
Once signed up, you can create a new organization (if you don't already have one) and call it whatever you want.
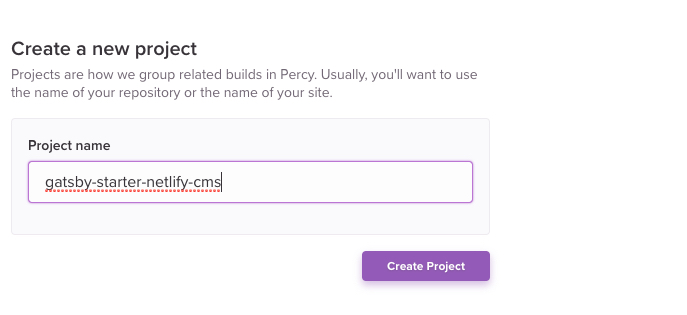
Next thing to do is add a project to the organization. It’s probably a good idea to call the project something matching the name of the repo so that it’s recognizable later.
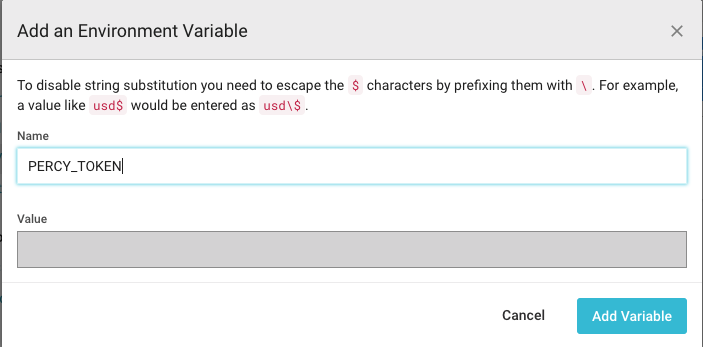
Now we need to add a Percy token to CircleCI. Percy tokens are located under "Project Settings."
My access token is blocked out.
Alright, let’s add the token in CircleCI in Environment Variables under “Build Settings." You can find Build Settings by clicking the gear icon beside your project in the workflows section.
Again, my token is blocked out.
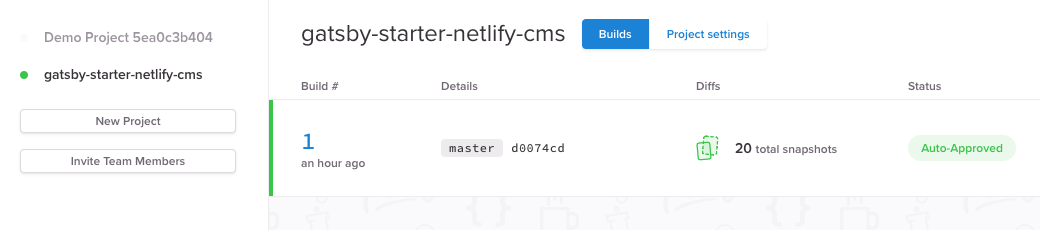
It’s time to run Percy! If you commented out the run our tests line in the config file earlier, then remove the comment because that command will run Percy. Push to master again and then head over to the Percy app — we will see Percy has started its own build for creating snapshots. If all goes well, this is what we should get:
If you click on this build, then you can see all the screens Percy has snapped of the application.
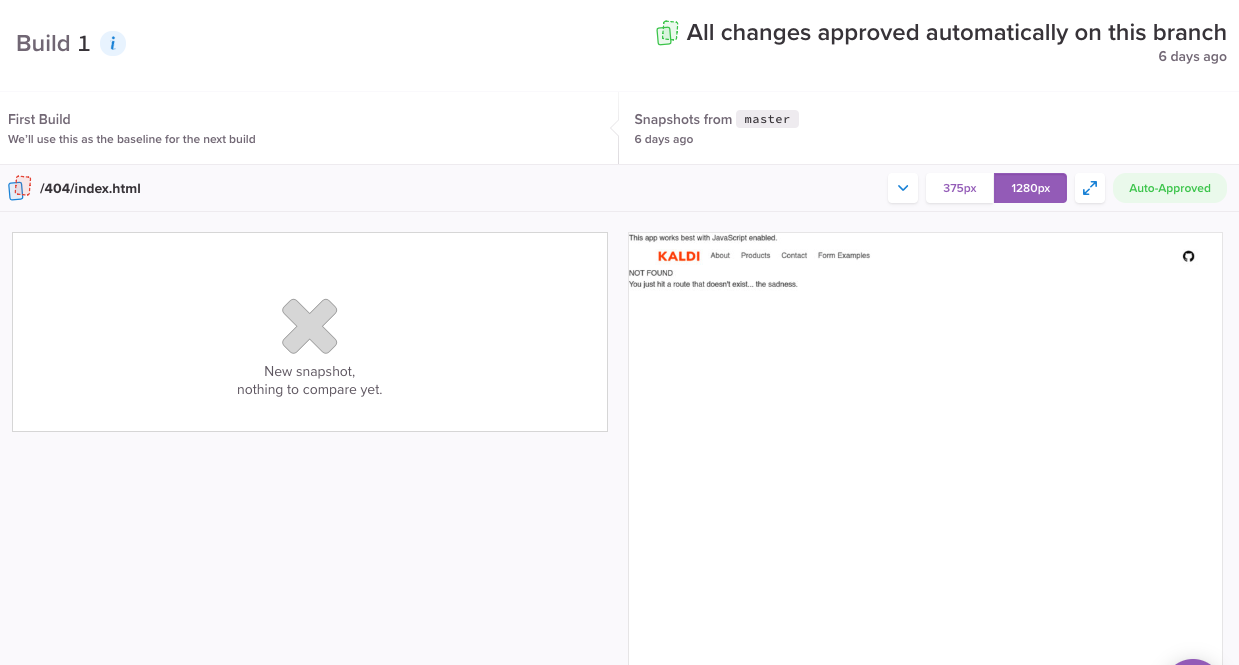
You might be wondering what the deal is with that empty left column. That's where the original screen normally is, but since this is the first test, Percy informs us that there are no previous snapshots to compare.
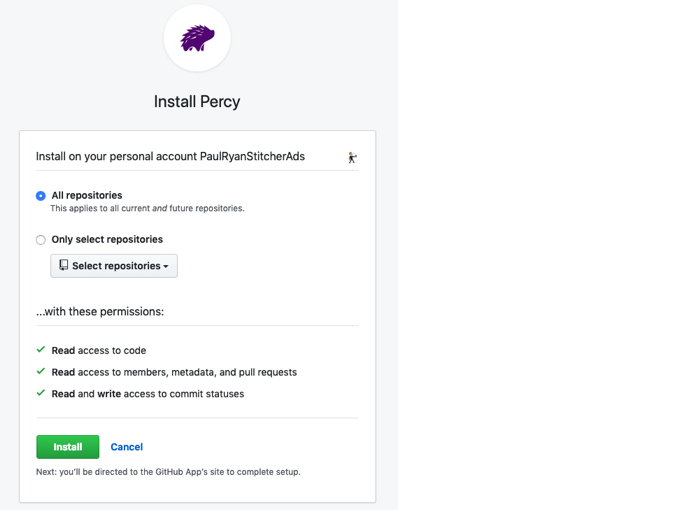
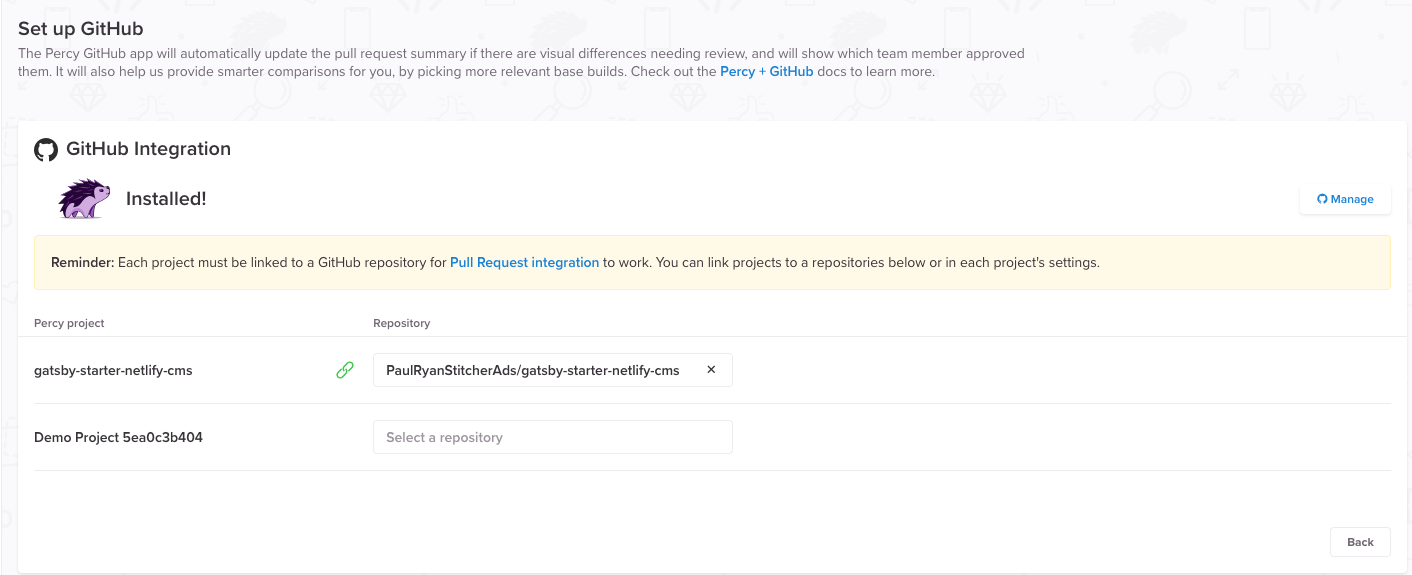
The final thing we need to do to wrap up this connection is link our repo to Percy. So, in Percy, click “Project Settings" then click on the “install an integration" link.
Select the organization and hit install for all repositories:
Finally! We can link to our repository.
Unlocking the true power of Percy
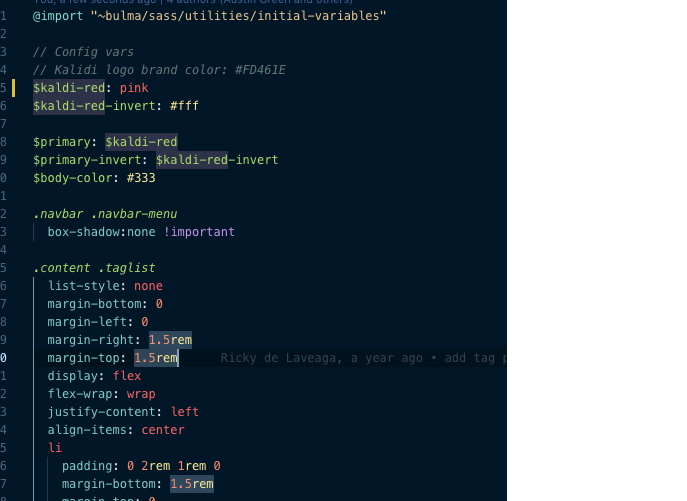
Since we now have everything set up, we can see how Percy can be used in a code review workflow! The first thing we will do is create a branch from master. I’m calling my branch "changing-color."
Go to the /src/components/all.sass file, change Line 5 to use the color pink, then push the change to the repo. This is what we’re going to evaluate in our visual test.
Create a pull request for the change in GitHub.
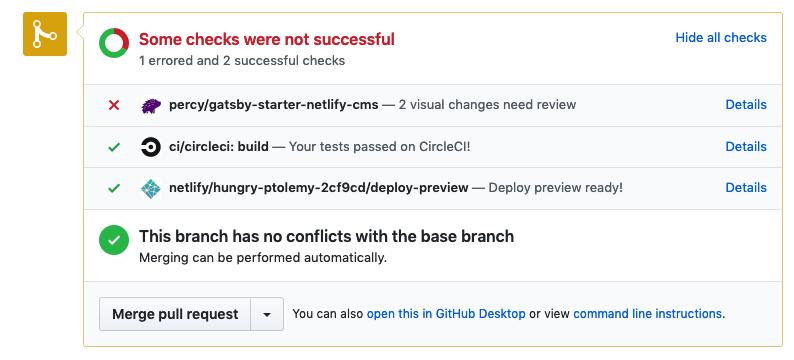
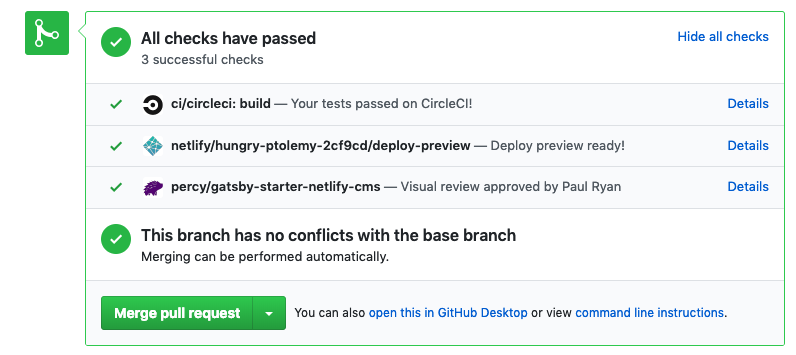
CircleCI is carrying out checks for us but the one we are focused on is the Percy step. It may need a minute or two for Percy to pop up:
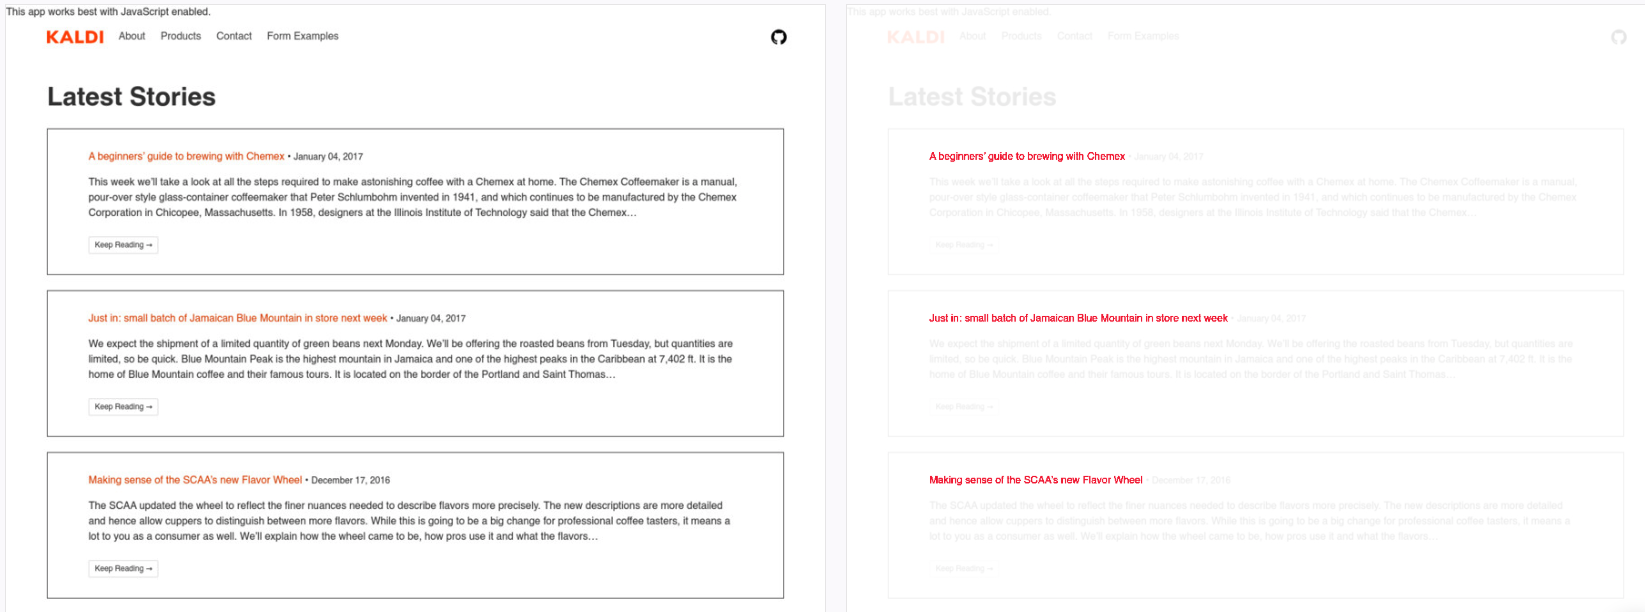
Percy is letting us know that we need to review changes we made, which in this case, is the change from red to pink. We can see the impact of that change:
Although the changes on the right are red, that is highlighting the areas that have been changed to pink. In other words, red is indicating the change rather than the actual appearance.
We can give this a quick glance and then click the “Approve" button which will give us a green tick on GitHub indicating we’re free to merge the pull request.
This is the true power of Percy: allowing us to see the impact of a small change and giving us the option to approve the changes.
Fantastic! We have now taking a tour on how to set Percy up in our projects along with how to integrate CircleCI. I really hope this will save you many headaches in the future when managing your UI.
There’s a lot to love about content management systems, or CMS. Maybe it’s the streamlined web design process: The website builders, themes, and no coding knowledge needed for any of it. Maybe it’s all those nifty plugins that can pull off technical features you’d have no idea where to begin with. But if WordPress just isn’t cutting it, what can you do?
Luckily, there are dozens of quality CMS and website builders out there that can potentially take WordPress’ place, depending on you and your clients’ needs. We’ve collected a few of them below.
Craft’s single best feature is that it’s intuitive – both for you and your clients. WordPress can be difficult to get the hang of and even harder to customize due to its API. But Craft starts with nothing and allows you to add pieces as you need them. Third-party themes and plugins are there too!
The only trouble is the price tag. This is not something you want if you’re working with small projects. But give the free version a spin on your own time and see if it’s something you’d enjoy working with.
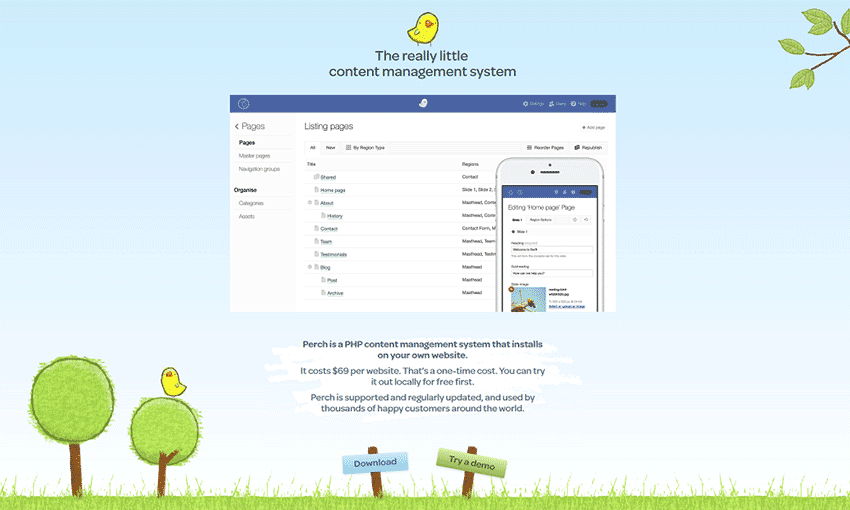
Need all the benefits of a CMS without having to deal with one during the design process? Create your website first and foremost, then add Perch to it later. Your clients get the simple interface and you get to design the site yourself.
Webflow was built as a comprehensive tool for freelance web designers. Design a site without ever touching code, build it with a CMS, and deploy to your clients with hosting available right from Webflow. It works great for small design teams, too!
Bolt CMS is defined by its simplicity. The code is simple and not bogged down with features you don’t need – but they’re easily added if you want them. This CMS use Twig to craft templates, so you can code them yourself from scratch. And editing the sites you create is super easy. No more frustrated clients! Plus, the platform is free and open source.
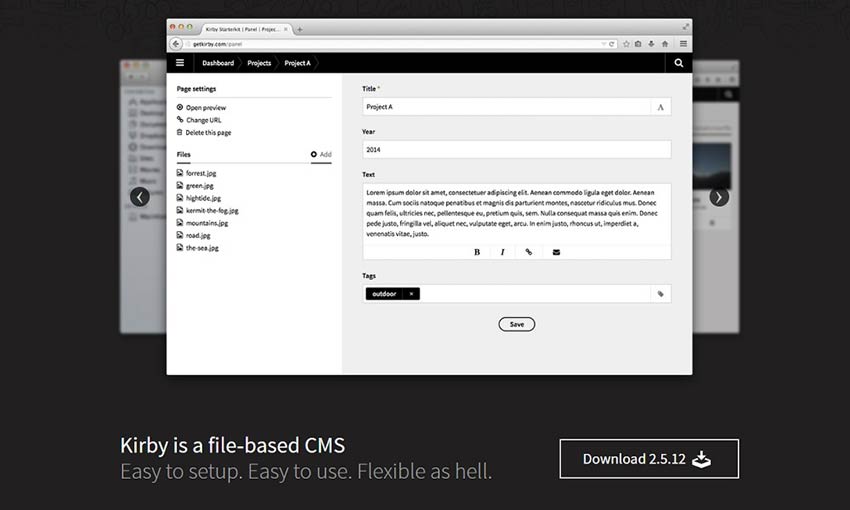
If your biggest woe with WordPress is the difficult installation process, Kirby might be what you’re looking for. It’s lightweight and super easy to set up on a server. No more 5000-step installation guides. There are no databases to contend with and the admin panel is reasonably client-friendly too. Kirby, however, is best for designers who can do some coding in PHP.
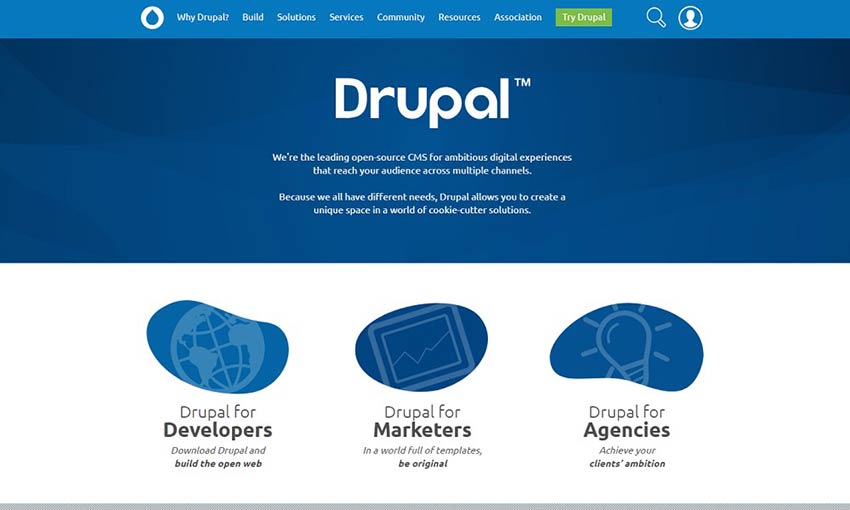
Drupal is not easy to learn as a web designer, especially if you’re used to WordPress. However, when you need a CMS that is capable of running websites that WordPress can’t, Drupal is the go-to option. It has a large following, a ton of modules, and way more advanced functionality. If you’re building simple, static websites, another CMS may be the best choice. But if you found WordPress not powerful enough, try Drupal.
While Squarespace offers drastically less flexibility compared to WordPress, it is considerably more client-friendly, as well as less prone to bugs and incompatibilities. The hosted service is not particularly expensive, either. Once you’ve created three websites for clients, Squarespace Circle becomes open to you. The circle can be a great opportunity to get your name out there and collaborate with other designers.
WordPress isn’t the only CMS!
For web designers, there’s always another option. Many feel they can’t pass up WordPress with all its popularity, but these platforms are a great alternative. There’s something for all the theme developers and web designers out there who definitely need a CMS, but no longer want to use WordPress. This list is just the tip of the iceberg!
Securing your website with a simple file backup is not enough. You need to go an extra mile to ensure that you do not ruin your reputation because getting hacked affects your SEO ranking. Here are simple ways that will help you to secure your WordPress website in 2019.
Unique passwords
When creating WordPress account passwords, use unique combinations. This is the part to play with sophisticated ideas that hackers cannot guess. Instead of using letters and numbers alone, sprinkle in symbols in a unique pattern.
Once you have a password, try to remember it. Do not save your password on Google. Similarly, change your password on a regular basis. It helps you to secure private client information and to keep your website free from hackers.
The two-factor authentication
It is imperative that you practice the two-factor authentication strategy. This involves having a password at two different security levels to verify your account. Remember, there are different ways to authenticate your account. They include using a secret question, a secret code on your mobile phone and an email verification through a unique code. While this process can be hectic, it plays a significant role in enhancing the security of your WordPress website in 2019.
Embrace core automatic updates
Hackers are always trying out new hacking techniques. For this reason, it is imperative that you update your apps whenever there are formal updates from Google and other related sources. It helps you to stay up to date with WordPress. Lucky enough, most automatic updates are usually set on as default and you are assured of important notifications. However, you need to always check on your WordPress settings to ensure that you haven’t switched off your notifications.
Limit your login attempts
In a WordPress website, you and other users are allowed to try to log in as much as you can. While this gives users a convenient approach to access their accounts, it also exposes your website to hackers. Therefore, to avoid creating security loopholes, it is wise that you limit your login attempts. Use different free plugins to limit attempts and by doing so, hackers will have very few chances of hacking your account.
Customize your URL address
It is always advisable that you customize your URL address or login page to keep hackers away. Ensure the page cannot be seen in the site’s main URL because it makes it vulnerable to hackers. However, if you customize the page, you are making it safe and unbreakable. Therefore, set up iThemes Security plugins or create a unique custom URL for example, my-custom-login. The former changes your login URL automatically.
Most importantly, do not use common names such as ‘admin’ as your username. In the event where you have already used the default admin name, it is recommended that you update it immediately using PHPMyAdmin and replace it by something much more unique and difficult for hackers to crack.
Switch to HTTPS
HTTPS protects your WordPress website from different security attacks and hackers. It offers a high level of encryption between your web server and browser, therefore, keeping attackers away. It also prevents the unauthorized transfer of data from one server to the other.
HTTPS also protects your WordPress site from various hidden scripts on your computer system.
With these security ideas, you can avoid a security breach on your WordPress website. Protect your admin and login page with the ideal security tools and apps to stay safe.
One of Google PageSpeed Insights performance suggestions is to defer offscreen images in WordPress with lazy loading.
Lazy loading images in WordPress lowers the initial load time and page payload, without sacrificing content. Lazy loading improves your visitor’s experience, by serving only what your visitors need when they need it. It’s way more efficient than the load-all-the-images-just-in-case approach that results in a slow loading image traffic jam.
In this post, I’m going to show you how lazy loading can improve page performance and how it works. Then we’ll look at how to lazy load your images in WordPress.
What is Lazy Loading?
Lazy loading is a technique for improving initial page speed and payload by deferring the loading of non-critical assets that are “below-the-fold” or in other words, everything that is not currently in the browser viewport. To defer offscreen images in WordPress basically means to wait to load the images we can’t see yet.
Notice I said assets and not images because a lot of things on your webpage can be lazy loaded, so long as they’re not needed to serve up the site layout and the top of the webpage that your visitor first sees.
Images are an ideal use case for lazy loading because they’re so resource intensive. Videos, scripts, and comments are also ideal candidates because they tend to add a lot of weight to a webpage.
With lazy loading, an asset doesn’t load until the moment is needed, but if the user never reaches it, then it is never loaded at all.
Why is Lazy Loading Better Than Regular Loading?
Lazy loading your images in WordPress improves site performance, SEO and your visitor’s experience.
Lazy loading serves up a much lighter initial webpage and adds elements as needed. With lazy loading, the browser will first build the DOM so your user can begin interacting with your site, even when the full page isn’t finished loading.
Lazy loading doesn’t actually make your image files or your webpage file size smaller. If you have a 3MB page size, that’s how big your page will be with or without lazy loading. This isn’t like compressing images. But lazy loading will greatly improve how your user perceives your site. It feels faster and that may just be enough to keep them on the page.
Google also uses pages peed as a ranking factor and recommends lazy loading images in order to improve performance. We also know that Google rewards faster sites with higher rankings, so lazy loading your images is a way to indirectly improve your image SEO.
Lazy loading also uses less data. Your visitors who are using a slow mobile connection will thank you. Lazy loading cuts down the resources used when a visitor doesn’t load all your images because they stopped browsing and moved on to the next page.
How Does Lazy Loading Work?
Here’s how you would defer offscreen images in WordPress without a plugin.
First off, you need to determine what images you want to lazy load. You should lazy load any images that are not visible in the viewport and do not contribute to the structure of your page. For example, logo images in the header or hero images above your body text should not be lazy loaded. To provide the best user experience, you should also load images that are within about 500px of the viewport, so they have time to load before the visitor gets to them.
Prevent Images from Loading the Normal Way
When you utilize lazy loading, you need to prevent images from loading the regular way on your site. One way to do this for images utilizing the <img> tag is by removing the image URL from the src attribute and moving it to another attribute, such as data-src, to be stored there temporarily.
Determine How the Browser will Detect Images in the Viewport
The next thing you need to do is address how the browser will determine if the image has entered the viewport. You can use either a Javascript Event Handler or the Intersection Observer API.
JavaScript Event Handler
If browser compatibility is crucial, then using the scroll, resize and orientationchange JavaScript event handlers are the ideal way to determine if an element has reached the viewport because this method is compatible with all browsers. Unfortunately, this requires that you include an additional step to detect element visibility using getBoundingClientRect. It can also cause a slight delay when rendering images. You can see an example here.
The Intersection Observer API
The Intersection Observer API is the modern and most efficient way for compatible browsers to figure out when an image has crossed into the viewport. It’s also faster than using event handlers. You’ll write way less code because you can skip the part where you have to come up with an image visibility detection method and just register an observer to watch the elements and determine what the browser should do when the image is visible.
The Intersection Observer API has pretty good support among browsers, but it hasn’t been universally adopted yet, so you may need to use Javascript event handlers as a fallback for non-compatible browsers.
Move the Image URL to the src Attribute
Once the browser detects that the image is “on stage” or close to it, then it’s time to pull the image URL into the src or srcset attribute so that the image can be downloaded and rendered. When this is done, we can remove any classes added to the image to help your JavaScript code identify it, and remove the observer.
How to Lazy Load Images in WordPress
Lazy loading can be added to your WordPress site with plugins or Javascript. All produce similar results. Lazy loading is relatively easy to implement, so even if you opt for a plugin, the file sizes are generally around 1-3kb and therefore light.
Option 1: Use Plain JavaScript to Defer Offscreen Images in WordPress
If you’re comfortable using straight JavaScript and want full control, you can add lazy loading directly to your site. The best way to add this functionality is to create a plugin for your JavaScript code of course. There are two examples on this page. One shows you how to use event handlers and the other shows you how to use the Intersection Observer API.
Option 2: Use JavaScript Lazy Loading Library
If you want to use a JavaScript library to help, there’s a lot to choose from. Many adhere to the process I’ve described above so you can get started quickly.
react-lazyload – A React lazy loading library, doesn’t use Intersection Observer
lozad.js – Only uses Intersection Observer, super lightweight
blazy – Also super lightweight, but doesn’t use Intersection Observer
yall.js – Uses Intersection Observer and falls back to event handlers
But by far the easiest way to get started with lazy loading is to use a WordPress plugin. Most premium image optimization plugins, like Smush Pro, have lazy loading built right in. We’ve also included it in our free version of Smush on WordPress.org
To activate lazy loading with Smush, we’ve made the process super duper simple. All you need to do is go to the Lazy Loading section in Smush Pro and push the Activate button.
Install Smush Pro and get lazy loading in less than 2 minutes
That’s it. If you want more control over what images are lazy loaded, you’ll have additional options available once you activate lazy loading. When you activate lazy loading in Smush Pro you’ll also lazy load your images for mobile users.
Things to Watch Out for When Lazy Loading Images
While lazy loading may not add extra weight that slows down your site, it can interfere with the search engine’s ability to crawl your site if not done correctly.
When trying to keep images above the fold, the fold varies by device, so keep this in mind when you’re trying to decide what images to defer.
Use a placeholder image instead of leaving the src attribute blank. And specify a height and width for your image so your content doesn’t shift as your images load.
Use <noscript> markup to specify what should happen if your visitor has JavaScript disabled.
That’s All
Deferring offscreen images and other assets is a great and easy way to improve your site performance. This technique will work for all the images in an <img> tag on your site, from images on your home page to the images in your posts and pages. If you want to lazy load background images in CSS, you’ll use a similar technique, but you’ll use CSS identifiers to target the images. Here’s an example of how to lazy load background images.
The easiest way to get started with lazy loading is with Smush free or Smush Pro. Smush Pro adds other features that can help you with other Google PageSpeed Insights opportunities. It can help you serve images in next-gen formats by converting your images to WebP files and properly size images by scaling your images with the Smush Pro CDN. Smush Pro is even compatible with the popular WP Retina 2x plugin, so you can lazy load those huge Retina images without slowing down WordPress.
Digging Into The Display Property: The Two Values Of Display
Digging Into The Display Property: The Two Values Of Display
Rachel Andrew
A flex or grid layout starts out with you declaring display: flex or display: grid. These layout methods are values of the CSS display property. We tend not to talk about this property on its own very much, instead concentrating on the values of flex or grid, however, there are some interesting things to understand about display and how it is defined that will make your life much easier as you use CSS for layout.
In this article, the first in a short series, I’m going to take a look at the way that the values of display are defined in the Level 3 specification. This is a change to how we defined display in earlier versions of CSS. While it may seem unusual at first for those of us who have been doing CSS for many years, I think these changes really help to explain what is going on when we change the value of display on an element.
Block And Inline Elements
One of the first things we teach people who are new to CSS are the concepts of block and inline elements. We will explain that some elements on the page are display: block and they have certain features because of this. They stretch out in the inline direction, taking up as much space as is available to them. They break onto a new line; we can give them width, height, margin as well as padding, and these properties will push other elements on the page away from them.
We also know that some elements are display: inline. Inline elements are like words in a sentence; they don’t break onto a new line, but instead reserve a character of white space between them. If you add margins and padding, this will display but it won’t push other elements away.
The behavior of block and inline elements is fundamental to CSS and the fact that a properly marked up HTML document will be readable by default. This layout is referred to as “Block and Inline Layout” or “Normal Flow” because this is the way that elements lay themselves out if we don’t do anything else to them.
Inner And Outer Values Of display
We understand block and inline elements, but what happens if we make an item display: grid? Is this something completely different? If we look at a component on which we have specified display: grid, in terms of the parent element in the layout it behaves like a block level element. The element will stretch out and take up as much space in the inline dimension as is available, it will start on a new line. It behaves just like a block element in terms of how it behaves alongside the rest of the layout. We haven’t said display: block though, or have we?
It turns out that we have. In Level 3 of the Display specification, the value of display is defined as two keywords. These keywords define the outer value of display, which will be inline or block and therefore define how the element behaves in the layout alongside other elements. They also define the inner value of the element — or how the direct children of that element behave.
This means that when you say display: grid, what you are really saying is display: block grid. You are asking for a block level grid container. An element that will have all of the block attributes — you can give it height and width, margin and padding, and it will stretch to fill the container. The children of that container, however, have been given the inner value of grid so they become grid items. How those grid items behave is defined in the CSS Grid Specification: the display spec gives us a way to tell the browser that this is the layout method we want to use.
I think that this way of thinking about display is incredibly helpful; it directly explains what we are doing with various layout methods. If you were to specify display: inline flex, what would you expect? Hopefully, a box that behaves as an inline element, with children that are flex items.
There are a few other things neatly explained by thinking about display in this new way, and I’ll take a look at some of these in the rest of this article.
We Are Always Going Back To Normal Flow
When thinking about these inner and outer display properties, it can be helpful to consider what happens if we don’t mess around with the value of display at all. If you write some HTML and view it in a browser, what you get is Block and Inline Layout, or Normal Flow. The elements display as block or inline elements.
The example below contains some markup that I have turned into a media object, by making the divdisplay: flex (the two direct children) now become flex items, so the image is now in a row with the content. If you see in the content, however, there is a heading and a paragraph which are displaying in normal flow again. The direct children of the media object became flex items; their children return to normal flow unless we change the value of display on the flex item. The flex container itself is a block box, as you can see by the fact the border extends to the edge of its parent.
If you work with this process, the fact that elements on your page will lay themselves out with this nice readable normal flow layout, rather than fighting against it and trying to place everything, CSS is much easier. You are also less likely to fall into accessibility issues, as you are working with the document order, which is exactly what a screen reader or a person tabbing through the document is doing.
Explaining flow-root And inline-block
The value of inline-block is also likely to be familiar to many of us who have been doing CSS for a while. This value is a way to get some of the block behavior on an inline element. For example, an inline-block element can have a width and a height. An element with display: inline-block also behaves in an interesting way in that it creates a Block Formatting Content (BFC).
A BFC does some useful things in terms of layout, for example, it contains floats. To read about Block Formatting Contexts in more detail see my previous article “Understanding CSS Layout And The Block Formatting Context.” Therefore saying display: inline-block gives you an inline box which also establishes a BFC.
As you will discover (if you read the above-mentioned article about the Block Formatting Context), there is a newer value of display which also explicitly creates a BFC. This is the value of flow-root. This value creates a BFC on a block, rather than an inline element.
display: inline-block gives you a BFC on an inline box.
display: flow-root gives you a BFC on a block box.
You are now probably thinking that is all a bit confusing: why do we have two completely different keywords here, and what happened to the two-value syntax we were talking about before? This leads neatly into the next thing I need to explain about display, i.e. the fact that CSS has a history we need to deal with in terms of the display property.
Legacy Values Of Display
The CSS2 Specification detailed the following values for the display property:
inline
block
inline-block
list-item
none
table
inline-table
Also defined were the various table internal properties such as table-cell which we are not dealing with in this article.
We then added to these some values for display, to support flex and grid layout:
grid
inline-grid
flex
inline-flex
Note: The specification also defines ruby and inline-ruby to support Ruby Text which you can read about in the Ruby specification.
These are all single values for the display property, defined before the specification was updated to explain CSS Layout in this way. Something very important about CSS is the fact that we don’t go around breaking the web; we can’t simply change things. We can’t suddenly decide that everyone should use this new two-value syntax and therefore every website ever built that used the single value syntax will break unless a developer goes back and fixes it!
While thinking about this problem, you may enjoy this list of mistakes in the design of CSS which are less mistakes in many cases as things that were designed without a crystal ball to see into the future! However, the fact is that we can’t break the web, which is why we have this situation where right now browsers support a set of single values for display, and the specification is moving to two values for display.
The way we get around this is to specify legacy and short values for display, which includes all of these single values. This means that a mapping can be defined between single values and new two keyword values. Which gives us the following table of values:
Single Value
Two-Keyword Values
Description
block
block flow
Block box with normal flow inner
flow-root
block flow-root
Block box defining a BFC
inline
inline flow
Inline box with normal flow inner
inline-block
inline flow-root
Inline box defining a BFC
list-item
block flow list-item
Block box with normal flow inner and additional marker box
flex
block flex
Block box with inner flex layout
inline-flex
inline flex
Inline box with inner flex layout
grid
block grid
Block box with inner grid layout
inline-grid
inline grid
Inline box with inner grid layout
table
block table
Block box with inner table layout
inline-table
inline table
Inline box with inner table layout
To explain how this works, we can think about a grid container. In the two-value world, we would create a block level grid container with:
.container {
    display: block grid;
}
However, the legacy keyword means that the following does the same thing:
.container {
    display: grid;
}
If, instead, we wanted an inline grid container, in the two-value world we would use:
.container {
    display: inline grid;
}
And if using the legacy values:
.container {
    display: inline-grid;
}
We can now go back to where this conversation began and look at display: inline-block. Looking at the table, you can see that this is defined in the two-value world as display: inline flow-root. It now matches display: flow-root which in a two-value world would be display: block flow-root. A little bit of tidying up and clarification of how these things are defined. A refactoring of CSS, if you like.
Browser Support For The Two-Value Syntax
As yet, browsers do not support the two-value syntax for the display property. The implementation bug for Firefox can be found here. Implementation — when it happens — would essentially involve aliasing the legacy values to the two-value versions. It’s likely to be a good while, therefore, before you can actually use these two-value versions in your code. However, that really isn’t the point of this article. Instead, I think that looking at the values of display in the light of the two-value model helps explain much of what is going on.
When you define layout on a box in CSS, you are defining what happens to this box in terms of how it behaves in relation to all of the other boxes in the layout. You are also defining how the children of that box behave. You can think in this way long before you can explicitly declare the values as two separate things, as the legacy keywords map to those values, and it will help you understand what happens when you change the value of display.
Do you want to add a Google Maps store locator to your WordPress website?
A store locator is a map pointing to your business location. If you run a local business, it will help your users to find you on the map, get driving directions, and share your location.
In this article, we will show you how to easily add a Google Maps store locator in WordPress.
Why Add Google Maps Store Locator in WordPress?
A lot of WordPress users run small business websites that serve a particular town or region. This includes businesses like restaurants, real estate agents, plumbers, maintenance service providers, small stores, salons, and more.
Adding a Google Maps store locator to your site will help your users to find you. They will be able to get driving directions to your store and share the location with their friends.
It can also help improve your site’s search engine visibility and attract more website visitors.
Let’s take a look at how to add a Google Maps store locator on your WordPress site. We’ll show you both free and paid methods with their pros and cons, then you can choose the one that best suits your needs.
Method 1: Adding a Simple Store Locator to WordPress (Free)
This method is free and easy because it doesn’t require the extra effort of creating a Google Maps API key. It’s recommended for users who want to add a simple map of their store location.
First, you need to visit the Google Maps website on your computer. Next, enter your store’s address in the search field and Google Maps will show it on the map with a pinned marker.
Make sure that the marker is placed in the correct location. You can select a zoom level by clicking the zoom buttons in the bottom right corner.
Once you are satisfied with how the map looks, you need to click on the share button from the left column. This will bring up a popup where you need to switch to the ‘Embed a Map’ tab.
You will now see your searched location on the map with HTML code. You should click the ‘Copy HTML’ link to get the embed code.
Now head over to the admin area of your WordPress website and edit the post or page where you want to display the store locator map.
On the post edit screen, you need to add a ‘Custom HTML’ block.
You should paste the code you copied from Google Maps into the text area of the ‘Custom HTML’ block.
You can now preview the page to see Google Maps embedded into your page. It will show your store location marked on the map with links to get directions there or to save the location.
This method works for quickly embedding Google maps, but it doesn’t give you maximum SEO benefits. In other words, it won’t help you to rank higher and get more traffic from search engines or Google map searches.
If you’re a small business, restaurant, or online store in one or more physical locations, then we recommend using the next solution to improve your local SEO rankings.
Method 2: Adding a Store Locator With Local SEO (Recommended)
Nearly 46% of all searches on Google have local intent. All in One SEO (AIOSEO) is the best WordPress SEO plugin on the market and helps you bring more free traffic from search engines to your website.
With AIOSEO, you can enter your store locations, contact details, and business hours using schema markup so that information is displayed on search engine results pages.
For example, when you search Google for ‘Mcdonald’s locations in Florida,’ you will be shown a featured snippet with the different destinations and a map with pinned locations.
Upon activation, the plugin will run a setup wizard. If you need help configuring the plugin, then please take a look at our guide on how to set up AIOSEO for WordPress.
Once the setup process is complete, you’ll need to head over to All in One SEO » Local SEO on your WordPress dashboard.
You can click the ‘Activate Local SEO’ button to get started configuring the local settings.
Next, you need to click the ‘Maps’ tab at the top Local SEO page.
On the Maps page, you should see the ‘API Key’ field.
You can obtain an API key for Google Maps by going to the Google Maps Platform and logging in with your Google account.
After that, you should click the ‘Get Started’ button.
Google Cloud resources are organized by project. If you don’t already have a project, then one will be created for you automatically.
Note that you will need to enable billing for the project in order to use the Google Maps API. However, it’s unlikely you will ever pay anything.
You need to click the ‘Create Billing Account’ button.
You will now see the Account Information page. You should select your country from the drop-down menu and agree to the terms of service.
When you’re ready, click the ‘Continue’ button.
Now you need to select an existing payments profile or create a new one.
The profile will be either for an individual or a business and will include the name of the individual or business, a payment method, and an address.
Once you’ve entered that information, you need to click the ‘Start My Free Trial’ button.
Don’t worry about the ‘Free Trial’ wording. Map embed requests remain free even when the free trial has ended, and your credit card will never be charged until you manually upgrade to a paid account.
You may also be asked to fill in a 30-second survey of your business to make sure you are given the most relevant information.
When you click the ‘Submit’ button, your Google Maps API key will be displayed. You will need to enter this key into the plugin settings for Methods 2 and 3.
Then, you can click the ‘Copy to Clipboard’ icon at the end of the ‘Your API Key’ field. Once you’ve done that, just dismiss the popup by clicking the ‘Go to Google Maps Platform’ button.
Restricting Your Google Maps API Key
We recommend that you restrict the key so that it can’t be used by others.
After you create your API key, Google will show a ‘Protect your API key’ popup where you can restrict your key so it only works on your own website.
In the ‘Select restriction type’ drop down, you need to select ‘HTTP referrers (web sites).’ Then in the next field, you should type your website domain name into the ‘New item’ field using the pattern *example.com/*.
You should see a message saying, ‘Successfully restricted your API key.’ Now the key will only work for Google Maps embedded on your specific website.
Back on your website, you should enter your API key in the field. Next, you can scroll down to edit the map settings.
AIOSEO lets you display Google Maps using a Gutenberg (WordPress editor) block, shortcode, widget, or PHP code. It also lets you choose different map styles and add a custom marker to your map.
For this tutorial, make sure the ‘Gutenberg Block’ setting is selected. Don’t forget to click the ‘Save Changes’ button when you’re done.
Now you can create your store locator map. How you do this depends on whether your business has just one store or multiple locations.
Adding a Map for a Single Location
If your business operates out of a single physical location, then the map will use the information you provide on All in One SEO’s ‘Locations Settings’ page.
Go ahead now and switch to the ‘Locations’ tab of the All in One SEO » Local SEO page.
Since you have a single physical location, you should make sure that the ‘Multiple Locations’ option is set to ‘No’.
Next, you should scroll down to the ‘Business Info’ section and fill in as much information about your business as possible.
This is important because the information may be displayed when someone searches for your business using Google search or Google Maps.
After that, scroll down to the ‘Maps’ section to pin your exact location.
Simply enter your address in the ‘Enter a query’ field. A pin will be added at that location, and you can move the pin by dragging it to a new location if necessary.
When you’re finished, you need to scroll to the top or bottom of the page and click the ‘Save Changes’ button to store your settings.
Now you can add your store locator map to any WordPress post or page. To start, simply edit or add a new post or page on your website.
Once you’re in the block editor, click the ‘+’ button at the top and add the ‘AIOSEO Local – Map’ block anywhere on the page. Make sure you click the ‘Update’ or ‘Publish’ button when you’re finished.
Congratulations, you have successfully added a Google Maps store locator to your site.
Adding Maps for Multiple Locations
To add a map for a different location, you need to navigate to the Locations tab of the All in One SEO » Local SEO page. Once there, you need to click the ‘Yes’ option for Multiple Locations, and then click the ‘Save Changes’ button at the top of the screen.
Once you save your changes, you will notice that a new Locations custom post type has been added to the admin sidebar. This is where you will enter your business locations.
Go ahead and navigate to Locations » All Locations and then click the ‘Add New’ button.
This will take you to the Locations editor. You will need to add a title for the location you are adding, such as the name of the store or the town.
Now you should scroll down to the ‘AIOSEO Local Business’ section of the page, under the post content.
Make sure you enter as much information as possible because it may be displayed when someone searches for your business in Google search or Google Maps.
After that, you should find the ‘Maps’ section and enter your address in the ‘Enter a query’ field.
A pin will be displayed at that location.
After entering your location on the map and adding location information, go ahead and click the ‘Publish’ button.
You can now repeat this step and add your other business locations.
Once you’ve finished, you can add a store locator map to your website for each location by using the ‘AIOSEO Local – Map’ block in the WordPress editor.
Now you will need to choose which location to display on the map.
To do that, look at the block settings pane on the right of the screen, and choose the store you wish to display from the ‘Location’ drop-down menu.
Simply add additional local map blocks for any other locations. Don’t forget to click the ‘Publish’ or ‘Update’ button at the top of the page to display the maps on your website.
Method 3: Displaying Multiple Store Locations on a Single Map
The first two methods let you add store locator maps with a single location. If you have multiple locations, then you need to add a separate map for each one.
Alternatively, you can use our third method to display multiple locations on a single map.
On activation, you need to visit Locatoraid » Configuration and set up the plugin.
In the ‘Google Maps’ tab, you’ll need to paste a Google Maps API key. You can follow the method above in Method 2 to create one.
Then you need to click the ‘Save’ icon to store the key. You should notice that Google Maps is able to load correctly in the ‘Map Style Preview’ window.
Next, you can visit the ‘Configuration’ tab and choose whether to display miles or kilometers on the map.
You can also check the other options, such as the address format, the details you would like to display on the map, and which users can use the plugin.
Once you are happy with the plugin’s settings, make sure you click the ‘Save’ button to store your settings.
Now you are ready to add your store locations. You should navigate to Locatoraid » Locations. Once there, you need to click the ‘Add New’ button.
This will take you to the ‘Add New Location’ page. Here you can type the store name, location, and other details.
When you finish, you should click the ‘Add New Location’ button at the bottom of the page.
You will be taken to the ‘Edit Location’ page where you can see the store location on a map.
If everything looks good, then you should click the ‘< Location’ button at the top of the screen to return to the Locatoraid » Locations page in your dashboard.
You can add more locations by clicking the ‘Add Location’ button and repeating these steps.
Once all of your store locations have been created, you can add the map to your website.
Simply add or edit a page and click the blue ‘+ Add Block’ icon. You should drag a Shortcode block onto the page and then enter the shortcode[locatoraid] into the field.
This default shortcode will work well for most websites. However, you can customize the map by using a different shortcode. Visit the Locatoraid » Publish page to learn more.
Now you can publish or update the page and visit your website to see your store locator map.
All of your store locations will be displayed on the same map. If your users type their address or click the ‘Locate Me’ link, then they can find the closest stores and get directions.
In our never-ending quest to create websites that are as lightweight as possible, image optimization plays an important role.
Poorly optimized images not only increase load time, they also take up precious bandwidth from both users and networks alike. Larger websites with copious amounts of images and traffic can be especially impacted.
TinyPNG
TinyPNG is a web-based image optimizer that will shrink the size of your PNG and JPG images with minimal loss in quality. The service is especially adept at significantly lowering the size of complex transparent PNG files.
ImageOptim
ImageOptim is a free, open source app for OS X that will optimize images while also deleting unnecessary meta info. Removing meta also has the side benefit of protecting your privacy. There’s also a lossy minification mode that will aggressively shrink PNG, GIF, JPG and SVG images – including animated PNGs and GIFs.
gulp-image
If you use the Gulp task-runner, gulp-image will automatically optimize GIF, JPEG, PNG and SVG images through a script. It’s a great option for those who have lots of images to process. Prefer to use Grunt? Then grunt-image has you covered.
Pngcrush
Pngcrush is a command-line script that can run on both MSDOS and Linux. The utility will scan your PNG files and try various compression levels and filter methods to reduce file size.
APNG Assembler
Use APNG Assembler to create highly-optimized animated PNG files. This standalone app includes versions for Windows, OS X and Linux.
Compressor.io
Compressor.io is a free online service that will optimize GIF, JPG, PNG and SVG files. You can choose from either lossless or lossy compression types.
Simple Image Optimizer
With Simple Image Optimizer, you’ll be able to both optimize and resize your images through a basic web interface. There are also separate options to simply resize or convert images.
Smush Image Compression and Optimization (WordPress)
Smush is a WordPress plugin that can automatically optimize and even resize your site’s images as you upload them. You can also bulk-optimize up to 50 images at once. It’s a very handy solution for ensuring images are optimized without having to lift a finger.
Image Optimize (Drupal)
Image Optimize is a module for Drupal websites that will utilize image optimization scripts already on your web server, such as OptiPNG or jpeglib. The module will also integrate with some 3rd party optimization services as well.
Apptrian Image Optimizer (Magento)
Apptrian Image Optimizer is an extension for Magento that uses lossless compression to optimize GIF, PNG and JPG files. Images can be batch processed and a cron task can be set up to periodically scan for and optimize new uploads.
Saving Time and Space
One of the great aspects of the free image optimization tools we looked at is the sheer variety of options available. There are solutions for advanced users who want to exercise a finer grain of control, while some of the more basic options require almost no user input at all. And with bulk image management, you’ll be able to quickly and easily optimize your entire image library.
Every bit of optimization counts. Taking a little time to bring your image sizes under control truly can make a difference. Your site’s users (and their data plans) will be glad you made the effort.
Both WordPress and its ecosystem of themes and plugins are seemingly always in a state of change. While WordPress core updates are usually limited to a few times a year (save for a quick bug fix/security release), plugins in particular are constantly being tweaked.
Regardless of what’s being updated, there is always the possibility of something breaking. Plugins may not have kept up with core updates and end up hindering the functionality of a site (or worse).
With that in mind, let’s explore some best practices for juggling multiple WordPress websites.
1. Keep Backups
Whether you manage one WordPress site or 100, make sure to use backups. There are tons of free plugins that can back up the site’s database and/or file system.
Depending on how often the site’s content changes, you’ll want to run backups accordingly. If something goes wrong due to an update or security issue, you’ll be glad that you have a stable copy of your sites backed up.
2. Craft a Plan
Ideally, you’d use an all-in-one dashboard that allows you to update multiple sites from a single screen. The ubiquitous Jetpack plugin includes this feature, as do third-party services like ManageWP. These solutions are great because you have everything you need, all in one place. This will save you a lot of time having to manually login to each site individually.
Short of using a unified dashboard, you’ll want to come up with a schedule for keeping your sites updated. Whether you want to update everything at once or do a few sites per day, it’s important to ensure that you have everything regularly updated (at least once every two weeks, if not more often).
3. Do Your Homework
While it’s tough to keep up with what’s running on every site you manage, it pays to look at a plugin’s changelog before hitting that update button. This is especially true if you’re working on a site using WooCommerce or another mission-critical plugin.
Unless there’s a vital security fix that absolutely needs installed right away, it may also be a good idea to give new releases a few days to see if any further bugs are discovered. Checking support forums first can save you a huge headache.
Also consider using a staging environment. Having a place to safely test updates beforehand is always recommended for eCommerce sites and those that get a lot of traffic. Some web hosts offer staging as part of their packages. Otherwise, you can also set up a local staging environment on your own machine.
4. Use Reputable Themes and Plugins
Just because a theme or plugin is readily available for free doesn’t mean it is any good.
For every site in your care, only use themes and plugins that are highly rated by users and receive regular updates. While a plugin that was last updated two years ago may in fact be fine, think about whether or not any future updates will come should something break.
It’s no fun having to cut functionality out of a live site because of an abandoned plugin.
5. Be Proactive
Managing multiple websites is a big responsibility – one that requires constant attention. Getting lazy (or too aggressive) at the wrong time can lead to serious problems.
That’s why it pays to stay proactive. Read up on WordPress related news and see what new releases hold in store. Make sure that you have an idea of what changes you may need to make to accommodate cutting-edge features.
Consistency is the Key
Let’s face it: No matter how much you plan, something will break sooner or later. But if you maintain a consistent approach to managing your WordPress websites, you’ll give yourself a better chance of avoiding problems.
And, when something does crop up, you will be better prepared to deal with it.
Successfully keeping multiple sites running along in a healthy manner takes some commitment. Still, it’s an achievable goal if you take the right steps.


 (@sophiatranterxo)
  I'm in love with my Pipdig theme now. However, I do like the 17th Avenue themes. Does anyone know if they're safe?
 (@rosymelissax)
  Ⓥ (@luisachristie)