Filterer Pattern in 10 Steps

Filterer is a pattern that should be applied only in special cases. In the original post, I presented a very simple example intended to show how to apply it. In this post, I present a much more detailed example that's intended to also explain when and why you should apply it.

Introduction

This post consists of 10 short, easy steps on how to correctly implement the filter pattern. In each step, I introduce the requirements of the following two types:

Device Power Management in IoT

One aspect to consider while developing an IoT project is device power management. With the rise of the Internet of Things, the optimization of the battery-operated devices is an important aspect that can make a huge difference. Device power management in the IoT is a challenging task because a device could always be powered up and could be located everywhere. Often, IoT devices are located remotely and they must use a battery to work.

IoT Device Power Management: How to Implement It

The device power management in IoT involves all the steps related to the designing process, and it is very important to take into account how the device will behave and how this behavior affects energy consumption. The battery capacity and device behavior are two of the most important aspects. In more detail, the device behavior can have a bad impact on energy management. Usually, we can model an IoT device power consumption using three different areas:

50+ Useful Kubernetes Tools

Updated September 2019

In the last few years, Kubernetes has laid waste to its fellow competitors in the battlefield of container orchestration. Sadly, Docker Swarm hasn’t been a major contender since 2016 and, like AWS, admitted defeat by pledging K8s support and integration. Since Kubernetes has skyrocketed to popularity as the container solution of choice, here’s a comprehensive list of all the tools that complement K8s to further enhance your development work.

The Smart Ways to Correct Mistakes in Git

The world of software development offers an infinite amount of ways to mess up: deleting the wrong things, coding into dead ends, littering commit messages with typos, are a mere few of the plentitude.
​​
​​Fortunately, however, we have a wonderful safety net under our feet in the form of Git when we’re working with version control. Not that you and I need a safety net, of course, because we never make mistakes, right? Sure, sure. But for the benefit of everyone else, let's take a tour of some of the "undo" tools in Git that can save us from ourselves.
​​
​​
​​
​​

Fixing the last commit

​​
​​Messing up a commit is all too easy. Classic case in point: making a typo in a commit message. Another? Forgetting to add a change to the staging area. And in many cases, we instantly realize our mistake — right after hitting the Enter key, naturally.
​​
​​Luckily, Git makes it ridiculously easy to fix the very last commit. Let's say we had just hit Enter on the following command:

​​

git commit -m "Massage full of typohs"

​​
​​And (as if this orthographic mess wasn't bad enough) let's say we also forgot to add another changed file to the staging area. We can correct both of our mistakes with the following two commands:
​​

git add forgotten-changes.js
​​git commit --amend -m "A sensible message"

​​
​​The magic ingredient is the --amend​ flag: when using it on a commit, Git will correct the very last commit — with any staged changes and the new message.
​​
​​A short word of warning, though: only use --amend​ on commits that haven't been pushed to a remote repository, yet. The reason is that Git replaces the original, bad commit with the amended version. Afterwards, it looks as if the original commit never happened. Yeah, that’s good for concealing mistakes, but only if we haven't already published this mistake on the remote server.
​​​​
​​

Undoing local changes

​​
​​Everyone’s had days like this: spend all morning hacking away, only to admit to yourself that the last few hours were a waste of time. Gotta start over and undo much (or all) of that work.
​​
​​But this is one of the reasons for using Git in the first place — to be able to try out things without the fear that we might break something.
​​
​​Let's take stock in an example situation:
​​

git status
​​  modified: about.html
​​  deleted:  imprint.html
​​  modified: index.html

​​
​​Now, let's assume that this is one of the wasted hacking days described above. We ought to have kept our hands off of about.html and not deleted imprint.html. What we now want is to discard our current changes in these files — while keeping the brilliant work done in index.html. ​​The git checkout​ command can help in this case. Instead, we’ve gotta get more specific with which files to check out, like this:

​​

git checkout HEAD about.html imprint.html

​​This command restores both about.html and imprint.html to their last committed states. Phew, we got away from a black eye!
​​
​​We could take this one step further and discard specific individual lines in a changed file instead of tossing out the entire thing! I’ll admit, it’s rather complicated to make it happen on the command line, but using a desktop Git client like Tower is a great way to go about it:

​​
​​For those really bad days, we might want to bring out the big guns in the form of:
​​
​​

git reset --hard HEAD

​​
​​While we only restored specific files with checkout​, this command resets our whole working copy. In other words, reset​ restores the complete project at its last committed state. ​​Similar to --amend​, there's something to keep in mind when using checkout​ and reset​: discarding local changes with these commands cannot be undone! They have never been committed to the repository, so it's only logical that they cannot be restored. Better be sure that you really want to get rid of them because there’s no turning back!
​​
​​

Undoing and reverting an older commit

​​
​​In many cases, we only realize a mistake much later, after it has long been committed to the repository.

​​How can we get rid of that one bad commit? Well, the answer is that we shouldn't… at least in most cases. Even when "undoing" things, Git normally doesn't actually delete data. It corrects it by adding new data. Let's see how this works using our "bad guy" example:
​​
​​

git revert 2b504bee

​​
​​By using git revert​ on that bad commit, we haven't deleted anything. Quite the contrary:

​​Git automatically created a new commit with changes that reverts the effects of the "bad" commit. So, really, if we started with three commits and were trying to correct the middle one, now we have four total commits, with a new one added that corrects the one we targeted with revert​.
​​​​
​​

Restoring a previous version of a project

​​
​​A different use case is when we want to restore a previous version of our project. Instead of simply undoing or reverting a specific revision somewhere in our commit history, we might really want to turn back time and return to a specific revision.
​​
​​In the following example scenario, we would declare all the commits that came after "C2" as unwanted. What we want is to return to the state of commit "C2" and forget everything that came after it in the process:

​​The command that's necessary is already (at least partly) familiar to you based on what we’ve already covered:
​​
​​

git reset --hard 2b504bee

​​
​​This tells git reset​ the SHA-1 hash of the commit we want to return to. Commits C3 and C4 then disappear from the project's history.
​​
​​If you're working in a Git client, like Tower, both git revert​ and git reset are available from the contextual menu of a commit item:

​​

​​Deleting commits, restoring deleted branches, dealing with conflicts, etc. etc. etc.

​​
​​Of course, there are many other ways to mess up things in a software project. But luckily, Git also offers many more tools for undoing the mess.
​​
​​Have a look at the "First Aid Kit for Git" project that I and other folks on the Tower team have created if you want to learn more about the scenarios we covered in this post, or about other topics, like how to move commits between branches, delete old commits, restore deleted branches or gracefully deal with merge conflicts. It’s a totally free guide that includes 17 videos and a handy cheat sheet you can download and keep next to your machine.

​​In the meantime, happy undoing!

The post The Smart Ways to Correct Mistakes in Git appeared first on CSS-Tricks.

WPWeekly Episode 345 – The Relationship Between Corporate Cash and Open Source Software

In this episode, John James Jacoby and I discuss a thought-provoking post published by Morten Rand-Hendriksen that takes a deep look at equity in open source software. Morten suggests that the mantra of decisions are made by those who show up be changed to decisions are made by those who can afford to show up.

We talk about the relationship and influence money from businesses can  have on open source software, especially if they’re employing someone to contribute to that project full-time. We discuss the pros and cons of financial contributions and whether or not WordPress could fall victim to progressing only at the whims of corporate sponsors.

Near the end of the show, John provides an overview of what’s new in Sugar Calendar 2.0.

Stories Discussed:

PetersenMediaGroup is Relaunched

https://www.petersenmediagroup.com/

WordPress 5.1 Field Guide

Gutenberg 5.0 Adds New RSS Block, Amazon Kindle Embed Block, and FocalPointPicker Component

Gutenberg Blocks Design Library Offers Pre-Built Page Designs Using Existing Core Blocks

Google+ is shutting down in April with some APIs shutting down in March

Sugar Calendar 2.0 Beta Released

The Dark Mode plugin developed by Daniel James is no longer a featured plugin.

WPWeekly Meta:

Next Episode: Wednesday, February 20th 3:00 P.M. Eastern

Subscribe to WordPress Weekly via Itunes

Subscribe to WordPress Weekly via RSS

Subscribe to WordPress Weekly via Stitcher Radio

Subscribe to WordPress Weekly via Google Play

Listen To Episode #345:

Email Test Automation With Mailtrap

In most of the applications that we use today, the use of email continues to be an important part of many of the main functionalities that these systems offer us. Whether it's to register as users, recover a password, receive reports, invoices, flight reservations, accommodations, or anything else, sending emails is something that is still closely linked to the core functionality of many systems.

On the other hand, email is something that has been around for a long time. This is why we often overlook tests where sending emails is involved, either because of the complexity of the task or because we assume that there will be no errors. However, there are certain scenarios where it is advisable to perform some minimal tests. For example, some elements that you should want to check might be:

3 Step Maturity Model for Your Automation-Centric Enterprise

Over the past few years, we have seen tremendous advances in machine learning (ML) and artificial intelligence (AI). Rooted in these inspiring technologies is the idea of robotic process automation (RPA), the possibility of automating routine and mundane tasks with software robots capable of interacting with traditional software systems in the same way as human operators would.

Enterprise executives are attracted by the numerous benefits of RPA, which include significant cost savings and productivity improvements, but they are often left wondering how to best adopt RPA to drive long-term growth.

Ultimate Blocks Plugin Adds Schema-Enabled Review Block

Ultimate Blocks, one of the many Gutenberg block collections that have sprouted up, launched before WordPress 5.0 with eight blocks. The collection has since doubled in size, adding features like accordions, social sharing buttons, tabbed content, a progress bar, and star-ratings. Many block collections are loosely organized around serving a specific user demographic. This one is aimed at bloggers and marketers.

Ultimate Blocks’ latest release includes Reviews, a new Gutenberg block that is unique to this plugin. It allows users to easily add rows of review criteria and will automatically calculate the cumulative star rating. Users can also edit the title of the review, author name, review summary, and call-to-action button.

One of the most interesting features of the plugin is that it is schema-enabled, which means that the reviews use a standard schema for structured data that can be easily read by applications like Google, Microsoft, Pinterest, and others. For example, when Google finds a schema-enabled review, it can display it as a rich review snippet with stars and other summary info. These snippets may appear in search results or in Google Knowledge Cards.

It’s important to clarify that this block is for the site owner to write their own reviews. It’s not a block that adds a frontend form for visitors to leave reviews. It’s more useful for site owners who want a nice way to display their own reviews for books, movies, restaurants, or any other type of information.

After testing the plugin, I was impressed by how the star rating calculations all work live inside Gutenberg while setting up the block. The back and frontend styles also match fairly well. The Reviews block is generic enough to be used for virtually any type of review a user wants to display. It would even more useful if the author expanded it to support frontend review submissions, which would allow users to create their own community review sites.

How to Secure Frontend Code by Moving to Serverless Cloud

We look at a modern approach to securely moving frontend code to the cloud using a serverless approach, walking step-by-step through two examples.

Frontend code is inherently insecure. Yes, you can mangle your code with something like UglifyJS, or use more a more advanced obfuscation tool like Jscrambler, but at the end of the day, the public nature of frontend code means it's accessible to nefarious users.

A Simple Checklist for Apache Ignite Beginners

If you are running Apache Ignite for the first time, you might face some difficulties. You have just downloaded Apache Ignite, run it a few times, and got some issues. Mostly, these problems are solved in a similar fashion. Therefore, I decided to create a checklist, which provides recommendations to help you avoid issues in the development environments.

1. Configuration Files

When Ignite starts in standalone mode by executing the ignite.sh|bat  file, Ignite uses the $IGNITE_HOME/config/default-config.xml configuration file. In this situation, to connect to the specified node from the Visor command line console, you should choose the default-config.xml file from the configuration file list. Most of the time, the default- config.xml file is the first file in the list.

Automated Cross-Browser Testing With Protractor and Selenium

What Do We Mean By JavaScript Test Automation Frameworks?

There has been a major growth in JavaScript framework usage over the past few years, the reason is, nowadays most of the apps are developed using technology like Angular or React. In fact, initially, Angular was the first choice for web developers, however, by the end of 2018, we could see major dominance over the web for React. React may even continue to dominate 2019 as well.

JavaScript test automation frameworks are end-to-end frameworks specialized to run automation scripts for web applications. However, choosing the right one can be very challenging based on the following criteria:

The Micro-Hexagon Architectural Pattern

Although microservices solve many technical problems, it is time perhaps to conclude, after a few years from the launch date of this concept, that this architecture needs to be further improved, to provide a way to have a clearer vision of the functional components. That's why many architects now use DDD decomposition.

Another concept that has been put in place with DDD is event sourcing and CQRS. In fact, we do not deny the benefits of these implementations but it could also have other technical drawbacks which impact our architecture with more complex debts.

Eclipse MAT: Shallow Heap Vs. Retained Heap

Eclipse MAT (Memory Analyzer Tool) is a powerful tool to analyze heap dumps. It comes quite handy when you are trying to debug memory related problems. In Eclipse MAT, two types of object sizes are reported:

  1. Shallow Heap
  2. Retained Heap

In this article, let's study the difference between them and explore how they are calculated

Best WordPress Security Plugin – (Review Updated for 2021)

You wouldn’t buy a brick and mortar business without getting a lock for the front door, right? I imagine you’d probably even get an alarm system and install some cameras.

These security measures are taken to prevent break-ins, from losing money, sustaining property damage, or putting sensitive information at risk.

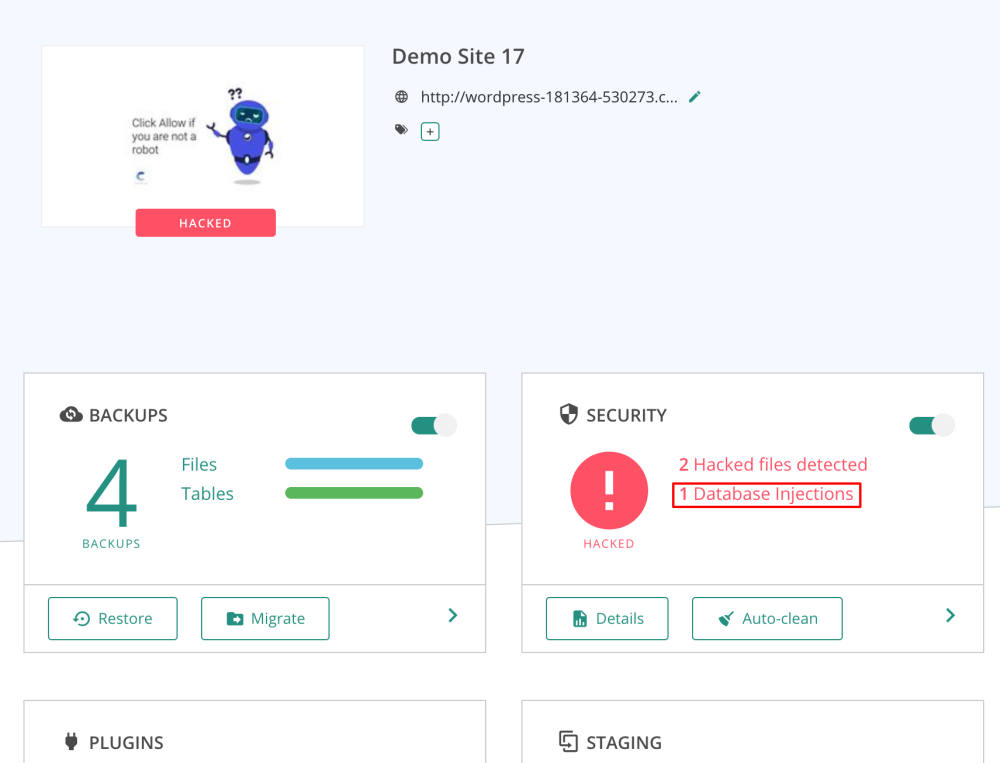
Your internet business is at risk for these very same things. It may even be at greater risk — the Internet makes it possible for cybercriminals to break into your website without having to leave their couch: On average, 18.5 million websites are infected with malware at any given time. The average website gets attacked 44 times per day. Of the roughly 90,000 websites that get hacked each day, 83% of them are using WordPress.

That’s why you need to take as many precautions as possible when it comes to properly securing your website.

Don’t have the “it won’t happen to me” mentality. Nobody is immune to vicious attacks. Even retail giants like Target have had data breaches that affected more than 41 million customers. That one security breach cost the company over $18 million in settlements. Something like this can be extremely damaging to your company’s online reputation.

I could go on and on all day about why your website needs to be secure, but I think I’ve made my point.

So how can you install the security you need?

To start, WordPress has some built-in security features. It’s also crucial for you to choose a secure web hosting company — with a host like WP Engine a lot of the security features are built into your hosting plan. Beyond these steps, you can take additional measures to beef up your protections with a WordPress security plugin.

There are so many different security plugins available for your website. How can you know which one is the best WordPress security plugin?

Rather than taking weeks to go through and research all of them, you can just review the ones that I’ve listed in this guide. I’ve identified the top seven WordPress security plugins of 2021. Use this information to increase your WordPress security and add credibility to your website.

1. MalCare

Malcare

The MalCare  security plugin is trusted by the likes of GoWP, WPBuffs, and Cloudways — so you know you’re in good company with them.

This is a security plugin you should get if you want to save time and energy. Their malware removal is fully automated, removing viruses and bad actors in less than a minute. They also protect your website from their own servers. That means you’ll never experience a slowdown on your site when they scan for viruses.

MalCare also comes with a powerful firewall to protect your website 24/7. It’ll also block any IP addresses that have been flagged for malicious intent from the thousands of sites on their network, according to their website.

Though it might not be for everyone, I really appreciate the fact that they have a host of features aside from security like their WordPress management plugin. It helps you manage multiple sites on WordPress and allows you to manage permissions so your team can collaborate on all fo them. This service also allows you to make 90 day backups of your websites so you never have to worry about losing data.

Pricing for MalCare is also relatively affordable for the features you’ll be receiving. It starts at $99 / year for one site and includes automatic malware removal, a website firewall, and complete website management.

2. Wordfence Security — Firewall & Malware Scan

Wordfence Security

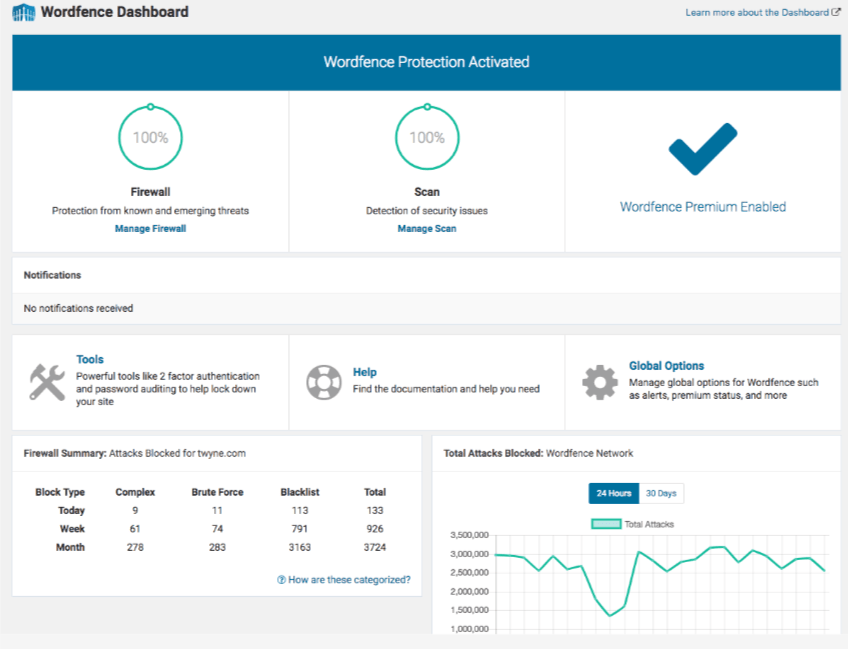
With over two million active installs, Wordfence Security — Firewall & Malware Scan is one of the most popular WordPress security plugins available. It fights spam, malware, and other threats in real time. Unlike other plugins, Wordfence Security offers a dashboard that’s extremely user friendly. You don’t have to be a tech wizard, have a background in IT, or study cybersecurity to use this plugin.

One of my favorite parts of this plugin is the ability to see data about your overall website traffic trends. These reports will show you any attempted hacks on your site. You’ll be able to tell if traffic is coming from humans, Google crawlers, or potentially malicious bots.

Another great feature of this plugin is the country blocking option. You can block attacks that come from specific geographic regions known for high rates of cybercrime.

The free version of Wordfence Security offers plenty of features that will keep your website safe. They definitely give you more out of the box than other free security plugins. You’ll get firewall blocks and brute force attack protection.

Premium pricing starts at $99 per year. The premium version comes with added features like two-factor authentication, direct customer support assistance, and real-time IP blacklisting. The real-time IP blacklist feature blocks requests from any IP address that has attacked another WordPress website that is also using Wordfence Security. When it comes to the safety and security of your website, that’s a pretty good deal in my opinion.

3. Sucuri Security — Auditing, Malware Scanner and Security Hardening

Sucuri Security

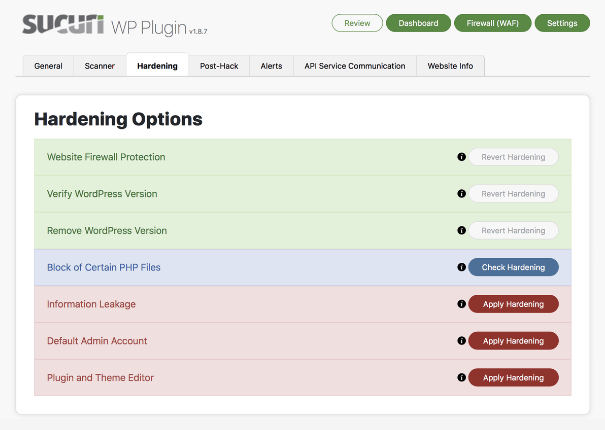
The name of this plugin alone shows all of the extensive security features it offers. When you install Sucuri Security, you’ll benefit from things like:

  • Firewall integrity monitoring
  • Malware scanning
  • Blacklist monitoring
  • Security audits
  • Security hardening
  • Notifications
  • Post-hack security procedures
  • Website firewall

All of these features, except for the website firewall, come with the free version of Sucuri Security. If you’re looking for a cost-effective way to protect your WordPress website, Sucuri Security is a top choice. For most sites, you don’t necessarily need the website firewall offered in the premium version.

In the event of a hack or attack, Sucuri Security offers actionable steps to help you proceed with repairing any damage. Now, some of you might not love the idea of hearing something like this. But in all reality, it’s nearly impossible for any website to be 100% impenetrable. There is always the chance of something going wrong. When something goes wrong, you’ll instantly receive a notification about it so you can act immediately.

Sucuri Security is upfront about that. They aren’t going to sit there and promise that the plugin is 100% effective. Rather than making false promises, this plugin has added a feature to assist you if your site is compromised in any way. I really like that.

The security hardening provided by Sucuri Security is exceptional. It’s easy to go through and check the status of the different elements of your website to add additional security.

If you have questions, problems, or run into any trouble when you’re using the Sucuri Security plugin, you can reach the customer service team via live chat or email.

4. iThemes Security

iThemes Security

Formerly known as Better WP Security, the iThemes Security plugin is another popular choice for WordPress users. Unlike the other plugins we’ve looked at so far, iThemes Security doesn’t offer as many free benefits, so it’s in your best interest to upgrade to the pro version if you’re going to install this plugin. The free version comes with basic security, but you won’t have access to the pro features, such as:

  • Two-factor authentication
  • Scheduled malware scans
  • Google reCAPTCHA
  • User action logs
  • WordPress security keys
  • Importing and exporting capabilities
  • Dashboard widgets
  • File comparisons
  • Password security and expiration

As you can see from this list, it’s definitely worth upgrading to iThemes Security Pro, which starts at $52 per year.

With iThemes Security, users will automatically be banned after attempting too many invalid logins, which will help prevent a brute force attack on your site.

There is also a scanning feature that will identify any potential vulnerabilities for an attack. Once those areas have been identified, the plugin shows you how to repair the problems in a matter of seconds. iThemes Security even helps strengthen the security of your server. The plugin forces SSL for admin pages, posts, and other pages on supporting servers. The plugin will hide the most common WordPress security vulnerabilities that are usually targeted by hackers. You’ll receive a notification via email anytime there is a problem or potential security threat on your WordPress site.

This plugin fully integrates with your WordPress dashboard as well, which is a nice touch. It doesn’t feel like it’s intrusive, and you don’t need to navigate to any third-party platforms to add security to your site. iThemes Security also offers extensive video tutorials, which I found to be extremely helpful.

5. All In One WP Security & Firewall

All In One WP Security & Firewall

All In One WP Security & Firewall is packed with free features. The interface is extremely easy to use, and you don’t need to be a technology or security expert to figure things out.

One of the reasons why this plugin made my list is because of the visual elements on the dashboard. You can get reports with graphs that explain all of the metrics related to your website’s security. Furthermore, the plugin tells you which actions you can take to improve the security of your WordPress website.

Each security feature is segmented into three categories:

  • Basic
  • Intermediate
  • Advanced

You have the ability to apply certain firewall rules progressively in a way that won’t hinder the functionality of your website. As a result, the speed of your website won’t be slowed at all.

The plugin scans your WordPress website for vulnerabilities. After these vulnerabilities have been checked, the plugin will assist you in implementing changes to enhance your security. Everything is measured by a grading system. The grades are based on different levels of security for each element on your website.

Another top feature offered by All In One WP Security & Firewall is spam security for your comments section. Getting lots of comments on your blog posts or other website pages can be extremely beneficial for SEO purposes, but not if those comments are spam. Instead of manually checking all of your comments and deleting spam on your own, this plugin can do the work for you. It automatically detects IP addresses that are known for producing spam and blocks them from commenting. If certain addresses have exceeded a specific number of spam comments, they will even be blocked from accessing your site altogether.

I haven’t even mentioned the best part of all. This plugin is free. That’s right, 100% free. Unlike free versions of other plugins, All In One WP Security & Firewall doesn’t withhold top features and pitch upsells. It’s completely free to all WordPress users.

6. BulletProof Security

BulletProof Security

The BulletProof Security WordPress plugin isn’t necessarily as popular as some of the other plugins out there, but that doesn’t mean you shouldn’t consider it as a top choice for your website.

It claims that in the last seven years, none of the 45,000 websites that installed BulletProof Security Pro have been hacked. Impressive, though this number has some contingencies and doesn’t account for things like server hacks.

This plugin is extremely easy to install and get up and running in just a couple of clicks. The free version of BulletProof Security gives you access to features like:

  • Security logs
  • Security monitoring
  • Malware scans
  • Database backups
  • Database restores
  • Anti-spam tools
  • Anti-hacking tools

I really like BulletProof Security’s maintenance mode. It will keep your site secure while you’re going through front-end as well as back-end updates and maintenance, times when your site would normally be more vulnerable to hacks or breaches.

While the installation and setup wizard is easy for anyone to do, overall I’d say this security plugin is geared more toward advanced WordPress developers. BulletProof Security allows you to customize so many different security settings. So, I’d say start with that version before you decide if you want to upgrade. That will at least give you a feel of the interface and navigation. If you go with the paid version, BulletProof Security offers a 30-day guarantee, so there’s no risk there either.

7. Jetpack

Jetpack is considered a WordPress powerhouse. It helps improve performance and protect your site in countless ways, including advanced security, automatic backups, easy-to-decipher analytics, marketing tools, site speed enhancements, and more. Plus, with more than 5+ million activations and frequent plugin updates, you know you’re in good hands. 

While Jetpack offers dozens of different features, its advanced security functionality is incredibly powerful on its own. As such, this WordPress security plugin is excellent for anyone needing real-time security scans, backups, and anti-spam protection. 

With it, you get real-time backups that automatically trigger anytime you make changes. So, your backups are always up-to-date and can be reverted back to if anything goes wrong. With your subscription, you get unlimited storage for backups so you never have to worry about running out of space. 

Furthermore, you proactively prevent security threats using Jetpack’s scan feature. You can set it up to automatically scan new files and content, or you can run it daily. It scans your entire website on the hunt for malware and malicious software to find vulnerabilities and stop attacks before they happen. 

Another standout feature is the ability to block and clear spam submissions through comments and input forms on your site. Without this, you may unknowingly end up with hundreds of spam comments creating an awful visitor experience for anyone unlucky enough to scroll to the bottom of your latest post. 

Not only that, but you have to manually delete them rather than blocking them from going through in the first place. 

Jetpack also delivers various other security features, including:

  • Brute force attack protection
  • Downtime monitoring so you learn about issues before your visitors do
  • Detailed activity log outlining every site change that’s made

There are dozens of pricing options to choose from, depending on what you need. If you want all of Jetpack’s security features, you’re looking at $55.95 per month for real-time security or $19.95 for daily security. 

Alternatively, you can get Jetpack’s full suite of tools, including security, marketing, design, SEO, CRM, and more, for $79.95 per month. If it’s within your budget, this is a great way to simplify your plugin stack. 

But if you’re on a tighter budget, you can purchase security features separately. Each of the three major tools (daily backups, daily scans, and anti-spam) is $7.95 per month individually.

Conclusion

What’s the best WordPress security plugin?

It’s tough to name one as the definitive best, but I’ve been able to narrow down the top seven for you to consider in 2021. It all depends on what you’re looking for.

Some of these plugins have more advanced features than others, which aren’t always necessary for all websites. Some plugins are easier for beginners, while others are better for advanced developers.

Do you want a free WordPress security plugin? Or do you want a pro version with annual charges?

All of this needs to be taken into consideration when you’re picking the best security plugin for your website. I’m confident you’ll find what you need on the list above.

​​Avoiding those dang cannot read property of undefined errors

​​​​Uncaught TypeError: Cannot read property 'foo' of undefined.​ The dreaded error we all hit at some point in JavaScript development. Could be an empty state from an API that returns differently than you expected. Could be something else. We don’t know because the error itself is so general and broad.

​​I recently had an issue where certain environment variables weren't being pulled in for one reason or another, causing all sorts of funkiness with that error staring me in the face. Whatever the cause, it can be a disastrous error if it’s left unaccounted for, so how can we prevent it in the first place?

​​Let’s figure it out.

​​Utility library

​​If you are already using a utility library in your project, there is a good chance that it includes a function for preventing this error. _.get​ in lodash​ (docs) or R.path in Ramda​ (docs) allow accessing the object safely.
​​
​​If you are already using a utility library, this is likely the simplest solution. If you are not using a utility library, read on!

​​

Short-circuiting with &&

​​​​One interesting fact about logical operators in JavaScript is that they don't always return a boolean. According to the spec, "the value produced by a &&​ or ||​ operator is not necessarily of type Boolean. The value produced will always be the value of one of the two operand expressions.”
​​
​​​​In the case of the &&​ operator, the first expression will be used if it a "falsy" value. Otherwise, the second expression will be used. This means that the expression 0 && 1​ will be evaluated as 0​ (a falsy value), and the expression 2 && 3​ will be evaluated as 3​. If multiple &&​ expressions are chained together, they will evaluate to either the first falsy value or the last value. For example, 1 && 2 && 3 && null && 4​ will evaluate to null​, and 1 && 2 && 3​ will evaluate to 3​.

​​​​How is this useful for safely accessing nested object properties? Logical operators in JavaScript will "short-circuit." In this case of &&​, this means that the expression will cease moving forward after it reaches its first falsy value.

​​​​

​​const foo = false && destroyAllHumans();
​​console.log(foo); // false, and humanity is safe

​​In this example, destroyAllHumans is never called because the &&​ operand stopped all evaluation after false​.

​​This can be used to safely access nested properties.

​​

​​const meals = {
​​  breakfast: null, // I skipped the most important meal of the day! :(
​​  lunch: {
​​    protein: 'Chicken',
​​    greens: 'Spinach',
​​  },
​​  dinner: {
​​    protein: 'Soy',
​​    greens: 'Kale',
​​  },
​​};
​​
​​const breakfastProtein = meals.breakfast && meals.breakfast.protein; // null
​​const lunchProtein = meals.lunch && meals.lunch.protein; // 'Chicken'

​​Aside from its simplicity, one of the main advantages of this approach is its brevity when dealing with small chains. However, when accessing deeper objects, this can be quite verbose.

​​

const favorites = {
​​  video: {
​​    movies: ['Casablanca', 'Citizen Kane', 'Gone With The Wind'],
​​    shows: ['The Simpsons', 'Arrested Development'],
​​    vlogs: null,
​​  },
​​  audio: {
​​    podcasts: ['Shop Talk Show', 'CodePen Radio'],
​​    audiobooks: null,
​​  },
​​  reading: null, // Just kidding -- I love to read
​​};
​​
​​const favoriteMovie = favorites.video && favorites.video.movies && favorites.video.movies[0];
​​// Casablanca
​​const favoriteVlog = favorites.video && favorites.video.vlogs && favorites.video.vlogs[0];
​​// null

​​The more deeply nested an object is, the more unwieldy it gets.

​​
​​

The “Maybe Monad”

​​Oliver Steele came up with this method and goes through it in much more detail in his blog post, "Monads on the Cheap I: The Maybe Monad." I will attempt to give a brief explanation here.

​​

const favoriteBook = ((favorites.reading||{}).books||[])[0]; // undefined
​​const favoriteAudiobook = ((favorites.audio||{}).audiobooks||[])[0]; // undefined
​​const favoritePodcast = ((favorites.audio||{}).podcasts||[])[0]; // 'Shop Talk Show'

​​Similar to the short-circuit example above, this method works by checking if a value is falsy. If it is, it will attempt to access the next property on an empty object. In the example above, favorites.reading​ is null​, so the books​ property is being accessed from an empty object. This will result in an undefined​, so the 0​ will likewise be accessed from an empty array.

​​The advantage of this method over the &&​ method is that it avoids repetition of property names. On deeper objects, this can be quite a significant advantage. The primary disadvantage would be readability — it is not a common pattern, and may take a reader a moment to parse out how it is working.​

​​

​​try/catch

​​​​try...catch​ statements in JavaScript allow another method for safely accessing properties.

​​

try {
​​  console.log(favorites.reading.magazines[0]);
​​} catch (error) {
​​  console.log("No magazines have been favorited.");
​​}

​​Unfortunately, in JavaScript, try...catch​ statements are not expressions. They do not evaluate to a value as they do in some languages. This prevents a concise try​ statement as a way of setting a variable.

​​One option is to use a let​ variable that is defined in the block above the try...catch​.

​​

let favoriteMagazine;
​​try { 
​​  favoriteMagazine = favorites.reading.magazines[0]; 
​​} catch (error) { 
​​  favoriteMagazine = null; /* any default can be used */
​​};

​​Although it’s verbose, this works for setting a single variable (that is, if the mutable variable doesn't scare you off). However, issues can arise if they’re done in bulk.

​​

let favoriteMagazine, favoriteMovie, favoriteShow;
​​try {
​​  favoriteMovie = favorites.video.movies[0];
​​  favoriteShow = favorites.video.shows[0];
​​  favoriteMagazine = favorites.reading.magazines[0];
​​} catch (error) {
​​  favoriteMagazine = null;
​​  favoriteMovie = null;
​​  favoriteShow = null;
​​};
​​
​​console.log(favoriteMovie); // null
​​console.log(favoriteShow); // null
​​console.log(favoriteMagazine); // null

​​If any of the attempts to access the property fails, this will cause all of them to fall back into their defaults.

​​An alternative is to wrap the try...catch​ in a reusable utility function.

​​

const tryFn = (fn, fallback = null) => {
​​  try {
​​    return fn();
​​  } catch (error) {
​​    return fallback;
​​  }
​​} 
​​
​​const favoriteBook = tryFn(() => favorites.reading.book[0]); // null
​​const favoriteMovie = tryFn(() => favorites.video.movies[0]); // "Casablanca"

​​By wrapping the access to the object in a function, you can delay the "unsafe" code and pass it into a try...catch​.

​​A major advantage of this method is how natural it is to access the property. As long as properties are wrapped in a function, they are safely accessed. A default value can also be specified in the case of a non-existent path.

​​Merge with a default object

​​
By merging an object with a similarly shaped object of "defaults," we can ensure that the path that we are trying to access is safe.
​​
​​

const defaults = {
​​  position: "static",
​​  background: "transparent",
​​  border: "none",
​​};
​​
​​const settings = {
​​  border: "1px solid blue",
​​};
​​
​​const merged = { ...defaults, ...settings };
​​
​​console.log(merged); 
​​/*
​​  {
​​    position: "static",
​​    background: "transparent",
​​    border: "1px solid blue"
​​  }
​​*/

​​
​​Careful, though, because the entire nested object can be overwritten rather than a single property.
​​
​​

const defaults = {
​​  font: {
​​    family: "Helvetica",
​​    size: "12px",
​​    style: "normal",
​​  },        
​​  color: "black",
​​};
​​
​​const settings = {
​​  font: {
​​    size: "16px",
​​  }
​​};
​​
​​const merged = { 
​​  ...defaults, 
​​  ...settings,
​​};
​​
​​console.log(merged.font.size); // "16px"
​​console.log(merged.font.style); // undefined

​​Oh no! To fix this, we'll need to similarly copy each of the nested objects.

​​

const merged = { 
​​  ...defaults, 
​​  ...settings,
​​  font: {
​​    ...defaults.font,
​​    ...settings.font,
​​  },
​​};
​​
​​console.log(merged.font.size); // "16px"
​​console.log(merged.font.style); // "normal"

​​Much better!

​​This pattern is common with plugins or components that accept a large settings object with included defaults.

​​A bonus about this approach is that, by writing a default object, we’re including documentation on how an object should look. Unfortunately, depending on the size and shape of the data, the "merging" can be littered with copying each nested object.

​​​

The future: optional chaining

​​There is currently a TC39 proposal for a feature called "optional chaining." This new operator would look like this:

​​console.log(favorites?.video?.shows[0]); // 'The Simpsons'
​​console.log(favorites?.audio?.audiobooks[0]); // undefined

​​The ?.​ operator works by short-circuiting: if the left-hand side of the ?.​ operator evaluates to null​ or undefined​, the entire expression will evaluate to undefined​ and the right-hand side will remain unevaluated.

​​To have a custom default, we can use the ||​ operator in the case of an undefined.

​​

console.log(favorites?.audio?.audiobooks[0] || "The Hobbit");

​​

Which method should you use?

​​The answer, as you might have guessed, is that age-old answer… "it depends." If the optional chaining operator has been added to the language and has the necessary browser support, it is likely the best option. If you are not from the future, however, there are more considerations to take into account. Are you using a utility library? How deeply nested is your object? Do you need to specify defaults? Different cases may warrant a different approach.

The post ​​Avoiding those dang cannot read property of undefined errors appeared first on CSS-Tricks.