In my previous article from this series, we looked into the details that determine how your integration becomes the key to transforming your customer experience.
It started with laying out the process of how I've approached the use case by researching successful customer portfolio solutions as the basis for a generic architectural blueprint. Now it's time to cover various blueprint details.
My fellow members! Ladies and gentlemen of the court!
My client has too often unfairly been an object of ridicule and public derision. Too many times developers, especially the developers of other languages, have made fun of him and laughed at him. They insist on considering it, so to speak, weird, bizarre, geeky.
Welcome to the world of machine learning with scikit-learn. Machine learning can be overwhelming at times, and this is partly due to a large number of tools that are available on the market. This post will simplify this process of tool selection down to one — scikit-learn.
In this series, you will learn how to construct an end-to-end machine learning pipeline using some of the most popular algorithms that are widely used in industry and professional competitions, such as Kaggle.
I wanted to write this short post to highlight the assertFailsWith function available to Kotlin that makes testing exceptions a bit easier. Testing exceptions isn’t something fancy or new to JVM languages (from now on, I will use Java for comparisons), but Kotlin comes with the nice extra benefit of providing this functionality as part of its standard library. Comparing this to Java, you are likely to bring AssertJ into the mix to achieve similar results.
The main purpose of this post is to make you aware of the assertFailsWith function. I personally did not know it existed for a while and defaulted to depending on AssertJ. Not that I have anything against AssertJ that is. There are many other features that the library provides, but for this specific instance, it might be possible to remove it (assuming you are not using it for anything else that is).
Competition within the web design industry is fierce. With the sheer number of agencies and freelancers out there fighting for clients, it can feel like no project is uncontested. Throw in the ever-growing list of companies that offer DIY solutions for business owners and the market becomes even more overcrowded.
For many of us, it is those services such as Wix, Squarespace and even WordPress.com that can cause a good bit of uneasiness. After all, part of their pitch insinuates that anyone can build a website. If that’s really the case, then who has a need for those of us who are web professionals?
Not so fast. While there are certainly cases where DIY services make sense, they aren’t right for everyone. You may even have some clients who came to you after they found that out the hard way.
As ever, it’s important to make yourself stand out from the crowd. If you tend to work with smaller clients, that should include differentiating yourself from the DIY segment. Let’s look at some strategies for making the case.
Understand Your Market
Have you ever handed someone a proposal, only to have them scoff at your pricing? They might even bring up the fact that they can “build it themselves” for $20 a month, or whatever a DIY service charges.
Sure, that argument has some truth to it. However, the important difference is that you’re choosing to pay for access to a tool as opposed to a real, dedicated professional. It’s sort of like buying the parts to rebuild your car’s engine and giving it a go, rather than hiring a trained mechanic to do it for you.
To be blunt, if someone believes that a website should only cost such a pittance, then let them go off and do it themselves. You won’t be losing much in terms of revenue or someone who appreciates your unique talents.
These people are not your target market. Therefore, there’s no need to try and bargain with them. Instead, the goal is to weed them out, before you have to waste your time on a proposal.
Educate Potential Clients
Even though the internet is omnipresent in our society, there’s still a lot of misunderstanding about what web designers and developers bring to the table. It’s up to us to provide some basic education.
Use your website and other marketing materials to explain (in layman’s terms) your process and your expertise in the field. Offer up testimonials from happy clients and maybe even some case studies that demonstrate what a great problem solver you are.
Some occasional blogging can also be beneficial in this area. Write about the trends you’re seeing and common problems that business owners may face when it comes to their website.
And, while you don’t have to give specific pricing info, you might consider publishing your minimum starting price. This type of information will scare away the $20 a month crowd and help to establish you as someone who knows their stuff.
Show the Value of a Custom Website
If anyone is shopping around and is still on the fence about whether to build their own website or hire a professional, value can be a deciding factor. But in this case value isn’t defined by simply how much a client spends. Instead, it’s about what they’re actually getting for that money.
A DIY service will likely have a number of attractive themes and layouts to choose from. Plus, they’ll make it easy to add or change things via a drag-and-drop UI (one of the reasons WordPress introduced Gutenberg). This is all well and good. But does it really constitute a custom website?
It doesn’t. And that’s something web designers need to shout from the rooftops. A truly custom website includes one or more of the following:
An original look, tied to the client’s branding;
The ability to add the exact functionality needed;
The ability to create new functionality, if it can’t be readily added through existing means;
Portability that lets you move a site to virtually any host;
A custom back end, tailored to client need, that allows for easier content management;
Simply put, a custom website offers a higher level of freedom. That comes with a higher cost. But it may also result in a much better fit for a client’s needs. Once they see the real value behind your offerings, the bargain bin products won’t seem nearly as attractive.
Everything Has Its Place
It’s quite understandable that web designers may feel a little anxious about DIY products. And it’s also easy to see why business owners would be curious to try them. These tools have a legitimate place in the market.
However, that doesn’t mean our businesses will just wither away. DIY is a solid choice for those with small budgets and an adventurous spirit. For everyone else, a custom, professionally-crafted website is still the best choice.
More than anything, it’s about putting honest and accurate information out there. Our job is to make sure that potential clients know the difference between these two offerings. That way, they can make comparisons and choose the best option for their needs.
Choosing the right domain name for your website is crucial for your success. If you choose the wrong domain name, then it can be a hassle to switch later on without hurting your brand and search rankings.
That’s why it’s extremely important that you choose the best domain name from the start.
When first starting out, it can be hard to come up with catchy business name ideas with a perfect domain name.
In this article, we’ll share all the tools and tips you need to get domain name ideas, choose the best domain name, and register your new domain (for free).
11 Tips for Choosing the Best Domain Name
When starting a blog, choosing a domain name can be stressful because you don’t want to make a mistake.
To make the process easier, we have a simple 11 step framework that you can use to pick the best domain for your website.
Let’s take a look at these tips one by one with more details.
1. Stick with .com
There are plenty of new domain name extensions available today, from the original .com, .net and .org to niche extensions like .pizza, .photography, and even .blog.
We always recommend choosing a .com domain name.
While it can be tempting to come up with clever blog names using new extensions, .com is still the most established and credible domain name extension.
Newer domain extensions like .ninja or .photography can be untrustworthy.
Dot-com domains are also the most memorable. Many users, especially those who aren’t as tech-savvy, will automatically type “.com” at the end of every domain without thinking about it.
If your website is something like jane.photography, and your users accidentally type in jane.photography.com, they will end up on an error page on photography.com website.
It’s smart to avoid that risk by sticking with .com.
Not to mention, most smartphone keyboards automatically have a .com button.
2. Use Keywords in Your Domain Name Search
Keywords play an important role in a domain. By using keywords in your domain name, you tell the search engines what your website is about. Together with quality content and good user experience, keywords in your domain can help you rank higher in Google.
It is very hard to find a good domain with your target keywords, that’s not already taken.
You will need to be creative and combine your keywords with other words to make your domain stand out.
3. Keep Your Domain Name Short
While keywords are important, don’t go overboard with domain length. It’s better to have a domain name that’s short and memorable.
We recommend keeping your domain name under 15 characters. Longer domains are harder for your users to remember.
Not to mention, users will also be more prone to entering typos with longer domain names which can lead to loss traffic.
That’s why it’s a good idea to keep your domain length short.
4. Make Your Domain Name Easy to Pronounce and Spell
You should be able to easily share your domain name when speaking as well as writing. You never know when you’ll be asked to share your domain name in person.
If you’re planning to use your domain name to create a professional business email address, then it definitely should be easy to understand and spell for any listener.
5. Keep it Unique and Brandable
Your blog domain name must be unique, so you can stand out in your readers’ minds. It’s smart to research other blogs in your niche and find out what domain names they’re using.
You don’t want to accidentally use a trademark name or get accused of copying another blogger.
You can also choose to pick a domain name that’s more brandable.
Brandable domain names are unique, catchy, and memorable. For example, “Amazon.com” is a much more brandable name than “BuyBooksOnline.com.”
6. Avoid Hyphens in Domain Name
Never create a domain name with hyphens. Hyphens can be a sign of spam domains which you do not want to be associated with.
Hyphenated domains are also prone to typos. If you choose a domain name with hyphens because the domain you want is already taken, then your users will likely end up at your competitor’s site if they forget to type in the hyphen.
7. Avoid Double Letters
It’s a good idea to avoid domains with doubled letters, because it increases your chances of losing traffic to typos. For example, a domain like Presssetup.com will be more prone to typos, and result in lost traffic.
Avoiding doubled letters will also make your domain easy to type and more brandable.
8. Leave Room to Expand
It’s smart to choose a domain name that’s related to your industry / niche because it gives users some idea of what your website is about. But you also don’t want to limit your long term options too much.
For example, a florist might choose a domain name like orchidblog.com, but then they may want to start blogging about other flowers beside orchids. In that case, the domain might prevent you from attracting readers interested in other flowers.
Properly moving your site to a new domain can be a frustrating process, and it can cause you to lose search rankings if you don’t do it right. That’s why it is important to pick a flexible domain name from the start.
9. Research Your Domain Name
Before you register a domain name, try to find out if there is already a registered business using the same name.
You can perform a trademark search to see if there is already a similar or exact name already trademarked.
You can also perform a Google search and check for the name’s availability on top social media websites like Twitter, Facebook, Instagram, etc.
A similar or matching name would not only cause confusion, but it could also have severe legal implications which may cost you a lot of money.
Currently, there are more than 360 Million registered domain names. This leads to many people saying that all good domains are already taken.
Searching for individual domain name manually can be very time consuming.
This is where domain name generators come in. These free tools automatically search for your defined keywords to find hundreds of clever domain name ideas.
We recommend using Nameboy, which is one of the oldest and most popular domain name generator tool online. You can also use IsItWP’s domain generator to find more domain name ideas.
11. Act Quickly Before Someone Else Takes it
Each day thousands of new domain names are registered from all parts of the world. If you have found a domain name that you like, then don’t wait too long.
Domain names are like real estate. Thousands of people are actively looking for good brandable domain names that they can register for better rates in the future.
If you don’t act fast, then someone may go ahead and register your domain idea.
Since domain names are relatively cheap, we always recommend our readers to act fast. If you change your mind later, then you can simply let it expire.
Best Places to Buy a Domain Name
There are hundreds of domain registrars on the web. It’s important to choose carefully because it can be difficult to move your domain later on.
Just like with web hosting, pricing for domain registrations can vary anywhere from $9 to $24. You can even get it for free*.
Let’s take a look at how you can easily buy a domain name.
Free Domain Registration with Web Hosting
Majority of web hosting companies also offer domain registration as a service. Some of those companies offer free domain registration with new hosting accounts.
If you’re starting a new website, then it’s a smart idea to take advantage of this offer and get your domain name for free.
Below are the two WordPress hosting companies that are offering our users over 60% off web hosting, free SSL certificate, and a free domain name:
Bluehost is one of the oldest and largest brand name when it comes to web hosting. They’re an official “WordPress” recommended hosting provider.
iPage powers over 1 million websites and is the most budget-friendly web hosting provider on the web. $1.99 / month for web hosting, and you get a free domain name.
It’s important to keep in mind that most hosts offer free domain registrations for 1 year only. After the first year, your domain registration will renew at usually around $14 per year.
A lot of users take advantage of the free domain for the first year because you would have to pay for the domain name regardless, why not get it for free.
Most Popular Domain Registrars
If you just want to register a domain name without purchasing hosting, then you can do that by purchasing it from a domain name registrar.
Domain.com is one of the best domain registrars on the market. They offer all top-level domain names, with a smart search feature, premium domains, and all the necessary tools to manage your domain names.
Domain.com is offering WPBeginner readers a 25% discount, and our domain.com coupon should be automatically applied on your purchase.
GoDaddy is the largest domain registrar in the world. They manage over 63 million domain names for over 14 million customers.
They also offer web hosting plans as well. If you use our GoDaddy coupon code, then you can get a free domain name.
iOS Performance Tricks To Make Your App Feel More Performant
iOS Performance Tricks To Make Your App Feel More Performant
Axel Kee
Although modern iOS hardware is powerful enough to handle many intensive and complex tasks, the device could still feel unresponsive if you are not careful about how your app performs. In this article, we will look into five optimization tricks that will make your app feel more responsive.
1. Dequeue Reusable Cell
You’ve probably used tableView.dequeueReusableCell(withIdentifier:for:) inside tableView(_:cellForRowAt:) before. Ever wondered why you have to follow this awkward API, instead of just passing an array of cell in? Let’s go through the reasoning of this.
Say you have a table view with a thousand rows. Without using reusable cells, we would have to create a new cell for each row, like this:
func tableView(_ tableView: UITableView, cellForRowAt indexPath: IndexPath) -> UITableViewCell {
   // Create a new cell whenever cellForRowAt is called.
   let cell = UITableViewCell()
   cell.textLabel?.text = "Cell \(indexPath.row)"
   return cell
}
As you might have thought, this will add a thousand cells to the device’s memory as you scroll to the bottom. Imagine what would happen if each cell contained a UIImageView and a lot of text: Loading them all at once could cause the app to run out of memory! Apart from that, every single cell would require new memory to be allocated during scrolling. If you scroll a table view quickly, a lot of small chunks of memory will be allocated on the fly, and this process will make the UI janky!
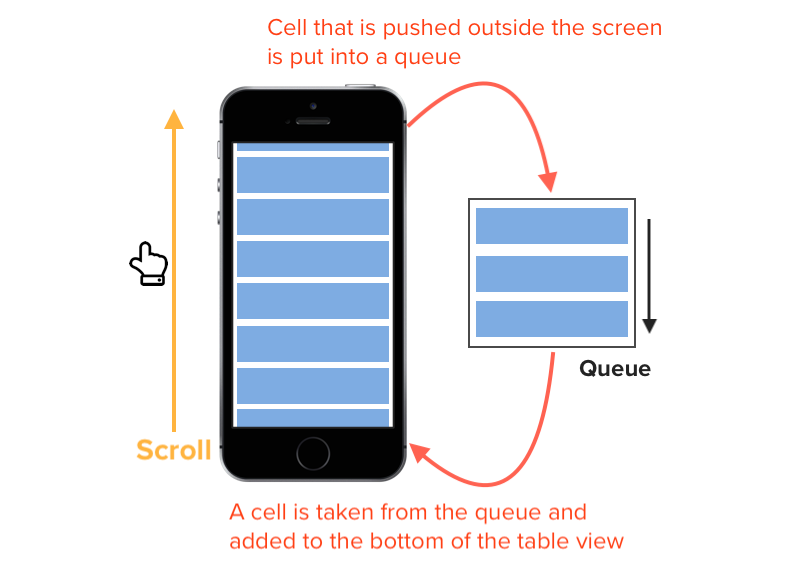
To resolve this, Apple has provided us with the dequeueReusableCell(withIdentifier:for:) method. Cell reuse works by placing the cell that is no longer visible on the screen into a queue, and when a new cell is about to be visible on the screen (say, the subsequent cell below as the user scrolls down), the table view will retrieve a cell from this queue and modify it in the cellForRowAt indexPath: method.
By using a queue to store cells, the table view doesn’t need to create a thousand cells. Instead, it needs just enough cells to cover the area of the table view.
By using dequeueReusableCell, we can reduce the memory used by the app and make it less prone to running out of memory!
2. Using A Launch Screen That Looks Like The Initial Screen
As mentioned in Apple’s Human Interface Guidelines (HIG), launch screens can be used to enhance the perception of an app’s responsiveness:
“It’s solely intended to enhance the perception of your app as quick to launch and immediately ready for use. Every app must supply a launch screen.”
It’s a common mistake to use a launch screen as a splash screen to show branding or to add a loading animation. Design the launch screen to be identical to the first screen of your app, as mentioned by Apple:
“Design a launch screen that’s nearly identical to the first screen of your app. If you include elements that look different when the app finishes launching, people can experience an unpleasant flash between the launch screen and the first screen of the app.
“The launch screen isn’t a branding opportunity. Don’t design an entry experience that looks like a splash screen or an "About" window. Don’t include logos or other branding elements unless they’re a static part of your app’s first screen.”
Using a launch screen for loading or branding purposes could slow down the time of first use and make the user feel that the app is sluggish.
When you start a new iOS project, a blank LaunchScreen.storyboard will be created. This screen will be shown to the user while the app loads the view controllers and layout.
To make your app feel faster, you can design the launch screen to be similar to the first screen (view controller) that will be shown to the user.
For example, the Safari app’s launch screen is similar to its first view :
A comparison of launch screen and first view of Safari app (Large preview)
The launch screen storyboard is like any other storyboard file, except that you can only use the standard UIKit classes, like UIViewController, UITabBarController, and UINavigationController. If you attempt to use any other custom subclasses (such as UserViewController), Xcode will notify you that using custom class names is prohibited.
Launch screen storyboard cannot contain non-UIKit standard class. (Large preview)
Another thing to note is that UIActivityIndicatorView doesn’t animate when placed on the launch screen, because iOS will generate a static image from the launch screen storyboard and displays it to the user. (This is mentioned briefly in the WWDC 2014 presentation “Platforms State of the Union”, around 01:21:56.)
Apple’s HIG also advises us not to include text on our launch screen, because the launch screen is static, and you can’t localize text to cater to different languages.
State preservation and restoration allow the user to return to the exact same UI state from just before they left the app. Sometimes, due to insufficient memory, the operating system might need to remove your app from memory while the app is in the background, and the app might lose track of its last UI state if it is not preserved, possibly causing users to lose their work in progress!
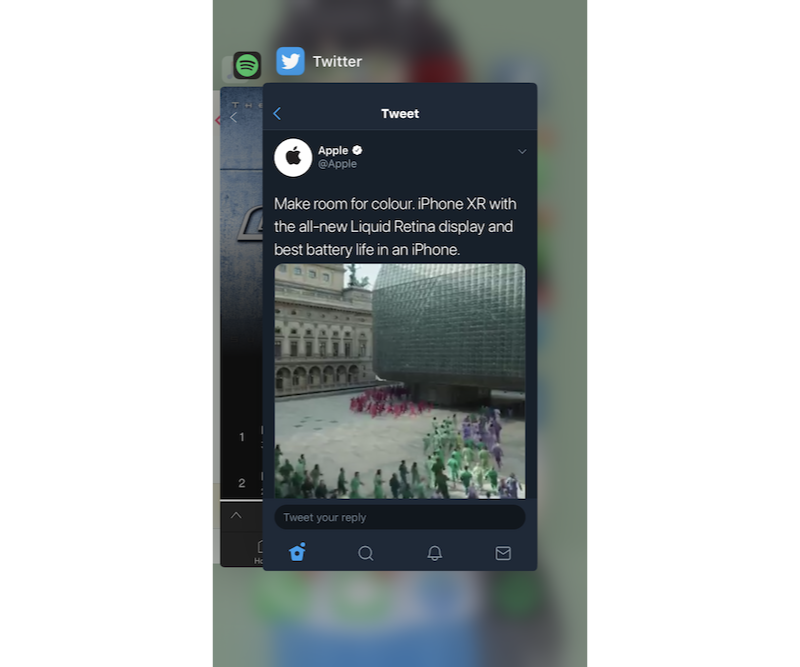
In the multitasking screen, we can see a list of apps that have been put in the background. We might assume that these apps are still running in the background; in reality, some of these apps might get killed and restarted by the system due to the demands of memory. The app snapshots we see in the multitasking view are actually screenshots taken by the system from right when we exited the app (i.e. to go to the home or multitasking screen).
Screenshots of apps taken by iOS when user exits the app (Large preview)
iOS uses these screenshots to give the illusion that the app is still running or is still displaying this particular view, whereas the app might have been already terminated or restarted in the background while still displaying the same screenshot.
Have you ever experienced, upon resuming an app from the multitasking screen, that the app shows a user interface different from the snapshot shown in the multitasking view? This is because the app hasn’t implemented the state-restoration mechanism, and the displayed data was lost when the app was killed in the background. This can lead to a bad experience because the user expects your app to be in the same state as when they left it.
“They expect your app to be in the same state as when they left it. State preservation and restoration ensures that your app returns to its previous state when it launches again.”
UIKit does a lot of work to simplify state preservation and restoration for us: It handles the saving and loading of an app’s state automatically at appropriate times. All we need to do is add some configuration to tell the app to support state preservation and restoration and to tell the app what data needs to be preserved.
To enable state saving and restoring, we can implement these two methods in AppDelegate.swift:
During state preservation, any view controller or view that has been assigned a restoration identifier will have its state saved to disk.
Restoration identifiers can be grouped together to form a restoration path. The identifiers are grouped using the view hierarchy, from the root view controller to the current active view controller. Suppose a MyViewController is embedded in a navigation controller, which is embedded in another tab bar controller. Assuming they are using their own class names as restoration identifiers, the restoration path will look like this:
When the user leaves the app with the MyViewController being the active view controller, this path will be saved by the app; then the app will remember the previous view hierarchy shown (Tab Bar Controller → Navigation Controller → My View Controller).
After assigning the restoration identifier, we will need to implement the encodeRestorableState(with coder:) and decodeRestorableState(with coder:) methods for each of the preserved view controllers. These two methods let us specify what data need to be saved or loaded and how to encode or decode them.
Let’s see the view controller:
// MyViewController.swift
// MARK: State restoration
// UIViewController already conforms to UIStateRestoring protocol by default
extension MyViewController {
// will be called during state preservation
override func encodeRestorableState(with coder: NSCoder) {
// encode the data you want to save during state preservation
coder.encode(self.username, forKey: "username")
super.encodeRestorableState(with: coder)
}
// will be called during state restoration
override func decodeRestorableState(with coder: NSCoder) {
// decode the data saved and load it during state restoration
if let restoredUsername = coder.decodeObject(forKey: "username") as? String {
self.username = restoredUsername
}
super.decodeRestorableState(with: coder)
}
}
Remember to call the superclass implementation at the bottom of your own method. This ensures that the parent class has a chance to save and restore state.
Once the objects have finished decoding, applicationFinishedRestoringState() will be called to tell the view controller that the state has been restored. We can update the UI for the view controller in this method.
// MyViewController.swift
// MARK: State restoration
// UIViewController already conforms to UIStateRestoring protocol by default
extension MyViewController {
...
override func applicationFinishedRestoringState() {
// update the UI here
self.usernameLabel.text = self.username
}
}
There you have it! These are the essential methods to implement state preservation and restoration for your app. Keep in mind that the operating system will remove the saved state when the app is being force-closed by the user, in order to avoid getting stuck in a broken state in case something goes wrong in the state preservation and restoration.
Also, don’t store any model data (i.e. data that should have been saved to UserDefaults or Core Data) to the state, even though it might seem convenient to do so. State data will be removed when the user force quits your app, and you certainly don’t want to lose model data this way.
To test whether state preservation and restoration are working well, follow the steps below:
Build and launch an app using Xcode.
Navigate to the screen with state preservation and restoration that you want to test.
Return to the home screen (by swiping up or double-clicking home button, or pressing Shift ⇧ + Cmd ⌘ + H in the simulator) to send the app to the background.
Stop the app in Xcode by pressing the ⏹ button.
Launch the app again and check whether the state has been restored successfully.
Because this section only covers the basics of state preservation and restoration, I recommend the following articles by Apple Inc. for more in-depth knowledge of state restoration:
4. Reduce Usage Of Non-Opaque Views As Much As Possible
An opaque view is a view that has no transparency, meaning that any UI element placed behind it is not visible at all. We can set a view to be opaque in the Interface Builder:
Or we can do it programmatically with the isOpaque property of UIView:
view.isOpaque = true
Setting a view to opaque will make the drawing system optimize some drawing performance while rendering the screen.
If a view has transparency (i.e. alpha is below 1.0), then iOS will have to do extra work to calculate what should be displayed by blending different layers of views in the view hierarchy. On the other hand, if a view is set to opaque, then the drawing system will just put this view in front and avoid the extra work of blending the multiple view layers behind it.
You can check which layers are being blended (non-opaque) in the iOS Simulator by checking Debug → Color Blended Layers.
Show color blended layers in Simulator
After checking the Color Blended Layers option, you can see that some views are red and some are green. Red indicates that the view is not opaque and that its output display is a result of layers blended behind it. Green indicates that the view is opaque and no blending has been done.
Assign non-transparent background color to UILabel whenever possible to reduce color blended layers. (Large preview)
The labels shown above (“View Friends”, etc.) are highlighted in red because when a label is dragged to the storyboard, its background color is set to transparent by default. When the drawing system is compositing the display near the label area, it will ask for the layer behind the label and do some calculation.
One way you can optimize app performance is to reduce how many views are highlighted with red as much as possible.
By changing label.backgroundColor = UIColor.clear to label.backgroundColor = UIColor.white, we can reduce layer blending between the label and the view layer behind it.
Many labels are highlighted in red because their background color is transparent, causing iOS to calculate the background color by blending the view behind it. (Large preview)
You might have noticed that, even if you have set a UIImageView to opaque and assigned a background color to it, the simulator will still show red in the image view. This is probably because the image you used for the image view has an alpha channel.
To remove the alpha channel for an image, you can use the Preview app to make a duplicate of the image (Shift ⇧ + Cmd ⌘ + S), and uncheck the “Alpha” checkbox when saving.
Uncheck the ‘Alpha’ checkbox when saving an image to discard the alpha channel. (Large preview)
5. Pass Heavy Processing Functions To Background Threads (GCD)
Because UIKit only works on the main thread, performing heavy processing on the main thread will slow down the UI. The main thread is used by UIKit not only to handle and respond to user input, and also to draw the screen.
The key to making an app responsive is to move as many heavy processing tasks to background threads as possible. Avoid doing complex calculation, networking, and heavy IO operation (e.g. reading and writing to disk) on the main thread.
You might have once used an app that suddenly became unresponsive to your touch input, and it feels like the app has hung. This is most probably caused by the app running heavy computation tasks on the main thread.
The main thread usually alternates between UIKit tasks (such as handling user input) and some light tasks in small intervals. If a heavy task is running on main thread, then UIKit will need to wait until the heavy task has finished before being able to handle touch input.
Here is how the main thread handles UI tasks and why it causes the UI to hang when heavy tasks are performed. (Large preview)
By default, the code inside view controller lifecycle methods (such as viewDidLoad) and IBOutlet functions are executed on the main thread. To move heavy processing tasks to a background thread, we can use the Grand Central Dispatch queues provided by Apple.
Here’s the template for switching queues :
// Switch to background thread to perform heavy task.
DispatchQueue.global(qos: .default).async {
   // Perform heavy task here.

   // Switch back to main thread to perform UI-related task.
   DispatchQueue.main.async {
       // Update UI.
   }
}
The qos stands for “quality of service”. Different quality-of-service values indicate different priorities for the specified tasks. The operating system will allocate more CPU time and CPU power I/O throughput for tasks allocated in queues with higher QoS values, meaning that a task will finish faster in a queue with higher QoS values. A higher QoS value will also consume more energy due to it using more resources.
Here is the list of QoS values from highest to lowest priority:
Quality-of-service values of queue sorted by performance and energy efficiency (Large preview)
Apple has provided a handy table with examples of which QoS values to use for different tasks.
One thing to keep in mind is that all UIKit code should always be executed on the main thread. Modifying UIKit objects (such as UILabel and UIImageView) on the background thread could have an unintended consequence, like the UI not actually updating, a crash occurring, and so on.
“Updating UI on a thread other than the main thread is a common mistake that can result in missed UI updates, visual defects, data corruptions, and crashes.”
The trade-off of performance optimization is that you have to write more code or configure additional settings on top of the app’s functionality. This might make your app delivered later than expected, and you will have more code to maintain in the future, and more code means potentially more bugs.
Before spending time on optimizing your app, ask yourself whether the app is already smooth or whether it has some unresponsive part that really needs to be optimized. Spending a lot of time optimizing an already smooth app to shave off 0.01 seconds might not be worth it, as the time could be better spent developing better features or other priorities.
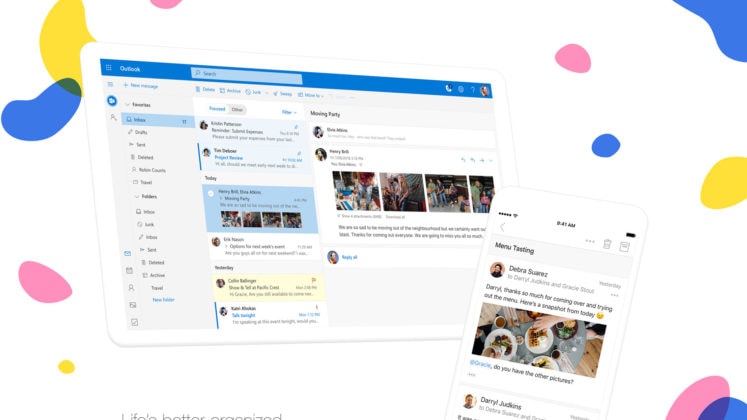
Although Microsoft Outlook is most widely used for B2B customers, something like sending an email with the unique layout is practically impossible. The reason for this lies in the fact that the Outlook is not compatible with most HTML innovations. …
In the previous article in this series I introduced you to the <feComponentTransfer>, and we used it to limit the number of colors in an image to create a poster effect. In this article, we will take a look at how it can be used to create a Photoshop-like duotone effect. We’ll also learn how to use it to control the intensity and contrast of an image’s colors.
A Quick Recap
To quickly recap, the feComponentTransfer primitive allows you to modify each of the R, G, B and A components present in a pixel. In other words, feComponentTransfer allows the independent manipulation of each color channel, as well as the alpha channel, in the input element.
The RGBA components are modified by running different kinds of functions on these components. To do that, each component has its own element. These component elements are nested within feComponentTransfer. The RGBA component elements are: feFuncR, feFuncG, feFuncB, and feFuncA.
The type attribute is used on a component element to define the type of function you want to use to modify this component. There are currently five available function types: identity, table, discrete, linear, and gamma. These function types are used to modify the RGBA components (the colors and alpha channel) of a source graphic. We mentioned that you can modify one or more component at a time and that you can modify channels independently, applying a different function to each component element.
<feComponentTransfer>
    <!-- The RED component -->
    <feFuncR type="identity | table | discrete | linear | gamma"></feFuncR>

    <!-- The GREEN component -->
    <feFuncG type="identity | table | discrete | linear | gamma"></feFuncG>

    <!-- The BLUE component -->
    <feFuncB type="identity | table | discrete | linear | gamma"></feFuncB>

    <!-- The ALPHA component -->
    <feFuncA type="identity | table | discrete | linear | gamma"></feFuncA>
</feComponentTransfer>">
In the previous article, we demystified the discrete function and saw how it can be used to posterize images. In this article, we will start by using the table function to create a duotone effect similar to what you can create in Photoshop.
Creating a Duotone Effect in Photoshop
I’m not a designer, and I don’t know my way around graphics editors like Photoshop. When I wanted to create a duotone effect in SVG, I looked for the way to create this effect in graphics editor first to see if I can replicate it using the filter operations available in SVG. As it turns out, the steps to create duotone images in SVG turned out to be same as those used in Photoshop.
The following video is a sped-up version of this tutorial I found on YouTube.
In the video, the designer creates the duotone effect following these steps:
Desaturate the image, making it grayscale.
Map the grayscale range into a new range that, instead of having black and white on either end, it has two different colors that you want to use in the duotone effect. In other words, you will need to create and use a gradient map that the grayscale is mapped to.
Let’s see how these steps can be replicated in SVG.
Creating a Duotone Effect in SVG
To recreate this effect in SVG, we will need to desaturate the image first. This is possible using the <feColorMatrix> filter primitive.
Then, we need to be able to create and provide a gradient map for the browser to map the new grayscale image to.
Converting an image to grayscale using feColorMatrix
Using feColorMatrix you can provide a color matrix that specifies the amount of red, green, and blue in your image. By providing equal amounts of these three components, we are creating a matrix that converts our image into a grayscale version of itself:
In the following image, the image on the right is the result of applying the above filter to the image on the left:
The result (on the right) of converting the image on the left to grayscale using the feColorMatrix filter operation.
You can learn all about feColorMatrix and how to use it in this article by Una Kravets.
Now that our image is essentially made of a gray gradient, we need to create a duotone gradient map to map the gray gradient to.
Creating a Gradient Map using the table component transfer function
In SVG, to create the gradient map, we can use feComponentTransfer primitive with the type table.
In the previous article, we saw how you can map the colors in an image to a list of colors that you provide in the tableValues attribute using the discrete function. The browser used our list of tableValues to generate ranges that are then used to map the colors to the values we provided.
When using the table function, we will also provide color values in the tableValues attribute. Once again, the browser will use the values we provide to map the colors in the image to them. How the browser will map the colors, though, is different. Instead of mapping color ranges to discrete color values, it will create a color range from the values we provide and then map the input range to this new range.
Suppose we want to use the following two colors for our duotone effect:
These two colors will be used to create a gradient map:
..that we are going to map our grayscale map to.
In order to use these colors in feComponentTransfer, we need to get the values of the R, G, and B channels of each color. Since tableValues are provided in fractions, we’ll need to convert the RGB values to fractions. Color values are usually in the range [0, 255]. To convert these values to fractions, we need to divide them by 255.
For example, the pink color has the following RGB values:
R: 254
G: 32
B: 141
Converted to fractions, these values are now equal to:
Now that we have our color values handy, it’s time to create our gradient map. We mentioned earlier that when we provide values to tableValues with the table function in use, the browser will use the tableValues to create a range. So we start by providing the RGB values of the two colors as values for the RGB component elements:
We saw in the previous article that when using the discrete function, the browser creates n ranges for n values in tableValues. When we use the table function, the browser creates n-1 ranges for n values; and since we provided two tableValues for each component, this means that we will get one range ([pink, yellow]) for each.
Now feComponentTransfer will do its thing: The browser will go over each and every pixel in the source image. For each pixel, it will get the value of the Red, Green, and Blue components. Since our image is grayscale, the R/G/B values will be in the range [0, 1] = [black, white] (0 being fully black, 1 being fully white, and shades of gray in between). Then, the value of each component will be mapped to the new range we provided in tableValues. So:
The red component value will be mapped to the range [.996078431, .984313725]
The blue component value will be mapped to the range [.125490196, .941176471]
The green component value will be mapped to the range [.552941176, .478431373]
So by the time the browser goes over all the pixels in the image, you will have replaced all RGB values in the grayscale gradient with the RGB values of the duotone gradient map. As a result, the image becomes duotone.
The result (on the right) of mapping the grayscale image (left) to our gradient map.
Our full code now looks like this:
<svg viewBox="0 0 266 400">
<filter id="duotone">
<!-- Grab the SourceGraphic (implicit) and convert it to grayscale -->
<feColorMatrix type="matrix" values=".33 .33 .33 0 0
.33 .33 .33 0 0
.33 .33 .33 0 0
0 0 0 1 0">
</feColorMatrix>
<!-- Map the grayscale result to the gradient map provided in tableValues -->
<feComponentTransfer color-interpolation-filters="sRGB">
    <feFuncR type="table" tableValues=".996078431  .984313725"></feFuncR>
    <feFuncG type="table" tableValues=".125490196  .941176471"></feFuncG>
    <feFuncB type="table" tableValues=".552941176  .478431373"></feFuncB>
</feComponentTransfer>
</filter>
<image xlink:href=".." width="100%" x="0" y="0" height="100%"
filter="url(#duotone)"></image>
</svg>
You can take this further and instead of providing only two color values for the gradient map you can provide three color values in tableValues, creating a gradient map that has three colors instead of two.
Controling color contrast and intensity with the gamma transfer function
Using the gamma component transfer function we are able to perform gamma correction on our source graphic. Gamma correction is the function of controlling an image’s luminance levels.
The gamma function has three attributes that allow you to control the gamma correction function that will be used to control the luminance: amplitude, exponent and offset. Combined, they make up the following transfer function:
C' = amplitude * pow(C, exponent) + offset
gamma can be used to control the overall contrast in an image. Increasing the exponent makes the darker areas darker while increasing the amplitude makes the lighter areas shine more. And this, in turn, increases the overall contrast of the image. The offset is used to increase the intensity of each component, and also affects the overall image: both highlights and dark areas.
Tweaking the contrast and dark and light areas of an image can sometimes be useful if you’re not getting the amount of “shine” that you’d like to see in an image.
For example, if I apply the duotone filter from the previous section to the following image, the result is not as “lively” as I’d want it to be:
The duotone image on the right looks a little pale and the colors slightly washed out. I want to add some contrast to it to make it look more lively. By increasing the amplitude and the exponent a little bit:
I am able to make the light areas shine more and the darker areas look more intense:
Of course, this is just an example. You may prefer the paler version of the image, especially that it might look better with text on top. I think gamma correction is most useful in controlling the contrast of black-and-white images. If I apply the same gamma correction operation to the grayscale version of the image, I get a more favorable version:
Of course, you may want to do the opposite: instead of increasing contrast, you may want to lighten the dark areas a bit, in which case you’d decrease the amplitude and/or exponent values instead of increasing them. The default value for both the amplitude and exponent is 1. The default offset value is 0.
Play with the gamma function values in the following live demo to get a better feel of how it affects the brightness and contrast of an image:
Yoksel has been playing with SVG Filters for a while and has recently created a fantastic visual tool that allows you to upload an image and apply different duotone and even tritone effects, and that generates the SVG filter code for you ready to copy-paste anywhere you need it. It is a great tool to play with to learn more about feComponentTransfer.
The SVG Gradient Map Filter tool by Yoksel.
The tool even allows you to tweak the grayscale effect created using feColorMatrix. In our code, we used equal amounts of the R, G, and B channels to get a grayscale effect. This is one way to make an image grayscale. But there are other ways, too. For example, you could create a grayscale effect per channel, which would result in a different grayscale result for each:
I recommend playing with the tool a little bit and checking how your choice of effect changes the underlying code, as this is one of the best ways to learn more about SVG filters.
Final Words
The feComponentTransfer primitive gives us a lot of control over the color and alpha components of images and enables us to create Photoshop-grade effects in the comfort of our code editors.
In the next article in this series, we will look at a couple more primitives that allow us to replicate yet another Photoshop effect using almost exactly the same steps as those you’d take in Photoshop, showing once again how SVG can bring the power of graphic editors into the Web platform. We’ll learn how to blend text with both the color and the texture of a background image, to create some eye-catching results. Stay tuned.
Whether you want to start affiliate marketing to drive sales, a blog to bring in new business, or showcase your creative portfolio, you’ll get everything to build an entire website in one place with any of the options above.
If you want to turn a profit on your blog, use WordPress, Wix, or Squarespace. You’ll be in complete control of your site and everything that’s on it. For people who want to blog with WordPress, we recommend using Hostinger as a web host to keep your speed high and costs low.
We’ll also cover options like Medium and LinkedIn that are great for hobby blogs and making connections–but not blogs for making a living. They are free, but you don’t get to choose how your blog looks, and adding your style is half the fun.
What makes these blogging platforms great? Where could they be better? To find out, we interviewed active users of each platform about where these platforms excel, and where they are falling behind.
It’s a highly customizable content management system (CMS) for bloggers who want to build out a site for their business. It’s also great if you plan to scale your blog for profit.
The reason? WordPress is open source. That means they don’t keep their source code a secret. Developers can go in and create widgets, plugins, and other tools to customize WordPress blogs—so youcan create any kind of blog you want.
There are virtually limitless options for WordPress plugins, meaning you can quickly find one that does exactly what you need…no coding required on your part.
What this means for WordPress users is that no matter the action or functionality they need, there is probably a plugin or widget already available that does it. And it is incredibly simple to add that functionality to your website. You simply find the tool you need, install it with just a few clicks, then easily customize it to your specifications.
This dramatically streamlines your website customization and eliminates the need for you to know how to code or hire a developer to create something for you. Chances are, there’s a plugin already out there that does exactly what you want. It doesn’t get much easier than that when it comes to making your website your own.
One user on our panel, who has stuck with WordPress for four years, describes the CMS as “blogger-friendly” with plenty of SEO features baked in. Their experience is echoed by many of our other users.
That said, there is a bit of a learning curve. To get the most out of WordPress in terms of customizability, you’ll need to be more hands-on with the plugins and widgets you choose and how you manage the backend.
However, even this is fairly straightforward in WordPress—and it didn’t take long for our users to learn the ropes at all.
“With no knowledge of WordPress when I started, it was a bit of a steep learning curve but I figured everything out quickly enough,” said one user. “WordPress is very intuitive and if you can’t figure something out, you just have to Google it or check on YouTube and you will likely find an answer.”
Another echoed that sentiment. However, they also said that “it’s fairly easy to use” after blogging on the platform for a few days.
WordPress is easy to use for All bloggers, including beginners.
The tradeoff is well worth it, as you’re able to get a fantastic website fully customized to your exact specifications. That’s what makes it perfect for creating a website that’s primed for audience growth and profit.
One user was also able to promote items for third parties in order to generate even more revenue. “I was able to monetize my blog using affiliate marketing, along with info products like ebooks and minicourses once my audience got big enough,” they said.
They were also able to leverage plugins to help them build their audience—and generate revenue growth.
“One thing that helped with that was creating an email subscriber list and a newsletter using the Mailchimp plugin,” they added. “It’s a must-have if you really want to monetize your blog.”
With the sheer number of plugins and the ability to customize your site, you will be able to find any option you want to include on your site. As your blog and audience grow, you can continue adjusting your site to accommodate it in whatever direction you want to go.
Blogging with WordPress
Confession time: WordPress is actually the CMS we use here at Quicksprout—so we’re a bit biased.
In fact, we’re very biased.
If you plan on building out a blog that draws in thousands or even millions of readers—not to mention monetizing it—we can’t recommend WordPress enough. But the users are right when they say it’s a bit tricky to learn at first.
At first blush, the blog dashboard for WordPress seems more complex than most. But once you jump in, it’s fairly easy to wrap your mind around. And you’ll get used to it relatively quickly.
The WordPress Gutenberg editor makes the blogging and editing process very straightforward. You really don’t have to know HTML unless you want to get crafty. All the fundamentals you need to publish a blog are point and click.
Sure, it’s not quite like the drag-and-drop functionality as Wix and Squarespace have since you can’t edit the entire page—but it’s pretty darn close.
You can fully customize your blog and content within the wordpress editor.
I’ve also found WordPress to be incredibly scalable. No matter what you want to build or how big you get, the platform will grow with you as long as you choose the right plugins.
A quick tip: Don’t make the rookie mistake of downloading a ton of plugins and widgets. It’s easy to think you need everything—but sometimes, less is more.
Plus installing a ton of plugins is an easy way to sloooooooow down your page’s loading speed.
One plugin we do recommend you get is the Yoast SEO plugin. This is an incredibly popular WordPress plugin that helps you set up your posts to be as SEO-friendly as possible with a few guided steps. It’s honestly a must-have if you’re using WordPress.
Yoast SEO is one of our favorite WordPress plugins here at Quicksprout.
And if you really want, you can start changing the code yourself. Since WordPress is open-source, that means you can do whatever you want with it. If you know PHP or are willing to hire a developer, you can change WordPress however you like.
One user put it best: “WordPress gave me everything I needed to create the blog I wanted. It gave me an easy interface to post my blogs, as well as everything I needed or wanted in my blog: a subscription box, an author area; just the look I wanted and the flexibility to change things as needed.”
Choosing a Host
To build your own site using WordPress, you’ll need to buy a domain name, get web hosting, and set up your account.
hostinger has wordpress-specific hosting plans that are perfect for new blogs.
Hostinger is one of the most popular web hosts, especially for WordPress users. That’s because they run servers that only have WordPress sites on them–this allows Hostinger to configure servers specifically for WordPress security and performance.
This means–with no extra work on your part–you can have a faster, safer WordPress site simply by signing up with Hostinger.
With just one click, you’ll be able to get your WordPress site up and running within minutes. I’m serious. You simply select WordPress as your desired CMS during the signup process, and it’s automatically installed for you.
The price was a big factor for most of the users we spoke with. Hostinger comes in at the very low end price-wise, yet it’s jam-packed with features to help you grow. Starting at $1.99 per month, you’re going to get the ability to:
Use your own domain name for free for the first year
Create up to 100 different websites
Create up to 100 email accounts tied to your domain
If you want to create additional sites or email people from a professional address @yourdomain.com, that’s going to cost extra with some of the other platforms.
Another helpful aspect of going with Hostinger is the 365/24/7 support via live chat. Most of your WordPress-related questions can be answered with a simple Google search–as the world’s most popular blogging platform, there’s a ton of info out there.
Cons of Blogging with WordPress
The user panel gave me varying feedback about WordPress’s beginner-friendliness. Some said that it was easy enough, while others pointed out that it was tough on novices at the beginning.
“I don’t like how it does take a bit of a learning curve to use,” said one user. Their thoughts showed that WordPress won’t be the easiest option, especially when building your first site. “Sometimes I’d like to have my hand held more through the blog creation process rather than having to look up a bunch of YouTube how-to videos to learn how.”
After testing and building sites myself using WordPress, I can say that it takes a bit to get the hang of it—but once you do, you’ll be glad you put the work in.
But even if you’re uncomfortable with it at first, it’s still the best option if you’re willing to learn and grow into the role of managing your website site.
Another flaw that one of our surveyed users mentioned is that WordPress lacks comprehensive customer support.
“I wish there was a help desk that you could contact either by email or by chat,” one user told us.
That is one other good aspect of signing up with Hostinger. There is someone you can reach out to via live chat any time of day or night. Their support teams handle a lot of common WordPress questions and may be able to help you out.
Final Thoughts on WordPress
Along with performing very highly across all criteria, WordPress with Hostinger is a great place to start if you really want to build a blog that will grow with you no matter how big you get.
This is especially good if you plan on monetizing your blog and optimizing it for traffic/growth. Eventually, you’ll need to add more resources some other platforms might not be able to offer you. WordPress and Hostinger can do that.
Some WordPress users had minor issues with the platform’s learning curve, they all said that they were able to create their ideal blog once they got the hang of it. They especially liked WordPress’s level of customization — with some of them monetizing their websites using the site builder’s many plugins and widgets.
Bottom line: Building a WordPress website takes more time than a Wix website. However, the tradeoff is your website is much more customizable (and powerful). And Hostinger makes it easy to host your WordPress site. As such, we highly recommend this combination for bloggers who want to really grow their traffic and/or profit margins.
Wix – Best for Beginners Building a Professional Blog
Wix is perfect for beginners because it doesn’t require any coding skills and you can start a new blog in minutes. Sign up for a free Wix account today.
Wix gives beginners a way to make it look like professionals designed their blogs—all without needing to learn code or web development.
In fact, one user told me, “I think it’s as straightforward as it can get for people with no coding background.” They created their site with ease without running into any stifling restrictions.
Another user called out the drag-and-drop editor’s intuitive UI and its tools to create individualized layouts and designs.
We jumped in and tested it out for ourselves and found they were right. You can create a blog in just a few minutes. Wix even walks you through the entire process step-by-step if you need it.
selecting a template is much easier than starting from a blank page.
They offer hundreds of templates across many different categories of websites. For example, they have templates for travel blogs, simple portfolios, or photography galleries. We love how you don’t need to have any coding knowledge to move assets around and create the blog you want.
Another user agreed that Wix offered a very intuitive blog-building experience while adding, “If I’m unsure about a certain topic, it’s quick to find it via their support.”
Wix offers both live support via a 24/7 callback service (if you’re in the United States) and a massive knowledge base with articles to help beginners out when they’re stuck.
The Wix knowledge base is comprehensive and a great resource as you’re building your website.
But you can also just let Wix’s ADI builder handle most of the dirty work entirely. This tool leverages artificial intelligence to help you build the exact website you want by just answering a few questions.
And, if security or reliability is a concern, Wix nails both with a robust 99.98 percent uptime rate and a team of security professionals on the job 24/7 monitoring the Wix ecosystem for potential cyber threats. All this protection lets you focus exclusively on creating great blog content.
Blogging with Wix
Wix’s blog manager is indeed simple and intuitive, with analytics and SEO built right in.
It’s simple to add the basic features you might want on your blog, too—elements like social tools, likes, comments, hashtags, categories, and subscriber forms.
Once you have a template, you customize the other on-page elements of your blog in the wix editor.
There’s a blog template category, which is a great place to start. Once you have your template selected, I suggest updating the font, colors, and logo to personalize your template and help it stand out from the rest.
Writing a post is as simple as clicking Create a Post, writing your copy, and adding images. You can save drafts or even give other contributors writing privileges for your site. This is all just as easy from a mobile device as from a desktop—no app required.
The blogging process is as intuitive and easy to use as folks described—but there were also some other additions that surprised me.
Wix offers Seo-friendly tools for bloggers.
You can easily add alt tags to images and nofollow tags to links without getting into the HTML. This stuff is really important for ranking high in search results, and with Wix, you don’t have to know a whole lot to get your SEO ducks in a row. For more tips like this, you can refer to our SEO for blogs guide.
All your posts automatically get a read-time count to show readers roughly how long it’ll take to go through your post (something Medium also offers) and is a great feature to have for readers.
We also like the ability to use live chat to interact with your readers in the Wix app. If you build a real community in your blog or are open to answering reader questions in real time—say, about an online course you’re offering or a webinar that’s coming up—then it’s a cool feature.
Most Wix blogs tended to look great across mobile, tablet, and desktop—something our users said helped them draw in readers. “Since my website runs very smoothly on any device,” said one user, “it made it easier for an audience to browse through my work and contact me immediately.”
Cons of Blogging with Wix
There are a few downsides to Wix — but even from our panel of users, it seemed their major complaints boiled down to a couple of points.
The platform sometimes doesn’t play well with mobile devices if you’re trying to do more ambitious scrolling designs, like parallax scrolling. One user said that “my scrolling effect cannot be achieved on mobile so I had to make a simpler version [of my website] separately.”
There’s also the matter of the subscription fee that—while fairly affordable—could cause some burgeoning bloggers to cringe (especially if you plan to be more bootstrap). If you plan on recouping some of that money with their ecommerce tools, you’ll still have to account for paying for a pricier plan for that functionality.
The panel of users rated Wix fairly low on monetization too—but that’s not to say it can’t be done. Occasionally Wix will feature stand-out blogs that use their platform, and that can lead to new opportunities as was the case with one of our users.
“Being featured on Wix did get me some freelance opportunities, and ultimately landed me my full-time job,” they said.
Ultimately, we think that despite the downsides, Wix is absolutely worth it for the platform’s ease of use and out-of-the-box blogging features.
Final Thoughts on Wix
Wix offers the best blogging platform for beginners. It offers a wide array of themes that’ll fit any type of blog and website you want to build.
You’ll also be able to easily change the look and feel of those themes to make your blog look the way you want it to—no coding knowledge needed.
The users we talked to praised Wix’s ease of use and the ability to customize their blogs on the platform. Our own hands-on research verified that. We could create a great-looking blog with zero experience with Wix in literal minutes. Imagine what you could do with more time.
And if you really want to take the guesswork out of designing your website, you can even let Wix take care of it for you by answering a few questions and letting their advanced AI take care of the rest.
Wix unique AI website-building platform requires you to answer just a few questions and it does the rest.
When you choose to let Wix create a site for you, the Wix AI website-building platform, called Wix ADI, basically does the rest. You simply identify a theme you like, from multiple color and font combination options, and then Wix prompts you with a variety of homepage designs to choose from.
From there, you choose the pages you want to include on your site and that’s it. Your site is up and running in less than two minutes. Of course, all elements of your new AI-designed website are still fully customizable, so you’re not locked into anything. But this is a great option for those who don’t want to devote time to building their site from scratch.
Bottom line: We highly recommend Wix to beginner bloggers who want to easily build a great-looking blog that’s both reliable and secure. Even experienced website builders will find there’s a lot they can get out of Wix. And with tools like its ecommerce functionality and Wix email marketing, you can grow and shape your website to optimize for things like profit and audience growth. For even more insights, refer to our in-depth Wix review to see how it works and how to get started.
Squarespace – Best Blog Builder for Artists and Designers
Squarespace is ideal for creative professionals because it has stunning designs and built-in tools for monetizing blogs. Sign up now to start your free trial.
The first thing I notice whenever I go onto a Squarespace blog is how gorgeous it typically looks.
Photography and graphic designs seem to leap off the screen. The blog owners themselves seem to always be artistically-minded like illustrators, photographers, graphic designers, home decor experts, and more.
Our panel was no exception. They were made up of a website design expert who teaches readers how to make stunning sites, a gardening influencer who frequently showcases mouth watering photos of his homegrown vegetables, and an interior designer who likes to flex their room designs off in gallery posts.
And there’s a reason they all chose Squarespace as their platform.
The trio rated Squarespace very highly across the board. Many of the users had glowing words to say about its ease of use and designs.
“I think I had my blog up and running within a day,” said the user who runs an interior design blog. Their site frequently showcases captivating photographs of eclectically designed rooms. “Squarespace offers clean, beautiful templates that you can easily tweak.”
squarespace shines above alternative options with its modern and beautiful design options.
Their claims are backed up by my own research of hundreds of Squarespace blogs. Each of the platform’s templates is created by their team of exceptional designers—and they all look stunning.
Blogging with Squarespace
Editing your blog—from the contacts page, to the about page, to the home page, to your portfolio, to the actual blog itself—is very easy with Squarespace. Like Wix they have a drag-and-drop tool. And unlike WordPress, users don’t have to deal with an occasionally confusing backend editor.
“They have a great What You See Is What You Get builder,” said one user. “That means when you’re building the page, you see what the page will look like as you’re building it.”
you can change the layout of your squarespace blog with a single click.
That user is also known as Paige Brunson. She discovered the wonders of Squarespace years back and loved it so much she created a thriving career helping other people design on it too.
She believes that Squarespace’s backend editor is superior to that of WordPress because you can see changes as you make them.
“Sometimes, like in WordPress, you’re editing your site in the backend, but then you have to go to the front end to see what it’ll look like when you’re finished,” she said. “With Squarespace, as you’re building the blog post, you’re seeing the changes happen at the same time. And I think that’s really, really useful. That’s one aspect that makes it really easy to use.”
Squarespace also gives you tools to add an ecommerce portion to your blog along with a newsletter integration. That can really help you scale and transform your blog for profitability and audience growth.
Squarespace has built-in tools to monetize your blog and grow your audience.
“There are quite a few built-in features in Squarespace to build your business the way you want like a shop, integrated email marketing, a members area and podcast support,” said another user. “Plus they have many resources on their website about every feature and how to use them.”
Cons of Blogging with Squarespace
Where our panel of users found Squarespace lacking can be boiled down to one word: Customization.
While the platform does offer ways to add email marketing, ecommerce, and membership functions to your site, it’s still relatively limited when it comes to overall customization when compared to a CMS like WordPress.
“Custom CSS is only available in the Business Plan,” said one user. “It’s doable for my website, I found some great tutorials on the internet for extra CSS customization and I had to buy a sidebar plugin because it wasn’t integrated in my template. For more complex websites this might be a problem.”
While Paige is an evangelist for Squarespace, she believes that it could be better when it comes to its mobile customization.
“The mobile editor is the thing which my students find the most annoying,” she says. “With Squarespace, building a website takes time [on desktop], and then you have to literally go build the thing a second time [for mobile]. It’s just a lot more time consuming of a process.”
Another user also had minor issues with Squarespace’s intuitiveness saying, “It could be more obvious what to perform certain actions. Sometimes you have to hunt and click here and there. Every now and then I’ve accidentally deleted a blog because I’ve clicked the wrong button.”
Final Thoughts on Squarespace
Squarespace users had extremely positive things to say about the platform’s stunning templates and overall usability.
Users might be turned off by the platform due to its lack of features. You also can’t access tools like the Yoast SEO plugin from WordPress. On top of all that, you need to pay a higher price for access to custom CSS.
It will cost you a bit more to maximize Squarespace’s ecommerce capabilities, as you need to opt into a more expensive plan.
Bottom line: Squarespace offers great looking templates, easy drag-and-drop designs, and an opportunity to show off your art, photographs, and more. Give Squarespace a try today.
LinkedIn gives you a built-in audience of over 740 million business professionals. The audience comes from all stripes, including HR, digital marketing, finance, tech, and more.
Many of them are highly active on the site, frequently sharing thought leadership and articles with one another via their LinkedIn feed.
So if you’re interested in establishing yourself as an influencer or thought leader in your business space, the audience on LinkedIn is your bread-and-butter.
The platform has a ready-made culture and set of expectations that a business blogger would dream of creating on their own site. The challenge for you is creating compelling and share-worthy content to build a following.
linkedin has simple and straightforward publishing options.
After all, LinkedIn is a social network. Your influence grows in proportion to the size of your network. The more posts you publish, the more connection requests and followers you’ll attract.
Since it’s a social network for industry professionals, that makes it a great channel to access prospects and get quick feedback from peers on your B2B-style articles. You have an opportunity to put your thought leadership in front of everyone from potential clients and customers, to recruiters, to influencers in your field.
And, you can turn your audience into partners and customers.
Each of the users on our panel leveraged LinkedIn blogging to make key networking connections and develop an audience.
“So far, I have experienced getting higher-quality clients through LinkedIn by blogging and writing content on the platform,” said one user I talked to.
It might seem painfully obvious, but not a lot of people realize that the platform can be incredibly lucrative if you’re in business. The folks on LinkedIn are typically high-earners. They’re C-Suite executives. They’re industry movers and shakers who want to innovate and build lasting businesses.
And they’re willing to pay a premium to the right person who will get them there.
Said one user, “I can probably make $1,000 or so from LinkedIn every month indirectly if I really tried.”
Blogging on LinkedIn
Creating a blog on LinkedIn is very simple and just requires a profile, which is free. From there, it’s just a matter of clicking on a Facebook-like status button and creating an article.
Like Medium, LinkedIn uses that Gutenberg-style editor that’s fairly intuitive. Our panel also found it very usable, with one saying, “The article feature is pretty easy to use. I simply add images, write the text, and publish—and I’m done. No crazy misalignment or formatting issues.”
It’s also worth noting that there are differences between a LinkedIn post and article.
A post is a smaller update you’d share with your feed and connections. Think along the lines of a quick anecdote or pro tip. They’re limited to 1,300 characters, which is about 5 lines.
Articles are longer and more in-depth, of course. They’re something that the broader LinkedIn audience would be interested in reading. And who knows, maybe your post will get picked up by one of LinkedIn’s blogs on marketing or sales.
your linkedin blogs have a chance of being viewed by a wider audience.
A person who reads your article can also follow you from there, so they’ll be alerted when you publish your next article. Any articles you publish will appear in the Articles section of your LinkedIn profile.
Is one better than the other? It depends, of course. After all, you might have a great idea for a long-form article that your audience will love.
But, one of the users on our panel thinks that the shorter the better. As such, they recommend avoiding making articles entirely.
“Go all in on multimedia posts and short status update posts,” said one user. “Do not post full articles here. If you want to get a lot of traction, post the right kind of content and figure out a way to divert that attention away to products or services that you can sell people on.”
Cons of Blogging on LinkedIn
While LinkedIn does offer a lot of opportunities for building your brand and creating thought leadership, it lacks in some vital areas.
For one, there’s no intuitive way for folks to access an archive of your past articles like you might find in Medium or a normal Wix, Squarespace, or WordPress blog.
Instead, the article will live in your Activity feed, which requires you to click on your profile, then your Activity feed, and then scroll down to your article. That’s a lot of work to find just one article.
“There’s not great discoverability for people who want to read my past blog posts on LinkedIn in my opinion,” said one user who went on to opine about the lack of a newsletter feature to help promote their blog.
That user also had a strong condemnation of blogging on LinkedIn as a whole, saying, “Articles notoriously get horrible reach in the feed. Creating an actual blog on LinkedIn, for me, is worthless.”
You also shouldn’t be using LinkedIn blogs a tool for attracting candidates. It’s much easier to use recruiting software.
Final Thoughts on LinkedIn Blogs
LinkedIn is a social networking platform first and foremost. Everything else comes secondary to that goal.
The same goes for their articles. It’s not a blogging platform per se in the traditional sense—but it can be a very effective blogging tool to grow your network and make connections.
And some of our users have made a lot of money by using their blogs to make these connections.
“I make money indirectly from LinkedIn. I have to make a post, then throw a link to a webinar in the comments section. Some people sign up and then purchase my course through the webinar later on,” one user explained.
But ultimately, it’s not a very effective blogging platform if blogging is all you want to do. We’d recommend going with any of the previous options if that’s your goal and supporting your blog by sharing your posts on LinkedIn.
Bottom line: LinkedIn is a decent blogging platform only if you’re using it to support a platform you own, like your business’s website. You can’t directly monetize it, and you’re entirely dependent on an algorithm for reach and engagement.
But if you’re blogging about business subjects like management or marketing, LinkedIn is a good opportunity to grow your network and audience. There’s a pre-existing community of people there talking about those topics and ready to read your posts.
Medium is great for people that want don’t want to build an audience from scratch because it already has over 60 million readers and the opportunity to get paid through their partner program. Sign up now to try Medium for free.
Medium is easily one of the most polarizing platforms out there—and it’s certainly the most controversial one on our list.
It’s home to bloggers focused on crafting niche content for readers. It’s also where you can find some of the most thought-provoking, incendiary content online.
What really makes Medium stand out for writers is its built-in communities of readers. People can browse a vast library of publications and topics, find your blog, and subscribe to it with a single click–they can even choose to get your blog posts sent to their email inbox every time you post. Writers can post pieces under their personal account, a publication they own and run, or submit their writing to publications for a chance to be published on other Medium blogs and put in front of even more readers.
“It’s just plugging and chugging and going,” one user told us. “Even if you have no writing experience, and just want to write, it’s not hard to get started and find an audience.”
The ability to tap into a well of readers was a draw for many users—especially after their less-than-stellar experience on another platform on this list. A huge draw of Medium is not having to try to drive traffic to your own independent website.
“I definitely recommend not even starting with a traditional WordPress blog,” one user said. “Just go on Medium because it works as a blogging tool and a social media platform. Naturally, there’s going to be a much larger audience there for people to read your work.”
Medium also gives you the ability to get paid for writing through the Medium Partner Program. This allows writers to get paid for their work based on the amount of engagement their articles get.
Some bloggers routinely make six figures a year from their posts—though even Medium is quick to point out that only 7% make more than $100 per year. All this makes it a good platform if you want to find and cultivate an audience of fans of your writing, and make a little bit of cash along the way.
you can use medium to get paid for your blog posts.
Blogging on Medium
There are two primary ways to blog on Medium:
Publish to your own publication. This involves creating your own Medium publication page that can be focused on whatever topic you want. You then craft content that will specifically be published on that page. This is the easiest way to get published right away.
Submit to other publications. This is when you write an article in the hopes of getting it published in another Medium blog. While this is a good way to tap into an established publication’s audience, it does mean you need to write an entire article beforehand with no guarantee that it’ll get published in the publication. Note, however, that if you do NOT get accepted into a publication, you can still put your article on your own page or publication you run.
After using Medium to do both, I can attest to it being incredibly simple to use.
All you have to do is click “Write a Story” and you can get started writing a Medium article. The dashboard is a lot like WordPress’s Gutenberg editor, so it’s fairly intuitive. Once you’re finished, add a few tags and click “publish” and it’s out in the world.
Submitting to other publications is a good way to access audiences. However, you’ll be writing on spec. And there’s a chance they might reject your article entirely.
The alternative to that is creating your own Medium publication which I definitely recommend.
This gives you the option to add other writers and editors to your blog, along with the ability to accept submissions. This can really help pad out your editorial calendar with little effort on your part—so you can have access to a stream of content for your readers.
Starting a publication on medium allows you to publish more content with minimal effort.
One of the users on our panel actually helped found one of the biggest and most popular publications on Medium: The Writing Cooperative. In fact, they currently boast about 226,000 followers on the site and publish multiple times each and every day.
“The Writing Cooperative began on Medium in 2014. In some regards, we’ve grown up with the platform” said co-founder Justin Cox. “[…] The Writing Cooperative’s content is often recommended in user feeds, which is a great way to grow an audience.”
Justin went on to say that he doesn’t make a living off of the Writing Cooperative, but he and his co-founder are able to generate some income by setting up a Patreon for the publication as well as launching a coaching program for their community. “Everything we do is geared towards supporting and encouraging writers,” he added.
You also have the option to accept submissions from other writers when you create a publication. That could be really great to help grow your blog while making connections with more users.
Cons of a Medium Blog
While our panel of Medium bloggers found that the platform was overall easy to use, they had varied perspectives on how it ultimately works to build an audience.
One of our users was simply not happy with the way the platform compensates them and signal boosts (or rather, doesn’t signal boost) their content.
“Medium did help me grow my audience by pushing my best content towards external promotions and new Medium users, but lately, this has stopped and I presume it is because of the large volume of new writers,” the user said. “When it comes to attracting new readers, I feel like Medium can do a lot more.”
They went on to explain how they were also frustrated by the platform’s payment system and the lack of transparency surrounding it. In fact, they even had to go a step further to help better market their blog.
“I had to invest money from my own pocket to publicize the publication which I think attracted new readers, but my efforts didn’t really get recognized by Medium,” they explained.
Another user expressed a similar opinion in regards to the payment program. “I make a few bucks,” they told me. “It does not pay nearly enough to justify the time and effort I put into writing.”
Inherent to the platform’s structure is a very Hunger Games-style of gaining readers and making money. You’re constantly competing against other articles for people’s attention, and fighting against bigger and more established publications.
This can be very discouraging for some bloggers—especially if you’re trying to launch a publication for the first time.
“Sometimes, even if your article is posted into those huge exclusive publications, they don’t even get much engagement in the first place,” said another user. “So, it’s kind of like you’re fighting for nothing.”
That’s some strong criticism that I can’t help but agree with to a certain extent. Medium is a platform for bloggers willing to put in the hours and craft content that people want to read, but it can be very discouraging both at the outset and after you start to gain traction.
Final Thoughts on Medium
Medium is a big player in the blogging space with the likes of former President Barack Obama and A-list celebs like Chrissy Teigen using the platform. Big brands like Patagonia also leverage the site to host their own blogs.
It’s a good platform for building an audience if you’re diligent at it and publish consistently—but its lack of transparency when it comes to the algorithm, as well as its Partner Program, resulted in a lower rank on the list.
Bottom line: Medium is a good all-around traditional blogging platform that gives you the opportunity of getting your writing in front of more people and potentially make some money blogging. Like our user panel said: It’s a blogging platform along with a social media platform.
The downside is that there are limits on how high you can go as a part of Medium. You won’t own the traffic, and you won’t be able to do things like sell ad placements, for example, so your profit potential is quite limited.
You can use Medium to get a feel for blogging, find your voice, and start attracting an audience. But once you gain a following, you’re better served jumping ship to another platform, like WordPress, that you have full control over.
How We Chose Which Products to Review
We chose our top five blogging platforms by focusing on four essential qualities:
We researched dozens of the most popular and prominent blog builders and platforms using the four elements above as a way to judge the blog builder’s quality.
This process involved “lighter” research that looked different from platform to platform. We created accounts and built out simple test blog pages. We also looked at each of the platform’s features and tools across their payment plans if they had them.
By doing this, we were able to get a sense of each blog site’s strengths, weaknesses, and target users.
Finally, we narrowed down our list from 12+ to five once we felt like we had a set of products that exemplified each of the criteria in unique ways.
We had a good amount of general knowledge, and some insights into the user interface for each platform at this point.
But we didn’t know what it was like to use each product for years or what it was like to depend on these blogs for business. So we set out to find people who did.
How We Reviewed Each Product
The best way to understand the quality of a blogging platform is by talking to actual users.
They’re the ones who have hands-on experience with the product, having spent anywhere from hours to years building their blogs. They know what’s working, what they love, and what needs to be improved.
To get real reviews from real users, we reached out to users across each of the platforms in order to attain a panel of three users each.
In all, we reached out to 116 users in order to gain our results. To verify they were actually users of the blog platform, we:
Used an advanced search query that gave us results for bloggers using the platform for Squarespace and Wix.
Read featured lists of actual users officially published by Wix and Squarespace.
Scoured LinkedIn for prolific bloggers and influencers and made sure that they had posted more than ten article posts to LinkedIn and posted recently sometime in the past calendar year.
Went through Medium for bloggers and publications to make sure that they had posted more than ten Medium posts and posted recently sometime in the past calendar year.
Once verified, we asked each user if they would be willing to either be surveyed or interviewed about their experience on the blog platform.
What We Learned on Choosing the Best Blogging Platform
Our biggest takeaway from our research: There simply isn’t a one-size-fits-all approach to blogging.
A person using Medium is going to be a different blogger than a person using WordPress. The right platform for you is ultimately going to be unique to your needs.
However, there are a few elements that we believe are universally applicable when it comes to looking for the right blogging platform.
Easy Learning Curve
If you’re a new blogger, you probably don’t want to start out with an overly complex platform. You might feel ambitious and want to learn how to create a big website, but I highly recommend not doing so for two reasons:
1. You’re going to get burned out—fast. It’s easy to bite off way more than you can chew in the beginning. When that happens, you’re going to end up getting tired of your blogging project very fast. You might even abandon it completely as a result.
2. There are much easier (and better) ways to do it. All of the platforms on this list are easy to use, but some are easier to pick up than others.
So find a platform that lets you launch quickly, cheaply, and easily.
Medium and LinkedIn are fairly straightforward to get started: You just create an account and you can start publishing immediately after. You also don’t have to worry about things like domain names, web hosting, or even page customization with these choices. The platforms take care of all that for you.
But if you’re a beginner who wants to own their platform with a personal blog site, Wix is the standout choice. Add a button, image, or embed a video–it only takes a few clicks.
wix makes it easy to add videos, audio, buttons, and other visual enhancements to posts.
They have the easiest learning curve of any blog builder we’ve seen yet. And the users that we talked to had glowing reviews of their own experience using the platform.
“[Wix’s] very intuitive and has great tools to create individual website designs,” one Wix user told us.
So if you’re not afraid to get your hands a little dirty, then I highly recommend Wix. They’ll ultimately give you the best combination of simplicity and website power.
Niche-Friendly Customization
Perhaps the most important decision you can make for your blog is what topic you’ll be writing about. This is going to determine your audience, its size, and your ultimate success.
No matter what you choose, you’re going to want to make sure that your blog allows you to customize its look and feel to fit your topic’s niche. This helps develop your blog and brand’s identity, and create a stronger relationship with your audience.
As you can see above, the websites that we reviewed do not all have the same level of customization. For example, WordPress gives you many more opportunities to customize everything, from your website’s colors and article layouts to your domain name and the fonts that you use.
If there’s something you can’t do right from your dashboard, you can simply install a plugin or a widget to get it done for you (or get your hands dirty with a little code).
Both Wix and Squarespace follow WordPress in terms of customization. Each of these platforms offers thousands of themes you can use in order to choose the exact look and feel you want from your blog. They’re the best option if you want to go for a more traditional blog and own your own platform.
Platforms like Squarespace even offer native tools to do things like add an ecommerce store to even further customize your blog.
squarespace is perfect for bloggers who want to monetize content by selling products.
“One of the reasons why I recommend Squarespace to small businesses or bloggers is because you don’t need to go get a third-party plugin to add a shop or to have your Instagram in the footer, or create your email newsletter collection,” said Paige Brunton, the Squarespace design coach on our panel. “It’s really an all-in-one system, which is really wonderful.”
Websites like LinkedIn and Medium offer limited customization options, only giving you the ability to change your logo and the images in your blog posts. However, the tradeoff is that they offer better ways to grow your audience.
Audience-Building Tools
Good blogging platforms offer you different tools to grow your audience. This could come in the form of SEO tools (to help your posts rank better in search results) or they could help connect you with new readers on their own platform.
For example, Medium is a great blogging platform if you want to tap into a large, existing audience and go viral. Be warned: It’s going to take work—and even then, success isn’t guaranteed. You’re beholden to their algorithm and that’s always going to come with risk.
“Medium did help me grow my audience by pushing my best content,” one user told us. “But lately, this has stopped […] When it comes to attracting new readers I feel like Medium can do a lot more.”
Wix, Squarespace, and WordPress have a variety of marketing tools, such as integrations with Google Analytics and SEO dashboards to help grow traffic. In fact, any tool that helps you elevate your search engine rankings can really help turbo-charge your audience building efforts.
There’s a reason WordPress’s Yoast SEO tool is as popular as it is. When you focus on getting organic traffic, it saves you money you’d otherwise spend on digital ads on Facebook or Google. Overall, this is great if you want to have a much more hands on, under-the-hood approach to your growth strategy.
Platforms like LinkedIn lack these tools. However, they can be a part of a bigger growth strategy by allowing you to make vital connections with influencers and change-makers in your industry. Those connections can really help grow your blogging reach as well.
However, the blog platform you ultimately choose is going to have a massive impact on how much money you can possibly make and how you make it.
For example, with LinkedIn, you’ll be the most limited in your profit making potential. That’s because the platform won’t allow you to implement typical blog profit-making strategies such as on-page advertising—but you can still make money by promoting things like webinars, ebooks, and online courses.
Medium offers its Partner Program that allows writers to earn money on their articles based on “member engagement.” That means if other people read, comment, and like your story, you’ll be paid by Medium on the strength of that.
But, you still won’t be able to earn money from advertising. And also, their Partner Program seems to be a fairly difficult way to make a living of any sort. We even had one user tell us that they had to invest their own money to publicize their publication.
Of course, you can still use those sites to make money via strategies like affiliate marketing or coaching and other freelance services. But remember: You’ll also be completely beholden to their algorithm for traffic. That means one algorithm change can mean the difference between making money and completely shuttering your business.
That’s not an exaggeration either. Algorithm changes have been notorious for shutting down once successful blogs by throttling their traffic.
If making money is important to you, then I highly recommend controlling your own platform by building your own blog with WordPress. You’ll be able to fully customize your site and build out your blog to optimize for profit.
Platforms like Squarespace and Wix offer native ways of monetizing your blog by giving you tools to add ecommerce stores to your website. However, they don’t boast the same level of customization that WordPress does—and so you’ll be more limited in how you can make money and grow your blog.
Wix, WordPress, and Squarespace give you a way of truly owning your blog at the end of the day. It’s your platform, so you can do with it what you want. You won’t have to worry about algorithm changes ruining your traffic. You’ll also be able to implement as many or as few profit-making methods as you please.
Best Blogging Platforms: Your Top Questions Answered
What is the best platform for blogging?
WordPress is the best blogging platform because it’s easy to set up, customize, and scale. It has a built-in content editor that enables bloggers to write and publish directly on the platform.
As an open-source blogging platform, WordPress is the most popular CMS on the market today. There are thousands of free WordPress plugins that can be used to extend the functionality of a blog. You can use these plugins to collect email addresses, sell digital products, and even manage your affiliate programs.
What is the best platform for a beginner blogger?
Wix is the best platform for beginner bloggers due to its simplicity. As one of the most user-friendly website builders in existence, you can use Wix to create a website in minutes by selecting a professionally-designed template or using the Wix ADI.
The vast majority of Wix templates already come with a blog. But if not, you can add a blog to your Wix site with just a few clicks. From there, it’s easy to start publishing content to your blog without having to hire a developer or write a single line of code.
How do beginner blogs make money?
Beginner blogs make money through ads, affiliate programs, and selling digital products or services. The great part about blogging is that you can implement multiple monetization strategies that align with your skills and goals.
Blogging is a great side hustle because it doesn’t require a full-time commitment. You can spend as much or as little time as you want running a blog in addition to your full-time job. Some bloggers choose to spend just one or two days a week writing content for their blogs, while others spend an hour or two per day.
While it may take some time to earn money, blogging is a popular side hustle because of its passive income opportunities. As your blog scales and gets more traffic, you can generate revenue while just maintaining your blog.
Alternatively, you can create a WordPress site for free and publish your blogs there. Just be aware that this route will require you to pay for a web hosting service. In this case, we recommend using WordPress with Hostinger.
The Top Blogging Platforms and Blog Sites in Summary
Your unique needs will determine the blogging platform you ultimately choose. I can see how some people would naturally gravitate to Wix as the easiest drag-and-drop blogging tool. But WordPress has everything you need to get the most out of your blogging experience.
You’ll be able to find what you’re looking for using our list above and methodology to guide you.