
With the forecast of over IoT devices being deployed globally by 2020, the amount of data stored in the cloud is hard to imagine. Not to mention the processing power needed to derive any tangible value from it.
No wonder business owners are increasingly looking to improve the performance and reduce operational costs of their IoT products. One of the ways to do so is by handling the data outside of the main cloud or at its "edge."
Amazon’s New Baby Activity Skill API Lets Parents Track Infant Data Hands-Free

Amazon has announced the release of the new Baby Activity Skill API, allowing users to enhance their baby care applications with hands-free tracking.
How to Make Money Blogging in 2019
I have a major disclaimer before we begin.
A good part of my career has been working for some of the folks in this list.
In fact, I was personally responsible for setting annual revenue goals and hitting those goals while I was the Senior Director of Growth and Product at I Will Teach You To Be Rich. In that case specifically, I’m extremely familiar with revenue totals and what drove that revenue.
Not to mention the affiliate commissions that were paid out to some of the people on this list, numbers that were shared in confidence after a few too many drinks, and second-hand rumors that I picked up along the way.
Unfortunately, I’ve got sad news.
I’m not going to share any of that insider knowledge. Sorry.
Some folks don’t mind publishing their revenue numbers but others keep it extremely private. If I shared that kind of info on how their blogs make money, I’d shatter the trust they placed in me. I take that trust very seriously.
For this post, I’m only going to be sharing revenue numbers that have been shared publicly.
Now here’s what I can do for you.
With the background that I have in this space, there are some common rules of thumb for figuring out revenue. They’re not perfect rules but they do tend to get the right number of digits. And after a while, you get a general sense for people’s revenue based on the size of their audience.
For most folks on this list, I’ll give a guess based on their public audience size and any hints that they’ve released publicly about their revenue. I’ll clearly label at is as a guess and you should take it with a grain of salt.
Ramit Sethi — I Will Teach You To Be Rich
Revenue = I can’t tell you
If you poke around the site a bit, it’s pretty obvious that the blog makes most of its money from infoproducts.
Ramit is absolutely at the top of his game when it comes to infoproducts and I consider this site one of the best to learn from if you’re considering monetizing your own blog with infoproducts. Make sure to sign up for his email list — you’ll start getting the launch funnels and you’ll be able to see how it all works.
There are also a few products available for purchase from the products page. That’s a great source for inspiration to see what an amazing infoproduct sales page looks like.
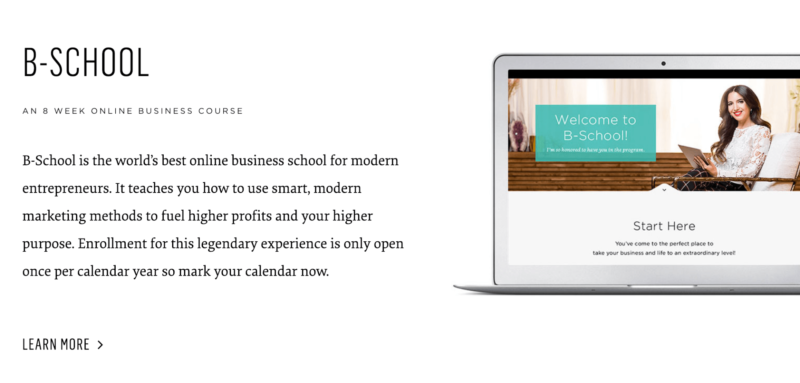
Marie Forleo — marieforleo.com
Revenue = My guess is several million per year
Marie has been blogging for a while now. She also put in a lot of work into her YouTube channel.
He content has a great reputation and her copy is world class. I assume most of her revenue comes from infoproducts, particularly her flagship program B-School. It’s been a while since I followed Marie closely but for a period, she launched B-School once per year.
She’s an amazing person to study if you want to learn how to produce high-quality positive content. She’s also brilliant at balancing valuable content with going for the sale in an authentic way.
Steve Kamb — Nerd Fitness
Revenue = Over $1 million per year
According to this post, Steve’s doing over seven figures with his business. It’s a mix of infoproducts, coaching, and bootcamps. He also wrote a book called Level Up Your Life.

What I love most about Steve’s business is how he’s chosen a specific segment of the market and differentiated himself from other fitness blogs. The fitness space is crazy competitive but by branding his entire business around fitness for nerds, he clearly separates himself from that competition. Even in the most competitive categories, there are still opportunities to target a niche with your blog and make real money with it.
Amy Porterfield — amyporterfield.com
Revenue = At least $2–3 million per year, maybe more
Amy’s About page states that she’s built a multi-million dollar business, something that I absolutely believe based on her audience size.
I’m assuming that the vast majority of her revenue is from her infoproducts, but it looks like she does some affiliate promotion too. Her affiliate page is pretty classy and well done. It’s a great example of how to promote products in an authentic and non-pushy way.
Jon Morrow — Smart Blogger
Revenue = Over $1.2 million per year
In this post, Jon states that he’s doing over $100K per month in affiliate revenue which is pretty impressive.
He also has several of infoproducts available for purchase on his site. I bet these do about $30–50K per year on their own. I’m not sure what Jon’s email funnels look like but if he’s pushing launch funnels aggressively, he could easily have another few million in revenue from infoproducts on top of his affiliate revenue.
Darren Rowse — Problogger
Revenue = My guess is about $10 million per year
Problogger has been around since 2004. That’s an eternity in online marketing. It’s one of the original “how to blog” blogs. Darren also owns Digital Photography School which has 8X as much traffic and revenue as Problogger.
Darren did do a income report on the first half of 2016. At that time, 46% of his revenue from both sites came from affiliates, 31% came from infoproducts, and the rest from a smattering of different categories.
Seth Godin — seths.blog
Revenue = My guess is over $2 million per year
Seth Godin had plenty of success before his blog: he’s written 18 books, built and sold a company to Yahoo, and then was a VP at Yahoo. And his blog has cemented him as the leading marketing thought leader. If you were trying to come up with an ideal example of a thought leader, you’d have a hard time finding a better example than Seth Godin.
Seth’s blog is the original, longest running, and possibly highest value blog in marketing. He’s posted every day for like 20 years or something.
For a long time, he never montized it. Unless you consider featuring his books occasionally to count as monetization. Recently, he has done a few infoproducts including the altMBA and The Marketing Seminar. I went through The Marketing Seminar myself and quite a few people were in the community, so it sold well. Seth’s site says that over 5,000 people took the course in total. At $800 per sale, that’s about $4 million in total spread over several years. Plus all the revenue from altMBA.
Neil Patel — neilpatel.com
Revenue = I’m not even going to guess
I worked for Neil when he was a co-founder of KISSmetrics. He’s the one that originally hired me. Also worked with him on some other projects after that. I’m not going to even hazard a revenue guess here since I don’t want to reveal anything that Neil would prefer to keep private.
He has stated publicly that his main site, neilpatel.com, generates over 2.5 million visitors per month. I’ll let you figure out the revenue from there.
Selena Soo — selenasoo.com
Revenue = Over $1.6 million per year
In this article, Selena reported that she made $1.6 million in 2017. I assume the majority of her revenue comes from infoproducts that she launches to her email list periodically. Considering the stage of her business, she’s built out a pretty impressive infoproduct portfolio along with some higher ticket mastermind offers.
Sam Dogen — Financial Samurai
Revenue = My guess is about $1 million per year
Sam gives a few hints on what he makes with his site. First, he does give the revenue of his infoproduct ebook which is $36,000 per year.
Funny enough, he chooses not to include his Adsense revenue or affiliate revenue as “passive” income within any of his passive income reports. Most folks in the industry would consider these revenue sources to be passive.
Sam does break down some hypothetical revenue amounts of blogs of different sizes here. One example includes a personal finance blog that’s generating about one million visitors per month. I remember Sam stating somewhere along the line that he has about that much traffic. The traffic estimation tools like Ahrefs also put his site in the range. So, the example that he gives should be close to his actuals. Using his projections as a guide and knowing that he has plenty of affiliate links along with Adsense on his site, a $1 million per year estimate should be close.
Brian Dean — Backlinko
Revenue = Over $1 million per year
He launches infoproducts to his email list a couple of times per year. I believe he has a course on SEO and one on YouTube. With his traffic volume, each of these launches should be doing upper six figures, possibly $1 million per launch.
He has stated in a few interviews like this one that he’s doing seven figures per year.
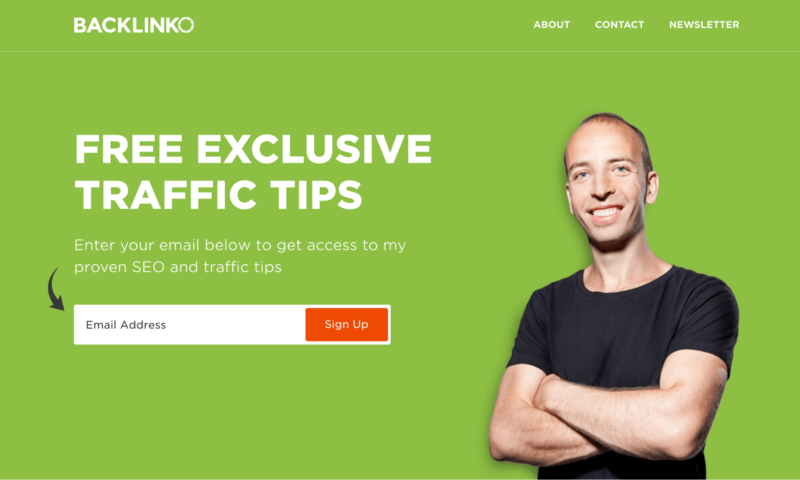
This is a great example of a business that’s focused really heavily on generating traffic, turning that traffic into email subscribers, then monetizing via a few infoproduct launches per year. It can seem magical to have a business with ridiculous profit margins at this stage. Most of us would love to have a $1 million per year business with a super small team and a handful of moving pieces.
James Dahle — White Coat Investor
Revenue = Over $1 million per year
James used to publish his annual revenue in his annual state of the blog posts but stopped as his blog became more well known. Here’s his 2019 state of the blog. His last reported income was $187,862 in 2014. He does mention multiple times that he’s now running a seven-figure business, so his current revenue is at least $1 million per year.
He does have a book by the same name. Looking through his site, the majority of his revenue comes from affiliates, ads, and sponsorships.
His email list is extremely small for the size of his blog — it’s only 21,725 subscribers. And with a small email list, any infoproduct launch is going to be limited to five figures. He does have an infoproduct on creating your own financial plan for $499. If he focused on conversion to email and got good at infoproducts, he could add another $1–2 million in revenue to his business.
Tim Ferriss — tim.blog
Revenue = My guess is about $10 million per year
Tim has a massive blog that’s been around for a long time. He started it before he even launched his first book, The 4 Hour Workweek.
Currently, I assume that the majority of Tim’s income comes from his podcast sponsorships. I have seen ads on his blog in the past but it doesn’t look like there are any right now. I don’t think he’s ever done an infoproduct or pursued affiliate ads aggressively.
According to this form, his podcast sponsorships go for $36K per slot. At 4–5 slots per episode, that’s $144,000 per episode at least. Tim averages about six podcasts per month, which would produce $864,000 per month or $10,368,000 per year.
The reason I’m not going to even guess is that I don’t have any experience buying or selling podcast sponsorships which I assume are his main source of income right now. Also, sites with Tim’s reach tend to start breaking standard revenue rules. Having one of the largest and highest rated podcasts can give you a lot of leverage, allowing you to charge more than normal on each sponsorship slot.
Otherwise, Tim has used his blog to promote his books heavily over the years. They include The 4-Hour Workweek, The 4-Hour Body, The 4-Hour Chef, Tools of Titans, and Tribe of Mentors.
Timothy Sykes — timothysykes.com
Revenue = Over $25 million per year
Timothy has been around for a while now, predominantly selling infoproducts on how to invest in penny stocks. According to this interview with Nathan Latka, Timothy was on track to do $25–27 million in revenue in 2016, $20 million of which came from infoproducts.

Timothy is a great person to follow if you want to see how an infoproduct business looks at scale.
Josh Axe — Dr. Axe
Revenue = Did $11 million per year in 2015, could be as high as $50–70 million per year now
Dr. Axe is a massive site with a huge audience. According to this press release, it has 17 million visitors per month, which is insane. They also push products pretty hard via their email list. It’s obvious that they know what their doing. Their revenue is a mix of infoproducts, affiliates, and supplements.
Supplements are a great category with nice margins. I only have a little experience in the health and fitness category but the advice I always get from the health and fitness experts is to go hard on supplements.
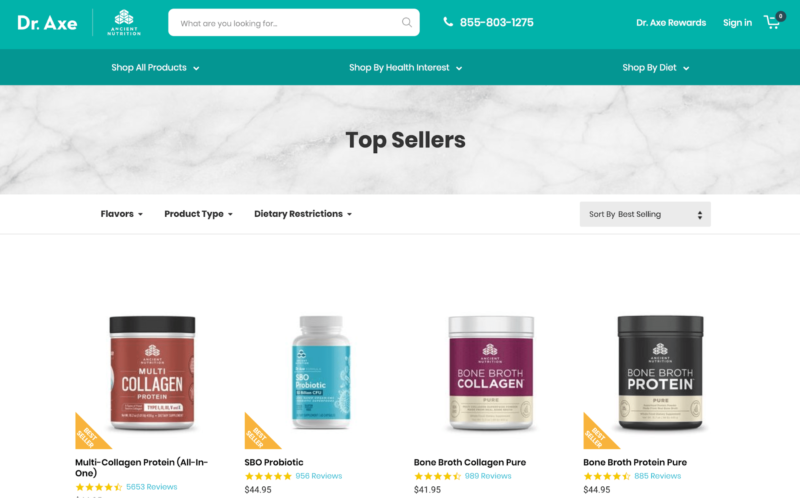
I did hear that they have a solid paid marketing engine going for their funnels. If that’s true, they could be doing easily $50–70 million per year by now.
I consider Dr. Axe to be a great example of what a health and fitness blog looks like when taken to its absolute height. If you’re considering a health and fitness blog, I’d study Dr. Axe closely
Peter Adeney — Mr. Money Mustache
Revenue = About $400,000 per year
According to this article from the New Yorker, Peter pulled in about $400,000 per year as of 2016. Ahrefs reports that Peter’s traffic has been static since the 2016 period. If that’s true, I would expect his current revenue to be around $400,000. Sounds like the majority of the revenue, possibly even all of it, comes from affiliates.
AJ Harbinger and Johnny Dzubak — Art of Charm
Revenue = My guess is $5–10 million per year
Jordan Harbinger didn’t reveal exact revenue but did say that it’s multiple seven figures per year. Based on the fact that the revenue is mostly infoproducts and the overall size of the audience, my guess is that Art of Charm does $5–10 million per year in revenue.
In 2018, Jordan Harbinger split from the Art of Charm and started his own podcast.
Pat Flynn — Smart Passive Income
Revenue = $2,171,652 per year
Pat Flynn posts all his income reports here, going back all the way to 2008.
Not sure if Pat decided to stop but it doesn’t look like he’s posted any new income reports since 2017. Regardless, I highly recommend reading through the first few years of income reports from Pat. That’ll give you a strong sense for what it takes to start making money with a blog.
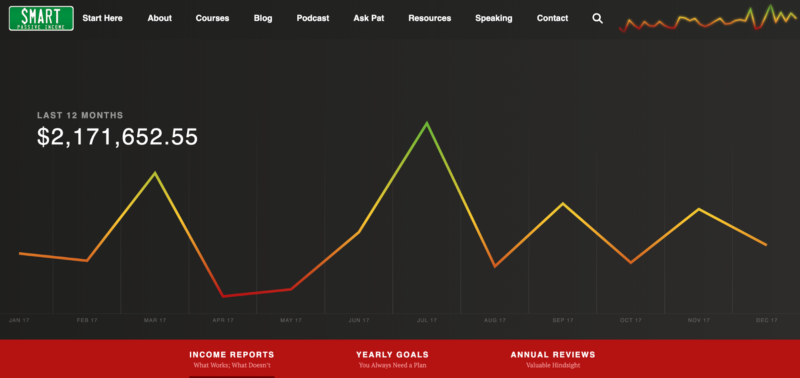
The majority of Pat’s revenue comes from affiliate offers and his own infoproducts, about 50/50 between the two. He also has a few books published, How to Be Better at Almost Everything and Will it Fly? Other than the months he received the advance from the publisher, I bet these books have a negligible direct impact on revenue.
John Lee Dumas — Entrepreneur on Fire
Revenue = $2,029,744 per year
No one really needs to guess at John Lee Dumas’ revenue, he posts monthly income reports directly to his site.

He also put together a nifty revenue breakdown by source:
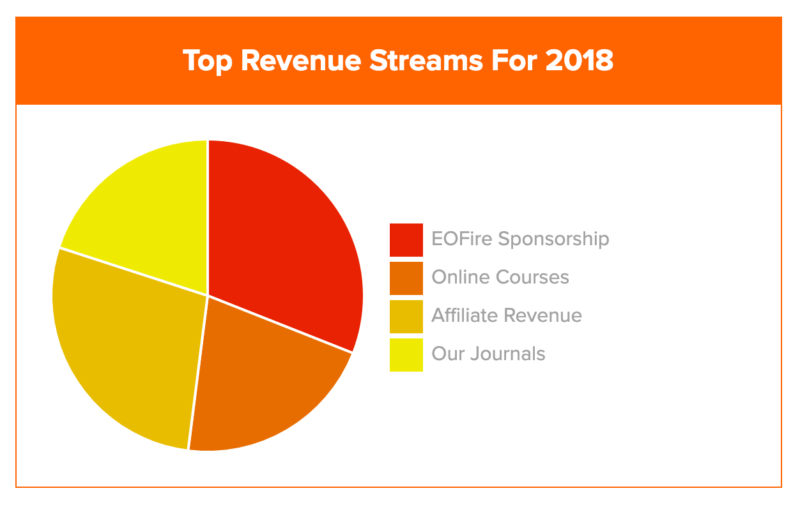
Sponsorships are slightly larger than everything else. Otherwise a pretty even split between infoproducts, affiliates, and his journals (The Freedom Journal, The Mastery Journal, and The Podcast Journal).
To get a sense for how blogs really make money, I highly recommend you read through the monthly income reports from the last 12 months for Entrepreneur on Fire. You’ll get an excellent feel for what a seven-figure blog looks like. I also recommend you read through the income reports from 2012 and 2013, which will show you what revenue looks like at the beginning and how it changes over time on the path to $1 million per year.
Navid Moazzez — navidmoazzez.com
Revenue = My guess is $300–500K per year
Navid is in the online marketing space and offers infoproducts on virtual summits. According to his About page, he’s earned over a $1 million dollars in “a few years.” Safe to say he’s easily doing six figures off his blog. Hence my guess above.
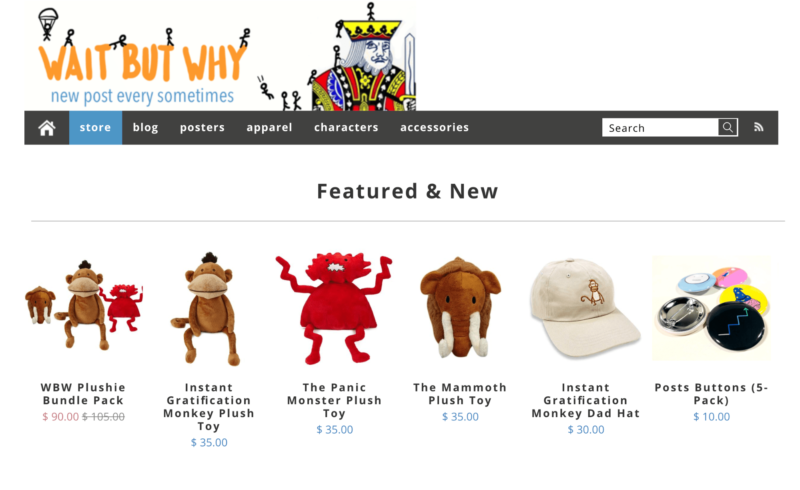
Tim Urban — Wait But Why
Revenue = At least $100,000, possibly $1+ million per year
Tim Urban got crazy popular and his blog posts were being shared all over the place for a while.
This is probably an example of what most people dream of when they start a blog. They plan to write a bunch of stuff, a rabid fan base will appear out of nowhere, they’ll offer some t-shirts, posters, and a Patreon account to make tons of passive income. They’ll finish by riding into the sunset of eternal blogging glory.
For Tim Urban, that’s basically what happened. And he absolutely deserves it. His content is phenomenal. It’s so good that people have been angry because he hasn’t posted in a while. Very few of us can write content that good. I can promise you no one gets upset when I stop blogging. So for us mortals, we should look to some of the other examples on this list for how to monetize our blogs.
I know that I gave a really broad range on the revenue here. Blogs like this are really tough to guess. Tim clearly has a massive, adoring audience. That doesn’t necessarily mean he’s swimming in gold. Although he might be. Blogs with massive audiences like this sometimes make a ton of money, and sometimes they make very little. It also looks like his main source of revenue is his ecommerce store. Unlike consulting, speaking, infoproducts, or affiliates, the margins on ecommerce products are much smaller. It’s entirely possible that he’s making a ton of top-line revenue but only enough profit to live a decent lifestyle.
That’s pretty common with ecommerce entrepreneurs. They claim that they’re making millions of dollars with their business but only take home $50–100K per year. Once you factor in costs of goods sold and overhead, there isn’t a ton left over. I have no idea if Tim Urban falls into this bucket. I simply don’t know.
Noah Kagan — OkDork, Sumo, and AppSumo
Revenue: $10M last year and growing
Noah’s business is based around four complimentary sites:
- Sumo.com: Free marketing tools to grow your business
- AppSumo: Groupon for geeks
- KingSumo: Giveaway web app or WordPress plugin
- BriefcaseHQ: Netflix for business software
This system of related businesses is one of his tips for growing a successful business. He thinks of these businesses like a pyramid — KingSumo helps grow your business with giveaways, Sumo (which is the core product) arms those businesses with the tools they need for marketing, and BriefcaseHQ and AppSumo provide the rest of the tools. Creating a system of interlocking tools means you don’t need to find new customers; you can simply market to the customers you already have.
This reminds me of Target adding in groceries. They increased their revenue by asking, What are our existing customers buying that they aren’t buying from us? What do they need that I could sell them?
Noah has an even better analogy: it’s like buying another book from an author you already love. If you love a book an author’s written, of course you’re going to but their next book and their next book.
He’s also got a lot of thoughts on setting the right pricing structure, leveraging recurring revenue, and bundling that’s all worth studying as well.
Shane Parrish — Farnam Street
Revenue: It’s all been reinvested into the business, plus speaker fees
Shane started his blog to track his own personal learning and development — he didn’t have any grand ambitions for the project, and the original url, 68131.blogger.com, shows it. Today his newsletter has 200,000 subscribers and Farnam Street gets 1M pageviews a month.
How does he make money? Well, “earn money” vs. “make money” is a good distinction here. Shane says he’s reinvested most of the money back into the business, “In 2014, I think we actually lost money. In 2015, we didn’t lose money, which was good. … I will say that I’ve never actually personally made a penny off Farnam Street. It’s all been reinvested back into content, experience, trying new things, and that’s the way that hopefully I foresee the future.”
He makes money in a variety of ways: he first paid his expenses with Amazon affiliate links, then in 2014 he started his first 9-month partnership deal, newsletter sponsorships, conferences, speaker fees, infoproducts, a podcast, a forthcoming book, and a membership plan for his site that you can choose what you pay, currently either $149 or $249. His model is based on providing free content to many and creating a base of super fans who’ll pay for more of that content, subsidize the free content to give back, and gain access to even more: a book club, a discussion group, and private Ask Me Anythings. If 5% of his 200,000 newsletter subscribers convert (that’d be 10,000 members), and each of them signed up at the $149 level, that’d be $1.5M a year.
Shane regularly turns down speaking engagements for $20,000 because it’s not how he wants to make money, and he doesn’t optimize his in-person workshops for revenue. He’s always asking what’s in the best interest of the business. That means the bulk of the revenue comes from memberships.
I agree with his advice: “The audience will grow if you put out good content.” And, “I know how easy it is for people to copy our content and even our business model. So that drives a lot of what we do. We want to do things that are hard to copy and that means we can’t cherry-pick what’s easy, because there is a lot of competition in easy.”
Ready to build you own blog that makes money?
I know the list above is full of people making serious money.
Here’s the crazy part.
For every blogger making a million dollars, there are thousands that make enough money to quit their job and work on their blog full time.
The list is too long to keep track of — I wouldn’t be able to put it together.
It is absolutely reasonable to start a blog with the goal of quitting your job and being your own boss. So many people have already done it you’d be walking a well-traveled path at this point.
I also believe that there’s still a ton of opportunity to be made blogging. I see new up-and-coming bloggers every year. It’s still possible to start a blog today and have it support you. I put together a 12-step guide on how to start a blog here. It’ll walk you through the whole process.
Daily API RoundUp: Xooa, Sentiance, Talkdesk, Instana
Every day, the ProgrammableWeb team is busy, updating its three primary directories for APIs, clients (language-specific libraries or SDKs for consuming or providing APIs), and source code samples.
25+ Best Elementor Addons for WordPress 2023
 What are the best Elementor extensions? Or what even is Elementor to start with? Ever since its introduction in 2016, Elementor has completely taken over the WordPress industry. The 5+ Million Active Users speak volume for itself. If you are not familiar with it, let us give you a brief on it. Elementor is the […]
The post 25+ Best Elementor Addons for WordPress 2023 appeared first on WPExplorer.
How to Start a Blog That Makes Money in 11 Simple Steps
Want to just get started? Click here to sign up for Hostinger and start your website today.
This blog generates hundreds of thousands of dollars every month by helping readers answer their questions.
It took me years and a team to get to this point–but you can start a profitable blog right now.
The money is there if you keep at it and follow some tried and true methods like the ones below.
Top-Rated Web Hosting Companies to Start a Blog That Makes Money
If you want to start a blog that makes money, you’ll need to start with a great web hosting company. Here are the best options:
- Hostinger – Best overall
- DreamHost – Best value for shared hosting
- Bluehost – Best for new WordPress websites
- HostGator – Best for simple websites
- GreenGeeks – Best for eco-friendly hosting
- SiteGround – Best WordPress-certified host for speed and security
- A2 Hosting – Fast & reliable shared hosting
- InMotion – Best VPS hosting
- WPEngine – Best managed WordPress hosting
- Nexcess – Best for ecommerce hosting
You can read our full reviews of each web hosting company here.
11 Steps to Start a Blog That Makes Money
Turning a profit requires a few more steps than hobby blogging (doing it just for fun and not worrying about consistency, SEO, and monetization). Here are the steps you need to know about how to start a blog:
- Find a blog idea
- Find the perfect domain name
- Sign up for Hostinger
- Install WordPress
- Pick a fitting WordPress theme
- Install WordPress plugins
- Install Google Analytics
- Set up your email list
- Pick a blogging cadence
- Build an audience
- Monetize your blog

Quickstart Guide to Blogging
You can jump straight into blogging if you already have a name and an idea for your blog.
Just head over to Hostinger and sign up for a Single WordPress plan. This is the best hosting service for beginners and the easiest way to start a new blog.

Plans start at just $1.99 per month. This rate is based on a four-year contract, but it’s the best deal in web hosting if you want reliable service from a reputable provider. In addition to web hosting, you’ll get a free domain name, website builder, email accounts, and everything else you need to get started.
The registration process is simple. Hostinger will walk you through a series of steps that are very straightforward. Here’s a quick overview that you can follow:
- Select Blog when you’re asked what type of site you’re creating.
- Claim your free domain when prompted unless you have already purchased one elsewhere.
- Install WordPress when asked to select a CMS (content management system).
- Choose a theme to determine your site layout. You can always change this later, so don’t overthink it.
- Click Finish Setup once you’ve reviewed and confirmed the selected options.
Now you can log into your new website and start blogging immediately.
Monetizing your blog is the next step. There are lots of different ways to make money from your blog, and we’ll cover that later on. For now, let’s dive straight into the entire blog creation process from the beginning.
Step 1: Find a Blog Idea
This is the most important step for your blog.
Choosing your blog’s topic (or niche) determines the rest of the website’s future. This is what you’re going to be writing about and — hopefully — making money from.
The good news: There’s practically an audience out there for every single topic you might be interested in.
But some topics tend to perform better than others. You need to find a topic that appeals to a big audience while still appealing to you.
To find the perfect blog niche, you’ll need to answer two questions:
What am I interested in?
What topic do you love? What are you obsessed with?
This is the basis of your blog niche. After all, if you don’t love the topic, you’re not going to want to write about it day after day.
To help answer this question, I suggest looking toward several areas:
- Talents. Is there something you’re naturally talented at? Maybe a sport, game, or musical instrument.
- Expertise. What skills and knowledge have you built up over the years? Maybe there’s something you went to school for that you can write about now. Think about academic subjects or skills like languages and car repair. Even having a wealth of lifestyle knowledge can be shared.
- Career. Your current career can be a fantastic place to write about. For example, if you’re a developer for a startup, you can start blogging about front-end development or the tech industry. Likewise, if you’re an experienced photographer.
- Hobbies and passions. Is there a topic you just love learning about? Think about the things you do in your free time. Maybe it’s reading books, working on your fantasy novel, or repairing that old car in your garage. These can be great topics to write about in your blog.
ACTION STEP: Write down 10 – 15 topics you’re interested in. Pull up a blank document or sheet of paper and write this down. It’ll help you keep your ideas focused. Plus, you can refer back to it later when you make your final decision.
What are other people interested in?
This area is a bit trickier.
You need to find out what other people are interested in as well. Otherwise, you might find yourself with a blog that doesn’t draw in a lot of people.
For example, you might think that a blog all about how wonderful your dog is is super interesting — but is that going to draw in a lot of people?
On the other hand, a blog about how to take care of and train dogs appeals to a much bigger audience of readers.
You need to take your personal interest and find a way to make it universal. Think back to how you initially gained interest in the topic. How did you gather expertise in the topic?
Think of all the questions and confusions you had when you started out and what helped you gain expertise.
To help, here are a few popular categories that always do well:
- Personal finance
- Fitness
- Online business
- Investing
- Productivity
- Real estate
- Careers
- Test prep
- Freelancing
Pro tip: Use Google’s Keyword Planner tool to see how often people search for a specific category or niche. It’ll reveal what people are and aren’t interested in.
ACTION STEP: Take a look at your list from before. Do any of them fall under these categories? If not, that’s okay! There’s probably still an audience out there for one of your topics.
For now, I want you to choose a topic from your list that you want to turn into a blog. Once you do, you’re going to make it even more specific and niche it down.
For example, you might want to start a personal finance website. Niching it down might mean you make a personal finance website for millennials making $100,000 a year. Or for 30-somethings who want to retire early.
Look back at the different topics you generated in Step 1. Can you blend two topics you like writing about to hone in on a niche?
Step 2: Find the Perfect Domain Name
Now the fun part: choosing your blog’s name. For this, I have good news and bad news.
- Bad news: Most of the very “best” domain names are already taken. The Internet is decades old. Makes sense.
- Good news: That doesn’t matter because we’re going to find the best one for you.
Here are a few good rules of thumb to keep in mind when choosing a good name:
- Keep it short. Don’t force potential visitors to have to type a bunch of words to visit your website. We recommend no more than 14 characters.
- Choose a .com, .org, or .net. These are the easiest ones for people to remember.
- Easy to spell and pronounce. You don’t want to spell it out constantly for people when you mention your blog’s domain.
- Avoid numbers and hyphens. Not only does it look clunky in the URL, it’s also difficult to type out when you add hyphens.
- Use your name. It’s pretty likely that your name is available as a domain. That makes it the perfect choice for a personal blog. I’ll speak more on this later.
When you come up with a domain you like, head to Hostinger to see if it’s available using their domain tool.

If it is, great! If not, you now have two options:
- Search until you find an available domain. I highly recommend you do this until you find a domain that’s available. If you’re going to write a blog, sharpen your synonym skills by searching for other words and phrases that might be available. Trust me. As a working writer, this is a VERY crucial skill.
- Purchase a domain name. While it is possible to buy a domain from someone who already has it, that’s an advanced option and can get expensive fast. Low-quality domains will usually go for a few thousand dollars. Highly quality domains that are two words can easily go for $10,000 to $50,000. I’ve even been in discussions to purchase domains for over $100,000, and the really hot ones can break seven figures. Not to mention all the hassle that comes from finding the person who owns the domain, negotiating with them, and transferring the domain if you even reach an agreement.
Your best bet is to keep going until you find a domain that you like and can purchase directly from a domain registrar for about $10.
We go into lots of detail on which domain registrar to use here. But I highly suggest you buy a web host that allows you to register a domain for free. That means going with Hostinger.
Using your personal name as the domain
If this is your first blog and you’re not completely sure what you want to blog about, I recommend that you use your personal name.
The reason is that changing your domain later will mean that you have to start over from scratch. There are a lot of mistakes in blogging that can be corrected later; having the wrong domain isn’t one of them.
Let’s say you pick a domain like fitnessfordoctors.com. Then after six months, you realize you’d rather be doing personal finance blogging for doctors. You’d need to get a new domain and start over from scratch.
Personal domains are much more flexible — it’s just a name after all. So if you jump categories after a few months, it’s not a big deal. Take down any old content that’s not relevant to your new direction, start posting new content, and you’re good to go.
That said, personal domains have two major downsides:
- Scalability. It’s much more difficult to recruit other writers or grow your blog beyond your personal identity later on.
- Profitability. Personal blogs, even if they’re generating serious cash, are much harder to sell. Prospective buyers want a site that isn’t dependent on a single person.
However, these are pretty advanced problems to have. If this is your first blog, the benefits of using your name as the domain greatly outweigh the costs that only show up down the road.
ACTION STEP: Pick a domain name and run with it.
While it’s important to pick a good, brandable domain name, the most important thing to do in this step is to make a decision and go. You don’t want to be stuck in the dreaded state of “paralysis by analysis.” Instead, just choose one based on the system above and run with it.
Go deeper: Want to learn more about this topic? Check out our article on how to buy the right domain name.
Step 3: Sign Up For Hostinger
Every website needs to have a web hosting provider. Your web host runs the servers where your site will “live” on the internet—making it possible for people to visit your blog.
This is one of the most important steps in this process, so don’t rush through it.
Having a quality web host ensures that your site loads quickly, performs well, and doesn’t crash unexpectedly.
You can check out our complete list of the best web hosts for WordPress, but Hostinger will be the best option for most new blogs—and that’s what we’ll use for the purposes of this tutorial.
- Normally $12.49/month
- Free domain and SSL certificate
- Create up to 100 websites
- 30-day money-back guarantee
Hostinger is straightforward and affordable, which is exactly what new blogs should be looking for in a web host.
For such an affordable price, Hostinger also performs at a really high level. So you’re still getting a high-quality hosting service at an entry-level price tag.
Speaking of price, you can get Hostinger for just $2.59 per month when you sign up using our special discount link. This is an amazing value when you consider all the features you’re getting.

The great part about Hostinger is that it can grow with you as your blog scales. So as you start getting more traffic over time, you can simply upgrade your plan to the next tier as needed.
If you’re looking for a simple and reliable web hosting service, look no further than Hostinger.
Step 4: Install WordPress
Your website needs a content management system (CMS) in order to function. This CMS is what allows you to create and manage blog posts.
And for this, there’s only one option: WordPress.

In reality, there are far more options than just WordPress, but trust me when I say that it’s the only one you should use.
Why?
Because WordPress is one of the (if not the) most powerful, easy-to-use, and customizable CMSs out there.
Here’s proof: WordPress powers roughly one-third of the internet. Pause on that for a moment – one-third of the entire internet. That’s a lot.
So, that’s why I stated from the beginning to just use WordPress for your blog, end of story.
Since WordPress is one of the most popular CMSs in existence, most web hosts offer a one-click install for WordPress making the setup a quick and painless experience.
There’s always the option to use a dedicated blogging platform like Medium or even LinkedIn. Both are great for sharing ideas, but they are quite difficult to generate any revenue from. WordPress, on the other hand, gives you plenty of ways to turn a profit, which is why it’s one of the most popular choices.
So, if you’re trying to make money blogging, WordPress is definitely the better choice.
ACTION STEP: Install WordPress on your host.
Hostinger makes it really easy–you will actually handle the WordPress install during the signup process.
Once you tell Hostinger the type of site you want to create (a blog, in this case), it will offer you a few appropriate CMS options. Simply select WordPress:

Complete the rest of the signup process, and launch your site. Once it’s ready, Hostinger will prompt you to activate WordPress the first time you sign in.
Anytime you want to interact with your WordPress site, you can find it on the lefthand sidebar of your Hostinger dashboard.

Step 5: Pick a Fitting WordPress Theme
It’s very easy to change your site’s look and feel with WordPress.
The best part: No coding knowledge is required.
That’s because WordPress uses “themes.” These are little packages of code that can be swapped in and out. Whenever you change your theme, your site will also change, but your blog content stays the same.
This makes it very easy to evolve your site over time without having to rebuild your entire site from scratch.
Hostinger actually has you choose a theme during the setup process, just after you select WordPress as your CMS.

Hostinger offers a bunch of free themes for you to get started. There were 38 when I signed up.
Choose something that you like, but don’t get too precious about it at this point. You can switch up your theme later with very little work.
The number of themes out there makes me dizzy. There are thousands of free and paid themes out there already, and the WordPress community is always creating more.
When picking a theme for my blogs, I go straight to StudioPress. The themes are a bit more expensive at $130. (Most themes go for $20–50.) But it’s totally worth it.
StudioPress was purchased by WP Engine and WP Engine now includes all the StudioPress themes as part of its hosting package. It’s a nice freebie if you are already planning on hosting your site with WP Engine.
If you want a wider selection of WordPress themes at standard prices, Themeforest is the most popular WordPress theme marketplace.
Still not sure? Check out our top list of the best WordPress themes for blogs. You’ll probably find something there that is perfect to start out with.
Because it’s so easy to select your first theme with Hostinger (one click during the setup process), I want to show you how to switch up your theme in the future. It’s not much harder at all.
ACTION STEP: Purchase a theme and add it to your website.
After you purchase your theme, log into your WordPress blog, go to the Theme section which is under Appearance in the WordPress sidebar menu. Then follow the instructions for adding the theme.

You’ll have to upload the theme files to WordPress and activate the theme from within WordPress. You can find the upload option by going to Themes > Add New, a button towards the top. Then you’ll see this option to upload:

You’ll be able to manage any themes you’ve uploaded to your WordPress blog from your Themes section:

You can always use free themes if you don’t want to pay for one, helping to keep your startup costs low. Just be aware that some free themes lack the features and customization options that come with premium themes. Some free themes are poorly coded, which could slow down your site or open you up to security vulnerabilities.
Step 6: Install WordPress Plugins
One of the best parts about WordPress is that it’s infinitely customizable. Since it’s open-source, you can change it to do whatever you want.
The easiest way to make changes is with plugins. Plugins are little batches of software you can install within WordPress to get extra functionality. This is how you’ll add a bunch of extra features to your site without having to code anything yourself.
Be careful here and try not to go overboard.
Some bloggers will install dozens of plugins on their blogs. That can cause a bunch of problems later on.
Not only can plugins cause unexpected conflicts with each other, they become a security liability since it’s unlikely that every plugin owner will maintain the plugin over time. They also become a huge headache to manage.
When you have that many plugins, you’re never sure which plugin is causing a particular problem.
I like to keep my selection limited to 5–10 amazing plugins.
ACTION STEP: Download helpful plugins
Here are a few of my favorites:
- Akismet – Required for every blog, it automatically filters a ton of comment spam which is a problem for every blogger. This is one of the few plugins that I happily pay to upgrade.
- Yoast SEO – The most highly recommended SEO plugin, it handles a bunch of SEO tasks automatically for you and also makes on-page SEO tasks a lot easier.
- Contact Form 7 – The most popular contact form out there. Set up a contact page on your site, and then use this plugin to create a contact form that will email you any time someone fills out the form. Super easy.
- TinyMCE Advanced – A bunch of improvements to the WordPress editor that makes writing in WordPress a lot easier. These days, I usually skip this one. I write all my posts in Google Docs and then format them in WordPress using its default HTML editor.
- WP Super Cache – A good plugin to speed up your site.
- MailChimp for WordPress – More on this below. It’s the easiest way to connect your WordPress site to a MailChimp account, create an email signup form, and start collecting email subscribers.
- WordPress Popular Posts – Easiest way to add a list of your most popular posts to your blog sidebar. The list will update automatically.

Step 7: Install Google Analytics
Google Analytics is a free tool that will help you monitor key performance metrics related to your blog traffic.
You can use it to see how many site visits you’re getting, the demographics of your visitors, and see which pages are driving the most traffic.
With that said, Google Analytics can get tricky if you don’t know how to use it. That’s why we’re going to ignore the majority of what the tool can do—at least for the moment.
Right now, you just need to create a Google Analytics account and install it on your blog.

While there are dozens of reasons why Google Analytics should be installed on your site, there are two major ones that we’re going to focus on right now.
First, Google Analytics tracks your data over time. So when you’re ready to dive deeper into the weeds later on, you’ll be happy that you’ve been collecting data from day one.
Second, it’s encouraging to watch people visit your blog in the early stages. This can give you the motivation you need to continue putting in the work required to scale your blog.
Google Analytics is also really easy to set up. Here’s how you do it:
Log into Google Analytics
This is simple. Go to Google Analytics and click on Start Measuring.

If you’re not logged into a Google account, it’ll ask you to log in to your Google account. If you have one, do so. If not, create one and log in with that.
Create your Google Analytics Account
The tool asks you to provide an account name. Use the name of your website or blog for this.
Don’t worry about the boxes with the checkmarks for now. You can always change them later.
Once you do that, click on Next at the bottom.

Choose what you want to measure
This screen asks you to choose whether you want to measure a website, an app, or a combination of both.
Choose Web since you’re creating a blog.

Then click Next.
Fill in the property details
Now fill in some details about your website, including its name, the URL, your industry category, and your timezone.
Once you’ve done that, click on Create at the bottom.

Copy and paste the tracking code onto your site
Once your account is created, you’ll have a unique JavaScript tracking code for your site. When you copy and paste that snippet of code into your site, Google Analytics will start collecting data for you.

Voila! That’s it. You are now tracking Google Analytics for your website.
Step 8: Set Up Your Email List
Every marketing engine I’ve built for companies has relied on emails at its core.
And there’s a good reason for that: Email lists are the best marketing tool. Period.
Think of your email list as a giant laser ray; you can focus on any offer you want. Selling consulting? Pitch your list to the reader.
Publishing a new blog post? Pitch your list at the bottom of the blog post.
A podcast just interviewed you? Pitch your list to the podcast’s audience.
Of all the marketing channels that have come and gone over the years, nothing compares to the power of a high-quality email list.
Even if you’re not sure what to send your email subscribers, that’s okay. The important thing is you start gathering a list of subscribers and build the foundation early.
ACTION STEP: Create an email list.
Using Constant Contact or other email marketing services, start collecting emails on your blog so that the list is ready for you as soon as you need it. It takes time to build a decent size list so your future self will be extremely grateful if you set it up now.
Even a super basic opt-in in your blog sidebar is enough to get you started, like this one from Divalicious Recipes.

Don’t even worry about sending any emails yet unless you want to. The main thing is that you’re collecting email subscribers from the beginning. Email lists can be a gold mine once you have a few thousand subscribers, and the money really rolls in once you have 10,000 subscribers and above.
Step 9: Pick a Blogging Cadence
Writing blog posts isn’t a sprint, it’s a marathon. Actually, it’s more like a multi-day backpacking trip.
The best bloggers settle into a consistent writing pace they can maintain for a few years. That’s right, years.
Here are a few posting frequency rules of thumb:
- At the bare minimum, find a way to post once per week. This needs to be a substantial post, too: 2,000 words at least. Long-form content receives twice as many page views, and Google’s algorithms favor content that is 3,000 words or longer. I recommend you start here.
- Serious bloggers will post 2-3 times per week.
- Larger sites quickly get to 5-7 posts per week. This requires multiple authors.
- The heavy hitters who push things to the limit will do 25-50 posts per week. No joke, this is for large businesses using content marketing as their primary customer acquisition channel. HubSpot is a classic example of this.
That said, don’t fall into the trap of writing your blog for search engine optimization (SEO) rather than for your readers. While SEO is important and can help increase your visibility, it shouldn’t come at the cost of creating quality content.
AI-based content creation tools can help to scale up your writing quickly, but you should always make sure to review the output before publication.
For example:
- SEO optimization tools like Clearscope are helpful for showing you keywords to include, but good “content grades” on these tools don’t equate to actual good content.
- AI content generators can help you write blogs faster, but they don’t know your audience, your subject matter, or your personal writing style. They also produce content at all costs, so they occasionally produce content that is completely false.
- Software like Grammarly is great for catching typos, but don’t listen to all of its suggestions—your English teacher isn’t grading your blog and your audience won’t respond to perfect-sounding sentences and robotic grammar.
- Your posts that generate the most traffic won’t always be the ones with the highest volume. If anything, highly targeted posts with fewer, more engaged readers will end up making you the most money.
It will get easier to publish posts the more you do it. Getting several posts out the door each week might sound like a lot now, but over time, every part of your process will get quicker.
The important thing is to start your blogging cadence off on the right foot. Begin with a weekly publishing rhythm, and build from there.
ACTION STEP: Start posting at least once a week.
I know writing isn’t easy. After writing blog posts full-time for three months, I always want to throw my MacBook out the window. It’s a grind for all of us. This is why I recommend starting at one post per week.
That still gives you the majority of the week to focus on other aspects of your site while also giving you a break from writing blog posts all the time.
A really great post should take you two days to complete. The first day is for research and outlining, along with as much writing as you can complete. The second day is for finishing the writing, proofreading, and publishing the post in WordPress.
Also, push quality as hard as you can. The key to building a site and traffic over time is to write posts that are more valuable than what other people have already published in your category.
Step 10: Build an Audience
There’s a super famous article in blogging circles: 1,000 True Fans.
Basically, getting 1,000 true fans means you can fully support yourself. You can quit your job, work wherever you like, and be in complete control of your life. All from hitting a very reasonable goal of 1,000 true fans.
With blogging, you’ll build your audience of 1,000 true fans slowly and consistently.
As long as you keep at it, you will get there. Typically, it takes a few years.
That said, it’s possible. 77% of internet users read blogs, and all you need is a tiny fraction of them to make a substantial living.
ACTION STEP: Use this system to get 1,000 true fans.
Here’s what to focus on in order to get there faster:
- Always post at least once per week. Never skip a week.
- Start posting 2-3 times per week if you can.
- On every post, push on quality as hard as you can. Google the topic and see what other people have done, then ask yourself how you can write something even better.
- Write stuff that hasn’t been written to death already. Find a new take or perspective on your topics that other people haven’t already covered.
- Find your voice and be authentic so people can get to know you. This builds connections with your audience faster. A quick hack for this is to pretend that you’re writing your posts to a close friend.
- Allow your readers to comment. Disqus has a ton of users and allows readers to leave feedback, praise your post, or leave criticism for it. If you’re up to engaging your first core readers, leverage this to make a solid connection with them.
- To push even harder, get active in other online communities. Post in Facebook groups, subreddits, on Twitter, do podcast interviews, get speaking engagements when you can – anything and everything. Be as helpful as you can be in these communities.
- For all of your content, constantly ask yourself, “How can I make this as valuable as possible?
As your blog audience matures, you will want to change your traffic strategies as you grow.
Step 11: Monetize Your Blog
There are three ways blogs make money.
Yes, only three. They are:
- Infoproducts. Online courses, webinars, e-books, etc.
- Affiliate programs. You work with a brand to promote their products and you get a cut of any sales.
- Freelancing and consulting. You use your blog as a platform to find clients and customers for your own services.
Here’s a quick primer on how they work:
How info products work
I could write a book on info products. For now, we’ll keep it simple. Here’s the model:
- Get people to visit your site.
- Then, give them a reason to subscribe to your email list.
- Once they’re an email subscriber, run them through a launch funnel. These are email funnels specifically designed to sell info products. Usually, these are courses that include a bunch of video lessons.
- Depending on your volume and target market, you’ll convert about 0.5% to 1% of new email subscribers into a customer for $500-$2,000 for your course. At volume, that adds up fast.
Now, this sounds too good to be true. While there are a few catches, it’s mostly true. What are the catches?
First, you’ll need to get extremely good at direct-response copy.
Second, it helps to be in the right category. People want money, status, and relationships.
How affiliate programs work
Affiliate marketing is pretty simple: You go about creating as large of an audience as possible. Then, throughout your content, you recommend products that are helpful to that audience.
When your audience clicks through the link of that recommendation, they get a special tracking code. If they end up purchasing, you get a cut of the sale.
You have no doubt seen affiliate disclosures on websites for years, like this one for Outside Magazine’s online edition.

The main downside is that only a small percentage of people will ever click through and an even smaller percentage of people will purchase. So it really helps to have a massive amount of traffic in order to make enough money from your blog.
It’s safe to say that Outside magazine has a big enough following to make affiliate links profitable for them.
How freelancing and consulting works
While info products and affiliates are the main ways to make serious money, you also need serious traffic in order to make them work. At least if you want them to work well enough to make six figures per year.
That’s why I believe freelancing and consulting are the best ways for beginners to start making money fast while blogging.
To make money quickly, this is by far your best option. It’s also the easiest to do.
Freelancing programs have taught thousands of people how to get started freelancing. What always blew me away was how life-changing those first few freelancing gigs are.
Anyone can create a blog and use it for freelancing lead generation. It’s enough to build a client base that pays you $3,000 to $5,000 per month. That’s enough to quit your job. That’s life-changing.
And it’s a much easier goal to hit than a fully ramped-up affiliate or info product marketing machine. You always have the option to build that stuff later anyway.
What about all those other monetization methods?
Most of them are a waste of time. The impact on revenue is marginal, it’s a complete distraction. A few are worth doing for marketing and branding. The rest should be ignored entirely. Here’s the list that bloggers always try at some point:
- Books – Great for marketing. Adds a ton of credibility to your brand. But you likely won’t feel the impact on revenue at all when it comes to royalities. However, they are great marketing and lead generation tools.
- Events – I loathe events with every fiber of my being. All the risk is front-loaded, all contracts get locked up ahead of time, they’re a pain to sell, and you don’t even know if you’ll make any money until right before the event. Even if you do make money, the margins are terrible. For me, these are complete distractions and a huge opportunity cost for the business.
- Banner ads (Google Ads, formerlly Adsense, for example) – The last time these made any decent money was around 2003. These days, I’m not even sure it’s possible to get banner ads to cover your hosting bill. I’m only partially joking.
- Speaking – Done the right way, occasional speaking can be a great brand builder. And while it sounds amazing to get paid $20,000 per speaking gig, it’s not nearly as amazing once you learn most speakers never get paid, it takes months worth of work to create a talk that commands that kind of fee, you really need a New York Times Bestseller in order to charge real fees, and you’ll get so sick of hotel rooms after the first year that you’ll never want to travel again. Do speaking gigs when good opportunities come up; don’t build a business on them.
Don’t let this discourage you though. The important thing is that you get started building your blog and writing. Do it consistently and stick to the system, and you’ll find that success comes quicker than you think.
That brings us to our last action step…
LAST ACTION STEP: Keep Growing! Read articles on how to start and grow a successful blog
We’ve been writing about blogging and how to make money blogging on Quick Sprout for years. Check out Everything About Blogging for an annotated list of what you should read next.
Starting a Blog: Your Top Questions Answered
#209: Chris Gannon
Show Description
Chris and Marie talk to CodePen community treasure Chris Gannon about how he uses CodePen with clients, how practicing on CodePen makes him better at his craft, and the various tools he's used to do his work over the years.
Sponsor 11:44 WordPress.com
WordPress powers a third of the internet. Surprising? Perhaps not once you get to know how easy and friendly, yet powerful and flexible WordPress.com is. If you can build a site on WordPress.com, you should. You're doing yourself a big favor by not taking on the incredible technical debt of hosting a site yourself. Focus on your business instead.
Time Jumps
- 00:50 Guest intro
- 02:59 Adding an element of surprise to animations
- 06:02 CodePen is central to Chris' client workflow
- 11:44 Sponsor: WordPress.com
- 13:48 Delivering work to clients on CodePen with an API
- 19:13 Practicing on CodePen helps a lot
- 22:30 Having a style helps people recognize your work
- 23:09 What apps do you use for referrals and finding clients?
- 26:07 What kinds of stickers?
- 28:29 What kind of tooling do you use?
- 32:17 What can CodePen do for you?
Show Links
- CodePen Radio with Dave and Trent
- Chris Gannon on Twitter
- Gannon.tv
- Chris Gannon on CodePen
- Chris Gannon on Dribbble
- Chris Gannon on Giphy
- Greensock
- Chris on CodePen / Chris on Twitter
- Marie on CodePen / Marie on Twitter
CodePen Links
- CodePen Support
- CodePen on Spectrum
- CodePen Spark
- CodePen Pro
- CodePen Meetups
- CodePen on Twitter
- CodePen on Facebook
- CodePen on Flickr
- CodePen on Instagram
- CodePen on Google+
- Sponsor an episode of CodePen Radio
- Buy a CodePen T-Shirt
The post #209: Chris Gannon appeared first on CodePen Blog.
Using the Little-Known CSS element() Function to Create a Minimap Navigator
W3C’s CSS Working Group often gives us brilliant CSS features to experiment with. Sometimes we come across something so cool that sticks a grin on our face, but it vanishes right away because we think, “that’s great, but what do I do with it?” The element() function was like that for me. It’s a CSS function that takes an element on the page and presents it as an image to be displayed on screen. Impressive, but quixotic.
Below is a simple example of how it works. It’s currently only supported in Firefox, which I know is a bummer. But stick with me and see how useful it can be.
<div id="ele">
<p>Hello World! how're you?<br>I'm not doing that<br>great. Got a cold 😷</p>
</div>
<div id="eleImg"></div>#eleImg {
background: -moz-element(#ele) no-repeat center / contain; /* vendor prefixed */
}The element() function (with browser prefix) takes the id value of the element it’ll translate into an image. The output looks identical to the appearance of the given element on screen.
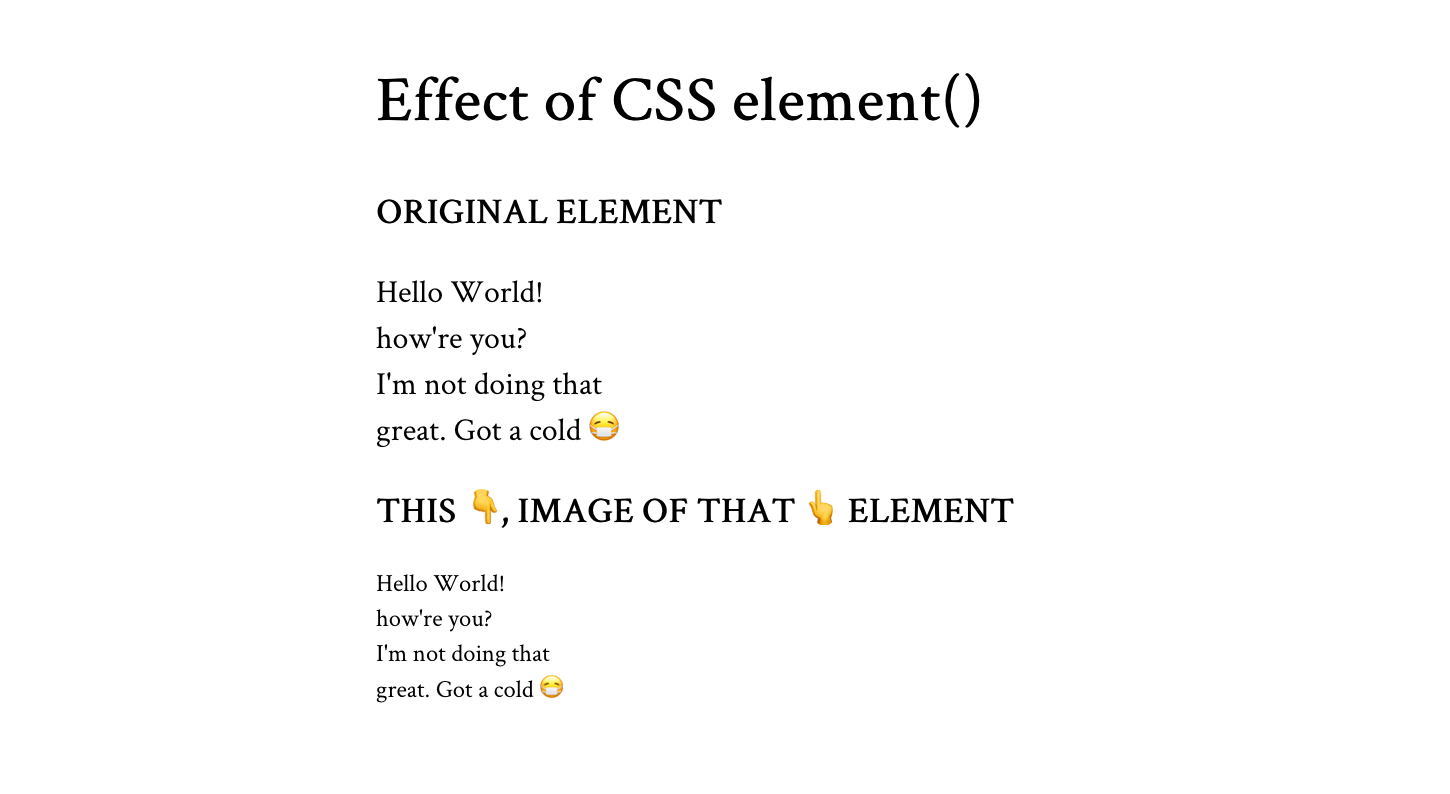
When I think of element()’s output, I think of the word preview. I think that’s the type of use case that gets the most out of it: where we can preview an element before it’s shown on the page. For example, the next slide in a slideshow, the hidden tab, or the next photo in a gallery. Or... a minimap!
A minimap is a mini-sized preview of a long document or page, usually shown at on one side of the screen or another and used to navigate to a corresponding point on that document.
You might have seen it in code editors like Sublime Text.
CSS element() is useful in making the “preview” part of the minimap.
Down below is the demo for the minimap, and we will walk through its code after that. However, I recommend you see the full-page demo because minimaps are really useful for long documents on large screens.
If you’re using a smartphone, remember that, according to the theory of relativity, minimaps will get super mini in mini screens; and no, that’s not really what the theory of relativity actually says, but you get my point.
See the Pen Minimap with CSS element() & HTML input range by Preethi Sam (@rpsthecoder) on CodePen.
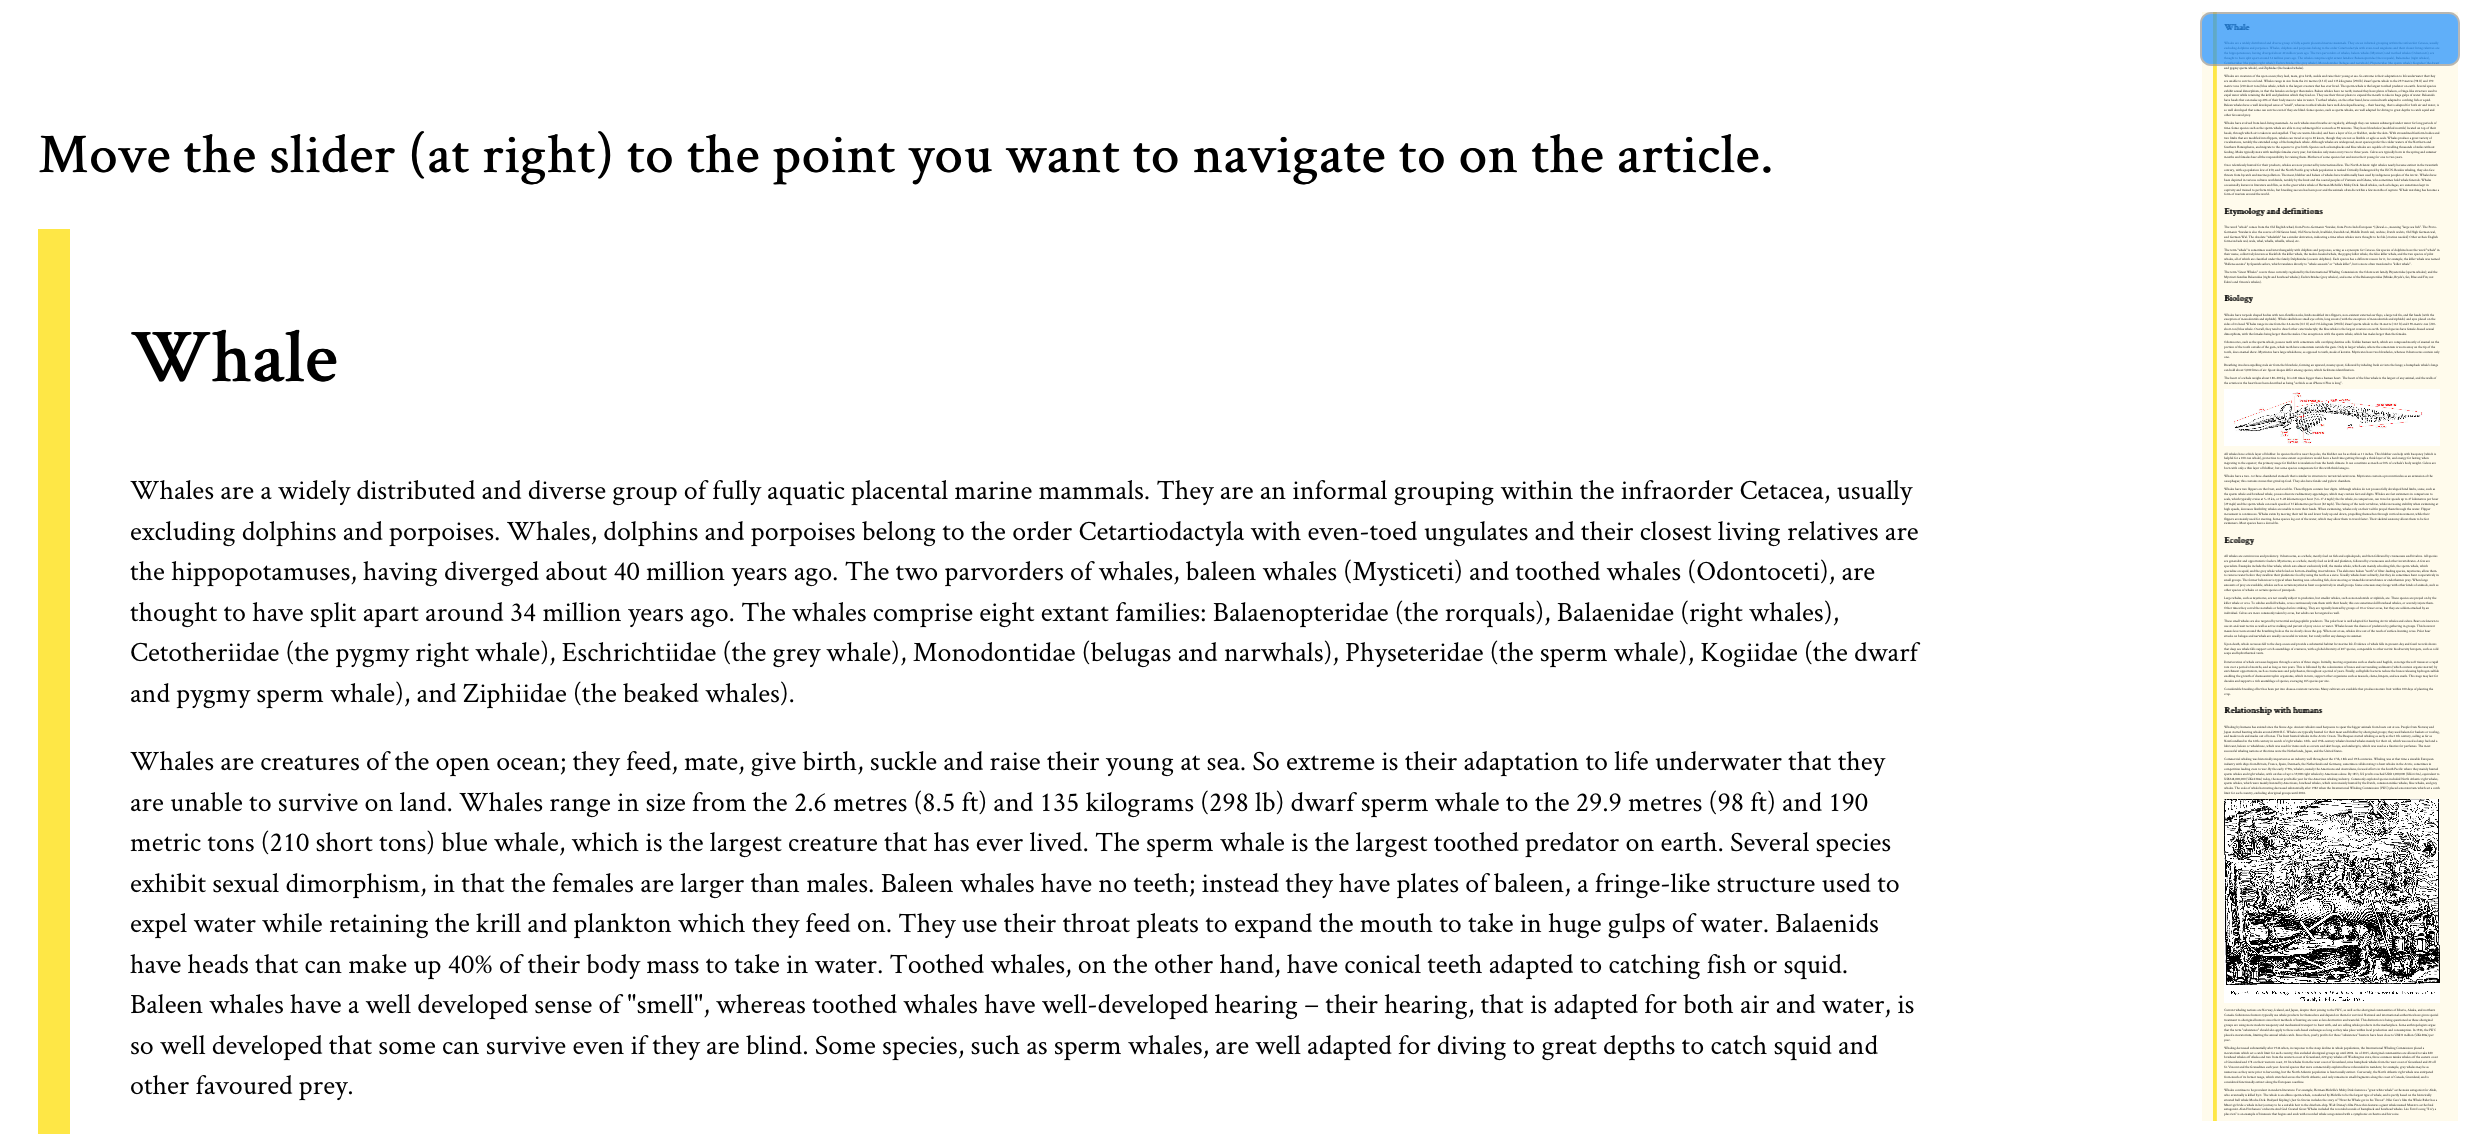
If you’re designing the minimap for the whole page, like for a single page website, you can use the document body element for the image. Otherwise, targeting the main content element, like the article in my demo, also works.
<div id="minimap"></div>
<div id="article"> <!-- content --> </div>
#minimap {
background: rgba(254,213,70,.1) -moz-element(#article) no-repeat center / contain;
position: fixed; right: 10px; top: 10px; /* more style */
}For the minimap’s background image, we feed the id of the article as the parameter of element() and, like with most background images, it’s styled to not repeat (no-repeat) and fit inside (contain) and at center of the box (center) where it’s displayed.
The minimap is also fixed to the screen at top right of the viewport.
Once the background is ready, we can add a slider on top of it and it will serve to operate the minimap scrolling. For the slider, I went with input: range, the original, uncomplicated, and plain HTML slider.
<div id="minimap">
  <input id="minimap-range" type="range" max="100" value="0">
</div>
#minimap-range {
/* Rotating the default horizontal slider to vertical */
transform: translateY(-100%) rotate(90deg);
transform-origin: bottom left;
background-color: transparent; /* more style */
}
#minimap-range::-moz-range-thumb {
background-color: dodgerblue;
cursor: pointer; /* more style */
}
#minimap-range::-moz-range-track{
background-color: transparent;
}Not entirely uncomplicated because it did need some tweaking. I turned the slider upright, to match the minimap, and applied some style to its pseudo elements (specifically, the thumb and track) to replace their default styles. Again, we’re only concerned about Firefox at the moment since we’re dealing with limited support.
All that’s left is to couple the slider’s value to a corresponding scroll point on the page when the value is changed by the user. That takes a sprinkle of JavaScript, which looks like this:
onload = () => {
  const minimapRange = document.querySelector("#minimap-range");
  const minimap = document.querySelector("#minimap");
  const article = document.querySelector("#article");
  const $ = getComputedStyle.bind();

  // Get the minimap range width multiplied by the article height, then divide by the article width, all in pixels.
  minimapRange.style.width = minimap.style.height =
    parseInt($(minimapRange).width) * parseInt($(article).height) / parseInt($(article).width) + "px";

  // When the range changes, scroll to the relative percentage of the article height
  minimapRange.onchange = evt =>
    scrollTo(0, parseInt($(article).height) * (evt.target.value / 100));
};
The dollar sign ($) is merely an alias for getComputedStyle(), which is the method to get the CSS values of an element.
It’s worth noting that the width of the minimap is already set in the CSS, so we really only need to calculate its height. So, we‘re dealing with the height of the minimap and the width of the slider because, remember, the slider is actually rotated up.
Here’s how the equation in the script was determined, starting with the variables:
- x1 = height of minimap (as well as the width of the slider inside it)
- y1 = width of minimap
- x2 = height of article
- y2 = width of article
x1/y1 = x2/y2
x1 = y1 * x2/y2

height of minimap = width of minimap * height of article / width of article
And, when the value of the slider changes (minimapRange.onchange), that’s when the ScrollTo() method is called to scroll the page to its corresponding value on the article. 💥
Fallbacks! We need fallbacks!
Obviously, there are going to be plenty of times when element() is not supported if we were to use this at the moment, so we might want to hide the minimap in those cases.
We check for feature support in CSS:
@supports (background: element(#article)) or (background: -moz-element(#article)){
  /* fallback style */
}
...or in JavaScript:
if(!CSS.supports('(background: element(#article)) or (background: -moz-element(#article))')){
  /* fallback code */
}
If you don’t mind the background image being absent, then you can still keep the slider and apply a different style on it.
There are other slick ways to make minimaps that are floating out in the wild (and have more browser support). Here’s a great Pen by Shaw:
See the Pen
Mini-map Progress Tracker & Scroll Control by Shaw (@shshaw)
on CodePen.
There are also tools like pagemap and xivimap that can help. The element() function is currently specced in W3C’s CSS Image Values and Replaced Content Module Level 4. Defintely worth a read to fully grasp the intention and thought behind it.
This browser support data is from Caniuse, which has more detail. A number indicates that browser supports the feature at that version and up.
Desktop
| Chrome | Opera | Firefox | IE | Edge | Safari |
|---|---|---|---|---|---|
| No | No | 4* | No | No | No |
Mobile / Tablet
| iOS Safari | Opera Mobile | Opera Mini | Android | Android Chrome | Android Firefox |
|---|---|---|---|---|---|
| No | No | No | No | No | 64* |
Psst! Did you try selecting the article text in the demo? See what happens on the minimap. 😉
The post Using the Little-Known CSS element() Function to Create a Minimap Navigator appeared first on CSS-Tricks.
Bandwidth or Latency: When to Optimise for Which
Harry Roberts:
A good rule of thumb to remember is that, for regular web browsing, improvements in latency would be more beneficial than improvements in bandwidth, and that improvements in bandwidth are noticed more when dealing with larger files.
Direct Link to Article — Permalink
The post Bandwidth or Latency: When to Optimise for Which appeared first on CSS-Tricks.
Plaid's Account Verification Now Available to All US Banks and Credit Unions
Plaid, API and solution provider to the financial services industry, has expanded its Auth product offering to work with every bank and credit union in the US. That's roughly 11,500 financial institutions. The expansion greatly improves on the last release that covered about 3,800 US-based institutions. The Auth product allows banks and credit unions of all sizes to authenticate accounts.
Python Functions Tutorial: Working With Functions in Python, Part 3
Advanced Basics: Bootstrap 4 With ASP.NET Core TagHelpers
The title of this post, Advanced Basics, takes the basics and fundamental concepts of what a developer has learned, whether it be a technique or library, and extends it exponentially to advance it to be something more efficient and useful for future projects.
We kick this post off by combining some Bootstrap with ASP .NET Core TagHelper goodness to provide a worthy post (maybe even a series? See below for more).
Tips for the Best Real Estate Website Design

What makes a good website? Depending on what industry you’re in, or your preferences, that answer may be a little different from person to person. There are a few key factors that make up a good website, but depending on the experience the owner is trying to give the audience, it’s never quite the same. With that said, today we’re going to focus on some of the elements that go into a good real estate website design.
As you might expect, a real estate website is a very specific niche. Yes, there are lots of different houses displaying different styles, but the goal of the website is very specific: sell houses. So what exactly goes into real estate website design? Let’s dive a little deeper:
Beautiful images
It is incredibly hard to sell a product online with terrible pictures. If the customer can’t get a good sense of what the house looks like from a computer screen, they may get the wrong impression, and lookover a house completely. High-quality, detailed images are absolutely vital to the overall design of the website.

You should try to provide the best images possible for the listings, yes, but that theme should carry throughout the entire website. Don’t cut any corners.
Let your images do the talking
You know that phrase, “A picture is worth a thousand words”? That phrase rings incredibly true in the real estate business. Working off of our last point, if you have high-quality images of beautiful homes, you can easily implement them into the main theme of the overall sight.
Remember, people are visiting these websites for one thing and one thing only: to look at beautiful houses. What better way to please them than to give them what they want, front and center?
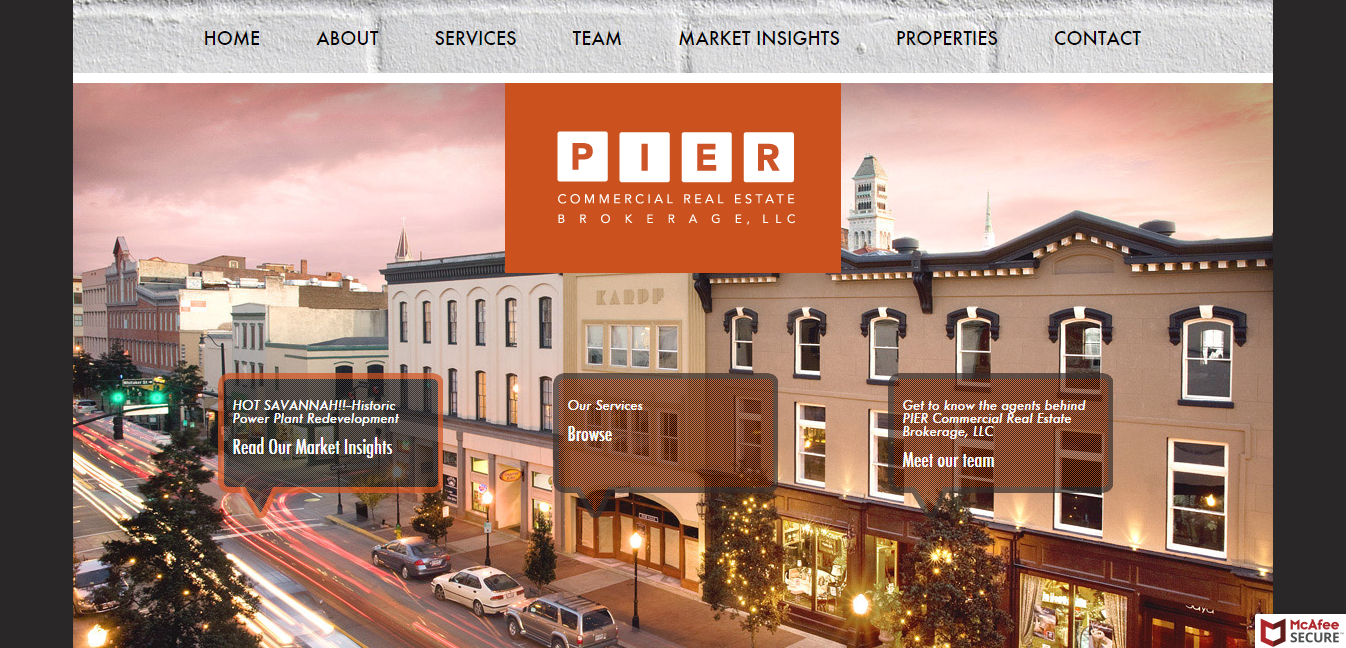
Take a look at Piercommercial.com, for example. It’s a simple, clean design that isn’t overwhelmed by tabs and sidebars. They’ve provided all the necessary information you need as a potential buyer, and topped it off with a nice image.
Include client testimonials
Granted, this is a great idea for any website selling a product or service, but you can understand why. Testimonials are a great way to include custom content that no other website can obtain. Each customer served or home sold produces a unique, one-of-a-kind experience that just simply can’t be duplicated naturally.
Besides that, a real estate website is all about pulling in traffic, and converting them to customers. The absolute best way to do that is to include past experiences that resulted in a happy customer. You can huff and puff all day long about how awesome you are at selling houses, but the average customer will believe another satisfied customer over you 9 times out of 10.
All of that being said, you’ll want to include images that represent the market you’re in. It doesn’t make much sense for a commercial real estate agent to use images of a country cottage. Perhaps the best practice would be to use images of homes or buildings that you’ve sold in the past.
Make it mobile friendly
It kind of goes without saying at this point that any website design should be created with mobile users in mind. In this case, we’re talking about real estate website design, which means that you’ll have clients out and about, going house to house as they find them.They’ll need a quick way to look up some information about the house that they very well could be standing right in front of.

As time goes on, the need for more mobile friendly websites will increase to a point where it will pretty much be unavoidable. So, if your website isn’t already created with mobile users in mind, you have homework to do.
Keep the navigation simple
There’s no need to get fancy with the navigation in your real estate website design. The best practice in this case would be to be straightforward. Again, this is something that a lot of websites struggle with. While it is appropriate to be a little silly or playful on some websites, a real estate page should be simple and professional.
I know, I know, professional can be boring, but it will help you in the end. You have to remember what kind of an audience you’re reeling in. most of the time, you’ll have people that want to get in, find what they’re looking for, and get out. Make it simple and straightforward, and it’ll avoid any potential confusion.
Focus on speed
Real estate websites contain a lot of information. This, of course, can result in very slow loading times, which isn’t a good thing. In fact, if your website loads slowly, not only will potential, high-paying clients leave, Google will, too. With that said, you should take every chance you get to improve loading speeds.

There are a few ways to help your site load faster, but perhaps the best and most widely used method is condensing image files. For a website with loads of images, it’s pretty important that all of their file sizes are as small as they can be without compromising the quality of the image itself. There are lots of free softwares that will help you do this online.
Create area profiles
Most people, when searching for their new home, know exactly the area they want to live in. if you create an area profile, it will help you in two ways:
First, it will really speed up the search process that everyone goes through when looking for a home. They don’t want to look at every house available in the state, or even city. They want to look neighborhood by neighborhood.
Second, it really helps with SEO search results. When someone is looking for a house in a specific neighborhood, they type ,”Homes for sale” and then the name of the neighborhood. If you’ve created a profile dedicated to such neighborhood, you’ll rank for it. It’s a win-win.
The conclusion
Real estate website design isn’t any sort of new industry or practice. It’s been around for quite a while, actually, but it does change. Although there are plenty of experimental methods out there (as there are for just about everything), there are methods that remain true to success. If you’re struggling with your real estate website design, or maybe just looking for ways to improve on it, give these tips a shot.
Read More at Tips for the Best Real Estate Website Design
Combine Extended Events and TagWith to Monitor Entity Framework
I'm going to start with a sentence that makes a lot of people crazy; as a DBA and database developer, I love Entity Framework.
That's right. Entity Framework is the bomb. It's amazing. It does wonderful stuff. Entity Framework makes the developers lives and jobs easier. It makes my life and job easier.
Gradle Goodness: Only Show All Tasks in a Group [Snippet]
To get an overview of all Gradle tasks in our project, we need to run the tasks task. Since Gradle 5.1, we can use the --group option followed by a group name. Gradle will then show all tasks belonging to the group and not the other tasks in the project.
Suppose we have a Gradle Java project and want to show the tasks that belong to the build group:
Good Tests and Bad Metrics: Choosing Quality Over Quantity in Software Testing
As a part of the quality assurance team, you are always expected to carry a quality stick to ensure quality is maintained to a "T." We are always asked to put ourselves into the shoes of the customers and ensure the products/projects meet their expectations with the highest quality achieved.
But the actual irony lies where all our quality metrics boil down to quantitative numbers and terms like bugs logged, the number of test cases written, the number of test cases executed, time spent on testing, URLs tested, browsers checked for cross-browser testing, defect leakage, and more.
Developing Spring Cloud Microservices With a Central Environment
How can developers work simultaneously on the same central Spring Cloud environment?
Developing software based on a microservices architecture is extremely easy when you use Spring Boot and Spring Cloud. Just throw in a few lines of code and you can have a microservice up and running. But how do you develop a real-world application in such an environment? In theory, each microservice is isolated and can be developed alone, but, in practice, this is often not the case. To develop and test your service in the context of the application that uses it requires more than just your microservice to be up and running. So, how can one conveniently develop in a multi-microservices environment?
missing leading zero id from db using ajax
inside mysql db which is table employe in coloumn id_employee, some data have a leading zero, etc :
id_employee : 0378192918
empy_name : Daniweb
i need to get id_employee for delete employe in my aplication, then i using ajax method like this :
if(id) {
      alert(id);
      $("#deleteBtn").unbind('click').bind('click',function(){
         $.ajax({
            url: 'pegawai/delpeg.php',
            type:'post',
            data: {emp_id : id},
            datatype: 'json',
            success:function(response) {
return value is 378192918, the first number 0 not showing in alert box. why ? then how to get entire value id_employe from db ?