IPinfo Launches Privacy Detection API

Featured Imgs 23

IPinfo announced today the availability of its Privacy Detection API. This API detects various methods used to mask a user's true IP address, including VPN detection, proxy detection, tor usage, or a connection via a hosting provider, which could potentially be used to tunnel traffic and mask the true IP address.

How to Recover and Restore Deleted Pages in WordPress

Featured Imgs 19

Are you trying to recover deleted pages in WordPress?

If you accidentally deleted a WordPress page, then it is possible to recover it from Trash.

In this beginner’s guide, we’ll show you how to easily recover deleted pages in WordPress and WooCommerce.

Recovering deleted pages in WordPress

How WordPress Handles Deleted Pages?

Just like your computer, WordPress moves deleted items into a ‘Trash’ folder. Doing that removes those items from your website and admin screens, but they’re not deleted permanently right away.

After 30 days, WordPress automatically deletes the item permanently from the trash, and your WordPress database.

If the page you deleted is still in the trash, then you can go ahead and restore it. We’ll show you how in a minute.

However, if it has been deleted from trash too, then you will need to try other ways to restore the deleted page in WordPress.

Sometimes you may accidentally delete a page and not notice it for a while. For instance, if you have multiple pages with the same name, and you end up deleting one that you actually needed.

Accidentally deleting similarly named pages in WordPress

Another common scenario that we have seen is users accidentally deleting pages needed by WooCommerce or their WordPress membership plugin.

That being said, let’s take a look at how to easily restore deleted pages in WordPress and WooCommerce. Here is quick table of content, so you can jump to the section that best fit your needs.

Method 1. Recover Deleted Pages from Trash in WordPress

This method is the easiest, and you should try it first before doing anything else.

Normally, when you delete an item in WordPress, it is sent to the trash folder, and you can recover it for the next 30 days. After that, it will be automatically deleted forever.

Simply go to Pages » All Pages inside your WordPress admin area. From here, you need to switch to the ‘Trash’ tab to view all the pages that have been deleted during last 30 days.

Restore deleted pages

If the page(s) you want to recover is listed there, then simply take your mouse over the page title, and you’ll see the option to ‘Restore’ it.

You can also restore multiple pages at once by selecting them and then choosing ‘Restore’ from the Bulk Actions drop-down menu at the top.

Restoring multiple pages in WordPress

You can now go to Pages » All Pages and locate the restored page there.

That was quick and easy, but what if the page you deleted is not listed under Trash?

Don’t worry, there are other ways to restore deleted pages in WordPress.

Method 2. Restore Deleted Pages in WordPress Using a Backup Plugin

Backups are one of the best WordPress security and productivity tools. All WordPress websites must set up a proper WordPress backup plugin.

These WordPress backup plugins not just help you recover a hacked WordPress site, but they can also help you recover deleted content including pages.

Note: WordPress backup plugins allow you to restore your entire website to an earlier point. This means any other changes you made to your website after that time can be lost.

If you know when you deleted a page, then you can access the last back up before that time to restore your website.

If you don’t have a WordPress backup plugin installed, then there is still a fairly good chance that your WordPress hosting company does, and you can still restore it via cPanel.

For step by step instructions you can follow our guide on how to restore WordPress from a backup. It shows how to restore WordPress from a backup using UpdraftPlus, BackupBuddy, phpMyAdmin, cPanel, and more.

Method 3. Recover Deleted WooCommerce Pages

By default, WooCommerce creates pages for the checkout, cart, shop, and account management. These are important pages for your WooCommerce store to function properly.

WooCommerce default pages

If you accidentally delete a WooCommerce page, then you can first try restoring it by looking into the Trash (see Method 1 above).

If you cannot find the page in trash, then you can simply create a new one. For instance, you can go to Pages » Add New and then create a blank page titled ‘Cart’.

Create new cart page in WooCommerce

Similarly, you can create other WooCommerce pages as well for shop, checkout, and account.

After you have created new pages, you can tell WooCommerce to use these new pages instead. Simply go to WooCommerce » Settings page and switch to the ‘Advanced’ tab.

Select WooCommerce default pages

From here, you can select pages you created earlier under the Page Setup section.

For the shop page, you’ll need to switch to the ‘Products’ tab and then select the page you want to use as your Shop page.

Shop page

Don’t forget to click on the ‘Save changes’ button to store your settings.

Method 4. Restore Selected Pages from a WordPress Backup (Advanced)

This method is a bit complicated, unreliable, and is not recommended for beginners. However, it would be useful if you don’t want to restore a complete a website and lose any changes you made after that backup.

You can simply restore your WordPress back up to a local server installation and then copy and paste the page contents that you wish to restore.

First, you’ll need to download your WordPress backup files to your computer. Simply go to your WordPress database backup plugin page and you will be able to see recent backups.

For instance, here is how you’ll see your recent backups listed in the UpdraftPlus.

Download WordPress database backup

Simply click on the database backup to download it to your computer.

Next, you will need to restore your WordPress site to a local server. You can install WordPress on your computer using WAMP (or MAMP for Mac).

After that, you can use can install your WordPress backup plugin on local server installation and restore using the backup files.

Optionally, if you have only the database backup, then you can restore that using phpMyAdmin as well.

Once you have restored the WordPress database, you will need to update WordPress Site and Home URLs in the database. To do that, simply open phpMyAdmin on your local server by typing the following URL:

http://localhost/phpmyadmin/

After that, you need to select your WordPress database from the left column and then click on the wp_options table. Switch to the browse tab and locate the rows containing ‘siteurl’ and ‘home’ under the option_name column.

Change site URLs

You’ll notice that the option_value column contains the URL of your live website. You need to edit both of these rows and replace your option_value to match your local server WordPress site.

After that click on the ‘Go’ button to save your changes.

You can now login to your localhost installation, and you’ll see all your old pages listed under Pages » All Pages.

Editing a WordPress page

Go a head and edit the page you want to restore. All you need to do is copy the content and paste it to your live WordPress website as a new page.

Copy page content

Don’t forget to update or publish changes on your live website.

We hope this article helped you learn how to recover deleted pages in WordPress. You may also want to see our complete WordPress security guide to keep your WordPress site safe and secure, and our list of the must have WordPress plugins for all websites.

If you liked this article, then please subscribe to our YouTube Channel for WordPress video tutorials. You can also find us on Twitter and Facebook.

The post How to Recover and Restore Deleted Pages in WordPress appeared first on WPBeginner.

5 Questions To Ask an Ottawa Graphic Designer Before You Hire Them

Featured Imgs 23

Many Ottawa companies these days are hiring professional graphic design firms or freelancers to absolve some challenges behind branding, but they do not always hire the right person. Since graphic designers are all unique—some with university degrees, some self-taught—you have to look through a lot of profiles before finding the one. 

It’s a little like dating! Fortunately, you won’t have to go on a million blind dates. All you have to do is ask the right questions during the Zoom conference or phone call. Aside from interviewing a graphic designer and getting them to tell you little tidbits about themselves, in creating rapport, you should consider the following questions:

Question #1: Can I See a Portfolio and References?

Any designer in Ottawa worth your time should have a professional portfolio with previous work. They should provide you with samples of styles they are adept in, as well as projects that are potentially similar to yours. As you peruse the portfolio, look at the aesthetic, the use of colours, and the composition. Ask yourself if it is what you want. 

At the same time, you should ask for references or any proof of reviews or testimonials from previous clients. Take both positive and negative feedback into consideration. How the professional handles the worst reviews is going to tell you a lot more than how they replied to a good one. 

Question #2: How Long Does It Take to Develop a Design?

While time is relative to the intricacies of the design and how many people are working on it, an experienced designer will be able to estimate a turnaround time. This is a good indicator of competency. 

Going with a freelancer? Then you should know that they probably have multiple projects going on and are doing so on their own unique schedule. You have to make sure you are both on the same page. Make sure they are going to be responsive to your emails and calls and that they confirm when they can deliver. 

Question #3: Can You Tell Me About You/Your Team’s Design Process?

Even if you don’t know anything about graphic design, the professional should be able to describe how the team (or the individual) comes up with their ideas and develops them. There is usually a system in place to help graphic designers produce quality work. Regardless of the complexity of the project, a trustworthy graphic designer will have steps they take that are easy to understand and logical. If they have trouble discussing this, they probably are not skilled enough to complete the job. 

Question #4: Who Owns The Copyright After Design Completion?

Never forget the all-important licensing and copyrighting. Sometimes, graphic designers are not happy to surrender their right to original work. Others will not have issues with it. This is up to you, but if you plan on making changes to the digital work in the future but may not want to use the same graphic designer, make sure you both agree that you receive the copyrights and licensing to do so. 

Question #5: Can You Work Within Our Budget? Or How Much Do You Charge For Services?

Some graphic designers have a fixed rate for a project. Others charge by the hour. Factors can alter the price, such as the number of designs you order, revisions, planning, licensing, and so on. All these impact the price. A graphic designer who is reliable will be honest and transparent about their charges and include that in any contract you sign. 

In short, hiring graphic designers for a project is much like hiring anyone else. You need to gauge their personality and their skill before giving them the green light. By asking these 5 questions, you will find the right person for the job in no time. 

All in One SEO Plugin Turns on Automatic Updates without Notifying Users, Removes Functionality in Latest Release

Category Image 091

Buried in the changelog of a series of minor releases that dropped before the Christmas holiday, All in One SEO plugin users were given the surprise gift of automatic updates. After a seemingly endless run of releases (12 updates during a span of six weeks at the end of 2020), the plugin’s developers decided to change its auto update policy so that it defaults to “on.” The plugin is installed on more than 2 million WordPress sites.

Version 4.0.8, released December 21, 2020, flipped on automatic updates without notifying users of the change. Despite having auto updates turned off for the plugin, many users discovered the change when they were notified by email that their sites had been updated without permission.

Frustrated users took to the plugin’s support forums to report the issue and find out how it was possible.

“Multiple sites have updated to 4.0.11 without my permission and while all auto updates are disabled,” one user said. “I/we do not want to hear that ‘it shouldn’t happen’ and we are looking into.

“Your once reliable plugin has destroyed hundreds of pages of social meta data on multiple sites, broken layout (and this after I fixed the problems and told you last week, I will be disabling all updates).”

Others commented on the issue, citing problems with a previous major release as the source of many bugs that followed.

“The rollout of version 4, and auto-updating without any chance to backup first was a blunder by AIOSEO,” plugin user Derek Haines said. “It has cost me hours, days, and now weeks to fix the problems caused.”

The All in One SEO plugin team apologized for the inconvenience users experienced but said they could not reproduce it on their end. The plugin’s settings page has a toggle for auto updates but it is just a wrapper for WordPress’ auto updater.

“I just wanted to give you an update and let you know that we’ve decided to remove our own auto-update functionality all together since this issue seems to be happening on a limited amount of websites and we aren’t able to reproduce it on our end,” Arnaud Broes said.

The problem was also discussed in the Advanced WordPress Facebook group.

“All In One SEO Pack apparently turned auto updates on, and in a few cases I found sites where those updates failed,” Eric Karkovack reported. “I had no idea they were turned on and in one case a site was inaccessible.”

Karkovack noted that there was only a small mention in the changelog, despite the plugin liberally using the dashboard notification UI for sales.

William Earnhardt, WordPress core contributor and developer at Bluehost, offered some insight as someone who has worked on core as well as plugins installed on a massive scale.

“In my experience if you are weighing the two options, auto-updates prevent significantly more issues and support requests than they create,” Earnhardt said. “So I’m strongly in the camp of enabling them by default, with a mechanism for preventing or disabling for those who prefer (core makes this possible with filters and now with per-plugin UI).

“I think when making these decisions, we as developers have to consider what is best for the broadest number of users and be realistic about the type of users we have. If a user is already not updating plugins regularly, it is unlikely they are going to have the awareness to flip a toggle to turn auto-updates on. So opt-in makes them mostly useless.”

Earnhardt agreed that notifying users of the change would have been a good idea, but admin notices are already “frequently abused and quite noisy.”

“It would likely be missed if not persistent, but really should only show after the update and then go away,” he said. “Is that enough when combined with a note in the changelog? Probably for most, but I’m sure some would disagree.”

As promised nine days ago, All in One SEO’s developers have now removed the functionality from the plugin in its first update of 2021, version 4.0.12 released today. It is noted in the changelog: “Fixed: Completely remove auto updates wrapper to let WordPress handle updates.”

allow to edit adress book

558fe5180e0e8fc922d31c23ef84d240

Write a C# console program that allows the user to edit an address book by displaying the following menu to the user:
1- Add New Address
2- Delete Address
3- Modify Address
4- View Address
5- Quit

when the user enters 1 the program just displays "You wish to add an address." And it does similarly for choices 2, 3, and 4. When the user enters 5 the program ends. The program should repeatedly ask the user for a choice until the user enters 5. If the user, by mistake, enters anything other than an integer number between 1 and 5 inclusive, the program alerts the user by an error message then gives him the chance to continue by redisplaying the menu.

WordPress Error Establishing a Database Connection

Category Image 032

WordPress Error Establishing a Database ConnectionWordPress is a powerful content management system (CMS) by all means, but it comes with its fair share of debilitating errors. Just like any other human-made system, it’s prone to errors that can result from many different things. Perhaps you installed a faulty theme or plugin and messed up your install. Maybe a natural disaster […]

The post WordPress Error Establishing a Database Connection appeared first on WPExplorer.

How to Get a SSL Certificate

Featured Imgs 23

Security needs to be a top priority for every website. From small personal blogs to global ecommerce sites, added security builds trust with visitors and boosts search rankings.

If you’re looking for a quick and easy way to secure your website, start with an SSL certificate.

What is an SSL certificate? SSL stands for “secure sockets layer.” It’s an internet protocol that secures the data transfer between a website and the visitor’s web browser. SSLs are typically used to protect login credentials, credit card data, and other sensitive information.

Generally speaking, SSL certificates can cost anywhere from $50 to $200 per year. But there’s no reason to pay those prices.

As someone who has owned and managed dozens of sites throughout my career, I’ll show you how to get an SSL for free.

What to Expect When Getting a Free SSL Certificate

The best way to get a free SSL certificate is by signing up for a web hosting plan from Bluehost. All of their hosting packages come with a free SSL, and the entire process can be completed in just three simple steps:

  1. Visit Bluehost.com
  2. Sign up and choose a hosting plan
  3. Activate the SSL

The Good

For the most part, getting an SSL certificate is easy. Many web hosting providers include a free SSL certificate with hosting plans. You need to get web hosting regardless, so it makes sense to get a hosting plan and SSL all from the same provider.

In many cases, you won’t even need to select the SSL certificate as an add-on. The certificate will automatically be bundled within the hosting plan.

You can get an SSL certificate for free with entry-level web hosting. Most new websites choose shared web hosting. These plans are cheap and have enough resources to accommodate brand new sites. Even with these low-cost hosting packages, you can still get an SSL certificate for free.

There is no shortage of reputable web hosting providers on the market today. So, you won’t have to dig too hard to find one that will provide you with a free SSL. I’ll show you my favorite option shortly (Bluehost).

The Bad

Getting an SSL certificate for free involves a few extra steps. It’s not a one-click process.

New website owners need to buy a domain and find a web hosting provider before they can consider getting an SSL certificate. Choosing a CMS (content management system) or site builder is something else that you’ll have to ponder. Some of these extra steps will cost money. And web hosting isn’t free, so you’ll still have to pay something.

But just because you have an SSL certificate doesn’t necessarily mean that it’s activated. So, there might be an additional step or two for enabling your SSL. Once installed, it could still take a few hours to activate.

Starting a website without an SSL certificate is a bad idea. Besides exposing your visitors to potential threats and hackers, some web browsers go out of the way to inform people that the site isn’t secure.

If people see this next to your URL, it makes them nervous and causes them to leave your site.

Personally, I always try to avoid unsecured websites. I’m not alone in this thought process. In fact, 50.8% of people immediately leave a website when they see a “not secure” notice. An additional 23.8% of visitors say they won’t share any personal details on these sites.

Step 1 – Visit Bluehost.com

Bluehost is arguably the most reputable and reliable web hosting provider on the market today. It’s an easy and affordable way for new websites to get a hosting plan and SSL certificate.

I like Bluehost because it’s essentially an all-in-one solution for new website needs. All hosting packages come with a free SSL certificate and a free domain.

They have hosting solutions for everyone. Whether you’re looking for a cheap entry-level plan, managed solution, WordPress hosting, or web hosting for an ecommerce site, Bluehost has you covered.

Before we dive into the free SSL, take a minute to assess your hosting needs. This will make the process much smoother as you continue through the tutorial. Here’s a brief overview of Bluehost’s hosting solutions, which will help you determine the best option for your website.

Shared Hosting

For new websites, shared hosting will be the best option. These plans are cheap but still accommodate the needs of low-traffic sites.

You’ll be sharing server resources with other websites, which can potentially cause slower loading times and performance issues. But that’s fine for most new sites, especially for smaller sites and personal blogs.

If you’re not expecting a ton of website visitors for the foreseeable future, there’s really no reason to break the bank and choose anything more advanced than a shared hosting plan.

In addition to a free SSL certificate, all of Bluehost’s shared plans also come with a free CDN and free domain for one year.

VPS Hosting

Bluehost’s VPS (virtual private server) plans are designed for sites that want better performance. This is a step above shared hosting and comes at a higher price point as well.

VPS hosting provides guaranteed resources to your site. While you’ll technically still be sharing a server with other websites, you’ll have dedicated resources on your “virtual” server.

For sites expecting higher volumes of traffic out of the gate, VPS hosting is a viable option. Advanced users will benefit from features like optional root access as well.

Dedicated Hosting

Dedicated hosting is the top of the line in web hosting. You can rent an entire server just for your website and won’t have to share it with anyone else.

These packages come with premium performance, but for a premium price.

The vast majority of you won’t need a dedicated hosting plan, so I won’t spend too much time explaining how this works. But generally speaking, these are reserved for high-traffic sites or for people who want complete control over their hosting environment.

WordPress Hosting

Bluehost has hosting plans that come with an automatic WordPress installation. This is one of only three web hosting providers explicitly recommended by WordPress, so these plans are extremely popular.

They also offer fully managed WordPress hosting, a viable option for growing websites with higher traffic volumes. Even the entry-level managed hosting plan can accommodate up to 50,000 visitors per month.

Additionally, Bluehost has ecommerce plans optimized for WooCommerce. So, if you’re planning to run an online store via WordPress with the WooCommerce plugin, these plans will be perfect for you.

Step 2 – Sign Up and Choose a Hosting Plan

Now that you understand the different hosting options offered by Bluehost, it’s time to select a plan that’s right for you. For the purposes of this tutorial, I’ll go with a shared hosting plan since most of you will likely fall into that same boat.

Here’s a quick overview of the shared packages:

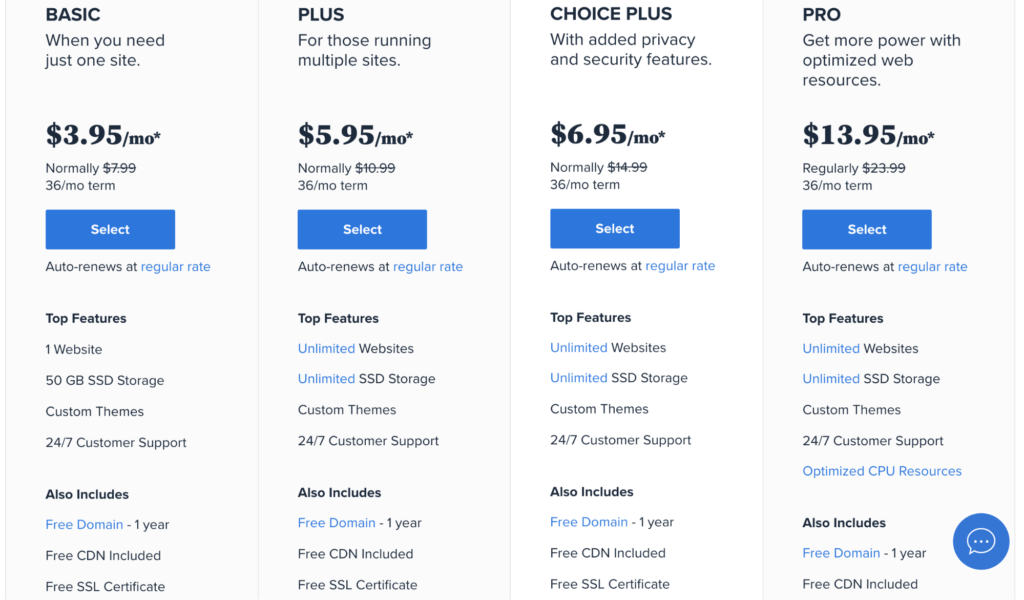
All of these plans come with a free SSL certificate. Once you’ve decided on a package, just click “Select” to continue.

Set Up Your Domain

After selecting a plan, you’ll automatically be prompted to set up your domain. There are two options to choose from, depending on your unique situation: creating a new domain or using a domain you already own.

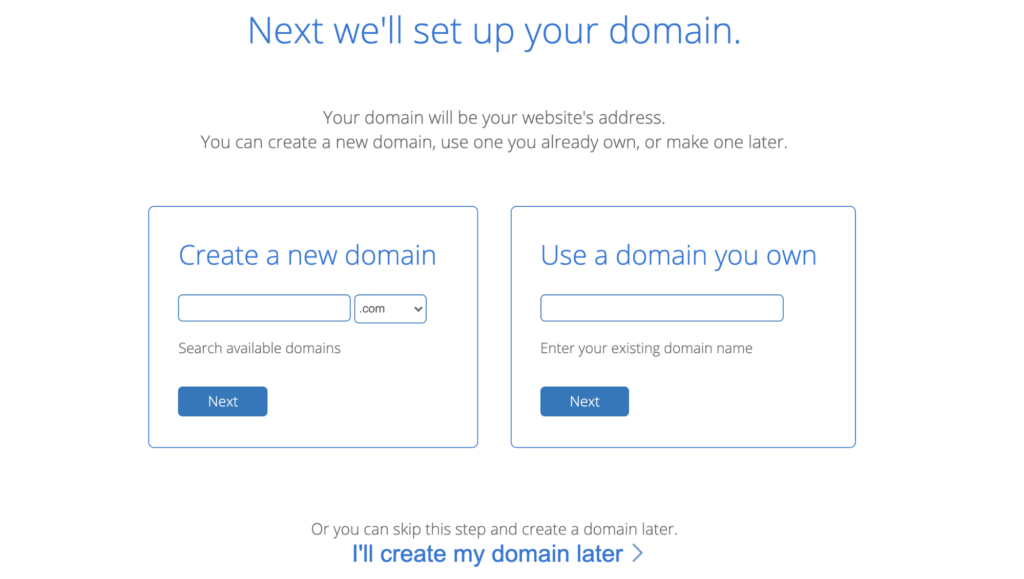
This is pretty self-explanatory. If you’ve already purchased a domain elsewhere, just enter it here. For those of you who don’t have a domain name yet, you can search for an available domain and get one directly from Bluehost.

Another reason why Bluehost is so appealing for new websites is that you’ll get a domain free for the first year when you create it with Bluehost.

If you’re not ready to do this quite yet, you can skip it and set up your domain later. Even if you skip this step, you’ll still be entitled to a free domain credit if you get one with Bluehost.

Since this tutorial focuses on getting an SSL certificate, I’ll select the option at the bottom of the screen and create my domain later.

Create Your Account

Bluehost will prompt you to sign up and create an account. You’ll just need to provide some basic details about yourself or your business to continue.

Those details include:

  • First and last name
  • Business name (optional)
  • Address
  • Phone number
  • Email address

This is about as straightforward as it gets and shouldn’t take more than a minute or so to fill out.

Choose Your Plan Terms

To get the best possible rate, sign up for a 36-month plan, and pay upfront. Bluehost also offers 24-month plans and 12-month hosting plans.

I’m all about value, so I recommend choosing the most extended contract to get the best terms. But the plans are cheap no matter what term length you decide on. Don’t overthink it.

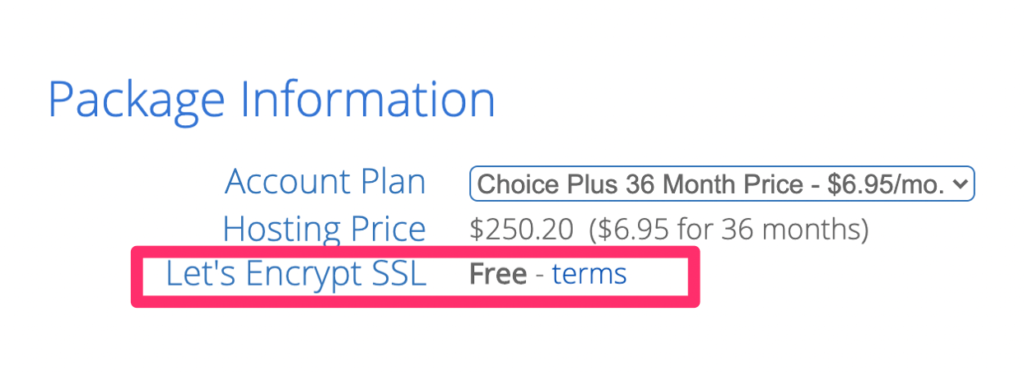
As you can see, a free Let’s Encrypt SSL is automatically added to your package. You don’t need to check any boxes or select an add-on to get this feature.

Bluehost will hit you with a couple of other upsells as you finalize the package. Examples include SEO tools and SiteLock Security. You can probably skip the SEO tools, but lots of people like SiteLock for added security. This covers things like malware detection, weekly scan reports, automatic malware removal, file-level scanning, and Google blacklist monitoring. You’ll want these features eventually, so it makes sense to get it now.

Provide Payment Details

Paying for your Bluehost plan is the final step to creating an account. Just enter your credit card details or pay via PayPal.

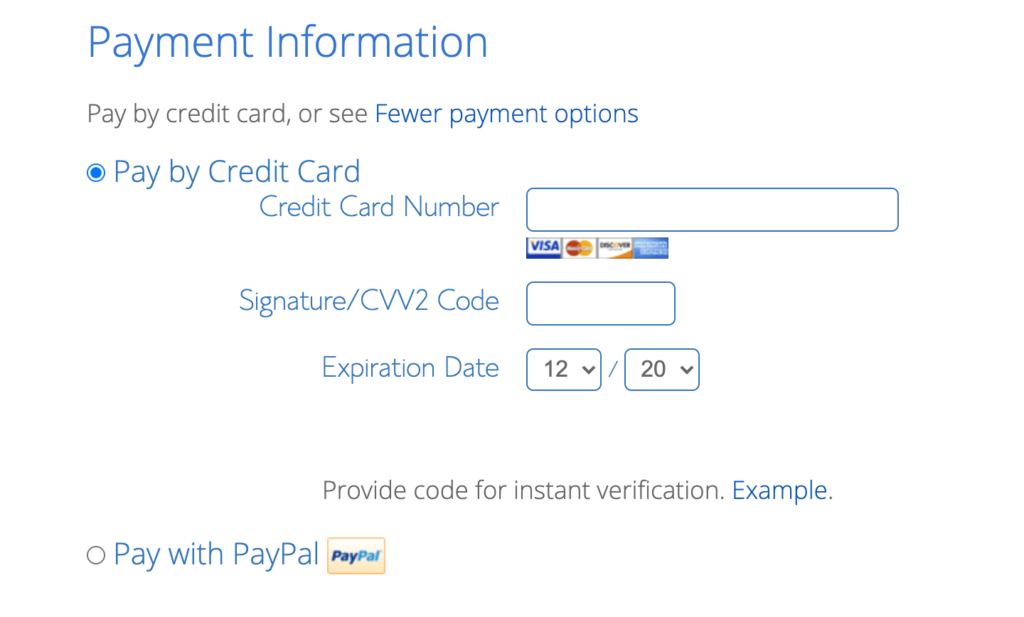
A 30-day money-back guarantee backs Bluehost plans. So, if you decide to cancel within 30 days, you’ll be eligible for a full refund. This guarantee doesn’t extend to add-on products like purchased domain names.

Your plan will automatically renew at the regular rate when the term expires. That’s another reason why I recommend locking in a longer contract. You won’t be able to access these low introductory rates after the first term.

Step 3 – Activate the SSL

Once you’re signed up, you need to make sure the SSL is active. In most cases, the SSL will be automatically assigned to your website and install itself on the domains in your account. However, some Bluehost customers need to enable the SSL certificate manually.

Whether you got your domain from Bluehost or a third-party provider, always verify that the SSL has been activated.

This is easily managed from your Bluehost control panel.

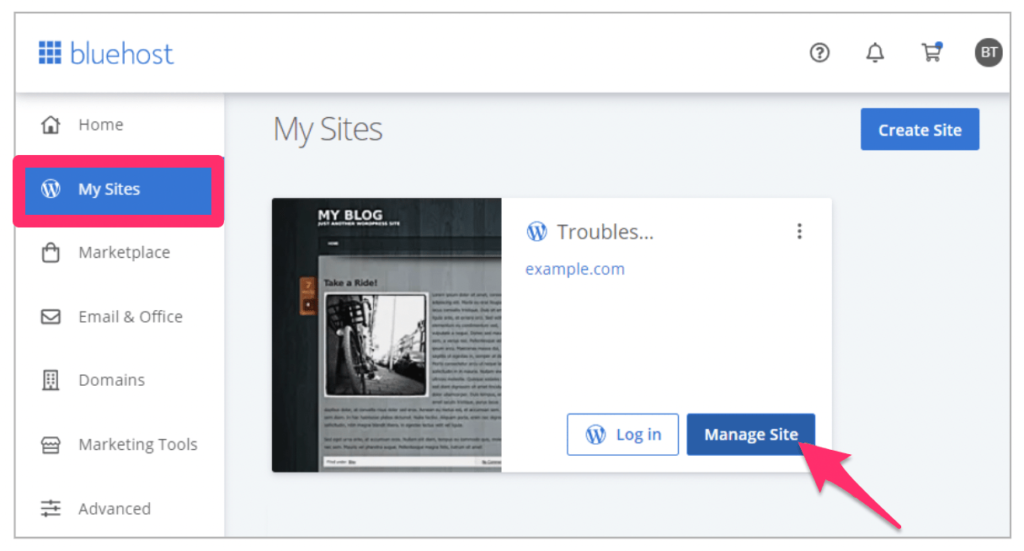
Click the “My Sites” Menu From Your Bluehost Dashboard

Once you’ve logged in to Bluehost, make your way over to the “My Sites” page of the dashboard. For those of you who have multiple sites hosted in the same account, you’ll see all options listed here.

Find the site you want to activate the SSL for and click the “Manage Site” button.

Enable Free SSL Certificate From the “Security” Tab

From here, you need to make your way to the “Security” menu. This can be found towards the top of the screen.

Next, locate the “Security Certificate” portion of this page. You’ll see “Free SSL Certificate” listed in this area.

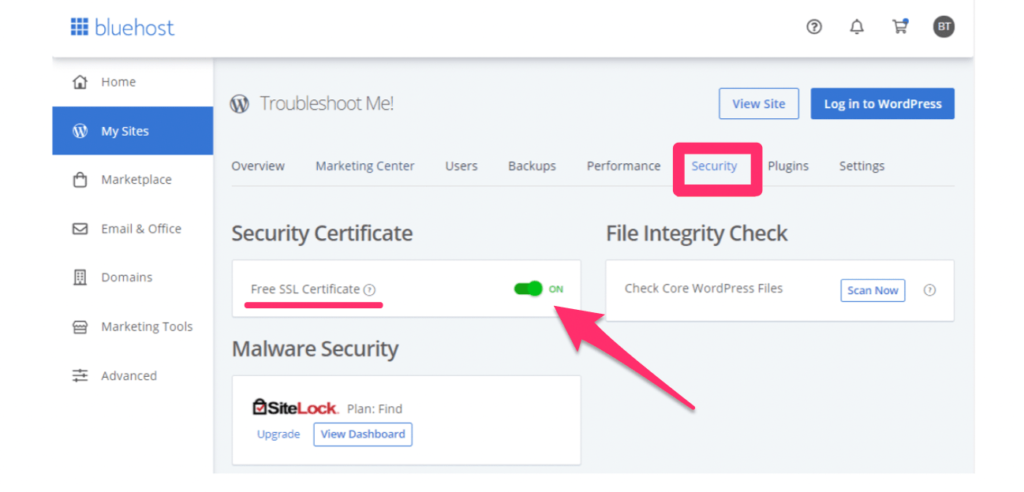
If the certificate is turned on (as shown above), there’s nothing you need to do. The SSL has already been installed. If not, simply toggle the free SSL certificate to the “on” position to activate it.

Once turned on, the SSL certificate can take a few hours to install itself completely and activate. Don’t be alarmed if your site is still showing as “not secure” immediately after turning the SSL on.

Keep a close eye on your email for the next few hours as well. In some instances, Bluehost will require you to complete an action to continue. Clear instructions will be sent to you via email if necessary.

If for some reason you ever want to de-activate the SSL, follow the same steps, and just switch the slider to the “Off” position.

Email Design Trends for 2021

Category Image 051

This post is originally published on Designmodo: Email Design Trends for 2021

Email Design Trends for 2021

Even though the world looked different in 2020, subscribers’ tastes and preferences continued to shape and change elements of successful email design. Email design trends for 2021 suggest that people will be delighted to see newsletters with long text to …

For more information please contact Designmodo

WordPress 5.6 Is Here, State of the Word, “Learn WordPress” Launches 🗞️ January 2021 WordPress News w/ CodeinWP

Category Image 091
Hey everyone, we wish you all a Happy New Year and hope you have a great year ahead. Let’s have a look at how the last month of the year was for WordPress and what to expect heading into the new year. There’s certainly been a lot going on in the WordPress ecosystem. For once, we have a completely new version of WordPress, and Matt Mullenweg held his annual State of the Word. But there’s more!

How to Highlight Text in WordPress (Beginner’s Guide)

Category Image 052

Are you looking for a way to highlight text in a WordPress post or page?

Highlighting text can help point the user’s attention to a specific part of your content. This can be great to show off a call to action, a special offer, or to simply add emphasis on specific sentences.

In this article, we will show you how to easily highlight text in WordPress.

Adding text highlight color in WordPress

Why and When to Highlight Text in WordPress

Text highlighting is an easy way to emphasize important information in your content. It helps you direct the user’s attention to details that you don’t want them to miss.

For instance, highlighting a discount offer on your WordPress website in a different color will draw the reader’s attention to it, helping you generate more sales.

Here’s a sample of what text highlighting might look like in a blog post:

Preview for highlighting text in the block editor

Highlighting text in a different color can also help users with visual impairments or reading difficulties to navigate and understand the content more easily. It can even enhance the appearance of your content and make it more visually appealing.

However, highlighting too much text on your page can be distracting and reduce its effectiveness. That’s why we recommend only highlighting very important text like calls to action, warnings, and other details that readers should pay attention to.

That being said, let’s take a look at how to easily highlight text in WordPress. You can use the quick links below to jump to the method you wish to use:

Method 1: Highlight Text in WordPress Using the Block Editor

This method is for you if you want to easily highlight text in WordPress using the block editor.

First, you will need to open up an existing or new post in the block editor from the WordPress admin sidebar.

Once you are there, simply select the text that you want to highlight and then click the ‘More’ icon in the block toolbar at the top.

This will open up a dropdown menu where you must the ‘Highlight’ option from the list.

Expand the More dropdown menu from the block toolbar and select the Highlight option

A color picker tool will now open up on your screen. From here, you will first need to switch to the ‘Background’ tab.

After that, you can choose a default highlight color from the given options.

You can also select a custom color to highlight text by clicking on the ‘Custom’ option to launch an ‘Eyedropper’ tool.

Choose a highlight color from the color picker tool

Finally, don’t forget to click the ‘Publish’ or ‘Update’ button to save your changes.

You can now visit your website to check out the highlighted text in action.

Preview for highlighting text in the block editor

Method 2: Highlight Text in WordPress Using WPCode (Recommended)

If you want to consistently use a specific color to highlight text all over your WordPress website, then this method is for you.

You can easily highlight text in WordPress by adding CSS code to your theme files. However, the smallest error when entering the code could break your website, making it inaccessible.

That’s why we recommend using WPCode, which is the best WordPress code snippet plugin on the market. It is the easiest and safest way to add code to your website without directly editing your theme files.

Create a Code Snippet With WPCode

First, you need to install and activate the free WPCode plugin. For more instructions, please see our beginners’ guide on how to install a WordPress plugin.

Upon activation, head over to the Code Snippets » + Add Snippet page from the WordPress admin sidebar.

Next, just click the ‘Use Snippet’ button under the ‘Add Your Custom Code (New Snippet)’ option.

Add new snippet

This will take you to the ‘Create Custom Snippet’ page, where you can start by typing a name for your code snippet.

After that, you need to select the ‘CSS Snippet’ option from the ‘Code Type’ dropdown menu.

Note: The ‘CSS Snippet’ option is only available in the premium version of WPCode. If you are using the free version, then you will have to select the ‘Universal Snippet’ option instead.

CSS Snippet as code type for the highlighting text in WordPress

Next, click inside the ‘Code Preview box’.

Then, you have to copy and paste the following code:

mark {
background-color: #ffd4a1;
}

Once you have done that, add the hex code for your preferred highlight color next to the background-color line in the code.

In our example, we are using #ffd4a1, which is a light brown color.

Paste the code snippet to highlight text in WordPress

After that, scroll down to the ‘Insertion’ section.

From here, select the ‘Auto Insert’ method to automatically execute the code upon activation.

Choose an insertion method

Next, head to the top of the page and toggle the ‘Inactive’ switch to ‘Active’.

Finally, click the ‘Save Snippet’ button to store your changes.

Save text highlight code snippet

Highlight Text in the Block Editor

Now that the CSS snippet has been activated, we will have to add some HTML code in the block editor to highlight the text in WordPress.

First, open up an existing or new post in the WordPress block editor.

From here, click on the ‘Options’ icon in the block toolbar at the top. This will open up a new dropdown menu where you must select the ‘Edit as HTML’ option.

Choose the edit as HTML option from the Options dropdown menu in the block toolbar

You will now see the block content in HTML format.

Here, simply wrap the text that you want to highlight inside the <mark> </mark> tags like this:

<mark>highlighted-text</mark>

This will highlight the text in the hex color that you choose in your WPCode snippet.

After that, click the ‘Edit Visually’ option in the block toolbar. to switch back to the visual editor.

Write HTML code on both sides of the text that you want to highlight

Once you are done, go ahead and click the ‘Update’ or ‘Publish’ button to save your changes.

Now, you can visit your website to check out the highlighted text in action.

Demo of highlighting text in WordPress

We hope this guide helped you learn how to highlight text in WordPress. You may also want to see our guide on how to customize colors in WordPress to make your website more aesthetically pleasing and our comparison of the best email marketing services to grow your traffic.

If you liked this article, then please subscribe to our YouTube Channel for WordPress video tutorials. You can also find us on Twitter and Facebook.

The post How to Highlight Text in WordPress (Beginner’s Guide) first appeared on WPBeginner.

SEO Audit – Link Issues

Featured Imgs 11

Internal links are wrecked One of the ways to rank websites pages in search engines is by swarming their links. If there are deceased links or broken links on your website, it can stop search engine bots from crawling your site and, thus, indexing it. It is good that your website has 0 dead links.

External links are lost anchor text (title) & no follow attribute Counting titles for the links helps search engines and users to better know about the page youre linking to. We must place titles on all the links so that users can simply understand that it is a link and we are connecting to that page.

Internal links are lost anchor text (title) Including title for the links assistances search engines and users to better know about the page youre linking to. We must place titles on all the links so that users can simply understand that it is a link and we are linking to that web page.

Centering in CSS

Category Image 052


Adam Argyle has a post over on web.dev digging into this. He starts with the assumption that you need to do vertical centering and horizontal centering. It’s that vertical centering that has traditionally been a bit trickier for folks, particularly when the height of the content is unknown.

We have a complete guide to centering that covers a wide variety of situations like a decision tree.

Adam details five(!) methods for handling it, even getting into centering unknown vertical and horizontal dimensions, plus a handful of other restraints like language direction and multiple elements. I guess all the silly jokes about the difficulty of centering things in CSS need to be updated. Maybe they should poke fun about how many great ways there are to center things in CSS.

Adam does a great job listing out the pros and cons of all the techniques, and demonstrating them clearly. There is also a video. He picks “the gentle flex” as the winning approach:

.gentle-flex {
  display: flex;
  flex-direction: column;
  align-items: center;
  justify-content: center;
  gap: 1ch;
}

You can always find it in my stylesheets because it’s useful for both macro and micro layouts. It’s an all-around reliable solution with results that match my expectations. Also, because I’m an intrinsic sizing junkie, I tend to graduate into this solution. True, it’s a lot to type out, but the benefits it provides outweighs the extra code.

Remember that when you’re “centering in CSS” it’s not always within these extreme situations. Let’s look at another situation, just for fun. Say you need to horizontally center some inline-*¹ elements… text-align: center; gets you there as a one-liner:

But what if you need to center the parent of those items? You’d think you could do a classic margin: 0 auto; thing, and you can, but it’s likely the parent is block-level and thus either full-width or has a fixed width. Say instead you want it to be as wide as the content it contains. You could make the parent inline-*, but then you need another parent in which to set the text-align on to get it centered.

Stefan Judis talked about this recently. The trick is to leave the element block-level, but use width: fit-content;

The ol’ gentle flex could have probably gotten involved here too, but we’d need an additional parent again. Always something to think about.

  1. What I mean by inline-* is: inline, inline-block, inline-flex, inline-grid, or inline-table. Did I miss any?

Direct Link to ArticlePermalink


The post Centering in CSS appeared first on CSS-Tricks.

You can support CSS-Tricks by being an MVP Supporter.