CSS Hell

Category Image 052

Collection of common CSS mistakes, and how to fix them

From Stefánia Péter.

Clever idea for a site! Some of them are little mind-twisters that could bite you, and some of them are honing in on best practices that may affect accessibility.

Why “CSS Hell”?

It’s a joke idea I stole from HTMHell. I hope adding some fun and sarcasm to learning might help raising awareness of how !important a good CSS code is.

Direct Link to ArticlePermalink


The post CSS Hell appeared first on CSS-Tricks.

You can support CSS-Tricks by being an MVP Supporter.

PayPal IPN for Digital Goods

Category Image 023

I appreciate you helping me with this problem, thank you. I have lots of pages in my shop, they are all <form> Add to Cart and the View Cart, they both work when I make a 1p sale, but I don't get the option of paying with PayPal, just my Debit card. Here is my button code, it's the same format on all my pages, it's just the code that's different.

I use a test-listener.htm (which is also in the root directory on my server) and it finds the IPN and it goes straight to where it lives on the thankyou.php page.
Thee thankyou.php page has html which assures the customer his/her transaction is received.
BUT, there's no download urls for the customer's order to be downloaded, even though they're in the PayPal 'return url' box.

This is completely baffling me and has been since before Xmas, I trid to install the smart buttons but lordy, that one was a maze, I had to give upon it!
I'd be so grateful for any clues, I get good hits on my site, but my sales have been zilch, apart from the odd one or two that slipped in somehow. I watch ms clarity and see the cart buttons clicked on, so there is activity.
Regards and gratitude, I hope I've explained it OK, from Steve

Upgrade Your Publishing Flow with the Post Descriptions WordPress Plugin

Featured Imgs 08

Tom de Visser, a developer from Amsterdam, released the Post Descriptions plugin last week. It was his first submission to the WordPress.org plugin repository. It allows users to write short descriptions on a per-post basis, which are then displayed on the post-management screen.

For an initial outing, it already seems to be a hit with its small user base. It has already racked up several five-star reviews and over 100 active installs. Granted, one of those reviews is from his employer, Mediaversa. While that might not seem like much from the outside looking in, anyone who has created plugins knows that it is a successful launch for an individual developer’s first plugin submission.

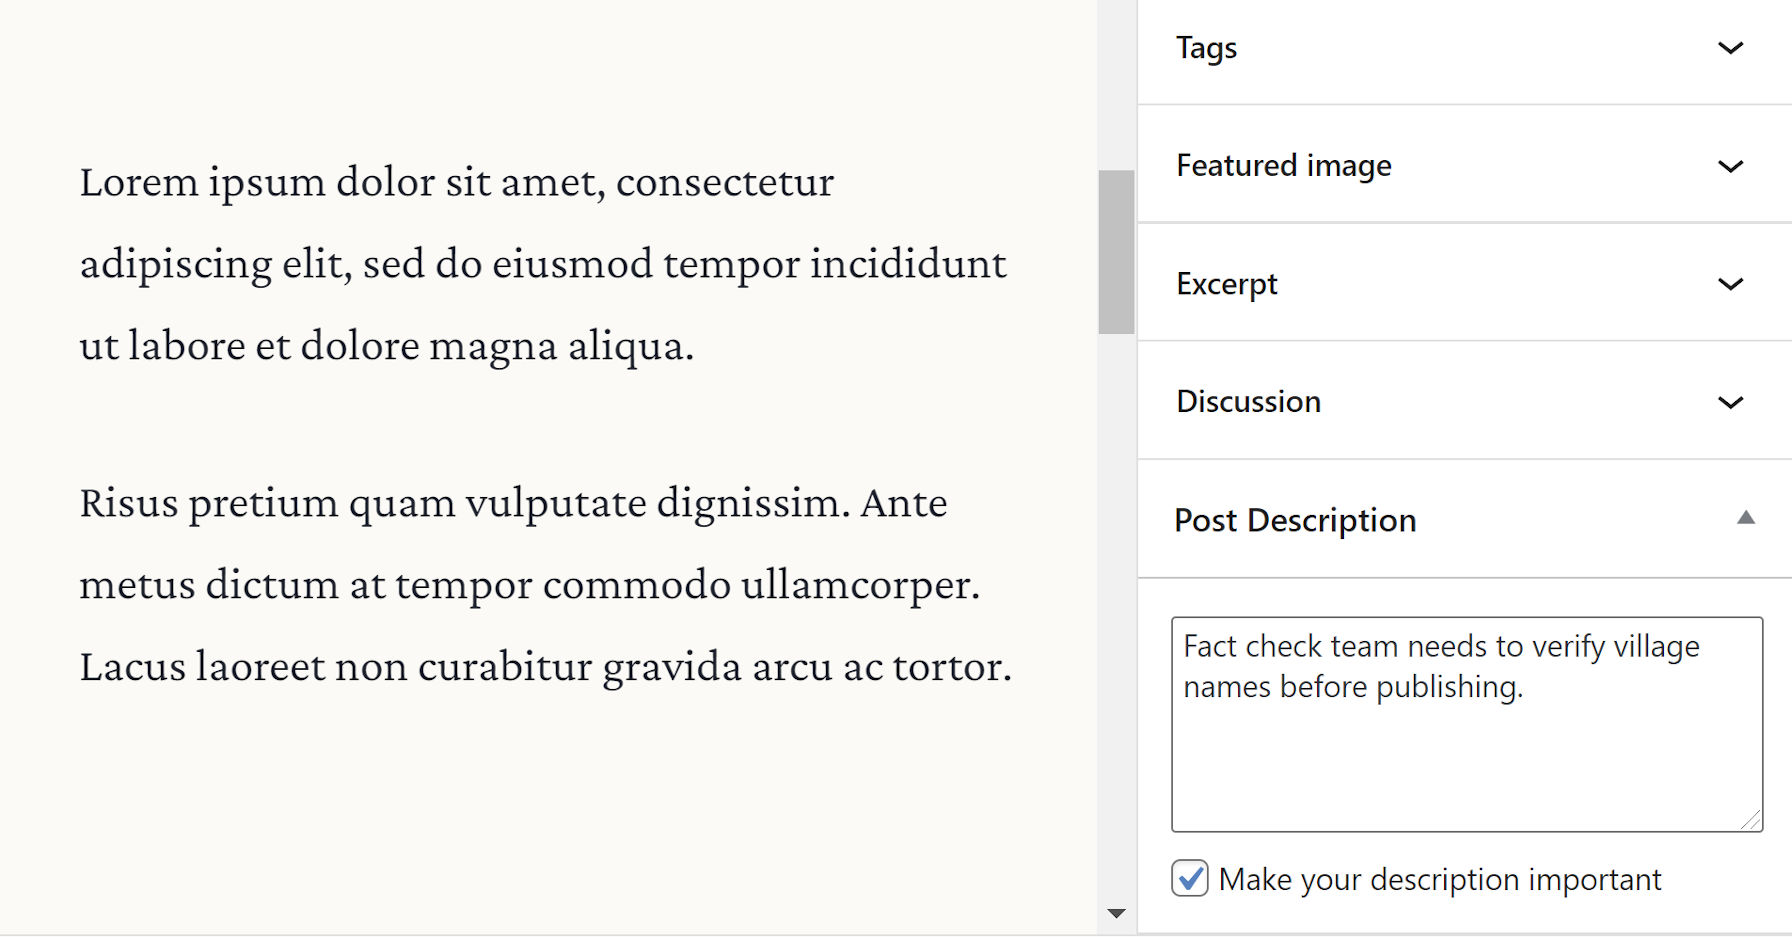
The plugin’s goal is simple: leave small notes, reminders, to-dos, or longer descriptions for posts. It could be an ideal solution for a small team, but lone bloggers might need it too.

Post Descriptions works with both the regular WordPress post editor or the classic editor by adding a meta box to the side of the editing screen. Currently, it only allows descriptions for posts or pages. Maybe the developer will add a post-type-support flag or filter hook for custom post types in the future.

Meta box on the post-editing screen for adding a post description.
Posts Descriptions plugin meta box.

Aside from the description input box, users can tick the “Make your description important” checkbox to highlight a particular note. This option gives the text’s display a red color and turns it bold when viewed.

Descriptions are viewable via the post or page management screens. By default, they appear as a “state,” similar to how pending or draft states next to the title. The plugin also displays them under a “Description” column. Users can turn off the state display via the plugin’s settings screen and toggle the extra column via WordPress’s built-in Screen Options tab.

Post states via the Post Descriptions plugin on the post management screen.
Descriptions as post “states.”

One of my favorite features of this plugin is the flexibility of selecting where the notes appear on the post-management screen. Those who prefer one or two words can choose to display them as states. Those who prefer lengthier descriptions can show them in a separate column. Or, do both.

Description column on the post management screen for displaying notes.
Column for displaying post descriptions.

Users can also add descriptions via the Quick Edit link on the post-management screen.

From a user-experience standpoint, it hits some of those sweet spots of usability and simplicity. Under the hood, the code is solid. The developer does not seem to be overthinking things and making the plugin more complicated than necessary.

For small teams, I envision building a labeling system around this plugin that could address workflow issues. Adding short notes like Editor Review, SEO Review, and similar would alert the right team members to sign off on a post.

While the flexibility of displaying notes as either states or descriptions is welcome, it does not account for a third type of user. My ideal workflow would be to have separate inputs for both states and descriptions. I could create a shorter state that gets my team’s attention. Then, if more information is needed, I could add a longer description.

Post management screen displaying short notes as post states and longer ones under a description column.
Idea: Separate state and description text.

The downside in such a system is that it puts yet another input field in front of the end-user. Sometimes the route with the least effort is best. And, for a quick post note plugin, it is tough to beat the plugin’s current solution.

Reduce the dimensions of the full recording mobile screen/view

558fe5180e0e8fc922d31c23ef84d240

This html web page code, when viewed via mobile device, captures video from the mobile device. By tapping the page, the mobile video full screen appears, ready to begin recording. I'd like to find a way to reduce the dimensions of that full screen, if possible. I'm guessing it might need height and width dimnsions via some javascript code referencing "fileToUpload"?

<form action="uploadMobile.php"  method="post" enctype="multipart/form-data">
<input type="file" name="fileToUpload" id="fileToUpload" accept="video/*" capture="user" onchange="submitForm();">
<input type="submit" value="Upload" name="submit" id="go" style="display: none;"/>
</form>

Any guidance/assistance is appreciated.

Learn CSS!

Category Image 052

Ooo look at this mighty SEO flex from Google: Learn CSS! Well deserved — this is great content. Twenty-three chapters taking you through all the fundamentals of CSS with extra content, like relevant podcasts, interactive examples, and even quizzes to make sure you retained what you read.

Has CSS become… a real system? Heck yes, it has.

Who’s behind the scenes here? Look at this extraordinary pedigree, which you can see for yourself in the conclusion:

Direct Link to ArticlePermalink


The post Learn CSS! appeared first on CSS-Tricks.

You can support CSS-Tricks by being an MVP Supporter.

Total Receipt Of A Drug Item of a simple pharmacy example

558fe5180e0e8fc922d31c23ef84d240

package Dialogs;
import java.text.DecimalFormat;
import java.util.Scanner;

public static void main(String[] args) {
    Scanner sc = new Scanner(System.in);
    Scanner newdata =new Scanner(System.in);
    DecimalFormat df = new DecimalFormat(".00");
    int newprogram;
    int count = 0;
    double Total1;

    System.out.print("How many items in a counter? : ");
        int Item = sc.nextInt();
        String new1 [] = new String [Item];
        int new2 [] = new int [Item];
        double new3 [] = new double [Item];

        double Totalnew1, Totalnew2, value;
        System.out.println();

    for(int i = 0; i< new1.length; i++){
        count++;
        System.out.println("\nDrug Item "+count);

        System.out.print("Enter The Drug Name : ");
        new1 [i] = sc.next();
        System.out.print("Enter Quantity: ");
        new2 [i] = sc.nextInt();
        System.out.print("Enter Price   : ");
        new3 [i]  = sc.nextDouble();
        System.out.println("");
        }

    System.out.println("\n====================  [ SUMMARY OF ORDERS  ]  ===================");
    System.out.println("Drug Name      Quantity       Item Price        Total Price");

    for(int i = 0; i < new1.length; i++){
        System.out.print(new1[i]);
        System.out.print("         "+new2[i]);
        System.out.print("             "+df.format(new3[i])+"          ");

        Total1 = new2[i]*new3[i];
        System.out.println(df.format(Total1));
    }
    }
    }
    // I want to know How to get this?
    [  TOTAL SUMMARY  ]

Total Price 450.00
After Tax 484 // 450 + Vat
VAT Tax ( 12% ) 54 // 450 .12
Discount ( 20% ) 96.8 // after tax
.20
=============================

Total Price Tax
With VAT /Discount 96.8 // Discount

======================================================
[1]Cash
[2]Credit Card
Choose Type Are : 1

======================================================
Amount of Pay
387.2 // After Tax - Discount

Cash
400 //

Exchange
12.8 // Cash - Amount

Expanding Daniweb

Featured Imgs 23

I think Daniweb should start a Face Book Group & a group on a new platform called groups.io. This new platform is the successor to Yahoo groups. in 2019 Yahoo made a business decission to discontinue its groups after almost 20 years.

In November of 2020, Yahoo deleted the entire groups division from its website. There are hundreds of groups using the platform, but they are still accepting new groups. Once you apply, it takes about 24 hours to get te approval from the people who manage the groups division.

As to Face Book, there is a group called Daniweb. I don't know who runs the group. There are 6 members, but with some publicity, it could grow. Face Book is one of the top social media websites, an a group with a lot of members will certainly help Daniweb expand its "brand".

How to Split WordPress Posts into Multiple Pages (Post Pagination)

Category Image 091

Are you looking for a way to split long WordPress posts into different pages?

Splitting lengthy content into several pages makes it easier for your visitors to read articles and navigate different sections.

In this article, we will show you how to split WordPress posts into multiple pages, step by step.
How to Split WordPress Posts

Why Split WordPress Posts into Multiple Pages?

If you have blog posts or guides that are lengthy, then setting up post pagination can improve the readability of your content.

It helps to break down the article into different sections and split them into multiple pages. This way, visitors can easily digest your content and read any section they are interested in.

Another benefit of splitting WordPress posts is that it can help increase pageviews and boost ad revenues.

That being said, let’s take a look at how to split WordPress posts into multiple pages. We will cover how to break your WordPress posts into multiple pages without a plugin and using a WordPress plugin.

Method 1. Split WordPress Posts without a Plugin

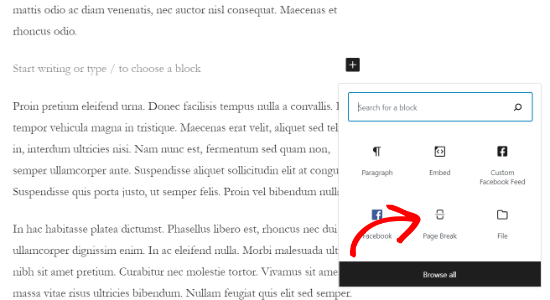
The easiest way of setting up post pagination is by using the ‘Page Break’ block in your WordPress content editor. You don’t need a WordPress plugin to break up your articles into multiple pages.

First, edit or add a new post on your WordPress website. After that, click the plus (+) button where you want to split your content and add a ‘Page Break’ block.
Add a page break block

You should now see a page break line in your content to indicate where the pagination will appear.
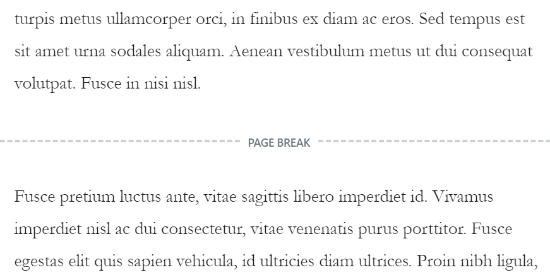
See page break in your content

If you are using the classic editor, then use the <!––nextpage––> tag to split your content.

Just edit any blog post and go to the ‘Text’ view to enter the tag where you would like to split the content.
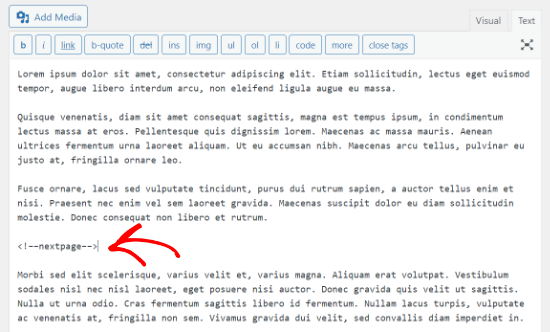
Insert next page tag in the classic editor

You can also use the Alt + Shift + P keys on your keyboard to insert page breaks. To do that, go to the ‘Visual’ view and press the keyboard shortcut keys where you would want to add a page break.

After that, you can preview and publish the blog post. You will now see post pagination at the bottom of the content.
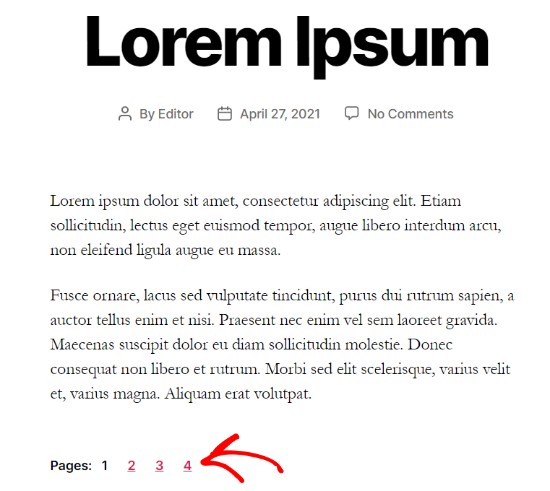
Post pagination example

Method 2. Split WordPress Post into Multiple Pages Using a Plugin

Another way to break lengthy content into various pages is by using a WordPress plugin. The benefit of this method is that it will automatically paginate posts when it meets certain criteria.

For this method, we will use the free Automatically Paginate Posts plugin, as it’s easy to use and works with any WordPress theme.

First, install and activate the Automatically Paginate Posts plugin on your WordPress website. For more details, go through our tutorial on how to install a WordPress plugin.

Once the plugin is active on your site, go to Settings » Reading and scroll down to the ‘Automatically Paginate Posts’ section.

You can select the post types to split into different pages. After that, choose whether to split posts by the total number of pages or approximate words per page.
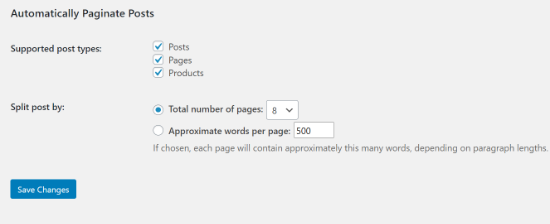
Automatically Paginate Posts section

Next, click the ‘Save Change’ button to store your settings.

The plugin will automatically split your content based on your settings. However, you can also add page breaks manually to your content while using the plugin.

We hope this article helped you learn how to split WordPress posts into multiple pages. You may also want to see our guide on the best WordPress page builders to create custom layouts, and our tutorial on how to add web push notifications in WordPress to grow your website traffic.

If you liked this article, then please subscribe to our YouTube Channel for WordPress video tutorials. You can also find us on Twitter and Facebook.

The post How to Split WordPress Posts into Multiple Pages (Post Pagination) appeared first on WPBeginner.

Notify.Events Ultimate WordPress Notifications

Featured Imgs 14

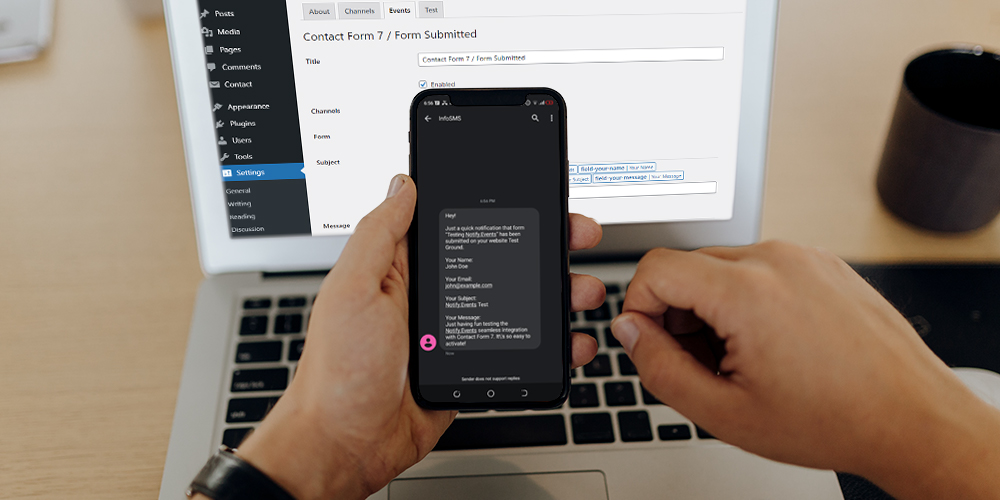
Notify.Events Ultimate WordPress NotificationsHow do can you monitor visitor activity and events on your website in real-time? That’s simple; you use real-time notifications. If you had no idea, you can receive notifications from your website via SMS, push notifications, Facebook Messenger, Telegram, and everything in between. And it’s all very easy to set up with the right WordPress […]

The post Notify.Events Ultimate WordPress Notifications appeared first on WPExplorer.

Euismod

Category Image 052

An interactive tool for learning grid syntax from Etesam Ansari. In the Learn section, it teaches you some concepts (involving multiple bits of the grid syntax) then gives you a task to complete by filling out the right syntax. I’m sharing because I think this sort of thing really clicks with people — I know Flexbox Froggy did. Once you know the possibility, there is no shame in memorizing all the details, that’s what our guides are for: we have them for flexbox and grid. Generators can be awfully helpful too, like Sarah’s Grid Generator.

Aside: I wonder what Euismod means. Google suggests it is Latin for Performance.

Direct Link to ArticlePermalink


The post Euismod appeared first on CSS-Tricks.

You can support CSS-Tricks by being an MVP Supporter.

the importance of cleaning

Category Image 023

https://iinjaz-alkhalj.com/%d8%b4%d8%b1%d9%83%d8%a9-%d8%aa%d9%86%d8%b8%d9%8a%d9%81-%d9%85%d8%ac%d8%a7%d9%84%d8%b3-%d8%a8%d8%a7%d9%84%d8%b1%d9%8a%d8%a7%d8%b6/

The Arab countries are famous for the Arab councils, in which a large number of individuals meet and which needs permanent cleaning, so we provide a cleaning company in Riyadh that provides its services in the Kingdom of Saudi Arabia through which the council can be cleaned and sterilized and overcome all kinds of insects and dirt accumulated inside the place with ease from During the work team assigned by the company

8 Top eBooks APIs

Featured Imgs 23

Digital Transformation is impacting all parts of entertainment. Streaming TV is now almost as popular as cable TV, digital music outsells analog CDs or vinyl records, online news subscriptions are slowly replacing print newspapers, and eBooks are just as popular as paper books. Although nothing feels as great as a paper book in one's hands, eBooks have some great advantages.

Sort an arraylist of an arraylist of doubles

558fe5180e0e8fc922d31c23ef84d240

I am looking to sort an arraylist of arraylist of doubles and I require help?

I was informed that I need to implement comparator or comparable and then use the collection.sort to sort the list of list in order...

ArrayList<ArrayList> list = new ArrayList<ArrayList>()

If you look at the list of list as the following example:

c1-5.0,4.5,10.3,3.5

c2-2.5,1.0,7.8,8.6

c3-6.0,5.6,9.6,9.5

It show go to this

c1-2.5,1.0,7.8,3.5

c2-5.0,4.5,7.8,8.6

c3-6.0,5.6,10.3,9.5

Salt Security Expands API Protection Platform

Featured Imgs 23

In 2019, Salt Security launched an API Protection Platform that leverages artificial intelligence in order to provide detailed API traffic monitoring that detects malicious behavior and prevents attacks before they can happen. Salt is now expanding this platform to include automated OpenAPI Specification (OAS) analysis and new security analysis points.