All in One SEO Pack Plugin Patches XSS Vulnerability

Wp Plugins

All in One SEO Pack patched an XSS vulnerability this week that was discovered by the security researchers at Wordfence on July 10. The popular plugin has more than 2 million active installs, according to WordPress.org.

Wordfence researchers categorized it as “a medium severity security issue” that could result in “a complete site takeover and other severe consequences:”

This flaw allowed authenticated users with contributor level access or above the ability to inject malicious scripts that would be executed if a victim accessed the wp-admin panel’s ‘all posts’ page.

Version 3.6.2, released on July 15, 2020, includes the following update in the changelog: “Improved the output of SEO meta fields + added additional sanitization for security hardening.”

All in One SEO Pack users are strongly recommended to update to the latest version. At the time of publishing, just 12% of the plugin’s user base is running versions 3.6.x, which includes the three most recent versions. This leaves more than 1.7 million installations (88% of the plugin’s users) vulnerable.

Many users don’t log into their WordPress sites often enough to learn about security updates in a timely fashion. Plugin authors often don’t advertise the importance of the update on their websites or social media. This is the type of situation that WordPress 5.5 should help to mitigate, as it introduces admin controls in the dashboard that allow users to enable automatic updates for themes and plugins.

Should WordPress Themes Add a Top-Level Admin Menu Item?

Featured Imgs 08

WordPress has almost always provided a top-level admin menu item for themes. It is clearly labeled “Appearance.” It is the single location that all WordPress users know to visit to modify any appearance-related things for their WordPress site. However, there is a movement within the Themes Team to allow themes to place an additional top-level menu link in the admin. The big question: should this idea move forward?

When the Themes Team (originally called the Theme Review Team) was formed, its members created a set of guidelines that would be shaped and reshaped over the years. They were a set of living guidelines that could always be changed with the times.

One of the oldest guidelines required that themes must place any custom admin pages under the Appearance menu item. It made sense. WordPress provided a standard location for any theme-related pages. The custom header and background features lived under Appearance. Widgets, also defined by the current theme, were housed as a sub-page. Eventually, WordPress’s custom nav menu system came along and was — you guessed it — situated under Appearance. The core developers even put the customizer link in the same place.

For over a decade, there was a well-defined standard. Sure, commercial themes outside of the official directory would sometimes break the mold. However, themes from the directory followed the pattern.

Now, the Themes Team is proposing that themes should be able to break from tradition.

The discussion arose after a question of whether themes should be able to add a custom panel to the block editor sidebar, which is not allowed.

“To keep the editor free from clutter, advertising and upsell, with the customizer being used less, and no dashboard widgets being allowed, can we give theme authors a better place to include their information, and limit upsell to that area?” wrote Carolina Nymark in last week’s team meeting notes.

The proposal seems to settle on the idea that themes will lose visibility as WordPress moves toward full-site editing and the customizer becomes less important. The customizer is not an ideal place for anything but theme options, but that notion seems to have been overlooked in the discussion. Nevertheless, the original guideline that disallowed themes from creating top-level menu items preceded the advent of the customizer by several years. Advertising, documentation, plugin recommendations, and similar pages were always allowed under the existing Appearance menu. The usefulness of the customizer was never a necessary part of that conversation.

Ultimately, the question should be about what is best for users. There is no data to support making the change or sticking with the status quo. However, we do have a standard that has existed for years.

The Proposed Guidelines

The proposal would create several new guidelines for theme authors to follow and reviewers to check, assuming the theme created a top-level admin menu item:

  • No admin menu priority may be used.
  • No UI or color changes are allowed for the menu item.
  • The title must be kept short and not include spam.
  • No more than three sub-pages.
  • Child themes are limited to one sub-page or can remove the parent’s pages and add its own.

Some of these make sense and follow along with existing guidelines, such as not spamming or changing the admin UI. However, others could be problematic.

If moving forward with the proposal, setting a menu item priority should be required rather than not allowed. If anything, it would make sense to require a specific priority to place the custom menu item immediately after the existing Appearance item. This would at least group them together by default. If changing the place where users are accustomed to seeing theme-related pages, it is probably best not to break too far from the standard location.

No more than three sub-pages? Surely there will be a theme with a top-level admin menu item that needs four sub-pages at some point. If giving theme authors the freedom to take up valuable real estate in the admin, a limit of three sub-pages seems like a rule to fix the mistake of allowing the top-level item in the first place. It is an arbitrary number at best. There would be no reason to cap it once making the guideline change. It also adds one more item that the team will need to police.

The limitation of sub-pages for child themes seems just as arbitrary. No such limitation exists when placing sub-pages under the standard Appearance screen.

The entire proposal is little more than extra work on a team that is already strained for resources.

Instead of the simple rule that has existed for years, the proposal adds a new rule with several sub-rules. If the team desires the extra work, I suppose this point doesn’t matter.

The Elephant in the Room

There is one Aspect of this discussion that everyone knows about but few are willing to broach. Underneath all the guidelines from the Themes Team and whether most theme authors support a particular decision is how this affects the financial bottom line. When we talk about visibility of a theme’s admin pages, we are primarily talking about providing another avenue for commercial upsells.

Some of this discussion on visibility is shrouded in concepts such as surfacing end-user documentation or adding a visible readme for the user’s benefit. These are legitimate concerns, especially when theme developers have watched tickets to address such downfalls seemingly dwindle into obscurity over the years. Whether a top-level admin menu item makes sense for exposing theme documentation might be worth discussing, but there is no world in which this would be the primary use case.

The topic of visibility rests on the idea of upselling the pro version of the theme, add-ons, or other services.

Far too many plugins already go overboard, creating a billboard of the WordPress admin. One of the things users could almost be assured of is that themes from the official directory were constrained enough that they were not the hot mess that plugins have become as of late. However, that could all change.

Do we really want an extra top-level admin menu item that will be, for all intents and purposes, to advertise?

Maybe it doesn’t matter in the end. Users are so accustomed to the clutter produced by the dozens of plugins on their sites. One more may not matter at this point.

Or, should we be having a different conversation altogether? If this ultimately boils down to advertising, are there ways we can open this up for theme authors while still creating a user experience that keeps the WordPress admin free of clutter?

4 Tips on Building an Effective Intranet Website Using WordPress

Featured Imgs 13

Communication is the glue that keeps teams and organizations together. When communication is done correctly, team members can work seamlessly with each other, and the organization as a whole can grow exponentially. More and more businesses are now setting up their own intranet website to allow team members to share information and documents, communicate with […]

The post 4 Tips on Building an Effective Intranet Website Using WordPress appeared first on WPArena.

Your Guide to Blogger Outreach: How-To and What You Should Know

Fotolia Subscription Monthly 4685447 Xl Stock

You’ve followed all of the marketing guides, sales funnel tips, and carefully built your subscriber list, yet your online business seems to be plateauing. What gives? This problem is common for a lot of online business owners. You don’t really want to use typical social media influencers because it feels… overdone or fake. Instead, you’d […]

The post Your Guide to Blogger Outreach: How-To and What You Should Know appeared first on WPArena.

How to move tkinter window | override-redirect flag

558fe5180e0e8fc922d31c23ef84d240

I have already created functions to handle that. But it's shacking when i try to move( After add more widgets). Can somebody help me with that.

from tkinter import *
from PIL import Image, ImageTk
import time

class modtk(Tk):
    toptitlebar = None
    maincanvaswindow = None
    resizeon = False
    dragging = False

    def updatetopbut(self, event):
        self.closebutton.config(fg=self.ttfg)
        self.fullscreenbutton.config(fg=self.ttfg)
        self.minimizebutton.config(fg=self.ttfg)

    def downdatetopbut(self, event):
        self.closebutton.config(fg=self.ttbg)
        self.fullscreenbutton.config(fg=self.ttbg)
        self.minimizebutton.config(fg=self.ttbg)

    def modify(self, title="tk", icon=None, titlebg="#ffffff", titlefg="#000000", bg="#EBEBEB"):
        self.tt = title
        self.ico = icon
        self.ttbg = titlebg
        self.ttfg = titlefg
        self.bgbg = bg
        self.title(title)
        self.width = 150
        self.height = 200
        self.maximized = False
        self.map = 0
        self.resizeside = None
        self.moveok = False
        self.minsizex = 0
        self.minsizey = 0
        self.resizeadjx = self.winfo_rootx()
        self.resizeadjy = self.winfo_rooty()
        self.update_idletasks()
        self.overrideredirect(True)
        self.config(bg=self.bgbg)
        if not icon == None:
            try:
                icon = Image.open(icon)
                icon = icon.resize((30, 30))
                icon = ImageTk.PhotoImage(icon)
            except Exception as e:
                print(e, "File should be a .png file.")
                icon = None
        __class__.toptitlebar = Frame(self, height=34, bd=0, highlightthickness=1, highlightbackground="#000000",
                                      bg=titlebg)
        __class__.toptitlebar.pack(side=TOP, fill=X)

        __class__.toptitlebar.bind("<ButtonPress-1>", self.SaveLastClickPos)
        __class__.toptitlebar.bind("<B1-Motion>", self.Dragging)
        __class__.toptitlebar.bind("<Double-Button-1>", self.maximize)
        __class__.toptitlebar.bind("<Enter>", self.updatetopbut)
        __class__.toptitlebar.bind("<Leave>", self.downdatetopbut)
        __class__.toptitlebar.bind("<ButtonRelease-1>", self.releaseresize)

        self.titlelabel = Label(__class__.toptitlebar, bg=titlebg, fg=titlefg, bd=0, padx=0, pady=0)
        self.titlelabel.image = icon
        self.titlelabel.config(image=icon, compound=LEFT, text="   %s" % title)
        self.titlelabel.place(x=0, y=0)

        self.titlelabel.bind("<ButtonPress-1>", self.SaveLastClickPos)
        self.titlelabel.bind("<B1-Motion>", self.Dragging)
        self.titlelabel.bind("<Double-Button-1>", self.maximize)
        self.closefunction = lambda event: self.destroy()

        self.closebutton = Label(__class__.toptitlebar, text="X",
                                 bd=0,
                                 bg=titlebg, fg=titlebg,
                                 padx=14, pady=7)
        self.closebutton.pack(side=RIGHT)

        self.closebutton.bind("<Enter>", lambda event: self.closebutton.config(bg="#FF0000"))
        self.closebutton.bind("<Leave>", lambda event: self.closebutton.config(bg=titlebg))
        self.closebutton.bind("<Button-1>", self.closefunction)

        self.fullscreenbutton = Label(__class__.toptitlebar, text="[]",
                                      bd=0,
                                      bg=titlebg, fg=titlebg,
                                      padx=14, pady=7)
        self.fullscreenbutton.pack(side=RIGHT)

        self.fullscreenbutton.bind("<Enter>", lambda event: self.fullscreenbutton.config(bg="#dddddd"))
        self.fullscreenbutton.bind("<Leave>", lambda event: self.fullscreenbutton.config(bg=titlebg))
        self.fullscreenbutton.bind("<Button-1>", self.maximize)

        self.minimizebutton = Label(__class__.toptitlebar, text="-",
                                    bd=0,
                                    bg=titlebg, fg=titlebg,
                                    padx=14, pady=7)
        self.minimizebutton.pack(side=RIGHT)

        self.minimizebutton.bind("<Enter>", lambda event: self.minimizebutton.config(bg="#dddddd"))
        self.minimizebutton.bind("<Leave>", lambda event: self.minimizebutton.config(bg=titlebg))
        self.minimizebutton.bind("<Button-1>", self.minimize)
        self.bind("<Map>", self.frame_mapped)

        __class__.maincanvaswindow = Canvas(self, width=self.width, height=self.height, bg=bg, highlightthickness=1,
                                            highlightbackground="#000000")
        __class__.maincanvaswindow.pack(side=TOP)

        self.bind("<Button-1>", self.startresize)
        self.bind("<B1-Motion>", self.resizewin)
        self.bind("<Motion>", self.isonresize)
        self.bind("<ButtonRelease-1>", self.releaseresize)

        self.lastClickX = 0
        self.lastClickY = 0
        self.map = 0
        self.maximized = False
`Inline Code Example Here`
    def modgeometry(self, w, h, x=None, y=None):
        w = int(w)
        h = int(h)
        self.width = w
        self.height = h
        if (__class__.maincanvaswindow.winfo_width() != w or __class__.maincanvaswindow.winfo_height() != h) and not __class__.resizeon and not __class__.dragging:
            __class__.maincanvaswindow.config(width=w, height=h)
        if not x == None or not y == None:
            x = int(x)
            y = int(y)
            self.geometry('%dx%d+%d+%d' % (w, (h + 33), x, y))
        else:
            self.geometry('%dx%d' % (w, (h + 33)))
`Inline Code Example Here`
    def SaveLastClickPos(self, event):
        if not self.maximized:
            if event.y > 5 and event.x > 5 and event.x < (self.winfo_width() - 5):
                self.lastClickX = event.x
                self.lastClickY = event.y
                self.moveok = True
            else:
                self.moveok = False
`Inline Code Example Here`
    def Dragging(self, event):
        if self.moveok:
            if not self.maximized:
                x = self.winfo_x() + (event.x - self.lastClickX)
                y = self.winfo_y() + (event.y - self.lastClickY)
                self.modgeometry(self.winfo_width(), (self.winfo_height() - 33), x, y)

    def frame_mapped(self, event=None):
        print(event)
        if self.map == 5:
            print("yes")
            self.update_idletasks()
            # self.deiconify()
            self.overrideredirect(True)
            self.map = 0
        else:
            self.map += 1

    def minimize(self, event=None):
        print("no")
        #self.map = 0
        self.update_idletasks()
        self.overrideredirect(False)
        self.iconify()

    def maximize(self, event=None):
        if not self.maximized:
            self.oldwidth = self.winfo_width()
            self.oldheight = self.winfo_height()
            self.oldx = self.winfo_x()
            self.oldy = self.winfo_y()
            self.maximized = True
            self.modgeometry(self.winfo_screenwidth(), (self.winfo_screenheight() - 33), 0, 0)
        else:
            self.maximized = False
            self.modgeometry(self.oldwidth, self.oldheight, self.oldx, self.oldy)

    def closefunc(self, func):
        self.closefunction = lambda event: func()
        self.closebutton.bind("<Button-1>", self.closefunction)

    def winfo_heightr(self):
        return (self.winfo_height() - 33)

    def startresize(self, event=None):
        print(event)
        if not self.maximized:
            #if event.widget == __class__.maincanvaswindow:
            if True:
                self.resizelastx = event.x
                self.resizelasty = event.y
                self.resizelastw = self.winfo_width()
                self.resizelasth = self.winfo_height() - 33
                self.resizeadjx = self.winfo_rootx()
                self.resizeadjy = self.winfo_rooty()
                __class__.resizeon = True
                print("canvas")
                nonety = True
##                if event.x < 5 and event.y < (self.winfo_height() - 33 -5):
##                    self.resizeside = "left"
##                    nonety = False
                if event.x > (self.winfo_width() - 5) and event.y < (self.winfo_height() - 33 -5):
                    self.resizeside = "right"
                    nonety = False
                if event.y >(self.winfo_height() -33 - 5) and event.x > 5 and event.x < (self.winfo_width() - 5):
                    self.resizeside = "down"
                    nonety = False
                if event.x > (self.winfo_width() - 5) and event.y > (self.winfo_height() - 33 - 5):
                    self.resizeside = "rightdown"
                    nonety = False
##                if event.x < 5 and event.y > (self.winfo_height() -33 - 5):
##                    self.resizeside = "leftdown"
##                    nonety = False
                if nonety:
                    self.resizeside = ""
                print(self.resizeside)
##            elif event.widget == __class__.toptitlebar:
##                self.resizelastx = event.x
##                self.resizelasty = event.y
##                self.resizelastw = self.winfo_width()
##                self.resizelasth = self.winfo_height() - 33
##                self.resizeadjx = self.winfo_rootx()
##                self.resizeadjy = self.winfo_rooty()
##                print("titlebar")
##                nonety = True
##                if event.x < 5 and event.y > 5:
##                    self.resizeside = "left"
##                    nonety = False
##                if event.y < 5 and event.x > 5 and event.x < (self.winfo_width() - 5):
##                    self.resizeside = "up"
##                    nonety = False
##                if event.x < 5 and event.y < 5:
##                    self.resizeside = "leftup"
##                    nonety = False
##                if event.x > (self.winfo_width() - 5) and event.y > 5:
##                    self.resizeside = "right"
##                    nonety = False
##                if event.x > (self.winfo_width() - 5) and event.y < 5:
##                    self.resizeside = "rightup"
##                    nonety = False
##                if nonety:
##                    self.resizeside = ""
##            else:
##                self.resizeside = ""

    def isonresize(self, event=None):
        print(event)
        if not self.maximized:
            #if event.widget == __class__.maincanvaswindow:
            if True:
                print("canvas")
                nonety = True
##                if event.x < 5:
##                    self.config(cursor="size_we")
##                    nonety = False
                if event.x > (self.winfo_width() - 5):
                    self.config(cursor="size_we")
                    nonety = False
                if event.y >(self.winfo_height() - 33 - 5):
                    self.config(cursor="size_ns")
                    nonety = False
                if event.x > (self.winfo_width() - 5) and event.y > (self.winfo_height() - 33 - 5):
                    self.config(cursor="size_nw_se")
                    nonety = False
##                if event.x < 5 and event.y > (self.winfo_height() - 33 - 5):
##                    self.config(cursor="size_ne_sw")
##                    nonety = False
                if nonety:
                    self.config(cursor="")
##            elif event.widget == __class__.toptitlebar:
##                print("titlebar")
##                nonety = True
##                if event.x < 5 and event.y > 5:
##                    self.config(cursor="size_we")
##                    nonety = False
##                if event.y < 5 and event.x > 5 and event.x < (self.winfo_width() - 5):
##                    self.config(cursor="size_ns")
##                    nonety = False
##                if event.x < 5 and event.y < 5:
##                    self.config(cursor="size_nw_se")
##                    nonety = False
##                if event.x > (self.winfo_width() - 5) and event.y > 5:
##                    self.config(cursor="size_we")
##                    nonety = False
##                if event.x > (self.winfo_width() - 5) and event.y < 5:
##                    self.config(cursor="size_ne_sw")
##                    nonety = False
##                if nonety:
##                    self.config(cursor="")
##            else:
##                self.config(cursor="")

    def resizewin(self, event=None):
        print(event)
        if not self.maximized:
            if self.resizeside == "right":
                neww = self.width + (event.x - self.resizelastx)
                print(self.resizeside)
                if neww < self.minsizex:
                    neww = self.minsizex
                self.resizelastx = neww
                self.modgeometry(neww, self.resizelasth)
            if self.resizeside == "rightdown":
                print(self.resizeside)
                neww = self.width + (event.x - self.resizelastx)
                newh = self.height + (event.y - self.resizelasty)
                if neww < self.minsizex:
                    neww = self.minsizex
                if newh < self.minsizey:
                    newh = self.minsizey
                self.resizelastx = neww
                self.resizelasty = newh
                self.modgeometry(neww, newh)
            if self.resizeside == "down":
                newh = self.height + (event.y - self.resizelasty)
                if newh < self.minsizey:
                    newh = self.minsizey
                self.resizelasty = newh
                self.modgeometry(self.resizelastw, newh)
            if self.resizeside == "rightup":
                print(self.resizeside)
                neww = self.width + (event.x - self.resizelastx)
                newh = self.resizelasth + (self.resizelasty - event.y)
                if neww < self.minsizex:
                    neww = self.minsizex
                if newh < self.minsizey:
                    newh = self.minsizey
                self.resizelastx = neww
                newy = self.resizeadjy - (self.resizelasty - event.y)
                newx = self.resizeadjx
                self.modgeometry(neww, newh, newx, newy)
            if self.resizeside == "up":
                print(self.resizeside)
                newh = self.resizelasth + (self.resizelasty - event.y)
                if newh < self.minsizey:
                    newh = self.minsizey
                newy = self.resizeadjy - (self.resizelasty - event.y)
                newx = self.resizeadjx
                self.modgeometry(self.resizelastw, newh, newx, newy)
            if self.resizeside == "leftup":
                print(self.resizeside)
                neww = self.resizelastw + (self.resizelastx - event.x)
                newh = self.resizelasth + (self.resizelasty - event.y)
                if neww < self.minsizex:
                    neww = self.minsizex
                if newh < self.minsizey:
                    newh = self.minsizey
                newy = self.resizeadjy - (self.resizelasty - event.y)
                newx = self.resizeadjx - (self.resizelastx - event.x)
                self.modgeometry(neww, newh, newx, newy)
            if self.resizeside == "left":
                print(self.resizeside)
                neww = self.resizelastw + (self.resizelastx - event.x)
                newx = self.resizeadjx - (self.resizelastx - event.x)
                if neww < self.minsizex:
                    neww = self.minsizex
                    newx = self.resizeadjx
                newy = self.resizeadjy
                self.modgeometry(neww, self.resizelasth, newx, newy)
            if self.resizeside == "leftdown":
                print(self.resizeside)
                neww = self.resizelastw + (self.resizelastx - event.x)
                newh = self.height + (event.y - self.resizelasty)
                if neww < self.minsizex:
                    neww = self.minsizex
                if newh < self.minsizey:
                    newh = self.minsizey
                self.resizelasty = newh
                newx = self.resizeadjx - (self.resizelastx - event.x)
                newy = self.resizeadjy
                self.modgeometry(neww, self.resizelasth, newx, newy)

    def releaseresize(self, event=None):
        if __class__.resizeon:
            __class__.resizeon = False
            self.width = self.winfo_width()
            self.height = self.winfo_heightr()
            __class__.maincanvaswindow.config(width=self.winfo_width(), height=self.winfo_heightr())
        if __class__.dragging:
            __class__.dragging = False

    def modminsize(self, event=None, w=None, h=None):
        if w != None:
            self.minsizex = w
        if h != None:
            self.minsizey = h

    def updatewin(self):
        self.update()

    def wmroot(self):
        return __class__.maincanvaswindow

    def retwm(self):
        return self

if __name__ == "__main__":
    root = modtk()
    root.modify(title="Modified window", titlebg="#000427", titlefg="#ffffff")
    root.modgeometry(600, 400)
    root.modminsize(600, 400)

    label01 = Label(root.wmroot(), text="This works")

    def closewin():
        root.destroy()
        quit()

    root.closefunc(closewin)

    windowExit = False

    while not windowExit:

        label01.place(x=(root.winfo_width() // 2), y=(root.winfo_heightr() // 2))

        root.updatewin()

        time.sleep(0.05)

closewin()

Uploading Avatars and Screenshots is better, too.

Featured Imgs 23

With all this recent work we did upgrading our Asset Hosting feature, there were some side-benefits around the app as well.

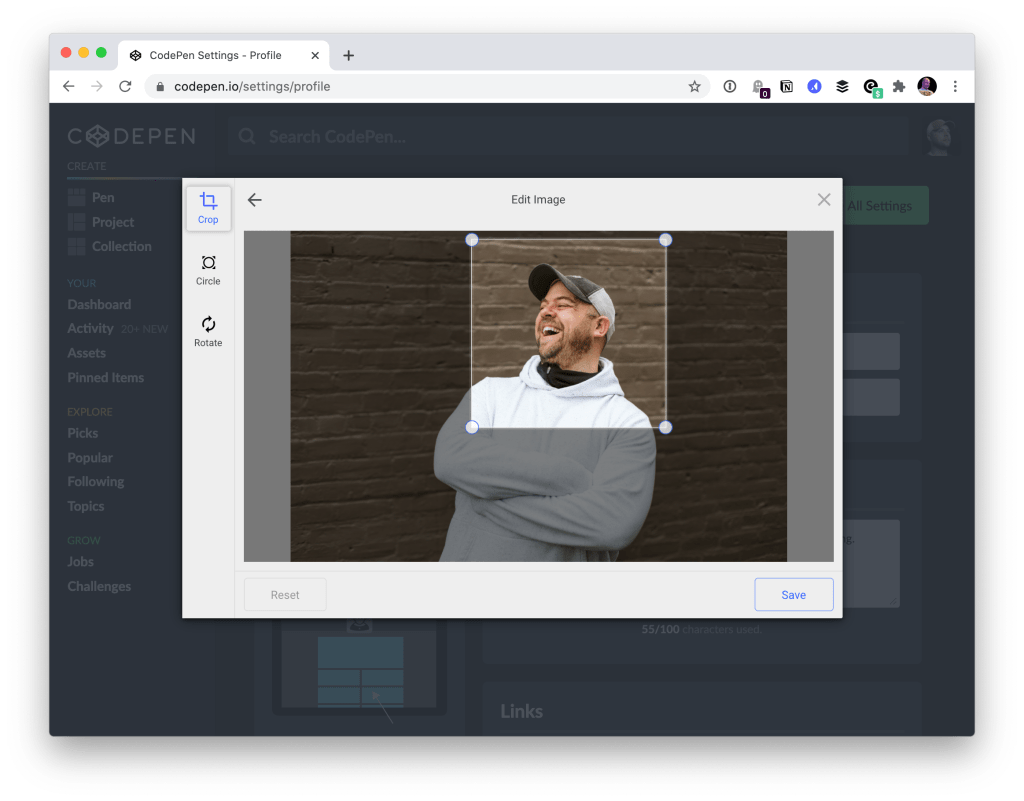
For example, as a PRO member, you can upload replacement screenshots for your Pens if you wish to. The uploader for those is the much nicer Filestack uploader now. Here’s how that works:

Similarly, avatar uploading users the new upload experience. So you can upload whatever ol’ image you have around (to your profile settings), even if it’s gigantic or the wrong size, and you’ll have the opportunity to crop it as you upload it:

We’ll take care of making sure it’s sized properly and being served as snappily as we can!

We even use this stuff internally. For example, when we build the email we send out each week for the CodePen Challenges, we have this slick little uploader to use for ourselves, making our own workflows just all that much smoother.

The post Uploading Avatars and Screenshots is better, too. appeared first on CodePen Blog.

6 Way to Upgrade the Look of Your WordPress

Featured Imgs 23

Your website can be two things: an asset, or just there. The difference between the two can be very subtle, but have an online asset can drive business like you’ve never imagined. So, how do you turn your website from a random property into an asset for your business? By focusing on two major factors: style and performance.

Get a New Theme

One of the easiest ways to upgrade the look and feel of your WordPress website is by picking a new theme. There are tons of themes out there to choose from, so you just have to find the one that speaks to you. You can find tons of themes for your WordPress on sites like Envato ThemeForest, and they come packed with reviews and documentation as well. Take your time when you are finding a theme, and pay extra close attention to the reviews. You want to find a theme that is easy to use and fast. If the reviews talk about those two things, you are in a better place. Also, when you find a theme you like on Envato, make sure you check out the actual website for the theme as well. If the author hasn’t taken the time to secure the site they sell it from, it’s probably going to be a pain to secure it on your own. The websites for the themes will give you a more in-depth look at the theme’s look and potential, and you will get to see it in action.

Build Your Own Pages

Another great way to create stylish pages quickly is by using a page builder. Page builders like Elementor let you use any theme you want and allows you to build custom pages within the theme. These page builders are normally very fast, and the style you can create using them is endless. If the builder you pick doesn’t have enough style for your liking, you might want to look into builder extensions like Ultimate Addons or JET plugins can add advanced modules into your page builder. These add-on packages help you get all of the crazy functionality you see on your competitors’ sites.

Hire a Professional Photographer

The pictures on your site tell a story, so you want to make sure the pictures you use directly relate to what you can offer. Instead of using simple stock photos to get your site up and running, you should work with professional photographers and graphic designers to create the perfect images for your website. This is the best way to make sure that your website is truly unique from top to bottom, and it will stop you from spending hours sifting through free stock photos on Google to find what you are looking for. A picture is worth a thousand words, so make sure those words directly relate to what you offer on your website.

Change Site Colors to Meet Contrast Requirements

Have you ever been to a website and had a hard time reading the text on the page? Most of the time this comes down to not meeting contrast requirements. When you are picking your colors for your site, you want to make sure that the background colors and foreground text colors are high enough contrast to read. If you don’t have a high enough contrast between the text and background colors, your text will start to blur on the page. If you have never checked to see if your colors have high enough contrast, you should use that link above to check it. You want to make sure that your contrast level passes all of the tests, so your text doesn’t blur on any devices. As a bonus, doing this will boost your accessibility score on your website.

Clean Up Your Code

Finally, you really want to make sure your code is caching and compiling correctly. You can use tools the Google Schema Tool to check your base code on the site and make sure you don’t have any small errors penalizing your site. If you are using href-lang on your site, this is extremely important to check. The smallest issues with href-lang can result in international visitors not getting the version of your page they need to understand what you are offering.

The post 6 Way to Upgrade the Look of Your WordPress appeared first on Photoshop Lady.

8 Photoshop Tips and Tricks All Photographers Should Know

Featured Imgs 23

Sixty-eight percent of adults edit their selfies before sharing them with anyone.

Statistics show the growing importance of learning advanced editing skills. A photographer cannot publish a photo without altering it in some way.

Photoshop, the industry standard, has plenty of tools to make your photos stand out. Learning those tools on your own can be difficult though.

To help you learn, let’s take a quick look at 8 fantastic Photoshop tips and tricks.

A Note About Photoshop Tips and Tricks

Before we dive into the tips and tricks, remember a good photo is even more important than good editing. If you take a bad photo, no amount of strong editing can save it.

Editing can, of course, improve a photo, but you cannot rely on it solely. But taking great shots is a whole different topic to discuss.

If you’re struggling to find the best photos, businesses like this company can do it for you. Then you can just focus on what you do with Photoshop.

Also, you should be careful when editing humans in photos. People may find it quite offensive if you change their skin tone or body shape.

1. Burn Tool

The burn tool is one of the most important tools for photographers to be able to use with great efficiency.

With this tool, you can darken areas on your photo. This allows you to hide overexposed areas on your photos and focus on certain subjects.

Like an old vignette, the burn tool can also make the background or other parts of your photos fade away. This makes the viewer focus on the subject you don’t burn.

2. Dodge Tool

The dodge tool is the opposite of the burn tool. Instead of making areas darker, the dodge tool increases the light wherever you use it.

This fixes underexposed areas of your photos. And photographers can also use it to draw attention to objects in a photo.

For example, you might want to lighten up the face of your subject in a busy photo. This would make them stand out from the environment around them.

3. Magnetic Lasso Tool

The magnetic lasso tool is a lifesaver for meticulous editors.

This tool allows you to draw a line around an object and select it. After you select it, all edits you make will be in the selected section alone.

The magnetic lasso tool is easy to use because it automatically attaches to objects. You don’t have to draw a perfect line, and you can move the line around if Photoshop picks the wrong spot.

Magnetic lasso tools are useful for any type of photo editing. Combining burning and dodging with this tool also proves effective for detailed editing.

4. Clone Stamp Tool

This is a must have for any photographer, but you have to be careful when you’re using it. You could easily make the next famous photoshop fail, which isn’t as fun when it happens to you.

This is useful for copying large parts of photos or matching colors. Let’s say you have one tree in a photo and want two, the clone stamp tool can grow a second tree for you.

First, you select a part of your photograph you want to clone. Then, you stamp the selected object wherever you want on the photo.

If you move your cursor, Photoshop will move the clone spot. The next time you stamp, the clone stamp will use the new area.

5. Spot Healing Tool

The spot healing tool is one of the famous photography tools used for models. The tool allows you to paint over part of your photo with another color in the photo.

You pick a sample source anywhere on the photo. Photoshop then perfectly matches the sample source’s color. Then, you can cover up spots with the tool.

Portrait photographers often use this to remove a blemish, freckle, or pimple. Nature photographers may use it to get rid of rot on a plant.

6. Layer Masking

Layer masking is an advanced editing tool you may not need for basic photography.

Explaining Layers

Layers are different photos stacked on top of each other. The top layer is your main photo, and layers below that only show if you tell Photoshop to show them.

For example, let’s say you want to make a normal photo of your friend look like they are in Antartica. You could make a second layer on Photoshop with a picture of Antartica.

Using the Masking Tool

With the masking tool, you can pinpoint exactly where you want a photo to show the second layer. For your friend in Antartica, you can cut out just their body and remove the rest of the photo.

And voila! The penguins have a new friend.

This is another tool to be careful with using. A simple mistake can make the whole photo look like a mess.

You might also use layer masking for face manipulation. Comedic face swaps are popular, and this tool is how you do it.

7. Blending Tools

The blending tool is a fun way to combine two photos. Often these photos are similar in nature, but they don’t have to be.

Photoshop stitches the two photos together to make one composite image. One photo is usually more prominent than the other.

You might have seen these types of photos when someone graduates from high school or college. Sometimes photographers blend a baby photo in the background of a graduation photo.

8. Liquify

Liquify is one of the most photo-altering tools you can use. Using liquify, you can make any part of the image widen, shrink, pulled, or puckered.

Controversy about photoshopping and body image in advertising is prevalent. But this tool is not limited to use on human subjects.

Designers who use Photoshop may use the liquify tool to alter an object in their design. It can give the whole photo a warped and purposefully unnatural view.

Next Steps

Because you have learned some Photoshop tips and tricks, you should be able to take your photos to the next level. Check out our other articles to learn more.

The post 8 Photoshop Tips and Tricks All Photographers Should Know appeared first on Photoshop Lady.

How to Easily Hide Widget Title in WordPress

Wp Plugins

Do you want to hide the title of a WordPress widget in your sidebar or footer?

WordPress widgets make it easy to drag and drop dynamic content into your theme to create unique layouts. However if you need to hide the widget title, then it typically requires coding knowledge of CSS and HTML.

In this article, we’ll show you how to easily hide the widget title in WordPress (without any code).

Hiding widget title in WordPress

Why Hide Widget Title in WordPress?

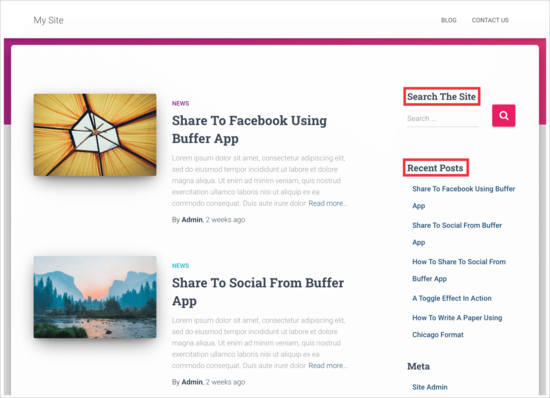
WordPress displays a default title for widgets, and it also allows you to rename them if you want. Most top WordPress themes will then display this title in the sidebar on your site.

Widgets titles displayed in sidebar

However, sometimes you may not want to display the widget title in the WordPress blog sidebar. By default, there is no built-in option to simply switch off widget titles.

That being said, let’s take a look at how you can easily hide the widget title in the WordPress sidebar.

Hiding Widget Title in WordPress

First, you want to install and activate the Widget Options plugin. For more details, please see our complete guide on how to install a WordPress plugin.

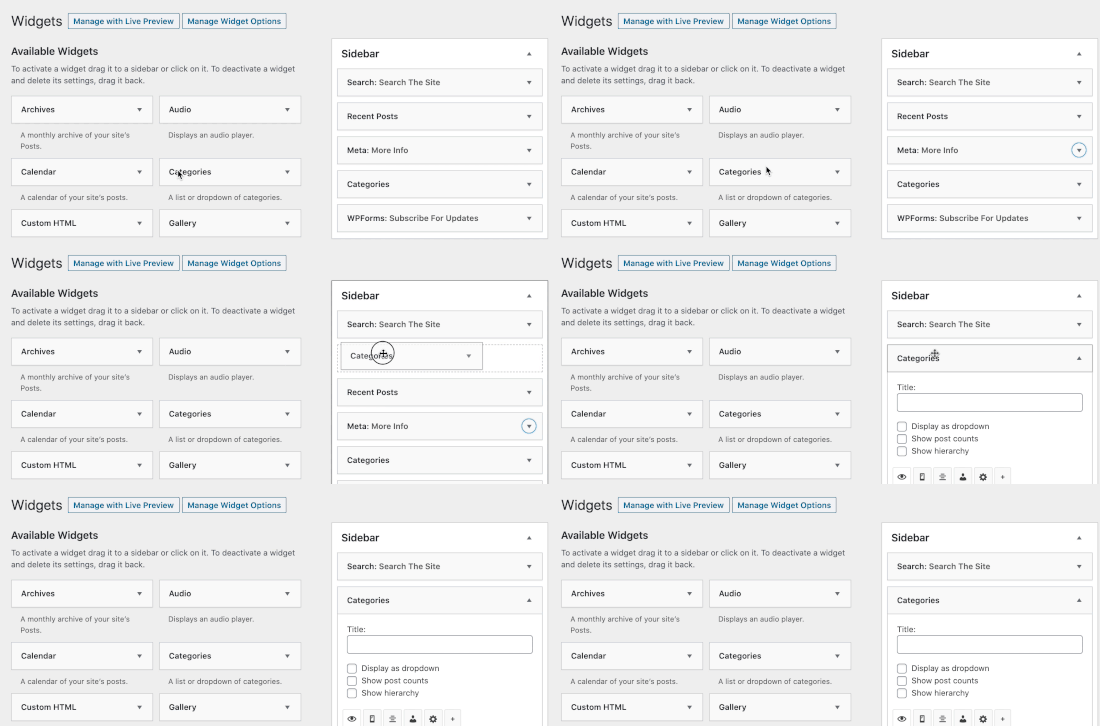
Once the plugin is activated, head over to Appearance » Widgets area in your WordPress admin area. Next, drag and drop a widget to your sidebar or any other widget-ready area on your site.

Drag and drop widget into sidebar

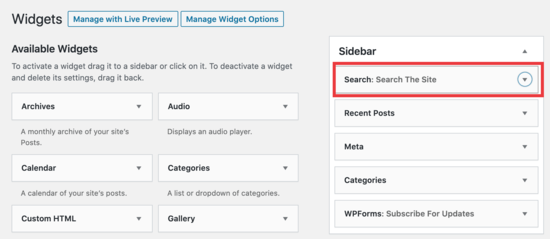
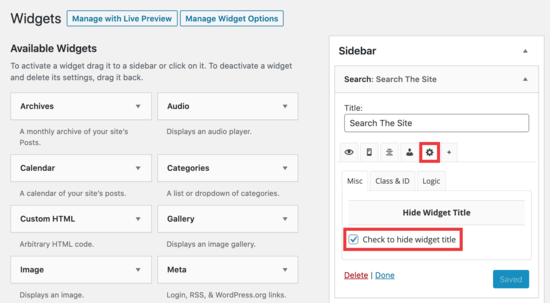
In this example, we’re going to remove the widget title ‘Search The Site’ from our search box in the sidebar.

Sidebar widget view

Simply click the arrow to open the widget and view the options to hide the title.

Hide widget title settings

Make sure you click on the ‘gear’ icon, and then check the box next to ‘Check to hide widget title’ and click the ‘Save’ button.

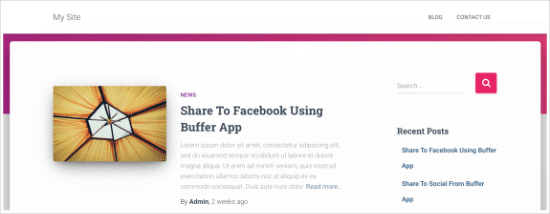
Now, when you view your site, the WordPress search box will appear without the widget title.

Widget title hidden on site

You can use this plugin to hide any widget title. The plugin also comes with multiple settings to hide or display titles based on page or post types and even screen sizes.

We hope this article helped you learn how to easily hide widget titles in WordPress. You may also want to check out our list of the most useful WordPress widgets for your site, and our comparison of the best drag and drop WordPress page builder plugins.

If you liked this article, then please subscribe to our YouTube Channel for WordPress video tutorials. You can also find us on Twitter and Facebook.

The post How to Easily Hide Widget Title in WordPress appeared first on WPBeginner.

5 Things You Should Keep in Mind Before Starting a Website

Featured Imgs 23

Starting a website can be a fun journey for some of the tech wizards out there, and a relative nightmare for the rest of us. So before you take a leap of faith and jump-start this project, there are a few things you need to keep in mind.

1.   The aim matters

This is where it all begins, your vision. What is your website about? What is it that you would like for your website to showcase? What is the call-to-action you hope your website’s visitors to make? As you answer the above questions, you will be able to utilize every aspect of your website to serve your aim. Not only that, but it will provide you with a detailed action plan that sets the tone for your website and guides you towards what you need to do next.

2.   Domain made easy

There are tons of domain hosts out there waiting for you to take a step, but it all boils down to selecting the domain name. How do you want to be remembered and linked to your audience? It is always advisable to select an easy name. If not your brand, then go for something relevant to your business. And choose wisely because changing it later can be a real hassle. Opt for simple and direct words that can cross language barriers, especially if you’re aiming for international engagement.

3.   Design and Navigation

At this stage, you probably have visited many websites of similar businesses and have a clearer idea of what you want and what you don’t want. But sometimes you can have the aim clearly set and the domain name settled, but you end up baffled when it comes to designing the layout and creating a convenient site map. Rodney Warner, owner of Creative Web Design (https://connectivewebdesign.com/) says that creating a website might sound easy, but it takes a village working in six interchangeable phases to get a website ready to launch. Your website’s design is absolutely crucial in representing your brand, and it’s the most accurate expression of your business.

4.   Easy to find and load

A website that loads within fleeting seconds makes it easier for visitors to access. Having an efficiently reliable host can provide that for you in addition to optimizing the media included on your website. But you need to keep in mind that the CSS code should initially be built to facilitate the scaling of your website to every screen your visitors might access from. This can easily be attained through a free of charge website.

5.   Content

Content will follow smoothly as your vision starts to clear. But you can still be creative with it. If your website is about selling products, creating content that describes the different uses is important. But don’t just stick to written words, use demonstrations, and provide testimonials. If you’re going for blog posts, think of the categories and writing style and tone; do you want it sophisticated, easy tips and tricks, short or long blog posts? All of this can be determined as you surf the internet and evaluate what would attract your visitors the most.

A website is important to any business as it shapes the first impression, so it can make or break your brand reputation. Having a clear vision of your aim, desired layout, and a few tricks here and there to facilitate the access would mean more visitors within a short amount of time.

The post 5 Things You Should Keep in Mind Before Starting a Website appeared first on Photoshop Lady.