Privacy-Conscious WordPress Plugin Caches and Serves Gravatar Images Locally

Featured Imgs 29

Ari Stathopoulos released his new Local Gravatars plugin last week. The goal of the plugin is to allow site owners to take advantage of the benefits of a global avatar system while mitigating privacy concerns by hosting the images locally.

In essence, it is a caching system that stores the images on the site owner’s server. It is an idea that Peter Shaw proposed in the comments on an earlier Tavern article covering local avatar upload. It is a middle ground that may satisfy some users’ issues with how avatars currently work in WordPress.

“I am one of the people that blocks analytics, uses private sessions when visiting social sites, I use DuckDuckGo instead of Google, and I don’t like the ‘implied’ consents,” said Stathopoulos. “I built the plugin for my own use because I don’t know what Gravatar does, I don’t understand the privacy policies, and I am too lazy to spend two hours analyzing them. It’s faster for me to build something that is safe and doesn’t leave any room for misunderstandings.”

He is referring to Automattic’s extensive Privacy Policy. He said it looks benign. However, he does not like the idea of any company being able to track what sites he visits without explicit consent.

“And when I visit a site that uses Gravatar, some information is exposed to the site that serves them — including my IP,” said Stathopoulos. “Even if it’s just for analytics purposes, I don’t think the company should know that page A on site B got 1,000 visitors today with these IPs from these countries. There is absolutely no reason why any company not related to the page I’m actually visiting should have any kind of information about my visit.”

The Local Gravatars plugin must still connect to the Gravatar service. However, the connection is made on the server rather than the client. Stathopoulos explained that the only information exposed in this case is the server’s IP and nothing from the client, which eliminates any potential privacy concerns.

The Latest Plugin Update

Stathopoulos updated the plugin earlier today to address some performance concerns for pages that have hundreds or more Gravatar images. In the version 1.0.1 update, he added a maximum processing time of five seconds and changed the cache cleanup process from daily to weekly. Both of these are filterable via code.

“Now, if there are Gravatars missing in a page request, it will get as many as it can, and, after five seconds, it will stop,” said Stathopoulos. “So if there are 100 Gravatars missing and it gets the first 20, the rest will be blank (can be filtered to use a fallback URL, or even fall back to the remote URL, though that would defeat the privacy improvement). The next page request will get the next 20, and so on. At some point, all will be there, and there will be no more delays.”

He did point out that performance could temporarily suffer when installing it on a site that has individual posts with 1,000s of comments and a lot of traffic. However, nothing would crash on the site, and the plugin should eventually lead to a performance boost in this scenario. For such large sites, owners could use the existing filter hooks to tweak the settings.

Right now, the plugin is primarily an itch he wanted to scratch for his own purposes. However, if given enough usage and feedback, he may include a settings screen to allow users to control some of the currently-filterable defaults, such as the cleanup timeframe and the maximum process time allowed.

The Growing List of Alternatives

With growing concerns around privacy in the modern world, Local Gravatars is another tool that end-users can employ if they have any concerns around the Gravatar service. For those who are OK with an auto-generated avatar, Pixel Avatars may be a solution.

“I’ve seen some of them, and they are wonderful!” Stathopoulos said of alternatives for serving avatars. “However, this plugin is slightly different in that the avatars the user already has on Gravatar.com are actually used. They can see the image they have uploaded. The user doesn’t need to upload a separate avatar, and an automatic one is not used by default.”

He would not mind using an auto-generated avatar when commenting on blogs or news sites at times. However, Stathopoulos prefers Gravatar for community-oriented sites.

“My Gravatar is part of my online identity, and when I see, for example, a comment from someone on WordPress.org, I know who they are by their Gravatar,” he said.

WP Agency Summit Begins Its Second Annual Virtual Event October 12

Featured Imgs 23

Jan Koch, the founder and host of WP Agency Summit, is kicking off his second annual event on October 12. The five-day event will feature 37 speakers from a wide range of backgrounds across the WordPress industry. It is a free virtual event that anyone can attend.

“The focus for the 2020 WP Agency Summit is showing attendees how to bring back the fun into scaling their agencies,” said Koch. “It is all about reducing the daily hustle by teaching how to successfully build and manage teams, how to work with enterprises (allowing for fewer customers but bigger projects), how to build sustainable recurring revenue, and how to position your agency to dominate your niche.”

This year’s event includes three major changes to make the content more accessible to a larger group of people. Each session will be available between October 12 – 16 instead of the previous 48-hour window that attendees had to find time for in 2019.

After the event has concluded, access to the content will be behind a paywall. Koch reduced the price to $77 for lifetime access for those who purchase pre-launch, which will increase to $127 during the event. Last year’s prices ballooned to $497, which meant that it was simply not affordable for many who found it too late.

Some of the proceeds this year are going toward transcribing all the videos so that hearing-impaired users can enjoy the content.

This year’s event will also focus on a virtual networking lounge for attendees. “I’ve seen how well it worked at the WP FeedBack Summit — we even had BobWP record a podcast episode on the fly in that lounge!” said Koch. “I’ve seen many new friendships develop, people connecting with new suppliers or getting themselves booked on podcasts, and sharing experiences about their businesses.”

The lounge will be open during the entirety of the summit, which will allow attendees to jump into the conversation on their own time.

A More Diverse Speaker Lineup

Koch received some backlash for the lack of gender diversity last year. The 2019 event had over 20 speakers from a diverse male lineup. However, only four women from our industry led sessions.

When asked about this issue in 2019, Koch responded, “I recognize this as a problem with my event. The reason I have so much more male than female speakers is quite simple, the current speaker line-up is purely based on connections I had when I started planning for the event. It was a relatively short amount of time for me, so I wasn’t able to build relationships with more female WP experts beforehand.”

The host said he paid attention to the feedback he received. While not hitting the 50/50 split goal he had for 2020’s event, 16 of the 37 speakers are women.

Koch said he strived to get speakers from a wider range of backgrounds. He wanted to bring in both freelancers and multi-million dollar agency owners. He also focused on getting people from multiple countries to represent WordPress agencies.

“I did reach out to around 130 people four months before the event to make new connections,” he said. “The community around the Big Orange Heart (a non-profit for mental well-being) also helped a lot with introducing me to new members of the WP community.”

Koch said he learned two valuable lessons when branching out beyond his existing connections for this year’s event:

Firstly, don’t hesitate to reach out to people you think will never talk to you because they’re running such big companies. For example, I immediately got confirmations from Mario Peshev from Devrix, Brad Touesnard from Delicious Brains, or Marieke van de Rakt from Yoast. When first messaging them, I had little hope they’d set aside time to jump on an interview with me – but they were super supportive and accommodating! The WordPress community really is a welcoming environment if you approach people in a humble way.

Secondly, build connections with sincerity. Do not just focus on what you can get from that connection but how you can help the other person. I know this sounds cheesy and you’ve heard this quite often — but it is true. Once I got the first response from new contacts and explained my goal of connecting fellow WordPress community members virtually, most immediately agreed because they also benefit from new connections and being positioned as a thought-leader in this event.

WP Agency Summit? WP FeedBack Summit?

For readers who recall the Tavern’s coverage of the WP FeedBack Summit earlier this year, the article specifically stated that the WP FeedBack Summit was a continuation of 2019’s WP Agency Summit. The official word at the time from WP FeedBack’s public relations team was the following:

Last year’s event, the WP Agency Summit has been rebranded under the umbrella of WP FeedBack’s brand when Jan Koch the host of last’s year WP Agency Summit joined WP FeedBack as CTO.

Koch said that it was a standalone event and not directly connected to WP Agency Summit but had the same target audience. However, the WP FeedBack Summit did use the previous WP Agency Summit’s stats and data to promote the event.

“The WP FeedBack Summit was hosted under the WP FeedBack brand because I joined their team as CTO in March this year,” he said. “Vito [Peleg] and I had the idea to host a virtual conference around WordPress because of WordCamp Asia being canceled — we wanted to help connect the community online through our summit.

Koch left WP FeedBack soon after the summit ended and is currently back on his own and has a goal of making WP Agency Summit a yearly event.

Parse text file line by line and split each line and store in matrix form.

558fe5180e0e8fc922d31c23ef84d240

data1,true,2000,422
data2,false,2001,421
data3,true,2050,427
data4,true,2004,432
the above data is in sample.txt. I want to write a program using a for loop and any filereader class or by any means, such that my output will be stored in as follows:

My_Data[1]= data1,true,2000,422
My_Data[1][0]= data1
My_Data[1][1]= true
My_Data[1][2]= 2000

My_Data[2]= data2,false,2001,421
My_Data[2][0]= data2
My_Data[2][1]= false
I want to access each My_Data[i] individually and under that My_Data[i][0] ,My_Data[i][1] and so on .

Can anyone please help writing this type of code ?

Identifying a Target Audience for Your WordPress Blog

Fotolia Subscription Monthly 4685447 Xl Stock

Identifying a Target Audience for Your WordPress BlogWhether you’re just starting a new blog or you’re working on your regular weekly content, it’s important to have a clear understanding of who your target audience is. So yes, even if you’ve been writing blog posts up until this point without an audience in mind, there’s no time like the present to figure it […]

The post Identifying a Target Audience for Your WordPress Blog appeared first on WPExplorer.

IMB Bank Announces Open Banking Platform

Featured Imgs 23

IMB Bank, an Australian bank, recently announced its Open Banking platform. The first release of the platform shares data related to deposits and transactions. More specifically, that data includes relevant features, rates, and fees. The platform shares such information through an API.   

After watching “The Social Dilemma” it appears to be successful you must..

Featured Imgs 20

Watched most of The Social Dilemma ( https://www.imdb.com/title/tt11464826/ ) it appears to me to be successful you must learn certain, let's say, deep physcology and think about how to sway your followers using all the tools noted in the movie. This is a drama documentary but what you see there does remind me of what methods I've seen before.

Yes, they do paint a dim picture but if you don't, your site and presence on the web appears to be diminishing.

Worth a watch.

Comment if you feel that pull to "The Dark Side."

How to Create a Sticky Floating Navigation Menu in WordPress

Category Image 091

Recently, one of our users asked us how to create a sticky navigation menu for their site?

Sticky navigation menus stay on the screen as users scroll down the page. This makes the top menu always visible, which is good for user experience because it contains links to the most important sections of your website.

In this article, we’ll show you how to easily create a sticky floating navigation menu in WordPress.

Creating a sticky floating navigation menu in WordPress

What is a Sticky Floating Navigation Menu?

A sticky or floating navigation menu is one that ‘sticks’ to the top of the screen as a user scrolls down. This makes your menu visible to users at all times.

Here’s a sticky menu in action. We’re going to show you how to create a menu exactly like this for your own site:

A sticky navigation menu in action on our demo website

Why and when sticky menus can be useful?

Usually, the top navigation menu contains links to the most important sections of a website. A floating menu makes those links always visible, which saves users from scrolling back to the top. It is also proven to increase conversions.

If you run an online store, then your top navigation menu likely include links to the cart, product categories, and product search. Making this menu sticky, can help you reduce cart abandonment and increase sales.

Some of the best WordPress themes have built-in support for a sticky navigation menu. Simply see your theme settings under Themes » Customize to enable this feature.

If your theme does not have this option, then keep reading, and we’ll show you how to easily create a sticky floating navigation menu in any WordPress theme or WooCommerce store.

Method 1: Add Your Sticky Floating Navigation Menu Using a Plugin

This is the easiest method. We recommend it for all WordPress users, particularly for beginners.

If you haven’t set up your navigation menu yet, go ahead and do that using our instructions on how to add a navigation menu in WordPress.

After that, you need to install and activate the Sticky Menu (or Anything!) on Scroll plugin. For more details, see our step by step guide on how to install a WordPress plugin.

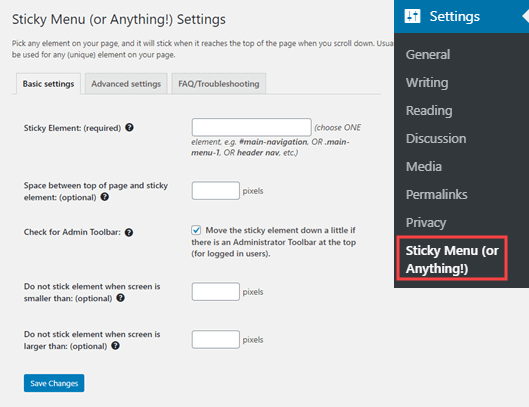
Upon activation, you need to visit the Settings » Sticky Menu (or Anything!) page to configure the plugin settings.

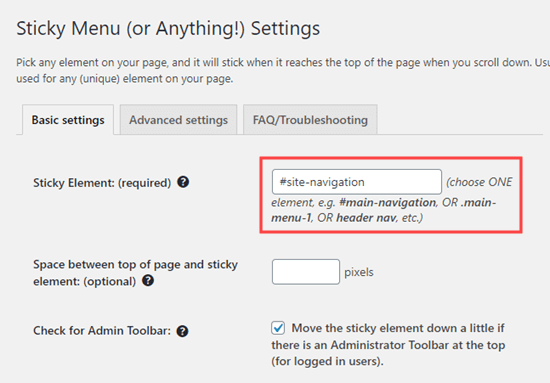
The Sticky Menu plugin's settings page

First you need to enter the CSS ID of the navigation menu that you want to make sticky.

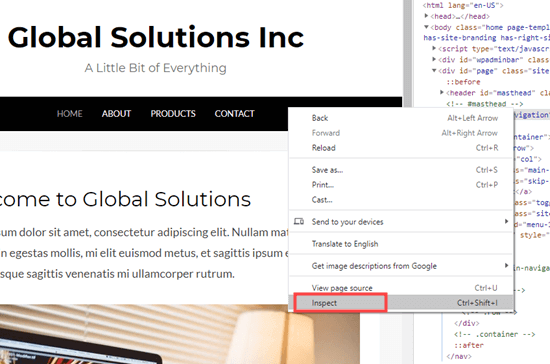
You will need to use your browser’s inspect tool to find the CSS ID used by your navigation menu.

Simply visit your website and take your mouse to the navigation menu. After that, you need to right-click and select Inspect from your browser’s menu.

Inspecting the navigation menu element on your website

This will split your browser screen, and you will be able to see the source code for your navigation menu.

You need to find a line of code that relates to your navigation, or your site header. It will look something like this:

<nav id="site-navigation" class="main-navigation" role="navigation">

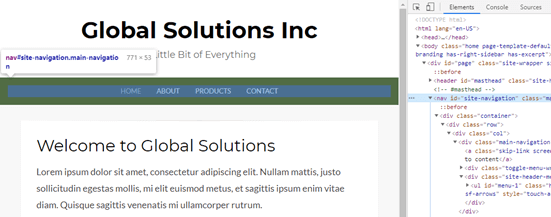
If you’re struggling to find it, bring your mouse cursor over the different lines of code in the Inspect pane. The navigation menu will be fully highlighted when you have the right line of code:

Finding the navigation menu ID using the inspect tool

In this case, our navigation menu’s CSS ID is site-navigation.

All you need to do is enter your menu’s CSS ID in the plugin settings with a hash at the start. In this case, that’s #site-navigation.

Entering the ID of the element that you want to make sticky (in this case, the navigation menu)

Don’t forget to click the ‘Save Changes’ button at the bottom of the page.

Now, go ahead and check out your sticky menu live on your WordPress website. It should stay on the page as you scroll down, like this:

Viewing the sticky menu on your website

The next option on the plugin’s settings page is to define the space between the top of your screen and the sticky navigation menu. You only need to use this setting if your menu is overlapping an element that you do not want to be hidden. If not, then ignore this setting.

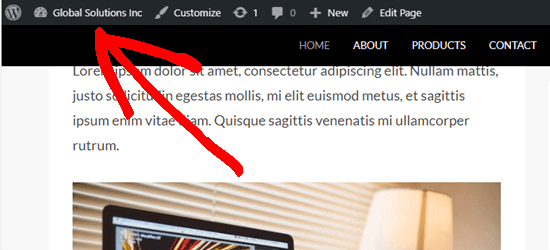
We recommend leaving the box checked next to the option: ‘Check for Admin Bar’. This allows the plugin to add some space for the WordPress admin bar, which is only visible to logged-in users.

Here, you can see that the admin bar on our test site is correctly displaying above the sticky menu:

The WordPress admin bar appears above the sticky menu

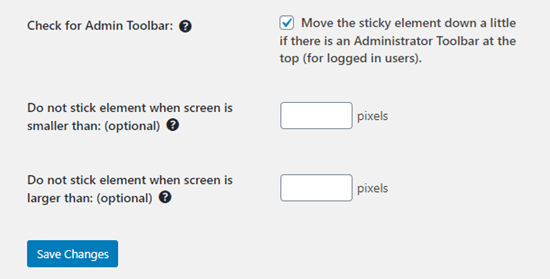
The next option allows you unstick the navigation menu if a user is visiting your website using a smaller screen such as a mobile device:

The sticky menu plugin offers further options too

You can test how your site looks on mobile devices or tablets. If you don’t like how it looks, simply add 780px for this option.

Don’t forget to click on the Save Changes button after making any changes to your options.

Method 2: Manually Add a Sticky Floating Navigation Menu

This method requires you to add custom CSS code to your theme. We don’t recommend it for beginners.

We also recommend that you take a look at our guide on how to easily add custom CSS to your WordPress site before you begin.

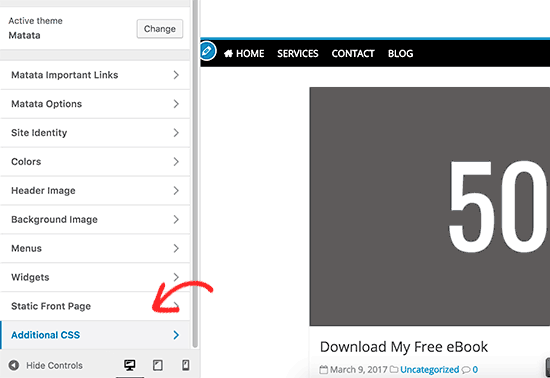
First, you need to visit Appearance » Customize to launch the WordPress theme customizer.

Adding custom CSS in WordPress theme

Next, click on ‘Additional CSS’ in the left pane and then add this CSS code.

#site-navigation {
    background:#00000;
    height:60px;
    z-index:170;
    margin:0 auto;
    border-bottom:1px solid #dadada;
    width:100%;
    position:fixed;
    top:0;
    left:0;
    right:0;
    text-align: center;
}

Note: This will produce a navigation menu with a black background. If you want a different color, change the number next to background. For example, using background: #ffffff will give you a white menu background.

Just replace #site-navigation with the CSS ID of your navigation menu then click on the Publish button at the top of the screen.

Go ahead and visit your website to see your sticky floating navigation menu in action:

A sticky / floating navigation menu created using CSS

What if your navigation menu normally appears below the site header instead of above it? If so, this CSS code could overlap the site title and header or appear too close to it before the user scrolls:

The sticky navigation menu is slightly overlapping the site title

This can be easily adjusted by adding a margin to your header area using some additional CSS code:

.site-branding {
margin-top:60px !important;
}

Replace site-branding with the CSS class of your header area. Now, the sticky navigation menu will no longer overlap your header before the user scrolls down:

There's now room for the title below the sticky navigation menu

We hope this article helped you add a sticky floating navigation menu to your WordPress site. You may also want to see our guide on how to create a custom WordPress theme without writing any code, and our comparison of the best WordPress page builder plugins.

If you liked this article, then please subscribe to our YouTube Channel for WordPress video tutorials. You can also find us on Twitter and Facebook.

The post How to Create a Sticky Floating Navigation Menu in WordPress appeared first on WPBeginner.

Parsel: A tiny, permissive CSS selector parser

Category Image 052

If you’ve ever thought to yourself, gosh, self, I wish I could have an Abstract Syntax Tree (AST) of this CSS selector, Lea has your back.

If you’ve ever thought that same thing for an entire CSS file, that’s what PostCSS is, which has gone v8. PostCSS doesn’t do anything by itself, remember. It just makes an AST out of CSS and gives it a plugin interface so plugins can be written to transform CSS with it. No shade on PostCSS, but it is funny how saying “We use PostCSS” doesn’t mean anything the way “We use Sass” does.

Direct Link to ArticlePermalink


The post Parsel: A tiny, permissive CSS selector parser appeared first on CSS-Tricks.

You can support CSS-Tricks by being an MVP Supporter.