Like a tree falling in the woods, if you plan a product launch without spreading the word — will anyone use it? Will anyone even want it?
![→ Download Now: Free Product Marketing Kit [Free Templates]](https://no-cache.hubspot.com/cta/default/53/08b5e1f4-5d26-405b-b986-29c99bd0cb14.png)
These are the questions that sometimes keep me up at night. And truthfully, as much as I wish it wasn’t the case, if you fail to effectively spread the word about your product launch, it will most likely fail.
Whether you’re launching something huge, something small, or you’re updating a current offering, you’ll want to start your preparation well in advance of the launch date with a product launch checklist.
Because there are so many moving parts in this process, bringing your product to market can be intimidating and tricky. To help you, I've come up with a step-by-step checklist for a successful product launch and gathered the best product launch tips from a HubSpot Product Marketer.
Table of Contents
What is a product launch?
A product launch is the process of introducing a brand-new product or service to the world. It involves various marketing and promotional activities aimed at creating buzz and demand around your new offering. The ultimate goal is to get customers excited and eager to buy the new product.
Take it from me: Product launches require a lot of planning. You can’t just drop a new product out of the blue and expect everyone to buy in — well, unless you’re Beyoncé. Which is unfortunate because there’s only one Beyoncé. Instead, you’ll need a plan.
Lucas Botzen, CEO of Rivermate, says, “If you really want to launch the product, you must begin with in-depth market research, identify your target audience, and understand their needs. Next, make a comprehensive plan for the launch, which defines specific, measurable goals, a marketing strategy, and all the materials and resources required.”
During the launch, Botzen recommends reaching out to the audience via different channels, gathering feedback, and being responsive to any issues. Immediately after launch, measure results and identify key learnings, making further adjustments if necessary for continuous improvement, Botzen advises.
“Planning can take significant time, and if you’re like me and you’re not much of a planner, this can be a major bummer. Luckily, our product launch checklist can help ensure that all your t’s are crossed and i’s are dotted before your official launch date. Trust me: This checklist is a lifesaver!” Botzen says.
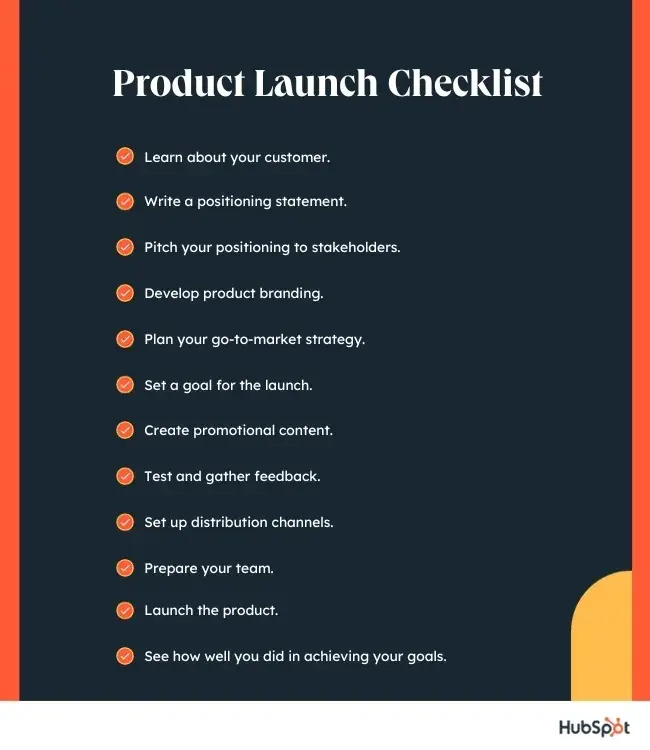
1. Learn about your customer.
Whether you call it “market research” or “customer development,” it's key to learn about what drives your target customer. In my experience, identifying their goals, motivations, and pain points could lead you to developing and marketing a valuable solution.
You don't need to perform years of intense research to learn about your customer. In fact, I suggest just talking to 12 to 15 current or prospective customers.
When speaking to them, pay extra attention when they start sentences with “I wish a product did this function…” or “Why can’t products do this?” When they give these statements, respond with questions that go deeper, like “Can you get more specific about that?"
If they don’t bring up any pain points, ask them a few specific questions that will encourage them to give deeper answers.
These conversations will give you a solid idea of what their biggest pain points are and how you can market a solution to them. Once you learn these key details about your customers, you can develop a buyer persona that your team can focus on serving.
2. Write a positioning statement.
When launching a new product, you must be able to clearly explain how it fills a need in the market. That’s where a positioning statement comes in.
It helps you communicate the unique value proposition and key benefits that differentiate your product from others.
I recommend writing out a statement that can clearly and concisely answer these three questions:
- Who is the product for?
- What does the product do?
- Why is it different from other products out there?
If you'd like to go even deeper, create a statement that answers the following questions:
- What is your target audience?
- What segment of the target audience is most likely to buy the product?
- What brand name will you give your product or service?
- What product or service category does your product lie in?
- How is it different from competitors in the same category?
- What evidence or proof do you have to prove that your product is different?
Still need more guidance on how to write a positioning statement? Check out this template.
3. Pitch your positioning to stakeholders.
Once you've established your positioning statement, present it to stakeholders in your company so they are all on the same page. Call a meeting, send an email, or create a presentation to present.
But I should remind you, when doing this, you’ll want to emphasize how your new product aligns with your overall business strategy, customer needs, market trends, and revenue potential. Use concrete examples, stories, or data to make your pitch more persuasive.
I also suggest you think proactively about potential questions or objections they might have. Prepare thoughtful responses to address concerns around market viability, competition, target audience, or feasibility.
If your employees have a hard time buying into the product, your customers might as well. If your team loves it, that might be a great sign that the product launch will go well.
4. Develop product branding.
Take the information you gathered while conducting your market research and writing your positioning statement, and let it inspire you as you craft your product brand identity.
Creating a brand identity is my favorite part of a product launch. During this step, you’ll develop all the elements needed to create a consistent and memorable brand, including:
- Product name, logo, and tagline.
- Color palette, typography, and imagery.
- Key brand, communications, and marketing guidelines.
- Packaging.
Product branding is a little different than company branding because it focuses on creating a distinct identity for a specific product, rather than an entire organization. However, they are both still interconnected and should be aligned.
5. Plan your go-to-market strategy.
This is the strategy that you will use to launch and promote your product. While some businesses prefer to build a funnel strategy, others prefer the flywheel approach.
Regardless of which method you choose, this process contains many moving parts. To create an organized strategy for launching your product, I find it can be helpful to use a template, like this one.
As you create the strategy, I recommend you also start considering which type of content you’ll use to attract a prospective customer’s attention during the awareness, consideration, and purchase decision stages.
You'll need to produce this content in a following step.
6. Set a goal for the launch.
Before you get started on implementing your strategy, make sure you write down your goals for the launch.
Alex Girard, a Product Marketing Manager at HubSpot, says, “Create specific goals for the launch’s success. Keeping these goals in mind will help you focus your efforts on launch tactics that will help you achieve those goals.”
For example, the goals of your product launch could be to effectively establish a new product name, build awareness, or create sales opportunities.
I think one of the best ways to set goals for your launch team is to write them out like SMART goals. A SMART goal is Specific, Measurable, Attainable, Relevant, and Time-bound. I like SMART goals because they’re easy to track and modify.
Once you have your goals in mind, you can start thinking about what KPIs you want to track, such as:
- Sales revenue.
- Units sold.
- Customer acquisition.
- Conversion rate.
- Website traffic and engagement.
- Social media engagement.
Identifying these metrics ahead of time will make it easier to assess whether or not you met your goals after the product is launched.
7. Create promotional content.
After planning out your go-to-market strategy and writing your SMART goals, start producing content that will support and align with those promotional efforts.
In my experience, this can include:
Our go-to-market template will also help you determine which content you should create for each phase of your prospective customer’s buyer’s journey.
Or, you can also use HubSpot’s Start Customer Platform. In this platform, you can easily create everything you’ll need for a successful launch, all while nurturing customer relationships and tracking analytics.
8. Test and gather feedback.
Before you officially launch your new product, I think it’s important to test it out to ensure your final product is the best it can be.
By testing the product in different scenarios with real users, potential bugs, usability problems, or functional issues can be discovered and resolved early on.
Fixing these problems before launching your product ensures a smoother user experience and helps maintain customer satisfaction — an invaluable step, in my opinion.
Gathering feedback from users also allows for product improvement. By listening to the opinions, suggestions, and criticisms of users, you can gain insight into what features are working well and which ones need improvement.
I’ve found this feedback-driven approach can help you make informed decisions on enhancing the product's functionality, usability, and performance.
9. Set up distribution channels.
Before you officially launch, you’ll need to set up your distribution channels.
This step is important because it determines how and where customers can purchase your product, be it online platforms, brick-and-mortar stores, or other distribution partners.
In my experience, well-planned distribution channels help accelerate the product's time to market. By proactively setting up channels ahead of the launch, you can quickly distribute the product once it becomes available, minimizing delays and maximizing opportunities to capture early adopters and gain market share.
If you can successfully position your product in prominent retail locations or online marketplaces, it increases visibility and boosts your chances of capturing customer attention and outperforming competitors.
Another benefit I’ve found, it also provides a foundation for future growth and scalability. As your business expands and introduces new products, you can leverage existing channel relationships and infrastructure to efficiently launch and distribute new offerings.
10. Prepare your team.
Be sure that your company and key stakeholders are ready for you to launch and begin marketing the product. In my opinion, it’s helpful to include them at the beginning of your product launch.
Before the big launch day, consider doing the following:
- Offer your team early access to the product so they can familiarize themselves with it firsthand.
- Provide training sessions to help your team understand the product inside and out.
- Develop sales enablement materials such as presentations, product sheets, FAQs, and objection handling guides.
- Conduct role-playing exercises to simulate real customer scenarios with the product.
During this process, I think it’s essential that all stakeholders are on the same page. Communicate with the company through internal presentations, Slack, or email to keep your company updated on your launch plan.
11. Launch the product.
Once you've completed all the above steps, you can launch the product. Here are some last-minute things I suggest you check over on launch day:
- Double-check all the necessary details, materials, and arrangements to ensure that everything is ready and working correctly.
- Conduct a brief team meeting to align everyone and address any last-minute questions or concerns.
- Keep an eye on social media channels to gauge customer reactions, respond to inquiries, and engage with potential customers.
- Ensure that your website and any systems related to the product launch, such as landing pages or checkout processes, are functioning smoothly.
Most importantly, you should take the time to celebrate the launch and the efforts of your team. This can be in the form of a team lunch, virtual celebration, or any other creative way to acknowledge everyone’s hard work.
12. See how well you did in achieving your goals.
After you launch your product, track how the go-to-market strategy is performing. Be prepared to pivot or adjust aspects of your plan if they aren't going smoothly.
Additionally, don't forget about the goals you set before the launch. I recommend taking the time to review the KPI targets you set ahead of the launch and assess how well you did in achieving those goals.
For instance, did you exceed your sales projections, or did you fall short? If the launch didn't meet expectations, you can rethink your go-to-market strategy and adjust from there.
Stages of a Product Launch
I’m not trying to scare you, but a staggering number of businesses experience a failed product launch each year.
The failure likely isn’t related to the product itself falling flat (although that can happen). It’s more likely that the business did not follow a strict launch strategy or conduct proper market research before putting their product up for sale.
Before you plan for your product launch, follow this quick guide to ensure you set your product up for maximum success (meaning, sales!).
1. Determining Customer Needs
I know this likely goes without saying, but your product should be a benefit to your customer, not a hindrance.
In my opinion, there is nothing worse than trying to use a product that doesn’t actually do what I need to do.
If your product is cumbersome to use or doesn’t actually solve a problem, your audience will likely not see the benefit and will forgo making a purchase.
My suggestion is to take some time to dig deep into your customers’ needs. A solid understanding of your customers’ pain points can help you craft a better product.
If you’re unsure of their current pain points, just ask them. A well-crafted survey can help you uncover their wants, wishes, and needs.
Plus, this survey can help you understand why your customers will or will not buy your product, which can help you determine your market positioning and a promotional strategy. You can also use your CRM to collect this data.
2. Looking at Competition
Remember how your teachers would tell you to “keep your eyes on your own paper?” As a former teacher, I’m guilty of saying those exact words.
But when it comes to a product launch, forget everything your teachers told you. It’s okay to take a look at your competitors.
In fact, it’s expected, and it’s one of the best ways to understand the advantages and disadvantages of a competing brand.
Eyeing your competitors can help you create a plan to set your product apart from the competition. By doing a deep dive into your competitors, you should be able to determine a better marketing strategy and how to position your product as the solution to customer needs compared to other brands.
3. Creating, Testing, and Refining a Prototype
Hopefully, you have a few key audience members on standby that you can bounce ideas off of. Using their expertise, create a prototype of your product and ask them to beta test it.
Take it from Oindrila Mandal, a senior game product manager at Electronic Arts. says, Mandal notes that, in the video game industry, phases of launch could start with a limited beta test.
Here “marketing efforts try to reach a specific segment of potentially highly engaged customers or ‘power users’ and ask them to sign up for the product as an exclusive preview. The product launched in this stage is largely still under testing, may have limited functionality, and will probably undergo changes based on the user feedback,” Mandal says.
Regardless of your industry, a beta test is an excellent idea. Using your beta testers’ notes and feedback, you can implement their suggestions to work out any bumps in your prototype or add a new suggested feature.
Your beta testers’ feedback is invaluable and an important part of a successful product launch. Don’t skip this step!
4. Determining Numbers
Before you spend more time and money creating and launching your product, it’s not a bad idea to crunch the numbers. Spend some time looking at factors like your profit margins, your product’s performance, and potential sales volume.
Doing so will help you create a baseline for needed conversions and sales.
And, running the numbers can give you insight into whether or not your product launch is worth the time and effort.
If your needed conversations and sales feels like an impossible task, it’s okay to scrap your plan, make some tweaks, and try again.
5. Building Pre- and Post-Launch Marketing Plan
A successful launch requires a good bit of pre-marketing and planning. You’ll need the help of those within your circle to help generate buzz about your product.
You might enlist the help of a PR agency or create partnerships with influencers within your niche. Take some time to brainstorm the best course of action. This will help you achieve a better launch.
6. Checking supply chain.
One of the reasons product launches fail is not because of an awful product, but because there is not enough of it to meet demand. Double check with your suppliers and vendors to ensure you have enough product for a successful launch.
You’ll also want to nail down a plan for scaling your product, if the demand exceeds your expectations.
7. Launching your product.
Launching your product is the most exciting stage of the product launch. This is when you’re finally able to show your hard work to your audience, and, hopefully, make a sale.
I’ll talk more about the how-tos of a successful product launch later in this post.
Keep reading!
8. Ask for and analyze feedback post-launch.
The public’s perception of your product is a big indicator of its success. Their feedback is valuable and can help you better understand what went right in your launch or which aspects failed.
Now that we know the stages of a product launch, let’s take a look at how to launch a product.
How to Launch a Product With Data and Expert Insight
Now that you know all the details that go into launching a product, we need to talk about how to *actually* launch it, from setting your launch date to releasing your product into the wild and anticipating orders from your loyal client base.
Lindsay Wyskowski, brand strategy director at Identity PR says, “You only get one bite of the apple, which really translates to getting the launch right because you only get one chance. All of the parts and pieces need to align appropriately, with everyone involved on the same page following the same plan, so the product launch can really be a milestone moment for the company.”
If you’re ready to come up with your own product launch plan to get that milestone moment for your business, follow these steps.
1. Set a date for your launch.
The first thing you need to do is pick a date for your launch. Whichever day you choose, be sure to give yourself plenty of time to get all the things you need to do done. Realistically, you’ll need to set your launch date out several weeks, or even months.
Bernardo Castro, backend developer and founder of Bybrand, tells me his company usually takes three months to launch a product.
Bernardo says, “The first month is about planning. What platforms are we going to use? Will it be available all at once or staggered? What is our sales objective for the first week? The second month is about polishing the product (the software, in our case) and creating marketing content. The last month is about teasing the launch, determining the launch date, and rolling out our marketing campaign.”
With his advice in mind, you’ll need time to:
- Craft marketing copy for emails and social media.
- Create a landing page for your product.
- Ensure your product’s bugs and kinks are worked out.
- Drum up some customer hype.
- Work out logistics.
If you’re like me, you’ll likely find picking a date and working backward to be helpful. This means once you have a good date in mind, you can mark off the weeks with deadlines detailing when and how to accomplish your pre-launch tasks.
2. Choose your marketing channels.
Where you market your product matters. It matters because if your audience is not hanging out on the platforms you’ve chosen, you’re essentially yelling into the wind.
Take some time to figure out which channels are your best marketing channels. Do your customers:
- Read and respond to emails or SMS messages?
- Are they active on specific social media platforms?
- Are they easily influenced by social media influencers?
The answers to these questions will help you determine your best plan of marketing action. And remember, 88% of people are likely to trust a recommendation from people they know and trust, so word-of-mouth marketing shouldn’t be off the table.
Don’t forget, you can market your product on multiple channels. So, while one marketing platform might not be the most effective, in my opinion, it’s not a bad idea to give it a try to reach all of your customers.
3. Develop your messaging and marketing materials.
You can’t have a successful product launch without compelling marketing materials. Your marketing materials will help draw in your audience, explain the benefits and usefulness of your product, and showcase your brand’s voice and message.
These materials include:
- Landing pages.
- Blog posts.
- Paid advertisements.
- Emails.
- SMS messages.
- Short-form video.
- Long-form video.
Speaking of your brand’s voice and message, though, you’ll also want to pinpoint exactly the tone you want your marketing materials to set. Ask yourself:
- How do you want to present your product?
- Do you want your brand to be helpful? Direct and to the point? Humorous? Optimistic?
The answer to those questions will help determine your tone of voice, which will guide you and your marketing team’s copywriting and content efforts. You can also look to your target audience, too, to help you determine your tone of voice.
Which attitude do they best respond to?
4. Create some buzz around your product.
Once your promotional materials are ready to go, it's time to start promoting your product and its launch! Ideally, you’ll want to start promoting your product about six or eight weeks before the launch date.
In my experience, this will give you plenty of time to generate interest among your target audience, without shocking them with a surprise launch that could fall flat.
Take a look at your launch date and then count back six to eight weeks. Whichever day that falls on should be the start of your marketing campaign.
Since 80% of social media marketers say they think customers will buy products directly in social apps, don’t discount the power of social selling and promotional social media posts.
You can use social media scheduling tools to help you schedule your posts ahead of time. Or, create a content calendar detailing your posting schedule to share with your team.
To create even more buzz and better market your product, consider:
- Hosting an exclusive pre-sale for select target audience members.
- Creating a limited edition of your product.
- Hosting a launch party, either in-person or online.
- Giving early access to influencers to help promote and market your product to their audiences.
Above all, I recommend using your six to eight weeks of promotional time wisely. When done right, this time will pay off in dividends.
5. Launch your product.
On launch day, it’s officially time to release your product to the public and make some hard-earned sales! Use your preferred marketing channels to announce your product launch to your audience.
Pro tip: Don’t forget to include a link to make a purchase!
6. Track the results.
You’ll have a good indication of how well your launch performed based on sales.
However, it’s a good idea to dig into your marketing channels’ analytics to get a better idea of what worked and what didn’t.
Keep an eye on your:
- Open rates for both emails and SMS.
- Click-through rates.
- Social media engagement data.
While you can’t go back and change your past marketing strategy, tracking your results can help you plan for a better launch the next time.
Plus, you can make changes to your strategy in real-time, like reviewing your open rates and editing email subject lines for a better chance at your audience opening them before you send follow-up emails.
And remember, 47% of email recipients open an email based on the subject line alone, so you really need to nail it to increase those open rates!
How to Launch a Product Online
To launch your product online, you’ll want to ensure you’ve followed the steps above. However, there are a few additional steps you'll want to follow to gain traction primarily online.
1. Figure out the story you want to tell regarding your product's bigger purpose.
What story do you want to tell across social platforms, landing pages, and email? This is similar to your positioning statement but needs to be geared entirely toward your target audience. Ask questions like:
- Why should they purchase your product?
- How will your product or service make their lives better?
Remember how I said it’s important to get your team and stakeholders involved before you start? Communicating cross-functionally ensures the communication materials you use across various online channels align — which is key when it comes to establishing a new product in the marketplace.
Consider, for instance, how Living Proof announced its new product, Advanced Clean Dry Shampoo, on its Instagram page. The story revolves around a simple nuisance common with most other dry shampoos — How consumers still want that just-washed feeling, even when using a dry shampoo.
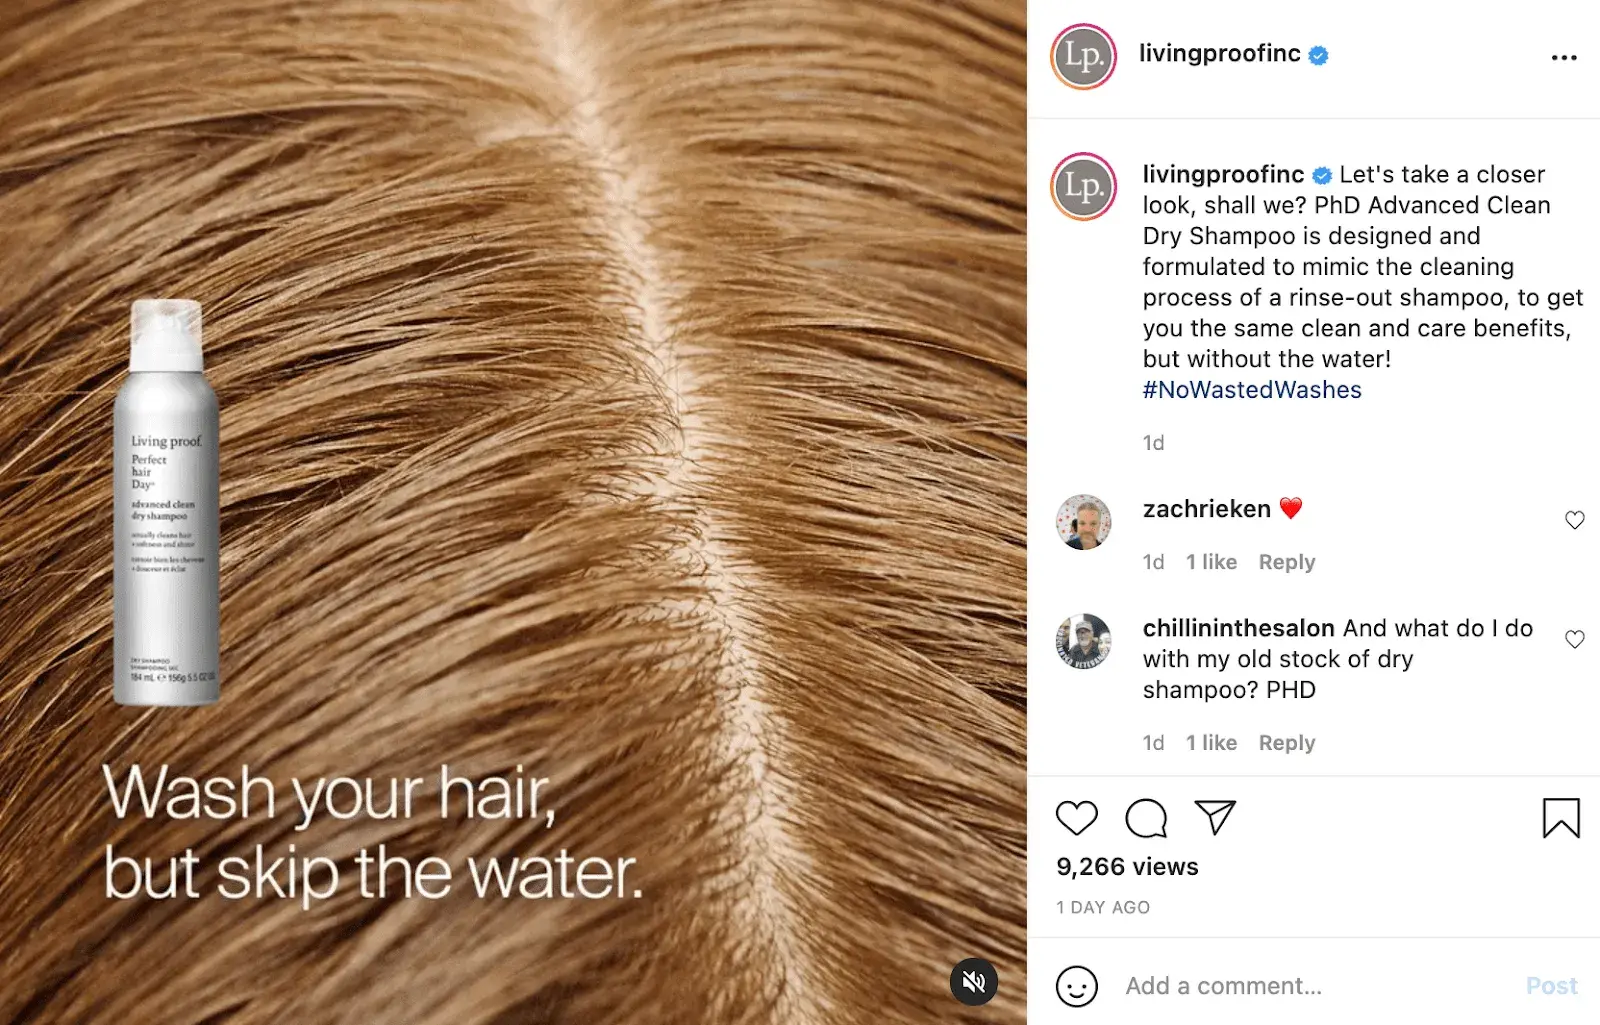
Image Source
I like how Living Proof builds excitement and demand for its new product by focusing on how the product will benefit consumers through storytelling, and using a new hashtag #NoWastedWashes.
2. Display customer testimonials, case studies, and other social evidence to positively frame your new product.
Consumers want to see that other consumers have already taken the risk and purchased your new product before doing it themselves.
I’m guilty of spending hours researching what others say about a product before I finally take the plunge. And because I’m not alone in this, this is where social proof comes into play.
In the weeks leading up to a product launch, or shortly after its launch, begin posting customer testimonials, reviews, and case studies to showcase how your new product has already helped other people.
Take this a step further and employ influencers to share the word about your product as well, if it’s a good fit for your brand.
Consumers are smart enough to know they shouldn't trust every advertisement they see — but they can trust fellow consumers. So leverage that trust through social proof methods.
3. Create a social and email campaign.
Create a full, comprehensive social media campaign to increase interest and awareness of your new product.
I advise using paid advertising to reach new audiences, creating full product explainer videos to use across your social channels, and using email to reach existing customers and provide an exclusive first look at your new product's features.
Since 73% of consumers prefer to watch a short-form video to learn about a product or service, I highly recommend you keep that in mind when creating your video content.
Additionally, you might consider hosting a live stream to connect directly with prospects and existing customers and invite experts from your product development team to explain the new features of your product.
It’s important to note — in this stage, you’ll want to pay attention to how consumers are interacting with the communication materials regarding your new product.
Share concerns and feedback with the product development team — it’s important to trust your consumers and use their feedback to strengthen your product.
4. Have a pre-order option.
If a consumer is excited to purchase your new product, don’t make them wait — provide an option to pre-order the product or service before it’s even available.
This helps spread out demand while enabling consumers to purchase the product whenever they’re feeling most inclined to do so.
The cost of launching a new product varies significantly.
For instance, an entrepreneur will see vastly different costs for launching a product on Amazon than an enterprise company might see for launching a product in a million-dollar market.
I’ll share two examples to explore this more closely.
Entrepreneur Product Launch Example
In the first example, let’s say you’re an entrepreneur who has invented a design app you’re hoping to sell online.
You might conduct market research to determine which marketing strategies work best for your goals, which messaging resonates best with your audience, and which design elements appeal to your desired prospects.
If you use a few focus groups to determine these answers, you might expect to spend roughly $5,000.
When you’re bringing a new app to the market, you’ll need to choose the best go-to marketing strategy for your needs. Regardless of the strategy you choose, they all cost money.
For instance, product branding could cost roughly $1,000 if you’re paying a designer to help you out, and website design could cost anywhere from $500-$3,000 if you’re paying a web designer a one-off fee.
These fees don’t include the cost you need to pay yourself and any employees if this is a full-time job. It also doesn’t include the costs of hiring an engineer to update the app’s features and ensure the app is running smoothly.
With this simplified example, you’re looking at roughly $8,000. Of course, you can cut some costs if you choose to do any of these tasks yourself, but you might risk creating a subpar customer experience.
Enterprise Product Launch Example
On the other end of the spectrum, let’s consider a large enterprise company that is launching a new product. Here, you’ll likely pay upwards of $30,000–$50,000 for market research.
Perhaps you'll spend $15,000 on brand positioning and the marketing materials necessary to differentiate yourself against competitors, and you might pay upwards of $30,000 for all the product design and brand packaging.
Finally, your marketing team could need a budget of roughly $20,000 for SEO, paid advertising, social, content creation, etc.
All said and done, launching a product against other enterprise competitors could cost roughly $125,000. Again, that doesn’t include the costs you'll pay your marketing, product development, and engineering teams.
Product Launch Best Practices by Industry
How to Launch a Digital Product
When launching a digital product, you’ll want to begin building anticipation with a strong content marketing strategy.
Use blog posts, email marketing, social media, and other channels of distribution to increase interest and demand for your digital product.
I also suggest you ensure you’re leveraging lead generation strategies to reach existing customers and prospects.
For instance, let’s say you’re launching an online course on SEO. In the weeks leading up to the launch, you might create SEO-related blog content to send to your email subscribers with an option to join the SEO course’s waitlist.
This helps you gauge the effectiveness of your marketing materials while reaching an audience that has already demonstrated interest in your brand.
How to Launch a Product on Amazon
Anyone who’s ever shopped on Amazon knows the importance of a good product listing. In the weeks leading up to launch, take the time to create a strong, high-converting product listing.
This includes taking high-resolution photos of your product, writing a description that outlines your product’s differentiating features, and using keywords to help your product rank on Amazon.
Additionally, product reviews are incredibly important on Amazon, so I recommend having reviews ready to go before you even launch your product on Amazon.
To do this, ensure you’ve either launched your product on your own website first (which gives you time to earn reviews before launching on Amazon).
You can also send your product to a select group of interested buyers ahead of the full launch and collect reviews from them.
Finally, ensure you’re ready for an Amazon product launch by checking inventory.
You never know how quickly your product might gain traction on the ecommerce superstore, so make sure you have enough products to fulfill Amazon orders quickly.
Pro tip: Take a look at HubSpot's The Ultimate Guide to Selling on Amazon for more information related to Amazon.
How to Launch a SaaS Product
To launch a SaaS product, you’ll want to start by researching competitors and understanding the marketplace at large. There’s plenty of demand for SaaS products, as the industry is expected to grow by more than 16% by 2026.
However, the SaaS industry is also well-saturated, so before launching a SaaS product, I highly recommend you determine how your product differs from all the others in the industry.
To create a successful product launch, you’ll want to conduct market research and focus groups to determine the true benefits and differentiators of your product.
Next, I suggest employing a strong content marketing strategy to increase your website’s visibility on search engines and to ensure your business is appearing in search results for topics related to your product.
Since you aren’t launching a physical product, your marketing efforts need to convince businesses that your product can solve their needs. Additionally, you might want to offer free trials or a freemium option for smaller businesses on lower budgets to test out your offerings before committing.
Pro tip: For a full SaaS rundown, take a look at HubSpot's Ultimate Guide to Software as a Service (SaaS).
How to Launch a Food Product
To launch a food product, you’ll first need to ensure you’re prepared for the costs required to do so.
This includes how much it costs to package and store the product (including packaging, warehousing, and distribution) and how much it costs to sell the product (including branding and digital marketing).
Next, you’ll want to follow federal and state food regulations. For instance, you need to ensure you’re following health department rules for food preparation surfaces, refrigeration, and sanitation.
You’ll also need to make sure the labeling you use on your product’s packaging is accurate, which requires you to send your food product to a lab for analysis and check with your state commerce to see what it requires for nutrition labels.
When launching a food product, I think it’s a good idea to hire a food broker. A food broker can foster relationships with national or local grocery stores and will create a promotional plan to help increase sales when your food hits the shelves.
Typically, a supermarket will test out your product for a few months before determining if there's enough consumer interest to keep it stocked — which is why a food broker can be incredibly useful for using business intelligence and industry knowledge to ensure a successful food product launch.

Image Source
Originating in 2011 as a website called donothingfor2minutes.com, Calm is a mobile app that provides various resources and tools for meditation, sleep, relaxation, and mindfulness. Although Headspace was the leading meditation app at the time of its launch, it didn’t take long for Calm to dominate the market.
Calm found success largely because of its content marketing and SEO strategy. According to Foundation’s research, Calm has attracted over 8 million backlinks and uses blog content and YouTube content to organically attract and engage prospects.
The company also partners with celebrities to create unique content and engaging ad campaigns. Some of Calm’s most famous collaborators include Lebron James, Harry Styles, Matthew McConaughey, and Camila Cabello.
Calm’s celebrity partnerships have given them a leg up compared to their competitors. Not only their celebrity-read Sleep Stories garner millions of views, but they also boost the brand’s visibility and authority.
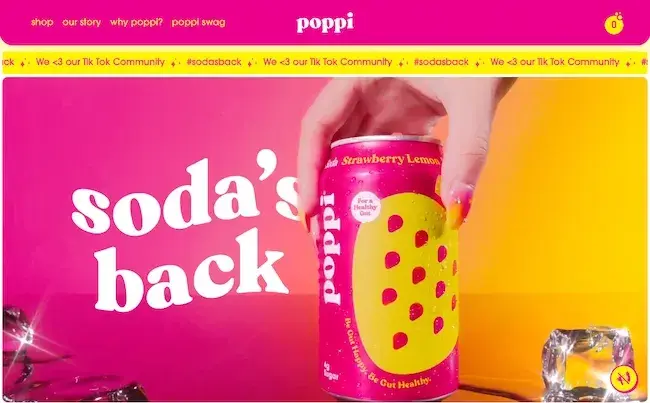
Image Source
Poppi is a “prebiotic soda,” which is a beverage that combines the fizziness and taste of a traditional soda with fruit juice, prebiotics, and apple cider vinegar. It comes in flavors such as Classic Cola, Root Beer, Orange, and Cherry Limeade.
Initially called “Mother Beverage,” Poppi was originally created when co-founder Allison Ellsworth wanted to create a drink that was both healthy and tasted good.
Not only does Poppi stand out from other beverages because of its health benefits, it also has a unique and colorful brand personality that attracts customers.
According to Ellsworth, “We had this really fun and vibrant brand and a product that people could relate to. People love it and it was created with ingredients that people knew to be effective and beneficial to their body.”
Poppi was originally slated for a retail launch in March of 2020. However, those plans changed due to the Covid-19 pandemic.
Fortunately, they were able to pivot to launch as a DTC product, selling on Amazon and other ecommerce platforms. Additionally, they used this opportunity to invest in social media marketing on Instagram and TikTok, where they gained popularity amongst Gen Z consumers.
In 2021, HubSpot launched Operations Hub as part of its CRM platform. The product is designed to help businesses streamline their operational processes, improve data quality and accuracy, and enable cross-team collaboration. This allows businesses to run more smoothly and scale more effectively.
One of the reasons why this launch was successful was because it solved a problem that many customers faced.
According to HubSpot’s research, “over 60% of operations professionals have to do duplicative work because of a lack of alignment between teams.” This happens because operations professionals get hired into separate departments and get siloed and overwhelmed with tasks as their companies scale.
In response, HubSpot introduced Operations Hub so operations employees could work together out of a shared system and remove friction from their day-to-day workflows.
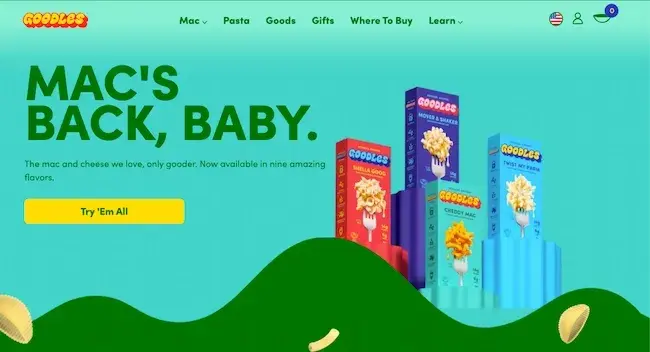
Image Source
Goodles is a noodle brand that takes boxed mac-and-cheese to the next level. This product differentiates itself by providing more nutritional value than the standard dry noodles, with 10g of protein and 7g of fiber with prebiotics in every serving.
“The pasta aisle is overflowing with golden, al dente pasta options that provide very little nutrition. There's also an ‘alt-pasta’ section with green, brown, orange, mushy, foamy noodles that offer more nutrition but little ‘yum,’” co-founder and CEO Jen Zeszut said in a press release. “Why should you have to choose between taste and nutrition?”
Aside from its positioning as a delicious and nutritious alternative to boxed mac-and-cheese, Goodles also stands out with its vibrant and fun branding.
While other noodle brands have neutral-colored packaging, Goodles uses a bold color palette, a nostalgic typeface, and cheeky product names, like Shella Good and Here Comes Truffle, to attract consumers in the grocery aisle.
Product Launch Tips
To learn the best practices for a successful product launch, I talked to Alex Girard again.
The HubSpot Product Marketing Manager said he had three main tips for a successful product launch:
- Your product positioning should reflect a shift you're seeing in the world, and how your product helps your customers take advantage of that shift.
- Create a recurring schedule for you and the core stakeholders for the launch to check in and ensure you're all on the same page.
- Make sure you keep the product team in the loop on your marketing plans. The product team could have insights that inform your overall marketing campaign.
However, sometimes, external factors might impact your ability to launch a product. When that happens, you might need to delay your launch.
How to Know When to Delay a Product Launch
To understand when and why, you might hold off on a product launch, Girard told me there are three key reasons why you might want to delay a product launch, including:
- When your product itself isn't ready and you need to change your timeline to create the best customer experience possible.
- If a situation occurs where your current customers are having a less-than-optimal experience with one of your current products. Before launching and promoting a new product, you should make sure your current customers are satisfied with your existing product offering.
- If something occurs on an international, national, state, or local level that requires your audience to readjust their priorities and shift focus away from your company and its product launch. Make sure that when the time comes to launch, your target audience is ready to learn about your new product.
Launching the Right Way
In my experience, a product launch involves a lot of moving parts and collaboration with a lot of people.
I’ve learned that I must keep my eye on my product, the stakeholders, our target audience, and our marketing materials to ensure a smooth and successful launch.
If you‘re looking for templates to coordinate your team efforts and align your company around your new product’s messaging, download our free product marketing kit below.
Editor's note: This post was originally published in November 2015 and has been updated for comprehensiveness.


 Microsoft Clarity offers essential insights to pinpoint issues on your app.
I would highly recommend using a tool like
Microsoft Clarity offers essential insights to pinpoint issues on your app.
I would highly recommend using a tool like  Session recordings are valuable for pinpointing particular problems in the interface.
If the heat maps or session recordings don’t make things clear, that is where you would need to consider usability testing.
Once you understand the problem, you can then begin exploring solutions and testing them rigorously to ensure they effectively reduce friction.
Session recordings are valuable for pinpointing particular problems in the interface.
If the heat maps or session recordings don’t make things clear, that is where you would need to consider usability testing.
Once you understand the problem, you can then begin exploring solutions and testing them rigorously to ensure they effectively reduce friction.
 Maze serves as a valuable resource for conducting remote testing, offering both test data and recordings for each test.
If testing uncovers issues you can’t fix, then try facilitated testing. Facilitated testing enables you to delve into any arising issues by asking questions.
Once you have a solution that works, it’s time to roll that feature out. But you need to be careful at this point because of the procedural knowledge I mentioned earlier.
Dealing With the Dangers of Procedural Knowledge
Introducing fixes to a user interface has a good chance of breaking a user’s procedural knowledge. Interface elements are often moved and so are no longer where users expect to find them, or they look different, and so users miss them.
This can upset many existing customers. That can panic stakeholders and lead to rash decisions.
To some extent, you need to accept that this is inevitable and prepare stakeholders for this eventuality. Users will normally adapt in a couple of weeks of regular use, and so there is no immediate need to panic.
That said, there are things you can do to mitigate the reaction.
Maze serves as a valuable resource for conducting remote testing, offering both test data and recordings for each test.
If testing uncovers issues you can’t fix, then try facilitated testing. Facilitated testing enables you to delve into any arising issues by asking questions.
Once you have a solution that works, it’s time to roll that feature out. But you need to be careful at this point because of the procedural knowledge I mentioned earlier.
Dealing With the Dangers of Procedural Knowledge
Introducing fixes to a user interface has a good chance of breaking a user’s procedural knowledge. Interface elements are often moved and so are no longer where users expect to find them, or they look different, and so users miss them.
This can upset many existing customers. That can panic stakeholders and lead to rash decisions.
To some extent, you need to accept that this is inevitable and prepare stakeholders for this eventuality. Users will normally adapt in a couple of weeks of regular use, and so there is no immediate need to panic.
That said, there are things you can do to mitigate the reaction.
 Slack use tooltips to explain how their interface works.
The key is to strike a balance. You must add needed improvements while causing minimal disruption to users’ workflows. You will also need to carefully monitor adoption and adapt accordingly.
Change The Way We Work
That constant monitoring and adaptation lies at the heart of digital product design. You cannot rely solely on the initial solution but must be prepared to continuously refine and iterate as user behavior and needs evolve.
Slack use tooltips to explain how their interface works.
The key is to strike a balance. You must add needed improvements while causing minimal disruption to users’ workflows. You will also need to carefully monitor adoption and adapt accordingly.
Change The Way We Work
That constant monitoring and adaptation lies at the heart of digital product design. You cannot rely solely on the initial solution but must be prepared to continuously refine and iterate as user behavior and needs evolve. 


![Download Now: 50+ Excel Hacks [Free Guide]](https://no-cache.hubspot.com/cta/default/53/067360a3-cf50-4923-b737-86af07177c39.png)