Paragraphs

Category Image 073

I sure do love little reminders about HTML semantics, particularly semantics that are tougher to commit to memory. Scott has a great one, beginning with this markup:

<p>I am a paragraph.</p>
<span>I am also a paragraph.</span>
<div>You might hate it, but I'm a paragraph too.</div>
<ul>
  <li>Even I am a paragraph.</li>
  <li>Though I'm a list item as well.</li>
</ul>
<p>I might trick you</p>
<address>Guess who? A paragraph!</address>

You may look at that markup and say “Hey! You can’t fool me, only the <p> elements are “real” paragraphs!

You might even call out such elements as divs or spans being used as “paragraphs” a WCAG failure.

But, if you’re thinking those sorts of things, then maybe you’re not aware that those are actually all “paragraphs”.

It’s easy to forget this since many of those non-paragraph elements are not allowed in between paragraph tags and it usually gets all sorted out anyway when HTML is parsed.

The accessibility bits are what I always come to Scott’s writing for:

Those examples I provided at the start of this post? macOS VoiceOver, NVDA and JAWS treat them all as paragraphs ([asterisks] for NVDA, read on…). […] The point being that screen readers are in step with HTML, and understand that “paragraphs” are more than just the p element.


Paragraphs originally published on CSS-Tricks, which is part of the DigitalOcean family. You should get the newsletter.

Integrating Image-To-Text And Text-To-Speech Models (Part 1)

Category Image 073

Audio descriptions involve narrating contextual visual information in images or videos, improving user experiences, especially for those who rely on audio cues.

At the core of audio description technology are two crucial components: the description and the audio. The description involves understanding and interpreting the visual content of an image or video, which includes details such as actions, settings, expressions, and any other relevant visual information. Meanwhile, the audio component converts these descriptions into spoken words that are clear, coherent, and natural-sounding.

So, here’s something we can do: build an app that generates and announces audio descriptions. The app can integrate a pre-trained vision-language model to analyze image inputs, extract relevant information, and generate accurate descriptions. These descriptions are then converted into speech using text-to-speech technology, providing a seamless and engaging audio experience.

By the end of this tutorial, you will gain a solid grasp of the components that are used to build audio description tools. We’ll spend time discussing what VLM and TTS models are, as well as many examples of them and tooling for integrating them into your work.

When we finish, you will be ready to follow along with a second tutorial in which we level up and build a chatbot assistant that you can interact with to get more insights about your images or videos.

Vision-Language Models: An Introduction

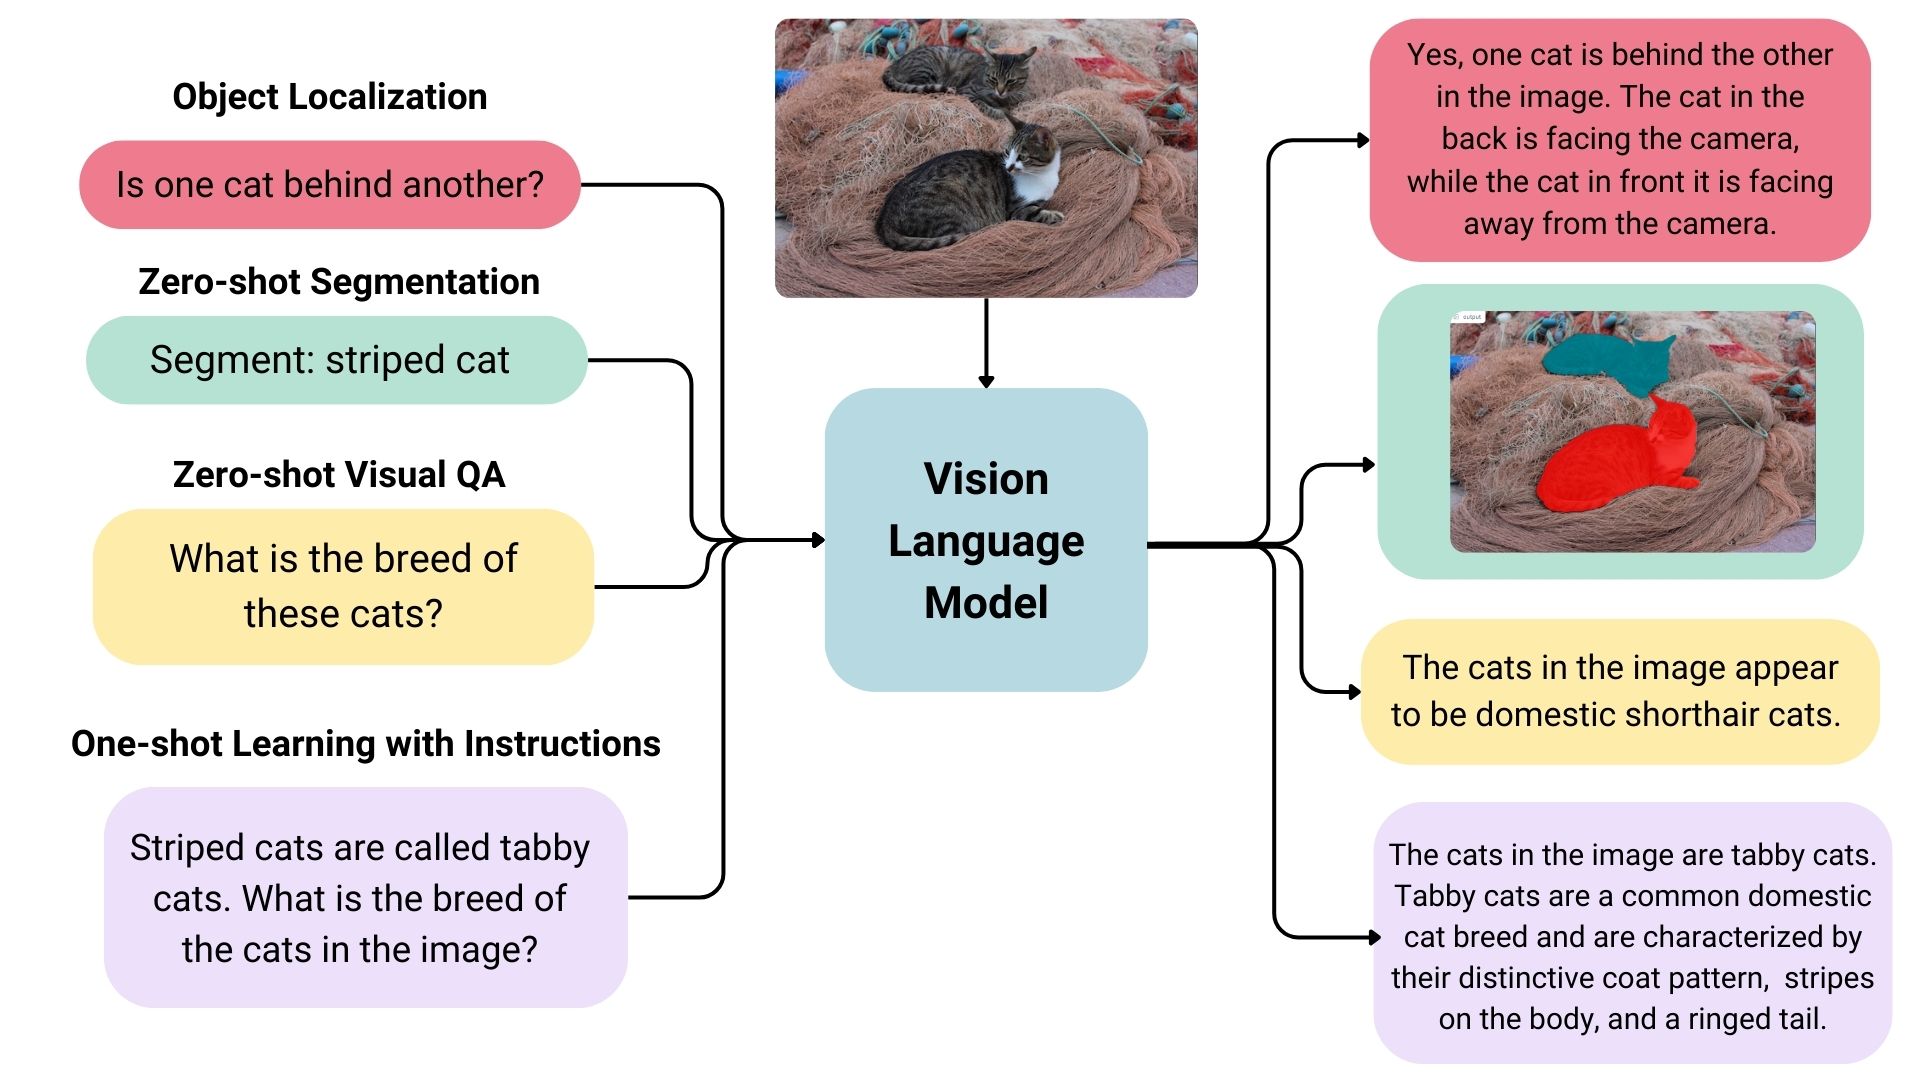
VLMs are a form of artificial intelligence that can understand and learn from visuals and linguistic modalities.

They are trained on vast amounts of data that include images, videos, and text, allowing them to learn patterns and relationships between these modalities. In simple terms, a VLM can look at an image or video and generate a corresponding text description that accurately matches the visual content.

VLMs typically consist of three main components:

  1. An image model that extracts meaningful visual information,
  2. A text model that processes and understands natural language,
  3. A fusion mechanism that combines the representations learned by the image and text models, enabling cross-modal interactions.

Generally speaking, the image model — also known as the vision encoder — extracts visual features from input images and maps them to the language model’s input space, creating visual tokens. The text model then processes and understands natural language by generating text embeddings. Lastly, these visual and textual representations are combined through the fusion mechanism, allowing the model to integrate visual and textual information.

VLMs bring a new level of intelligence to applications by bridging visual and linguistic understanding. Here are some of the applications where VLMs shine:

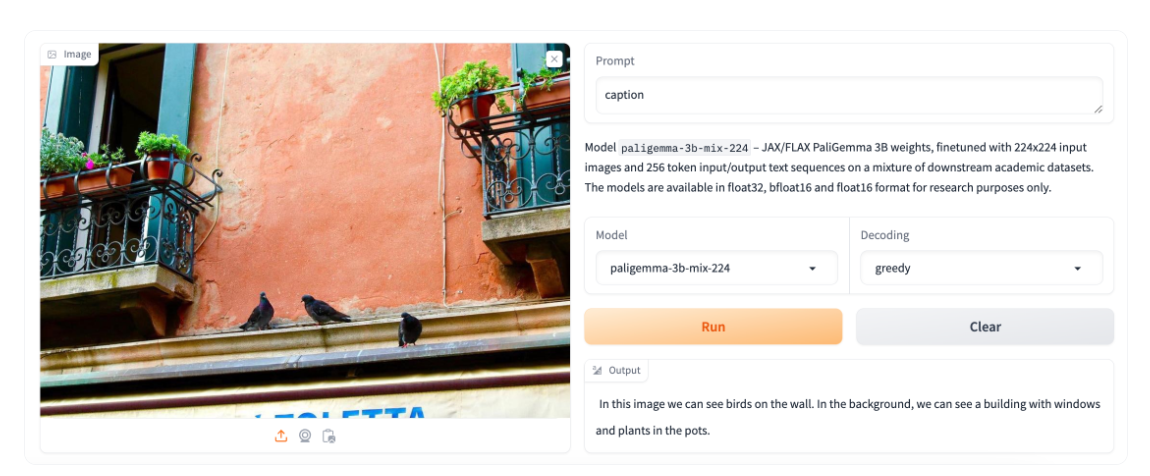
  • Image captions: VLMs can provide automatic descriptions that enrich user experiences, improve searchability, and even enhance visuals for vision impairments.
  • Visual answers to questions: VLMs could be integrated into educational tools to help students learn more deeply by allowing them to ask questions about visuals they encounter in learning materials, such as complex diagrams and illustrations.
  • Document analysis: VLMs can streamline document review processes, identifying critical information in contracts, reports, or patents much faster than reviewing them manually.
  • Image search: VLMs could open up the ability to perform reverse image searches. For example, an e-commerce site might allow users to upload image files that are processed to identify similar products that are available for purchase.
  • Content moderation: Social media platforms could benefit from VLMs by identifying and removing harmful or sensitive content automatically before publishing it.
  • Robotics: In industrial settings, robots equipped with VLMs can perform quality control tasks by understanding visual cues and describing defects accurately.

This is merely an overview of what VLMs are and the pieces that come together to generate audio descriptions. To get a clearer idea of how VLMs work, let’s look at a few real-world examples that leverage VLM processes.

VLM Examples

Based on the use cases we covered alone, you can probably imagine that VLMs come in many forms, each with its unique strengths and applications. In this section, we will look at a few examples of VLMs that can be used for a variety of different purposes.

IDEFICS

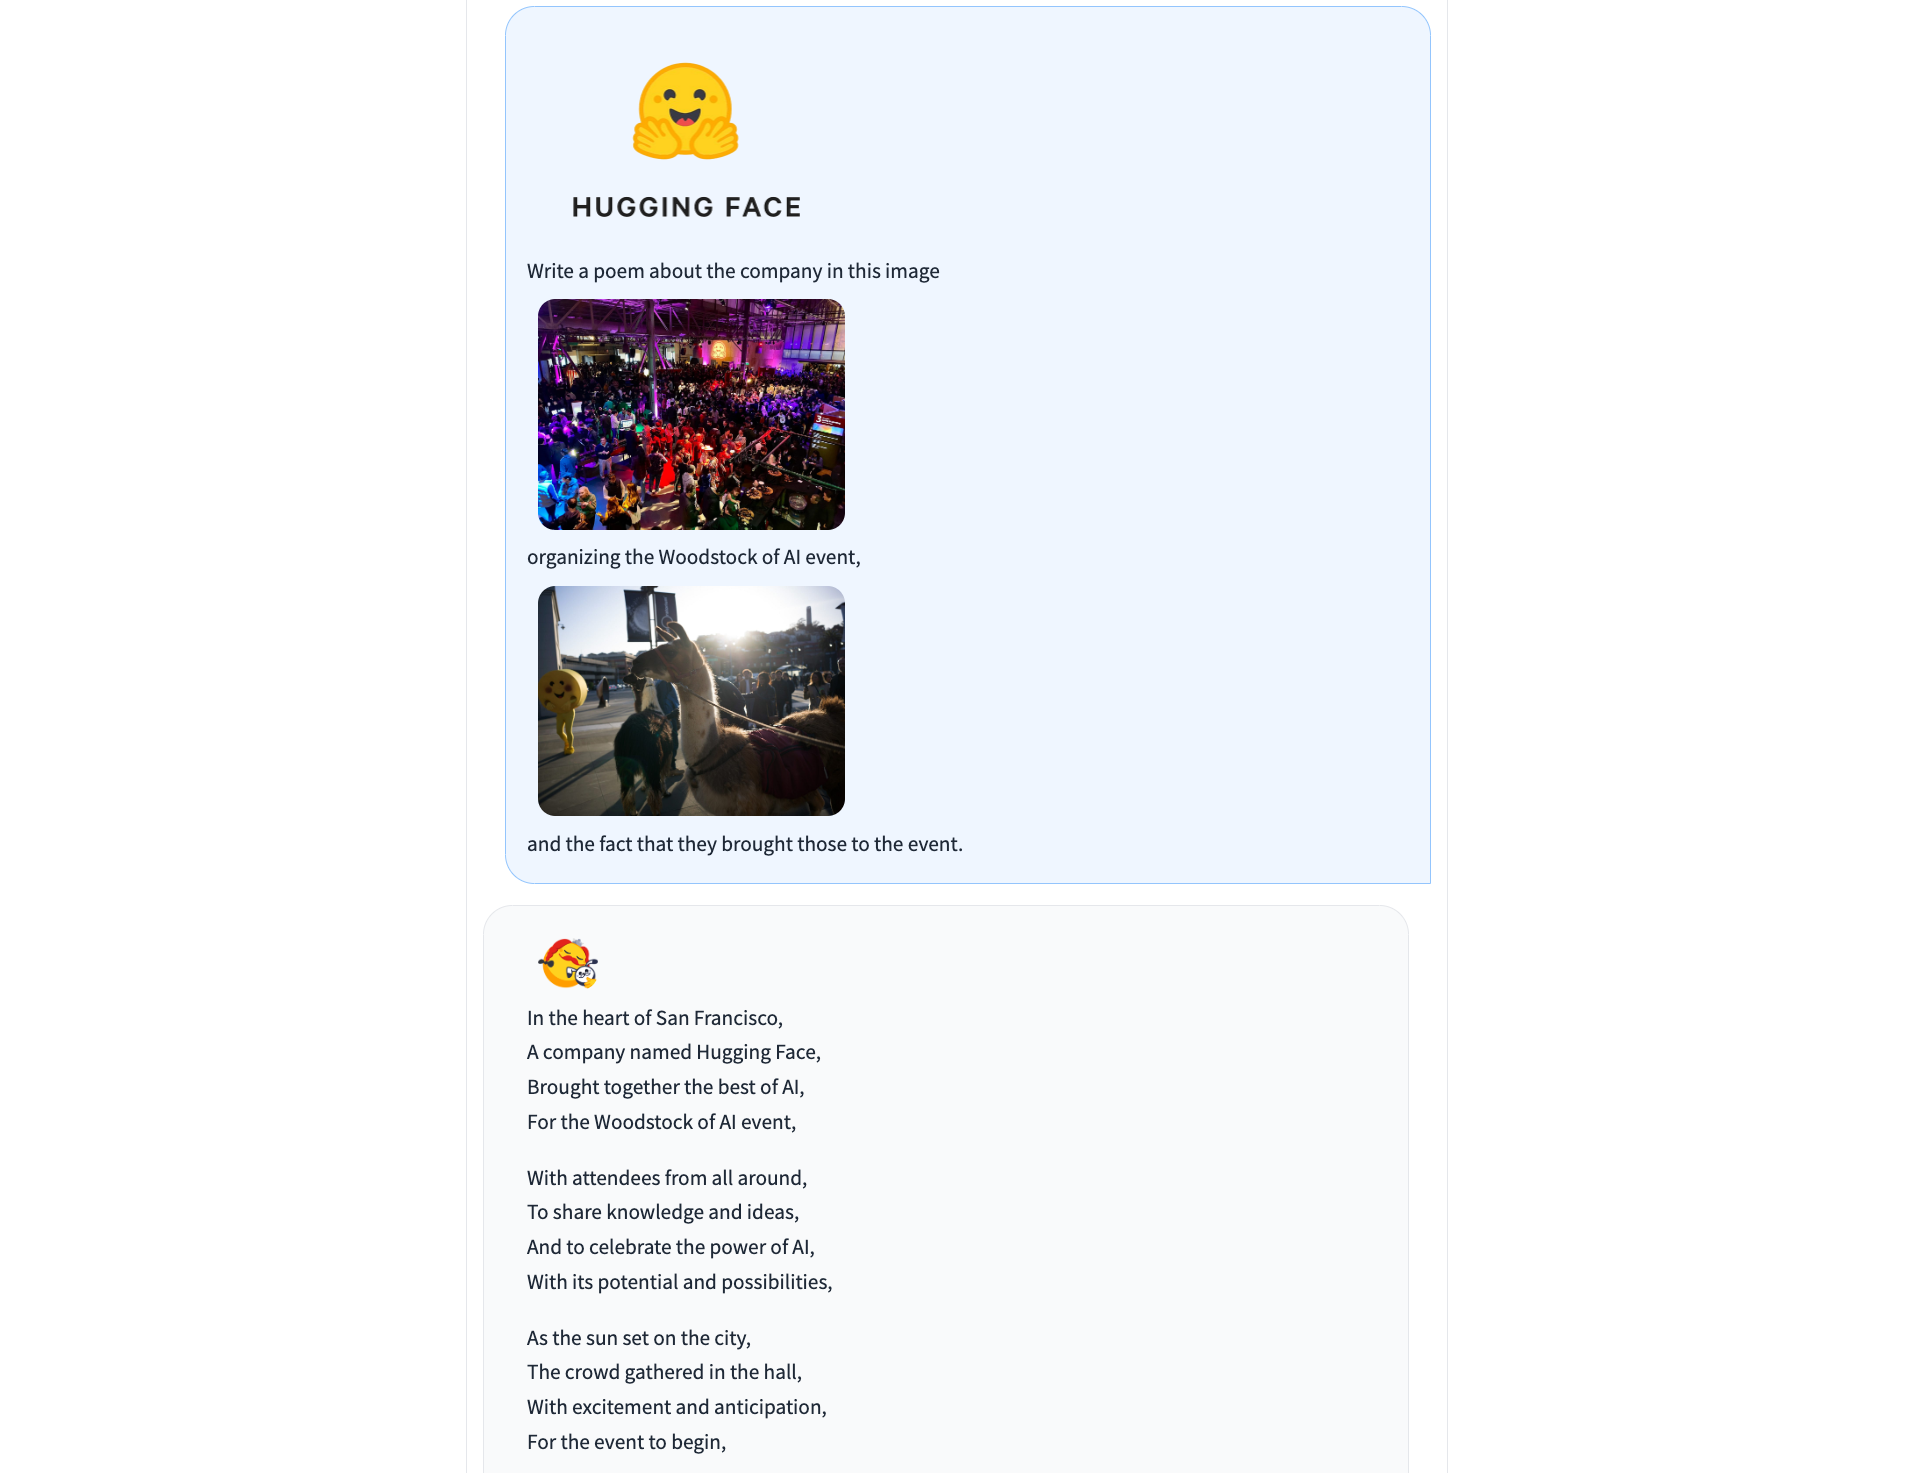
IDEFICS is an open-access model inspired by Deepmind’s Flamingo, designed to understand and generate text from images and text inputs. It’s similar to OpenAI’s GPT-4 model in its multimodal capabilities but is built entirely from publicly available data and models.

IDEFICS is trained on public data and models — like LLama V1 and Open Clip — and comes in two versions: the base and instructed versions, each available in 9 billion and 80 billion parameter sizes.

The model combines two pre-trained unimodal models (for vision and language) with newly added Transformer blocks that allow it to bridge the gap between understanding images and text. It’s trained on a mix of image-text pairs and multimodal web documents, enabling it to handle a wide range of visual and linguistic tasks. As a result, IDEFICS can answer questions about images, provide detailed descriptions of visual content, generate stories based on a series of images, and function as a pure language model when no visual input is provided.

PaliGemma

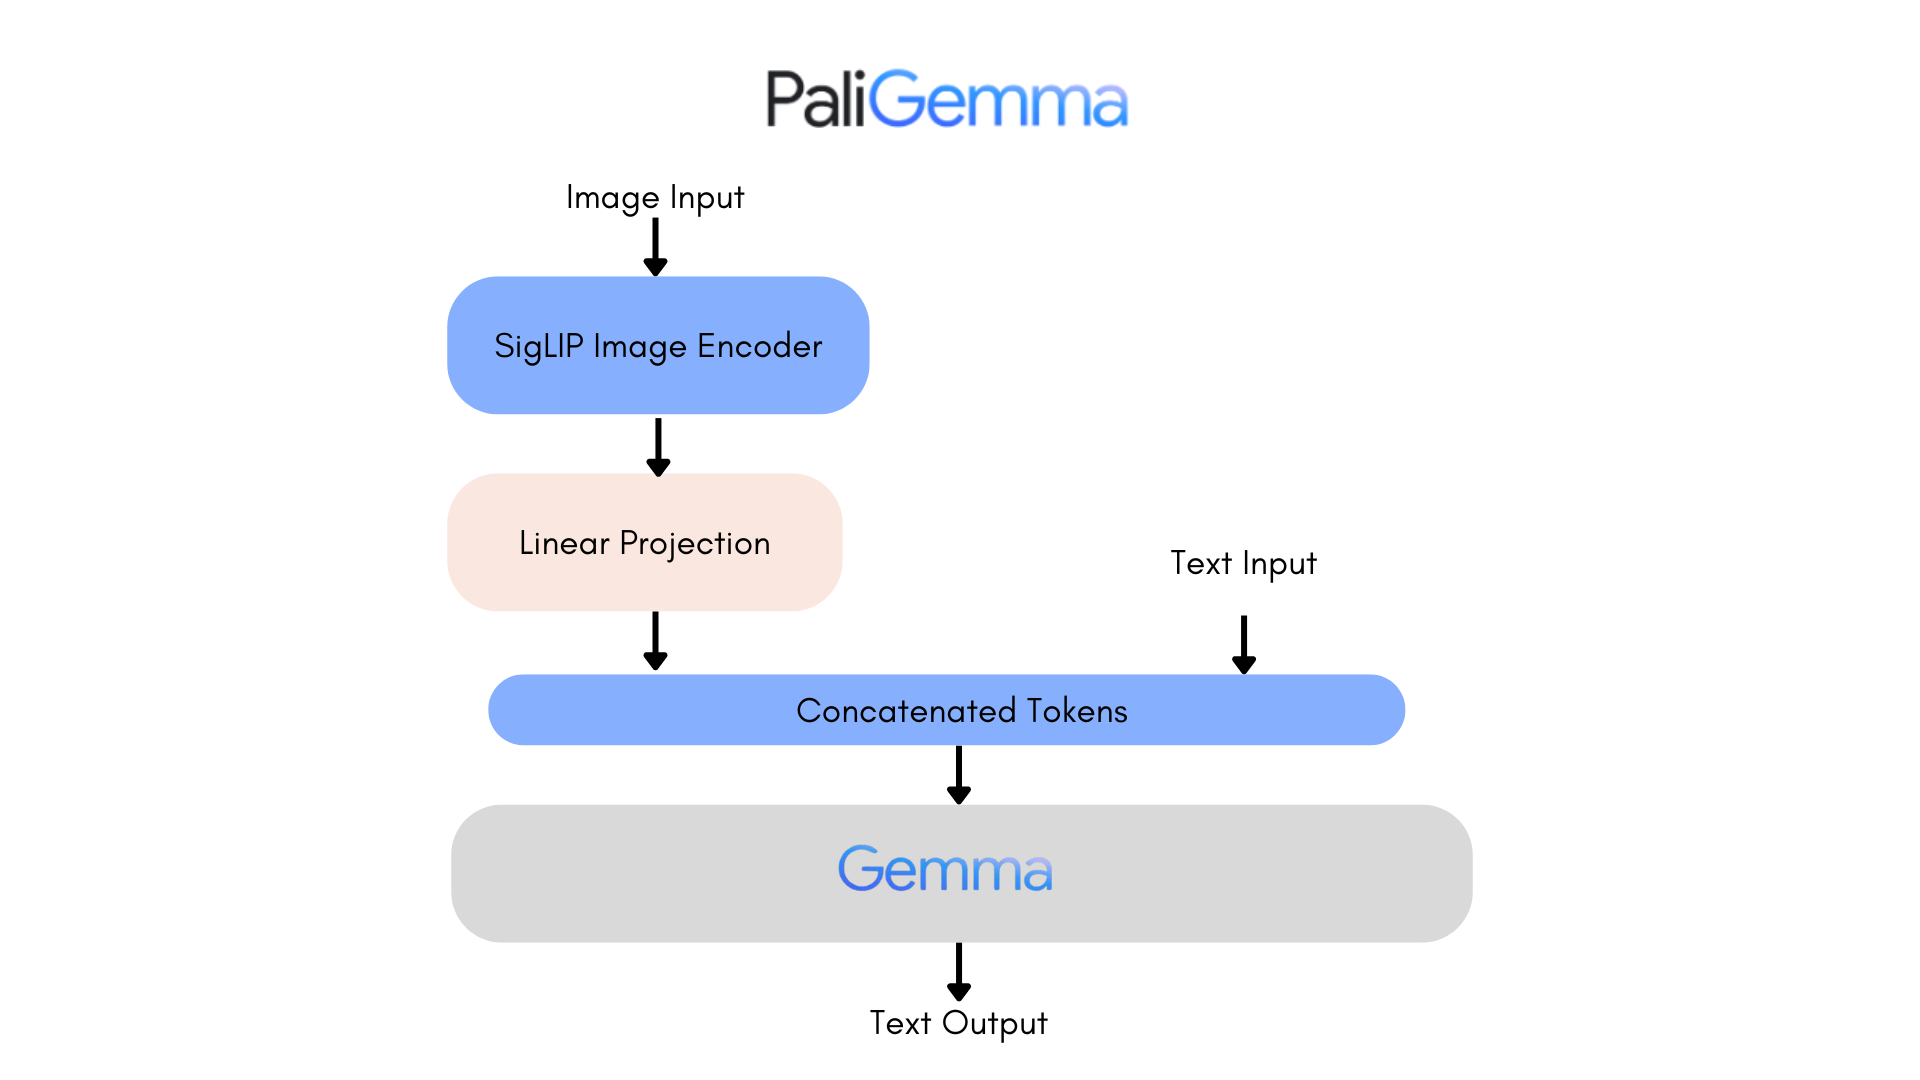
PaliGemma is an advanced VLM that draws inspiration from PaLI-3 and leverages open-source components like the SigLIP vision model and the Gemma language model.

Designed to process both images and textual input, PaliGemma excels at generating descriptive text in multiple languages. Its capabilities extend to a variety of tasks, including image captioning, answering questions from visuals, reading text, detecting subjects in images, and segmenting objects displayed in images.

The core architecture of PaliGemma includes a Transformer decoder paired with a Vision Transformer image encoder that boasts an impressive 3 billion parameters. The text decoder is derived from Gemma-2B, while the image encoder is based on SigLIP-So400m/14.

Through training methods similar to PaLI-3, PaliGemma achieves exceptional performance across numerous vision-language challenges.

PaliGemma is offered in two distinct sets:

  • General Purpose Models (PaliGemma): These pre-trained models are designed for fine-tuning a wide array of tasks, making them ideal for practical applications.
  • Research-Oriented Models (PaliGemma-FT): Fine-tuned on specific research datasets, these models are tailored for deep research on a range of topics.

Phi-3-Vision-128K-Instruct

The Phi-3-Vision-128K-Instruct model is a Microsoft-backed venture that combines text and vision capabilities. It’s built on a dataset of high-quality, reasoning-dense data from both text and visual sources. Part of the Phi-3 family, the model has a context length of 128K, making it suitable for a range of applications.

You might decide to use Phi-3-Vision-128K-Instruct in cases where your application has limited memory and computing power, thanks to its relatively lightweight that helps with latency. The model works best for generally understanding images, recognizing characters in text, and describing charts and tables.

Yi Vision Language (Yi-VL)

Yi-VL is an open-source AI model developed by 01-ai that can have multi-round conversations with images by reading text from images and translating it. This model is part of the Yi LLM series and has two versions: 6B and 34B.

What distinguishes Yi-VL from other models is its ability to carry a conversation, whereas other models are typically limited to a single text input. Plus, it’s bilingual making it more versatile in a variety of language contexts.

Finding And Evaluating VLMs

There are many, many VLMs and we only looked at a few of the most notable offerings. As you commence work on an application with image-to-text capabilities, you may find yourself wondering where to look for VLM options and how to compare them.

There are two resources in the Hugging Face community you might consider using to help you find and compare VLMs. I use these regularly and find them incredibly useful in my work.

Vision Arena

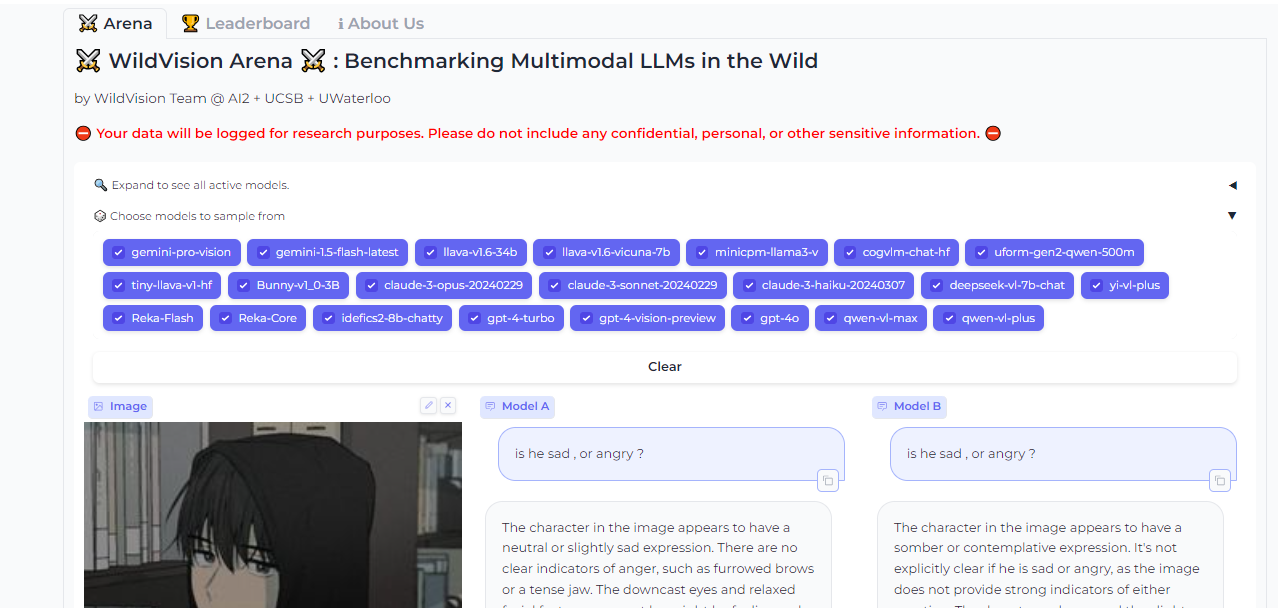
Vision Arena is a leaderboard that ranks VLMs based on anonymous user voting and reviews. But what makes it great is the fact that you can compare any two models side-by-side for yourself to find the best fit for your application.

And when you compare two models, you can contribute your own anonymous votes and reviews for others to lean on as well.

OpenVLM Leaderboard

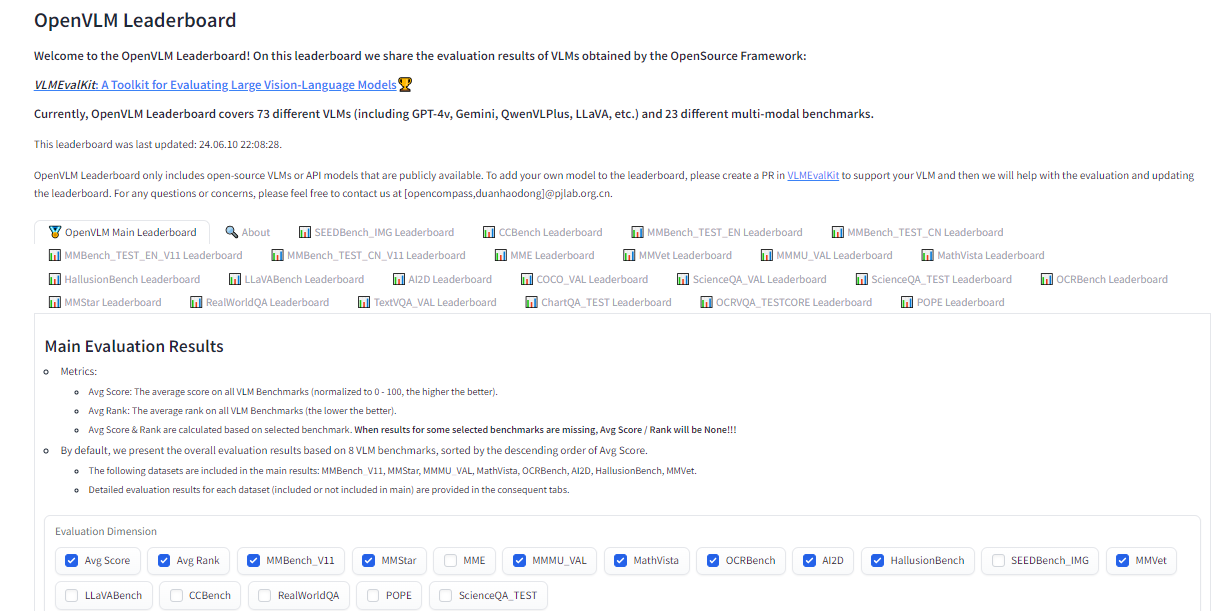
OpenVLM is another leaderboard hosted on Hugging Face for getting technical specs on different models. What I like about this resource is the wealth of metrics for evaluating VLMs, including the speed and accuracy of a given VLM.

Further, OpenVLM lets you filter models by size, type of license, and other ranking criteria. I find it particularly useful for finding VLMs I might have overlooked or new ones I haven’t seen yet.

Text-To-Speech Technology

Earlier, I mentioned that the app we are about to build will use vision-language models to generate written descriptions of images, which are then read aloud. The technology that handles converting text to audio speech is known as text-to-speech synthesis or simply text-to-speech (TTS).

TTS converts written text into synthesized speech that sounds natural. The goal is to take published content, like a blog post, and read it out loud in a realistic-sounding human voice.

So, how does TTS work? First, it breaks down text into the smallest units of sound, called phonemes, and this process allows the system to figure out proper word pronunciations. Next, AI enters the mix, including deep learning algorithms trained on hours of human speech data. This is how we get the app to mimic human speech patterns, tones, and rhythms — all the things that make for “natural” speech. The AI component is key as it elevates a voice from robotic to something with personality. Finally, the system combines the phoneme information with the AI-powered digital voice to render the fully expressive speech output.

The result is automatically generated speech that sounds fairly smooth and natural. Modern TTS systems are extremely advanced in that they can replicate different tones and voice inflections, work across languages, and understand context. This naturalness makes TTS ideal for humanizing interactions with technology, like having your device read text messages out loud to you, just like Apple’s Siri or Microsoft’s Cortana.

TTS Examples

Based on the use cases we covered alone, you can probably imagine that VLMs come in many forms, each with its unique strengths and applications. In this section, we will look at a few examples of VLMs that can be used for a variety of different purposes.

Just as we took a moment to review existing vision language models, let’s pause to consider some of the more popular TTS resources that are available.

Bark

Straight from Bark’s model card in Hugging Face:

“Bark is a transformer-based text-to-audio model created by Suno. Bark can generate highly realistic, multilingual speech as well as other audio — including music, background noise, and simple sound effects. The model can also produce nonverbal communication, like laughing, sighing, and crying. To support the research community, we are providing access to pre-trained model checkpoints ready for inference.”

The non-verbal communication cues are particularly interesting and a distinguishing feature of Bark. Check out the various things Bark can do to communicate emotion, pulled directly from the model’s GitHub repo:

  • [laughter]
  • [laughs]
  • [sighs]
  • [music]
  • [gasps]
  • [clears throat]

This could be cool or creepy, depending on how it’s used, but reflects the sophistication we’re working with. In addition to laughing and gasping, Bark is different in that it doesn’t work with phonemes like a typical TTS model:

“It is not a conventional TTS model but instead a fully generative text-to-audio model capable of deviating in unexpected ways from any given script. Different from previous approaches, the input text prompt is converted directly to audio without the intermediate use of phonemes. It can, therefore, generalize to arbitrary instructions beyond speech, such as music lyrics, sound effects, or other non-speech sounds.”

Coqui

Coqui/XTTS-v2 can clone voices in different languages. All it needs for training is a short six-second clip of audio. This means the model can be used to translate audio snippets from one language into another while maintaining the same voice.

At the time of writing, Coqui currently supports 16 languages, including English, Spanish, French, German, Italian, Portuguese, Polish, Turkish, Russian, Dutch, Czech, Arabic, Chinese, Japanese, Hungarian, and Korean.

Parler-TTS

Parler-TTS excels at generating high-quality, natural-sounding speech in the style of a given speaker. In other words, it replicates a person’s voice. This is where many folks might draw an ethical line because techniques like this can be used to essentially imitate a real person, even without their consent, in a process known as “deepfake” and the consequences can range from benign impersonations to full-on phishing attacks.

But that’s not really the aim of Parler-TTS. Rather, it’s good in contexts that require personalized and natural-sounding speech generation, such as voice assistants and possibly even accessibility tooling to aid visual impairments by announcing content.

TTS Arena Leaderboard

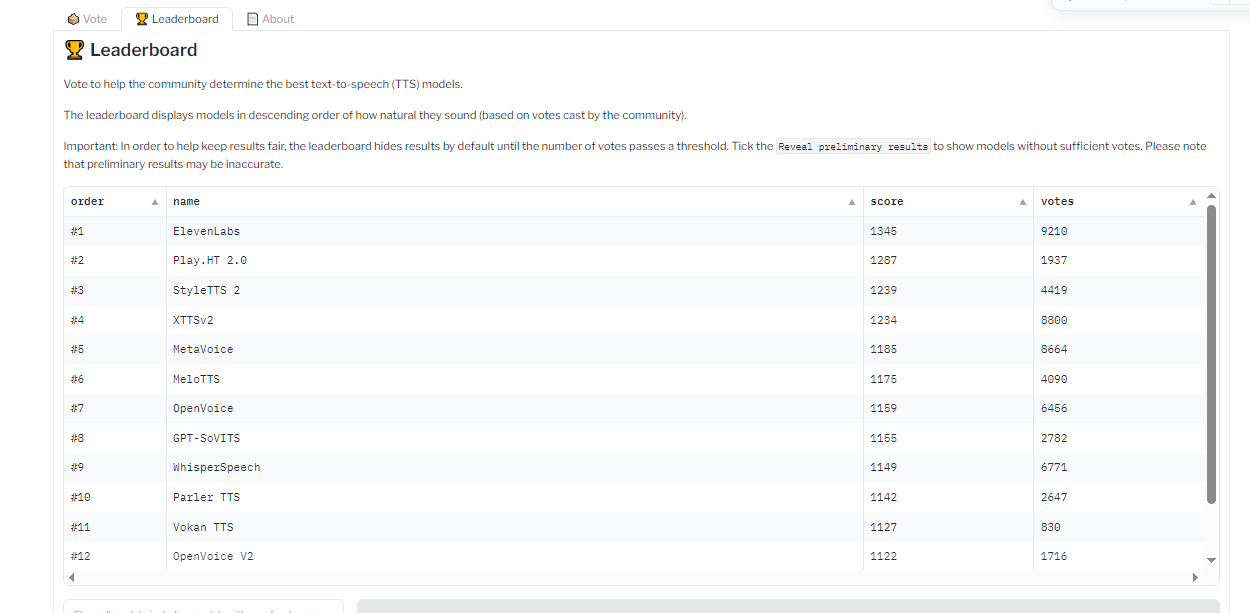
Do you know how I shared the OpenVLM Leaderboard for finding and comparing vision language models? Well, there’s an equivalent leadership for TTS models as well over at the Hugging Face community called TTS Arena.

TTS models are ranked by the “naturalness” of their voices, with the most natural-sounding models ranked first. Developers like you and me vote and provide feedback that influences the rankings.

TTS API Providers

What we just looked at are TTS models that are baked into whatever app we’re making. However, some models are consumable via API, so it’s possible to get the benefits of a TTS model without the added bloat if a particular model is made available by an API provider.

Whether you decide to bundle TTS models in your app or integrate them via APIs is totally up to you. There is no right answer as far as saying one method is better than another — it’s more about the app’s requirements and whether the dependability of a baked-in model is worth the memory hit or vice-versa.

All that being said, I want to call out a handful of TTS API providers for you to keep in your back pocket.

ElevenLabs

ElevenLabs offers a TTS API that uses neural networks to make voices sound natural. Voices can be customized for different languages and accents, leading to realistic, engaging voices.

Try the model out for yourself on the ElevenLabs site. You can enter a block of text and choose from a wide variety of voices that read the submitted text aloud.

Colossyan

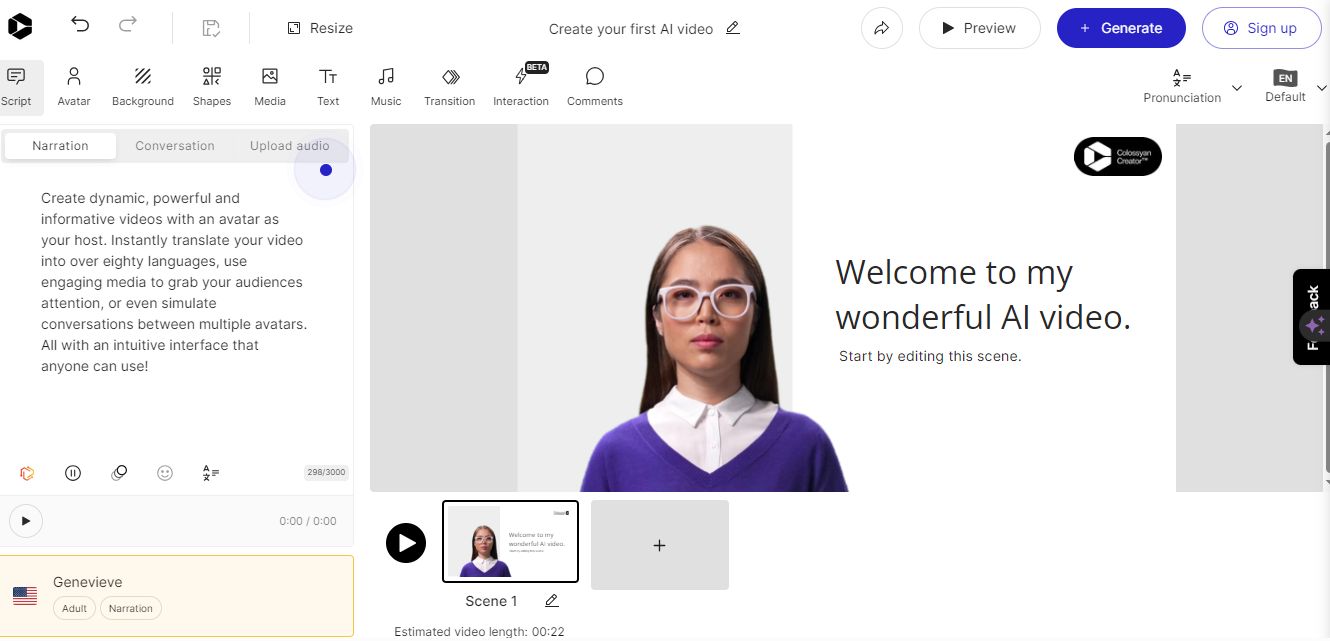
Colossyan’s text-to-speech API converts text into natural-sounding voice recordings in over 70 languages and accents. From there, the service allows you to match the audio to an avatar to produce something like a complete virtual presentation based on your voice — or someone else’s.

Once again, this is encroaching on deepfake territory, but it’s really interesting to think of Colossyan’s service as a virtual casting call for actors to perform off a script.

Murf.ai

Murf.ai is yet another TTS API designed to generate voiceovers based on real human voices. The service provides a slew of premade voices you can use to generate audio for anything from explainer videos and audiobooks to course lectures and entire podcast episodes.

Amazon Polly

Amazon has its own TTS API called Polly. You can customize the voices using lexicons and Speech Synthesis Markup (SSML) tags for establishing speaking styles with affordances for adjusting things like pitch, speed, and volume.

PlayHT

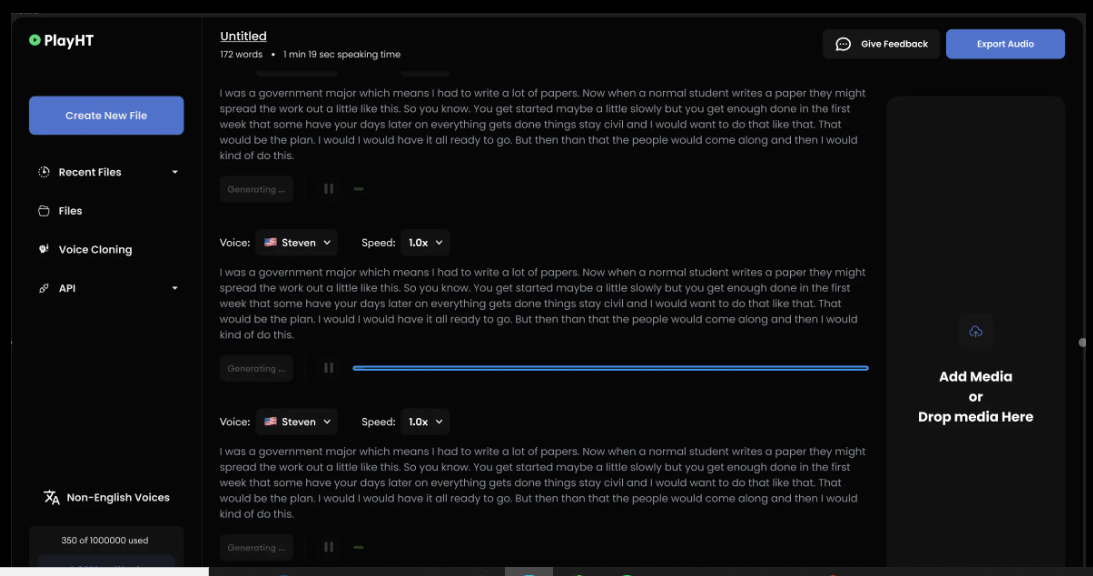
The PlayHT TTS API generates speech in 142 languages. Type what you want it to say, pick a voice, and download the output as an MP3 or WAV file.

Demo: Building An Image-to-Audio Interface

So far, we have discussed the two primary components for generating audio from text: vision-language models and text-to-speech models. We’ve covered what they are, where they fit into the process of generating real-sounding speech, and various examples of each model.

Now, it’s time to apply those concepts to the app we are building in this tutorial (and will improve in a second tutorial). We will use a VLM so the app can glean meaning and context from images, a TTS model to generate speech that mimics a human voice, and then integrate our work into a user interface for submitting images that will lead to generated speech output.

I have decided to base our work on a VLM by Salesforce called BLIP, a TTS model from Kakao Enterprise called VITS, and Gradio as a framework for the design interface. I’ve covered Gradio extensively in other articles, but the gist is that it is a Python library for building web interfaces — only it offers built-in tools for working with machine learning models that make Gradio ideal for a tutorial like this.

You can use completely different models if you like. The whole point is less about the intricacies of a particular model than it is to demonstrate how the pieces generally come together.

Oh, and one more detail worth noting: I am working with the code for all of this in Google Collab. I’m using it because it’s hosted and ideal for demonstrations like this. But you can certainly work in a more traditional IDE, like VS Code.

Installing Libraries

First, we need to install the necessary libraries:

#python
!pip install gradio pillow transformers scipy numpy

We can upgrade the transformers library to the latest version if we need to:

#python
!pip install --upgrade transformers

Not sure if you need to upgrade? Here’s how to check the current version:

#python
import transformers
print(transformers.__version__)

OK, now we are ready to import the libraries:

#python
import gradio as gr
from PIL import Image
from transformers import pipeline
import scipy.io.wavfile as wavfile
import numpy as np

These libraries will help us process images, use models on the Hugging Face hub, handle audio files, and build the UI.

Creating Pipelines

Since we will pull our models directly from Hugging Face’s model hub, we can tap into them using pipelines. This way, we’re working with an API for tasks that involve natural language processing and computer vision without carrying the load in the app itself.

We set up our pipeline like this:

#python
caption_image = pipeline("image-to-text", model="Salesforce/blip-image-captioning-large")

This establishes a pipeline for us to access BLIP for converting images into textual descriptions. Again, you could establish a pipeline for any other model in the Hugging Face hub.

We’ll need a pipeline connected to our TTS model as well:

#python
Narrator = pipeline("text-to-speech", model="kakao-enterprise/vits-ljs")

Now, we have a pipeline where we can pass our image text to be converted into natural-sounding speech.

Converting Text to Speech

What we need now is a function that handles the audio conversion. Your code will differ depending on the TTS model in use, but here is how I approached the conversion based on the VITS model:

#python

def generate_audio(text):
  # Generate speech from the input text using the Narrator (VITS model)
  Narrated_Text = Narrator(text)

  # Extract the audio data and sampling rate
  audio_data = np.array(Narrated_Text["audio"][0])
  sampling_rate = Narrated_Text["sampling_rate"]

  # Save the generated speech as a WAV file
  wavfile.write("generated_audio.wav", rate=sampling_rate, data=audio_data)

  # Return the filename of the saved audio file
  return "generated_audio.wav"

That’s great, but we need to make sure there’s a bridge that connects the text that the app generates from an image to the speech conversion. We can write a function that uses BLIP to generate the text and then calls the generate_audio() function we just defined:

#python
def caption_my_image(pil_image):
  # Use BLIP to generate a text description of the input image
  semantics = caption_image(images=pil_image)[0]["generated_text"]

  # Generate audio from the text description
  return generate_audio(semantics)

Building The User Interface

Our app would be pretty useless if there was no way to interact with it. This is where Gradio comes in. We will use it to create a form that accepts an image file as an input and then outputs the generated text for display as well as the corresponding file containing the speech.

#python

main_tab = gr.Interface(
  fn=caption_my_image,
  inputs=[gr.Image(label="Select Image", type="pil")],
  outputs=[gr.Audio(label="Generated Audio")],
  title=" Image Audio Description App",
  description="This application provides audio descriptions for images."
)

# Information tab
info_tab = gr.Markdown("""
  # Image Audio Description App
  ### Purpose
  This application is designed to assist visually impaired users by providing audio descriptions of images. It can also be used in various scenarios such as creating audio captions for educational materials, enhancing accessibility for digital content, and more.

  ### Limits
  - The quality of the description depends on the image clarity and content.
  - The application might not work well with images that have complex scenes or unclear subjects.
  - Audio generation time may vary depending on the input image size and content.
  ### Note
  - Ensure the uploaded image is clear and well-defined for the best results.
  - This app is a prototype and may have limitations in real-world applications.
""")

# Combine both tabs into a single app 
 demo = gr.TabbedInterface(
  [main_tab, info_tab],
  tab_names=["Main", "Information"]
)

demo.launch()

The interface is quite plain and simple, but that’s OK since our work is purely for demonstration purposes. You can always add to this for your own needs. The important thing is that you now have a working application you can interact with.

At this point, you could run the app and try it in Google Collab. You also have the option to deploy your app, though you’ll need hosting for it. Hugging Face also has a feature called Spaces that you can use to deploy your work and run it without Google Collab. There’s even a guide you can use to set up your own Space.

Here’s the final app that you can try by uploading your own photo:

Coming Up…

We covered a lot of ground in this tutorial! In addition to learning about VLMs and TTS models at a high level, we looked at different examples of them and then covered how to find and compare models.

But the rubber really met the road when we started work on our app. Together, we made a useful tool that generates text from an image file and then sends that text to a TTS model to convert it into speech that is announced out loud and downloadable as either an MP3 or WAV file.

But we’re not done just yet! What if we could glean even more detailed information from images and our app not only describes the images but can also carry on a conversation about them?

Sounds exciting, right? This is exactly what we’ll do in the second part of this tutorial.

How To Improve Your Microcopy: UX Writing Tips For Non-UX Writers

Category Image 073

Throughout my UX writing career, I’ve held many different roles: a UX writer in a team of UX writers, a solo UX writer replacing someone who left, the first and only UX writer at a company, and even a teacher at a UX writing course, where I reviewed more than 100 home assignments. And oh gosh, what I’ve seen.

Crafting microcopy is not everyone’s strong suit, and it doesn’t have to be. Still, if you’re a UX designer, product manager, analyst, or marketing content writer working in a small company, on an MVP, or on a new product, you might have to get by without a UX writer. So you have the extra workload of creating microcopy. Here are some basic rules that will help you create clear and concise copy and run a quick health check on your designs.

Ensure Your Interface Copy Is Role-playable
Why it’s important:
  • To create a friendly, conversational experience;
  • To work out a consistent interaction pattern.

When crafting microcopy, think of the interface as a dialog between your product and your user, where:

  • Titles, body text, tooltips, and so on are your “phrases.”
  • Button labels, input fields, toggles, menu items, and other elements that can be tapped or selected are the user’s “phrases.”

Ideally, you should be able to role-play your interface copy: a product asks the user to do something — the user does it; a product asks for information — the user types it in or selects an item from the menu; a product informs or warns the user about something — the user takes action.

For example, if your screen is devoted to an event and the CTA is for the user to register, you should opt for a button label like “Save my spot” rather than “Save your spot.” This way, when a user clicks the button, it’s as if they are pronouncing the phrase themselves, which resonates with their thoughts and intentions.

Be Especially Transparent And Clear When It Comes To Sensitive Topics
Why it’s important: To build trust and loyalty towards your product.

Some topics, such as personal data, health, or money, are extremely sensitive for people. If your product involves any limitations, peculiarities, or possible negative outcomes related to these sensitive topics, you should convey this information clearly and unequivocally. You will also need to collaborate with your UX/UI Designer closely to ensure you deliver this information in a timely manner and always make it visible without requiring the user to take additional actions (e.g., don’t hide it in tooltips that are only shown by tapping).

Here’s a case from my work experience. For quite some time, I’ve been checking homework assignments for a UX writing course. In this course, all the tasks have revolved around an imaginary app for dog owners. One of the tasks students worked on was creating a flow for booking a consultation with a dog trainer. The consultation had to be paid in advance. In fact, the money was blocked on the user’s bank card and charged three hours before the consultation. That way, a user could cancel the meeting for free no later than three hours before the start time. A majority of the students added this information as a tooltip on the checkout screen; if a user didn’t tap on it, they wouldn’t be warned about the possibility of losing money.

In a real-life situation, this would cause immense negativity from users: they may post about it on social media, and it will show the company in a bad light. Even if you occasionally resort to dark patterns, make sure you can afford any reputational risks.

So, when creating microcopy on sensitive topics:

  • Be transparent and honest about all the processes and conditions. For example, you’re a fintech service working with other service providers. Because of that, you have fees built into transactions but don’t know the exact amount. Explain to users how the fees are calculated, their approximate range (if possible), and where users can see more precise info.
  • Reassure users that you’ll be extremely careful with their data. Explain why you need their data, how you will use it, store and protect it from breaches, and so on.
  • If some restrictions or limitations are implied, provide options to remove them (if possible).

Ensure That The Button Label Accurately Reflects What Happens Next
Why it’s important:
  • To make your interface predictable, trustworthy, and reliable;
  • To prevent user frustration.

The button label should reflect the specific action that occurs when the user clicks or taps it.

It might seem valid to use a button label that reflects the user’s goal or target action, even if it actually happens a bit later. For example, if your product allows users to book accommodations for vacations or business trips, you might consider using a “Book now” button in the booking flow. However, if tapping it leads the user to an order screen where they need to select a room, fill out personal details, and so on, the accommodation is not booked immediately. So you might want to opt for “Show rooms,” “Select a rate,” or another button label that better reflects what happens next.

Moreover, labels like “Buy now” or “Book now” might seem too pushy and even off-putting (especially when it comes to pricey products involving a long decision-making process), causing users to abandon your website or app in favor of ones with buttons that create the impression they can browse peacefully for as long as they need. You might want to let your users “Explore,” “Learn more,” “Book a call,” or “Start a free trial” first.

As a product manager or someone with a marketing background, you might want to create catchy and fancy button labels to boost conversion rates. For instance, when working on an investment app, you might label a button for opening a brokerage account as “Become an investor.” While this might appeal to users’ egos, it can also come across as pretentious and cheap. Additionally, after opening an account, users may still need to do many things to actually become investors, which can be frustrating. Opt for a straightforward “Open an account” button instead.

In this regard, it’s better not to promise users things that we can’t guarantee or that aren’t entirely up to us. For example, in a flow that includes an OTP password, it’s better to opt for the “Send a code” button rather than “Get a code” since we can’t guarantee there won’t be any network outages or other issues preventing the user from receiving an SMS or a push notification.

Finally, avoid using generic “Yes” or “No” buttons as they do not clearly reflect what happens next. Users might misread the text above or fail to notice a negation, leading to unexpected outcomes. For example, when asking for a confirmation, such as “Are you sure you want to quit?” you might want to go with button labels like “Quit” and “Stay” rather than just “Yes” and “No.”

Tip: If you have difficulty coming up with a button label, this may be a sign that the screen is poorly organized or the flow lacks logic and coherence. For example, a user has to deal with too many different entities and types of tasks on one screen, so the action can’t be summarized with just one verb. Or perhaps a subsequent flow has a lot of variations, making it hard to describe the action a user should take. In such cases, you might want to make changes to the screen (say, break it down into several screens) or the flow (say, add a qualifying question or attribute earlier so that the flow would be less branching).
Make It Clear To The User Why They Need To Perform The Action
Why it’s important:
  • To create transparency and build trust;
  • To boost conversion rates.

An ideal interface is self-explanatory and needs no microcopy. However, sometimes, we need to convince users to do something for us, especially when it involves providing personal information or interacting with third-party products.

You can use the following formula: “To [get this], do [this] + UI element to make it happen.” For example, “To get your results, provide your email,” followed by an input field.

It’s better to provide the reasoning (“to get your results”) first and then the instructions (“provide your email” ): this way, the guidance is more likely to stick in the user’s memory, smoothly leading to the action. If you reverse the order — giving the instructions first and then the reasoning — the user might forget what they need to do and will have to reread the beginning of the sentence, leading to a less smooth and slightly hectic experience.

Ensure The UI Element Copy Doesn’t Explain How To Interact With This Very Element
Why it’s important:
  • If you need to explain how to interact with a UI element, it may be a sign that the interface is not intuitive;
  • Risk omitting or not including more important, useful text.

Every now and then, I come across meaningless placeholders or excessive toggle copy that explains how to interact with the field or toggle. The most frequent example is the “Search” placeholder for a search field. Occasionally, I see button labels like “Press to continue.”

Mobile and web interfaces have been around for quite a while, and users understand how to interact with buttons, toggles, and fields. Therefore, explanations such as “click,” “tap,” “enter,” and so on seem excessive in most cases. Perhaps it’s only with a group of checkboxes that you might add something like “Select up to 5.”

You might want to add something more useful. For example, instead of a generic “Search” placeholder for a search field, use specific instances a user might type in. If you’re a fashion marketplace, try placeholders like “oversized hoodies,” “women’s shorts,” and so on. Keep in mind the specifics of your website or app: ensure the placeholder is neither too broad nor too specific, and if a user types something like you’ve provided, their search will be successful.

Stick To The Rule “1 Microcopy Item = 1 Idea”
Why it’s important:
  • Not to create extra cognitive load, confusion, or friction;
  • To ensure a smooth and simple experience.

Users have short attention spans, scan text instead of reading it thoroughly, and can’t process multiple ideas simultaneously. That’s why it’s crucial to break information down into easily digestible chunks instead of, for example, trying to squeeze all the restrictions into one tooltip.

The golden rule is to provide users only with the information they need at this particular stage to take a specific action or make a decision.

You’ll need to collaborate closely with your designer to ensure the information is distributed over the screen evenly and you don’t overload one design element with a lot of text.

Be Careful With Titles Like “Done,” “Almost There,” “Attention,” And So On
Why it’s important:
  • Not to annoy a user;
  • To be more straightforward and economical with users’ time;
  • Not to overuse their attention;
  • Not to provoke anxiety.

Titles, written in bold and larger font sizes, grab users’ attention. Sometimes, titles are the only text users actually read. Titles stick better in their memory, so they must be understandable as a standalone text.

Titles like “One more thing” or “Almost there” might work well if they align with a product’s tone of voice and the flows where they appear are cohesive and can hardly be interrupted. But keep in mind that users might get distracted.

Use this quick check: set your design aside for about 20 minutes, do something else, and then open only the screen for which you’re writing a title. Is what happens on this screen still understandable from the title? Do you easily recall what has or hasn’t happened, what you were doing, and what should be done next?

Don’t Fall Back On Abstract Examples
Why it’s important:
  • To make the interface more precise and useful;
  • To ease the navigation through the product for a user;
  • To reduce cognitive load.

Some products (e.g., any B2B or financial ones) involve many rules and restrictions that must be explained to the user. To make this more understandable, use real-life examples (with specific numbers, dates, and so on) rather than distilling abstract information into a hint, tooltip, or bottom sheet.

It’s better to provide explanations using real-life examples that users can relate to. Check with engineers if it’s possible to get specific data for each user and add variables and conditions to show every user the most relevant microcopy. For example, instead of saying, “Your deposit limit is $1,000 per calendar month,” you could say, “Until Jan 31, you can deposit $400 more.” This relieves the user of unnecessary work, such as figuring out the start date of the calendar month in their case and calculating the remaining amount.

Try To Avoid Negatives
Why it’s important:
  • Not to increase cognitive load;
  • To prevent friction.

As a rule of thumb, it’s recommended to avoid double negatives, such as “Do not unfollow.” However, I’d go further and advise avoiding single negatives as well. The issue is that to decipher such a message, a user has to perform an excessive logical operation: first eliminating the negation, then trying to understand the gist.

For example, when listing requirements for a username, saying “Don’t use special characters, spaces, or symbols” forces a user to speculate (“If this is not allowed, then the opposite is allowed, which must be…”). It can take additional time to figure out what falls under “special characters.” To simplify the task for the user, opt for something like “Use only numbers and letters.”

Moreover, a user can easily overlook the “not” part and misread the message.

Another aspect worth noting is that negation often seems like a restriction or prohibition, which nobody likes. In some cases, especially in finance, all those don’ts might be perceived with suspicion rather than as precaution.

Express Action With Verbs, Not Nouns
Why it’s important:
  • To avoid wordiness;
  • To make text easily digestible.

When describing an action, use a verb, not a noun. Nouns that convey the meaning of verbs make texts harder to read and give off a legalistic vibe.

Here are some sure signs you need to paraphrase your text for brevity and simplicity:

  • Forms of “be” as the main verbs;
  • Noun phrases with “make” (e.g., “make a payment/purchase/deposit”);
  • Nouns ending in -tion, -sion, -ment, -ance, -ency (e.g., cancellation);
  • Phrases with “of” (e.g., provision of services);
  • Phrases with “process” (e.g., withdrawal process).
Make Sure You Use Only One Term For Each Entity
Why it’s important: Not to create extra cognitive load, confusion, and anxiety.

Ensure you use the same term for the same object or action throughout the entire app. For example, instead of using “account” and “profile” interchangeably, choose one and stick to it to avoid confusing your users.

The more complicated and/or regulated your product is, the more vital it is to choose precise wording and ensure it aligns with legal terms, the wording users see in the help center, and communication with support agents.

Less “Oopsies” In Error Messages
Why it’s important:
  • Not to annoy a user;
  • To save space for more important information.

At first glance, “Oops” may seem sweet and informal (yet with an apologetic touch) and might be expected to decrease tension. However, in the case of repetitive or serious errors, the effect will be quite the opposite.

Use “Oops” and similar words only if you’re sure it suits your brand’s tone of voice and you can finesse it.

As a rule of thumb, good error messages explain what has happened or is happening, why (if we know the reason), and what the user should do. Additionally, include any sensitive information related to the process or flow where the error appears. For example, if an error occurs during the payment process, provide users with information concerning their money.

No Excessive Politeness
Why it’s important: Not to waste precious space on less critical information.

I’m not suggesting we remove every single “please” from the microcopy. However, when it comes to interfaces, our priority is to convey meaning clearly and concisely and explain to users what to do next and why. Often, if you start your microcopy with “please,” you won’t have enough space to convey the essence of your message. Users will appreciate clear guidelines to perform the desired action more than a polite message they struggle to follow.

Remove Tech Jargon
Why it’s important:
  • To make the interface understandable for a broad audience;
  • To avoid confusion and ensure a frictionless experience.

As tech specialists, we’re often subject to the curse of knowledge, and despite our efforts to prioritize users, tech jargon can sneak into our interface copy. Especially if our product targets a wider audience, users may not be tech-savvy enough to understand terms like “icon.”

To ensure your interface doesn’t overwhelm users with professional jargon, a quick and effective method is to show the interface to individuals outside your product group. If that’s not feasible, here’s how to identify jargon: it’s the terminology you use in daily meetings among yourselves or in Jira task titles (e.g., authorization, authentication, and so on), or abbreviations (e.g., OTP code, KYC process, AML rules, and so on).

Ensure That Empty State Messages Don’t Leave Users Frustrated
Why it’s important:
  • For onboarding and navigation;
  • To increase discoverability of particular features;
  • To promote or boost the use of the product;
  • To reduce cognitive load and anxiety about the next steps.

Quite often, a good empty state message is a self-destructing one, i.e. one that helps a user to get rid of this emptiness. An empty state message shouldn’t just state “there’s nothing here” — that’s obvious and therefore unnecessary. Instead, it should provide users with a way out, smoothly guiding them into using the product or a specific feature. A well-crafted empty message can even boost conversions.

Of course, there are exceptions, for example, in a reactive interface like a CRM system for a restaurant displaying the status of orders to workers. If there are no orders in progress and, therefore, no corresponding empty state message, you can’t nudge or motivate restaurant workers to create new orders themselves.

Place All Important Information At The Beginning
Why it’s important:
  • To keep the user focused;
  • Not to overload a user with info;
  • Avoid information loss due to fading or cropping.

As mentioned earlier, users have short attention spans and often don’t want to focus on the texts they read, especially microcopy. Therefore, ensure you place all necessary information at the beginning of your text. Omit lead-ins, introductory words, and so on. Save less vital details for later in the text.

Ensure Title And Buttons Are Understandable Without Body Text
Why it’s important:
  • For clarity;
  • To overcome the serial position effect;
  • To make sure the interface, the flow, and the next steps are understandable for a user even if they scan the text instead of reading.

There’s a phenomenon called the serial position effect: people tend to remember information better if it’s at the beginning or end of a text or sentence, often overlooking the middle part. When it comes to UX/UI design, this effect is reinforced by the visual hierarchy, which includes the bigger font size of the title and the accentuated buttons. What’s more, the body text is often longer, which puts it at risk of being missed. Since users tend to scan rather than read, ensure your title and buttons make sense even without the body text.

Wrapping up

Trying to find the balance between providing a user with all the necessary explanations, warnings, and reasonings on one hand and keeping the UI intuitive and frictionless on the other hand is a tricky task.

You can facilitate the process of creating microcopy with the help of ChatGPT and AI-based Figma plugins such as Writer or Grammarly. But beware of the limitations these tools have as of now.

For instance, creating a prompt that includes all the necessary details and contexts can take longer than actually writing a title or a label on your own. Grammarly is a nice tool to check the text for typos and mistakes, but when it comes to microcopy, its suggestions might be a bit inaccurate or confusing: you might want to, say, omit articles for brevity or use elliptical sentences, and Grammarly will identify it as a mistake.

You’ll still need a human eye to evaluate the microcopy &mdahs; and I hope this checklist will come in handy.

Microcopy Checklist

General

✅ Microcopy is role-playable (titles, body text, tooltips, etc., are your “phrases”; button labels, input fields, toggles, menu items, etc. are the user’s “phrases”).

Information presentation & structure

✅ The user has the exact amount of information they need right now to perform an action — not less, not more.
✅ Important information is placed at the beginning of the text.
✅ It’s clear to the user why they need to perform the action.
✅ Everything related to sensitive topics is always visible and static and doesn’t require actions from a user (e.g., not hidden in tooltips).
✅ You provide a user with specific information rather than generic examples.
✅ 1 microcopy item = 1 idea.
✅ 1 entity = 1 term.
✅ Empty state messages provide users with guidelines on what to do (when possible and appropriate).

Style

✅ No tech jargon.
✅ No excessive politeness, esp. at the expense of meaning.
✅ Avoid or reduce the use of “not,” “un-,” and other negatives.
✅ Actions are expressed with verbs, not nouns.

Syntax

✅ UI element copy doesn’t explain how to interact with this very element.
✅ Button label accurately reflects what happens next.
✅ Fewer titles like “done,” “almost there,” and “attention.”
✅ “Oopsies” in error messages are not frequent and align well with the brand’s tone of voice.
✅ Title and buttons are understandable without body text.

How I Learned To Stop Worrying And Love Multimedia Writing

Category Image 073

Prior to the World Wide Web, the act of writing remained consistent for centuries. Words were put on paper, and occasionally, people would read them. The tools might change — quills, printing presses, typewriters, pens, what have you — and an adventurous author may perhaps throw in imagery to compliment their copy.

We all know that the web shook things up. With its arrival, writing could become interactive and dynamic. As web development progressed, the creative possibilities of digital content grew — and continue to grow — exponentially. The line between web writing and web technologies is blurry these days, and by and large, I think that’s a good thing, though it brings its own challenges. As a sometimes-engineer-sometimes-journalist, I straddle those worlds more than most and have grown to view the overlap as the future.

Writing for the web is different from traditional forms of writing. It is not a one-size-fits-all process. I’d like to share the benefits of writing content in digital formats like MDX using a personal project of mine as an example. And, by the end, my hope is to convince you of the greater writing benefits of MDX over more traditional formats.

A Little About Markdown

At its most basic, MDX is Markdown with components in it. For those not in the know, Markdown is a lightweight markup language created by John Gruber in 2003, and it’s everywhere today. GitHub, Trello, Discord — all sorts of sites and services use it. It’s especially popular for authoring blog posts, which makes sense as blogging is very much the digital equivalent of journaling. The syntax doesn’t “get in the way,” and many content management systems support it.

Markdown’s goal is an “easy-to-read and easy-to-write plain text format” that can readily be converted into XHTML/HTML if needed. Since its inception, Markdown was supposed to facilitate a writing workflow that integrated the physical act of writing with digital publishing.

We’ll get to actual examples later, but for the sake of explanation, compare a block of text written in HTML to the same text written in Markdown.

HTML is a pretty legible format as it is:

<h2>Post Title</h2>

<p>This is an example block of text written in HTML. We can link things up like this, or format the code with <strong>bolding</strong> and <em>italics</em>. We can also make lists of items:</p>

<ul>
  <li>Like this item<li>
  <li>Or this one</li>
  <li>Perhaos a third?</li>
</ul>

<img src="image.avif" alt="And who doesn't enjoy an image every now and then?">

But Markdown is somehow even less invasive:

## Post Title

This is an example block of text written in HTML. We can link things up like this or format the code with **bolding** and *italics*. We can also make lists of items:

- Like this item
- Or this one
- Perhaos a third?


I’ve become a Markdown disciple since I first learned to code. Its clean and relatively simple syntax and wide compatibilities make it no wonder that Markdown is as pervasive today as it is. Having structural semantics akin to HTML while preserving the flow of plain text writing is a good place to be.

However, it could be accused of being a bit too clean at times. If you want to communicate with words and images, you’re golden, but if you want to jazz things up, you’ll find yourself looking further afield for other options.

Gruber set out to create a “format for writing for the web,” and given its ongoing popularity, you have to say he succeeded, yet the web 20 years ago is a long way away from what it is today.

This is the all-important context for what I want to discuss about MDX because MDX is an offshoot of Markdown, only more capable of supporting richer forms of multimedia — and even user interaction. But before we get into that, we should also discuss the concept of web components because that’s the second significant piece that MDX brings to the table.

Further Reading

A Little About Components

The move towards richer multimedia websites and apps has led to a thriving ecosystem of web development frameworks and libraries, including React, Vue, Svelte, and Astro, to name a few. The idea that we can have reusable components that are not only interactive but also respond to each other has driven this growth and continues to push on evolving web platform features like web components.

MDX is like a bridge that connects Markdown with modern web tooling. Simply put, MDX weds Markdown’s simplicity with the creative possibilities of modern web frameworks.

By leaning into the overlaps rather than trying to abstract them away at all costs, we find untold potential for beautiful digital content.

Further Reading

A Case Study

My own experience with MDX took shape in a side project of mine: teeline.online. To cut a long story short, before I was a software engineer, I was a journalist, and part of my training involved learning a type of shorthand called Teeline. What it boils down to is ripping out as many superfluous letters as possible — I like to call this process “disemvowelment” — then using Teeline’s alphabet to write the remaining content. This has allowed people like me to write lots of words very quickly.

During my studies, I found online learning resources lacking, so as my engineering skills improved, I started working on the kind of site I’d have used when I was a student if it was available. Hence, teeline.online.

I built the teeling.online site with the Svelte framework for its components. The site’s centerpiece is a dataset of shorthand characters and combinations with which hundreds of outlines can be rendered, combined, and animated as SVG paths.

Likewise, Teeline’s “disemvowelment” script could be wired into a single component that I could then use as many times as I like.

Then, of course, as is only natural when working with components, I could combine them to show the Teeline evolution that converts longhand words into shorthand outlines.

The Markdown, meanwhile, looks as simple as this:

It’s not exactly the sort of complex codebase you might expect for an app. Meanwhile, the files themselves can sit in a nice, tidy directory of their own:

The syllabus is neatly filed away in its own folder. With a bit of metadata sprinkled in, I have everything I need to render an entire section of the site using routing. The setup feels like a fluid medium between worlds. If you want to write with words and pictures, you can. If an idea comes to mind for a component that would better express what you’re going for, you can go make it and drop it in.

In fairness, a “WordToOutline” component like this might not mean much to Teeline newcomers, though with such a clear connection between the Markdown and the rendered pages, it’s not much of a stretch to work out what it is. And, of course, there’s always the likes of services like Storybook that can be used to organize component libraries as they grow.

The raw form of multimedia content can be pretty unsightly — something that needs to be kept at arm’s length by content management systems. With MDX — and its ilk — the content feels rather friendly and legible.

Benefits

I think you can start to see some of the benefits of an MDX setup like this. There are two key benefits in particulart that I think are worth calling out.

Editorial Benefits

First and foremost, MDX doesn’t distract the writing and editorial flow of working with content. When we’re working with traditional code languages, even HTML, the code format is convoluted with things like opening and closing tags. And it’s even more convoluted if we need the added complexity of embedding components in the content.

MDX (and Markdown, for that matter) is much less verbose. Content is a first-class citizen that takes up way less space than typical markup, making it clear and legible. And where we need the complex affordance of components, those can be dropped in without disrupting that nice editorial experience.

Another key benefit of using MDX is reusability. If, for example, I want to display the same information as images instead, each image would have to be bespoke. But we all know how inefficient it is to maintain content in raster images — it requires making edits in a completely different application, which is highly inconvenient. With an old-school approach, if I update the design of the site, I’m left having to create dozens of images in the new style.

With MDX (or an equivalent like MDsveX), I only need to make the change once, and it updates everywhere. Having done the leg work of building reusable components, I can weave them throughout the syllabus as I see fit, safe in the knowledge that updates will roll out across the board — and do it without affecting the editorial experience whatsoever.

Consider the time it would take to create images or videos representing the same thing. Over time, using fixed assets like images becomes a form of technical — or perhaps editorial — debt that adds up over time, while a multimedia approach that leans into components proves to be faster and more flexible than vanilla methods.

Tech Benefits

I just made the point that working with reusable components in MDX allows Markdown content to become more robust without affecting the content’s legibility as we author it. Using Svelte’s version of MDX, MDsveX, I was able to combine the clean, readable conventions of Markdown with the rich, interactive potential of components.

Caveats

It’s only right that all my gushing about MDX and its benefits be tempered with a reality check or two. Like anything else, MDX has its limitations, and your mileage with it will vary.

That said, I believe that those limitations are likely to show up when MDX is perhaps not the best choice for a particular project. There’s a sweet spot that MDX fills and it’s when we need to sprinkle in additional web functionality to the content. We get the best of two worlds: minimal markup and modern web features.

But if components aren’t needed, MDX is overkill when all you need is a clean way to write content that ports nicely into HTML to be consumed by whatever app or platform you use to display it on the web.

Without components, MDX is akin to caring for a skinned elbow with a cast; it’s way more than what’s needed in that situation, and the returns you get from Markdown’s legibility will diminish.

Similarly, if your technical needs go beyond components, you may be looking at a more complex architecture than what MDX can support, and you would be best leaning into what works best for content in the particular framework or stack you’re using.

Code doesn’t age as well as words or images do. An MDX-esque approach does sign you up for the maintenance work of dependency updates, refactoring, and — god forbid — framework migrations. I haven’t had to face the last of those realities yet, though I’d say the first two are well worth it. Indeed, they’re good habits to keep.

Key Takeaways

Writing with MDX continues to be a learning experience for me, but it’s already made a positive impact on my editorial work.

Specifically, I’ve found that MEX improves the quality of my writing. I think more laterally about how to convey ideas.

Is what I’m saying best conveyed in words, an image, or a data visualization? Perhaps an interactive game?

There is way more potential to enhance my words with componentry than I would get with Markdown alone, opening more avenues for what I can say and how I say it.

Of course, those components do not come for free. MDX does sign you up to build those, regardless of whether you have a set of predefined components included in your framework. At the same time, I’d argue that the opportunities MDX opens up for writing greatly outweigh having to build or maintain a few components.

If MDX had been around in the age of Leonardo Di Vinci, perhaps he may have reached for MDX in his journals. I know I’m taking a great leap of assumption here, but the complexity of what he was writing and trying to describe in technical terms with illustrations would have benefited greatly from MDX for everything from interactive demos of his ideas to a better writing experience overall.

Further Reading

Multimedia Writing

In many respects, MDX’s rich, varied way of approaching content is something that Markdown — and writing for the web in general — encourages already. We don’t think only in terms of words but of links, images, and semantic structure. MDX and its equivalents merely take the lid off the cookie jar so we can enhance our work.

Wouldn’t it be nice if… is a redundant turn of phrase on the web. There may be technical hurdles — or, in my case, skill and knowledge hurdles — but it’s a buzz to think about ways in which your thoughts can best manifest on screen.

At the same time, the simplicity of Markdown is so unintrusive. If someone wants to write content formatted in vanilla Markdown, it’s totally possible to do that without trading up to MDX.

Just having the possibility of bespoke multimedia content is enough to change the creative process. It leaves you using words because you want to, not because you have to.

Why describe the solar system when you can render an explorable one? Why have a picture of a proposed skyscraper when you can display a 3D model? Writing with MDX (or, more accurately, MDsveX) has changed my entire thought process. Potential answers to the question, How do I best get this across?, become more expansive.

As You Please

Good things happen when worlds collide. New possibilities emerge when seemingly disparate things come together. Many content management systems shield writers — and writing — from code. To my mind, this is like shielding painters from wider color palettes, chefs from exotic ingredients, or sculptors from different types of tools.

Leaning into the overlap between writing and coding gets us closer to one of the web’s great joys: if you can imagine it, you can probably do it.

10 Copywriting Tips to Boost WordPress Conversions

Category Image 073

10 Copywriting Tips to Boost WordPress Site ConversionsIf you want to start your business effortlessly, WordPress is the best platform, regardless of the business type. After building your website, you would naturally aim to drive traffic to your website. To succeed, you need to convert the site visitors into customers. And that’s where copywriting comes in. But the thing is, the copies […]

The post 10 Copywriting Tips to Boost WordPress Conversions appeared first on WPExplorer.

Writing Better Code: Symfony Dependency Injection

Category Image 073

Dependency Injection (DI) is widely used to manage class dependencies and avoid issues that can arise from implicit dependency usage. Most modern frameworks have native support for the DI feature or can use third-party libraries for it. In this article, we will describe the implementation of DI in the Symfony framework.

Symfony uses the PSR-11 compatible service container to store and obtain services. The service container is aware of all registered services and their dependencies and can provide an already initialized and properly created instance of the required service.

Tired of Messy Code? Master the Art of Writing Clean Codebases

Category Image 073

You've conquered the initial hurdle, learning to code and landing your dream job. But the journey doesn't end there. Now comes the real challenge: writing good code. This isn't just about functionality; it's about crafting elegant, maintainable code that stands the test of time.

Navigating a poorly designed system feels like being lost in a foreign city with no map. These systems are often clunky, inefficient, and frustrating.

Writing a Vector Database in a Week in Rust

Category Image 073

Vector databases are currently all the rage in the tech world, and it isn't just hype. Vector search has become ever more critical due to artificial intelligence advances which make use of vector embeddings. These vector embeddings are vector representations of word embeddings, sentences, or documents that provide semantic similarity for semantically close inputs by simply looking at a distance metric between the vectors.

The canonical example from word2vec in which the embedding of the word "king" was very near the resulting vector from the vectors of the words "queen", "man", and "woman" when arranged in the following formula:

Chris’ Corner: Relatively Recent Great CSS Writing

Category Image 073

Chen Hui Jing, So your designer wants stuff to overlap

Love that title. Elements in HTML don’t just overlap each other by default. In fact, they intentionally push other elements around so that they don’t. You’ll need CSS to force elements to overlap if you need them to. The traditional ways:

  • negative margins
  • transform translate
  • absolute positioning

But Chen Hui Jing makes sure we don’t forget about grid! It might not come to mind immediately as we mostly think about making a grid and placing individual elements in individual grid cells. But grid cells don’t care! You can put as many elements as you want in a grid cell (or multiple grid cells). They are really just placement coordinates, not slots that only take one element.

Michelle Barker, Quick Tip: Negative Animation Delay

This is one of my favorite classic CSS tricks because it’s so obvious… but only after you’ve learned it. The point is mainly staggered animations. If you want animations to all be at different points along the same animation when they start animating, you can use animation-delay. But if you use a positive time value, the animation won’t start for the first time until that delay (duh). So instead, you use a negative value. The animation starts immediately, but backed up to where it needs to be to have the beginning of the animation hit once the negative delay elapses.

Charlotte Dann, Fancy Frames with CSS

Awesome research from Charlotte, covering lots of ways to make interesting “framed” shapes like these:

So is there one obvious clear best path forward to do this in CSS (and friends)? No — haha. Charlotte explores using 1️⃣ multiple gradient backgrounds (very complicated to construct, limitations with transparency), 2️⃣ border-image (one of the weirder CSS properties, but does help with placing gradients, or SVGs), 3️⃣ mask-border which I’m not sure I’ve ever even looked at in my life (no Firefox support), and finally, 4️⃣ Houdini which has no Firefox or Safari support, but does bring interesting JavaScript-powered opportunities into the mix.

Just to throw another one in the mix here… I happened to be playing with Open Props the other day and it has a “Mask Corner Cuts” section. It just uses mask (or -webkit-mask, as apparently the vendor-prefixed version alone gets the best support).

Scott Vandehey, The Power of CSS Blend Modes

Scott is inspired by other-Scott’s Pen (which happens to be #91 on the Top Pens of 2022 list) and breaks down exactly how it works. It’s a combination of filtering and blending layers. that’s just cool as heck.

You gotta go check out the article to see how Scott was able to stretch the idea to other effects, like a halftone filter.

Kate Rose Morley, Tree views in CSS

This is entirely doable in just semantic HTML and CSS alone:

The trick is putting all the list items that have a sub-list with a <details> element. The text of that <li> becomes whatever the <summary> is. Then you can style the ::marker of the details elements to have the plus-and-minus look rather than the default triangle. I appreciated Kate’s usage of :focus-visible too which keeps the focus styles away from mouse clicks.

Reading and Writing With a ConcurrentHashMap

Category Image 073

ConcurrentHashMap provides a Map implementation with thread-safe read and write operations.

The Map and ConcurrentMap interfaces provide methods that ConcurrentHashMap takes advantage of to provide thread-safe interactions. Generally, I tend to solely really on the Map interface as it provides most of the same methods that ConcurrentMap has; however, depending on your use case, it might be beneficial to check out the ConcurrentMap methods yourself.

Writing a Chat With Akka

Category Image 073

Ah, writing chats. So simple yet so complex. Yes, writing chats — as in coding them, not chatting (though that might prove to be problematic too, but that’s a whole different problem). If you’re looking for a step-by-step tutorial on implementing the backend for a basic multichannel chat, read on. 

So let’s dive into the technicalities. To give you some more details, the service will be implemented as a mix of a simple REST API and a Web Socket app. To make this more interesting, I decided to use Akka-related libraries and typed actors in as many numbers as possible. 

5 Copywriting Tools for Graphic Designers 2022

Category Image 073

Graphic design provides visual communication and expression of concepts and ideas using graphic tools and elements. It incorporates copywriting tools as graphic design is employed in the process of writing advertising promotional materials. In graphic design, copywriters help create web page content, online ads and other online content related to the web in question. Image...

The post 5 Copywriting Tools for Graphic Designers 2022 appeared first on DesignrFix.