How to Add Additional User Profile Fields in WordPress Registration

Category Image 091

Do you want to add extra profile fields for users to fill in when they register on your WordPress website?

Maybe you want to allow users to submit their social media profiles. Or you might want them to submit their business phone number when registering. This can all be done by adding additional profile fields.

In this article, we will show how to easily add additional user profile fields in WordPress registration forms.

Adding additional user profile fields in WordPress registration

Why Add Additional User Profile Fields in WordPress Registration?

By adding more user profile fields to your WordPress website’s registration form, you can collect extra information from users to improve your marketing campaigns, personalize content, or simply learn more about your audience.

For example, you can ask your users to provide their phone numbers or social media profiles when registering on your WordPress site.

This way, you will be able to send targeted SMS messages to your users or can ask them to promote your WordPress blog on their social media accounts.

All of these extra fields can be handy if you run a membership website or allow users to sign up as subscribers to your blog. They can also be helpful if you want to store extra contact information for the other writers on your multi-author blog.

That being said, let’s see how to easily add additional user profile fields in WordPress. For this tutorial, we will be discussing two methods, and you can use the links below to jump to the method of your choice:

Method 1: Add Custom User Profile Fields Using Advanced Custom Fields (Recommended)

The best way to add extra user profile fields in WordPress is to use the Advanced Custom Fields plugin. It lets you choose from multiple fields and customize them to fit your needs.

First, you need to install and activate the Advanced Custom Fields plugin. For more details, see our step-by-step guide on how to install a WordPress plugin.

Upon activation, you need to head to the ACF » Field Groups page from the WordPress admin sidebar and click the ‘+ Add Field Group’ button.

Click the Add Field Group button

This will take you to a new page where you can start by typing a name for the field group.

Keep in mind that this will be the name of the entire field group and not the individual user’s field.

Type field group name

After that, scroll down to the ‘Fields’ section and choose a field type from the dropdown menu.

For example, if you want users to provide their phone number upon registration, then you can choose the ‘Number’ option. Alternatively, if you want users to provide their social media profiles, then you can pick the ‘Text’ option.

Choose a field type from the dropdown menu

Once you have done that, just type the name of your field into the ‘Field Label’ option. For instance, if you want users to provide their Twitter handle before registering, then you can enter that into the field.

The plugin will then automatically generate a field name according to your label name.

Add field name and label

Next, you must switch to the ‘Validation’ tab from the top. From here, you can make the field required by toggling on the switch. This way, users won’t be able to register on your WordPress site without filling in the additional field.

After that, you can even set a character limit for your custom field.

Toggle the Required switch for the additional field

Now, switch to the ‘Presentation’ tab from the top.

Once you are there, you can add placeholder text, instructions, and wrapper attributes for your additional user profile field.

Configure the Presentation settings

Next, scroll down to the ‘Settings’ section and make sure that the ‘Location Rules’ tab is selected. From here, you must set up conditional logic for your custom field so that it will only be displayed for your WordPress site registration.

To do this, select the ‘User Form’ option from the dropdown menu in the left corner of the screen. After that, choose the ‘Register’ option from the dropdown menu in the right corner.

Add conditional logic for the additional user field

Finally, click the ‘Save Changes’ button at the top of the screen to store your settings.

If you want to add another additional field, then you can also click the ‘+ Add Field’ button.

Save the additional field

Now visit your user registration page to view the additional user profile field in action.

This is how it looked on our demo website.

Preview for additional user profile field

Method 2: Add Additional User Profile Fields With Profile Extra Fields (Easy & Simple)

This method allows you to quickly and easily add extra fields to user profiles and user registration forms in WordPress. It is a little less flexible, but it gets the job done.

First, you need to install and activate the Profile Extra Fields plugin. If you are not sure how to do this, then you can check out our full guide on how to install a WordPress plugin.

Once the plugin is activated, it’s time to create some additional user profile fields to use on your registration forms.

We are going to create a phone number field as an example, but you can add as many of these fields as you want.

First, visit the Profile Extra Fields » Add New page from the WordPress admin sidebar. From here, type the name of the field next to the ‘Name’ option.

For example, if you are creating a field for users to submit their phone number, then you can type ‘Phone Number’ as the field name.

After that, select a field type from the dropdown menu. If you are adding a social media profile field, then you can use the ‘Text Field’ option.

However, if you want a field for phone numbers, then you need to select that option from the dropdown menu.

Add field name and type

After that, you can also type a pattern for your phone number field or add a description for it.

Next, scroll down to the ‘Field Properties’ section and check the boxes for the user roles that you want this field to be displayed for.

For instance, if you want this field to be displayed for all the authors registering on your WordPress site, then you can check the box next to this user role.

You can choose as many user roles as you want.

Configure field properties

Next, you can also check the ‘Required’ box if you don’t want users to register without filling in this field in the form. Make sure that the ‘Always Show in User Registration Form’ box is checked so that your user field will be displayed in the form.

Finally, click the ‘Save Changes’ button to store your settings.

Check the box to show the field in user registration form

Now, you will need to go into your WordPress dashboard to change some settings for new registrations.

Head to the Settings » General page in your WordPress admin area and then check the membership box so that anyone can register on your website.

Next, you need to make sure that the default role is set to the role which you have added extra fields for. After that, click the ‘Save Changes’ button to store your settings.

Set user default role

This way, you can control the level of access new users have, and this will force the registration form to show the fields you selected earlier in this tutorial.

Here’s what the default registration form looked like on our demo website.

Preview for the user field in registration form

Bonus: Make a Custom User Registration Form in WordPress

The methods in this tutorial have shown you how to add extra user profile fields to the default WordPress registration form.

However, if you would like to create a custom user registration form in WordPress, then you can also easily do that by using the WPForms plugin.

It is the best WordPress form plugin that allows you to design your own user registration form using drag and drop. It also integrates seamlessly with plugins like Advanced Custom Fields, so you can easily insert additional user profile fields.

Edit user registration form

For detailed instructions, please follow our tutorial on how to create a custom user registration form in WordPress.

We hope this tutorial helped you learn how to add additional user profile fields in WordPress registration. You may also want to see our beginner’s guide on how to create a custom WordPress login page and our comparison of the best WordPress membership plugins to create and sell courses.

If you liked this article, then please subscribe to our YouTube Channel for WordPress video tutorials. You can also find us on Twitter and Facebook.

The post How to Add Additional User Profile Fields in WordPress Registration first appeared on WPBeginner.

Contact Form 7 Version 5.3.2 Patches Critical Vulnerability, Immediate Update Recommended

Category Image 091

Contact Form 7 has patched a critical file upload vulnerability in version 5.3.2, released today by plugin author Takayuki Miyoshi. The plugin is installed on more than five million WordPress sites.

“An unrestricted file upload vulnerability has been found in Contact Form 7 5.3.1 and older versions,” Miyoshi said. “Utilizing this vulnerability, a form submitter can bypass Contact Form 7’s filename sanitization, and upload a file which can be executed as a script file on the host server.”

The vulnerability was discovered by Jinson Varghese Behanan from Astra Security on December 16, 2020, and Miyoshi released a fix less than 24 hours later. Behanan highlighted a few ways this vulnerability might be exploited:

  1. Possible to upload a web shell and inject malicious scripts
  2. Complete takeover of the website and server if there is no containerization between websites on the same server
  3. Defacing the website

Astra Security plans to publish more details on the vulnerability in two weeks after the plugin’s user base has had more time to update to the patched version.

Version 5.3.2 removes control, separator, and other types of special characters from the filename to fix the unrestricted file upload vulnerability. At the time of publishing, more than a million Contact Form 7 updates have been downloaded today. Approximately 20% of the plugin’s user base is protected from the vulnerability. Now that it has been patched and published, Contact Form 7 users who do not update will be more at risk of having the vulnerability exploited.

A Forminator Quiz Is the Answer to Collecting Emails and Generating Leads

Category Image 091

Collecting leads has never been as much fun! Thanks to our free 5-star plugin, Forminator, you can now create engaging quizzes and capture emails simultaneously.

Plus, you can easily manage your leads, integrate the emails with a 3rd party app (like Mailchimp, Aweber, etc.), automatically run submission reports, and more!

Quizzes are highly engaging, can offer personalized feedback, are interactive, and entertaining. Combine all of these elements with Forminator –the best form builder for WordPress– and you have a powerful and creative way to generate leads in just a few simple steps.

In this article, we’ll be going over how to:

  1. Set Up a Quiz in Forminator to Gather Leads
  2. Customize the Lead Generation Form to Your Specifications
  3. Adjust the Quiz Module Editor
  4. Set Up Email Notifications and Integrations
  5. Implement Quizzes on Your WordPress Site
  6. Easily View Submissions

You’ll have your lead generating quiz up quickly and added to your WordPress site in no time.

So…

I think that’s the best answer, too.

1. Set Up a Quiz in Forminator to Gather Leads

It takes only a switch of a button to get the lead generator feature on your next quiz.

From the Forminator dashboard, simply click Create, name the quiz, and pick whether you want to create a knowledge or personality quiz. When you hit Continue, activate the option for collecting email leads in one-click.

One-click and your quiz is primed for collecting leads.

It’s that simple! There’s nothing more to get your lead generating quiz started.

From here, you’re ready to…

2. Customize the Default Lead Generation Form to Your Specifications

When it comes to adjusting your quiz, you’ll see all of the available options in the Edit section of the dashboard.

Since we’ve covered the basics already on creating a quiz in other articles (check out the quiz section in Getting the Most Out of Forminator for more details), we’ll jump down to Leads.

When you’re in this section, the Lead Generation Form area is where you can customize the default lead generation form. To edit, just click on the pencil in the container that shows the quiz’s name, and it will open up in a new tab.

The lead generation form.
This example is named ‘Test Quiz.’

When you open the new tab, you’ll find the default fields are already in place. These include:

  • HTML
  • Email Address
  • First Name
  • GDPR
Where you edit the fields.
These fields are an excellent start for creating a quiz with lead generation.

Add as many fields as you feel are necessary by clicking Insert Fields. Also, adjust the default ones by clicking on each area’s gear icon.

With Forminator’s drag-and-drop functionality, you can arrange the fields any way you want. Also, delete any fields with one-click.

When it comes to editing the rest of the form, you’ll notice that Email Notifications and Integrations are locked. That’s because these are shared settings between the quiz and form modules. They’re configured back in the quiz editor (which we’ll get to in a moment).

The unaccessable areas to edit.
You can’t access Email Notifications or Integrations from here.

Everything else is accessible and editable.

In the Appearance section, you can pick the form container’s design style, change colors of separate areas, use custom fonts, create an optional border, adjust the spacing, and even add custom CSS.

Blue? Bold? Want a new font? You can do it all from here.

Choose what you want to happen after a form is successfully submitted in the Submission Behavior section.

In terms of validation, you decide if you want validation checks when the user submits the form using Ajax (which is recommended). The live method will inspect fields at the same time as the user fills them out.

Plus, you can enable inline validation with one-click.

Also, the Submission Indicator can be activated to show a loader on your form until it’s submitted.

The submission behavior area.
Choose your validation method and whether you’d like a submission indicator to be displayed.

You can enable autofill, boost security by enabling Honeypot protection & enabling logged in submissions only, and set the life span of the form for submissions.

We’ll add some added protection to this quiz with Honeypot.

In the Settings area, it’s possible to disable the store submissions in your database.

Also, determine how long you want to retain the form’s submission form by the number of days, customize how you’d like to handle erasure requests, and, if your form contains files, decide if the file gets deleted with deleted submissions.

The privacy area where you can edit submissions.
Customize exactly how long you want to retain your form’s submission and more.

The global privacy settings can also be accessed from here, where you can adjust however you’d like.

The global privacy settings.
When clicking the global privacy settings, it opens up in a new tab, and you can adjust.

You’ll also notice that the status is Published. That’s because when created, it’s automatically connected to the quiz module.

The status says it's published.
The status tells you it’s published.

Since it’s published, all you need to do is save any changes by clicking on Update.

Where you'll update to save changes.
Clicking update will save all of your changes.

You can adjust the settings at any time if you ever need to make changes.

3. Adjust the Quiz Module Editor

Now that we have the default lead generation form set up, you can hop back over to the tab that has the quiz editor, and you’ll be able to adjust additional settings.

In the Leads section, you’ll notice that you now have Form Placement and Skip Form options.

Where you'll edit the form placement.
You now have two more areas to adjust since editing the default lead generation form.

Form Placement is where you want to embed the lead generation form. You can choose between the beginning of the quiz or before showing the results.

If you want to give users the option to skip the form, you can enable the Skip Form feature.

Enter a customized message when you enable the Skip Form feature.

You can configure the Appearance and Behavior of the quiz, too. For help with this, please refer to our documentation on Appearance and Behavior.

4. Setting Up Email Notifications and Integrations

We can now get back into the Email Notifications and Integrations area since we set up the lead generation default. They were locked, but are now accessible. This is where we’ll set up email notifications every time a user opts into the quiz.

In the Email Notifications area, set up the Admin Notification and Participant’s Notification.

Where you can adjust the email notifications.
The admin’s email is also displayed here.

In terms of setting up, both of these fields function the same.

You can edit the message to the admin & participants that will go out after opting in, edit what emails the message goes out to, create advanced customizations with the email (e.g. CC & BCC), and add conditions.

Customize email notifications the way you want them.

Plus, in our new form data dropdown list, you can add quiz and form data in the body of your emails.

Add any specific piece of data in the emails that you’d like.

If you have any 3rd party apps integrated with Forminator, you can connect them in the Integrations area. Just click on the plus sign, and that particular app will walk you through on how to connect.

A view of the integrations area.
Easily sync your quiz up with MailChimp, Zapier, and more!

Once connected, you can start collecting the quiz’s data with any supported integrated app.

5. Implement Quizzes on Your WordPress Site

Once you have your quiz set up the way you’d like, hit Publish. Then, Forminator will give you a shortcode that you can use on any post, page, or acceptable widget.

Forminator hands over the shortcode as quick as that. 

Simply copy and paste the code, and that’s it. Your quiz is now ready to collect leads!

6. Easily Viewing Submissions

Viewing and monitoring submissions is quick and easy. The Quizzes dashboard gives you an immediate glimpse of activity.

You can see when the last submission was made, the number of submissions in the last 30 days, and easily access the submissions for a specific quiz.

Forminator's quizzes dashboard.
You can create a new quiz, view submissions, and edit quizzes in Forminator’s dashboard.

To see submissions from a specific quiz, locate the name of the quiz, tap on the gear icon, and then View Submissions.

Where you'll view submissions.
View submissions and much more from the gear icon.

Once you click View Submissions, Forminator brings up all the submissions to that particular quiz. It shows the submission date & time, email address, first name, and information from other fields you included.

Individual submissions display.
The submissions are also numbered by the submission date.

By clicking on the dropdown on individual submissions, you can view detailed information, quiz results, and any details on 3rd party integrations.

All of the field information is displayed here and quiz results.

Want to download the data? That’s a click away.

Click on Export and you can download a CSV file. Plus, you can apply submission filters and schedule exports by specific times, making them automatically emailed directly to you.

Manually or schedule exporting the data.

Q: What’s the Best Lead Generating Quiz Maker Out There?

A: With a 5-star rating and many tens of thousands of active downloads, we have to side with our four-eyed friend as the best lead generating quiz maker because he makes it quick, easy, and free to do.

Plus, Forminator can create contact & registration forms, collect payments, make polls, perform calculations, and much more. He’s continuously updated, thanks to Forminator’s awesome team of developers and designers.

To check out what else is coming out with Forminator, check out our Roadmap. And to learn more, you can always refer to Forminator’s documentation.

Finally, for a quick overview of what we just covered, be sure to watch this short video:

Need a recap? Check out this video.

Happy lead-generating quiz making!

Jetpack 8.9 Adds Donations Block, Newsletter Form, and Social Previews

Category Image 102

Jeremey Herve, a Jetpack developer at Automattic, announced the release of Jetpack 8.9 earlier today. The update brings several major features to the plugin’s users. Jetpack now sports a new social preview option in the block editor, a newsletter signup form type, and a block for handling donations.

Version 8.9 also adds support for the AMP plugin. Herve noted that Google and Automattic have worked together over the past six months to make this integration happen. He also announced that the team would release an in-depth post on the Jetpack blog on how end-users can use the tools available.

Overall, the update seems to be a solid release. I have not run into any issues with the features I make use of thus far.

Social Network Preview for Posts

Social Previews modal from the Jetpack plugin.
Social Previews popup modal.

The latest version of the plugin adds a new Social Previews tab under the Jetpack sidebar panel in the block editor. It lists a few social icons and a preview button. Clicking the button pops up a modal window that allows users to preview what their post will look like in various places.

Currently, only Google Search, Facebook, and Twitter previews are integrated. However, the announcement post noted that LinkedIn previews are in the works.

Social Previews is not a particularly groundbreaking feature. However, it is a nice value-add for Jetpack users and almost a given in today’s climate that is led by social networking sites. The feature is similar to what some SEO plugins, such as Yoast SEO Premium, offer.

Newsletter Sign-up Form

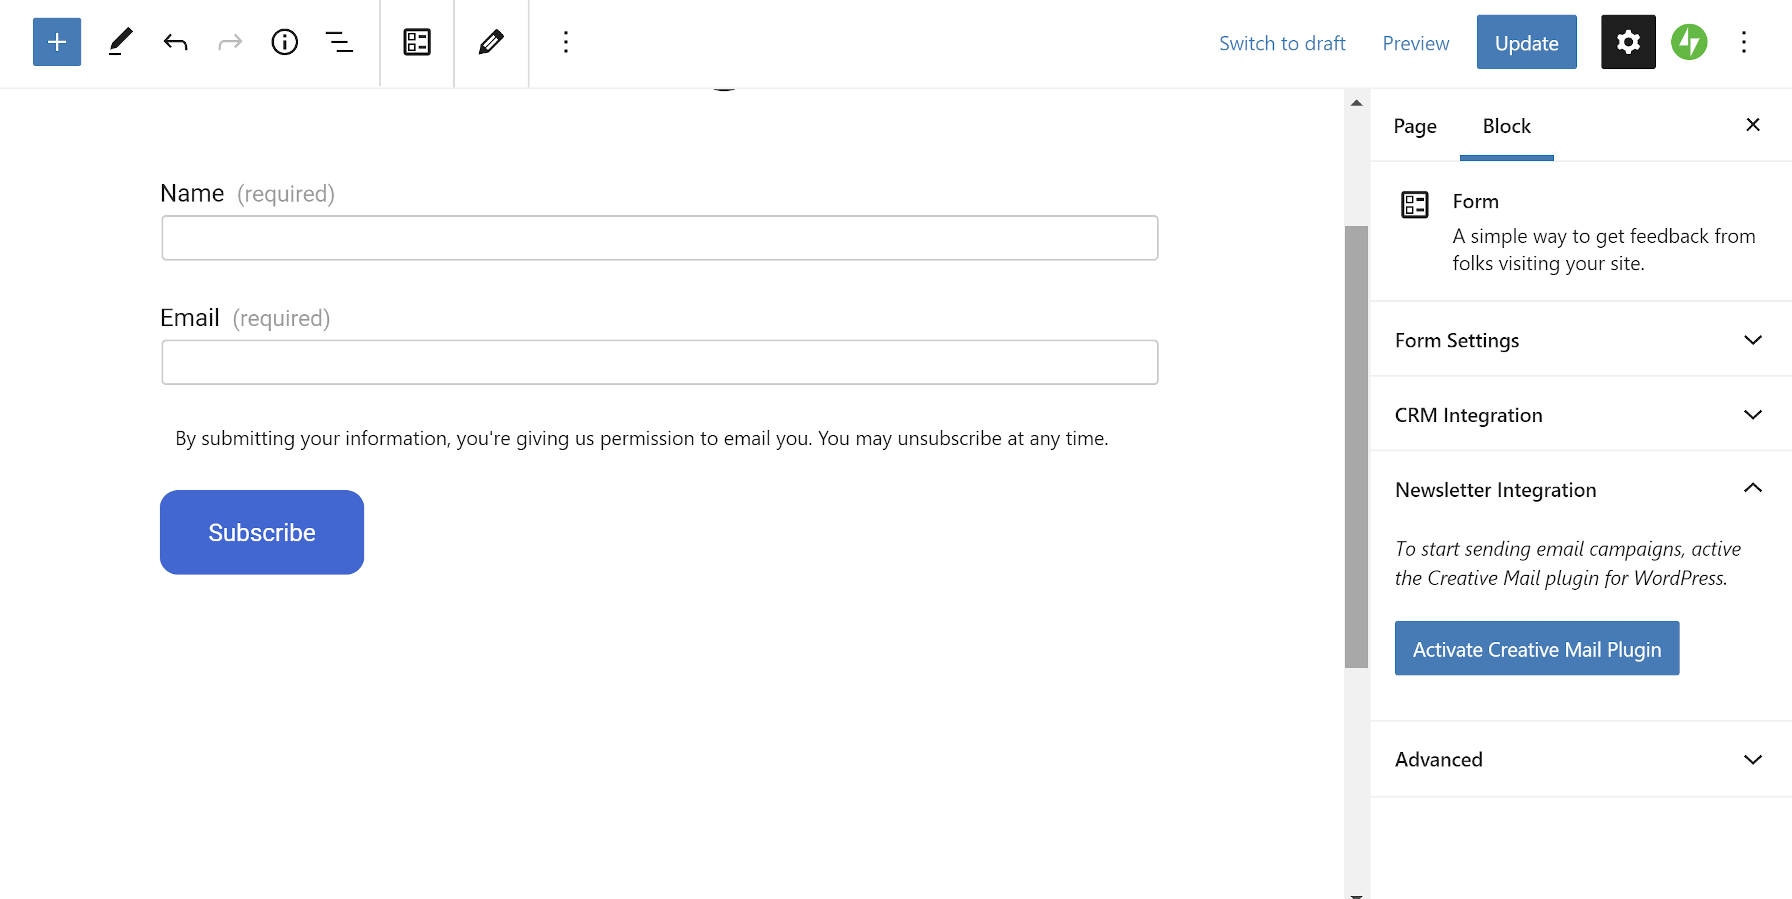
Jetpack 8.9 introduces a Newsletter Sign-up form type via its Form block. When creating a new form, users will see the new option. It works as you might expect, adding a name and email field along with a message that the visitor is granting permission to send emails.

It might not be immediately apparent for some users is that they will need to install and activate the third-party Creative Mail plugin for newsletters to work. Jetpack’s Newsletter Sign-up merely handles the form. The newsletter Aspect requires an account through the Creativ.eMail website. The free plan allows up to 5,000 emails per month, but you will need to upgrade to a paid tier after that, which will cost at least $4.95 each month.

If this sounds a bit convoluted, it’s because it is. Without reading the docs or opening the Newsletter Integration tab in the block options, some users may be wondering how this feature works.

The integration itself works fluidly. Users can install and activate the plugin directly from the block editor. However, they will need to run through the setup and signup steps to begin using email campaigns, such as a newsletter.

Donations Block

Jetpack's Donations block in the post editor.
Donations block and options.

Requiring yet another third-party service is Jetpack’s new Donations block. Users will need to be on a paid Jetpack plan to use the block, which allows them to integrate their Stripe account for collecting payments.

The Donations block is a simple affair. With a paid account in place, it is pretty much a plug-and-play system. The block options should be straightforward for the average end-user.

At this point, the Donations block and system may be too limited for some campaigns. This feature seems to more squarely target users who are looking to accept basic donations without all the features that a more mature donation plugin would provide. For anything beyond accepting a few small donations each year, I would lean toward the GiveWP plugin. Its team is hyper-focused on making a great donation experience that scales to larger campaigns.

For users who are already using Jetpack and want to start small, it wouldn’t hurt to give this block a spin. It is always possible to move up to a dedicated donation plugin down the road.

How to Create a Questionnaire in WordPress (Easy Way)

Category Image 091

Do you want to create a questionnaire in WordPress to survey your visitors or collect data?

Getting feedback on your products or simply learning more about your users can help your business to succeed.

In this article, we will show you how to easily create a questionnaire in WordPress, step by step.

The easy way to create a questionnaire in WordPress

Why Create a Questionnaire in WordPress?

Creating a questionnaire is a great way to learn more about your audience. This lets you tailor your content to their needs. You can also use the results to create or modify the products / services that will be most helpful to your audience.

There are several survey tools that you can use outside your website, but having your questionnaire on your website itself means you have full control over how it’s displayed. Plus, it’s more familiar and reassuring for your audience.

That being said, let’s take a look at how to easily add a questionnaire to your WordPress site.

Creating a Questionnaire Form in WordPress

For this tutorial, we’ll be using WPForms to create a questionnaire.

WPForms is the best forms plugin for WordPress and allows you to easily create any kind of forms using a simple drag and drop form builder.

First, you need to install and activate the WPForms plugin on your WordPress site. For more details, see our step by step guide on how to install a WordPress plugin.

Note: You’ll need the Pro version of the plugin to get the features that we will use in this tutorial.

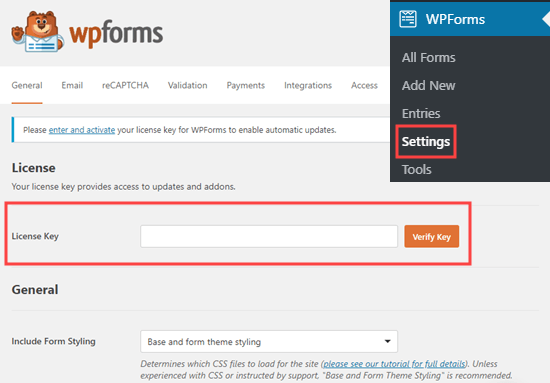
Upon activation, you need to visit the WPForms » Settings page in your WordPress admin area to enter your license key. You’ll find the license key under your account on the WPForms website.

Entering your license key for WPForms

Now, it’s time to move on and create your questionnaire.

Creating a Questionnaire Using WPForms’ Survey and Polls Feature

WPForms’ powerful surveys and polls addon lets you create questionnaires easily. It also produces beautiful visual graphs of the results.

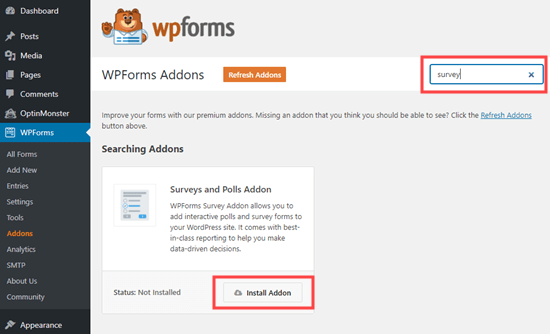
First, visit the WPForms » Addons page to install the Survey and Polls addon. Use the search bar to find it, then click the Install Addon button.

Installing the Survey and Polls addon for WPForms

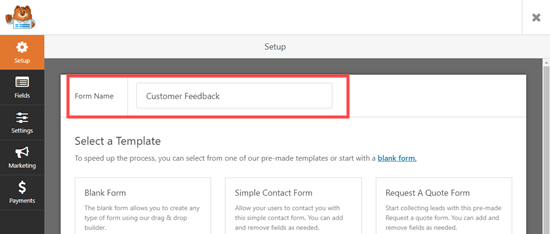
Next, go to WPForms » Add New to create a new form. First, type in a name for your form at the top of the screen:

Naming your questionnaire in WPForms

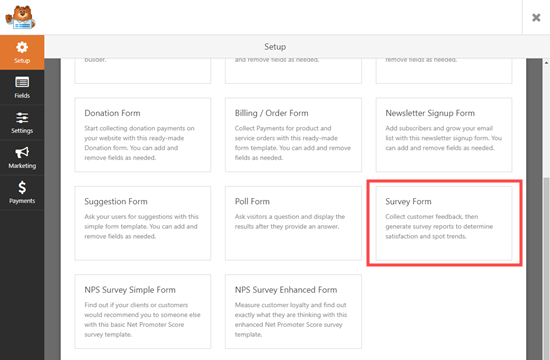
There are 4 different pre-built survey form templates to choose from. These are the Poll Form, the Survey Form, the NPS Survey Simple Form, and the NPS Survey Enhanced Form.

We are going to use the Survey Form for our questionnaire.

Select the Survey form template in WPForms

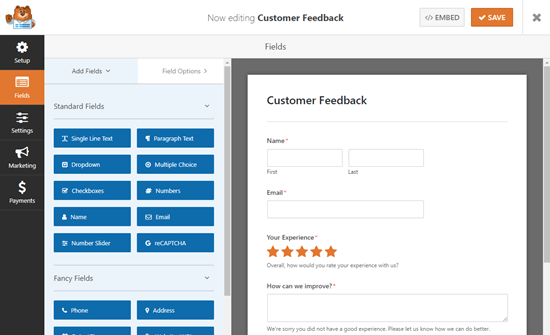
After you select the template, it will open up in the WPForms editor.

The Survey template in the WPForms editor

We recommend that you edit the questions to make them appropriate for your audience and needs. We are going to use the form to gather customer feedback on products and delivery.

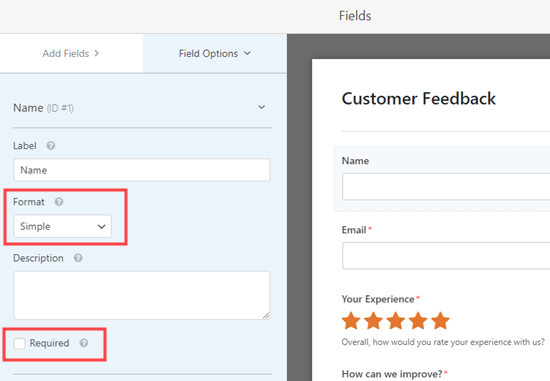
To edit any field, simply click on it. The editing view will then open up on the left-hand side of your screen. Here, we are editing the Name field at the top. We changed the format to ‘Simple’ using the dropdown.

We also made it optional by unchecking the ‘Required’ box.

Editing the Name field in our WPForms questionnaire

The ‘How can we improve?’ box only appears if the user rates their experience as 1 star or 2 stars.

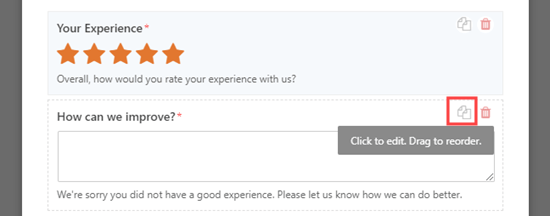
We’re going to add a new feedback box that will appear if the user rates their experience as 3 or 4 stars. To do this, simply bring your mouse cursor over the ‘How can we improve?’ box then click the Copy button:

Clicking the button to copy a field in WPForms

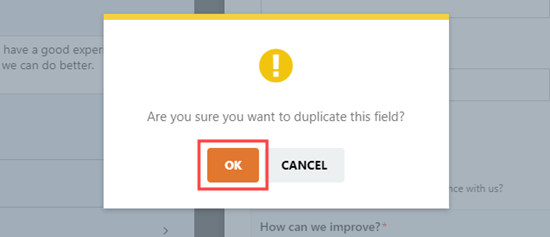
Next, WPForms will check that you want to duplicate the field. Go ahead and click the ‘OK’ button to continue:

Click the OK button to go ahead and duplicate the field

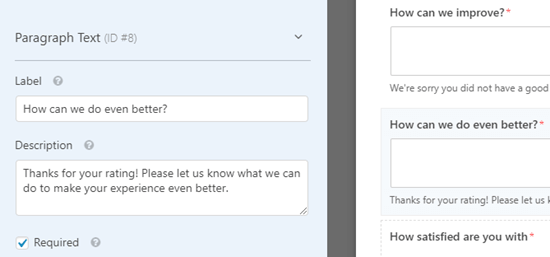
Now, you can edit your new field on the left-hand side of the screen. We have changed the label, which appears above the box. We also changed the description, which appears below the box:

Editing the new feedback box that you've created in WPForms

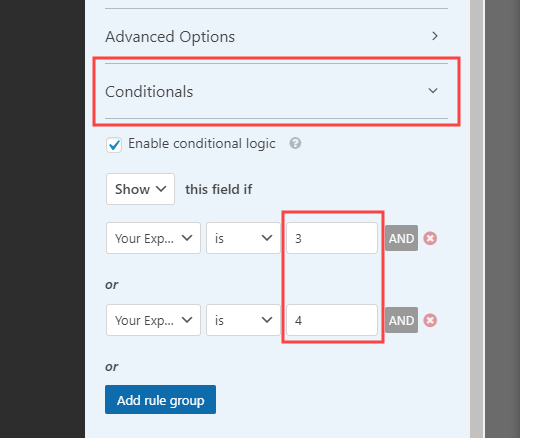
You also need to set the conditional logic for this field. To do that, click the Conditionals tab. Then, set the numbers to 3 and 4 instead of 1 and 2:

Opening up and editing the conditional logic for the field in WPForms

Finally, we are going to edit the ‘How satisfied are you with’ Likert scale. A Likert rating scale is a 5 or 7 point scale that is often used to measure satisfaction or attitudes.

Again, simply click on the field to edit it. Then, change the labels of the rows or columns to the text you want to use.

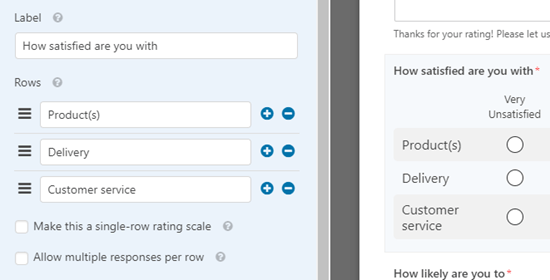
We are going to change the labels of the rows to make them more specific:

Editing the options on the Likert satisfaction scale

Go ahead and make as many changes to the form as you like. Don’t forget to click the ‘Save’ button at the top of the screen:

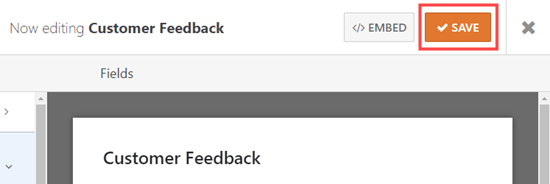
Save the customer feedback form after editing

Setting Up Notifications for Your Questionnaire

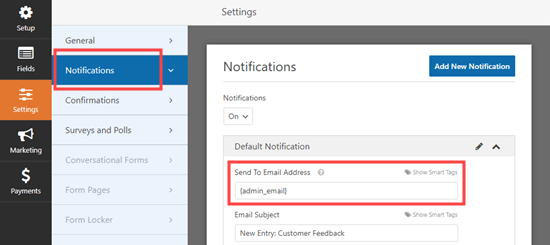
WPForms will send each completed questionnaire to the business email address that’s set in your website settings. It’s easy to change this by going to Settings » Notifications.

Simply delete the {admin_email} in the ‘Send To Email Address’ box and enter the email address you want to use instead:

Changing the email address that the questionnaire is sent to

Tip: Not sure what your WordPress administration email is? Go to Settings » General and check what is listed in the ‘Administration Email Address’ box.

Don’t forget to save your questionnaire after making any changes.

Adding Your Questionnaire to Your Website

You can add your questionnaire to any post or page on your website. You can even add it to your sidebar.

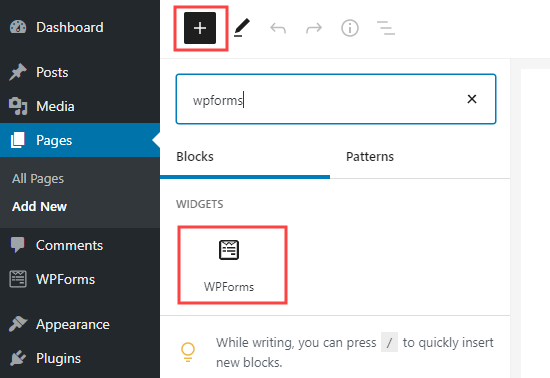
To add your form to a page, edit your page or go to Pages » Add New to create a new one. Then, click the + button to add a new block. Select the ‘WPForms’ block:

Add a WPForms block to your page in WordPress

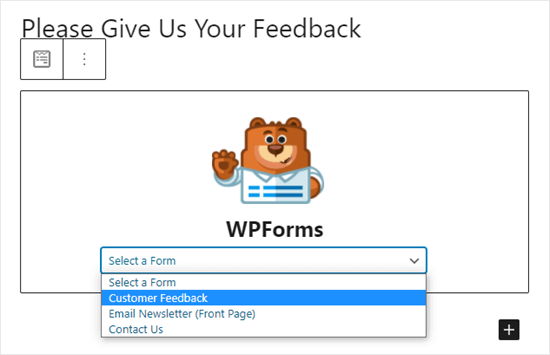
Next, simply click on the dropdown and select your questionnaire form.

Select your questionnaire from the dropdown list

Now, simply preview or publish your post to see the form live on your WordPress website:

Your finished questionnaire live on the website

Creating a Questionnaire Using Conversational Forms

You can also use WPForms’ conversational forms feature.

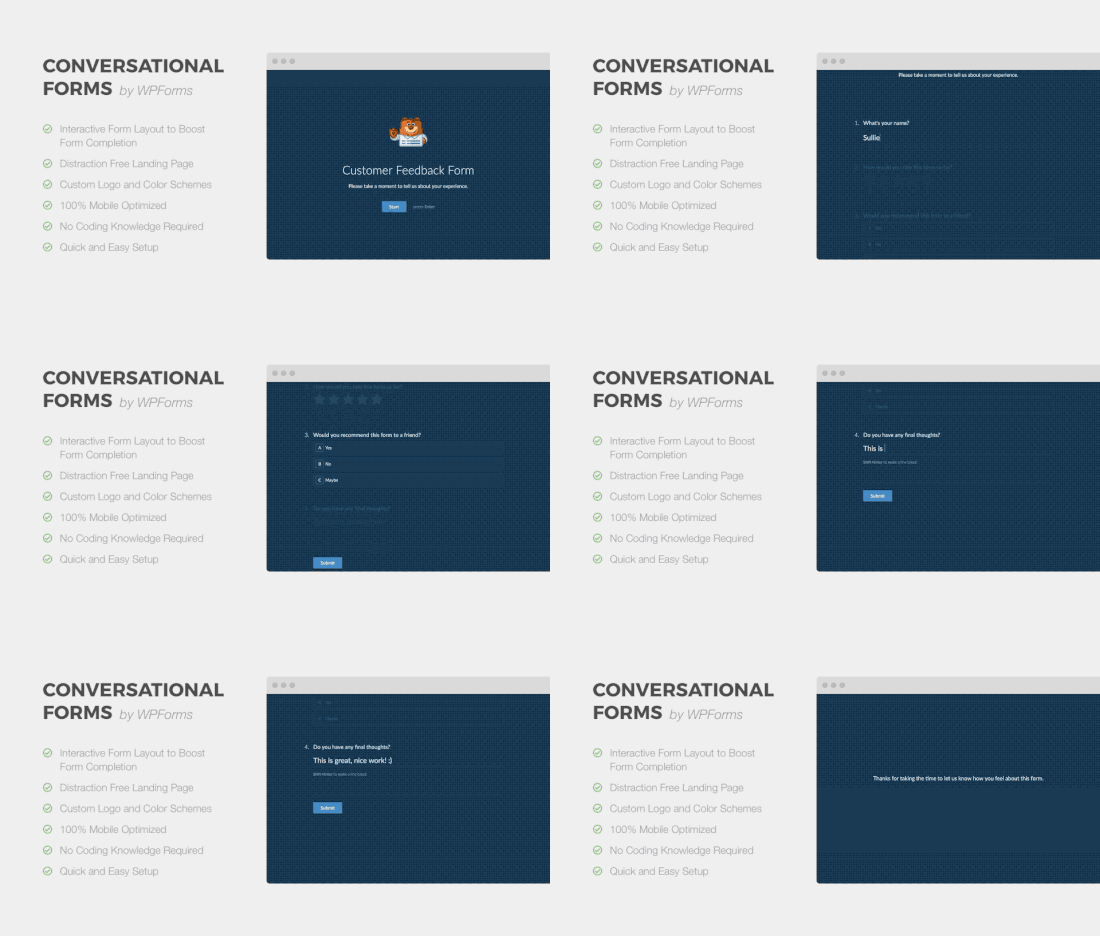
A conversational form is an interactive form that flows like a conversation. Users answer a question and it automatically shows them the next one.

It makes longer forms like a questionnaire easier to fill out and reduces form abandonment.

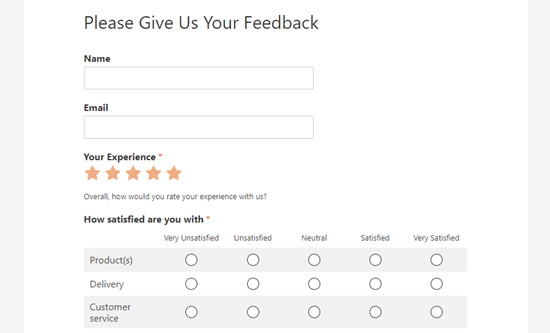
Conversational forms example

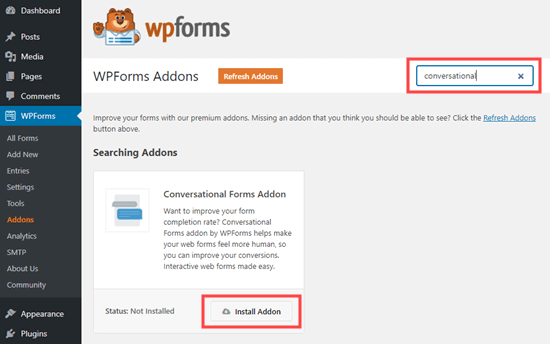
First, you need to go to WPForms » Addons in your WordPress admin. Then, search for and install the Conversational Forms addon:

Installing the conversational forms addon in WPForms

After that, go to WPForms » Add New and create a new form using the instructions in the previous method.

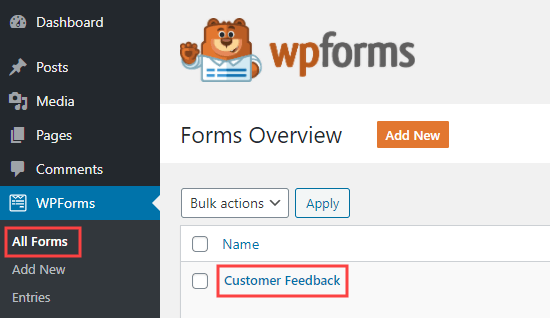
If you already created your form, then simply go to WPForms » All Forms page and click on it to edit it:

Editing your questionnaire form in WPForms

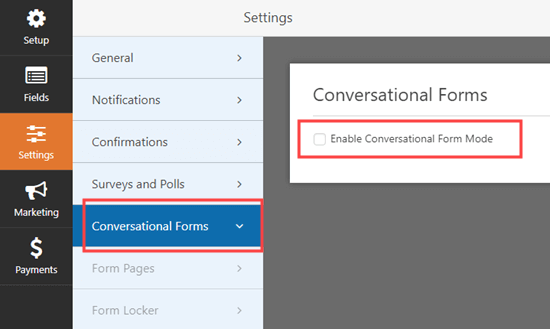
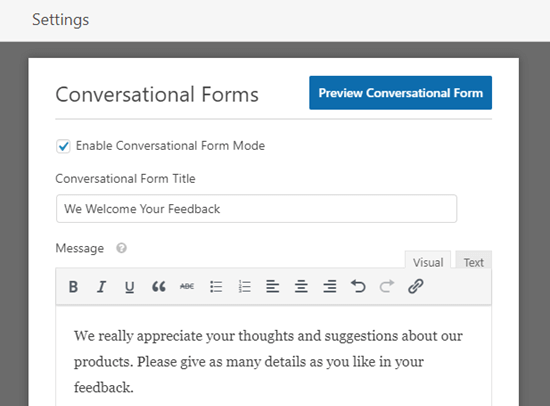
Now, we are going to convert your form into a conversational form. First, go to the Settings » Conversational Forms tab. Then, simply check the ‘Enable Conversational Form Mode’ box.

Enabling conversational form mode for your questionnaire form

You will then see a number of extra options to fill in. Conversational forms can’t be embedded in a post or page, so you need to give your form a title here. You can also write any text that you want to display above the form:

Entering a title and message for your conversational form

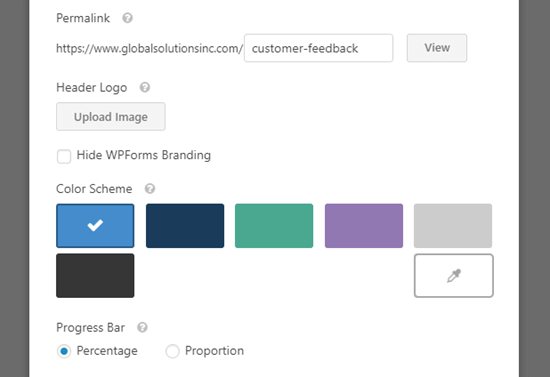
WPForms will automatically create a URL for your conversational form based on the form’s name. If you want to change this, simply type in a different URL here.

Optionally, you can also upload a header image, choose a color scheme, and change the Progress Bar style.

Editing the other options for your conversational form

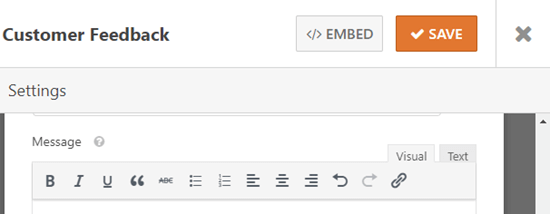
Once you are happy with your form’s settings, don’t forget to click the ‘Save’ button at the top of the screen:

Make sure you save your conversational form before moving on

Now, click the ‘View’ button next to the permalink for your form to see it live on your site:

Click the button to view your conversational form live on your site

The customer simply clicks the Start button to begin the form.

The conversational questionnaire - user clicks the Start button to begin

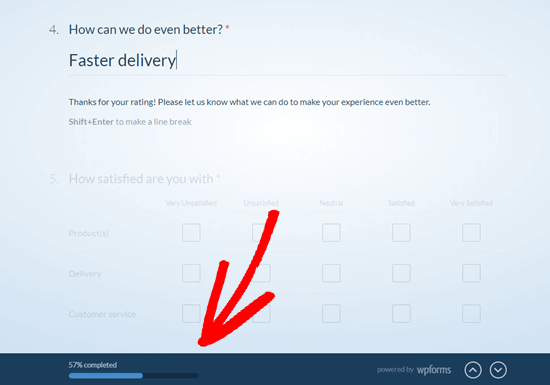
They can then enter their responses one question at a time. The questions that aren’t active will be faded out until the customer moves to them.

The questions displaying on the conversational questionnaire

The sticky progress bar at the bottom of the screen will show how far through the form the customer is:

WPForms will show the user how far through the questionnaire they are, using the progress bar

That’s it. You’ve successfully created your conversational questionnaire.

Viewing the Results from Your Questionnaire

Whether you created a regular survey or a conversational form, the process for viewing the results is the same.

Each questionnaire response will be emailed to the email address you set up under Settings » Notifications.

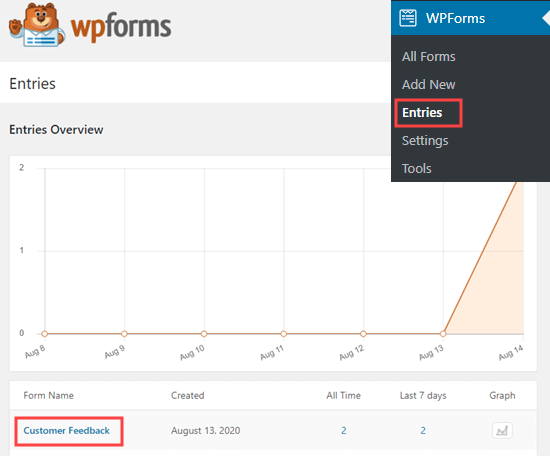
WPForms also stores all your survey results in your WordPress database. To view them, go to WPForms » Entries in your WordPress dashboard. Then, click on the name of your survey form:

Click on the name of your form to view the questionnaire results

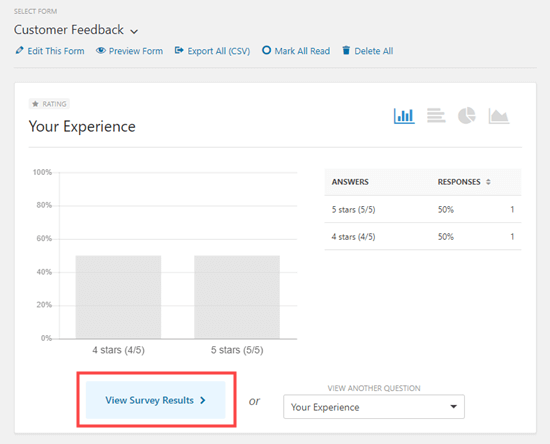
You will then see some of the answers from your questionnaire. Simply click the ‘View Survey Results’ button to view all the questionnaire results.

Click the View Survey Results button to see all the graphs and charts from your questionnaire results

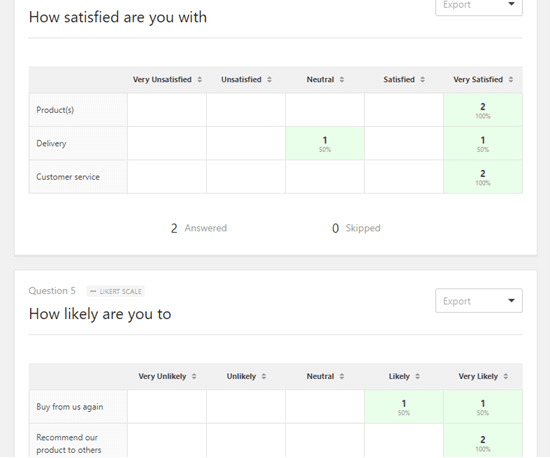
WPForms will automatically create graphs and charts to make it easy to interpret the results:

Two of the charts that WPForms has automatically created from the questionnaire results

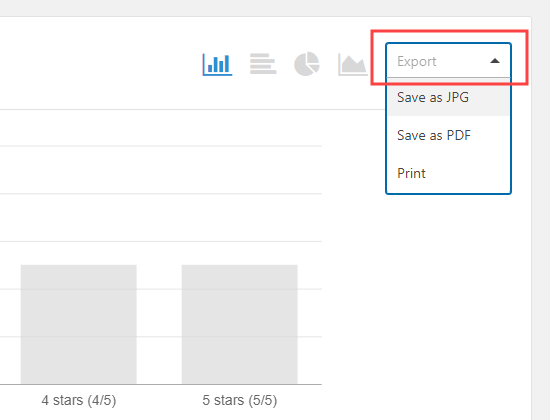
It’s easy to export any of the graphs as a PDF or JPG. You can even print them to share with others in your organization. Just click the ‘Export’ link next to any item and choose from the dropdown menu:

Exporting a chart from the questionnaire using the Export dropdown for that question

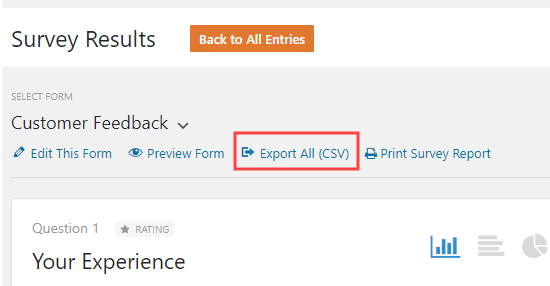
You can also download all your results as a CSV file. Just click the ‘Export All (CSV)’ button near the top of the page to download all the results:

Exporting all answers from the questionnaire as a CSV file

If you want to view the questionnaire answers from individual customers, then click the ‘Back to All Entries’ button at the top of the screen:

Going back to view all the entries for the WPForms questionnaire

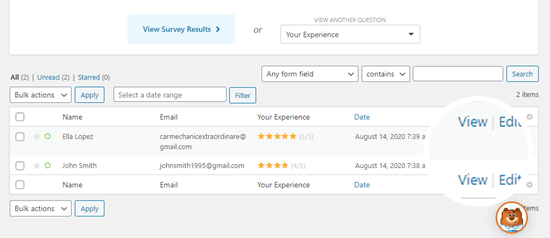
Next, scroll down to the table at the bottom of the screen. Click the ‘View’ button for the entry you want to see:

Viewing individual answers to the questionnaire

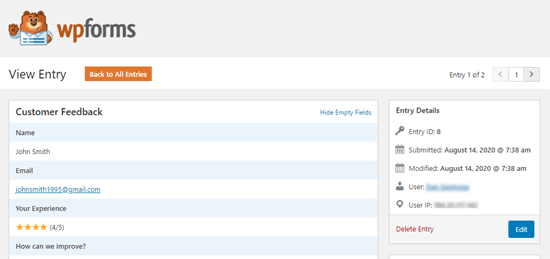
You will now see all the answers submitted by that person.

Viewing the details of one submitted survey response

We hope this article helped you learn how to create a questionnaire in WordPress. You might also enjoy our articles on the best email marketing services and how to start an online store.

If you liked this article, then please subscribe to our YouTube Channel for WordPress video tutorials. You can also find us on Twitter and Facebook.

The post How to Create a Questionnaire in WordPress (Easy Way) appeared first on WPBeginner.

How to Create a File Upload Form in WordPress

Category Image 091

Do you want to enable your website visitors to upload files on your contact form?

Maybe you are hiring employees and want to collect resumes, or perhaps you are running a photography contest where you need the applicant to attach files.

In this article, we will show you how to easily create a file upload form in WordPress.

Creating a File Upload form in WordPress

Why Create a File Upload Form in WordPress?

If you want to collect any kind of file from your users on your WordPress website, then a file upload form is a great idea.

You can let users upload images, PDF files, Word documents, or other types of files.

Using a file upload form makes life easy for you and your users. Instead of the email back-and-forth, you can create a form that includes all the fields you need, so you can collect all information at once.

Also, your form should automatically save the form data in your WordPress database. That way, you can easily find the submissions, even if you miss or delete an email.

That being said, let’s take a look at how to create a file upload form in WordPress.

How to Create a File Upload Form in WordPress

For this tutorial, we will be using WPForms, which is the best contact form plugin for WordPress.

First, you will need to install and activate the WPForms plugin. For more detailed instructions, check out our step-by-step guide on how to install a WordPress plugin.

Note: WPForms also offers a free version. However, you will need the Pro version of the plugin to unlock the file upload form template.

Upon activation, head to the WPForms » Add New page from the WordPress admin sidebar.

This will take you to the ‘Search Template’ page, where you can start by naming your form. You need to also look for the file upload form template in the search box on the left.

Next, simply click the ‘Use Template’ button under the ‘File Upload Form’ option.

Choose the File Upload form template

You will now be taken to the WPForms builder, where the File Upload Form will be automatically created for you.

You can use the file upload form template without making any changes, or you can also drag and drop form fields from the ‘Add Fields’ sidebar.

File Upload form will now be automatically created for you

Next, click on the ‘File Upload’ field in the form to open up its settings in the left column.

By default, you can upload different types of files in the form, including:

  • Image files: .png, .gif, .jpg
  • Documents: .doc, .xls, .ppt, .pdf
  • Audio: .wav, .mp3, .mp4
  • Video: .mpg, .mov, .wmv

All you have to do is type the file formats that you want to accept into the ‘Allowed File Extensions’ box.

For this tutorial, we are going to allow the image formats .png, .gif, and .jpg. Make sure to separate each file format with a comma.

Type file extension type

Note: WordPress limits the types of files that can be uploaded to the site for WordPress security reasons. You can add additional file types to WordPress if you want to allow users to upload file types that aren’t normally allowed.

You can also set a maximum file size and a maximum number of files. For our tutorial, we are going to allow people to submit up to 3 photos of up to 50MB each.

If you want to prevent people from submitting the form without attaching their file(s), you can toggle on the ‘Required’ switch. This means the form can’t be submitted unless at least 1 file has been uploaded.

Choose file size and the number of files to be uploaded

Next, simply switch to the ‘Advanced’ tab from the top.

By default, the File Upload Field uses a modern format that lets users drag and drop their files.

However, if you have limited space for your form, or you prefer a classic upload field, you can change this. Simply select the ‘Classic’ option from the ‘Style’ dropdown menu.

Tip: The classic upload field only allows one file to be uploaded. If you want users to be able to submit more than one file, you will need to add multiple File Upload Fields to your form.

Choose the Classic option as the form style from the dropdown menu

You can also choose to store the submitted files in the WordPress Media Library by toggling on the ‘Store file in WordPress Media Library’ switch. This makes it easy for you to add the uploaded files to a post or page.

For instance, if we are running a photography competition, then we may want to include the best photos when we announce the winner.

Note: The uploaded files will still be saved in your WordPress database, even if you don’t check this box. They are just stored in a separate folder in your WordPress hosting account.

Toggle the switch to allow the form to store files in the media library

If you want to edit any of the other fields on your form, you can click on them to open the field’s settings in the left column.

You can also add other fields to your File Upload form.

For example, you may want to add a Website/URL field to the form so that users can give you the link to their website.

Save the form after adding additional fields

Once you are happy with your form, click the ‘Save’ button in the top right corner of the screen to store your settings.

Setting Up Your File Upload Form’s Notifications

To change the notification settings for the form, you need to open the ‘Settings’ tab in the left corner. Once you are there, simply click on the ‘Notifications’ tab.

By default, the form sends an email notification to {admin_email}.

If you created your WordPress site by yourself, then this will be your email address. If not, then you can delete {admin_email} and type your own email address here instead.

Change the email address the receives the notifications

If you are not sure if {admin_email} is your email address, simply visit the Settings » General page from your WordPress admin dashboard.

Once you are there, look for the Administration Email Address. You can now change the admin email address from here.

Check the admin email

Once you are done, don’t forget to click the ‘Save Changes’ button to store your settings.

If you want the submitted files to be sent to more than one person, then you may want to see our tutorial on how to create a contact form with multiple notification recipients.

You can also change the confirmation message that users see after the form is submitted.

To do this, you need to visit the Settings » Confirmations page from the left column. Then, simply type the message into the ‘Confirmation Message’ box. You can also add formatting like bold and italics.

Change the confirmation message

Finally, don’t forget to save your form once you have made the changes.

You can exit the form builder by clicking the ‘X’ in the top right.

Adding the File Upload Form to Your Website

Once you have finished creating your form, you will need to add it to your website.

To do this, you must open an existing or new post or page from the WordPress admin sidebar. For this tutorial, we are going to add the File Upload form to a new page.

Once you are there, click on the Add New Block ‘(+)’ button in the top left corner of the screen and find the WPForms block.

Locate and add the WPForms block

Upon adding the block, you will see a WPForms dropdown menu displayed on the page.

Go ahead and select the File Upload form that you just created.

Choose the File Upload form from the dropdown menu

Finally, click the ‘Publish’ or ‘Update’ button to save your changes.

You can now visit your website to see the File Upload form in action.

File upload form preview

You can also make changes to your form anytime by visiting the WPForms » All Forms page from the admin sidebar.

From here, simply click on the name of the form, or hover your mouse over it and click the ‘Edit’ link to open up the form builder.

Edit form

When you edit your form, it will be automatically updated on your website, so you don’t need to add it to your page again.

Tip: It’s a good idea to test your form to make sure it’s working as expected. If you don’t get an email notification after creating a form entry, then you can read our step-by-step guide on fixing the WordPress not sending email issue.

Viewing or Downloading the Uploaded Files

When someone sends a file using your file upload form, you can see it in your email inbox or your WordPress dashboard.

With each form entry, you will get an email like this:

Preview of the email you'll receive when someone fills the form

Just click the links to view or download the files themselves.

You can also easily find the files in your WordPress dashboard. Simply go to the WPForms » Entries page and then click on the name of your form.

Choose the file upload form on the entries page

You can see the uploaded files in the table of form entries.

Alternatively, you can click the ‘View’ link to see the full details for each form entry.

View form entries

We hope this tutorial helped you learn how to create a file upload form in WordPress. You might also want to check out our expert picks for the best WordPress survey plugins and read our guide on how to create an email newsletter.

If you liked this article, then please subscribe to our YouTube Channel for WordPress video tutorials. You can also find us on Twitter and Facebook.

The post How to Create a File Upload Form in WordPress first appeared on WPBeginner.

Leave at Door: New Free WooCommerce Plugin Enables Contact-free Delivery

Category Image 091

As many countries around the world are currently in some form of lockdown to mitigate the spread of the coronavirus, the hospitality industry has been one of the hardest hit by the new restrictions. Restaurants and breweries in particular have had to radically change how they do business and either lay off or furlough the majority of their employees. Many of those that have survived the mandated dine-in closures are jump-starting delivery services in order to stay afloat.
Scott DeLuzio, a WordPress plugin developer and founder of Amplify Plugins, recently noticed a “leave at door” option when ordering food from a local restaurant. He thought it would be a helpful option for WooCommerce store owners to add and created a plugin that makes it easy.

Leave at Door is now available for free from the official WordPress Plugin Directory. It enables customers to maintain social distancing while receiving deliveries. The plugin adds a checkbox before the Place Order button at checkout, which reveals an optional text input for additional delivery instructions. If the customer chooses contact-free delivery, store owners will see it displayed on the admin order edit screen and in the order email. It will also be displayed on the customer’s order invoice.

DeLuzio’s Amplify Plugins shop focuses on plugins that improve the customer experience in WooCommerce. He reported that his products have seen more activity since social distancing recommendations were put in place. With the pandemic slowing down shipments from Amazon and other major retailers, local and independent stores have an opportunity to gain the confidence of new customers.

“I have definitely seen an uptick in plugin sales over the last month or so,” DeLuzio said. “I think, through talking to a few customers, this can probably be attributed to traditional brick and mortar stores and restaurants that are looking to move online to compensate for the lack of foot traffic that they are getting in their stores.”

The availability of contact-free delivery may be the deciding factor for some customers in quarantine, which could make all the difference for small business owners.

“There are probably a good number of local businesses that are struggling these days,” DeLuzio said. “Their customers are probably very concerned with the virus and maintaining social distancing, so if something like this plugin can help them out, even in a small way, I’m happy to have been able to put it together for them.”

Even when some economies begin opening up, there will undoubtedly be customers who will still be keen on having a contact-free delivery option, especially those among the populations most vulnerable to COVID-19. The notion of contact-free delivery may have a longer run beyond this current crisis and perhaps even become a permanent fixture on e-commerce checkout screens.