Anti-Hotlinking Script for WP on Apache (.htaccess) – Linkspam Prevention

Category Image 091

Never published this before, so this is a DaniWeb.com Exclusive :)

If your WP-Site has a lot of K-Links, you should consider using this script.

It definetly works. For now...

Negative SEO through spamming Backlinks can be a huge problem for the visibility of a webpage.

You can not defend your site against all kinds of attacks, but on one of the most common, you can significantly decrease the negative effects:

"K-Links" (new version: C-Links), where Image Hotlinking is used to generate Links, targeting mainly Wordpress Instances.

Examples:
k-links.png

this is why they're called "K-Links/C-Links". They always end with "-k.html" oder "-c.html"

The basic Anti-Hotlinking-Script can help in reducing the amount of traffic, when hotlinking is abused to burn your bandwith.

But i have never seen it recover any visibility losses in the SERPs.

This is the basic "Anti-Hotlinking-Script":
<IfModule mod_rewrite.c>
    RewriteEngine On
    RewriteCond %{HTTP_REFERER} !^$
    RewriteCond %{HTTP_REFERER} !^http(s)?://(www\\.)?daniweb.com [NC]
    RewriteCond %{HTTP_REFERER} !^http(s)?://(www\\.)?google.com [NC]
    RewriteCond %{HTTP_REFERER} !^http(s)?://(www\\.)?bing.com [NC]
    RewriteCond %{HTTP_REFERER} !^http(s)?://(www\\.)?yahoo.com [NC]
    RewriteCond %{HTTP_REFERER} !^http(s)?://(www\\.)?duckduckgo.com [NC]
    RewriteRule \\.(jpg|jpeg|png|gif|avif|webp|svg)$ /nohotlink.html [L]
</IfModule>

---

content nohotlink.html:

<body>
    <h1>Hotlinking not allowed</h1>
    <p>Too view our images, please visit our <a href="<https://daniweb.com/>">Website</a>.</p>
</body>

It integrates the "Whitelist" directly into .htaccess, which is not optimal.

I had a case, where this caused problems, because the Whitelist was huge (1000+ Domains).

So i found this solution with "RewriteMap", which i integradted into this Script to put the whitelist inside a .txt file.
This also was easier for the client, as he might needs to add entries to the whitelist and like this does not have to edit the htaccess everytime.

I have also set the link inside the HTML to rel="nofollow".

I did get some nice results with this!

Even if there are still other DoFollow-Links on the Hotlinking Site, the presence of this one nofollow-link seems to reduce the toxicity of each one.

Important: Dont link the actual Canonical URl from your Main Page from nohotlink.html!
If your Domain is https://daniweb.com for example, you link to http://www.daniweb.com (with "www" and "http").

I experimented a lot with this and set the Canonical of the nohotlink.html to the Main Page, tested with noindex, nofollow robots tag, but it was all a mess.

If anybody is as deep into this stuff as i am, i will be happy to discuss.

Feel free to share your thoughts!

Disclaimer: Please use at your own risk, only if you know, what you are doing. Don't make me responsible, if you make mistakes. They are yours, not mine.

Beginner’s Guide: How to Center Align a Video in WordPress

Category Image 091

Do you want to center-align a video in WordPress?

By default, if your video’s width is less than your article area, then WordPress automatically aligns it to the left, leaving extra white space on the right side.

In this article, we will show you how to easily center align a video in WordPress.

How to center align a video in WordPress

Why Center Align Videos in WordPress?

When you embed a video in WordPress, it automatically aligns them to the left by default. This is because videos are external content embedded in the content, so WordPress is unable to guess how you would like to display it.

As a best practice, it automatically aligns it to the left, leaving it up to you to adjust the alignment if needed.

By aligning the video to the center, users will have a better experience viewing your content. This way, you won’t have noticeable blank space on the one side of the page, which could give an unprofessional look.

Besides, if you upload videos directly to WordPress, the same thing will happen to them if their width is less than your content area. WordPress will align them to the left by default.

That being said, let’s see how you can easily center-align a video in a WordPress website. We’ll cover both the block editor and classic editor, so you can click the links below to jump ahead to any section.

How to Center Align Video in WordPress Content Editor

If you want your video to fill the width of your content area, then the best way to do this is by adding a YouTube or Vimeo video URL directly in the WordPress content editor.

First, you’ll need to edit a post or a page or add a new one. Once you are in the content editor, simply paste the link to the video. WordPress will embed the video automatically.

Paste video embed code in block editor

Next, select the video block and then click the Change Alignment option. From the dropdown menu, you can choose the position of the video.

WordPress lets you choose from the following alignments:

  • wide width
  • full width
  • align left
  • align center
  • align right.

Go ahead and select the ‘Align center’ option.

Align the video to the center

After that, you can preview and publish your page or post.

The video will now be center-aligned.

Center aligned video preview

However, sometimes for one reason or another, you may need to use the embed code. In that case, you will need to add some simple HTML around your video’s embed code.

First, you need to click the 3 dotted icons in the video block. After that, you can select the ‘Edit as HTML’ option from the dropdown menu.

Edit as HTML

Next, you can enter the following piece of HTML code around the embed code of the video:

<div style="text-align:center;">

/// your video embed code goes here

</div>

Here’s what your embed code would look like with the custom HTML.

Preview of custom HTML code

You can now save your changes and preview the post or page. Your video will be neatly aligned in the center of your content area.

Another approach is to manually increase your video’s width to fit the content area. To achieve this, you need to add or change the ‘width’ parameter in your embed code.

<iframe width="760" height="315" src="https://www.youtube.com/embed/4YpyiJ05YOg" frameborder="0" allow="autoplay; encrypted-media" allowfullscreen></iframe>

How to Center Align Video in the Classic Editor

If you’re using the Classic editor, then you can center align videos by editing a post or creating a new one.

Once you’re in the editor, switch to the Text view. Now enter the following HTML code:

<div style="text-align:center;">

/// your video embed code goes here

</div>

Just make sure to replace ‘your video embed code goes here’ with your video’s embed code.

Once that’s done, it will look something like this:

Center align videos in classic editor

You can now preview and publish your page.

Simply visit your website to see the center-aligned video.

Center aligned video classic editor preview

We hope this article helped you learn how to center align a video in WordPress. You may also want to see our guide on how to start a WordPress blog and must-have WordPress plugins.

If you liked this article, then please subscribe to our YouTube Channel for WordPress video tutorials. You can also find us on Twitter and Facebook.

The post Beginner’s Guide: How to Center Align a Video in WordPress first appeared on WPBeginner.

WordPress Hosting Survey 2022: The Results Are In! 3,400+ Voted

Category Image 091
WordPress Hosting Survey 2022Looking for WordPress hosting recommendations online is a bit tough. Sure, you will find loads of reviews from various publishers – including us – but how can you know which of the hosts go beyond that initial positive impression and deliver good experience long term? That’s the kind of stuff you can only learn from actual users and website owners. This is where our WordPress hosting survey comes into play!

How to Easily Disable the Default WordPress Sitemap

Category Image 091

Do you want to disable the default WordPress sitemap on your website?

The default sitemap feature was introduced in WordPress 5.5, and it enables WordPress to publish XML sitemaps for your website automatically. The challenge is that this feature is lacking advanced WordPress SEO features that you need to rank higher.

In this article, we will show you how to easily disable the WordPress sitemap and improve it with a more powerful solution.

How to Easily Disable the Default WordPress Sitemap

Why Should You Disable WordPress Sitemap

An XML sitemap is a file that lists all your website content in an XML format, which makes it easy for search engines to discover and index your content.

Sitemaps are very beneficial for your website as they bring more traffic and improve the SEO rankings of your site.

However, numerous WordPress SEO plugins like All in One SEO, Yoast SEO, and Google XML Sitemaps already implement sitemaps on your website, which results in WordPress pages having two sets of sitemaps.

Duplicate sitemaps for the same WordPress page can confuse search engines and can drop your SEO rankings.

If you’re not using a SEO plugin for your sitemap, then you’re missing out on advanced features. For example, many popular WordPress SEO plugins offer features like Video Sitemap, News Sitemap, RSS Sitemap, etc that you need to outrank your competitors in SEO.

With that being said, let’s see how you can easily disable the default WordPress sitemap.

Method 1. Disable WordPress Sitemap Using WordPress SEO Plugin

If you’re using any of the popular WordPress SEO plugins, then they will automatically disable the default WordPress sitemap feature and replace it with a more powerful solution.

For the sake of this tutorial, we will be demonstrating AIOSEO plugin because that’s the plugin we use on WPBeginner.

All in One SEO is the best WordPress SEO plugin that allows you to easily optimize your WordPress website for search engines and social media platforms. Over 3 million websites use AIOSEO including our own.

By default, All in One SEO will enable their Sitemap feature for you which automatically replaces the basic WordPress sitemaps upon activation.

The first thing you need to do is install and activate the AIOSEO plugin. For more details, please see our guide on how to install a WordPress plugin.

Once activated, you will need to configure the AIOSEO plugin. If you need help, then you can follow our step-by-step guide on how to set up All in One SEO in WordPress correctly.

After that, head over to the All in One SEO » Sitemaps page from the WordPress admin dashboard to review your sitemap settings.

Next, navigate to the ‘General Sitemap’ tab. Here, make sure that the ‘Enable Sitemap’ switch is set to ‘Active’. This will disable the default WordPress sitemap.

AIOSEO sitemap settings

Aside from the General Sitemap, we recommend that you enable the video sitemap, news sitemap, as well as the RSS sitemap on your site to maximize your SEO rankings.

Method 2. Disable WordPress Sitemap Using Code Snippet

You can also easily disable the default WordPress sitemap using code, too. You can add the code snippet in your theme’s functions.php file.

However, the biggest problem in adding code to your functions.php file is that even a tiny mistake can break your website.

That is why we recommend using WPCode to add custom code to WordPress. This free plugin makes it easy to add code snippets in WordPress without having to edit your theme’s functions.php file.

First, you need to install and activate the free WPCode plugin. For further instructions, check out our guide on how to install a WordPress plugin.

Next, go to the new Code Snippets entry in the left-hand menu of your WordPress dashboard. This will bring you to the ‘All Snippets’ page.

Next, just click on the ‘Add New’ button.

Go to Code Snippets and click on Add New

WPCode will then take you to the ‘Add Snippet’ page where you can choose to add your own custom code or search to find an existing snippet from the WPCode library.

As we have to add custom code, simply hover over ‘Add Your Custom Code (New Snippet)’ option and click ‘Use snippet.’

Click on the Use Snippet button

Now you will be directed to the ‘Create Custom Snippet’ page. You can start by typing a name for your code snippet. It can be anything you like.

Then, select a ‘Code Type’ from the dropdown menu to the right. As we will be using a PHP code, simply click on the ‘PHP Snippet’ option.

Type a name for your code snippet and choose PHP as code type

Next, simply copy and paste the following PHP code snippet in the ‘Code Preview’.

add_filter( 'wp_sitemaps_enabled', '__return_false' );

It will look like this when you’ve done so.

Paste your disable sitemap snippet

After pasting the code, scroll down to the ‘Insertion’ section where you will find two insert methods.

Simply choose the ‘Auto Insert’ option since you want it to run sitewide.

Choose an Insertion mode

Now, go to the top of the page, toggle the switch from ‘Inactive’ to ‘Active’ at the top right corner, and then click the ‘Save Snippet’ button.

Once, you have saved and activated the code snippet, it will be active and the default WordPress sitemap disabled.

Save your snippet

We hope this article helped you learn how to disable the default WordPress sitemap. You may also want to check out our ultimate WordPress SEO guide to improve your rankings, and see our comparison of the best managed WordPress hosting.

If you liked this article, then please subscribe to our YouTube Channel for WordPress video tutorials. You can also find us on Twitter and Facebook.

The post How to Easily Disable the Default WordPress Sitemap first appeared on WPBeginner.

How to Disable Directory Browsing in WordPress

Category Image 091

Do you want to disable directory browsing in WordPress?

Directory browsing can put your site at risk by showing important information to hackers which can be used to exploit vulnerabilities in your site’s plugins, themes, or even your hosting server.

In this article, we will show you how you can disable directory browsing in WordPress.

How to disable directory browsing in WordPress

What Does Disabling Directory Browsing in WordPress Do?

Every time someone visits your website, your web server will process that request.

Usually, the server delivers an index file to the visitor’s browser, such as index.html. However, if the server can’t find an index file, then it may show all the files and folders in the requested directory instead.

This is directory browsing, and it’s often enabled by default.

If you’ve ever visited a site and seen a list of files and folders instead of a webpage, then you’ve seen directory browsing in action.

A WordPress site with directory browsing enabled

The problem is that hackers can use directory browsing to see the files that make up your website, including all the themes and plugins that you’re using.

If any of these themes or plugins have known vulnerabilities, then hackers can use this knowledge to take control of your WordPress blog or website, steal your data, or perform other actions.

Attackers may also use directory browsing to look at the confidential information inside your files and folders. They might even copy your website’s contents, including content that you would usually charge for such as ebook downloads or online courses.

This is why it’s considered a best practice to disable directory browsing in WordPress.

How to Check is Directory Browsing is Enabled in WordPress

The easiest way to check whether directory browsing is currently enabled for your WordPress website is by simply visiting the /wp-includes/ folder link like this: https://example.com/wp-includes/.

You’ll want to replace www.example.com with your website’s URL.

If you get a 403 Forbidden or similar message, then directory browsing is already disabled on your WordPress website.

A website with directory browsing disabled

If you see a list of files and folders instead, then this means that directory browsing is enabled for your website.

A WordPress site with directory browsing enabled

Since this makes your website more vulnerable to attack, you’ll typically want to block directory browsing in WordPress.

How to Disable Directory Browsing in WordPress

To disable directory listing, you’ll need to add some code to your site’s .htaccess file.

To access the file, you’ll need an FTP client, or you can use the file manager app inside your WordPress hosting control panel.

If this is your first time using FTP, then you can see our complete guide on how to connect to your site using FTP.

After connecting to your site, simply open your website’s ‘public’ folder and find the .htaccess file. You can edit the .htaccess file by downloading it to your desktop and then opening it in a text editor like Notepad.

At the very bottom of the file, simply add the following code:

Options -Indexes

It will look something like this:

The WordPress .htaccess file

Once you’re done, save your .htaccess file and upload it back to your server using an FTP client.

That’s it. Now if you visit the same http://example.com/wp-includes/ URL, you’ll get a 403 Forbidden or similar message.

How to disable directory browsing in WordPress

We hope this article helped you learn how to disable directory browsing in WordPress. You may also want to see our ultimate WordPress security guide, or see our expert pick of the best WordPress membership plugin to protect your files.

If you liked this article, then please subscribe to our YouTube Channel for WordPress video tutorials. You can also find us on Twitter and Facebook.

The post How to Disable Directory Browsing in WordPress first appeared on WPBeginner.

How to Disable Gravatars in WordPress

Category Image 091

Do you want to disable Gravatars in WordPress?

WordPress uses Gravatars to display user profile photos or Avatars. It is a third-party service that allows users to have the same profile photo on different websites.

Gravatars are highly useful, particularly in WordPress comments. However, some users may not want to use Gravatars at all.

In this article, we’ll show you how to easily disable Gravatars in WordPress. We’ll also show you how to use local avatars instead.

Turn off Gravatars in WordPress

Why Disable Gravatars in WordPress

Gravatars are a third-party service that allows users to add a profile photo to their WordPress website and use it across the internet.

Basically, you create an account and then upload your profile photo.

Managing Gravatar profile

After that, whenever you use that particular email address on a website that supports Gravatar, it will automatically show your profile photo from the Gravatar website.

To learn more see our explainer, What is Gravatar and why you should use it.

However, some website owners may not want to use Gravatars for several reasons.

For instance, they may want to turn it off to improve website performance and speed.

Similarly, some site owners may not want to use Gravatar due to privacy concerns.

That being said, let’s take a look at how to easily disable Gravatars in WordPress.

Disabling Gravatars in WordPress

WordPress makes it super easy to customize or turn off Gravatars on your website.

First, you need to login to the admin area of your website and then go to the Settings » Discussion page.

From here, you need to scroll down to the Avatars section and uncheck the box next to ‘Show Avatars’ option.

Turn off Gravatars in WordPress

Don’t forget to click on the Save Changes button to store your settings.

WordPress will now disable Gravatars across your website. You’ll now see a generic user icon in the admin toolbar instead of your Gravatar image.

User profile photo disabled

Similarly, the comments page inside the admin area will also stop showing Gravatars.

Comments page without Gravatar images

WordPress will also stop showing Gravatar images in the comments area under your posts and pages.

Comments without Gravatars

How to Replace Gravatar with Local Avatars in WordPress?

Some users may want to disable Gravatar but still want to display profile photos under author bios and other places.

This allows you to keep the avatar functionality in WordPress and enable users to upload their own profile photos. At the same time, it disables Gravatars and prevents your website to make any requests to Gravatar website.

To do this, you’ll need to install and activate the WP User Avatars plugin. For more details, see our step by step guide on how to install a WordPress plugin.

Upon activation, you need to visit the Settings » Discussion page and check the box next to the ‘Block Gravatar’ option.

Block Gravatar

Don’t forget to click on the Save Changes button to store your settings.

The plugin will now block any requests to Gravatar.com while allowing you to keep avatar functionality.

To upload profile photos, users will need to upload their own images under their profiles.

Simply go to Users » Profile page. From here, you can upload an image from your computer or use one from the media library.

Local avatar

Don’t forget to click on the Update Profile button to save your changes.

WordPress will now use custom profile photos instead of Gravatars. For all unregistered users it will show the default avatar image you have set in the settings.

For all registered users, it will use the custom avatar image that they uploaded. If a user hasn’t uploaded their custom avatar image, then the plugin will use the default avatar image.

We hope this article helped you learn how to disable Gravatars in WordPress. You may also want to see our guide on how to make a membership website in WordPress, and our comparison of the best WordPress page builder plugins.

If you liked this article, then please subscribe to our YouTube Channel for WordPress video tutorials. You can also find us on Twitter and Facebook.

The post How to Disable Gravatars in WordPress first appeared on WPBeginner.

How to Add the First and Last CSS Class to WordPress Menu Items

Category Image 091

Do you need to add custom styling to the first and last items of your WordPress navigation menu?

You could simply add a custom CSS class to the first and last menu items, but if the menu is rearranged, then those items will no longer be first and last.

In this article, we’ll show you how to add a .first and .last class that will style the first and last menu items even if the menu items are reordered.

How to Add the First & Last Class to WordPress Navigation Menu Items

Why Style the First and Last Navigation Items Differently?

In a past custom design project, we needed to add some custom styling to the navigation menu items of a WordPress website. This design in particular required different styling for the first menu item and the last menu item.

Now we could easily edit the menu and add a custom CSS class to the first and last menu item. But because we were delivering the project to a client, our solution had to work even if they rearranged the order of the menus.

So we decided to do use filters instead.

In this tutorial, we’ll show you two ways to style the first and last items of your navigation menu. You can choose your preferred method from the list below:

Method 1: Adding First and Last Class Using a Filter

The first way to style your first and last navigation menu items differently is to add a filter to your theme.

You’ll need to add code to your theme’s functions.php file. If you haven’t done this before, then see our guide on how to copy and paste code in WordPress.

All you have to do is open your theme’s functions.php file then paste the following code snippet:

function wpb_first_and_last_menu_class($items) {
    $items[1]->classes[] = 'first';
    $items[count($items)]->classes[] = 'last';
    return $items;
}
add_filter('wp_nav_menu_objects', 'wpb_first_and_last_menu_class');

This creates .first and .last CSS classes for your first and last navigation menu items respectively. You can use those classes to style the menu items.

To learn how to do this in detail, refer to our guide on how to style WordPress navigation menus.

For this tutorial, we’ll add the following basic CSS formatting to our theme’s style.css stylesheet to simply bold the first and last menu items:

.first a {font-weight: bold;}

.last a {font-weight: bold;}

Here you can see screenshots before and after we added the code to our demo site.

Preview of First and Last Menu Items Styled Differently

Method 2: Styling First and Last Items Using CSS Selectors

A second way to style the first and last menu items differently is to use CSS selectors. This method is simpler, but it may not work with some older browsers, such as Internet Explorer.

To follow this method you’ll have to add code to your theme’s style sheet or the ‘Additional CSS’ section of the WordPress Theme Customizer.

If you haven’t done this before, then see our guide on how to easily add custom CSS to your WordPress site.

You should start by editing your theme’s style.css file, or by navigating to Appearance » Customize and clicking on ‘Additional CSS’.

After that, you need to paste the following code snippet and then save or publish your changes.

ul#yourmenuid > li:first-child { }
ul#yourmenuid > li:last-child { }

Note that you will need to replace ‘yourmenuid’ with the actual ID of the navigation menu. The selectors ‘first-child’ and ‘last-child’ select an element if it is the first and last child of its parent, which is the navigation menu.

For example, we used this code to bold the first and last navigation menu items on our demo site:

ul#primary-menu-list > li:first-child a {
    font-weight: bold;
}
ul#primary-menu-list > li:last-child a {
    font-weight: bold;
}
Using CSS Selectors to Style First and Last Menu Items Differently

We hope this tutorial helped you learn how to add the .first and .last class to WordPress navigation menus.

You may also want to learn how to fix 50 common WordPress errors, or check out our list of the best drag and drop page builders.

If you liked this article, then please subscribe to our YouTube Channel for WordPress video tutorials. You can also find us on Twitter and Facebook.

The post How to Add the First and Last CSS Class to WordPress Menu Items first appeared on WPBeginner.

How to Create Additional Image Sizes in WordPress

Featured Imgs 13

Do you want to create additional image sizes in WordPress?

By default, WordPress automatically creates several copies of image uploads in different sizes. Additionally, WordPress themes and plugins can also create their own image sizes.

In this article, we’ll show you how to easily create additional image sizes in WordPress and use them on your website.

Creating additional image sizes in WordPress

Why Create Additional Image Sizes in WordPress?

Normally, all popular WordPress themes and plugins handle image sizes very well. For instance, your WordPress theme may create additional sizes to use as thumbnails on archive pages.

However, sometimes these image sizes may not fit your own requirements. You may want to use a different image size in a child theme or a post grid layout.

You can do this by creating additional image sizes in WordPress and then calling these sizes whenever you need them.

That being said, let’s take a look at how to create additional image sizes in WordPress.

Registering Additional Image Sizes for your Theme

Most WordPress themes including all the top WordPress themes support post thumbnails (featured image) feature by default.

However, if you are creating a custom WordPress theme then you will need to add support for post thumbnails by adding the following code to your theme’s functions.php file.

add_theme_support( 'post-thumbnails' );

Once you enable the support for post thumbnails, you can now use the functionality of registering additional image sizes by using the function add_image_size().

The add_image_size function is used in the following format:

add_image_size( 'name-of-size', width, height, crop mode );

Example code can look like the following:

add_image_size( 'sidebar-thumb', 120, 120, true ); // Hard Crop Mode
add_image_size( 'homepage-thumb', 220, 180 ); // Soft Crop Mode
add_image_size( 'singlepost-thumb', 590, 9999 ); // Unlimited Height Mode

Now if you notice, we have specified three different sorts of image sizes. Each has different modes such as hard crop, soft crop, and unlimited height.

Let’s cover each example and how you can use them in your own projects.

1. Hard Crop Mode

As you may notice, there is a “true” value added after the height. This tells WordPress to crop the image exactly to the size that we have defined (in this case 120 x 120px).

This method is used to ensure that everything is exactly proportionate. This function will automatically crop the image either from the sides or from the top and bottom depending on the size.

Hard crop images example

2. Soft Crop Mode

By default, soft cropping mode is turned on this is why you do not see any additional value added after the height. This method resizes the image proportionally without distorting it. So you might not get the dimensions that you wanted. Usually, it matches the width dimension and the heights are different based on each image’s proportion. An example display would look like this:

Soft crop example

Unlimited Height Mode

There are times when you have super long images that you want to use in your design, but you want to make sure that the width is limited. For instance, infographic images tend to be very long and usually wider than the content width.

This mode allows you to specify a width that will not break your design while leaving the height to be unlimited.

Unlimited height mode

Displaying additional image sizes in your WordPress theme

Now that you have added the functionality for the desired image sizes lets take a look at displaying them in your WordPress theme. Open the theme file where you want to display the image and paste the following code:

<?php the_post_thumbnail( 'your-specified-image-size' ); ?>

Note: This bit of code must be pasted inside the post loop.

That’s all you really have to do to display the additional image sizes in your WordPress theme. You probably should wrap it around with the styling that fits your need.

Regenerating Additional Image Sizes

If you are not doing this on a brand new site, then you probably will have to regenerate thumbnails.

The add_image_size() function only generates the sizes from the point it was added into the theme. This means any post images that were added prior to the inclusion of this function will not have new sizes.

To fix this, you need to regenerate the new image size for older images. This is made easy by the plugin called Regenerate Thumbnails. Once you install and activate the plugin, a new option is added under the menu: Tools » Regenerate Thumbnails

Regenerate thumbnails

You’ll see the option to regenerate thumbnail for all images or just the featured images. We recommend regenerating all images to avoid any unexpected behavior or broken images.

For more details, see our article on how to easily regenerate new image sizes in WordPress.

Enabling Additional Image Sizes for your Post Content

Even though you have enabled image sizes in your theme, the usage is limited only to your theme which does not make any sense.

All image sizes are being generated regardless, so why not make it available for the post author to use within the post content.

You can do this by adding the following code to your theme’s functions file.

function wpb_custom_image_sizes( $size_names ) {
    $new_sizes = array(
        'homepage-thumb' => 'Homepage Thumbmail', 
        'singlepost-thumb' => 'Infographic Single Post'
    );
    return array_merge( $size_names, $new_sizes );
}
add_filter( 'image_size_names_choose', 'wpb_custom_image_sizes' );

Don’t forget to save your changes after adding the code.

You can now go and upload an image to a WordPress post or page. In the image block settings you’ll see your custom image sizes under the ‘Image size’ option.

Choose your custom image size inside post editor

You and other authors working on your website can now select these size options when adding images to posts and pages.

We hope this article helped you learn how to create additional image sizes in WordPress. You may also want to see our article on the best image compression plugins for WordPress and our WordPress performance guide to improve your website speed.

If you liked this article, then please subscribe to our YouTube Channel for WordPress video tutorials. You can also find us on Twitter and Facebook.

The post How to Create Additional Image Sizes in WordPress appeared first on WPBeginner.

How to Disable Image Attachment Pages in WordPress

Category Image 091

Do you want to disable image attachment pages in WordPress?

Image attachment pages can look like incomplete pages on your site. If a visitor views these, then it can leave a poor impression.

In this article, we’ll show you how to disable image attachment pages in WordPress and redirect it to the parent post.

How to disable image attachment pages in WordPress

Why Should You Disable Image Attachment Pages in WordPress?

By default, WordPress creates a single page for every media attachment you have on your site.

This includes images, audio/video files, pdfs, and more. Some users might find this functionality useful, however, most WordPress websites don’t need it.

For example, a photography theme could use the attachment page to display EXIF data. This could show the camera model used, the camera settings, and even the image’s location data.

Often we get complaints from users who accidentally linked their images to the attachment pages, and they don’t like the way it looks.

This is a big issue because many themes don’t have special templates for the image attachment pages.

Sometimes an image on your website can become popular, and people might start landing on the attachment page directly from Google.

Ideally, you want visitors to land on your post and see the image in the context you have used it.

This is why we always recommend users to disable image attachment pages on their WordPress blog.

How to Disable Image Attachment Pages in WordPress (2 Methods)

There are two ways to disable image attachment pages in WordPress.

The first approach uses WordPress plugins, while the second involves adding custom code to WordPress.

You’ll want to choose the method that’s best suited for your skills.

Method 1: Disable Image Attachment Pages in WordPress (with a Plugin)

The easiest way to disable image attachment pages is to use a WordPress plugin. This method is beginner friendly and requires no coding.

We recommend using All in One SEO. It’s the best SEO plugin for WordPress used by over 2 million sites.

The first thing you’ll need to do is install and activate the plugin. To do this, see our guide on how to install a WordPress plugin.

Once the plugin is installed and activated, you’ll have a new menu item called ‘All in One SEO’.

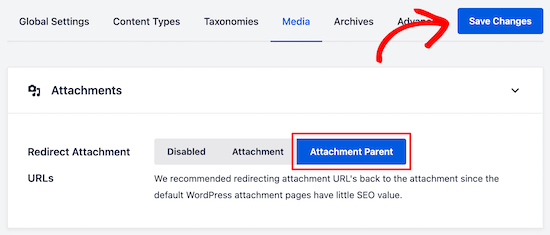
Navigate to All in One SEO » Search Appearance. Next, click the ‘Media’ navigation tab.

All in One SEO search appearance media setting

The first setting is ‘Redirect Attachment URLs’. You can disable the setting entirely, redirect to the attachment page, or the attachment parent page.

We recommend redirecting to the ‘Attachment Parent’ page. That way, when a user lands on the image attachment page, they’ll be redirected to your article instead.

All in One SEO select attachment parent

Once you select your preferred setting, make sure to click ‘Save Changes’ before exiting the screen.

If you aren’t using the All in One SEO plugin, you can still disable image attachment pages and redirect users to a parent post using a plugin called Attachment Pages Redirect.

All you have to do is install and activate the plugin. It’ll automatically start redirecting users that land on attachment pages to the parent post.

If no parent post is found, then users will be redirected to your homepage.

This plugin works out of the box and has no settings page. Simple and easy.

Method 2: Disable Image Attachment Pages in WordPress (with Code Snippet)

Another option is to add a code snippet to WordPress that accomplishes the same goal as the plugin above.

If you don’t want to use a plugin or feel that you’re already using too many WordPress plugins, then you can use this method.

First, you’ll need to create a new file in your WordPress theme folder and name it image.php. If your theme already has an image.php file, then you’ll need to edit that file instead.

After that, all you have to do is add the following code as the first line in your image.php file:

<?php wp_redirect(get_permalink($post->post_parent)); ?>

Next, you need to save the image.php file and upload it to your theme directory using FTP or your WordPress hosting control panel.

Now, when a user lands on your image attachment page, they’ll be redirected to the parent post.

We hope this article helped you disable image attachment pages in WordPress. You may also want to see our beginner’s guide to image SEO and our guide on how to fix common image issues in WordPress.

If you liked this article, then please subscribe to our YouTube Channel for WordPress video tutorials. You can also find us on Twitter and Facebook.

The post How to Disable Image Attachment Pages in WordPress appeared first on WPBeginner.

How to Display Full Size Images in WordPress (4 Methods)

Featured Imgs 13

Do you want to learn how to display full-size images in WordPress?

The latest version of WordPress automatically resizes large images to improve performance. But sometimes you may need to display images with larger dimensions.

In this tutorial, we’ll share four different ways to display full-size images on your WordPress site.

How to display full-size images in WordPress

Why is WordPress Scaling Large Images?

Earlier versions of WordPress allowed users to upload images with very large dimensions.

But, what happened is WordPress beginners were uploading images that were simply too large for the modern web. Large images lead to slow website loading speeds and poor performance.

To fix this issue, the WordPress 5.3 update changed how WordPress handles very large images.

For example, if you upload an image with the dimensions of 5000px by 7000px, then WordPress will resize the image to 2560px and scale the width to match the original dimensions.

Now, when a user visits a page with a previously large image, they’ll see the scaled-down version of that image.

This leads to improved website performance and happier users overall.

Reasons to Stop WordPress From Scaling Images

This new feature is useful for most WordPress website owners, but some users might need to display full-size images.

For example, if you’re a photographer or artist who sells your work, then you may want to display larger images on your website, so visitors can buy or download them.

Or, you could be running a website where larger images are a requirement, like a stock photo website or website that sells custom prints and pictures.

Maybe, you need one large image for your home page background image that’s bigger than the 2560px limits?

No matter what your reason for wanting a full-size image, we’ll show you how to do it, step by step.

How to Display Full-Size Images in WordPress (4 Methods)

There are 4 different ways you can display full-size images in WordPress.

Some methods work better for single images, while others are best for an entire image library.

You’ll want to choose the full-size image method that’s right for your goals.

Method 1. Get Full Size Image URL in WordPress

If you only want to use one or two large images on your website, then this solution is probably best.

When you upload an image to WordPress that exceeds the dimensions, WordPress will scale your image and create a new one. But, the original image is still intact.

To display the original image dimensions, you’ll need to delete ‘-scaled’ from the end of the WordPress image URL and insert the image into your site with the modified link.

Simply head over to your media library by going to Media » Library and select your large image.
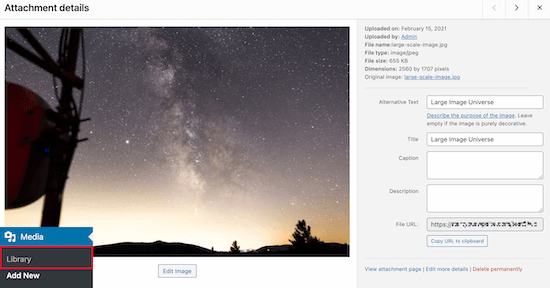
Large image media library

Now, locate your ‘File URL’ in the image box.

Next, you’ll want to delete ‘-scaled’ from the end of your image URL.

Delete scaled image URL

After that, you can copy the image URL and insert the image into your website.

Note that you’ll need to embed the image into your site using the link, minus the scaled portion.

To do this navigate to a post or page you want to add the image and click the ‘+’ icon to add a new block.
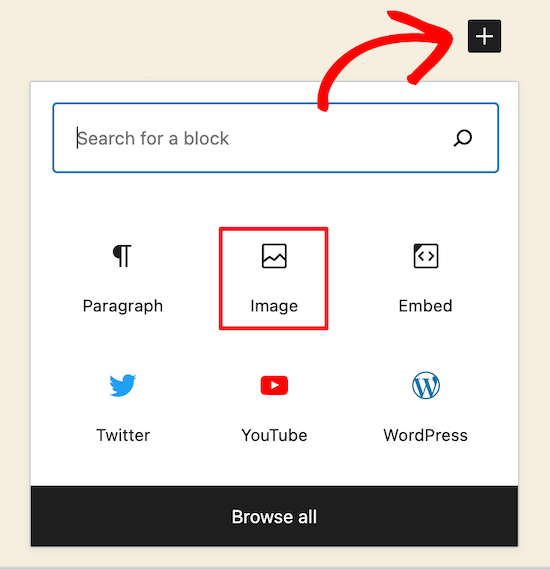
Insert new image block for large image

Then click the ‘Image’ icon to add an image block where you can paste your URL.

Click ‘Insert from URL’, then paste your full size image URL into the box and press the ‘Enter’.
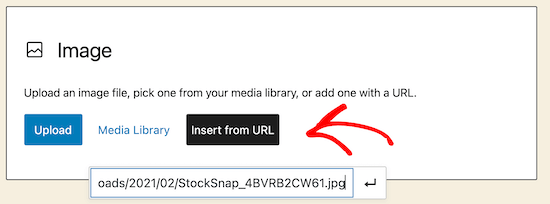
Add non scaled image URL

After that, you’ll need to click ‘Publish’, or ‘Update’, if the post is already live, and your full-size image will now be viewable on your site.

You can follow this same process for every full-size image you want to add to your site. But, as long as you use the File URL minus ‘scaled,’ your WordPress images will display in full size.

Method 2. Automatically Disable Image Scaling in WordPress (with a Plugin)

The second method is using a WordPress plugin to disable image scaling across your site.

The plugin we recommend is called Disable “BIG Image” Threshold. This plugin offers one of the easiest workarounds for displaying big images on your site, and it’s entirely free to use.

First, you’ll need to install and activate the Disable “BIG Image” Threshold plugin. For more details on installing a plugin, see our step by step guide on how to install a WordPress plugin.

Once you’ve installed and activated the plugin on your site, it’ll automatically remove the big image threshold added by WordPress.

You’re free to add new images just as you were before the WordPress image update.

When this plugin is active, WordPress will not add the ‘-scaled’ attribute to any image.

Method 3. Automatically Disable Big Image Scaling in WordPress (with Code Snippet)

Another option is to add a code snippet to WordPress that accomplishes the same goal as the plugin above.

If the plugin doesn’t work for some reason, or you don’t want to install too many plugins, then you can use this method.

The new WordPress image scaling feature uses a filter called big_image_size_threshold.

You’ll want to use the following code to disable this function:

add_filter( 'big_image_size_threshold', '__return_false' );

You need add this code in your theme’s functions.php file, in a site-specific plugin, or by using the Code snippets plugin.

Method 4: Open Full-Size WordPress Images in a Lightbox

The final option is to add a full-size image lightbox to your site. With this solution, you get the best of both world.

You can load smaller image thumbnails in your blog content, gallery, or carousel, and when clicked, it will popup with your full-size image.

Show full size image lightbox effect

To do this, we recommend using the Envira Gallery plugin. It’s the best WordPress image gallery plugin in the market and lets you easily add the lightbox popup image effect.

The first thing you’ll need to do is install the Envira Gallery plugin. For more details, see our step by step guide on how to install a WordPress plugin.

After installing and activating the plugin, see our step by step guide on creating an image gallery in WordPress with the lightbox effect.

Keep in mind that before you upload full-size images for your gallery, you’ll need to disable image scaling via the plugin or child theme methods above.

Otherwise, your lightbox images will be using the scaled-down version of the image.

Finally, it’s important to note that if you add images with large dimensions, it’s essential to optimize them for the web, so you don’t slow down your website.

We hope this article has helped you display full-size images in WordPress. You may want to see our guide on optimizing images for SEO and our expert pick of 40 useful tools to manage and grow your blog.

If you liked this article, then please subscribe to our YouTube Channel for WordPress video tutorials. You can also find us on Twitter and Facebook.

The post How to Display Full Size Images in WordPress (4 Methods) appeared first on WPBeginner.

How to Disable WordPress Admin Bar for All Users Except Administrators

Category Image 091

Do you want to easily disable the admin bar in WordPress?

By default, you can easily disable the WordPress admin bar for any user from the dashboard. But this method can take time if you have a lot of registered users on your site.

In this article, we’ll show you how to disable the WordPress admin bar for all users except administrators.

Disabling WordPress admin bar for all users except administrators

What is WordPress Admin Bar?

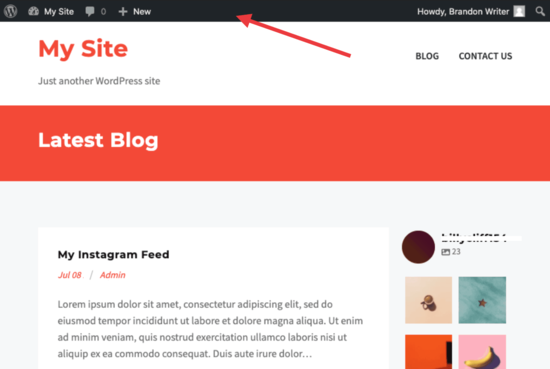
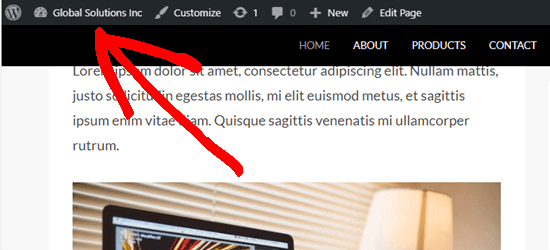
By default, WordPress displays an admin bar on the top for all logged-in users. This toolbar is visible in the WordPress admin area as well as all other pages when you are logged in.

WordPress admin bar

The WordPress admin toolbar contains useful shortcuts to different WordPress sections. The shortcuts available in the admin bar change based on a users’ role and permissions in WordPress.

However, when viewing the public pages on the front-end of your website, the admin bar can be a bit distracting. It may also affect your website’s design and user experience.

Luckily, there are multiple ways to easily disable the WordPress admin bar for all users except administrators.

Method 1. Disabling The WordPress Admin Bar for Any User

WordPress allows each user to disable the admin bar by simply editing their user profile. As a site owner, you can also edit other user’s profiles and disable the admin bar for them.

If you want to disable the admin bar for any particular user in WordPress, you’ll need to edit their user profile.

Simply go to the Users » All Users page and then click on the ‘edit’ link for any user you want to disable the admin bar for.

Edit user settings

This will bring you to the user profile editor page. From here, uncheck the box next to the ‘Show toolbar when viewing site’ option.

Disable admin bar

Scroll down and click the ‘Update User’ button to save your changes.

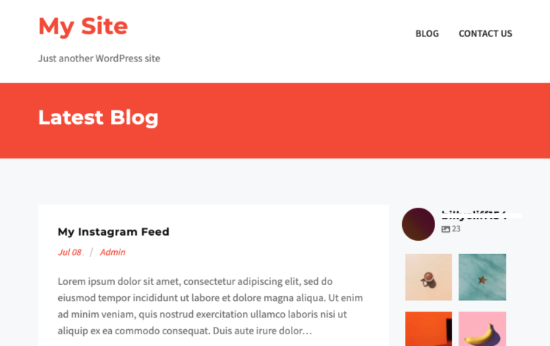
This will disable the admin bar for that particular user when they visit the website.

Site without admin bar

If you have a handful of users, then you can go ahead and manually disable the admin bar for all of them. However, if you run a membership site with a lot of users, then this method wouldn’t work.

Luckily, there are other ways to quickly disable the admin bar for all users except administrators.

Method 2. Disable Admin Bar for All Users Except Admins with a Plugin

This method allows you to quickly disable the WordPress admin for all users.

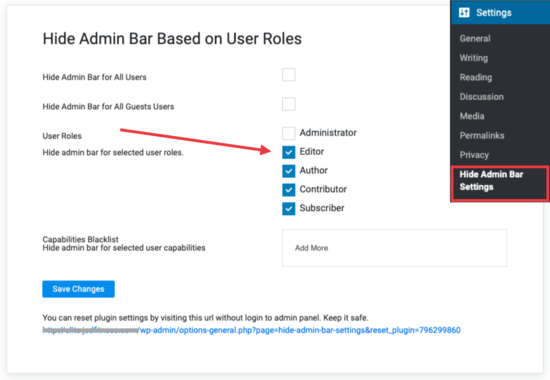
First, you need to install and activate the Hide Admin Bar Based on User Roles plugin. For more details, see our step by step guide on how to install a WordPress plugin.

Upon activation, go to the Settings » Hide Admin Bar Settings page. From here, check the boxes next to the user roles where you want to disable the admin bar.

Hide Admin settings with a plugin

Don’t forget to click on the ‘Save Changes’ button to store your settings.

Method 3. Disable Admin Bar for All Users Except Administrators Using Code

This method requires you to add code to your WordPress theme files. If you have not done this before, then check out our guide on how to copy and paste code snippets in WordPress.

Simply add the following code to your theme’s functions.php file or a site-specific plugin.

add_action('after_setup_theme', 'remove_admin_bar');
function remove_admin_bar() {
if (!current_user_can('administrator') && !is_admin()) {
  show_admin_bar(false);
}
}

This code checks if the current user is not an administrator, and they are not viewing the admin dashboard. If both conditions match, then it will disable the WordPress admin bar.

Don’t forget to save your changes and check your website to make sure everything is working fine.

Method 4. Disable Admin Bar for All Users Including Admins

What if you wanted to disable the admin bar for all users including yourself and any other administrator on your site?

You can do this by modifying the code we showed earlier.

Simply add the following code to your theme’s functions.php file or a site-specific plugin.

/* Disable WordPress Admin Bar for all users */
add_filter( 'show_admin_bar', '__return_false' );

This code will disable the admin bar for all users when viewing the public pages of your website. All users will still be able to see the toolbar inside the WordPress admin dashboard.

We hope this article helped you learn how to disable the WordPress admin bar for all users except administrators. You may also want to see our ultimate WordPress security guide and our comparison of the best WordPress page builder for creating custom page layouts without any code.

If you liked this article, then please subscribe to our YouTube Channel for WordPress video tutorials. You can also find us on Twitter and Facebook.

The post How to Disable WordPress Admin Bar for All Users Except Administrators appeared first on WPBeginner.

How to Create a Sticky Floating Navigation Menu in WordPress

Category Image 091

Recently, one of our users asked us how to create a sticky navigation menu for their site?

Sticky navigation menus stay on the screen as users scroll down the page. This makes the top menu always visible, which is good for user experience because it contains links to the most important sections of your website.

In this article, we’ll show you how to easily create a sticky floating navigation menu in WordPress.

Creating a sticky floating navigation menu in WordPress

What is a Sticky Floating Navigation Menu?

A sticky or floating navigation menu is one that ‘sticks’ to the top of the screen as a user scrolls down. This makes your menu visible to users at all times.

Here’s a sticky menu in action. We’re going to show you how to create a menu exactly like this for your own site:

A sticky navigation menu in action on our demo website

Why and when sticky menus can be useful?

Usually, the top navigation menu contains links to the most important sections of a website. A floating menu makes those links always visible, which saves users from scrolling back to the top. It is also proven to increase conversions.

If you run an online store, then your top navigation menu likely include links to the cart, product categories, and product search. Making this menu sticky, can help you reduce cart abandonment and increase sales.

Some of the best WordPress themes have built-in support for a sticky navigation menu. Simply see your theme settings under Themes » Customize to enable this feature.

If your theme does not have this option, then keep reading, and we’ll show you how to easily create a sticky floating navigation menu in any WordPress theme or WooCommerce store.

Method 1: Add Your Sticky Floating Navigation Menu Using a Plugin

This is the easiest method. We recommend it for all WordPress users, particularly for beginners.

If you haven’t set up your navigation menu yet, go ahead and do that using our instructions on how to add a navigation menu in WordPress.

After that, you need to install and activate the Sticky Menu (or Anything!) on Scroll plugin. For more details, see our step by step guide on how to install a WordPress plugin.

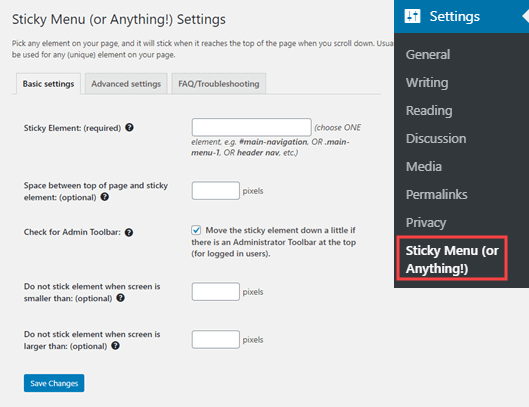
Upon activation, you need to visit the Settings » Sticky Menu (or Anything!) page to configure the plugin settings.

The Sticky Menu plugin's settings page

First you need to enter the CSS ID of the navigation menu that you want to make sticky.

You will need to use your browser’s inspect tool to find the CSS ID used by your navigation menu.

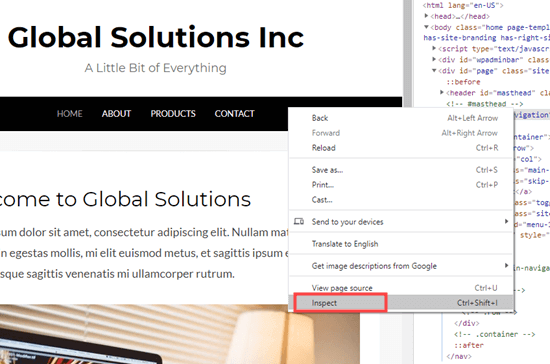
Simply visit your website and take your mouse to the navigation menu. After that, you need to right-click and select Inspect from your browser’s menu.

Inspecting the navigation menu element on your website

This will split your browser screen, and you will be able to see the source code for your navigation menu.

You need to find a line of code that relates to your navigation, or your site header. It will look something like this:

<nav id="site-navigation" class="main-navigation" role="navigation">

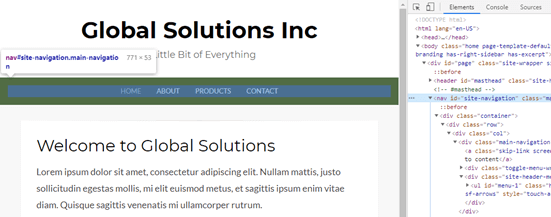
If you’re struggling to find it, bring your mouse cursor over the different lines of code in the Inspect pane. The navigation menu will be fully highlighted when you have the right line of code:

Finding the navigation menu ID using the inspect tool

In this case, our navigation menu’s CSS ID is site-navigation.

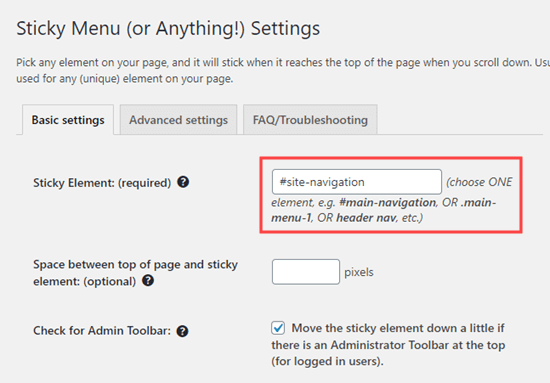
All you need to do is enter your menu’s CSS ID in the plugin settings with a hash at the start. In this case, that’s #site-navigation.

Entering the ID of the element that you want to make sticky (in this case, the navigation menu)

Don’t forget to click the ‘Save Changes’ button at the bottom of the page.

Now, go ahead and check out your sticky menu live on your WordPress website. It should stay on the page as you scroll down, like this:

Viewing the sticky menu on your website

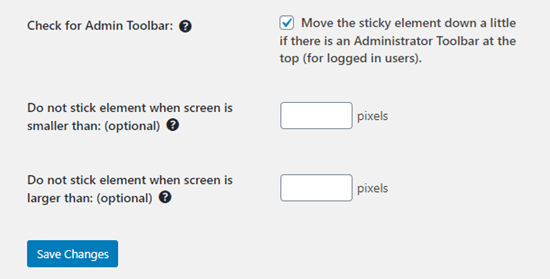
The next option on the plugin’s settings page is to define the space between the top of your screen and the sticky navigation menu. You only need to use this setting if your menu is overlapping an element that you do not want to be hidden. If not, then ignore this setting.

We recommend leaving the box checked next to the option: ‘Check for Admin Bar’. This allows the plugin to add some space for the WordPress admin bar, which is only visible to logged-in users.

Here, you can see that the admin bar on our test site is correctly displaying above the sticky menu:

The WordPress admin bar appears above the sticky menu

The next option allows you unstick the navigation menu if a user is visiting your website using a smaller screen such as a mobile device:

The sticky menu plugin offers further options too

You can test how your site looks on mobile devices or tablets. If you don’t like how it looks, simply add 780px for this option.

Don’t forget to click on the Save Changes button after making any changes to your options.

Method 2: Manually Add a Sticky Floating Navigation Menu

This method requires you to add custom CSS code to your theme. We don’t recommend it for beginners.

We also recommend that you take a look at our guide on how to easily add custom CSS to your WordPress site before you begin.

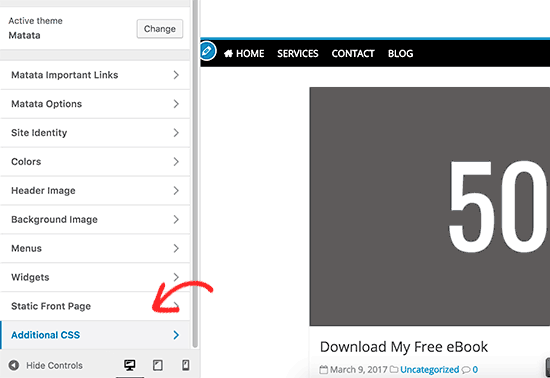
First, you need to visit Appearance » Customize to launch the WordPress theme customizer.

Adding custom CSS in WordPress theme

Next, click on ‘Additional CSS’ in the left pane and then add this CSS code.

#site-navigation {
    background:#00000;
    height:60px;
    z-index:170;
    margin:0 auto;
    border-bottom:1px solid #dadada;
    width:100%;
    position:fixed;
    top:0;
    left:0;
    right:0;
    text-align: center;
}

Note: This will produce a navigation menu with a black background. If you want a different color, change the number next to background. For example, using background: #ffffff will give you a white menu background.

Just replace #site-navigation with the CSS ID of your navigation menu then click on the Publish button at the top of the screen.

Go ahead and visit your website to see your sticky floating navigation menu in action:

A sticky / floating navigation menu created using CSS

What if your navigation menu normally appears below the site header instead of above it? If so, this CSS code could overlap the site title and header or appear too close to it before the user scrolls:

The sticky navigation menu is slightly overlapping the site title

This can be easily adjusted by adding a margin to your header area using some additional CSS code:

.site-branding {
margin-top:60px !important;
}

Replace site-branding with the CSS class of your header area. Now, the sticky navigation menu will no longer overlap your header before the user scrolls down:

There's now room for the title below the sticky navigation menu

We hope this article helped you add a sticky floating navigation menu to your WordPress site. You may also want to see our guide on how to create a custom WordPress theme without writing any code, and our comparison of the best WordPress page builder plugins.

If you liked this article, then please subscribe to our YouTube Channel for WordPress video tutorials. You can also find us on Twitter and Facebook.

The post How to Create a Sticky Floating Navigation Menu in WordPress appeared first on WPBeginner.