How to Properly Add Images in WordPress (Step by Step)

Category Image 091

Are you looking for the right way to add images to your WordPress website or blog?

By adding images in WordPress correctly, you can improve the visual appeal, accessibility, and SEO of your website. You can even allow users to upload their own images and use them on your site or in your competitions.

In this article, we will show you how to properly add images in WordPress.

Add images in WordPress properly

The Importance of Correctly Uploading Images in WordPress

Sometimes, users directly copy an image from the source and paste it into their website content. Unfortunately, this can cause problems like slow pages, poor user experience, and poor SEO.

When you add images to your WordPress website, it’s important to do it properly. This means using the right file format, file name, and alt text.

We recommend naming your images with descriptive words separated by dashes. For example, you might use the file name ‘bali-vacation-photo.jpg’ for an image on your travel blog.

Properly adding images also means resizing your images so that they load quickly and look good on all devices. For example, some image formats like JPEG, are more compressed than others, which means that these images will take up less space on your server and will take less time to load.

By using these formats, along with an image compression plugin for the images on your WordPress blog, you can improve the user experience of your website.

Similarly, by using the Image block in WordPress and properly optimizing your images for SEO and alt text, you can make it easier for search engines to index your images.

This can increase your website’s rankings and improve the accessibility of your website for people with disabilities.

That being said, let’s see how to properly add images in WordPress. We will cover several methods, and you can use the quick links below to jump to the different sections of our tutorial:

How to Add Images in the Block Editor (Gutenberg)

You can easily add images in the WordPress block editor by using the Image block.

First, you need to open the existing or new page/post where you want to add an image.

Once you are there, click the ‘+’ button in the top left corner of the screen to open the block menu. From here, you must find and add the Image block to the post or page.

Add image block to the post

Once you have done that, click the ‘Media Library’ button to launch the ‘Select or Upload Media’ prompt on the screen.

From here, you can switch to the ‘Upload Files’ tab if you want to upload an image from your computer.

However, if you want to add an image from the media library, then you can also do that by switching to the ‘Media Library’ tab.

Select image from the media library

Upon adding an image, you will need to add alt text for it in the left column. This alt text is crucial for image SEO as it helps search engines understand the context of the image. It also allows people with screen readers to see this information about your images.

You can also add a title and caption describing the image in the right column. Captions are the visible text descriptions of your images, while the title will appear when a user hovers their mouse over the image.

For details, you may want to see our beginner’s guide on how to add captions to images in WordPress.

Next, just click the ‘Select’ button to add the image to your page or post.

Fill in image details

Now that you have uploaded an image, you can further customize its size, dimensions, border, and style from the block panel on the right.

For details, check out our tutorial on how to add and align images in WordPress.

Images settings in the block panel

Finally, click the ‘Update’ or ‘Publish’ button to store your settings.

You have now properly added an image in the Gutenberg editor.

How to Add Images in the Classic Editor

If you are still using the old classic editor in WordPress, then you can use this method.

First, you need to visit the page or post where you want to add the image from the WordPress dashboard. Once you are there, just click the ‘Add Media’ button to launch the media library.

Click the add media button

After that, you can switch to the ‘Upload Files’ tab to upload an image from your computer.

Alternatively, for adding an image from the media library, just switch to the ‘Media Library’ tab.

Upload image file in the classic editor

Upon adding an image, you will need to add alt text and a title for it. You can also add a description and caption if you wish.

You can simply describe the image for all these options. This will help search engine index your image and increase your website’s visibility.

Next, go ahead and click the ‘Insert into Post’ button.

Configure attachment details in classic editor

Now, the image will be added to your WordPress post or page.

From here, you can change its alignment by using the alignment icons above the image. You can also further edit an image by clicking on the pencil icon.

Click the Pencil icon to edit an image

This will open the ‘Image details’ prompt on your screen, where you can change the size and add image title attributes, CSS classes, alignment, and more.

Once you are done, just click the ‘Update’ button to save the changes you made.

Edit image in the classic editor

After that, simply click the ‘Publish’ or Update’ button to save your post.

How to Add Images in the Media Library

If you want, you can also directly add an image to the media library. Keep in mind that after adding an image to the media library, you will still need to open a post or page and insert the Image block.

To add an image from the media library, you must visit the Media » Add New page from the WordPress admin area.

Once you are there, click the ‘Select Files’ button to upload an image from your computer. Then, click the ‘Edit’ link next to the image.

Add Image in the media library and click the Edit link

This will take you to the ‘Edit Media’ page, where you can start by changing the title for the image. After that, you can add alt text, a caption, and a description by scrolling down.

Once you have done that, you can also click on the ‘Edit Image’ button.

Click the Edit Image button

This will direct you to another page, where you can crop, scale, rotate, or flip the image according to your liking. For detailed instructions, please see our beginner’s guide on how to do basic image editing in WordPress.

Once you are satisfied, just click the ‘Update’ button to save your changes.

basic editing features in WordPress

This will take you back to the ‘Edit Media’ page, where you have to click on the ‘Update’ button again to store your settings.

You have now successfully added an image to the media library.

Next, visit the post where you want to add this image from the WordPress admin sidebar. Once you are there, click the ‘+’ button to add an Image block to the post.

Next, you need to select the ‘Media Library’ button.

Image block

This will launch the ‘Select or Upload Media’ prompt on your screen, where you will notice the image that you uploaded in the media library at the top.

On selecting the image, you will see that its title, alt text, caption, and description have already been added to it from the media library page.

Now, simply click the ‘Select’ button to upload the image to the block editor.

Add image from the media library

Finally, click the ‘Publish’ or ‘Update’ button to store your settings.

How to Optimize an Image for WordPress SEO

Once you have added an image to a post/page, it is also crucial to optimize it for search engines. Unfortunately, WordPress does not offer any built-in advanced SEO features for images.

This is where All in One SEO for WordPress (AIOSEO) comes in.

It is the best WordPress SEO plugin on the market that makes it super easy to optimize your content, including images, for search engines.

First, you need to install and activate the AIOSEO plugin. For more instructions, see our step-by-step guide on how to install a WordPress plugin.

Note: AIOSEO also has a free version. However, you will need the pro version of the plugin to unlock the Image SEO feature.

Upon activation, you will have to configure the setup wizard.

For more details, see our guide on how to set up All in One SEO for WordPress correctly.

AIOSEO setup wizard

Next, head over to the All in One SEO » Search Appearance page from the WordPress admin sidebar and switch to the ‘Image SEO’ tab.

After that, scroll down and click the ‘Activate Image SEO’ button to unlock the feature.

Activating the Image SEO Module in AIOSEO

You will now be able to see the Image SEO settings. Here, you will notice different tabs for the title, alt text, caption, description, and filename.

Configure Automatic Image Titles

Once you switch to the ‘Title’ tab on the Image SEO page, you can start by creating a title format for your images using smart tags.

These smart tags will then automatically generate title attributes for your images. This is what a visitor will see when they hover their mouse over your images.

For example, if you want each image title attribute to use the image title and the site title, then you can add these smart tags in the ‘Title Format’ field.

Add smart tags to configure title SEO

After that, you can also enable the Strip Punctuation option if you want AIOSEO to automatically remove some characters when creating an image title from the filename.

For example, if you use dashes when saving an image file like ‘an-example-image’, then you can choose the ‘Dashes (-)’ option in the ‘Characters to Convert to Spaces’ section.

Once you do that, AIOSEO will automatically remove these dashes and turn them into spaces, making the image title ‘an example image’.

Configure strip punctuation and casing options

After that, scroll down to the ‘Casing’ section.

From here, you can choose a casing option for your title. We recommend picking sentence case or title case to make your titles more readable.

Configure Automatic Alt Tags

After configuring title settings, switch to the ‘Alt Tag’ tab from the top.

From here, you can use the smart tags next to the ‘Alt Tag Format’ option to automatically generate alt text for all your images.

After that, you can also enable the Strip Punctuation setting if you want characters like dashes (-) or underscores (_) to be converted into spaces.

SEO settings for alt tags

Similarly, if there are characters like numbers or plus signs (+) that you don’t want AIOSEO to strip when creating the alt text, then you can check the boxes for these options in the ‘Characters to Exclude from Being Stripped’ section.

You can also select a casing for your alt text.

Configure Automatic Captions and Descriptions

To generate automatic captions for your images, switch to the ‘Captions’ tab.

From here, make sure that the ‘Autogenerate Caption on Upload’ option is enabled. You can then select the smart tags that will be used to generate captions for your images.

Enable Captions toggle and configure its smart tags

Next, you can also use the Strip Punctuation feature to exclude or include characters in the captions and choose a casing for them.

Once you are done, you need to switch to the ‘Description’ tab from the top.

From here, make sure that the ‘Autogenerate Description on Upload’ option is enabled. You must also select the smart tags you want to use for generating automatic image descriptions.

Enable the Description toggle and configure its smart tags

Next, you can also use the Strip Punctuation feature to include/exclude characters like underscores, apostrophes, or numbers in the description.

After that, simply select a casing for your image descriptions.

Strip punctuation and casing settings

Configure Automatic Filenames

As we mentioned earlier, we recommend giving your image files SEO-friendly file names. You can do this before uploading your images, or AIOSEO can do it for you automatically.

Once you switch to the ‘Filename’ tab from the top, you will notice that AIOSEO has already configured the Strip Punctuation setting for you.

However, if there are any more characters that you want AIOSEO to delete from your image filenames when creating titles or alt text, then you can type those characters into the ‘Words to Strip’ box.

AIOSEO settings for Filename

After that, you can also select a casing for your filenames.

Once you are done, don’t forget to click the ‘Save Changes’ button to store your settings.

You have now successfully optimized your images for SEO, and AIOSEO will automatically generate titles, alt text, captions, and descriptions for all your images.

For more detailed instructions, please see our beginner’s guide on how to optimize images for search engines.

Bonus: Allow Users to Upload Images in WordPress

You may also want to allow your users to upload their own images to your WordPress website. This can come in handy if you are hosting a contest or running a photography website that accepts user-generated images.

For this, you can use WPForms, which is the best contact form plugin on the market. It comes with a drag-and-drop builder that makes it super easy to create any kind of form you want, including an image submission form.

First, you will need to install and activate the WPForms plugin. For details, see our instructions on how to install a WordPress plugin.

Upon activation, head over to the WPForms » Add New screen from the WordPress dashboard to launch the form builder.

From here, you need to type a name for your form and then click the ‘Use Snippet’ button under the ‘Simple Contact Form’ template.

Select contact form template

This will load the form template in the form builder, where you will notice its preview on the right and the available fields in the left column.

From here, go ahead and drag and drop the File Upload field onto the form and click on it to further customize its settings.

Add file upload field

From here, you can change the label and description of the field and even specify the extensions that are allowed.

For example, if you want to allow JPEG and PNG files only, then you must type these options into the ‘Allowed File Extensions’ field. Keep in mind to separate each extension with a comma.

After that, you can also configure the maximum image file size and number of uploads in the left column.

Configure field settings

For more detailed instructions, you may want to see our tutorial on how to allow users to upload images in WordPress.

Once you are done, just click the ‘Save’ button to store your settings.

Next, open the page/post where you want to add the image upload form. Once there, click the ‘+’ button in the top left corner of the screen to open the block menu

From here, you need to add the WPForms block to the page/post.

Locate and add the WPForms block

Just choose the image file upload form that you created from the dropdown menu.

Finally, click the ‘Update’ or ‘Publish’ button to store your settings. Now, you can visit your WordPress site to view the form in action, and visitors will be able to submit their images using the form.

We hope this article helped you learn how to properly add images in WordPress. You may also want to see our beginner’s guide on how to change the block height and width in WordPress, and our expert picks for the best WordPress themes for graphic designers.

If you liked this article, then please subscribe to our YouTube Channel for WordPress video tutorials. You can also find us on Twitter and Facebook.

The post How to Properly Add Images in WordPress (Step by Step) first appeared on WPBeginner.

How to Make Recipe Cards in WordPress (Step by Step)

Category Image 091

Are you looking to add recipe cards to your WordPress content?

Millions of people online are searching for recipes every single day. Whether it’s for whipping up a quick weekday dinner or impressing guests with a show-stopping dessert, recipe cards with easy-to-follow instructions can guide readers to recreating their desired dish.

In this article, we will show you step-by-step how to make recipe cards in WordPress.

make-recipe-cards-in-post

What Are Recipe Cards And Why Use Them?

Recipe cards provide the ingredients and instructions for cooking a particular dish. These cards often feature a structured format with sections such as:

  • Recipe title
  • List of ingredients
  • Step-by-step instructions
  • Additional notes or tips
  • Nutritional facts

They’re essentially blueprints for whipping up delicious dishes. Recipe cards are perfect for cooks of all skill levels, especially busy people in need of quick and easy meal ideas. They’re laid out in a tidy format, allowing your readers to recreate your meals easily and simply.

recipe card

Besides that, they’re highly shareable, which is helpful for building your social media presence. Also, recipe cards use structured data (schema markup), meaning they have better odds of appearing higher in search engine rankings.

Chances are, if you run a food blog, have a restaurant website, or are a health and wellness professional, you already have thought about adding recipes to your site.

Best of all, it doesn’t take complex coding or a ton of technical know-how to do so. Let’s dig in and see how it’s done.

Adding Recipe Cards With WP Tasty Recipes

The best way to add recipe cards is with a recipe plugin like WP Tasty Recipes. It’s a simple plugin that lets you customize your recipes in lots of ways.

Step 1: Installing WP Tasty Recipes Plugin

To get started, you’ll need to install and activate the WP Tasty Recipes plugin. For more information, check out our detailed tutorial on how to install a WordPress plugin.

Next, head over to the WP Tasty » Dashboard from your WordPress admin. Click on ‘Enter License.’

enter license

A popup window will appear. Simply paste your license key from the downloads page from your WP Tasty account.

Select the ‘All Plugins’ and then hit the ‘Save License’ button.

Save license

Step 2: Adjusting the Recipe Card Design

Next, it’s a good idea to adjust the design of the recipe card to fit your needs.

Go to the WP Tasty » Tasty Recipes page from your WordPress dashboard.

Under the Design tab, you can customize how your recipe card will look.

design recipe card

You can customize elements like as button colors, title and subtitle colors, star ratings, and even a social footer.

If you scroll all the way to the bottom, you’ll notice that the ‘Default Template’ is selected.

change recipe card template

Click on the left and right arrows and pick the template that you find most visually appealing and suits your site’s design the best.

From there, make sure to click ‘Save Changes.’

Step 3: Adding Recipe Cards to a Post in WordPress

Next, head over to the post that you want to add your recipe card to. Click on the ‘+’ icon in the upper-left of the block editor to add a new block.

Here, you can search and select the ‘Tasty Recipe’ block.

tasty recipe block

From there, a window will appear on the screen. This is where you’ll need to add all of the information about your recipe.

It’s important to add as many details as possible so that Google can easily identify the information and give you the best odds to display rich snippets in search results.

create recipe

Here, you’ll be able to add the following information:

  • Title
  • Recipe image
  • Author Name
  • Description
  • Ingredients
  • Instructions
  • Notes
  • Details such as prep time, cook time, yield, category, etc.
  • Keywords
  • Video URL
  • Equipment
  • Nutrition

Once you’ve filled out the information about your recipe, click the ‘Insert’ button at the bottom.

Insert recipe card

After that, all you have left is to make sure that your recipe card is live on the site!

Step 4: Publishing Your Recipe Card

Now, you’re ready to publish your recipe card. Just hit the ‘Publish’ or ‘Update’ button at the top.

publish recipe card

Now, just go to the front end of your website to see your recipe card in action.

Here’s what our S’mores Brownies card looks like on the front end of our demo site.

example of recipe card

Step 5: Adding the ‘Pin It’ Button to Your Recipe Card (Optional)

If you upgraded to the WP Tasty ‘All Access’ plan or bought the Tasty Pins product, then you may want to also add a ‘Pin It’ button to your recipe card so that your readers can easily add the recipe to a Pinterest board.

When readers pin your recipe to Pinterest, it will show your image to more users on the platform. As a result, that can potentially drive more traffic to your website.

Scroll to the bottom of your block editor and then add a Pinterest image, title, and text, which will be used to optimize your images for SEO and Pinterest.

tasty pins

This will apply a ‘Pin It’ button to all images related to the recipe card, making your content much easier to share.

Bonus: Adding SEO-Friendly Recipes With Schema in WordPress

Making recipe cards is only one piece of the puzzle. You also have to make sure you drive as much traffic as possible to your recipes. That could ultimately lead to more sales of your cookbook, affiliate sales, or bookings for your services.

The best way to do that is to add a recipe schema markup in WordPress by using the All in One SEO plugin.

Once installed and activated, you’ll have the ability to generate any type of schema in your posts or pages.

You’ll need to scroll to the bottom of the block editor where it says ‘AIOSEO Settings.’ Then, under the ‘Schema’ tab, select ‘Generate Schema.’

generate schema for recipe card

From here, a popup window will appear where you’ll see a variety of schema templates from which to choose. This does all the heavy lifting for you since it creates structured data based on the type of post you’re publishing.

In this case, we’d click on the ‘+’ icon next to ‘Recipe.’

recipeschemaaddrecipeschema

You’ll enter all of the details of your recipe in the Schema Generator.

You and your visitors won’t be able to see a difference on your website, but search engine bots will have the information they need for featured snippets.

recipeschemaaioseoaddschema

For more details, check out our full tutorial on how to add SEO-friendly recipe schema in WordPress.

We hope that this article helped you learn how to make recipe cards in WordPress. You may also want to see our showcase of the best WordPress themes for recipe blogs and our tutorial on how to easily create a restaurant website with WordPress.

If you liked this article, then please subscribe to our YouTube Channel for WordPress video tutorials. You can also find us on Twitter and Facebook.

The post How to Make Recipe Cards in WordPress (Step by Step) first appeared on WPBeginner.

How to Create Additional Image Sizes in WordPress

Featured Imgs 13

Do you want to create additional image sizes in WordPress?

By default, WordPress automatically creates several copies of image uploads in different sizes. Additionally, WordPress themes and plugins can also create their own image sizes.

In this article, we’ll show you how to easily create additional image sizes in WordPress and use them on your website.

Creating additional image sizes in WordPress

Why Create Additional Image Sizes in WordPress?

Normally, all popular WordPress themes and plugins handle image sizes very well. For instance, your WordPress theme may create additional sizes to use as thumbnails on archive pages.

However, sometimes these image sizes may not fit your own requirements. You may want to use a different image size in a child theme or a post grid layout.

You can do this by creating additional image sizes in WordPress and then calling these sizes whenever you need them.

That being said, let’s take a look at how to create additional image sizes in WordPress.

Registering Additional Image Sizes for your Theme

Most WordPress themes including all the top WordPress themes support post thumbnails (featured image) feature by default.

However, if you are creating a custom WordPress theme then you will need to add support for post thumbnails by adding the following code to your theme’s functions.php file.

add_theme_support( 'post-thumbnails' );

Once you enable the support for post thumbnails, you can now use the functionality of registering additional image sizes by using the function add_image_size().

The add_image_size function is used in the following format:

add_image_size( 'name-of-size', width, height, crop mode );

Example code can look like the following:

add_image_size( 'sidebar-thumb', 120, 120, true ); // Hard Crop Mode
add_image_size( 'homepage-thumb', 220, 180 ); // Soft Crop Mode
add_image_size( 'singlepost-thumb', 590, 9999 ); // Unlimited Height Mode

Now if you notice, we have specified three different sorts of image sizes. Each has different modes such as hard crop, soft crop, and unlimited height.

Let’s cover each example and how you can use them in your own projects.

1. Hard Crop Mode

As you may notice, there is a “true” value added after the height. This tells WordPress to crop the image exactly to the size that we have defined (in this case 120 x 120px).

This method is used to ensure that everything is exactly proportionate. This function will automatically crop the image either from the sides or from the top and bottom depending on the size.

Hard crop images example

2. Soft Crop Mode

By default, soft cropping mode is turned on this is why you do not see any additional value added after the height. This method resizes the image proportionally without distorting it. So you might not get the dimensions that you wanted. Usually, it matches the width dimension and the heights are different based on each image’s proportion. An example display would look like this:

Soft crop example

Unlimited Height Mode

There are times when you have super long images that you want to use in your design, but you want to make sure that the width is limited. For instance, infographic images tend to be very long and usually wider than the content width.

This mode allows you to specify a width that will not break your design while leaving the height to be unlimited.

Unlimited height mode

Displaying additional image sizes in your WordPress theme

Now that you have added the functionality for the desired image sizes lets take a look at displaying them in your WordPress theme. Open the theme file where you want to display the image and paste the following code:

<?php the_post_thumbnail( 'your-specified-image-size' ); ?>

Note: This bit of code must be pasted inside the post loop.

That’s all you really have to do to display the additional image sizes in your WordPress theme. You probably should wrap it around with the styling that fits your need.

Regenerating Additional Image Sizes

If you are not doing this on a brand new site, then you probably will have to regenerate thumbnails.

The add_image_size() function only generates the sizes from the point it was added into the theme. This means any post images that were added prior to the inclusion of this function will not have new sizes.

To fix this, you need to regenerate the new image size for older images. This is made easy by the plugin called Regenerate Thumbnails. Once you install and activate the plugin, a new option is added under the menu: Tools » Regenerate Thumbnails

Regenerate thumbnails

You’ll see the option to regenerate thumbnail for all images or just the featured images. We recommend regenerating all images to avoid any unexpected behavior or broken images.

For more details, see our article on how to easily regenerate new image sizes in WordPress.

Enabling Additional Image Sizes for your Post Content

Even though you have enabled image sizes in your theme, the usage is limited only to your theme which does not make any sense.

All image sizes are being generated regardless, so why not make it available for the post author to use within the post content.

You can do this by adding the following code to your theme’s functions file.

function wpb_custom_image_sizes( $size_names ) {
    $new_sizes = array(
        'homepage-thumb' => 'Homepage Thumbmail', 
        'singlepost-thumb' => 'Infographic Single Post'
    );
    return array_merge( $size_names, $new_sizes );
}
add_filter( 'image_size_names_choose', 'wpb_custom_image_sizes' );

Don’t forget to save your changes after adding the code.

You can now go and upload an image to a WordPress post or page. In the image block settings you’ll see your custom image sizes under the ‘Image size’ option.

Choose your custom image size inside post editor

You and other authors working on your website can now select these size options when adding images to posts and pages.

We hope this article helped you learn how to create additional image sizes in WordPress. You may also want to see our article on the best image compression plugins for WordPress and our WordPress performance guide to improve your website speed.

If you liked this article, then please subscribe to our YouTube Channel for WordPress video tutorials. You can also find us on Twitter and Facebook.

The post How to Create Additional Image Sizes in WordPress appeared first on WPBeginner.

The Right Way to Remove WordPress Version Number

Category Image 091

Do you want to remove the WordPress version number from your website?

Many believe that removing the WordPress version number from your website’s source code can prevent some common online attacks.

In this article, we’ll show you how to easily remove WordPress version number the right way.

Hiding WordPress version number from your website

Why Remove WordPress Version Number?

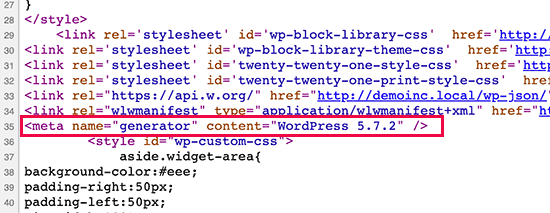
By default, WordPress leaves its footprints on your site for the sake of tracking. That is how we know that WordPress is the top website builder in the world.

WordPress version shown in source code by default

However, sometimes this footprint might be a security leak on your site if you are not running the most updated version of WordPress. It provides the hacker with useful information by telling them which version you are running.

We recommend using the latest version of WordPress on all your websites so you don’t have to worry about this. However, if for some reason you are running an older version of WordPress, then you should definitely follow this tutorial.

It is quite difficult to remove all traces of which WordPress version you are using on your website. A sophisticated attack may still be able to find that information.

However, it will prevent automatic scanners and other less sophisticated attempts from guessing your WordPress version.

That being said, let’s take a look at some ways to easily remove version number from your WordPress website.

Method 1. Remove WordPress Version Number using Sucuri

This method is easier and recommended for all users.

All top WordPress security plugins offer an option in the settings to hide your WordPress version number.

However, we recommend using Sucuri because it automatically hides WordPress version information and offers other more advanced security features.

Simply install and activate the Sucuri plugin. For more details, see our step by step guide on how to install a WordPress plugin.

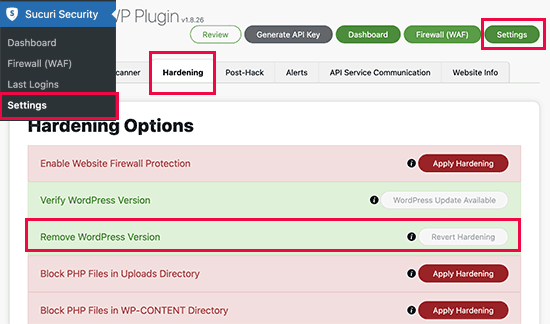
Upon activation, the plugin will automatically hide WordPress version information. You can verify it by visiting Sucuri Security » Settings and switching to the Hardening tab.

Sucuri WordPress version hardening

Method 2. Manually Remove WordPress Version Information

This method requires you to add code to your WordPress website. If you haven’t done this before, then see our guide on how to copy and paste code snippets in WordPress.

Now, many websites will recommend you to edit your theme’s header.php file and get rid of the following line of code:

<meta name="generator" content="WordPress <?php bloginfo('version'); ?>" />

This method doesn’t work as a new theme update will automatically replace the old template with the new file.

Another commonly recommended, but inefficient method is to put this code in your theme’s functions.php or site-specific plugin:

remove_action('wp_head', 'wp_generator');

This will only remove the information from the WordPress header. The version number will still be visible in your website’s RSS feeds.

The right way to remove WordPress version information is by disabling the function responsible for displaying it.

In order for you to completely remove your WordPress version number from both your head file and RSS feeds, you will need to add the following code to a site-specific plugin or code snippets plugin.

function wpbeginner_remove_version() {
return '';
}
add_filter('the_generator', 'wpbeginner_remove_version');

By adding this code, you will remove the WordPress version number from WordPress RSS feeds and your website’s head section.

Can You Completely Hide WordPress Version?

WordPress may still add the version information in various other places throughout your website. For instance, it is included as the query string in source code for CSS and JS files.

WordPress version shown with CSS and JS files

Removing all instances of WordPress version information can be time-consuming, complicated, and may not always work.

From a security perspective, removing the obvious generator tags can protect you from some very common attacks.

However, if someone is determined to break into your website, then hiding your WordPress version number does little to stop this.

You need to implement a proper WordPress security setup in place to make your website more secure. This adds layers of security around your website making it harder to hack into.

We hope this article helped you learn how to easily hide WordPress version number from your website. You may also want to see our guide on how to get a free SSL certificate for your website, or our list of must-have WordPress plugins for small business.

If you liked this article, then please subscribe to our YouTube Channel for WordPress video tutorials. You can also find us on Twitter and Facebook.

The post The Right Way to Remove WordPress Version Number appeared first on WPBeginner.

How to Split WordPress Posts into Multiple Pages (Post Pagination)

Category Image 091

Are you looking for a way to split long WordPress posts into different pages?

Splitting lengthy content into several pages makes it easier for your visitors to read articles and navigate different sections.

In this article, we will show you how to split WordPress posts into multiple pages, step by step.

How to Split WordPress Posts

Why Split WordPress Posts into Multiple Pages?

If you have blog posts or guides that are lengthy, then setting up post pagination can improve the readability of your content.

It helps to break down the article into different sections and split them into multiple pages. This way, visitors can easily digest your content and read any section they are interested in.

Another benefit of splitting WordPress posts is that it can help increase pageviews and boost ad revenues.

That being said, let’s take a look at how to split WordPress posts into multiple pages. We will cover how to break your WordPress posts into multiple pages without a plugin and using a WordPress plugin.

Method 1. Split WordPress Posts without a Plugin

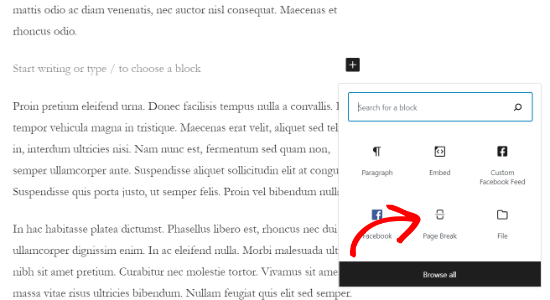
The easiest way of setting up post pagination is by using the ‘Page Break’ block in your WordPress content editor. You don’t need a WordPress plugin to break up your articles into multiple pages.

First, edit or add a new post on your WordPress website. After that, click the plus (+) button where you want to split your content and add a ‘Page Break’ block.

Add a page break block

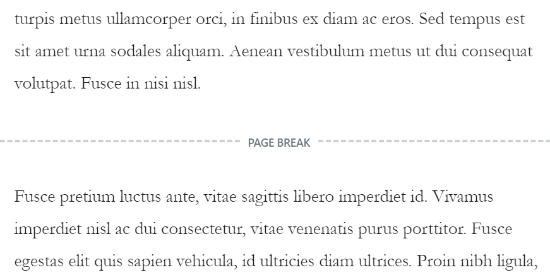
You should now see a page break line in your content to indicate where the pagination will appear.

See page break in your content

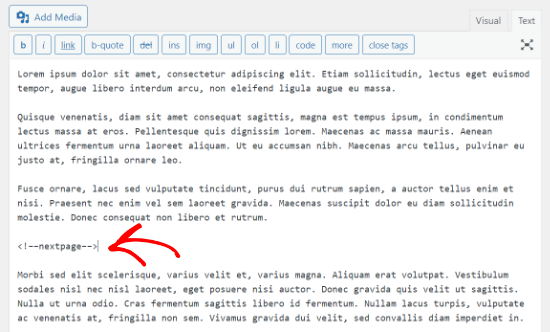
If you are using the classic editor, then use the <!––nextpage––> tag to split your content.

Just edit any blog post and go to the ‘Text’ view to enter the tag where you would like to split the content.

Insert next page tag in the classic editor

You can also use the Alt + Shift + P keys on your keyboard to insert page breaks. To do that, go to the ‘Visual’ view and press the keyboard shortcut keys where you would want to add a page break.

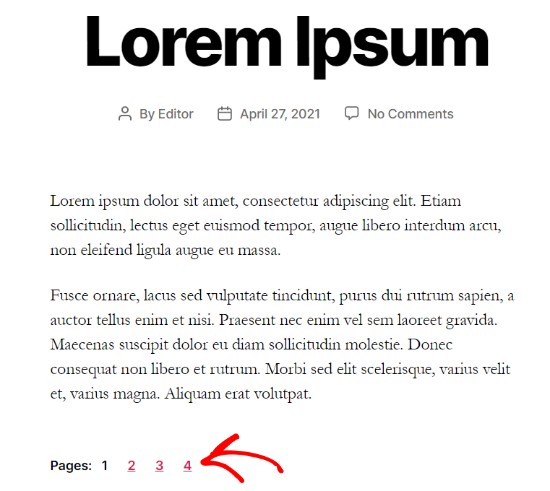
After that, you can preview and publish the blog post. You will now see post pagination at the bottom of the content.

Post pagination example

Method 2. Split WordPress Post into Multiple Pages Using a Plugin

Another way to break lengthy content into various pages is by using a WordPress plugin. The benefit of this method is that it will automatically paginate posts when it meets certain criteria.

For this method, we will use the free Automatically Paginate Posts plugin, as it’s easy to use and works with any WordPress theme.

First, install and activate the Automatically Paginate Posts plugin on your WordPress website. For more details, go through our tutorial on how to install a WordPress plugin.

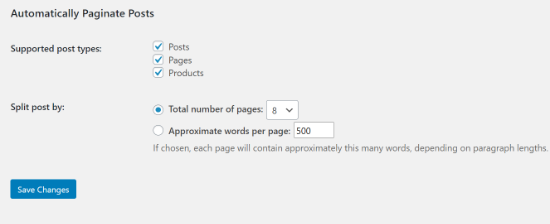
Once the plugin is active on your site, go to Settings » Reading and scroll down to the ‘Automatically Paginate Posts’ section.

You can select the post types to split into different pages. After that, choose whether to split posts by the total number of pages or approximate words per page.

Automatically Paginate Posts section

Next, click the ‘Save Change’ button to store your settings.

The plugin will automatically split your content based on your settings. However, you can also add page breaks manually to your content while using the plugin.

We hope this article helped you learn how to split WordPress posts into multiple pages. You may also want to see our guide on the best WordPress page builders to create custom layouts, and our tutorial on how to add web push notifications in WordPress to grow your website traffic.

If you liked this article, then please subscribe to our YouTube Channel for WordPress video tutorials. You can also find us on Twitter and Facebook.

The post How to Split WordPress Posts into Multiple Pages (Post Pagination) appeared first on WPBeginner.

How to Display Full Size Images in WordPress (4 Methods)

Featured Imgs 13

Do you want to learn how to display full-size images in WordPress?

The latest version of WordPress automatically resizes large images to improve performance. But sometimes you may need to display images with larger dimensions.

In this tutorial, we’ll share four different ways to display full-size images on your WordPress site.

How to display full-size images in WordPress

Why is WordPress Scaling Large Images?

Earlier versions of WordPress allowed users to upload images with very large dimensions.

But, what happened is WordPress beginners were uploading images that were simply too large for the modern web. Large images lead to slow website loading speeds and poor performance.

To fix this issue, the WordPress 5.3 update changed how WordPress handles very large images.

For example, if you upload an image with the dimensions of 5000px by 7000px, then WordPress will resize the image to 2560px and scale the width to match the original dimensions.

Now, when a user visits a page with a previously large image, they’ll see the scaled-down version of that image.

This leads to improved website performance and happier users overall.

Reasons to Stop WordPress From Scaling Images

This new feature is useful for most WordPress website owners, but some users might need to display full-size images.

For example, if you’re a photographer or artist who sells your work, then you may want to display larger images on your website, so visitors can buy or download them.

Or, you could be running a website where larger images are a requirement, like a stock photo website or website that sells custom prints and pictures.

Maybe, you need one large image for your home page background image that’s bigger than the 2560px limits?

No matter what your reason for wanting a full-size image, we’ll show you how to do it, step by step.

How to Display Full-Size Images in WordPress (4 Methods)

There are 4 different ways you can display full-size images in WordPress.

Some methods work better for single images, while others are best for an entire image library.

You’ll want to choose the full-size image method that’s right for your goals.

Method 1. Get Full Size Image URL in WordPress

If you only want to use one or two large images on your website, then this solution is probably best.

When you upload an image to WordPress that exceeds the dimensions, WordPress will scale your image and create a new one. But, the original image is still intact.

To display the original image dimensions, you’ll need to delete ‘-scaled’ from the end of the WordPress image URL and insert the image into your site with the modified link.

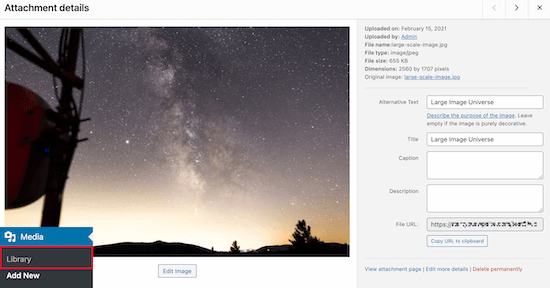
Simply head over to your media library by going to Media » Library and select your large image.

Large image media library

Now, locate your ‘File URL’ in the image box.

Next, you’ll want to delete ‘-scaled’ from the end of your image URL.

Delete scaled image URL

After that, you can copy the image URL and insert the image into your website.

Note that you’ll need to embed the image into your site using the link, minus the scaled portion.

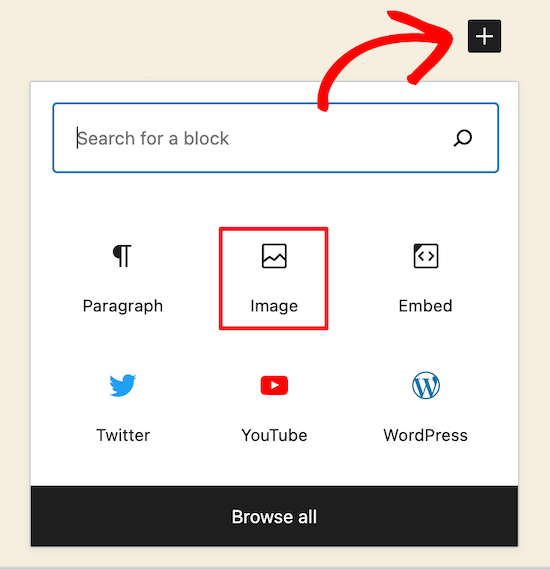
To do this navigate to a post or page you want to add the image and click the ‘+’ icon to add a new block.

Insert new image block for large image

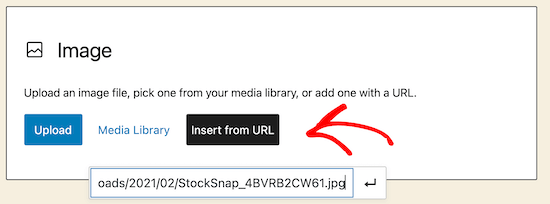
Then click the ‘Image’ icon to add an image block where you can paste your URL.

Click ‘Insert from URL’, then paste your full size image URL into the box and press the ‘Enter’.

Add non scaled image URL

After that, you’ll need to click ‘Publish’, or ‘Update’, if the post is already live, and your full-size image will now be viewable on your site.

You can follow this same process for every full-size image you want to add to your site. But, as long as you use the File URL minus ‘scaled,’ your WordPress images will display in full size.

Method 2. Automatically Disable Image Scaling in WordPress (with a Plugin)

The second method is using a WordPress plugin to disable image scaling across your site.

The plugin we recommend is called Disable “BIG Image” Threshold. This plugin offers one of the easiest workarounds for displaying big images on your site, and it’s entirely free to use.

First, you’ll need to install and activate the Disable “BIG Image” Threshold plugin. For more details on installing a plugin, see our step by step guide on how to install a WordPress plugin.

Once you’ve installed and activated the plugin on your site, it’ll automatically remove the big image threshold added by WordPress.

You’re free to add new images just as you were before the WordPress image update.

When this plugin is active, WordPress will not add the ‘-scaled’ attribute to any image.

Method 3. Automatically Disable Big Image Scaling in WordPress (with Code Snippet)

Another option is to add a code snippet to WordPress that accomplishes the same goal as the plugin above.

If the plugin doesn’t work for some reason, or you don’t want to install too many plugins, then you can use this method.

The new WordPress image scaling feature uses a filter called big_image_size_threshold.

You’ll want to use the following code to disable this function:

add_filter( 'big_image_size_threshold', '__return_false' );

You need add this code in your theme’s functions.php file, in a site-specific plugin, or by using the Code snippets plugin.

Method 4: Open Full-Size WordPress Images in a Lightbox

The final option is to add a full-size image lightbox to your site. With this solution, you get the best of both world.

You can load smaller image thumbnails in your blog content, gallery, or carousel, and when clicked, it will popup with your full-size image.

Show full size image lightbox effect

To do this, we recommend using the Envira Gallery plugin. It’s the best WordPress image gallery plugin in the market and lets you easily add the lightbox popup image effect.

The first thing you’ll need to do is install the Envira Gallery plugin. For more details, see our step by step guide on how to install a WordPress plugin.

After installing and activating the plugin, see our step by step guide on creating an image gallery in WordPress with the lightbox effect.

Keep in mind that before you upload full-size images for your gallery, you’ll need to disable image scaling via the plugin or child theme methods above.

Otherwise, your lightbox images will be using the scaled-down version of the image.

Finally, it’s important to note that if you add images with large dimensions, it’s essential to optimize them for the web, so you don’t slow down your website.

We hope this article has helped you display full-size images in WordPress. You may want to see our guide on optimizing images for SEO and our expert pick of 40 useful tools to manage and grow your blog.

If you liked this article, then please subscribe to our YouTube Channel for WordPress video tutorials. You can also find us on Twitter and Facebook.

The post How to Display Full Size Images in WordPress (4 Methods) appeared first on WPBeginner.

How to Add Custom Navigation Menus in WordPress Themes

Best Wordpress Themes 1

Do you want to add custom navigation menus in your WordPress theme?

All themes have set locations where you can display a navigation menu. However, by default, you can’t add a menu anywhere else except these pre-defined locations.

In this article, we’ll show you how to add a custom navigation menu to any area of your WordPress theme.

How to add custom navigation menus in WordPress themes

Why Add Custom Navigation Menus in WordPress Themes?

A navigation menu is a list of links pointing to important areas of your website. They make it easy for visitors to find interesting content, which can increase pageviews and reduce bounce rate in WordPress.

The exact location of your menu will vary based on your WordPress theme. Most themes have several options, so you can create different menus and show them in different places.

To see where you can display menus in your current WordPress theme, simply head over to Appearance » Menus and then take a look at the ‘Display location’ section.

The following image shows the locations that are supported by the Astra WordPress Theme.

The menu locations in the popular Astra theme

However, sometimes you may want to show a menu in an area that isn’t listed as a ‘Display location’ in your theme.

With that in mind, let’s take a look at how to create WordPress navigation menus and then add them to your theme. Simply use the quick links below to jump to the method you prefer.
Method 1. Adding a Custom Navigation Menu in Full Site Editing

If you’re using a block theme, then you can add a custom navigation menu using Full Site Editing (FSE) and the block editor. For more details, you can see our article on the best WordPress full-site editing themes.
This method doesn’t work with every theme, and it doesn’t let you customize every part of the menu. If you want to add a completely custom menu to any WordPress theme, then we recommend using a page builder plugin.

If you are using a block-based theme, then head over to Appearance » Editor.

How to launch the FSE

This will launch the full site editor with one of your active theme’s templates already selected.

If you want to add a custom navigation menu to a different template, then click on the arrow in the toolbar and select ‘Browse all templates.’

Changing templates in the Full Site Editor

The site editor will now show all the different templates that are part of your theme.

Simply find the template that you want to edit, and give it a click.

Switching templates in the block-based FSE

The next step is adding a Navigation block to the area where you want to show your menu.

In the top-left corner, click on the blue ‘+’ button.

Adding blocks to your WordPress theme

Now, go ahead and type ‘Navigation’ into the search bar.

When the ‘Navigation’ block appears, simply drag and drop it onto your layout.

The WordPress Navigation block

Next, click to select the Navigation block.

If you’ve already created the menu that you want to display, then click ‘Select Menu’ and make your selection from the dropdown.

Adding a custom navigation menu using FSE

Another option is to click on ‘Create new menu,’ which allows you to build a navigation menu inside the full site editor.

To start with a blank menu, simply click on ‘Start empty.’

Building a menu in the WordPress full site editor

To add items to the new menu, just click on the ‘+’ icon.

This opens a popup where you add any post or page, and decide whether these links should open in a new tab.

How to build a new menu in the block editor

Simply repeat these steps to add more items to the menu.

When you’re happy with how the menu looks, simply click on the ‘Save’ button. Your site will now be using the new template, and visitors can interact with your custom navigation menu.

Method 2. Creating a Custom Navigation Menu in WordPress Using SeedProd (Works With All Themes)

The full site editor is a quick and easy way to add a basic custom menu to block-based themes. However, if you want to add an advanced, fully-customizable menu to any theme, then you’ll need a page builder plugin.

SeedProd is the best WordPress page builder plugin on the market and allows you to customize every part of your navigation menu.

SeedProd comes with over 180 professionally-designed templates that you can use as your starting point. After choosing a template, you can add a custom navigation menu to your site using simple drag and drop.

First, you need to install and activate the SeedProd plugin. For more details, see our step-by-step guide on how to install a WordPress plugin.

Note: There’s also a free version of SeedProd that allows you to create custom navigation menus without writing code. However, in this guide, we’ll be using SeedProd Pro since it has lots more templates for you to choose from.

After activating the plugin, SeedProd will ask for your license key.

SeedProd license key

You can find this information under your account on the SeedProd website. After entering the key, click on the ‘Verify Key’ button.

Once you’ve done that, go to SeedProd » Landing Pages and click on the ‘Add New Landing Page’ button.

SeedProd's page design templates

You can now choose a template for your custom page.

To help you find the right design, all of SeedProd’s templates are organized into different campaign types such as coming soon and lead squeeze campaigns. You can even use SeedProd’s templates to improve your 404 page.

The SeedProd template library

To take a closer look at any design, simply hover your mouse over that template and then click on the magnifying glass icon.

When you find a design that you want to use, click on ‘Choose This Template.’

Choosing a SeedProd template for your WordPress website

We’re using the ‘Black Friday Sales Page’ template in all our images, but you can use any template you want.

After choosing a template, type in a name for that custom page. SeedProd will automatically create a URL based on the page’s title, but you can change this URL to anything you want.

After entering this information, click on the ‘Save and Start Editing the Page’ button.

Creating a new page using SeedProd

Most templates already contain some blocks, which are the core components of all SeedProd page layouts.

To customize a block, just click to select it in the page editor.

The left-hand toolbar will then show all the settings for that block. For example, in the image below, we’re changing the text inside a ‘Headline’ block.

Editing a headline in SeedProd

You can format the text, change its alignment, add links, and more using the settings in the left-hand menu.

To add new blocks to your design, simply find any block in the left-hand menu and then drag it onto your design. If you want to delete a block, then simply click to select that block and then click on the trash can icon.

Removing blocks from a custom layout

Since we want to create a custom navigation menu, drag a ‘Nav Menu’ block onto the page.

This creates a navigation menu with a single default ‘About’ item.

Adding a custom navigation menu to a WordPress layout

To customize this menu item, click to select it in the left-hand menu.

This opens some controls where you can change the text, as well as add the URL for the menu item to link to.

Adding a custom navigation menu to a landing page

By default, the menu item will be a ‘dofollow’ link and open in the same browser window. To change either of these settings, simply use the checkboxes in the ‘URL Link’ section.

In the following image, we’re creating a “nofollow” link that will open in a new window.

Marking a menu item as no-follow

To add more items to the menu, simply click on the ‘Add New Item’ button.

You can then customize each of these items by following the same process described above.

Adding items to a custom navigation menu

The left-hand menu also has settings that change the font size and text alignment.

You can even create a divider, which will appear between each item in the menu.

Creating a divider for your custom navigation menu

After that, go ahead and switch to the ‘Advanced’ tab. Here, you can change the menu’s colors, spacing, typography, and other advanced options.

As you make changes, the live preview will update automatically so you can try different settings to see what looks good in your design.

The SeedProd advanced customization settings

When you’re happy with how the custom menu looks, it’s time to publish it.

Simply click the dropdown arrow next to ‘Save’ and then select ‘Publish.’

How to publish a custom page layout

Your custom navigation menu and the page will now go live on your WordPress blog.

Method 3. Creating a Custom Navigation Menu in WordPress Using Code (Advanced)

If you don’t want to set up a page builder plugin, then you can add a custom navigation menu using code. Normally, you would need to add custom code snippets to your theme’s functions.php file.

However, we don’t recommend this method for anyone but advanced users, and even then, a small mistake in your code could cause a number of common WordPress errors, or break your site completely.

That’s why we recommend using WPCode. It is the easiest and safest way to add custom code in WordPress without having to edit any core WordPress files.

The first thing you need to do is install and activate the free WPCode plugin on your website. For more details, see our step-by-step guide on how to install a WordPress plugin.

Upon activation, go to Code Snippets » Add Snippet in your WordPress dashboard.

Adding a code snippet using the WPCode WordPress plugin

Here, you’ll see all of the different ready-made snippets that you can add to your site.

Since we want to add our own snippet, hover your mouse over ‘Add Your Custom Code,’ and then click ‘Use snippet.’

Adding a custom snippet to your WordPress website

To start, enter a title for the custom code snippet. This can be anything that helps you identify the snippet.

After that, open the ‘Code Type’ dropdown and select ‘PHP Snippet.’

Adding a custom navigation menu using WPCode

Once you’ve done that, simply paste the following snippet into the code editor:

function wpb_custom_new_menu() {
  register_nav_menu('my-custom-menu',__( 'My Custom Menu' ));
}
add_action( 'init', 'wpb_custom_new_menu' );

This will add a new menu location to your theme, called ‘My Custom Menu.’ To use a different name, simply change the above code snippet.

If you want to add more than one new navigation menu to your theme, then simply add an extra line to your code snippet. For example, here we’re adding two new menu locations to our theme, called My Custom Menu and Extra Menu:

function wpb_custom_new_menu() {
  register_nav_menus(
    array(
      'my-custom-menu' => __( 'My Custom Menu' ),
      'extra-menu' => __( 'Extra Menu' )
    )
  );
}
add_action( 'init', 'wpb_custom_new_menu' );

Below the code box, you will see insertion options. If it isn’t already selected, then choose the ‘Auto Insert’ method so the snippet will be automatically inserted and executed on your site.

After that, open the ‘Location’ dropdown and click on ‘Run Everywhere.’

Running a custom code snippet

Then, you’re ready to scroll to the top of the screen and click on the ‘Inactive’ toggle so it changes to ‘Active.’

Finally, go ahead and click on ‘Save’ to make this snippet live.

Inserting a custom navigation menu using the WPCode WordPress plugin

After that, go to Appearance » Menus and look at the ‘Display location’ area.

You should now see a new ‘My Custom Menu’ option.

A custom navigation menu created using the WPCode plugin

You’re now ready to add some menu items to the new location. For more information, please see our step-by-step guide on how to add navigation menus for beginners.

When you’re happy with your menu, the next step is adding it to your WordPress theme.

Adding the custom navigation menu to your WordPress theme

Most website owners show their navigation menu directly under the header section just after the site logo or title. This means the navigation menu is the first thing visitors see.

However, you can display your custom navigation menu anywhere you want by adding some code to the theme’s template file.

In your WordPress dashboard, go to Appearance » Theme File Editor.

In the right-hand menu, select the template that you want to edit. For example, if you want to show the custom navigation menu in your website’s header, then you’ll typically want to select the header.php file.

The WordPress theme file editor

For help finding the right template file, please see our guide on how to find which files to edit in your WordPress theme.

After selecting the template file, you need to add a wp_nav_menu function and specify the name of your custom menu. For example, in the following code snippet we’re adding My Custom Menu to the theme’s header:

wp_nav_menu( array( 'theme_location'=>'my-custom-menu', 'container_class'=>'custom-menu-class' ) );

After adding the code, click on the ‘Update File’ button to save your changes.

Editing the WordPress theme files

Now if you visit your site, you’ll see the custom menu in action.

By default, your menu will appear as a plain bulleted list.

A custom WordPress menu created using code

You can style the custom navigation menu to better match your WordPress theme or company branding by adding custom CSS code to your site.

To do this, go to Appearance » Customize.

Customizing a WordPress theme

In the WordPress customizer, click on ‘Additional CSS.’

This opens a small code editor where you can type in some CSS.

Adding additional CSS to your WordPress theme

You can now style your menu using the CSS class that you added to your theme template. In our example, this is .custom_menu_class.

In the following code, we’re adding margins and padding, setting the text color to black, and arranging the menu items in a horizontal layout:

div.custom-menu-class ul {
    margin:20px 0px 20px 0px;
    list-style-type: none;
    list-style: none;
    list-style-image: none;
    text-align:right;
	display:inline-block;
}
div.custom-menu-class li {
    padding: 0px 20px 0px 0px;
    display: inline-block;
} 

div.custom-menu-class a {
    color:#000;
}

The WordPress customizer will update automatically to show how the menu will look with the new style.

Styling a custom navigation menu

If you’re happy with how the menu looks, then click on ‘Publish’ to make your changes live.

For more information, please see our guide on how to style WordPress navigation menus.

Do More With WordPress Navigation Menus

With WordPress, you can do much more than just show links in a menu. Here’s how to get even more out of your navigation menus:

We hope this ultimate guide helped you learn how to add a custom navigation menu in WordPress. You may also want to see the best ways to increase your blog traffic and how to track website visitors to your WordPress site.

If you liked this article, then please subscribe to our YouTube Channel for WordPress video tutorials. You can also find us on Twitter and Facebook.

The post How to Add Custom Navigation Menus in WordPress Themes first appeared on WPBeginner.