How to Prevent Changes to Plugins, Themes, and WordPress Core Files

This is a common question I get from folks in the WordPress community. How can I “lock things down” and prevent any changes to plugins, themes, and WordPress core files. For example, how to prevent any themes and/or plugins from being updated or deleted, and how to prevent any new plugins from being installed. This is useful for certain projects where it’s necessary to lock a website to a static version. Fortunately, WordPress makes this super easy with a couple of PHP constants. Let’s take a quick look..

Contents

Prevent Changes via File Editor

Did you know that WordPress provides a Plugin File Editor and Theme File Editor in the WP Admin Area. You can find them:

  • Under the Appearance menu ▸ Theme File Editor
  • Under the Plugins menu ▸ Plugin File Editor

These tools enable admins to make changes to any plugin or theme files. Huge convenience for those that need it. For those that don’t, you can disable any changes via the file editors by adding the following line to your site’s wp-config.php file, which resides in the root WordPress directory:

// disable file changes via plugin and theme editors
define('DISALLOW_FILE_EDIT', true);

Once this line is included in the site’s configuration file, all file-editing via the Admin Area will be disabled. No menu items, no editing, nada. It’s another layer of security that effectively minimizes your site’s attack surface, so sensitive files cannot be modified by any user, including admins. This helps to protect against any changes that could compromise or crash your site.

Note: As explained at WordPress.org, disabling the file editors via DISALLOW_FILE_EDIT constant may affect any plugins that check for sufficient capabilities using current_user_can('edit_plugins'). Plugins should check if the constant is set, and if so display an appropriate error message.

Prevent All Changes via Admin Area

While the previous technique disables changes to plugins and themes via the file editors, this next technique prevents all changes to any files from inside the Admin Area. This includes:

  • Updating, deleting, installing plugins
  • Updating, deleting, installing themes
  • Updating the WordPress core files

It also includes changes made via the plugin and theme file editors. Basically this technique staticizes a site to its current version. So if that sounds like you, here is the magic code to lock it down:

// disable all changes to all files via admin area
define('DISALLOW_FILE_MODS', true);

Once this line is included in the site’s configuration file, all changes (installing, updating, deleting) to plugins and themes will be disabled. Note that the above line also disables updates to the WordPress core files, so trying to update WordPress via Dashboard ▸ Updates will not work.

Of course, it always is possible for changes to be made directly on the server via SFTP or similar method. But any file changes from within the Admin Area will be disabled completely.

Note: As mentioned, the above line disables all changes from anywhere within the Admin Area, including the file editors. So you do not need to set both DISALLOW_FILE_MODS and DISALLOW_FILE_EDIT. Just including DISALLOW_FILE_MODS takes care of everything.
Note: Be careful when adding DISALLOW_FILE_MODS to your site’s wp-config.php file. WordPress needs to be able to make changes in order to keep plugins, themes, and core files current via updates. So only disable changes if you are 100% certain that you don’t want any updates on your WordPress site.

Round Up: 18 Free Plugins to Help Troubleshoot and Debug WordPress

I’ve written numerous tutorials explaining how to troubleshoot WordPress, plugins, email, and more. When investigating issues, diagnosing problems, and hunting bugs, troubleshooting is a critical core skill for any web developer. To help readers level up their tool belt, here’s a quick round-up of free plugins to help troubleshoot any of your WordPress projects.

Plugins to troubleshoot & debug WordPress

There are TONS of great troubleshooting plugins available at the WordPress.org Plugin Directory. Some of these plugins you’re probably familiar with, others are newer with their own unique features. While nobody is gonna need all of these plugins, it is comforting that there are so many to choose from. So you can find the best tools for whatever inspecting or debugging is needed. Plus all of these plugins are open source and 100% free. So without further ado..

BugFu Console Debugger
Handy plugin that enables logging of PHP directly via the browser console. Can be a huge time saver for developers.
Code Profiler
Measures the performance of your plugins and themes at the PHP level. Finally a replacement for the once-great P3 Profiler.
Debug
Handles the configuration of debug and other variables via wp-config.php. So you don’t have to edit the file manually.
Debug Bar
Adds a debug menu to the admin bar that shows query, cache, and other debugging information. Super useful tool for analyzing performance.
Debug Info
Provides important details about your WordPress operating environment. Easy way to get PHP configuration (via phpinfo()).
Debug Log Manager
Provides all sorts of tools for managing your site’s debug logs and more. Another massive time-saving tool.
Debug This
Displays lots of details about your WordPress site via the admin bar. Reveals “under the hood” what’s happening on each page.
Log HTTP Requests
Incredibly useful plugin for measuring and logging outgoing HTTP requests. One of my favorite plugins when developing.. other plugins :)
Plugin Detective
Holds your hand through the process of troubleshooting your site. Could be super useful depending on your workflow.
Query Monitor
Enables debugging of database queries, PHP errors, hooks, and much more. Hands down one of the best plugins for debugging WordPress.
System Dashboard
Monitors WordPress components, processes, server hardware, software, and resource usage. A must-have for serious WordPress developers.
Variable Inspector
Enables you to inspect various PHP variables via the dashboard in the WP Admin Area. Huge time-saver when working with PHP variables.
WP Console
Adds PsySH runtime developer console, interactive debugger and REPL. Write code and view the output right in your browser.
WP Crontrol
Enables you to view and control what’s happening in the WP-Cron system. Excellent plugin and highly recommended.
WP Debug Log
Enables you to check the debug log from the dashboard and optionally send email notifications. Looks super useful for debugging with WordPress.
WP Debugging
Adds the requisite PHP constants to the wp-config.php file to enable debugging. So you don’t have to edit the file manually.
WPPerformanceTester
Measures performance of your WordPress site. Looks interesting and useful but hasn’t been updated in a while.
WordPress Hosting Benchmark tool
Tests the performance of your server and compares with results from other servers. A great tool for diving deeper into server performance.
Explore even more debug tools..
The WP Plugin Directory is loaded with many plugins for developing, troubleshooting, and debugging your site. Try a few searches and browse the results. All free and open source. Amazing.
Shouts out to the developers working to provide these free tools to the WordPress community. Your work is important and appreciated.

Note: WordPress plugins tend to change over time, usually for the better but not always. So to be safe, make sure to check the official homepage/docs for more details before trying any of the above plugins. If anything should or should not be on the list, please let us know so we can update the post. Thank you!

Props

Gotta give props here. I was inspired to put this round up together after seeing this post in David McCan’s Dynamic WordPress group on Facebook. Check it out for some interesting comments and more ideas for troubleshooting your WordPress-powered websites.

Cheers! 😎


The Difference Between Taxonomies, Categories, and Tags (Oh My!)

A common question for new WordPress users is, “what’s the difference between categories and tags?” Like everyone knows what a “category” is, but the idea of “tags” can seem very similar. And then you throw in related WordPress concepts like “taxonomy”, and things can get confusing very quickly. But no worries, it’s really not that complicated. Let’s break it down..

Contents

Taxonomies

In WordPress, Taxonomies are used to organize posts. There are different types of taxonomies. The two most familiar types of Taxonomies are Categories and Tags. Both are enabled by default when you install WordPress. So when you create a post, you can choose which categories and tags should be assigned.

Currently, WordPress provides three taxonomies by default:

  • Categories – hierarchical taxonomy
  • Tags – non-hierarchical taxonomy
  • Post Formats – non-hierarchical taxonomy

In addition to these default taxonomies, a WordPress site also may support some Custom Taxonomies that are provided by plugins. For example, an e-commerce plugin may add custom taxonomies for things like “Product Type”, “Price Range”, “Brand Name”, or any other attribute. And for each of these taxonomies, you can add any number of terms.

Note: You can learn more about Post Formats at WordPress.org.

Notice in the above list of default taxonomies, that Categories are hierarchical while Tags are not. This means that categories can have sub-categories (aka child categories), like this:

  • Hats
  • Shirts
  • Pants
  • Shoes
    • Fast shoes
    • Slow shoes
    • Nice shoes
      • Smooth shoes
      • Fancy shoes
      • Funny shoes

Categories can have as many sub-categories as needed. Tags on the other hand, are non-hierarchical, so there are no child tags or grandchild tags. It’s a “flat” taxonomy. Further, any custom taxonomies may be either hierarchical or non-hierarchical, depending on how they are configured.

Note: Some themes also provide their own custom taxonomies, although they shouldn’t. According to WordPress best practices, adding custom taxonomies is “plugin territory”. Only plugins should provide custom taxonomies.

Simple example

To illustrate, say we have a post that describes a store product, like shoes. It might have the following taxonomies (left column) and terms (right column):

Post = Shoes that don't leave any footprints

	Category:      Store
	Tags:          stealth, speed
	Product Type:  shoes
	Price Range:   $100-$300
	Brand Name:    Rolf Ahl

This shows how taxonomies are used to define relationships between posts. So on the front end, visitors can sort items based on their category, tags, product type, and so forth. Indeed, any aspect of your posts can be classified and organized with taxonomies.

Real-world example

To check out an effective use of taxonomies, visit Amazon.com and do a search for something like “shoes”. Then look in the sidebar at all the different ways to sort the results. Each of those sidebar sections (like “Shoe Size” and “Shoe Width”) are added via custom taxonomies. Amazon doesn’t actually run on WordPress, but it’s a great example of taxonomies.

Search results for 'shoe' at Amazon.com
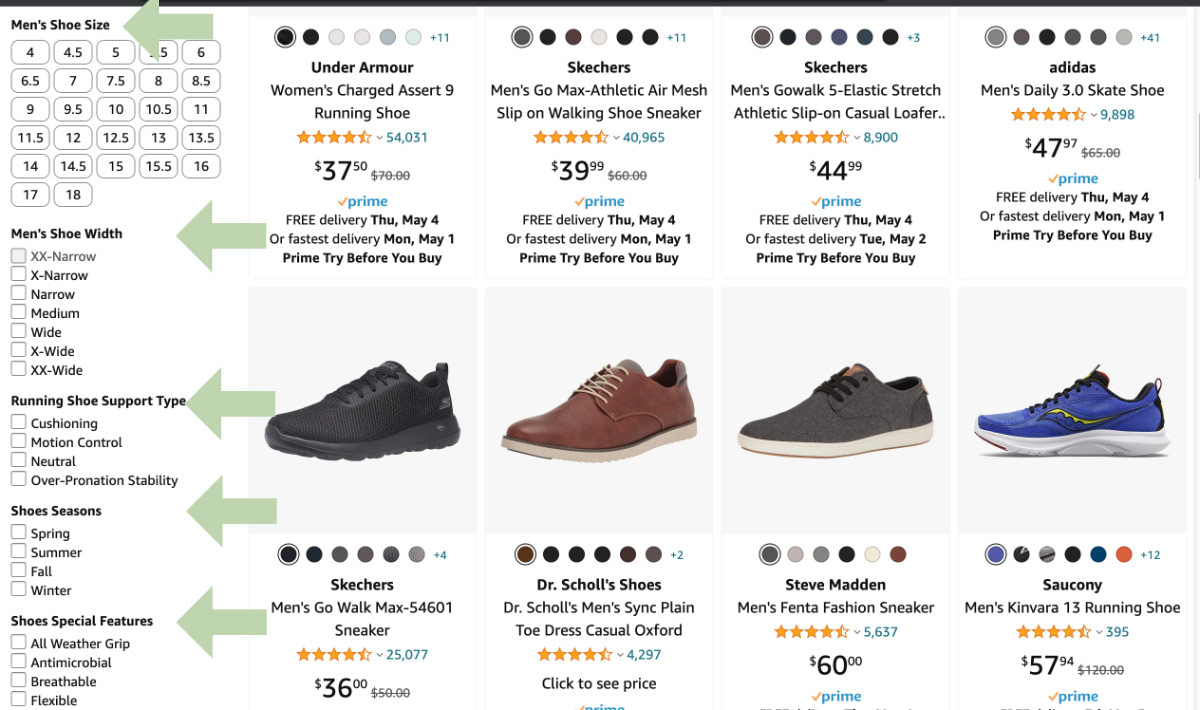
All the sidebar options are examples of custom taxonomies.

As shown here, taxonomies enable your visitors to easily sort through your posts and find related and similar content.

Categories vs. Tags

As discussed, both Categories and Tags are types of Taxonomies. The only technical difference is that Categories are hierarchical, while Tags are not. So with categories, you can create sub-categories (or child categories). With tags, you cannot. Tags always have a “flat” organizational structure.

Other than that, the main difference between Categories and Tags has to do with scope. With WordPress:

  • Categories are used to broadly organize posts into groups
  • Tags are used to denote any specific post characteristics

I know that’s a bit abstract, so let’s go through some “real-world” examples..

Categories: real-world example

Let’s say it’s our job to clean up a house that has tons of junk in it. There are piles of stuff all over the place, and it’s our job to go in there and clean it all up. First we create two piles: “stuff that stays”, and “stuff that goes”. Those two piles represent categories.

After hauling away the “stuff that goes” pile, it’s time to organize the “stuff that stays”. Again, we use categories to make things easier. There are many ways we could categorize all the remaining items. We could organize by room, so our categories would be like:

  • Living Room
  • Kitchen
  • Bathroom
  • Bedroom

Makes sense, right? It’s the same idea with WordPress posts. Categories simply group similar types of posts together. For the purpose of organizing content and making it easier for visitors to find.

Categories: another example

Generally categories represent broad similarities among items, but you can get as specific as you’d like. For example, it’s common for a web-development site to group posts into the following categories:

  • CSS
  • HTML
  • PHP
  • JavaScript
  • Etc.

..such that each coding language gets its own category. That’s gonna keep posts broadly organized based just on the language. All posts about CSS go into the “CSS” category. All posts about HTML into the “HTML” category, and so forth.

But you can get more specific with categories. Say our tutorial site has a LOT of posts on all the coding languages. We might want to refine our categories to include version information, for example:

  • CSS
    • CSS 1.0
    • CSS 2.0
    • CSS 3.0
  • HTML
    • HTML 4.0
    • HTML 5.0
  • Etc.

Because categories can be hierarchical, we can get as specific or as broad as is necessary to organize your posts. And to organize things even further, we can throw tags into the mix..

Tags: real-world example

Returning to our “hoarder house” example, let’s look at how we can use tags to help further organize things. Recall that all the stuff currently is organized by room. So our categories are:

  • Living Room
  • Kitchen
  • Bathroom
  • Bedroom

In each room, we can further organize things by adding a tag to each item. For example, we tag the “chairs”, “tables”, “desks”, “electronics”, “clothes”, “food”, “towels”, and so on. And the nice thing about tags is that they can be added across categories. There may be “chairs” in both Living Room and Kitchen categories. Or there may be “electronics” in all categories. So when visitors arrive at your house, they can click the “food” tag and eat all of your food, regardless of which room it’s in :)

10-second summary

The difference between Taxonomies, Categories, and Tags:

  • Taxonomies are used to organize posts. WordPress provides two default Taxonomies: Categories and Tags. It’s also possible to create Custom Taxonomies. Taxonomies may be hierarchical or non-hierarchical.
  • Categories are used to broadly organize posts into groups. Categories may have a hierarchical structure.
  • Tags denote any specific post characteristics. Tags are non-hierarchical, flat organizational structure.

Resources


Stay Logged in to WordPress

I work from home so can afford to leave tabs open for each of my WordPress sites. That way I can jump on anytime and update or add new content very quickly. The problem I kept running into is that WordPress automatically logs out users after 48 hours. Which means I have to log back in every day even when it’s not necessary. So I needed a way to stay logged in to WordPress indefinitely. Fortunately WordPress is very flexible and easy to customize, and the login duration can be changed via several different methods.

Here are three easy ways to stay logged in to WordPress for a longer period of time.

Three ways to do it..

Check the box

The easiest way to increase the expiration date/time for logins, is to simply check the “Remember Me” checkbox when logging in to WordPress. That will increase the expiration to 14 days, or whenever the browser is closed. After that time, the session cookie expires and you’ll need to log in once again.

This is useful if 14 days is enough time for your workflow.

One downside is that it requires an extra click to check the box. Fine I guess if you’re logging in manually. But if you’re using a password manager or other auto-login app, the extra checkbox step requires action on your part, thus adding friction and slowing things down.

Another downside is that 14 days is not always enough. For my own workflow, I prefer to minimize as many needless steps as possible. So I prefer the next method of extending the login duration, using a slice of custom code..

Add custom code

For more flexibility and less friction, you can add the following code snippet to stay logged in to WordPress for however long is necessary, even indefinitely if it makes sense to do so. This is the preferred technique for my own websites.

Important: Be mindful of any other users who may be logging in on public machines. Only extend the login duration if you know 100% that it’s safe and secure.

Here is the magic code to stay logged in to the WordPress Admin Area. You can add this code via your theme functions file, or add via simple custom plugin. Here is a guide that explains how to do both.

function shapeSpace_stay_logged_in($expires) {
	
	return 172800; // default 48 hours
	
}
add_filter('auth_cookie_expiration', 'shapeSpace_stay_logged_in');

As written, this code hooks into auth_cookie_expiration and filters the expiration duration (in seconds). By default the duration is 48 hours. You can change that to anything that works best.

To stay logged in forever, change the interval to some very large number, like 3153600000 to stay logged in for 100 years ;) To help with converting time to seconds, you can use a free time conversion calculator.

Thanks to Alex Mills (Viper007Bond) for sharing this code at Stack Exchange.

Install a plugin

If you want to extend the login beyond 14 days, but don’t want to go the custom code route, installing a plugin is the way to go. Currently there seems to be only a couple of capable plugins in the WP Plugin Directory:

Let me know if I’ve missed anything! :)


How to Disable Embeds for Any Specific URLs

Quick tip: how to disable embeds for any URL(s). The other day I was adding URLs to a draft post in WordPress. Some of the URLs were for Twitter tweets. Checking a preview of the post on the front end, I was surprised that WordPress had automatically embedded the actual tweet in place of the URL. After a few minutes searching for a way to disable the automatic embedded tweet, I remembered about WordPress oEmbed (now referred to as Embeds), which I’ve actually written about in several tutorials. Turns out the solution is dead simple.

Contents

How embed works

By default, WordPress embeds tweets, video, audio, and other media from third-party services like Facebook, Twitter, YouTube, and many other sites.

Embed media via block editor

To enable embed for any URL when using the Gutenberg Block Editor, add an Embed Block and enter the URL. WordPress takes care of the rest, and will automatically convert the URL to embedded media, right there on your page.

Embed media via classic editor

To enable embed for any URL when using the Classic Editor, simply add the URL on its own line, like this:

Lorem ipsum this is just an example..

https://twiter.com/perishable/status/1616553818183065601

Lorem ipsum dolor amet..

When WordPress finds any URLs on their own line, it auto-embeds the actual media. For example here is the previous tweet URL added to its own line:

If all is working correctly, a formatted tweet should be displayed. This method works for all supported media sites.

How to disable embed for any URL

As you’ve probably guessed, the solution to not auto-embedding media is simple. Here’s how to do it easily using either the Gutenberg Block Editor or the Classic Editor.

Disable embeds via block editor

To disable media embeds for any specific URL using the block editor, simply remove whichever Embeds block contains your URL. I know, it may seem obvious but not everyone knows or understands how it all works.

Disable embeds via classic editor

To disable media embeds for any specific URL using the classic editor, make sure that the URL is not written on its own line. There are numerous ways of doing it, the easiest is to simply prepend a word like “Link”, for example:

Link: https://twitter.com/perishable/status/1616553818183065601

Another method is to make the URL an actual link, by wrapping it with an HTML hyperlink, for example in the post we would write:

<a href="https://twitter.com/perishable/status/1616553818183065601">https://twitter.com/perishable/status/1616553818183065601</a>

On the page, wrapping a URL with a link looks like this:

https://twitter.com/perishable/status/1616553818183065601

See ma! No embed! :)

How to disable ALL media embeds

An easy way to disable WordPress oEmbed/Embeds is to use a plugin.

Currently there is only one available at the WordPress Plugin Directory, Disable Embeds by Pascal Birchler.

I’ve used this plugin on my sites for several years now. It does a great job of disabling all of the needless oEmbed scripts and functionality. BUT it only disables oEmbed for non-whitelisted sites. So media embeds for sites like Facebook, Twitter, YouTube, et al will continue to work normally.

SO at this point, in order to disable ALL media embeds, you’ve gotta do it with custom code. I’m not going to rewrite the wheel here, tutorials for this already exist, for example:

From what I can tell, either tutorial provides the same code/information, and should work great to completely disable ALL WordPress Embeds on your site.

CU Later

I didn’t see this information posted anywhere so thought I’d share here at DigWP.com. Cheers people :)


Database Tip: Clean Up User-Agent Data

I just finished up my latest book, Wizard’s SQL Recipes for WordPress. And it’s packed with over 300 time-saving code snippets for managing and optimizing your WordPress database. For example, one of the recipes from the book shows how to delete unwanted user-agent data from the WP comments table. This is an easy optimization step that can help to free up some precious disk space.

Check out the Demo/Table of Contents for Wizard’s SQL Recipes for WordPress.

Show all user-agent data

Did you know that WordPress collects the visitor’s user-agent data for every comment? In the database, user-agent data is stored in the comments table in the comment_agent column. But you would never know it because WordPress does not display the collected user-agent data anywhere in the Admin Area. No worries for us though. A simple SQL query will summon the information:

SELECT comment_ID, comment_author, comment_agent 
FROM wp_comments;

If comments have ever been enabled on your site, that simple query may return some surprising results. Or if you’re using an application like phpMyAdmin to manage your database, you can check out all of the user-agent data by visiting the wp_comments table and examining the comment_agent column. To give you a better idea, here is an example of a typical user agent:

Mozilla/5.0 (Macintosh; Intel Mac OS X 10_15_7) AppleWebKit/537.36
(KHTML, like Gecko) Chrome/94.0.4606.81 Safari/537.36

Most comments should have some sort of user agent recorded, although some may not. It depends entirely on the client that the visitor was using when leaving the comment. Incidentally, any collected user-agent data can be used to identify which browsers/clients people (and bots) are using to visit your site.

Tip: WhatIsMyBrowser.com provides an excellent tool for identifying user agents.

In general, user agents can vary greatly. Some user agents consist of a small number of characters, while many others (like the previous example) consist of many characters. Either way, depending on the number of comments, user-agent data can consume a significant amount of space.

Delete all user-agent data

Before going further, if your site uses a plugin that makes use of user agents (remember, WordPress itself does not use user agents for anything), then stop right here. You don’t want to delete any user-agent data. But for everyone else — like probably around 99% of WordPress sites — all of that user-agent information is pretty much useless. So it gives us an excellent opportunity to clean up the database by deleting all user-agent information from the comments table. Here is the magic SQL recipe to do it:

UPDATE wp_comments SET comment_agent = '';

Here we replace the user-agent data with a blank/empty value for all comments in the WordPress database. If you would rather replace the data with n/a or any other string, replace '' with 'n/a' or whatever makes sense for your site.

Depending on the number of comments on your site, that simple query can reduce the size of the database considerably. And that’s a good thing.

Want more SQL recipes like this one? Check out Wizard’s SQL Recipes for WordPress — includes an entire chapter on optimizing the WP database!


How to Disable Gutenberg Styles on the Frontend

By default the Gutenberg Block Editor loads its default CSS/stylesheet on the front-end of your WordPress site. This is fine for most cases, but there may be situations where you want to disable the Gutenberg styles for whatever reason. For example, my free WordPress plugin, Disable Gutenberg, enables users to disable the Gutenberg Block Editor and restore the Classic Editor. Included in the plugin settings is an option called “Enable Frontend” that lets users enable or disable the Gutenberg CSS/styles as desired. This quick DigWP tutorial explains programmatically how to disable Gutenberg styles on the front-end.

Bonus: Disable Gutenberg plugin also enables restoring of Classic Widgets!

Why?

One reason why people may want to remove extraneous/unnecessary CSS/stylesheets from loading is improved site performance. So by disabling the Gutenberg CSS when it’s not needed, that’s one less asset that needs to load for every page request. That can have a huge cumulative effect on the performance of your WordPress site.

FYI the default Gutenberg stylesheet looks like this when included in the source code of your web pages:

<link rel='stylesheet' id='wp-block-library-css'  href='https://example.com/wp-includes/css/dist/block-library/style.min.css' type='text/css' media='all' />

So you know what to look for.

Disable Gutenberg styles on the front-end

Without further ado, here is the magic code snippet sauce to add to your WordPress-powered site. You can add this code using a plugin such as Code Snippets, or you can add directly via theme (or child theme) functions.php, or add via simple custom plugin. Many ways to add the following code:

// disable gutenberg frontend styles @ https://m0n.co/15
function disable_gutenberg_wp_enqueue_scripts() {
	
	wp_dequeue_style('wp-block-library');
	wp_dequeue_style('wp-block-library-theme');
	
}
add_filter('wp_enqueue_scripts', 'disable_gutenberg_wp_enqueue_scripts', 100);

This script disables the default Gutenberg stylesheet wp-block-library, and it also disables the theme-specific Gutenberg stylesheet (if applicable) wp-block-library-theme. That’s all it does, plain and simple.

Note: To re-enable the Gutenberg styles, simply remove the above code snippet.

Bonus: Disable other block stylesheets

In general, any WordPress stylesheet can be disabled using the WP core function, wp_dequeue_style(). For example, if you are using WooCommerce and the Storefront theme, you may want to prevent their related Gutenberg Block CSS/stylesheets from loading on the front-end. To do it, modify the previous code snippet so it looks like this:

// disable gutenberg frontend styles @ https://m0n.co/15
function disable_gutenberg_wp_enqueue_scripts() {
	
	wp_dequeue_style('wp-block-library');
	wp_dequeue_style('wp-block-library-theme');
	
	wp_dequeue_style('wc-block-style'); // disable woocommerce frontend block styles
	wp_dequeue_style('storefront-gutenberg-blocks'); // disable storefront frontend block styles
	
}
add_filter('wp_enqueue_scripts', 'disable_gutenberg_wp_enqueue_scripts', 100);

The wp_dequeue_style() function is what’s doing all the work here. It is very effective and can be used to disable any stylesheet that is registered with WordPress. Check the docs at WordPress.org for more details.

One for the road..

The code techniques so far are kept very minimal for the sake of clarity. But as you probably know, there is much more that can be done when customizing asset loading and so forth. For example, you can add conditional logic so the stylesheets will be disabled only under certain conditions.

To give you an idea of the possibilities, here is a “real-world” example showing how Disable Gutenberg conditionally disables the front-end styles depending on user preference in the plugin settings.

// disable gutenberg frontend styles @ https://m0n.co/15
function disable_gutenberg_wp_enqueue_scripts() {
	
	global $wp_query;
	
	if (is_admin()) return;
	
	$post_id = isset($wp_query->post->ID) ? $wp_query->post->ID : null;
	
	$options = get_option('disable_gutenberg_options');
	
	$enable = isset($options['styles-enable']) ? $options['styles-enable'] : false;
	
	if (!$enable && !disable_gutenberg_whitelist($post_id)) {
		
		wp_dequeue_style('wp-block-library');
		wp_dequeue_style('wp-block-library-theme');
		
	}
	
}
add_filter('wp_enqueue_scripts', 'disable_gutenberg_wp_enqueue_scripts', 100);

Again this is just an example taken from an actively developed plugin. So much more is possible, as WordPress core provides all sorts of useful functions with which to work. So have fun and build something creative :)

Note: The above code snippet taken from the Disable Gutenberg plugin is for example purposes only; so don’t try to use it on any live site. Instead if you want to explore, download the plugin and examine the source code.

Related Posts

More of our posts on Gutenberg Block Editor:


Fix Site Health Error: The authorization header is missing

Quick post that explains how to fix the error, “The authorization header is missing”. This error may be found under “recommended improvements” in the WordPress Site Health tool (located under the WP menu ▸ Tools ▸ Site Health).

When running a Site Health check, the “authorization header” warning happens when you’ve upgraded WordPress (to version 5.6 or better) and have Permalinks enabled, but the site’s .htaccess rules have not been updated with the latest. This DigWP tutorial explains what’s happening and shows how to fix the error easily with a few clicks.

The authorization header is missing.

Contents

The solution

When testing your WordPress with the Site Health tool, if you get this:

Site Health Results: Authorization Header MissingWP menu ▸ Tools ▸ Site Health — The authorization header is missing. Click for full-size image.

If you click the error and toggle it open, you’ll get a bit more information: “The Authorization header comes from the third-party applications you approve. Without it, those apps cannot connect to your site.” Screenshot:

Site Health Results: Authorization Header Missing (Details)Details about the authorization-header error. Click for full-size image.

This error means that your WordPress Permalink rules are not up-to-date. To fix the issue, you need to update the Permalink rules in your site’s .htaccess file. There are several ways to do this:

  • Easy — Visit your Permalink settings and click “Save Changes”
  • Manual — Manually update .htaccess with current Permalink rules

So try the easy method first. If it works, then stop; you’re done. If it does not work, the “manual” method definitely should resolve the issue. Let’s walk through each of these solutions..

Flush Permalinks

The easiest way to fix the authorization-header issue, is to click on the “Flush permalinks” link, which is displayed right there on the Site Health screen. Here is a screenshot:

Authorization Header Missing: Flush PermalinksShowing the location of the “Flush permalinks” link. Click for full-size image.

That will take you to the WordPress Permalinks settings. This is where you can “flush” (i.e., update) your site’s Permalink rules. You can do this by clicking the “Save Changes” button as shown here:

Permalink settings showing Save Changes buttonPermalink settings showing the “Save Changes” button. Click for full-size image.

You do NOT need to make any actual changes to any Permalink settings. All you need to do is click “Save Changes” and done. Once you do that, WordPress will attempt to update the site’s .htaccess file with the latest/current Permalink rules. Thus solving the authorization-header issue. You can verify the fix by running a fresh Site Health test.

Important! Updating/flushing Permalink rules via the Admin Area results in changes made to the .htaccess file on the server. Flushing does not affect the local copy of your .htaccess file. So make sure to update both local and server copies to avoid having to go through this again in the future.

Manually update .htaccess

If the easy method does not work to resolve the “authorization header is missing”, you will need to update your Permalink rules manually. To do it, open your site’s .htaccess file. Look for a block of code that begins with this line:

# BEGIN WordPress

..and ends with this line:

# END WordPress

Located between these two lines are the WordPress Permalink rules. Whatever you have there, you want to replace with the latest set of rules. You can find the current rules at WordPress.org. So grab a copy of the correct rules for your site (Basic or Multisite), and replace your existing rules via copy/paste. Save the file, upload, and done.

That should resolve the Site Health authorization-header issue. To verify success, try another test with the Site Health tool.

If after updating your Permalink rules, Site Health continues to show the error, most likely there is something else that is interfering with normal functionality. In this case you may contact your support team. Or if you’re savvy, follow our Troubleshooting Guide to help diagnose and resolve any outstanding issues.

About the error

So what causes the “authorization header” error? WordPress version 5.6 introduces Application Passwords. This feature enables authenticated users and apps to interact with your site. Application Passwords started as an awesome free plugin that could be added to any WordPress site as needed. Now it’s been integrated into WordPress core so all sites must have it, whether needed or not.

DigWP Tip: If you have no need for Application Passwords, you can disable them easily with my free plugin, Disable Application Passwords.

WordPress users may be familiar with the new “Application Passwords” settings that are displayed on the Profile screen of every registered user. If you have yet to check it out, go take a look at the bottom of any “Edit User” screen. Here is a screenshot of how it looks in WordPress 5.6:

Application Passwords SettingsWP menu ▸ User Profile/Edit User ▸ Application Passwords settings. Click for full-size image.

That’s all great, but what most WordPress users probably are not aware of, is that the new Application Passwords feature brings changes to the WordPress Permalink rules located in the site’s .htaccess file. The changes are required for WordPress and Application Passwords to work properly.

.htaccess changes in WP 5.6

Here is the new line that is added to WordPress Permalink rules (via .htaccess) in version 5.6:

RewriteRule .* - [E=HTTP_AUTHORIZATION:%{HTTP:Authorization}]

This line helps to handle the Authorization header for HTTP requests coming from any approved third-party applications. Without proper handling of the Authorization header, apps will not be able to connect with your site.

So for sites using outdated Permalink rules, the above new line will be missing from .htaccess. This causes errors when WordPress tries processing requests. The Site Health error happens because WordPress expects certain authorization headers that are not included with the request.

As of now, here is what the WordPress Permalink rules look like in the site’s .htaccess file:

# BEGIN WordPress
# The directives (lines) between "BEGIN WordPress" and "END WordPress" are
# dynamically generated, and should only be modified via WordPress filters.
# Any changes to the directives between these markers will be overwritten.
<IfModule mod_rewrite.c>
RewriteEngine On
RewriteRule .* - [E=HTTP_AUTHORIZATION:%{HTTP:Authorization}]
RewriteBase /
RewriteRule ^index\.php$ - [L]
RewriteCond %{REQUEST_FILENAME} !-f
RewriteCond %{REQUEST_FILENAME} !-d
RewriteRule . /index.php [L]
</IfModule>

# END WordPress

Notice the E=HTTP_AUTHORIZATION rule added right up front there. When that line is included as shown here, the Site Health “authorization header” error should not happen.

DigWP Tip: For a complete guide to Apache/.htaccess, check out my book .htaccess made easy. Features an entire chapter covering all things WordPress :)

How to Troubleshoot WordPress, Easy Step-by-Step Guide

Easily hands down the most common thing that I find myself explaining to WordPress users is how to troubleshoot WordPress in order to find the cause of some issue. And it makes sense if you think about it. WordPress and all of its plugins and themes are made of code. And code is a complex thing. The more code you add to a site, the more likely it is for bugs and issues to happen. And when they do, it can be confusing and frustrating to the average user.

Fortunately, there is a reliable, proven technique for figuring out why any given problem is happening. It's referred to as "troubleshooting", a very powerful tool that everyone should have in their belt. This DigWP tutorial explains two methods of troubleshooting using plain, easy to follow steps.

Troubleshooting is something that literally anyone can do. It is a straightforward, proven process that helps millions of people diagnose problems every day.

Table of Contents

Two different approaches

When it comes to troubleshooting WordPress, there are two ways to do it:

  • From the top down
  • From the ground up

Each of these methods uses basic logic to eliminate variables and determine causality. As one might imagine, either technique has its own pros and cons. In a nutshell, most common method is top-down, which is used to quickly diagnose plugin/theme conflicts, etc. The ground-up method is a more rigorous, clinical approach that generally requires more time.

Let's take a closer look at each..

Troubleshooting from the top down

Top-down testing is basically:

Temporarily deactivating each of your other plugins one at a time, re-testing the problem/issue after each, until the issue no longer happens. This tells you as quickly as possible which plugin is interfering with normal functionality.

Pros of top-down testing:

  • Can be the fastest way of diagnosing issues

Cons of top-down testing:

  • May not be feasible to test on a live site
  • Can be complicated if lots of other plugins used on site
  • May require lots of time if using lots of other plugins

To understand how it works, let's go thru an example..

Example

Let's say that you have a plugin named "Amazing Plugin". It is not working correctly, and you suspect there is some conflict with one of your other plugins or theme. You want to find out why the issue is happening, and hopefully get it resolved. Before contacting the plugin provider, take a few minutes to do some basic testing of your plugins and theme. Doing so will help the support team understand and provide help as quickly as possible.

Here are the magic steps to troubleshoot your setup using top-down troubleshooting..

Troubleshooting steps

To troubleshoot why "Amazing Plugin" is not working using top-down testing, it is necessary to test all other plugins and the theme. It doesn't matter which you start with, for this tutorial we'll start with testing the other plugins, as that is where I've found most conflicts can happen.

Note: The steps below are for testing a plugin called "Amazing Plugin". The steps also work if you are testing a theme. Just replace "Amazing Plugin" with "Amazing Theme" and you're good to go.

Test your other plugins

  1. Deactivate one of your other plugins
  2. Re-test if Amazing Plugin is working properly
  3. If Amazing Plugin now works, stop; you have found the conflict
  4. Otherwise, if Amazing Plugin still is not working, deactivate another one of your other plugins
  5. If Amazing Plugin now works, stop; you have found the conflict
  6. Otherwise, if Amazing Plugin still is not working, deactivate another one of your other plugins
  7. Repeat this process for all of your other plugins, or until Amazing Plugin is working properly

At this point, if the Amazing Plugin is working normally, then the cause of the issue is whichever plugin that was last deactivated. Otherwise, if you get through deactivating all of your other plugins and Amazing Plugin still is not working correctly, it is time to repeat the test with your theme.

Test your theme

If you follow the above steps and deactivate all of your other plugins, and the problem remains, it's time to repeat the process to test your current theme:

  1. With all of the other plugins deactivated, switch to one of the default WP themes (e.g., Twenty Twenty)
  2. With the default theme active, try retesting the Amazing Plugin
  3. If Amazing Plugin now works properly, you have found the issue: there is some conflict with your theme
  4. Otherwise, if you have deactivated all other plugins and switched to the default theme, and the issue persists, then there is something else that is interfering

Hopefully at this point, you have found out which plugin or theme is interfering. If not, then further sleuthing is required to solve the mystery.

Beyond plugins and theme

After completing the above troubleshooting steps, in 99% of the cases I've seen, the conflicting plugin (or theme) will be found. If that is not the case, then one of the following must be true:

  • Further testing/troubleshooting is required
  • The issue is with the plugin itself
  • The issue is with WordPress core
  • Something else outside of WordPress
  • Some combination of the above

So with all other plugins deactivated, and using the default WordPress theme, if the issue persists, then there may be a conflict with specific plugin settings, server configuration, network interference, or even WordPress itself (although rare, in my experience). In this case, further testing is required in order to find (and hopefully resolve) the issue.

This is where ground-up testing can be useful. Instead of trying to reverse-engineer your entire current site, you can start from scratch using the ground-up technique, which gives you a "clean slate" that eliminates all other variables. Let's take a look..

Troubleshooting from the ground up

Ground-up testing is basically:

Set up a new WordPress installation, leave everything at the defaults (e.g., plugins, theme, and settings), and then install the plugin or theme that you want to troubleshoot. This enables you to verify that the plugin works normally, without interference from any other plugins, theme, or settings.

Pros of ground-up testing:

  • Gives you a clean slate to work with
  • Does not interfere with your other/original site
  • Provides a baseline where the plugin works correctly

Cons of ground-up testing:

  • Takes more time to set up another WP install
  • May require transferring of plugin license(s)

Let's look at a quick example..

Example

For example, say you have a plugin named "Super Duper". It is not working correctly, and you suspect there is some conflict with one of your other plugins or theme. You want to find out why the issue is happening, and hopefully get it resolved. Before contacting the plugin provider, take some time to do some basic troubleshooting. Doing so will help the support team understand and provide help as quickly as possible.

Troubleshooting steps

To troubleshoot why the Super Duper plugin is not working using ground-up troubleshooting, follow these steps:

  1. Set up a new WordPress installation
  2. Leave the plugins, theme, and settings at default values
  3. Install only the plugin (or theme) that is not working

After following these steps, you can verify that the plugin or theme you are testing works normally on default WordPress. This is your baseline: the plugin works on default WordPress. IF that is not the case, then you have found a bug with the plugin (or theme) itself. And should be reported to the plugin developer.

Otherwise, if the plugin is working properly on default WordPress, then the problem is not a bug with the plugin, but rather a bug with your particular setup, configuration, etc. So further testing is required..

Test your other plugins

Once you verify that the plugin is working properly on default WordPress, you can begin troubleshooting by installing and activating each of your other plugins, one at a time. You want to re-test the problematic plugin after adding each new plugin. At some point, as you are doing this, the issue will return, and you will know exactly which plugin is breaking things.

If you get through adding all of your other plugins, and the issue has not reappeared, the next step is to test your theme.

Test your theme

If you get through adding all of your other plugins without the issue reappearing, then move on to the theme. Try installing and activating whichever theme you are using on the other site and re-test the issue again. If the theme breaks things, then you have the information you need to either:

  • Report the issue to both plugin and theme developers
  • Troubleshoot within the theme itself (or hire someone to do it for you)

And of course, if you get to this point and the issue has not resurfaced, then yep you guessed it, more digging is required.

Beyond plugins and theme

If you get through testing each of your plugins and theme, and the issue does not return, then there must be something else — some other difference between your original WordPress installation and the test/default installation — that is causing the problem.

In this case, the next step is to figure out the specific differences between the two WordPress sites. For the sites to behave differently (i.e., one showing the issue and the other working normally), there must be some difference between them. Your job is to continue the troubleshooting process by eliminating variables until the issue returns.

Take-home message

The take-home message for this tutorial is that troubleshooting is something that literally anyone can do. It is a straightforward, proven process that helps millions of people diagnose problems every day. And more importantly, a bit of troubleshooting provides valuable information that can help the plugin or theme provider to understand and hopefully resolve any issue.

Remember, the people who develop your WordPress plugins and themes love to help you, but they are only human. They do not possess a crystal ball or Palantír that magically reveals to them exactly what is happening on any given site.

Seriously none of us have anything like that.

We have no idea what's happening on your site unless you tell us. So by doing some basic troubleshooting, you can provide the developer precise information, increase the chance of getting the issue resolved quickly, and benefit from better understanding of your own website.

Going further..

For a more in-depth troubleshooting tutorial, check out my post at Perishable Press: The Art of Troubleshooting WordPress. That goes into much more depth, plus provides all sorts of tips and tricks, etc.

Thanks for reading and happy troubleshooting.


How to Check if Post has Taxonomy Term

Something I did not know about when working with Custom Post Types and Custom Taxonomies. Normally when checking if a regular WP Post belongs to a specific category, we can use the WordPress function in_category(). But that does not work with Custom Post Types. To check if a CPT belongs to a specific term in a Custom Taxonomy, use has_term() instead.

Check if WP Post belongs to specific category

To check if the current post belongs to a specific category, use in_category(). For example in your theme's single.php template, you can do this:

if (in_category(1)) {
	
	// post is in category with ID = 1
	
}

Here we are checking if the post belongs to category with ID = 1. You can change that to any category ID, name or slug, or an array containing multiple values.

Here is an example where mutliple categories are checked:

if (in_category('donuts')) {
	
	// post belongs to "donuts" category
	
} elseif (in_category(array('coffee', 'beer'))) {
	
	// post belongs to either "coffee" or "beer"
	
} else {
	
	// post does not belong to any of the above categories
	
}

Notice the use of an array in the elseif condition. You can specify as many categories as needed using an array of category IDs, names, or slugs.

Check if CPT belongs to specific taxonomy term

Now for the main point of this tutorial. To check if the current post belongs to a specific term in a custom taxonomy. For example, if we have a taxonomy named download_category and want to check if the current post belongs to the term combo, we can do this:

if (has_term('combo', 'download_category')) {
	
	// post belongs to "combo" in "download_category" taxonomy
	
}

When calling has_term(), the first parameter is the name of the term, and the second parameter is the name of the taxonomy.

To check multiple terms, use an array of term IDs, names, or slugs. For example:

if (has_term(array('combo', 'book', 'deal'), 'download_category')) {
	
	// post belongs to "combo", "book", or "deal" in "download_category" taxonomy
	
}

So this example will check if the current post belongs to "combo", "book", or "deal" in the "download_category" taxonomy.

Bonus Tip: Check for *any* taxonomy term

To check if the current post belongs to any term in a given taxonomy, simply leave the first parameter empty/blank. Example:

if (has_term('', 'download_category')) {
	
	// post belongs to a term in the "download_category" taxonomy
	
}

Here we are checking if the current post belongs to any term in the "download_category" taxonomy.

That's the thick and thin of it.

Bottom line is just remember:

  • Check post for category — use in_category()
  • Check post for tax term — use has_term()

Is it okay to use plugins that are not current with latest version of WordPress?

People often ask me whether it is safe to run plugins that are not tested with the latest version of WordPress. And it's a good question, because software in general is something that you want to keep current and updated with all the latest. For WordPress plugins however, there are many plugins that simply don't need to be updated with each new version of WordPress.

The answer? It depends..

A safe answer for the general case would be that, unless there are known security or other outstanding issues, it may be fine but really depends on the plugin. For example, the original Subscribe to Comments plugin once went like 10 years without an update and kept working great. So even though it was many versions behind ("not tested"), the plugin had many happy users with no issues for years.

Ultimately you will need to do a little research to determine whether or not a particular plugin is safe for your site.

Why? Because many plugins are simple and use only well-established core WordPress functionality. For example, my plugin Disable WordPress Responsive Images contains fewer than 10 lines of code and uses two core hooks and some basic PHP logic. The code itself has not changed in over two years, and is safe to run on any version of WordPress 5.0 or better.

The difference is that some plugins (such as my own) are tested and updated with each WordPress update. So the changelog is kept current with everything even though none of the code may change from one version to the next.

That is why having a current readme.txt/changelog is so critical to plugin success. It eliminates the guesswork and saves the user time. Otherwise the infamous "hasn't been tested" warning is displayed on the plugin homepage at WordPress.org:

This plugin hasn't been tested with the latest 3 major releases of WordPress. It may no longer be maintained or supported and may have compatibility issues when used with more recent versions of WordPress.

You've seen that right? It is displayed for any plugin which has a readme.txt file that has not been updated for at least three major versions of WordPress.

The warning is helpful but does not tell the user whether or not the plugin is safe to use. There "may" be issues or there may not be issues. The plugin may be abandoned or may not be abandoned. It's just a "heads up" letting you know, essentially, that the plugin developer has not checked in with the plugin for at least three major versions of WordPress. Which is around a year or so.

The warning message essentially says, hey the developer of this plugin has not checked in for a while.

The warning message is NOT saying that there is any particular problem with the plugin, or that you should not use it. It is only telling you that the developer may be lazy or busy or whatever, and has not taken the time to check in and update the plugin or at least bump the version number in the readme.txt.

Subscribe to Comments WP Plugin"This plugin hasn't been tested" warning message for the Subscribe to Comments plugin

So the plugin may or may not work perfectly on the latest version of WordPress, even if its homepage displays the "not been tested" warning. This is why there is no one-size-fits-all answer to the question, "Is it okay to use plugins that are not current with latest version of WordPress?" Because it depends on the plugin.

As WordPress.org forum moderator Jan Dembowski clearly explains:

Because it's unnecessary to update the majority of plugins. The time of the last update does not mean anything to users nor does it mean that that plugin does not work or has any issues with the code.

Jan goes on to say that "it is nice when authors update the 'Tested up to' field to let users know that it works with newer versions but aside from that, this suggestion would generate a lot of work, punish authors and most importantly deprive users of plugins for a bad idea."

Determining if a plugin is safe to use

If you're a plugin developer, the easiest way to verify plugin functionality is to test it locally and examine the code.

For everyone else, and maybe developers too, you're gonna need to do some research. Here are some things that may help determine whether or not a plugin that is not current with latest WordPress is safe to use:

  • Look at the plugin's changelog (under the "Development" tab)
  • Post a question on the plugin's support forum
  • Read thru some posts in the plugin support forum
  • Contact the developer directly and ask if the plugin is safe to use
  • Search around online for other opinions and information
  • Examine the plugin source code, or hire a developer to do it
  • Test the plugin on a default installation of WordPress
  • Check the site error/debug logs for any signs of errors, warning, etc.

With a bit of effort, you can put the pieces together and get a clear picture of whether or not some "not current" plugin is safe to use.

If there is any doubt after a bit of research, do not use the plugin. Find another.

Also worth mentioning, if you notice any issue with the plugin, you can help the WP community by posting about the problem in the plugin's support forum at WordPress.org. Clearly explain the issue and any relevant information. Even if the plugin developer does not respond, maybe someone else in the community will. And if nothing else, your post may help others save some time with research and testing.

About the readme.txt file

The WordPress Plugin Directory uses the readme.txt file to determine whether or not to display the ominous "not been tested" warning on the plugin homepage. Each plugin includes a readme.txt file that includes information that looks like this:

Plugin Name: Disable Responsive Images Complete
Plugin URI: https://perishablepress.com/disable-wordpress-responsive-images/
Description: Completely disables WP responsive images
Tags: responsive, images, responsive images, disable, srcset
Author: Jeff Starr
Contributors: specialk
Requires at least: 4.4
Tested up to: 5.4
Stable tag: 1.8
Version: 1.8
Requires PHP: 5.6.20
License: GPL v2 or later

Notice the "Stable tag", "Tested up to", and "Version"? That all translates into the helpful information that is displayed on the plugin homepage. For example, the above readme header is converted to the following sidebar information on the plugin homepage at the WordPress Plugin Directory:

Disable Responsive Images Complete

The information displayed in the sidebar is super useful when determining whether or not the plugin is safe and healthy. If anything looks out of place or otherwise lacking, feel free to pass on the plugin and find something else.

For plugin developers

From one plugin dev to another, take a few moments for each major WordPress release and test/update your plugins. If the plugin does not require any changes, then at least bump the minimum-required and stable tags. It only takes a moment and definitely helps people in the community decide whether or not your plugin is safe to use on their site.


Which Pricing Model Do You Prefer: One-Time or Recurring?

For a long time, premium WordPress plugins and themes were sold as a one-time payment. So for example, if you wanted to buy a new WordPress theme, you would make a single purchase and own the theme indefinitely, with no future payments due. Then somewhere along the way, a recurring pricing model became popular. These days, it is very common for themes and plugins to be sold via recurring payment scheme. So for example, if you want to use some awesome pro plugin or theme, you pay an annual or in some cases monthly fee.

Different Pricing Models

For WordPress products, like plugins and themes, there are myriad pricing models available:

  • Free — no purchase required, use product indefinitely
  • Freemium — free for basic features, pay to unlock more
  • Trial-Based — free to use for limited time, then time to pay
  • One-time Payment — pay once and own/use the product indefinitely
  • Recurring Payment — pay every year, month, or other interval

You can find examples of each of these pricing models by simply shopping around for plugins and themes. The same thing is true for software and digital products outside of the WordPress marketplace. For example, a few years ago Adobe switched from one-time payment to a subscription-based plan, where you pay a monthly or yearly fee to use Photoshop, Illustrator, et al.

There also is a more subtle, sort of middle-of-the-road pricing model: one-time payments for a specific version of the software. For example, if you purchase apps like MAMP Pro, 1Password, Carbon Copy Cloner (a few examples that come readily to mind), the initial purchase is one-time, non-recurring. But you only get updates for one or two major versions. So if you purchased MAMP Pro version 4.0, you get free updates for all version-4 releases, like 4.1, 4.2, 4.3, etc. But then you have to pay again for version 5.0 and beyond.

Regardless of which pricing model you're talking about, ultimately it comes down to either paying only once or paying multiple times.

So my question for you: what is the BEST pricing model for WordPress plugins and themes?

As some of you may know, I strongly prefer to own the plugins that are used on my sites. I do not like the idea of having to pay more every year. It's probably because I am such an "old school" developer who is accustomed to one-time, flat-fee payments for scripts, plugins, and themes. In fact, I sell my own premium WordPress plugins using the one-time (non-recurring) pricing model.

Most if not all of my direct competitors sell their plugins using the recurring payments model. So users will have to pay more every year just to continue receiving updates and so forth. In my mind, this benefits the seller more than the customer. Whereas one-time purchases tend to benefit the customer more than the seller. But this is my own biased opinion, so I want to ask..

What do YOU think?

I think the most popular/no-brainer answer is that "there is no "best" pricing model" that applies to all products. Rather it depends on the nature of the product, scope of functionality, and other variables. Everything has to be factored in: development, support, marketing, the whole nine yards.

What do YOU think? Do you like paying more every year or month for plugins and scripts? Should plugins be considered more of a SaaS type deal? Is there a happy middle ground? Share your thoughts in the comments below!


How to Add Custom Content to WordPress Feeds

There are numerous ways to add custom content to your WordPress feeds. If you're not using a plugin, it's possible to just add a code snippet to your theme's functions.php file. For most cases, I think probably going the plugin route is the easiest way to add custom content to your WordPress RSS/feeds. Just install, activate, add your content and done. But for WordPress developers and designers who want more fine-grained control, this article explains how to add custom feed content programmatically using the WP API. So whether you need to add copyright text, advertisements, hyperlinks, or virtually anything at all, this post explains how to make it happen.

Add custom content to feed content

Often the easiest way to explain something is to just show it:

// add custom content to all feeds
function shapeSpace_add_content_to_all_feeds($content) {

	$before = '<p>Custom content displayed before content.</p>';
	$after = '<p>Custom content displayed after content.</p>';

	if (is_feed()) {

		return $before . $content . $after;

	} else {

		return $content;

	}

}
add_filter('the_content_feed', 'shapeSpace_add_content_to_all_feeds');

This snippet adds the specified custom content to each item in your WordPress feeds. You can add this code to your WordPress site by including it in your theme, or you can make a simple plugin and go that route. Either way is fine, totally up to you.

How it works

In the previous code, our function shapeSpace_add_content_to_all_feeds() first defines the custom content that we want to add $before the feed content and $after the feed content. Using either/both of these variables, you can define virtually any custom content, text, markup, or whatever you wish.

After defining the custom content, the function continues with a conditional check via the is_feed() tag. If the request is for any of WordPress’ feeds, then the custom content will be included with the feed content. Otherwise, if the request is not for any feed, then the original content is returned unmodified.

FYI: Technically the conditional is_feed() check is not necessary, but it's useful to show how a conditional tag might be used in this context.

By itself, our shapeSpace_add_content_to_all_feeds() function won't do anything. To get it to work, we need to call it. And because this is WordPress, we can use add_filter() to choose exactly when and where the function should be called. For WP feeds, we can hook our function into the_content_feed, so our custom content will be added to the <content> tag of every WordPress feed.

Example of feed output

To help visualize what happens when custom content is added to WordPress feeds, here is an example of what the feed markup (XML) will look like after adding our custom $before and $after content using the method above:

<item>
	<title>Securing the WP REST API</title>
	<link>https://digwp.com/2018/08/secure-wp-rest-api/</link>
	<comments>https://digwp.com/2018/08/secure-wp-rest-api/#comments</comments>
	<pubDate>Mon, 27 Aug 2018 19:40:33 +0000</pubDate>
	<dc:creator>Jeff Starr</dc:creator>
	<category><![CDATA[ Security ]]></category>
	<guid isPermaLink="false">https://digwp.com/?p=8446</guid>
	<description>
		<![CDATA[ I think many WordPress users probably underestimate the amount of data that is made available via the REST API. Just about everything is available to anyone or anything that asks for it: posts, pages, categories, tags, comments, taxonomies, media, users, settings, and more. [&#8230;] ]]>
	</description>
	<content:encoded>
		<![CDATA[
		<p>Custom content displayed before content.</p>

		<p>I think many WordPress users probably underestimate the amount of data that is made available via the <a href="https://developer.wordpress.org/rest-api/" title="REST API Handbook">REST API</a>. Just about everything is available to anyone or anything that <strong>asks for it</strong>: posts, pages, categories, tags, comments, taxonomies, media, users, settings, and more. ...</p>
		<p>Post content continues here...</p>

		<p>Custom content displayed after content.</p>
		]]>
	</content:encoded>
	<wfw:commentRss>https://digwp.com/2018/08/secure-wp-rest-api/</wfw:commentRss>
	<slash:comments>1</slash:comments>
</item>

Here you can see the "before" and "after" custom content added to the <content> tag. And that's pretty much all there is to it. Now let's change it up and add our custom content to the feed description (i.e., excerpt).

Add custom content to feed description

In the previous section, we cover how to add our custom content to the the <content> tag. To instead display the custom content in the <description> tag, we simply need to change the hook that is used by our add-content function. So instead of doing this:

add_filter('the_content_feed', 'shapeSpace_add_content_to_all_feeds');

..we hook our function into the_excerpt_rss, like so:

add_filter('the_excerpt_rss', 'shapeSpace_add_content_to_all_feeds');

Here is the result of using this new tag:

<item>
	<title>Securing the WP REST API</title>
	<link>https://digwp.com/2018/08/secure-wp-rest-api/</link>
	<comments>https://digwp.com/2018/08/secure-wp-rest-api/#comments</comments>
	<pubDate>Mon, 27 Aug 2018 19:40:33 +0000</pubDate>
	<dc:creator>Jeff Starr</dc:creator>
	<category><![CDATA[ Security ]]></category>
	<guid isPermaLink="false">https://digwp.com/?p=8446</guid>
	<description>
		<![CDATA[
		<p>Custom content displayed before content.</p>
		
		I think many WordPress users probably underestimate the amount of data that is made available via the REST API. Just about everything is available to anyone or anything that asks for it: posts, pages, categories, tags, comments, taxonomies, media, users, settings, and more.  [&#8230;] 
		
		<p>Custom content displayed after content.</p>
		]]>
	</description>
	<content:encoded>
		<![CDATA[
		
		<p>I think many WordPress users probably underestimate the amount of data that is made available via the <a href="https://developer.wordpress.org/rest-api/" title="REST API Handbook">REST API</a>. Just about everything is available to anyone or anything that <strong>asks for it</strong>: posts, pages, categories, tags, comments, taxonomies, media, users, settings, and more. ...</p>
		<p>Post content continues here...</p>
		
		]]>
	</content:encoded>
	<wfw:commentRss>https://digwp.com/2018/08/secure-wp-rest-api/</wfw:commentRss>
	<slash:comments>1</slash:comments>
</item>

By hooking our function into the_excerpt_rss, our "before" and "after" content is added to the <description> instead of the <content>. So it follows that we can add to BOTH description AND content by calling our function with BOTH hooks, something like this:

add_filter('the_content_feed', 'shapeSpace_add_content_to_all_feeds');
add_filter('the_excerpt_rss', 'shapeSpace_add_content_to_all_feeds');

Take home message

Basic thing to remember:

  • the_excerpt_rss — filters feed <description>
  • the_content_feed — filters feed <content>

You can call your "content-adding" function using either or both of these hooks. Then you can configure just about any sort of custom feed content that you can imagine. BTW, I find myself using this technique somewhat frequently, so I wrote a plugin to help automate the process of adding custom content to feeds, posts, pages, or any combination — gives you lots of flexibility.


Better Way to Add Inline Scripts

If you are a WordPress developer, you may have used the WordPress hook wp_print_scripts to add any necessary inline JavaScript. Alternately, you may have used the function wp_localize_script() to add your inline scripts. But did you know that not too long ago, WordPress added a new function for adding inline JavaScript? Yep, as of WordPress version 4.5 and better, we can use the superior function wp_add_inline_script() to do the job.

One of the nice things about this newer function is that you can associate it with any registered script AND include more than just JavaScript variables. This DigWP article explains how wp_add_inline_script() works, why it's better than either of the alternate inline methods, and how to support older (pre-4.5) versions of WordPress. Along the way, we'll look at some example code that you can customize and use in your own WordPress projects.

Inline scripts via wp_print_scripts

In the past, one way to add inline scripts to the frontend was to use the action hook wp_print_scripts (and/or admin_print_scripts for the Admin Area). Here is an example function adapted from one of my plugins:

// inline script via wp_print_scripts
function shapeSpace_print_scripts() { 
	
	?>
	
	<script>
		var var1 = <?php echo json_encode('var1'); ?>;
		var var2 = <?php echo json_encode('var2'); ?>;
		var var3 = <?php echo json_encode('var3'); ?>;
	</script>
	
	<?php
	
}
add_action('wp_print_scripts', 'shapeSpace_print_scripts');

This function defines three variables based on plugin options, and then outputs them to the head section (on the front-end) using the wp_print_scripts hook. To instead add the script to the Admin Area, we would replace wp_print_scripts with admin_print_scripts and call it a day.

Pros

Works every time to add any scripts to the <head> section of your web pages. No restriction on the code that is added; you can add JS variables, conditionals, methods, functions, or whatever you want.

Cons

No way to associate the added code with any registered script. You can sort of control the relative location of the added code using the $priority parameter of the add_action() function. But mostly the output code depends on other factors, so not any real, consistent way to control output location.

Inline scripts via wp_localize_script()

Another common way that developers include inline JavaScript is the function, wp_localize_script(). This function is meant for localizing JavaScript variables for use with internationalization and language translation. But I think a lot of developers use it just to add inline scripts. Here is an example:

// inline scripts via wp_localize_script()
function shapeSpace_enqueue_scripts() {
	
	wp_enqueue_script('shapeSpace_script', get_template_directory_uri() .'/js/script.js', array(), '1.0', true);
	
	$array = array(
		'var1' => __('Value for Variable 1', 'shapeSpace'),
		'var2' => __('Value for Variable 2', 'shapeSpace'),
		'var3' => __('Value for Variable 3', 'shapeSpace'),
	);
	
	wp_localize_script('shapeSpace_script', 'shapeSpace', $array);
	
}
add_action('wp_enqueue_scripts', 'shapeSpace_enqueue_scripts');

This example function enqueues our JavaScript file and gives it a handle/ID of shapeSpace_script. Then an associative array that contains our variables is defined. And lastly, the variables are passed to wp_localize_script() to be included inline along with the registered script, shapeSpace_script. This enables us to use any of the added JS variables like shapeSpace.var1, etc.

Pros

This technique is nice because it enables (read: requires) association with an existing/registered script. So it provides a consistent way to manage the relative location of your custom script output.

Cons

The only real downside to this otherwise robust technique is that you can only add JavaScript variables (i.e., var = 'value';). So if you need to add other types of inline scripts, like equations, conditionals, functions or whatever, it's just not possible to do with wp_localize_script().

BEST: inline scripts via wp_add_inline_script()

Now that we've seen the pros and cons of the two alternate inline-script techniques, let's look at a better way using the new(er) WordPress function, wp_add_inline_script(). In practice, it looks quite similar to wp_localize_script(), but can do a LOT more. Here is an example:

// inline scripts via wp_add_inline_script()
function shapeSpace_enqueue_scripts() {
	
	wp_enqueue_script('shapeSpace_script', get_template_directory_uri() .'/js/script.js', array(), '1.0', true);
	
	$script  = 'var1 = '. json_encode('var1') .'; ';
	$script .= 'var2 = '. json_encode('var2') .'; ';
	$script .= 'var3 = '. json_encode('var3') .'; ';
	
	wp_add_inline_script('shapeSpace_script', $script, 'before');
	
}
add_action('wp_enqueue_scripts', 'shapeSpace_enqueue_scripts');

This may not look like much, but it's actually super awesome. We have the best of BOTH worlds:

  • add ANY JavaScript snippet
  • associate with any registered script

That means we have full control over script content and its relative location. Also note the third parameter, $position. That enables us to include the $script either before or after the $handle, shapeSpace_script.

Pro Tip: Always escape your inline JavaScript using json_encode() or equivalent.

Pros

All pros. Add literally any JavaScript code inline, located either before or after the registered script, which itself may be included in the head section or footer. So you have full control.

Cons

None. All good.

Complete Example: Inline Script with Fallback

Putting everything together, we can fashion a complete technique for adding inline scripts that works in virtually ANY version of WordPress. For example, I use the following 3-function technique in my front-end posts plugin.

// enqueue scripts
function shapeSpace_enqueue_scripts() {
	
	wp_enqueue_script('shapeSpace_script', get_template_directory_uri() .'/js/script.js', array(), '1.0', true);
	
	shapeSpace_inline_script();
	
}
add_action('wp_enqueue_scripts', 'shapeSpace_enqueue_scripts');


// inline scripts WP >= 4.5
function shapeSpace_inline_script() {
	
	$wp_version = get_bloginfo('version');
	
	if (version_compare($wp_version, '4.5', '>=')) {
		
		$script  = 'var1 = '. json_encode('var1') .'; ';
		$script .= 'var2 = '. json_encode('var2') .'; ';
		$script .= 'var3 = '. json_encode('var3') .'; ';
		
		wp_add_inline_script('shapeSpace_script', $script, 'before');
		
	}
	
}


// inline scripts WP < 4.5
function shapeSpace_print_scripts() { 
	
	$wp_version = get_bloginfo('version');
	
	if (version_compare($wp_version, '4.5', '<')) {
		
		?>
		
		<script>
			var var1 = <?php echo json_encode('var1'); ?>;
			var var2 = <?php echo json_encode('var2'); ?>;
			var var3 = <?php echo json_encode('var3'); ?>;
		</script>
		
		<?php
		
	}
	
}
add_action('wp_print_scripts', 'shapeSpace_print_scripts');

That's the magic ticket right there. Three simple functions. First we enqueue our JavaScript file. From there, we call the second function, which adds our inline script using wp_add_inline_script() for WordPress versions 4.5 and better. Then the third and final function is the fallback for older versions of WordPress. Anything older than 4.5 will add our inline script via the wp_print_scripts hook. So bottom line is that the above technique works perfectly to add inline scripts to any version of WordPress going back to like 2.1 or something crazy.

Recap

Here is a recap just FYI. Adding inline scripts to WordPress:

  • wp_print_scripts / admin_print_scripts — Add any code to the header
  • wp_localize_script() — Add any JS variables to any registered script
  • wp_add_inline_script() — Add any JS code to any registered script

Also: Want to add inline CSS/style instead of JavaScript? WordPress provides a set of "add style" functions that are similar to those used for adding scripts. For example, check out wp_add_inline_style() and wp_print_styles.


Official Resources for the Gutenberg Block Editor

Just a quick post to share some recommended useful resources for anyone working with the new Gutenberg Block Editor. Our book Digging Into WordPress now links to this post, so readers can learn more and dive deep into Gutenberg. Or just bookmark for future reference. What does that mean? It means that this page will be updated with any new useful and official resources. And by "official" just means the information is sourced/hosted at WordPress.org.

Learn more about Gutenberg

There are many official posts that are useful in specific contexts. This list focuses on just the main resources for learning more about Gutenberg Block Editor. Starting points for digging in and branching out.

Any one of these resources will open many doors for further learning and exploration of the Gutenberg Block Editor and related WordPress features.

Gutenberg Alternatives

The Gutenberg Block Editor has come a long way since it first began as a plugin. But not everyone is ready for the changes. Some folks like myself prefer the original "classic" editor. So for anyone looking for alternatives to Gutenberg, here are some resources that may be useful.

  • Classic Editor — official plugin by the WP team to restore the Classic Editor, already over 1 million active installations.
  • Disable Gutenberg — free WP plugin that completely disables all traces of Gutenberg and restores the Classic Editor. Includes robust options for custom configuration and selective enabling of the Block Editor.
  • ClassicPress — the new "Gutenberg-free" version of WordPress (forked at WP 4.9) that's focused on providing a reliable, consistent CMS.

Or if you are a developer and would like to know how to disable Gutenberg or selectively enable the Block Editor, check out these DigWP tutorials:

Plus there are lots of other plugins now available to help you configure, customize, and disable Gutenberg. Also lots of plugins to help you customize and extend the Block Editor, visit the WordPress.org Plugin Directory to explore the possibilities.

Bonus tip

Also useful if you want to look at the "Welcome" screen for WordPress 5.0 (or whichever version you are using), just enter the following URL while logged into your WordPress site:

https://example.com/wp-admin/about.php?updated

Or if you have WordPress installed in a subdirectory, say, /wordpress/, you would enter this URL instead:

https://example.com/wordpress/wp-admin/about.php?updated

Then you would replace "example.com" with your actual domain. That should get you to the "Welcome" screen for your current version of WordPress. So for awhile you can get a broad look at Gutenberg, how it works, features, etc.

WordPress 5.0 Welcome Screen

Send any suggestions for useful/official Gutenberg resources that should be added to this post, please comment or contact direct, thank you! :)


How to Selectively Enable Gutenberg Block Editor

Previously, we covered numerous techniques to disable Gutenberg. For example, you can disable Gutenberg on specific post types, user roles, post IDs, and so forth. But what about doing the opposite and conditionally enabling Gutenberg? For example, if Gutenberg is disabled by default, you could then selectively enable it on whichever post types, user roles, or whatever criteria that's required. So this tutorial explains how to enable Gutenberg using simple WordPress filter hooks. You'll learn how to enable Gutenberg for any single posts, new posts, post meta, categories, tags, and post types. Plus some juicy tips and tricks along the way!

Update! To selectively enable Gutenberg only on certain posts, you can do it without touching any code. My free plugin Disable Gutenberg now provides whitelist options to always use Block Editor on any post IDs, slugs, or titles :)

First: Disable Gutenberg by default

In WordPress 5.0 and beyond, Gutenberg is enabled by default. So if you want to enable Gutenberg everywhere, you don't need to do anything: it just works.

Otherwise, if you want to enable Gutenberg only on specific post IDs, post types, and so forth, you will need to first disable Gutenberg everywhere. To do this, we can use either of the following filter hooks (depending on WP version):

// WP < 5.0 beta
add_filter('gutenberg_can_edit_post', '__return_false', 5);

// WP >= 5.0
add_filter('use_block_editor_for_post', '__return_false', 5);

So choose either or both of these hooks (to support all versions of WP), and add to your theme's functions.php. Or, if you would rather disable Gutenberg and restore the Classic Editor using a plugin, check out Disable Gutenberg, which is super lightweight, flexible, and easy to customize exactly where Gutenberg should be disabled on your site. However you choose to disable Gutenberg, you will need to do so in order for the following techniques to work properly.

Tip: Notice the third parameter (5) in the two filters above? Setting that value makes it possible to override and enable Gutenberg using techniques such as the ones provided below.

Enable Gutenberg for any Post IDs

Once Gutenberg is disabled everywhere, here is an example showing how to enable it only for specific post IDs:

function shapeSpace_enable_gutenberg_post_ids($can_edit, $post) {
	
	if (empty($post->ID)) return $can_edit;
	
	if (1 === $post->ID) return true;
	
	return $can_edit;
	
}

// Enable Gutenberg for WP < 5.0 beta
add_filter('gutenberg_can_edit_post', 'shapeSpace_enable_gutenberg_post_ids', 10, 2);

// Enable Gutenberg for WordPress >= 5.0
add_filter('use_block_editor_for_post', 'shapeSpace_enable_gutenberg_post_ids', 10, 2);

As written, this function will enable Gutenberg on post ID = 1. You can change that as needed in the third line of the function.

Tip: To selectively disable Gutenberg on any post, role, type, and so forth, check out my previous tutorial, How to Disable Gutenberg: Complete Guide.

Enable Gutenberg for new posts

To enable Gutenberg for all new posts, you can do something like this:

function shapeSpace_enable_gutenberg_new_posts($can_edit, $post) {
	
	if (empty($post->ID)) return $can_edit;
	
	$current = get_current_screen();
	
	if ('post' === $current->base && 'add' === $current->action) return true;
	
	return $can_edit;
	
}

// Enable Gutenberg for WP < 5.0 beta
add_filter('gutenberg_can_edit_post', 'shapeSpace_enable_gutenberg_new_posts', 10, 2);

// Enable Gutenberg for WordPress >= 5.0
add_filter('use_block_editor_for_post', 'shapeSpace_enable_gutenberg_new_posts', 10, 2);

As written, this function checks if the user is viewing the post-new.php screen, and if so returns true (to enable Gutenberg).

Tip: Notice the 10 value that these techniques are passing via the add_filter hooks. Why? Remember we set that parameter to 5 when we disable Gutenberg, so by setting it to 10 or any value greater than 5, we easily override the disabling function and thereby enable Gutenberg. It's all about hook priority!

Enable Gutenberg for specific Post Meta

What about enabling Gutenberg Block Editor only on posts that have some specific meta data attached? Easy, here is an example showing how to do it:

function shapeSpace_enable_gutenberg_post_meta($can_edit, $post) {
	
	if (empty($post->ID)) return $can_edit;
	
	if ('Happy' === get_post_meta($post->ID, 'current_mood', true)) return true;
	
	return $can_edit;
	
}

// Enable Gutenberg for WP < 5.0 beta
add_filter('gutenberg_can_edit_post', 'shapeSpace_enable_gutenberg_post_meta', 10, 2);

// Enable Gutenberg for WordPress >= 5.0
add_filter('use_block_editor_for_post', 'shapeSpace_enable_gutenberg_post_meta', 10, 2);

As written, this function checks the current post for a custom field named current_mood with a value of Happy. If it exists, the function then returns true to enable Gutenberg for that post. Note that these examples are kept as simple as possible to help understanding. Much more is possible!

Tip: Notice that we hook the function name into both Gutenberg filter hooks: gutenberg_can_edit_post and use_block_editor_for_post. This means that the function will run in all applicable versions of WordPress. So if you are not worried about supporting older or newer versions of WordPress, you can simply remove one or the other add_filter() functions and done.

Enable Gutenberg for specific categories

Here is an example showing how to enable Gutenberg only for specific categories:

function shapeSpace_enable_gutenberg_post_cats($can_edit, $post) {
	
	if (empty($post->ID)) return $can_edit;
	
	if (has_category(12)) return true;
	
	return $can_edit;
	
}

// Enable Gutenberg for WP < 5.0 beta
add_filter('gutenberg_can_edit_post', 'shapeSpace_enable_gutenberg_post_cats', 10, 2);

// Enable Gutenberg for WordPress >= 5.0
add_filter('use_block_editor_for_post', 'shapeSpace_enable_gutenberg_post_cats', 10, 2);

As written, this function uses WP's has_category() to check if the current post belongs to category 12; if so, true is returned thereby enabling Gutenberg. Of course, you can specify your own category or array of categories, or whatever.

Tip: To check if the current post contains any Gutenberg blocks, we can add this logic to any of our enabling functions: if (has_blocks($post)) return true;

Enable Gutenberg for specific tags

Here is an example showing how to enable Gutenberg only for specific tags:

function shapeSpace_enable_gutenberg_post_tags($can_edit, $post) {
	
	if (empty($post->ID)) return $can_edit;
	
	if (has_tag(50)) return true;
	
	return $can_edit;
	
}

// Enable Gutenberg for WP < 5.0 beta
add_filter('gutenberg_can_edit_post', 'shapeSpace_enable_gutenberg_post_tags', 10, 2);

// Enable Gutenberg for WordPress >= 5.0
add_filter('use_block_editor_for_post', 'shapeSpace_enable_gutenberg_post_tags', 10, 2);

As written, this function uses WP's has_tag() to check if the current post is tagged with tag ID = 50; if so, true is returned thereby enabling Gutenberg. Of course, you can specify your own tag or array of tags.

Tip: Notice the 3rd parameter, 2, passed to either of the add_filter() functions. That specifies the number of parameters passed to the hooked function, which in this case is shapeSpace_enable_gutenberg_post_tags. So if you look at that function, you will see that it accepts two parameters, $can_edit and $post.

Enable Gutenberg for any Post Type

One more for the road! Here is an example showing how to enable Gutenbeg only for specific post types:

function shapeSpace_enable_gutenberg_post_type($can_edit, $post) {
	
	if (empty($post->ID)) return $can_edit;
	
	if ('books' === $post_type) return true;
	
	return $can_edit;
	
}

// Enable Gutenberg for WP < 5.0 beta
add_filter('gutenberg_can_edit_post_type', 'shapeSpace_enable_gutenberg_post_type', 10, 2);

// Enable Gutenberg for WordPress >= 5.0
add_filter('use_block_editor_for_post_type', 'shapeSpace_enable_gutenberg_post_type', 10, 2);

This function is similar to the others, but hook-wise it does something a bit differently. When working with post types, WordPress/Gutenberg provide the following filter hooks for working with Post Types:

// WP < 5.0 beta
gutenberg_can_edit_post_type

// WP >= 5.0
use_block_editor_for_post_type

So we use these recommended hooks to enable Gutenberg for specific post types. Note also that our function currently checks the current post type. As written, it checks for a post type named books; feel free to modify as needed to suit your needs. The possibilities are endless!


Subscribe to Comments Plugin: Delete Data from Database

During the latest site redesign, I removed the Subscribe to Comments plugin. Wisely, the plugin does not delete any subscriber information from the database. So as a part of the site's redesign slash clean-up, I wanted to export/save and then delete all subscriber information to decrease overall database size. After searching and not finding any specific solution or preferred technique for this process, I rolled my own. Actually it's just a simple SQL query to get it done! :)

Step 1: Backup Database

Before making any changes to your database, it always is a good idea to make a good working backup copy. This way you can restore your previous content should something unexpected happen.

Also, if you want to keep a copy of all your subscriber infos (i.e., names and emails), then take a moment to export those data as well. You never know when/where the information may be useful.

Step 2: Select Data

Using your favorite database UI (e.g., phpMyAdmin), enter the following query:

SELECT * FROM wp_postmeta WHERE meta_key = "_sg_subscribe-to-comments";

Remember to double-check the database prefix (e.g., wp_) and edit to match your own. This query will return all subscriber data added via the Subscribe to Comments plugin. Just so you are aware of what you will be deleting. Take a moment to observe the total number of entries and so forth. Also as another reminder, now would be a good time to grab a copy of the subscriber data you are about to delete.

Step 3: Delete Data

At this point, there is no going back. Enter the following SQL query to delete ALL data collected via the Subscribe to Comments plugin. Again, remember to check and change the database prefix if necessary.

DELETE FROM wp_postmeta WHERE meta_key = "_sg_subscribe-to-comments";

And DONE. All subscriber data should be removed from your database.

Step 4 (Optional): Replace "Subscribe" Link

After deleting all subscriber data and deleting the plugin itself, there may be one more detail to consider. Namely, a way for your readers to subscribe to comments on your awesome posts. There probably a bunch of different approaches or solutions for this.

For example, if your readers are savvy like ours, you can simply replace the "Subscribe to Comments" button with a link to the RSS feed for each post. Here is a screenshot showing how this was done here at DigWP.com:

WP Comments FeedSimple link for users to subscribe to RSS feed for post comments

And the underlying code to make it happen:

<div class="comment-feed"><a href="<?php echo get_post_comments_feed_link(); ?>" title="Post Comments RSS Feed">Comments feed for this post</a></div>

That is added directly in the theme's comments.php template. Of course, some CSS also is used to dial in everything visually. So while comments are open, each post will display an RSS icon and feed link, for example:

https://digwp.com/2018/08/secure-wp-rest-api/feed/

Using some other plugin?

If you are not using the same plugin, Subscribe to Comments, the previous SQL queries will return zero results. But the concept is the same regardless of plugin. The only thing you need to find out is the name of the database column (and/or table if necessary), and then modify the previous queries accordingly.

Why Remove Subscribe to Comments?

The main reason is that we don't get a lot of comments these days, so it's not really necessary. But more importantly, I removed the plugin to eliminate all the errors. Well, not errors they were just PHP Notices or warnings. But there were a LOT of them. Like many megabytes worth of log entries every month. So basically endless log spam. It was just time to move on.

The Subscribe to Comments plugin was an essential and awesome plugin that served us well for many years. So total respect and props for the amazing run :)