Copyediting with Semantic HTML

Category Image 052

Tracking changes is a quintessential copyediting feature for comparing versions of content. While we’re used to tracking changes in a word processing document, we actually have HTML elements capable of that. There are a lot of elements that we can use for this process. The main ones we’ll look at are <del>, <ins> and <mark>. But, as we’ll see, pairing them with other elements — including <u>, <aside> and custom markup — we can get the same sort of visual tracking changes features as something like Word, Google Docs, or even WordPress.

Side-by-side screenshots of how Pages, Google Docs and WordPress display tracked changes.
Different apps have different ways of tracking changes.

Let’s start with the <ins> element.

The <ins> designates text that should be or has been inserted. The verb tense gets a little wonky here because while the <ins> tag is suggesting an edit, it has to have, by virtue of being in the <ins> tag, already been inserted. It’s sorta like saying, “Hey, insert this things that’s technically already there.”

Notice how the browser underlines the inserted text for us. It’s nice to have that sort of visual indication, even if it could be mistaken as an underline using the <u> element, a link, or the CSS text-decoration property.

Let’s pair the insertion with the <del> element, which suggests text that should be or has been deleted.

The browser styles <del> like a strikethrough (<s>) element, but they mean different things. <del> is for content that should be removed/edited out (like that creepy seeming section above) while <s> is for content that’s no longer true or inaccurate (like the letter writer’s belief that that section would be endearing).

OK, great, so we have these semantic HTML elements and they produce some light visual indicators for content that is either inserted or deleted. But there’s something you might not know about these elements: they accept a cite  attribute that can be used to annotate the change.

cite takes a properly formatted URL that provides points somewhere to find the reasons why the change was made. That somewhere could even be an anchor on the existing page.

That’s cool, but one issue is that the citation URL isn’t actually visible or clickable. We could use some CSS magic to display it. But even then, it still won’t take you to the citation when clicked… nor can it be copied. 

That said, it does make semantically clear what’s part of the edit and what is not. If we wrap <ins> and <del> in a link (or even the other way around) it still is not clear whether the link is supposed to be part of the edited content or not.

But! There’s a second attribute that <ins> and <del> both share: datetime. And this is how we can indicate when an edit was made. Again, this is not immediately available to a user, but it keeps semantically clear what is part of the edit and what isn’t. 

HTML’s datetime format, as a machine readable date and time, requires precision and can thus be a bit, well, cranky, But it’s general tenants aren’t too hard. It’s worth noting though that, while datetime is used on other elements, such as <time>, formatting the value in a way that doesn’t include at least a specific day, month, and year on <ins> and <del> would be problematic, obscuring the date and time of an edit rather than provide clarity.

We can make things clearer with a little more CSS magic. For example, we can reveal the datetime value on hover:

Checkboxes work too:

But good editing is far more than simply adding and deleting content. It’s asking questions and figuring out what the heck the author intended. (For me personally, it’s also about saving me from embarrassing spellling and grammar mistooks).

So, meet the <mark> element.

<mark> points out text of special interest to the reader. It usually renders as a yellow background behind the content. 

If you’re the editor and want to write a note to the writer (let’s name that person Stanley Meagher) with suggestions to make Stanly’s letter more awesome (or less creepy, at the very least) and that note is large enough to warrant flow content (i.e. block level elements), then the note can be an <aside> element.

<aside class="note">Mr. Meagher, I highly recommend you remove this list of preferred cheeses and replace it with things you love about the woman you are writing to. While I'm sure there are many people for whom your list would be interesting if not welcome, that list rarely includes a romantic interest in the midst of your profession of love. Though, honestly, if she is as perfect for you as you believe, it may be the exact thing you need to test that theory.</aside>

But often you’ll want to do something inline in order to point something out or make a comment about sentence structure or word choice. Unfortunately there’s no baked in way to do that in HTML, but with a little ingenuity and some CSS you can add a note.

<span class="note">Cheesecake isn't really a "cheese"</span>

The <u> element — long an anathema to web developers for fear of confusion with a link — does actually have a use (I know, I was surprised too). It can be used to point out a misspelling (apparently squiggly and red underlines aren’t a standard browser rendering feature). It should still not be used anywhere it might be confused with an actual link and, when used, it definitely should use a color that distinguishes it from links. Red color may be appropriate to indicate an error. 

<p>Please, <u>Lura</u> tell me your answer. Will you wear my mathlete letter jacket?</p>

As we’ve seen throughout this article, the browser’s default styles for the elements we’ve covered so far are certainly helpful but can also be confusing since they are barely distinguishable from other types of content. If a user does not know that the document is showing edits, then the styling may be misconstrued or misunderstood by the user. I’d therefore suggest some additional or alternate styles to help make it clear what’s going on.

ins {
  padding: 0 0.125em;
  text-decoration: none;
  background-color: lightgreen
}
del {
  padding: 0 0.125em;
  text-decoration: none;
  background-color: pink;
}
mark {
  padding: 0 0.125em;
}
.note {
  padding: 0 0.125em;
  background-color: lightblue;
}
aside.note {
  padding: 0.5em 1em;
}
u {
  text-decoration: none;
  border-bottom: 3px red dashed;
}

I ask myself the same question every time I learn something new in HTML: How can I needlessly animate this?

It would be great if we could fade up the changes so that when you clicked a checkbox the edits would fade in as well.

The notes and text in <del> tags can’t be faded in with CSS the same way that background colors and paddings can. Also, display: none  results in no fading at all. Everything pops back in place, including the backgrounds. But using a combining the CSS visibility property with a set height and width value of 0 allows the backgrounds to smoothly fade in.


And there you have it: specifications and a few strategies for keeping track of edits on the web (plus an excellent example of how not to write a love letter (or, perhaps, how to write one so perfect that responding positively to it is a sign you’re soulmates).

Edit: Adrian Roselli adds some excellent accessibility information in the comments. Before you implement these ideas in production, be sure to consider those suggestions.


The post Copyediting with Semantic HTML appeared first on CSS-Tricks.

You can support CSS-Tricks by being an MVP Supporter.

Knobs for Demos

Category Image 052

CodePen is full of prototypes and loaded with full-blown art. Generative art is common, since hey, we’re working with code anyway, might as well make some of the code randomized and adjustable. There is a great project that has been around years and years that is purpose-built for giving users a UI to change values on-the-fly called dat.GUI. I once blogged about it right here on the CodePen Blog because I wanted to showcase how useful it can be for generative art Pens. While dat.GUI is still pretty cool and perfectly usable, there is a new player on the block.

Introducing Knobs by Yair Even Or! Demo first:

To me, the API and configuration is really clear and usable. I like how it is also modernized by using stuff like <input type="range"> for the sliders rather than re-inventing that. And the focus on changing CSS custom properties is very clever. Plus, you can style the controls themselves.

I snagged it and updated my Gray Burst idea from the other day to have a stroke-width knob:

I wish every generative art Pen had knobs!

The post Knobs for Demos appeared first on CodePen Blog.

How to Work With WordPress Block Patterns

Category Image 052

Just a little post I wrote up over at The Events Calendar blog. The idea is that a set of blocks can be grouped together in WordPress, then registered in a register_block_pattern() function that makes the group available to use as a “block pattern” in any page or post.

Block patterns are becoming upper-class citizens in the WordPress block editor. They were announced without much fanfare in WordPress 5.5 back in August, but have been given prominent real estate in the block inserter with its own tab next to blocks, including 10 or so default ones right out of the box.

Block patterns are sandwiched between Blocks and Reusable Blocks in the block inserter, which is a perfect metaphor for where it fits in the bigger picture of WordPress editing.

If the 5.6 Beta 3 release notes are any indication, then it looks like more patterns are on the way for default WordPress themes. And, of course, the block registration function has an unregister_block_pattern() companion should you need to opt out of any patterns.

What I find interesting is how the blocks ecosystem is evolving. We started with a set of default blocks that can be inserted into a post. We got reusable blocks that provide a way to assemble a group of blocks with consistent content across all pages of posts. Now we have a way to do the same, but in a much more flexible and editable way. The differences are subtle, but the use cases couldn’t be more different. We’ve actually been using reusable blocks here at CSS-Tricks for post explanations, like this:

We drop some text in here when we think there’s something worth calling out or that warrants a little extra explanation.

Any reusable block can be converted to a “regular” block. The styles are maintained but the content is not. That’s been our hack-y approach for speeding up our process around here, but now that block patterns are a thing, previous reusable blocks we’ve been using now make more sense as patterns.

Direct Link to ArticlePermalink


The post How to Work With WordPress Block Patterns appeared first on CSS-Tricks.

You can support CSS-Tricks by being an MVP Supporter.

Themes Team Removes Outdated CSS Guidelines, Adds Stricter Requirement for Links in Content

Best Wordpress Themes 1

In yesterday’s twice-monthly meeting, the WordPress Themes Team made a couple of important changes to the official theme directory guidelines. They removed a requirement of some CSS classes that have long been sitting on the chopping block. They also implemented the third stage in their long-term plan to make all WordPress themes accessibility-ready.

For years, theme authors have needed to either style several WordPress classes via CSS or add empty, unused selectors. It was a bit irritating for authors who fell in the latter group. The list includes several classes like .sticky (for sticky posts) and .bypostauthor (for post author comments). Now, styling these classes are optional.

The one question mark in this decision is probably around the classes for handling left, right, and center alignment. While the newer block editor stylesheet does support these classes on the front end, it could leave end-users in the dust if they are using the classic editor and a theme author decides to drop support. Any images in posts could become misaligned. Theme authors should test this and consider any problems before deciding to remove these from their stylesheets. For the other classes, those are mostly design decisions.

This change will not be official until the Theme Check plugin is updated to allow themes without these classes through the system.

The second big change is the reignition of the push toward creating more accessible themes in the directory. All themes in the directory are now required to distinguish links in “content” areas via an underline.

The full guideline is as follows:

When links appear within a larger body of block-level content, they must be clearly distinguishable from surrounding content (Post content, comment content, text widgets, custom options with large blocks of texts).

Links in navigation-like contexts (e.g., menus, lists of upcoming posts in widgets, grouped post meta data) do not need to be specifically distinguished from surrounding content.

The underline is the only accepted method of indicating links within content. Bold, italicized, or color-differentiated text is ambiguous and will not pass.

While this is a simple change, it is a bold one. Thus far, there has not been any pushback from theme authors on the announcement post or in the team meeting. However, some may be expected as the news trickles through the theme design community.

The one question that arose about the requirement was whether theme authors could add an option to allow end-users to opt-out of this behavior. The team said this was allowed as long as the underlined links were enabled by default.

The Road to Accessibility

Decorative image of people walking along a crosswalk with cars stopped in the background.

In July 2019, the Themes Team made a commitment to push theme authors to make their themes more accessible. It was not a switch they were going to flip overnight. Instead, the team made a goal of implementing a new accessibility-related requirement every two months or so. These periods would give both theme authors and reviewers ample time to familiarize themselves with each change.

This is the third requirement added to the guidelines since the team implemented the plan. The team started with some low-hanging fruit and added a requirement that themes ship with a skip-to-content link. That guideline addition went over relatively smoothly. The team quickly added a new guideline requiring that visitors be able to navigate menus via keyboard.

That second guideline landed in August 2019. From the outside looking in, the project was initially going well. However, until yesterday, the team had not added any new accessibility guidelines. Over a year had passed, and the plan seemed to be grinding to a halt. Accessibility advocates were probably wondering what happened.

In a discussion with the Themes Team reps a few months ago, they were not sure when they would implement the next guideline. The project was not going as planned.

“We have not added anything else above that because theme authors are still not releasing themes with working implementations of skip links and usable keyboard navigation,” said team representative William Patton at the time. “When those two things become habitual it will be time to introduce another Aspect as a requirement. The fact that this has taken so long for authors to get this right probably indicates that we need to do better at guiding them to resources to learn how to do it and why it is important. Perhaps that is a better avenue to pursue than looking to implement additional asks of them.”

Team rep Carolina Nymark shared similar sentiments. She mentioned that underlined links were up next on the list. However, they did not have a deadline in mind yet.

“Skip links and keyboard navigation are still a headache to some extent for some authors,” said Ganga Kafle, a team representative. He said that theme authors who regularly submit themes are doing so with these requirements in mind. However, keyboard navigation remains the biggest pain point, particularly on mobile views.

“But almost all the themes we get are with skip links working properly,” he said. “That is a good thing so far. The new requirement is not so huge and tough. And I think we need to add such small things in a timely manner.”

For now, the team seems to be picking up where they left off. There is still a long path to go before the project is complete.

The best thing that theme authors can do right now is to follow all of the optional accessibility guidelines. This will prepare them for a future in which they are all required.

Understanding flex-grow, flex-shrink, and flex-basis

Category Image 052

When you apply a CSS property to an element, there’s lots of things going on under the hood. For example, let’s say we have some HTML like this:

<div class="parent">
  <div class="child">Child</div>
  <div class="child">Child</div>
  <div class="child">Child</div>
</div>

And then we write some CSS…

.parent {
  display: flex;
}

These are technically not the only styles we’re applying when we write that one line of CSS above. In fact, a whole bunch of properties will be applied to the .child elements here, as if we wrote these styles ourselves:

.child {
  flex: 0 1 auto; /* Default flex value */
}

That’s weird! Why do these elements have these extra styles applied to them even though we didn’t write that code? Well, that’s because some properties have defaults that are then intended to be overridden by us. And if we don’t happen to know these styles are being applied when we’re writing CSS, then our layouts can get pretty darn confusing and tough to manage.

That flex property above is what’s known as a shorthand CSS property. And really what this is doing is setting three separate CSS properties at the same time. So what we wrote above is the same as writing this:

.child {
  flex-grow: 0;
  flex-shrink: 1;
  flex-basis: auto;
}

So, a shorthand property bundles up a bunch of different CSS properties to make it easier to write multiple properties at once, precisely like the background property where we can write something like this:

body {
  background: url(sweettexture.jpg) top center no-repeat fixed padding-box content-box red;                   
}

I try to avoid shorthand properties because they can get pretty confusing and I often tend to write the long hand versions just because my brain fails to parse long lines of property values. But it’s recommended to use the shorthand when it comes to flexbox, which is…weird… that is, until you understand that the flex property is doing a lot of work and each of its sub-properties interact with the others.

Also, the default styles are a good thing because we don’t need to know what these flexbox properties are doing 90% of the time. For example, when I use flexbox, I tend to write something like this:

.parent {
  display: flex;
  justify-content: space-between;
}

I don’t even need to care about the child elements or what styles have been applied to them, and that’s great! In this case, we’re aligning the child items side-by-side and then spacing them equally between each other. Two lines of CSS gives you a lot of power here and that’s the neatest thing about flexbox and these inherited styles — you don’t have to understand all the complexity under the hood if you just want to do the same thing 90% of the time. It’s remarkably smart because all of that complexity is hidden out of view.

But what if we want to understand how flexbox — including the flex-grow, flex-shrink, and flex-basis properties — actually work? And what cool things can we do with them?

Just go to the CSS-Tricks Almanac. Done!

Just kidding. Let’s start with a quick overview that’s a little bit simplified, and return to the default flex properties that are applied to child elements:

.child {
  flex: 0 1 auto;
}

These default styles are telling that child element how to stretch and expand. But whenever I see it being used or overridden, I find it helpful to think of these shorthand properties like this:

/* This is just how I think about the rule above in my head */

.child {
  flex: [flex-grow] [flex-shrink] [flex-basis];
}

/* or... */

.child {
  flex: [max] [min] [ideal size];
}

That first value is flex-grow and it’s set to 0 because, by default, we don’t want our elements to expand at all (most of the time). Instead, we want every element to be dependent on the size of the content within it. Here’s an example:

.parent { 
  display: flex; 
}

I’ve added the contenteditable property to each .child element above so you can click into it and type even more content. See how it responds? That’s the default behavior of a flexbox item: flex-grow is set to 0 because we want the element to grow based on the content inside it.

But! If we were to change the default of the flex-grow property from 0 to 1, like this…

.child {
  flex: 1 1 auto;
}

Then all the elements will grow to take up an equal portion of the .parent element:

This is exactly the same as writing…

.child {
  flex-grow: 1;
}

…and ignoring the other values because those have been set by default anyway. I think this confused me for such a long time when I started working with flexible layouts. I would see code that would add just flex-grow and wonder where the other styles are coming from. It was like an infuriating murder mystery that I just couldn’t figure out.

Now, if we wanted to make just one of these elements grow more than the others we’d just need to do the following:

.child-three {
  flex: 3 1 auto;
}

/* or we could just write... */

.child-three {
  flex-grow: 3;
}

Is this weird code to look at even a decade after flexbox landed in browsers? It certainly is for me. I need extra brain power to say, “Ah, max, min, ideal size,” when I’m reading the shorthand, but it does get easier over time. Anyway, in the example above, the first two child elements will take up proportionally the same amount of space but that third element will try to grow up to three times the space as the others.

Now this is where things get weird because this is all dependent on the content of the child elements. Even if we set flex-grow to 3, like we did in the example above and then add more content, the layout will do something odd and peculiar like this:

That second column is now taking up too much darn space! We’ll come back to this later, but for now, it’s just important to remember that the content of a flex item has an impact on how flex-grow, flex-shrink, and flex-basis work together.

OK so now for flex-shrink. Remember that’s the second value in the shorthand:

.child {
  flex: 0 1 auto; /* flex-shrink = 1 */
}

flex-shrink tells the browser what the minimum size of an element should be. The default value is 1, which is saying, “Take up the same amount of space at all times.” However! If we were to set that value to 0 like this:

.child {
  flex: 0 0 auto;
}

…then we’re telling this element not to shrink at all now. Stay the same size, you blasted element! is essentially what this CSS says, and that’s precisely what it’ll do. We’ll come back to this property in a bit once we look at the final value in this shorthand.

flex-basis is the last value that’s added by default in the flex shorthand, and it’s how we tell an element to stick to an ideal size. By default, it’s set to auto which means, “Use my height or width.” So, when we set a parent element to display: flex

.parent {
  display: flex;
}

.child {
  flex: 0 1 auto;
}

We’ll get this by default in the browser:

Notice how all the elements are the width of their content by default? That’s because auto is saying that the ideal size of our element is defined by its content. To make all the elements take up the full space of the parent we can set the child elements to width: 100%, or we can set the flex-basis to 100%, or we can set flex-grow to 1.

Does that make sense? It’s weird, huh! It does when you think about it. Each of these shorthand values impact the other and that’s why it is recommended to write this shorthand in the first place rather than setting these values independently of one another.

OK, moving on. When we write something like this…

.child-three {
  flex: 0 1 1000px;
}

What we’re telling the browser here is to set the flex-basis to 1000px or, “please, please, please just try and take up 1000px of space.” If that’s not possible, then the element will take up that much space proportionally to the other elements.

You might notice that on smaller screens this third element is not actually a 1000px! That’s because it’s really a suggestion. We still have flex-shrink applied which is telling the element to shrink to the same size as the other elements.

Also, adding more content to the other children will still have an impact here:

Now, if we wanted to prevent this element from shrinking at all we could write something like this:

.child-three {
  flex: 0 0 1000px;
}

Remember, flex-shrink is the second value here and by setting it to 0 we’re saying, “Don’t shrink ever, you jerk.” And so it won’t. The element will even break out of the parent element because it’ll never get shorter than 1000px wide:

Now all of this changes if we set flex-wrap to the parent element:

.parent {
  display: flex;
  flex-wrap: wrap;
}

.child-three {
  flex: 0 0 1000px;
}

We’ll see something like this:

This is because, by default, flex items will try to fit into one line but flex-wrap: wrap will ignore that entirely. Now, if those flex items can’t fit in the same space, they’ll break onto a new line.


Anyway, this is just some of the ways in which flex properties bump into each other and why it’s so gosh darn valuable to understand how these properties work under the hood. Each of these properties can affect the other, and if you don’t understand how one property works, then you sort of don’t understand how any of it works at all — which certainly confused me before I started digging into this!

But to summarize:

  • Try to use the flex shorthand
  • Remember max, min and ideal size when doing so
  • Remember that the content of an element can impact how these values work together, too.

The post Understanding flex-grow, flex-shrink, and flex-basis appeared first on CSS-Tricks.

You can support CSS-Tricks by being an MVP Supporter.

Bidirectional scrolling: what’s not to like?

Category Image 052

Some baby bear thinking from Adam Silver.

Too hot:

[On horizontal scrolling, like Netflix] This pattern is accessible, responsive and consistent across screen sizes. And it’s pretty easy to implement.

Too cold:

That’s a lot of pros for a pattern that in reality has some critical downsides.

Just right:

[On rows of content with “View All” links] This way, the content isn’t hidden; it’s easy to drill down into a category; data isn’t wasted; and an unconventional, labour intensive pattern is avoided.

Direct Link to ArticlePermalink


The post Bidirectional scrolling: what’s not to like? appeared first on CSS-Tricks.

You can support CSS-Tricks by being an MVP Supporter.

compute cuter

Category Image 052

Get that desk more cuter, fam. Amy (@sailorhg) has this perfectly cute minisite with assorted desktop backgrounds, fonts, editor themes, keyboard stuff, and other accessories. These rainbow cables are great.

And speaking of fonts, we’re still plucking away at this microsite for coding fonts and it’s ripe for contribution if anyone is into it.

Direct Link to ArticlePermalink


The post compute cuter appeared first on CSS-Tricks.

You can support CSS-Tricks by being an MVP Supporter.
Celebrating 1000 Editions Of The WhiP! + Special Giveaway

Category Image 052

With its hand-picked selection of WordPress news and epic puns, The WhiP has been a welcome arrival in thousands of inboxes for over 6 years. And to celebrate our fav newsletter reaching the big 1K we’re doing an extra-special giveaway.

May 14th, 2014.

Just your typical Wednesday.

All of Me by John Legend was the US number one, and we’d finally finished eating all of our Easter eggs.

At 8am, 70 people across the world received an email. An email that would be the start of something amazing…

…it was the first ever WhiP.

A look at the first edition of The Whip
A lot has changed since the first WhiP newsletter graced our inboxes.

Good, Clean[ish] Puns

Since that first edition, we’ve seen 1,000 editions, a truckload of legendary puns, and the audience currently sits at over 200K subscribers.

Each and every week, we’ve brought you a roundup of important and interesting news from across the WordPress biz – and we don’t plan on stopping any time soon.

We also can’t celebrate 1,000 editions without paying homage to our past WhiP contributors. Especially Joshua Dailey and Raelene Morey – the first ever WhiP Team.

They did an awesome job at bringing this idea to life and that it’s still going more than six years later is a testament to all their hard work.

Some kind comments from WhiP readers
The WhiP’s punny take on WP news continues to entertain thousands.

GIF it Away, GIF it Away Now

Alright now that we’ve recapped The WhiP’s journey and how awesome it is (subscribe here if you haven’t yet silly), onto the special giveaway!

The WhiP is of course famous for its use of puns to bring even the most boring WP news to life. And we’ve had tons of feedback over the years letting us know that you love our puns.

So much so, current WhiP-master, Rick, used the “Do you know who I am?!” line in Starbucks last week when they only gave him one shot of caramel in his latte.

So in the spirit of The WhiP’s punny nature, we’re giving you the chance to…

WIN one of 10 custom-made “punny” WhiP t-shirts + a year’s worth of hosting.

That’s right, we decided to honor some of the best puns by turning them into awesome, punny t-shirts and putting them up for grabs in a sweet little giveaway!

Winners will be able to choose from six puntastic WhiP shirts we designed especially for this promotion. You’ll also be able to choose your preferred design, size, color, etc.

But wait, there’s more…

Along with the shirts, we’re throwing in ONE YEAR’S worth of bronze hosting credit ($120) for our 10 winners!

*If you don’t host with us and aren’t planning on switching any time soon, you can spend your credits on anything else from our range. This includes any of our membership plans and subscriptions or add-ons for your favorite WPMU DEV plugins.

Choosing the top puns to print on the t-shirts was a difficult task. But after trawling through hundreds of previous WhiPs and then a team vote to narrow it down even further, we present to you our six favorites.

Winners can choose from one of these 6 puntastic t-shirt designs:

All hand-picked from previous WhiP editions and designed by us especially for this giveaway!

1.You Had Me at “Hello World”

One of the shirt designs winners can get their hands on

2.Never Gonna Give You App

One of the shirt designs winners can get their hands on

3.Cache Me If You Can

One of the shirt designs winners can get their hands on

4.You Have The Right To Domain Silent

One of the shirt designs winners can get their hands on

5.Don’t Worry, Be HaPHP

One of the shirt designs winners can get their hands on

6.Go Hard Or Go Chrome

One of the shirt designs winners can get their hands on

Which punny shirt is your fav? Let us know below.

How do I get my hands on one of these WhiP t-shirts and the free hosting??

To win one of these awesome t-shirts (and the free hosting cred), head to one of our social media accounts and simply retweet, share, or comment on any social post with the hashtag “#WhiP1000.”

That’s it! We’ll draw 10 winners using a random number generator, and the more times you retweet, share, or comment on a WhiP post, the more entries you’ll have in the pool.

One more condition… You’ll need to be subscribed to the WhiP to be in the running – this is all in honor of the 1000th edition after all!

If you aren’t yet subscribed (what rock have you been living under?!) you can do so here.

Finally, you have until Friday to enter and we’ll be contacting the lucky WhiP winners next week!

Here are our social media accounts for reference:

Facebook icon
twitter logo
Instagram logo

Pun and Dusted

Get sharing and commenting on social, and may the odds be in your favor!

To all our loyal WhiP subscribers, especially those who’ve been rocking with us since day one, we thank you.

We know it’s cliché, but reaching 1000 editions simply would not have been possible without you.

And to any new or recent subscribers, welcome to the WhiP family, and we hope you’ll stick around and laugh with us throughout the next 1000 editions!

Here are those ways to win one more time in case it didn’t sink in above:

  • On Twitter… retweet any WPMU DEV post with the hashtag #WhiP1000.
  • On Facebook… share or comment on any WPMU DEV post with the hashtag #WhiP1000.
  • On Instagram… comment on any WPMU DEV post with the hashtag #WhiP1000.
  • You must be subscribed to The WhiP to be eligible.
  • Contest ends this Friday the 23rd of October.
  • The 10 lucky winners will be contacted next week.

See you on the next WhiPPing punny newsletter.

Full Bleed

Category Image 052

We’ve covered techniques before for when you want a full-width element within a constrained-width column, like an edge-to-edge image within a narrower column of text. There are loads of techniques.

Perhaps my favorite is this little utility class:

.full-width {
  width: 100vw;
  position: relative;
  left: 50%;
  right: 50%;
  margin-left: -50vw;
  margin-right: -50vw;
}

That works as long as the column is centered and you don’t mind having to hide overflow-x on the column (or the body) as this can trigger horizontal overflow otherwise.

There was a little back and forth on some other ideas lately…

Josh Comeau blogged that you could set up a three-column grid, and mostly place content in the middle column, but then have the opportunity to bust out of it:

.wrapper {
  display: grid;
  grid-template-columns:
    1fr
    min(65ch, 100%)
    1fr;
}
.wrapper > * {
  grid-column: 2;
}
.full-bleed {
  width: 100%;
  grid-column: 1 / -1;
}

I think this is clever. I’d probably use it. But I admit there are bits that feel weird to me. For instance…

  • Now everything within the container is a grid element. Not a huge deal, but the elements will behave slightly differently. No margin collapsing, for one.
  • You have to apply the default behavior you want to every single element. Rather than elements naturally stacking on top of each other, you have to select them and tell them where to go and let them stack themselves. Feels a little less like just going with the web’s grain. Then you still need a utility class to do the full bleed behavior.

What I really like about the idea is that it gives you this literal grid to work with. For example, your left spacer could be half the width of the right and that’s totally fine. It’s setting up that space to be potentially used, like Ethan talked about in his article on constrained grids.

Kilian Valkhof responded to the article with this idea:

body > *:not(img):not(video) { 
  position: relative;
  max-width: 40rem;
  margin: auto;
}

Also very clever. This constrains the width of everything (in whatever container, and it wouldn’t have to be the body) except the elements you want to bust out (which could be a utility class there too, and not necessarily images and videos).

Again, to me, this feeling that I have to select every single element and provide it this fundamental information about layout feels slightly weird. Not like “don’t use it” weird, just not something I’m used to doing. Historically, I’m more comfortable sizing and positioning a container and letting the content in that container lay itself out without much further instruction.

You know what I like the most? That we have so many powerful layout tools in CSS and we have conversations about the pros and cons of pulling off exactly what we’re going for.


The post Full Bleed appeared first on CSS-Tricks.

You can support CSS-Tricks by being an MVP Supporter.

How to Create a Sticky Floating Navigation Menu in WordPress

Category Image 091

Recently, one of our users asked us how to create a sticky navigation menu for their site?

Sticky navigation menus stay on the screen as users scroll down the page. This makes the top menu always visible, which is good for user experience because it contains links to the most important sections of your website.

In this article, we’ll show you how to easily create a sticky floating navigation menu in WordPress.

Creating a sticky floating navigation menu in WordPress

What is a Sticky Floating Navigation Menu?

A sticky or floating navigation menu is one that ‘sticks’ to the top of the screen as a user scrolls down. This makes your menu visible to users at all times.

Here’s a sticky menu in action. We’re going to show you how to create a menu exactly like this for your own site:

A sticky navigation menu in action on our demo website

Why and when sticky menus can be useful?

Usually, the top navigation menu contains links to the most important sections of a website. A floating menu makes those links always visible, which saves users from scrolling back to the top. It is also proven to increase conversions.

If you run an online store, then your top navigation menu likely include links to the cart, product categories, and product search. Making this menu sticky, can help you reduce cart abandonment and increase sales.

Some of the best WordPress themes have built-in support for a sticky navigation menu. Simply see your theme settings under Themes » Customize to enable this feature.

If your theme does not have this option, then keep reading, and we’ll show you how to easily create a sticky floating navigation menu in any WordPress theme or WooCommerce store.

Method 1: Add Your Sticky Floating Navigation Menu Using a Plugin

This is the easiest method. We recommend it for all WordPress users, particularly for beginners.

If you haven’t set up your navigation menu yet, go ahead and do that using our instructions on how to add a navigation menu in WordPress.

After that, you need to install and activate the Sticky Menu (or Anything!) on Scroll plugin. For more details, see our step by step guide on how to install a WordPress plugin.

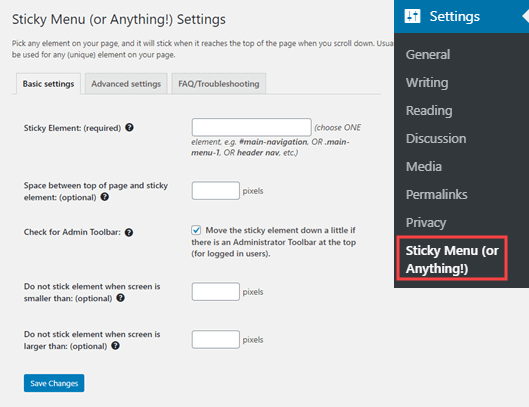
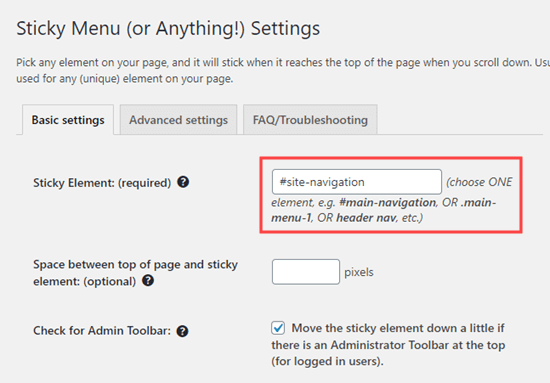
Upon activation, you need to visit the Settings » Sticky Menu (or Anything!) page to configure the plugin settings.

The Sticky Menu plugin's settings page

First you need to enter the CSS ID of the navigation menu that you want to make sticky.

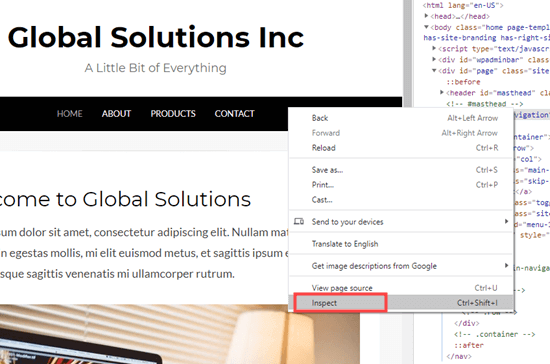
You will need to use your browser’s inspect tool to find the CSS ID used by your navigation menu.

Simply visit your website and take your mouse to the navigation menu. After that, you need to right-click and select Inspect from your browser’s menu.

Inspecting the navigation menu element on your website

This will split your browser screen, and you will be able to see the source code for your navigation menu.

You need to find a line of code that relates to your navigation, or your site header. It will look something like this:

<nav id="site-navigation" class="main-navigation" role="navigation">

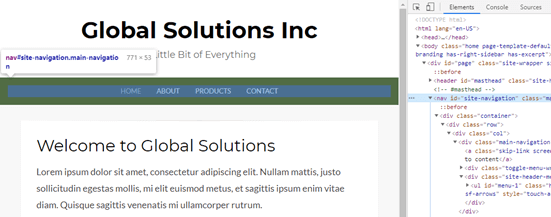
If you’re struggling to find it, bring your mouse cursor over the different lines of code in the Inspect pane. The navigation menu will be fully highlighted when you have the right line of code:

Finding the navigation menu ID using the inspect tool

In this case, our navigation menu’s CSS ID is site-navigation.

All you need to do is enter your menu’s CSS ID in the plugin settings with a hash at the start. In this case, that’s #site-navigation.

Entering the ID of the element that you want to make sticky (in this case, the navigation menu)

Don’t forget to click the ‘Save Changes’ button at the bottom of the page.

Now, go ahead and check out your sticky menu live on your WordPress website. It should stay on the page as you scroll down, like this:

Viewing the sticky menu on your website

The next option on the plugin’s settings page is to define the space between the top of your screen and the sticky navigation menu. You only need to use this setting if your menu is overlapping an element that you do not want to be hidden. If not, then ignore this setting.

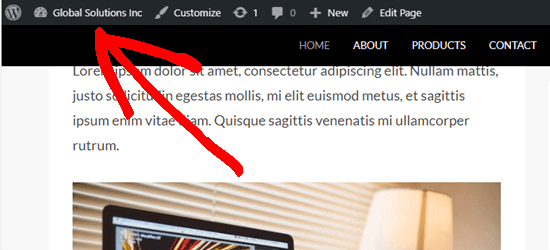
We recommend leaving the box checked next to the option: ‘Check for Admin Bar’. This allows the plugin to add some space for the WordPress admin bar, which is only visible to logged-in users.

Here, you can see that the admin bar on our test site is correctly displaying above the sticky menu:

The WordPress admin bar appears above the sticky menu

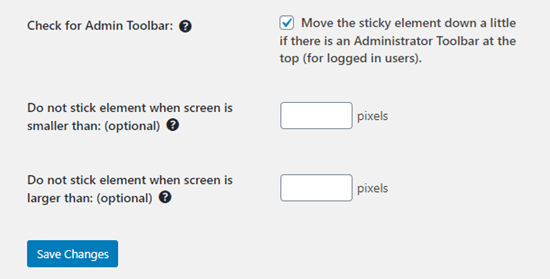
The next option allows you unstick the navigation menu if a user is visiting your website using a smaller screen such as a mobile device:

The sticky menu plugin offers further options too

You can test how your site looks on mobile devices or tablets. If you don’t like how it looks, simply add 780px for this option.

Don’t forget to click on the Save Changes button after making any changes to your options.

Method 2: Manually Add a Sticky Floating Navigation Menu

This method requires you to add custom CSS code to your theme. We don’t recommend it for beginners.

We also recommend that you take a look at our guide on how to easily add custom CSS to your WordPress site before you begin.

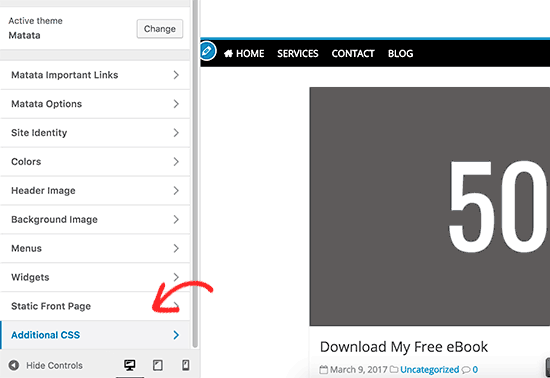
First, you need to visit Appearance » Customize to launch the WordPress theme customizer.

Adding custom CSS in WordPress theme

Next, click on ‘Additional CSS’ in the left pane and then add this CSS code.

#site-navigation {
    background:#00000;
    height:60px;
    z-index:170;
    margin:0 auto;
    border-bottom:1px solid #dadada;
    width:100%;
    position:fixed;
    top:0;
    left:0;
    right:0;
    text-align: center;
}

Note: This will produce a navigation menu with a black background. If you want a different color, change the number next to background. For example, using background: #ffffff will give you a white menu background.

Just replace #site-navigation with the CSS ID of your navigation menu then click on the Publish button at the top of the screen.

Go ahead and visit your website to see your sticky floating navigation menu in action:

A sticky / floating navigation menu created using CSS

What if your navigation menu normally appears below the site header instead of above it? If so, this CSS code could overlap the site title and header or appear too close to it before the user scrolls:

The sticky navigation menu is slightly overlapping the site title

This can be easily adjusted by adding a margin to your header area using some additional CSS code:

.site-branding {
margin-top:60px !important;
}

Replace site-branding with the CSS class of your header area. Now, the sticky navigation menu will no longer overlap your header before the user scrolls down:

There's now room for the title below the sticky navigation menu

We hope this article helped you add a sticky floating navigation menu to your WordPress site. You may also want to see our guide on how to create a custom WordPress theme without writing any code, and our comparison of the best WordPress page builder plugins.

If you liked this article, then please subscribe to our YouTube Channel for WordPress video tutorials. You can also find us on Twitter and Facebook.

The post How to Create a Sticky Floating Navigation Menu in WordPress appeared first on WPBeginner.

Parsel: A tiny, permissive CSS selector parser

Category Image 052

If you’ve ever thought to yourself, gosh, self, I wish I could have an Abstract Syntax Tree (AST) of this CSS selector, Lea has your back.

If you’ve ever thought that same thing for an entire CSS file, that’s what PostCSS is, which has gone v8. PostCSS doesn’t do anything by itself, remember. It just makes an AST out of CSS and gives it a plugin interface so plugins can be written to transform CSS with it. No shade on PostCSS, but it is funny how saying “We use PostCSS” doesn’t mean anything the way “We use Sass” does.

Direct Link to ArticlePermalink


The post Parsel: A tiny, permissive CSS selector parser appeared first on CSS-Tricks.

You can support CSS-Tricks by being an MVP Supporter.

What is the Value of Browser Diversity?

Category Image 052

In 2018, Rachel Nabors made the point that browser diversity is similar to biological ecosystem diversity. There are literal advantages to more diversity. That article was before the Edge engines were shut, and now the big shakeups at Mozilla have the topic of browser diversity on people’s minds again.

I really like Dave’s take on the matter. The diversity of browser engines makes web tech slow. Frustratingly slow, to many, but that slowness can bring value.

There’s a lot of value in slow thinking. You use the non-lizard side of your brain. You make more deliberate decisions. You prioritize design over instant gratification. You can check your gut instincts and validate your hypothesis before incurring mountains of technical debt.

I’d bet you a dollar that the less engines we have, the faster things get. Fast can be satisfying in the moment, but doesn’t make for the best brisket.

If we do see a major reduction in browser diversity, I think we lose the intentional slowness and the cooperation mechanisms we have in place. Who knows what will happen, but my hope is that just like iron can sharpen iron, maybe chromium can sharpen chromium.

Direct Link to ArticlePermalink


The post What is the Value of Browser Diversity? appeared first on CSS-Tricks.

You can support CSS-Tricks by being an MVP Supporter.

Using a brightness() filter to generically highlight content

Category Image 052

Rick Strahl:

I can’t tell you how many times over the years I’ve implemented a custom ‘button’ like CSS implementation. Over the years I’ve used images, backgrounds, gradients, and opacity to effectively ‘highlight’ a control. All that works of course, but the problem with most of these approaches is that one way or the other you’re hard coding a color value, image, or gradient.

You certainly have a lot more control if you specify exact colors, but if you can pull off brightening, darkening, or even a hue-shift in a way that feels cohesive on your site, it’s certainly a lot less code to maintain,

.button.specific-button {
  background: #4CAF50;
}
.button.specific-button:focus,
.button.specific-button:hover {
  background: #A5D6A7;
}

/* vs. */
.button:focus,
.button:hover {
  filter: brightness(120%);
}

/* or maybe you're super hardcore and do it everywhere */
:focus,
:hover {
  filter: brightness(120%) saturate(120%);
}

Direct Link to ArticlePermalink


The post Using a brightness() filter to generically highlight content appeared first on CSS-Tricks.

You can support CSS-Tricks by being an MVP Supporter.

How to Use CSS Grid for Sticky Headers and Footers

Featured Imgs 25

CSS Grid is a collection of properties designed to make layout easier than it’s ever been. Like anything, there’s a bit of a learning curve, but Grid is honestly fun to work with once you get the hang of it. One area where it shines is dealing with headers and footers. With a little adjustment in our thinking, we can pull off headers and footers that behave like they are fixed, or have that “sticky” treatment (not position: sticky, but the kind of footer that hugs the bottom of the screen even if there isn’t enough content to push it there, and is pushed away with more content). 

Hopefully this sparks further interest in modern layouts, and if it does, I can’t recommend Rachel Andrew’s book The New CSS Layout strongly enough: it covers both of the major modern layout techniques, grid and flexbox.

What we’re making

Let’s implement a fairly classic HTML layout that consist of a header, main content and footer.

We’ll make a truly fixed footer, one that stays at the bottom of the viewport where the main content scrolls within itself, as needed, then later update the footer to be a more traditional sticky footer that starts at the bottom of the viewport, even if the main content is small, but gets pushed down as needed. Further, to broaden our exposure to grid, let’s design our main content holder so that it can either span the whole width of the viewport, or take up a nicely centered strip down the middle.

A fixed footer is slightly unusual. Footers are commonly designed to start at the bottom of the viewport, and get pushed down by main content as needed. But a persistent footer isn’t unheard of. Charles Schwab does it on their homepage. Either way, it’ll be fun to implement!

But before we move on, feel free to actually peek at the fixed footer implemented on the Charles Schwab site. Unsurprisingly, it uses fixed positioning, which means it has a hard-coded size. In fact, if we crack open DevTools, we see that right off the bat:

body #qq0 {
  border-top: 4px solid #133568;
  background-color: #eee;
  left: 0;
  right: 0;
  bottom: 0;
  height: 40px!important;
}

Not only that, but there’s the balance of making sure the main content doesn’t get hidden behind that fixed footer, which it does by setting hard-coded paddings (including 15px on the bottom of the <footer> element), margins (including 20px on <ul> in the footer), and even line breaks.

Let’s try to pull this off without any of these restrictions.  

Our baseline styles

Let’s sketch out a bare minimum UI to get us started, then enhance our grid to match our goals. There’s a CodeSandbox below, plus additional ones for the subsequent steps that get us to the end result.

First, let’s do some prep work. We’ll make sure we’re using the whole height of the viewport, so when we add our grid, it’ll be easy to put the footer at the bottom (and keep it there).  There’s only going to be one element inside the document’s <body> with an ID of #app, which will hold the <header, <main> and <footer> elements.

body {
  margin: 0; /* prevents scrollbars */
}


#app {
  height: 100vh;
}

Next, let’s set up our header, main, and footer sections, as well as the grid they’ll all sit in. To be clear, this will not work the way we want right out of the gate. It’s just to get us started, with a base to build from.

body {
  margin: 0;
}


#app {
  height: 100vh;
  
  /* grid container settings */
  display: grid;
  grid-template-columns: 1fr;
  grid-template-rows: auto 1fr auto;
  grid-template-areas: 
    'header'
    'main'
    'footer';
}


#app > header {
  grid-area: header;
}


#app > main {
  grid-area: main;
  padding: 15px 5px 10px 5px;
}


#app > footer {
  grid-area: footer;
}

We’ve created a simple one-column layout, with a width of 1fr. If that 1fr is new to you, it essentially means “take the remaining space” which, in this case, is the entire width of the grid container, #app.

We’ve also defined three rows:

#app {
  /* etc. */
  grid-template-rows: auto 1fr auto;
  /* etc. */
}

The first and third rows, which will be our header and footer, respectively, are sized with auto, which means they’ll take up as much space as needed. In other words: no need for hard-coded sizes! This is a super important detail and a perfect example of how we benefit from using CSS Grid.

The middle row is where we’ll put our content. We’ve assigned it a size of 1fr which, again, just means it takes up all of the remaining space that’s left over from the other two rows. If you’re wondering why we aren’t making it auto as well, it’s because the entire grid spans the viewport’s whole height, so we need one section to grow and fill up any unused space. Note that we do not have, nor will we ever need at any point, any fixed heights, margins, paddings — or even line breaks! — to push things into place. Such is the good life when working with grid!

Shall we try some content?

You’ll notice in the Sandbox that I used React to build this demo, but since this isn’t a post about React, I won’t belabor those details; React has absolutely nothing to do with any of the CSS Grid work in this post. I’m only using it as an easy way to navigate between different chunks of markup. If you hate React, that’s fine: hopefully you can ignore it in this post.

We have Header, Main and Footer components that render the expected <header> , <main>  and <footer> elements, respectively. And, of course, this all sits inside our #app container. Yes, in theory, #app should be an <article> element, semantically speaking, but that’s always looked weird to me. I just wanted to covey these details so we’re all one the same page as we plow ahead.

For the actual content, I have Billing and Settings sections that you can navigate between in the header. They both render fake, static content, and are only meant to show our layout in action. The Settings section will be the content that we put in a centered strip on our page, Billing will be the one that spans our whole page.

Here’s the Sandbox with what we have so far.

The Billing section looks good, but the Settings section pushes our footer off screen. Not only that, but if we scroll, the entire page scrolls, causing us to lose our header. That may be desirable in some cases, but we want both the header and footer to stay in view, so let’s fix that.

Fixed header, fixed footer

When we initially set up our grid, we gave it a height of 100vh, which is the entire height of the viewport. We then assigned the rows for the header and footer an auto height, and the main a height of 1fr to take up the remaining space. Unfortunately, when content exceeds the space available, it expanded beyond the viewport bounds, pushing our footer down and out of view.

The fix here is trivial: adding overflow: auto will cause our <main> element to scroll, while keeping our <header> and <footer> elements in place.

#app > main {
  grid-area: main;
  overflow: auto;
  padding: 15px 5px 10px 5px;
}

Here’s the updated demo that puts this to use.

Adjustable width main section

We want our <main> element to either span the whole width of the viewport, or be centered in a 600px space. You might think we could simply make <main> a 600px fixed width, with an auto margins on either side. But since this is a post about grid, let’s use moar grid. (Plus, as we’ll see later, a fixed width won’t work anyway).

To achieve our centered 600px element, we’ll actually make the <main> element a grid container. That’s right, a grid within a grid! Nesting grids is a totally legit approach, and will even get easier in the future when subgrid is officially supported across browsers. In this scenario, we’ll make <main> a grid with three column tracks of 1fr 600px 1fr or, stated simply, 600px in the middle, with the remaining space equally divided on the sides.

#app > main {
  display: grid;
  grid-template-rows: 1fr;
  grid-template-columns: 1fr 600px 1fr;
}

Now let’s position our the content in the grid. Our different modules all render in a <section> child. Let’s say that by default, content will occupy the middle section, unless it has a .full class, in which case it will span the entire grid width. We won’t use named areas here, and instead specify precise grid coordinates of the form [row-start] / [col-start] / [row-end] / [col-end]:

#app > section {
  grid-area: 1 / 2 / 1 / 3;
}


#app > section.full {
  grid-area: 1 / 1 / 1 / 4
}

You might be surprised to see a col-end value of 4, given that there’s only three columns. This is because the column and row values are column and row grid lines. It takes four grid lines to draw three grid columns. 

Our <section> will always be in the first row, which is the only row. By default it’ll span column lines 2 through 3, which is the middle column, unless the section has a full class on it, in which case it’ll span column lines 1 through 4, which is all three columns.

Here’s an updated demo with this code. It’ll probably look good, depending on your CodeSandbox layout, but there’s still a problem. If you shrink the display to smaller than 600px, the content is abruptly truncated. We don’t really want a fixed 600px width in the middle. We want a width of up to 600px. It turns out grid has just the tool for us: the minmax() function. We specify a minimum width and a maximum width, and the grid will compute a value that falls in that range. That’s how we prevent the content from blowing out of the grid.

All we need to do is swap out that 600px value with minmax(0, 600px):

main {
  display: grid;
  grid-template-rows: 1fr;
  grid-template-columns: 1fr minmax(0, 600px) 1fr;
}

Here’s the demo for the finished code.

One more approach: The traditional fixed footer

Earlier, we decided to prevent the footer from being pushed off the screen and did that by setting the <main> element’s overflow property to auto.

But, as we briefly called out, that might be a desirable effect. In fact, it’s more of a classic “sticky” footer that solves that annoying issue, and places the footer on the bottom edge of the viewport when the content is super short.

Hey, get back to the bottom!

How could we keep all of our existing work, but allow the footer to get pushed down, instead of fixing itself to the bottom in persistent view?

Right now our content is in a grid with this HTML structure:

<div id="app">
  <header />
  <main>
    <section />
  </main>
  <footer />
</div>

…where <main> is a grid container nested within the #app grid container, that contains one row and three columns that we use to position our module’s contents, which go in the <section> tag.

 Let’s change it to this:

<div id="app">
  <header />
  <main>
    <section />
    <footer />
  </main>
</div>

…and incorporate <footer> into the <main> element’s grid. We’ll start by updating our parent #app grid so that it now consists of two rows instead of three:

#app {
  /* same as before */


  grid-template-columns: 1fr;
  grid-template-rows: auto 1fr;
  grid-template-areas: 
    'header'
    'main';
}

Just two rows, one for the header, and the other for everything else. Now let’s update the grid inside our <main> element:

#app > main {
  display: grid;
  grid-template-rows: 1fr auto;
  grid-template-columns: 1fr minmax(0, 600px) 1fr;
}

We’ve introduced a new auto-sized row. That means we now have a 1fr row for our content, that holds our <section>, and an auto row for the footer.

Now we position our <footer> inside this grid, instead of directly in #app:

#app > footer {
  grid-area: 2 / 1 / 2 / 4;
}

Since <main> is the element that has scrolling, and since this element now has our footer, we’ve achieved the sticky footer we want! This way, if <main> has content that exceeds the viewport, the whole thing will scroll, and that scrolling content will now include our footer, which sits at the very bottom of the screen as we’d expect.

Here’s an updated demo. Note that the footer will be at the bottom of the screen if possible; otherwise it’ll scroll as needed. 

I made a few other small changes, like minor adjustments to paddings here and there; we can’t have any left or right paddings on <main>, because the <footer> would no longer go edge-to-edge.

I also made a last-minute adjustment during final edits to the <section> element—the one we enabled adjustable width content on. Specifically, I set its display to flex, its width to 100%, and its immediate descendant to overflow: auto. I did this so the <section> element’s content can scroll horizontally, within itself, if it exceeds our grid column boundary, but without allowing any vertical scrolling.

Without this change, the work we did would amount to the fixed footer approach we covered earlier. Making section> a flex container forces its immediate child — the <div> that contains the content — to take up all of the available vertical space. And, of course, setting that child div to overflow: auto enables scrolling. If you’re wondering why I didn’t just set the section’s overflow-x to auto, and overflow-y to visible, well, it turns out that’s not possible.

Parting thoughts 

We haven’t done anything revolutionary in this post, and certainly nothing that couldn’t be accomplished before CSS Grid. Our fixed width <main> container could have been a block element with a max-width value of 600px, and auto margins on the left and right. Our fixed footer could have been made with position: fixed (just make sure the main content doesn’t overlap with it). And, of course, there are various ways to get a more traditional “sticky footer.”

But CSS Grid provides a single, uniform layout mechanism to accomplish all of this, and it’s fun to work with — honestly fun. In fact, the idea of moving the footer from fixed to sticky wasn’t even something I planned at first. I threw it in at the last minute because I thought the post was a bit too light without it. It was trivial to accomplish, basically moving grid rows around, not unlike putting lego blocks together. And again, these UIs were trivial. Imagine how brightly grid will shine with more ambitious designs!


The post How to Use CSS Grid for Sticky Headers and Footers appeared first on CSS-Tricks.

You can support CSS-Tricks by being an MVP Supporter.

Posts Sunset

Category Image 052

We are removing the Posts editor from CodePen in December 2020.

If you’re looking for a great place to publish blog posts, there are lots of places you can blog for free, like the developer-focused DEV, WordPress.com, or hey, maybe it’s a good time to play around with a static site generator and self-publish.

Here’s what’s changed now:

  • Readers cannot create new comments on Posts
  • Readers cannot heart Posts
  • We are no longer picking Posts for the homepage picks
  • Posts are removed from Topics

Here’s what will happen in December:

  • The Post editor at codepen.io/write will be removed
  • Post editing will be disabled
  • The Posts section of member profiles will be removed
  • Search for Posts will be removed
  • Only users with published Posts will see UI for it in their own work

But all published Posts will remain published at their original URLs. Nothing is being deleted or taken offline.

  • Private Posts will remain private
  • Public Posts will remain public
  • Post authors can delete published Posts and unpublished drafts
  • Post authors can view and copy the raw Markdown of published Posts and unpublished drafts

Any questions at all, feel free to message us in support.

The post Posts Sunset appeared first on CodePen Blog.

Copy the Browser’s Native Focus Styles

Category Image 052

Remy documented this the other day. Firefox supports a Highlight keyword and both Chrome and Safari support a -webkit-focus-ring-color keyword. So if you, for example, have removed focus from something and want to put it back in the same style as the browser default, or want to apply a focus style to an element when it isn’t directly in focus itself, this can be useful.

For example:

button:focus + span {
  outline: 5px auto Highlight;
  outline: 5px auto -webkit-focus-ring-color;
}

Looks good to me. It’s especially helpful with the sorta weird new Chrome double-outline style that would be slightly tricky to replicate otherwise.

Chrome 84
Safari 13.1
Firefox 80


The post Copy the Browser’s Native Focus Styles appeared first on CSS-Tricks.

You can support CSS-Tricks by being an MVP Supporter.