How to Fix WordPress Redirecting to Old Domain After Migration

Featured Imgs 11

Do you want to fix the issue of redirecting to an old domain?

When you migrate a WordPress website to a new domain, there is a possibility that users will be redirected back to the old domain.

In this article, we will show you how to fix WordPress redirecting to an old domain after migration.

How to fix WordPress redirecting to old domain after migration

What Causes Redirection to Old Domain After Migration Issue?

When you’re moving your WordPress website to a new domain, it is important to set up redirection. This way, users automatically land on the new location, and you get to keep your keyword rankings and traffic.

However, redirection to a new domain may not work properly, and your visitors would be redirected back to the old domain.

One of the main causes for this issue is that your site URL and home URL values are different in the WordPress database tables. You need to make sure that both these values lead to your new domain.

Besides that, DNS issues can also cause users to redirect to the old domain after migration. If the DNS server is not responding or DNS records haven’t been updated, then your visitors won’t be able to view your new website URL.

That said, let’s see how you can fix WordPress redirecting to the old domain after migration. We will cover different methods, so you can click the links below to jump ahead to your preferred section.

Method 1: Update the Site Address in WordPress Settings

The easiest way to fix this issue is by ensuring that the WordPress address and site address is the same in your WordPress settings.

If your Site Address (URL) still shows the old domain, then users will be redirected to the previous URL after migration.

To fix this, simply head to Settings » General from your WordPress admin panel. After that, enter your new domain under the ‘Site Address (URL)’ field.

Site address URL

Once you’re done, simply save your changes and visit the new domain to see if the problem is resolved.

If, however, the URL fields are greyed out and won’t let you type a new address, continue reading and use one of the other methods to redirect your domain.

Method 2: Changing Site URL in WordPress Database

Another method of fixing the redirecting to the old domain issue is by updating the site URL in the WordPress database tables.

You can easily access the database using the cPanel provided by the WordPress hosting service. For this tutorial, we will be using Bluehost as an example, but the process is similar for other hosting companies like Hostinger, SiteGround, etc.

First, you’ll need to log in to the hosting service control panel. After that, simply click on the ‘Advanced’ tab from the menu on your left.

Bluehost's PhpMyAdmin tool

Next, you can scroll down to the Databases section and click the ‘phpMyAdmin’ option.

You will need to wait for a few seconds until phpMyAdmin opens.

Once it opens, you will need to go to the wp_options table from the navigational panel on your left.

Do note that each hosting service has a different naming convention for database tables. However, the one you’re looking for will always end in ‘_options.”

For example, in this tutorial, we will click the ‘staging_45f_options’ table in Bluehost’s phpMyAdmin.

Open the options table

Next, you will need to edit the ‘siteurl’ and ‘home’ options.

First, go ahead and click the ‘Edit’ button for ‘siteurl’ option.

Enter siteurl

After that, you will need to enter the new domain name in the option_value field. Once that’s done, simply click the ‘Go’ button.

Now, you can return to the main wp_options page and edit the ‘home’ option.

Enter the home field value

Next, you will need to enter the new domain in the option_value field.

After entering the value, click the ‘Go’ button.

Method 3: Flush DNS Cache on Your PC

If you’re still unable to resolve the issue of the old domain redirecting after migration, then you should check the DNS settings.

At times, it can take up to 12 to 48 hours for the change of domain name to take effect. As a result, internet providers that don’t have updated DNS records will redirect users to the old domain.

You simply flush the DNS cache so that it gets the latest information and the new website URL. This also helps resolve the DNS server not responding issue.

For more details, please see our guide on how to clear your DNS cache on Mac, Windows, and Google Chrome.

Pro Tip: Use SEO Plugin to Perform Full Site Redirect

When you manually perform redirection to a new domain, then there is always a chance of errors. As a result, users would still be redirected to the old domain.

An easier way of setting up redirection is by using an WordPress SEO plugin like All in One SEO (AIOSEO). It offers a powerful redirection manager that you can use to redirect your entire site to a new domain without any issues.

Full site redirect in All in One SEO

This tool was built by our team, and it is what we use when we’re migrating websites to a new domain or merging two sites into one. You can learn more by following our step by step guide on how to properly do a full site redirect in WordPress.

We hope that this article helped you learn how to fix WordPress redirecting to an old domain after migration. You may also want to see our guide on the most common WordPress errors and how to fix them and our expert picks for the must-have WordPress plugins for business sites.

If you liked this article, then please subscribe to our YouTube Channel for WordPress video tutorials. You can also find us on Twitter and Facebook.

The post How to Fix WordPress Redirecting to Old Domain After Migration first appeared on WPBeginner.

Beginner’s Guide: How to Center Align a Video in WordPress

Category Image 091

Do you want to center-align a video in WordPress?

By default, if your video’s width is less than your article area, then WordPress automatically aligns it to the left, leaving extra white space on the right side.

In this article, we will show you how to easily center align a video in WordPress.

How to center align a video in WordPress

Why Center Align Videos in WordPress?

When you embed a video in WordPress, it automatically aligns them to the left by default. This is because videos are external content embedded in the content, so WordPress is unable to guess how you would like to display it.

As a best practice, it automatically aligns it to the left, leaving it up to you to adjust the alignment if needed.

By aligning the video to the center, users will have a better experience viewing your content. This way, you won’t have noticeable blank space on the one side of the page, which could give an unprofessional look.

Besides, if you upload videos directly to WordPress, the same thing will happen to them if their width is less than your content area. WordPress will align them to the left by default.

That being said, let’s see how you can easily center-align a video in a WordPress website. We’ll cover both the block editor and classic editor, so you can click the links below to jump ahead to any section.

How to Center Align Video in WordPress Content Editor

If you want your video to fill the width of your content area, then the best way to do this is by adding a YouTube or Vimeo video URL directly in the WordPress content editor.

First, you’ll need to edit a post or a page or add a new one. Once you are in the content editor, simply paste the link to the video. WordPress will embed the video automatically.

Paste video embed code in block editor

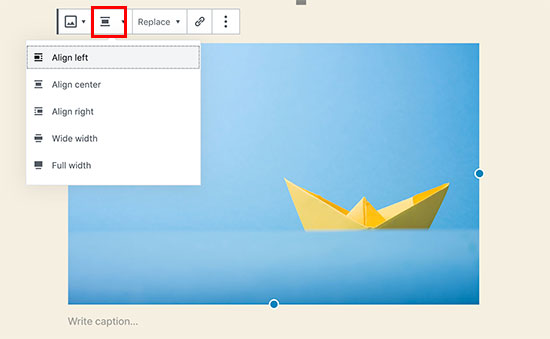
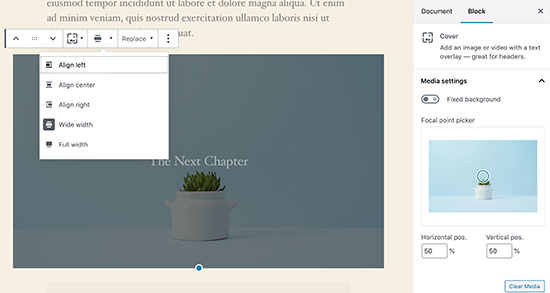
Next, select the video block and then click the Change Alignment option. From the dropdown menu, you can choose the position of the video.

WordPress lets you choose from the following alignments:

  • wide width
  • full width
  • align left
  • align center
  • align right.

Go ahead and select the ‘Align center’ option.

Align the video to the center

After that, you can preview and publish your page or post.

The video will now be center-aligned.

Center aligned video preview

However, sometimes for one reason or another, you may need to use the embed code. In that case, you will need to add some simple HTML around your video’s embed code.

First, you need to click the 3 dotted icons in the video block. After that, you can select the ‘Edit as HTML’ option from the dropdown menu.

Edit as HTML

Next, you can enter the following piece of HTML code around the embed code of the video:

<div style="text-align:center;">

/// your video embed code goes here

</div>

Here’s what your embed code would look like with the custom HTML.

Preview of custom HTML code

You can now save your changes and preview the post or page. Your video will be neatly aligned in the center of your content area.

Another approach is to manually increase your video’s width to fit the content area. To achieve this, you need to add or change the ‘width’ parameter in your embed code.

<iframe width="760" height="315" src="https://www.youtube.com/embed/4YpyiJ05YOg" frameborder="0" allow="autoplay; encrypted-media" allowfullscreen></iframe>

How to Center Align Video in the Classic Editor

If you’re using the Classic editor, then you can center align videos by editing a post or creating a new one.

Once you’re in the editor, switch to the Text view. Now enter the following HTML code:

<div style="text-align:center;">

/// your video embed code goes here

</div>

Just make sure to replace ‘your video embed code goes here’ with your video’s embed code.

Once that’s done, it will look something like this:

Center align videos in classic editor

You can now preview and publish your page.

Simply visit your website to see the center-aligned video.

Center aligned video classic editor preview

We hope this article helped you learn how to center align a video in WordPress. You may also want to see our guide on how to start a WordPress blog and must-have WordPress plugins.

If you liked this article, then please subscribe to our YouTube Channel for WordPress video tutorials. You can also find us on Twitter and Facebook.

The post Beginner’s Guide: How to Center Align a Video in WordPress first appeared on WPBeginner.

How to Disable Gravatars in WordPress

Category Image 091

Do you want to disable Gravatars in WordPress?

WordPress uses Gravatars to display user profile photos or Avatars. It is a third-party service that allows users to have the same profile photo on different websites.

Gravatars are highly useful, particularly in WordPress comments. However, some users may not want to use Gravatars at all.

In this article, we’ll show you how to easily disable Gravatars in WordPress. We’ll also show you how to use local avatars instead.

Turn off Gravatars in WordPress

Why Disable Gravatars in WordPress

Gravatars are a third-party service that allows users to add a profile photo to their WordPress website and use it across the internet.

Basically, you create an account and then upload your profile photo.

Managing Gravatar profile

After that, whenever you use that particular email address on a website that supports Gravatar, it will automatically show your profile photo from the Gravatar website.

To learn more see our explainer, What is Gravatar and why you should use it.

However, some website owners may not want to use Gravatars for several reasons.

For instance, they may want to turn it off to improve website performance and speed.

Similarly, some site owners may not want to use Gravatar due to privacy concerns.

That being said, let’s take a look at how to easily disable Gravatars in WordPress.

Disabling Gravatars in WordPress

WordPress makes it super easy to customize or turn off Gravatars on your website.

First, you need to login to the admin area of your website and then go to the Settings » Discussion page.

From here, you need to scroll down to the Avatars section and uncheck the box next to ‘Show Avatars’ option.

Turn off Gravatars in WordPress

Don’t forget to click on the Save Changes button to store your settings.

WordPress will now disable Gravatars across your website. You’ll now see a generic user icon in the admin toolbar instead of your Gravatar image.

User profile photo disabled

Similarly, the comments page inside the admin area will also stop showing Gravatars.

Comments page without Gravatar images

WordPress will also stop showing Gravatar images in the comments area under your posts and pages.

Comments without Gravatars

How to Replace Gravatar with Local Avatars in WordPress?

Some users may want to disable Gravatar but still want to display profile photos under author bios and other places.

This allows you to keep the avatar functionality in WordPress and enable users to upload their own profile photos. At the same time, it disables Gravatars and prevents your website to make any requests to Gravatar website.

To do this, you’ll need to install and activate the WP User Avatars plugin. For more details, see our step by step guide on how to install a WordPress plugin.

Upon activation, you need to visit the Settings » Discussion page and check the box next to the ‘Block Gravatar’ option.

Block Gravatar

Don’t forget to click on the Save Changes button to store your settings.

The plugin will now block any requests to Gravatar.com while allowing you to keep avatar functionality.

To upload profile photos, users will need to upload their own images under their profiles.

Simply go to Users » Profile page. From here, you can upload an image from your computer or use one from the media library.

Local avatar

Don’t forget to click on the Update Profile button to save your changes.

WordPress will now use custom profile photos instead of Gravatars. For all unregistered users it will show the default avatar image you have set in the settings.

For all registered users, it will use the custom avatar image that they uploaded. If a user hasn’t uploaded their custom avatar image, then the plugin will use the default avatar image.

We hope this article helped you learn how to disable Gravatars in WordPress. You may also want to see our guide on how to make a membership website in WordPress, and our comparison of the best WordPress page builder plugins.

If you liked this article, then please subscribe to our YouTube Channel for WordPress video tutorials. You can also find us on Twitter and Facebook.

The post How to Disable Gravatars in WordPress first appeared on WPBeginner.

How to Regenerate Your Permalinks in WordPress

Featured Imgs 19

Do you need to regenerate or flush your WordPress permalinks?

If you are not able to view your website content, then neither can your visitors. Broken links and 404 errors can damage the user experience, and your position in SEO rankings. 

In this article, we will show you how to fix these dead URLs by regenerating your permalinks in WordPress. We will also talk about what causes this error, and how to spot broken links, before your visitors do. 

How to Regenerate Your Permalinks in WordPress

Why Do I Need to Regenerate Permalinks in WordPress?

Most of the time, the URLs on your WordPress site are permanent and won’t cause any problems. They just work.

However, sometimes you may click on a link and get a 404 error. You might even get a 404 when trying to access your entire WordPress website.

This sometimes happens after moving your WordPress site to a new host or server. It could also happen after you install a new plugin. This is because some plugins edit your site’s .htaccess file without your knowledge. This can affect your site in lots of different ways, including damaging your URLs. 

Note: For this tutorial, you’ll need to be able to log in to the WordPress dashboard. If you can’t access your WordPress admin page, then see our step by step guide on what to do when you are locked out of WordPress admin.

Often, regenerating your permalinks can be a quick and easy fix for those issues. Let’s take a look at how to do that.

How to Regenerate Your Permalinks in WordPress

When you regenerate your links, you’re rebuilding and repairing the WordPress permalink structure. This may sound complicated, but don’t worry. You simply need to click on a button, and WordPress will handle the rest.

To get started, head over to Settings » Permalinks from your WordPress admin menu.

The WordPress Permalink settings.

This will take you to the WordPress Permalinks Settings page. Here, you’ll see the permalink structure that you’re currently using.

WordPress supports several options for permalinks. You can see our guide on how to create custom permalinks in WordPress for step by step instructions on how to customize them.

To regenerate your permalinks, just scroll to the bottom of the page and click on the ‘Save Changes’ button.

After a few moments, you should see a message confirming that WordPress has updated your permalink structure. 

WordPress' 'Permalink structure updated' notification.

That’s it! WordPress has now regenerated your permalinks.

To make sure it worked, head over to your site and try clicking on a few different links. 

Are You Still Seeing Permalink Errors After Regenerating?

If you’re still getting 404 errors, then you may have to clear your browser cache. For more details, see our guide on how to clear your browser cache in all major browsers.

If this doesn’t fix the problem, then think about what happened right before you started seeing these 404 messages. If you’d just installed or updated a plugin, then this might have affected your links. You can try disabling this plugin, to see whether this removes the 404 error.

The Plugin settings, as seen in the WordPress dashboard.

If this doesn’t work, then you can try deactivating all plugins to see whether this fixes your broken links. 

This is a bit of a drastic step, so it’s smart to put your site into maintenance mode first. This will keep visitors informed while you test your plugins, giving a better impression than seeing a broken website.

If deactivating all of your plugins solves the problem, then you’ll know that at least one plugin is affecting your URLs. In this case, reactivate each plugin individually and then test how this impacts your links.

When the 404 error reappears, you’ve found the plugin that’s causing the issue. You can then delete this plugin from your site or ask the developer for support.

Your site should now be error-free and running smoothly. If not, then check our list of the most common WordPress errors and how to fix them

How to Track and Avoid Broken Permalinks in WordPress

Broken links are bad news for visitors, conversions, and your search engine rankings. Over time, dead URLs can impact where you appear in the search engine rankings. This means less traffic to your website.   

With so much at stake, you’ll want to know about any dead links as soon as possible.

The easiest way to track and fix broken links on your WordPress website is by using the All in One SEO (AIOSEO) plugin for WordPress. Over 3 million website owners use AIOSEO including us here at WPBeginner.

The All in One SEO (AIOSEO) WordPress plugins.

AIOSEO allows you to easily find broken links and fix them with just a few clicks using their powerful redirection manager. For more details, please see our guide on how to track 404 pages and redirect them in WordPress.

We hope this article helped you learn how to regenerate your permalinks in WordPress. You can also go through our guide on how to choose the best website builder, or our expert pick of the best domain registrars.

If you liked this article, then please subscribe to our YouTube Channel for WordPress video tutorials. You can also find us on Twitter and Facebook.

The post How to Regenerate Your Permalinks in WordPress first appeared on WPBeginner.

What’s the Difference Between Landing page vs Website?

Featured Imgs 19

Do you want to learn the difference between landing page vs website?

Many small businesses wonder whether they should make a landing page or a full-fledged website to showcase their online presence.

In this article, we’ll show you the difference between landing page vs website and which one you should make for your business.

Landing page vs website - what is the difference

What is a Landing Page?

A landing page is a stand-alone web page designed for a specific purpose and goal. It is a highly versatile tool that can be used in marketing, advertising, and lead generation campaigns.

It can also be used as a coming soon website for a business, a single-page website on its own, a product sales page, and more.

Landing page example

Landing pages are specifically designed for higher conversions. They have unique design characteristics that make it easier for users to perform the desired action.

This action could be signing up for an email list, purchasing a product, filling out a form, and more. These actions are referred to as ‘Call to action’.

Overall, the goal of landing pages is to minimize distractions that could take users away, and provide them with all the information they need to take action.

A landing page could also be a stand-alone website on its own with different sections all leading to one clear call to action.

A landing page website

What is a Website?

A website is a collection of different landing pages and sections to help your users find what they’re looking for.

For instance, a typical business website can have an about section, a separate blog page, a contact us page, products and services pages, and more.

There are many different types of websites and they can all have different pages for different features.

How a Website Differs from a Landing Page?

Unlike a landing page, a website can have multiple pages of information with different goals and purposes.

Not each page on a website is as highly focused on conversions as a landing page.

For instance, a business website may want users to get information about all the products and services they are offering. It may also give users multiple calls to action to choose from (e.g. make a purchase, ask for quote, join email list, follow on social media, and more).

Different types of websites would have different goals and a website gives them more ways to engage the audience.

A website could also be supported by multiple landing pages for their marketing campaigns.

For instance, a membership website may utilize a landing page for a subscription plan or an eCommerce store may want to create a pre-launch landing page for an upcoming product.

Landing page vs Website – Which One to Choose?

Many beginners struggle to decide between landing page vs website and which one to choose?

The answer lies in your own requirements and what you want to achieve for your business.

If you want to quickly launch a product, create an online presence for your business, capture potential leads and customers, then a landing page would be an easy way to go.

Example of a quick landing page

On the other hand, if you want to create a multi-page online presence for your business, use an eCommerce cart, sell online courses, start a blog, and more, then you will be better off with a website.

WPForms Website example

Remember you can always choose to create a landing page as a single-page website. You can also convert your landing page to a full-fledged website as your business grows.

Similarly, you can also create a complete website with multiple pages and still add landing pages for specific campaigns.

What Do I Need to Make a Landing Page vs Website?

You’ll need a domain and a web hosting account to create a landing page or a website.

A domain name is the location of your website or landing page (e.g. wpbeginner.com). This is what your users will type in their browsers to view your landing page or website.

The web hosting account is where your landing page or website files will be stored.

Normally, a domain costs around $16 per year, and hosting plans start at $7.88 per month (usually paid annually). Now this is a significant amount if you are just starting out.

Luckily, our friends at Bluehost has agreed to offer a free domain name and a generous discount on hosting for WPBeginner users.

Basically, you can get started for just $2.75 per month.

→ Click Here to Claim This Exclusive Bluehost Offer ←

Bluehost is one of the biggest hosting companies in the world and an officially recommended WordPress hosting provider.

Once you have signed up for a hosting account, Bluehost will automatically install WordPress for you.

WordPres is the world’s best website builder and makes it super easy to create a website or make landing pages. Simply log in to your hosting account and then login to your WordPress account dashboard.

Log in to WordPress

How to Make a Landing Page for My Business

The easiest way to make a landing page is by using SeedProd. It is the best landing page builder on the market and allows you to easily create landing pages using a drag and drop interface and without writing any code.

First, you need to install and activate the SeedProd plugin. For more details, see our step by step guide on how to install a WordPress plugin.

Note: There is also a free version of SeedProd available that you can use to give it a try. However, you’ll need to upgrade to unlock all features and templates available in the premium version.

Upon activation, you need to enter your SeedProd license key. You can find this information under your account on the SeedProd website.

SeedProd license key

You can now start building your first landing page.

Simply head over to SeedProd » Pages page and click on the ‘Create new landing page’ button.

Creating a new landing page

Next, you will be asked to choose a template page as a starting point for your landing page. SeedProd comes with dozens of beautiful templates that you can completely modify or you can even start with a blank template.

Choose a landing page template

This will bring up a popup asking you to provide a name for your landing page. Enter a name for your page and then click on the ‘Save and Start Editing the Page’ button.

Name your landing page

SeedProd will now load the page builder interface with a live preview of your chosen template.

SeedProd page builder interface

You can simply point and click on any item in the live preview to edit it. You can also add new blocks from the left column to your page.

SeedProd comes with all commonly used elements as blocks. Each block has its own settings that you can adjust using a simple user interface.

It also includes blocks for WooCommerce and integrations for all popular email marketing services under the ‘Connect’ tab.

Integrations

Once you are satisfied with your landing page, you can click to save or publish your page to make it live.

Publish landing page

Publishing Landing Page as Homepage for Your Domain

Now if you want to only display your landing page when someone enters your domain name, then you’ll need to set it up as your homepage in WordPress.

Simply go to Settings » Reading page. From here you need to select ‘A static page’ under ‘Your homepage displays’ option.

Set homepage

After that, go ahead and select the landing page you created earlier as your ‘Homepage’. Don’t forget to click on the Save changes button to update your settings.

Creating Landing Pages for Other Domain Names?

What if you wanted to create landing pages for other domain names? This comes in handy if you have multiple domains to cover different markets and regions.

SeedProd comes with built-in domain mapping support. This allows you to easily create a landing page in SeedProd and map it to any other domain name.

Set custom domain name

For more details, see our tutorial on how to easily add a custom domain for your landing page in WordPress.

How to Make a Complete Website for My Business

WordPress is the most powerful website builder used by millions of business websites, eCommerce stores, blogs, news and media sites.

Since you have already installed WordPress on your Bluehost account, you can simply login to your account dashboard and start working on your website.

First, you want to add new pages by visiting Pages » All Pages page and clicking on the Add New button.

Adding new pages in WordPress

WordPress comes with a powerful editor that allows you to easily add design and content elements to your pages as blocks. To learn more, see our tutorial on how to use WordPress editor.

Tip: Need ideas for pages? See our list of the most important pages to create for a new WordPress website for some excellent ideas.

Next, you would want to choose a design for your website. WordPress comes with thousands of free and paid themes for all sorts of websites.

Bonus Tip: Need help choosing a theme, see our expert pick of the most popular WordPress themes or take a look at these great themes for business websites.

Once you have found a theme you want to use, you can go to Appearance » Themes page and click on the Add New button to install it.

Install WordPress theme

See our tutorial on how to install a WordPress theme for detailed instructions.

The real power of WordPress comes from its plugins. These are like apps for your WordPress websites that you can install to extend its features. Start by checking out our pick of the essential WordPress plugins.

Need more help with your new website? See our detailed tutorial on how to make a website with step by step instructions.

We hope this article helped you learn the difference between landing page vs website. You may also want to see our guide on how to promote your business on a budget and our tips on quickly getting more traffic to your website.

If you liked this article, then please subscribe to our YouTube Channel for WordPress video tutorials. You can also find us on Twitter and Facebook.

The post What’s the Difference Between Landing page vs Website? appeared first on WPBeginner.

How to Change the Admin Color Scheme in WordPress (Quick & Easy)

Featured Imgs 19

Do you want to change the admin color scheme in WordPress?

Changing the color scheme of the WordPress admin lets you create a custom dashboard for you and your team. The color scheme can match the design of your brand, or just feature your favorite colors.

In this article, we’ll show you how to change the admin color scheme in WordPress easily.

How to change the admin color scheme in WordPress

Why Change the Admin Color Scheme in WordPress?

If you’re not a fan of the default admin color scheme in WordPress, then you can easily change the color scheme to something you like.

You can also change the color scheme to match the design of your WordPress theme, or even add a dark mode feature.

This can be useful if you have a membership site or online store where users can log in to your site, and want your website and admin dashboard to offer a similar experience.

You could also use a different admin color scheme for your staging site to more easily tell it apart from your live site.

That being said, let’s show you a few different ways you can change the admin color scheme in WordPress. You can use the quick links below to jump straight to the method you want to use.

How to Change the Admin Color Scheme with WordPress Default Settings

WordPress has a built in feature that lets you choose from a few predetermined color palettes for your WordPress admin dashboard.

To change the admin color scheme, simply login to your WordPress admin dashboard, and then navigate to Users » Profile.

After that, select the new color scheme in the ‘Admin Color Scheme’ section by clicking the radio button.

Select new admin color scheme

There are 9 different color schemes to choose from.

As you click different options, the color scheme will automatically change.

Admin color scheme change example

Once you’ve selected a color scheme you like, you need to scroll down to the bottom of the page and click the ‘Update Profile’ button.

Save new admin color scheme

You can also control the admin color scheme for other registered users on your WordPress website.

To do this, go to Users » All Users, and then hover over the user and click the ‘Edit’ button.

Edit user color scheme

Then, simply follow the same process as above to change the admin color scheme for that user.

Once you’re finished, make sure to click the ‘Update Profile’ button at the bottom of the page.

How to Create Custom Admin Color Schemes in WordPress

If you want even more color choices for your admin dashboard, then you can create custom color schemes and upload them to your WordPress blog.

To do this, go to the free WordPress Admin Colors website and click the ’Start Creating’ button.

Click start creating button

Then, enter a name into the ‘Color Scheme Name’ box.

This name will show up in your WordPress admin panel as a new color option.

Enter color scheme name

After that, you can fully customize your color scheme by clicking the color options in the ‘Choose your colors’ section.

To change one of the existing colors, click the color and choose your new color from the popup. You can click anywhere on the color picker, or enter a hex code for a specific color.

Click to customize colors

Once you’re finished customizing your color scheme, click the ‘Generate Color Scheme’ button at the bottom of the page.

This will create the color scheme code that you need to add to WordPress.

Click to generate color scheme

On the next page there will be two different code files.

You need to download the CSS file and copy the code snippet and paste it into your favorite text editor. We will be adding these to your WordPress files.

Download CSS and copy PHP code

If you haven’t done this before, then check out our guide on how to copy and paste code in WordPress.

You can add the code snippet to your functions.php file, in a site-specific plugin, or by using a code snippets plugin.

For this tutorial, we’ll use a code snippets plugin. It’s the easiest and most beginner-friendly method of adding code snippets to your WordPress site.

First, you need to install the Code Snippets plugin. For more details, see our beginner’s guide on how to install a WordPress plugin.

Upon activation, you’ll have a new menu item labeled ‘Snippets’ in your WordPress admin bar. Go ahead and navigate to Snippets » Add New.

Then, give your code snippet a name. This can be anything to help you remember your code.

After that, you can paste the snippet you copied above into the ‘Code’ box.

Name and add new code snippet

Next, click the ‘Save Changes and Activate’ button at the bottom of the screen.

This will save the code and activate the new admin color scheme.

Save and activate code snippet

Now, you need to upload the CSS stylesheet you downloaded earlier to your theme directory in your WordPress hosting account.

To do this, you can use an FTP client, or the file manager option in your WordPress hosting control panel.

If you haven’t used FTP before, then you might want to check out our guide on how to use FTP to upload files to WordPress.

First, you need to connect to your website using an FTP client, or the file manager in cPanel. Once you’re connected, you need to navigate to the /wp-content folder.

Select wp-content folder FTP

Inside the wp-content folder, you will see a folder called themes. This is where WordPress stores all the themes your website uses or has used in the past.

You need to click on the themes folder, and then open up the folder for the theme you’re using.

Open themes folder and select theme

Then, upload the display.css file that you downloaded.

Your CSS file will have the name that you chose earlier.

Upload new CSS file

Note: If you change WordPress themes, then you will need to upload the CSS file to your new theme folder.

After that, navigate to Users » Your Profile.

Then, you can select the new color scheme you just created.

Select custom color scheme

If you want to use this color scheme, then make sure to click the ‘Update Profile’ button at the bottom of the page.

How to Control the Default Admin Color Scheme for New Users

When a new user creates an account, they’ll have the option to customize their color scheme. But, you may want to control the default admin color scheme or prevent users from changing the color scheme altogether.

The easiest way to do this is by using the free plugin Force Admin Color Scheme.

First, you need to install and activate the plugin. For more details, see our step by step guide on how to install a WordPress plugin.

Upon activation, navigate to Users » Profile and then select your admin color and click the ‘Force this admin color scheme on all users’ checkbox.

Check force admin color scheme checkbox

After that, click the ‘Update Profile’ button at the bottom of the page.

Now the default admin color scheme will be the same for all new and existing users on your site.

The plugin also disables the admin color scheme selector for all of your users. The only users who can change this color are those with admin access.

We hope this article helped you learn how to change the admin color scheme in WordPress. You may also want to see our expert picks on the best WordPress landing page plugins and our guide on how to choose the best domain name registrar.

If you liked this article, then please subscribe to our YouTube Channel for WordPress video tutorials. You can also find us on Twitter and Facebook.

The post How to Change the Admin Color Scheme in WordPress (Quick & Easy) appeared first on WPBeginner.

How to Change the Author of a Post in WordPress

Featured Imgs 23

Do you want to change the author of a post in WordPress?

Sometimes you may need to change a post to a different author than the user who first uploaded the post. You can do this without having to copy and paste the post with a different account.

In this article, we’ll show you how to simply change the author of a post in WordPress with just a few clicks.

How to change the author of a post in WordPress

Before You Change the Author of a WordPress Post

If you just want to show your own name on a post written by another user on your WordPress site, then you’re ready to follow the instructions in this article.

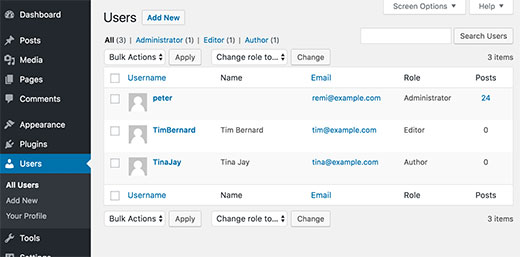
But, if you want to show a different user as the author, then you need to make sure this user exists on your WordPress site first. See our guide on how to add new users and authors in WordPress for detailed instructions.

You can view and manage all the users on your WordPress site by visiting the ‘Users’ menu item when logged in with your WordPress administrator account.

Managing users in WordPress

If you only want to change the way your name is displayed, then check out our guide on how to add or change your full name in WordPress.

Having said that, let’s look at how to quickly and easily change the author of a post in WordPress.

Video Tutorial

If you don’t like the video or need more instructions, then continue reading.

How to Change the Author of a Single WordPress Post

First you need to open the post or page where you want to change the author name.

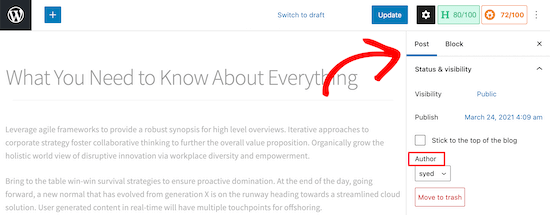
On the post edit screen, you need to make sure ‘Post’ is selected in the right-hand sidebar.

Then, locate ‘Author’ under the ‘Status & Visibility’ section.

Locate post then author section

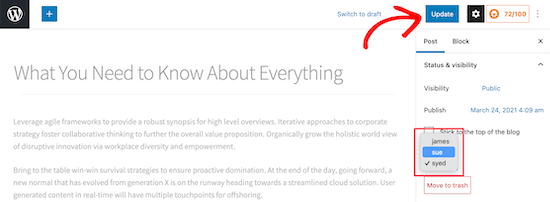
Next, select the new author name from the drop down menu.

You’ll see a list of available authors to choose from.

Select new author drop down

Once you’ve done that, make sure you click ‘Update’ or ‘Save Draft’ to save your changes.

That’s it, you have successfully changed the author of a post in WordPress.

How to Change the Author of Multiple WordPress Posts

Changing the author by editing a single post is easy.

However, if you want to change the author for multiple posts, then this would take a lot of time.

Luckily, there’s an easier way to quickly change the author for multiple WordPress posts at once.

To bulk update authors, click on the ‘Posts’ menu item from your WordPress admin menu. This will list all the posts on your WordPress site.

By default, WordPress shows 20 posts per page. If you want to display more posts, then you need to click on ‘Screen Options‘ and change the number of posts you want to display.

Show more posts in admin area

Now you need to select the posts where you want to change the author.

After selecting posts, select ‘Edit’ from ‘Bulk Actions’ dropdown menu and then click the ‘Apply’ button.

Bulk edit posts in WordPress

WordPress will now show you ‘Bulk Edit’ metabox.

You need to select the new author by clicking on the dropdown menu next to Author option.

Bulk edit author for multiple posts in WordPress

Don’t forget to click on the ‘Update’ button to save your changes.

That’s it, you have successfully changed the author for multiple WordPress posts without editing them individually.

How to Optimize Your Author Profiles for SEO

Finally, you may want to optimize your author profile pages to improve your SEO rankings.

The author profile is what appears at the bottom of blog posts published under your name.

Author info box plugin preview

Here you can add a brief bio, links, and even your social media profiles.

By showcasing your author bio, you can build more credibility and give your readers a chance to learn more about you and the authors on your site.

WordPress allows you to add a brief author bio, but to add social media links you’ll need to use a WordPress author bio plugin.

Aside from that, you’ll also want to improve your Author archive pages where WordPress displays a list of posts written by that author.

To optimize author pages for SEO, we recommend using All in One SEO. It’s the best SEO plugin for WordPress used by over 2 million websites.

For more details, see our guide on how to install a WordPress plugin.

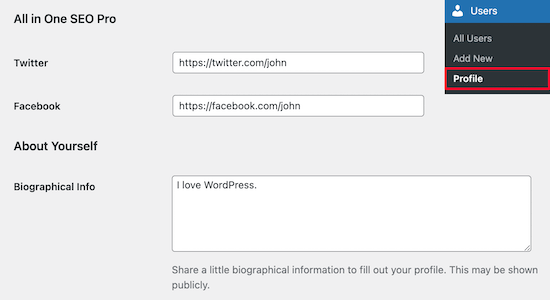
Upon activation, simply navigate to Users » Profile to edit your author profile.

Next, scroll down to the ‘All in One SEO Pro’ section where you can add links to your Facebook and Twitter profiles and create an author bio.

Author profile SEO

Once you’ve made the necessary changes, make sure you click ‘Update Profile’ at the bottom of the page.

Users will now see your new author bio at the bottom of any post you publish or change to your name.

We hope this article helped you learn how to change the author of a post in WordPress. You may also want to see our expert list of the best WordPress plugins for websites, and our comparison of the best online course platforms.

If you liked this article, then please subscribe to our YouTube Channel for WordPress video tutorials. You can also find us on Twitter and Facebook.

The post How to Change the Author of a Post in WordPress appeared first on WPBeginner.

How to Recover and Restore Deleted Pages in WordPress

Featured Imgs 19

Are you trying to recover deleted pages in WordPress?

If you accidentally deleted a WordPress page, then it is possible to recover it from Trash.

In this beginner’s guide, we’ll show you how to easily recover deleted pages in WordPress and WooCommerce.

Recovering deleted pages in WordPress

How WordPress Handles Deleted Pages?

Just like your computer, WordPress moves deleted items into a ‘Trash’ folder. Doing that removes those items from your website and admin screens, but they’re not deleted permanently right away.

After 30 days, WordPress automatically deletes the item permanently from the trash, and your WordPress database.

If the page you deleted is still in the trash, then you can go ahead and restore it. We’ll show you how in a minute.

However, if it has been deleted from trash too, then you will need to try other ways to restore the deleted page in WordPress.

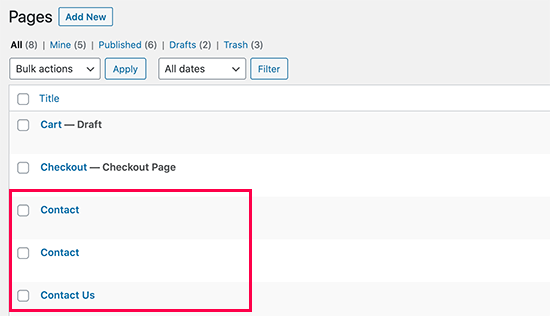
Sometimes you may accidentally delete a page and not notice it for a while. For instance, if you have multiple pages with the same name, and you end up deleting one that you actually needed.

Accidentally deleting similarly named pages in WordPress

Another common scenario that we have seen is users accidentally deleting pages needed by WooCommerce or their WordPress membership plugin.

That being said, let’s take a look at how to easily restore deleted pages in WordPress and WooCommerce. Here is quick table of content, so you can jump to the section that best fit your needs.

Method 1. Recover Deleted Pages from Trash in WordPress

This method is the easiest, and you should try it first before doing anything else.

Normally, when you delete an item in WordPress, it is sent to the trash folder, and you can recover it for the next 30 days. After that, it will be automatically deleted forever.

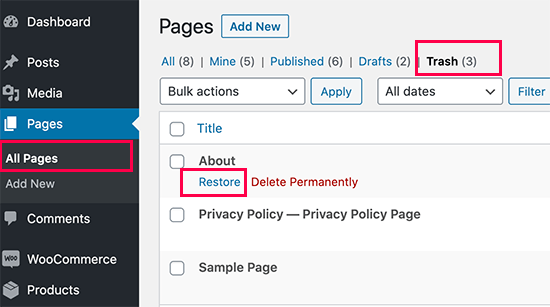
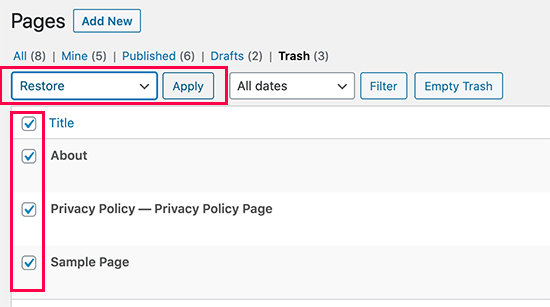
Simply go to Pages » All Pages inside your WordPress admin area. From here, you need to switch to the ‘Trash’ tab to view all the pages that have been deleted during last 30 days.

Restore deleted pages

If the page(s) you want to recover is listed there, then simply take your mouse over the page title, and you’ll see the option to ‘Restore’ it.

You can also restore multiple pages at once by selecting them and then choosing ‘Restore’ from the Bulk Actions drop-down menu at the top.

Restoring multiple pages in WordPress

You can now go to Pages » All Pages and locate the restored page there.

That was quick and easy, but what if the page you deleted is not listed under Trash?

Don’t worry, there are other ways to restore deleted pages in WordPress.

Method 2. Restore Deleted Pages in WordPress Using a Backup Plugin

Backups are one of the best WordPress security and productivity tools. All WordPress websites must set up a proper WordPress backup plugin.

These WordPress backup plugins not just help you recover a hacked WordPress site, but they can also help you recover deleted content including pages.

Note: WordPress backup plugins allow you to restore your entire website to an earlier point. This means any other changes you made to your website after that time can be lost.

If you know when you deleted a page, then you can access the last back up before that time to restore your website.

If you don’t have a WordPress backup plugin installed, then there is still a fairly good chance that your WordPress hosting company does, and you can still restore it via cPanel.

For step by step instructions you can follow our guide on how to restore WordPress from a backup. It shows how to restore WordPress from a backup using UpdraftPlus, BackupBuddy, phpMyAdmin, cPanel, and more.

Method 3. Recover Deleted WooCommerce Pages

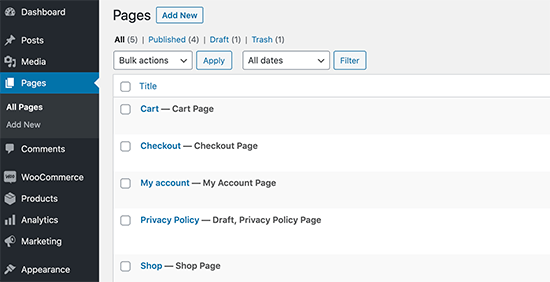
By default, WooCommerce creates pages for the checkout, cart, shop, and account management. These are important pages for your WooCommerce store to function properly.

WooCommerce default pages

If you accidentally delete a WooCommerce page, then you can first try restoring it by looking into the Trash (see Method 1 above).

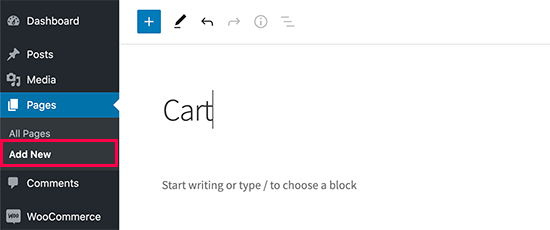
If you cannot find the page in trash, then you can simply create a new one. For instance, you can go to Pages » Add New and then create a blank page titled ‘Cart’.

Create new cart page in WooCommerce

Similarly, you can create other WooCommerce pages as well for shop, checkout, and account.

After you have created new pages, you can tell WooCommerce to use these new pages instead. Simply go to WooCommerce » Settings page and switch to the ‘Advanced’ tab.

Select WooCommerce default pages

From here, you can select pages you created earlier under the Page Setup section.

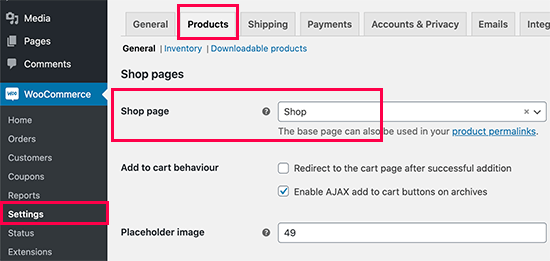
For the shop page, you’ll need to switch to the ‘Products’ tab and then select the page you want to use as your Shop page.

Shop page

Don’t forget to click on the ‘Save changes’ button to store your settings.

Method 4. Restore Selected Pages from a WordPress Backup (Advanced)

This method is a bit complicated, unreliable, and is not recommended for beginners. However, it would be useful if you don’t want to restore a complete a website and lose any changes you made after that backup.

You can simply restore your WordPress back up to a local server installation and then copy and paste the page contents that you wish to restore.

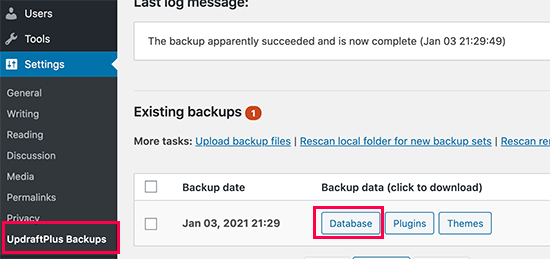
First, you’ll need to download your WordPress backup files to your computer. Simply go to your WordPress database backup plugin page and you will be able to see recent backups.

For instance, here is how you’ll see your recent backups listed in the UpdraftPlus.

Download WordPress database backup

Simply click on the database backup to download it to your computer.

Next, you will need to restore your WordPress site to a local server. You can install WordPress on your computer using WAMP (or MAMP for Mac).

After that, you can use can install your WordPress backup plugin on local server installation and restore using the backup files.

Optionally, if you have only the database backup, then you can restore that using phpMyAdmin as well.

Once you have restored the WordPress database, you will need to update WordPress Site and Home URLs in the database. To do that, simply open phpMyAdmin on your local server by typing the following URL:

http://localhost/phpmyadmin/

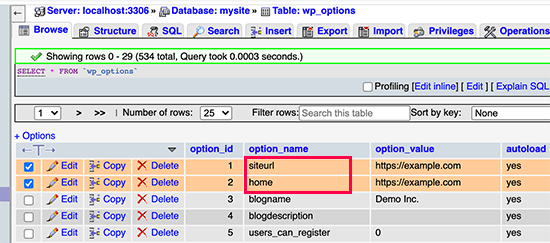
After that, you need to select your WordPress database from the left column and then click on the wp_options table. Switch to the browse tab and locate the rows containing ‘siteurl’ and ‘home’ under the option_name column.

Change site URLs

You’ll notice that the option_value column contains the URL of your live website. You need to edit both of these rows and replace your option_value to match your local server WordPress site.

After that click on the ‘Go’ button to save your changes.

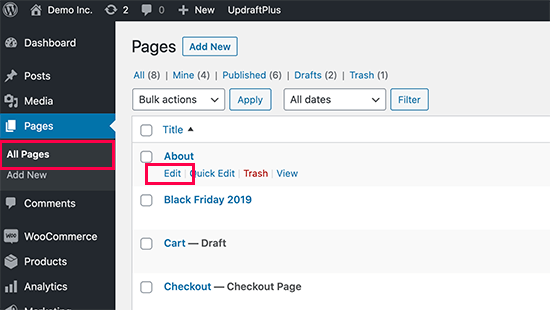
You can now login to your localhost installation, and you’ll see all your old pages listed under Pages » All Pages.

Editing a WordPress page

Go a head and edit the page you want to restore. All you need to do is copy the content and paste it to your live WordPress website as a new page.

Copy page content

Don’t forget to update or publish changes on your live website.

We hope this article helped you learn how to recover deleted pages in WordPress. You may also want to see our complete WordPress security guide to keep your WordPress site safe and secure, and our list of the must have WordPress plugins for all websites.

If you liked this article, then please subscribe to our YouTube Channel for WordPress video tutorials. You can also find us on Twitter and Facebook.

The post How to Recover and Restore Deleted Pages in WordPress appeared first on WPBeginner.

How to Put Images Side by Side in WordPress (Easily)

Category Image 091

Do you want to put images side by side in your WordPress content?

Often beginners struggle to find how to put two pictures next to each other in their WordPress posts and pages.

In this step by step guide, we will show how to easily put images side by side in WordPress (without writing any code).

Putting images side by side in WordPress

Using the Block Editor to Put Images Side by Side

The easiest way to get your images side by side is to use the WordPress block editor.

The block editor has a special ‘Gallery’ block that lets you display images in rows and columns.

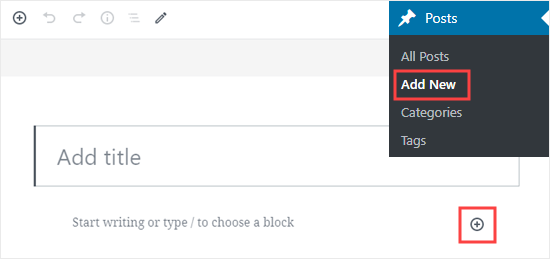
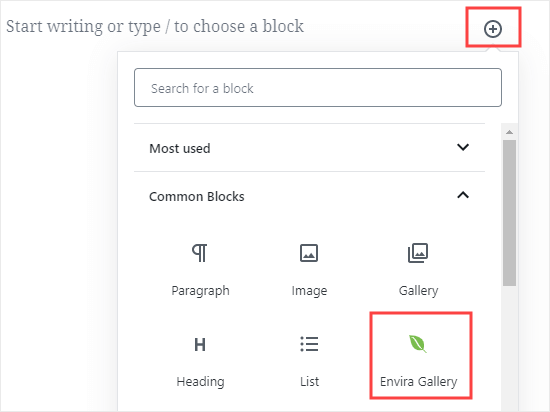
First, you’ll need to create a new post / page or edit an existing one to open the content editor. Once inside, click the (+) symbol to add a new block.

Creating a post and adding a block to it

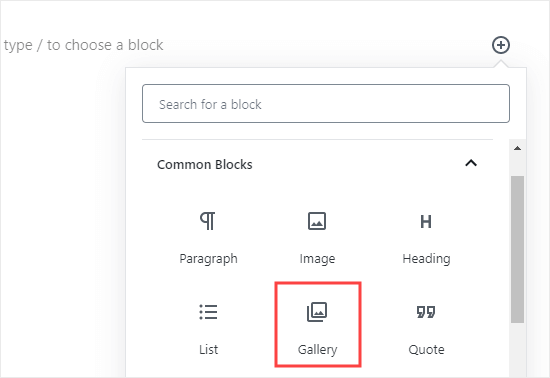
Next, you need to select the Gallery block and add it to your page. You can find the Gallery block in the Common Blocks section, or you can use the search bar to quickly locate it.

Selecting the Gallery block to add to your post

Now, you can easily add images to your gallery block, by dragging them into it or by using the Upload button. You can also select images from your WordPress media library.

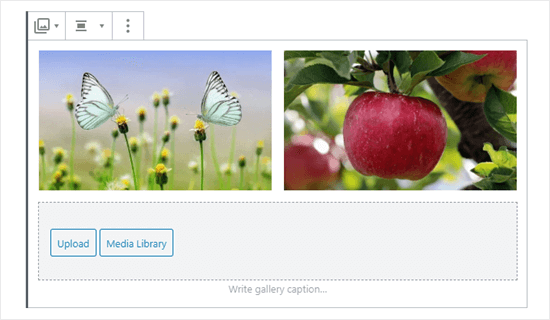
As you can see, we’ve added 2 images to our Gallery block. WordPress has automatically positioned them side by side.

Two images in the gallery (butterflies and apple)

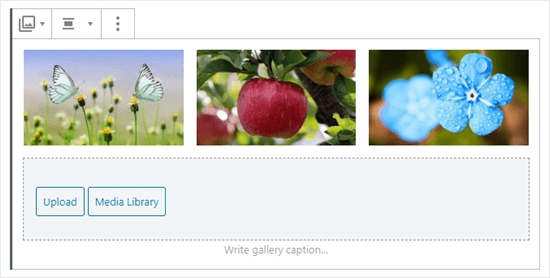
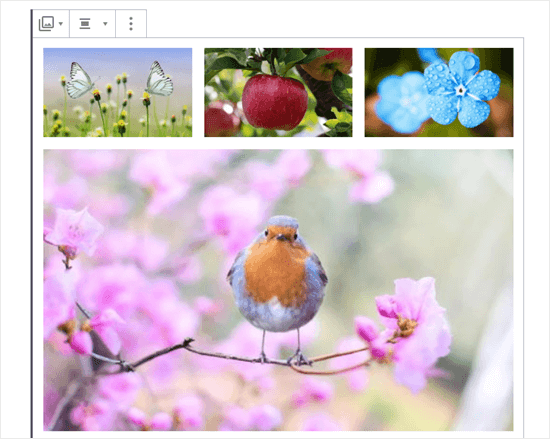
What if you want 3 images side by side? Here’s what happens if we add a third image. WordPress simply resizes the others to fit all 3 side by side:

Three images in the gallery (butterflies, apple, and blue flowers)

If you upload a fourth image, then WordPress will place it beneath the others.

Four images in the gallery (butterflies, apple, blue flowers, and robin)

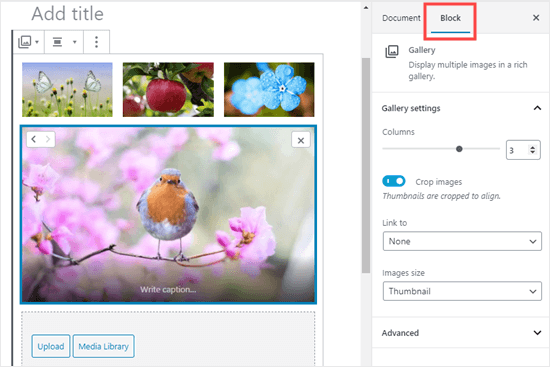
You can change the number of images WordPress should include side by side in a single column.

First, click on the Gallery block, if it’s not already selected. On the right hand side of the screen, you’ll see the Gallery’s block settings.

Changing the settings for the gallery block

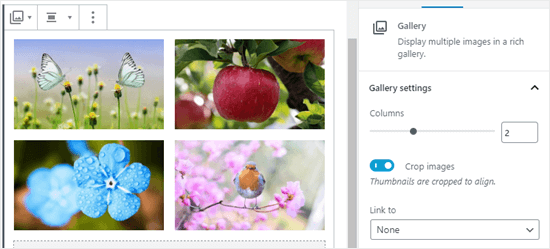
You can adjust the number of columns here to any number between 1 and 4. For instance, if you want two images side by side, and two more beneath them, you can set the Columns to 2.

Setting the gallery to have 2 columns rather than 3

It’s as simple as that!

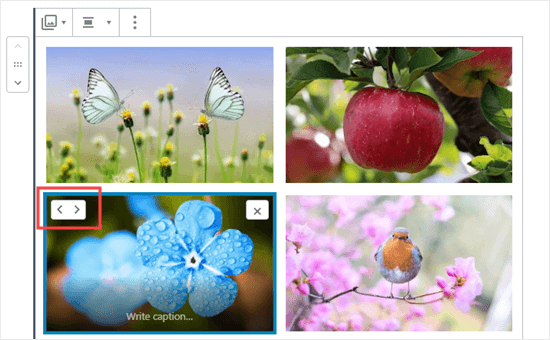
If you want to change where an image is positioned in your gallery, just click on it. You’ll then see arrows that you can use to move it forward or backward in the gallery.

Moving an image forward or backward in the gallery

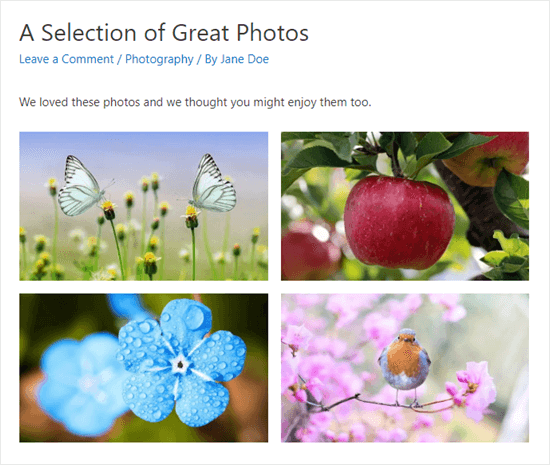
Here’s a finished gallery demo from our sample post:

The 2 column gallery in a live post

Using a Plugin to Put Images Side by Side in WordPress

If you’re using the old classic WordPress editor, or if you want to create more complex galleries than the default Gallery block, then you will need a WordPress gallery plugin.

We recommend using Envira Gallery because it is the best WordPress gallery plugin

For the sake of this tutorial, we will be using the free version of Envira, but you may want to get the Pro version to get powerful features like albums, image slideshows, etc.

First, you’ll need to install and activate the Envira Gallery plugin. If you’re not sure how, just check out our step by step guide on how to install a WordPress plugin.

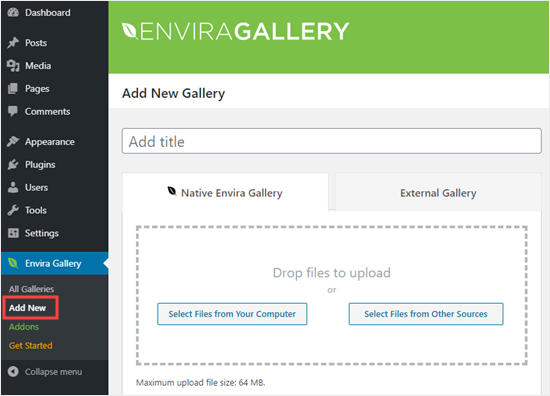
Next, you can go to Envira Gallery » Add New in your WordPress dashboard.

Add a new gallery in Envira Gallery

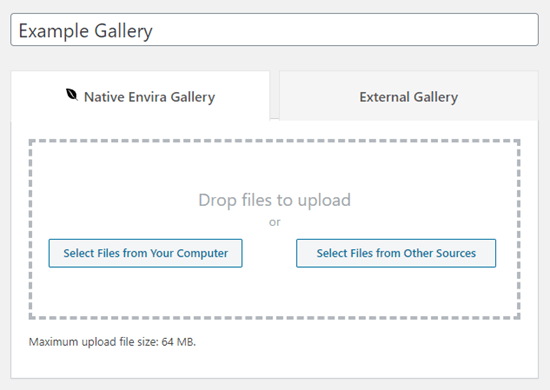
You’ll need to give your gallery a title. We’ve called ours ‘Example Gallery’. Next, upload the images you want to use.

You can either drag and drop them into the upload box, or you can use one of the ‘Select Files’ buttons.

Give your new gallery a name

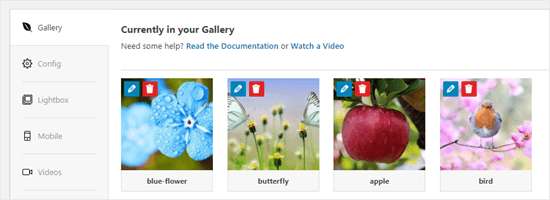
Here’s how the images look once they’ve been uploaded:

Images uploaded to Envira Gallery

You may want to give your images a title and alt text here. The title appears below your image when the user brings their mouse cursor over it.

The title also appears below the image in the lightbox popup mode, which we’ll take a look at in a moment.

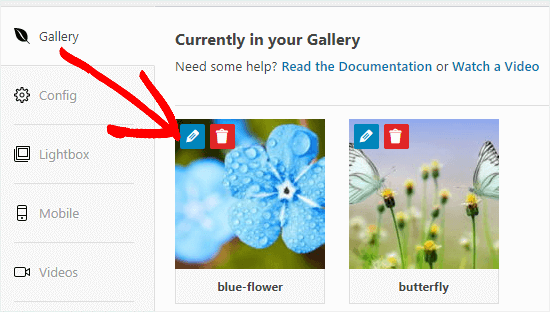
To edit the title and alt text, click the Edit button on an image in the gallery.

Click the Edit button to edit an image in your gallery

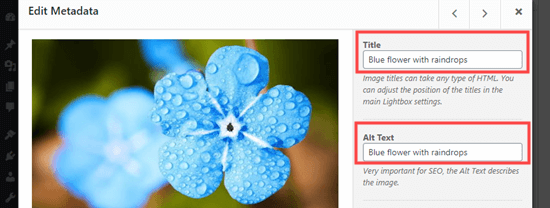
You can then change the title for your image. It defaults to the image’s filename.

You should also enter alt text, as this is helpful for your WordPress site’s SEO. If your title describes the image, then you can simply repeat it for the alt text.

Setting the title and the alt text for the image

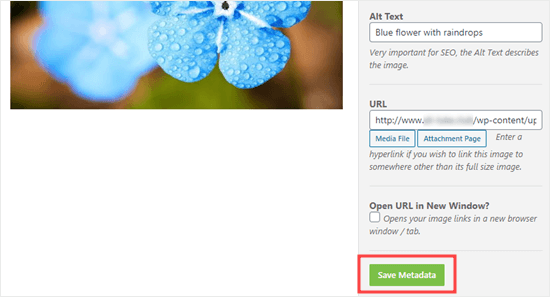
Once you’re done, please make sure you click the ‘Save Metadata’ button before clicking the X to close the window.

Click the Save Metadata button to save your changes

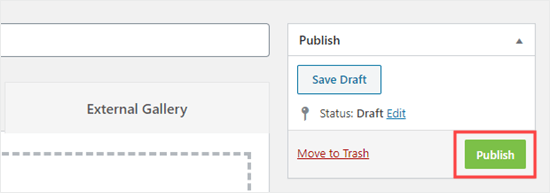
To add your gallery on the site, you’ll first need to publish it. Go ahead and click the Publish button on the right hand side of the screen.

Click the Publish button to publish your gallery, so you can use it on your site

Now, edit a post or page, or create a new one. Inside the content editor, click (+) to add a block to your post, and select the Envira Gallery block. You can find it in the Common Blocks section, or you can use the search bar.

Add the Envira Gallery block to your post or page

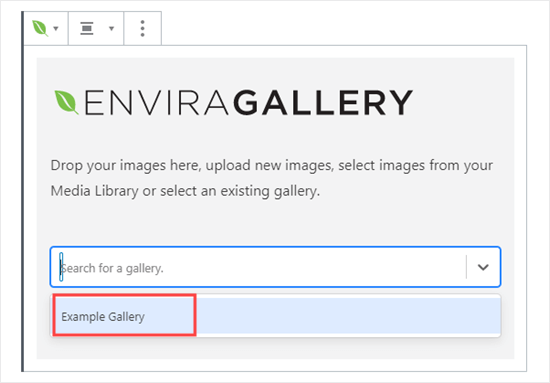
You’ll then need to click on the dropdown to select your gallery.

Select your gallery from the Envira Gallery block

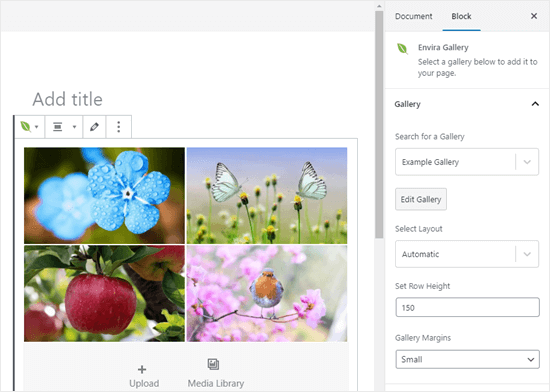
You should see your gallery in place in your post.

You can adjust the settings on the right-hand side of the screen. For instance, you might want to change the column layout, or the size of the margin between images.

The Envira Gallery shown in the post editor

We decided to set our gallery to always display in two columns. We also added a wider margin between the images.

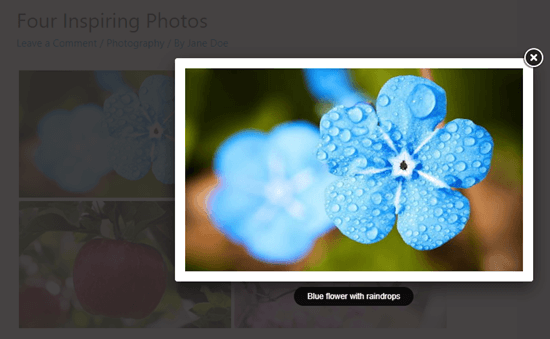
The user can click on an image to see the full-sized version in a lightbox. They can scroll through the images using the lightbox, too.

Viewing an image from the Envira gallery in a lightbox

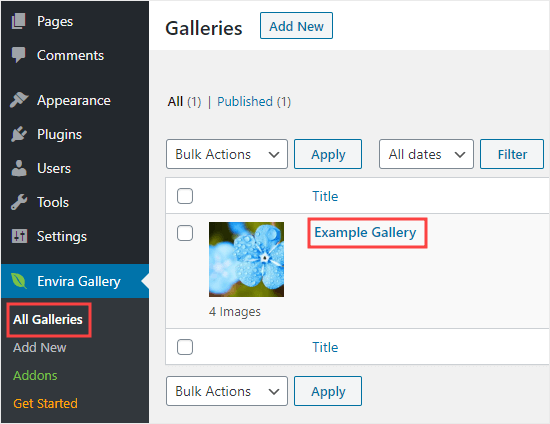
If you want to add more images to your gallery, then you can go back to it by visiting Envira Gallery » All Galleries in your WordPress dashboard. Simply click on the name of your gallery to edit it.

Editing a gallery you've already created in Envira Gallery

Any changes you make to your gallery will appear wherever you’ve placed it in your posts, pages, or sidebars. You don’t need to add it to these again.

Tip: If you’re using the classic editor instead of the block editor, you can still use Envira Gallery.

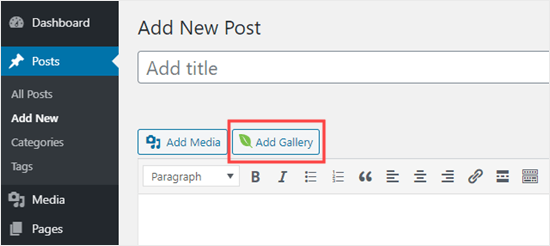
You’ll see an ‘Add Gallery’ button above the classic editor that you can use to add an existing gallery to your post.

Adding an Envira gallery in the classic editor

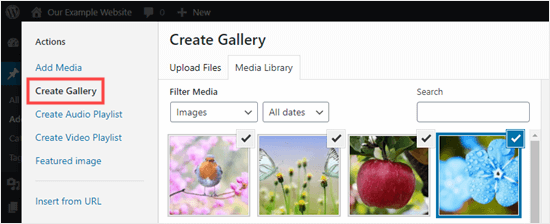
You can also create a new gallery by clicking the ‘Add Media’ button then ‘Create Gallery’.

Creating a new gallery using the Media Library in the Classic Editor

We hope this tutorial helped you learn how to put images side by side in WordPress. You might also want to go through our guide on how to align images in the WordPress block editor, and our comprehensive list of the must have WordPress plugins (expert pick).

If you liked this article, then please subscribe to our YouTube Channel for WordPress video tutorials. You can also find us on Twitter and Facebook.

The post How to Put Images Side by Side in WordPress (Easily) appeared first on WPBeginner.

Beginner’s Guide on How to Add a Link in WordPress

Category Image 091

Do you want to add a hyperlink in WordPress? Recently, one of our users asked us how to add a link in WordPress.

There are several different ways to add links in WordPress. You can add links in your posts, pages, navigation menu, sidebar widgets, footer area, and more.

In this comprehensive beginner’s guide, we will show you how to add a link in WordPress posts, pages, widgets, navigation menus, and more.
How to easily add a link in WordPress

Since this is a detailed tutorial, please use the navigation below to quickly jump to the section you need:

Why Are Links Important?

Links are the bloodstream of the internet, which makes them really important.

Basically, most websites on the internet are connected via links, which is why the term ‘web’ or ‘World Wide Web’ was introduced in the first place.

These are the hyperlinked text, buttons, and other elements that you click to go from one page to another or from one website to another.

Imagine visiting a web page with no link for you to click on. You’ll have no option but to click on the back button in your browser.

For individual websites, links tell your users where to click to view more information.

Properly placing links on your website allows you to increase the time users spend on your website. It also helps users discover more content, make a purchase on your online store, or subscribe to your email newsletter.

That being said, let’s take a look at how to easily add links in different areas of your WordPress website.

How to Add Links in WordPress Posts and Pages

WordPress makes it really easy to add links in your blog posts and pages using the block editor.

Simply edit your post or page, or create a new one.

Next, highlight the text that you want to attach the link to. This selected text is called the anchor text for the link. Now click on the ‘Link’ button:

You’ll see a box where you can enter a URL. A URL is a web address. For instance, WPBeginner’s guide on how to start a WordPress blog has the URL https://www.wpbeginner.com/start-a-wordpress-blog.

You can simply copy and paste the URL of the post or page you want to link to, like this:

Creating a link by pasting in a URL using the WordPress block editor

Click the Apply (Enter) button to insert the link into your post.

If you’re linking to content on your own site, then it might be quicker to search for it. Type a word or two from your content title, and WordPress will find it:

Searching for a page to link to using the WordPress block editor

Click on the title of the page or post you want to link to, and the URL will be automatically added for you. Again, you’ll need to click the Apply button to put the link into your post.

If you want to set your link to open in a new tab, then click the arrow on the right. You can then click the toggle and set your link to open in a new tab.

Setting your link to open in a new tab using the WordPress block editor

Note: We recommend that you only use this option for links to third-party websites. This way your users don’t leave your website while visiting it.

Adding Link in Old WordPress Editor

If you are using the older classic editor instead of the block editor, then the process for adding a link is quite similar.

Open up the post that you want to edit, or create a new one. Find the text you want to use as the link’s anchor and highlight it. Then, click the ‘Link’ button which should appear in the first row of toolbar buttons.

Creating a link using the WordPress classic editor

You can then copy and paste the URL you want to link to, or search for it, as in the block editor.

Pasting your URL directly onto the anchor text

Another, even quicker, way to add a link in both the block editor and classic editor is to simply paste the URL onto the anchor text.

First, copy the URL you want to link to. Then, highlight your chosen anchor text in your post.

Next, you can either right-click and select ‘Paste’ or simply press Ctrl+V (Windows) or Command+V (Mac) to paste the URL.

Paste your link directly into your content

WordPress will automatically detect that you’re pasting a URL, not text, and will turn the anchor text into a link.

Take a look at our tips for mastering the WordPress content editor to learn more about using the block editor effectively.

How to Add Links in WordPress Text Widgets

WordPress allows you to add widgets to your site’s non-content areas like sidebar, footer, or other widget areas.

Some of these widgets are automated and do not have many options. For example, the Recent Posts widget will automatically show links to your recent posts. You don’t need to do anything extra.

However, if you want to add some custom text with links in your sidebar, then you can use the Text Widget.

Go to the Appearance » Widgets page and then drag ‘Text’ widget into your sidebar or other widget area.

You can then type in your text and add a link just as you would when adding one to a post or page.
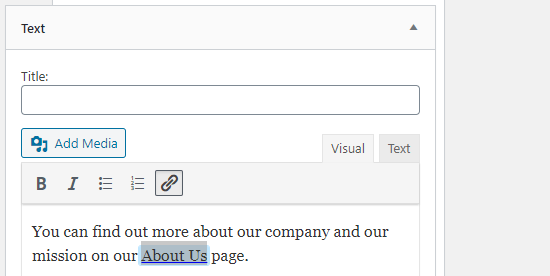
Adding a link in a widget

Make sure you click the ‘Save’ button beneath your widget after making changes.

How to Add Links in WordPress Navigation Menus

Do you want to add links to your site’s navigation menu? WordPress comes with a built-in drag and drop menu editor which allows you to create and manage navigation menus on your WordPress site.

Go to the Appearance » Menus page. If you don’t already have a menu set up, then you can create one by entering a menu name.

Next, select the pages you want to add to your menu on the left-hand side, then click the ‘Add to Menu’ button.

WordPress will automatically link to your selected posts and pages. You can move menu items and up and down to rearrange them.

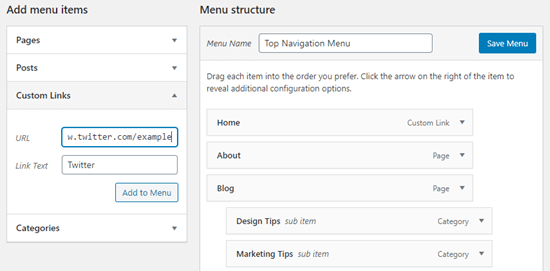
You can also add any link you want to your menu. It doesn’t have to be a page or post on your site. For instance, you could enter the URL of your Twitter profile and add that to your navigation menu.

To enter a link, just click the arrow next to the ‘Custom Links’ section on the left. You can then type in the URL and the text you want to use for the link.
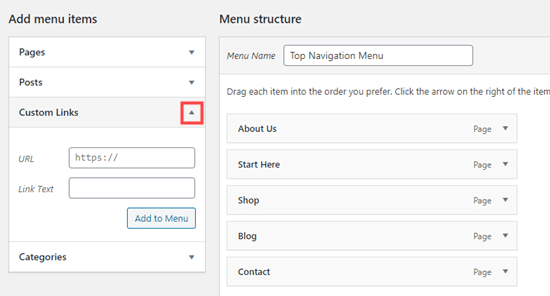
Adding a custom link to your navigation menu

For more help with creating your menu, take a look at our beginner’s guide on how to add navigation menus in WordPress.

How to Add Title and Nofollow in WordPress Links

It’s often useful to give your links a title. This is the text that appears when someone runs their mouse cursor over the link, like this:

A link with a title

Adding a title often makes it clear where the link leads to. It can be helpful or even reassuring for your readers.

However, WordPress does not allow you to add title to the links with the default editor. You can still add it, and we’ll show you how to do that in a bit.

You may also want to add a nofollow tag to external links. This tells search engines not to pass your site’s SEO score to that link because you don’t own or control the content on that website.

WordPress also does not support nofollow by default either.

Method 1. Use AIOSEO plugin in Gutenberg

All in One SEO plugin (AIOSEO) for WordPress automatically adds the title, nofollow, sponsored, and UGC attributes to your links.
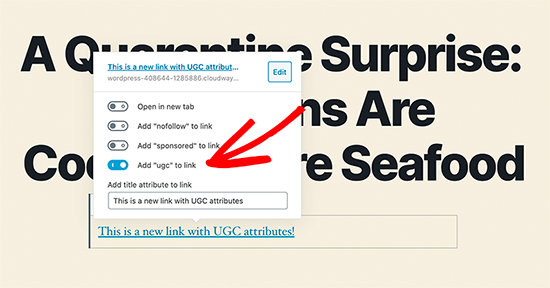
All in One SEO Title and Nofollow

Method 2. Use HTML code in Gutenberg

If you’re using the Gutenberg editor, and don’t want to use AIOSEO, then you’ll need to manually edit the HTML to add title and nofollow attributes to your links.

First, add your link within your paragraph block in the usual way. Next, click on the three vertical dots and select ‘Edit as HTML’ as shown here:
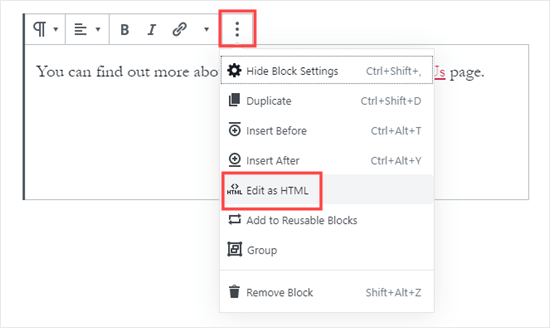
Switching to the HTML view of a block in the WordPress block editor

You’ll now see the HTML code for your block.

Viewing the HTML code for a block in the WordPress editor

You can add a title and/or a nofollow attribute to the link like this:

<p>You can find out more about our company on our <a href="https://www.examplecompany.com/about-us/" title="About Us" rel="nofollow">About Us</a> page.</p>

For the title, you can change “About Us” to be whatever you want. With the nofollow attribute, this should always be rel="nofollow". Don’t forget the double quotation marks around the title and the “nofollow” as your link won’t work correctly without them.

Method 3. Use a Plugin with the Classic Editor

If you’re using the Classic Editor, you can install and activate the the Title and Nofollow for Links plugin.

This plugin will add title, nofollow, and sponsored checkbox options to the insert link popup.

Highlight your anchor text and click the ‘Link’ button, then click the cog:

Locating the cog icon for a link in the classic editor

You’ll then see the additional options:
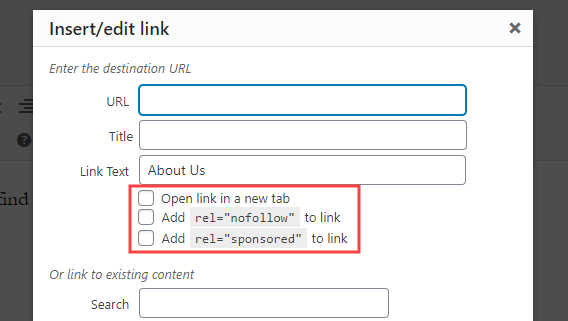
Additional options created by the Title and Nofollow for Links WordPress plugin

For more help, take a look at our guide on how to add title and nofollow to the insert link popup in WordPress for more information on this plugin.

How to Add Link Buttons in WordPress

Do you want to add a button to your WordPress posts or pages? There are many ways you can do this. The easiest is using WordPress’s built-in Button block.

Create a new post or page, or edit an existing one. Then, click the (+) icon to create a new block. Select ‘Button’ from the ‘Layout Elements’ options, or simply search for the Button block.
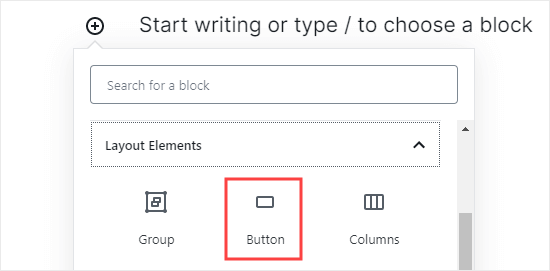
Adding a 'Button' block to your post or page in WordPress

You can type the text for your button by clicking in the colored area. Enter the URL that the button should go to in the ‘Link’ box.

Adding the text and link for your button

To change the button’s alignment, or to make the text bold or italic, just use the controls at the top of the block itself.

You can make more changes to how the button looks in the block options on the right-hand side of your screen. For instance, you might want to change the color or add a wider border.

You can also change the link settings here. You can set your link to open in a new tab, and if you want, you can also add the ‘nofollow’ attribute to the link by typing it in the ‘Link rel’ box.
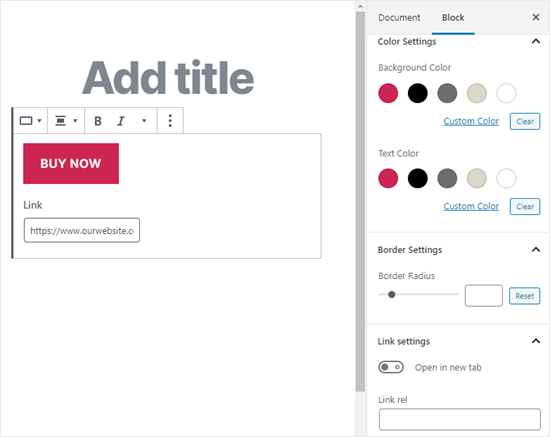
The right hand panel where you can edit your button's design and how the link works

What if you’re still using the old WordPress classic editor? You can install the “Forget About Shortcode Buttons” plugin to easily create buttons while you’re editing a post or page.

Simply install and activate the Forget About Shortcode Buttons plugin. Then, create a new post or edit an existing one.

You’ll see the ‘Insert Button’ icon in the toolbar, on the right hand side:

The Insert Button icon on the right hand side of the classic editor's toolbar

Click on the button, and you’ll see a popup. Here, you can customize your button, choose colors, borders, add text, add an icon, and include the link itself while seeing a live preview.
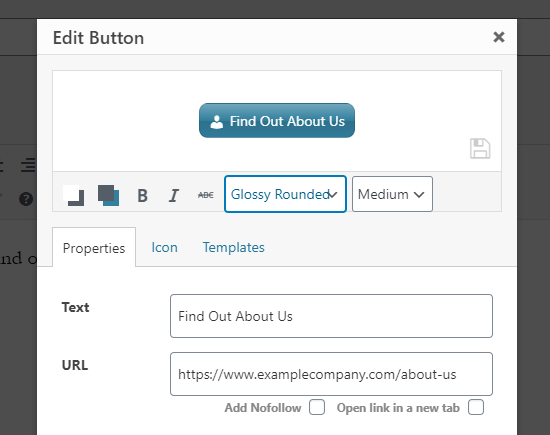
Creating a button for your link and customizing the design

For more information and details take a look at our guide on how to add buttons in WordPress without using shortcodes.

How to Embed Linked Content in WordPress

You can easily embed certain types of content in WordPress by simply inserting its URL in your post. This is sometimes called creating a “content card” in your post.

Just paste the whole URL into its own paragraph block. The whole tweet, including images, likes, timestamp, and more will be embedded like this:

Embedding a tweet by pasting in the link to it in WordPress

The process is the same for YouTube videos. Simply find the video you want to use on YouTube and copy the URL from the top of your browser window:

Get the link to your chosen YouTube video from your browser's address bar

Next, paste the link into your post or page. It’ll automatically embed the video:
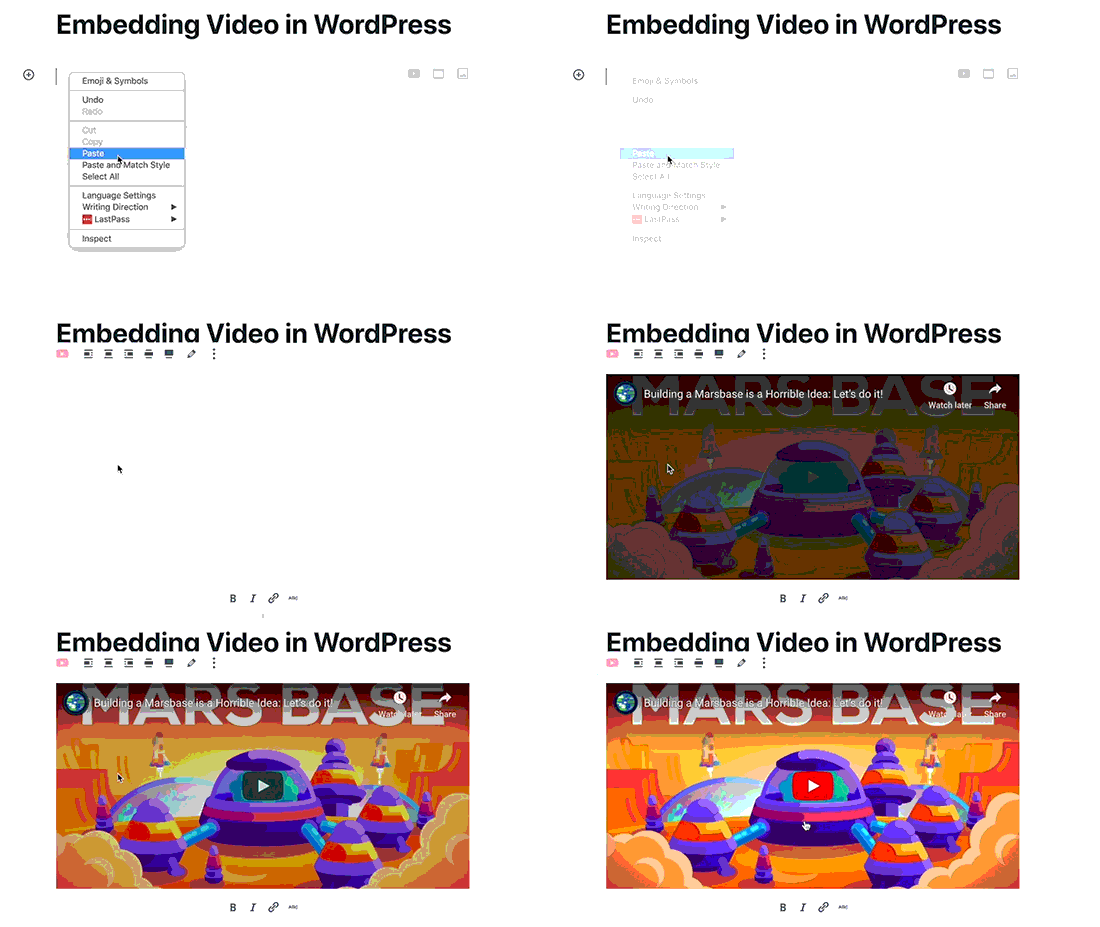
Embedding a YouTube video into your post

As well as being great for Twitter posts and YouTube videos, this method also works for many other types of content. You can find out more from WordPress’s support article on ‘Embeds’.

How to Add Affiliate Links in WordPress

Do you want to increase your site’s revenue by using affiliate links? Affiliate marketing provides a steady income to many blogs and websites.

All you need to do is add special referral links to products and services that you recommend. When your visitors purchase these products after clicking your links, you get a commission.

The problem that most beginners face is that each product or website they want to recommend has a different URL. It’s tricky to keep track of these, especially if you’re recommending lots of products.

The best way to add and manage affiliate links is by using an affiliate management plugin. We recommend using either Pretty Links or Thirsty Affiliates.

Both of these plugins work by creating redirect links such as www.yoursite.com/refer/partnersitename that send people to your special affiliate link.

The plugins will add a new option to your WordPress menu where you can add your affiliate links. Here’s how that looks with ThirstyAffiliates. You simply copy and paste your special affiliate link into the ‘Destination URL’ box.
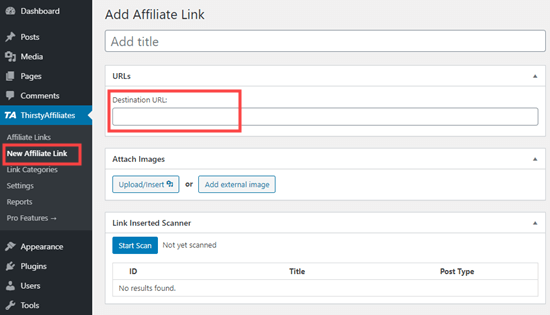
Adding a link in ThirstyAffiliates

You can set specific options for your link on the right hand side, deciding whether to nofollow it, open it in a new window/tab, and more.
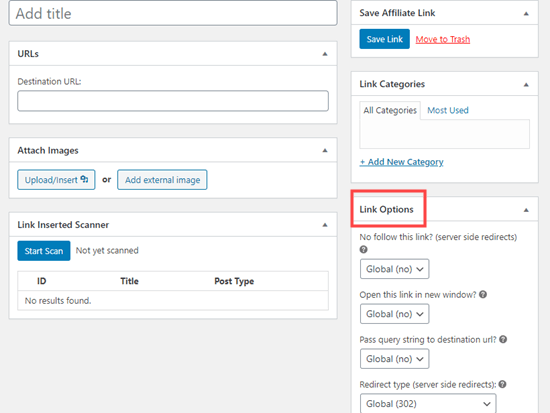
Setting the options for your affiliate link with ThirstyAffiliates

Once you’re done, click ‘Save Link’.

After you’ve set up your affiliate links, you can easily add them into your posts and pages. In a paragraph block, click the down arrow then select the ‘Affiliate Link’ option:
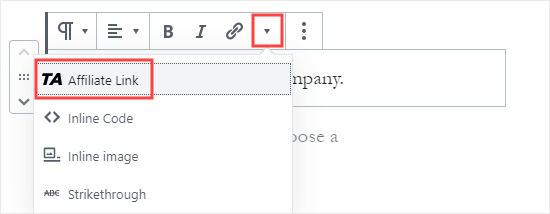
Adding an affiliate link to your post

Next, type in the start of whatever you named that affiliate link. In our example, that’s “Our Affiliate Partner”.

Finding your affiliate link by searching for it

You can then click the name and click ‘Apply’ to add the affiliate link to your post.

If you ever need to change an affiliate link (e.g. if the company you’re linking to moves to a different affiliate program) then that’s really easy to do.

You just change it once in your dashboard, under “ThirstyAffiliates” or “Pretty Links”. The redirect link stays the same as before, but it’ll now redirect to the new affiliate link everywhere it’s used.

For more handy affiliate plugins, check out our post on the best affiliate marketing tools and plugins for WordPress.

How to Manually Add a Link in HTML

Occasionally, you might want to add a link to your site using HTML code. This could happen if you need to use a custom HTML block or widget.

You might also need to directly edit a link in your theme file. Just make sure you always use a child theme so you don’t lose your changes when you update the parent theme.

It’s easy to create a link in HTML. To try it, add a custom HTML block to a post or page. You can find this block under ‘Formatting’ or you can search for it using the search bar.
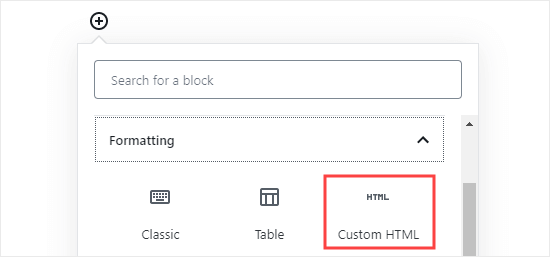
Adding a custom HTML block to your post or page

Next, you’ll see a box where you can write HTML. Copy this code into the box:

<a href="https://www.yourlinkhere.com">Text</a>

It should look like this:

The HTML code to create a link

You can click the ‘Preview’ tab to see how your code will look in your post or page:

Previewing how the HTML will display in the post or page

Now click back to the ‘HTML’ tag. Change the URL to the URL you want to link to. Change the word ‘Text’ to whatever word or words you want to use for your link.

To add a title to your link, you’ll need to include it in the code like this. You can change “This is the title” to anything you want.

<a href="https://www.yourlinkhere.com" title="This is the title">Text</a>

If you want your link to open in a new tab, simply add target="_blank" to the HTML code, like this:

<a href="https://www.yourlinkhere.com" target="_blank">Text</a>

If you want your link to be nofollowed, add rel="nofollow", like this:

<a href="https://www.yourlinkhere.com" rel="nofollow">Text</a>

You can include all of these at once. This is how a link with a title, that opens in a new tab and is nofollowed, would look:

<a href="https://www.yourlinkhere.com" title="This is the title" target="_blank" rel="nofollow">Text</a>

That’s how you create a link in HTML, if you ever need to.

An anchor link is a type of link on the page that brings you to a specific place on that same page. It allows users to jump to the section they’re most interested in.

Take a look at the animated screenshot below:
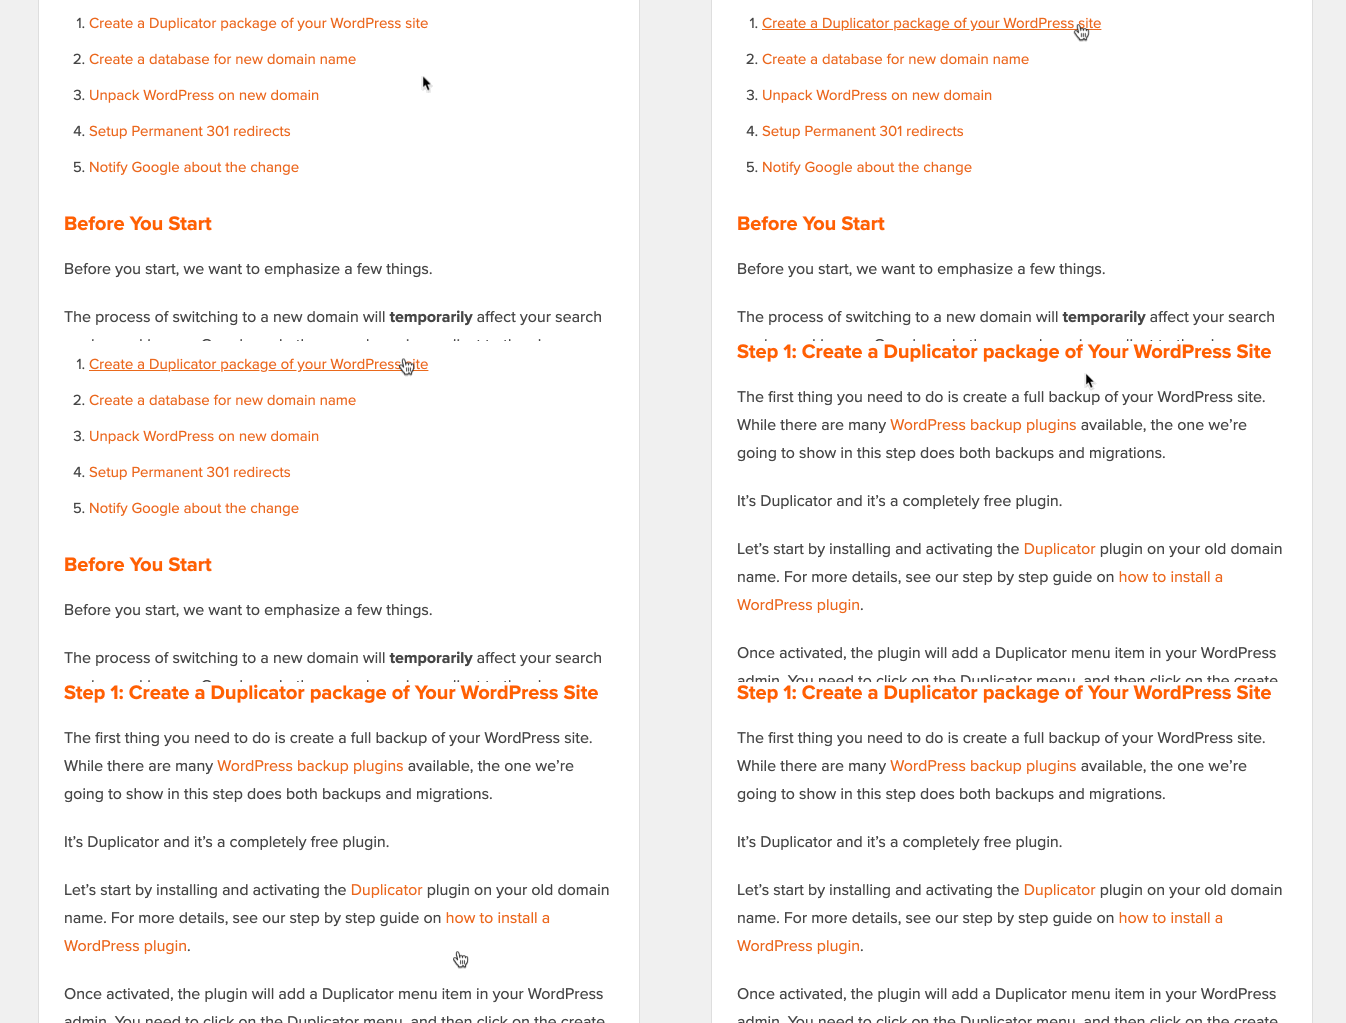
Anchor link preview

These type of links are really helpful when writing longer tutorials or content, so your users can easily jump to the section they’re most interested in.

We have created a detailed step by step guide on how to easily add anchor links in WordPress.

Want to add social share links or buttons on your site?

These links make it easy for your users to share your content on their favorite social networks. Sometimes social share links or buttons are also accompanied by total share count.
Facebook social share button

We don’t advise users to add these links manually. Instead, you should always use a social share plugin.

We have a step by step guide on how to add social share buttons in WordPress.

We hope this article helped you learn how to add a link in WordPress. You may also want to see our beginner’s guide on how to create a professional business email address, and how to start an email newsletter to grow your audience.

If you liked this article, then please subscribe to our YouTube Channel for WordPress video tutorials. You can also find us on Twitter and Facebook.

The post Beginner’s Guide on How to Add a Link in WordPress appeared first on WPBeginner.

How to Add Navigation Menu in WordPress (Beginner’s Guide)

Category Image 091

Do you want to add a navigation menu to your WordPress site?

WordPress comes with a drag and drop menu interface that you can use to create header menus, menus with dropdown options, and more.

In this step by step guide, we will show you how to easily add a navigation menu in WordPress.

How to Add Navigation Menu in WordPress

What is a Navigation Menu?

A navigation menu is a list of a links pointing to important areas of a website. They are usually presented as a horizontal bar of links at the top of every page on a website.

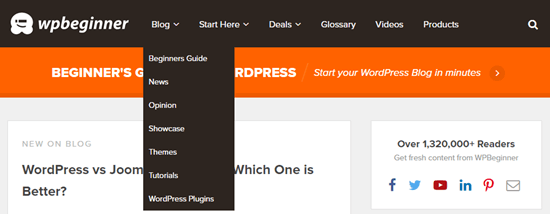
Navigation menus give your site structure and help visitors find what they’re looking for. Here’s how the navigation menu looks on WPBeginner:

The WPBeginner navigation menu

WordPress makes it really easy to add menus and sub-menus. You can add links to your most important pages, categories or topics, blog posts, and even custom links such as your social media profile.

The exact location of your menu will depend on your WordPress theme. Most themes will have several options, so you can create different menus that can be displayed in different places.

For instance, most WordPress themes come with a primary menu that appears on the top. Some themes may include a secondary menu, a footer menu, or a mobile navigation menu as well.

Creating Your First Custom Navigation Menu

To create a navigation menu, you need to visit the Appearance » Menus page in your WordPress admin dashboard.

Creating a menu in WordPress

First, you need to provide a name for your menu, like ‘Top Navigation Menu’ and then click the ‘Create Menu’ button. This will expand the menu area, and it will look like this:

A newly created menu in WordPress

Next, you can choose the pages you want to add to the menu. You can either automatically add all new top-level pages, or you can select specific pages from the left column.

First, click the ‘View All’ tab to see all your site’s pages. After that click the box next to each of the pages you want to add to your menu, and then click on the ‘Add to Menu’ button.

Adding items to the navigation menu

Once your pages have been added, you can move them around by dragging and dropping them.

Dragging and dropping an item to move it in the menu

Note: All menus have their items listed in a vertical (top to bottom) list in the menu editor. When you put the menu live on your site, it’ll either display vertically or horizontally (left to right), depending on the location you select.

Most themes have several different locations where you can put menus. In this example, we’re using the default 2020 theme, which has 5 different locations.

After adding pages to the menu, select the location where you want to display the menu and click on the ‘Save Menu’ button.

Selecting the display location for your menu

Tip: If you’re not sure where each location is, try saving the menu in different places, then visiting your site to see how it looks. You probably won’t want to use all the locations, but you might want to use more than one.

Here’s our finished menu on the site:

Finished Live Navigation Menu

Creating Drop-Down Menus in WordPress

Drop-down menus, sometimes called nested menus, are navigation menus with parent and child menu items. When you run your cursor over a parent item, all the child items will appear beneath it in a sub-menu.

To create a sub menu, drag an item below the parent item, and then drag it slightly to the right. We’ve done that with 3 sub-items beneath ‘Services’ in our menu:

Add menu items as a sub-men

Here’s the sub-menu live on the site:

A drop-down sub menu in the site's navigation

You can even add multiple layers of dropdown, so that your sub menu can have a sub menu. This can end up looking at bit cluttered, and many themes do not support multi-layer drop-down menus.

In this example, you can see that ‘Logo Design’ (a child item of ‘Services’) has two child items of its own.

A nested drop-down menu

Adding Categories to WordPress Menus

If you’re using WordPress to run a blog, then you may want to add your blog categories as a drop-down in your WordPress menu. We do this on WPBeginner:

The WPBeginner menu showing the categories drop-down

You can easily add categories to your menu by clicking the Categories tab on the left side of the Menus screen. You may also need to click the ‘View All’ tab to see all your categories.

Simply select the categories you want to add to the menu, and then click the ‘Add to Menu’ button.

Adding categories to your menu

The categories will appear as regular menu items at the bottom of your menu. You can drag and drop them into position. We’re going to put all of these categories under the Blog menu item.

Putting the categories under the 'Blog' menu item

Do you want to have a blog page on your site that’s separate from your homepage? If so, check out our tutorial on how to create a separate page for blog posts in WordPress.

Adding Custom Links to Your WordPress Navigation Menus

Aside from categories and pages, WordPress also makes it super easy to add custom links to your menu. You can use it to link to your social media profiles, your online store, and / or other websites that you own.

You will need to use the ‘Custom Links’ tab on the Menu screen. Simply add the link along with the text you want to use in your menu.

Adding a custom link to Twitter to the menu

You can even get creative and add social media icons in your menu.

Social media menu

Editing or Removing a Menu Item in WordPress Navigation Menus

When you add pages or categories to your custom navigation menu, WordPress uses the page title or category name as the link text. You can change this if you want.

Any menu item can be edited by clicking on the downward arrow next to it.

Expanding a menu item to edit its name

You can change the name of the menu item here. This is also where you can click ‘Remove’ to take the link off your menu altogether.

If you’re struggling with the drag and drop interface, then you can also move the menu item around by clicking the appropriate ‘Move’ link.

Adding WordPress Menus in Sidebars and Footers

You don’t have to just stick to the display locations for your theme. You can add navigation menus in any area that uses widgets, like your sidebar or footer.

Simply go to Appearance » Widgets and add the ‘Navigation Menu’ widget to your sidebar. Next, add a title for the widget and choose the correct menu from the ‘Select Menu’ drop down list.

Adding a menu as a sidebar widget

Here’s an example of a custom WordPress footer menu built on Syed Balkhi website.

WordPress Footer Menu Example - Syed Balkhi

Going Further with Navigation Menus

If you want to create a truly epic menu with loads of links, we’ve got a tutorial on how to create a mega menu in WordPress. This lets you create a drop-down with lots of items including images.

Mega menu preview

Mega menus are a great option if you have a large site, like an online store or news site. This type of menu is used by sites like Reuters, Buzzfeed, Starbucks, etc.

We hope this article helped you learn how to add a navigation menu in WordPress. You may also want to check out our guides on how to style navigation menus in WordPress and how to create a sticky floating navigation menu in WordPress.

If you liked this article, then please subscribe to our YouTube Channel for WordPress video tutorials. You can also find us on Twitter and Facebook.

The post How to Add Navigation Menu in WordPress (Beginner’s Guide) appeared first on WPBeginner.

How to Fix Common Image Issues in WordPress

Category Image 091

WordPress comes with some pretty neat tools to manage and edit images. You can easily upload images, align them, and even edit them inside WordPress.

Most beginners are not aware of these WordPress image editing features. It takes users a while to discover out some of them while other features go completely unnoticed.

If you ever had a question about WordPress images, then you’re in luck. In this article, we will cover the most common image issues in WordPress and how to fix them.

Fixing common image issues in WordPress

Since this is a detailed article, here is the list of image related issues that we will cover this article.

  1. How to Upload Images in WordPress?
  2. How to Align Image to the Left or Right in WordPress?
  3. How to Add Caption below Images?
  4. How to Display Photos in Columns and Rows?
  5. Create Beautiful Responsive Image Galleries in WordPress
  6. How to Fix Missing Post Thumbnails / Featured Image?
  7. How to Add Cover Images in WordPress Posts and Pages
  8. How to Fix Featured Image Appearing Twice Issue?
  9. Image too Big? How to Crop Images in WordPress?
  10. How to Add a Header Image in WordPress?
  11. How to Add a Background Image in WordPress?
  12. How to Find Free Images for Your WordPress Blog Posts?
  13. How to Tag Images in WordPress?
  14. How to Import External Images in WordPress?
  15. How to Require Featured Image for Posts in WordPress?
  16. How to Set a Default Featured Image in WordPress?
  17. How to Remove the Default Image Link in WordPress?

Let’s start with the most obvious one.

1. How to Upload images in WordPress?

WordPress makes it super easy to upload images to your posts, pages, and non-content areas like sidebars.

To upload images in WordPress posts and pages, you simply need to add the image block to the content editor.

Adding an image block to a WordPress post or page

You can also add the image block by simply typing /image in a paragraph block. The editor will start showing blocks you can insert as soon as you start typing.

Adding image block

WordPress will now add the image block to the editor. You need to click on the ‘Upload’ button to select and upload the image from your computer.

Select and upload image

You can also select a previously uploaded image from your media library.

After uploading the image, you’ll see a live preview of the image in the content editor.

Image preview

You’ll see a bunch of image settings on the right panel. From there you can provide image alt text, select image size, and image style.

2. How to Align Image to the Left or Right in WordPress?

WordPress makes it easier to align images to the left, right, or center. Simply select the image by clicking on it, and then click on alignment button from the block toolbar.
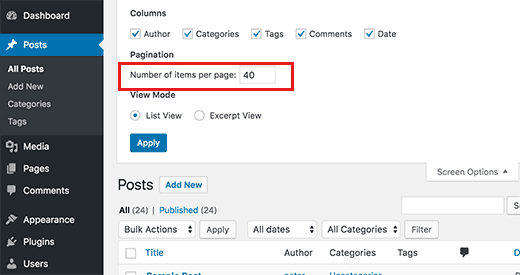
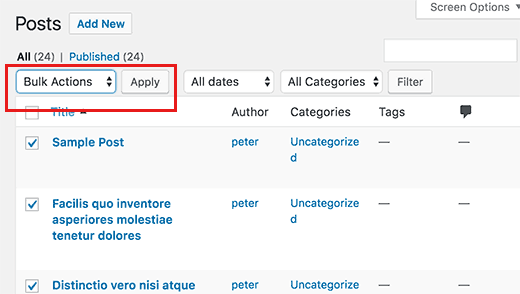
Image alignment options

You may have noticed how some popular blogs use images with text wrapped around them. This is done by using the align feature.
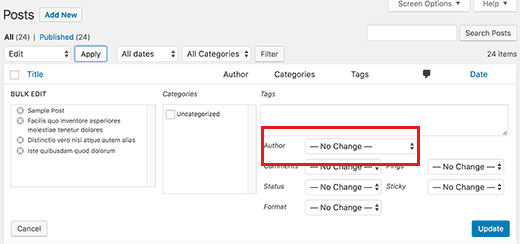
Image aligned left with text on the right

Alternatively, you can also use the ‘Media & Text’ block instead of the image block. This block is made specifically for adding images next to the text.

Media and text block

You can then upload an image and text side by side. You can also use the block toolbar to change the image or text side.

Image next to the text in WordPress

3. How to Add Caption below Images?

WordPress allows you to easily add caption for images. After you upload an image, you’ll see the option to add caption right below the image preview.

Write caption for an image in WordPress

Similarly, you can also add captions to image galleries in WordPress. For more details, see our guide on how to add captions to images in WordPress.

4. How to Display Photos in Columns and Rows?

Often users ask us how to neatly display photos in columns and rows.

Let’s say you want to share photos of a birthday party or vacation photos. You can add them one by one into a post, but this will look like a lengthy list of images.

The better way to group your photos is by creating image galleries.

WordPress comes with a built-in gallery block that allows you to easily add images in rows and columns with thumbnail previews.

Simply add the gallery block to the post editor and select the images you want to upload.

Adding a gallery in WordPress

For more detailed instructions see our guide on how to create an image gallery in WordPress.

5. Create Beautiful Responsive Image Galleries in WordPress

Envira Gallery

You will notice that the default WordPress image galleries lack several features. For instance, they are also not very easy to browse.

If you often upload images and photographs to your WordPress site, then you will need a proper WordPress photo gallery plugin.

We recommend using Envira Gallery. It allows you to easily create beautiful and fully mobile-friendly image galleries on your WordPress site.

The best part is that it adds additional functionality like albums, gallery templates, social sharing, slideshows, watermarking, pagination, password protection, tagging, fullscreen view, and much more.

6. How to Fix Missing Post Thumbnails / Featured Image?

Most WordPress themes allow you to prominently display a featured image with your articles. Here is how to set a featured image in WordPress to avoid missing thumbnails.

Setting a featured image for a WordPress post

Now, you can click on ‘Set Featured Image’ to upload your post thumbnail. After uploading the image, you’ll be able to see your post thumbnail in the featured image meta box like this:

Featured image preview in post editor

For more details, see our guide on how to add featured image or post thumbnail in WordPress.

7. How to Add Cover Images in WordPress Posts and Pages

Cover images are the wide or full-width images that can be used as a separator between different sections of an article or a lengthy sales page.

They are highly engaging and help users easily scan a page without feeling overwhelmed by too much text.

To add a cover image, you simply need to add the ‘Cover’ block to the content editor.

Adding cover block to WordPress post editor

Next, you need to upload the image you want to use from your computer or select one from the media library. If you don’t want to use an image, then you can also select a color background as the cover.

Tip: It is best to use a large image for a better result.

You’ll now see a liver preview of your cover image in the editor. You can change the cover image display options from the block toolbar or using the settings on the right.

Cover image preview

To learn more see our guide on the difference between cover image vs featured image in WordPress and how to use them effectively.

8. How to Fix Featured Image Appearing Twice Issue?

Inserting the featured image inside content is a common mistake made by beginners.

Once you set a featured image, you don’t need to insert it into the post editor along with your post content.

Doing so, will make your featured image appear twice. Once as the featured image, and once as an image inside the post.

Featured image appearing twice

You can add other images in your post, but your featured image goes in the featured image box.

For more details, see our guide on how to fix featured image appearing twice in WordPress posts.

9. Image too Big? How to Crop Images in WordPress?

When you are uploading images from your phone or camera they are usually too big.

WordPress automatically creates small, medium, and large image sizes for your original upload. But sometimes you may need to crop the image in a different size.

WordPress is no Photoshop, but it comes with some basic image editing features like scale, crop, flip and rotate images.

Go to Media » Add New and upload your image. After uploading the image, you will see an Edit link next to the uploaded image.

Clicking on it will open the Edit Media screen where you will see an Edit Image button right below the image. This will open the WordPress image editor.

Editing image in WordPress

From here you can click on the ‘Edit Image’ button below the image preview. This will open the image editing screen.

On the image editor screen, you will see buttons to perform some basic image editing tasks such as cropping, rotating, resizing, etc.

WordPress image editing features

For more detailed instructions see our guide on how to crop, rotate, scale, and flip images in WordPress.

10. How to Add a Header Image in WordPress?

A header image in WordPress is a theme feature. Many WordPress free and premium themes comes with support for header image.

You can upload your own custom header image from the Appearance » Customize page.

Header options

Since it is a theme feature, many WordPress themes come with their own header options. Some allow you to set a site-wide header image, while others allow you to only set a header image for the homepage.

11. How to Add a Background Image in WordPress?

Just like the custom header image, custom background image is also a WordPress theme feature. Many WordPress themes come with support for custom background images.

Visit Appearance » Customize to launch the theme customizer. If you can see the Background Image option, then your theme has support for custom backgrounds.

Custom background

It is a theme feature which is why it varies from one theme to another. Depending on your theme you’ll see different options for styling your background image.

If your theme does not support background image, then you can still use a plugin to add full-screen background images to your website.

12. How to Find Free Images for Your WordPress Blog Posts?

Finding images for blog posts

Images can make your articles stand out. However, you must respect copyrights of other people and try to find images that you are legally allowed to use.

We are often asked by our readers about how to find best royalty free images to use in their posts?

There are many websites where you can find free images to use. However, you will soon notice that images on those sites look overused and generic.

See our list of the best sources for free public domain and CC0-licensed images on the internet.

13. How to Tag Images in WordPress?

If you run a photography blog, then you will notice that WordPress does not allow you to sort photos and images.

Wouldn’t it be great if you could add tags to your images, so that you and your users can easily browse them?

Luckily, there are some great plugins that allow you to do just that.

For a photography related blog, the best option is to use Envira Gallery which comes with an add-on to add tags.

Envira Gallery allows you to create beautiful, mobile-ready, photo galleries in WordPress. Using tags, your users can easily filter and sort photos without even reloading a page.

Envira Gallery tags feature

For more details, see our article on how to add categories and tags to WordPress media library.

14. How to Import External Images in WordPress?

This question often comes up when you are migrating your site to WordPress. Some images on your website may still be pointing to older location.

Specially users importing blogs from Blogger, Squarespace, or WordPress.com may face this problem.

While the images on your site may appear correctly, they are still loading from external source. To solve this issue, all you need to do is install and activate Auto Upload Images plugin.

Auto upload image settings

The plugin will check for external images once you update or save any post or page. You can manually do that for each post or page or you can bulk edit all posts and simply click the update button.

For detailed instructions, see our guide on how to import external images in WordPress.

15. How to Require Featured Image for Posts in WordPress?

When running a multi-author site in WordPress, some of your authors may not be familiar with the featured image functionality.

In this case, you may want to remind yourself or your users to upload a featured image whenever they are submitting a post in WordPress.

You can do this by installing and activating the Require Featured Image plugin.

Once activated, the plugin will display a notification box in the post edit area, informing users that this post requires a featured image.

Require featured image

You and your users will be able to save posts as drafts, but you cannot publish the post until you add a featured image.

See our article on how to require featured images for posts in WordPress for more instructions.

16. How to Set a Default Featured Image in WordPress?

Finding the perfect featured image for every post or article is a tough task. Sometimes you may not want to add a featured image to a post, but your theme may look awkward without a featured image.

This is where a default featured image can come in handy. A default featured image is used when an article does not have a featured image of its own.

You can set a default featured image by using the default featured image plugin.

Default featured image

We hope this article helped you fix some of the most common image issues in WordPress. You may also want to see our list of the most common WordPress errors and how to fix them.

If you liked this article, then please subscribe to our YouTube Channel for WordPress video tutorials. You can also find us on Twitter and Facebook.

The post How to Fix Common Image Issues in WordPress appeared first on WPBeginner.